

Page 1

Resetting the MC95XX
Preliminary
There are two reset functions, warm boot and cold boot. A warm boot restarts the MC95XX by closing all running
programs. A cold boot also restarts the MC95XX, and also initializes some drivers. Data saved in flash memory or
a memory card is not lost.
If the MC95XX is not functioning properly, perform a warm boot first. If the MC95XX still does not respond, perform
a cold boot.
Performing a Warm Boot
Hold down the red Power button for approximately five seconds. As soon as the MC95XX starts to boot release the
Power button.
Performing a Cold Boot
To perform a cold boot, simultaneously press the red Power button and the 1 and 9 keys.
Using the MC95XX 3 - 3
Waking the MC95XX
The wake-up conditions define what actions wake up the mobile computer after it has gone into suspend mode.
The mobile computer can go into suspend mode by either pressing the Power button or automatically by Control
Panel time-out settings. These settings are configurable and the factory default settings are shown in Table 3-2 are
subject to change/update.
Table 3-2
AC power is applied. No Yes
Mobile computer is inserted into a cradle. No Yes
Mobile computer is removed from a cradle. No Yes
Mobile computer is connected to a USB device. No Yes
Mobile computer is disconnected from a USB device. No Yes
A key is pressed. No Yes
The scan triggered is pressed. No Yes
The screen is touched. No No
Bluetooth communication Yes Yes
Wake-up Default Settings
Condition for Wake-up Power Button Automatic Time-out
Incoming phone call (MC9596 and MC9598 only) Yes Yes
Page 2

3 - 4 MC95XX Series Mobile Computer User Guide
Device Unlocked Icon Device Locked Icon
Preliminary
Locking the MC95XX
You can lock the MC95XX by disabling key presses and screen tap or by requiring a password.
Keypad Locking
Locking the MC95XX turns off keyboard and touch screen functionality. This is helpful when the MC95XX is turned
on and you want to prevent accidental key presses.
To lock the device, tap the Device unlocked icon. The icon changes to locked.
Figure 3-2
To unlock the device and free it for use, tap Unlock.
Figure 3-3
Tap Unlock on the Unlock window.
Device Locked/Unlocked Icons
Unlock Device Window
NOTE You can make emergency calls even when the MC95XX is locked. See Making an Emergency Call on page
5-9 for more information.
Password Locking
Use the Password window to set a password to disable unauthorized access to the MC95XX.
NOTE If the device is configured to connect to a network, use a strong (difficult to figure out) password
to help protect network security. Password cracking tools continue to improve and the
computers used to crack passwords are more powerful than ever.
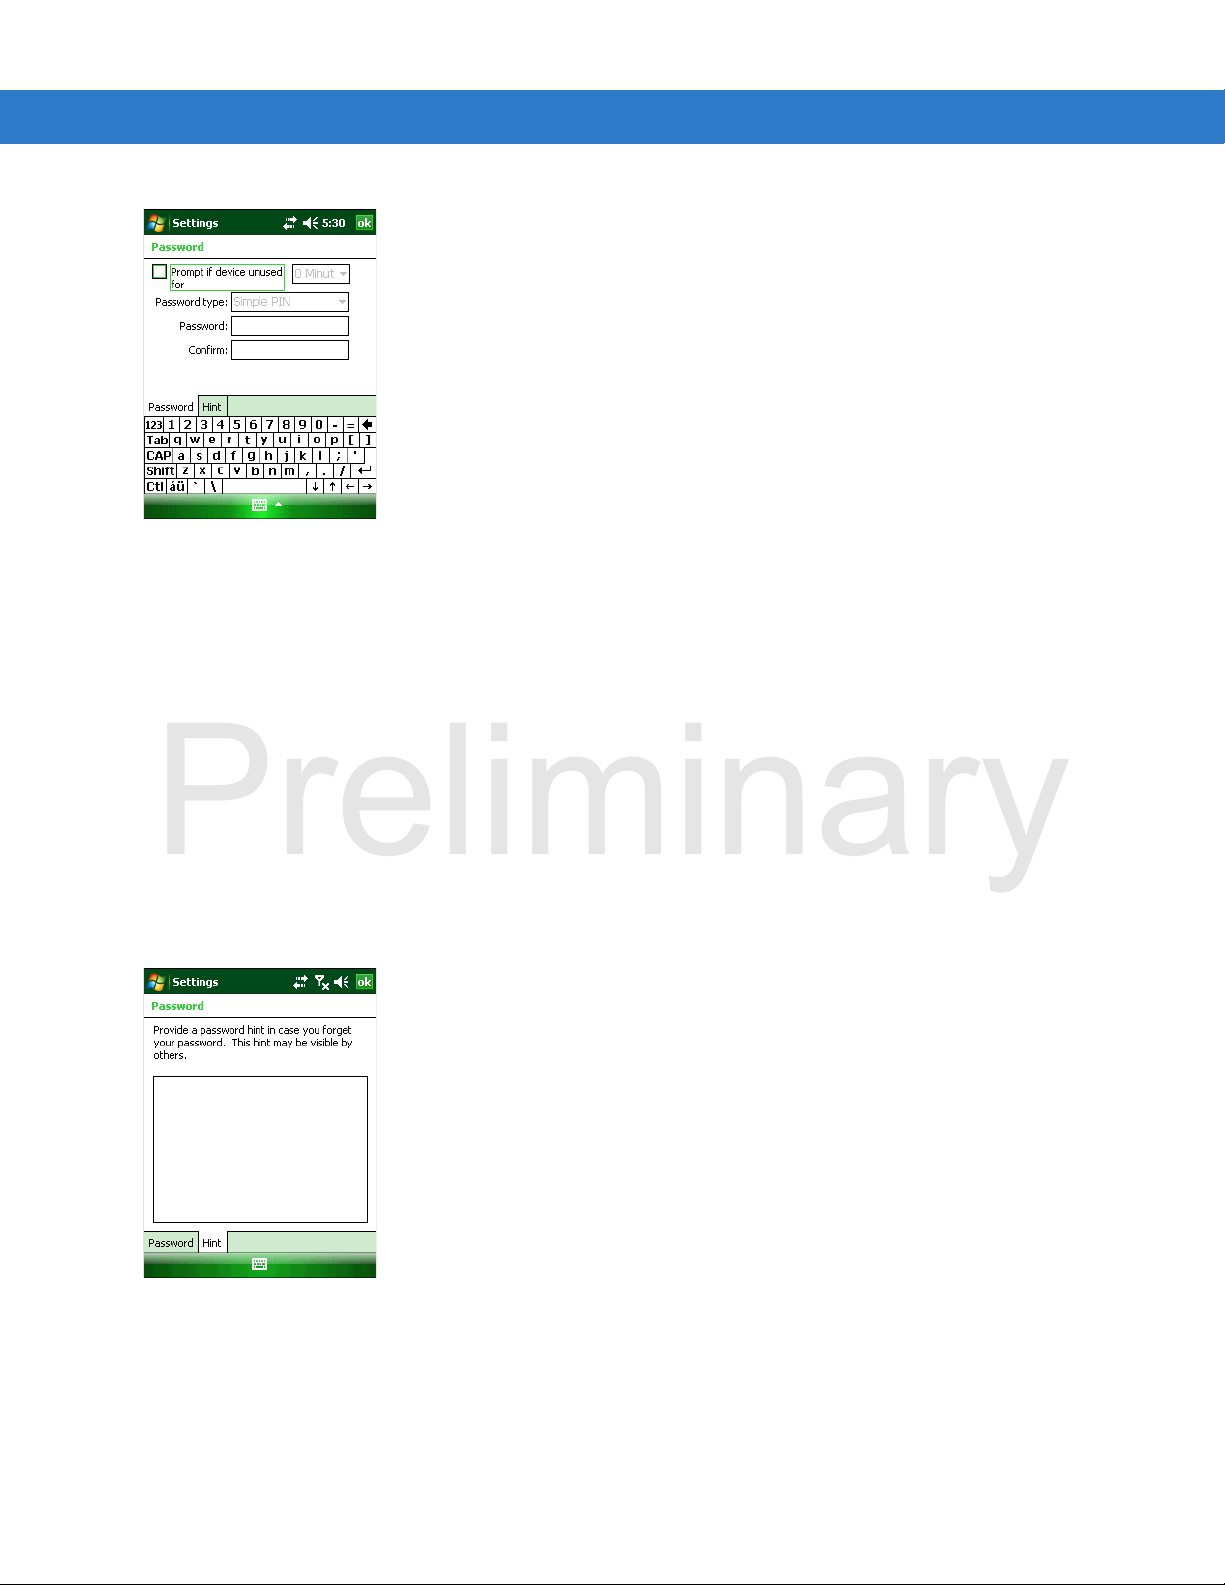
1. Tap Start > Settings > Personal tab > Lock icon > Password tab.
Page 3
Using the MC95XX 3 - 5
Preliminary
Figure 3-4
2. Select Prompt if device unused for check box to enable password protection.
3. From the drop-down list, select a time value for the protection to take affect after non-use.
4. From the Password type: drop -d own list, select either Simple PIN or Strong alphanumeric.
5. For a simple password, enter a four-digit password in the Password field.
For a stronger password:
a. Enter a seven character password in the Password: field. A strong password must contain at least seven
b. Re-enter the password in the Confirm: field.
6. Tap ok.
7. To set a hint to remember the password, tap the Hint tab.
Password Window - Password Tab
characters and contain at least three of the following: uppercase and lowercase letters, numerals, and
punctuation.
Figure 3-5
8. In the text box, enter a hint for a password reminder.
9. Tap ok.
When the MC95XX is not used for a period of time and the user tries to access the device, the Password window
appears.
Password Window - Hint Tab
Page 4

3 - 6 MC95XX Series Mobile Computer User Guide
Preliminary
Figure 3-6
Enter the password to un-lock the device.
Tap Unlock.
Enter Password Windows
Keypads
The MC95XX offers four types modular keypad configurations. See Appendix C, Keypads for keypad functionality.
Function Buttons
The MC95XX’s buttons perform certain functions.
•
Power: Press the red Power button to place the MC95XX into suspend mode or wake from suspend mode.
Also use the Power button to reset the MC95XX by performing a warm or cold boot. See Resetting the
MC95XX on page 3-3.
•
Scan/Action: Press to scan bar codes or capture images. See Chapter 4, Data Capture.
Or, press to open an application or perform a function. See the Microsoft
Guide to set an application to open.
•
Volume Up/Down: Press to increase or decrease the MC95XX’s volume.
®
Applications for Mobile 6 User
•
Action: Press to open an application or perform a function. See the Microsoft® Applications for Windows
Mobile 6 User Guide to set an application to open.
•
Green Key: Press to open the Phone Dialer window or answer an incoming call or place a call on hold.
•
Red Key: Press to end a call.
•
Function Keys: Programmable functions for performing specific applications.
• F1 - Left soft key
• F2 - Right soft key
• F3 - Talk (MC9596/8 only), user programmable (MC9590)
• F4 - End Call (MC9596/8 only), user programmable (MC9590)
• F5 - User programmable
• F6 - Volume Up.
Page 5

Stylus
Single-hand Method Two-hand Method
Preliminary
Use the MC95XX stylus to select items and enter information. The stylus functions as a mouse.
•
Tap: Touch the screen once with the stylus to press option buttons and open menu items.
•
Tap and Hold: T ap and hold the stylus on an item to see a list of actions available for that item. On the pop-up
menu that appears, tap the action to perform.
•
Drag: Hold the stylus on the screen and drag across the screen to select text and images. Drag in a list to
select multiple items.
CAUTION To prevent damage to the screen, do not use any device other than t he Motorola-provided stylus.
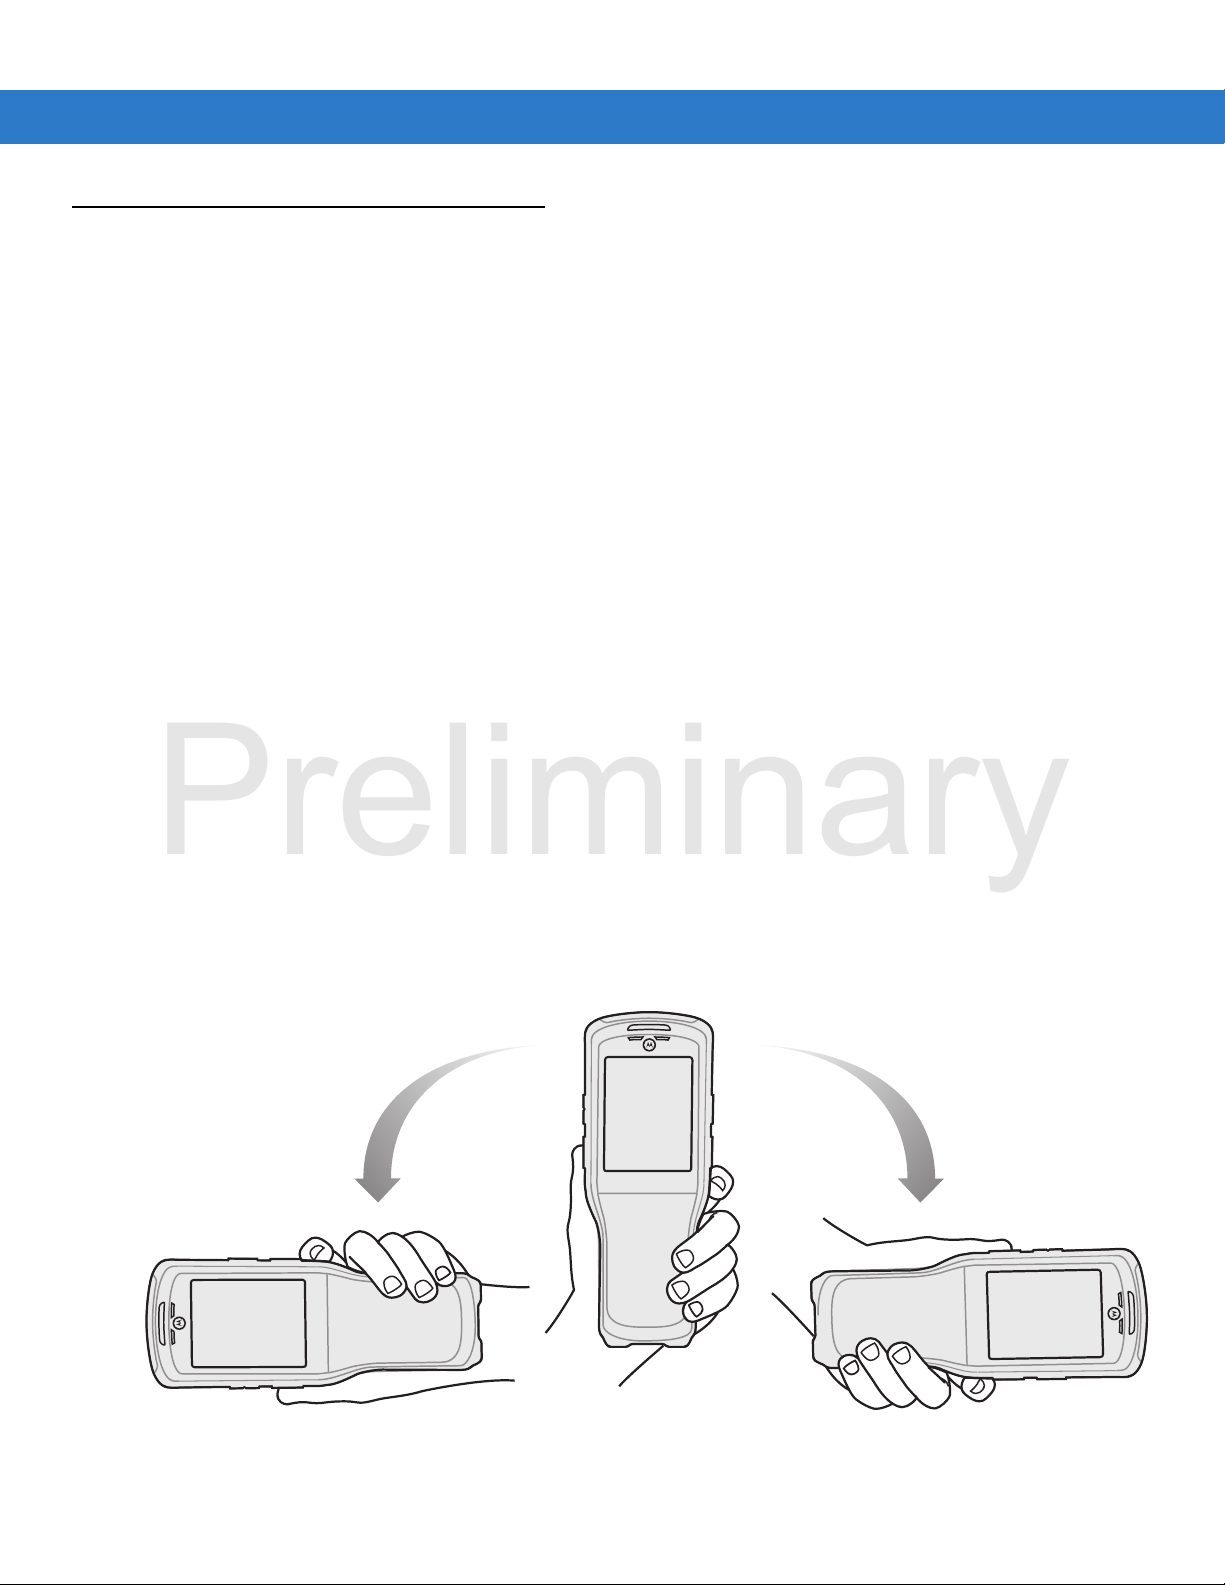
Entering Data
When entering data on the keypad, use either the single-hand method or the two-hand method as shown in Figure
3-7.
Using the MC95XX 3 - 7
Figure 3-7
Entering Data on the Keypad
Page 6
3 - 8 MC95XX Series Mobile Computer User Guide
Preliminary
Interactive Sensing Technology
This section describes the functionality of the Interactive Sensing Technology (IST) feature on the MC95XX.
The IST supports the following features.
•
Power Management – manage power by configuring IST to control switching on/off the backlight, control
suspend mode of the MC95XX by monitoring motion and orientation.
•
Display Orientation – switch the screen orientation to either landscape or portrait depending on the MC95XX
orientation.
•
Gesture Input – configure the MC95XX to perform various tasks by monitoring user gestures and reacting to
them.
•
Free Fall Detection – monitors free fall duration and records the time and type of the drop event.
Power Management
The MC95XX orientation and motion sensitive data can be used as an indicator of MC95XX usage and can be
used to manage the battery power of the mobile computer. For example, IST can be configured to control the
backlight on and off functionality or go into suspend according to a user gesture by placing screen facing down. It
can also be used to keep the MC95XX active while it is in movement to prevent it from quickly going into suspend
mode while in use.
Display Orientation
The screen can be rotated between portrait and landscape modes automatically, depending on the physical
orientation of the MC95XX. For example, if the MC95XX is rotated 90° counterclockwise, IST rotates the display
counterclockwise 90° so that the screen display appears correct.
This functionality is achieved by monitoring screen angle and rotating the display to counter any changes. IST only
rotates the screen in multiples of 90°.
Figure 3-8
Display Orientation
Page 7

Using the MC95XX 3 - 9
Preliminary
Gesture Input
Gesture detection can be used to determine user intent and acts accordingly. IST can control screen scrolling
line-by-line or page-by page according to a user gesture of flick of the wrist whilst holding the mobile computer.
Figure 3-9
Free Fall Detection
IST continuously monitors gravitational force on the MC95XX according to its current position. When the MC95XX
free falls, IST detects the absence of gravitational force and records the event data if it detects a free fall more than
450 ms, which may indicates nearly a one meter drop. This data can be used as an indicator of potential abuse or
misuse.
IST features a log for recording the free fall events. This log records the date, time and the time period of the free
fall.
Gesture Inputs
Page 8

3 - 10 MC95XX Series Mobile Computer User Guide
Preliminary
Figure 3-10
Free Fall Detection
Page 9

Today Screen
Open the Start Menu
Adjust volume
Change the date and time
Soft Keys
Battery Status
Command Bar
WAN Signal Strength
Turn on or off radios
Change the date and time, set up the alarm, and more
IST Configuration
Wireless Applications
Notification
Connectivity
Preliminary
The Today screen displays important information, such as upcoming appointments and status indicators. Tap a
section on the screen to open the associated program. Alternatively, tap Start > Today to display the Today
screen.
Using the MC95XX 3 - 11
Figure 3-11
To customize the Today screen, tap Start > Settings > Today icon. Use the Appearance tab to customize the
background and the Items tab to change the list and order of items that appear on the screen.
Status Icons
The Navigation bar at the top of the screen can contain the status icons listed in Table 3-3.
Table 3-3
Icon Function Description
Today Screen
Status Icons
Notification Backup Battery Low.
Notification that one or more instant messages were received.
Notification that one or more e-mail/text messages were received.
Notification that one or more voice messages were received.
There are more notification icons than can be displayed. Tap to display
remaining icons.
Indicates a reminder of an upcoming calendar event.
Page 10

3 - 12 MC95XX Series Mobile Computer User Guide
Preliminary
Table 3-3
Icon Function Description
Status Icons (Continued)
Connectivity Connection is active.
Connection is not active.
Synchronization is occu r ring.
Wi-Fi available.
Wi-Fi in use.
HSDPA available. (MC9596 only)
HSDPA connecting. (MC9596 only)
3G available. (MC9596 only)
3G connecting. (MC9596 only)
GPRS available. (MC9596 only)
GPRS connecting. (MC9596 only)
EGPRS available. (MC9596 only)
EGPRS connecting. (MC9596 only)
EVDO connecting. (MC9598 only)
1xRTT available. (MC9598 only)
EVDO Rev. 0 available. (MC9598 only)
EVDO Rev. A available. (MC9598 only)
Dormant State - no data transmission during a 1x or EVDO connection.
(MC9598 only)
Page 11

Using the MC95XX 3 - 13
Preliminary
Table 3-3
Icon Function Description
Status Icons (Continued)
WAN Call missed.
Dialing while no SIM card is installed.
Voice call in progress.
Calls are forwarded.
Call on hold.
Speakerphone is on.
Antenna/signal icon: wireless on/good signal.
Antenna/signal icon: wireless off.
Antenna/signal icon: no service or searching.
HSDPA in use. (MC9596 only)
3G in use. (MC9596 only)
GPRS in use. (MC9596 only)
EGPRS in use. (MC9596 only)
EVDO in use. (MC9598 only)
Roaming.
SIM Card not installed. (MC9596 only)
Speaker All sounds are on.
All sounds are off.
Vibrate is on.
Battery Main battery is charging.
Battery power completely depleted.
Main battery is low.
Main battery level.
Time and Next
Appointment
Displays current time in analog or digital format.
Page 12

3 - 14 MC95XX Series Mobile Computer User Guide
Preliminary
The Command Bar at the bottom of the screen can contain the application icons listed in Table 3-4.
Table 3-4
Icon Description
Programs
Command Bar Icons
Wireless connection
status
Out-of-network range
(not associated)
No wireless LAN
network card detected
Bluetooth Enabled Indicates the Bluetooth radio is on.
Bluetooth Disabled Indicates the Bluetooth radio is off.
Bluetooth Connection Indicates the Bluetooth radio is connected to another Bluetooth device.
ActiveSync Indicates an active serial connection between the MC95XX and the host
Indicates WLAN signal strength.
Indicates no wireless LAN network connection. Notify the network
administrator.
Indicates Wireless LAN disabled or radio disabled. Notify the network
administrator.
(Displays only if the StoneStreet One Bluetooth stack is enabled)
(Displays only if the StoneStreet One Bluetooth stack is enabled)
(Displays only if the StoneStreet One Bluetooth stack is enabled)
computer.
Table 3-5 lists the default programs on the Start menu.
Table 3-5
Programs in the Start Menu
Icon Name Description
Office Mobile
Calendar Keep track of appointments and create meeting requests. Refer to the
Contacts Keep track of friends and colleagues. Refer to the Microsoft
Use the complete suite of Microsoft
device.
Excel Mobile - Create new workbooks or view and edit Microsoft
®
Excel
OneNote Mobile - Create new notes or view existing notes.
PowerPoint Mobile - View Microsoft
presentations.
Word Mobile - Create, view, and edit Microsoft
Refer to the Microsoft Applications for Windows Mobile 6 User Guide
for more information.
Microsoft Applications for Windows Mobile 6 User Guide for more
information.
Applications for Windows Mobile 6 User Guide for more information.
workbooks.
®
Office applications for your mobile
®
®
PowerPoint® slides and
®
Word do cume nts.
Page 13
Using the MC95XX 3 - 15
Preliminary
Table 3-5
Table 3-6 lists programs that are listed in the Programs window.
Table 3-6
Programs in the Start Menu
Icon Name Description
Internet Explorer Mobile Browse Web and WAP sites as well as download new programs and
files from the Internet. Refer to the Microsoft Applications for Windows
Mobile 6 User Guide for more information.
Messaging Send and receive e-mail and text messages. Refer to the Microsoft
Applications for Windows Mobile 6 User Guide for more information.
Phone Make and receive calls, switch between calls, and set up conference
calling. See Chapter 5, Using the Phone for more information. MC9596
and MC9598 only.
Help See Help topics for the current screen or program.
Programs in Program Window
Icon Name Description
ActiveSync Synchronize information between the MC95XX and a host computer or
the Exchange Server. Refer to the MC95XX Series Mobile Computer
Integrator Guide for more information.
AirBEAM Allows specially designed software packages to be transferred between
a host server and the MC95XX. Refer to the MC95XX Series Mobile
Computer Integrator Guide for more information.
BT Information Displays information about the Bluetooth radio. See Chapter 7, Using
Bluetooth.
BTExplorer Manages StoneStreet One Bluetooth connections. Refer to the
MC95XX Series Mobile Computer Integrator Guide for more
information. Appears only if the StoneStreet One Bluetooth stack is
enabled.
Calculator Perform basic arithmetic and calculations, such as addition,
subtraction, multiplication, and division. Refer to the Microsoft
Applications for Windows Mobile 6 User Guide for more information.
File Explorer Organize and manage files on your device. Refer to the Microsoft
Applications for Windows Mobile 6 User Guide for more information.
Getting Started Provides quick links for setting the devices clock, setting up e-mail,
setting a device password, setting a background image and transferring
music. Refer to the Microsoft Applications for Windows Mobile 6 User
Guide for more information.
Internet Sharing Connect a notebook computer to the Internet using the MC95XX's data
connection.
Page 14

3 - 16 MC95XX Series Mobile Computer User Guide
Preliminary
Table 3-6
Programs in Program Window (Continued)
Icon Name Description
Messenger Use this mobile version of Windows Live Messenger. Refer to the
Microsoft Applications for Windows Mobile 6 User Guide for more
information.
MMAX Showcase Provides a web link to Motorola’s featured demos for the MC95XX.
Modem Link
MSP Agent Interacts with MSP agents to collect monitoring and asset information
Notes Create handwritten or typed notes, drawings, and voice recordings.
Pictures & Videos View and manage pictures, animated GIFs, and video files. Refer to the
TBS
to enable the configuration, provisioning, monitoring and
troubleshooting of the MC95XX. Refer to the Mobility Services Platform
User Guide for more information.
Refer to the Microsoft Applications for Windows Mobile 6 User Guide
for more information.
Microsoft Applications for Windows Mobile 6 User Guide for more
information.
Rapid Deployment
Client
Remote Desktop
Mobile
Search Search contacts, data, and other information on your MC95XX. Refer to
SIM Toolkit Manage the contacts that are stored on your SIM card. Copy SIM
Task Manager Enables viewing of memory and CPU allocations and stops running
Tasks Keep track of your tasks. Refer to the Microsoft Applications for
Facilitates software dow nloads from a Mobility Serv ices Platf orm Console
FTP serv er to th e MC95XX.
more information.
Log onto Windows NT server type comp uters and use all o f the program s
that are available on that computer from the MC95XX.
the Microsoft Applications for Windows Mobile 6 User Guide for more
information.
contents to Contacts on the MC95XX. See Chapter 5, Using the Phone
for more information. MC9596 and MC9598 only.
processes. Refer to the Microsoft Applications for Windows Mobile 6
User Guide for more information.
Windows Mobile 6 User Guide for more information.
Refer to the MC95XX Integrator Guide for
Page 15

Using the MC95XX 3 - 17
Preliminary
Table 3-6
Settings
Table 3-7 lists control applications pre installed on the MC95XX. Tap Start > Settings to open the Settings
window.
Table 3-7
Personal Tab
Programs in Program Window (Continued)
Icon Name Description
Windows Live Use this mobile version of Windows Live™ to find information on the
web. Refer to the Microsoft Applications for Windows Mobile 6 User
Guide for more information.
Windows Media Play back audio and video files. Refer to the Microsoft Applications for
Windows Mobile 6 User Guide for more information.
Settings in the Setting Window
Icon Name Description
Buttons Assign a program to a button. Refer to the Microsoft Applications for
Windows Mobile 6 User Guide for more information.
Input Set options for each of the input methods. Refer to the Microsoft
Applications for Windows Mobile 6 User Guide for more information.
Lock Set a password for the MC95XX.
Menus Set what programs appear in the Start menu. Refer to the Microsoft
Applications for Windows Mobile 6 User Guide for more information.
Owner Information Enter personal information on the MC95XX. Refer to the Microsoft
Applications for Windows Mobile 6 User Guide for more information.
Phone Make and receive calls, switch between calls, and set up conference
calling. See Chapter 5, Using the Phone for more info rmati on. See
Chapter 5, Using the Phone for more information. MC9596 and
MC9598 only.
Sounds & Notifications Enable sounds for events, notifications, and more, and set the type of
notification for different events. Refer to the Microsoft Applications for
Windows Mobile 6 User Guide for more information.
Today Customize the appearance and the information to be displayed on the
Today screen. Refer to the Microsoft Applications for Windows Mobile 6
User Guide for more information.
Page 16

3 - 18 MC95XX Series Mobile Computer User Guide
Preliminary
Table 3-7
System Tab
Settings in the Setting Window (Continued)
Icon Name Description
About
Backlight Set the display backlight time-out and adjust brightness. Refer to the
Certificates See information about certificates installed on the MC95XX. Refer to
Clock & Alarms Set the device clock to the date and time of your locale or to a visiting
Customer Feedback Submit feedback on the Windows Mobile 6.1 software. Refer to the
View basic information such as the Windows Mobile
of processor used on the MC95XX. Refer to the Microsoft Applications
for Windows Mobile 6 User Guide for more information.
Microsoft Applications for Windows Mobile 6 User Guide for more
information.
the Microsoft Applications for Windows Mobile 6 User Guide for more
information.
time zone when you’re traveling. Alarms can also be set at specified
days and times of a week. Refer to the Microsoft Applications for
Windows Mobile 6 User Guide for more information.
Microsoft Applications for Windows Mobile 6 User Guide for more
information.
®
version and type
Encryption Allow files on a storage card to be encrypted. Encrypted files are
readable only on your device.
Error Reporting Enable or disable the device's error reporting function. When this
function is enabled and a program error occurs, technical data about
the state of the program and your computer is logged in a text file and
delivered to Microsoft's technical support if you choose to send it. Refer
to the Microsoft Applications for Windows Mobile 6 User Guide for more
information.
External GPS Set the appropriate GPS communication ports, if required. You may
need to do this when there are programs on your device that access
GPS data or you have connected a GPS receiver to the MC95XX.
GPS Setup View GPS SUPL information.
HAC Settings Enable or disable the Hearing Aid Compatibility (HAC) feature. See
Chapter 5, Using the Phone for more information. MC9596 and
MC9598 only.
IST Settings Set the appropriate setting for configuring the device’s Interactive
Sensing Technology. See
Keylight Set the keypad backlight time-out. Refer to the Microsoft Applications
for Windows Mobile 6 User Guide for more information.
Page 17

Using the MC95XX 3 - 19
Preliminary
Table 3-7
Settings in the Setting Window (Continued)
Icon Name Description
Managed Programs Lists applications that have been installed remotely by your system
administrator. Refer to the Microsoft Applications for Windows Mobile 6
User Guide for more information.
Memory Check the device memory allocation status and memory card
information. Refer to the Microsoft Applications for Windows Mobile 6
User Guide for more information.
Phone Info Displays the phone version information. MC9596 and MC9598 only.
Power Check battery power and set the time-out for turning off the display to
conserve battery power. Refer to the Microsoft Applications for
Windows Mobile 6 User Guide for more information.
Regional Settings Set the regional configuration to use, including the format for displaying
numbers, currency, date, and time on the MC95XX. Refer to the
Microsoft Applications for Windows Mobile 6 User Guide for more
information.
Remove Programs Remove programs that you installed on the MC95XX. Refer to the
Microsoft Applications for Windows Mobile 6 User Guide for more
information.
Screen Change the screen orientation, re-calibrate the screen, and change the
System Info Displays the MC95XX’s software and hardware information. Refer to
Task Manager Enables viewing of memory and CPU allocations and stops running
Windows Update Link to Microsoft's web site and update Windows Mobile® on your
Connections Tab
Beam Set the device to receive incoming IrDA beams.
Bluetooth Enables Bluetooth radio and functionality. See
screen text size. Refer to the Microsoft Applications for Windows
Mobile 6 User Guide for more information.
the Microsoft Applications for Windows Mobile 6 User Guide for more
information.
processes. Refer to the Microsoft Applications for Windows Mobile 6
User Guide for more information.
device with the latest security patches or fixes. Do not use. Obtain
updates from Motorola. Refer to the Microsoft Applications for Windows
Mobile 6 User Guide for more information.
Connections Set up one or more types of modem connections for your device, such
as phone dial-up, GPRS, Bluetooth, and more, so that your device can
connect to the Internet or a private local network.
Page 18

3 - 20 MC95XX Series Mobile Computer User Guide
Preliminary
Table 3-7
Settings in the Setting Window (Continued)
Icon Name Description
Domain Enroll Make your device an AD domain member for device management and
security. Refer to the Microsoft Applications for Windows Mobile 6 User
Guide for more information.
USB to PC Enables or disables the enhanced network connectivity. Refer to the
Microsoft Applications for Windows Mobile 6 User Guide for more
information.
Wi-Fi Setup wireless network connection and customize settings. Refer to the
Microsoft Applications for Windows Mobile 6 User Guide for more
information.
Wireless Manager Enables or disables the MC95XX’s wireless radios and customizes
Wi-Fi and Bluetooth and Phone settings.
Page 19

Adjusting Volume
Preliminary
To adjust the system volume using the Speaker icon in the navigation bar:
1. Tap the Speaker icon. The Volume dialog box appears.
Using the MC95XX 3 - 21
Figure 3-12
2. Tap and move the slide bar to adjust the volume.
3. Select the On or Off radio button to turn the volume on or off.
Y ou can also adjust the system volume using the Sounds & Notifications window, or use the Up/Down button on
the side of the MC95XX.
Volume Dialog Box
Battery Status Indications
Battery icons appear on the navigation bar indicating the battery power level. When the main battery power falls
below a predetermined level the icon indicates the status and a battery dialog box appears indicating the status of
the battery.
Figure 3-13
The Battery icon always appears in the navigation bar when the Today screen is visible. The icon indicates the
battery power level. The message displays until the Dismiss button is pressed.
Battery Status Dialog Box
Page 20

3 - 22 MC95XX Series Mobile Computer User Guide
Preliminary
Figure 3-14
Also view the battery status using the Power window. Either:
•
•
Figure 3-15
Battery Reserve Options
Battery Icon on the Title Bar
Tap the Battery icon
Tap Start > Settings > System tab > Power icon.
Settings Power Window
If the charge of the battery reaches a critical threshold, the MC95XX shuts down. This threshold can be changed
but affects the amount of time that data can be retained.
1. Tap Start > Settings > System tab > Power icon > RunTime tab. A warning message appears.
Figure 3-16
2. Read the warning message and tap ok.
Warning Message
Page 21

Using the MC95XX 3 - 23
Preliminary
Figure 3-17
3. Select one of the Battery Reserve Options.
•
•
•
4. Tap ok.
Main Battery Temperature Notifications
The temperature notification system implements three levels of notification when the temperature within the battery
exceeds specific temperature thresholds:
•
•
•
RunTime Tab
Option 1: Minimum - After a low battery shutdown, data will be retained for minimum amount of time.
Battery should be replaced immediately to avoid data loss.
Option 2: Less - After a low battery shutdown, data will be retained for less than normal amount of time.
Option 3: Normal - After a low battery shutdown, data will be retained for maximum amount of time.
Level 1: Temperature Watch; this level is similar to main battery low warning. It indicates that the battery
temperature has reached the first threshold level. The user should move to an environment within proper
operating temperature.
Level 2: Temperature Warning; this level is similar to main battery very low warning. It indicates the battery
temperature has reached the second threshold level. The user should stop using the MC95XX.
Level 3: Temperature Error; this level indicates the battery has reached an unusable temperature threshold
and immediately suspends the MC95XX. This level does not have any graphical notification associated with
it.
Figure 3-18
Main Battery Temperature Watch Dialog Box
Page 22

3 - 24 MC95XX Series Mobile Computer User Guide
Preliminary
Figure 3-19
Main Battery Temperature Warning Dialog Box
NOTE The Temperature Warning dial og box remains visible until you tap Hide.
Using Voice-Over-IP
The MC95XX supports Voice over IP over WLAN (VoWLAN) using Motorola or third party voice clients. The
MC95XX can communicate using VoIP either using the MC95XX supports several audio outputs, including back
speaker phone, front receiver or handset, and Bluetooth headset.
It is recommended that the wireless network use the 802.11a (5 GHz) band for voice applications. Using the 5 GHz
band avoids some noise sources that may occur on the 802.11b/g (2.4 GHz) band due to wireless interference.
When using a Bluetooth headset with the MC95XX and VoWLAN, it is required to use the Bluetooth Headset profile
instead of Hands-free profile. Use the buttons on the MC95XX to answer and end calls. See Chapter 7, Using
Bluetooth for information on setting up a Bluetooth Headset Profile.
Infrared Connection
Using infrared, you can enable short-range file exchange between your MC95XX and another IrDA device.
Exchanging Files using IR Connection
Ensure that the IrDA function on both the MC95XX and the other device are enabled.
To send files via IrDA connection:
1. Switch to the program where you created the item you want to send and locate the item in the list.
NOTE Do not cover or block the I rDA window.
2. Align the IrDA port of the MC95XX with that of the IrDA device so that they are unobstructed and within a close
range.
Page 23

Using the MC95XX 3 - 25
Preliminary
Figure 3-20
3. Tap and hold the item, then tap Beam [type of item] on the pop-up menu.
4. Tap the device that you want to send the file to.
Figure 3-21
To receive files via IrDA connection:
1. Align the IrDA port of the MC95XX with that of the other IrDA device so that they are unobstructed and within a
close range.
Align MC95XX with IrDA Device
Beam Contact
2. On the other device, send the file to the MC95XX.
Page 24

3 - 26 MC95XX Series Mobile Computer User Guide
Preliminary
Figure 3-22
3. When the Receiving Data dialog displays, tap Yes.
Receive File
Page 25

Chapter 4 Data Capture
Preliminary
Introduction
The MC95XX offers three types of data capture options:
•
Linear scanning
•
Imaging
•
Digital camera.
NOTE To perform data capture, a scanning enabled application must be installed on the MC95XX. A sample
scanning application can be downloaded from the Motorola Support Central site at
http://www.motorola.com/enterprisemobility/support.
Linear Scanning
MC95XX with an integrated linear laser scanner have the following features:
•
Reading of a variety of bar code symbologies, including the most popular linear, postal, and 1-D code types.
•
Intuitive aiming for easy point-and-shoot operation.
Scanning Considerations
Typically, scanning is a simple matter of aim, scan, and decode and a few quick trial efforts master it. However,
consider the following to optimize scanning performance:
•
Range
Any scanning device decodes well over a particular working range — minimum and maximum distances from
the bar code. This range varies according to bar code density and scanning device optics.
Scanning within range brings quick and constant decodes; scanning too close or too far away prevents
decodes. Move the scanner closer and further away to find the right working range for the bar codes being
scanned.
Page 26

4 - 2 MC95XX Series Mobile Computer User Guide
Incorrect
Correct
Preliminary
•
Angle
Scanning angle is important for promoting quick decodes. When laser beams reflect directly back into the
scanner from the bar code, this specular reflection can “blind” the scanner.
To avoid this, scan the bar code so that the beam does not bounce directly back. But don’t scan at too sharp
an angle; the scanner needs to collect scattered reflections from the scan to make a successful decode.
Practice quickly shows what tolerances to work within.
•
Hold the MC95XX farther away for larger symbols.
•
Move the MC95XX closer for symbols with bars that are close together.
NOTE Scanning procedures de pend on the app licat ion and MC9 5XX confi guratio n. An applicat ion may us e dif fere nt
scanning procedures from the one listed above.
Linear Scanning
1. Ensure that a scan enabled application is loaded on the MC95XX.
2. Aim the exit window at the bar code.
Figure 4-1
3. Press the scan button. Ensure the red scan beam covers the entire bar code. The Decode LED lights red to
Figure 4-2
Imaging
MC95XX with an integrated imager have the following features:
Linear Scanning
indicate that scanning is in process, then lights green and a beep sounds, by default, to indicate the bar code
was decoded successfully.
Linear Scanner Aiming Pattern
•
Omnidirectional reading of a variety of bar code symbologies, including the most popular linear, postal,
PDF417, and 2D matrix code types.
•
The ability to capture and download images to a host for a variety of imaging applications.
•
Advanced intuitive laser aiming for easy point-and-shoot operation.
Page 27

Data Capture 4 - 3
Preliminary
The imager uses digital camera technology to take a digital picture of a bar code, stores the resulting image in its
memory, and executes state-of-the-art software decoding algorithms to extract the data from the image.
Operational Modes
MC95XX with an integrated imager support three modes of operation, listed below. Activate each mode pressing
the Scan button.
•
Decode Mode: In this mode, the MC95XX attempts to locate and decode enabled bar codes within its field of
view. The imager remains in this mode as long as you hold the scan button, or until it decodes a bar code.
NOTE To enable Pick List Mode, download the Control Panel applet from the Support Central web site at
http://www.motorola.com/enterprisemobility/support
command.
•
Pick List Mode: This mode allows you to selectively decode a bar code when more than one bar code is in
the MC95XX’s field of view. To accomplish this, move the aiming crosshair center dot over the required bar
code to decode only that bar code. This feature is ideal for pick lists containing multiple bar codes and
manufacturing or transport labels containing more than one bar code type (either 1D or 2D).
•
Image Capture Mode: Use this mode to capture an image within the MC95XX’s field of view. This is useful
for capturing signatures or images of items like damaged boxes.
. Pick List can also be set in an application using a API
Imager Scanning
1. Ensure that a scan-enabled application is loaded on the MC95XX.
2. Aim the exit window at the bar code.
3. Press the scan button.
The red laser aiming pattern turns on to assist in aiming. Ensure the cross-hair is on top of the bar code.
The Decode LED lights red to indicate that scanning is in process, then lights green and a beep sounds, by
default, to indicate the bar code was decoded successfully. Note that when the MC95XX is in Pick List Mode,
the imager does not decode the bar code until the crosshair center dot touches the bar code.
Figure 4-3
Imager Aiming Pattern: Bar Code Centered
Figure 4-4
4. Release the scan button.
Pick List Mode with Multiple Bar Codes
Page 28

4 - 4 MC95XX Series Mobile Computer User Guide
Preliminary
NOTE Imager decoding usually occurs instantaneously. The MC95XX repeats the steps required to take a digital
picture (image) of a poor or difficult bar code as long as the scan button remains pressed.
Digital Camera
MC95XX with an integrated digital camera have the following features:
•
Omnidirectional reading of a variety of bar code symbologies, including the most popular linear, postal,
PDF417, and 2D matrix code types.
•
Advanced intuitive aiming for easy point-and-shoot operation
•
Photo capture
•
Video capture.
Digital Camera Scanning
The camera uses digital camera technology to take a digital picture of a bar code, stores the resulting image in its
memory, and executes state-of-the-art software decoding algorithms to extract the data from the image.
1. Ensure that a scan-enabled application is loaded on the MC95XX.
2. Aim the camera lens on the back of the MC95XX at a bar code.
3. Press and hold the scan button. A preview window appears on the display window with a red aiming reticle in
the center. The Decode LED lights red to indicate that scanning is in process.
Figure 4-5
4. Move the MC95XX until the red aiming reticle is over the bar code to scan.
5. The Decode LED lights green and a beep sounds, by default, to indicate the bar code was decoded
successfully.
Sample Scan Application with Preview Window
NOTE The camera decode feature is set by default to automatically decode the bar code when read. This feature
can be programmed to display a green aiming rectile upon good decode indicating that the bar code has
been successfully decoded and to release the scan button.
Page 29

Taking Photos
Preliminary
NOTE Ensure that the scanning/imaging application is disabled prior to enabling the camera.
To take a photo:
1. Tap Start > Programs > Pictures & Videos icon.
2. Tap Camera on the command bar.
3. Check the image on the view finder, adjust if necessary.
4. Press the Enter key to take the picture. Hold the MC95XX still until the shutter sound is heard.
Recording Video
NOTE Ensure that the scanning/imaging application is disabled prior to enabling the camera.
To record a video clip:
Data Capture 4 - 5
1. Tap Start > Programs > Pictures & Videos icon.
2. Tap Camera on the command bar.
3. Tap Menu > Video to set shooting mode to video.
The available recording time displays on the screen.
NOTE By default, the time limit for recording videos is set to 30 seconds.
4. Press the Enter key to begin recording.
Recording stops when you press the Enter button again.
Viewing Photos and Videos
To view photos and video clips:
1. Tap Start > Programs > Pictures & Videos icon.
2. Tap the picture or video clip to view.
Page 30

4 - 6 MC95XX Series Mobile Computer User Guide
Preliminary
Page 31

Chapter 5 Using the Phone
Preliminary
Introduction
Use the MC9596and MC9598 to make phone calls, set up speed dials, keep track of calls, and send text
messages. Your wireless service provider may also provide other services such as voice mail, call forwarding, and
caller ID.
Also use the integrated phone to connect to an ISP or work network in order to browse the Web and read e-mail.
Connect to the Internet or work network over High-Speed Downlink Packet Access (HSDPA) (MC9596) or
Evolution Data-Optimized (EvDO) (MC9598) using Cellular Line, or using the modem specified by the mobile
operator. For more information, or to customize the MC95XX phone by changing phone settings, see the
MC95XXSeries Mobile Computer Integrator Guide.
Accessing the Phone Keypad
NOTE Keypads vary depending on services and the state of the phone.
Access the keypad regardless of the program in use. Applications on the MC95XX can be in use during a call.
Page 32

5 - 2 MC95XX Series Mobile Computer User Guide
Antenna Signal
MC9598
MC9596
Preliminary
Figure 5-1
To access the phone keypad tap Start > Phone, press the F1 key or press the green key.
To receive calls when the MC95XX is suspended, leave the phone radio turned on and ensure the MC95XX is set
to wake with any key.
Phone Keypads
Turning the Phone On and Off
Windows Mobile 6.1 devices include Wireless Manager, which provides a simple method of enabling and
disabling the phone.
To open Wireless Manager, tap the Connectivity icon.
Figure 5-2
Select Wireless Manager. The Wireless Manager window appears.
To toggle on or off the phone, tap Phone bar.
To configure settings for a connection, tap Menu > Phone Settings.
Opening Wireless Manager
NOTE To receive calls when your device is suspended, leave the phone turned on.
Page 33

Audio Modes
Headset ModeHandset Mode Speaker Mode
Preliminary
The MC95XX offers three audio modes for use during phone calls:
•
Handset Mode: Switches audio to the speaker at the top front of the MC95XX, so you can use the MC95XX
as a handset. This is the default mode.
•
Speaker Mode: Use the MC95XX as if on speaker phone. T ap the Speaker On button to activate this mode.
Tap the Speaker Off button to switch back to handset mode.
•
Headset Mode: Connect a Bluetooth headset or a wired headset to automatically switch audio to the
headset.
The MC95XX defaults to handset mode. When a wired headset is plugged into the MC95XX headset connector or
a Bluetooth headset is configured for use with the MC95XX, the earpiece and speakerphone are muted and audio
is heard through the headset.
NOTE While using a Bluetooth headset during a call, the mobile computer will not go into suspend mode.
Using the Phone 5 - 3
Figure 5-3
Using a Wired Headset
You can use a stereo headset for audio communication when using an audio-enabled application. To use a
headset, plug the headset jack of the Headset Adapter Cable into the headset connector on the side of the
MC95XX. Plug the Headset connector into the connector on the Headset Adapter Cable. Set the MC95XX’s
volume appropriately before putting the headset on. Plugging a headset into the jack mutes the speaker.
Audio Modes
Page 34

5 - 4 MC95XX Series Mobile Computer User Guide
Headset Adapter
Cable
Breakaway
Connectors
Headset
Connector
Preliminary
Figure 5-4
Using a Bluetooth Headset
You can use a Bluetooth headset for audio communication when using an audio-enabled application. See Chapter
7, Using Bluetooth for information on connecting a Bluetooth headset to the MC95XX. Set the MC95XX’s volume
appropriately before putting the headset on. When a Bluetooth headset is connected the speakerphone is muted.
It is recommended for phone conversations to use the Bluetooth Hands-free profile instead of the Headset profile.
See Chapter 7, Using Bluetooth for more information.
The following dialog box displays when a Bluetooth headset connection is established and the power button is
pressed.
Using a Headset
NOTE When using a Bluetooth headset, during a call, the MC95XX power button is disabled and the MC95XX will
not go into suspend mode. Once the call is completed, the power button functionality is enabled.
Figure 5-5
WWAN Bluetooth Audio Notification Dialog Box
Page 35

Using the Phone 5 - 5
Phone Volu me Slider
Preliminary
Adjusting Audio Volume
Use the Volume Control Slider or the keypad keys to adjust the volume of the ringer when not in a call and the
audio volume when in a call.
Figure 5-6
To adjust the volume tap the Speaker icon in the Title bar. Move the slider up or down to adjust the volume.
Phone Volume Slider
NOTE Adjust the conversation phone volume during a call. Adjusting the volume while not in a call affects the ring
and notification sound levels.
Hearing Aid Compatibility Setting
To set the HAC setting:
Tap Start > Settings> System > HAC Settings icon. The HAC Settings window appears.
Figure 5-7
To enable the HAC feature, tap the Enable HAC radio button.
To disable the HAC feature, tap the Disable HAC radio button.
HAC Settings Window
Page 36

5 - 6 MC95XX Series Mobile Computer User Guide
Preliminary
Making a Call
NOTE You can make emergency calls even when the MC95XX is locked or when a SIM card is not installed. See
Making an Emergency Call on page 5-9 for more information.
With the MC95XX, you can make a call from the phone, contacts, speed dial and call history.
Using the Phone
To make a call using the phone keypad:
1. Tap Start > Phone or press the green key.
2. From the Phone keypad, tap the number to call.
3. Tap Talk.
4. Tap End to stop dialing or end the call.
NOTE Alternatively, use the green and red keys on the MC95XX function key to dial (green) and end (red) calls.
If you tap a wrong number, tap Delete key to erase each subsequent digit of a number. To erase the entire
number, tap and hold the Delete key.
Using Contacts
Use Contacts to make a call without looking up or entering the phone number.
To make a call from Contacts:
1. Tap Start > Contacts.
2. From the contact list, tap and hold the contact name.
3. Tap Call Work, Call Home or Call Mobile.
NOTE To make a call from an open contact, tap the number to call. See On-Device Help for more information about
Contacts.
Creating an Outlook Contact
NOTE When entering a cont act phone num ber that cont ains a st ar (*) cha racter followe d by a plus (+) ch aracter, save
the contact as an Outlook Contact. Do not save the contact to a SIM card.
To create an Outlook contact:
1. Tap Start > Contacts.
2. Tap New.
3. If the Phone is on the Select Contact Type window displays. Select Outlook Contact.
Page 37

Using the Phone 5 - 7
Notes is a good place for
maps and directions
Scroll to see more fields
Tap to return to the contact list
(the contact is saved automatically)
Preliminary
Figure 5-8
4. Using the input panel, tap in each field and enter contact information as needed. Scroll down to see all fields.
5. Tap the arrow next to the Name: or Home addr: field to open a window for adding more details.
6. To assign the contact to a category, tap Categories.
7. To select one or more categories for the contact, select their check boxes. This allows displaying contacts by
category in the contact list.
8. Tap New to add a category.
9. Enter the name for the category in the text box, and tap ok.
10. Tap ok.
11. To add notes, tap the Notes tab and enter text, draw, or create a recording.
12. When finished, tap ok to return to the contact list.
Editing an Outlook Contact
To make changes to a contact:
1. Tap Start > Contacts.
2. Tap the contact in the contact list to open it.
Creating a Contact
3. Tap Menu > Edit and make the changes.
4. Tap ok.
Deleting a Contact
To delete a contact:
1. Tap Start > Contacts.
2. Tap and hold the contact in the contact list and select Delete Contact from the pop-up menu, or select the
contact and tap Menu > Delete Contact.
Page 38

5 - 8 MC95XX Series Mobile Computer User Guide
Phone icon
Preliminary
Creating a SIM Contact
To create a SIM contact:
NOTE When entering a cont act phone num ber that cont ains a st ar (*) cha racter followe d by a plus (+) ch aracter, save
the contact as an Outlook Contact. Do not save the contact to a SIM card.
1. Tap Start > Contacts.
2. Tap New.
3. Select SIM Contact.
Figure 5-9
4. Using the input panel, tap in each field and enter contact information.
5. When finished, tap ok to return to the contact list.
Using Call History
To make a call using Call History:
1. Tap Start > Phone or press the green key.
2. From the Phone keypad, tap Call History.
Creating a SIM Contact
Figure 5-10
3. Tap the phone icon next to the number to begin dialing and return to the phone keypad.
Call History
Page 39

Using the Phone 5 - 9
Speed Dial
Location Number
Preliminary
4. Tap End or press the red key to stop dialing or end the call.
Making a Speed Dial Call
Use Speed Dial to call someone saved in the speed dial directory.
To make a speed dial call:
1. Tap Start > Phone or press the green key.
2. From the Phone keypad, tap and hold the speed dial location number assigned to a contact. (To dial a one-digit
speed dial location number, tap and hold the speed dial number. To dial a two-digit speed dial location number,
tap the first digit and then tap and hold the second digit.)
or
From the Phone keypad, tap Speed Dial and tap the speed dial location number of the desired contact in the
list.
Figure 5-11
3. To stop dialing or end the call, tap End or press the red key.
Speed Dial Contact List
Making an Emergency Call
Your service provider programs one or more emergency phone numbers, such as 911 or 999, that you can call
under any circumstances, even when your phone is locked or the SIM card is not inserted. Your service provider
can program additional emergency numbers into your SIM card. However, your SIM card must be inserted in your
phone in order to use the numbers stored on it. See your service provider for additional information.
When the alpha-numeric keypad is locked, press the Orange key twice to set the keypad to numeric mode and
then enter the emergency number.
NOTE Emergency numbers vary by country. Your phone’s pre-programmed emergency number(s) may not work in
all locations, and sometimes an emergency call cannot be placed due to network, environmental, or
interference issues.
Answering a Call
A dialog box appears on the MC95XX when it receives an incoming call. If the phone is set to ring, a ring tone
sounds. Answer or ignore the incoming call.
To answer an incoming call tap Answer on the Phone > Incoming... dialog or press the green key.
Page 40

5 - 10 MC95XX Series Mobile Computer User Guide
Preliminary
Figure 5-12
To ignore the incoming call tap Ignore. This may send the caller to voice mail, depending on the service provider.
Otherwise, this presents Busy to the calling party.
To end the call tap End or press the red key.
Incoming Call
Incoming Call Features
•
If you receive a call while in a call, tap Wait to place the call in call waiting.
•
You can use other programs on the MC95XX during a call. To switch back to Phone, tap Talk or tap Start >
Phone. Tap End to end the call.
•
If a caller isn't in your contact list, create a contact during the call or from Call History by tapping Menu >
Save to Contacts.
•
To terminate a call when a second call comes in and answer the waiting call, tap End on the Phone keypad to
disconnect the active call, then tap Answer or press the Send key to answer the waiting call.
•
To hold the current call and answer a waiting call, tap Answer or press the Send key to place the current call
on hold and answer the incoming call.
•
To put a call on hold to call another number or answer an incoming call, tap Hold. To move from one call to
another, tap Swap.
Smart Dialing
Smart Dialing makes it easy to dial a phone number. When you start entering numbers or characters, Smart Dialing
automatically searches and sorts the contact entries on the SIM card, in Contacts, and the phone numbers in Call
History (including incoming, outgoing, and missed calls). You can then select the desired number or contact from
the filtered list to dial.
Open the Phone screen, then tap the keys on the Phone keypad that correspond to the phone number or contact to
call. The contact panel lists contacts that match the sequence that you entered.
Smart Dialing starts looking for numbers or contacts that match the sequence entered.
To find a phone number:
•
Enter the first one or two digits to find a phone number in Call History.
•
Enter the first three digits or more to find a phone number from the saved Contacts and SIM card.
Page 41

Using the Phone 5 - 11
Preliminary
To find a contact name:
• Enter the first letter of a contact’s first name or last name. Smart Dialing searches for the letter starting
from the first character of a contact name as well as from the character that appears after a space, dash,
or underscore in a contact name. For example, if you tap number “2” which is associated with [a, b, c] on
the Phone keypad, contact names such as the following will be considered matches: “Smith, Bernard”,
“Adams, John”, “Carlson, Eileen”, “Dillon, Albert”, “Childs, Larry”, “Cooper, Robert” and “Parks, Celine”.
• If the matching list is long narrow down the search further by entering another letter. Using the same
example above, tap “3” which is associated with (d, e, f), the matching list is narrowed down to the
following names: “Smith, Bernard”, “Adams, John”, and “Parks, Celine”.
Figure 5-13
To make a call or send a text message using Smart Dialing:
1. Begin entering the first few numbers or characters.
2. In the Smart Dialing panel, use the up and down arrows on the keypad to navigate to the desired contact or
phone number.
3. When the correct contact is selected, press TALK to make a voice call.
4. To send a text message to the selected contact, tap Menu > Send Text Message.
5. To call a different phone number associated with the selected contact, tap the contact name and select the
phone number to call.
Muting a Call
During a call, you can mute the microphone so you can hear the person on the line but he or she cannot hear
conversation from the microphone. This is useful when there is conversation or background noise on your end.
To mute or unmute a call:
1. Tap Start > Phone or press the green key.
2. Make a call.
Finding a Contact
3. Tap Mute on the display to mute the audio. The Mute icon appears.
Page 42

5 - 12 MC95XX Series Mobile Computer User Guide
Mute Icon
Note icon
Preliminary
Figure 5-14
Taking Notes
To create a note during a call, tap Note on the display, then enter the note. For more information about creating
notes see the Windows On-Device Help.
To access a note created during a call:
1. Tap Start > Phone or press the green key.
2. From the Phone keypad, tap Call History.
3. Tap and hold the number or the Note icon for the phone call entry containing the note.
Mute Button and Icon
Figure 5-15
4. Tap View Note.
5. Tap ok to exit.
Call History - Notes Menu
NOTE Also access notes directly from the Notes application by tapping Start > Programs > Notes.
Page 43

Using Speed Dial
Preliminary
Create speed dial numbers to dial frequently called numbers with a single tap. Before creating a speed dial entry,
ensure the phone number exists in Contacts.
Adding a Speed Dial Entry
To add a speed dial entry from the phone keypad:
1. Ensure the contact and phone number are in the Contacts list.
2. Tap Start > Phone or press the green key.
3. Tap Speed Dial > Menu > New.
Using the Phone 5 - 13
Figure 5-16
4. Tap the desired contact name and number in the list.
Figure 5-17
5. In the Location field, tap the up/down arrows to select an available location to assign as the new speed dial
entry. The first speed dial location is reserved for voice mail.
6. Tap ok to add the contact to the speed dial list.
7. Tap ok to exit the Speed Dial Contact List.
Contacts
Speed Dial Contact Location
To add a speed dial entry from the Contacts window:
Page 44

5 - 14 MC95XX Series Mobile Computer User Guide
Preliminary
1. Tap Start > Contacts.
Figure 5-18
2. Tap a contact name.
3. Tap Menu > Add to Speed Dial.
Figure 5-19
4. Tap the up/down arrows to select an available location to assign as the new speed dial entry. The first speed
dial location is reserved for voice mail.
5. Tap ok.
Contacts
Speed Dial Contact Location
Editing a Speed Dial Entry
1. Tap Start > Phone or press the green key.
2. Tap Speed Dial.
Page 45

Using the Phone 5 - 15
Preliminary
Figure 5-20
3. Tap and hold the contact name.
4. Tap Edit... .
5. Change the name, phone number, or location information.
6. Tap ok.
Deleting a Speed Dial Entry
1. Tap Start > Phone or press the green key.
2. Tap Speed Dial.
3. Tap and hold the contact name.
Speed Dial Contact List
NOTE Editing names and phone numbers in Speed Dial does not alter contact info rmation in Contacts (Start >
Contacts).
Figure 5-21
4. Tap Delete.
5. Tap Yes to confirm permanently deleting the speed dial entry.
Speed Dial Delete Menu
NOTE Deleting names and phone num bers in Speed Dial does not delete th e cont act infor mation in Contacts (Start
>
Contacts).
 Loading...