

Page 1

ZT610/ZT620
Industrial Printer with
Optional Color Touch Display
User Guide
P1100103-02EN
Page 2

ZEBRA and the stylized Zebra head are trademarks of Zebra Technologies Corporation, registered in
many jurisdictions worldwide. All other trademarks are the property of their respective owners.
© 2019 Zebra Technologies Corporation and/or its affiliates. All rights reserved.
Information in this document is subject to change without notice. The software described in this document
is furnished under a license agreement or nondisclosure agreement. The software may be used or copied
only in accordance with the terms of those agreements.
For further information regarding legal and proprietary statements, please go to:
SOFTWARE:http://www.zebra.com/linkoslegal
COPYRIGHTS:http://www.zebra.com/copyright
WARRANTY:http://www.zebra.com/warranty
END USER LICENSE AGREEMENT: http://www.zebra.com/eula
Terms of Use
Proprietary Statement
This manual contains proprietary information of Zebra Technologies Corporation and its subsidiaries
(“Zebra Technologies”). It is intended solely for the information and use of parties operating and
maintaining the equipment described herein. Such proprietary information may not be used, reproduced,
or disclosed to any other parties for any other purpose without the express, written permission of Zebra
Technologies.
Product Improvements
Continuous improvement of products is a policy of Zebra Technologies. All specifications and designs are
subject to change without notice.
Liability Disclaimer
Zebra Technologies takes steps to ensure that its published Engineering specifications and manuals are
correct; however, errors do occur. Zebra Technologies reserves the right to correct any such errors and
disclaims liability resulting therefrom.
Limitation of Liability
In no event shall Zebra Technologies or anyone else involved in the creation, production, or delivery of the
accompanying product (including hardware and software) be liable for any damages whatsoever
(including, without limitation, consequential damages including loss of business profits, business
interruption, or loss of business information) arising out of the use of, the results of use of, or inability to
use such product, even if Zebra Technologies has been advised of the possibility of such damages. Some
jurisdictions do not allow the exclusion or limitation of incidental or consequential damages, so the above
limitation or exclusion may not apply to you.
Publication Date
November 20, 2019
2
Page 3

Contents
Declaration of Conformity .................................................................................................................... 6
Compliance Information ................................................................................................. 7
FCC Radiation Exposure Statement
(for printers with RFID encoders) ............................................................................ 7
Canadian DOC Compliance Statement ................................................................... 7
Printer Setup ........................................................................................................................................ 8
Select a Location for the Printer ...................................................................................... 9
Order Supplies and Accessories ................................................................................... 10
Media ..................................................................................................................... 10
Ribbon ................................................................................................................... 10
Inspect the Contents of the Box .................................................................................... 11
Install Label Software .................................................................................................... 12
Install Printer Drivers and Connect the Printer to Your Devices ................................... 12
Connect to a Computer ......................................................................................... 12
Connect to a Phone or Tablet ................................................................................ 12
Determine the Label Collection Method ........................................................................ 13
Load the Media ............................................................................................................ 16
Insert the Media into the Printer ............................................................................ 16
Tear-Off Mode ....................................................................................................... 19
Peel-Off Mode or Applicator Mode ........................................................................ 23
Rewind Mode ......................................................................................................... 30
Cutter Mode or Delayed Cut Mode ........................................................................ 37
Determine the Type of Ribbon to Use .......................................................................... 41
Load the Ribbon ........................................................................................................... 42
Run the Print Wizard and Print a Test Label ................................................................. 46
Printer Configuration and Adjustment ................................................................................................ 49
Home Screen ................................................................................................................ 50
Printer Wizards ..............................................................................................................
3
51
Page 4

Contents
User Menus ................................................................................................................... 52
System Menu ......................................................................................................... 53
Connection Menu .................................................................................................. 59
Print Menu ............................................................................................................. 69
RFID Menu ............................................................................................................ 77
Storage Menu ........................................................................................................ 81
Calibrate the Ribbon and Media Sensors ..................................................................... 83
Adjust the Printhead Pressure and Toggle Position ...................................................... 84
Toggle Position Adjustment ................................................................................... 85
Printhead Pressure Adjustment ............................................................................. 87
Adjust the Sensor Position ............................................................................................ 89
Install the Rewind/Liner Take-Up Plate ......................................................................... 90
Peel Mode/Applicator Mode .................................................................................. 90
Rewind Mode ......................................................................................................... 92
Routine Maintenance ......................................................................................................................... 94
Cleaning Schedule and Procedures .............................................................................. 94
Clean the Exterior, the Media Compartment, and the Sensors ............................. 96
Clean the Printhead and Platen Roller .................................................................. 97
Clean and Lubricate the Cutter Module ............................................................... 101
Remove Used Ribbon ................................................................................................. 109
Replacing Printer Components ................................................................................... 111
Ordering Replacement Parts ............................................................................... 111
Recycling Printer Components ............................................................................ 111
Storing the Printer ....................................................................................................... 111
Lubrication ...................................................................................................................111
Diagnostics and Troubleshooting .................................................................................................... 112
Judging Barcode Quality ............................................................................................. 113
Configuration Labels ................................................................................................... 115
PAUSE Self Test ......................................................................................................... 116
Sensor Profile ............................................................................................................. 117
Communication Diagnostics Mode ............................................................................. 119
Load Defaults or Last Saved Values .......................................................................... 120
Alert and Error States .................................................................................................. 121
Alerts and Error Messages .................................................................................. 122
Indicator Lights .................................................................................................... 125
Troubleshooting .......................................................................................................... 127
Printing or Print Quality Issues ............................................................................ 127
Ribbon Issues ...................................................................................................... 131
4
Page 5

Contents
RFID Issues ......................................................................................................... 133
Communications Issues ...................................................................................... 136
Miscellaneous Issues .......................................................................................... 137
Service the Printer ....................................................................................................... 140
Ship the Printer .................................................................................................... 140
Install the Printer Driver and Connect to a Computer ...................................................................... 141
Install Zebra Setup Utilities ......................................................................................... 141
Connect a Computer to the Printer’s USB Port .......................................................... 150
Connect a Computer to the Printer’s Serial or Parallel Port ........................................ 153
Connect to Your Network through the Printer’s Ethernet Port .................................... 159
Connect the Printer to Your Wireless Network ........................................................... 167
Using a USB Host Port and the Print Touch Feature ...................................................................... 173
Items Required for the Exercises ................................................................................ 173
Files for Completing the Exercises ...................................................................... 173
USB Host ................................................................................................................... 176
Exercise 1: Copy Files to a USB Flash Drive and Perform USB Mirror ............... 176
Exercise 2: Print a Label Format from a USB Flash Drive .................................. 178
Exercise 3: Copy Files to/from a USB Flash Drive .............................................. 179
Exercise 4: Enter Data for a Stored File with a USB Keyboard and Print a Label 181
Print Touch/Near Field Communication (NFC) .......................................................... 182
Exercise 5: Enter Data for a Stored File with a Smart Device andPrintaLabel . 183
Specifications ................................................................................................................................... 185
General Specifications ................................................................................................ 185
Power Specifications .................................................................................................. 186
Power Cord Specifications ......................................................................................... 187
Communication Interface Specifications ..................................................................... 188
Standard Connections ......................................................................................... 189
Optional Connections .......................................................................................... 191
Wireless Specifications ........................................................................................ 192
Printing Specifications ................................................................................................ 193
Media Specifications .................................................................................................. 195
Ribbon Specifications .........................................
Glossary ........................................................................................................................................... 197
5
......................................................... 196
Page 6

Declaration of Conformity
We have determined that the Zebra printers identified as the
ZT610 ™ and ZT620 ™
manufactured by:
Zebra Technologies Corporation
3 Overlook Point
Lincolnshire, Illinois 60069 U.S.A.
Have been shown to comply with the applicable technical standards of the FCC
For Home, Office, Commercial, and Industrial use
If no unauthorized change is made in the equipment,
and if the equipment is properly maintained and operated.
6
Page 7

Compliance Information
FCC Compliance Statement
This device complies with Part 15 of the FCC Rules. Operation is subject to the following two conditions:
1. This device may not cause harmful interference, and
2. This device must accept any interference received, including interference that may cause undesired
operation.
This equipment has been tested and found to comply with the limits for a Class B digital device, pursuant
to part 15 of the FCC Rules. These limits are designed to provide reasonable protection against harmful
interference in a residential installation. This equipment generates, uses, and can radiate radio frequency
energy and, if not installed and used in accordance with the instructions, may cause harmful interference
to radio communications. However, there is no guarantee that interference will not occur in a particular
installation. If this equipment does cause harmful interference to radio or television reception, which can be
determined by turning the equipment off and on, the user is encouraged to try to correct the interference by
one or more of the following measures:
• Reorient or relocate the receiving antenna.
• Increase the separation between the equipment and receiver.
Declaration of Conformity
• Connect the equipment into an outlet on a circuit different from that to which the receiver is connected.
• Consult the dealer or an experienced radio/TV technician for help.
FCC Radiation Exposure Statement (for printers with RFID encoders)
This equipment complies with FCC radiation exposure limits set forth for an uncontrolled environment. This
equipment should be installed and operated with minimum distance 20cm between the radiator and your
body.
This transmitter must not be co-located or operating in conjunction with any other antenna or transmitter.
Canadian DOC Compliance Statement
This Class B digital apparatus complies with Canadian ICES-003.
Cet appareil numérique de la classe B est conforme à la norme NMB-003 du Canada.
7
Page 8

Printer Setup
This section assists a user with initial setup and operation of the printer.
8
Page 9

Select a Location for the Printer
22.7– 29.4 kg
50 – 65 lb
Select a location for the printer that meets these conditions:
• Surface: The surface where the printer will be located must be solid, level, and of sufficient size and
strength to hold the printer.
• Space: The area where the printer will be located must include enough space for ventilation and for
accessing the printer components and connectors. To allow for proper ventilation and cooling, leave
open space on all sides of the printer.
Printer Setup
CAUTION: Do not place any padding or cushioning material behind or under the printer because this
restricts air flow and could cause the printer to overheat.
• Power: The printer should be within a short distance of an appropriate power outlet that is easily
accessible.
• Data communication interfaces: The printer must be within range of your WLAN radio (if applicable)
or within an acceptable range for other connectors to reach your data source (usually a computer). For
more information on maximum cable lengths and configuration, see General Specifications on
page 185.
• Operating conditions: Your printer is designed to function in a wide range of environmental and
electrical conditions, including a warehouse or factory floor. Table 1 shows the temperature and relative
humidity requirements for the printer when it is operating.
Table 1 Operating Temperature and Humidity
Mode Temperature Relative Humidity
Thermal Transfer 40° to 104°F (5° to 40°C) 20 to 85% non-condensing
Direct Thermal 32° to 104°F (0° to 40°C)
9
Page 10

Order Supplies and Accessories
The following things that you will need do NOT come with the printer:
• Communication/network cables (such as USB, serial, parallel, wired Ethernet)
• Media
• Ribbon (if your printer has a thermal transfer option)
Media
For optimal printing quality and proper printer performance across our product line, Zebra strongly
recommends the use of Zebra Certified Supplies as part of the total solution. A wide range of paper,
polypropylene, polyester, and vinyl stock has been specifically engineered to enhance the printing
capabilities of the printer and to prevent premature printhead wear. To purchase supplies, go to
http://www.zebra.com/supplies.
The Glossary on page 197 includes terms associated with media, such as black mark media, gap/notch
media, RFID media, fanfold media, and roll media. Use these terms to help determine which type of media
will be best for your needs.
Printer Setup
Ribbon
Do I need to use ribbon? The media itself determines if you will need to use ribbon. Thermal Transfer
media requires ribbon while Direct Thermal media does not.
How can I tell if media is Direct Thermal or Thermal Transfer? The easiest way is to scratch the surface
of the media rapidly with your fingernail. If a black mark appears where you scratched, the media is Direct
Thermal, and you do not need to use ribbon.
What kind of ribbon can I use? Ribbon can be wound with the coated side on the inside or outside. This
printer can only use ribbon that is coated on the outside unless you purchase and install the optional
spindle that allows ribbon that is coated on the inside. Contact your authorized Zebra reseller for ordering
information.
How can I tell which side of the ribbon is coated? Press a corner of the sticky side of a label to the outer
surface of the roll of ribbon, and then peel the label off of the ribbon. If ink particles adhere to the label, the
outer side of the roll is coated. Repeat this test with the inner surface if necessary to confirm the coated
surface.
An alternate method is to unroll a short length of ribbon, place the outer surface against a piece of paper,
and scratch the inner surface of the ribbon with your fingernail. Lift the ribbon and check for marks on the
paper. If the ribbon left a mark, the outer side is coated.
10
Page 11

Inspect the Contents of the Box
IMPORTANT: Zebra Technologies is not responsible for any damage incurred during the shipment of the
equipment and will not repair this damage under warranty.
When you receive the printer, do the following:
1. Verify that the following items are included in the box with the printer:
Printer Setup
Additional items may be included, depending on the options ordered with the printer.
2. If anything is missing, notify your authorized Zebra reseller.
3. Immediately unwrap the printer and inspect for shipping damage.
• Save all packing materials.
• Check all exterior surfaces for damage.
• Raise the media door, and inspect the media compartment for damage to components.
4. If you discover shipping damage upon inspection:
• Immediately notify the shipping company and file a damage report.
• Keep all packaging material for shipping company inspection.
• Notify your authorized Zebra reseller
5. The printer shipped with several protective items for shipping, including a film of plastic over the
transparent window on the media door. Before operating the printer, remove these protective items.
11
Page 12

Printer Setup
Install Label Software
Select and install the software that you will use to create label formats for your printer. One option is
ZebraDesigner ™ , which you can download from www.zebra.com.
Install Printer Drivers and Connect the Printer to Your Devices
After you have set up the printer, verified that it can print a test label, and made adjustments to the print
quality, you are ready to connect the printer to your device (such as a computer, phone, or tablet).
Connect to a Computer
If you have not already done so, install the Zebra Setup Utilities program (www.zebra.com/setup) before
connecting the printer to a computer. Your computer will not install the correct printer drivers if you connect
the printer to it without the Zebra Setup Utilities program.
Run the Zebra Setup Utilities program. This utility will walk you through the process for connecting your
printer to your computer. For step-by-step instructions, see Install the Printer Driver and Connect to a
Computer on page 141.
Connect to a Phone or Tablet
Use the Zebra Printer Setup Utility app for Android devices (available for free from Google Play ™ at
http://play.google.com/store/apps/details?id=com.zebra.printersetup).
12
Page 13

Printer Setup
Determine the Label Collection Method
Use a label collection method that matches the media being used and the printer options available (see
Table 2 and Figure 1 on page 15). The media path is the same for roll and fanfold media.
1. On the Home screen, touch Menu > Print > Label Position > Collection Method.
2. Select a collection method that is compatible with the options available on your printer. See Table 2 and
Figure 1 on page 15.
3. Touch the home icon to return to the Home screen.
Table 2 Collection Methods and Printer Options
Collection Method Required Printer Option Description
Tear Off Can be used with any printer
option and most media types.
Peel Off Rewind option The printer peels the label from the liner during
Rewind Rewind option The printer prints without pausing between
Cutter Cutter option The printer cuts between labels after each one
Delayed Cut Cutter option The printer waits for a delayed cut ZPL
The printer prints label formats as it receives
them. The printer operator can tear off the
printed labels when the printer stops.
printing and then pauses until the label is
removed. The backing is wound on the rewind
spindle without using the rewind plate.
labels. The media is wound onto a core after
printing. The rewind plate is used to keep the
labels from separating from the backing.
is printed.
command (
label.
~JK) before it cuts the last printed
13
Page 14

Printer Setup
Table 2 Collection Methods and Printer Options (Continued)
Collection Method Required Printer Option Description
Applicator This mode is for use with a
machine that applies labels.
Linerless Peel* * Reserved for future use.
Linerless Rewind*
Linerless Tear*
Linerless Cut*
Linerless Delayed
Cut*
The printer prints when it receives a signal
from the applicator. Refer to the Advanced
User Information section of the Maintenance
Manual for additional information about the
applicator interface.
14
Page 15

Figure 1 Printer Options
12
34
Printer Setup
1
Tear-Off (standard)
2
Cutter option
3
Rewind option set for Peel mode
4
Rewind option set for Rewind mode
15
Page 16

Load the Media
Use the instructions in this section for loading roll or fanfold media in the appropriate label collection
method for your needs.
IMPORTANT: You are not required to turn off the printer power when working near an open printhead, but
Zebra recommends it as a precaution. If you turn off the power, you will lose all temporary settings, such as
label formats, and you must reload them before you resume printing.
Insert the Media into the Printer
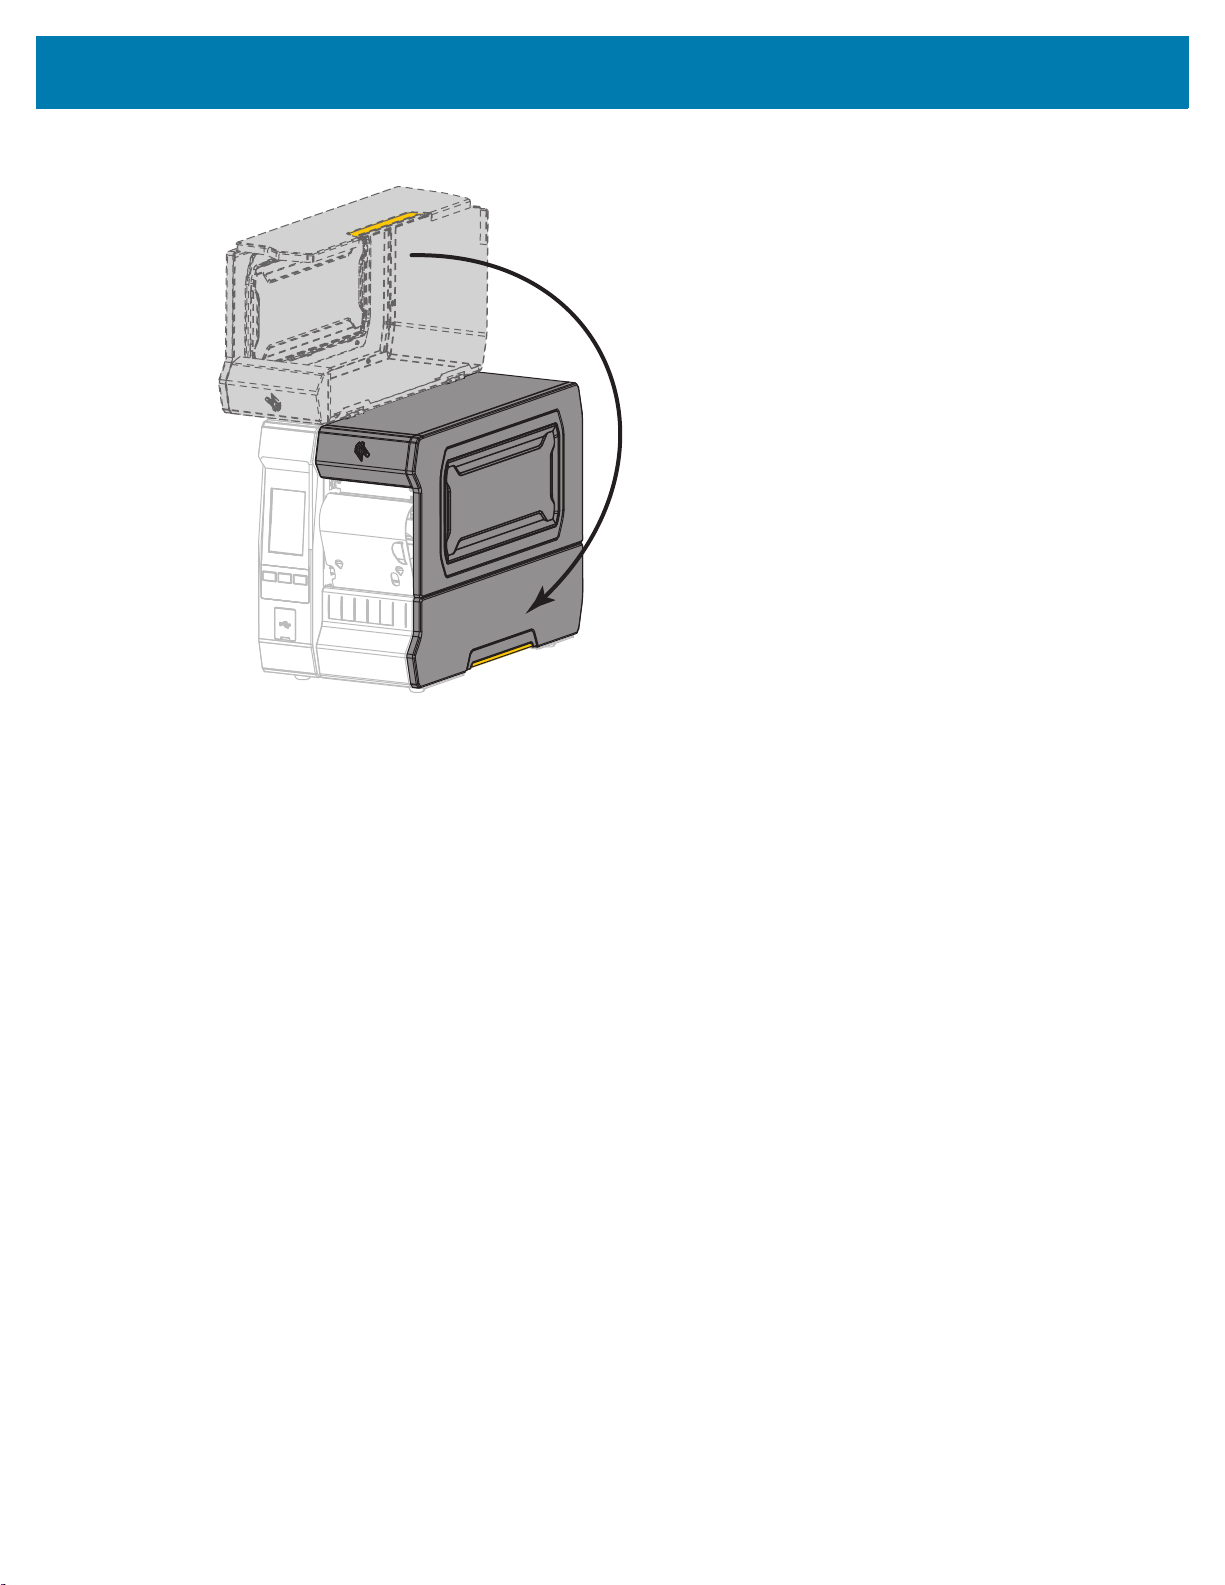
1. Raise the media door.
Printer Setup
2. Remove and discard any tags or labels that are torn or dirty or that are held by adhesives or tape.
16
Page 17

Printer Setup
3.
Insert roll or fanfold media into the printer. The media loading path is the same for both roll and fanfold
media, so this is the only step that will be different.
Roll Media—Place the roll of media on the media supply spindle. Push the roll as far back as
it will go.
Fanfold Media—Fanfold media can be stored behind or under the printer. Depending on where
the media is stored, feed the media from behind or through the bottom access slot.
Rear Feed Bottom Feed
17
Page 18

Printer Setup
4.
Which collection method are you using? (See Determine the Label Collection Method on page 13.)
If using… Then…
Tear Off Continue with Tear-Off Mode on page 19.
Peel Off or Applicator Continue with Peel-Off Mode or Applicator Mode
on page 23.
Rewind Continue with Rewind Mode on page 30.
Cutter or Delayed Cut Continue with Cutter Mode or Delayed Cut Mode
on page 37.
18
Page 19

Tear-Off Mode
1. If you have not already done so, follow the instructions in the section Insert the Media into the Printer on
page 16.
2. Open the printhead assembly by rotating the printhead-open lever upward.
Printer Setup
19
Page 20

Printer Setup
1234
3.
Rotate the media guide adjustment knob as shown until the media guide slides all the way out.
CAUTION—HOT SURFACE: The printhead may be hot and could cause severe burns. Allow the
printhead to cool.
4. From the media spindle (1), feed the media under the dancer assembly (2), through the media sensor
(3), and under the printhead assembly (4). Slide the media back until it touches the inside back wall of
the media sensor.
20
Page 21

Printer Setup
5.
Rotate the media guide adjustment knob as shown until the media guide just touches the edge of the
media.
6. Does the media that you are using require ribbon for printing? If you are not sure, see Ribbon on
page 10.
If using… Then…
Direct Thermal media (no ribbon needed) Continue with step 7.
Thermal Transfer media (ribbon needed) a. If you have not already done so, load ribbon in
the printer. See Load the Ribbon on page 42.
b. Continue with step 7.
7. Rotate the printhead-open lever downward until it locks the printhead in place.
21
Page 22

8.
Close the media door.
Printer Setup
9. Set the printer to the appropriate collection method (see Print > Label Position > Collection Method on
page 71).
10. Press PAUSE to exit pause mode and enable printing.
The printer may perform a label calibration or feed a label, depending on your settings.
11. For best results, calibrate the printer. See Calibrate the Ribbon and Media Sensors on page 83.
12. If desired, print a configuration or other label to verify that your printer is able to print. (See System >
Settings > Print: System Settings on page 58.)
Media loading in Tear-Off mode is complete.
22
Page 23

Peel-Off Mode or Applicator Mode
1. If you have not already done so, follow the instructions in the section Insert the Media into the Printer on
page 16.
2. If necessary, install the rewind/liner take-up plate in the peel-off position as shown.
Printer Setup
23
Page 24

Printer Setup
3.
If desired, slide a core onto the rewind spindle until it is flush against the guide plate. A core is not
necessary for liner take-up.
4. Open the printhead assembly by rotating the printhead-open lever upward.
24
Page 25

Printer Setup
1234
5.
Rotate the media guide adjustment knob as shown until the media guide slides all the way out.
CAUTION—HOT SURFACE: The printhead may be hot and could cause severe burns. Allow the
printhead to cool.
6. From the media spindle (1), feed the media under the dancer assembly (2), through the
media sensor (3), and under the printhead assembly (4). Slide the media back until it touches the
inside back wall of the media sensor.
25
Page 26

Printer Setup
7.
Extend approximately 18 in. (500 mm) of media out of the printer. Remove and discard the labels from
this exposed media, leaving just the liner.
8. Feed the liner behind the rewind/liner take-up plate.
9. Remove the hook from the rewind spindle.
26
Page 27

Printer Setup
2
1
10.
Wind the liner around the rewind spindle as shown. Rotate the rewind spindle several turns to tighten
the liner and remove any slack.
11. Reinstall the spindle hook over the liner. Insert the long end of the hook into the small hole on the guide
plate (1). Insert the short end of the hook into the hole in the center of the adjusting nut (2).
27
Page 28

Printer Setup
12.
Rotate the media guide adjustment knob as shown until the media guide just touches the edge of the
media.
13. Does the media that you are using require ribbon for printing? If you are not sure, see Ribbon on
page 10.
If using… Then…
Direct Thermal media (no ribbon needed) Continue with step 14.
Thermal Transfer media (ribbon needed) a. If you have not already done so, load ribbon in
the printer. See Load the Ribbon on page 42.
b. Continue with step 14.
14. Rotate the printhead-open lever downward until it locks the printhead in place.
28
Page 29

15.
Close the media door.
Printer Setup
16. Set the printer to the appropriate collection method (for more information, see Print > Label Position >
Collection Method on page 71).
17. Press PAUSE to exit pause mode and enable printing.
The printer may perform a label calibration or feed a label, depending on your settings.
18. For best results, calibrate the printer. See Calibrate the Ribbon and Media Sensors on page 83.
19. If desired, print a configuration or other label to verify that your printer is able to print. (See System >
Settings > Print: System Settings on page 58.)
Media loading in Peel-Off or Applicator mode is complete.
29
Page 30

Rewind Mode
1. If you have not already done so, follow the instructions in the section Insert the Media into the Printer on
page 16.
Printer Setup
2. If necessary, install the rewind/liner take-up plate in the rewind position as shown.
30
Page 31

Printer Setup
3.
Slide a core onto the rewind spindle until it is flush against the guide plate.
4. Open the printhead assembly by rotating the printhead-open lever upward.
31
Page 32

Printer Setup
1234
5.
Rotate the media guide adjustment knob as shown until the media guide slides all the way out.
CAUTION—HOT SURFACE: The printhead may be hot and could cause severe burns. Allow the
printhead to cool.
6. From the media spindle (1), feed the media under the dancer assembly (2), through the media sensor
(3), and under the printhead assembly (4). Slide the media back until it touches the inside back wall of
the media sensor.
32
Page 33

Printer Setup
7.
Extend approximately 18 in. (500 mm) of media out of the printer.
8. Feed the media over the rewind/liner take-up plate.
33
Page 34

Printer Setup
9.
Wind the media around the rewind spindle as shown. Rotate the rewind spindle several turns to tighten
the media and remove any slack.
10. Rotate the media guide adjustment knob as shown until the media guide just touches the edge of the
media.
34
Page 35

Printer Setup
11.
Does the media that you are using require ribbon for printing? If you are not sure, see Ribbon on
page 10.
If using… Then…
Direct Thermal media (no ribbon needed) Continue with step 12.
Thermal Transfer media (ribbon needed) a. If you have not already done so, load ribbon in
the printer. See Load the Ribbon on page 42.
b. Continue with step 12.
12. Rotate the printhead-open lever downward until it locks the printhead in place.
35
Page 36
13.
Close the media door.
Printer Setup
14. Set the printer to Rewind mode (for more information, see Print > Label Position > Collection Method on
page 71).
15. Press PAUSE to exit pause mode and enable printing.
The printer may perform a label calibration or feed a label, depending on your settings.
16. For best results, calibrate the printer. See Calibrate the Ribbon and Media Sensors on page 83.
17. If desired, print a configuration or other label to verify that your printer is able to print. (See System >
Settings > Print: System Settings on page 58.)
Media loading in Rewind mode is complete.
36
Page 37

Cutter Mode or Delayed Cut Mode
1. If you have not already done so, follow the instructions in the section Insert the Media into the Printer on
page 16.
2. Open the printhead assembly by rotating the printhead-open lever upward.
Printer Setup
37
Page 38

Printer Setup
1234
3.
Rotate the media guide adjustment knob as shown until the media guide slides all the way out.
CAUTION—HOT SURFACE: The printhead may be hot and could cause severe burns. Allow the
printhead to cool.
4. From the media spindle (1), feed the media under the dancer assembly (2), through the media sensor
(3), and under the printhead assembly (4). Slide the media back until it touches the inside back wall of
the media sensor.
38
Page 39

Printer Setup
CAUTION: The cutter blade is sharp. Do not touch or rub the blade with your fingers.
5. Feed the media through the cutter.
6. Rotate the media guide adjustment knob as shown until the media guide just touches the edge of the
media.
7. Does the media that you are using require ribbon for printing? If you are not sure, see Ribbon on
page 10.
If using… Then…
Direct Thermal media (no ribbon needed) Continue with step 8.
Thermal Transfer media (ribbon needed) a. If you have not already done so, load ribbon in
the printer. See Load the Ribbon on page 42.
b. Continue with step 8.
39
Page 40

Printer Setup
8.
Rotate the printhead-open lever downward until it locks the printhead in place.
9. Close the media door.
10. Set the printer to the appropriate collection method (for more information, see Print > Label Position >
Collection Method on page 71).
11. Press PAUSE to exit pause mode and enable printing.
The printer may perform a label calibration or feed a label, depending on your settings.
12. For best results, calibrate the printer. See Calibrate the Ribbon and Media Sensors on page 83.
13. If desired, print a configuration or other label to verify that your printer is able to print. (See System >
Settings > Print: System Settings on page 58.)
Media loading in Cutter mode is complete.
40
Page 41

Printer Setup
Determine the Type of Ribbon to Use
NOTE: This section applies only to printers that have the Thermal Transfer option installed.
What kind of ribbon can I use? Rolls of ribbon are wound with the coated surface of ink on the inside of
the roll or on the outside of the roll. This printer with a standard Thermal Transfer option uses ribbon that is
coated on the outside. An optional ribbon spindle is available to use ribbon that is coated on the inside.
Contact your authorized Zebra reseller for ordering information.
If you are unsure which side of a particular roll of ribbon is coated, perform an adhesive test or a ribbon
scratch test to determine which side is coated.
Adhesive Test If you have labels available, perform the adhesive test to determine which side of a ribbon
is coated. This method works well for ribbon that is already installed.
1. Peel a label from its liner.
2. Press a corner of the sticky side of the label to the outer surface of the roll of ribbon.
3. Peel the label off of the ribbon.
4. Observe the results. Did flakes or particles of ink from the ribbon adhere to the label?
If ink from the ribbon... Then...
Adhered to the label The ribbon is coated on the outside and can be used in this
printer.
Did not adhere to
the label
The ribbon is coated on the inside and cannot be used in the
standard printer. To verify this result, repeat the test on the other
surface of the roll of ribbon.
Ribbon Scratch Test Perform the ribbon scratch test when labels are unavailable.
1. Unroll a short length of ribbon.
2. Place the unrolled section of ribbon on a piece of paper with the outer surface of the ribbon in contact
with the paper.
3. Scratch the inner surface of the unrolled ribbon with your fingernail.
4. Lift the ribbon from the paper.
5. Observe the results. Did the ribbon leave a mark on the paper?
If the ribbon... Then...
Left a mark on the paper The ribbon is coated on the outside and can be used in this
printer.
Did not leave a mark on
the paper
The ribbon is coated on the inside and cannot be used in the
standard printer. To verify this result, repeat the test on the other
surface of the roll of ribbon.
41
Page 42

Load the Ribbon
IMPORTANT: You are not required to turn off the printer power when working near an open printhead, but
Zebra recommends it as a precaution. If you turn off the power, you will lose all temporary settings, such as
label formats, and you must reload them before you resume printing.
Use ribbon that is wider than the media to protect the printhead from wear. Ribbon must be coated on the
outside for use in a standard printer. For more information, see What kind of ribbon can I use? on page 41.
1. Raise the media door.
Printer Setup
CAUTION—HOT SURFACE: The printhead may be hot and could cause severe burns. Allow the
printhead to cool.
2. Open the printhead assembly by rotating the printhead-open lever upward.
42
Page 43

Printer Setup
3.
Place the roll of ribbon on the ribbon supply spindle with the loose end of the ribbon unrolling as shown.
Push the roll back as far as it will go.
4. Bring the ribbon under the printhead assembly and around its left side, as shown.
43
Page 44
Printer Setup
5.
With the ribbon tracking as far back as it can under the printhead assembly, wrap the ribbon around the
ribbon take-up spindle. Rotate the spindle several turns in the direction shown to tighten and align the
ribbon.
44
Page 45

Printer Setup
6.
Is media already loaded in the printer?
If... Then...
No Continue with Load the Media on page 16 to load media in the printer.
Yes a. Rotate the printhead-open lever downward until it locks the printhead in place.
b. Close the media door.
c. If necessary, press PAUSE to enable printing.
45
Page 46

Printer Setup
Run the Print Wizard and Print a Test Label
The Print Wizard configures the printer, prints test labels, and adjusts print quality based on the results of
the test labels.
IMPORTANT: When using the Wizards, do not send data to the printer from the host.
For best results, use full-width media running the Print Wizard or Set All Wizard. If the media is smaller
than an image to be printed, the results may be truncated or print across multiple labels.
After you have completed the printer setup procedures and run the printer setup wizard, use this section to
print a test label. Printing this label allows you to see if your connection is working and if you need to adjust
any of the print settings.
1. On the Home screen, touch Wizards > Print > Start Print.
2. Follow the prompts to specify the following information:
• print type (Thermal Transfer or Direct Thermal)
• label type (Continuous, Gap/Notch, or Mark)
• label width
• collection method (tear off, peel-off, rewind, cutter, delayed cut, linerless peel, linerless rewind,
linerless tear, or applicator)
After you have specified these, the wizard instructs you to load media and then to place a label over the
media sensor.
3. Load media so that a label is over the green light from the media sensor, and then touch the check
mark.
4. At the prompt, close the printhead, and then touch the next check mark.
The printer calibrates and then asks if you would like to print a test label.
5. Follow the prompts until the printer completes auto calibration.
46
Page 47

Printer Setup
6.
When asked to print a test label, touch the check mark.
A test label similar to this one prints. If your labels are smaller than the image, only a portion of the test
label will print.
7. Examine the position of the label over the tear bar. If necessary, shift the position of the media over the
tear-off bar after printing.
• If the space between labels falls on the tear bar, continue with the next step.
• If the space between labels does not fall directly on the tear bar, shift the position of the media over
the tear bar after printing. Lower numbers move the media into the printer by the specified number
of dots (the tear line moves closer to the edge of the label just printed). Higher numbers move the
media out of the printer (the tear line moves closer to the leading edge of the next label).
8. Examine the quality of the image on the test label. Is the quality of the barcode and text on the test label
acceptable? See Judging Barcode Quality on page 113 for assistance.
• If yes, touch the check mark, and then continue with step 13.
• If no, adjust the print quality manually by changing darkness and speed settings through the printer’s
menu system, or continue with this procedure to run the Print Quality Assistance wizard.
Print Quality Assistance Wizard
9. Touch Print Quality Assistance.
The printer prompts for the number of test labels to print. The more labels you choose to print, the more
choices that you will have available to decide on label quality. In general, if your test label from the
previous wizard was acceptable, a lower number of test labels in this step will probably suffice.
47
Page 48

Printer Setup
10.
Select a number of test labels to print.
The printer prints the specified number of test labels and prompts you for the best test label.
11. Decide which test label is the best quality. See Judging Barcode Quality on page 113 for assistance. If
none of the labels are acceptable, use the arrow to back up a screen in the wizard, and select a larger
number of test labels.
12. In the list on the display, select the identifier for the test label with the best quality, and then touch the
check mark.
The printer changes the darkness and speed to the levels used on the best test label.
13. If necessary, see Printing or Print Quality Issues on page 127 to see what other issues may be affecting
your print quality.
The print setup procedure is complete.
48
Page 49

Printer Configuration and Adjustment
This section assists you with configuration of and adjustments to the printer.
49
Page 50

Home Screen
The printer’s Home screen shows you the printer’s current status and allows you to access the printer’s
menus. You can rotate the image of the printer 360 degrees to view it from all angles.
Printer Configuration and Adjustment
If the background color of the Home screen is yellow or red, the printer is in an alert or error state. For
more information, see Alert and Error States on page 121.
The following items are located on the Home screen Print Status tab:
•Menu—Allows you to change the printer settings. See User Menus on page 52.
• Wizards—Allows you to change printer settings by going through prompts. See Printer Wizards on
page 51.
• Shortcuts—Allows you to quickly access the most recent menu items and to save your favorites. Touch
the darkened heart icon next to a menu item to save it to your list of favorites. Items in the favorites are
shown in the order in which they were saved.
50
Page 51
Printer Wizards
The printer Wizards can assist you by walking you through the setup process for various printer settings
and features.
The following wizards are available:
• Set All Wizard—runs all the Wizards in sequence.
• System Wizard—sets up non-print related operating system settings.
• Connection Wizard—configures the printer’s connectivity options.
•Print Wizard—configures key printing parameters and features. See Run the Print Wizard and Print a
Test Label on page 46.
•RFID Wizard—sets up the RFID subsystem’s operations.
On the Home screen, touch Wizards to see the available options. For more information about individual
settings set by any of the wizards, see User Menus on page 52.
Printer Configuration and Adjustment
IMPORTANT: When using the Wizards, do not send data to the printer from the host.
For best results, use full-width media running the Print or Set All Wizards. If the media is shorter than an
image to be printed, the image may be truncated or print across multiple labels.
51
Page 52

User Menus
The printer’s user menus can be used to configure the printer.
Printer Configuration and Adjustment
See the following sections:
• System Menu on page 53
• Connection Menu on page 59
• Print Menu on page 69
• RFID Menu on page 77
• Storage Menu on page 81
The user menu descriptions include the following other ways to change the same settings, when other
options exist. You can also use the printer’s wizards to change some of the settings. (See Printer Wizards
on page 51.)
•ZPL and Set/Get/Do (SGD) commands. See the
http://www.zebra.com/manuals for more information.
• The printer’s web pages, for when the printer has an active wired or wireless print server connection.
See the
more information.
ZebraNet Wired and Wireless Print Servers User Guide
Zebra Programming Guide
at http://www.zebra.com/manuals for
at
52
Page 53

System Menu
Printer Configuration and Adjustment
System > Language
If necessary, change the language that the printer displays. This change affects the words
shown on the following:
• the Home screen
• the user menus
• error messages
• the printer configuration label, the network configuration label, and other labels that you can
select to print through the user menus
Accepted values: ENGLISH, SPANISH, FRENCH, GERMAN, ITALIAN,
NORWEGIAN, PORTUGUESE, SWEDISH, DANISH, DUTCH,
FINNISH, CZECH, JAPANESE, KOREAN, ROMANIAN,
RUSSIAN, POLISH, SIMPLIFIED CHINESE,
TRADITIONAL CHINESE
NOTE: The selections for this parameter are displayed in
the actual languages to make it easier for you to find one
that you are able to read.
Related ZPL command(s):
^KL
SGD command used: display.language
Printer web page: View and Modify Printer Settings > General Setup > Language
System > Program Language > Diagnostic Mode
Use this diagnostics tool to cause the printer to output the hexadecimal values for all data
received by the printer. For more information, see Communication Diagnostics Mode on
page 119.
Accepted values: DISABLED, ENABLED
Related ZPL command(s):
SGD command used:
Control panel key(s): Hold PAUSE + FEED for 2 seconds when the printer is in the
~JD to enable, ~JE to disable
device.diagnostic_print
Ready state.
53
Page 54

Printer Configuration and Adjustment
System > Program Language > Virtual Device
If any Virtual Device apps are installed on your printer, you may view or enable/disable them
from this user menu. For more information about Virtual Devices, go to the User Guide for the
appropriate Virtual Device, or contact your local reseller.
System > Program Language > ZBI
Zebra Basic Interpreter (ZBI 2.0 ™ ) is a programming option that may be purchased for your
printer. If you would like to purchase this option, contact your Zebra reseller for more
information.
If ZBI programs have been downloaded to your printer, you may select one to run using this
menu item. If no program exists on your printer, NONE is listed.
When ZBI programs have been downloaded but none are running, the printer lists all available
programs. To run one of them, touch Run (highlighted in white) under the program name.
After a program is running, only that program is listed. Touch Stop (highlighted in white) to end
the program.
SGD command used:
zbi.key (identifies if the ZBI 2.0 option is enabled or disabled on
the printer)
54
Page 55

Printer Configuration and Adjustment
System > Settings > Display Time Format
Select the time format used by the printer.
Accepted values: 12-Hour, 24-Hour
SGD command used:
System > Settings > Password Level
Select the level of password protection for user menu items.
Accepted values: Selected, All, None
device.idle_display_value
Related ZPL command(s):
^KP (to change the printer password)
System > Settings > Set Password
Set a new printer password for menu items protected by the previous parameter. The default
printer password is
1234.
Accepted values: Numerals 0-9
Related ZPL command(s):
^KP
55
Page 56

Printer Configuration and Adjustment
System > Settings > Power Up Action
Set the action for the printer to take during the power-up sequence.
Accepted values: CALIBRATE—Adjusts sensor levels and thresholds, determines
the label length, and feeds the media to the next web.
FEED—Feeds the labels to the first registration point.
LENGTH—Determines the label length using current sensor
values, and feeds the media to the next web.
NO MOTION—Tells the printer not to move the media. You must
manually ensure that the web is positioned correctly, or press feed
to position the next web.
SHORT CAL—Sets the media and web thresholds without
adjusting sensor gain, determines the label length, and feeds the
media to the next web.
Related ZPL command(s):
SGD command used:
^MF
ezpl.power_up_action
Printer web page: View and Modify Printer Settings > Calibration
System > Settings > Head Close Action
Set the action for the printer to take when you close the printhead.
Accepted values: CALIBRATE—Adjusts sensor levels and thresholds, determines
the label length, and feeds the media to the next web.
FEED—Feeds the labels to the first registration point.
LENGTH—Determines the label length using current sensor
values, and feeds the media to the next web.
NO MOTION—Tells the printer not to move the media. You must
manually ensure that the web is positioned correctly, or press feed
to position the next web.
SHORT CAL—Sets the media and web thresholds without
adjusting sensor gain, determines the label length, and feeds the
media to the next web.
Related ZPL command(s):
SGD command used:
^MF
ezpl.head_close_action
Printer web page: View and Modify Printer Settings > Calibration
56
Page 57

Printer Configuration and Adjustment
System > Settings > Screen Calibration
Touch each crosshair to calibrate the screen.
System > Settings > Restore Defaults
Restore specific printer, print server, and network settings back to the factory defaults. Use
care when loading defaults because you will need to reload all settings that you changed
manually. This menu item is available through two user menus with different default values for
each.
Accepted values: PRINTER—Restores all printer settings other than the network
settings back to the factory defaults. Use care when loading
defaults because you will need to reload all settings that you
changed manually.
NETWORK—Reinitializes the printer’s wired or wireless print
server. With a wireless print server, the printer also reassociates
with your wireless network.
LAST SAVED—Loads settings from the last permanent save.
Related ZPL command(s): PRINTER—
NETWORK— ^JUN
LAST SAVED— ^JUR
Control panel key(s): PRINTER—Hold FEED + PAUSE during printer power-up to reset
the printer parameters to factory values.
NETWORK—Hold CANCEL + PAUSE during printer power-up to
reset the network parameters to factory values.
LAST SAVED—N/A
Printer web page: PRINTER—View and Modify Printer Settings > Restore Default
Configuration
NETWORK—Print Server Settings > Reset Print Server
LAST SAVED—View and Modify Printer Settings > Restore Saved
Configuration
^JUF
57
Page 58

Printer Configuration and Adjustment
System > Settings > Print: System Settings
Prints a printer configuration label. The following is a sample label.
Related ZPL command(s):
~WC
Control panel key(s): Do one of the following:*
• Hold CANCEL during printer power-up. (Formerly called a
CANCEL self test.
• Hold FEED + CANCEL for 2 seconds when the printer is in the
Ready state.
Printer web page: View and Modify Printer Settings > Print Listings on Label *
* Prints a printer configuration label and a network configuration label.
58
Page 59

Printer Configuration and Adjustment
System > Energy Saving > Energy Star
When Energy Star mode is enabled, the printer goes into a “sleep” mode after a timeout period,
thereby lowering power consumption. Press any button on the control panel to bring the printer
back to an active state.
Accepted values: ON, OFF
SGD command used:
Connection Menu
Connection > Networks > Reset Network
This option resets the wired or wireless print server and saves any changes that you made to
any network settings.
Related ZPL command(s):
SGD command used:
Printer web page: Print Server Settings > Reset Print Server
power.energy_star.enable
power.energy_star_timeout
(to set the amount of idle time before Energy Star is invoked)
IMPORTANT: You must reset the print server to allow changes to the network settings
to take effect.
~WR
device.reset
Connection > Networks > Primary Network
View or modify whether the wired or wireless print server is considered primary. You may select
which one is primary.
Accepted values: Wired, WLAN
Related ZPL command(s):
SGD command used:
^NC
ip.primary_network
59
Page 60

Printer Configuration and Adjustment
Connection > Networks > IP Port
This printer setting refers to the internal wired print servers port number that the TCP print
service is listening on. Normal TCP communications from the host should be directed to this
port.
SGD command used:
internal_wired.ip.port
wlan.ip.port
Printer web page: View and Modify Printer Settings > Network Communications
Setup > TCP/IP Settings
Connection > Networks > IP Alternate Port
This command sets the port number of the alternate TCP port.
NOTE: Print servers supporting this command will monitor both the primary port and the
alternate port for connections at the same time.
SGD command used:
internal_wired.ip.port_alternate
wlan.ip.port_alternate
Printer web page: View and Modify Printer Settings > Network Communications
Setup > TCP/IP Settings
60
Page 61
Printer Configuration and Adjustment
Connection > Networks > Print: Network Info
Prints the settings for any print server or Bluetooth device that is installed. The following is a
sample label.
Related ZPL command(s):
~WL
Control panel key(s): Do one of the following:*
• Hold CANCEL during printer power-up. (Formerly called a
CANCEL self test.
• Hold FEED + CANCEL for 2 seconds when the printer is in
the Ready state.
Printer web page: View and Modify Printer Settings > Print Listings on Label *
* Prints a printer configuration label and a network configuration label.
61
Page 62

Printer Configuration and Adjustment
Connection > Networks > Visibility Agent
When the printer is connected to a wired or wireless network, it will attempt to connect to
Zebra’s Asset Visibility Service via the Cloud-based Zebra Printer Connector using an
encrypted, certificate-authenticated web socket connection. The printer sends Discovery Data
and Settings and Alerts Data. Data printed via any label formats is NOT transmitted.
To opt out of this feature, disable this setting. For more information, see the “Opting Out of the
Asset Visibility Agent” application note at http://www.zebra.com.
Accepted values: ON, OFF
SGD command used:
weblink.zebra_connector.enable
Printer web page: View and Modify Printer Settings > Network Configuration > Cloud
Connect Settings
Connection > Wired > Wired IP Protocol
This parameter indicates if the user (permanent) or the server (dynamic) selects the wired print
server’s IP address. When a dynamic option is chosen, this parameter tells the method(s) by
which this print server receives the IP address from the server.
IMPORTANT: You must reset the print server to allow changes to the network settings
to take effect. See Connection > Networks > Reset Network on page 59.
Accepted values: ALL, GLEANING ONLY, RARP, BOOTP, DHCP,
DHCP & BOOTP, PERMANENT
Related ZPL command(s):
SGD command used:
^ND
internal_wired.ip.protocol
Printer web page: View and Modify Printer Settings > Network Communications
Setup > TCP/IP Settings
Connection > Wired > Wired IP Address
View and, if necessary, change the printer’s wired IP address.
To save changes to this setting, set Connection > Wired > Wired IP Protocol on page 62 to
PERMANENT, and then reset the print server (see Connection > Networks > Reset Network on
page 59).
Accepted values: 000 to 255 for each field
Related ZPL command(s):
SGD command used:
^ND
internal_wired.ip.addr
Printer web page: View and Modify Printer Settings > Network Communications
Setup > TCP/IP Settings
62
Page 63

Printer Configuration and Adjustment
Connection > Wired > Wired Subnet
View and, if necessary, change the wired subnet mask.
To save changes to this setting, set Connection > Wired > Wired IP Protocol on page 62 to
PERMANENT, and then reset the print server (see Connection > Networks > Reset Network on
page 59).
Accepted values: 000 to 255 for each field
Related ZPL command(s):
SGD command used:
^ND
internal_wired.ip.netmask
Printer web page: View and Modify Printer Settings > Network Communications
Setup > TCP/IP Settings
Connection > Wired > Wired Gateway
View and, if necessary, change the default wired gateway.
To save changes to this setting, set Connection > Wired > Wired IP Protocol on page 62 to
PERMANENT, and then reset the print server (see Connection > Networks > Reset Network on
page 59).
Accepted values: 000 to 255 for each field
Related ZPL command(s):
SGD command used:
^ND
internal_wired.ip.gateway
Printer web page: View and Modify Printer Settings > Network Communications
Setup > TCP/IP Settings
Connection > Wired > Wired Mac Address
View the Media Access Control (MAC) address of the wired print server. This value cannot be
modified.
SGD command used:
internal_wired.mac_addr
Printer web page: View and Modify Printer Settings > Network Communications
Setup > TCP/IP Settings
63
Page 64

Printer Configuration and Adjustment
Connection > WLAN > WLAN IP Protocol
This parameter indicates if the user (permanent) or the server (dynamic) selects the wireless
print server’s IP address. When a dynamic option is chosen, this parameter tells the method(s)
by which this print server receives the IP address from the server.
IMPORTANT: You must reset the print server to allow changes to the network settings
to take effect. See Connection > Networks > Reset Network on page 59.
Accepted values: ALL, GLEANING ONLY, RARP, BOOTP, DHCP,
DHCP & BOOTP, PERMANENT
Related ZPL command(s):
SGD command used:
^ND
wlan.ip.protocol
Printer web page: View and Modify Printer Settings > Network Communications
Setup > Wireless Setup
Connection > WLAN > WLAN IP Address
View and, if necessary, change the printer’s wireless IP address.
To save changes to this setting, set Connection > WLAN > WLAN IP Protocol on page 64 to
PERMANENT, and then reset the print server (see Connection > Networks > Reset Network on
page 59).
Accepted values: 000 to 255 for each field
Related ZPL command(s):
SGD command used:
^ND
ip.addr, wlan.ip.addr
Printer web page: View and Modify Printer Settings > Network Communications
Setup > Wireless Setup
Connection > WLAN > WLAN Subnet
View and, if necessary, change the wireless subnet mask.
To save changes to this setting, set Connection > WLAN > WLAN IP Protocol on page 64 to
PERMANENT, and then reset the print server (see Connection > Networks > Reset Network on
page 59).
Accepted values: 000 to 255 for each field
Related ZPL command(s):
SGD command used:
^ND
wlan.ip.netmask
Printer web page: View and Modify Printer Settings > Network Communications
Setup > Wireless Setup
64
Page 65

Printer Configuration and Adjustment
Connection > WLAN > WLAN Gateway
View and, if necessary, change the default wireless gateway.
To save changes to this setting, set Connection > WLAN > WLAN IP Protocol on page 64 to
PERMANENT, and then reset the print server (see Connection > Networks > Reset Network on
page 59).
Accepted values: 000 to 255 for each field
Related ZPL command(s):
SGD command used:
^ND
wlan.ip.gateway
Printer web page: View and Modify Printer Settings > Network Communications
Setup > Wireless Setup
Connection > WLAN > WLAN Mac Address
View the Media Access Control (MAC) address of the wireless print server. This value cannot
be modified.
SGD command used:
wlan.mac_addr
Printer web page: View and Modify Printer Settings > Network Communications
Setup > Wireless Setup
Connection > WLAN > ESSID
The Extended Service Set Identification (ESSID) is an identifier for your wireless network.
Specify the ESSID for the current wireless configuration.
Accepted values: 32-character alphanumeric string (default 125)
SGD command used:
wlan.essid
Printer web page: View and Modify Printer Settings > Network Communications
Setup > Wireless Setup
65
Page 66

Printer Configuration and Adjustment
Connection > WLAN > WLAN Security
Select the security type being used on your WLAN.
Related ZPL command(s):
SGD command used:
^WX
wlan.security
Printer web page: View and Modify Printer Settings > Network Communications
Setup > Wireless Encryption Setup
Connection > WLAN > WLAN Band
Set a preferred band to connect with via wifi.
Accepted values: 2.4, 5, None
SGD command used:
wlan.band_preference
Printer web page: View and Modify Printer Settings > Network Communications
Setup > Wireless Setup
Connection > WLAN > WLAN Country Code
The country code defines the regulatory country for which the wireless radio is currently
configured.
The list of country codes is specific to each printer and depends on the printer model
and its wireless radio configuration. The list is subject to change, addition, or deletion
with any firmware update, at any time, without notice.
To determine the country codes available on your printer, issue the
! U1 getvar "wlan" command to return all commands related to WLAN settings.
Locate the
wlan.country.code command in the results and view the country codes
available for your printer.
SGD command used:
wlan.country_code
66
Page 67

Printer Configuration and Adjustment
Connection > Bluetooth > Bluetooth
Select if the printer is “Discoverable” for Bluetooth device pairing.
Accepted values: ON—Enables the Bluetooth radio.
OFF—Disables the Bluetooth radio.
SGD command used:
bluetooth.enable
Connection > Bluetooth > Bluetooth Discovery
Select if the printer is “Discoverable” for Bluetooth device pairing.
Accepted values: ON—Enables Bluetooth discoverable mode.
OFF—Disables Bluetooth discoverable mode.
SGD command used:
bluetooth.discoverable
Connection > Bluetooth > Friendly Name
This command sets the friendly name, which is used during service discovery. For changes to
take effect, you must power cycle the printer or issue the
device.reset command (see
Connection > Networks > Reset Network on page 59).
If you do not set a friendly name, it will default to the printer serial number.
Accepted values: 17-character text string
SGD command used:
bluetooth.friendly_name
67
Page 68

Printer Configuration and Adjustment
Connection > Bluetooth > Minimum Security Mode
This printer setting parameter sets the Bluetooth Minimum Security mode. Minimum Security
Mode provides for different levels of security, depending on the printer radio version and printer
firmware. See the
information.
Accepted values: 1, 2, 3, 4
SGD command used:
Connection > Bluetooth > Specification Version
This parameter displays the Bluetooth library version number.
SGD command used:
Zebra Programming Guide
bluetooth.minimum_security_mode
bluetooth.version
at http://www.zebra.com/manuals for more
Connection > Bluetooth > MAC Address
This parameter displays the Bluetooth device address.
SGD command used:
bluetooth.address
68
Page 69

Printer Configuration and Adjustment
Connection > Bluetooth > Bluetooth Auth. PIN
Set the PIN used when Bluetooth authentication is enabled.
SGD command used:
Connection > Bluetooth > Bluetooth Bonding
Controls whether the Bluetooth stack will “bond” or save link keys for devices that successfully
connect to the printer.
Accepted values: ON—Enables Bluetooth bonding.
SGD command used:
bluetooth.bluetooth_pin (to set the PIN)
bluetooth.authentication (to enable authentication)
OFF—Disables Bluetooth bonding.
bluetooth.bonding
Print Menu
Print > Print Quality > Darkness
Set the print darkness to the lowest setting that provides good print quality. If you set the
darkness too high, the label image may print unclearly, barcodes may not scan correctly, the
ribbon may burn through, or the printhead may wear prematurely.
Accepted values: 0.0 to 30.0
Related ZPL command(s):
SGD command used:
Printer web page: View and Modify Printer Settings > General Setup > Darkness
^MD, ~SD
print.tone
69
Page 70

Printer Configuration and Adjustment
Print > Print Quality > Print Speed
Select the speed, in inches per second (ips), for printing a label. Slower print speeds typically
yield better print quality.
Accepted values: ZT610 203 dpi =
ZT610 300 dpi =
ZT610 600 dpi = 1 to
2 to 14 ips
2 to 12 ips
6 ips
ZT620 203 dpi = 2 to 12 ips
Related ZPL command(s):
SGD command used:
ZT620 300 dpi =
^PR
media.speed
2 to 8 ips
Printer web page: View and Modify Printer Settings > General Setup > Print Speed
Print > Print Quality > Print Type
Specify if the printer needs to use ribbon for printing.
Accepted values: • Thermal Transfer—Uses ribbon and thermal transfer media.
• Direct Thermal—Uses direct thermal media and no ribbon.
Related ZPL command(s):
SGD command used:
^MT
ezpl.print_method
Printer web page: View and Modify Printer Settings > Media Setup > Print Method
Print > Print Quality > Label Type
Select the type of media that you are using.
Accepted values: Continuous, Gap/Notch, Mark
If you select Continuous, you must include a label length in your
label format (
^LL if you are using ZPL). If you select Gap/Notch or
Mark for various noncontinuous media, the printer feeds media to
calculate the label length.
Related ZPL command(s):
SGD command used:
^MN
ezpl.media_type
Printer web page: View and Modify Printer Settings > Media Setup > Media Type
70
Page 71

Printer Configuration and Adjustment
Print > Print Quality > Label Length
View the calibrated label length in dots. This value cannot be modified.
Print > Print Quality > Label Width (Dots)
Specify the width of the labels being used, in dots. The default value is the maximum width for
the printer, based on the printhead’s DPI value.
Accepted values: NOTE: Setting the width too narrow can result in portions
of a label format not being printed on the media. Setting
the width too wide wastes formatting memory and can
cause the printer to print off of the label and onto the platen
roller. This setting can affect the horizontal position of the
label format if the image was inverted using the
ZPL II command.
^POI
ZT610 203 dpi = 0002 to 832
ZT610 300 dpi = 0002 to 1248
ZT610 600 dpi = 0002 to 2496
ZT620 203 dpi = 0002 to 1344
ZT620 300 dpi = 0002 to 1984
Related ZPL command(s):
SGD command used:
^PW
ezpl.print_width
Printer web page: View and Modify Printer Settings > Media Setup > Print Width
Print > Label Position > Collection Method
Select a collection method that is compatible with the options available on your printer.
Accepted values: Tear Off, Peel Off, Rewind, Cutter, Delayed Cut, Linerless Peel,
Linerless Rewind, Linerless Tear, Applicator, Linerless Cut,
Linerless Delayed Cut
Related ZPL command(s):
SGD command used:
^MM
media.printmode
Printer web page: View and Modify Printer Settings > General Setup > Print Mode
71
Page 72

Printer Configuration and Adjustment
Print > Label Position > Tear Line Offset
If necessary, shift the position of the media over the tear-off bar after printing.
• Lower numbers move the media into the printer by the specified number of dots (the tear
line moves closer to the edge of the label just printed).
• Higher numbers move the media out of the printer (the tear line moves closer to the leading
edge of the next label).
Accepted values: –120 to +120
Related ZPL command(s):
~TA
SGD command used: ezpl.tear_off
Printer web page: View and Modify Printer Settings > General Setup > Tear Off
72
Page 73

Printer Configuration and Adjustment
Print > Label Position > Label Offset
If necessary, shift the position of the image horizontally or vertically on the label.
Horizontal
• Negative numbers move the left edge of the image toward the left edge of the label by the
number of dots selected.
• Positive numbers move the edge of the image toward the right edge of the label.
Accepted values: –9999 to 9999
Related ZPL command(s):
SGD command used:
^LS
zpl.left_position
Printer web page: View and Modify Printer Settings > Advanced Setup > Left
Position
Vertical
• Lower numbers move the image higher on the label (toward the printhead).
• Higher numbers move the image farther down on the label (away from the printhead) by the
specified number of dots.
Accepted values: –120 to +120
Related ZPL command(s):
^LT
Printer web page: View and Modify Printer Settings > General Setup > Label Top
73
Page 74

Printer Configuration and Adjustment
Print > Sensors > Manual Calibration
Calibrate the printer to adjust the sensitivity of the media and ribbon sensors.
For complete instructions on how to perform a calibration procedure, see Calibrate the Ribbon
and Media Sensors on page 83.
Related ZPL command(s):
SGD command used:
~JC
ezpl.manual_calibration
Control panel key(s): Hold PAUSE + FEED + CANCEL for 2 seconds to initiate
calibration.
Printer web page: The calibration procedure cannot be initiated through the web
pages. See the following web page for settings that are set during
sensor calibration:
View and Modify Printer Settings > Calibration
IMPORTANT: Do not change these settings unless you are
told to do so by Zebra Technical Support or by an
authorized service technician.
Print > Sensors > Label Sensor
Set the sensitivity of the label sensor.
NOTE: This value is set during sensor calibration. Do not change these settings unless
you are told to do so by Zebra Technical Support or by an authorized service technician.
Accepted values: 0 to 255
SGD command used:
ezpl.label_sensor
Printer web page: View and Modify Printer Settings > Calibration
Print > Sensors > Sensor Type
Select the media sensor that is appropriate for the media that you are using. The reflective
sensor typically is used only for black mark media. The transmissive sensor typically is used for
other media types.
Accepted values: TRANSMISSIVE, REFLECTIVE
Related ZPL command(s):
SGD command used:
^JS
device.sensor_select
Printer web page: View and Modify Printer Settings > Media Setup
74
Page 75

Printer Configuration and Adjustment
Print > Sensors > Print: Sensor Profile
Shows the sensor settings compared to actual sensor readings. To interpret the results, see
Sensor Profile on page 117.
Related ZPL command(s):
~JG
Control panel key(s): Hold FEED + CANCEL during printer power-up.
Printer web page: View and Modify Printer Settings > Print Listings on Label
Print > Print Station
Use this menu item to fill in variable fields in a label format and print the label using a Human
Input Device (HID), such as a USB keyboard, scale, or barcode scanner. A suitable label format
must be stored on the E: drive of the printer to use this option. See the exercises in Using
USB Host Ports and the NFC Capabilities for an exercise using this capability.
When you plug an HID into one of the printer’s USB host ports, use this user menu to select a
form on the printer’s E: drive. After you have been prompted to fill in each variable
^FN field on
the form, you can specify the desired quantity of labels to print.
For more information about using the
feature, see the
Zebra Programming Guide
^FN command or the SGD commands related to this
at http://www.zebra.com/manuals for more
information.
* This menu item can be used only if a USB device is connectecd to a USB host port on the printer.
SGD command used: usb.host.keyboard_input
(must be set to ON)
usb.host.template_list
usb.host.fn_field_list
usb.host.fn_field_data
usb.host.fn_last_field
usb.host.template_print_amount
Print > Applicator > Applicator Port Mode
Controls the way in which the applicator port’s “End Print” signal functions.
Accepted values: Off
1 = End Print signal normally high, and low only when the printer is
moving the label forward.
2 = End Print signal normally low, and high only when the printer is
moving the label forward.
3 = End Print signal normally high, and low for 20 ms when a label
has been printed and positioned.
4 = End Print signal normally low, and high for 20 ms when a label
has been printed and positioned.
Related ZPL command(s):
^JJ
SGD command used:
device.applicator.end_print
75
Page 76

Printer Configuration and Adjustment
Print > Applicator > Start Print Mode
Determines if the applicator port’s “Start Print” signal is in level mode or pulse mode.
Accepted values: Pulse—Start Print signal must be deasserted before it can be
asserted for the next label.
Level—Start Print signal does not need to be deasserted to print
the next label. As long as the Start Print signal is low and a label is
formatted, a label prints.
Related ZPL command(s):
SGD command used:
^JJ
device.applicator.start_print
Print > Applicator > Error on Pause
Determines how applicator port errors are treated by the printer. Enabling this feature also
causes the “Service Required” pin to be asserted.
Accepted values: ENABLED, DISABLED
SGD command used:
device.applicator.error_on_pause
Printer web page: View and Modify Printer Settings > Advanced Setup > Error on
Pause
Print > Applicator > Applicator Reprint
Specifies if a high or low value is required for an applicator to reprint a label.
Enables or disables the
~PR command, which when enabled reprints the last printed label. It
also enables the Reprint button on the Home screen.
Related ZPL command(s):
^JJ and ~PR
SGD command used: device.applicator.reprint
76
Page 77
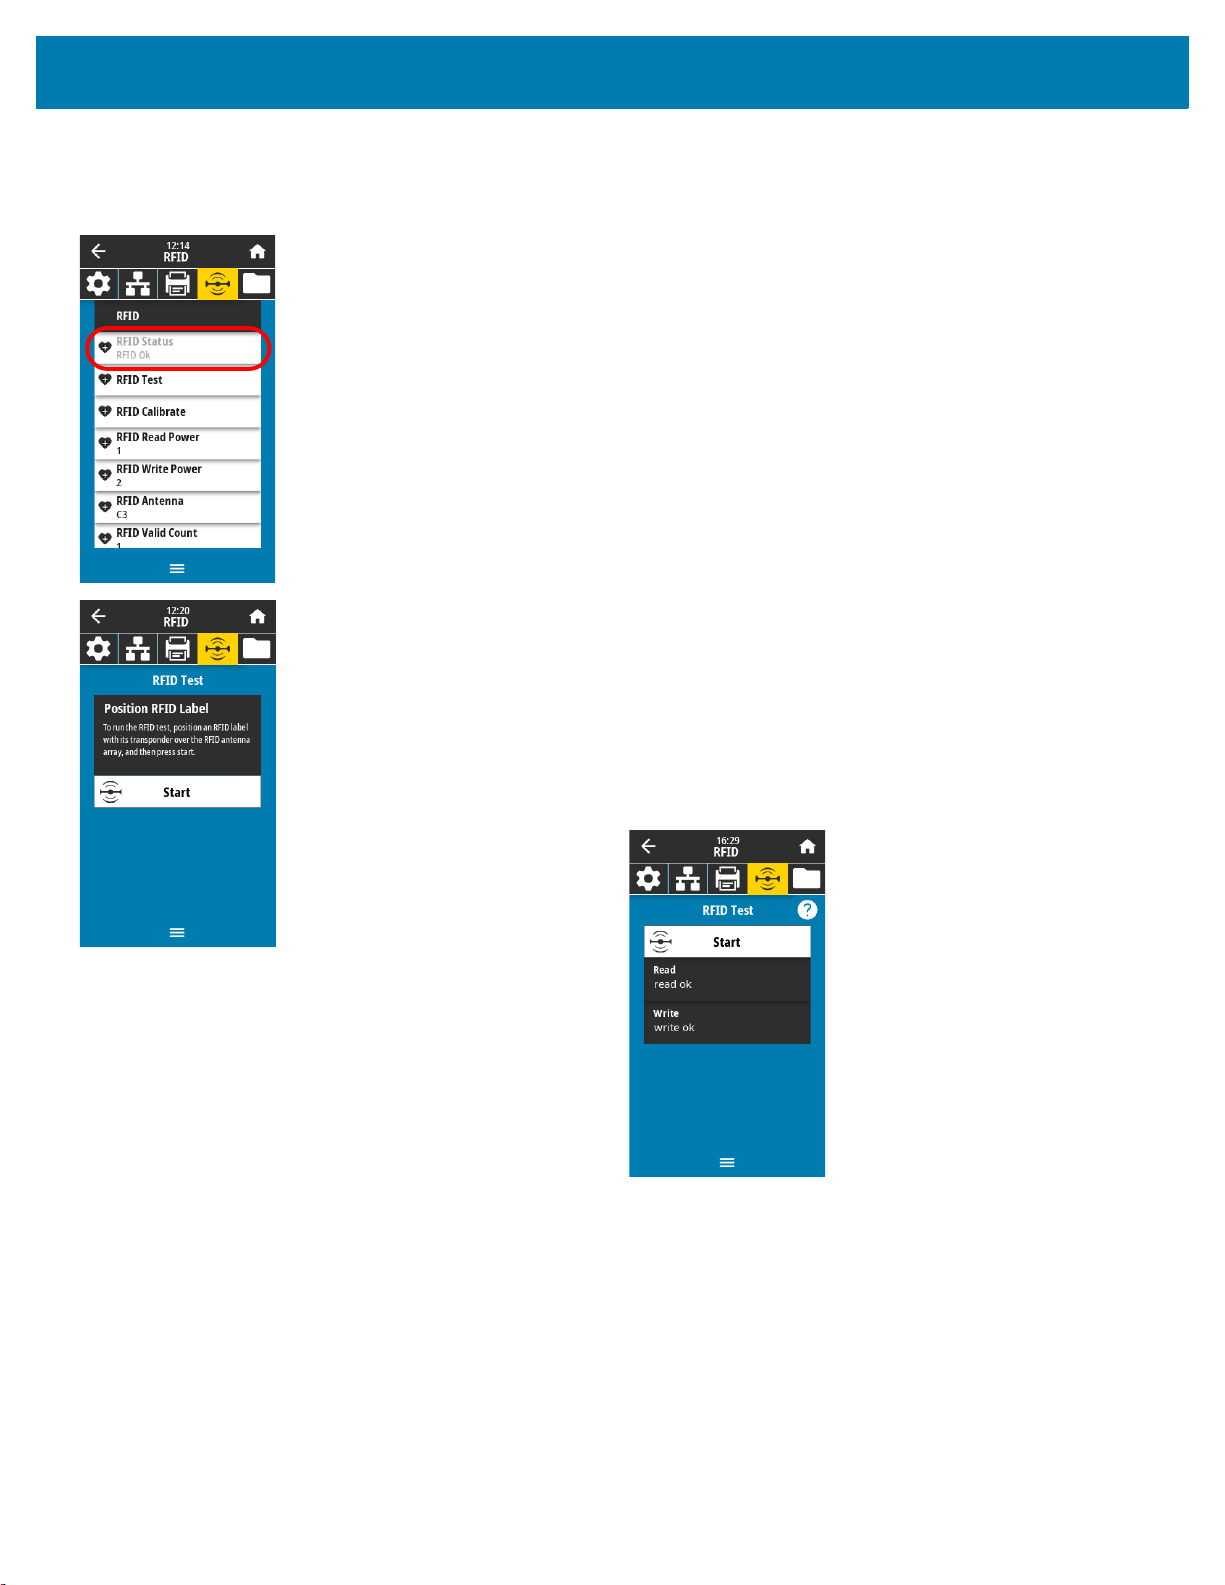
RFID Menu
Printer Configuration and Adjustment
RFID > RFID Status
Display the status of the RFID subsystem of the printer.
Related ZPL command(s):
SGD command used: rfid.error.response
RFID > RFID Test
During the RFID test, the printer attempts to read and write to a transponder. No printer
movement occurs with this test.
To test an RFID label:
1. Position the RFID label with its transponder over the RFID antenna array.
2. Touch Start.
The results of the test are shown on the display.
^HL or ~HL
SGD command used:
rfid.tag.test.content and rfid.tag.test.execute
77
Page 78
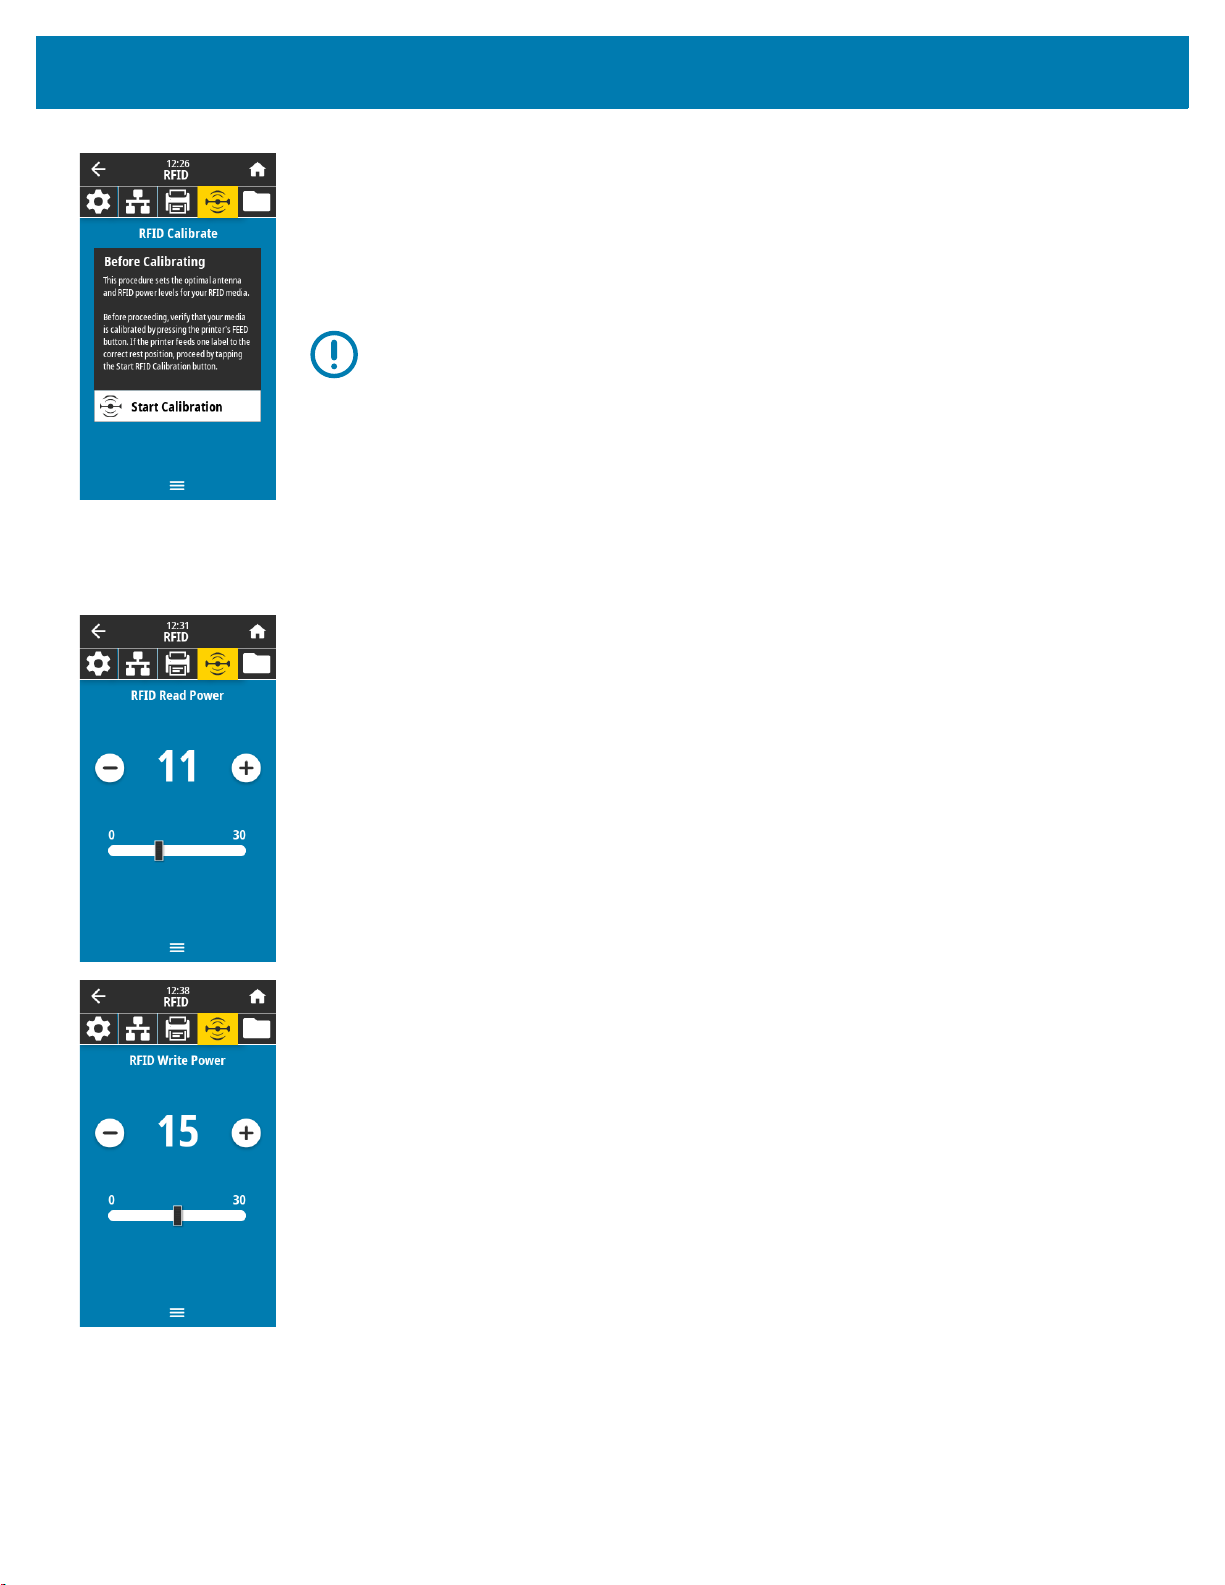
Printer Configuration and Adjustment
RFID > RFID Calibrate
Initiate tag calibration for RFID media. (Not the same as media and ribbon calibration.) During
the process, the printer moves the media, calibrates the RFID tag position, and determines the
optimal settings for the RFID media being used. These settings include the programming
position, the antenna element to use, and the read/write power level to use. See the
Programming Guide 3
for more information.
IMPORTANT: Before running this command, load the printer with RFID media, calibrate
your printer, close the printhead, and feed at least one label to make sure that tag
calibration will begin from the correct position.
Leave all transponders before and after the tag that is being calibrated. This allows the
printer to determine RFID settings which do not encode the adjacent tag. Allow a portion
of media to extend out the front of the printer to allow for backfeed during the tag
calibration procedure.
RFID
Related ZPL command(s):
SGD command used:
^HR
rfid.tag.calibrate
RFID > Read Power
If the desired read power is not achieved through RFID tag calibration, a value may be
specified.
Accepted values: 0 to 30
Related ZPL command(s):
SGD command used:
^RW
rfid.reader_1.power.read
Printer web page: View and Modify Printer Settings > RFID Setup > RFID READ
PWR
RFID > Write Power
If the desired write power is not achieved through RFID tag calibration, a value may be
specified.
Accepted values: 0 to 30
Related ZPL command(s):
SGD command used:
^RW
rfid.reader_1.power.write
Printer web page: View and Modify Printer Settings > RFID Setup > RFID WRITE
PWR
78
Page 79

Printer Configuration and Adjustment
RFID > RFID Antenna
If the desired antenna is not achieved through RFID tag calibration, a value may be specified.
Accepted values: A1, A2, A3, A4
B1, B2, B3, B4
C1, C2, C3, C4
D1, D2, D3, D4
E1, E2, E3, E4
Related ZPL command(s):
SGD command used:
^RW
rfid.reader_1.antenna_port
Printer web page: View and Modify Printer Settings > RFID Setup > RFID ANTENNA
RFID > RFID Valid Count
Resets the RFID valid label counter to zero.
Related ZPL command(s):
SGD command used:
~RO
odometer.rfid.valid_resettable
RFID > RFID Void Count
Resets the RFID void label counter to zero.
Related ZPL command(s):
SGD command used:
~RO
odometer.rfid.void_resettable
79
Page 80

Printer Configuration and Adjustment
RFID > RFID Program Position
If the desired programming position (read/write position) is not achieved through RFID tag
calibration, a value may be specified.
Accepted values: F0 to Fxxx (where xxx is the label length in millimeters or 999,
whichever is less)—The printer feeds the label forward for the
specified distance and then begins programming.
B0 to B30—The printer backfeeds the label for the specified
distance and then begins programming. To account for the
backfeed, allow empty media liner to extend out of the front of the
printer when using a backward programming position.
Related ZPL command(s):
SGD command used:
^RS
rfid.position.program
Printer web page: View and Modify Printer Settings > RFID Setup > PROGRAM
POSITION
RFID > Read RFID Data
Read and return the specified tag data from the RFID tag located over the RFID antenna. No
printer movement occurs while tag data is being read. The printhead can be open or closed.
To read and display the information stored on an RFID tag:
1. Position the RFID label with its transponder over the RFID antenna.
2. Touch Read RFID Data.
The results of the test are shown on the display.
Related ZPL command(s):
SGD command used:
^RF
rfid.tag.read.content
rfid.tag.read.execute
80
Page 81

Storage Menu
Printer Configuration and Adjustment
Storage > USB > Copy: Files to USB
Select files from the printer to store on a USB Flash drive.
To copy files from the printer to a USB Flash drive:
1. Insert a USB flash drive into the printer’s USB host port.
The printer lists available files.
1. Touch the box next to the desired files. Select All is also available.
2. Touch the check mark to copy the selected files.
SGD command used:
Storage > USB > Copy: Files to Printer
Select files to copy to the printer from a USB Flash drive.
To copy files to the printer from a USB Flash drive:
1. Insert a USB flash drive into the printer’s USB host port.
The printer lists available files.
1. Touch the box next to the desired files. Select All is also available.
2. Touch the check mark to copy the selected files.
SGD command used:
Storage > USB > Copy: Configuration to USB
Use this function to copy the printer’s configuration information to a USB mass storage device,
such as a USB Flash drive, that is plugged into one of the printer’s USB host ports. This makes
the information accessible without having to print physical labels.
usb.host.write_list
usb.host.read_list
Related ZPL command(s):
Printer web page: Printer Home Page > View Printer Configuration
^HH—Returns the printer configuration information returned to the
host computer.
(to view printer configuration information on your web browser)
View and Modify Printer Settings > Print Listings on Label
(to print the configuration information on labels)
81
Page 82

Printer Configuration and Adjustment
Storage > USB > Print: From USB
Select files to print from a USB Flash drive.
To print files from a USB Flash drive:
1. Insert a USB flash drive into the printer’s USB host port.
The printer lists available files.
1. Touch the box next to the desired files. Select All is also available.
2. Touch the check mark to print the selected files.
SGD command used:
Storage > Print Asset Lists
Print the specified information on one or more labels.
Accepted values: Formats—Prints the available formats stored in the printer’s RAM,
Related ZPL command(s):
Printer web page: View and Modify Printer Settings > Print Listings on Label
usb.host.read_list
Flash memory, or optional memory card.
Images—Prints the available images stored in the printer’s RAM,
Flash memory, or optional memory card.
Fonts—Prints the available fonts in the printer, including standard
printer fonts plus any optional fonts. Fonts may be stored in RAM
or Flash memory.
Barcodes—Prints the available barcodes in the printer. Barcodes
may be stored in RAM or Flash memory.
All—Prints the previous labels plus the printer configuration label
and the network configuration label.
^WD
82
Page 83

Printer Configuration and Adjustment
Calibrate the Ribbon and Media Sensors
Use the procedure in this section to calibrate the printer, which adjusts the sensitivity of the media and
ribbon sensors.
1. Touch Print > Sensors > Manual Calibration.
2. Touch Start Calibration.
3. Follow the steps in the calibration procedure.
IMPORTANT: Follow the calibration procedure exactly as presented. You may press and hold CANCEL at
any step in the procedure to cancel the calibration process.
4. When calibration is complete, press PAUSE to exit pause mode and enable printing.
83
Page 84

Printer Configuration and Adjustment
21
Adjust the Printhead Pressure and Toggle Position
The printhead pressure toggles can be adjusted to create more or less pressure, as needed. They can
also be moved from side to side to adjust the pressure in certain areas.
If the toggles are not positioned correctly or adjusted to apply the correct pressure, the following types of
issues may result:
• media and ribbon may slip
• ribbon may wrinkle
• media may move from side to side during printing
• printing may be too light or too dark on one side of the media
Use the lowest printhead pressure necessary to produce good print quality. Higher pressures may cause
premature wear on the printhead elements.
Figure 2 Printhead Pressure Toggles
1
Inside toggle
2
Outside toggle
84
Page 85
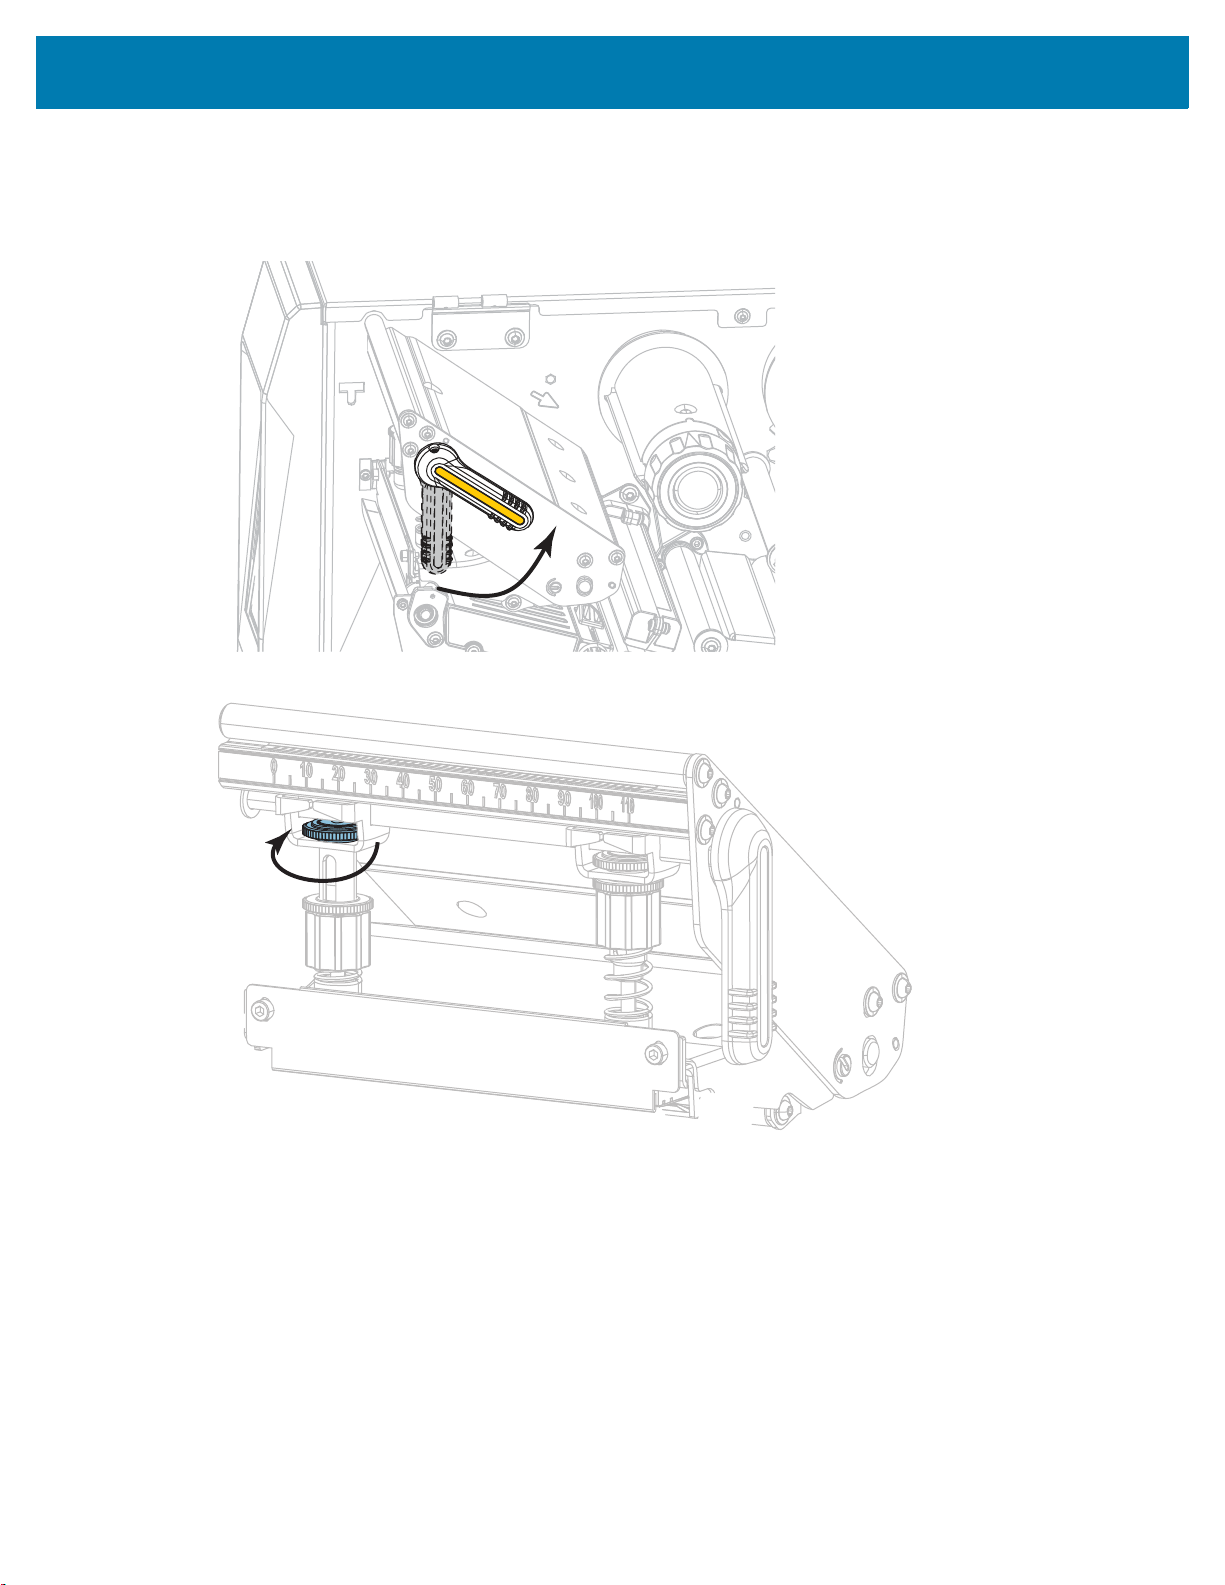
Printer Configuration and Adjustment
Toggle Position Adjustment
1. Open the printhead assembly by rotating the printhead-open lever to lessen the pressure on the
toggles.
2. Loosen the locking nut at the top of the toggle to be moved.
85
Page 86

Printer Configuration and Adjustment
3.
Reposition the toggle as necessary to provide even pressure on the media. For extremely narrow
media, position the inside toggle over the center of the media, and decrease the pressure on the
outside toggle.
4. Tighten the locking nut.
86
Page 87

Printer Configuration and Adjustment
Printhead Pressure Adjustment
If positioning the toggles properly does not solve a print quality or other issue, try adjusting the printhead
pressure. Maximize printhead life by using the lowest pressure that produces the desired print quality.
1. Initiate a PAUSE Self Test on page 116.
2. While printing labels, use the control panel to lower the darkness setting until the labels are printing
gray instead of black. (See Print > Print Quality > Darkness on page 69.)
3. Are you experiencing any of the following issues?
If the media... Then...
Requires higher pressure overall to print well Increase the pressure on both toggles.
Requires lower pressure overall to print well Decrease the pressure on both toggles.
Prints too lightly on the left side of the label. Increase the pressure on the inside toggle.
Prints too lightly on the right side of the label. Increase the pressure on the outside toggle.
Shifts left while printing Increase the pressure on the outside toggle.
Shifts right while printing Increase the pressure on the inside toggle.
OR
Decrease the pressure on the inside toggle.
OR
Decrease the pressure on the outside toggle.
If none of these issues exist, do not continue with this procedure.
4. To make adjustments to the printhead pressure, loosen the upper knurled nut on the toggle to be
adjusted.
87
Page 88

Printer Configuration and Adjustment
Increase pressure Decrease pressure
5.
Increase or decrease the pressure by rotating the lower nut.
6. Hold the lower nut in place and tighten the upper knurled nut.
7. If necessary, reinitiate a PAUSE Self Test on page 116.
8. While printing labels, use the control panel to raise the darkness setting until the labels are again
printing black instead of gray. (See Print > Print Quality > Darkness on page 69.)
9. Check the print quality, and if necessary, repeat this procedure until the printhead pressure is
adequate.
88
Page 89

Printer Configuration and Adjustment
Adjust the Sensor Position
The transmissive media sensor assembly consists of two parts: a light source and a light sensor. The lower
part of the media sensor is the light source, and the upper part of the media sensor is the light sensor. The
media passes between the two parts.
Adjust the position of the sensor only if the printer cannot detect the top of the labels. In this situation, the
display shows a media out error even though there is media loaded in the printer. For non-continuous
media with a notch or hole, the sensor must be positioned directly at the notch or hole.
1. Remove the ribbon so you can clearly see the media path.
2. With media loaded, locate the green light that shines from the lower part of the media sensor.
3. If necessary, turn the gold transmissive sensor adjustment wheel to move the sensor until it is
positioned at a notch or hole in the media.
89
Page 90

Printer Configuration and Adjustment
Install the Rewind/Liner Take-Up Plate
The rewind/liner take-up plate is used in different positions for Rewind mode versus Peel mode or
Applicator Mode.
Peel Mode/Applicator Mode
1. Loosen the knurled nut (1) on the outside stud on the printer’s base.
90
Page 91

Printer Configuration and Adjustment
2.
Align the large hole of the keyhole in the rewind/peel plate over the knurled nut, and then slide the plate
down until it hits the studs.
3. Tighten the knurled nut.
91
Page 92

Rewind Mode
Printer Configuration and Adjustment
To install the rewind/liner take-up plate for Rewind mode:
1. Locate the four mounting slots for the rewind/liner take-up plate.
92
Page 93
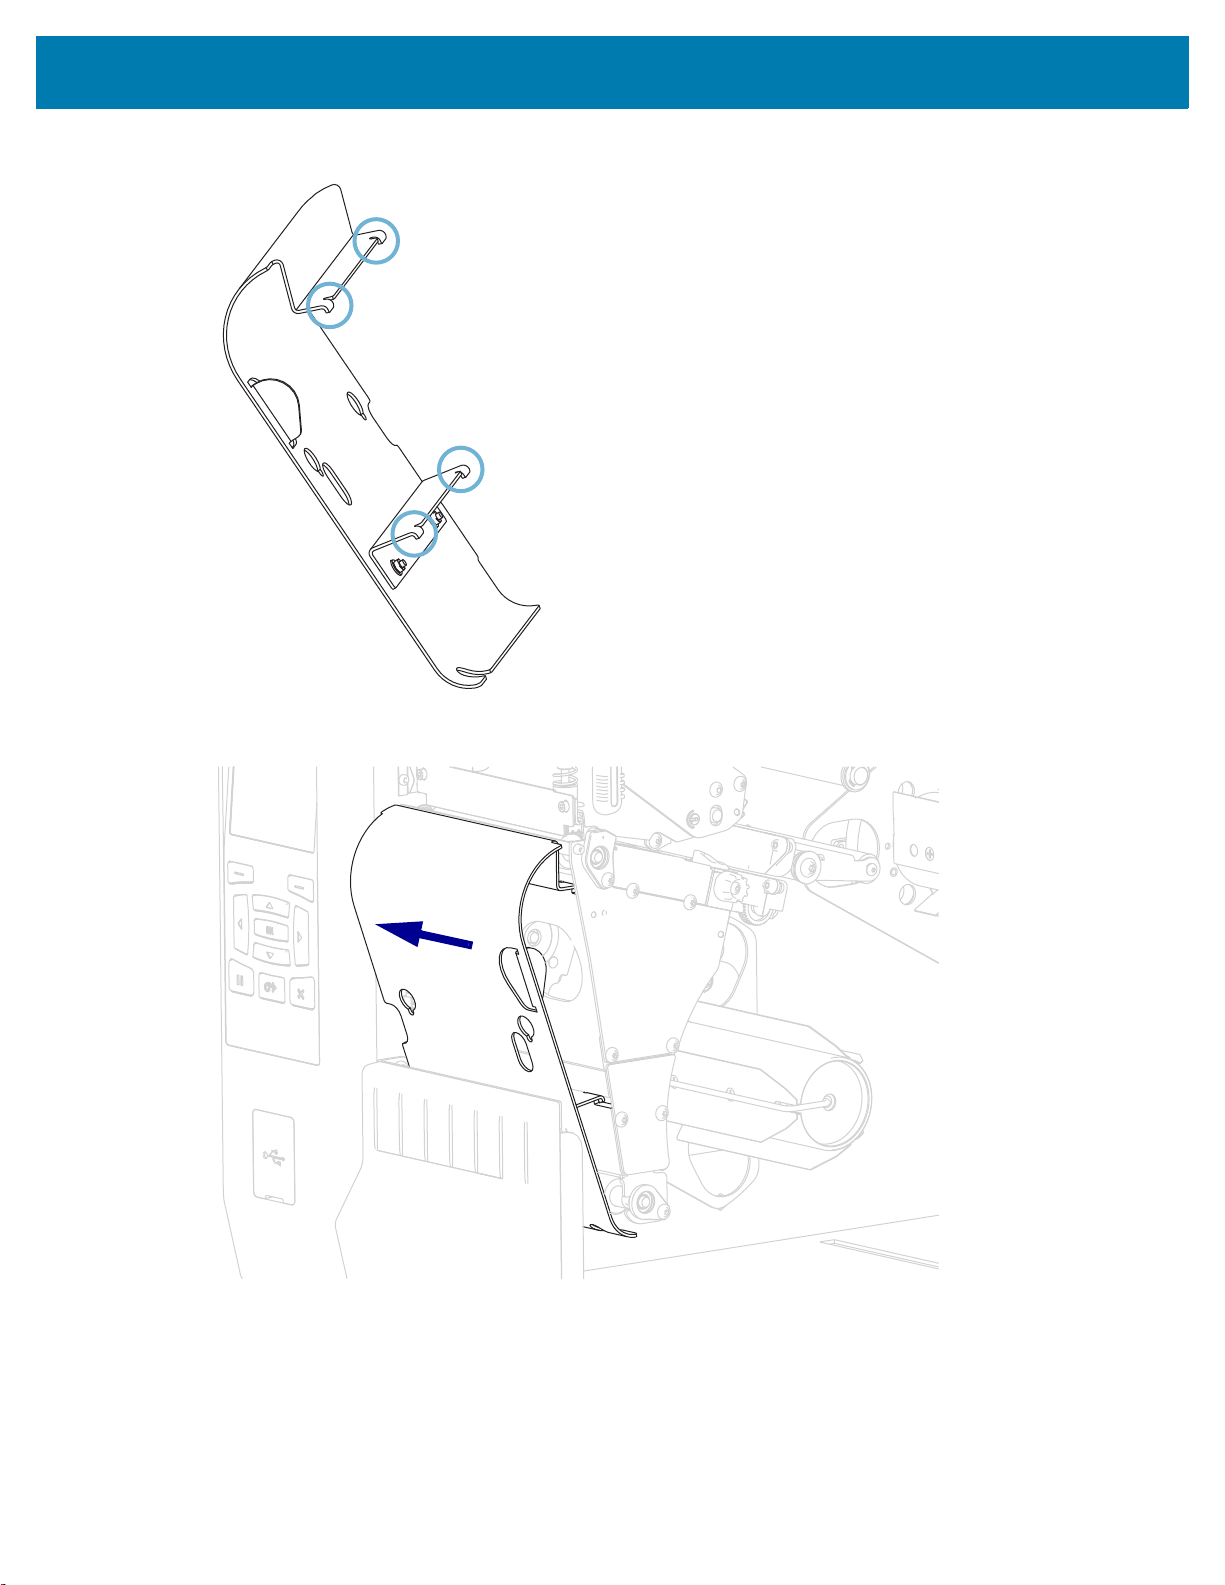
Printer Configuration and Adjustment
2.
Locate the four mounting tabs on the rewind/liner take-up plate.
3. Insert the mounting tabs of the rewind plate into the mounting slots of the printer, and then slide the
rewind plate to the left until it will not go any farther.
93
Page 94

Routine Maintenance
This section provides routine cleaning and maintenance procedures.
Cleaning Schedule and Procedures
Routine preventive maintenance is a crucial part of normal printer operation. By taking good care of your
printer, you can minimize the potential problems that you might have with it and help to achieve and to
maintain your standards for print quality.
Over time, the movement of media or ribbon across the printhead wears through the protective ceramic
coating, exposing and eventually damaging the print elements (dots). To avoid abrasion:
• Clean the printhead frequently.
• Minimize printhead pressure and burn temperature (darkness) settings by optimizing the balance
between the two.
• When using Thermal Transfer mode, ensure that the ribbon is as wide or wider than the media to
prevent exposing the printhead elements to the more abrasive label material.
IMPORTANT: Zebra is not responsible for damage caused by the use of cleaning fluids on this printer.
Specific cleaning procedures are provided on the following pages. Table 3 shows the recommended
cleaning schedule. These intervals are intended as guidelines only. You may have to clean more often,
depending upon your application and media.
.
Table 3 Recommended Cleaning Schedule
Area Method Interval
Printhead Solvent* Direct Thermal Mode: After every roll of media
Platen roller Solvent*
Media sensors Air blow
Ribbon sensor Air blow
Media path Solvent*
Ribbon path Solvent*
Pinch roller (part of Peel-Off option) Solvent*
*Zebra recommends using the Preventive Maintenance Kit (p/n 47362 or p/n 105950-035 - multipack). In place of this kit, you may
use a clean swab dipped in 99.7% isopropyl alcohol.
For 600 dpi printers, use Save-a-Printhead cleaning film. This specially coated material removes contamination buildup without
damaging the printhead. Call your authorized reseller or distributor for more information.
(or 500 feet of fanfold media).
Thermal Transfer Mode: After every roll of
ribbon.
94
Page 95

Routine Maintenance
Table 3 Recommended Cleaning Schedule
Area Method Interval
Cutter
module
Tear-off/peel-off bar Solvent* Once a month.
Take-label sensor Air blow Once every six months.
*Zebra recommends using the Preventive Maintenance Kit (p/n 47362 or p/n 105950-035 - multipack). In place of this kit, you may
use a clean swab dipped in 99.7% isopropyl alcohol.
For 600 dpi printers, use Save-a-Printhead cleaning film. This specially coated material removes contamination buildup without
damaging the printhead. Call your authorized reseller or distributor for more information.
If cutting continuous,
pressure-sensitive media
If cutting tag stock or
label liner material
Solvent* After every roll of media (or more often,
depending upon your application and media).
Solvent* and
After every two or three rolls of media.
air blow
95
Page 96

Routine Maintenance
1
2 3
Clean the Exterior, the Media Compartment, and the Sensors
Over time, dust, grime, and other debris may build up on the outside and inside of your printer, particularly
in a harsh operating environment.
Printer Exterior
You may clean the exterior surfaces of the printer with a lint-free cloth and a small amount of a mild
detergent, if necessary. Do not use harsh or abrasive cleaning agents or solvents.
IMPORTANT: Zebra is not responsible for damage caused by the use of cleaning fluids on this printer.
Media Compartment and Sensors
1. Brush, air blow, or vacuum any accumulated paper lint and dust away from the media and ribbon paths.
2. Brush, air blow, or vacuum any accumulated paper lint and dust away from the sensors.
1
Take-label sensor
2
Ribbon sensor
3
Media sensor
96
Page 97

Routine Maintenance
Clean the Printhead and Platen Roller
Inconsistent print quality, such as voids in the barcode or graphics, may indicate a dirty printhead. For the
recommended cleaning schedule, see Table 3 on page 94.
IMPORTANT: You are not required to turn off the printer power when working near an open printhead, but
Zebra recommends it as a precaution. If you turn off the power, you will lose all temporary settings, such as
label formats, and you must reload them before you resume printing.
CAUTION—ESD: Before touching the printhead assembly, discharge any built-up static electricity by
touching the metal printer frame or by using an anti-static wriststrap and mat.
1. Raise the media door.
97
Page 98

Routine Maintenance
CAUTION—HOT SURFACE: The printhead may be hot and could cause severe burns. Allow the
printhead to cool.
2. Open the printhead assembly by rotating the printhead-open lever upward.
3. Remove the ribbon (if used) and the media.
4. Using the swab from a Zebra Preventive Maintenance Kit, wipe along the brown strip on the printhead
assembly from end to end. In place of the Preventive Maintenance Kit, you may use a clean swab
dipped in 99.7% isopropyl alcohol. Allow the solvent to evaporate.
98
Page 99

Routine Maintenance
5.
While manually rotating the platen roller, clean it thoroughly with the swab. Allow the solvent to
evaporate.
6. Reload the ribbon (if used) and the media. For instructions, see Load the Ribbon on page 42 or Load
the Media on page 16.
7. Rotate the printhead-open lever downward until it locks the printhead in place.
99
Page 100

8.
Close the media door.
Routine Maintenance
The printer is ready to operate.
9. Press PAUSE to exit pause mode and enable printing.
The printer may perform a label calibration or feed a label, depending on your settings.
NOTE: If performing this procedure does not improve print quality, try cleaning the printhead with
Save-A-Printhead
cleaning film. This specially coated material removes contamination buildup without
damaging the printhead. Call your authorized Zebra reseller for more information.
100
 Loading...