

Page 1
TR 220
Thermal Printer
User’s Manual
User’s Manual No. 980402-001 Rev.A
©2002 ZIH Corp.
Page 2
COPYRIGHT NOTICE
This document contains information proprietary to Zebra Technologies Corporation. This docu
ment and the information contained within is copyrighted by Zebra Technologies Corporation and
may not be duplicated in full or in part by any person without written approvalfromZebraTechnol
ogies Corporation . Whileeveryefforthasbeenmadetokeeptheinformation contained withincur
rent and accurate as of the date ofpublication, no guarantee isgiven or implied thatthe document
is error-free or that it is accurate with regard to any specification. Zebra Technologies Corporation
reserves the right to make changes, for the purpose of product improvement, at any time.
TRADEMARKS
TR 220 is aservice markand Zebraand Zebra Technologiesare trademarksof ZebraTechnologies
Corporation .
SPT 1700, SPT 1800, PDT 2700 and PDT 2800 are trademarks of Symbol Technologies, Inc.
All other marks are trademarks or registered trademarks of their respective holders.
TR 220 Thermal Printer
European Council
Directive
89/336/EEC EMC Directive EN55022-B, 1998 RF Emissions control
92/31/EE EMC Directive EN55024, 1998
Compliance to Standards
Immunity to
Electromagnetic
Disturbances
-
-
-
73/23/EEC CB Schema EN60950 IEC950 Product Safety
FCC - Declaration Of Conformity:
Model: TR 220 conforms to the following specification:
FCC Part 15, Subpart B, Section 15.107(a) and Section
15.109(a) Class B digital device
Supplemental Information:
This device complies withPart 15 ofthe FCC Rules.Operation is subjectto the followingTwo Con
ditions: (1) This device may not cause harmful interference , and (2) this device must accept any
interference received, including interference that may cause undesired operation.
Industry Canada Notice:
This device complies with Industry Canada ICS-003 class B requirements.
Cet equipement est conforme a l’ICS-003 classe B de la norm Industrielle Canadian
-
ii 980402-001 Rev.A
Page 3

Contents
Operation . . . . . . . . . . . . . . . . . . . . . . . . . . Chapter 1
Getting to Know Your Printer. . . . . . . . . . . . . . . . . . . . . . . 2
Getting Started . . . . . . . . . . . . . . . . . . . . . . . . . . . . . . 5
Charge the Battery . . . . . . . . . . . . . . . . . . . . . . . . . . . . 5
Installing the Battery . . . . . . . . . . . . . . . . . . . . . . . . . . . 6
Loading Media . . . . . . . . . . . . . . . . . . . . . . . . . . . . . . 7
AutoSense: Media Sensing without the Terminal . . . . . . . . . . . . 10
Mating the Terminal to the Printer. . . . . . . . . . . . . . . . . . . . 11
AutoSense: Media Sensing with the Terminal Installed . . . . . . . . . 12
Terminal Configuration Information. . . . . . . . . . . . . . . . . . . 13
Dump Mode Printer Status Label . . . . . . . . . . . . . . . . . . . . 16
Operator Maintenance . . . . . . . . . . . . . . . . . . . . Chapter 2
Maintaining Your Printer . . . . . . . . . . . . . . . . . . . . . . . . 17
Media, Cleaning and Handling . . . . . . . . . . . . . . . . . . . . . 18
Print Care Guidelines . . . . . . . . . . . . . . . . . . . . . . . . . . 19
Cleaning the Print Head. . . . . . . . . . . . . . . . . . . . . . . . . 19
Cleaning the Printer . . . . . . . . . . . . . . . . . . . . . . . . . . . 20
Cleaning the Platen Roller. . . . . . . . . . . . . . . . . . . . . . . . 21
Universal Battery Charger Accessory . . . . . . . . . . . . . Chapter 3
Using the UBC . . . . . . . . . . . . . . . . . . . . . . . . . . . . . 24
Charging the Battery . . . . . . . . . . . . . . . . . . . . . . . . . . 25
UBC Status Indicators . . . . . . . . . . . . . . . . . . . . . . . . . . 26
Serial Interface Communication Configuration . . . . . . . . . . . . . 31
Symbol Terminal Serial Interface . . . . . . . . . . . . . . . . . . . . 31
TR 220 Command Reference . . . . . . . . . . . . . . . . Chapter 5
General Printer Configuration Information . . . . . . . . . . . . . . . 36
980402-001 Rev.A iii
Page 4
General Cautions and Warnings
This page describes general safety and maintenance warnings and cautions for the printer and
are referenced throughout the manual.
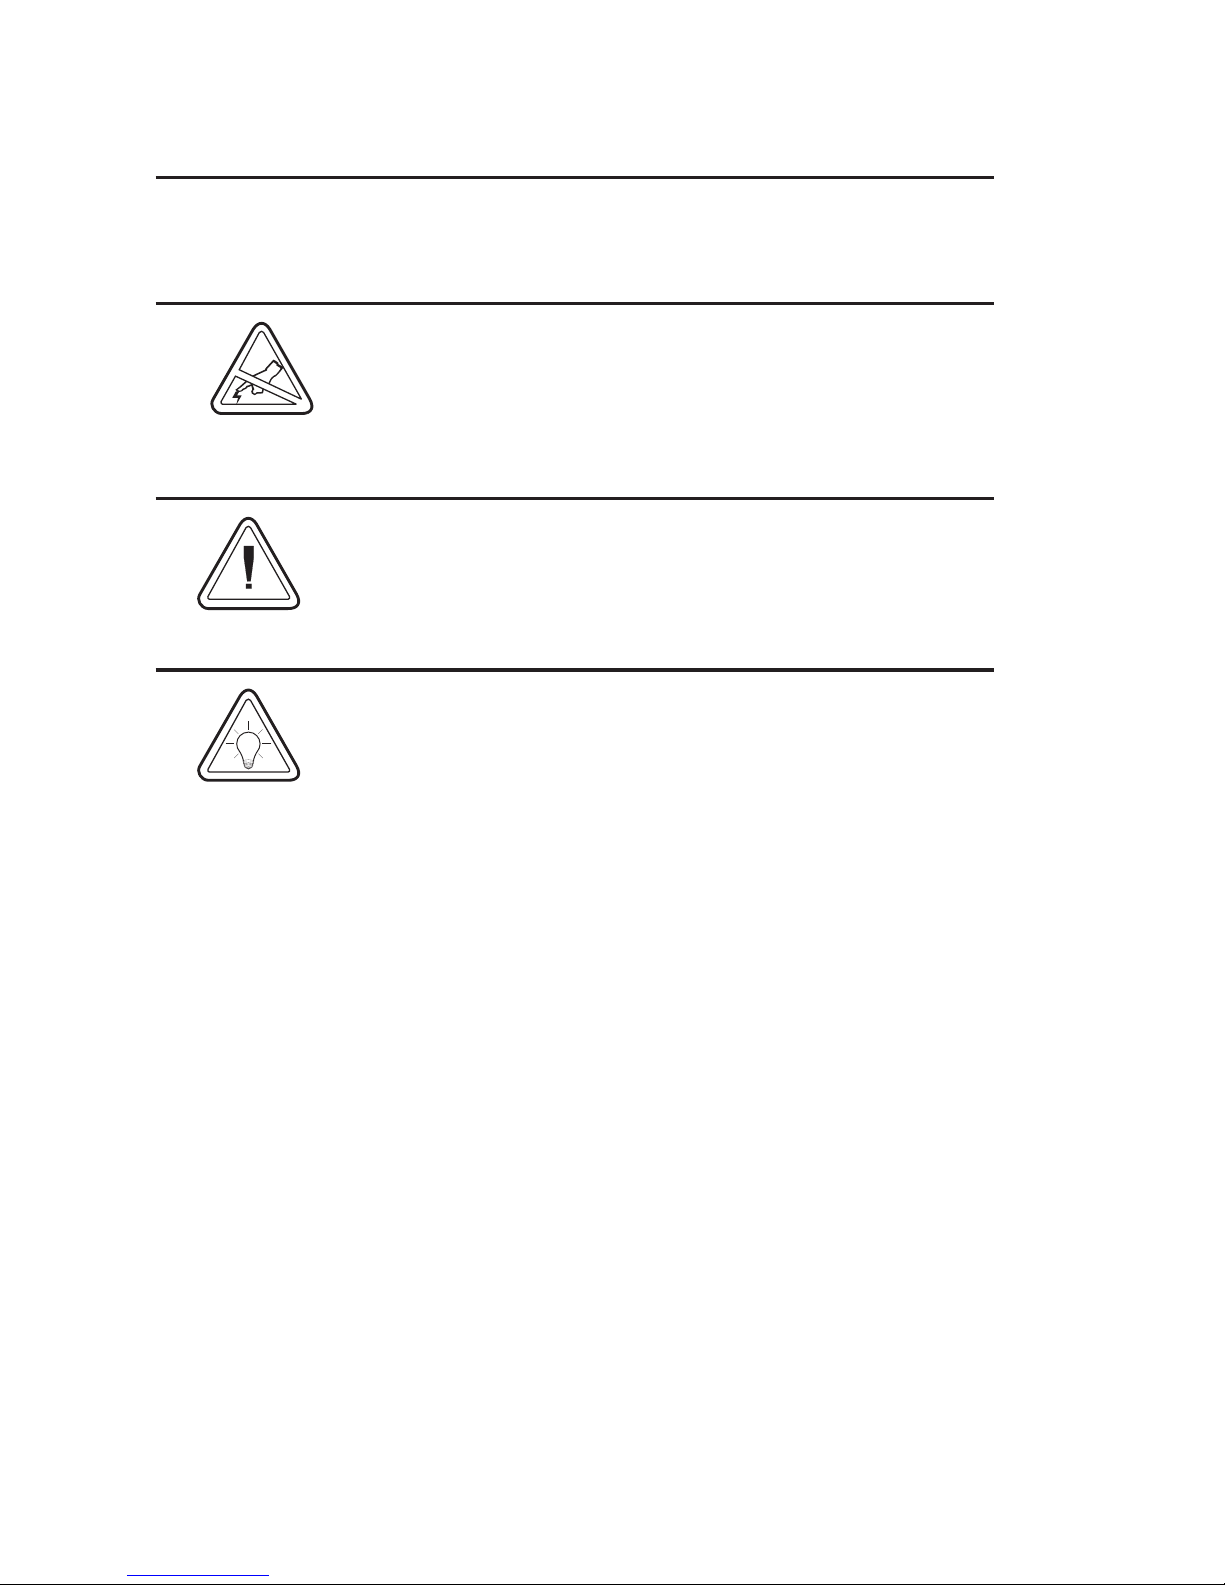
Warning - Static Discharge
The discharge of electrostatic energy that accumulates on the
surface of the human body or other surfaces can damage or
destroy the print head or electronic components used in this
device. DO NOT TOUCH the print head or the electronic
components under the print head assembly.
Media Warning
Always use high quality approved labels and tags. If adhesive
backed labels are used that DO NOT lay flat on the backing
liner, the exposed edgesmay stick to inside theprinter, causing
the label to peel off from the liner and jam the printer.
Media Reload Hint
If you should run out of labels while printing, DO NOT turn the
terminal power OFF or remove the printer’s battery while
reloading or data loss may occur. The printer will automatically
resume printing when a new label is loaded.
iv 980402-001 Rev.A
Page 5

Battery Handling and Usage Warnings
Misusing the battery may cause the battery to get hot, explode,
or ignite and cause serious injury. Be sure to follow the safety
rules listed below:
Do not place the battery in fire or heat the battery.
Do not disassemble or modify the battery. The battery
contains safety and protection devices which, if damaged,
may cause the battery to generate heat, explode or ignite.
Do not connect the positive terminal and the negative
terminal of the battery to each other with any metal object
(such as wire).
Do not solder directly onto the battery.
Do not pierce the battery with nails, strike the battery with a
hammer, step on the battery, or otherwise subject it to strong
impacts or shocks.
Do not expose the battery to water or salt water, or allow the
battery to get wet.
Do not place the battery on or near fires, stoves, or other
high-temperature locations. Do not place the battery in
direct sunshine, or use or store the battery inside cars in hot
weather. Doing so may cause the battery to generate heat,
explode, or ignite. Using the battery in this manner may also
result in a loss of performance and a shortened life
expectancy.
When the battery is worn out, insulate the terminals with
adhesive tape or similar materials before disposal.
Immediately discontinue use of the battery if, while using,
charging, or storing the battery, the battery emits an unusual
smell, feels hot, changes color, changes shape, or appears
abnormal in any other way.
In the event thatthe battery leaks and thefluid gets intoone’s
eye, do not rub the eye. Rinse well with water and
immediately seek medical care. If left untreated the battery
fluid could cause damage to the eye.
980402-001 Rev.A
v
Page 6

vi 980402-001 Rev.A
Page 7

1
Operation
The Zebra TR 220 is a 2-inch wide direct thermal mobile printer that is designed to mate with
a variety of Symbol® Portable Data Terminals,
including Symbol models SPT 1700, SPT
1800, PDT 2700 and PDT 2800. The printer’s
rugged design features include a tough
polycarbonate plastic body and shock absorbing rubber bumpers to permit the unit to withstand a 3-foot drop.
The TR 220 direct thermal printer can address
printing requirements for labels, receipts, and
tags. The printer accepts a maximum media
width of 2.25 inches and prints in an industry
standard 203 dpi (dots per inch) print
resolution. Media sensing capability includes
gap, black mark and notch.
980402-001 Rev.A 1
The printer has a light lithium ion battery that
allows printing of 2500 inches at 25% black
coverage of media on a single charge.
The printer utilizes the Zebra EPL2 program
ming language to communicate and process la
bels and forms.
-
-
Page 8
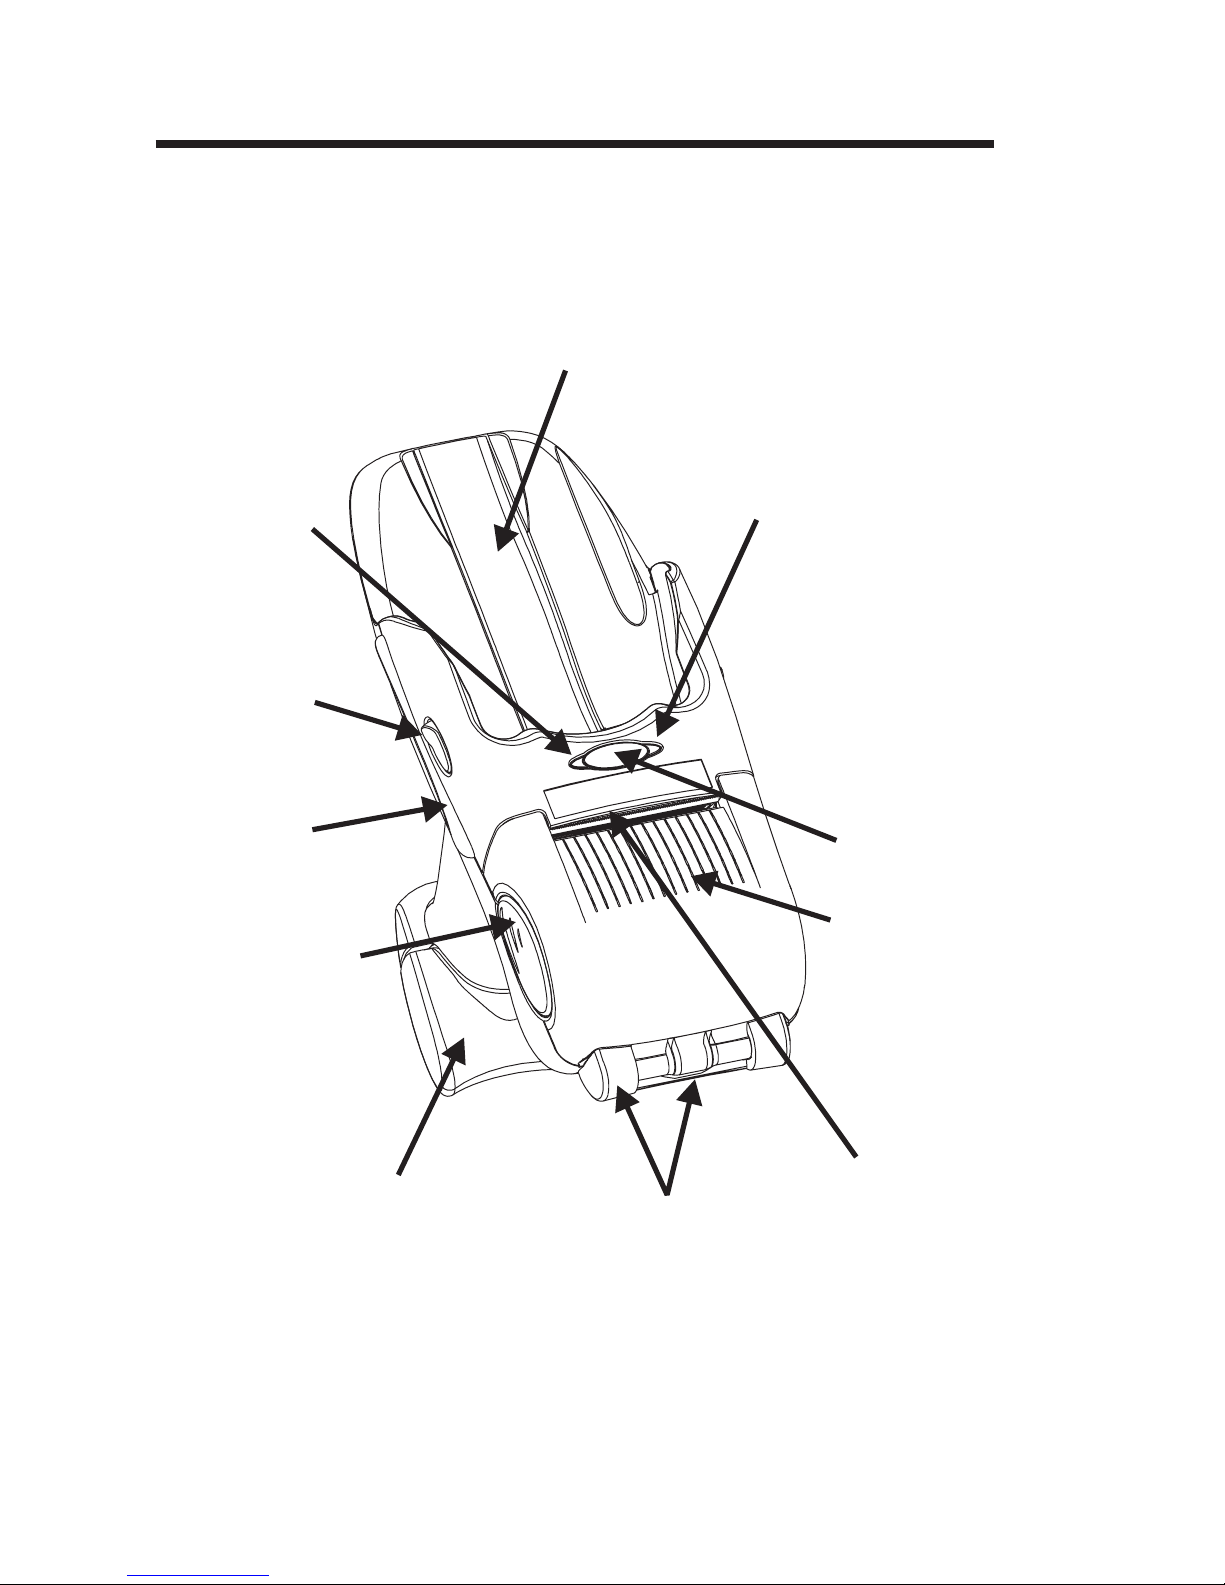
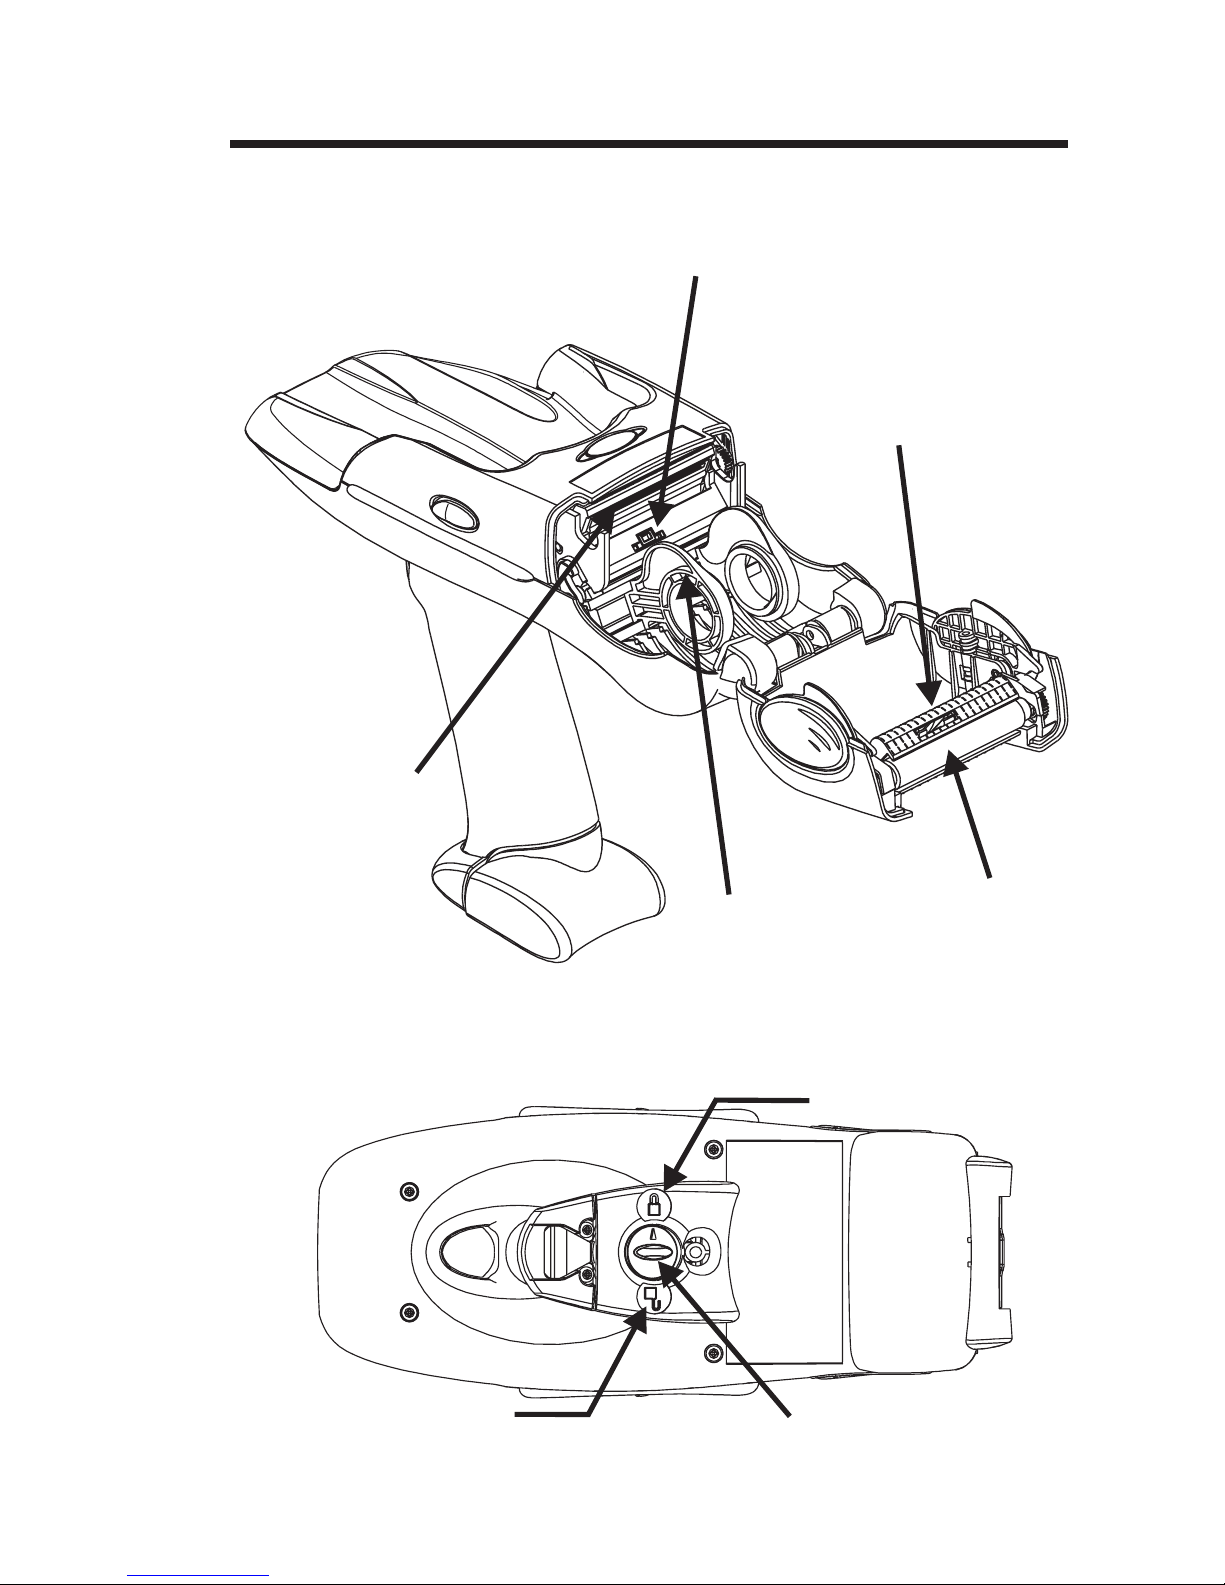
Getting to Know
Your Printer
Terminal
Cradle
Printer Status
Indicator
Terminal
Latch
Release
Bumper
Media Door
Release
Battery Status
Indicator
Feed Button
Media Door
Battery Installed
in Handle
2 980402-001 Rev.A
Rear Bumper
and Hinge
Media
Tear-Off
Strip
Page 9
Getting to Know
Your Printer
(continued)
Media Sensor
(Transmissive “Gap” Transmitter)
Media Sensor
(Transmissive “Gap” Receiver and
Reflective “Black line”
Receiver and Transmitter)
Print Head
Media
Holders
Bottom View
Platen
Roller
Locked
Unlocked
980402-001 Rev.A 3
Battery
Latch
Page 10
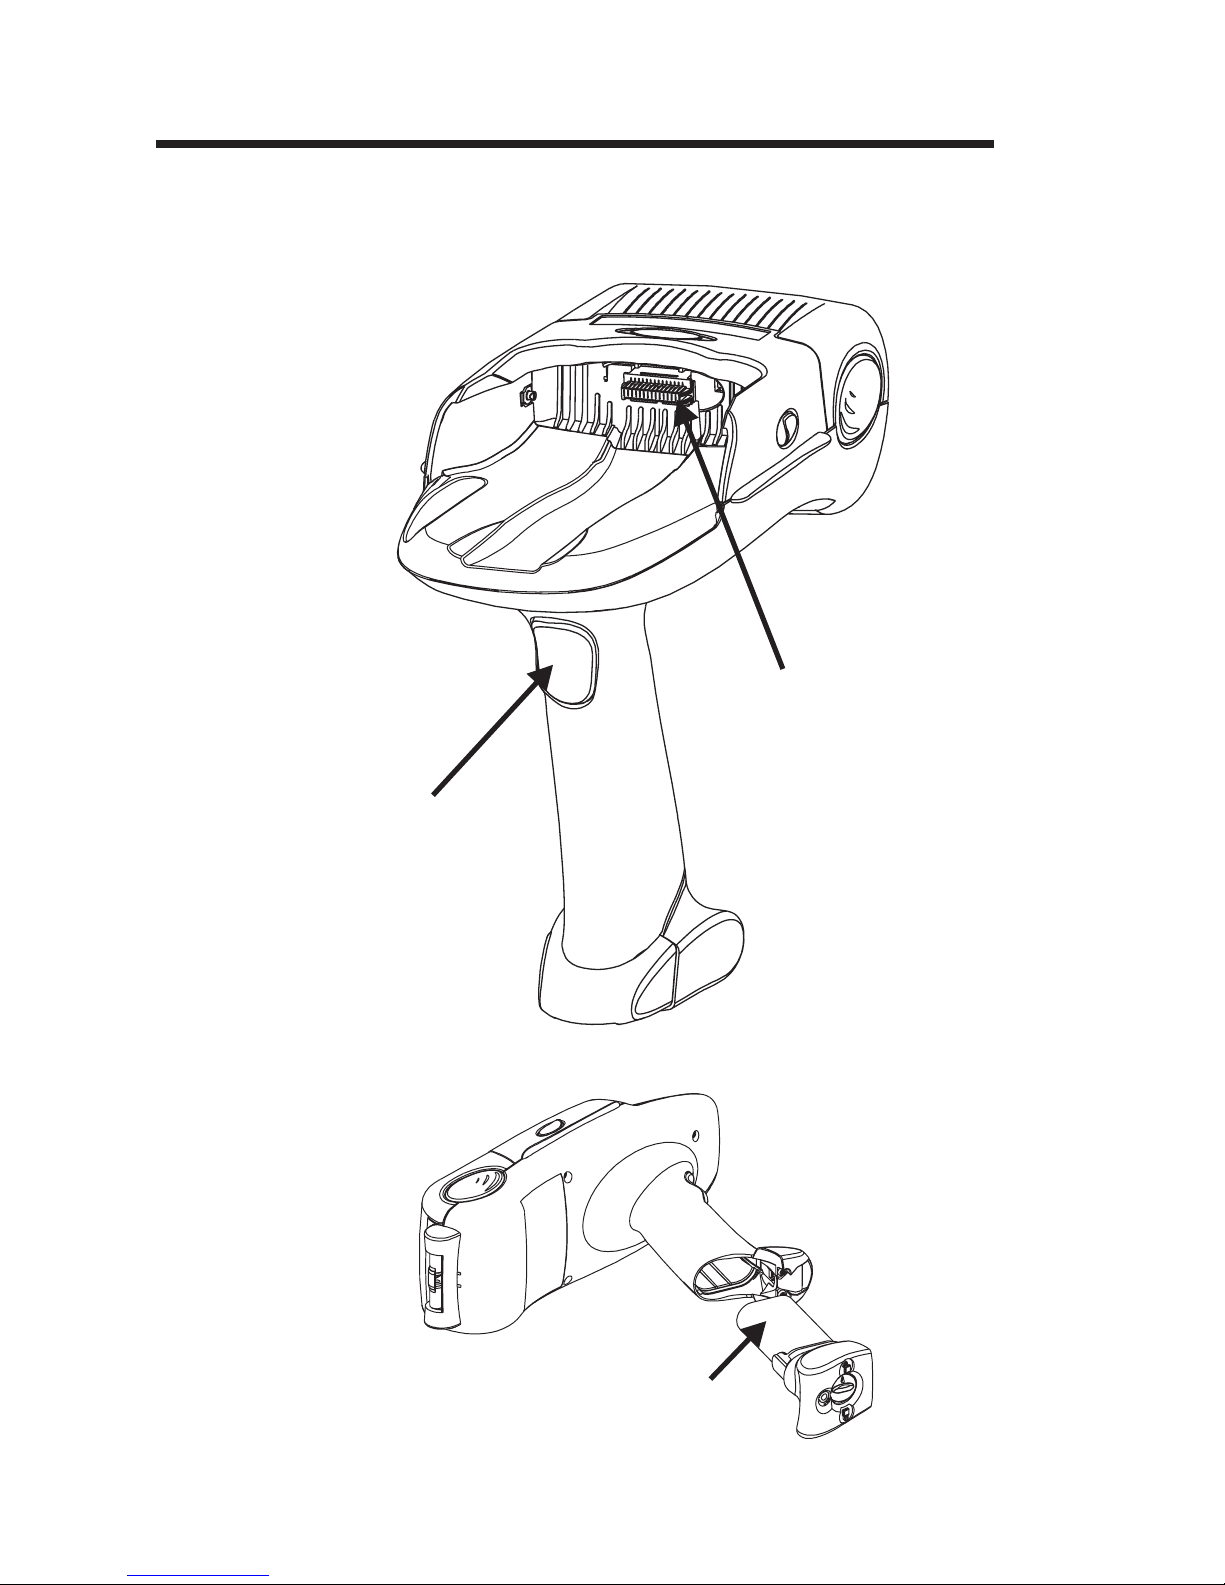
Getting to Know
Your Printer
(continued)
Serial Port
Scan Trigger
Bottom View
4 980402-001 Rev.A
Lithium Ion Battery
Page 11

Getting Started Before you can use the TR 220 printer, do the
following:
Charge and Install the Battery
•
Load the Printer with Media
•
Initialize the Media
•
Mate the Printer and Terminal
•
Charge the Battery Before the printer can be used the first time, the
lithium-ion battery must be charged and in
stalled into the printer.
The printer’s battery can be charged using the
Universal Battery Charger (UBC) which is an
optional printer accessory, see page 23.
For instructions on using the UBC to charge
your battery, see the Quick Reference Guide
which comes with the UBC. Follow these same
procedures to recharge the battery when the
printer’s battery level is low.
-
The printer’s battery (Reorder number
p/n 105312-001) must be exclusively used as
the power source for the TR 220 printer and
should not be used for any other purpose.
980402-001 Rev.A 5
Page 12

Installing the
Battery
Step 1 Remove the fully charged battery from the
To install the battery in the TR 220 printer:
charger. Leave the battery latch in the unlocked
position to install into the printer.
Do not force the battery. The battery and printer
are uniquely shaped (keyed) to avoid inserting
the battery incorrectly or mixing batteries with
similar products.
100%
0%
Un-latched
Latched
Lock
Battery
Step 2 Slide the battery into the empty printer handle.
Step 3 Rotate the battery latch while holding the bat
tery in the printer’s handle to secure the battery.
The point the arrow on the latch’s locking knob
to the closed lock symbol.
-
6
980402-001 Rev.A
Page 13
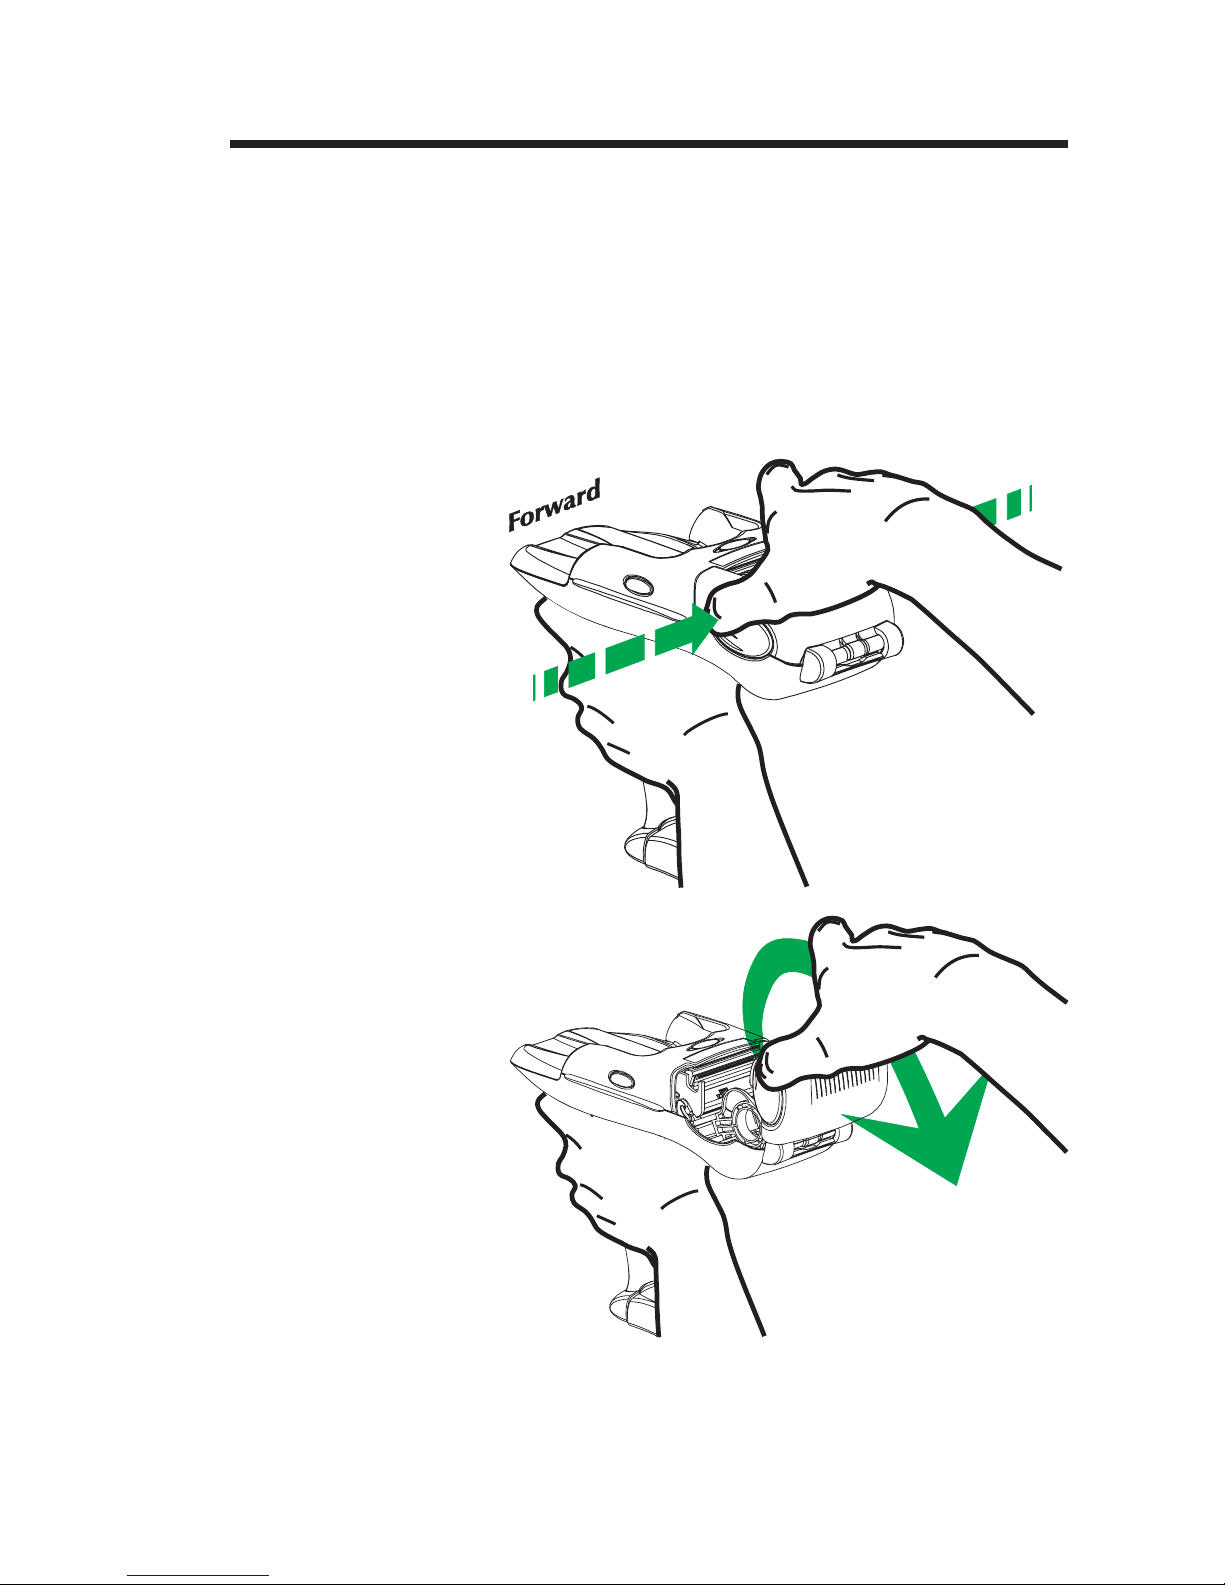
Loading Media To load media into the printer:
Step 1 To open the media door, simultaneously press
the front (forward) portion of the media door
release buttons, located on the right and left
sides.
Lift the door open.
980402-001 Rev.A 7
Page 14
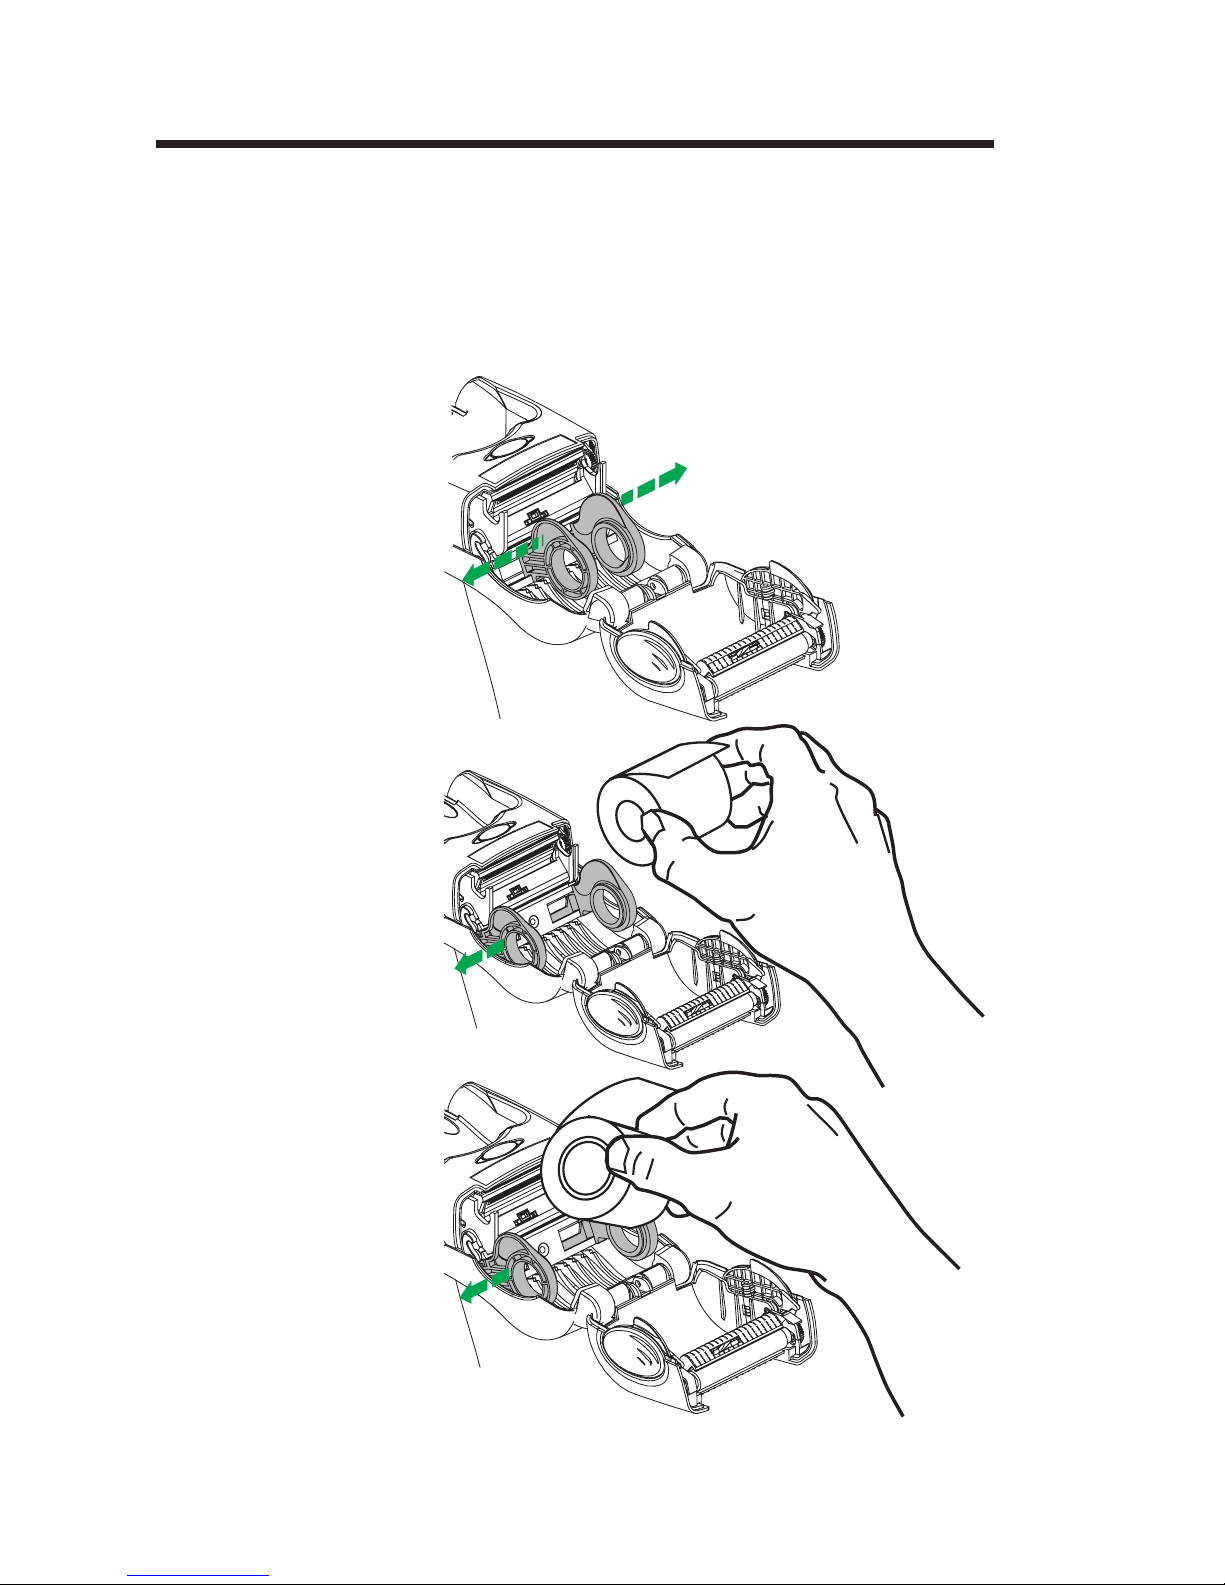
Loading Media
Step 3
Open the media guides. Insert the media roll.
The media roll holders are linked. Both sides
open when one side is pushed open.
Place the media to unwind in the clockwise di
rection when viewed from the left side of the
printer.
-
8
980402-001 Rev.A
Page 15

Loading Media
Step 4
Center the roll between the holders and release
the roll holders. Gently wiggle and pull on the
roll to guarantee the roll has seated and is cen
tered on the roll holders. The roll should not
bind and be able to rotate freely.
-
Step 5 Close and lock the cover. Tear off the excess
media.
Remove the first few inches of media to
eliminate contamination that collects from
handling, storage and adhesive. Contaminates
can transfer from the media to the print head,
reducing print head life or performance.
980402-001 Rev.A 9
Page 16

AutoSense:
Media Sensing
without the
Terminal
Step 1 Remove the terminal from the printer.
Step 2 Load media into the printer.
Step 3 Press and hold the Scan Trigger.
Step 4 Press and hold the Feed Button down for 2
Prior to printing, the media sensing levels
and the label’s length and gap distances be
tween labels must be set to print properly.
The user initiates the TR 220’s AutoSense
feature to set and store these parameters in
the printer.
Use the following procedure to run the
printer’s AutoSense routine.
seconds and release. The Printer Status Indicator should begin blinking green.
-
Step 5 The indicator will stop blinking and then go
solid green. When the media begins to feed
(advance), release the Scan Trigger.
Step 6 The printer will advance 3-4 labels (or ap-
proximately 12 inches) while performing the
adjustment. When the adjustment is complete, a status summary label will be printed
and the printer will be placed in Diagnostic
Dump mode.
Step 7 Press the Feed Button once to exit “Dump
Mode”.
The printer will remain on for 5 minutes in
Stand-by Mode and then automatically turn
off if there is no printer activity.
See “AutoSense: Media Sensing with the
Terminal Installed” on page 12 to detect and
configure the printer for new media while us
ing the terminal and printer.
-
10
980402-001 Rev.A
Page 17

Mating the
Terminal to the
Printer
1 Secure the strap.
2 Turn the terminals power off.
3 Slide the terminal into the printer until it latches
The terminal can be inserted into and mate
with the printer. The printer connects to the ter
minal via a unique serial connector (port) and a
patented latching mechanism.
The terminal’s hand strap maybe installed or
removed. The strap should be closed and se
cured to itself to avoid interference with the
scanner, binding or catching on other objects.
To mate the terminal to the printer:
in place. Both latches typically will make an audible click when the terminal is engaging properly with the printer.
-
-
980402-001 Rev.A 11
Verify that the terminal is secured properly,
gently pull the terminal outward and wiggle it.
Page 18

AutoSense:
Media Sensing
with the Terminal
Installed
Step 1 Load media into the printer.
Prior to printing, the media sensing levels and
the label’s length and gap distances between la
bels must be set to print properly. The user initi
ates the TR 220’s AutoSense feature to set and
store these parameters in the printer.
Use the following procedure to run the printer’s
AutoSense routine.
-
-
Step 2 To turn on the printer, activate (select) an appli
cation previously loaded in the terminal that is
designed to use the TR220 printer. The printer
status indicator should be on and green, if the
printer is ready to operate.
The software application in the terminal must
activate the printer via a serial port signal
(5volts) for the printer to operate. Contact your
system integrator or administrator to identify
the proper software, application, and terminal
combination to operate the printer.
Step 3 Turn the terminal off.
Step 4 Press and hold the Feed button down turn the
terminal on. Release the Feed button after the
printer status indicator is blinking green.
Step 5 The indicator will stop blinking and then go
solid green. The printer will advance 3-4 labels
(or approximately 12 inches) while performing
the adjustment. When the adjustment is com
plete, a status summary label will be printed
and the printer will be placed in Diagnostic
Dump mode.
-
-
Step 6 Press the Feed Button once to exit “Dump
12
Mode”.
The printer is ready to print.
980402-001 Rev.A
Page 19

Terminal
Configuration
Information
In order to successfully use the TR220, the 5V
output signal must be activated, and a printing
library needs to be installed. The printing li
brary, printer manual, printcap file and sample
printing code are included in the Symbol SDK.
Symbol software tools are available online at:
http://devzone.symbol.com
External 5V Signal The terminals each require particular software
drivers that enable Palm and Windows CE ap
plications to control the activation of the exter
nal 5V signal. However, these drivers are not
readily found on all terminals nor do they all
work the same way. The steps required by each
terminal to allow for the control of the external
5V signal are given below.
SPT 1700 The power driver (powerdrv35r.prc) and trigger
scan mgr (1700_trigger_scanmgr.prc) must be installed through a Hot-Sync operation followed by
a soft reset. Once installed, the application developer then initializes the serial communication
port with the "srmOpen" function and "upwr" port
parameter to activate the external 5V signal.
-
-
-
SPT 1800 The power driver for the SPT 1800 is pre-installed
and does not require any other software installa
tion. By initializing the serial communication port
with the "srmOpen" function and "upwr" port pa
rameter, the external 5V signal is activated.
PPT 2700 and
2800
Printer Command
Language
980402-001 Rev.A 13
The driver is pre-installed on the PPT 2700 and
PPT 2800 terminals. By selecting “Com7” as
the active serial communication port, the exter
nal 5V signal is automatically activated.
For SPT 1700 and SPT 1800 terminals, you
must use EPL2 Page Mode commands via the
"ptwriteprinter" command. Refer to the Symbol
Software Development Kit for more informa
tion. For PPT 2700 and 2800 terminals, refer to
the PPT 2700 and PPT 2800 WinCE SDK.
-
-
-
-
Page 20

The Feed Button, Scan Trigger and Status Indicators
Printer State Media Feed Button Printer Response
Terminal mated
with Power Off
Terminal mated
with Power On
Terminal mated
with Power On,
door latched,
ready, not printing
Terminal mated
with Power On,
door latched,
ready, not printing
Terminal mated
with Power On,
door latched,
ready, not printing
N/A
N/A
Labels or Tags
Loaded
Labels or Tags
Loaded
Continuous Media
Loaded
Tap or Hold No Action
Wakes up printer from
Standby Mode.
Tap and Release
Tap
(If in Standby
mode, tap and
release to wake
up printer)
Press and Hold
(If in Standby
mode, tap and
release to wake
up printer)
Press and Hold
Standby Mode is initi
ated by eight seconds
of printer inactivity.
Form Feed: the printer
advances to the top of
the next label or tag.
Continuous Form Feed:
the printer advances
media continuously until the button is released, then continues
to the top of the next
label or tag.
The printer advances
media continuously
while the button is
pressed. Upon release,
the printer will advance
one form length (set by
programming com
mand).
-
-
Terminal mated
with Power On,
door latched
No terminal, door
latched, ready, not
printing
Terminal mated
door latched,
ready, not printing
Media Loaded
Media Loaded
14 980402-001 Rev.A
Media Out
(If in Standby
mode, tap and
release to wake
up printer)
Press and Hold
Uses the Feed button and Scan Trigger
to initiate the AutoSense Routine for de
tecting the media without the terminal,
see page 10 for details.
Uses the Feed button and the terminal to
initiate the AutoSense Routine for detect
ing the media with the terminal installed,
see page 12 for details.
Motor will turn equiva
lent of 15mm media
motion, printer will de
tect no media condition
and then motor will
stop.
-
-
-
-
Page 21

Status
Indicator
Battery
Indicator
Condition Printer Operational State
Dark Dark Off
Terminal Power Off or is not mated.
The printer’s battery is missing or not
connected.
Ready
Green N/A
or
Printing
Red N/A Media Out
Error - Syntax
(Data)
Orange N/A
Error - Media
Detection
Terminal Power ON, printer opera
tion normal.
Note: If a print job is in process and
the terminal power goes off or the
terminal is disconnected after passing
the print job to the printer, the printer
status indicator will remain green and
the print job will finish. The status in
dicator will then go dark (off) after
completion of this print job.
Terminal Power On. Printer is not
printing. No media is detected.
Terminal Power ON, printer is not
printing, Error condition detected.
1) If the error report status is commanded to be “off’ via software, the
status indicator will only indicate motor or print head over temperature errors.
2) If error reporting status is enabled
by the US command, then all pro
gramming syntax and media detec
-
tion errors will result in an
Orange-constant status indicator con
dition.
-
-
N/A
N/A
Blinking
Orange
Orange
Constant
980402-001 Rev.A 15
Low Battery
Warning
Battery
Replacement
or
Recharge
required
Indicates battery remaining charge
power level is less than 40% initial
full charge.
Printer will operate normally while
this warning is displayed.
Indicates battery remaining charge
power level is less than 20% of full
charge and requires recharging. The
printer will finish printing jobs in
progress, but will not start new print
jobs until the battery charge level is
greater than 20%.
Page 22

Dump Mode
Printer Status
Label
Uq311 V3.18
Serial port:96,N,8,1
Image buffer size:114K
Fmem:000.0K,061.4K avl
Gmem:000K,069K avl
Emem:000K,069K avl
I8,0,001 rN
Battery: 60%
|**|**|**|--|--|
D10 R000,000 ZT UN
q384 Q817,025
Option:
16 23 31
now in DUMP
Dump Mode Print Sample
The operator can use the Dump Mode Status
printout to check the battery charge status, print
quality, verify printer to terminal serial interface
settings (printer and terminal must match) and
the firmware version number. The rest of the in
formation on the printout is for program devel
opment and debug.
. Printer I.D. code number and firmware
A
version number.
. Serial port configuration.
B
. Print head test pattern.
C
.Amountofmemoryavailableforthe
D
Image buffer.
. Amount of memory used and memory
E
available for Form storage.
. Amount of memory used and memory
F
available for Graphics storage.
. Amount of memory used and memory
G
available for Soft fonts.
. Currently selected Character Set ( ) and
H
Image Buffer mode setting
rN
( = Double Buffering Disabled)
. Battery Status
I
. Currently selected Heat Density ( ),
J
Reference Point ( ), Print Orientation ( )
and Error Status ( ).
. Currently selected Form Width (q) and
K
Length ( ).
. Current Hardware and Software
L
Option status - (Not Supported)
. Current AutoSense Through (Gap)
M
Sensor values. The three numbers
represent;
1. Backing Transparent point
2. Set point
3. Label Transparent point.
. Current Dump Mode Status
N
Q
RZ
U
I
D
-
-
16
980402-001 Rev.A
Page 23

2
Operator Maintenance
This section provides information on operator
maintenance procedures for your printer.
Maintaining Your
Printer
The printer requires regularmaintenance to optimize printing and extend the serviceable life of
your printer. Zebra Technologies uses only
high quality components and materials in its
printers. The printers are manufactured and
tested under a strict quality management program. Although only minimal routine maintenance is required, following these simple
maintenance guidelines will ensure longer life
with quality printing performance.
The printer’s design allows for cleaning of
printer’s media path. The operator can safely
clean the print head, platen roller and areas ad
jacent to the media path surfaces by following
the simple procedures and guidelines on the
following pages.
-
980402-001 Rev.A 17
Page 24

Media, Cleaning
and Handling
The printer requires periodic cleaning to maxi
mize the print quality and print head life. The
main factors that contribute to reduced head
life (and platen life) are:
Touching the print head! Static electricity
can discharge and damage the print head. The
body’s oils and acids also damage the print
head.
Cleaning - For optimum performance, clean
the print head regularly after every 3-5 rolls of
media.
Abrasion - Over time, the movement of media
across the print head will wear through the protective ceramic coating, exposing and eventually damaging the print elements (dots).
-
Use of proper media - Use only approved
media. Non-approved media may contain
chemicals that can destroy or dramatically reduce the print head’s life.
Temperature - Print head density (heat) setting. Set the density to the lowest possible setting that prints a good image.
Using Zebra Technologies approved media also
helps ensure that your printer will have a longer
life with quality printing performance.
See www.zipzebra.com
for your on-line
thermal label and ribbon media source.
ZipZebra has bar code label and ribbon supplies
for Zebra and Eltron label printers, and thermal
printer ribbons and labels for other popular
thermal label printing systems.
18
980402-001 Rev.A
Page 25

Print Care
Guidelines
Remove the outer layer of media from the la
•
bel roll before loading media. Tape or adhe
sive that holds the loose end and the outside
length of media becomes contaminated
when handled or stored. When you remove
this part of the media, you remove poten
tially contaminating oils, dust, and adhe
sives.
Clean the print head every 3-5 label rolls.
•
Clean the platen (drive) roller to remove con
•
taminates. Note - Paper or label liner parti
cles do not normally affect print operation.
-
-
-
-
-
-
Cleaning the Print
Head
1 Open the media door and remove the media.
2 Gently rub the cleaning pen across the upper
As you use your printer, the print head may become contaminated resulting in poor print
quality. Every 3-5 rolls of media the print head
should be cleaned with a cleaning pen.
black and colored areas of the print head. Allow
the print head to dry for 1 minute before loading media.
980402-001 Rev.A 19
Do Not Clean the Print Head with sharp ob
jects! Only used approved cleaning materials.
-
Page 26

Cleaning the
Printer
Cleaning the outside of the printer is not gener
ally recommended except in cases where the
contaminates may migrate to the media or the
platen roller (both contact the print head).
-
Linerless media printers need additional clean
ing to avoid adhesive buildup on the ribs in the
media path near the platen roller.
Always Remove The Battery And
Terminal Before Cleaning the Platen
Roller or General Printer Cleaning.
Do Not Clean The Battery.
Do Not Clean the Printer’s Serial Port
Connector.
The exterior surfaces and the media path surfaces (except the print head) can be cleaned
with a lint free, clean, damp cloth very lightly
moistened with medical grade alcohol. Medical
grade alcohol (95% pure or better) may be
used to help remove any adhesive or label material buildup.
-
20
Avoid cleaning the media sensors. Remove ac
cumulated dust with a dry swab from the sen
sors by gently wiping them off. If adhesives or
other contaminates get on the sensor, then an
alcohol moistened swab may be used. Clean
several times to remove any film that may be
left from the initial cleaning or sensors may not
function properly. Using too much alcohol can
allow it to get between the electronic compo
nents and will require a much longer drying
time before the printer will function properly.
980402-001 Rev.A
-
-
-
Page 27

Cleaning the
Platen Roller
The standard platen (drive) roller normally
does not require cleaning. Paper and liner dust
can accumulate without effecting print opera
tions. Contaminates on the platen roller can
damage the print head or cause the media to
slip when printing. Adhesive, dirt, general dust,
oils and other contaminates should be cleaned
immediately off the platen.
The non-stick platen roller on Linerless media
printers requires frequent cleaning to keep ad
hesive buildup from occurring and transferring
to the print head and the media path.
The platen can be cleaned with a fiber free
swab (such as a Texpad swab) or a lint free,
clean, damp cloth very lightly moistened with
medical grade alcohol (95% pure or better). Do
Not Use the Cleaning Pen!
-
-
1 Open the media door and remove the media.
2 Clean the platen surface with the alcohol moist-
ened swab. Rotate the platen while swabbing.
Repeat this process two to three times with a
new swab to remove residual contaminates.
Adhesives and oils, for example, may be
thinned by the initial cleaning but not com
pletely removed.
-
980402-001 Rev.A 21
Allow the printer to dry for 1 minute before
loading labels.
Page 28

22 980402-001 Rev.A
Page 29

Power
Cord
3
Universal Battery Charger Accessory
The Universal Battery Charger (UBC) is not included with the printer and is sold as an accessory. The UBC is designed specifically for use
with TR 220 printer. It provides the proper voltage and currents to safely charge your printer’s
lithium-ion battery. The UBC accessory contains the following:
980402-001 Rev.A 23
Power
Supply
UBC
The Universal Battery Charger (UBC) is the
only approved, safe method to charge your
battery. Using other methods to charge your
printer’s battery may damage the battery or in
the worst cases cause a fire or explosion.
See the Battery Warnings on page v
Page 30

Using the UBC The single unit UBC configuration setup is out
lined below.
1 Plug the DC Power cable into the UBC.
2 Plug the AC Power cord into the power supply.
The power supply has a standard modular AC
plug design to accommodate multiple
grounded power cord variations. The power
supply is capable of utilizing a wide range of in
put voltages from 100 to 240 VAC.
Plug the other end of the AC Power cord into a
properly grounded AC power receptacle.
3 The UBC’s Power indicator will light green.
-
-
12
24
3
980402-001 Rev.A
Page 31

Charging the
Battery
1 Set the battery’s lock to the unlocked position
2 Insert the battery and while pushing down on
3 The UBC’s Charge indicator will flash for a few
4 The Ready indicator will go green when charg-
The printer’s battery is keyed and designed to
only install into it’s UBC. This is to protect the
battery and operator from improper charging.
and insert it into the UBC.
the battery, turn the battery’s lock to the locked
position.
seconds while the battery and charger are
initializing and then go solid yellow while
charging.
ing has completed.
980402-001 Rev.A 25
Page 32

UBC Status
Indicators
POWER - Solid Green when the UBC has
power connected and is ready to charge.
READY - Solid Green when the battery is
ready to use.
CHARGING / FAULT - Solid Yellow when
the battery is charging.
CHARGING / FAULT - Flashing Yellow
when the battey has been rejected due to bat
tery failure (short, dead cell, etc.).
-
26
980402-001 Rev.A
Page 33

Appendix A - Troubleshooting
Problem Solution or Reason
Sleep Test - Press the Feed Button
until the Printer Status Indicator blinks
green and release the trigger and button.
This is normal operation. If the
indicators are:
1. Both Dark - The battery needs to be
Printer Status Unknown
Terminal Not Mated
Status indicators are:
Printer - DARK
Battery - DARK
installed, charged or is defective.
2. Both Dark - Printer failure.
3. Battery Status - Orange or Blinking
Orange - Battery Low, needs charge.
3. Printer Status other than blinking green Remove and re-insert the battery to
reset the printer. Repeat Sleep Test.
Function Test and Status Report Run the AutoSense: Media Sensing
without the Terminal procedure (see
page 10) to verify printer operation. The
Dump Mode printout includes battery
charge status.
Terminal Mated and ON
Terminal application
software is active - Status
Unknown
The status indicators are:
Printer - DARK
Battery - DARK
Terminal Mated and ON
The status indicators are:
Printer - GREEN
Battery -N/A
Sleep Test - Printer only
Press the Feed Button and verify printer
status is blinking green. If the indicators
are:
1. Both DARK - The battery needs to be
installed, charged or is defective.
2. Both DARK - Remove the terminal and
verify printer operational readiness with
the Sleep Test and Function Test above.
3. Printer Status - Blinking GREEN Printer is not activated via software.
Install or activate a printer aware
application on the terminal.
Printer operating normally.
1. Printer Ready - Printer aware software is
active.
2. Printer is receiving data through
interface.
980402-001 Rev.A 27
Page 34

Problem Solution or Reason
Terminal Mated and ON
The status indicators are:
Print - Blinking GREEN
Battery - N/A
Print command(s) sent
1. Printer is in a functional diagnostic or
test mode.
2. With the Feed button depressed - printer
is in Sleep test, AutoSense and other
diagnostics modes.
3. Error condition - Reset printer by
removing and re-installing the battery.
The status indicators are:
Print - ORANGE
Battery - N/A
Printing stops and STATUS
indicator lights ORANGE or
RED.
AutoSense - Media Change
The status indicators are:
Print - ORANGE
Battery - N/A
1. Printer has a syntax or command error.
Check program and resend print job.
1. Perform AutoSense gap sensor
adjustment on page 12.
2. Possible problem with label stock. Use
only approved labels and tags.
3. Possible label jam.
4. Terminal - Application may have set
insufficient memory for label size or is
caused by other programming issues.
Contact your system integrator or
administrator to identify the
configuration for proper printing.
Integrator - Check the printer’s
memory configuration. Refer to the
EPL2 Programming manual.
1. Media type has changed from labels
or black line media to continuous
media. Prints “no gap detected” or
“no black line detected”.
Terminal - change to an application
that supports the media or insert the
correct media for the application.
Contact your system integrator or
administrator to identify the proper
software media combination. Note - The
media setting is programmed into the
printer via printer commands embedded
into the print job.
28 980402-001 Rev.A
Page 35

Problem Solution or Reason
The status indicators are:
Print - Blinking ORANGE
with momentary GREEN
Battery - N/A
1. Firmware download in process.
Terminal Mated and ON
Media Loaded and a
Print Command or Feed has
been issued to printer
The status indicators are:
Print - RED
Battery - N/A
Terminal Mated and ON
The status indicators are:
Print - GREEN
Battery - N/A
Terminal Mated and ON
Media Loaded
Will not print or FEED labels
The status indicators are:
Print - GREEN
1. Media is out. Reload with new media.
2. Sensor has contaminates on it or label
jam. Check media path.
3. Clean platen roller. Platen roller may be
contaminated causing media to slip.
4. Verify that the media cover is closed
properly.
5. Power-up failure. Reset the printer by
removing and replacing the battery
1. Printer ready to receive flash
programming during firmware
download.
1. Verify that the terminal is mated
correctly to the printer.
2. Check that the media roll is loaded with
the direct thermal side facing up. Ensure
top cover is locked closed.
3. Clean platen roller. Platen roller may be
contaminated causing media to slip.
4. Terminal - Application software
sending the print job may have print
density (darkness) set to low. Contact
your system integrator or administrator
to identify the proper software media
and density setting combination for
proper printing. Note - The media
setting is programmed into the printer
via printer commands embedded into
the print job.
980402-001 Rev.A 29
Page 36

Problem Solution or Reason
Printing is faded or poor
quality.
Printer appears to be
working (media is being fed
out), but nothing is printed.
The status indicators are:
Print - GREEN
1. Clean the print head with cleaning pen.
2. Terminal - Adjust print darkness within
software. Application software sending
the print job may have print density
(darkness) set to low. Note - The media
setting is programmed into the printer
via printer commands embedded into
the print job.
3. Check the media and verify that print
surface is facing up.
1. Verify the roll is loaded with the direct
thermal side facing up.
2. Verify that the media is the correct type.
Use approved direct thermal media
only. Thermal transfer or regular paper
will not print.
3. Clean the print head with cleaning pen.
4. Terminal - Application software
sending the print job may have print
density (darkness) set to low. Contact
your system integrator or administrator
to identify the proper software media
and density setting combination for
proper printing. Note - The media
setting is programmed into the printer
via printer commands embedded into
the print job.
Prints only partial label or
skips a label.
30 980402-001 Rev.A
1. Perform AutoSense gap sensor
adjustment on page 12.
2. Label caught on print head. Clean print
head.
3. Top cover is not properly latched.
4. Terminal - Possible software problem.
Contact your system integrator or
administrator to identify the
configuration for proper printing.
Integrator - Check the printer’s
memory configuration. Refer to the
EPL2 Programming manual.
Page 37

Serial Interface
Communication
Configuration
The printer’s serial port is configured with the
Y command for the printer. The printer sup
ports interface data rates from 1200 to 38,400
baud. See the EPL2 programmer's manual for
details.
The printer’s serial port default configuration is:
9600 baud
8 bit data
1 stop bit
No parity
The printer and the terminal communication
speeds and settings must match. Check the
printer’s settings with the AutoSense routine’s
“Dump Mode” status printout.
-
Symbol Terminal
Serial Interface
Pin # Signal
1 5.0V input
2 DSR
3 RxD
4 RTS
5 TxD
6 CTS
7I1
8I2
9 DTR
10 XGND
11 PGND
The figure below displays the connections
needed to communicate with the printer via the
printer’s custom serial interface. The printer’s
connector is a SMK p/n CSS5014-0314R.
Description
5.0V applied by terminal, used to turn printer on.
Not Used
Data Receive
Ready to Send (Hardware flow control)
Data Transmit
Clear to Send (Hardware flow control)
Interrupt 1 used by terminal application to initiate
scanning. (Terminal side is “high” activate)
Not Used
Not Used
Digital Ground (Connected to PCB ground)
Power Ground (Connected to PCB ground)
12 8V input
13 Thermistor
14 Thermistor
980402-001 Rev.A 31
Reserved
Connected to PCB ground
Connected to Analog input of microprocessor (used
to monitor stepper motor operating temperature)
Page 38

32 980402-001 Rev.A
Page 39

Appendix B
TR 220 Command Reference
This section outlines the mobile printer EPL2
commands supported by the TR 220 printer. It
is intended as a quick reference for EPL2 page
mode programmers. The EPL Page Mode
Programmer’s manual is available in electronic
form on the user’ documentation CD or on the
Internet at www.zebra.com
.
980402-001 Rev.A 33
Page 40

Command Summary for the TR220 Mobile Printer
The EPL2 command and description are noted in the left columns,
while the unique TR220 operation appears in the right column.
Command
A ASCII Text
AUTOFR Automatic Form Printing
B Bar Code
b MaxiCode
C Counter
C Cut Immediate
D Density
EI Print Soft Font Info.
EK Delete Soft Font
eR User Definable Error Response
ES Store Soft Font
f Cut/Peel Position
FE End Form Store
FI Print Form Info.
FK Delete Form
FR Retrieve Form
FS Store Form
GG Retrieve Graphics
GI Print Graphics Info.
GK Delete Graphic
GM Store Graphic
GW Direct Graphic Write
I Character Set Selection
JB Disable Top Of Form Backup
JF Enable Top Of Form Backup
LE Line Draw Exclusive
LO Line Draw Black
LS Line Draw Diagonal
LW Line Draw White
M Memory Allocation
N Clear Image Buffer
o Cancel Customized Settings
oB Cancel Customize Bar Code
oE Line Mode Font Substitution
oH Macro PDF Offset
oM Disable Initial Esc Sequence Feed
oR Character Substitution (Euro)
Description
PDF417
TR220 Unique Operation
Not Supported
Not Supported
Not Supported
Not Supported
Not Supported
Not Supported
34
980402-001 Rev.A
Page 41

Command Summary for the TR220 Mobile Printer
Command
Description
oW Customize Bar Code Parameters
O Options Select
OEPL1 Set Line Mode
P Print
PA Print Automatic
Set Form Length
Q
Transmissive (Gap) Sensor
Black Line Sensor
Continuous Stock
q Set Form Width
R Set Reference Point
r Set Double Buffer Mode
S Speed Select
TD Define Date Layout (& Print Date)
TS Set Real Time Clock
TT Define Time Layout (& Print Time)
U Print Configuration
UA Enable Clear Label Counter Mode
UB Reset Label Counter Mode
UE External Font Information Inquiry
UF Form Information Inquiry
UG Graphic Information Inquiry
UI Host Prompts/Codepage Inquiry
UM Codepage & Memory Inquiry
UN Disable Error Reporting
UP Codepage & Memory Inquiry/Print
UQ Configuration Inquiry
US Enable Error Reporting
U% Host Prompt/Battery Inquiry
U%
Host Prompt/Motor Temperature
Inquiry
V Define Variable
W Windows Mode
xa Sense Media
X Box Draw
Y Serial Port Setup
Z Print Direction
? Download Variables
^@ Reset Printer
^ee Status Report - Immediate
TR220 Unique Operation
Not Supported
Not Supported
Single Buffer Only
Auto Selects Speed
Not Supported
Not Supported
Not Supported
Status LED Enable
Mobile Printers Only
Mobile Printers Only
Not Supported
Not Supported
980402-001 Rev.A 35
Page 42

General Printer
Configuration
Information
The TR 220 mobile printer has features that re
quire special consideration when program
ming. The EPL2 command support has been
modified to maximize battery charge utilization
and ignore unusable features. Some of the
features and commands that need special con
sideration when developing applications in
clude the following:
The TR 220 printer operates in Single Buffer
•
Mode only.
Single buffering increases the maximum
•
image buffer size to 2235 dots long (22
inches/ 558.8mm) with the maximum print
width of 384 dots (1.89 inches/ 48 mm).
• Speed (S) is automatically adjusted to maxi-
mize battery life. It can not be set by programming.
-
-
-
-
• Density (D) has a default value of 10. The
programmer should set this value to the lowest level that produces ausable label to maximize battery life.
• The use of large, highly dot dense images
(solid black) is not recommended. This will
reduce battery charge utilization. The printer
is rated to print at 25% density (3mm solid
black bar across the print width alternated
with a 9mm non-printing bar or an equiva
lent density pattern).
•
Long multiple label or high density print jobs
may cause the printer to temporarily delay
printing operations while the motor or print
head cool to safe operation temperatures.
•
The Enable Error Reporting (US) command
enables the command syntax error reporting
via the orange printer status indicator.
-
36
980402-001 Rev.A
Page 43

U% Host Prompts/Motor Temperature
Description EPL2 Mobile Printers Only (TR 220) - This
command will cause the printer to send to the
host the motor temperature status through the
mobile printer’s serial port.
Syntax
U%
The printer will send motor temperature in 2ºC
increments to the host via the serial port. The
printer uses the data format of NNdeg C,
where NN equals the motor temperature.
Range Reported (
U%
Degrees Celsius): 24≤NN<60
EPL2 Mobile printers suspend printing
operations, including printer to host
communication, until the motor returns to safe
operating temperatures.
The mobile printer will stop printing are 60ºC or
higher.
Example:
980402-001 Rev.A 37
The printer will resume printing at 50ºC.
U%¿ : Command sent to printer
: Printer responds with motor temperature
: 24 deg C
Page 44

U$ Host Prompts/Battery Status
Description EPL2 Mobile Printers Only (TR 220) - This
command will cause the printer to send to the
host the battery charge status.
Syntax
U$
The printer will send information about battery
charge status in increments of 10 percent. The
printer uses the data format of VccNNN%,
where NNN represents the battery’s charge
level.
EPL2 Mobile printers suspend all new printing
operations, including printer to host
communication, until the battery charge level is
greater than 20%.
Print jobs or forms (single label or batch
operations) will continue processing until
finished.
The mobile printer will accept new commands
and print after the battery charge is greater than
20%.
Example:
38 980402-001 Rev.A
U$¿ : Command sent to printer
: Printer responds with
: Vcc90%
Page 45

US Enable Error Reporting
Description Use this command to enable the printer’s status
reporting feature.
Serial Port - If an error occurs, the printer will
send a NACK(0x15), followed by the error
number, to the computer. If no errors occur, the
printer will echo ACK(0x6) after each P com
mand.
If paper or ribbon empty occurs, the printer will
send, through the serial port, a”-07” and
“Pnnn” where nnn is the number of labels re
maining to print.
Mobile Printers Only (TR220) - Enables
command error reporting via printer’s status indicator, as well as, the serial port.
-
-
Syntax
US[p1]
The printer’s default setting is off.
Parameters p
If no errors occur, the printer will echo
ACK(0x6) after each label that is successfully
printed.
= 1 Optional Parameter
1
980402-001 Rev.A 39
Page 46

US Command - Enable Error Reporting
Code Error/Status Description
No Error
00
Syntax Error
01
Object Exceeded Label Border
02
Bar Code Data Length Error
03
(e.g.: EAN-13 is a 12 or 13 digit only)
Insufficient Memory to Store Data
04
Memory Configuration Error
05
RS-232 Interface Error
06
Paper
07
Duplicate Name: Form, Graphic or Soft Font
08
Name Not Found: Form, Graphic or Soft Font
09
Not in Data Entry Mode
10
Pause Mode or Paused in Peel mode
12
Mobile Printers: Print head too hot
13
Mobile Printers: Motor too hot
14
Mobile Printers: Battery low warning (≥ 40%)
15
Mobile Printers: Battery low limit (≥ 20%)
16
Does not fit in area specified
50
Data length to long
51
PDF-417 coded data to large to fit in bar code
93
40 980402-001 Rev.A
 Loading...