

Page 1

TM2000
Configuration Guide
MN-003656-05EN Rev. A
Page 2

ZEBRA and the stylized Zebra head are trademarks of Zebra Technologies Corporation, registered in
many jurisdictions worldwide. All other trademarks are the property of their respective owners. © 2022
Zebra Technologies Corporation and/or its affiliates. All rights reserved.
Information in this document is subject to change without notice. The software described in this document
is furnished under a license agreement or nondisclosure agreement. The software may be used or copied
only in accordance with the terms of those agreements.
For further information regarding legal and proprietary statements, go to:
SOFTWARE:zebra.com/linkoslegal
COPYRIGHTS:zebra.com/copyright
WARRANTY:zebra.com/warranty
END USER LICENSE AGREEMENT: zebra.com/eula
Terms of Use
Proprietary Statement
This manual contains proprietary information of Zebra Technologies Corporation and its subsidiaries
(“Zebra Technologies”). It is intended solely for the information and use of parties operating and
maintaining the equipment described herein. Such proprietary information may not be used, reproduced,
or disclosed to any other parties for any other purpose without the express, written permission of Zebra
Technologies.
Product Improvements
Continuous improvement of products is a policy of Zebra Technologies. All specifications and designs are
subject to change without notice.
Liability Disclaimer
Zebra Technologies takes steps to ensure that its published Engineering specifications and manuals are
correct; however, errors do occur. Zebra Technologies reserves the right to correct any such errors and
disclaims liability resulting therefrom.
Limitation of Liability
In no event shall Zebra Technologies or anyone else involved in the creation, production, or delivery of the
accompanying product (including hardware and software) be liable for any damages whatsoever
(including, without limitation, consequential damages including loss of business profits, business
interruption, or loss of business information) arising out of the use of, the results of use of, or inability to
use such product, even if Zebra Technologies has been advised of the possibility of such damages. Some
jurisdictions do not allow the exclusion or limitation of incidental or consequential damages, so the above
limitation or exclusion may not apply to you.
Publication Date
February 3, 2022
2
Page 3

Contents
TM2000 Configuration ....................................................................................................................... 4
Introduction ..................................................................................................................... 4
CMM Overview ................................................................................................................ 4
Logging In to CMM .................................................................................................. 4
CMM Home Screen ................................................................................................. 6
Resource Management ........................................................................................... 6
Status & Activity .............................................................................................. 12
Info .................................................................................................................. 17
Settings ........................................................................................................... 19
Commands ...................................................................................................... 23
Batch Firmware Updates ................................................................................................................. 27
Using Action-Settings to Update Firmware ................................................................... 27
Using Action-Command to Update Firmware ................................................................ 30
Site Configuration ............................................................................................................................ 33
Configuring a Site .......................................................................................................... 33
Adding a Site ......................................................................................................... 33
Device Status Notifications .................................................................................... 39
3
Page 4

TM2000 Configuration
Introduction
This guide provides instructions on getting LMU devices online and to enable the management and
monitoring of LMU devices via the Configuration Management and Monitoring (CMM) tool.
CMM Overview
The Configuration Management and Monitoring (CMM) tool provides a web-accessed user interface that
allows SPS (Smart Pack Solutions) site administrators to efficiently configure, monitor, and troubleshoot
aspects of a site deployment.
Logging In to CMM
To access CMM:
1. Open a browser and enter the DNS name (not the IP address for CMM).
2. Select Login.
Figure 1 CMM Login Screen
3. Enter your Username and Password and select SIGN IN. The CMM home screen displays.
4
Page 5

Figure 2 CMM Sign In Screen
TM2000 Configuration
The CMM home screen displays.
5
Page 6

CMM Home Screen
The CMM home screen displays all existing sites, includes a search icon for locating particular sites, and a
menu button that provides access to site and user management features.
Figure 3 CMM Home Screen
TM2000 Configuration
Menu
Search
Existing Sites
Add Site
Site
Dimensions
Resource Management
Resource management allows you to access and manage device and server information.
The Resources tab includes the following information:
• Name - LMU given name
• Serial Number - LMU serial number
• Model - LMU model type
• Type - Device type
• Inst Status - Installation status (Installed or Not Installed)
• Network Status - Status of network (Offline or Online)
• Health Status - Reports the status of the device warning events.
6
Page 7

TM2000 Configuration
Viewing Device and Server Information
To view and manage devices for a particular site:
1. On the home page, select the desired site (see Figure 3 on page 6).
2. Select the Resources tab to view a list of all servers and devices installed at the site, as well as status
information for each.
Figure 4 Resources Tab
Search
3. To narrow the list:
a. Select the Search icon (see Figure 4).
Figure 5 Resources Search Screen
Resources
Actions
b. In the Search Attributes row, select the desired attribute to search: Name, Serial Number, or
Model.
c. Select the desired resource check boxes for the items to display or select the Search All check box
to select all of the options.
d. In the search field, enter text representing some or all of the attribute chosen.
e. Select Search.
4. To perform actions such as settings or commands to selected devices:
a. Select Actions (see Figure 4).
7
Page 8

TM2000 Configuration
Figure 6 Device Type Window
b. Click on the Device Type drop-down menu and select a device.
c. Click on the Device Sub-type drop-down menu and select a specific device type.
Figure 7 Scope Window
d. Under Scope, select the All LMUs for the entire list of devices or select the specific device check
boxes.
e. Under Action Type, select Setting Update or Command.
8
Page 9

Figure 8 Action Type Window
TM2000 Configuration
Setting Update
f. In the Select an action field, select the desired action.
Setting Update options:
• Timezone - Sets the timezone in which the device is used.
• Wifi Country Code - Wifi for the country that the device resides.
• Firmware Download Package URL - URL to SFTP setting.
• User Name - User name for SFTP server.
• Password - SFTP server password.
• NTP Server - Network Time Protocol server.
• Horizontal Offset - Horizontal offset from center of load point as installed (measured in feet).
• Desired Angle - Desired angle reading of LMU.
• Angle Error Threshold - The number of degrees difference between the measured and
configured elevation angles, +/-, at which the LMU declares an alert and sets its LEDs
accordingly.
• Watchdog Enabled - Controls whether or not the LMU is checking its watch dog timer. True
enables watchdog and False disables watchdog.
• Minimized RGB Storage - When enabled (true), the Image (RGB) Files are purged based on
Image (RGB) Storage in minutes. When Minimize RGB Storage is not enabled (false), the Image
(RGB) files are purged daily based in the Image (RGB) Storage Time.
Command
• Image (RGB) Storage Time (day/minute) - Determines how often the RGB files are purged.
• Depth Storage Time, max at 10 (day) - Depth frame storage.
• 3D Storage Time (min) - Determines how often the PCD is purged.
• Distance from camera to door - Distance from LMU to trailer/container door.
• Image capture width dimension - Width of image capture.
• Image capture height dimension - Height of image capture.
• Trailer is an inbound or outbound - Direction of trailer/container; (1 = inbound, 0 = outbound).
9
Page 10

TM2000 Configuration
• TLA Backend Server Address - The hostname or IP of the SPX backend server with which the
LMU communicates.
• CMM Server Address and Port - Server address for CMM and Port.
• Redis/Kafka server - Server for Redis or Kafka.
• CCTV Enabled - Enable or disable video.
• RGB Frame Rate - Frequency at which images display.
• Use Door_AJAR ML - Enable/Disable machine learning to detect if door is fully opened.
• LMU Human Blur - Options include: replace existing image, save to separate image, or disable
feature.
• TMU Algorithm Setup (tmu_algorithms.xml)
• tmu_algorithms.xml Current Version - Allows you to select one of the saved
tmu_algorithms.xml copies as the current version. If the version of that file does not exists, the
new version setting is not taken.
• General Device Setup (tmu.xml) - Allows you to directly push all the device configuration
parameters (other than algorithms params) into the LMU device.
• tmu.xml current version - Allows user to select one of the saved tmu.xml copy as current
version. If the version of that file does not exists, the new version setting is not taken.
Command options:
• Ping - Device responds to command by incrementing the value of the pingResponse property.
This command has no payload.
• Reboot - Reboot the device to restore from an unexpected firmware failure.
• Enterprise Reset - Restore the device from factory setting, keep the WiFi and CMM connection.
• Update Firmware - Update firmware with the selected version saved in CMM server.
• Rollback - Firmware roll back to previous version.
g. Click on the Select an action drop-down menu to select an action from the list.
h. If required, enter the setting value.
10
Page 11

TM2000 Configuration
Configuring Device and Server Information
Select the device for which to view or configure listed under the Resource tab (see Figure on page 11).
Figure 9 Resource Option Tabs
The following resource option tabs display:
• Status & Activity - Read Only
• Info - Read Only
• Settings - Used to change the configuration of the device.
• Commands - Performs executable commands such as, firmware update, reboot, firmware roll back.
11
Page 12

Status & Activity
Figure 10 Status & Activity Tab: Time and Network
TM2000 Configuration
The Status & Activity information (see Figure 10) is as follows:
Time
• UTCOffset - Difference in hours and minutes between the TMU device and Coordinated Universal
Time (UTC).
• LMU Current Time - Current time of the LMU.
Network
• Ethernet IP - Ethernet IP addresses assigned to the connectivity interface (e.g. IPv4, IPv6, etc.).
• Wifi IP - WiFi IP addresses assigned to the connectivity interface. Including the SSID.
• Wifi Strength - Strength of the wireless network.
• Uptime Since Last Reboot - Time (in minutes) since the last device reboot.
12
Page 13

TM2000 Configuration
Figure 11 Status & Activity Tab: Firmware
Firmware (see Figure 11)
• Download State - Indicates the current firmware download state: Idle (before downloading or after
updating); Downloading; Downloaded.
• Update Result - Firmware download result: Success; Insufficient storage; oom, Connection lost
during download; CRC failed; unsupported pkg; invalid URL.
• Last Updated Package Name - The package name from the last firmware update using CMM.
• Download Progress - Percentage of download complete.
13
Page 14

TM2000 Configuration
Figure 12 Status & Activity Tab: System
System (see Figure 12)
• Ping Response - Device increments the value of this property on receipt of a ping command from
the cloud.
• Depth - Depth of the container/trailer calculated by the algorithm.
• The Last Image - Last image captured by the unit.
• Operating Temperature (C) - Current LMU operating temperature measured in Celsius.
• CPU Utilization - CPU utilization percentage.
• Current Angle - Current angle reading of LMU.
• Camera out of range - True (out of camera range) or false (not out of camera range).
• NTP Synch Flag State - Boolean flag (true or false) indicates if the LMU has successfully
synchronized its system time with a Network Time Protocol (NTP) server (LMU relies on an NTP
server for time).
14
Page 15
TM2000 Configuration
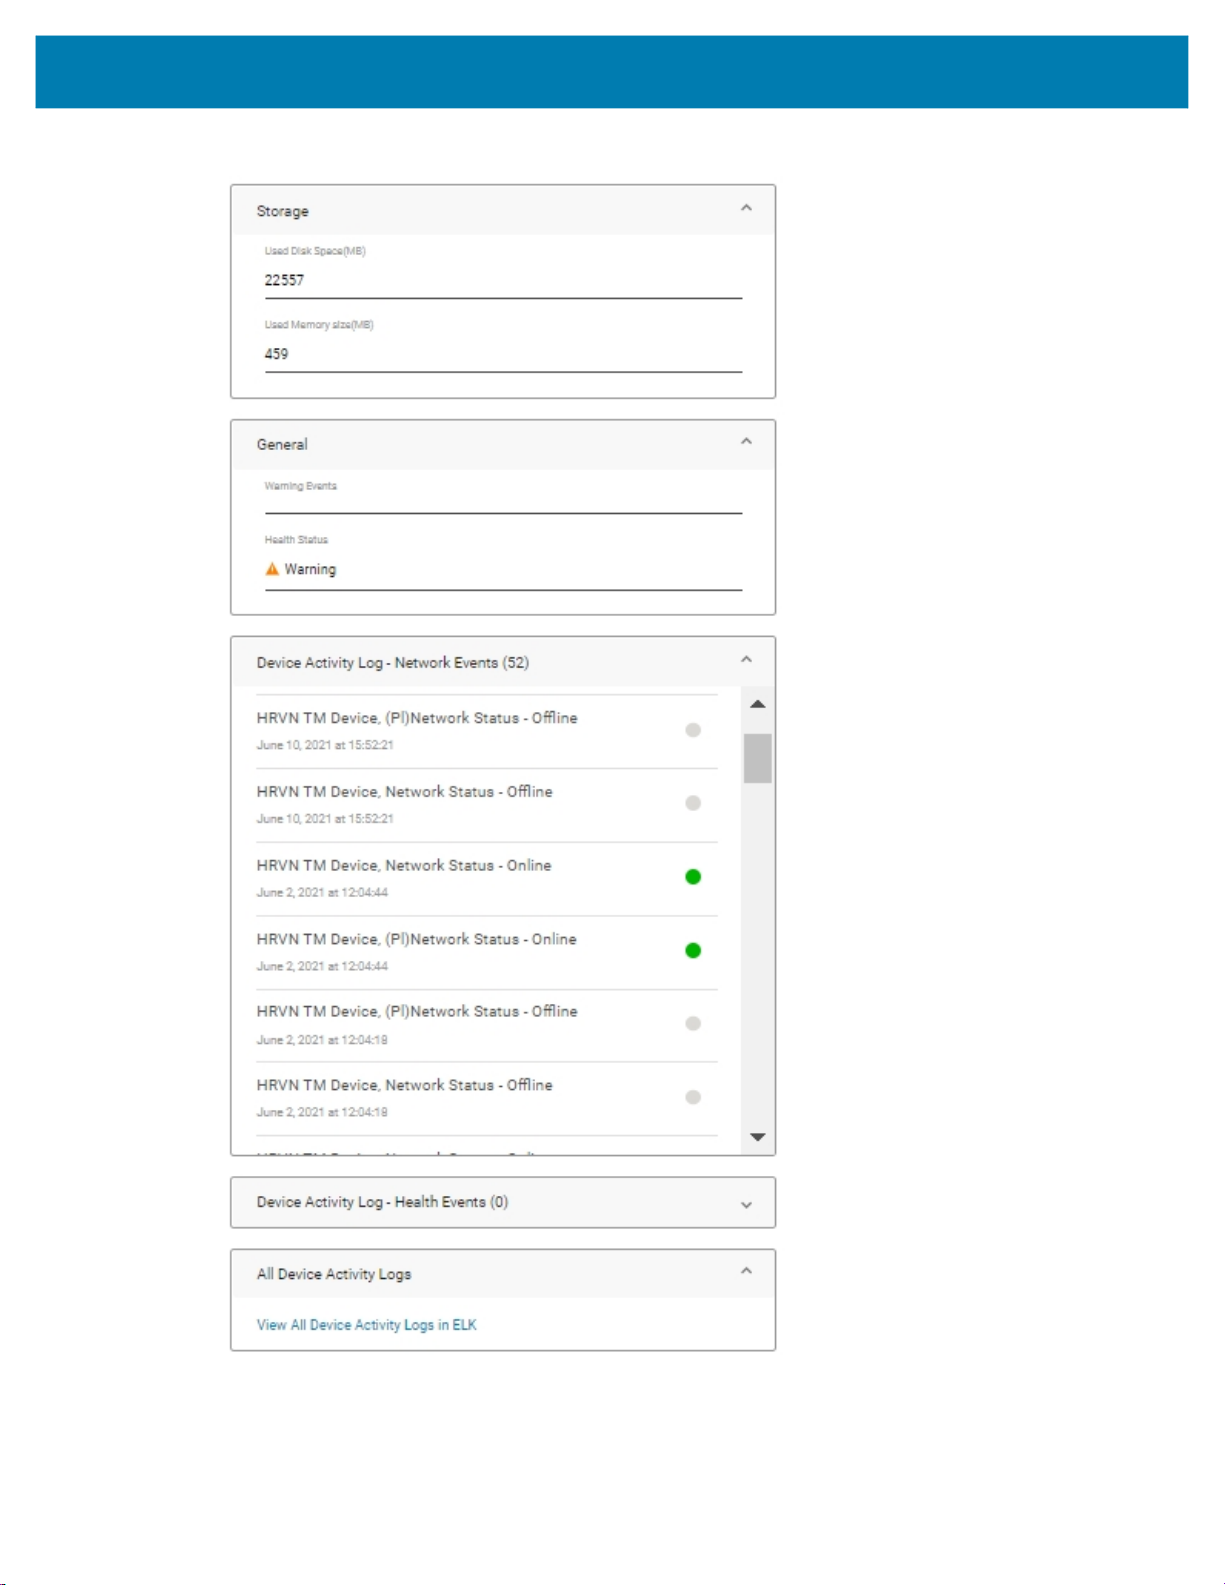
Figure 13 Status & Activity Tab: Storage and General
Storage (see Figure 13)
• Used Disk Space (MB) - Total disk space used measured in MB.
15
Page 16

TM2000 Configuration
• Used Memory Size (MB) - Total RAM used measured in MB.
General (see Figure 13)
• Warning Events - Reports events which cause the error.
Under the Health Events status, events include a colored indicator. A Green indicator is fine, and an
Orange indicator is a warning event and an error code is associated with a warning event as follows:
• [Cert_expiration]
• [Camera_sensor]
• [Depth_sensor]
• [Door_AJAR]
• [Camera_OutOfRange]
• Health Status - An Okay status indicates that the camera sensor or depth sensor is working
properly. If the camera sensor or depth sensor has a problem, or the mounted angle is beyond the
threshold (see elevation angle error threshold resource in Settings Tab: System and WiFi Region on
page 20), it returns false as an alarm.
Device Activity Log - Network Events - Listing of LMU network activity (see Figure 14).
Device Activity Log - Health Events - Listing of LMU health activity (see Figure 14).
16
Page 17

Figure 14 Info Tab: General
TM2000 Configuration
Info
The items listed under Info are as follows:
General (see Figure 14)
• Serial Number - Unique device serial number.
• Network Status - Online or offline status of the network connection.
• Manufacturer - Name of manufacturer of the device.
• Model - Type of device model.
• Type - Device type as reported by the device.
• Hardware Version - Current hardware version of the device.
• Part Number - Device part number.
• Host Name - A label that is assigned and used to identify a device connected to a computer
network.
17
Page 18

TM2000 Configuration
Figure 15 Info Tab: Firmware Version and Network
Firmware Version (see Figure 15)
• Boot Loader - Version of the bootloader in the device.
• Operating System - Version of operating system in the device.
• File System - Version of file system in the unit.
• Firmware - Firmware that is currently installed on the device.
Network (see Figure 15)
• WiFi Adapter MAC Address - LMUs unique hardware number on the WiFi card adapter.
• Ethernet Adapter MAC Address - Hardware identification number that identifies each device on
the network with the use of an Ethernet adapter.
• Bluetooth MAC Address - A unique identifier assigned to each Bluetooth device by the
manufacturer.
Figure 16 Info Tab: Storage
Storage (see Figure 16)
• Disk Size (MB) - Total disk space measured in MB.
• Memory Size (MB) - Total memory size measured in MB.
18
Page 19

Figure 17 Info Tab: Certificate
Settings
The options in the settings tab may be edited. To edit a settings option:
TM2000 Configuration
Certificate (see Figure 17)
• CMM server cert expiration Date - CMM Certificate status reporting. Within one month of the cert
expiration date, the "Warning events" resource sends out a [Cert_expiration] notification.
• CA cert expiration Date - Zebra CA root certificate status reporting. Within one month of the cert
expiration date, the "Warning events" resource sends out a [Cert_expiration] notification.
1. Select the Edit icon (see Figure 20 on page 22).
2. Select or enter the desired information.
3. Select Update.
19
Page 20

TM2000 Configuration
Figure 18 Settings Tab: System and WiFi Region
Edit
20
Page 21

TM2000 Configuration
The Settings options (see Figure 18) are as follows:
System
• Timezone - Sets the timezone in which the device is used.
• NTP Server - Defines one NTP servers for LMU to use commandType set.
• Watchdog Enabled - Controls whether or not the LMU is checking its watch dog timer. Select an
option from using drop-down arrow: True to enable watchdog and False to disable watchdog.
• TLA Backend Server Address - The hostname or IP of the SPX backend server with which the
LMU communicates.
• CMM Server Address and Port - Server address for CMM and Port.
• Redis/Kafka server - Server for Redis or Kafka.
• CCTV Enabled - Enable/disable video.
• RGB Frame Rate - Frequency at which images display.
• Use Door_AJAR ML - Enable/disable machine learning to detect if door is fully opened.
• LMU Human Blur - Options include: replace existing image, save to separate image, or disable
feature.
WiFi Region
• WiFi Country Code - The WiFi for the country that the device resides.
Figure 19 Settings Tab: Settings Activity
• Settings Activity - List of activities performed in settings.
21
Page 22

TM2000 Configuration
Figure 20 Settings Tab: Firmware Update and Camera
Firmware Update (see Figure 20)
• Firmware Download Package URL - This setting allows the user to input the SFTP location plus
the new build package name.
For example: sftp://10.17.218.81/mnt/ftp/LMU2.0/2.99.47_build
The SFTP location is sftp://10.17.218.81/mnt/ftp/LMU2.0/ and the new firmware build name is
2.99.47_build.
• User Name - User name for SFTP server.
• Password - SFTP server password.
To perform a batch firmware update (on multiple LMUs), see Batch Firmware Updates on page 27.
22
Page 23

TM2000 Configuration
Camera (see Figure 20)
• Horizontal Offset - The horizontal offset from center of load point as installed (measured in feet).
• Desired Angle - The measured and desired elevation angles.
• Angle Error Threshold - The number of degrees difference between the measured and configured
elevation angles, +/-, at which the LMU declares an alert and sets its LEDs accordingly.
• Distance from Camera to Door (measured in meters)
• Image Capture Width Dimension
• Image Capture Height Dimension
• Trailer is an Inbound or Outbound (1=inbound, 0=outbound)
Figure 21 Settings Tab: Image Files Retention
Image Files Retention
• Minimized RGB Storage - When enabled (true), the Image (RGB) Files are purged based on
• Image (RGB) Storage Time (day/minute) - Determines how often the RGB files are purged.
• Depth Storage Time, max at 10 (day) - Depth frame storage.
• 3D Storage Time (min) - Determines how often the PCD is purged.
Commands
The Command options are executable. To execute a command, select Execute under the desired
option(s):
• Ping - Device responds to command by incrementing the value of the pingResponse property. This
• Reboot - Reboot the device to restore from an unexpected firmware failure.
• Roll Back - Firmware roll back to previous version.
Image (RGB) Storage in minutes. When Minimize RGB Storage is not enabled (false), the Image
(RGB) files are purged daily based in the Image (RGB) Storage Time.
Default value on the LMU is 30d (30 Days).
command has no payload.
23
Page 24

TM2000 Configuration
• Enterprise Reset - Restore the device from factory setting, keep the WiFi and CMM connection.
• Update Firmware - Update firmware with the selected version saved in CMM server.
To update the firmware:
i. Obtain the correct firmware .zip file from Artifactory:
https://artifactory-ny.zebra.com:443/artifactory/local-ny-dcs-dev/SmartPack.
Figure 22 Configuration Manager Options
ii. To upload the firmware build zip file to the CMM server for firmware update, click the upper left
menu to expand and display options.
iii. Click Tenant Settings.
Figure 23 Create New Firmware Window
iv. Click + next to Firmware Version Control. The Create new firmware window displays.
v. Click on the Upload Firmware icon and select the desired file.
vi. Click Create.
24
Page 25

TM2000 Configuration
Figure 24 Firmware Version Control Screen
vii.From the CMM Command, select the correct build file from the drop-down list.
Figure 25 Update Firmware Screen
viii.Click Execute.
NOTE: After getting the release build .zip file, run MD5 utility on it and compare the MD5 value with the
checksum content inside TM2000_TLA_checksum.txt in Artifactory. Both should match.
25
Page 26

Figure 26 Commands Tab
TM2000 Configuration
IX. Click on the STATUS & ACTIVITY tab. Scroll to the Firmware section to display the update
progress.
Figure 27 Confirm Command Execution
X. The confirmation screen displays. Select Confirm.
26
Page 27

Batch Firmware Updates
There are two options for performing a batch update (updating the firmware on multiple LMUs). Either use
Action-Settings or Actions-Command.
Using Action-Settings to Update Firmware
1. Under the Resources tab, click Actions.
Figure 28 Resources Tab: Actions
Actions
2. Click on the Device Type drop-down arrow and select LMU.
27
Page 28

Batch Firmware Updates
Figure 29 Actions: Device Type
3. Click on the Select a device sub-type drop-down arrow and select TM2000.
Figure 30 Actions: Scope
4. Under Scope, select the desired LMU check boxes to update or select the All LMUs check box to
select all of the LMUs listed.
28
Page 29

Batch Firmware Updates
Figure 31 Actions: Setting User Name
5. Under Action Type, select Setting Update.
6. Click on the Select an action drop-down arrow and select User Name.
7. In the Enter setting value field, enter the SFTP server user name.
8. Click DONE.
Figure 32 Actions: Password
9. Click on the Select an action drop-down arrow and select Password.
10.In the Enter setting value field, enter the Password (the files are located locally; enter the Password
for your SFTP server).
11.Click DONE.
29
Page 30

Batch Firmware Updates
Figure 33 Actions: Firmware Package
12.Set SFTP user name and password (see Firmware (see Figure 11) on page 13).
13.Click on the Select an action drop-down arrow and select Firmware Download Package URI.
14.In the Enter setting value field, enter the URL to the SFTP setting (see Firmware (see Figure 11) on
page 13).
15.Click DONE.
Using Action-Command to Update Firmware
1. Under the Resources tab, click Actions.
Figure 34 Resources Tab: Actions
Actions
2. Click on the Device Type drop-down arrow and select LMU.
30
Page 31

Batch Firmware Updates
Figure 35 Actions: Device Type
3. Click on the Select a device sub-type drop-down arrow and select TM2000.
Figure 36 Actions: Scope
4. Under Scope, select the desired LMU check boxes to update or select the All LMUs check box to
select all of the LMUs listed.
31
Page 32

Batch Firmware Updates
Figure 37 Actions: Setting User Name
5. Under Action Type, select Command.
6. See Update Firmware on page 24 for detailed instructions.
32
Page 33

Site Configuration
Configuring a Site
Sites and devices may be added and configured using CMM.
Adding a Site
To add a site:
Figure 38 Add Site
Menu
Search
Existing Sites
Add Site
1. On the home page, select Add Site.
33
Page 34

Site Configuration
Figure 39 Add Site Details Window
2. Enter the following information for the new site within the number of characters specified below each
field:
• Site Name
• Site Description
• Site Address
3. Select Next.
34
Page 35

Site Configuration
Figure 40 Device Status Notifications
4. Under Network Status Notifications, enter the email address for the contact to be notified when a
device reports Offline and/or Online, then select the Add button. Enter additional addresses if required.
To remove an email address, select the X next to the email address.
35
Page 36

Site Configuration
Figure 41 Health Status Notifications
5. Under Health Status Notifications, enter email addresses for the contacts to be notified when a
device network status reports an error, a warning, or an OK, and select the Add button. Repeat to enter
additional addresses.
To remove an email address, select the X next to the email address.
Figure 42 Review Site Details Screen
6. Select Next.
36
Page 37

Site Configuration
7. Review the site details for accuracy. If the information is correct, select Add Site.
To edit information, select the Back button and enter the desired information. Once revisions are
complete, select Next until the Review Site Details screen appears and select Add Site.
Adding a Device
To add a device:
1. On the home page, select the desired site.
2. Select the Resources tab.
Figure 43 CMM Configuration Tab
3. Select Add Device.
Figure 44 Device Details Window
4. The Device Details window displays.
37
Page 38

Site Configuration
Figure 45 Completed Device Details Window
5. Enter the required information:
• Friendly Name - Enter a friendly name for the device.
• Device Type - Click on the device type drop-down arrow and select a device from the list.
• Serial Number - The LMU serial number.
6. Select Update.
7. Select Finish.
38
Page 39

Device Status Notifications
Email Notifications
If email addresses are not entered during initial setup (as shown in Figure 40 on page 35 and Figure 42 on
page 36) or if you want to include additional email addresses for contacts to receive device status
notifications, you many enter email contacts as follows:
1. On the home page, select the desired site (see Figure 38 on page 33).
Figure 46 Notifications Tab
Site Configuration
Menu Options
Icon
Menu Options
2. Select the Notifications tab. A list of Notifications displays.
3. Next to the desired Notification Type, select the Menu Options Icon to expand the menu options.
4. Select Edit.
Figure 47 Expression Tab
5. Select the Expression tab to send an email.
39
Page 40

Site Configuration
Figure 48 Send Email Option
6. Scroll down and select the Send Email check box.
Figure 49 Enter Email Addresses
jack.smith@zebra.com
john.doe@zebra.com
jane.doe@zebra.com
7. In the Enter email address field, enter the desired email address and select Add. Enter additional
addresses as needed and select Add after each entry.
To remove an email address, select the X next to the email address.
8. Select Update.
Notification Content
To set up notification content:
1. On the home page, select the desired site (see Figure 38 on page 33).
2. Select the Notifications tab (see Figure 46 on page 39). A list of Notifications displays.
3. Next to the desired Notification Type, select the Menu Options Icon to expand the menu options (see
Figure 46 on page 39).
4. Select Edit.
5. Select the Notification Content tab.
40
Page 41

Site Configuration
Figure 50 Notification Content Tab
6. Select the desired notification options:
• Under Email Notification, select Start with a new notification or Start with a template.
• Under SMS Notification, select Start with a new notification and enter the desired message.
7. Select Create.
41
Page 42

www.zebra.com
 Loading...