

CS4070 Scanner
Quick Reference Guide

2 CS4070 Scanner
No part of this publicati on may be reproduced or used in any
form, or by any electrical or mechanical means, without
permission in writing. Thi s includes electronic or mechanical
means, such as photocopying, recording, or information
storage and retrieval systems. The material in this manual is
subject to change without notice.
The software is provided strictly on an “as is” basis. All
software, including firmware, furnished to the user is on a
licensed basis. We grant to the user a non-transferable and
non-exclusive license to use each software or firmware
program delivered hereunder (licensed program). Except as
noted below, such license may not be assign ed, sublicensed, or
otherwise transferred by the user without our prior written
consent. No right to copy a licensed program in whole or in part
is granted, except as permitted under copyright law. The user
shall not modify, merge, or incorporate any form or portion of a
licensed program with other program material, create a
derivative work from a licensed program, or use a licensed
program in a network without written permission. The user
agrees to maintain this copyright notice on the licensed
programs delivered hereunder, and to include the same on any
authorized copies it makes, in whole or in part. The user agrees
not to decompile, disassemble, decode, or reverse engineer
any licensed program del ivered to the user or any portion
thereof.
Zebra reserves the right to make changes to any product to
improve reliability, function, or design.
Zebra does not assume any product liability arising out of, or in
connection with, the application or use of any product, circuit, or
application described herein.
No license is granted, e ither expressly or by implication,
estoppel, or otherwise under any patent right or patent,
covering or relating t o any combination, system, apparatus,
machine, material, method, or process in which Zebra products
might be used. An implied license exists only for equipment,
circuits, and subsystems contained in Zebra products.
Zebra and the Zebra head graphic are registered trademarks of
ZIH Corp. The Symbol logo is a registered trademark of Symbol
Technologies, Inc., a Zebra Technologies company.
All trademarks and servic e marks are proprietary to their
respective owners. Bluetooth is a registered trademark of
Bluetooth SIG. Microsoft, Windows and ActiveSync are either
registered trademarks or trademarks of Microsoft Corporation.
All other product or service names are the property of their
respective owners.
Quick Reference Guide 3
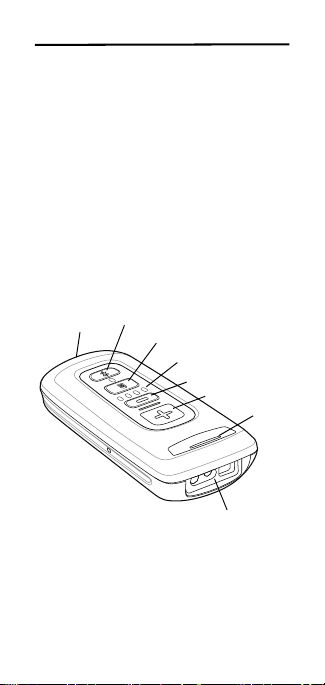
Scanner Window
Scan/Add Key
LED
Bluetooth Key / LED
Delete Key
Battery Level LEDs
Battery Level Key
Micro USB Port
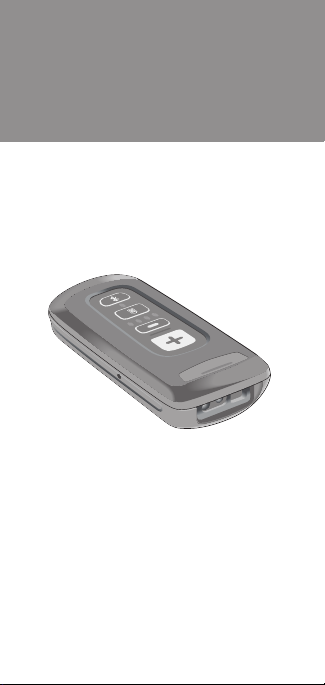
Introduction
The CS4070 Scanner captures and stores bar
codes for a variety of uses, and transmits bar
code data to a host via USB connection or
Bluetooth.
This document provides basic instructions for
setting up, programming, and using CS4070
scanners. The scanner is available in the
following configurations:
• CS4070SR - Standard range, cordless
Bluetooth
• CS4070HC - Healthcare, cordless
Bluetooth
Each scanner includes a micro USB host cable.
Cradles are also available for mounting,
charging, and host connection.
4 CS4070 Scanner
Charging
Before using the CS4070 for the first time,
charge the battery using the micro USB cable
or a cradle until all four green charging LEDs
light. Charge time is approximately three hours
for a fully discharged battery.
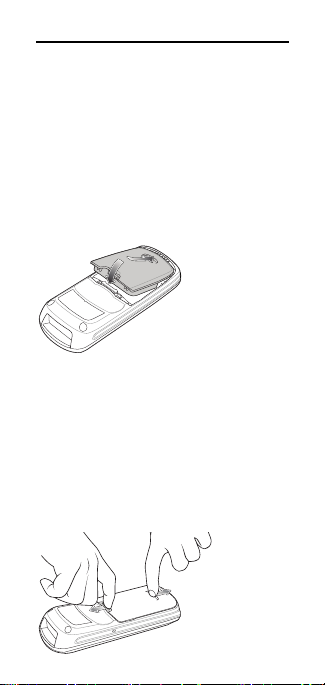
Inserting the Battery
1. Insert the battery, bottom first, into the
battery compartment in the back of the
device. Ensure the charging contacts point
toward the bottom of the scanner.
2. Press the battery down into the battery
compartment until the battery release latch
snaps into place.
Removing the Battery
To remove the battery, pull the release latch
upward with one finger, and use a finger from
your other hand to pull back on the indent in the
bottom of the battery housing. The battery
rotates about the bottom edge and the latch
end of the battery pops up, enabling you to lift it
out from the sides.
Quick Reference Guide 5
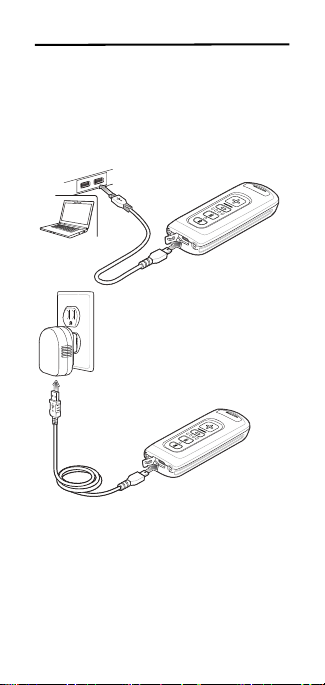
Charging via USB Host Cable
1. Insert the micro USB connector on the
cable in the interface port on the scanner.
2. Connect the other end of the host cable to a
USB port on the host PC, or to a USB
power adapter plugged into an AC outlet.
6 CS4070 Scanner
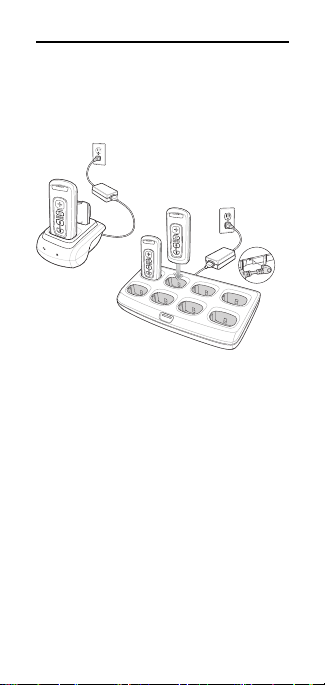
Charging via Charging Cradle
1. Connect the single-slot or 8-slot charging
cradle to power.
2. Insert the CS4070 into a device slot to
begin charging.
The CS4070 begins charging. The charge
status LEDs light to indicate progress. See
User Indications on page 14 for charging
indications.
Refer to the CS4070 Scanner Product
Reference Guide for information on
accessories.
Quick Reference Guide 7
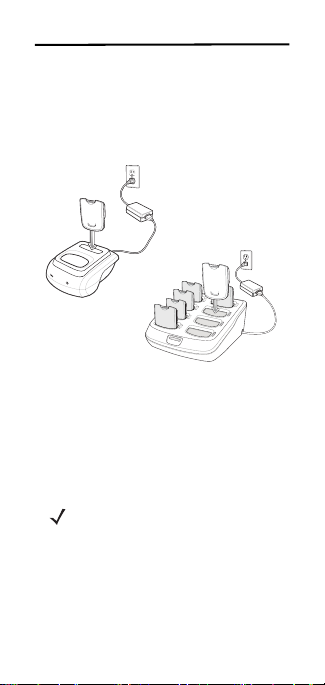
Charging Spare Batteries
1. Connect the single-slot cradle or 8-slot
spare battery charger to power.
2. Insert the battery into a spare battery slot
with the charging contacts facing down,
contacting the charging pins in the cradle.
The charge LED on the cradle lights to show
the charge status.
Connecting to a Host
Batch Connection
The micro USB cable enables communication
between the CS4070 and a PC, and charges
the battery in the CS4070.
Note To enter batch scanning mode, the
scanner cannot be paired to a
Bluetooth host.
See Charging via USB Host Cable on page 5
for connection instructions.

8 CS4070 Scanner
Bluetooth Connection
Pairing
The CS4070 supports Serial Port Profile (SPP)
and Human Interface Device (HID) protocols.
To pair to a Bluetooth-enabled host:
1. Press the scan button (+) to wake the
scanner.
2. Press and hold the Bluetooth button until
the scanner beeps and the blue LED
begins to flash to indicate that the scanner
is discoverable by the host.
3. On the host, launch the Bluetooth pairing
application and place the application into
discover Bluetooth device mode. Refer to
the CS4070 Scanner Product Reference
Guide for pairing examples.
4. Select the CS4070 from the discovered
device list. The Bluetooth application may
prompt you to scan a PIN it generated, or
for you to create and then scan the PIN.
5. If required, scan PIN Entry Bar Codes on
page 10 that correspond to the PIN, then
scan Enter.
The Bluetooth button blinks slowly to indicate
that the scanner paired with the host.
Note Bluetooth pairing suspends
temporarily while charging via a
USB cable. Disconnecting the cable
re-establishes Bluetooth pairing.
Note When pairing with an iPad, press
the delete key (- ) on the CS4070 to
toggle the virtual keyboard on and
off.

Quick Reference Guide 9
Pairing via the Dongle
To use the dongle accessory to pair to a USB
HID device:
1. Connect the RJ45 cable to the dongle RJ45
port, and the other end of the cable to a
USB port on the HID device.
2. Press the scan button (+) to wake the
scanner.
3. Scan the bar code on the dongle to pair the
scanner with the HID device.
Unpairing
To unpair the scanner and host, press the
Bluetooth button. Upon unpairing, the Bluetooth
button stops blinking.
Note To enter batch scanning mode, the
scanner cannot be paired to a
Bluetooth host.
10 CS4070 Scanner
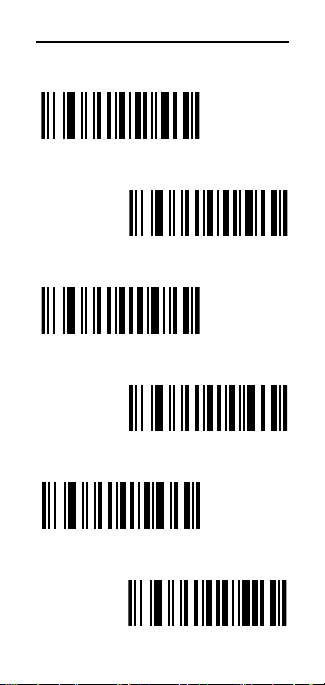
PIN Entry Bar Codes
0
1
2
3
4
5
 Loading...