

Page 1

ZEBRA SCANNER SDK FOR
WINDOWS
DEVELOPER’S GUIDE
Page 2

Page 3

ZEBRA SCANNER SDK FOR WINDOWS
DEVELOPER’S GUIDE
72E-149784-07EN
Revision A
December 2020
Page 4

ii ZEBRA SCANNER SDK FOR WINDOWS DEVELOPER’S GUIDE
No part of this publication may be reproduced or used in any form, or by any electrical or mechanical means,
without permission in writing from Zebra. This includes electronic or mechanical means, such as photo copying,
recording, or information storage and retrieval systems. The material in this manual is subject to change
without notice.
The software is provided strictly on an “as is” basis. All software, including firmware, furnished to the user is on
a licensed basis. Zebra grants to the user a non-transferable and non-exclusive license to use each software
or firmware program delivered hereunder (licensed program) . Except as n oted below, such licen se may not b e
assigned, sublicensed, or otherwise tran sfe rr e d by th e user without prior written consent of Zebra. No right to
copy a licensed program in whole or in part is granted, except as permitted under copyright law. The user shall
not modify , merge, or incorporate any for m or portion of a licensed program with other pro gram material, create
a derivative work from a licensed program , or us e a li censed program in a network without written permission
from Zebra. The user agrees to maintain Zebra’s copyright notice on the licensed programs delivered
hereunder , and to include the same on any au thorized copies it m akes, in whole or in part. The user agrees not
to decompile, disassemble, decode, or reverse engineer any licensed program delivered to the user or any
portion thereof.
Zebra reserves the right to make changes to any software or product to improve reliability, function, or design.
Zebra does not assume any product liability arising out of, or in connection with, the application or use of any
product, circuit, or application described herein.
No license is granted, either expressly or by implication, estoppel, or otherwise under any Zebra Technologies
Corporation, intellectual property rights. An implied license only exists for equipment, circuits, and su bsystems
contained in Zebra products.
Page 5

Revision History
Changes to the original guide are listed below:
Change Date Description
-01 Rev A 6/2011 Initial release.
-02 Rev A 3/2012 Updates for 64-bit:
-03 Rev A 11/2013 Adds:
iii
- updated Table 2-2; converted code to text from graphics
- removed unsupported methods
- updated Table 2-2 (add cradle info for DS6878 & LS4278)
- added USB CDC support
- updated pgs. 4-13 & 4-14: DEVICE_BEEP_CONTROL & DEVICE_LED_ON
changed to SET_ACTION; <arg-int> values changed to 2 & 43, respectively
- updated note and Step 6 on page 4-14; adde d 3 rows for TW AIN to the bo ttom
of Table 2-3 on page 2-11.
->Scale information.
->Intelligent Document Ca pture (IDC) information.
->USB IBM Table-top; SSI
Updates:
->Installation package name changes
->New Configuration section (pg. 2-13).
-04 Rev A 4/2015 Zebra software branding.
-05 Rev A 3/2016 Zebra software rebranding.
-06 Rev A 3/2017 - Removed /r ep la ce d re fe re nc es to the Attribute Data Dictionary
- Updated supported operating systems table
- Updated List of Methods table
- Added Action Attributes table
- Removed CONFIGURE_DADF and RESET_DADF commands
-07EN Rev A 12/2020 Software updates.
Page 6

iv ZEBRA SCANNER SDK FOR WINDOWS DEVELOPER’S GUIDE
Page 7

TABLE OF CONTENTS
Revision History.............................................................................................................................. iii
About This Guide
Introduction..................................................................................................................................... ix
Chapter Descriptions ...................................................................................................................... ix
Notational Conventions................................................................................................................... x
Service Information......................................................................................................................... x
Chapter 1: INTRODUCTION TO THE SCANNER SDK
Overview ........................................................................................................................................ 1-1
Quick Startup ................................................................................................................................. 1-3
FAQs .............................................................................................................................................. 1-4
Scanner SDK Architecture ............................................................................................................. 1-5
Multiple Scanner Device Identification Methodology For Applications ........................................... 1-7
How Multiple Applications Access Multiple Scanners From Scanner SDK .................................... 1-7
Three Applications Connected To One Scanner ..................................................................... 1-7
Implementation Details ....................................................................................................... 1-7
Three Applications Connected To Two Scanners .................................................................... 1-8
Implementation Details ....................................................................................................... 1-8
Many-to-Many Application Device Usage ................................................................................ 1-8
Implementation Details ....................................................................................................... 1-8
One Application Connected to Two Scanners ......................................................................... 1-9
Implementation Details ....................................................................................................... 1-9
Chapter 2: INSTALLATION & CONFIGURATION
Overview ........................................................................................................................................ 2-1
SDK Components .......................................................................................................................... 2-2
System Requirements .................................................................................................................... 2-2
Supported Operating Systems ................................................................................................. 2-2
Scanner Models Versus Communication Modes ........................................................................... 2-3
Installing the SDK .......................................................................................................................... 2-3
Page 8

vi ZEBRA SCANNER SDK FOR WINDOWS DEVELOPER’S GUIDE
Step-by-Step Installation Instructions ...................................................................................... 2-3
Installed Components .................................................................................................................... 2-8
Configuration ................................................................................................................................. 2-10
Serial Mode Settings ................................................................................................................ 2-10
Sample <SERIAL_MODE_SETTINGS> Definition in Config.xml ...................................... 2-10
Simulated HID Keyboard Output .............................................................................................. 2-11
Sample <HID_KB_PUMP_SETTINGS> definition in config.xml: ....................................... 2-11
Notes .................................................................................................................................. 2-12
Simple Data Formatting (SDF) ................................................................................................. 2-12
Sample <SDF> definition in config.xml: ............................................................................. 2-12
Basic Installation Verification ......................................................................................................... 2-14
Silent Unattended Installation of the Scanner SDK ....................................................................... 2-15
Chapter 3: SCANNER SDK API
Overview ........................................................................................................................................ 3-1
Scanner ID ..................................................................................................................................... 3-2
API Commands .............................................................................................................................. 3-3
Open ........................................................................................................................................ 3-3
GetScanners ............................................................................................................................ 3-4
ExecCommand ........................................................................................................................ 3-5
ExecCommandAsync ............................................................................................................... 3-6
Close ........................................................................................................................................ 3-6
API Events ..................................................................................................................................... 3-7
ImageEvent .............................................................................................................................. 3-7
VideoEvent ............................................................................................................................... 3-8
BarcodeEvent .......................................................................................................................... 3-8
PNPEvent ................................................................................................................................ 3-12
ScanRMDEvent ....................................................................................................................... 3-14
CommandResponseEvent ....................................................................................................... 3-14
IOEvent .................................................................................................................................... 3-15
ScannerNotificationEvent ......................................................................................................... 3-15
BinaryDataEvent ...................................................................................................................... 3-16
Methods Invoked Through ExecCommand Or ExecCommandAsync ........................................... 3-17
Examples: Using the Methods ................................................................................................. 3-19
GET_VERSION ................................................................................................................. 3-19
REGISTER_FOR_EVENTS ............................................................................................... 3-20
UNREGISTER_FOR_EVENTS ......................................................................................... 3-20
CLAIM_DEVICE ................................................................................................................. 3-21
RELEASE_DEVICE ........................................................................................................... 3-21
ABORT_MACROPDF ........................................................................................................ 3-21
ABORT_UPDATE_FIRMWARE ........................................................................................ 3-22
AIM_OFF ........................................................................................................................... 3-22
AIM_ON ............................................................................................................................. 3-22
FLUSH_MACROPDF ......................................................................................................... 3-23
DEVICE_PULL_TRIGGER ................................................................................................ 3-23
DEVICE_RELEASE_TRIGGER ......................................................................................... 3-23
SCAN_DISABLE ................................................................................................................ 3-24
SCAN_ENABLE ................................................................................................................. 3-24
SET_PARAMETER_DEFAULTS ....................................................................................... 3-24
DEVICE_SET_PARAMETERS .......................................................................................... 3-25
Page 9

Table of Contents vii
SET_PARAMETER_PERSISTANCE ................................................................................ 3-25
REBOOT_SCANNER ........................................................................................................ 3-26
DEVICE_CAPTURE_IMAGE ............................................................................................. 3-26
DEVICE_CAPTURE_BARCODE ....................................................................................... 3-26
DEVICE_CAPTURE_VIDEO ............................................................................................. 3-27
ATTR_GETALL .................................................................................................................. 3-27
ATTR_GET ........................................................................................................................ 3-29
ATTR_GETNEXT ............................................................................................................... 3-30
ATTR_SET ......................................................................................................................... 3-31
ATTR_STORE ................................................................................................................... 3-31
GET_DEVICE_TOPOLOGY .............................................................................................. 3-32
START_NEW_FIRMWARE ............................................................................................... 3-32
UPDATE_FIRMWARE ....................................................................................................... 3-33
UPDATE_FIRMWARE_FROM_PLUGIN ........................................................................... 3-33
UPDATE_DECODE_TONE ............................................................................................... 3-34
ERASE_DECODE_TONE .................................................................................................. 3-34
SET_ACTION ..................................................................................................................... 3-34
DEVICE_SET_SERIAL_PORT_SETTINGS ...................................................................... 3-36
DEVICE_SWITCH_HOST_MODE ..................................................................................... 3-37
KEYBOARD_EMULATOR_ENABLE ................................................................................. 3-38
KEYBOARD_EMULATOR_SET_LOCALE ........................................................................ 3-38
KEYBOARD_EMULATOR_GET_CONFIG ........................................................................ 3-39
SCALE_READ_WEIGHT ................................................................................................... 3-40
SCALE_ZERO_SCALE ...................................................................................................... 3-41
SCALE_SYSTEM_RESET ................................................................................................. 3-41
Error/Status Codes .................................................................................................................. 3-42
Chapter 4: TEST UTILITIES & SOURCE CODE
Overview ........................................................................................................................................ 4-1
Test Utilities Provided in the SDK .................................................................................................. 4-2
Scanner SDK C++ Sample Application .................................................................................... 4-3
Scanner SDK C#.Net Sample Application ............................................................................... 4-4
How to Verify Scanner SDK Functionality ...................................................................................... 4-7
Scanner Discovery/Asset Tracking Information/Validating Successful SDK Installation ......... 4-7
Barcode Scanning .................................................................................................................... 4-10
Example ............................................................................................................................. 4-10
Language/Locale Details .................................................................................................... 4-11
Capture Image and Video ........................................................................................................ 4-11
Beep the Beeper ...................................................................................................................... 4-15
Flash the LED .......................................................................................................................... 4-16
Querying Attributes and Parameters ........................................................................................ 4-17
Parameter Setting (Device Configuration) ............................................................................... 4-21
Examples ........................................................................................................................... 4-22
Host Variant Switching ............................................................................................................. 4-25
Firmware Upgrade ................................................................................................................... 4-27
Firmware Upgrade Scenarios ............................................................................................ 4-27
Firmware Upgrade Procedure ............................................................................................ 4-27
Page 10

viii ZEBRA SCANNER SDK FOR WINDOWS DEVELOPER’S GUIDE
Chapter 5: SAMPLE SOURCE CODE
Overview ........................................................................................................................................ 5-1
Sample Utilities Provided in the SDK ............................................................................................. 5-1
Creation of COM Object And Registration for Events .............................................................. 5-1
Register for COM Events ......................................................................................................... 5-2
Calling Open Command ..................................................................................................... 5-2
Calling Close Command .................................................................................................... 5-2
Calling GetScanners Command .............................................................................................. 5-3
Calling ExecCommand Command and ExecCommandAsync Command ............................... 5-3
Appendix A: WRITE SIMPLE APPLICATIONS USING THE SCANNER SDK API
Overview ........................................................................................................................................ A-1
Import CoreScanner Reference, Class Declaration and Instantiation ........................................... A-2
Call Open API ................................................................................................................................ A-5
Call GetScanners API .................................................................................................................... A-6
Calling ExecCommand API to Demonstrate Beep the Beeper ...................................................... A-8
Retrieve Asset Tracking Information from ExecCommand with the RSM_GET Method ............... A-10
Enable the UPC-A Attribute by Calling SET_ATTRIBUTE via ExecCommand ............................. A-12
Capture Barcode Data into an Application ..................................................................................... A-13
Appendix B: SCANNER SDK VISUAL STUDIO PROJECT TEMPLATE
Overview ........................................................................................................................................ B-1
Environment ................................................................................................................................... B-1
Installing the Project Template ...................................................................................................... B-1
Using the Project Template ........................................................................................................... B-3
Appendix C: DESCRIPTION OF INTELLIGENT DOCUMENT CAPTURE FORMAT
Overview ........................................................................................................................................ C-1
Example ................................................................................................................................... C-2
Appendix D: CORESCANNER DEBUG LOGGING
Overview ........................................................................................................................................ D-1
Microsoft DebugView ..................................................................................................................... D-2
Index
Quick Startup
Page 11

ABOUT THIS GUIDE
Introduction
This guide provides information about the Ze bra Scan ne r Softwa re D evelo pe r Kit (SDK) - an archit ectural
framework providing a single programm in g in te r fac e ac ro ss mu ltip le pr og r am m ing lang u ag e s and acr os s mu ltiple
system environments for all scanners communication variants (such as IBMHID, SNAPI, SSI, HIDKB, Nixdorf
Mode B, etc.).
Chapter Descriptions
Topics covered in this guide are as follows:
•
Chapter 1, INTRODUCTION TO THE SCANNER SDK provides an overview of the Zebra Scanner Software
Developer Kit (SDK).
•
Chapter 2, INSTALLATION & CONFIGURATION describes how to install Zebra Scanner SDK and its
components on recommended platforms.
•
Chapter 3, SCANNER SDK API provides the set of APIs to interface with scanner devices.
•
Chapter 4, TEST UTILITIES & SOURCE CODE provides information about testing and evaluation of the
Zebra Scanner SDK's software components using the test utilities provided in the SDK.
•
Chapter 5, SAMPLE SOURCE CODE provides information about how a developer uses the Zebra Scanner
SDK.
•
Appendix A, WRITE SIMPLE APPLICATIONS USING THE SCANNER SDK API provides a step by step
guide to writing simple applications using CoreScanner APIs.
•
Appendix B, SCANNER SDK VISUAL STUDIO PROJECT TEMPLATE provides information about using the
SDK project template.
•
Appendix C, DESCRIPTION OF INTELLIGENT DOCUMENT CAPTURE FORMAT provides Intelligent
Document Capture output information.
•
Appendix D, CORESCANNER DEBUG LOGGING provides information about enabling debug logging.
Page 12

x ZEBRA SCANNER SDK FOR WINDOWS DEVELOPER’S GUIDE
Notational Conventions
The following conventions are used in this document:
•
Courier New font is used for code segments.
•
Italics are used to highlight:
• Chapters and sections in this and related documents
• Dialog box, window and screen names
• Drop-down list and list box names
• Screen field names
• Check box and radio button names
• File names
• Directory names.
•
Bold text is used to highlight:
• Parameter and option names
• Icons on a screen
• Key names on a keypad
• Button names on a screen.
•
bullets (•) indicate:
• Action items
• Lists of alternatives
• Lists of required steps that are not necessarily seq ue nt ial
•
Sequential lists (e.g., those that describe step-by-step procedures) appear as numbered lists.
•
Notes, caution and warning statements appear as follows:
NOTE This symbol indicates something of special interest or importance to the reader. Failure to read the note
does not result in physical harm to the reader, equipment or data.
CAUTION This symbol indicates that if this information is ignored, the possibility of data or material damage may
occur.
WARNING! This symbol indicates that if this information is ignored the possibility that serious personal
Service Information
injury may occur.
If you have a problem using the equipment, contact your facility's technical or systems support. If there is a
problem with the equipment, they will contact the Zebra Technologies Global Customer Support Center at:
www.zebra.com/support
.
Page 13

CHAPTER 1 INTRODUCTION TO THE
SCANNER SDK
Overview
The Zebra Scanner Software Developer Kit (SDK) defines an architectural framework providing a single
programming interface across multiple programming languages (such as MS .NET, C++, Java) and across
multiple system environments (such as Vista, Linux) for all scanners communication variants (such as IBMHID,
SNAPI, HIDKB, Nixdorf Mode B, etc.).
The Zebra Scanner SDK includes a suite of components that provides a unified software development
framework with a wide range of functions for interfacing Zebra scanners to user applications and solutions.
With this SDK you can read barcodes, manage scanner configurations, cap ture images/vide os and selectively
choose a list of scanners on which to work. While one application is in one programming language using a
scanner or a set of scanners, another application in a different language can be used differently within the
same system environment.
For a list of the most commonly requested topics within this guide, see Quick Startup in the back of the guide.
Figure 1-1
The SDK can build an application with complete control of its scanner's capabilities.
•
Software Developer Framework
Data, Barcode
• Simulation HID Keyboard output
• OPOS/JPOS output
• SNAPI output
Page 14

1 - 2 ZEBRA SCANNER SDK FOR WINDOWS DEVELOPER’S GUIDE
•
Command and Control
• LED and Beeper Control
• Aim Control
•
Imaging
• Capture/Transfer of images
• Capture/Transfer of Video
•
Remote Scanner Management
• Asset Tracking
• Device Configuration (Get, Set and Store scanner attributes)
• Firmware Upgrade
• Scanner Communication Protocol Switching
• Service to Automate Configuration/Firmware Upgrade Process.
NOTE For a list of a scanner's supported attribute (parame ter) numbers and definitions, refer to the Product
Reference Guide for that model scanner, available from the Zebra Support website at
http://www.zebra.com/support. Attributes include configuration parameters, monitored data, and asset
tracking information.
Page 15

Quick Startup
Overview ......................................................................................................................................................1-1
Operating systems/System requirements ..............................................................................................2-2
Scanner model vs. Communication modes.....................................................................................1-6, 2-3
Block diagram of system........................................................................................................................1-5
SDK Components & Installation details.............................................................................................2-1, 2-3
Components and folder paths......................................................................................................... 2-2, 2-8
Validate SDK installed properly.....................................................................................................2-14, 4-7
OPOS/JPOS Drivers................................................................................................................2-1, 2-2, 2-6
WMI/Remote Scanner Management.................................................................................2-2, 2-3, 2-6, 2-8
T est and sample utilities.............................................................................................................................4-2
Table of buttons and input fie lds.............................................................................................................4-4
List of utility functionality ........................................................................................................................4-2
Bar code Data Display ................................ ... .................................... ...............A-13, A-12, 4-10, 4-10
Discovery.........................................................................................................................................4-8
Querying asset information..................................................................................A-10, 4-8, 4-17, 4-19
Query and Set Parameters/Attributes
Capturing an image....................................................................................................................... 4-11
Capturing a video.......................................................................................................................... 4-11
Firmware Upgrade ...............................................................................................................4-27, 4-28
Host Variant Switching.........................................................................................................4-26, 4-25
C++ sample application and source code................................................................................2-8, 4-3, 5-1
C# sample application and source code ..................................................................................2-9, 4-4, 5-1
Starter application using CoreScanner API............................................................................................A-1
INTRODUCTION TO THE SCANNER SDK 1 - 3
One application connected to two scanners............................................................................1-9
Simulated HID Keyboard Output ....................................................................1-6, 2-11, 4-4, 4-11
Query values........................................... ................................. ... ... ......................4-17, 4-19, 4-19
Set Value (Device Configuration)..................................................................................3-17, 4-21
Programming an ADF rule.........................................................................................4-19, 4-23
LED control ................................ .................................. ... .................................4-16, 4-16, 4-24
Beeper control..........................................................................................A-8, 4-15, 4-15, 4-24
Enable/disable a symbology .....................................................................................A-12, 4-22
API overview................................................................................................................................................3-1
Create com object..............................................................................................................
Register for event............................................................................................................................5-2, 4-8
Open ....................................................................................................................................... A-5, 3-3, 5-2
Get scanner......................................................................................................................A-6, 3-4, 4-8, 5-3
Execute command .............................................................. ... ................................. .......A-8, 4-17, 3-5, 5-3
List of Methods.....................................................................................................................................3-17
Execute command asynchronously................................................................................................3-6, 5-3
Close...............................................................................................................................................3-6, 5-2
....................5-1
Page 16

1 - 4 ZEBRA SCANNER SDK FOR WINDOWS DEVELOPER’S GUIDE
FAQs
•
Can multiple scanners be connected to the CoreScanner Driver?
• Yes, multiple scanners can be connected simultaneously to one host running the CoreScanner driver.
•
If two scanners are connected, can data be tracked by scanner ID?
• Yes, if scanner X decodes a barcode 123, it returns to the application a data event consisting of 123
as the data label and the serial number as the scanner ID.
•
Can multiple applications be connected to the CoreScanner Driver?
• Yes, multiple applications can be connected simultaneously on one host running the CoreScanner
driver. An application can register from a selection of event types (such as barcode, image, video or
management). The application receives the event information plus the originating scanner ID.
•
Are the CoreScanner calls common across operating systems?
• Yes. For example, the Open method's function signatures for C++ and Java are the same except for
the platform specific data and return types (highlighted in yellow below).
Figure 1-2
Function Signatures for C++ and Java
Page 17

Scanner SDK Architecture
Zebra Scanner SDK
INTRODUCTION TO THE SCANNER SDK 1 - 5
Figure 1-3
You can configure Zebra scanner devices to be operated in different host communication modes such as USB
SNAPI, USB OPOS, USB HID Keyboard, USB IBM Table-top, SSI, and RS232 Nixdorf Mode B. Device feature
support varies depending on communication mode but all modes support barcode scanning. Refer to the
Product Reference Guide of a specific scanner for the barcodes to set its supported host communication
modes.
Using the Zebra Scanner SDK, you can switch between supported host communication modes by calling the
host variant switching command programmatically. This is useful when the device is in a less feature
supportive mode and some advanced functionality is required but no t supported by the cu rrent communica tion
mode. The scanner can be switched to a featur e rich mode and commands executed before switching the
scanner back to the previous mode.
For example, you want to disable the UPC-A symbology but the device is in USB HID Keyboard mode. If the
mode is supported by the scanner, you may switch to USB SNAPI or USB OPOS, set UPC-A to be disabled
permanently and then switch the scanner back to USB HID Keyboard mode. See Table 1-1 on page 1-6 for
more information.
SDK Architecture
Page 18

1 - 6 ZEBRA SCANNER SDK FOR WINDOWS DEVELOPER’S GUIDE
Table 1-1 illustrates scanner capabilities supported by each communication mode. Refer to the specifications
of a device for its ability to support of each communication mode.
Table 1-1
Data Supported Supported Supported Supported Supported Supported
Host Variant Switching Supported Supported Supported Supported Not Available Not Available
Management Supported Supported Not Available Supported Not Available Supported
Image & Video Supported Not Available Not Available Not Available Not Available Supported
Simulated HID
Keyboard Output
*Advanced Data Formatting (ADF) is not supported when using Simulated HID Keyboard Output.
Scanner Device Communication Modes Vs. Capabilities
Capabilities
*
Simulated HID Keyboard Output is a feature enabling scanners in USB SNAPI, USB IBM Table-top, USB
OPOS, or SSI mode to emulate HID Keyboard keystrokes to a host system for scanned data labels. It sends
the content of the scanned data label as HID Keyboard keystrokes thus emulating USB HID Keyboard scanner
mode.
USB
SNAPI
Supported Supported Not Applicable Supported Supported * Supported
USB OPOS
USB HID
Keyboard
USB IBM
Table-top
RS232
Nixdorf B
SSI
(Image Only)
Page 19

INTRODUCTION TO THE SCANNER SDK 1 - 7
Multiple Scanner Device Identification Methodology For Applications
The Zebra Scanner SDK supports multiple scanner devices to any application that runs on top of CoreSca nner
APIs. Each scanner device is shown to the user application by a unique scanner identification number. The
scanner ID is a numeric value assigned to e ach connected device so there cannot be multiple scanner devices
holding the same scanner ID.
Asset tracking information like model number , serial nu mber, current firmware version and date of manufacture
are available if the scanner and its current host mode support the management feature.
For example, in some modes like USB HID Keyboard, you do not see asset tracking information but the same
scanner device shows you such information when it is in USB OPOS or USB SNAPI mode.
The format of device asset tracking informatio n can follo w different na m ing con ve nt ion s for dev ice mod e l,
serial number or current firmware version. For example, the length of a serial nu mber for DS67 07 and DS98 08
scanners can be different.
How Multiple Applications Access Multiple Scanners From Scanner SDK
The Zebra Scanner SDK supports multiple applications accessing multiple scanner devices connected to the
host at the same time.
As described previously, a scanner ID uniquely identifies a connected scanner device to all applications. A
scanner ID is consistent among all applications for one SDK instance. If the CoreScanner service or the host
machine is restarted, a device may be assigned a different scanner ID but it is unique and referenced by all
applications.
Three Applications Connected To One Scanner
Figure 1-4 illustrates how multiple applications communicate with multiple scanner devices.
Figure 1-4
Three Applications Connected to One Scanner
Implementation Details
•
Three applications are connected to one scanner.
•
App 1 & App 2 support bi-directional (two way) communication with the scanner.
•
Legacy App 3 supported by driver converting SNAPI data into HID format.
Page 20

1 - 8 ZEBRA SCANNER SDK FOR WINDOWS DEVELOPER’S GUIDE
Three Applications Connected To Two Scanners
Figure 1-4 illustrates how multiple applications communicate with multiple scanner devices.
Figure 1-5
Three Applications Connected To Two Scanners
Implementation Details
•
Three applications are connected to two scanners.
•
App 1 and App 2 support bi-directional (two way) communication with the DS6878.
•
Legacy App 3 receives HID keyboard emulation data from the LS2208.
Many-to-Many Application Device Usage
Figure 1-6
Many-to-Many Application Device Usage
Implementation Details
•
App 1 performs image capture with the DS6878.
•
App 2 can remotely manage both the DS6878 and LS4208.
•
App 3 receives OPOS data from both the DS6878 and LS4208.
Page 21

One Application Connected to Two Scanners
INTRODUCTION TO THE SCANNER SDK 1 - 9
Figure 1-7
One Application Connected to Two Scanners
Implementation Details
•
One application can manage multiple scanners in multiple communication interfaces.
•
The application can capture data, image and video, send management commands and receive
responses from multiple scanners.
•
All responses from the scanners consist of the scanner device details (ScannerID, seria l number, model
number, etc.) identifying the device that sent the response.
For example, a barcode event for a scanned label is shown below. The scanned data label arrives with a
unique ScannerID and the scanner's model number and the serial number.
<?xml version="1.0" encoding="UTF-8"?>
<outArgs>
<scannerID>1</scannerID>
<arg-xml>
<scandata>
<modelnumber>DS6707-SR20001ZZR </modelnumber>
<serialnumber>7114000503308 </serialnumber>
<GUID>9008A01BB72BA34BB519806B63701AAA</GUID>
<datatype>11 </datatype>
<datalabel>0x39 0x37 0x38 0x30 0x32 0x30 0x31 0x34</datalabel>
<rawdata>0x39 0x37 0x38 0x30 0x32 0x30 0x31 0x34</rawdata>
</scandata>
</arg-xml>
</outArgs>
Page 22

1 - 10 ZEBRA SCANNER SDK FOR WINDOWS DEVELOPER’S GUIDE
Page 23

CHAPTER 2 INSTALLATION &
CONFIGURATION
Overview
This chapter describes how to install Zebra Scanner SDK and its components on recommended platforms.
NOTE See System Requirements on page 2-2 for supported platforms.
The SDK installation package includes support for:
•
Installing required components to enable any Zebra scanner to communicate with applications or tools
that execute on top of the Zebra Scanner SDK.
•
Supporting documents.
•
Test utilities.
•
Sample applications and source projects.
This section covers installation and configuration instructions.
NOTE Uninstall any previous Zebra, Symbol or 3rd party drivers or SDKs installed on your system which
communicate with Zebra Scanner Devices before installing the Zebra Scanner SDK. This includes but is
not limited to Zebra and Symbol supplied OPOS, JPOS and SNAPI drivers.
For a list of the most commonly requested topics within this guide, see Quick Startup in the back of the guide.
NOTE For a list of a scanner's supported attribute (para me ter) numbers and definitions, refer to the Product
Reference Guide for that model scanner, available from the Zebra Support website at
http://www.zebra.com/support. Attributes include configuration parameters, monitored data, and asset
tracking information.
Page 24

2 - 2 ZEBRA SCANNER SDK FOR WINDOWS DEVELOPER’S GUIDE
SDK Components
The SDK installation package includes following components.
•
Zebra Scanner SDK Core components and drivers (COM API, Imaging drivers)
•
OPOS Drivers
• Scanner OPOS
• Scale OPOS
•
JPOS Driers
• Scanner JPOS
• Scale JPOS
•
Remote Management Components
• Scanner WMI Provider
• Driver WMI Provider
•
Web Link to latest Developer's Guide - Document(s)
•
Test & Sample utilities with Source code packages
• Scanner SDK Sample Application (C++)
• Scanner SDK Sample Application (Microsoft® C# .NET)
• Scanner OPOS Test Utility
• Scale OPOS Test Utility
• JPOS Test Utility for Scanner and Scale
• Scanner WMI Provider Test Utility (Microsoft® C# .NET)
• Driver WMI Provider Test Utility (Microsoft® C# .NET).
The SDK installation package installs its components to the following default location:
C:\Program Files\Zebra Technologies\Barcode Scanners\.
System Requirements
Supported Operating Systems
Table 2-1
Zebra Scanner SDK Installation Package
Supported Operating Systems
Microsoft® Windows 7, Windows 8, and Windows 10 (32bit)
Microsoft® Windows 7, Windows 8, and Windows 10 (64bit)
Recommended minimum hardware requirement: x86 PC for 32 -bit SDK, o r x6 4 PC for 64 -b it SDK with 512Mb
RAM.
Zebra_Scanner_SDK_(32bit)_v3.xx.xxxx.exe
Zebra_Scanner_SDK_(64bit)_v3.xx.xxxx.exe
Page 25

Scanner Models Versus Communication Modes
For an up-to-date table listing scanner models and their suppo rted communication mod es refer to the Scanne r
SDK for Windows website at: www.zebra.com/scannersdkforwindows
Installing the SDK
Download the relevant Scanner SDK setup program for the 32-bit or 64-bit operating system on your PC from
http://www.zebra.com/scannersdkforwindows.
There are two options for installing the Zebra Scanner SDK on a system.
•
Typical installation - Loads all components in the installation package.
•
Custom installation - Provides the ability to change the default selection of components.
If you install components such as OPOS, JPOS or WMI provider (remote management), the installer
automatically installs sample programs and test utilities related to those components.
To download the appropriate OPOS, JPOS and WMI Developer’s Guides go to:
INSTALLATION & CONFIGURATION 2 - 3
.
http://www.zebra.com/scannersdkforwindows
.
Step-by-Step Installation Instructions
1. Execute the setup program. The installation process checks for CoreScanner drivers on the target
machine. If the driver package is not present or outdated, clicking Install adds updated drivers before
installing the scanner SDK package.
Figure 2-1
Prerequisite Check And Install
Page 26

2 - 4 ZEBRA SCANNER SDK FOR WINDOWS DEVELOPER’S GUIDE
2. Installation continues once the prerequisite drivers are installed on the machine.
Figure 2-2
3. Click Next on the Welcome screen.
Initial Window
Figure 2-3
Welcome Screen
Page 27

4. Review the license agreement and click Yes to accept.
INSTALLATION & CONFIGURATION 2 - 5
Figure 2-4
5. Select the Setup Type.
License Agreement
The user is prompted with two installation options:
• Complete - The installation package installs all components.
• Custom - The installation package gives the option to select which compone nts are loaded during th e
installation process. The user is prompted to select components from the available list.
Page 28

2 - 6 ZEBRA SCANNER SDK FOR WINDOWS DEVELOPER’S GUIDE
The user can select the destination folder by clicking Browse and selecting the drive and fo lder in which to
install the Zebra Scanner SDK. However, common components are placed in designated locations for
consistency with other SDK users.
Figure 2-5
6. Select features. The user is prompted to select features to be installed from the available components list.
Setup Type
Figure 2-6
NOTE Scanner SDK and USB imaging drivers are common components and are installed automatically.
Select Features
Page 29

7. Wait for the installation to complete.
INSTALLATION & CONFIGURATION 2 - 7
Figure 2-7
8. Installation complete.
Figure 2-8
Installation Progress
Installation Complete
Page 30

2 - 8 ZEBRA SCANNER SDK FOR WINDOWS DEVELOPER’S GUIDE
Installed Components
There are three Windows services installed with the CoreScanner driver in a default installation:
•
CoreScanner - coordinates activity between the communication layer (SNAPI, IBMHH, SSI, etc.) and
upper level drivers (OPOS, JPOS, SDK API, etc.).
•
RSM Driver Provider - provides WMI support.
•
Symbol Scanner Management - provides WMI support.
Table 2-2 lists the components installed.
Table 2-2
Component File Description Installation Path
Scanner Driver CoreScanner.exe Scanner Driver/COM
Scanner Driver SNAPITrans.dll Transport Component .\Common
Scanner Driver USBHIDKBTrans.dll Transport Component .\Common
Scanner Driver NIXBTrans.dll Transport Component .\Common
Scanner Driver IBMHIDTrans.dll Transport Component .\Common
Scanner Driver SSITrans.dll Transport Component .\Common
Scanner Driver IBMHIDTTTrans.dll Transport Comonent .\Common
WMI Providers ScannerService.exe WMI Provider Services .\Common
WMI Providers symbscnr.dll WMI Instance Providers .\Common
WMI Providers ScannerWMITest.sln Scanner WMI Sample
WMI Providers RSMDriverProviderService.exe WMI Provider Services .\Common
Zebra Scanner SDK Components
Server
Application
.\Common
\Scanner
SDK\wmiprovider_scanner\Sample
Applications\src
WMI Providers RSMDriverProvider.dll WMI Instance Providers .\Common
WMI Providers symbscnr.mof Managed Object Format
file for WMI and CIM
WMI Providers RSMDriverProvider.mof Managed Object Format
file for WMI and CIM
WMI Providers DriverWMITest.sln Driver WMI Sample
Application
Configuration config.xml Scanner Driver
Configuration File
Scanner Driver HIDKeyboardEmulator.exe HID Keyboard Emulator .\ Common\
SDK C++
Sample App
source code
SampleApp_CPP.sln SDK C++ Sample
Application and source
projects
.\Common
.\Common
\Scanner
SDK\wmiprovider_driver\Sample
Applications\src
.\Common
.\ Scanner SDK\ Scanner
SDK\Sample Applications\src
Page 31

INSTALLATION & CONFIGURATION 2 - 9
Table 2-2
Component File Description Installation Path
SDK C# Sample
App source code
OPOS OPOSScanner.ocx OPOS Scanner Control .\Scanner SDK\OPOS\Scale
OPOS STIOPOS.dll OPOS Service Object .\Scanner SDK\OPOS\Scale
OPOS TestScan.sln OPOS Sample application
OPOS OPOSScale.ocx OPOS Scale Control .\Scanner SDK\OPOS\Scale
OPOS ScaleOPOS.dll OPOS Scale Service .\Scanner SDK\OPOS\Scale
OPOS OPOSScaleSampleApp.exe OPOS Scale Sample
JPOS CSJPOS.dll JPOS JNI Layer for
Zebra Scanner SDK Components (Continued)
SampleApp_CSharp.sln SDK C++ Sample
Application and source
projects
source project
Application source project
CoreScanner API
.\ Scanner SDK\ Scanner
SDK\Sample Applications\src
OPOS\Sample Applications\src
OPOS\Sample Applications\src
.\Scanner SDK\OPOS\Scale
OPOS\Sample Applications\src
OPOS\bin
OPOS\bin
.\Scanner SDK\OPOS\Scale
OPOS\Sample Applications\src
.\ Scanner SDK\JPOS\bin
JPOS POStest JPOS Sample Application .\ Scanner SDK\JPOS\Sample
Applications\src
TWAIN twain.ds TWAIN driver data source %WinDir%\twain_32\Zebra (32-bit)
%WinDir%\twain_64\Zebra (64-bit)
TWAIN TWAIN_App_mfc32.exe TWAIN sample application .\ Scanner SDK\JPOS\Sample
Applications\bin
TWAIN TWAIN_APP_MFC.sln TWAIN sample application
source project
.\ Scanner SDK\JPOS\Sample
Applications\src
Page 32

2 - 10 ZEBRA SCANNER SDK FOR WINDOWS DEVELOPER’S GUIDE
Configuration
Serial Mode Settings
The Zebra Scanner SDK is capable of communicating with scanners connected to serial ports through Nixdorf
Mode B, or SSI serial host mode. The SDK does n ot open any serial port without user consent to prevent other
devices from being interfered with by Scanner SDK commands. Users can configure SDK usage of serial ports
with entries in the < SERIAL_MODE_SETTINGS > section of the config.xml file located in
%Program Files%\Zebra Technologies\Barcode Scanners\Common.
Serial mode setting entries indicate the serial com port number (PORT ID), the baud rate (BAUD) and the
serial host mode (NAME) used to communicate with the attached scanner. The value of the name field can be
NIXMODB, or SSI and the value of each of the three fields must be enclosed in quotation marks.
By default, the serial port settings in config.xml are commented out. To activate a serial mode setting, enter a
line outside of the commented area, modify the settings appropriately, save the config.xml file and restart the
CoreScanner service.
Sample <SERIAL_MODE_SETTINGS> Definition in Config.xml
<SERIAL_MODE_SETTINGS>
<!-- Uncomment lines in this section to configure Serial Scanners
<PORT ID='5' BAUD='9600' NAME='NIXMODB'/>
-->
<PORT ID='3' BAUD='9600' NAME='SSI'/>
</ SERIAL_MODE_SETTINGS >
Page 33

INSTALLATION & CONFIGURATION 2 - 11
Simulated HID Keyboard Output
The Zebra Scanner SDK is capable of configuring a scanner to send simulated HID keyboard output (also
known as HIDKB pump, or HIDKB emulation mode) while in USB SNAPI, USB IBM Hand-held, USB IBM
Table-top, SSI, or RS-232 Nixdorf Mode B communication modes. This simulated HID keyboard output
functionality can be configured by changing the XML elements in the <HID_KB_PUMP_SETTINGS> section of
the config.xml file.
By default, the language locale of the simulated keyboard output is English. Only the English and French
languages are currently supported.
Table 2-3
Config.xml File Elements
Tag Values Description
< ENABLE> 0, 1 0 - Disable (default)
1 - Enable
< LOCALE> 0, 1 0 - English (default)
1 - French
< FUNCTION_KEY_MAPPING> 0, 1 When - 0
VK_RETURN transmitted as VK_CONTROL + M
VK_TAB transmitted as VK_CONTROL + I
VK_BACK transmitted as VK_CONTROL + H
When - 1
VK_RETURN transmitted as VK_RETURN
VK_TAB transmitted as VK_TAB
VK_BACK transmitted as VK_BACK
Refer to your scanner's Product Reference Guide for further
information on function key mapping.
< INTER_KEY_DELAY> 0, >0 Character transmission delay interval in milliseconds. The
default value of zero transmits keystrokes as they are
decoded. If > 0, latency is introduced into key transmission so
that any receiving application can adjust to the rate of
transmission.
Sample <HID_KB_PUMP_SETTINGS> definition in config.xml:
<HID_KB_PUMP_SETTINGS>
<LOCALE>0</LOCALE>
<!-- ENGLISH=0, FRENCH=1 -->
<ENABLE>0</ENABLE>
<!-- ENABLED=1, DISABLED=0 -->
<FUNCTION_KEY_MAPPING>1</FUNCTION_KEY_MAPPING>
<INTER_KEY_DELAY>0</INTER_KEY_DELAY>
</HID_KB_PUMP_SETTINGS>
Page 34

2 - 12 ZEBRA SCANNER SDK FOR WINDOWS DEVELOPER’S GUIDE
Notes
•
Refer to the specific scanner Product Reference Guide for supported serial port parameter settings.
•
Simulated HID Keyboard Output settings can be temporarily changed by an application using the
CoreScanner API commands KEYBOARD_EMULATOR_ENABLE and
KEYBOARD_EMULA TOR_SET_LOCALE. To make permanent changes to these settings that remain
persistent over a reboot of the host machine, the Config.xml file must be manually edited. Changes to
Config.xml take effect only after the CoreScanner service is restarted.
•
When using the language locale with Simulate d HID Keyboard Output, the user may need to cha nge the
input language of the application receiving keyboard input to match the lang uage specifie d in Config.xml.
•
Simulated HID Keyboard functionality becomes unavailable if you use Windows’ Switch User
functionality to switch the user on your PC. Manually restar t the CoreScanner, RSM Driver Provider, and
Symbol Scanner Management services, or rebo ot the host PC to ensure correct operation.
Simple Data Formatting (SDF)
SDF enables the formatting of scanned barcode data with prefix and suffix labels through the CoreScanner
driver. SDF is available while the scanner is in USB SNAPI, USB IBM Hand-held, USB IBM Table-top, SSI, or
RS-232 Nixdorf Mode B communication mode
modifying the scanned barcode data itself with any rule-based method. The prefix/suffix labels are composed
of one or more ASCII characters (1-255). There can be one or more prefix/suffix labels, and they are defined in
the config.xml file in the <SDF> section using the <SDFTAGDEF> tag. The SDF description is composed of a
<SDFMETA> section, and a <SDFSELECT> section. The <SDFMETA> section defines the prefix/suffix labels
used in SDF, and how they are combined in various ways to compose one or more SDF format definitions in
the form of <SDFDEF> tags.
1
. Unlike Advanced Data Formatting (ADF), SDF does not permit
1
NOTE
T o add prefix/suf fix formatting for a scanner in HID keyboard mode, use the programming barcodes in the
scanner's Product Reference Guide.
Sample <SDF> definition in config.xml:
<SDF>
<SDFMETA>
<SDFTAGDEF>SUFFIX1.SUFFIX2.PREFIX1.PREFIX2</SDFTAGDEF>
<SUFFIX1>13.10</SUFFIX1>
<SUFFIX2>35.36</SUFFIX2>
<PREFIX1>37.38</PREFIX1>
<PREFIX2>48.49.50</PREFIX2>
<SDFDEF SdfCode='0' SdfFormat='DATA'/>
<SDFDEF SdfCode='1' SdfFormat='DATA.SUFFIX1'/>
<SDFDEF SdfCode='2' SdfFormat='DATA.SUFFIX2'/>
<SDFDEF SdfCode='3' SdfFormat='DATA.SUFFIX1.SUFFIX2'/>
<SDFDEF SdfCode='4' SdfFormat='PREFIX2.DATA'/>
<SDFDEF SdfCode='5' SdfFormat='PREFIX2.DATA.SUFFIX1'/>
<SDFDEF SdfCode='6' SdfFormat='PREFIX1.DATA.SUFFIX2'/>
<SDFDEF SdfCode='7' SdfFormat='PREFIX1.DATA.SUFFIX1.SUFFIX2'/>
</SDFMETA>
<SDFSELECT>6</SDFSELECT>
</SDF>
Page 35

INSTALLATION & CONFIGURATION 2 - 13
In the XML sample above, four SDF prefix/suffix labels are defined as: SUFFIX1, SUFFIX2, PREFIX1, and
PREFIX2. The values in these tags are delimited by a '.' character in the XML. Each of these labels is defined
as shown below with the decimal ASCII character sequence that they represent:
SUFFIX1 = ascii(13), ascii(10) = CR, LF
SUFFIX2 = ascii(35), ascii(36) = #, $
PREFIX1 = ascii(37), ascii(38) = %, &
PREFIX2 = ascii(48), ascii(49), ascii(50) = 0, 1, 2
Formats are also delimited by a '.' character in the XML. There can be one or more format definitions that use
the above defined labels as follows:
<SDFDEF SdfCode='6' SdfFormat='PREFIX1.DATA.SUFFIX2' />
This format definition is identified by the keyword SdfCode and the format is represented by the keyword
SdfFormat. Note that DATA is an intrinsic that means Insert the Scanned Bar Code Here. The format defin ition
to be executed is based on SdfCode and is specified in the <SDFSELECT> tag. The XML clause above would
transmit the barcode data as:
%& BarcodeData#$
Page 36

2 - 14 ZEBRA SCANNER SDK FOR WINDOWS DEVELOPER’S GUIDE
Basic Installation Verification
You can perform a basic inspection on your system process list to verify a successful installation of the Zebra
Scanner SDK.
NOTE This is simple verification of the operation of the Zebra Scanner SDK. See How to Verify Scanner SDK
Functionality on page 4-7 for more advanced SDK testing.
The following instructions guide you through a simple check of the Scanner SDK's operation.
1. Right click on the Windows Task Bar and select Task Manager.
Figure 2-9
2. Under the Processes tab, find the CoreScanner.exe in the Image Name list under.
Figure 2-10
3. The appearance of CoreScanner.exe in the Processes list indicates a successful installation.
Task Bar Selection of Task Manager
CoreScanner.exe on Ta sk Manager
Page 37

Silent Unattended Installation of the Scanner SDK
The CoreScanner driver and the Scanner SDK require the Microsoft 2017 C++ Redistributable Package which
automatically installs if it is does not already exist on the host PC. For an unattended installation, a
complication arises if the 2017 C++ Redistributable is not pre-installed. By default, Microsoft triggers a reboot
of the PC after the C++ Redistributable installation. In this case, a reboot is injected into the overal l silent install
process (which may then also require a login).
To avoid the interruption, the 2017 C++ Redistributable can be downloaded from Microsoft and pre-installed
silently while suppressing the reboot using the command lin e switches /install /quiet /norestart. This de lays the
required reboot, and allows a custom silent CoreScanner and Scanner SDK install to be performed using a
subsequent command.
The Visual C++ Redistributable for Visual Studio 2017 can be downloaded from the Microsoft website. The
appropriate file vcredist_x86.exe (32-bit version) or vcredist_x64.exe (64-bit version) must be selected and
downloaded. The command line to perform its install silently without reboot is:
vcredist_x86.exe /install /quiet /norestart
or
vcredist_x64.exe /install /quiet /norestart
INSTALLATION & CONFIGURATION 2 - 15
The required reboot must be performed at the end of the overall installation process to ensure correct
operation.
The Zebra Scanner SDK, including the underlying CoreScanner driver, is packaged using the Flexera
InstallShield installer program. SDK components can be selectively installed using the SDK Custom Installation
option. In conjunction with this custom install option, the installer program supports command line switches to
record custom responses that can be used to create a silent install response file. The se respon se files, ending
in the extension .iss, may then be used to perform a silent installation of the CoreScanner driver and Scanner
SDK components on production PCs.
The Silent Install command line options are listed in Table 2-4.
Table 2-4
Command Line Switch Description
Silent Install Command Line Options
-s Silent mode. The -s switch runs the i nstal lation in silent mode using the responses
contained in a recorded response file.
-r Record mode. The -r switch displays all the setup dialogs and records the chosen
responses in the file specified with the -f1 switch described below.
-f1 Specify custom response file name and path. The -f1 switch specifies where the
response file is located for the -s switch, or where it should be created when using
the -r switch. Specify an absolute path; using a relative path yields unpredictable
results.
-f2 Specify alternative log file name and path. When running an installation in silent
mode (using the -s switch), the log file is created by default in the same directory
and with the same name (except for the extension) as the response file. The -f2
switch enables you to specify an alternative log file location and fil e name. Spe cify
an absolute path; using a relative path yields unpredictable results.
When executed from a command prompt, the example below uses the -r and -f1 switches to record your
responses to the setup prompts into a custom response file:
Zebra_Scanner_SDK_(32bit)_v3.0x.00xx.exe" -r -f1"c:\path\customsetup.iss
Page 38

2 - 16 ZEBRA SCANNER SDK FOR WINDOWS DEVELOPER’S GUIDE
The responses chosen using the command above are saved in the specified resp onse file and can then be
used as input to silently install the SDK with those chosen responses on production PCs.
The next example shows how the -s switch uses the response file created with the previous command to
perform the silent install:
Zebra_Scanner_SDK_(32bit)_v3.0x.00xx.exe" -s -f1"c:\path\customsetup.iss
Note that there is no space between the -f1 switch and first quotation mark for the custom response file.
If necessary, the -r switch option can also be used to record a custom response file for a silent removal of the
SDK by running the command on a PC that has the SDK already installed.
IMPORTANT The CoreScanner drivers are required for any SDK component so the CoreScanner services are
installed and must be running to provide functionality.
Page 39

CHAPTER 3 SCANNER SDK API
Overview
The Zebra Scanner SDK provides an easy to use yet powerful and extendible set of API commands to
interface with scanner devices. The API commands include:
•
Open
•
GetScanners
•
ExecCommand
•
ExecCommandAsync
•
Close.
Once the SDKs Open and GetScanners commands are invoked and the list of connected scanners is
retrieved, all other methods execute through the ExecCom mand and ExecCommandAsync co mmands. This is
a user friendly approach, and easy to code in terms of day-to-day programming.
With the evolution of the SDK's capabilities, it is easier to increase the number of methods rather than increase
the number of API commands. The benefit to the user is that, once you have the system up and running, a new
method is just an additional operation to the existing code.
In addition to the commands above, the Zebra Scanner SDK supports seven types of events:
•
ImageEvent
•
VideoEvent
•
BarcodeEvent
•
PNPEvent
•
ScanRMDEvent
•
CommandResponseEvent
•
IOEvent
•
BinaryDataEvent.
See Appendix A, WRITE SIMPLE APPLICATIONS USING THE SCANNER SDK API for a starter example of
an application illustrating the Zebra Scanner SDK API. For a table listing the most commonly requested topics
within this guide, see Quick Startup in the back of the guide.
NOTE For a list of a scanner's supported attribute (para me ter) numbers and definitions, refer to the Product
Reference Guide for that model scanner, available from the Zebra Support website at
http://www.zebra.com/support. Attributes include configuration parameters, monitored data, and asset
tracking information.
Page 40

3 - 2 ZEBRA SCANNER SDK FOR WINDOWS DEVELOPER’S GUIDE
Scanner ID
In the SDK context, scanner ID uniquely identifies a scanner device connected to the CoreScanner driver, and
is required to communicate programmatically with the device. Developers need to call the GetScanners
method of the CoreScanner API in order to retrieve the scanner IDs of connected devices. For example, to
switch on a scanner’s red LED, the scanner ID of that particular scanner must be obtaine d to provide that value
in the <scannerID> element of inXML of the ExecCommand method call.
During each CoreScanner driver instance, scann e r IDs are sequentially assigned to each connected device.
When the CoreScanner driver is restarted, the array of connected scanners is reinitialized and previous
scanner IDs may no longer be valid. In this ca se, the GetScanners meth od must be executed to obtai n the new
scanner IDs.
During a single CoreScanner driver instance, an RSM
retaina its unique scanner ID. However, a non-RSM device is assigned a different scanner ID each time it is
reconnected.
1
NOTE
Remote Scanner Management
1
-supported scanner that is unplugged , and reconnected
Page 41

API Commands
Open
Opens an application instance from the user application or user library. This must be the first API command
called before invoking any other API command from the user level application.
Syntax
SCANNER SDK API 3 - 3
C# C++
void Open(
int reserved,
System.Array sfTypes,
short lengthOfTypes,
out int status);
HRESULT STDMETHODCALLTYPE Open(
/* [in] */ LONG reserved,
/* [in] */ SAFEARRAY * sfTypes,
/* [in] */ SHORT lengthOfTypes,
/* [out] */ LONG *status) = 0;
Parameters
reserved - Reserved argument. Set to 0.
sfTypes - Selects the types of scanners requested for use with the API.
Table 3-1
SCANNER_TYPES_ALL 1 All Scanners
SCANNER_TYPES_SNAPI 2 SNAPI Scanners
SCANNER_TYPES_SSI 3 SSI Scanners (RS232)
SCANNER_TYPES_IBMHID 6 IBM Hand Held Scanners (USB OPOS)
SCANNER_TYPES_NIXMODB 7 Nixdorf Mode B scanners (RS232)
SCANNER_TYPES_HIDKB 8 USB HID Keyboard emulation scanners
Value s for sfTypes
Code Value Scanner Category
SCANNER_TYPES_IBMTT 9 IBM T able Top Scanners
lengthOfTypes - Number of elements or the size of sfTypes array
status - Return value for the command
Return Values
0 - Success.
Any other value - See Error and Status Codes on page 3-42.
Page 42

3 - 4 ZEBRA SCANNER SDK FOR WINDOWS DEVELOPER’S GUIDE
GetScanners
Gets a list of scanners of the requested types that are connected at any time. This command should be
invoked after the Open command.
Syntax
C# C++
void GetScanners(
out short numberOfScanners,
System.Array sfScannerIDList,
out string outXML,
out int status);
HRESULT STDMETHODCALLTYPE GetScanners(
/* [out] */ SHORT *numberOfScanners,
/* [out][in] */ SAFEARRAY * sfScannerIDList,
/* [out] */ BSTR *outXML,
/* [out] */ LONG *status) = 0;
Parameters
numberOfScanners - Number of connected scanners of requested type(s).
sfScannerIDList - Array of scannerIDs of the requested type(s). The size of the array is 255
(MAX_NUM_DEVICES).
outXML - XML string-scanner meta information. See Chapter 4, TEST UTILITIES & SOURCE CODE for
examples.
status - Return value for the command.
Return Values
0 - Success.
Any other value - See Error and Status Codes on page 3-42.
Page 43

ExecCommand
Provides synchronous execution of a method via an opcode.
Syntax
C# C++
SCANNER SDK API 3 - 5
void ExecCommand(
int opcode,
ref string inXML,
out string outXML,
out int status);
HRESULT STDMETHODCALLTYPE ExecCommand(
/* [in] */ LONG opcode,
/* [in] */ BSTR *inXML,
/* [out] */ BSTR *outXML,
/* [out] */ LONG *status) = 0;
Parameters
opcode - Method to be executed. See Table 3-11 on page 3-17 for opcodes.
inXML - Relevant argument list for the opcode, structured into an XML str ing.
outXML - XML string, scanner meta information.
status - Return value for the command.
Return Values
0 - Success.
Any other value - See Error and Status Codes on page 3-42.
Page 44

3 - 6 ZEBRA SCANNER SDK FOR WINDOWS DEVELOPER’S GUIDE
ExecCommandAsync
Provides asynchronous execution of a method via an opcode. Any response data is retrieved as
CommandResponseEvents. See CommandResponseEvent on page 3-14.
HRESULT STDMETHODCALLTYPE ExecCommandAsync(
/* [in] */ LONG opcode,
/* [in] */ BSTR *inXML,
/* [out] */ LONG *status) = 0;
Syntax
C# C++
void ExecCommandAsync(
int opcode,
ref string inXML,
out int status);
HRESULT STDMETHODCALLTYPE ExecCommandAsync(
/* [in] */ LONG opcode,
/* [in] */ BSTR *inXML,
/* [out] */ LONG *status) = 0;
Parameters
opcode - Method to be executed. See Table 3-11 on page 3-17 for opcodes.
inXML - Relevant argument list for the opcode, structured into an XML string.
status - Return value for the command.
Return Values
0 - Success.
Any other value - See Error and Status Codes on page 3-42.
Close
Closes the application instance through the CoreScanner service.
Syntax
C# C++
void Close(
int reserved,
out int status);
HRESULT STDMETHODCALLTYPE Close(
/* [in] */ LONG reserved,
/* [out] */ LONG *status) = 0;
Parameters
reserved - Reserved argument. Set to 0.
status - Return value for the command.
Return Values
0 - Success.
Any other value - See Error and Status Codes on page 3-42.
Page 45

API Events
The user application must register for each event category separately to receive events for that category. Use
the methods REGISTER_FOR_EVENTS and UNREGISTER_FOR_EVENTS for this purpose (see Table 3-11
on page 3-17).
ImageEvent
Triggered when an imaging scanner captures images in image mode. To receive ImageEvents, an application
needs to execute the REGISTER_FOR_EVENTS method with the SUBSCRIBE_IMAGE event type.
Syntax
SCANNER SDK API 3 - 7
C# C++
void OnImageEvent(
short eventType
int size
short imageFormat,
ref object sfimageData,
ref string pScannerData)
void OnImageEvent(
SHORT eventType,
LONG size,
SHORT imageFormat,
VARIANT *sfImageData,
BSTR* pScannerData)
Parameters
eventType - Type of image event received (see Table 3-2).
Table 3-2
IMAGE_COMPLETE 1 Triggered when complete image captured
IMAGE_TRAN_STATUS 2 Triggered when image error or status
size - Size of image data buffer.
imageFormat - Format of image. (See Table 3-3.)
Table 3-3
BMP_FILE_SELECTION 3
Image Event Types
Event Type Value Description
Image Formats
Image Type Value
TIFF_FILE_SELECTION 4
JPEG_FILE_SELECTION 1
sfimageData - Image data buffer.
pScannerData - Information in XML format about the scanner (ID, Model Number, Serial Number and GUID)
that triggered the image event.
<?xml version="1.0" encoding="UTF-8"?>
<outArgs>
<scannerID>1</scannerID>
<arg-xml>
<modelnumber>DS6707-SR20001ZZR</modelnumber>
<serialnumber>7114000503322</serialnumber>
<GUID>33C01F39EB23D949B5F3DBF643304FC4</GUID>
</arg-xml>
</outArgs>
Page 46

3 - 8 ZEBRA SCANNER SDK FOR WINDOWS DEVELOPER’S GUIDE
VideoEvent
Triggered when an imaging scanne r captures video in video mode. To receive VideoEvents, an application
needs to execute the REGISTER_FOR_EVENTS method with the SUBSCRIBE_VIDEO event type.
Syntax
C# C++
void OnVideoEvent(
short eventType,
int size,
ref object sfvideoData,
ref string pScannerData)
void OnVideoEvent(
SHORT eventType,
LONG size,
VARIANT *sfvideoData,
BSTR* pScannerData)
Parameters
eventType - Type of video event received (see Table 3-4).
size - Size of video data buffer.
sfvideoData - Video data buffer.
pScannerData - Reserved parameter: always returns an empty string.
Table 3-4
Video Event Types
Event Type Value Description
VIDEO_FRAME_COMPLETE 1
Triggered when complete video frame is captured.
BarcodeEvent
Triggered when a scanner captures bar codes. To receive BarcodeEvents, an application needs to execute the
REGISTER_FOR_EVENTS method with the SUBSCRIBE_BARCODE event type.
Syntax
C# C++
void OnBarcodeEvent(
short eventType,
ref string pscanData)
void OnBarcodeEvent(
SHORT eventType,
BSTR pscanData )
Parameters
eventType - Type of barcode event received (see Table 3-4).
Table 3-5
SCANNER_DECODE_GOOD
Barcode Event Types
Event Type Value Description
1
Triggered when a decode is su ccessful.
Page 47

SCANNER SDK API 3 - 9
pscanData - Barcode string that contains information about the scanner that triggered the barcode event
including data type, data label and raw data of the scanned barcode.
<?xml version="1.0" encoding="UTF-8"?>
<outArgs>
<scannerID>1</scannerID>
<arg-xml>
<scandata>
<modelnumber>DS6707-SR20001ZZR</modelnumber>
<serialnumber>7114000503322</serialnumber>
<GUID>33C01F39EB23D949B5F3DBF643304FC4</GUID>
<datatype>8</datatype>
<datalabel>0x30 0x32 0x31 0x38 0x39 0x38 0x36 0x32</datalabel>
<rawdata>0x30 0x32 0x31 0x38 0x39 0x38 0x36 0x32</rawdata>
</scandata>
</arg-xml>
</outArgs>
The value of the <datatype> in the XML above indicates the barcode type of the scanned barcode.
Table 3-6 lists the values received in IBM Hand-Held USB, SNAPI and Wincor-Nixdorf RS-232 Mode B
communication protocols for each supported barcode type.
Table 3-6
Barcode Data Types
Communication Protocol
Barcode Data Type
SNAPI IBM Hand-Held NIXDORF Mode B
Code 39 1 1 1
Codabar 2 2 2
Code 128 3 3 3
Discrete (Standard) 2 of 5 4 4 4
IATA 5 N/A 4
Interleaved 2 of 5 6 6 6
Code 93 7 7 7
UPC-A 8 8 8
UPC-E0 9 9 9
EAN-8 10 10 10
EAN-13 11 11 8
Code 11 12 N/A N/A
Code 49 13 13 N/A
MSI 14 N/A 14
EAN-128 15 15 15
UPC-E1 16 N/A N/A
A barcode data type marked as N/A is unsupported by that communication protocol. The SDK
typically returns a value of 0 for these barcode data types. However, in some cases the SDK may
identify these symbologies as a related data type. For example, UPC-A + 2 Supplemental is not a
supported symbology in Nixdorf Mode B but the SDK identifies it as UPC-A.
Page 48

3 - 10 ZEBRA SCANNER SDK FOR WINDOWS DEVELOPER’S GUIDE
Table 3-6
PDF-417 17 17 17
Code 16K 18 N/A N/A
Code 39 Full ASCII 19 N/A N/A
UPC-D 20 N/A N/A
Code 39 Trioptic 21 N/A N/A
Bookland 22 N/A 8
Coupon Code 23 N/A N/A
NW-7 24 N/A N/A
ISBT-128 25 N/A N/A
Micro PDF 26 N/A 26
DataMatrix 27 27 27
QR Code 28 28 28
Barcode Data Types (Continued)
Barcode Data Type
Communication Protocol
SNAPI IBM Hand-Held NIXDORF Mode B
Micro PDF CCA 29 N/A N/A
PostNet US 30 N/A N/A
Planet Code 31 N/A N/A
Code 32 32 N/A N/A
ISBT-128 Con 33 N/A N/A
Japan Postal 34 N/A N/A
Australian Postal 35 N/A N/A
Dutch Postal 36 N/A N/A
MaxiCode 37 37 37
Canadian Postal 38 N/A N/A
UK Postal 39 N/A N/A
Macro PDF 40 N/A N/A
Micro QR code 44 44 28
Aztec 45 45 45
GS1 Databar (RSS-14) 48 48 48
RSS Limited 49 49 48
A barcode data type marked as N/A is unsupported by that communication protocol. The SDK
typically returns a value of 0 for these barcode data types. However, in some cases the SDK may
identify these symbologies as a related data type. For example, UPC-A + 2 Supplemental is not a
supported symbology in Nixdorf Mode B but the SDK identifies it as UPC-A.
Page 49

SCANNER SDK API 3 - 11
Table 3-6
GS1 Databar Expanded (RSS Expanded) 50 50 48
Scanlet 55 N/A N/A
UPC-A + 2 Supplemental 72 72 N/A
UPC-E0 + 2 Supplemental 73 73 N/A
EAN-8 + 2 Supplemental 74 74 N/A
EAN-13 + 2 Supplemental 75 75 N/A
UPC-E1 + 2 Supplemental 80 N/A N/A
CCA EAN-128 81 N/A N/A
CCA EAN-13 82 N/A N/A
CCA EAN-8 83 N/A N/A
CCA RSS Expanded 84 N/A N/A
CCA RSS Limited 85 N/A N/A
Barcode Data Types (Continued)
Barcode Data Type
Communication Protocol
SNAPI IBM Hand-Held NIXDORF Mode B
CCA RSS-14 86 N/A N/A
CCA UPC-A 87 N/A N/A
CCA UPC-E 88 N/A N/A
CCC EAN-128 89 N/A N/A
TLC-39 90 N/A N/A
CCB EAN-128 97 N/A N/A
CCB EAN-13 98 N/A N/A
CCB EAN-8 99 N/A N/A
CCB RSS Expanded 100 N/A N/A
CCB RSS Limited 101 N/A N/A
CCB RSS-14 102 N/A N/A
CCB UPC-A 103 N/A N/A
CCB UPC-E 104 N/A N/A
Signature Capture 105 N/A N/A
Matrix 2 of 5 113 N/A N/A
Chinese 2 of 5 114 N/A N/A
A barcode data type marked as N/A is unsupported by that communication protocol. The SDK
typically returns a value of 0 for these barcode data types. However, in some cases the SDK may
identify these symbologies as a related data type. For example, UPC-A + 2 Supplemental is not a
supported symbology in Nixdorf Mode B but the SDK identifies it as UPC-A.
Page 50

3 - 12 ZEBRA SCANNER SDK FOR WINDOWS DEVELOPER’S GUIDE
Table 3-6
Barcode Data Types (Continued)
Communication Protocol
Barcode Data Type
SNAPI IBM Hand-Held NIXDORF Mode B
UPC-A + 5 Supplemental 136 136 N/A
UPC-E0 + 5 Supplemental 137 137 N/A
EAN-8 + 5 Supplemental 138 138 N/A
EAN-13 + 5 Supplemental 139 139 N/A
UPC-E1 + 5 Supplemental 144 N/A N/A
Macro Micro PDF 154 N/A N/A
A barcode data type marked as N/A is unsupported by that communication protocol. The SDK
typically returns a value of 0 for these barcode data types. However, in some cases the SDK may
identify these symbologies as a related data type. For example, UPC-A + 2 Supplemental is not a
supported symbology in Nixdorf Mode B but the SDK identifies it as UPC-A.
PNPEvent
Triggered when a scanner of a requested type attaches to the syste m or detaches from the system. The pairing
of a Bluetooth scanner to a cradle does not trigger a PnP event. To receive information about a newly paired
device, the GetScanners command must be called again. To receive PnPEvents, an application needs to
execute the REGISTER_FOR_EVENTS method with the SUBSCRIBE_PNP event type.
Syntax
C# C++
void OnPNPEvent(
short eventType,
ref string ppnpData)
void OnPNPEvent (
SHORT eventType,
BSTR ppnpData)
Parameters
eventType - Type of PnP event received (see Table 3-7).
Table 3-7
SCANNER_ATTACHED
SCANNER_DETACHED
ppnpData - PnP information string containing the asset tracking information of the attached or detached
device.
PnP Event Types
Event Type Value Description
0
1
Triggered when a Zebra Scanner is attached.
Triggered when a Zebra Scanner is detached.
Page 51

SCANNER SDK API 3 - 13
<?xml version="1.0" encoding="UTF-8"?>
<outArgs>
<arg-xml>
<scanners>
<scanner type="USBIBMHID">
<scannerID>1</scannerID>
<modelnumber>CR0078-SC10007WR </modelnumber>
<serialnumber>1020800512980 </serialnumber>
<GUID>3665579766A9514DAAF523D35E051674</GUID>
<pnp>0</pnp>
<scanner type="USBIBMHID">
<scannerID>2</scannerID>
<modelnumber>DS6878-SR20007WR </modelnumber>
<serialnumber>M1M87R38Y </serialnumber
>
<GUID></GUID>
<pnp>1</pnp>
</scanner>
</scanner>
</scanners>
<status>1</status>
</arg-xml>
</outArgs>
Information about
Bluetooth Cradle
Information about
Bluetooth Scanner
Samples
Sample ppnpData XML for attachment of a direct scanner.
<?xml version="1.0" encoding="UTF-8"?>
<outArgs>
<arg-xml>
<scanners>
<scanner type="SNAPI">
<scannerID>1</scannerID>
<modelnumber>DS9808-SR00007C1WR</modelnumber>
<serialnumber>1026300507698 </serialnumber>
<GUID>77E48FC31C75444B90BE318FECFAE867</GUID>
</scanner>
</scanners>
<status>1</status>
</arg-xml>
</outArgs>
Sample ppnpData XML for a ttachment of a cascaded scan ner. This XML can be received as a PnP event after
a GetScanners command, if there are devices newly paired to a Bluetooth cradle.
Page 52

3 - 14 ZEBRA SCANNER SDK FOR WINDOWS DEVELOPER’S GUIDE
ScanRMDEvent
Receives RMD Events when updating firmware of the scanner. To receive RMD Events, an application needs
to execute the REGISTER_FOR_EVENTS method with the SUBSCRIBE_RMD event type.
Syntax
C# C++
void OnScanRMDEvent(
short eventType,
ref string prmdData)
void OnScanRMDEvent (
SHORT eventType,
BSTR prmdData )
Parameters
eventType - Type of the RMD event received (see Table 3-8).
prmdData - ScanRMD information string containing the data of event. (See Firmware Upgrade Scenarios on
page 4-27 for more details on this string.)
Table 3-8
SCANNER_UF_SESS_START 11 Triggered when flash download session starts.
SCANNER_UF_DL_START 12 Triggered when component download starts.
SCANNER_UF_DL_PROGRESS 13 Triggered when block(s) of flash completed.
SCANNER_UF_DL_END 14 Triggered when component download ends.
SCANNER_UF_SESS_END 15 Triggered when flash download session ends.
SCANNER_UF_STATUS 16 Triggered when update error or status.
RMD Event Types
Event Type Value Description
CommandResponseEvent
Received after an asynchronous command execution (ExecCommandAsync). To receive
CommandResponseEvents, an application needs to execute the REGISTER_FOR_EVENTS method with the
SUBSCRIBE_OTHER event type.
Syntax
C# C++
void OnCommandResponseEvent(short status,
ref string prspData)
Parameters
status - Status of the executed command. (See Error/Status Codes on page 3-42.)
prspData - CommandResponse information string that contains the outXML of the executed command.
void OnScanRMDEvent (
SHORT status,
BSTR prspData)
Page 53

SCANNER SDK API 3 - 15
IOEvent
Received when an exclusively claimed device is accessed by another client application. To receive IOEvents,
an application needs to execute the REGISTER_FOR_EVENTS method with the SUBSCRIBE_OTHER event
type. Standard practice is that an application handles these IO Events once it has claimed a scanner. While
that application has the scanner claimed, other applications get STATUS_LOCKED when they try to execute
commands directed toward the claimed scanner.
Syntax
C# C++
void OnIOEvent(
short type,
byte data)
void OnIOEvent(
short type,
BYTE data)
Parameters
type - Reserved parameter.
data - Reserved parameter.
ScannerNotificationEvent
Received when a SNAPI scanner changes its operational mode. To receive ScannerNotificationEvents, an
application needs to execute the REGISTER_FOR_EVENTS method with the SUBSCRIBE_OTHER event
type.
Syntax
C# C++
void OnScannerNotification (
short notificationType,
ref string pScannerData)
Parameters
void OnScannerNotification (
short notificationType,
BSTR pScannerData)
notificationType - Type of the notification event received (see Table 3-9).
pScannerData - Information about the scanner (ID, Model Number, Serial Number and GUID) that triggered
the notification event.
Table 3-9
Notification Event Types
Notification Type Value Description
DECODE_MODE 1 Triggered when a scanner changes its operation mode to
decode.
SNAPSHOT_MODE 2 Triggered when a scanner changes its operation mode to
image mode.
VIDEO_MODE 3 Triggered when a scanner changes its operation mode to
video mode.
Page 54

3 - 16 ZEBRA SCANNER SDK FOR WINDOWS DEVELOPER’S GUIDE
BinaryDataEvent
Triggered when an IDC-supported imaging scanner captures an image in Intelligent Document Capture (IDC)
or Signature Capture mode. To receive a BinaryDataEvent, an application needs to execute the
REGISTER_FOR_EVENT method with the SUBSCRIBE_IMAGE event type.
Syntax
C# C++
void On_BinaryDataEvent(
short eventType,
int size,
short dataFormat,
ref object sfBinaryData,
ref string pScannerData)
void OnBinaryDataEvent(
SHORT eventType,
LONG size,
SHORT dataFormat,
VARIANT * sfBinaryData,
BSTR* pScannerData)
Parameters
eventType - Reserved.
size - Size of the BinaryData data buffer.
dataFormat - The format of the Binary DataEvent
Table 3-10
0xB5 IDC format
0x69 Signature Capture Format
sfBinaryData - IDC/Signature Capture data buffer.
pScannerData - Information in XML format about the scanner (ID, Model Number, Serial Number, and GUID)
that triggered the BinaryDataEvent.
Notification Event Types
Data Format Description
<?xml version="1.0" encoding="UTF-8"?>
<outArgs>
<scannerID>1</scannerID>
<arg-xml>
<modelnumber>DS6707-DC20007ZZR </modelnumber>
<serialnumber>1222800502597 </serialnumber>
<GUID>28B8BF91FB7F3A459CFF63BAEFDC767B</GUID>
<channel>usb_BULK</channel>
</arg-xml>
</outArgs>
NOTE The <channel> tag in the XML above refers to the USB channel which the scanner uses to send the
Binary data. This can be usb_BULK or usb_HID.
Both Intelligent Document Capture (IDC) and Signature Capture data are presented with the BinaryDataEvent.
This event is fired by the CoreScanner service when this binary capture data is available. A client application
has to register for image events using the RegisterForEvents opcode in order to receive BinaryDataEvents
from the CoreScanner driver. The image data payload of a BinaryDataEvent is passed through the VARIANT
type argument sfBinaryData. The event type captured, IDC or Signature, is specified with the dataFormat
parameter of the event handler function. Document Capture data is formatted according to the ISO15434
Specification (see Appendix C, DESCRIPTION OF INTELLIGENT DOCUMENT CAPTURE FORMAT for
details). Signature Capture data is formatted with the Z ebra standa rd image for mat (refer to Signature Cap ture
in the Appendix of Product Reference Guide for the image scanner in use).
Page 55

SCANNER SDK API 3 - 17
Methods Invoked Through ExecCommand Or ExecCommandAsync
Table 3-11
Scanner SDK Commands GET_VERSION 1000
Scanner Access Control Commands CLAIM_DEVICE 1500
Scanner Common Commands ABORT_MACROPDF 2000
List of Methods
Description Method Value Page
REGISTER_FOR_EVENTS 1001
UNREGISTER_FOR_EVENTS 1002
RELEASE_DEVICE 1501
ABORT_UPDATE_FIRMWARE 2001
AIM_OFF 2002
AIM_ON 2003
FLUSH_MACROPDF 2005
DEVICE_PULL_TRIGGER 2011
DEVICE_RELEASE_TRIGGER 2012
SCAN_DISABLE 2013
3-19
3-20
3-20
3-21
3-21
3-21
3-22
3-22
3-22
3-23
3-23
3-23
3-24
SCAN_ENABLE 2014
SET_PARAMETER_DEFAULTS 2015
DEVICE_SET_PARAMETERS 2016
SET_PARAMETER_PERSISTANCE 2017
REBOOT_SCANNER 2019
Scanner Operation Mode Commands DEVICE_CAPTURE_IMAGE 3000
DEVICE_CAPTURE_BARCODE 3500
DEVICE_CAPTURE_VIDEO 4000
* Values for the SET_ACTION method are available in
Table 3-13 on page 3-35
.
3-24
3-24
3-25
3-25
3-26
3-26
3-26
3-27
Page 56

3 - 18 ZEBRA SCANNER SDK FOR WINDOWS DEVELOPER’S GUIDE
Table 3-11
Scanner Management Commands ATTR_GETALL 5000
Scanner Action Commands * SET_ACTION 6000
Serial Scanner Commands DEVICE_SET_SERIAL_PORT_SETTINGS 6101
List of Methods (Continued)
Description Method Value Page
ATTR_GET 5001
ATTR_GETNEXT 5002
ATTR_SET 5004
ATTR_STORE 5005
GET_DEVICE_TOPOLOGY 5006
START_NEW_FIRMWARE 5014
UPDATE_FIRMWARE 5016
UPDATE_FIRMWARE_FROM_PLUGIN 5017
UPDATE_DECODE_TONE 5050
ERASE_DECODE_TONE 5051
3-27
3-29
3-30
3-31
3-31
3-32
3-32
3-33
3-33
3-34
3-34
3-34
3-36
Other Commands DEVICE_SWITCH_HOST_MODE 6200
Keyboard Emulator Commands KEYBOARD_EMULATOR_ENABLE 6300
KEYBOARD_EMULATOR_SET_LOCALE 6301
KEYBOARD_EMULATOR_GET_CONFIG 6302
Scale Commands SCALE_READ_WEIGHT 7000
SCALE_ZERO_SCALE 7002
SCALE_SYSTEM_RESET 7015
* Values for the SET_ACTION method are available in
Table 3-13 on page 3-35
.
3-37
3-38
3-38
3-39
3-40
3-41
3-41
Page 57

Examples: Using the Methods
<inArgs></inArgs>
outXml:
<?xml version="1.0" encoding="UTF-8"?>
<outArgs>
<arg-xml>
<arg-string>01.00.00</arg-string>
</arg-xml>
</outArgs>
Version of the CoreScanner driver
NOTE The inXML segments that follow are only examples. The inXML strings must be customized by the
programmer based on each user’s requirements.
GET_VERSION
Value 1000
Description: Gets the version of CoreScanner Driver
Asynchronous supported: No
Supported Scanner Communication Protocols: N/A
inXml:
SCANNER SDK API 3 - 19
Page 58

3 - 20 ZEBRA SCANNER SDK FOR WINDOWS DEVELOPER’S GUIDE
<inArgs>
<cmdArgs>
<arg-int>6</arg-int>
<arg-int>1,2,4,8,16,32</arg-int>
</cmdArgs>
</inArgs>
Number of Events
Event ID(s)
<inArgs>
<cmdArgs>
<arg-int>6</arg-int>
<arg-int>1,2,4,8,16,32</arg-int>
</cmdArgs>
</inArgs>
Number of Events
Event ID(s)
REGISTER_FOR_EVENTS
Value 1001
Description: Register for API events described API Events beginning on
page 3-7
Asynchronous supported: No
Supported Scanner Communication Protocols: N/A
inXml:
Table 3-12 lists the Event IDs for the inXML code above.
Table 3-12
Event IDs
Event Name Event ID
SUBSCRIBE_BARCODE
SUBSCRIBE_IMAGE
SUBSCRIBE_VIDEO
SUBSCRIBE_RMD
SUBSCRIBE_PNP
SUBSCRIBE_OTHER
1
2
4
8
16
32
outXml: null
UNREGISTER_FOR_EVENTS
Value 1002
Description: Unregister from API events described in API Events
beginning on page 3-7
Asynchronous supported: No
Supported Scanner Communication Protocols: N/A
inXml:
outXml: null
Page 59

SCANNER SDK API 3 - 21
<inArgs>
<scannerID>1</scannerID>
</inArgs>
Specified Scanner ID
<inArgs>
<scannerID>1</scannerID>
</inArgs>
Specified Scanner ID
<inArgs>
<scannerID>1</scannerID>
</inArgs>
Specified Scanner ID
CLAIM_DEVICE
Value 1500
Description: Claim a specified device
Asynchronous supported: No
Supported Scanner Communication Protocols: n/a
inXml:
outXml:null
RELEASE_DEVICE
Value 1501
Description: Release a specified device
Asynchronous supported: No
Supported Scanner Communication Protocols: n/a
inXml:
outXml:null
ABORT_MACROPDF
Value 2000
Description: Abort MacroPDF of a specified scanner
Asynchronous supported: No
Supported Scanner Communication Protocols:SNAPI
inXml:
outXml:null
Page 60

3 - 22 ZEBRA SCANNER SDK FOR WINDOWS DEVELOPER’S GUIDE
<inArgs>
<scannerID>1</scannerID>
</inArgs>
Specified Scanner ID
<inArgs>
<scannerID>1</scannerID>
</inArgs>
Specified Scanner ID
<inArgs>
<scannerID>1</scannerID>
</inArgs>
Specified Scanner ID
ABORT_UPDATE_FIRMWARE
Value 2001
Description: Abort Firmware updates process of a specified scanner while
it is progressing
Asynchronous supported: No
Supported Scanner Communication Protocols: IBM Hand-held, IBM Table-top, SNAPI , SSI
inXml:
outXml:null
WARNING! If the scanner’s firmware is not backup protected, issuing this command during a firmware
update may cause a corruption leaving the scanner inoperab le. For models that are backup
protected refer to the Scanner SDK for Windows website at:
www.zebra.com/scannersdkforwindows.
AIM_OFF
Value 2002
Description: Turn off the aiming of a specified scanner
Asynchronous supported: No
Supported Scanner Communication Protocols: SNAPI
inXml:
outXml:null
AIM_ON
Value 2003
Description: Turn on the aiming of a specified scanner
Asynchronous supported: No
Supported Scanner Communication Protocols: SNAPI
inXml:
outXml:null
Page 61

SCANNER SDK API 3 - 23
<inArgs>
<scannerID>1</scannerID>
</inArgs>
Specified Scanner ID
<inArgs>
<scannerID>1</scannerID>
</inArgs>
Specified Scanner ID
<inArgs>
<scannerID>1</scannerID>
</inArgs>
Specified Scanner ID
FLUSH_MACROPDF
Value 2005
Description: Flush MacroPDF of a specified scanner
Asynchronous supported: No
Supported Scanner Communication Protocols: SNAPI
inXml:
outXml:null
DEVICE_PULL_TRIGGER
Value 2011
Description: Pull the trigger of a specified scanner
Asynchronous supported: N/A
Supported Scanner Communication Protocols: SNAPI, IBM Hand-held*, IBM Table-top*, SSI*
* Supported auxiliary scanners if the firmware supports.
inXml:
outXml:null
DEVICE_RELEASE_TRIGGER
Value 2012
Description: Release the pulled trigger of a specified scanner
Asynchronous supported: N/A
Supported Scanner Communication Protocols: SNAPI, IBM Hand-held*, IBM Table-top*, SSI*
* Supported auxiliary scanners if the firmware supports.
inXml:
outXml:null
Page 62

3 - 24 ZEBRA SCANNER SDK FOR WINDOWS DEVELOPER’S GUIDE
<inArgs>
<scannerID>1</scannerID>
</inArgs>
Specified Scanner ID
<inArgs>
<scannerID>1</scannerID>
</inArgs>
Specified Scanner ID
<inArgs>
<scannerID>1</scannerID>
</inArgs>
Specified Scanner ID
SCAN_DISABLE
Value 2013
Description: Disable scanning on a specified scanner
Asynchronous supported: N/A
Supported Scanner Communication Protocols: SNAPI, IBM Hand-held, IBM Table-top, Nixdorf Mode B, SSI
inXml:
outXml:null
SCAN_ENABLE
Value 2014
Description: Enable scanning on a specified scanner
Asynchronous supported: N/A
Supported Scanner Communication Protocols: SNAPI, IBM Hand-held, IBM Table-top, Nixdorf Mode B, SSI
inXml:
outXml:null
SET_PARAMETER_DEFAULTS
Value 2015
Description: Set parameters to default values of a specified scanner
Asynchronous supported: No
Supported Scanner Communication Protocols: SNAPI
inXml:
outXml:null
Page 63

SCANNER SDK API 3 - 25
<inArgs>
<scannerID>1</scannerID>
<cmdArgs>
<arg-xml>
<attrib_list>
<attribute>
<id>145</id>
<datatype>B</datatype>
<value>0</value>
</attribute>
</attrib_list>
</arg-xml>
</cmdArgs>
</inArgs>
Specified Scanner ID
Attribute Number
Attribute Type
Attribute Value
<inArgs>
<scannerID>1</scannerID>
<cmdArgs>
<arg-xml>
<attrib_list>
<attribute>
<id>145</id>
<datatype>B</datatype>
<value>0</value>
</attribute>
</attrib_list>
</arg-xml>
</cmdArgs>
</inArgs>
Specified Scanner ID
Attribute Number
Attribute Type
Attribute Value
DEVICE_SET_PARAMETERS
Value 2016
Description: Set parameter(s) of a specified scanner temporarily.
Parameters set using this command are lost after the next
power down.
Asynchronous supported: No
Supported Scanner Communication Protocols: SNAPI
inXml:
outXml:null
NOTE Refer to the pertinent scanner's Product Reference Guide for supported attribute numbers, types, and
possible values.
SET_PARAMETER_PERSISTANCE
Value 2017
Description: Set parameter(s) of a specified scanner persistently.
Asynchronous supported: No
Supported Scanner Communication Protocols: SNAPI
inXml:
outXml:null
Parameters set using this command are persistent over
power down and power up cycles.
Page 64

3 - 26 ZEBRA SCANNER SDK FOR WINDOWS DEVELOPER’S GUIDE
<inArgs>
<scannerID>1</scannerID>
</inArgs>
Specified Scanner ID
<inArgs>
<scannerID>1</scannerID>
</inArgs>
Specified Scanner ID
<inArgs>
<scannerID>1</scannerID>
</inArgs>
Specified Scanner ID
REBOOT_SCANNER
Value 2019
Description: Reboot a specified scanner. Direct execution of this
command on a Bluetooth scanner does not result in a reb oot.
This command needs to be sent to the scanner’s associated
cradle to reboot the Bluetooth scanner.
Asynchronous supported: N/A
Supported Scanner Communication Protocols: IBM Hand-held, IBM Table-top, SNAPI , SSI
inXml:
outXml:null
DEVICE_CAPTURE_IMAGE
Value 3000
Description: Change a specified scanner to snapshot mode. While in this
mode, an imaging scanner blinks the green LED at one
second intervals to indicate it is not in standard operating
(decode) mode. The scanner comes to its standard oper ating
mode after a trigger pull or the snapshot time out is
exceeded. After a trigger pull, the CoreScanner driver
triggers an ImageEvent containing the captured image (see
ImageEvent on page 3-7).
Asynchronous supported: N/A
Supported Scanner Communication Protocols: SNAPI
inXml:
outXml:null
DEVICE_CAPTURE_BARCODE
Value 3500
Description: Change a specified scanner to decode mode.
Asynchronous supported: N/A
Supported Scanner Communication Protocols: SNAPI
inXml:
outXml:null
Page 65

SCANNER SDK API 3 - 27
<inArgs>
<scannerID>1</scannerID>
</inArgs>
Specified Scanner ID
<inArgs>
<scannerID>1</scannerID>
</inArgs>
outXml:
<?xml version="1.0" encoding="UTF-8" ?>
<outArgs>
<scannerID>1</scannerID>
<arg-xml>
<modelnumber>DS670-SR20001ZZR</modelnumber>
<serialnumber>7116000501003</serialnumber>
<GUID>A2E647DED2163545B18BCEBD0A2A133D</GUID>
<response>
<opcode>5000</opcode>
<attrib_list>
<attribute name="">0</attribute>
<attribute name="">1</attribute>
<attribute name="">2</attribute>
<attribute name="">3</attribute>
<attribute name="">4</attribute>
<attribute name="">5</attribute>
<attribute name="">6</attribute>
<attribute name="">7</attribute>
<attribute name="">8</attribute>
<attribute name="">9</attribute>
<attribute name="">10</attribute>
<attribute name="">11</attribute>
<attribute name="">12</attribute>
<attribute name="">13</attribute>
<attribute name="">14</attribute>
<attribute name="">15</attribute>
<attribute name="">16</attribute>
Specified Scanner ID
Scanner ID of Data Receiving
Method Response
Received
Asset Tracking Information
of the Scanner
Attribute Numbers
DEVICE_CAPTURE_VIDEO
Value 4000
Description: Change a specified scanner to video mode. In this mode, the
imaging scanner behaves as a video camera as long as the
trigger is pulled. When the trigger is released, the scanner
returns to Decode Mode. As long as the trigger is pulled, the
CoreScanner driver triggers VideoEvents that contain the
video data (see VideoEvent on page 3-8).
Asynchronous supported: N/A
Supported Scanner Communication Protocols: SNAPI
inXml:
outXml:null
ATTR_GETALL
Value 5000
Description: Get all the attributes of a specified scanner. A synchronous
Asynchronous supported: Yes
Supported Scanner Communication Protocols: IBM Hand-held, IBM Table-top, SNAPI , SSI
inXml:
call of this method returns an outXML like the example below.
An asynchronous call of this event triggers a
CommandResponseEvent (See page 3-14).
Page 66

3 - 28 ZEBRA SCANNER SDK FOR WINDOWS DEVELOPER’S GUIDE
<attribute name="">17</attribute>
<attribute name="">18</attribute>
<attribute name="">19</attribute>
<attribute name="">20</attribute>
<attribute name="">21</attribute>
<attribute name="">22</attribute>
<attribute name="">23</attribute>
<attribute name="">24</attribute>
<attribute name="">25</attribute>
<attribute name="">26</attribute>
<attribute name="">27</attribute>
<attribute name="">28</attribute>
<attribute name="">29</attribute>
<attribute name="">30</attribute>
<attribute name="">31</attribute>
<attribute name="">34</attribute>
<attribute name="">35</attribute>
<attribute name="">36</attribute>
<attribute name="">37</attribute>
<attribute name="">38</attribute>
<attribute name="">39</attribute>
<attribute name="">655</attribute>
<attribute name="">656</attribute>
<attribute name="">657</attribute>
<attribute name="">658</attribute>
<attribute name="">659</attribute>
<attribute name="">665</attribute>
<attribute name="">670</attribute>
<attribute name="">672</attribute>
<attribute name="">673</attribute>
<attribute name="">705</attribute>
<attribute name="">716</attribute>
<attribute name="">718</attribute>
<attribute name="">721</attribute>
<attribute name="">724</attribute>
<attribute name="">726</attribute>
<attribute name="">727</attribute>
<attribute name="">728</attribute>
<attribute name="">730</attribute>
<attribute name="">731</attribute>
<attribute name="">734</attribute>
<attribute name="">735</attribute>
<attribute name="">745</attribute>
<attribute name="">6000</attribute>
<attribute name="">6001</attribute>
<attribute name="">6002</attribute>
<attribute name="">6003</attribute>
<attribute name="">6004</attribute>
<attribute name="">20004</attribute>
<attribute name="">20006</attribute>
<attribute name="">20007</attribute>
<attribute name="">20008</attribute>
<attribute name="">20009</attribute>
<attribute name="">20010</attribute>
<attribute name="">20011</attribute>
<attribute name="">20013</attribute>
</attrib_list>
</response>
</arg-xml>
</outArgs>
NOTE Refer to the pertinent scanner's Product Reference Guide for supported attribute numbers, types, and possible
values
Attribute Numbers
inXml (continued):
Page 67

SCANNER SDK API 3 - 29
><inArgs>
<scannerID>1</scannerID>
<cmdArgs>
<arg-xml>
<attrib_list>535,20004,1,140,392</attrib_list>
</arg-xml>
</cmdArgs>
</inArgs>
Specified Scanner ID
Required Attribute Numbers
<?xml version="1.0" encoding="UTF-8" ?>
<outArgs>
<scannerID>1</scannerID>
<arg-xml>
<modelnumber>DS670-SR20001ZZR</modelnumber>
<serialnumber>7116000501003</serialnumber>
<GUID>A2E647DED2163545B18BCEBD0A2A133D</GUID>
<response>
<opcode>5001</opcode>
<attrib_list>
<attribute>
<id>535</id>
<name></name>
<datatype>S</datatype>
<permission>R</permission>
<value>27APR07</value>
</attribute>
<attribute>
<id>20004</id>
<name></name>
<datatype>S</datatype>
<permission>R</permission>
<value>DS6707X4</value>
</attribute>
<attribute>
<id>1</id>
<name></name>
<datatype>F</datatype>
<permission>RWP</permission>
<value>True</value>
</attribute>
<attribute>
<id>140</id>
<name></name>
<datatype>B</datatype>
<permission>RWP</permission>
<value>0</value>
</attribute>
Scanner ID of Data Receiving
Method Response
Received
Asset Tracking Information
of the Scanner
Attribute Number
Attribute Data Typer
Permissions of the Attribute
Attribute Value
ATTR_GET
Value 5001
Description: Query the values of attribute(s) of a specified scanner. An
synchronous call of this method returns outXML like the
example below. An asynchronous call of this event triggers a
CommandResponseEvent (see CommandResponseEvent
on page 3-14).
Asynchronous supported: Yes
Supported Scanner Communication Protocols: IBM Hand-held, IBM Table-top, SNAPI , SSI
inXml:
outXML:
Page 68

3 - 30 ZEBRA SCANNER SDK FOR WINDOWS DEVELOPER’S GUIDE
<attribute>
<id>392</id>
<name></name>
<datatype>A</datatype>
<permission>RWP</permission>
<value>0x01 0x00 0x58 0x55 0x41 0x00 0x0b 0x00 0x00 0x00 0x00 0x00 0x00 0x00 0x00
0x00 0x00 0x00 0x00 0x00 0x00 0x00 0x00 0x00 0x00 0x00 0x00 0x00 0x00 0x00 0x00 0x00 0x00 0x00
0x00 0x00 0x00 0x00 0x00 0x00 0x00 0x00 0x00 0x00 0x00 0x00 0x00 0x00 0x00 0x00 0x00 0x00 0x00
0x00 0x00 0x00 0x00 0x00 0x00 0x00 0x00 0x00 0x00 0x00 0x00 0x00 0x00 0x00 0x00 0x00 0x00 0x00
0x00 0x00 0x00 0x00 0x00 0x00 0x00 0x00</value>
</attribute>
</attrib_list>
</response>
</arg-xml>
</outArgs>
<inArgs>
<scannerID>1</scannerID>
<cmdArgs>
<arg-xml>
<attrib_list>14</attrib_list>
</arg-xml>
</cmdArgs>
</inArgs>
Attribute Numbers
Specified Scanner ID
<?xml version="1.0" encoding="UTF-8"?>
<outArgs>
<scannerID>1</scannerID>
<arg-xml>
<modelnumber>DS670-SR20001ZZR</modelnumber>
<serialnumber>7116000501003</serialnumber>
<GUID>A2E647DED2163545B18BCEBD0A2A133D</GUID>
<response>
<opcode>5002</opcode>
<attrib_list>
<attribute>
<id>15</id>
<name></name>
<datatype>F</datatype>
<permission>RWP</permission>
<value>True</value>
</attribute>
</attrib_list>
</response>
</arg-xml>
</outArgs>
Scanner ID of Data Receiving
Method Response Received
Asset Tracking Information
of the Scanner
Attribute Numbers
Attribute Value
Permissions of the Attribute
outXML: (continued)
ATTR_GETNEXT
Value 5002
Description: Query the value of the next attribute to a given attribute of a
specified scanner. A synchronous call of this method returns
an outXML like the example below. An asynchronous call of
this event triggers a CommandResponseEvent (see
CommandResponseEvent on page 3-14).
Asynchronous supported: Yes
Supported Scanner Communication Protocols: IBM Hand-held, IBM Table-top, SNAPI , SSI
inXml:
outXML:
NOTE If the next available attribute is not readable (for example, an Action attribute), this command returns the
next available readable attribute value.
Page 69

SCANNER SDK API 3 - 31
<inArgs>
<scannerID>1</scannerID>
<cmdArgs>
<arg-xml>
<attrib_list>
<attribute>
<id>1</id>
<datatype>F</datatype>
<value>False</value>
</attribute>
</attrib_list>
</arg-xml>
</cmdArgs>
</inArgs>
Attribute Numbers
Attribute Data Type
Attribute Value
Specified Scanner ID
<inArgs>
<scannerID>1</scannerID>
<cmdArgs>
<arg-xml>
<attrib_list>
<attribute>
<id>1</id>
<datatype>F</datatype>
<value>False</value>
</attribute>
</attrib_list>
</arg-xml>
</cmdArgs>
</inArgs>
Attribute Number
Attribute Data Type
Attribute Value
Specified Scanner ID
ATTR_SET
Value 5004
Description: Set the values of attribute(s) of a specified scanner.
Attribute(s) set using this command are lost after the next
power down.
Asynchronous supported: Yes
Supported Scanner Communication Protocols: IBM Hand-held, IBM Table-top, SNAPI , SSI
inXml:
outXml:null
ATTR_STORE
Value 5005
Description: Store the values of attribute(s) of a specified scanner.
Asynchronous supported: Yes
Supported Scanner Communication Protocols: IBM Hand-held
inXml:
outXml: null
Attribute(s) store using this command are persistent over power
down and power up cycles.
, IBM Table-top, SNAPI, SSI
Page 70

3 - 32 ZEBRA SCANNER SDK FOR WINDOWS DEVELOPER’S GUIDE
<inArgs></inArgs>
<?xml version="1.0" encoding="UTF-8"?>
<outArgs>
<arg-xml>
<scanners>
<scanner type="SNAPI">
<scannerID>1</scannerID>
<modelnumber>DS670-SR20001ZZR</modelnumber>
<serialnumber>7116000501003</serialnumber>
<GUID>A2E647DED2163545B18BCEBD0A2A133D</GUID>
<VID>1504</VID>
<PID>6400</PID>
<DoM>24MAR10</DoM>
<firmware>NBRPUAAM</firmware>
</scanner>
<scanner type="USBIBMHID">
<scannerID>2</scannerID>
<modelnumber>CR0078-SC10007WR</modelnumber>
<serialnumber>MXA4WD88</serialnumber>
<GUID>993DF345C3B00E408E8160116AE9A319</GUID>
<VID>1504</VID>
<PID>2080</PID>
<DoM>24MAR10</DoM>
<firmware>NBCACAK7</firmware>
<scanner type="USBIBMHID">
<scannerID>3</scannerID>
<serialnumber>M1M87R39H</serialnumber>
<modelnumber>DS6878-SR20007WR</modelnumber>
<DoM>08OCT10</DoM>
<firmware>PAAAJS00-002-N25</firmware>
</scanner>
</scanner>
</scanners>
</arg-xml>
</outArgs>
Scanner Type
Asset Tracking
Information of
the Scanner
Cascaded Scanner
<inArgs>
<scannerID>1</scannerID>
</inArgs>
Specified Scanner ID
GET_DEVICE_TOPOLOGY
Value 5006
Description: Get the topology of devices that are connected to the calling
system
Asynchronous supported: No
Supported Scanner Communication Protocols: IBM Hand-held
inXml:
outXML:
, IBM Table-top, SNAPI, SSI
START_NEW_FIRMWARE
Value 5014
Description: Start the updated firmware. This causes a reboot of the
Asynchronous supported: N/A
Supported Scanner Communication Protocols: IBM Hand-held, IBM Table-top, SNAPI , SSI
inXml:
outXml:null
specified scanner.
Page 71

SCANNER SDK API 3 - 33
<inArgs>
<scannerID>1</scannerID>
<cmdArgs>
<arg-string>D:\ScannerFW\DS6707\NBRPUCAM.DAT</arg-string>
<arg-int>2</arg-int>
</cmdArgs>
</inArgs>
Specified Scanner ID
Bulk Update
Option
Path to the
DAT File
<inArgs>
<scannerID>1</scannerID>
<cmdArgs>
<arg-string>D:\ScannerFW\DS9808\DS9808-COMMON SR MODELS-S-018.SCNPLG</arg-string>
<arg-int>2</arg-int>
</cmdArgs>
</inArgs>
Specified Scanner ID
Bulk Update Option
Path to the Plug-in File
UPDATE_FIRMWARE
Value 5016
Description: Update the firmware of the specified scanner. A user can
specify the bulk firmware update option for faster firmware
download in SNAPI mode. If an application registered for
ScanRMDEvents, it receives ScanRMDEvents as described
on page 3-14.
Asynchronous supported: N/A
Supported Scanner Communication Protocols: IBM Hand-held, IBM Table-top, SNAPI , SSI
inXml:
outXml:null
UPDATE_FIRMWARE_FROM_PLUGIN
Value 5017
Description: Update the firmware of the specified scanner using a scanner
plug-in. A user can specify the bulk firmware update option
for faster firmware download in SNAPI mode. If an
application registered for ScanRMDEvents, it receives
ScanRMDEvents as described on page 3-14.
Asynchronous supported: N/A
Supported Scanner Communication Protocols: IBM Hand-held, IBM Table-top, SNAPI , SSI
inXml:
outXml:null
NOTE The UPDATE_FIRMWARE_FROM_PLUGIN command does not verify the supported scanner models of
the plug-in. It attempts the firmware update with the DAT file extracted from the specified plug-in file
regardless of model.
Page 72

3 - 34 ZEBRA SCANNER SDK FOR WINDOWS DEVELOPER’S GUIDE
<inArgs>
<scannerID>1</scannerID>
<cmdArgs>
<arg-string> C:\WavFiles\tone16Khz16bit.wav</arg-string>
</cmdArgs>
</inArgs>
Specified Scanner ID
Path to WAV File
<inArgs>
<scannerID>1</scannerID>
</inArgs>
Specified Scanner ID
<inArgs>
<scannerID>1</scannerID>
<cmdArgs>
<arg-int>0</arg-int>
</cmdArgs>
</inArgs>
Specified Scanner ID
Scanner Action
Commands
UPDATE_DECODE_TONE
Value 5050
Description: Update good scan tone of the scanner with the specified
WAV file.
Asynchronous supported: N/A
Supported Scanner Communication Protocols: IBM Hand-held, IBM Table-top, SNAPI , SSI
inXml:
outXml:null
ERASE_DECODE_TONE
Value 5051
Description: Erase the good scan tone of the scanner.
Asynchronous supported: N/A
Supported Scanner Communication Protocols: IBM Hand-held, IBM Table-top, SNAPI , SSI
inXml:
outXml:null
SET_ACTION
Value 6000
NOTE Values for the SET_ACTION method are available in Table 3-13.
Description: Perform an action involving the scanner’s beeper or LEDs.
Asynchronous supported: N/A
Supported Scanner Communication Protocols: IBM Hand-held, IBM Table-top, SNAPI , SSI
inXml:
outXml:null
Page 73

SCANNER SDK API 3 - 35
Table 3-13
Attribute
Number
(Opcode)
6000 Beeper/LED Triggers the
Action Attributes and Values
Attribute Name Description
beeper/LED via
command
Data
Type
'X' 0 - 1 high short beep
1 - 2 high short beeps
2 - 3 high short beeps
3 - 4 high short beeps
4 - 5 high short beeps
5 - 1 low short beep
6 - 2 low short beeps
7 - 3 low short beeps
8 - 4 low short beeps
9 - 5 low short beeps
10 - 1 high long beep
11 - 2 high long beeps
12 - 3 high long beeps
13 - 4 high long beeps
14 - 5 high long beeps
15 - 1 low long beep
16 - 2 low long beeps
17 - 3 low long beeps
18 - 4 low long beeps
19 - 5 low long beeps
20 - Fast warble beep
21 - Slow warble beep
22 - High-low beep
23 - Low-high beep
24 - High-low-high beep
25 - Low-high-low beep
26 - High-high-low-low beep
42 - Green LED off
43 - Green LED on
45 - Yellow LED
46 - Yellow LED off
47 - Red LED on
48 - Red LED off
Values
6001 ParameterDefaults Initiates a
parameter
defaults
command
6003 BeepOnNextBootup Controls whether
or not boot
up/power up beep
is suppressed on
the next power up
6004 Reboot Remote reboot
command
'X' 0 - Restore Defaults
1 - Restore Factory Defaults
2 - Write Custom Defaults
'X' 0 - Disable beep on next bootup
1 - Enable beep on next bootup
'X'
Page 74

3 - 36 ZEBRA SCANNER SDK FOR WINDOWS DEVELOPER’S GUIDE
<inArgs>
<scannerID>1</scannerID>
<cmdArgs>
<arg-int>5</arg-int>
<arg-int>9600,8,0,0,1</arg-int>
</cmdArgs>
</inArgs>
Specified Scanner ID
Number of Parameters
Serial Port Settings
Table 3-13
Action Attributes and Values (Continued)
Attribute
Number
Attribute Name Description
(Opcode)
6005 HostTriggerSession Triggers the
scanner to start
scanning via
command
6011 StatsReset Reset/default a
specific statistic
6013 StatsResetAll Reset/default all
statistics
6017 ScaleReadWeight Read Weight from
scale
Data
Type
Values
'X' 0 - start Host Trigger Session
1 - stop Host Trigger Session
'X' The specific statistic attribute to reset.
Range: 15002-19999
'X' '
'A' Byte[0] status:
0 - scaleNotEnabled
1 - scaleNotReady
2 - stableWeightOverLimit
3 - stableWeightUnderZero
4 - nonStableWeight
5 - stableZeroWeight
6 - stableNonZeroWeight
Byte[1] units:
0=kgs
1=lbs
Bytes[2-5] weight in thousandths of units
6018 ScaleZero Zeros the scale 'X'
6019 ScaleReset Resets the scale 'X'
6022 ChangeAllCodeTypes Enables/Disables
all code types
'X' 0 = Disable All Code types
1 = Enable All Code Types
DEVICE_SET_SERIAL_PORT_SETTINGS
Value 6101
Description: Set the serial port settings of a NIXDORF Mode B Scanner
Asynchronous supported: N/A
Supported Scanner Communication Protocols: n/a
inXml:
outXml:null
Page 75

SCANNER SDK API 3 - 37
<inArgs>
<scannerID>1</scannerID>
<cmdArgs>
<arg-string>XUA-45001-1</arg-string>
<arg-bool>TRUE</arg-bool>
<arg-bool>FALSE</arg-bool>
</cmdArgs>
</inArgs>
String Code for Target Host Variant
Silent Switch Option
Permanent Change Option
Specified Scanner ID
DEVICE_SWITCH_HOST_MODE
Value 6200
Description: Switch the USB host mode of a specified scanner. This
operation causes a reboot of the device as a result of the
host mode switch. When the specified scanner is in HID
Keyboard mode, the only supported target host variants are
IBM Hand-held, IBM Table-top, SNAPI, and SSI. A user can
configure the switching host mode as a silent switch
(suppressing the typical device reboot beeps) and keep the
targeted host mode as the permanent host mode of the
device by setting those parameters in the inXML string. Direct
execution of this command on a Bluetooth scanner does not
result in a host mode switch. This command needs to be sent
to the scanner’s associated cradle to switch the host mode of
the Bluetooth scanner.
Asynchronous supported: N/A
Supported Scanner Communication Protocols: IBM Hand-held, IBM Table-top, SNAPI, HID Keyboard.
inXml:
Table 3-14 lists the string codes for USB host variants.
Table 3-14
USB Host Variants
Host Variant String Code
USB-IBMHID XUA-45001-1
USB-IBMTT XUA-45001-2
USB-HIDKB XUA-45001-3
USB-OPOS XUA-45001-8
USB-SNAPI with Imaging XUA-45001-9
USB-SNAPI without Imaging XUA-45001-10
USB-CDC Serial Emulation (see note below) XUA-45001-11
NOTE USB-CDC (Communications Device Class) host mode enables Zebra barcode scanners to communicate
with applications requiring legacy serial COM port emulation using a USB port. Using the Scanner SDK,
you can switch the scanner into USB-CDC mode, but you cannot switch back into other modes. Please
scan the Set All Defaults barcode from your scanner's Quick Start Guide to make the scanner visible to
the SDK. Go to: http://www.zebra.com/support for more information about USB CDC host mode.
outXml:null
Page 76

3 - 38 ZEBRA SCANNER SDK FOR WINDOWS DEVELOPER’S GUIDE
<inArgs>
<cmdArgs>
<arg-bool>TRUE</arg-bool>
</cmdArgs>
</inArgs>
Keyboard Emulator State
<inArgs>
<cmdArgs>
<arg-int>1</arg-int>
</cmdArgs>
</inArgs>
Keyboard Emulator Language Locale ID
KEYBOARD_EMULATOR_ENABLE
Value 6300
Description: This setting enables/disables the keyboard emulation mode
of the connected scanners which are in IBM Hand-held, IBM
Table-top, NIXDORF Mode B, SNAPI, and SSI host modes.
Asynchronous supported: No
Supported Scanner Communication Protocols: N/A
inXml:
outXml:null
NOTE Any HIDKB Emulator-related settings that are changed using the API are tempor ary. These settings revert
to the values in the config.xml file after a restart of the CoreScanner service or a system reboot.
KEYBOARD_EMULATOR_SET_LOCALE
Value 6301
Description: Change the locale of the emulated keyboard
Asynchronous supported: No
Supported Scanner Communication Protocols: N/A
inXml:
Table 3-15 lists the Language Locale ID for the XML code above.
Table 3-15
English 0
French 1
outXml:null
Language Locale IDs
Locale Value
Page 77

SCANNER SDK API 3 - 39
<inArgs></inArgs>
<outArgs>
<arg-xml>
<KeyEnumState>1</KeyEnumState>
<KeyEnumLocale>0</KeyEnumLocale>
</arg-xml>
</outArgs>
Keyboard Emulator State
Keyboard Emulator Language Locale ID
KEYBOARD_EMULATOR_GET_CONFIG
Value 6302
Description: Gets the current configuration of the HID Keyboard Emulator from the config.xml file.
Asynchronous supported: No
Supported Scanner Communication Protocols: N/A
inXml:
outXml:
Page 78

3 - 40 ZEBRA SCANNER SDK FOR WINDOWS DEVELOPER’S GUIDE
<inArgs>
<scannerID>1</scannerID>
</inArgs>
<?xml version="1.0" encoding="UTF-8"?>
<outArgs>
<scannerID>1</scannerID>
<arg-xml>
<modelnumber>MP6200-LN000M010US</modelnumber>
<serialnumber>13049010501209 </serialnumber>
<GUID>D827BAC4979B430BB6E57747620C1978</GUID>
<response>
<opcode>7000</opcode>
<weight>0.700</weight>
<weight_mode>English</weight_mode>
<status>6</status>
<rawdata>0x06 0x01 0x00 0x00 0x02 0xbc </rawdata>
</response>
</arg-xml>
</outArgs>
SCALE_READ_WEIGHT
Value 7000
Description: Measure the weight on the scanner's platter and get the
value.
Asynchronous supported: No
Supported Scanner Communication Protocols: SNAPI, IBM HID, IBM Table-top, SSI
inXml:
outXml:
outXml Tag Descriptions
weight: The weight of the item in killogram or English pounds.
weight_mode: English (pounds), Metric (Kg).
status: Satus of the scale.
rawdata: The value retrieved from RSM attribute 6017. See Table 3-13 on page 3-35 for more
information.
Table 3-16
Status Code Descriptions
Status Code Value Description
0 scaleNotEnabled
1 scaleNotReady
2 stableWeightOverLimit
3 stableWeightUnderZero
4 nonStableWeight
5 stableZeroWeight
6 stableNonZeroWeight
Page 79

SCANNER SDK API 3 - 41
<inArgs>
<scannerID>1</scannerID>
</inArgs>
<inArgs>
<scannerID>1</scannerID>
</inArgs>
SCALE_ZERO_SCALE
Value 7002
Description: Zero the scale.
Asynchronous supported: No
Supported Scanner Communication Protocols: SNAPI, IBM HID, IBM Table-top, SSI
inXml:
outXml:Null
SCALE_SYSTEM_RESET
Value 7015
Description: Reset the scale.
Asynchronous supported: No
Supported Scanner Communication Protocols: SNAPI, IBM HID, IBM Table-top, SSI
inXml:
outXml:Null
Page 80

3 - 42 ZEBRA SCANNER SDK FOR WINDOWS DEVELOPER’S GUIDE
Error/Status Codes
Table 3-17
SUCCESS 0 Generic success
STATUS_LOCKED 10 Device is locked by another application
ERROR_INVALID_APPHANDLE 100 Invalid application handle. Reserved parameter.
ERROR_COMMLIB_UNAVAILABLE 101 Required Comm Lib is unavailable to support the
ERROR_NULL_BUFFER_POINTER 102 Null buffer pointer
ERROR_INVALID_BUFFER_POINTER 103 Invalid buffer pointer
ERROR_INCORRECT_BUFFER_SIZE 104 Incorrect buffer size
ERROR_DUPLICATE_TYPES 105 Requested Type IDs are duplicated
ERROR_INCORRECT_NUMBER_OF_TYPES 106 Incorrect value for number of Types
ERROR_INVALID_ARG 107 Invalid argument
ERROR_INVALID_SCANNERID 108 Invalid scanner ID
ERROR_INCORRECT_NUMBER_OF_EVENTS 109 Incorrect value for number of Event IDs
Error and Status Codes
Error/ Status Code Value Description
Value is zero.
requested Type
ERROR_DUPLICATE_EVENTID 110 Event IDs are duplicated
ERROR_INVALID_EVENTID 111 Invalid value for Event ID
ERROR_DEVICE_UNAVAILABLE 112 Required device is unavailable
ERROR_INVALID_OPCODE 113 Opcode is invalid
ERROR_INVALID_TYPE 114 Invalid value for Type
ERROR_ASYNC_NOT_SUPPORTED 115 Opcode does not support asynchronous method
ERROR_OPCODE_NOT_SUPPORTED 116 Device does not support the Opcode
ERROR_OPERATION_FAILED 117 Operation failed in device
ERROR_REQUEST_FAILED 118 Request failed in CoreScanner
ERROR_OPERATION_NOT_SUPPORTED_FOR_
AUXILIARY_SCANNERS
ERROR_DEVICE_BUSY 120 Device busy. Applications should retry command.
ERROR_ALREADY_OPENED 200 CoreScanner is already opened
ERROR_ALREADY_CLOSED 201 CoreScanner is already closed
ERROR_CLOSED 202 CoreScanner is closed
119 Operation not supported for auxiliary scanners
ERROR_INVALID_INXML 300 Malformed inXML
ERROR_XMLREADER_NOT_CREATED 301 XML Reader could not be instantiated
Page 81

SCANNER SDK API 3 - 43
Table 3-17
ERROR_XMLREADER_INPUT_NOT_SET 302 Input for XML Reader could not be set
ERROR_XMLREADER_PROPERTY_NOT_SET 303 XML Reader property could not be set
ERROR_XMLWRITER_NOT_CREATED 304 XML Writer could not be instantiated
ERROR_XMLW RITER_OUTPUT_NOT_SET 305 Output for XML Writer could not be set
ERROR_XMLWRITER_PROPERTY_NOT_SET 306 XML Writer property could not be set
ERROR_XML_ELEMENT_CANT_READ 307 Cannot read element from XML input
ERROR_XML_INVALID_ARG 308 Arguments in inXML are not valid
ERROR_XML_WRITE_FAIL 309 Write to XML output string failed
ERROR_XML_INXML_EXCEED_LENGTH 310 InXML exceed length
ERROR_XML_EXCEED_BUFFER_LENGTH 311 buffer length for type exceeded
ERROR_NULL_POINTER 400 Null pointer
ERROR_DUPLICATE_CLIENT 401 Cannot add a duplicate client
ERROR_FW_INVALID_DATFILE 500 Invalid firmware file
Error and Status Codes (Continued)
Error/ Status Code Value Description
ERROR_FW_UPDATE_FAILED_IN_SCN 501 FW Update failed in scanner
ERROR_FW_READ_FAILED_DATFILE 502 Failed to read DAT file
ERROR_FW_UPDATE_INPROGRESS 503 Firmware Update is in progress (cannot proceed
another FW Update or another command)
ERROR_FW_UPDATE_ALREADY_ABORTED 504 Firmware update is already aborted
ERROR_FW_UPDATE_ABORTED 505 FW Update aborted
ERROR_FW_SCN_DETTACHED 506 Scanner is disconnected while updating firmware
STATUS_FW_SWCOMP_RESIDENT 600 The software component is already resident in the
scanner
Page 82

3 - 44 ZEBRA SCANNER SDK FOR WINDOWS DEVELOPER’S GUIDE
Page 83

CHAPTER 4 TEST UTILITIES & SOURCE
CODE
Overview
This chapter provides information about testing and evaluation of the Zebra Scanner SDK's software
components using the test utilities provided in the SDK.
For a list of the most commonly requested topics within this guide, see Quick Startup in the back of the guide.
NOTE For the attributes (parameters) applicable to a specific scanner, refer to the Product Reference Guide.
Product Reference Guides may also contain an appendix listing the generic non-parameter attributes
supported on most Zebra scanners.
Page 84

4 - 2 ZEBRA SCANNER SDK FOR WINDOWS DEVELOPER’S GUIDE
Test Utilities Provided in the SDK
The Zebra Scanner SDK includes the following test utilities:
•
Zebra Scanner SDK C++ Sample Application
•
Zebra Scanner SDK C# .Net Sample Application
Each test utility demonstrates the main functionalities of the SDK. You can gain an understanding of the Zebra
Scanner SDK using these test utilities. This section also describes how to use the test utilities' functionality.
NOTE You may need to install the Microsoft®.Net Framework v2.0 or later to execute C# .Net Sample
application. If so, Microsoft detects and informs the user of this requirement.
The Zebra Scanner SDK Test Utilities support the following functionality:
•
Discovery of asset tracking information
•
Scan a barcode
•
Capture Image and Video
•
Capture documents with Intelligent Document Capture (IDC)
•
Attribute query and setting
•
Host Variant switching
•
Firmware upgrade.
Page 85

TEST UTILITIES & SOURCE CODE 4 - 3
Scanner SDK C++ Sample Application
The Scanner SDK C++ Sample Application enables you to simulate an application that communicates with the
Scanner SDK. The utility demonstrates the functionality of the SDK. It includes C++ source code and its
solution and project files for further reference.
Figure 4-1
C++ Sample Application
Page 86

4 - 4 ZEBRA SCANNER SDK FOR WINDOWS DEVELOPER’S GUIDE
Scanner SDK C#.Net Sample Application
The Scanner SDK C#.Net Sample Application enables you to simulate an application that communicates with
the Scanner SDK. The utility demonstrates the functionality of the SDK. It includes C#.Net source code and its
solution and project files for further reference.
Figure 4-2
Table 4-1
Discover Scanners Invokes Open, GetScanners methods and register for all the events.
Select Scanner Select the scanner you want to invoke the command
Connected Scanners List all the connected scanners regardless of the mode
Pull Trigger Soft Pull Trigger the scanner for Barcode, Image and Video actions
Release Trigger Soft Release Trigger the scanner for Barcode, Image and Video actions
Barcode Tab
Flush Macro PDF Flush Macro PDF barcode buffer
Abort Macro PDF Abort Macro PDF continues read
Clear Clear the barcode data area
Decoded Barcode Display label value of the scanned barcode
Symbology Display the symbology of scanned barcode
Tes t Utility Buttons and Fields by Tab Screen
Button or Field Description
C# Sample Application
Enable Emulation Enable Simulated HID Keyboard Output
Page 87

TEST UTILITIES & SOURCE CODE 4 - 5
Table 4-1
Image/Video Tab
Image Invoke image capture mode
Video Invoke video capture mode.
Abort Transfer Abort Image Tran sfer on serial scanners.
Image Type Select JPG, TIFF or BMP image type.
Enable Video View Finder Enable the view finder in image mode.
Save Image Save the captured image.
IDC Tab
Get Display value of the IDC-related parameter in the drop-down menu.
Set Temporarily set the value of the IDC-related parameter in the drop-down menu.
Store Permanently store the value of the IDC-related parameter in the drop-down menu.
Value Field to display. Enter an IDC-related parameter value.
Decode Data Value of linked or anchor barcode data.
Tes t Utility Buttons and Fields by Tab Screen (Continued)
Button or Field Description
Symbology Symbology of linked or anchor barcode.
Use HID Specify HID channel for data transmission (instead of the default BULK channel).
Clear Clears all the fields.
Scanner Actions T ab
Enable/Disable Scanner Enable/Disable the scanner for data/image/video capture initiation.
Aim Switch on and off Aim control of the scanner.
Beeper Beep the peeper of the scanner.
Reboot Scanner Reboot the scanner.
LED Light the LED(s) on the scanner.
Switch Host Variant Switch the scanner host type from current type to desired type; the user has the option
to select silent feature and variant change persistent and non-persistent.
RSM Tab
Get All IDs Get all supported attribute IDs from the selected scanner.
Get Value Select one or more attribute IDs and get the value for them.
Next Value Get the next attributes value given the current attribute number.
Store Value Store value(s) for selected attribute(s).
Set Value Set value(s) for selected attribute(s).
Select All Select all the attribute IDs at the RSM data viewer.
Clear All Clear all the attribute data at the RSM data viewer.
Page 88

4 - 6 ZEBRA SCANNER SDK FOR WINDOWS DEVELOPER’S GUIDE
Table 4-1
Tes t Utility Buttons and Fields by Tab Screen (Continued)
Button or Field Description
Clear All Values Clear all the attribute values at the RSM data viewer (C# only).
Clear Value Clear a selected attribute value at the RSM data viewer (C# only).
Advanced Tab
Firmware Update Operations Updated firmware and launch the new firmware on the scanner.
Browse Browse the Firmware file (*.DAT ) or Plug-in file (*.SCNPLG).
Update Initiate firmware update process.
Abort If you want to abort firmware update process.
Launch Once firmware update finishes launch the new firmware in the scanner.
Claim Scanner Exclusively claim and declaim the scanner for this application.
Miscellaneous Tab
SDK Version Get the scanner SDK version.
Get Device Topology Get the scanner device topology, this is useful to get an idea of scanner topology for
cascaded scanners.
Serial Interface Settings Serial interface settings for serial scanners.
Scale Tab
Read weight Read the weight of the item on the scale.
Zero scale Zero the scale.
Reset scale Reset the scale.
Weight Measured Weight of the item (Pounds or Kilograms).
Weight Unit Weight mode of the scale (English or Metric).
Logs Tab
Event Log Command and event log, logs commands initiated.
XML log Displays Output of each function if an output exists.
Clear Event Log Clear command and event log area.
Clear XML Log Clear XML log area.
NOTE The SDK Sample Application in the latest release of the Scanner SDK for Windows implements a
ScanToConnect tab. The ScanToConnect feature enables a Zebra cordless Bluetooth scanner to pair
directly to a PC/tablet by scanning an on-screen barcode, replacing the need for a paper pairing label.
This paperless pairing solution wirelessly connects the scanner directly to the host, without the need for a
cradle.
Sample source code for the ScanToConnect tab is included with installation of the SDK Sample
Application. For further information on this functionality, contact the Zebra Technologies Global
Customer Support Center at: www.zebra.com/support
.
Page 89

TEST UTILITIES & SOURCE CODE 4 - 7
How to Verify Scanner SDK Functionality
This section guides you through a series of use cases and test cases of the Zebra Scanner SDK and its
functionality.
See Basic Installation Verification on page 2-14 for more information.
Scanner Discovery/Asset Tracking Information/Validating Successful SDK Installation
1. Connect a Zebra USB scanner(s) to the computer and put the scanner into USB OPOS (Hand Held) or
USB SNAPI mode by scanning one of the barcodes below.
USB (IBM Hand Held)
USB SNAPI
2. Launch the Zebra Scanner SDK Sample Utility by selecting Start > All Programs > Zebra Scanner >
Scanner SDK > SDK - C++ Sample App.
Figure 4-3
3. Click Discover Scanners to display all the connected scanners in the Connected Scanners area.
Start Scanner SDK Sample Application (C++) or C# .Net
Page 90

4 - 8 ZEBRA SCANNER SDK FOR WINDOWS DEVELOPER’S GUIDE
4. Clicking Discover Scanners in the sample application executes an Open for all types of scanners and an
ExecCommand with the REGISTER_FOR_EVENTS method using the following XML and a GetScanners
API call:
<inArgs>
<cmdArgs>
<arg-int>6</arg-int>
<arg-int>1,2,4,8,16,32</arg-int>
</cmdArgs>
</inArgs>
NOTE The first <inArgs> tag in the XML is filled with the number of events you want to register. In the example
above, number of event it wants to register is 6. The second <arg-int> tag is filled with the event ids that
you want to register separated by the commas (,). See event IDs in Table 4-2.
Table 4-2
Supported Event IDs
Event Name Event ID
SUBSCRIBE_BARCODE 1
SUBSCRIBE_IMAGE 2
SUBSCRIBE_VIDEO 4
SUBSCRIBE_RMD 8
SUBSCRIBE_PNP 16
SUBSCRIBE_OTHER 32
See Chapter 5, SAMPLE SOURCE CODE for more information about how to call
GetScanners
1. The GetScanners API call produces XML code as follows:
<?xml version="1.0" encoding="UTF-8" ?>
<scanners>
<scanner type="SNAPI">
<scannerID>1</scannerID>
<serialnumber>7116000501003</serialnumber>
<GUID>A2E647DED2163545B18BCEBD0A2A133D</GUID>
<VID>1504</VID>
<PID>6400</PID>
<modelnumber>DS670-SR20001ZZR</modelnumber>
<DoM>27APR07</DoM>
<firmware>NBRPUAAC</firmware>
</scanner>
</scanners>
APIs.
Open, ExecCommand
and
Page 91

TEST UTILITIES & SOURCE CODE 4 - 9
Table 4-3
Data Representation of the GetScanners Output in this Example
Scanner Information Value Description
Scanner ID 1 A unique ID assigned for a scanner from the
SDK; any scanner specific method execute
from ExecCommand should point to a scanner
ID
Serial Number 7116000501003 Device serial number printed on the label
Model Number DS670-SR20001ZZR Device model number
Date of Manufacture 27APR07 Device date of manufacture
Firmware Version NBRPUAAC Current firmware version
H/W GUID A2E647DED2163545B18BCEBD0A2A133D Hardware unique ID
2. The XML consists of the scanner type, scanner ID, serial number, GUID, VID, PID, model number, date of
manufacture and firmware version of the connected scanners.
All discovered scanners are presented in the Connected Scanners window (Figure 4-4) by processing the
XML received from the GetScanners
command along with their asset tracking information returned by
querying device parameters. The detection of scanners indicates the SDK was installed successfully.
Click Discover Scanners to display the connected scanners.
Figure 4-4
Connected Scanners
Page 92
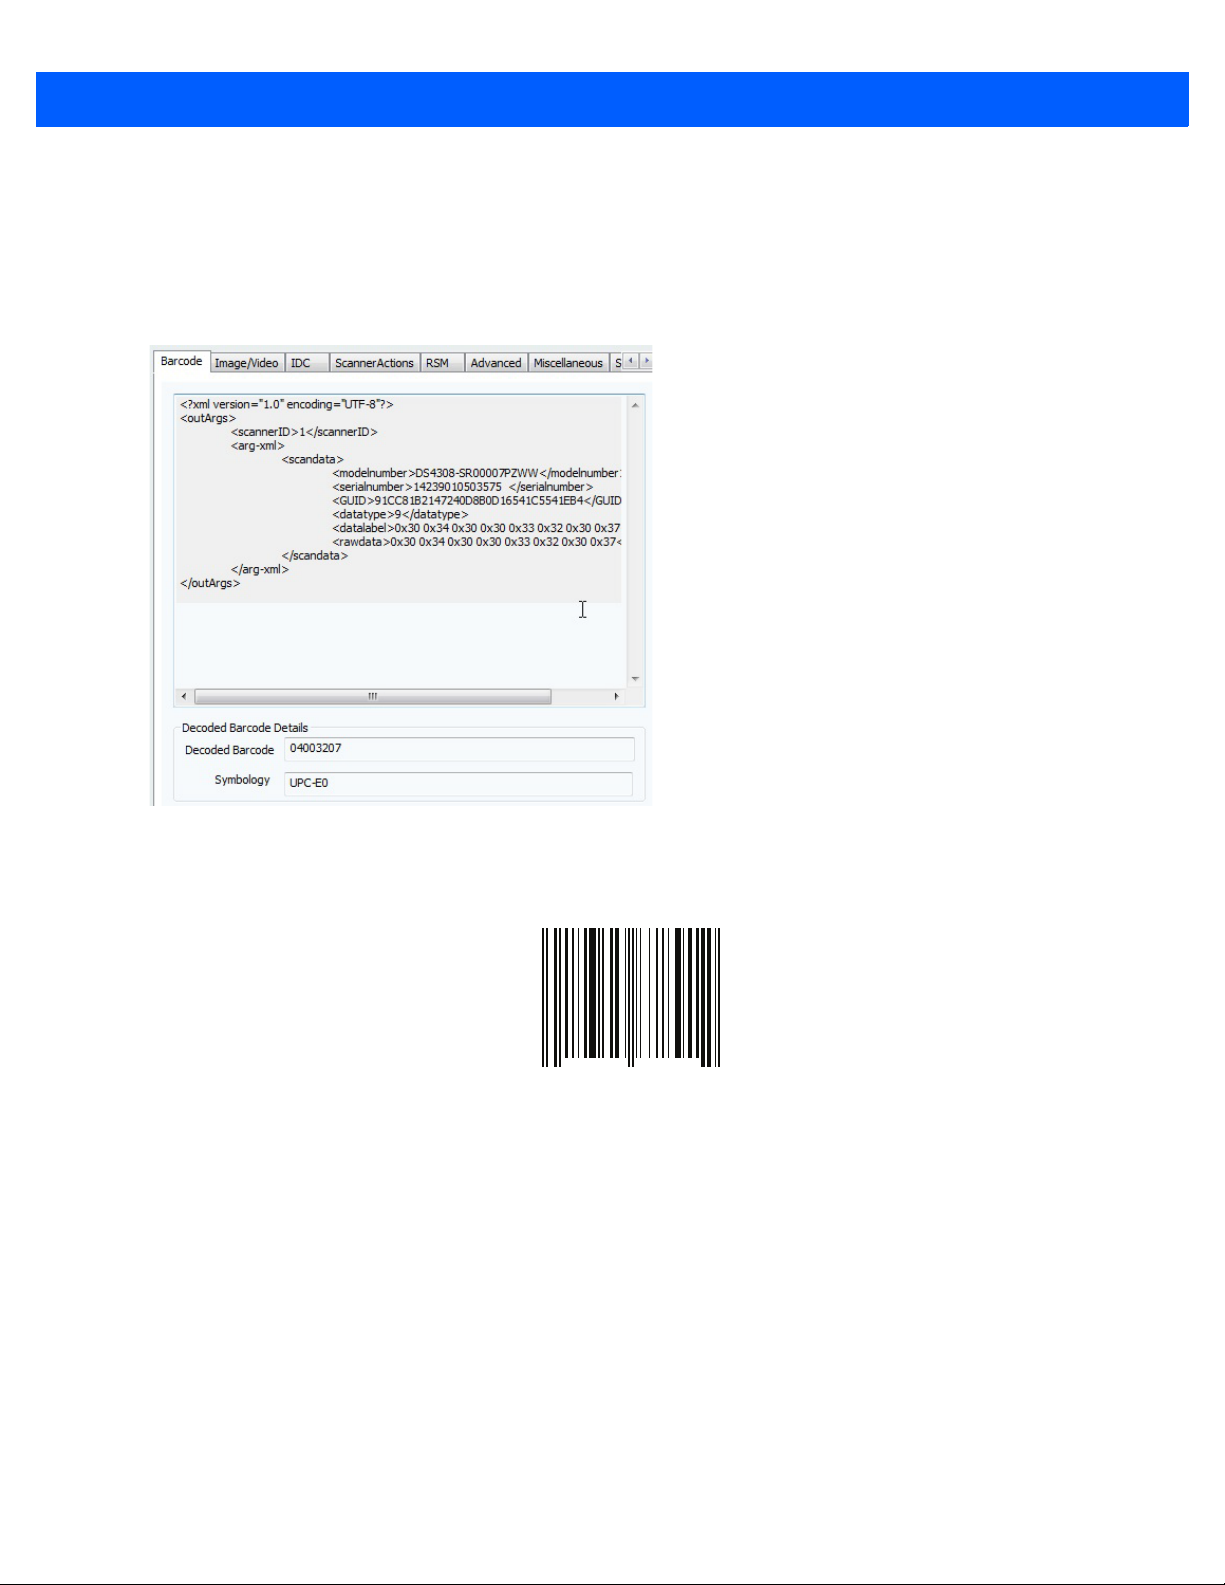
4 - 10 ZEBRA SCANNER SDK FOR WINDOWS DEVELOPER’S GUIDE
0
1 2 3 4 5 6 7 8 9 1
2
Barcode Scanning
1. Connect and discover a scanner (see Scanner Discovery/Asset Tracking Information/Va lidating Successful
SDK Installation on page 4-7).
2. Scan a barcode and its decoded data is returned in the form of XML data and displayed on the Barcode
tab. To illustrate the typical implementation, the sample application also displays only the barcode data
below the XML data.
Figure 4-5
Decoded Barcode Data
Example
1. Scan the following sample barcode after discovering the scanner in the sample application (see Scanner
Discovery/Asset Tracking Information/Validating Successful SDK Installation on page 4-7).
Sample Barcode
2. The following XML is returned:
<?xml version="1.0" encoding="UTF-8" ?>
<outArgs>
<scannerID>2</scannerID>
<arg-xml>
<scandata>
<modelnumber>DS670-SR20001ZZR</modelnumber>
<serialnumber>7116000501003</serialnumber>
<GUID>A2E647DED2163545B18BCEBD0A2A133D</GUID>
<datatype>8</datatype>
<datalabel>0x30 0x31 0x32 0x33 0x34 0x35 0x36 0x37 0x38 0x39 0x31 0x32< /datalabel>
<rawdata>0x30 0x31 0x32 0x33 0x34 0x35 0x36 0x37 0x38 0x39 0x31 0x32</rawdata>
</scandata>
</arg-xml>
</outArgs>
By processing the XML above, the sample application displays the decoded barcode in the Decoded
3.
Barcode text box and the symbology in the Symbology text box.
Page 93

TEST UTILITIES & SOURCE CODE 4 - 11
Language/Locale Details
1. Toggle the Enable Emulation check box to enable/disable Simulated HID Keyboard Output.
2. Select the language locale from the drop-down menu.
The sample application first retrieves the current config.xml file (see Simulated HID Keyboard Output on
page 2-11 by executing an ExecCommand API call with the KEYBOARD_EMULATOR_GET_CONFIG
method and an empty inXML. It receives outXML as shown below:
inXML:
<inArgs></inArgs>
outXML:
<outArgs>
<arg-xml>
<KeyEnumState>1</KeyEnumState>
<KeyEnumLocale>0</KeyEnumLocale>
</arg-xml>
</outArgs>
The sample application processes the XML above and populates the user interf ace. The <KeyEnumState>
tag indicates the current state of Simulated HID Keyboard Output, where enabled = 1 and disabled = 0.
The <KeyEnumLocale> tag indicates the language locale number currently active with the CoreScanner
service. The value of 0 above indicates English.
Use the ExecCommand API call with the KEYBOARD_EMULATOR_ENABLE method and following
inXML to enable/disable Simulated HID Keyboard Output.
<inArgs>
<cmdArgs>
<arg-bool>TRUE</arg-bool>
</cmdArgs>
</inArgs>
To enable HID KB Emulator use TRUE in <arg-bool> tags and FALSE to disable it.
Use the ExecCommand API call with the KEYBOARD_EMULATOR_SET_LOCALE method and following
inXML to change the language locale.
<inArgs>
<cmdArgs>
<arg-int>1</arg-int>
</cmdArgs>
</inArgs>
Set the <KeyEnumLocale> tag value to 1 for French and 0 for English.
Capture Image and Video
1. Connect and discover an imaging scanner (see Scanner Discovery/Asset Tracking Information/Validating
Successful SDK Installation on page 4-7).
2. Select a SNAPI mode scanner ID from the Select Scanner drop-down box. Your selection is then reflected
in the Connected Scanners window.
NOTE If no SNAPI scanner is shown in the Connected Scanners window, you must connect an imaging scanner
that supports image/video transfer. For an up-to-date table listing scanner models and their supported
communication modes refer to the Scanner SDK for Windows website at:
www.zebra.com/scannersdkforwindows.
Page 94

4 - 12 ZEBRA SCANNER SDK FOR WINDOWS DEVELOPER’S GUIDE
Alternatively, select SNAPI mode scanner in the Connected Scanners area. Your selected Scanner's ID is
displayed in the Select Scanner drop-down combo box.
Figure 4-6
3. Go to the Image & Video tab.
4. Select an image type of JPG, TIFF or BMP.
5. Selecting the image type in the sample application executes an ExecCommand API call using the
Scanner Selection
DEVICE_SET_PARAMETERS method and following XML code:
<inArgs>
<scannerID>1</scannerID>
<cmdArgs>
<arg-xml>
<attrib_list>
<attribute>
<id>304</id>
<datatype>B</datatype>
<value>4</value>
</attribute>
</attrib_list>
</arg-xml>
</cmdArgs>
</inArgs>
NOTE The <scannerID> tag in the XML is filled with the scanner’s ID selected in the Connected Scanners list of
the sample application. The <id> tag contains the image file type parameter of the selected scanner. In the
XML example above, this value is 304. The value 4 indicates the image type the user should get from the
scanner. See Table 4-4 for valid Image Types.
Table 4-4
Image Types
Image Type Value
BMP_FILE_SELECTION 3
TIFF_FILE_SELECTION 4
JPEG_FILE_SELECTION 1
NOTE These values may change with the scanner model. Refer to the scanner Product Reference Guide for
more information on scanner parameters. For more information about parameter settings, see Parameter
Setting (Device Configuration) on page 4-21.
Page 95

TEST UTILITIES & SOURCE CODE 4 - 13
6. Check Enable Video View Finder and click either Image to put the scanner into image capture mode or
Video to put the scanner into video capture mode.
7. Checking Enable Video View Finder in the sample application executes an ExecCommand API call with
the DEVICE_SET_PARAMETERS method and following XML code:
<inArgs>
<scannerID>1</scannerID>
<cmdArgs>
<arg-xml>
<attrib_list>
<attribute>
<id>324</id>
<datatype>B</datatype>
<value>1</value>
</attribute>
</attrib_list>
</arg-xml>
</cmdArgs>
</inArgs>
NOTE The <scannerID> tag in the XML contains the selected scanner’s ID from the Connected Scanners list of
the sample application. The <id> tag contains the video view finder parameter number of the scanner and
value 1 indicates that the view finder is enabled. A value “0” indicates the view finder is disabled.
Click Image in the sample application. Image executes an ExecCommand API call using the
8.
DEVICE_CAPTURE_IMAGE method with the XML code below . Click Vi deo to execute an ExecCommand
API call using the DEVICE_CAPTURE_VIDEO method with the following XML code.
<inArgs>
<scannerID>1</scannerID>
</inArgs>
Click Pull Trigger on the bottom left side of the utility to capture an image. If the scanner was place into
9.
video capture mode in the previous step, click Pull Trigger once to start video capture and click Release
Trigger to stop video capture.
10. Clicking Pull Trigger or Release Trigger in the sample application executes an ExecCommand API call
using the corresponding DEVICE_PULL_TRIGGER or DEVICE_RELEASE_TRIGGER method with the
following XML code
<inArgs>
<scannerID>1</scannerID>
</inArgs>
NOTE You can use the trigger on the scanner to start and stop image or video capture instead of the soft trigger
buttons provided in the sample utility.
Page 96

4 - 14 ZEBRA SCANNER SDK FOR WINDOWS DEVELOPER’S GUIDE
Figure 4-7
11. If you registered with ImageEvent (see Register for COM Events on page 5-2) you receive an image event
Captured Image Displayed on the Image & Video Tab
for the performed pull trigger when in image mode.
12. If you registered with VideoEvent (see Register for COM Events on pag e 5-2) you receive a video event for
the performed pull trigger when in video mode.
Page 97

TEST UTILITIES & SOURCE CODE 4 - 15
Beep the Beeper
Zebra scanners are capable of sounding the beeper by invoking the Beeper method from the host system.
1. Connect and discover a scanner (see Scanner Discovery/Asset Tracking Information/V alidating Successful
SDK Installation on page 4-7).
2. Select a SNAPI or OPOS/IBM OPOS mode scanner ID from the Select Scanner drop-down box. Your
selection is reflected in the Connected Scanners window (see Figure 4-6 on page 4-12).
3. Select the desired beep sequence from the list defined on the Scanner Actions tab as shown in Figure 4- 8.
4. Click Beep.
Figure 4-8
5. Clicking Beep in the sample application executes an ExecCommand API call with the SET_ACTION
Beep Values
method and following XML code:
<inArgs>
<scannerID>1</scannerID>
<cmdArgs>
<arg-int>2</arg-int>
</cmdArgs>
</inArgs>
NOTE The <scannerID> tag in the XML is filled with the scanner’s ID selected in the Connected Scanners list of
the sample application. The <arg-int> tag in the XML is filled with the beep’s ID selected in the Beeper
drop-down list shown in Figure 4-10 on page 4-19.
Y o u can sound any of the beeps defin ed in Table 3-13 on page 3-35 by changing the value of the <arg-int>
6.
tag in the XML code. Successful execution of the command returns the status parameter as 0.
Page 98

4 - 16 ZEBRA SCANNER SDK FOR WINDOWS DEVELOPER’S GUIDE
Flash the LED
Zebra scanners are capable of flashing an LED by initiating the flash LED method from the host system.
1. Connect and discover a scanner (see Scanner Discovery/Asset Tracking Information/Va lidating Successful
SDK Installation on page 4-7).
2. Select a SNAPI or OPOS/IBM OPOS mode scanner ID from the Select Scanner drop-down box. Your
selection is reflected in the Connected Scanners window (see Figure 4-6 on page 4-12).
3. Select the desired LED from the list, defined on the Scanner Actions tab (see Figure 4-9 on page 4-16).
4. Click On to light the LED and Off to turn it off.
Figure 4-9
5. Clicking On in the sample application executes an ExecCommand API call with the SET_ACTION method
LED Selection
and the following XML code:
<inArgs>
<scannerID>1</scannerID>
<cmdArgs>
<arg-int>43</arg-int>
</cmdArgs>
</inArgs>
NOTE The <scannerID> tag in the XML is filled with the scanner ID selected in the Connected Scanners list of
the sample application. The <arg-int> tag in the XML is filled with the corresponding action value to turn on
or off the LED selected from the drop-down list shown in Figure 4-9.
You can control any LED supported by the scanner by changing the action value in the <a rg -in t> ta g. The
6.
list of action values can be found in Table 3-13 on page 3-35.
Page 99

TEST UTILITIES & SOURCE CODE 4 - 17
<?xml version="1.0" encoding="UTF-8" ?>
<outArgs>
<scannerID>1</scannerID>
<arg-xml>
<modelnumber>DS670-SR20001ZZR</modelnumber>
<serialnumber>7116000501003</serialnumber>
<GUID>A2E647DED2163545B18BCEBD0A2A133D</GUID>
<response>
<opcode>5000</opcode>
<attrib_list>
<attribute name="">0</attribute>
<attribute name="">1</attribute>
<attribute name="">2</attribute>
<attribute name="">3</attribute>
<attribute name="">4</attribute>
<attribute name="">5</attribute>
<attribute name="">6</attribute>
<attribute name="">7</attribute>
<attribute name="">8</attribute>
<attribute name="">9</attribute>
<attribute name="">10</attribute>
<attribute name="">11</attribute>
<attribute name="">12</attribute>
<attribute name="">13</attribute>
<attribute name="">14</attribute>
<attribute name="">15</attribute>
<attribute name="">16</attribute>
<attribute name="">17</attribute>
<attribute name="">18</attribute>
7. Clicking Off in the sample application executes an ExecCommand API call using the DEVICE_LED_OFF
method with the same XML code that turned it on.
NOTE The Beep the Beeper and Flash the LED XML code examples are the same. The only difference between
these commands is the method name. All XML used in an ExecCommand API call has a common format.
The </inArgs> tag always contains the <scannerID> tag and optionally contains <cmdArgs> tags and
<arg-xml> tags inside the </inArgs> tag. Inside <cmdArgs>, there can be <arg-string>,<arg-bool> and
<arg-int> tags. You can execute different commands for the same XML by changing the method
parameter in ExecCommand.
Querying Attributes and Parameters
To query parameters from a specific device, such as the Date of Manufacture and Firmware Version, use the
following procedure.
1. Connect and discover a scanner (see Scanner Discovery/Asset Tracking Information/V alidating Successful
SDK Installation on page 4-7).
2. Select the scanner you want to query from the list of Connected Scanners an d then select the RSM tab.
3. Click Get All IDs to retrieve the entire list of supported attribu te IDs of the selected scanner . This operation
executes an ExecCommand API call with the ATTR_GETALL method and the following XML:
<inArgs><scannerID>1</scannerID></inArgs>
NOTE The <scannerID> tag in the XML contains the scanner’s ID selected in the Connected Scanners list of the
sample application.
4.
The sample application receives the XML output below and displays the correspo nding attribute IDs on the
grid (see Figure 4-10 on page 4- 19).
Page 100

4 - 18 ZEBRA SCANNER SDK FOR WINDOWS DEVELOPER’S GUIDE
<attribute name="">20</attribute>
<attribute name="">21</attribute>
<attribute name="">22</attribute>
<attribute name="">23</attribute>
<attribute name="">24</attribute>
<attribute name="">25</attribute>
<attribute name="">26</attribute>
<attribute name="">27</attribute>
<attribute name="">28</attribute>
<attribute name="">29</attribute>
<attribute name="">30</attribute>
<attribute name="">31</attribute>
<attribute name="">34</attribute>
<attribute name="">35</attribute>
<attribute name="">36</attribute>
<attribute name="">37</attribute>
<attribute name="">38</attribute>
<attribute name="">39</attribute>
<attribute name="">655</attribute>
<attribute name="">656</attribute>
<attribute name="">657</attribute>
<attribute name="">658</attribute>
<attribute name="">659</attribute>
<attribute name="">665</attribute>
<attribute name="">670</attribute>
<attribute name="">672</attribute>
<attribute name="">673</attribute>
<attribute name="">705</attribute>
<attribute name="">716</attribute>
<attribute name="">718</attribute>
<attribute name="">721</attribute>
<attribute name="">724</attribute>
<attribute name="">726</attribute>
<attribute name="">727</attribute>
<attribute name="">728</attribute>
<attribute name="">730</attribute>
<attribute name="">731</attribute>
<attribute name="">734</attribute>
<attribute name="">735</attribute>
<attribute name="">745</attribute>
<attribute name="">6000</attribute>
<attribute name="">6001</attribute>
<attribute name="">6002</attribute>
<attribute name="">6003</attribute>
<attribute name="">6004</attribute>
<attribute name="">20004</attribute>
<attribute name="">20006</attribute>
<attribute name="">20007</attribute>
<attribute name="">20008</attribute>
<attribute name="">20009</attribute>
<attribute name="">20010</attribute>
<attribute name="">20011</attribute>
<attribute name="">20013</attribute>
</attrib_list>
</response>
</arg-xml>
</outArgs>
NOTE To find the corresponding attribute names refer to the scanner’s Product Reference Guide.
Date of Manufacture is
27 April 2007
Firmware Version is
DS6707X4
UOC A status is
TRUE so it is enabled
Beeper Volume is
0 so it is high
ADF Rule Contained Within the
Scanner's ADF Buffer
 Loading...