

Page 1

SB1
PROGRAMMER’S GUIDE
Page 2

Page 3

SB1 PROGRAMMERS GUIDE
72E-170991-03
Rev. A
February 2015
Page 4

ii SB1 Programmer’s Guide
No part of this publication may be reproduced or used in any form, or by any electrical or mechanical means,
without permission in writing from Zebra. This includes electronic or mechanical means, such as photocopying,
recording, or information storage and retrieval systems. The material in this ma nual is subject to change
without notice.
The software is provided strictly on an “as i s” basis. All sof twar e, including firmware, furnished to the user is on
a licensed basis. Zebra grants to the user a non-transferable and non-exclusive license to use each software
and firmware program delivered hereunder (licensed program). Except as noted below, such license may not
be assigned, sublicensed, or otherwise transferred by the user without prior written consent of Zebra. No right
to copy a licensed program in whole or in part is granted, except as permitted under copyright law. The user
shall not modify, merge, or incorporate any form or portion of a licensed program with other program material,
create a derivative work from a licensed program, or use a licensed program in a network without written
permission from Zebra. The user agrees to maintain Zebras copyri ght notice on the licensed programs
delivered hereunder, and to include the same on any authorized copies it makes, in whole or in part. The user
agrees not to decompile, disassemble, decode, or reverse engineer any licensed program delivered to the user
or any portion thereof.
Zebra reserves the right to make changes to any software or product to improve reliability, function, or design.
Zebra does not assume any product liability arising out of, or in connection with, the application or use of any
product, circuit, or application described herein.
No license is granted, either expressly or by implication, estoppel, or otherwise under any ZebraTechnologies
Corporation, intellectual property rights. An implied license only exists for equipment, circuits, and subsystems
contained in Zebra products.
Page 5

Revision History
Changes to the original guide are listed below:
Change Date Description
-01 Rev. A 1/10/2013 Initial release.
-02 Rev A 7/15/2014 Add description for Wait/Quit behavior.
-03 Rev A 2/28/2015 SB1 RevC Features
Add description for hour glass.
Add details for additional configura
Add keyboard APIs an
Rev B.5 changes.
d samples.
iii
tions introduced in config.js.
Page 6

iv SB1 Programmer’s Guide
Page 7

TABLE OF CONTENTS
Revision History.............................................................................................................................. iii
Introduction..................................................................................................................................... xxxv
Documentation Set ................................................................................................................... xxxv
Chapter Descriptions ...................................................................................................................... xxxv
Notational Conventions................................................................................................................... xxxvi
Related Documents and Software.................................................................................................. xxxvi
Chapter 1: Introduction
SB1 System Applications/Shell UI Services .................................................................................. 1-1
Namespaces .................................................................................................................................. 1-3
SB1 Client Applications ............................................................................................................ 1-4
Backend ............................................................................................................................. 1-4
Frontend ............................................................................................................................. 1-4
CSS .................................................................................................................................... 1-4
JavaScript .......................................................................................................................... 1-4
Quick Start Guide ........................................................................................................................... 1-4
Develop First SB1 Application ................................................................................................. 1-4
Add Hello SB1 App in apps.json .............................................................................................. 1-6
Deploy the Hello Application .......................................................................................................... 1-6
Manual Deployment ................................................................................................................. 1-6
Deployment using RDT Solo for Many Devices ............................................................................. 1-7
Chapter 2: Application Integration
Integration with SB1 Shell .............................................................................................................. 2-1
System Integration ................................................................................................................... 2-1
Visual Integration ..................................................................................................................... 2-2
Installation ...................................................................................................................................... 2-2
config.js File ............................................................................................................................. 2-3
apps.json File ........................................................................................................................... 2-3
Remote apps.json file ......................................................................................................... 2-5
Starting Applications .......................................................................................................... 2-5
Developer Content ................................................................................................................... 2-6
Page 8

ii SB1 Programmer’s Guide
Application Timeout ................................................................................................................. 2-7
Upgrade from Older Versions ........................................................................................................ 2-8
Chapter 3: Application Shared Library
Application System Variables ............................................................................................ 3-1
Application Services ...................................................................................................................... 3-2
Running an Application ............................................................................................................ 3-2
Anonymous: asl.run(appUrl, data, callback); ..................................................................... 3-3
asl.exit(data); ..................................................................................................................... 3-4
asl. close (appName); ........................................................................................................ 3-5
asl. closeChildApp (data); .................................................................................................. 3-5
asl. closeAll (); .................................................................................................................... 3-5
asl. apps (list, append); ...................................................................................................... 3-6
asl. getUserData (); ............................................................................................................ 3-6
asl.minimize(); .................................................................................................................... 3-7
asl. fullscreen (); ................................................................................................................. 3-7
asl.reboot(); ........................................................................................................................ 3-7
asl. enableTouch (); ........................................................................................................... 3-7
asl. disableTouch (); ........................................................................................................... 3-8
Events ...................................................................................................................................... 3-8
asl.events.fire(eventName, data) ....................................................................................... 3-8
asl.events.subscribe(eventName, callback) ....................................................................... 3-8
asl.events.unbsubscribe(eventName) ................................................................................ 3-9
Native Shell Events ............................................................................................................ 3-9
Notification Services ...................................................................................................................... 3-10
Parameters .............................................................................................................................. 3-10
asl. clearNotification (all, type); .......................................................................................... 3-12
Keyboard Services ......................................................................................................................... 3-13
Explicit Keyboard Execution .................................................................................................... 3-13
Keyboard Events ................................................................................................................ 3-14
Shared UI Services ........................................................................................................................ 3-18
Back Button .............................................................................................................................. 3-18
Parameters ........................................................................................................................ 3-18
Title Label ................................................................................................................................ 3-19
Options Menu Button ............................................................................................................... 3-19
Parameters ........................................................................................................................ 3-21
Full Screen Mode ..................................................................................................................... 3-21
Resource Services ......................................................................................................................... 3-23
NPAPI ...................................................................................................................................... 3-23
Messaging Services ....................................................................................................................... 3-26
Authentication Services ................................................................................................................. 3-27
User Profiles and Authentication .............................................................................................. 3-27
Shell Authentication ................................................................................................................. 3-27
Parameters ........................................................................................................................ 3-28
Shell Authentication Properties .......................................................................................... 3-28
asl. signOut() ...................................................................................................................... 3-29
Application Authentication ........................................................................................................ 3-29
Badge Mode ....................................................................................................................... 3-29
asl.lock(url); ........................................................................................................................ 3-30
Setting User Profile from an Application ............................................................................ 3-30
Page 9

Table of Contents iii
Window Services ........................................................................................................................... 3-31
Alert Window ............................................................................................................................ 3-31
Confirm Window ....................................................................................................................... 3-31
Hourglass ................................................................................................................................. 3-31
Wait/Quit Feature ..................................................................................................................... 3-31
Startup Applications ................................................................................................................. 3-32
Ghosting ................................................................................................................................... 3-32
Cradle Insert and Removal Enhancements ............................................................................. 3-32
QWERTY Keyboard ................................................................................................................. 3-32
Process Application ................................................................................................................. 3-33
Chapter 4: Configuration
ScanTo Application ........................................................................................................................ 4-1
Maximum Number of Running Applications ................................................................................... 4-3
Application Source File Location .................................................................................................... 4-3
Push Notifications Port Number ..................................................................................................... 4-3
Push Notifications Pass Key .......................................................................................................... 4-3
Home Screen Shortcut Buttons ..................................................................................................... 4-4
Home Screen Refresh ................................................................................................................... 4-4
PIN Lock Require ........................................................................................................................... 4-4
Default Lock Screen Page ............................................................................................................. 4-4
Default Badge Screen Page .......................................................................................................... 4-5
Lock Screen Timeout ..................................................................................................................... 4-5
Rotate Badge Screen Timeout ....................................................................................................... 4-6
Disable Profile Button .................................................................................................................... 4-6
Default User Information ................................................................................................................ 4-6
Login Screen Require .................................................................................................................... 4-7
Login Screen URL .......................................................................................................................... 4-7
Logoff URL ..................................................................................................................................... 4-7
Login Timeout ................................................................................................................................ 4-8
Admin Settings PIN Require .......................................................................................................... 4-8
Admin PIN value ............................................................................................................................ 4-8
More Settings Menu Item PIN Require .......................................................................................... 4-8
More Settings PIN Value ................................................................................................................ 4-8
Beeper Duration ............................................................................................................................. 4-8
Beeper Frequency ......................................................................................................................... 4-9
Date Format ................................................................................................................................... 4-9
Time Format ................................................................................................................................... 4-9
Cradle Insert URL .......................................................................................................................... 4-9
Cradle Remove Application ........................................................................................................... 4-9
Process Type Application .............................................................................................................. 4-9
Low Battery URL ............................................................................................................................ 4-10
Manage LED in Shell ..................................................................................................................... 4-10
Beeper for Application Notifications ............................................................................................... 4-10
Beeper for System Notifications ..................................................................................................... 4-10
Beeper for Server Notifications ...................................................................................................... 4-10
Scanner Persist Across Pages ...................................................................................................... 4-10
Number of Waits ............................................................................................................................ 4-11
Wait for Response Timeout ........................................................................................................... 4-11
Clear Local Storage on Reboot ...................................................................................................... 4-11
Page 10

iv SB1 Programmer’s Guide
Scanner Configuration for the scanTo Application ........................................................................ 4-11
Push Notifications Number of Parameters ..................................................................................... 4-12
Startup Application ......................................................................................................................... 4-12
Start Process Application ............................................................................................................... 4-12
Cradle Insert Activities ................................................................................................................... 4-13
Keyboard Configurations ............................................................................................................... 4-14
Other Configurations ................................................................................................................ 4-14
Chapter 5: Localization
String Resource Files ............................................................................................................... 5-2
Keyboard Resource Files ......................................................................................................... 5-2
Client Application Localization ................................................................................................. 5-2
Chapter 6: Additional Notes
Chapter 7: App Development and Deployment Guidelines
Application Naming ........................................................................................................................ 7-1
Content File Naming ...................................................................................................................... 7-2
Content File Location in SB1 ......................................................................................................... 7-2
Content File Location in Development Workstation ....................................................................... 7-3
Applications Versions .................................................................................................................... 7-4
Memory Considerations ................................................................................................................. 7-7
SB1 Baseline Files and Baseline State ......................................................................................... 7-7
Creating an SB1 Baseline ........................................................................................................ 7-8
Building an SB1 Baseline Package .......................................................................................... 7-9
Deploying an SB1 Baseline Package ...................................................................................... 7-9
Removing an SB1 Baseline Package ...................................................................................... 7-10
Developing and Testing an SB1 Application .................................................................................. 7-10
Building an SB1 Application Package ...................................................................................... 7-11
Deploying an SB1 Application Package ................................................................................... 7-13
Removing an SB1 Application Package .................................................................................. 7-13
Chapter 8: Using Fonts on the SB1
Introduction .................................................................................................................................... 8-1
RhoElements Font System ............................................................................................................ 8-1
Utilizing Current Fonts ................................................................................................................... 8-1
Utilizing New Fonts ........................................................................................................................ 8-2
Installing A New Font To a Local File System ......................................................................... 8-2
Font-Face/Webfonts ................................................................................................................ 8-2
Transferring Fonts ......................................................................................................................... 8-3
Font Licenses ................................................................................................................................ 8-3
Chapter 9: Running off-line Web Applications
Introduction .................................................................................................................................... 9-1
How to Deploy a Web Application ............................................................................................ 9-1
Enabling the Cache Manifest in HTML .......................................................................................... 9-1
Page 11

Table of Contents v
Cache Manifest .............................................................................................................................. 9-2
Structure .................................................................................................................................. 9-2
Header ............................................................................................................................... 9-2
Cache ................................................................................................................................. 9-2
Network .............................................................................................................................. 9-2
Fallback .............................................................................................................................. 9-2
Server ...................................................................................................................................... 9-3
Tips ................................................................................................................................................ 9-3
Revising the Cache Manifest ................................................................................................... 9-3
Off-line Mode ................................................................................................................................. 9-4
Discerning Connection Status .................................................................................................. 9-4
Network Module ................................................................................................................. 9-4
WEBSQL .................................................................................................................................. 9-5
Example of Using WEBSQL in RhoElements .......................................................................... 9-5
More Information ............................................................................................................................ 9-5
SB1 smart badge - Best Practices & User Training ....................................................................... 9-6
Scanning Recommendations ................................................................................................... 9-6
Overall Usability ....................................................................................................................... 9-6
SB1 Accessories ...................................................................................................................... 9-7
Network Connectivity and Coverage ........................................................................................ 9-7
Configuration and Application Development ............................................................................ 9-7
Known Issues ........................................................................................................................... 9-8
Troubleshooting ....................................................................................................................... 9-9
Page 12

vi SB1 Programmer’s Guide
Page 13

ABOUT THIS GUIDE
Introduction
This guide provides information developing applications for use on the SB1.
NOTE Screens and windows pictured in this guide are samples and may differ from actual screens.
Documentation Set
The documentation set for the SB1 is divided into guides that provide information for specific user needs.
•
SB1 Regulatory Guide - provides all regulatory and safety information.
•
SB1 User Guide - describes how to use the SB1.
•
SB1 Integrator Guide - describes how to set up the SB1 and accessories.
•
SB1 Programmers Guide - describes how to develop applications for the SB1.
Chapter Descriptions
Topics covered in this guide are as follows:
•
Chapter 1, Introduction - provides an introduction to the Programmers Guide.
•
Chapter 2, Application Integration - Lists the steps required for integrating and installing applications on th e
SB1.
•
Chapter 3, Application Shared Library - describes the modules of the Application Shared Library.
•
Chapter 4, Configuration - Lists the options available in the SB1 configuration file.
•
Chapter 5, Localization - describes localization support for the SB1.
•
Chapter 6, Additional Notes - provides additional recommendations and best practices for using the SB1.
Page 14

xxxvi SB1 Programmer’s Guide
•
Chapter 7, App Development and Deployment Guidelines - provides guidelines for application
development and deployment.
•
Chapter 8, Using Fonts on the SB1 - provides information for using fonts.
•
Chapter 9, Running off-line Web Applications - describes how to run application off-line.
Notational Conventions
The following conventions are used in this document:
•
The term “SB1” refers to the Zebra SB1 smart badge.
•
Italics are used to highlight the following:
• Chapters and sections in this and related documents
• Folder names
•
Bold text is used to highlight the following:
• Key names on a keypad
• Button names on a screen.
• Dialog box, window and screen names
• Drop-down list and list box names
• Check box and radio button names
• Icons on a screen.
•
Courier Bold text is used to highlight filenames.
•
Bold Italic text is used to highlight MSP package names.
•
Bullets (•) indicate:
• Action items
• Lists of alternatives
• Lists of required steps that are not nece ssarily sequential.
•
Sequential lists (e.g., those that describe step-by-s te p pr oc ed ur e s) ap pe a r as nu m be re d lists.
Related Documents and Software
The following items provide more information about the SB1.
•
SB1 Regulatory Guide, p/n 72-162415-xx
•
SB1 User Guide, p/n 72E-164711-xx
•
SB1 Integrator Guide, p/n 72E-164712-xx
•
Administrating MSP 4.0, p/n 72E-128775-04
•
Understanding Mobility Services Platform 4.0, p/n 72E-128712-05
•
Mobility Services Platform 4.0 Software Installation Guide, p/n 72E-100159-13
•
Mobility Services Release Notes, p/n 72E-100160-17
•
Using Mobility Services Platform 4.0, p/n 72E-128802-05
Page 15

About This Guide xxxvii
For the latest version of this guide and all guides, go to: http://www.zebra.com/support
Page 16

xxxviii SB1 Programmer’s Guide
Page 17

CHAPTER 1 INTRODUCTION
This guide provides the starting point for developing applications for the SB1 Shell environment. It provides
basic information about the system environment, what types of applications can run in this env iro nm e nt ,
system libraries and how to access device capabilities.
The SB1 Shell is a multi-instance, multi-tasking application which enables RhoElements “hybrid”
(HTML/JavaScript) applications to run concurrently, interact with each other and share device and system
resources. The Shell runs within RhoElements and uses the Webkit engine. This means that most rules and
specific attributes that can be found in Webkit are available in the SB1 Shell.
SB1 System Applications/Shell UI Services
These applications are:
•
Home - the starting point of the SB1 Shell and gives access to all its functions and applications.
•
AppLauncher - responsible for listing and managing client applications. Also includes a Task Manager
enabling users to observe running apps as well as quitting them.
•
Settings - provides UI for managing device capabilities and SB1 Shell settings. Settings is split into
different sections.
• Main settings - Provides basic UI for observing battery and wireless status as well as volume and
beeper control.
• More settings - Provides control points for PTT Express, Screen calibration, Beeper settings and
Advanced Settings. This menu item can be protected by PIN.
• Advanced settings - Provides control points for Device Manager Settings, RD Client, Wireless and
Date and time settings, Software Version etc., This menu item can be protected by PIN code.
•
Lock - Lock screen is a web page which will be displayed when user configurable inactivity time reached.
This lock screen can be configurable in config.js or and API can be used to set custom lock screen.
Page 18

1 - 2 SB1 Programmer’s Guide
Figure 1-1
•
Figure 1-2
•
•
Lock Screen
Badge - Badge screen is a web page which displays when user device moved to upside down and
configurable delay time reached. This badge screen can be configurable in config.js or and API can be
used to set cuctom badge screen.
Badge Screen
Notifications - gives access to the notificat ion s re ce iv ed fro m th e different server applications, from
other devices and the system itself.
Profile - provides the user a way to customize their SB1 by setting their name and title as well as signing
out or switching device.
Page 19

Introduction 1 - 3
Settings PageApp Launcher
Profile PageHome page with Wireless
and PTT Shortcuts
Home Page
Badge ScreenLock ScreenNotification List
Figure 1-3
Namespaces
This section provides information on the JavaScript objects namespaces, e.g. each layer in the Structure
section is encapsulated by a JavaScript object (namespace):
•
•
•
All of the modules described are provided with their namespaces.
System Applications
Application Shared Library - asl
Shell UI Services - sui
Shell System Library - sys
Page 20

1 - 4 SB1 Programmer’s Guide
Figure 1-4
Structure Diagram
SB1 Client Applications
The SB1 Shell is designed to run custom built web based client applications. They are required to meet the
following technical specifications:
Backend
Web applications can implement some specific logic based on the workflow required. The implementation can
be made in various technologies and programming languages (C#.NET, RoR, PHP, etc.). The SB1 Shell does
not interact with the application backend. A pplica tio ns wr it te n in an y clien t- s e rver en vir on m en t ha s to be
hosted on a server and need to be accessible through a network. The SB1 Shell should be configured to know
the address of an application provided as an application URL. SB1 Shell then will create an application icon
and will allow application to be started and running into their own application pool implemented as an iframe.
Frontend
The SB1 Shell runs in in RhoElements web browser that has support for HTML 5. SB1 Shell applications are
HTML page that can be implemented using HTML5, CSS3 and Javascript. This allows application designers to
take advantage of the latest improvements as markup elements, web databases, browser local and session
storages and browser caches.
CSS
The SB1 Shell supports the CSS 3 official specification with webkit extensions.
JavaScript
The SB1 Shell supports the JavaScript ECMAScript 3 with some extensions from ECMAScript 5. Refer to
RhoElements documentation for more information.
Quick Start Guide
Once device open from package box users need to place the device on cra dle to reboot the device an d charge.
After charging the device, now device is ready to configure.
Develop First SB1 Application
Develop any thin client web application and deploy on any remote server or develop any HTML 5 based app
and deploy on device.
Page 21

Introduction 1 - 5
<!DOCTYPE html>
<html>
<head>
<title>
This is hello SB1 sample
</title>
<!- Add asl.js reference in all web pages -->
<script type="text/javascript"
src="http://127.0.0.1:83/Application/www/sapp/src/asl.js"></script>
<!- Use asl APIs to set the page title and back arrow, options -->
<script type="text/javascript">
asl.title('Hello SB1 Demo');
asl.back(function (t) { asl.exit(); }, 'http://127.0.0.1:83/imagepath/ic_x.png');
asl.options([
{
title: 'About',
callback: function() {alert('This is a sample app to demonstrate Hello SB1
Sample');}
},
{
title: 'Quit',
callback: quit
}
]);
function quit() {
confirm('Are you sure you want to quit the current application?',
function(confirmation) {
if(confirmation) {
asl.exit();
}
})
};
</script>
</head>
<body>
<!- Construct business page here -->
Hello SB1.
</body>
</html>
Page 22

1 - 6 SB1 Programmer’s Guide
Add Hello SB1 App in apps.json
Copy the config folder from SB1 Toolkit and add the Hello SB1 app in apps.json.
{
"name": "hello",
"url": "http://127.0.0.1:83/UserDrive/apps/hello/hello.html"
}
Deploy the Hello Application
Manual Deployment
1. Connect the SB1 to a host computer using a USB cable. In a file explorer application, the Logs folder and
Fusion data folder display as shown.
Figure 1-5
2. Copy the apps folder and the config folder from host computer to the UserDrive folder on the SB1.
Logs and Fusion Folders
Page 23

Introduction 1 - 7
Host Computer Host SB1
3. Reboot the SB1.
4. Go to Applauncher and find the Hello application .
Figure 1-6
5. Select the Hello application.
Figure 1-7
Applauncher
Hello SB1 Application
Deployment using RDT Solo for Many Devices
If customers deploy their web applications on any remote server, the proper app URL to be configured in
apps.json.
You can use the Zebra RDT Solo application to upgrade to latest OS, WLAN Profile and application
configurations.
Page 24

1 - 8 SB1 Programmer’s Guide
View the videos on using RDT Solo to deploy applications:
•
Using RDT to stage the SB1 on a WLAN network
•
How to Perform an OS Update on the SB1 Device using RDT
Page 25

CHAPTER 2 APPLICATION INTEGRATION
Each client application that meets the technical specifications can be integrated and installed on the SB1. In
order to create SB1 Shell applications developers should follow specific requirements that are listed below:
•
create HTML5 compliant web application
•
integrate SB1 Shell shared library
This document doesn't aim providing help or res ourc es on cre at ing HTM L 5 com p lian t applications.
Integration with SB1 Shell
System Integration
NOTE If the client application page is to be served from a remote location, it must refer to a copy of the asl.js
library from the same location. This is due to Web Security Standards which will not allow a remote page
to load JavaScript from a local address.
Every HTML page within an SB1 application must include a special library called asl.js. This library provides
the following services in the SB1 multi-instance environment:
•
application services
•
notification services
•
keyboard services
•
shared UI services
•
resource services
•
messaging services
•
authentication services
•
window services.
The following code shows an example of how to include asl.js within an HTML page:
Page 26

2 - 2 SB1 Programmer’s Guide
<head>
...
<script type="text/javascript"
src="http://127.0.0.1:83/Application/www/sapp/src/asl.js"></script>
...
</head>
<body>
...
NOTE The asl.js file must be the first JavaScript file included in the client application document. asl is always
the first library that access the document model and document events. This is required because the
application system library needs to setup a connection with the SB1 Shell to initialize the device profile.
Client application logic implementation should never override the asl namespace. Application developers
should never use statements in JavaScript that override the application shared library object - asl.
It is recommended that asl.js is linked to the local SB1 web server on
http://127.0.0.1:83/Application/www/sapp/src/asl.js. This will preve nt applications from dealing with asl
library versions and they will be always using the latest asl file for the current Shell instance.
Visual Integration
The SB1 Shell includes a style sheet file that overrides the default styling of the web document. It is
recommended that client applications running on the SB1 use these styles in order to achieve consistent
application look and user experience. The style sheet can be included in HTML documents by adding the link
tag that is shown in the following example:
<head>
…
<script type="text/javascript"
src="http://127.0.0.1:83/Application/www/sapp/src/asl.js"></script>
<link rel="stylesheet" type=”text/css” href="path/asl.css"></link>
…
</head>
<body>
...
Installation
Once an application is prepared to communicate with the SB1 Shell by linking asl.js, it has to be installedon the
SB1 instance that will be running it. This can be done by adding the application in the SB1 SHell installation file
apps.json. Depending on the configuration scheme, this file can be found on different locations.
SB1 Shell default configuration file is located on the following location:/Application/www/config/config.js Third
party application providers can override the default con fig uration file by uploading their custom configurations
on /UserDrive/config/config.js. This file is called user configuration file for SB1.
Page 27

Application Integration 2 - 3
One of the settings that user configuration file contains is called config.app s.src which holds the addr ess to the
application list that will be installed.
In general, the SB1 has two primary configuration files:
•
config.js
•
apps.json
config.js File
The config.js file, in the config folder, is the general configuration file for SB1. One of the values it contains
is called config.apps.src which holds the address to the application list that will be installed. By default, the
value is:
config.apps.src = ‘‘/UserDrive/config/apps.json;
NOTE The apps.jason file can be located at a remote location. For example:
config.apps.src = ‘http://www.example.com/config/apps.json;
Once a remote location is set for this file, the system downloads it to a device location, configured in
config.apps and then fetches the listed applications from this file.
See Chapter 4, Configuration for more information.
NOTE The apps.json file can be made variable based on the logged-in user. If Single Sign-On authentication
is configured, the authentication server can send a different
system loads the user applications once the user logs in successfully. See Authentication Services on
page 3-27 for more information.
apps.json file depending on the user. The
apps.json File
The apps.json file, in the config folder, contains the list of the applications that are installed once the SB1
Shell is configured. It is formatted in JSON, a JavaScript native format. To add an application to this list, create
a list element and insert it before or after any other list el ement in the
file is manual. Take caution in editing. Be sure to include the proper synt ax (i.e., qu otes, commas and slashes).
Modifications to the
apps.json file will not take effect unless the SB1 is rebooted.
Example
},
{
"name": "App X",
"url": "http://www.example.com/index.html",
"icon": "http://www.example.com/assets/icon.png"
},
{
apps.json file. Editing of the apps.json
where:
Page 28

2 - 4 SB1 Programmer’s Guide
•
name = name of the application. This pa rameter is mandatory and must be unique for an apps.json file,
otherwise the application will not be recognized by the system.
•
url = address where the application can be found. This parameter is mandatory.
•
icon = a path to the icon to be shown in the Applications application on the SB1. This parameter should
be an absolute path. For example: http://example.com/images/icon.png. Relative paths will not work:
/images/icon.png.
•
Applications need a permission to overwrite custom badge. canOverwriteBadge = true can be configured
to overwrite badge.
Table 2-1
S NO Configuration Description
1{
Sample app configuration with necessary permissions.
name: "MWM", Name of the app
url: "http:// <SERVER IP >/MWM/TSD", application URL. The application URL may be
either local or remote depends on application
deployment.
icon:"http://127.0.0.1:83/UserDrive/mwm/Taskworker_
SB1.png",
canOverwriteBadge: true, Permission for a app to overwrite default
canClearNotifications : true, Permission for a app to clear notifications
canOverwriteProfile : true, Permission for a app to set the profile.
canAddApplications : true, Permission for a app to add dynamically
Icon to be displayed on app launcher
Badge. Applications can set custom badge
using asl.badge()
Depends on user locale shell will be reloaded
in case of localization.
another app
disableKeyboard : true Enable/Disable a SIP keyboard for the app.
Apps can use their own keyboard.
isProcessApp: false, Permission for a process app. Process app
will not be displayed in applauncher. Add true
for process app and add false for all normal
apps.
canCloseApp: true, Permission for app to close.
canCloseApplications: true Permission for a app to close another App
}
Once configured, the application is accessible from the SB1 Application screen.
Page 29

Application Integration 2 - 5
Figure 2-1
Applications Screen
NOTE The position of the application icon in the Applications screen depends on the position of the
configuration element in the
apps.json file.
Remote apps.json file
The apps.json file can be placed on a remote location and SB1 Shell can be instructed to load the remote
apps.json file by default. This configuration brings a specific behavior on device reboot. Once the device
reboots and SB1 Shell starts, The Shell will try to find the remote apps.json file, to download it and load the
application configuration. In some occasions after reboot the wireless connection is not availabl e at the time of
Shell resource loading e.g. downloading the apps.json file. If the shell detects that the wireless is not active and
file is not downloadable, it will wait until the signal NPAPI object returns a successful status for the wireless
connection and then it will reinstantiate the procedure of downloading and installing applications. A side effect
of this scenario is that users may see the Application Launcher empty until a valid wireless signal is available
and the apps.json file is downloaded.
Starting Applications
When users starts an application, the SB1 Shell will create an application pool (iframe) and will start loading
the application home page. During page loading, the SB1 Shell will display an hourglass icon to indicate SB1
that there is an ongoing process. The SB1 Shell loading cycle includes the following steps:
•
assign an application pool (iframe) for the started application
•
set the application home page as source of the iframe
•
show hourglass to indicate users that application is loading
•
start a timeout function that waits for the application load and handshake process
•
assign an onload event of the application iframe
•
once the onload event of the application iframe occurs, Shell st arts a handshake process which includes
sending system information to the application via HTML 5 postMessage
•
SB1 Shell waits for a response from the application and if it receives it, it will automatically destroy the
timeout and send back to the application an asl onloaded event
If the SB1 Shell does not receive the iframe onload event or a handshake confirmation from the application, in
a configured interval of time it will prompt the user with a notification that informs them that the current
application is busy or not loaded from the server.
Page 30

2 - 6 SB1 Programmer’s Guide
Figure 2-2
Figure 2-3
SB1 Shell Notification - Wait or Quit Application Due to Slow Loading
SB1 Shell Notification - Reload or Quit Application Due to Slow Loading
Figure 2-4
The Shell tries to reload the last requested page automatically once th e network is restored. Once the ne twork
is connected, the device IP address will display at the bottom of the no network image.
Not Connected to Network
NOTE Application handshake process is handled by the asl library. If this library is not included or not accessible
in the application iframe, applications will not be able to work in the Shell environment and users might
consistently get the Wait/Quit notification.
Developer Content
All developer content can only be placed in the \UserDrive folder of the SB1. Basic configuration of an SB1
should have a folder structure similar to:
Page 31

Application Integration 2 - 7
\UserDrive\config\
apps.json
config.js
resources-en-US.js
kbd-en-US.js
See the SB1 toolbox for sample(s) of a configured /UserDrive folder.
•
apps.json - list of applications can be configured.
•
config.js - Necessary configuration values can be changed. And also apps.json path to be changed.
•
resources-en-US - Users can copy required language resources to the \UserDrive\config folder
•
kbd-en-US - Users can copy required language keyboard to the \UserDrive\config folder.
•
TEGroups.json - Users can add the PTT channel names in json for ma t.
By default out of box device configured with sample demo ap
applications in apps.json and make necessary conf igu ratio n ch an ge s re qu ire d for their bus ine ss in co nfig .js.
Both apps.json and config.js can be copied to \UserDrive\config folder.
NOTE When connecting the SB1 to a host computer, the root of the UserDrive folder is shown. It may not be
obvious of your location in the file system. So whe n placin g content on the SB1 when connect to a host
computer, developers should create a folder \config and place the appropriate configuration content in the
folder.
\config (correct)
\UserDrive\config (incorrect)
\apps
app1\app1.html
app2\app2.html
After configuring the UserDrive content, the developer should:
1. Remove the USB cable.
2. Reboot to see the changes take effect.
plications in apps.json. Customers can configure
Application Timeout
When the SB1 Shell opens an application, it creates a timeout function that wait s for the application to respond.
If that timeout function does not execute, the SB1 Shell considers the application unavailable and prompts the
user with a notification if they want to quit the application or to wait until it loads.
Page 32

2 - 8 SB1 Programmer’s Guide
Figure 2-5
Application Timeout Notification
NOTE The only way for an application to respond to the SB1 Shell is through the asl library. The asl library
should be included in the application code as it enables the application and stops the timeout.
Upgrade from Older Versions
In the Rev C Shell has a new powerful validation mechanism for shell configurations on SB1. It will validate all
the configurations and if there is any configuration issues found the Shell will display a message to user and
load the default configurations. This may happen when upgrading from Rev A to Rev B version configurations
under UserDrive.
Figure 2-6
Version error Message
Page 33

CHAPTER 3 APPLICATION SHARED
LIBRARY
The Application Shared Library contains eight modules for integrating client applications with the SB1 Shell:
•
Application services
•
Notification services
•
Keyboard services
•
Shared UI services
•
Resource services
•
Messaging services
•
Authentication services
•
Window services.
NOTE If the client application page is to be served from a remote location, it must refer to a copy of the asl.js
library from the device. (http://127.0.0.1:83//Application/www/sapp/src/asl.js).
Application System Variables
Application system variables are settings or configurations coming from Shell. Normally they are instantiated
on Application start but can be changed during application execution based on different events.
•
asl.prv.name
Shell name of the current application instance.
•
asl.prv.id
Shell version
•
asl.prv.version
Shell id of the current application instance.
•
asl.prv.locale
Locale of the current Shell instance.
•
asl.prv.tegroup
Current Team Express group in Shell instance.
Page 34

3 - 2 SB1 Programmer’s Guide
asl.run
asl.exit
asl.events
asl.run(‘APP2,data)
Shell knows who
started APP2 and
gives back the data
to the caller
APP2 is started from
Shell and given with
data
asl.exit(data)
•
asl.prv.data
Data that can be given to application when started.
•
asl.prv.user
User Data that can be given to application when started.
•
asl.prv.beeperId
Id of the beeper NPAPI notification type.
•
asl.prv.orientation
Current orientation status.
•
asl.prv.enabledKeyboard
V alue re presenting the st atus of the Shell integrated SIP - if fa lse this means that the SIP is disabled and
will not show up in case users focus on text field.asl.prv.scannerPagePersist
Current status scanner persist.
Application Services
The asl module provides several ways to manage and control applications from a client application (starting,
exiting and switching applications). The library provides an event management mechanism with different
options for application developers to communicate with other client or system applications. These are
implemented through the SB1 Shell. Once the client application tries to use the application services, the asl
module communicates with the SB1 Shell and the Shell executes the requested command.
Figure 3-1
asl Module Communication
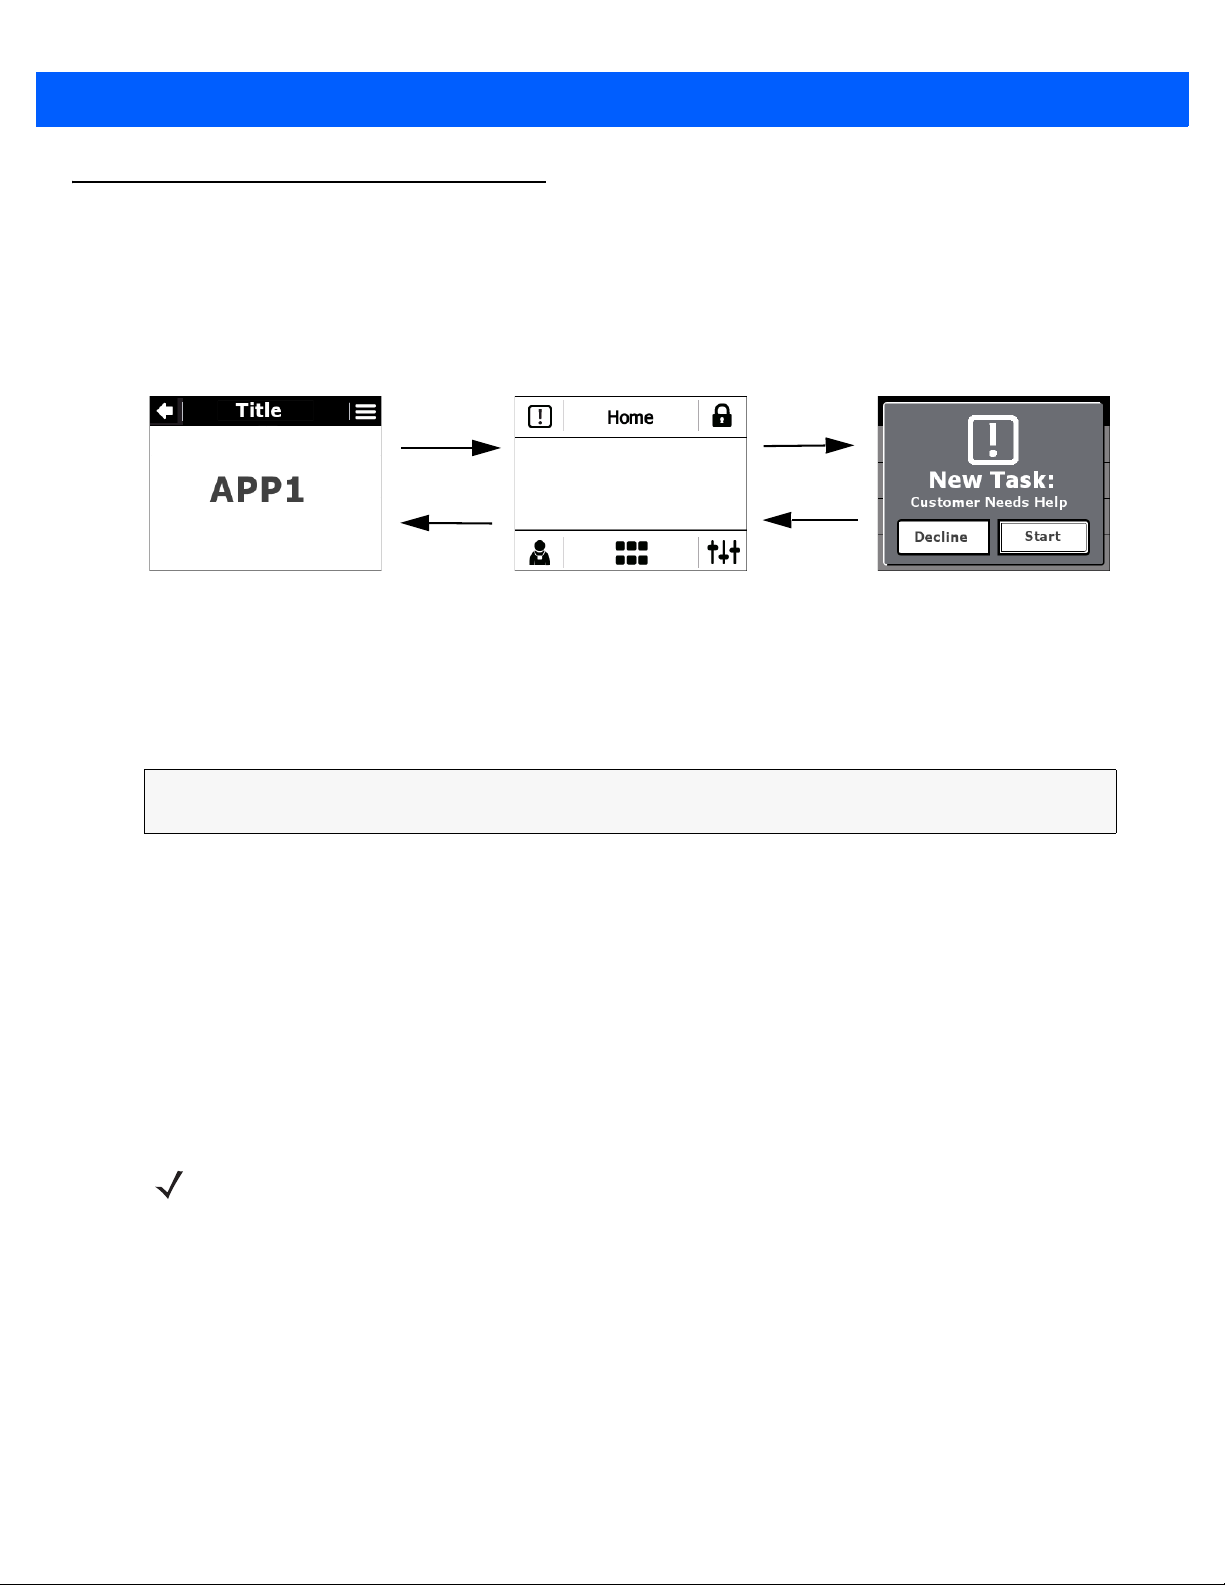
Running an Application
Figure 3-2
Running an Application Flow
Page 35

Application Shared Library 3 - 3
Starting or switching to an application is done through the asl.run function call. Client applications do not
need to know if the application that they call has been started or is running. Client applications can run two
types of applications; anonymous and installed.
Anonymous: asl.run(appUrl, data, callback);
Anonymous applications are applications that are not defined in th e apps.json file. They are always st arted in
a new application instance. They are run by providing the URL of the app to the appUrl parameter.
Parameters
•
appUrl (string)
URL or application name. If the appUrl parameter is a URL, the SB1 Shell starts a new application
instance with the given URL. It appears at the end of the Application list. If the parameter is an
application name, the SB1 Shell looks for the application in the
application, the SB1 Shell reports an error. If the SB1 Shell finds the application in the
starts the application and indicates that the requested application is opened in the Application screen.
•
data (object)
JSON formatted object of data that will be sent to the application defined in appUrl.
apps.json file. If it does not find the
apps.json file, it
Example
asl.run('http://127.0.0.1:83/UserDrive/apps/product/index.html',{ProductId :
"101"}, function() {console.log('callback')});
The above data received in a app in loaded function.
Example
asl.events.subscribe(asl.events.types.loaded, function(data)
{console.log(data);
});
•
callback (function)
Function that is executed once the requested application exits. This callback is executed in the context of
the invoking application.
Example
asl.run('http://www.zebra.com/citf/app1.html',{'taskId': '1024'});
•
disableKeyboard
This parameter used to enable or disable Shell Keyb oard in opened app. If disab led, app lications should
use their keyboard for data entry.
•
name
Installed applications have their unique identifier in the SB1 system which can be used for either starting the
application or switching to the already running application. For that purpose the caller has to know the
appName (the unique identifier of the application).
Page 36

3 - 4 SB1 Programmer’s Guide
Parameters
•
Name (string)
If the parameter is an application name, the SB1 Shell looks for the a pplication in the apps.json file. If it
does not find the application, the SB1 Shell reports an error. If the SB1 Shell finds the application in the
apps.json file, it starts the application and indicates that the requested application is opened in the
Application screen.
Example
asl.run('Price Check', function() {console.log('callback')});
•
callback (function)
Function that is executed once the requested application exits. This callback is executed in the conte xt of
the invoking application.
Example
asl.run('TeamMate');
The data parameter can be used if the callee wants to provide specific data to the client application. The data
parameter has to be json formatted object (or null).
Example
asl.run('myApplication', {'size': '1024'});
NOTE Installed applications run only one instance. Once the run method of an installed application is
called a second time and the application is already running, its instance loads the default
application url. The anonymous application can be run in multiply instances. Every time
someone calls asl.run of a url it creates a new instance and loads the application from that
url in this instance.
asl.exit(data);
Exiting an application can be called through asl.exit function. If the client application needs to provide a
status code or some data to its callee this can be done by the data parameter of the exit function. The data
parameter has to be json formatted object (or null).
Parameters
•
data (object)
json object that is passed to the invoking application once the current application exits.
•
oskip
Boolean parameter to wait if true the exit function will fire an event but will not quit; the event callback
should contain asl.exit(false) to force quitting.
Example
asl.exit({'message': 'Data was successfully saved.', 'status':
'1'});
Page 37

Application Shared Library 3 - 5
If an application calls asl.exit and was started by another application by calling asl.run, the control of the
screen is returned to this caller through the callback parameter of the asl.run function.This process is
controlled by the Shell System Library. Callback function from the parent
parameters returned from
asl.exit (data).
asl.run is executed with the
Example
asl.run('http://www.zebra.com/citf/app1.html',
{'taskId': '1024'}, function(){
alert(sessionStorage.getItem("SuccessURL"));
});
asl. close (appName);
Close the specified application.
Parameters
•
app Name
Name of the app to be closed.
Example
asl.close('Price Check');
asl. closeChildApp (data);
API that forces the application to quit all its child application..
Parameters
•
data
null for closing child apps.
-1 for closing parent and child apps. Alternately asl.closeAll() can be used.
Example
asl.closeChildApp(null);
asl. closeAll ();
API that forces the application to quit all its child application..
Parameters
•
NIL
Example
asl closeAll();
NOTE All asl.closeAll() / asl.closeChildApp() / asl.close() APIs will close apps only if user configure
CanCloeApp permission is true in apps.json.
Page 38

3 - 6 SB1 Programmer’s Guide
asl. apps (list, append);
API for adding dynamically client applications to device without changing apps.json and reboot.
Parameters
•
list {Object}
List of client applications to be added dynamically
•
append {Boolean}
Whether to append or replace the apps.
Example
var obj = [
{
"name": "App A",
"url": "/UserDrive/apps/AppA/index.html",
"canClearNotifications": true
},
{
"name": "App B",
"url": "/UserDrive/apps/AppB/index.html"
}
];
asl.apps(obj, false);
Application should have a permission in apps.json to add apps.
Example
{
"name": "Price Check",
"url": "http://127.0.0.1:83/apps/index.html", "icon": "default_app.png",
"canAddApplications : true
},
asl. getUserData ();
API returns information to applications for the currently logged user as object.
Parameters
•
NIL
Page 39

Application Shared Library 3 - 7
Example
var _userData = asl.getUserData();
alert('Name: '+userData.name)
{ name: 'Chenna',
title: 'Sales associate',
pin: '0000',
dept: 'Sales',
photo:'Image path',
locale: 'en-US',
tegroup: '1',
volume: '4'
asl.minimize();
A client application may request to hide its own window. This can be done by calling the minimize function. The
minimize function does not close the application, it leaves it in background mode.
Example
asl.minimize();
asl. fullscreen ();
A client application may request this API to display the page in full screen without title.
Example
asl.fullscreen();
asl.reboot();
This API can be used to cold boot the device from the Client Application.
Parameters
•
NIL
Example
asl.reboot();
asl. enableTouch ();
This API can be used to enable the touch on device from the Client Application.
Please refer http://docs.rhomobile.com/en/2.2.0/rhoelements/stylus for more details
Parameters
•
NIL
Page 40

3 - 8 SB1 Programmer’s Guide
Example
asl.enableTouch();
asl. disableTouch ();
This API can be used to disable the touch on device from the Client Application.
Please refer http://docs.rhomobile.com/en/2.2.0/rhoelements/stylus for more details
Parameters
•
NIL
Example
asl.disableTouch();
Events
Client applications are provided with a set of events to which they can subscribe or invoke when they want to
notify the SB1 Shell. There are two functions in asl for managing events:
•
asl.events.fire (eventName, data)
•
asl.events.subscribe (eventName, callback)
asl.events.fire(eventName, data)
Parameters
•
eventName (string)
The name of the event that is fired.
•
data (object)
Data that is sent to the subscribers of eventName.
Example
asl.events.fire('onerror', 'Problem with connection to the server.');
asl.events.subscribe(eventName, callback)
Parameters
•
eventName (string)
The name of the event that is subscribed.
•
callback (function)
The function that is executed, if eventName occurs.
Page 41

Application Shared Library 3 - 9
Example
asl.events.subscribe('onfocus', function(){changeBackground();
});
asl.events.unbsubscribe(eventName)
Parameters
•
eventName (string)
The name of the event that is unsubscribed.
Example
asl.events.unbsubscribe('onfocus');
Native Shell Events
The following list contains all the events that are supported by the SB1 Shell for subscribing:
•
onFocus - Called when the application receives focus.
•
onFocusOut - Called when the application loses the focus. For example, Home button is pressed,
lock/badge screen is turned on or a notification appears.
•
onBackPressed - Called when the user presses the back button.
•
onOptionSelected - Called when the user selects an option from the options menu.
•
onCradleInsert - Called when the SB1 is placed in a cradle.
•
onCradleRemove - Called when the SB1 is removed from a cradle.
•
onLowBattery - Called when the battery level reaches a limit specified in the configuration file.
•
onCriticalBattery - Called when the battery level reaches a limit specified in the configuration file.
•
onSignalLost - Called when the RhoElements signal event is fired and the signal percentage is zero.
•
onSignalRestored - Called when the RhoElements signal event is fired and the signal percentage is
different than zero.
•
onKill - Called when the application is forced to exit.
•
onExit - Fired by the application when it is ready to exit.
•
onlock - Called when lock screen is displayed.
•
appStarted - Called when app is started.
•
onlocaleChange - Called when locale changed.
•
onLogout - Called when Shell is about to Logout the Profile.
•
onLoaded - Called when the application has confirmed that all the scripts and files are loaded and it is
able to communicate with SB1 Shell.
NOTE Subscribing for an event is valid only for the current page of the application. Navigating to a new page
within the application removes the event subscriptions. Multiple subscriptions to the same event are
executed in the same order as defined.
Page 42
3 - 10 SB1 Programmer’s Guide
asl.notify(params) Shell starts a notification
Shell can notify the
invoking application
with the user selection
User interacts with
notification
Notification Services
Notifications are messages sent to the SB1 user with specific properties (text, icon and actions). They are used
to inform the user when some system, network or application event occurs. The asl module provides a function
that can be used to put a notification to the notification queue based in the SB1 Shell.
Figure 3-3
A notification can be invoked with the following method:
asl.notify(type, priority, title, message, buttons, actions, timeout,
iconPath);
Notifications
Parameters
•
type (string)
Type of the notification: application, server or system.
•
priority (string)
Priority of the notification: low, normal or urgent. Note that notification priority is not cu rren tly used by the
SB1 Shell but has to be provided when a notification is created.
•
title (string)
Title of the notification that is shown in the notification popup or notifica tio n lis t.
NOTE If the title is blank, the default title New Message displays on a notification and in the notification list.
•
message (string)
The text of the notification that is shown in the detailed notification popup or view.
•
buttons (array)
Array of strings that contains the text for the notification buttons. Button length is a maximum of two
items; If it is not provided (null value is provided) the notification shows the default buttons.
•
actions (array)
Array of functions that contains the actions for the notification buttons. The action at position 0 in the
array corresponds to the item in the button list. The action at position 1 in the array corresponds to the
item at position 1 in the button list.
Page 43

Application Shared Library 3 - 11
•
timeout (int)
NOTE If a notification times out, it will appear in the Notification tray.
•
Number of seconds that the notification popup stays on the screen. 0 or null is for no timeout (the
notification stays forever until a user action).
•
iconPath (string)
Absolute path to an image that can be used as a notification icon.
•
cleanAfterTimeout
Notification will be removed from the list after timeout. This is a Boolean variable.
Example
asl.notify(
asl.notifications.system,
asl.priority.high,
'Force quit!',
'Application A needs to close. <br/>(Popup will close in 10 seconds)',
['Dismiss', 'OK'],
[null, function() { asl.exit(); }],
10,
'/Application/www/img320x240/ic_alert.png',true);
NOTE If you provide one button, it is automatically set as default button. If you provide two buttons,
the second one is set as the default button.
To use one of the buttons to dismiss the notification, set its callback as null.
When a callback is defined, make sure that all variables and functions in th e callback are in the
global scope or are kept in session or local storage. When the callback function is defined, asl
keeps it during page pre-loads. Even if the application navigates to a different url, once the
callback is called, the asl restores the function and executes it. It is best to keep all callback
variables in persistence store session and local storage.
Example
asl.notify('application', 'normal', 'Restock',
'Produce needs to restock all brands of tomatoes, onions and fresh herbs.',
['Accept', 'Dismiss'],
[function(){
asl.run('http://www.zebra.com/citf/app1.html',
{'taskId': '1024'}, true);
}, null], 10, 'http://www.example.com/image/icon.png');
The above example produces a notification that displays a message to the user and two options; accept the
task or dismiss it.
Page 44

3 - 12 SB1 Programmer’s Guide
If the user accepts the task, the asl.run callback is called from within the client application that created the
notification (note that the anonymous function in the callbacks parameter should be defined in the client
application window). This asl.run call starts a Custom In-Task Flow (CITF) application located at the given
URL with some additional data parameters (taskId). If the client application that created the notification has
changed its location to a different URL by the time the user interacts with the notification, the asl library stores
the callback function so it can be accessed by the notificat i on .
The following example shows how to call a notification that uses a URL callback instead of function callback.
Example
asl.notify(
'Produce needs to restock all brands of tomatoes, onions and fresh herbs.',
['Accept', 'Dismiss'],
['http://www.zebra.com/example/
callback_url.aspx?params=123']);
The difference in this example is that when the user selects Accept, the client application that created the
notification is forwarded to the URL defined as the callback.
There are two types of notifications depending on how the notification is defined:
•
blocked - where the user is forced to choose a specific action.
•
normal - where the user is given options to choose.
Figure 3-4
If the user receives more notifications, the notification stack displays.
Notification Options
asl. clearNotification (all, type);
Clear the app's notification, or notifications of certain type
Parameters
•
all {Boolean} all Clear all stacked notification
type {String} type Clear notification of the given type
Example
asl clearNotification(true,'application');
Page 45

Keyboard Services
when user
focuses a text
field in an
application, the
Shell is notified
the Shell returns
the keyboard
result to the
application asl
module that
knows where to
put the text
the Shell gets
the text field
properties as
type and label
and show the keyboard
of specific type with
specific title
when the user
presses enter
on the
keyboard
Keyboard services provide automatic on-screen keyboards when the user touches a text field on the screen.
The SB1 Shell provides various modes of keyboards, alpha, alphamore, symbol, currency and numeric, etc.
Depending upon the type of the html input field, the asl module activates the keyboard that is required.
Numeric keyboard for number, date and time fields. Alpha keyboard for all other input fields.
Application Shared Library 3 - 13
Figure 3-5
Keyboards
The appearance of the keyboard is controlled by the asl module. The asl module tracks the load event of the
client applications document, discovers all the text fields in the document and uses the focus event of each text
input field to activate the keyboard on text field focus. The same tracking and discovery procedure is executed
for text inputs that are dynamically added to the document, after the load event, using the DOM Mutation
events.
Explicit Keyboard Execution
Applications can invoke the keyboard manually by calling the asl.showKeyboard() or asl.keyboard()
method. The text inputted into the keyboard will then be returned to the application via a callback.
asl.showKeyboard(params, callback);
Example
asl.showKeyboard({
inputId: "test",
mode: "number",
title: "Enter Value",
scanner: "true",
value: "predefined value"
}, function(re, val){ alert(val); });
Page 46

3 - 14 SB1 Programmer’s Guide
<input id="myInput" type="number" />
•
title (string)
Set the keyboard title by providing a title attribute of the text input field in HTML.
<input id="myInput" type="number" title="My Field" />
•
maxLength (int)
Set the fields maximum length by setting the maxlength attribute of the text input field within the HTML
code. The keyboard considers this property and limits the inpu t.
<input id="myInput" type="number" maxlength="4" />
NOTE data-autoReturn (bool)
NOTE data-autoReturn (bool) is not available for scanned data.
•
Setting this attribute will automatically close the keyboard and post the text back into the input field when
the maxlength value has been hit. Note that data-autoReturn does not work without a maxlength set.
NOTE If a bar code is scanned with exact maximum length size, auto-return does not work. User
needs to click on tick mark button.
<input id="myInput" type="number" maxlength="4" data-autoReturn="true" />
•
Scanner Enable/Disable on a field
<input id="myInput" type="number" scanner-enabled="true/false" />
Keyboard Events
When the keyboard posts the text to the text field, the asl library fires the text input elements onchange event.
By listening to this event, client applications can be notified when the value of the text field has changed.
<input id="myInput" type="number" onchange="alert('Event onchange is
defined.')" />
Shell version 2.8.3 and above provides a new features to the SIP which is starting the SIP in specific mode
from the asl. Third party applications can have a text field of text type but start the SIP in numeric mode. In
previous versions the Shell was invoking the SIP by default e.g. alpha mo de. This featur e is only applicable for
Page 47

Application Shared Library 3 - 15
text, bar code and password fields. To enable SIP mode, third party applications have to use data-mode
attribute for text inputs.
The following provides the specifications of this feature:
<input type="currency" />
This will be ignored as the only available SIP type for currency field is numeric SIP.
Figure 3-6
<input type="text" data-mode="number" />
SIP will be started in numeric mode.
Figure 3-7
<input type="password" />
Currency Keyboard Sample
Number Keyboard Sample
SIP will be started in alphaMore mode e.g. if there is a second alpha chars mode it will be started by default.
Page 48

3 - 16 SB1 Programmer’s Guide
Figure 3-8
Password Keyboard Sample
<input type="pin" />
SIP will be started in PIN mode.
Figure 3-9
PIN keyboard Sample
<input type="text" data-mode="symbol" />
SIP will be started in symbol mode.
Figure 3-10
Text Keyboard Sample
Page 49

Application Shared Library 3 - 17
Page 50

3 - 18 SB1 Programmer’s Guide
Shared UI Services
Each client application can display and use a SB1 Shell specific title bar that provides a consistent user
navigation across applications. The title bar contains three elements; a back button, title information and an
options menu. The asl module provides an API to control the title bar elements.
These functions to be added in web pages as first statements.
•
asl.title('Page Title');
•
asl.back();
•
asl.options();
NOTE These functions cannot be called with buttons/links once page is loaded.
Back Button
Applications can define a back action by calling the asl.back function with a callback function as a
parameter . Defining the back action will show the back button on the title bar. Once the back button is pressed,
the Shell executes the defined callback function. If the application wants to disable the back button it should
call asl.back without parameters (or null for callb ack). Users can use wh ichever p age they do not nee d back
arrow. Options and back arrow will be persisted.
Figure 3-11
asl.back(callback);
Back Button
Example
asl.back(function(){
//do something
});
It is also possible to change the back button image by calling asl.back with an additional parameter:
asl.back(callback, imageUrl);
Parameters
•
callback (function)
The function that will be executed once the back button is pressed.
Page 51

Application Shared Library 3 - 19
•
imageUrl (string)
An absolute path to an image to be used as the back button.
Example
asl.back(function(){
//do something
}, 'http://www.example.com/assets/back.gif');
Title Label
Applications can define title text by calling the asl.title function with a string parameter. This title text will
be displayed in the title bar. If an application requires an empty title then it should call the asl.title function
with an empty string or null.
Figure 3-12
For the English language, a maximum of 20 lowercase characters or a maximum of 11 uppercase characters
can fit in title. For other languages the developer must verify and accommodate the text.
asl.title(titleText);
Title Label
Example
asl.title('Title');
Options Menu Button
Applications can define an options menu by calling the asl.options function with a collection parameter
containing the defined options. If an application requires no options menu it should call the asl.options
function with empty or null parameter.
Page 52

3 - 20 SB1 Programmer’s Guide
Figure 3-13
Options Menu
For the English language, a maximum of 25 lowercase characters or a maximum of 14 uppercase characters
can fit in list item. For other languages the developer must verify and accommodate the text.
Figure 3-14
Without Options
Figure 3-15
Figure 3-16
Without Options and Back Button
Custom Back Icon
Page 53

Application Shared Library 3 - 21
asl.options(optionsList);
Parameters
•
optionsList (array)
Array of objects containing title and callback property. Title will be used to set the text for the option
menu. Callback is a function that will be executed once the option is selected.
Option list should contain:
• Title: Name of the menu item.
• Callback: callback function for menu item.
Example
asl.options([
{
'title' : 'Menu Option 1',
'callback' : function(){/*do something*/}
},
{
'title' : 'Menu Option 2',
'callback' : asl.exit
},
{
'title' : 'Menu Option 3',
'callback' : asl.exit
},
{
'title' : 'Menu Option 4',
'callback' : asl.exit
}
]);
NOTE All title bar elements are persistent between page loads. Once the back, title or options are
defined, they will persist for each page within the same application. If you want to change or
disable any of the back, title or options services, the application wil l need to call the asl.back,
asl.title or asl.options function with either null or the new callback function.
Full Screen Mode
Applications can run in full screen mode by not defining, title, back button, and option menu.
Page 54

3 - 22 SB1 Programmer’s Guide
Figure 3-17
Full Screen Mode
Page 55

Resource Services
Access to device resources such as scanner, audio and battery is provided to client applications through the
asl module. The asl module communicates with the System Library module to prevents conflicts which could
arise when different client applications try to use same resources at the same time. The RhoElements NPAPI
objects are overwritten by he asl library which will forward the necessary actions to the original RhoElements
NPAPI objects depending on the application request. Note: The asl based overridden NPAPI objects are not
defined under the asl namespace for backward compatibility with RhoElements Help documentation.
NPAPI
RhoElements uses an NPAPI interface to give applications access to the device capabilities via JavaScript.
Client applications that need to access these device capabilities are able to do so through the asl library.
The following is a list of APIs available in asl:
•
fileTransfer
Note: Relative file path does not supported in SB1 device.Full File paths to be provided.
Ex: file://\\UserDrive\\apps\\app7\\test_http_device.txt'
For more details Please refer
http://docs.rhomobile.com/en/2.2.0/rhoelements/FileTransfer
Application Shared Library 3 - 23
•
audioCapture
For more details Please refer http://docs.rhomobile .com /e n/2.2.0/rhoelements/AudioCapture
•
scanner
For more details Please refer http://docs.rhomobile.com/en/2.2.0/rhoelements/scanner
•
wlan - Supported only 3 APIs
• enableAdapter
• disableAdapter
• getAdapterPowerState
•
battery - Battery module is not overridden by the asl library and works entirely in RhoElements mod e. asl
library provides additional events for the status of the battery which are:
• oncradleinsert
• oncradleremove
• onlowbattery
• oncriticalbattery.
Page 56

3 - 24 SB1 Programmer’s Guide
•
push - Push port, push passkey and number of parameters for push notifications are available for
configuration in the Shell in
• detected - can be overriden by a client application. If a push event is available for the current client
application, the callback or the url defined in detected parameter will be invoked
• start - not available for use in client applications
• stop - not available for use in client applications
• port - not available for use in client applications
• passKey - not available for use in client applications
• response - not available for use in client applications
• path - not available for use in client applications
• unattended - not available for use in client applications
port, passKey properties can be configured in config.js. Json formatted push event is not supported
by the Shell;
•
signal - asl library provides additional events for notifying client applications for the signal status:
• onsignallost
• onsignalrestored
For more details please refer http://docs.rhomobile.com/en/2.2.0/rhoelements/signal
config.js file. List of push module settings:
•
keyCapture - Only the keyEvent property is enabled in asl.
For more details please refer http://docs.rhomobile.com/en/2.2.0/rhoelements/keycapture
•
systemTime - Rho object supported except se tSNTPServerIP.
For more details please refer http://docs.rhomobile.com/en/2.2.0/rhoelements/systemTime
•
ptt - ptt object supported.
• ptt.enable() - API for enabling PTT
• ptt.disble() - API for disabling PTT
• ptt.setGroup(groupNumber) - API to set PTT channel group number.
•
screenOrientation - Rho object supported to get screen orientation in applications.
• screenOrientation. screenOrientationEvent = If apps subscribe to screenOrientationEvent event, app
will get screen rotation when device rotated.
For more details please refer http://docs.rhomobile.com/en/2.2.0/rhoelements/screenorientation.
Page 57

Application Shared Library 3 - 25
•
generic - Available generic methods and properties:
• InvokeMETAFunction
• Log
• LaunchProcess
• LaunchProcessNonBlocking
• CloseProcess
• GetProcessExitCode
• WaitProcess
• SetRegistrySetting
• GetRegistrySetting
• PlayWave
• ReadConfigSetting
• WriteConfigSetting
• ReadUserSetting
• WriteUserSetting
• OEMInfo
• UUID
• Beep
Ex: generic.beep (frequency, duration)
Limits: duration can be 5 sec max and frequency can be used as 2600 or 2900 for better
performance. But users can use 1000 to 3000 based on their audible sounds requirement.
For more details please refer http://docs.rhomobile.com/en/2.2.0/rhoelements/generic
NOTE The push module works in a custom mode within the asl library. Since there is only one push server for
the SB1 Shell, it is defined and started at Shell startup and is shared between all applications. It is
predefined with a custom number of parameters which can be set in the configuration file (see Push
Notifications Number of Parameters on page 4-12). Since the push servi ce is shared between all client
applications, to be able to forward the data to the correct application, the push request will need to contain
an extra parameter (the name of the application). This parameter must be the first parameter in the push
request. If the external source that calls the push applies more parameter than configured in config.js,
they will not be passed to the client application.
NOTE All of the above APIs work in the same way as in a raw RhoElements environment. Client application
developers will not have to do anything additional in order to use and work with the NPAPI object. The way
NPAPI are supposed to be used is the same as how the RhoElements help documentation defines - using
META tags, the generic object or by directly accessing the required module.
Scanner Limitations:
•
scanner.autoTab = 'enabled' not supported due to technical limitations. Customers can use
asl.showkeyboard() to call after successful receipt of scanned barcode data.
•
scanner. a uto Enter= 'enabled' not supported due to technica l limitations. Customers can use submit the
form on successful receipt of scanned barcode data.
Refer to the RhoElements Help Documentation for more information on the above APIs. Go to:
http://docs.rhomobile.com/en/2.2.0/rhoelements/apicompatibility.
Page 58

3 - 26 SB1 Programmer’s Guide
postMessage(started)
postMessage(accepted)
Messaging Services
Messaging services provide the ability for each application to communicate with the SB1 Shell and other
applications. Messaging services are based on the HTML 5 postMessage method. The Shells Messaging
services are not designed to be used by applications using the postMessage API. Instead, the asl module
supports a common language between applications and the SB1 Shell based on messaging services which
are responsible for passing between instances commands, events, notifications and NPAPI calls.
When an application is started, the Shell always sends a message (hi) to the application. With this message
the SB1 Shell ensures that the client application is able to communicate with it and passes important
parameters (like id and shell address) to the application. The SB1 Shell expects that the client application will
respond to this message with an accepted status. After this handshake, both SB1 Shell and the client
application establish a connection and are able to communicate with each other.
Figure 3-18
Client application developers do not need to do anything explicit to make this handshake happen. They only
need to include the asl library and it processes this communication.
Message Handshake
NOTE The handshake process occurs on every page load in the client application.
Page 59

Authentication Services
The SB1 Shell supports user profiles and two types of authentication; Shell authentication and Application
authentication. By default, the SB1 does not use authentication.
User Profiles and Authentication
By default, the SB1 Shell has a system user, which is defined in the configuration file, and has the following
properties:
•
name - The name of the user to be displayed on the badge screen.
•
title - The title of the user to be displayed on the badge screen.
•
pin - The pin code of the user. A numeric value that is requested from the user if the lock screen is
enabled.
•
dept - Department of the user.
•
photo - Photo of the user.
•
locale - The current locale of the Shell.
Application Shared Library 3 - 27
•
tegroup - PTT Express group (currently not implemented).
•
volume - To set the device volume.
If the SB1 Shell authentication is enabled in config.js, then users may have additional properties coming
from the authentication server that can be customized for a customer. Once the login is successful, the client
application responsible for the login can change the user profile by calling the asl.auth API.
Shell Authentication
The SB1 Shell supports central authentication and has to be configured to use a client application as an
authentication application and to enable the login in
config.login.require = true;
config.login.page = "http://127.0.0.1:83/UserDrive/apps/auth/login.html";
The above configuration enables the authentication.
NOTE After you change the configuration in /UserDrive/config folder you may need to go to the SB1
Shell profile screen and force log out in order to r eset the browser to the mo dified config uration
settings.
After the authentication is enabled on the device, start up users will see the authentication screen provided by
the authentication application page (in the example case this will be the content of login.html file). This
application should support forms authentication as this is the only supported method.
config.js file.
Users are able to populate their username, passwords or any custom fields using the keyboard.
Once the authentication application authenticates the user, it has to notify the SB1 Shell. This is done through
the asl API called asl.auth.
Page 60

3 - 28 SB1 Programmer’s Guide
asl.auth(status, data);
Parameters
•
status (bool)
True or false depending if the user has b een authenticated successfully or not.
•
data (object)
The user object (described in shell authentication properties below) populated with the data of the
authenticated user.
Example
<script type="text/javascript"
src="http://127.0.0.1:83/Application/www/sapp/src/asl.js"></script>
...
<script type="text/javascript">
asl.events.subscribe(asl.events.types.loaded, function(){
asl.auth(true, {
apps: 'http://127.0.0.1:83/UserDrive/apps/auth/doe.json',
name: 'John Doe',
pin: '0001',
idleTimeout: 1800
});
});
</script>
...
</html>
With the above call, the authentication application supplies the SB1 Shell with the specific user data.
This API call should be executed in the first page after the authentication client application authenticates the
user.
NOTE Shell authentication supports a login timeout. If the auth message is not received within that timeout, the
login is considered unsuccessful.
NOTE When using Shell authentication, application developers should provide a signout URL in order to allow
the Shell to sign out the user in different circumstances like pressing sign-out button, cradle in or critical
battery events or idleTimeout. This can be done by setting the config.login.signOutUrl parameter in
config.js file.
Shell Authentication Properties
When using Shell authentication, the following properties can be set:
•
name
•
title
•
pin
Page 61

Application Shared Library 3 - 29
•
apps
•
idleTimeout
•
badge
•
tegroup
•
volume
•
Locale.
asl. signOut()
Applications can trigger this API in their signout buttons or session timeout to indicate shell to signout.
Parameters
•
NIL
Example
<script type="text/javascript"
src="http://127.0.0.1:83/Application/www/sapp/src/asl.js"></script>
...
<script type="text/javascript">
asl.signOut();
</script>
...
</html>
NOTE Please refer a reference implementation of Single Sign On (SSO) from Toolbox.
Application Authentication
The SB1 Shell supports Application authentication. A client application that requires authentication needs to
implement forms authentication and to integrate the asl library to its pages. Once the client application covers
these conditions it does not need to inform the SB1 Shell for login status or any user data.
Badge Mode
The SB1 Shell has the ability to allow client applications provide the badge page that appears once the SB1
enters into badge mode. This can be done by using an asl method in the client applications page:
asl.badge(url);
Page 62

3 - 30 SB1 Programmer’s Guide
Parameters
•
url (string)
The url of the badge page that displays once the SB1 gets locked or rotates.
Example
asl.badge('http://127.0.0.1:83/UserDrive/apps/ChangeBadge/badge1.html');
NOTE For security purposes, smart badge should be enabled for a client application once it is installed in the
apps.json file. This can be done by adding an attribute to the client application record called
canOverwriteBadge which accepts true or false.
{
"name": "ChangeBadge",
"url": "http://127.0.0.1:83/apps/ChangeBadge/index.html", "icon":
"default_app.png",
"canOverwriteBadge": true
asl.lock(url);
Parameters
•
url (string)
The url of the lock page that displays once the SB1 gets locked.
Example
asl.lock('http://127.0.0.1:83/UserDrive/apps/ChangeBadge/lock.html');
Setting User Profile from an Application
The user profile can be updated by any application that by using asl.profile method. The application needs to
be configured as canOverwriteBadge (see a bove) in ord er to be ab le to ove rwrite the pr ofile. Af ter the profile is
updated, the SB1 Shell restarts RhoElements to reload the new profile.
asl.profile({name: "James", photo:
"http://127.0.0.1:83/UserDrive/apps/app8/img.png",
apps:"http://127.0.0.1:83/UserDrive/apps/app8/fr.json"}
The above example updates the profile with a new name “James”, a new photo of James and a new
application list.
Page 63

Window Services
The asl library includes a predefined version of alert and confirm pop-up native windows. It overrides the
default alert and confirm functions and provides other custom designed pop-ups that acts in a similar way.
Alert Window
alert(message);
Example
alert('This application will close');
Confirm Window
asl.confirm(title, message, buttons, actions, timeout, iconPath, fontsize) {
Example
asl.confirm(' Confirm Popup'','You need to confirm to open a App',
['Cancel', 'Save'], [function() { alert('Cancelled the Popup'); },function() {
// do something for your app }], 10,
'/Application/www/img320x240/ic_alert.png', null);
Application Shared Library 3 - 31
The difference between the native alert/con firm windows and the asl alert/confirm windows is that the asl
representation does not stop the thre ad once the popup ap pears. Fo r th is re ason the confir m function requ ires
a callback for the OK action, because the function is executed only when the user confirms the action.
NOTE The native alert/confirm pop-up windows are still available through _alert/_confirm. It is highly
recommend to use the native pop-ups only for debugging purposes.
Font Size not supported in asl.confirm() API.
Hourglass
In previous versions of the Shell there were circumstances in which a number of blank white screens displaye d
during page transitions and application loading. T o avoid these white screens, an hourglass is displayed during
application loading and page transitions. This feature is partiality implemented in this release which will cover
only local and remote applications except in setting the screens.
Wait/Quit Feature
In previous versions of the Shell there were no indications to the user to show whether a page is loading or if
there are any network issues when loading a page. Instead, a blank white screen would appea r providing no
information on what was happening on the device. In the current release of the Shell, a W ait/Quit notification is
displayed if a page is not loaded within 10 seconds (default) after the navigation request occurs. A
configuration option in the
is:
config.js file can be used to configure the default value of this delay. The option
config.waitForResponseTimeout = 10*1000;
Whenever there is no network or low network areas, the HTTP request of the client application may not reach
the remote server and a Wait/Quit notification will be displayed. By default, the Shell is configured to show two
Page 64

3 - 32 SB1 Programmer’s Guide
Wait/Quit notifications and then a Retry/Quit notification. Once the user clicks on the Retry button, if there is no
network connection, a Network Not Connected page displays. Once the SB1 connects to a network, the
device's IP address displays and the client application automatically loads the previous GET request page.
To configure the number of consecutive Wait/Quit dialogs:
config.numberofWaits = 2;
If the Shell has been configured to require the user to logon, any "Wait/Quit" dialogs for the logon application
will not display the "Quit" option. This stops the user from quitting the logon application and accessing the
device without authentication.
Startup Applications
In this and previous versions of the SB1 shell, developers can configure the shell to launch a startup
application when the SB1 boots.
Upon booting the SB1, there can be a delay before connecting to a Wireless network. This can interfere with
the behavior of remotely hosted startup applications as the application will be requested before the Wireless
connection has been established. If the SB1 cannot co nnec t to the st a rtup application se rver af ter 10 seco nds,
a "Wait/Quit" dialog notification will display to the user. Pressing "Wait" will dismiss the notification and wait
another 10 seconds for the page to load. If the page has still not loaded, the "Wait/Quit" dialog will appear
again. If "Wait" is again selected and the page is not loaded after another 10 seconds, another "Retry/Quit"
dialog displays. Pressing "Retry" will display a "Network not connected" page which will show realtime device
IP information and will resend the HTTP request when reconnected.
If the user logs out from the profile screen, we are reloading the config file, and the startup application should
load without any network issue.
Ghosting
Sometimes ghosting of a previous screen might be observed during the usage of device. As per the e-ink
display on the SB1 device, the screen may only update partially depending on how much of the scree n needs
updating and how many updates since the last full screen update. This may not be noticeable b y regular users
of SB1 device.
Cradle Insert and Removal Enhancements
A configurable delay has been introduced between the "oncradle" event and when the shell closes all the
running applications (if configured to do so). This delay allows applications to correctly log out or shut down.
The default value for this setting is 1 second.
Developers can configure applications to be startup applications. A new configuration option will open these a
applications as soon as the device is removed from the cradle.
Ex: config.startUpApp = "PriceCheck";
config.cradleremoveapp = false;
QWERTY Keyboard
Client applications can disable the default keyboard and use client specific keyboards. Ex: QWERTY
keyboard.
To enable this feature, configure apps.json with disableKeyboard set totrue.
Page 65

Application Shared Library 3 - 33
Example
Process Application
{
"name": "Customer app name",
"url": "http://127.0.0.1:83/UserDrive/apps/qwerty/Index.html",
"login": false,
"disableKeyboard":true
}
For CITF applications, keyboard can be disabled using asl.run() API.
asl.run(url, data ,callback, disableKeyboard)
•
Page 66

3 - 34 SB1 Programmer’s Guide
Page 67

CHAPTER 4 CONFIGURATION
This chapter details all of the configuration settings which have been provided to allow customization of the
SB1 Shell. These configuration settings are contained in the
NOTE The config.js is a JavaScript file which needs to be configured carefully. JavaScript is a case sensitive
language and requires good syntax. Care must be take to produce a correct file.
ScanTo Application
// To get only barcode data.
config.scanToApp = {
url: " http://127.0.0.1:83/UserDrive/apps/app5/scanto.html?data=%s"
};
OR // To get all barcode parameters from scanner
config.scanToApp = {
url: "
http://127.0.0.1:83/UserDrive/apps/app5/scanto.html?Data=%s&Source=%s&Type=%
s&Time=%s&Length=%s"
};
config.js file.
ScanTo is a feature of the shell that enables bar codes to be scanned from the home page. The purp ose of this
feature is to get enable access to a bar code lookup application simply by pressing the home button and
scanning a bar code. When a bar code is scanned from the home page, an application specified in this
configuration setting is launched with the bar code data passed to the application. . A scanto sample provided
in Toolbox.
This configuration parameter defines the URL to send the scanner decode information. This is equivalent to
setting the RhoElements scanner module's “decodeEvent” event parameter. The syntax for both can be found
in the RhoElements documentation. Refer to the RhoElements Help Documentation for more informatio n. See
http://docs.rhomobile.com/v/2.2/rhoelements/scanner.
Scan to app will be displayed under running applications. In earlier versions scanto apps used to display in
applauncher with random number as a app name. And also each time one new app used to create. It use to
Page 68

4 - 2 SB1 Programmer’s Guide
consume more memory on device. Now scan to app will be launched on single iframe and displayed under
running apps list but app name will be some random number.
Example
<!DOCTYPE html>
<html>
<head>
<script type="text/javascript"
src="http://127.0.0.1:83/Application/www/sapp/src/asl.js"></script>
<script>
asl.title('ScanTo Example');
asl.back(quit);
function quit() {
}
function getDataFromQueryString() {
}
window.addEventListener('load', getDataFromQueryString, false);
</script>
</head>
<body>
<div>Scanned Data = <span id="dataSpan"></span></div>
</body>
</html>
asl.exit();
var data = window.location.search.substring(6);
//Do a lookup (i.e. AJAX) using the data variable
document.getElementById('dataSpan').textContent = data;
Page 69

Maximum Number of Running Applications
config.apps.maxRunning = 5;
Defines the number of applications that can be running at the same time. It is advised to run as few
applications as possible to get the best performance from the device. The advised value is 5 or less. If the user
requests 6
the least used application. We suggest to use less than 5 for this configuration to get better performance.
th
Iframe, the system displays a notification popup to indicate to the user that the system is closing
Configuration 4 - 3
Figure 4-1
Close Application Notification
Application Source File Location
config.apps.src = '/UserDrive/config/apps.json';
Defines the location of the default application file. The list of applications that are installed on the SB1. This
parameter can point to either a local or remote file. If the configured file does not exists , the shell loads the
default
apps.json file instead.
Push Notifications Port Number
config.push.port = '8080';
Port number for the push module.
Push Notifications Pass Key
config.push.passKey = null;
Defines the passKey value for the RhoElements push notification module.
Page 70

4 - 4 SB1 Programmer’s Guide
Home Screen Shortcut Buttons
config.homeButton1 = {};
config.homeButton2 = {};
Configuration for a home page application shortcut. The provided icons ar e seen on the ho me screen, th e app
property must be set to an installed application name. The allowed size of images is 62 x 55.
Figure 4-2
Example
config.homeButton1
{ imagePath: '/UserDrive/apps/myapp/myicon.png', app: 'General' };
Home Screen with Wireless and PTT apps shortcuts and Homebutton 1 and 2 shortcuts
Home Screen Refresh
config.refreshHome = true;
Refreshes the home page each time Home Button is pressed to remove ghost images.
PIN Lock Require
config.lockscreen.requirePIN = false;
Enables or disables the PIN for the SB1 Shell lock screen. The default PIN (supports only numeric values) can
be set through the user configuration object.
Default Lock Screen Page
config.lockscreen.page = "";
Page 71

Configuration 4 - 5
A URL to a custom lock screen page. The lock screen is used once the SB1 is locked.
Example
config.lockscreen.page = "http://127.0.0.1:83/UserDrive/apps/lock/lock.html";
Remote lock pages can be configured by applications using asl.lock(URL).
Figure 4-3
Figure 4-4
Default Badge Screen
Custom Badge Screen
Default Badge Screen Page
config.badgescreen.page = "";
A URL to a custom badge screen page.
Example
config.badgescreen.page =
"http://127.0.0.1:83/UserDrive/apps/badge/badge.html"; Remote badge pages can
be configured by applications using asl.badge(URL).
Lock Screen Timeout
config.lockscreen.timeOut = 60*1000;
Page 72

4 - 6 SB1 Programmer’s Guide
Defines the time period, in milliseconds, of no user activity required to automatically lock the screen. Set to 0 to
disable screen locking.
Rotate Badge Screen Timeout
config.lockscreen.timeOutOnRotate = 3*1000;
Defines the time period, in milliseconds, to wait after the SB1 is rotated into the up-side down orientation
before the badge screen is shown automatically. Set to 0 to disable rotation.
Disable Profile Button
config.profile.disable = false;
Enables or disables the profile button in home screen.
Figure 4-5
Home Screen with Profile Button Disabled
Default User Information
config.user.data = {
name: "Badge",
title: "User Config",
pin: "0000",
dept: '',
photo: '',
locale: 'en-US',
local: '',
tegroup: ''
volume: '4'
};
Defines the default user information that is used in the profile and lock screens.
Page 73

Example
name: "Nick Price", (Name of the User)
title: "Sales Associate", (Title of the User)
pin: "0000",(Badge PIN)
dept: 'Sales',(Department of User)
photo: 'http://127.0.0.1:83/UserDrive/myPhoto.png',(Photo of the User)
locale: 'en-US',(Prefered Language of the User)
volume: '4', The default volume to set on device ( range is 0 - 4)
local: '', (This property for future purpose)
tegroup: '1' The default PTT channel group
Login Screen Require
config.login.require = false;
Configuration 4 - 7
Enables or disables the login screen. Works together with config.login.page (if this setting is not provided, l ogin
is not enabled).
Login Screen URL
config.login.page = "";
Defines the page address for the login screen. This page appears if the user is not authenticated against the
SB1 Shell. Login should be enabled by config.login.require = true.
Example
Config.login.url = 'http://<REMOTE_SERVER>/ server path/login.html';
Logoff URL
config.login.logOutUrl = "";
Defines the URL to be used for the signing off action when the SB1 Shell authentication is enabled. It is called
once a user tries to sign out, switch devices or any other activity that requires logging off.
Example
config.login.logOutUrl = "http://example.com/logoff.html";
Page 74

4 - 8 SB1 Programmer’s Guide
Login Timeout
config.login.idleTimeout = 60;
Default timeout to signout user if authentication is used. The idle timeout value is in minutes.
Admin Settings PIN Require
config.adminPINrequire = false;
Enables or disables the PIN for the Administrative Settings section.
Admin PIN value
config.adminPIN = '668765';
Defines the value of the Admin settings PIN. Default value: 668765.
More Settings Menu Item PIN Require
config. moreSettingsPINrequire= false;
Enables or disables the PIN for the more Settings menu section.
More Settings PIN Value
config. moreSettingsPIN = '668765';
Defines the value of the more settings PIN. Default value: 668765.
Beeper Duration
config.beeperDuration = 2000;
Defines the duration of the device beeper on SB1 Shell notifications (RhoElements documentation should be
used for reference for the available values).
Page 75

Beeper Frequency
config.beeperFrequency = 2600;
Defines the frequency of the beeper on SB1 Shell notifications (RhoElements documentation should be used
for reference for the available values).
Date Format
config.dateFormat = 'DD/MM/YY';
Defines the date format used for the settings set date and time functionality. Options: DD/MM/YY,
DD/MM/YYYY.
Configuration 4 - 9
Time Format
config.timeFormat = 'HH:MM';
Defines the time format string used for the settings set date and time functionality. Options: HH:MM.
Cradle Insert URL
config.showCradleInsertURL = true;
Enables or disables the appearance of a system page when the SB1 is placed into a cradle.
Cradle Remove Application
config.cradleremoveapp = false;
Starts the specified APP mentioned in startupapp property on un-cradle of the device.
Process Type Application
config.startProcessApp = "PriceCheck";
Starts the specified Process APP on reboot,profile logout or switch device. Is Process app :true to be added in
apps.json before using this property.
Page 76

4 - 10 SB1 Programmer’s Guide
Low Battery URL
config.showLowBatteryURL = true;
Enables or disables display of low battery page when device is in low battery state.
Manage LED in Shell
config.handleLowBatteryLED = true;
Enables or disables the low battery handling by shell or OS eg. true - handle by shell , false - handle by OS.
Beeper for Application Notifications
config.beepForApplication = true;
Enables or disables the beeper sound for ap plication notification s. Can also be changed throu gh settings pag e.
Beeper for System Notifications
config.beepForSystem = true;
Enables or disables beeper sound for system notifications. Can also be changed through settin gs page.
Beeper for Server Notifications
config.beepForServer = true;
Enables or disables beeper sound for server notifications. Can also be changed throug h settings page.
Scanner Persist Across Pages
config.scannerPagePersist = false;
Enable/disable the scanner persist across pages. Applications can enable scan on a page o nce and use in any
page without enabling if app has many scanning pages.
Page 77

Number of Waits
config.numberofwaits=2;
Number of wait/quit notifications to be displayed to user incase of low network, no network or slow server
responses.
Wait for Response Timeout
config.waitforResponseTimeout = 10*1000
Timeout to receive Wait/Quit notification incase of no network coverage or app taking more time to load.
Clear Local Storage on Reboot
Configuration 4 - 11
config.clearLocalStorageOnReboot = true;
This configuration clears the local storage and session storage durin g device start up. It is up to the application
user to configure this setting. Setting this to false will increase localStorage and sessionStorage resulting in
performance issues.Only local storage data for local applications is cleared.
It is the application user responsibility to clear the localStorage and Session Storage at appropriate time if this
is set to false.
Scanner Configuration for the scanTo Application
Holds the default settings for the scanner, when used in ScanTo function. The possible values that ca n be held
in this configuration setting object are any scanner or decoder parameter detailed in the RhoElements scanne r
documentation pages:
•
http://docs.rhomobile.com/rhoelements/toc_decoders
•
http://docs.rhomobile.com/rhoelements/scanner
The format of each scanner setting within this object is:
[parameter]: '[value]',
Where [parameter] is the name of the parameter detailed in the RhoElements documentation, and [value] is
the appropriate value, also detailed in the documentation. For example, to enable the code39 decoder, the
setting would be:
code39: 'enabled',
Note the format for this setting is the regular JSON Object notation. Therefore, ensure the last scanner setting
does not end with a comma.
Page 78

4 - 12 SB1 Programmer’s Guide
config.scanner = {
duration: '5000',
allDecoders:'disabled',
code128: 'enabled',
code39:'disabled',
ean13: 'enabled'
};
Push Notifications Number of Parameters
config.pushCallbackParameters = 5;
Defines the maximum number of the parameters that the push notifications callback can receive.
Startup Application
config.startUpApp = "";
Holds a reference to an application to start on SB1 Shell launch. Can be a URL or installed application name.
Example
config.startUpApp = "General";
or
Example
config.startUpApp = "http://localhost:83/UserDrive/apps/sample.html";
Start Process Application
config. startProcessApp = "";
Holds a reference to an application to start on SB1 Shell launch as a process app. Can be a installed
application name. The process app can not be displayed in applauncher.And users need to configure
isProcessApp=true in apps.json
Example
config.startProcessApp = " Price Check";
Page 79

Cradle Insert Activities
config.cradle.clearNotifications = true;
Enables or disables clearing notifications when the SB1 is placed in the cradle.
config.cradle.closeApplications = true;
Enables or disables closing applications when the SB1 is placed in the cradle.
If config.cradle.closeApplications is set to true, the Shell will close all running client applications, will
minimize all running system applications like settings, PTT, Wireless, Profile, App Launcher, etc., will bring the
home screen as a current Shell application and will show up the Cradle Insert Page if it is configured to be
shown. The expectation is that Home button will not do anything as there is no background application. If
Cradle Insert page is disabled, Shell should be in full operation mode.
If config.cradle.closeApplications is set to false, the Shell will leave all running client applications but
will minimize them e.g. if they're background apps, they will be removed as background apps, Shell will
minimize all running system applications like settings, PTT, Wireless, Profile, App Launcher, etc., will bring the
home screen as a current Shell application and will show up the Cradle Insert Page if it is configured to be
shown. The expectation is that Home button will not do anything as there is no background application just
after Cradling. If Cradle Insert page is disabled, Shell should be in full operation mode.
Configuration 4 - 13
If Cradle Insert Page is disabled, the device has been cradled and some operations were executed while it is
cradled, on cradle remove, Shell will minimize all running client or system apps and will bring up the Home
screen without a background running application.
config.cradle.cleanUserData = true;
Enables or disables cleaning user data when the SB1 is placed in the cradle. If the user configures the data
from the profile screen or any login application, the data will be deleted.
config.cradle.waitBeforeClose = 1 * 1000;
If user configured config.cradle.closeApplications = true, the Shell will send a cradle insert event to
the client applications to logout their applications or follow closing procedures of client application. The Shell
wait for one second to close the client applications.
config.cradle. openStartupAppOnCradleRemoval = true;
Enables or disables opening of a client application upon device r emoval from crad le. If user configure d startup
application and this configuration is enabled, the application will be opened as soon as the device is removed
from the cradle.
Page 80

4 - 14 SB1 Programmer’s Guide
Keyboard Configurations
config.keyboardEnabled= true;
Enables or disables the scanner on shell keyboard in order to allow client applications to control the scanner
on keyboards. Scanner on SIP can be controlled through HTML code and application is the high priority to
decide the scanner disable/enable.
Ex: <input type = 'text' id='itemId' scanner-enabled=true >
/**
* @description how many characters to offset, when the cursor is at the end of
the text field in SIP keyboard.
* @example config.cradle.kbdCharOffset = 5;
* @type {Number}
*/
config.kbdCharOffset = 5;
This configuration helps to move configured number of chars to left when cursor reaches end of the SIP
keyboard textfield..
NOTE If user configure offset as 5 It may move left only 2/4. This is known observation.
NOTE If user click on shift key on SIP keyboard for capitals, single click on Shift key allow to type only one
capital char. The user can double click on shift key for more than one char to type capitals.
Other Configurations
By default, the SB1 Shell is configured to display a maximum of eight notifications in the Notifications list page.
Page 81

Configuration 4 - 15
/**
* @description holds the maximum number of notification listed in notifications
list page.
* @example config.maxNotifications = 8; 0 for infinite number
* @type {Number}
*/
config.maxNotifications = 8;
By default, the SB1 Shell disables the network login feature as a part of optimize the device performance.
/**
* @description configure User network login feature to load in shell. By
default this feature disabled.
* @example config.useNetworkLogin = true; or config.useNetworkLogin = false;
* @type {Boolean}
*/
config.useNetworkLogin = false;
Enable Shell in debug mode by making true for the config.debugInfo variable in config.js
config.debugInfo = false;
User can configure default beeper volume. The value can be from 0 for disable and 1 to enable.
/**
* @description default beeper volume value - can be from 0 to 4
* @type {Number}
*/
config.defaultBeeperVolume = 1;
Shell validates ASL client library version and log in log.txt. Existing apps may be using older asl.js and when
they upgrade to RevC version some of the functions may not work as expected. Shell validate the asl and log
the information in log.txt to upgrade asl by users.
/**
* @description validates ASL client library version and log in log.txt
* @example config.validateASL = true; or config.validateASL = false;
* @type {Boolean}
*/
config.validateASL = false;
In RevC version Shell supports asian languages. Users can configure the required asian lang uage to load the
respective language.
Page 82

4 - 16 SB1 Programmer’s Guide
/**
* @description Required asian language codes can be configured.
* @example config.asianLanguages = ["zh-CN" ,"zh-TW" ,"ko-KR", "ja-JP"];
* @type {String Array}
*/
config.asianLanguages = ["zh-CN" ,"zh-TW" ,"ko-KR", "ja-JP"];
Display of Date and Time can be configured to display on Home Screen. Can be configured on UI also.
/**
* @description this configuration shows date and time on home screen.
* @example config.displayDateTimeOnHome = true; or
config.displayDateTimeOnHome = false;
* @type {Boolean}
*/
config.displayDateTimeOnHome = false;
Display of Signal and Battery can be configured to display on Home Screen. Can be configured on UI also.
/**
* @description this configuration shows wireless and battery status on home
screen.
* @example config.displayShorcutOnHome = true; or config.displayShorcutOnHome
= false;
* @type {Boolean}
*/
config.displaySignalBatteryOnHome = false;
Display of Wireless and PTT apps can be configured to display on Home Screen. Can be configured on UI
also.
/**
* @description Configure shortcut for Wireless and PTT apps on Home Screen top
row.
* @example config.displayShorcutOnHome = true; or config.displayShorcutOnHome
= false;
* @type {Boolean}
*/
config.displayShorcutOnHome = true;
Page 83

Configuration 4 - 17
Enable/Disable the Home Screen display with signal status on signal restored and signal lost.
/**
* @description enable/disable the Home Screen display with signal status on
signal restored and signal lost
* @example config.displayHomeOnSignal = true; or config.displayHomeOnSignal =
false;
* @type {Boolean}
*/
config.displayHomeOnSignal = false;
This configuration helps to use different MDM software(exe) on SB1.
Page 84

4 - 18 SB1 Programmer’s Guide
/**
* @description To configure any MDM software name and path to pick the MDM.
* @example config.DeviceManagerProcess = '\\Windows\\30agent.exe'; Example
provided for MSP
* @type {String}
*/
config.DeviceManagerProcess = '\\Windows\\30agent.exe';
Note: This configuration for Avalaunch Wavelink MDM. Users can comment MSP settings and uncomment
wavelink settings. Please note that Wavelink package to be installed before using this configuration.
config.DeviceManagerProcess = '\\Program Files\\Wavelink\\Avalanche\\Monitor';
config.DeviceManagerArguments = '/stc';
Enable/Disable the push messages to shell/device.
/**
* @description enable/disable the push messages to shell/device.
* @example config.push.shellMessages = true; or config.push.shellMessages =
false;
* @type {Boolean}
*/
config.push.shellMessages = true;
Note: The communication between device to device works only if devices are in same network and able to ping
one device to other device through IP address;
Enable/Disable the PTT.
/**
* @description enable/disable ptt.
* @example config.enablePTT = true; or config.enablePTT = false;
* @type {Boolean}
*/
config.enablePTT = true;
Holds a url reference to an app that will be opened every time home button is pressed for long time
Page 85

Configuration 4 - 19
**
* @description holds a url reference to an app that will be opened every time
home button is pressed for long time
* @example config.pauseButtonApp =
"http://127.0.0.1:83/UserDrive/apps/pausebutton.html";
* @type {String}
*/
config.pauseButtonApp = " http://127.0.0.1:83/UserDrive/apps/launchmyapp.html
";
Holds string which will be configured as navigator.userAgent property in RhoElements.
/**
* @description holds string which will be configured as navigator.userAgent
property in RhoElements
* @example config.userAgent = 'Mozilla/5.0 (Windows NT 6.1; WOW64)
AppleWebKit/537.36 (KHTML, like Gecko) Chrome/35.0.1916.153 Safari/537.36';
* @type {String}
*/
config.userAgent = "'Mozilla/5.0 (Windows NT 6.1; WOW64) AppleWebKit/537.36
(KHTML, like Gecko) Chrome/35.0.1916.153 Safari/537.36'";
Holds the location of the default TEGroups. Users can add the names which will appear in set groups page of
PTT instead of group1,group2 etc.
/**
* @description holds the location of the default TEGroups file
* @example config.TE.Groups = '/UserDrive/config/TEGroups.json';
* @type {String}
*/
config.TE.Groups = '/UserDrive/config/TEGroups.json';
Page 86

4 - 20 SB1 Programmer’s Guide
Page 87

CHAPTER 5 LOCALIZATION
The SB1 Shell supports one language for the current instance of the SB1 Shell. Only client applications
(including an authentication application) can change the language of the SB1 Shell by changing the locale
using asl.profile or asl.auth. Once the locale is changed the SB1 Shell rest arts RhoElement s and loads the new
resource files.
In order to change the default locale of the SB1 Shell, change the config.js file:
config.user.data = {
name: "Badge",
title: "User Config",
pin: "0000",
dept: '',
photo: '',
locale: 'en-US',
tegroup: ''
volume: '4'
};
asl.profile(data);
Parameters
•
data (object)
An object containing a set of user properties from the user profile object that will be configured by the
profiling callee.
Client applications can also change dynamically the locale of the SB1 Shell by using asl.profile call:
asl.profile({locale:'en-US', name: "George"});
Page 88

5 - 2 SB1 Programmer’s Guide
String Resource Files
Programmers can provide a resource file in the /UserDrive/config folder. To use this resource file it has to be
named in a way that the SB1 Shell understands it. For exam ple, for a locale en-US, the resource file should be
named
configuration is made, the SB1 Shell loads the new setting s.
resources-en-US.js. Once the file is placed in the /UserDrive/config folder and the above
Example
resources.ConfirmCancel = "Cancel";
resources.ConfirmOK = "OK";
resources.AlertOK = "OK";
...
resources.NotificationsEmpty = "Empty";
resources.NotificationsTitle = "Notifications";
Keyboard Resource Files
Similar to the resource files, programmers can provision a custom keybo ard file in the /UserDrive/config folder.
If the locale is set with the required string, the keyboard
kbd-en-US.js file is loaded according to the locale.
Example
config.kbd.keyboards['en-US'] = {
name: "English",
delay: 1000,
alpha: [
{
keys: [
{
label: "abc",
actions: ["a", "b", "c"]
},
...
Client Application Localization
Client applications may also use localization but they must implement their own localization strategies. What
the SB1 Shell provides when it starts an application is to give them information about the locale of the SB1
Shell. This is done by using the asl.prv .locale pro perty of the asl. This p roperty is ready to use af ter asl onLoa d
event of the client application.
Page 89

CHAPTER 6 ADDITIONAL NOTES
The following notes are recommendations and best practices for using the SB1 Shell.
•
Please refrain from using the JQueryMobile library when developing SB1 applications as it can use a
significant amount of memory at run time, which could lead to low memory issues on the SB1.
NOTE Developers should reference the internal shell ASL.
•
Integration of the asl library in all pages of the client application prevents unexpected behavior of the
SB1 Shell.
•
All the application pages must refer to asl.js from the SB1 location as a first line in head tag.
Example
<head>
<script type="text/javascript"
src="http://127.0.0.1:83/Application/www/sapp/src/asl.js"></script>
</head>
•
It is recommended to call the asl.back, asl.title and asl.options functions on every page as they are
persistent across page loads and may cause unexpected behavior of a client applica tion. For example , if
you set the title on one page and do not set the title on the next page, the next page uses the previously
set title.
•
It is recommended that all JavaScript calls in a page should be done in asl.events.types.loaded event
subscription. This ensures application developers that the page is loaded and the communication
between SB1 Shell and the client application has already been setup. . It is recommended that use
asl.events.types.loaded event subscription instead of body onload or DOMContentLoaded.
•
Careful consideration of the scope of application variables. Some of the callback functions that
application developers can define might be executed in a completely dif fer en t sco pe than the one that is
expected. This prevents applications and callbacks from crashing.
•
Logging of application specific events or errors in RhoElements log is impor tant for future debugging of
the applications.
Page 90

6 - 2 SB1 Programmer’s Guide
•
For production purposes only the use of the custom alert and confirm boxes is recommended.
Sometimes stopping the thread from the native alert/confirm boxes may have unpredictable
consequences.
•
Some of the NP API modules have limitations within the multi-inst ance envir onment as the mo dules were
not originally designed for multi-application use. One of which is the "push" module where most of its
parameters are only modifiable through the
information.
•
Resource management within client applications like js, css or image files - cleanup resources from
pages that are not used in the current page. This increases the speed of the application load.
•
Use validation tools to validate your HTML, JavaScript or CSS. Examples can be seen on:
• http://validator.w3.org
• http://www.jslint.com
•
Compress and consolidate source files to decrease the size of the code and the number of requests to
the server.
config.js file. Refer to the documentation for more
Page 91

CHAPTER 7 APP DEVELOPMENT AND
DEPLOYMENT GUIDELINES
All applications developed for the SB1 are developed for the SB1 Shell. The SB1 Shell environment imposes a
few mandatory requirements which must be followed to achieve an acceptable result. This chapter presents
some additional guidelines that provide the following significant benefits:
•
Allows SB1 applications to be developed in parallel by multiple developers while providing a degree of
confidence that such applications coexists in the same SB1.
•
Allows a single common development and testing cycle to be used by all developers.
•
Allows SB1 applications that are developed an d tested to be easily packaged using the MSP Package
Builder templates for the SB1 so that these packages can be deployed individually or in groups to SB1s
using MSP Staging.
Application Naming
It is important that each application be given a unique application name. This ensures that different SB1
applications can be clearly distinguished from each other an d that there is no confusion if multiple SB1
applications are deployed to the same SB1. The unique application name is used for a variety of purposes,
including file naming, folder naming, etc. To ensure that the unique application name can be used universally
for all such purposes, the unique application name should follow the rules for workstation and SB1 file names
(minus the file extension).
Valid unique application names:
•
MyApp
•
myRhoApp
•
MyCompany.MyApp.SB1
Invalid unique application names:
•
MyApp\Test
•
myRhoApp*Working?
•
MyCompany>MyApp:SB1
Page 92

7 - 2 SB1 Programmer’s Guide
The critical need is that the unique application name must ensure that two distinct applications never have
identical names. An additional important consideration might also be to ensure that the purpos e, owner, etc. of
an SB1 application can be readily determined from its unique application name.
Content File Naming
Since SB1 applications vary in terms of complexity and content, it likely is not practical to impose highly rigid
guidelines on how the content files that make up an application are named and organized . For example, it may
not make sense to dictate how an SB1 application that consists of multiple linked
subsidiary
JavaScript files, style sheets, etc., it may not make sense to dictate whether or not these files should be placed
into subfolders.
Without some sort of guidelines, it could be quite difficult to ensure that independently developed applications
can coexist peacefully. At a minimum, it is recommended that at least the main
application be named based on the unique application name. For example, if the unique application name for
an SB1 application is “myapp”, then using a main
Any subsidiary files that are referenced from that main
suits the needs of the developer.
.HTML files. Similarly, if an SB1 application has other subsidiary files, such as image files,
.HTML files should name
.HTML file for an SB1
.HTML file name of “myapp.HTML” would be recommended.
.HTML file could be named in whatever manner best
Content File Location in SB1
It is important that the content files that make up an SB1 application be located under a unique folder in the
SB1. While this may not always be required, it is nonetheless highly recommended. The developer of one SB1
application cannot be certain that the developers of other applications will follow any specific conventions
regarding the naming of content files. Consequently, if two applicatio ns were allowed to p lace their content files
into the same folder, they might have certain file names in common. This could cause one SB1 application to
replace content files of another and would produce unpredictable results, depending on the order in which the
SB1 applications were deployed to a given device.
It is recommended that all content files for a given SB1 application be located in a unique subfolder on the SB1
that is dedicated for the use of that application. In addition, to make it easy to locate the content for an SB1
application, the subfolder for that SB1 application shou ld be named based on the unique application na me and
should be placed under the \UserDrive\a pps folde r in th e SB1 . If appropriate, additional su bfolders can also be
created to further separate and organize the content files for an SB1 application, so long as those subfolders
are located under the subfolder dedicated for use by that SB1 application.
For example, consider that three SB1 applications, with the unique application names of “myapp1”, “myapp2”,
and “myapp3” are deployed to the same SB1. The recommended organization for the content files associate d
with these SB1 applications would be:
Page 93

App Development and Deployment Guidelines 7 - 3
\UserDrive\
apps\
myapp1\
myapp1.HTML
myapp2\
myapp2.HTML
myapp3
myapp3.HTML
Config\
Apps.json
Config.js
Content File Location in Development Workstation
While it is not absolutely necessary that the location of the content files that make up an SB1 application be
organized on the developer's workstation in the same manner that they are in the SB1, it is nonetheless
recommended to do so. Further , to simplify the eventual packa ging of an SB1 application, it is recommended to
replicate on the workstation the entire folder structure in which the content files for an SB1 application will be
stored on the SB1.
Following from the prior example, let's assume that a single developer is working on all three of the
applications on the same workstation, but wants to ensure that the applications can be used freely, alone in
combinations, on any given SB1. Further, let's assume that the de veloper wants to ke ep all his SB1 work under
the folder D:\MyProjects\SB1. The recommended organization for the content files associated with these
applications would be:
D:\MyProjects\SB1\
myapp1\
UserDrive\
apps\
myapp1\
myapp1.HTML
myapp2\
UserDrive\
apps\
myapp2\
myapp2.HTML
myapp3\
UserDrive\
apps\
myapp3
myapp3.HTML
Page 94

7 - 4 SB1 Programmer’s Guide
While the above organization might seem somewhat redundant, the reason for it will later become clear as it
will simplify the packaging of the SB1 applications later and will also facilitate keeping the SB1 applications
separate on a given Workstation.
Applications Versions
Inevitably, SB1 applications undergo modifications over time, resulting in a need to keep track of multiple
distinct versions of one or more SB1 application. While many different schemes could be used to sep arate and
identify multiple versions of a given SB1 application, certain approaches should be avoided since they would
conflict with the goals of these guidelines. In particular, while it might at first seem like a good idea, it is likely
unwise to include the application version as part of the un ique app lica tio n na m e. Such an appr oac h wou ld
likely make it more difficult to manage application upgrades and downgrades on the SB1 and could result in
inadvertently having multiple versions of the same application deployed to a single SB1, which likely is not a
desirable outcome.
Instead, multiple versions of the same SB1 application should all have the same unique application name but
should be distinguished from each other by an application version that is unique within the context of that SB1
application and meaningful to the developer and users of that application. All uses of the unique application
name described above to label files and folders should be based on the unique application name without the
application Version. The one exception is the top level organization for a given SB1 application on the
Workstation, which would need to include the application Version if multiple versions of the same SB1
application will reside on the Workstation at the same time.
To continue with the prior examples, let's assume that we have two ve rsions of each of three SB1 applications,
and that the versions of these SB1 applications are identified by application versions “v1” and “v2”. Then, the
recommended organization for the content files associated with these SB1 applications might be:
Page 95

D:\MyProjects\SB1\
myapp1-v1\
UserDrive\
apps\
myapp1\
myapp1.HTML
myapp1-v2\
UserDrive\
apps\
myapp1\
myapp1.HTML
myapp2-v1\
UserDrive\
apps\
myapp2\
myapp2.HTML
myapp2-v2\
UserDrive\
apps\
myapp2\
myapp2.HTML
myapp3-v1\
UserDrive\
apps\
myapp3
myapp3.HTML
myapp3-v2\
UserDrive\
apps\
myapp3
myapp3.HTML
App Development and Deployment Guidelines 7 - 5
The above organization includes the application version with the application n ame as part of the folder nam e in
the part of the folder structure that is not stored in the SB1. This ensures that the same folders in the SB1 are
used for every version of a given SB1 application.
Or, alternately, another possible organ ization for the content files associated with those same SB1 applications
might be:
Page 96

7 - 6 SB1 Programmer’s Guide
D:\MyProjects\SB1\
myapp1\
v1\
UserDrive\
apps\
myapp1\
v2\
UserDrive\
apps\
myapp1\
myapp2\
v1\
UserDrive\
apps\
myapp2\
v2\
UserDrive\
apps\
myapp2\
myapp3\
v1\
UserDrive\
apps\
myapp3\
v2\
UserDrive\
apps\
myapp3\
myapp1.HTML
myapp1.HTML
myapp2.HTML
myapp2.HTML
myapp3.HTML
myapp3.HTML
The above organization uses the application version to introduce an extra level of the folder structure in the
part of the folder structure that is not stored in the SB1. This ensures that the same folders in the SB1 will be
used for every version of a given SB1 application.
Page 97

Memory Considerations
Devices supported by RhoElements span the entire range of the perfo rm an ce spe ctr um an d th er ef or e ca re
should be taken when developing applications. Know the capabilities of the device when developing
applications. Consider the following:
•
JavaScript libraries such as Sencha touch or JQuery Mobile can use a significant amount of memory at
runtime. The more JavaScript libraries loaded into the DOM the greater the RAM footprint of the web
page.
•
There are APIs available in the device to monitor the memory, including memory l ogs and a Memory API.
Use these tools to get an understanding of the requirements for the application.
•
Resources ( including blogs and webinars) are available on developer.zebra.com to help create great
looking, streamlined applications.
•
Online performance tests for JavaScript and CSS, particularly those involving DOM manipulation will
often be written to target desktop computers and may not run on all supported devices.
•
Minimize application icon and image sizes. This saves network bandwidth and memory.
•
Include only required JS and CSS files on a page to minimize its memory fo otprint and avoid
unnecessarily wasting memory.
App Development and Deployment Guidelines 7 - 7
•
Consider separating the JS and/or CSS files into multiple files.
SB1 Baseline Files and Baseline State
Certain files must be present in the UserDrive on the SB1 in order for SB1 applications stored on the UserDrive
to be included in the behavior of the SB1 Shell. These files are generally independent of whatever ap plications
are to be used and are common and shared by all applications. Because these files represent the base onto
which applications can then be added, they are referred to as baseline files. The state that an SB1 is in, when
the baseline files are present is called the SB1 baseline state. You can think of the SB1 baseline state as the
application environment that must be present in order for SB1 applications to function.
Baseline files include configuration files that control the operation of the SB1 Shell and that define the
applications that display on the Application screen. As a result, the baseline files typically vary, to some
degree, from customer to customer . Some customer s might want to have more than one set of baseline files, if
they intend to deploy SB1s for multiple highly-specialized purposes.
The most important baseline file is the config.js file. If a valid config.js file is not present in the
\UserDrive\config folder of the SB1 at boot, then all contents of the UserDrive is ignored by the SB1 Shell. In
such a case, the SB1 Shell behaves according to the
sometimes referred to as the default or fresh out of the box behavior of the SB1. For more information on the
config.js file, see config.js File on page 2-3.
When a config.js file is initially placed into the \UserDrive\config folder of the SB1, and each time it is
modified, a cold boot must be performed before the SB1 Shell begins using the new file. Whenever a bund le
(used during staging and / or during management by MSP) is deployed to an SB1 to upd ate its contents, a co ld
boot is automatically initiated at the end of the bundle. This ensures that any changes made by the bundle are
activated for use by the SB1 Shell once the deployment of that bundle is completed.
config.js file that is built into the SB1. This behavior is
Another important baseline file is the apps.json file. The SB1 Shell determines the set of application icons
that are shown in the Application screen based on the content of an
apps.json file that is used by the SB1 Shell is determined by the config.js file that is being used to control
the behavior of the SB1 Shell. When a
config.js file is placed into the \UserDrive\config folder of the SB1, it
apps.json file. The location of the
Page 98

7 - 8 SB1 Programmer’s Guide
should specify the location of the apps.json file that should be used. In most cases, the apps.json file
specified by the
A set of baseline files might include an empty apps.json file or might include a non-em pty apps.json file that
specifies a set of applications that are considered part of the baseline st ate of the SB1. If an empty
file is used, it should actually contain a single empty list element and the set of baseline files need not include
any application content files. If a non-empty
applications and the set of baseline files would also need to include any application content files required by
the specified applications. For more information on the format of an
page 2-3.
The following is an example of an empty apps.json file:
{
}
The following is an example of a non-empty apps.json file:
{
'name': 'App1',
'url': '/UserDrive/apps/myapp1/myapp1.HTML'
},
{
'name': 'App2',
'url': '/UserDrive/apps/myapp2/myapp2.HTML'
}
config.js file also resides in the \UserDrive\config folder of the SB1.
apps.json
apps.json file is used, then it should specify the desired set of
apps.json file, see apps.json File on
In most cases, the set of baseline files for an SB1 also includes additional files that are referenced, directly or
indirectly, by the
that is common and required to be part of the application envir onment for the SB1, as opp osed to being p art of
an optional application that might or might not be added to that SB1, should be made part of the baseline state
for that SB1.
config.js file. These might include resource files, style sheets, image files, etc. Anything
Creating an SB1 Baseline
It is generally easier to start with a known working baseline state and customize it by changing the things you
do not like than it would be to start from scratch and try to identify everything you might need. The sample
Sb1SampleBaseline package has been provided as par t of the MSP 4.2 Supplement for SB1. This sample
package can be used as a starting point for defining a SB1 baseline state and it can then be used to create a
SB1 Baseline Package to place any number of SB1s into that baseline state.
The Sb1SampleBaseline package is provided in a form that is ready-to-use. In most cases, however, it is
likely that you will need or want to modify this sample to create your own custom baseline state. The best way
to do that is to understand the application environment established by the sample baseline package and
determine any ways in which it does not meet your needs. This generally involves the following parallel steps:
•
Deploy the Sb1SampleBaseline package to an SB1 so you can exper ience the application environment
that it establishes. This can be done by following th e instructions for Deploying an SB1 Baseline Package
to an SB1. Once you have an SB1 configured accordingly, explore the behavior of the SB1 to see how it
does or does not meet your needs.
Page 99

App Development and Deployment Guidelines 7 - 9
•
Using the Tools > Convert to Project menu option of the MSP Package Builder, extract the contents of
the Sb1SampleBaseline package onto a workstation. Exploring the extracted content, especially the
config.js file, should help understand how the Sb1SampleBaseline package produces the behavior
that it does and how that behavior might be modified by modifying selected content files.
If any changes in behavior are needed or wanted, the relevant extracted content files can be modified. Once all
desired changes have been made, the Project created when the files were extracted can be used to create a
new package with the new modified content. This new package can then be deployed to change the SB1 into
the new modified Baseline State. This process can be repeated as many times as needed until th e de sire d
Baseline State is achieved.
Building an SB1 Baseline Package
Once you have a suitable UserDrive folder containing the desired baseline files on the workstation, you can
build an SB1 Baseline package to deploy those baseline files to SB1s via the follo wing pr ocess:
1. Launch the MSP Package Builder.
2. Open the Package Project (.MSPPROJ) file that was created when the Sb1SampleBaseline package
contents were extracted.
3. Select the Files section of the Project and delete the entire UserDrive folder.
4. Drag the UserDrive folder containing the modified baseline files on the workstation into the Client File
System pane of the project.
5. Select File > Save to save the modified Package Project (.MSPPROJ) file.
6. Select Tools > Generate APF File to make a package file containing the modified content.
7. Enter a version for the package to be created.
Deploying an SB1 Baseline Package
There are a variety of circumstances under which you might want to deploy an SB1 Baseline Package to an
SB1. All are situations where you want to place the SB1 into the baseline state defined b y that package . Some
of the possible situations are:
•
When an SB1 is in fresh out of the box state and needs to be prepared for production use by placing it
into the baseline state defined by the package.
•
When an SB1 is in fresh out of the box state and needs to be prepared for use in application
development and testing by placing it into the baseline state defined by the package.
•
When an SB1 is returned to production use and needs to be placed into the baseline st ate defined by the
package.
•
When an SB1 is returned to production use after it has been used for application development and
testing and needs placed into the baseline state defined by the package.
Note that in some of the above cases, the SB1 is assumed to be in fresh out of th e box state and in other cases
the current state of the SB1 may or may not be known. Since the UserDrive on an SB1 is empty in fresh out of
the box state, it would be possible to simplify the process of deploying an SB1 Baseline Package if it was
known for certain that the SB1 was in the fresh out of the box state. But since it is generally necessary to deal
with SB1s that may be in any state, a single more generic process, is generally simpler in the long run.
When the state of a SB1 is not known, we cannot know what content may be present in UserDrive. If we simply
installed an SB1 Baseline Package, the new content being placed into the UserDrive would simply be merged
into any old content that was already present in the UserDrive. Depending on the prior content, the end result
Page 100

7 - 10 SB1 Programmer’s Guide
might or might not be what was desired. To ensure that the new content specified in the SB1 Baseline Package
and only that new content, will be in the UserDrive, it is necessary to wipe the current contents of the UserDrive
before deploying the new contents.
The SB1 UserDrive can be wiped by using the special SB1-specific WipeUserDrive package. When a bu ndle
is created to install an SB1 Baseline Package, include an extra install package step in the same bundle to
install the WipeUserDrive package just before the Install Package Step that installs the SB1 Baseline
Package. When that bundle is deployed to an SB1, this ensures that when the SB1 Baseline Package is
installed, it adds content to a freshly wiped UserDrive. This is safe even for SB1s that are in fr esh out of the box
state since it is benign to wipe a UserDrive that is already empty.
When creating a bundle to deploy an SB1 Baseline Package, you may want to install other packages. For
example, you might want to install the SB1SaveCalibration package or the UpdateInProgress and
EndUpdateInProgress packages. For more information on the use of those packages, refer to the SB1
Integrator Guide. When including an Install Package Step into a bundle to install the WipeUserDrive package,
it is generally recommended to set the “Force Install” flag to “True”. This ensures that the UserDrive folder is
always wiped even if it has previously been wiped using the WipeUserDrive package.
Removing an SB1 Baseline Package
An SB1 Baseline package can be removed by placing an Uninstall Package Step into a bundle and deploying
that bundle to the SB1. This could be a bundle that does nothing but uninstall the SB1 Baseline Package or a
bundle that is also installing or uninstalling other packages. However, it is generally not recommended to
remove an SB1 Baseline Package while SB1 application packages remain installed. This would likely render
those applications non-functional since they depend on the Baseline State established by the SB1 Baseline
package. The end result would likely be to cause the SB1 Shell to exhibit its default (out of the box) behavior
since it no longer see the
confusing situation since the UserDrive folder would not be empty, yet applications deployed to the UserDrive
folder would be ignored.
config.js file that was deployed by the SB1 Baseline Package. This would be a
The best approach is to first remove all SB1 application packages, then remove the SB1 Baseline Package. T o
prepare the SB1 for use again, you would ag ain proceed as d efined in
page 7-9.
Developing and Testing an SB1 Application
Since application packages to deploy SB1 applications are expected to be deployed as add-ons to an SB1 that
is in baseline state, the best approach is to place an SB1 into the baseline state in which the application is
expected to run. Since a given SB1 application might need to run in SB1s that have different baseline states, it
might be prudent to, at some point, test the application on SB1s that are in all relevant baseline states. If the
various sets of SB1 baseline files are created properly, in accordance with the above guidelines, this should
mostly be a formality to catch any mistakes. And at least initially, an application can likel y be tested on any SB1
that is in any convenient baseline state.
The most efficient way of performing SB1 application development and testing is likely using an SB1 that is
equipped with the optional Developer Back Housing. A developer can connect the SB1 to a workstation using
a micro USB cable and access the UserDrive of the SB1 from the workst ation. This permit s the files associated
with an SB1 application to be rapidly copied to the SB1 then tested.
While an SB1 is connected to the workstation, the UserDrive of the SB1 is dismounted and is completely
inaccessible by all software running on the SB1. While in this state, the UserDrive of the SB1 appears as a
drive on the workstation and the developer can copy files and folders to or from the SB1, delete files or folders
from the SB1, etc. No attempt should be made to format the UserDrive or perform error correction on the
UserDrive from the workstation as this could cause it to become damaged and could leave it unusable
thereafter by all software running on the SB1.
Deploying an SB1 Baseline Package on
 Loading...