

Page 1
L10 Quick Start Guide
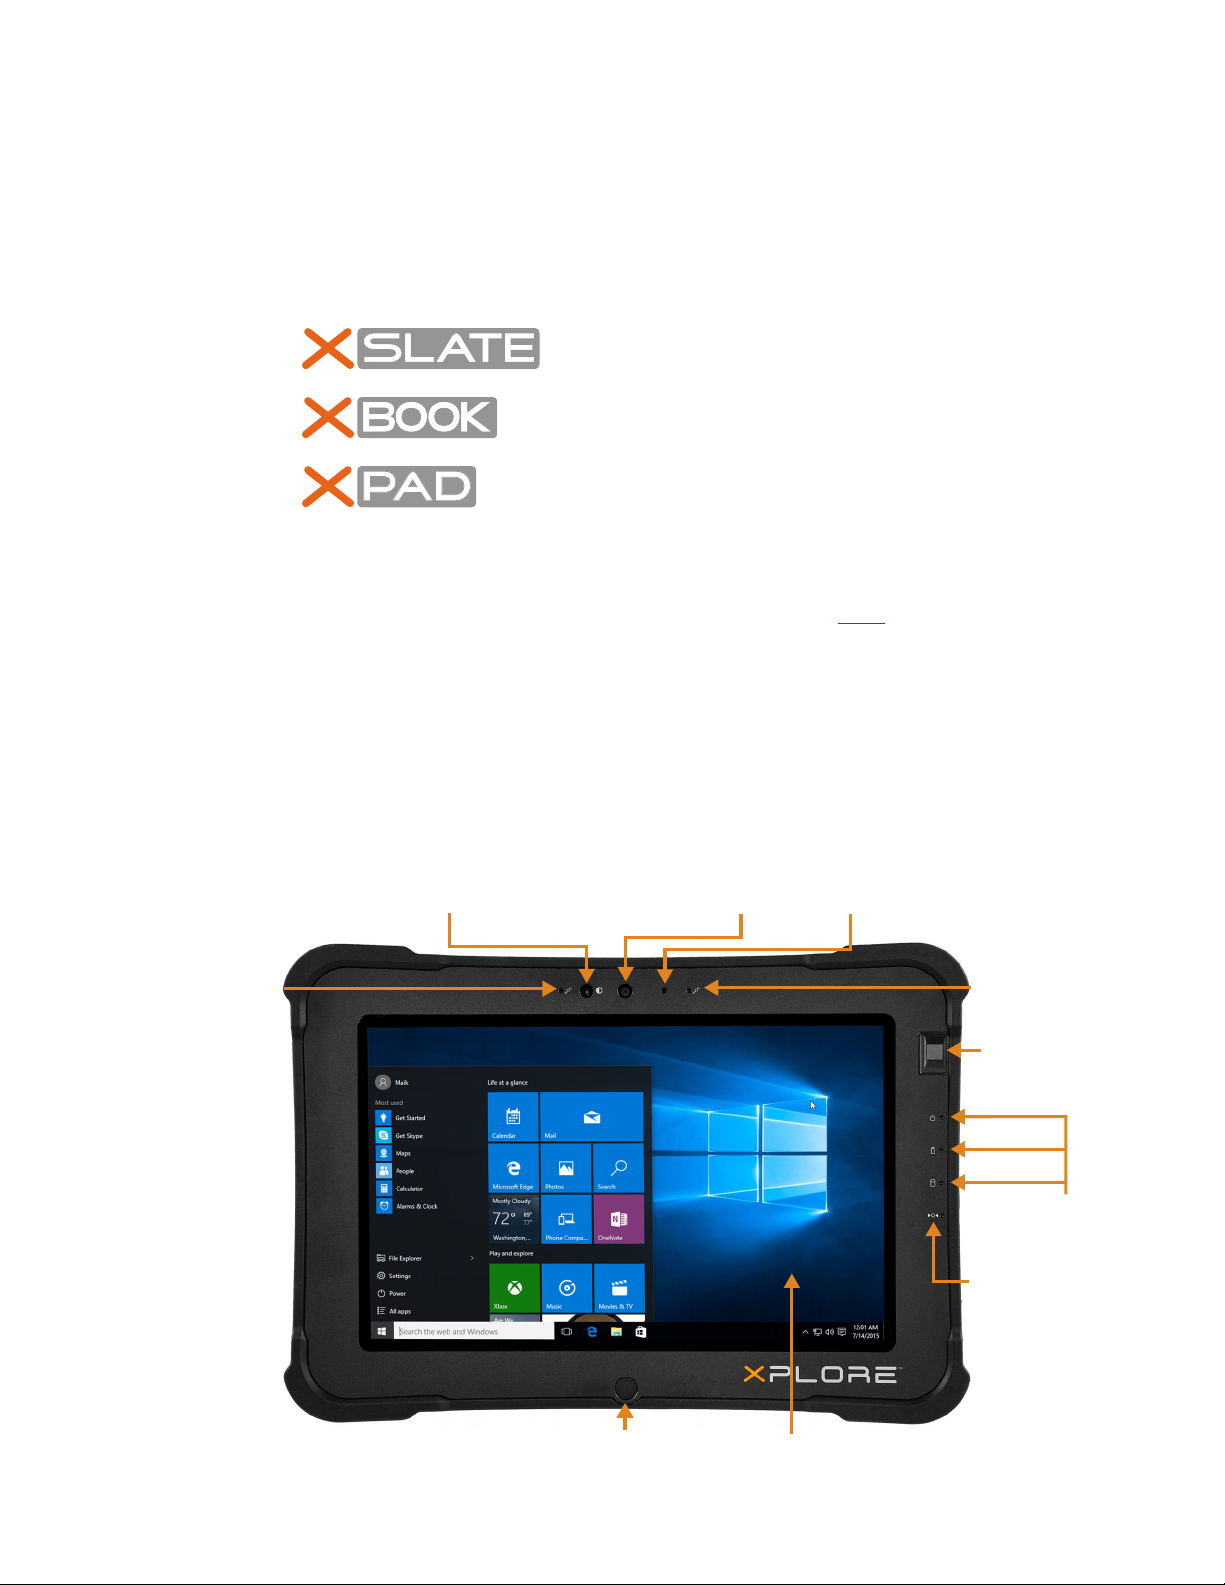
L10 Tablet PC Models
There are three models in the Xplore™ L10 Platform. Each tablet is different from the other two.
®
XSLATE™ L10 has no handle but is otherwise like the
XPAD model.
TM
TM
Important: For all important safety information about your tablet, it is necessary to read the
Safety and Regulatory Guide. To download this information, click HERE.
XBOOK™ L10 is the same as the XSLATE but includes a
companion keyboard and kickstrap.
XPAD™ L10 is distinguished by its integrated hard
handle. The handle has space for an integrated
barcode reader option, two programmable buttons
and a front facing speaker.
Overview of the XSLATE L10 Tablet
Front of the XSLATE L10 Tablet PC
Ambient light
sensor camera
Front
Camera
indicator
Microphones
Home button
L10 Quick Start Guide Overview of the XSLATE L10 Tablet 1
8/31/18
Touchscreen
Microphones
Fingerprint
reader
System status
Battery status
SSD Activity
Indicator
LEDs
Kill
switch
Page 2
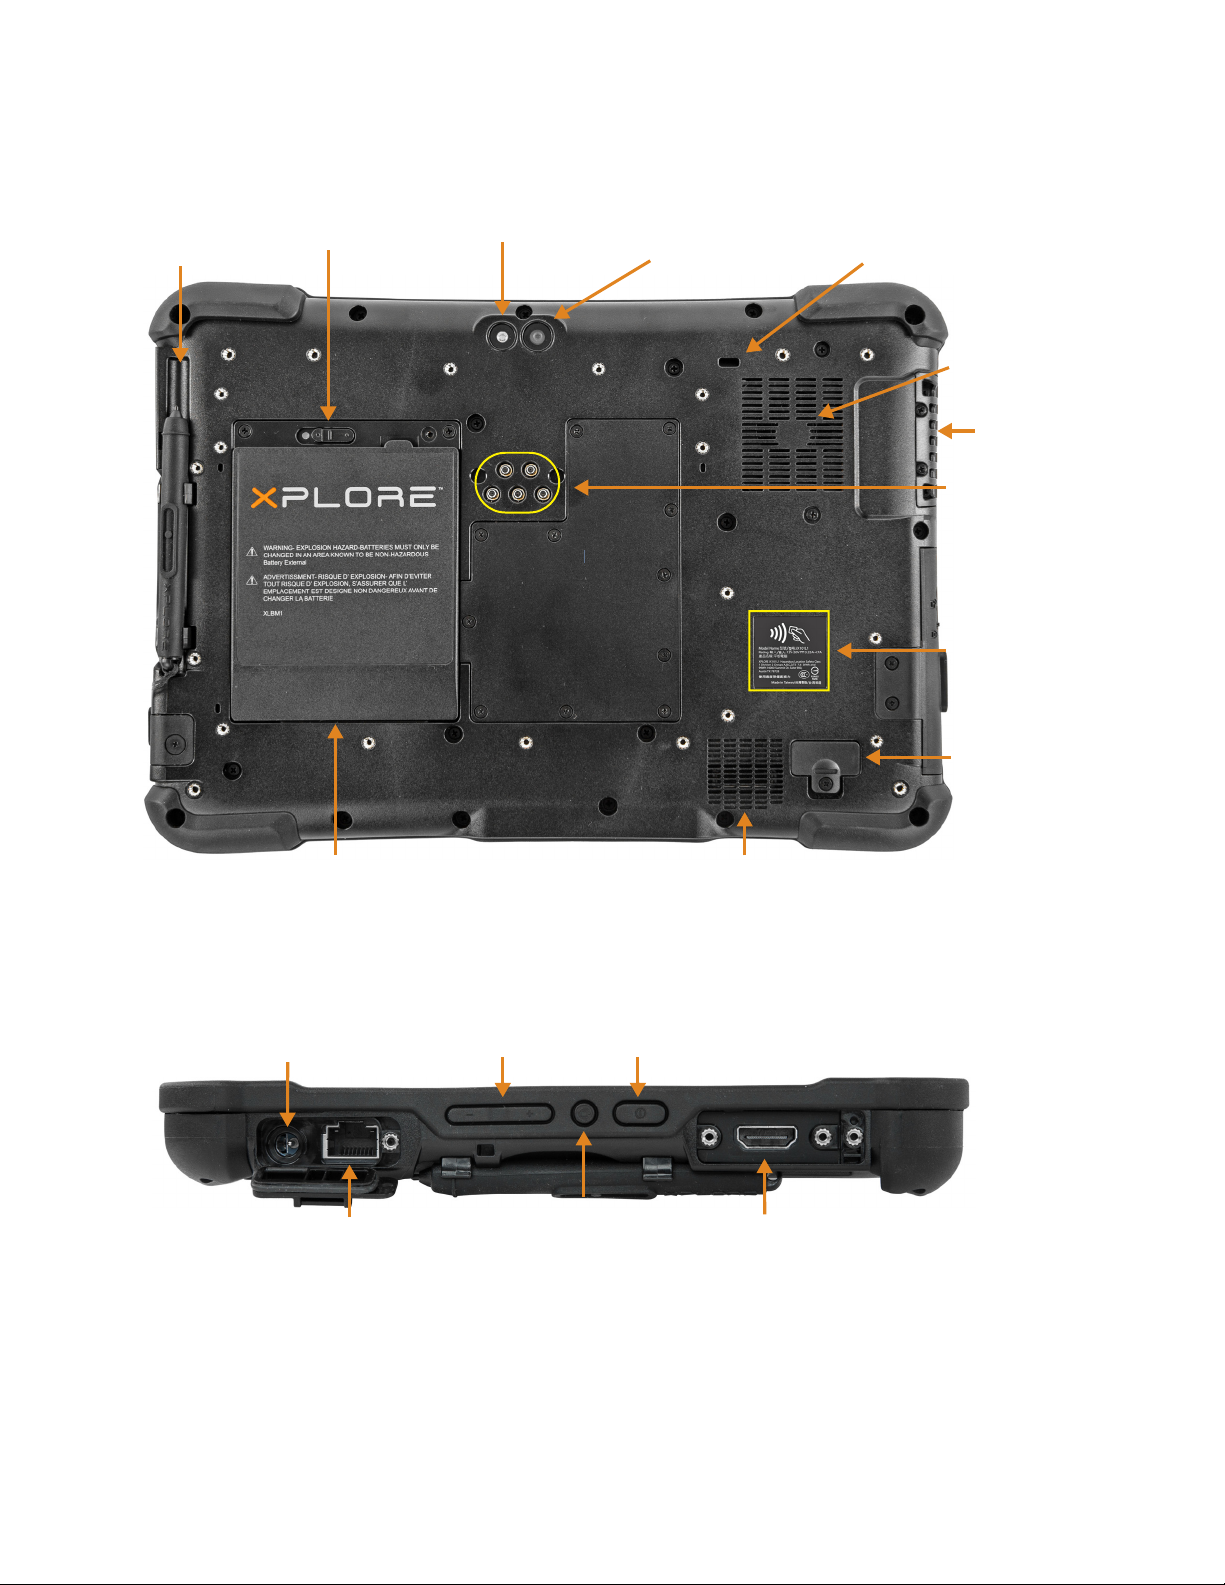
Back of the XSLATE L10
Pen holder 13 megapixel
Battery latch
Camera light
camera
Kensington
lock slotand pen
Fan intake
Fan
exhaust
Antenna
pass-through
ports (optional)
RFID/NFC
(optional)
Battery
Right Side of the XSLATE L10
Volume
Power input
Ethernet jack
control
Secure Attention
Sequence (SAS)
Power button
Expansion
port cover
Speaker
Multifunction port
2 Overview of the XSLATE L10 Tablet L10 QuickStart Guide
Page 3
Left Side of the XSLATE L10
Fan
exhaust
Memory
card slot Two USB 3.1
Headset
jack
Locking Door
Bottom Side of XSLATE and XPAD Tablets
Docking connectors
USB
type-C
port
Pens for the L10 Tablets
All L10 tablets support touch input with your finger. In addition, a pen or stylus is provided with your
tablet, and is compatible with the screen configuration that you order. The XSLATE and XBOOK
tablets come with short pens that fit in the pen holder. The XPAD tablet includes a longer, thicker
pen. If you want a longer pen for the XSLATE or XBOOK, a handle accessory can be ordered with the
longer pen.
Capacitive Pens
Capacitive pens work with the tablet’s touchscreen and are sometimes called passive pens. The short
capacitive pen does not need a battery. The long capacitive pen uses a AAAA battery.
Short Capacitive Pen Long Capacitive ePen w/battery
Active Digitizer Pens
If the L10 tablet is ordered with an active Wacom digitizer built in to the screen, you will receive one
of the two pens pictured below. These Wacom-compatible pens allow for a large range of pressure
sensitivity, tilt detection, and hover capability.
Short Active Digitizer Pen Long Active Digitizer Pen
L10 Quick Start Guide Pens for the L10 Tablets 3
Page 4

Overview of the XPAD L10 Tablet
The following photos show the locations the external features on the XPAD™ L10 Tablet PC.
Note: In these photos, the light gray text indicates a feature that is described for the XSLATE
L10 and is the same on the XPAD L10. See page 1 to page 3 for the XSLATE overview.
The blue text indicates that the feature is available only on the XPAD or is located in a
different place on the XPAD tablet.
Front of the XPAD L10
Ambient light
sensor camera
Pen holder
Front
Camera
indicator
Programmable
function buttons
Microphones Microphones
lights
Home button
The XPAD tablet has the speaker, a pen holder, and programmable function buttons in the handle.
Touchscreen display
Speaker
Fingerprint
reader
System status
Battery status
SSD activity
Indicator
LEDs
Kill switch
4 Overview of the XPAD L10 Tablet L10 QuickStart Guide
Page 5

Back of the XPAD L10
Tether post
for pen
Battery latch
Camera light
13 megapixel camera
Kensington
lock slot
Fan intake
Fan output
Antenna
pass-through
(optional)
ports
Battery
Left Side of the XPAD L10
Barcode scanner
The barcode scanner is optional.
Fan
Memory
card slot
USB Type-C
Two USB
3.1 ports
RFID/NFC
(optional)
Expansion
port cover
Headset
jack
L10 Quick Start Guide Overview of the XPAD L10 Tablet 5
Page 6

Top Side of the XPAD L10
Pen Holder
Barcode scanner
button
Preparing the L10 Tablet for First Use
This section has steps for setting up the L10 platform for the first use.
Inserting a SIM Card
If your L10 tablet is enabled with Wireless Wide Area Networking (WWAN), you need an activated
SIM card in the SIM card holder to access the cellular data network. The SIM holder is located in the
battery bay of the L10 and can hold one or two Nano SIMs (4FF).
Docking
connectors
SIM card holder
The L10 supports two SIM cards and switching between SIMs is done in Windows. Most people need
only one SIM. To add or change a SIM, follow these instructions:
1. Shut down and turn off the tablet.
2. Remove the battery if it is in the tablet.
3. Pull out the SIM holder shown above.
4. Put your SIM card into the slot with the contacts facing down ensuring the notched edge
on the card aligns with the notched edge in the holder.
5. Then put the frame back into its port and return the battery to its bay.
See the L10 User Guide for more details, including how to connect to a cellular network,
Setting Up Mobile Broadband.
6 Preparing the L10 Tablet for First Use L10 QuickStart Guide
Page 7

Powering Up the Tablet
1. Remove the battery from the packaging. On the back of the tablet, insert the bottom of
the battery into the bay. Tilt the battery as shown and press it down until it clicks securely
into place.
Insert this end of
the battery first.
2. The external power has two parts: the part that plugs into the power source and the
adapter with a cord that plugs into your tablet. Join the two parts by plugging the power
cord into the adapter to form one long cord.
3. To connect external power to the tablet, open the port door to expose the power adapter
port. Plug the AC adapter into this port on your tablet.
Power adapter port
Insert Photo
4. Plug the power cord into an outlet.
The battery charging indicator on the front of the L10 tablet blinks green to indicate that
the battery is charging. It is solid green when fully charged
5. Press and release the oval Power button in the center of the right side of the tablet to turn
it on.
Power button
6. Keep the tablet on AC power until the battery is fully charged. However, you don’t have to
wait until the tablet is fully charged to turn it on. The L10 will charge while you use it.
L10 Quick Start Guide Preparing the L10 Tablet for First Use 7
Page 8

Optional Setup Tasks
Backing Up Files and Creating a Recovery Drive
After setting up the L10 the way you like it and installing applications, create a recovery drive on an
external USB drive. A recovery drive lets you start your tablet and access recovery and
troubleshooting tools if you encounter any issues with your Windows installation. For more
information, see the L10 User Guide
Attaching the Pen Tether
The pen comes with a tether so that you can attach it to your tablet to avoid misplacing it.
Slip one end of the tether through the hole at the end of the pen, and pull the pen through the loop
until it is tight.
Slip the other end of the tether through the attach point on the tablet, then pull the pen through the
loop until it is tight.
For More Information
The Know Your Tablet application is on the desktop and the Windows Start screen of the tablet.
The user guide describes the full set of features and provides instructions for common tasks.
Download the complete L10 User Guide from the Xplore site under Support/User Documentation.
You can find other useful information on the Xplore web site:
• Support
• L10 Overview
• Knowledge Base
• Accessories
8 Optional Setup Tasks L10 QuickStart Guide
 Loading...