

Page 1

RS5100
Ring Scanner
Quick Start Guide
MN-003559-03EN Rev. A
Page 2

Copyright
ZEBRA and the stylized Zebra head are trademarks of Zebra Technologies Corporation, registered in many
jurisdictions worldwide. All other trademarks are the property of their respective owners. ©2020 Zebra
Technologies Corporation and/or its affiliates. All rights reserved.
COPYRIGHTS & TRADEMARKS: For complete copyright and trademark information, go to
www.zebra.com/copyright
RS5100 Quick Start Guide
.
WARRANTY: For complete warranty information, go to www.zebra.com/warranty
END USER LICENSE AGREEMENT: For complete EULA information, go to www.zebra.com/eula
Terms of Use
• Proprietary Statement
This manual contains proprietary information of Zebra Technologies Corporation and its subsidiaries (“Zebra
Technologies”). It is intended solely for the information and use of parties operating and maintaining the
equipment described herein. Such proprietary information may not be used, reproduced, or disclosed to any
other parties for any other purpose without the express, written permission of Zebra Technologies.
• Product Improvements
Continuous improvement of products is a policy of Zebra Technologies. All specifications and designs are
subject to change without notice.
• Liability Disclaimer
Zebra Technologies takes steps to ensure that its published Engineering specifications and manuals are
correct; however, errors do occur. Zebra Technologies reserves the right to correct any such errors and
disclaims liability resulting therefrom.
• Limitation of Liability
In no event shall Zebra Technologies or anyone else involved in the creation, production, or delivery of the
accompanying product (including hardware and software) be liable for any damages whatsoever (including,
without limitation, consequential damages including loss of business profits, business interruption, or loss of
business information) arising out of the use of, the results of use of, or inability to use such product, even if
Zebra Technologies has been advised of the possibility of such damages. Some jurisdictions do not allow the
exclusion or limitation of incidental or consequential damages, so the above limitation or exclusion may not
apply to you.
.
.
Warranty
For the complete Zebra hardware product warranty statement, go to: www.zebra.com/warranty.
Service Information
Before you use the unit, it must be configured to operate in your facility’s network and run your applications.
If you have a problem using your equipment, contact your facility’s Technical or Systems Support. If there is a
problem with the equipment, they will contact the Zebra Global Customer Support at www.zebra.com/support
For the latest version of this guide go to: www.zebra.com/support
.
.
2
Page 3
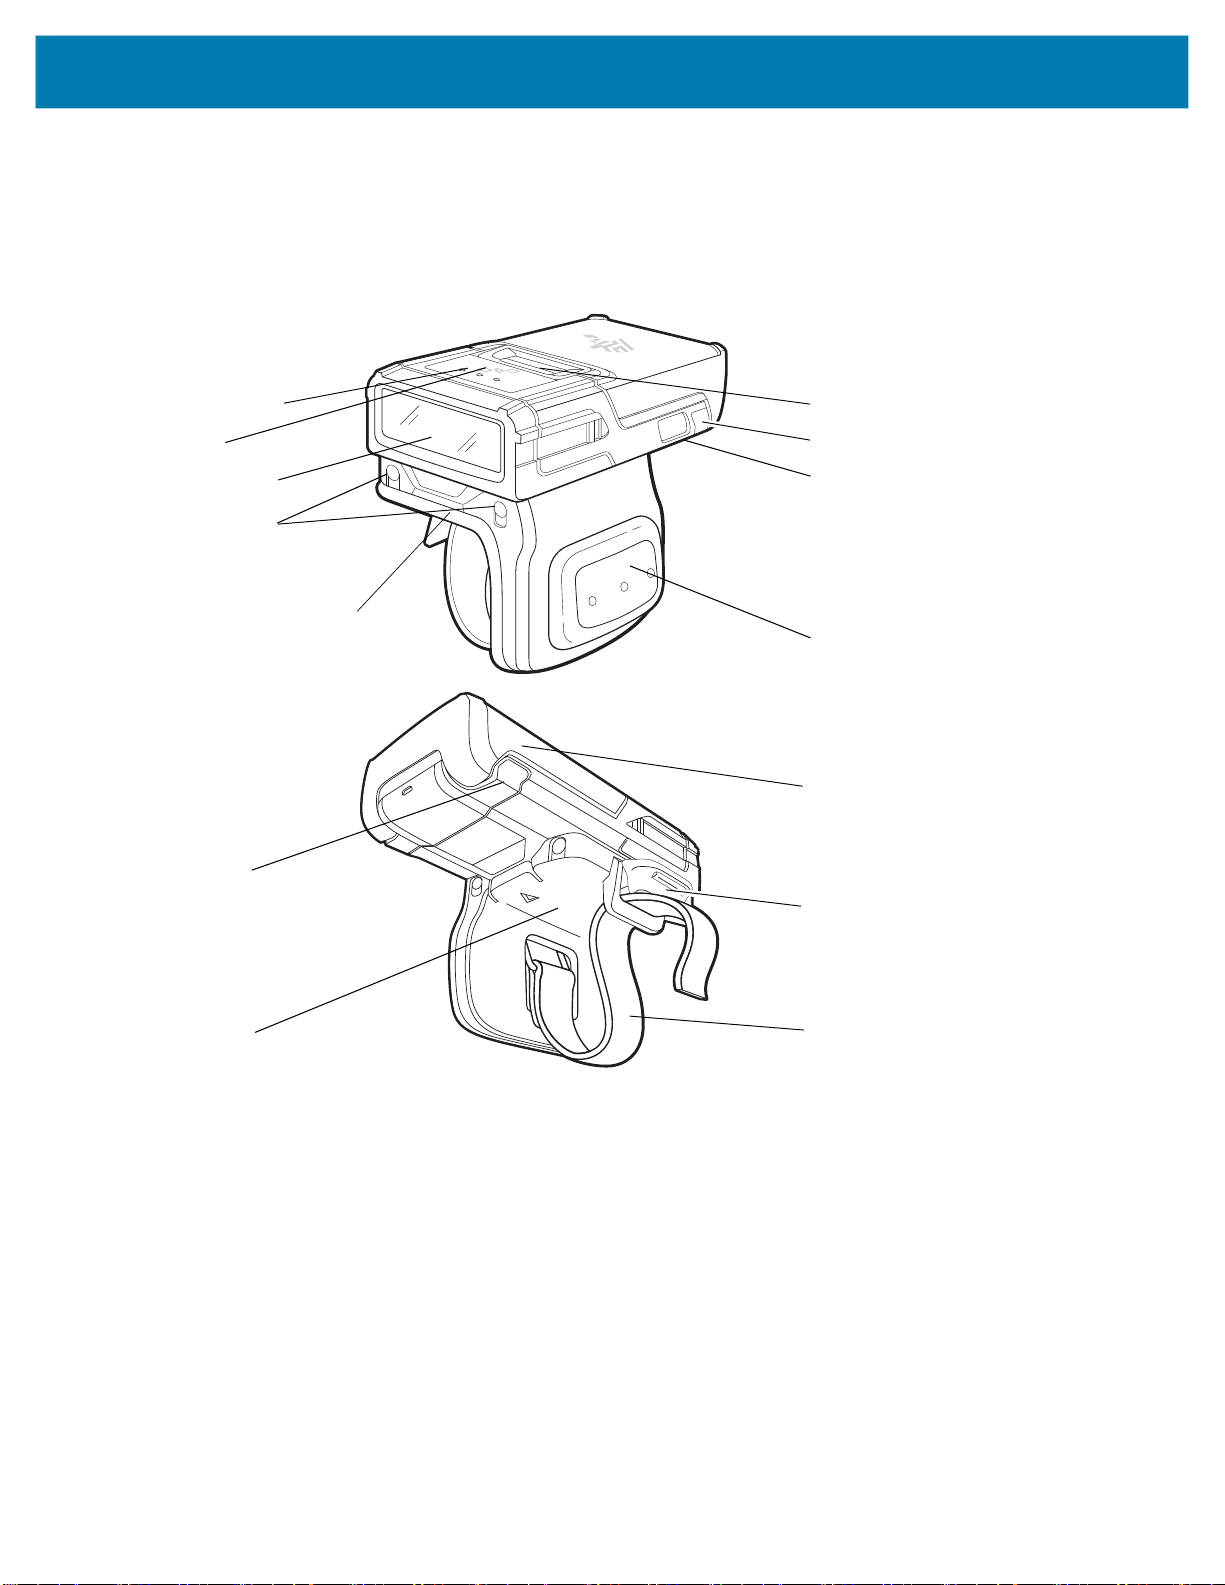
Features
Single Trigger
Figure 1 RS5100 Single Trigger Configuration Features
RS5100 Quick Start Guide
Top Scan Trigger
NFC Icon
Imager Window
Charging Pads for
Cradles
Trigger Assembly
System LED
Battery Release Latch
System LED
Restore Key
Side Scan Trigger
Battery
Strap Buckle
Comfort Pad
Finger Strap
3
Page 4
RS5100 Quick Start Guide
Double Trigger
Figure 2 RS5100 Double Trigger Configuration Features
Top Scan Trigger
NFC Icon
Imager Window
Charging Pads for
Cradles
Trigger Assembly
System LED
Battery Release Latch
System LED
Restore Key
USB Slot
(Not available on all
configurations)
Side Scan Trigger
Battery
USB Slot
(Not available on all
configurations)
Finger Straps
4
Page 5

Installing the Battery
1. Align the battery on top of the RS5100 and insert into the battery compartment.
Figure 3 Install the Battery
Battery Release Latch
2. Slide the battery all the way into the locking slot of the RS5100.
RS5100 Quick Start Guide
Battery
3. Firmly press the battery into the RS5100 until a click is heard ensuring the battery release latch is fully engaged
with the RS5100.
NOTE: Brand new batteries from the factory are shipped in Ship Mode for protection, and need to be plugged into a charger
(cradle or battery toaster) to activate the battery.
Removing the Battery
1. Push the battery release latch down until the latch pops up.
Figure 4 Release Battery
2. Slide the battery out of the battery compartment.
5
Page 6
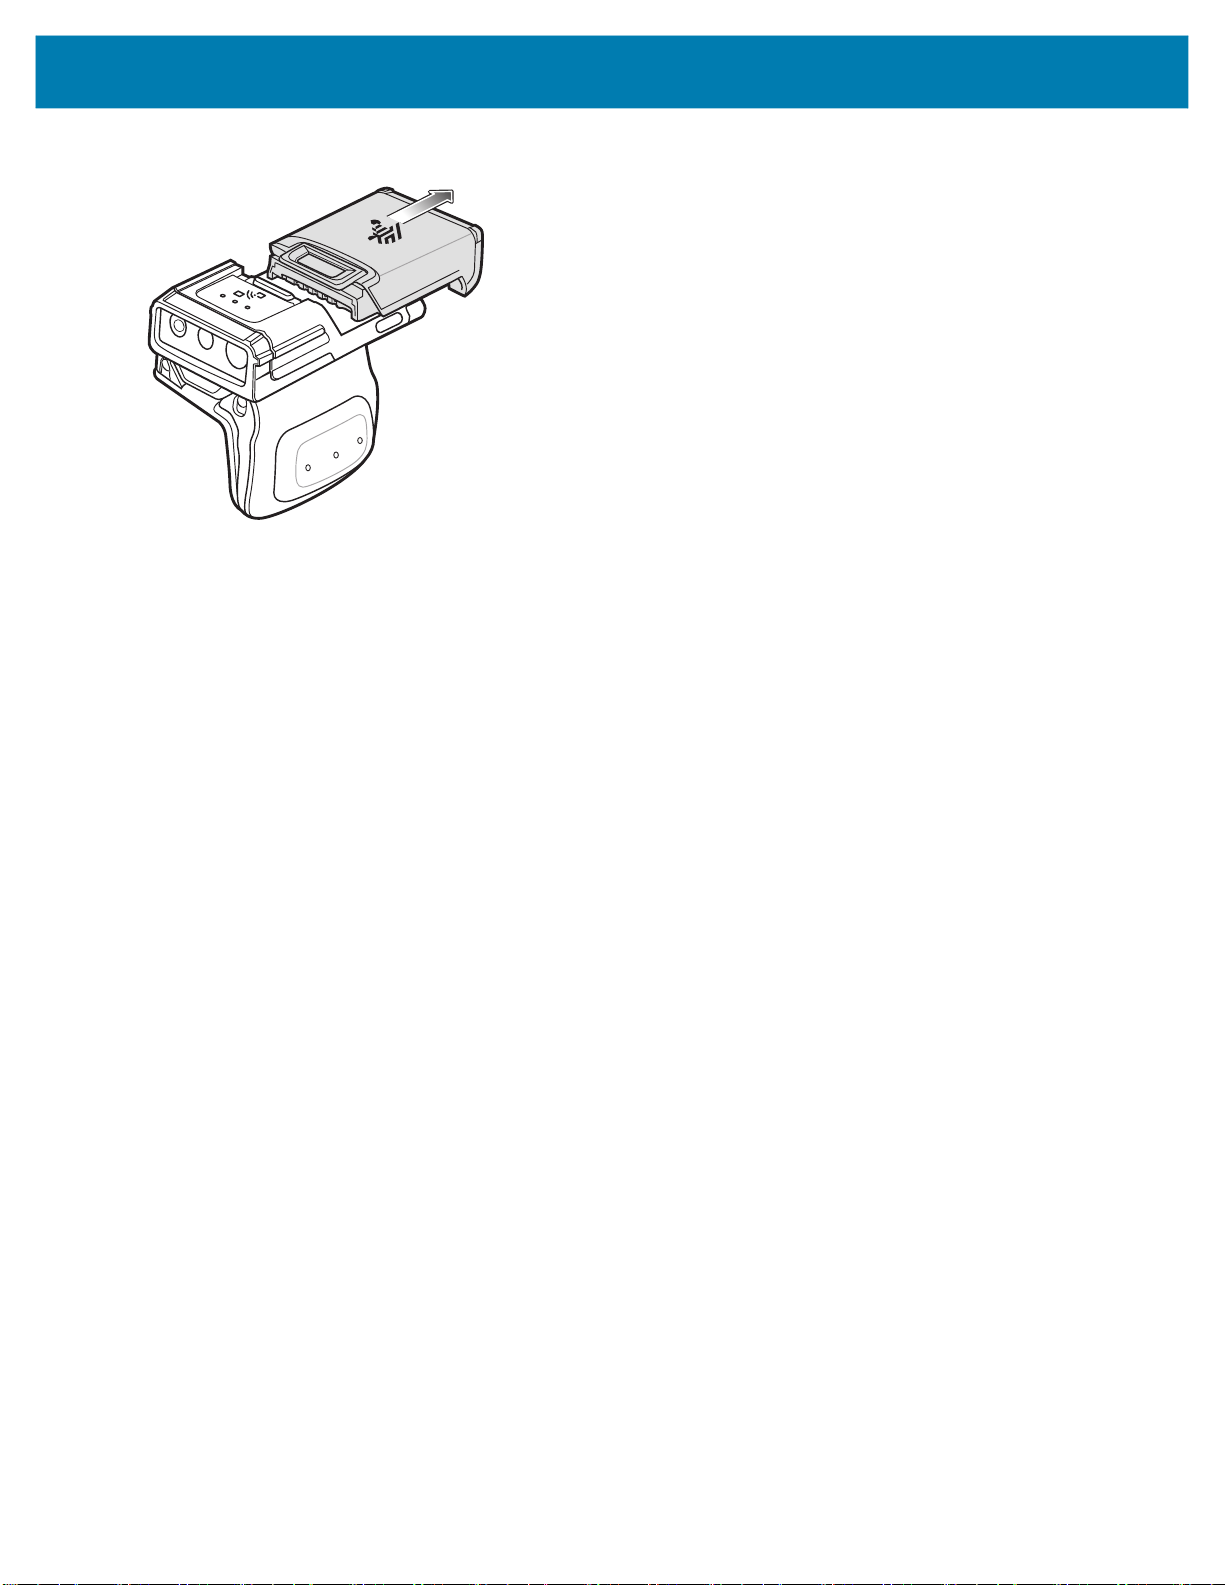
Figure 5 Remove the Battery
RS5100 Quick Start Guide
6
Page 7

Mounting the RS5100
1. Slide the RS5100 onto the index finger with the Scan Trigger next to the thumb.
RS5100 Quick Start Guide
Scan Trigger
Single Trigger
2. To tighten the Finger Strap on the Single Trigger, pull the end of the strap through the Strap Buckle. To loosen
the Finger Strap, lift the Strap Buckle away from the Finger Strap while pulling the strap through the Strap
Buckle. Release the Strap Buckle to hold the Finger Strap in place.
Finger Strap
Strap Buckle
Double Trigger
Scan Trigger
7
Page 8

Powering On
To power on the device:
1. Install the battery (if not already installed).
NOTE: Brand new batteries from the factory are shipped in Ship Mode for protection, and need to be plugged into a charger
(cradle or battery toaster) to activate the battery.
2. Press one of the following:
• side scan trigger on the single trigger
• left side scan trigger on the double trigger
• scan trigger on the lanyard
• scan trigger on the back of hand mount.
Bluetooth Connection
NOTE: The connection methods below apply only to Zebra Mobile Computers. For more information, refer to the RS5100 Product
Reference Guide.
RS5100 Quick Start Guide
NFC Tap-to-Pair
The RS5100 is NFC enabled and supports Bluetooth Tap-to-Pair.
To connect with a device, such as the WT6000 or TC52:
1. Check that NFC is enabled on the device.
2. Align the NFC icon on the RS5100 with the NFC icon on the device.
The Status LED blinks blue indicating that the RS5100 is attempting to establish connection with the device.
When a connection is established, the Status LED turns off and the RS5100 emits a single string of low/high
beeps.
8
Page 9

Figure 6 Touch NFC Antennas
NFC Logo
RS5100 Quick Start Guide
NFC Logo
NOTE: Not all Zebra devices support NFC readers and the Tap-to-Pair feature.
9
Page 10

RS5100 Quick Start Guide
Scan2Pair
To pair the RS5100 with a device, such as the WT6000 or TC52 using SSI:
1. On the device, touch > . The Bluetooth Pairing Utility opens.
Figure 7 Bluetooth Pairing Utility
2. Using the RS5100, scan the barcode on the screen.
The Status LED blinks blue indicating that the RS5100 is attempting to establish a connection with the device.
When a connection is established, the Status LED turns off and the RS5100 emits a single string of low/high
beeps.
The device indicates a successful pairing attempt with a toast notification (audio and visual). When the
Bluetooth connection is established, pop-up notifications appear on the device’s screen.
3. On the device, touch to return to the main screen.
Scanning
The RS5100 is available with two scan engine options: the SE4710 and SE4770. The SE4710 emits an orange
LED dot aimer, while the SE4770 emits a red laser cross-hair aimer. For information on enabling scanning, refer to
the RS5100 Product Reference Guide.
RS5100 Scanning with SE4710
To scan a barcode:
1. Launch a scanning application.
2. Press the Scan Trigger and aim the device at a barcode.
3. Adjust the position of the device so that the orange aiming dot appears at the center of the barcode.
Ensure the barcode is within the area formed by the aiming pattern. The aiming dot is used for increased
visibility in bright lighting conditions.
The Status LED illuminates red. Upon successful decode, the Status LED changes from red to green and an
audible beep sounds.
NOTE: When the device is in Picklist Mode, the imager does not decode the barcode until the crosshair or aiming dot touches
the barcode.
4. Release the Scan Trigger.
The barcode data displays on the screen.
10
Page 11

RS5100 Scanning with SE4770
To scan a barcode:
1. Launch a scanning application.
2. Press the Scan Trigger and aim the device at the barcode.
3. Adjust the position of the device so that the red laser cross-hair appears at the center of the barcode.
4. The status LED illuminates red. Upon successful decode, the status LED changes from red to green and an
audible beep sounds.
NOTE: In some configurations proper decoding of a barcode is indicated by the software application running on the mobile
computer.
Charging
NOTE: Ensure that you follow the guidelines for battery safety described in the RS5100 Product Reference Guide.
RS5100 Quick Start Guide
Use one of the accessories in the following table to charge the RS5100 and/or spare battery.
Table 1 Charging and Communication
Charging Communication
Description Part Number
4-Slot RS5100 Charge Only
Cradle
20-Slot RS5100 Charge
Only Cradle
8-Slot Battery Charger SAC-RS51-8SCHG-01 No Yes No No
40-Slot Battery Charger SAC-RS51-40SCHG-01 No Yes No No
Refer to the RS5100 Product Reference Guide
CRD-RS51-4SCHG-01 Yes No No No
CRD-RS51-20SCHG-01 Yes No No No
,
Battery
(In Device)
for detailed information on all charging accessories.
Battery Only
microUSB to
USB
Ethernet
11
Page 12

RS5100 Quick Start Guide
Charging the RS5100
To Charge the RS5100:
1. Insert the RS5100 into the RS5100 charging slot with the scan window facing the charge contacts.
Figure 8 Insert RS5100 Single Trigger and Double Trigger into Cradle
2. Ensure that the RS5100 is properly seated in the charging slot.
NOTE: It is suggested to charge the RS5100 before doing a firmware update over Bluetooth.
Charging the Spare Battery
1. Insert a spare battery into the spare battery slot.
Figure 9 Insert Battery into Cradle
2. Ensure the battery is seated properly. The Spare Battery Charging LED blinks indicating charging.
12
Page 13

RS5100 Quick Start Guide
Battery Charging
The RS5100 Charging LED indicates the charging status of the battery in the RS5100 and the Spare Battery
Charging LED indicates the charging status of the spare battery. See Table 2 on page 13.
NOTE: Brand new batteries from the factory are shipped in Ship Mode for protection, and need to be plugged into a charger
(cradle or battery toaster) to activate the battery.
Table 2 Charging LED Indicators
State Indication
Off The battery is not charging. The RS5100 or battery is not inserted correctly in the cradle or
connected to a power source. Cradle is not powered.
Solid Amber Battery is charging.
Solid Green Battery charging is complete.
Fast Blinking
Red
(2
blinks/second)
Solid Red Unhealthy battery is charging or fully charged.
Charge batteries in temperatures from 5°C to 40°C (41°F to 105°F). The standard battery charges from 0% to 90%
in less than two and a half hours at room temperature. When the charging temperature is from 5°C to 10°C (41°F
to 50°F), the standard battery charges in less than five hours.
The device and cradle monitor the battery temperature. Battery charging is only performed when the battery is
within safe charging temperature limits. At higher temperatures (e.g. approximately +35 °C (+95 °F)) the device or
charging cradle may for small periods of time alternately enable and disable battery charging to keep the battery at
acceptable temperatures. This process may require additional time to complete a full charge cycle. The RS5100 or
cradle indicate when charging is disabled due to abnormal temperatures via the Status LED.
Charging error, e.g.:
- Battery temperature is too low or too high for charging.
- The battery has reached the charge cycle time-out period. Battery charging has gone on too long
without completing a full charge cycle (typically eight hours).
13
Page 14

RS5100 Quick Start Guide
4-Slot RS5100 Charge Only Cradle
Figure 10 4-Slot RS5100 Charge Only Cradle
RS5100 Charging Slots (4)
8-Slot Battery Charger
Figure 11 8-Slot Battery Charger
Power LED
Battery Charging LED (8)
Battery Charging Slot (8)
14
Power LED
Page 15

RS5100 Quick Start Guide
20-Slot RS5100 Charge Only Cradle
Figure 12 20-Slot RS5100 Charge Only Cradle
RS5100 Charging Slots (20)
Power LED
15
Page 16

40-Slot Battery Charger
Figure 13 40-Slot Battery Charger
RS5100 Quick Start Guide
Battery Charging LED (40)
Battery Charging Slots (40)
Ergonomic Considerations
• Reduce or eliminate repetitive motion
• Maintain a natural position
• Reduce or eliminate excessive force
• Keep objects that are used frequently within easy reach
• Perform tasks at correct heights
• Reduce or eliminate vibration
• Reduce or eliminate direct pressure
• Provide adequate clearance
• Provide a suitable working environment
• Improve work procedures.
Power LED
16
Page 17

www.zebra.com
 Loading...