


Quick Start Guide
P4T/RP4T
Introduction
Getting Started
Using the
Printer
Introduction
Thank you for choosing
one of our Zebra P4T
Series Mobile Printers.
The P4T Series con-
sists of two models. The P4T can
print on direct thermal or thermal
transfer media. The RP4T can
print on direct or thermal transfer
media and also encode special
RFID media.
Because these printers are made
by Zebra Technologies you can
be assured of world-class support for all of your bar code printers, software, and supplies.
This document provides an easy
reference for operating and maintaining either the P4T or the RP4T Mobile Printer.
Complete and current documentation for these
printers is provided by the P4T/RP4T User Guide
available on the Internet at:
www.zebra.com/manuals.
8
7
9
6
P4T/RP4T Overview
5
4
3
2
1
10
Troubleshooting
Contact Us
Always refer to the Important
Safety Information data sheet
shipped with each printer and
the Technical Bulletin shipped
with each battery pack. These
documents detail procedures to
ensure maximum reliability and
safety while using this printer.
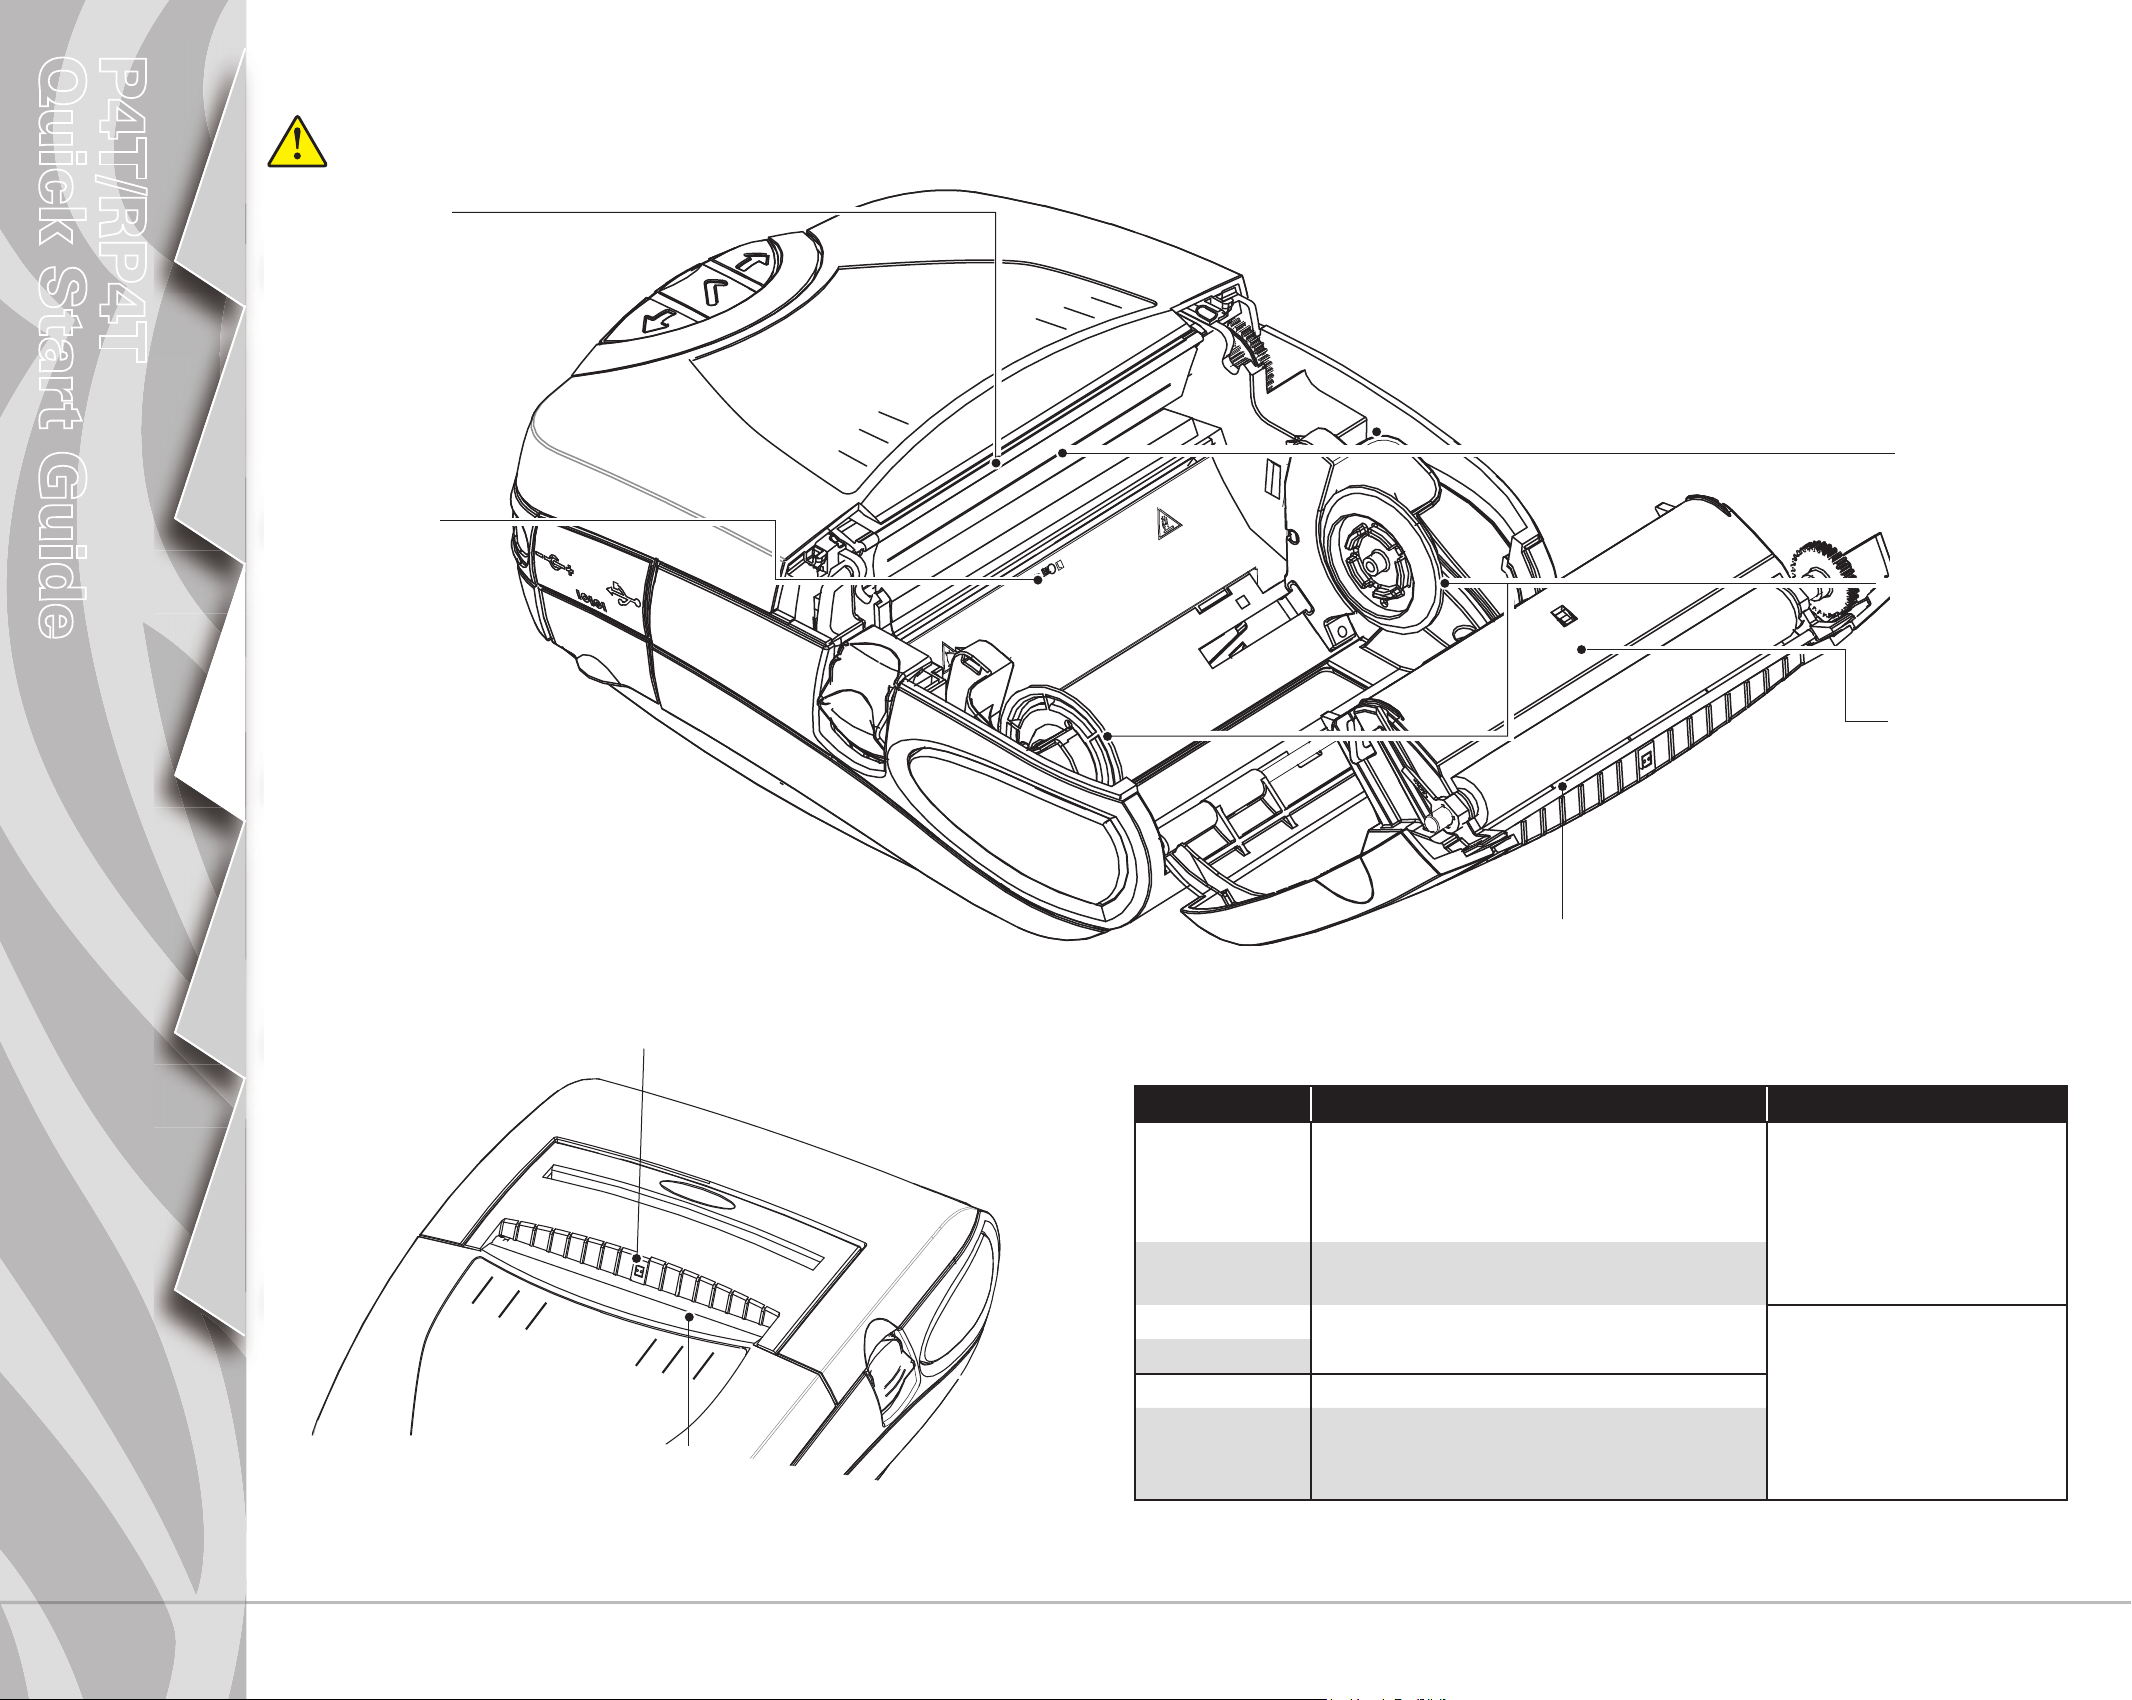
1. Platen Roller
2. Bar Sensor
3. Media Support
4. RFID Reader/Encoder (RP4T only)
5. Printhead
6. Ribbon Cartridge Cover
7. Control Panel
8. Ribbon Cartridge Cover Latch
9. Media Cover Latch
10. Media Support Disks
11. Label Peeler
12. Media Cover
13. External Media Access (optional)
14. Battery
15. Battery Charging Receptacle
16. RS232 Communications Port
17. USB Port
15
11
17
16
12
13
QSG-P4T-002 Rev. D
14
© ZIH Corp. 2013
1

Quick Start Guide
P4T/RP4T
Charge the Battery Pack
Introduction
Getting Started
Using the
Printer
Battery packs are shipped uncharged. Remove
protective shrink-wrap and labels from new battery
packs and allow them to charge completely prior to
initial use.
The printer cannot be used while charging with the
single charger.
Battery Charging
Receptacle
LI72 Single
Battery Charger
Battery Pack
The printer may be used while charging the battery
pack with the AC adapter. However, prolonged use of
the printer while charging will greatly increase charge
times.
AC
Adapter
Open the
protective cover
for access to
the charger
receptacle
Troubleshooting
Contact Us
Using the Single Battery Charger
If the Battery Pack is new, remove its protective wrapping and
discard the warning label covering the battery contacts. If you are
charging a previously used Battery Pack, remove it from the printer.
Insert the plug from the Charger cable into the Battery Charging
Receptacle. Plug the Charger into an appropriate AC outlet.
The light on the front of the charger will indicate the battery
pack’s charge status.
Using the AC Adapter
If the Battery Pack is new, remove its protective wrapping and
discard the warning label covering the battery contacts. Install the
Battery Pack in the printer.
Insert the plug from the AC Adapter cable into the Battery Charging Receptacle. Plug the Adapter into an AC outlet.
Consult the P4T/RP4T User’s Guide available at
www.zebra.com/manuals for complete information on charging
batteries on P4T Series printers.
Section Continues
2

Quick Start Guide
Fault
Fast Charg e
Fault
Fast Charg e
Fault
Fast Charg e
Ready
Power
Full Charg e
Ready
Full Charg e
Ready
Full Charg e
Full Charg e
Fault
Fast Charg e
Ready
P4T/RP4T
UCLI72-4 Quad Charger
The UCLI72-4 uad Charger is an optional accessory kit allowing simultaneous charging of up to four battery packs.
Introduction
Getting Started
Using the
Printer
1. Slide Battery
Pack into a Charger bay
2. Rock Battery Pack into
place
Power Supply
The UCLI72-4 Quad Charger is designed to charge
up to four battery packs simultaneously. Charging
time is as follows:
Battery Status Charging
Time
80% charged 2.5 Hrs.
Full charge 5 Hrs.
Plug a battery pack into any one of the four charging bays as shown opposite, noting the orientation
of the battery pack. Slide the battery pack into the
charging bay until it stops. Then rock the battery
pack back until it snaps into place. The amber indicator directly under the battery pack being charged
will turn on if the battery pack is properly inserted.
The indicators under each battery pack will allow
you to monitor the charging process per the table
below:
Amber Green
Battery Status
Troubleshooting
Contact Us
On O Charging
On Flashing
Amber
Indicator
Green
Indicator
Charger Bay
Power
Indicator
O On
Flashing O Faulty battery
For more information refer to the instructions included with the UCLI72-4 Quad Charger, or to the more detailed discussion of the quad
charger in the P4T/RP4T User Guide.
The UCLI72-4 Quad Charger has a safety feature which stops charging after six hours regardless of the battery pack’s charge state.
80% charged
(O.K. to use)
Completely
Charged
pack
Section Continues
3

Quick Start Guide
P4T/RP4T
Install the Battery Pack
Always use Zebra approved battery packs and media for maximum performance
and superior printing results. P4T Series printers will not operate with non-Zebra
batteries.
Introduction
Getting Started
Using the
Printer
Troubleshooting
Contact Us
Insert a fully charged battery pack
into the bottom of the printer as
shown.
Press battery pack until it clicks
into place
Remove the battery pack by
pressing on the latch and
rotating the battery pack out
of the bottom of the printer.
Battery Pack
Section Continues
4

Quick Start Guide
P4T/RP4T
Introduction
Getting Started
Load the Media
Press down on the Media
Cover Latch Lever
1. Open the Media Cover
Media cover opens
Pull Media Supports
apart where shown.
Load Media Roll
Note direction media pulls o the roll.
Always ensure you are using the correct media. Use RFID media only in RP4T printers.
Using the
Printer
Troubleshooting
Contact Us
Pull Media out of the Printer.
Use alignment marks on the
cover to ensure alignment.
Close Media Cover
2. Load the Media Roll
Peeler Assembly.
Peeler Bar.
3. Feed the leader over
the peeler bar and into
the printer.
4. Press down on Peeler
Assembly where shown
and slide the media until it
emerges .
1. Remove enough
labels from the media roll to create a 4”
[100 mm] leader.
2. Align the edge of the leader
with the index marks on the
top cover to ensure it will pass
through the peeler without
wrinkling.
3. Close the Media Cover
4. Insert Media into Peeler
Optional Step for label stock only
Section Continues
5

Quick Start Guide
P4T/RP4T
Load the Thermal Transfer Ribbon Cartridge
Use the Thermal Transfer Ribbon Cartridge only when using thermal transfer or RFID media.
Introduction
Getting Started
Using the
Printer
1. Press down on the
Media Cover Latch
Lever
1. Open the Printer Covers
3. Press the Ribbon Cartridge Cover latch
Cover will slide open
2. Media
cover opens
Drop the cartridge in place over the
printhead. Ensure the I.D. Label faces
away from the media compartment.
Troubleshooting
Contact Us
Locating pins on the
cartridge must lock
into the printer frame.
2. Load the Ribbon Cartridge Cartridge
Remove tape and pretension the media to
remove wrinkles.
1. Slide the Ribbon Cartridge Cover closed until it
locks in place.
Always close the Ribbon Cartridge cover
before closing the Media Cover.
2. Ensure Media
is pulled out of
Printer
3. Close Media
Cover
3. Close the Printer Covers
Section Continues
6

Quick Start Guide
P4T/RP4T
Connect the Printer
Introduction
Getting Started
Using the
Printer
Connect The Printer With a Cable
You can connect your printer to a terminal or a PC using
either RS232C or USB protocols. Refer to the Label Vista™
application available at
setting up communications with your printer.
Communications
Ports
RS232
www.zebra.com/software for help on
RS232C or USB
Communications
Cable to Terminal
Refer to Appendix A
in the P4T/RP4T User
Guide for part numbers.
USB
Terminal
Connect the Printer by Radio
If your P4T Series printer has a radio option, you can connect
wirelessly to either a terminal or a wireless network (WLAN.) A
P4T printer can use either 802.11x and/or Bluetooth protocols for
wireless connections. An RP4T printer can have only one radio
option (802-11x or Bluetooth) in addition to the RFID encoder. Refer to the Mobile Printer Wireless Configuration Guide available at
www.zebra.com/manuals for help on setting up wireless communi-
cations with your printer.
Printer with
wireless option
Terminal with wireless
communications
capability
Troubleshooting
Contact Us
Cable Communications with a Terminal.
RS-232C or USB
Communications Cable to
Computer
Refer to Appendix A in the User
Guide for part numbers.
USB
RS232
Connector
Cable Communications with a P.C.
Connector
RS232
Connector
USB
Connector
If you are using a USB cable to connect to a PC you
may need to install the Zebra Designer Driver available
www.zebra.com/drivers.
at:
7

Quick Start Guide
8
P4T/RP4T
Introduction
Getting Started
Printer Controls
LCD and Keypad
Refer to the P4T/RP4T User Guide for complete information.
Scroll Back Button
Press to scroll to the previous
menu choice on the display.
Refer to the P4T/RP4T User Guide
for more complete information.
Select Button
Press to select a menu
choice on the display.
Scroll Forward Button
Press to scroll to the next menu
choice on the display.
Refer to the P4T/RP4T User Guide
for more complete information.
Using the
Printer
Troubleshooting
Contact Us
Power Button
Press to turn unit on. Press
again to turn unit o .
Display
Indicates status messages
and menu prompts.
Printer Status Icons
Refer to the Troubleshooting section
for more information on the status
icons.
Printer Model
P4T shown, RFID printers will
display “Zebra RP4T”.
Feed Button
Press to advance a blank
label or a predetermined
length of journal media.
Section Continues
8

Quick Start Guide
9
P4T/RP4T
Introduction
Getting Started
Adjustable Shoulder Strap
An adjustable shoulder strap is supplied with each printer. Its use is detailed below.
Hold Buckle
Pull Strap here to
shorten
Pull Strap here to
lengthen
Using the
Printer
Troubleshooting
Contact Us
Snap into feature on
printer
• Snap each end of the shoulder strap into the retaining features on top of the printer.
• Hold the buckle and adjust the strap as shown until you achieve the desired length.
Section Continues
9
Quick Start Guide
P4T/RP4T
Cleaning the Printer
Caution • To avoid possible personal injury or damage to the printer never insert sharp or pointed objects into the printer mechanism.
Tear Edge
Introduction
Printhead
Elements
Getting Started
Using the
Printer
Troubleshooting
Gap
Sensor
Media
Support
Disks
Bar Sensor
Platen Surface
Label Presence Sensor
Contact Us
Peeler Bar
Area Cleaning Method Interval
Use a Zebra cleaning pen to clean the print
Printhead
Elements
Platen Surface
Peeler Bar
Tear Edge
Exterior Wipe with water-dampened cloth
Interior Brush/air blow. Ensure the Bar Sensor, Gap Sensor
elements from end to end (the print elements
are located in the thin gray line on the
printhead).
Rotate the platen roller and clean it
thoroughly with the cleaning pen.
Clean thoroughly with the cleaning pen.
and Label Present Sensor windows and the Media
Support Disks are free of dust.
After every ve rolls of media (or
more often, if needed)
As needed
10

Quick Start Guide
P4T/RP4T
Introduction
Getting Started
Troubleshooting
LCD Control Panel
The top of the display shows icons indicating the status of various printer functions. Check the icon’s status and refer to the referenced
Troubleshooting topic on the following pages.
Ref. to Trou-
Icon Status Indication
On Bluetooth link established n/a
O No Bluetooth link 6,8
On 802.11b/g RF Link established n/a
O No 802.11b/g RF Link 6,8
Number of bars indicates 802.11g signal strength n/a
bleshooting
Topic
Using the
Printer
Troubleshooting
Blank Screen n/a
Troubleshooting Topics
Outer element ashing Low Battery 4, 6,
Number of bars indicates battery charge level.
Display will cycle through the charge level icons if it is
undergoing a charge from the AC Adapter.
Alternate Flashing
Flashing Out of Media 9
Flashing Ribbon Cartridge depleted 9
Flashing Data processing in process n/a
Battery pack too hot or too cold to
charge
Battery voltage too low to turn
printer on or no application loaded
n/a
2
1,14
Contact Us
1. No power:
• Check that battery pack is installed properly.
• Recharge or replace battery pack as necessary.
•If the battery voltage is outside of the printer’s operating range and the AC Adapter is plugged into printer, the printer will not turn
on. The battery will start to charge, but will give no indication that the battery is charging. When the battery voltage reaches a valid
operating range, the printer will still not turn on unless the user manually turns it on, or unplugs and re-plugs the charge cable.
2. AC Adapter is plugged in and the battery icon is ashing
or :
• Indication that the battery is out of its safe charging temperature range. Charging will resume when the battery reaches a safe
charging temperature.
Section Continues
11
Quick Start Guide
P4T/RP4T
Troubleshooting Topics (continued)
3. Media does not feed:
• Be sure printhead is closed and latched.
• Check media support components for any binding.
• If unit is equipped with label presence sensor, ensure the most recently printed label is removed.
Introduction
Getting Started
Using the
Printer
• Ensure label sensor is not blocked.
4. Poor or faded print or
• Clean printhead.
• Check battery pack. Recharge or replace as necessary. Always dispose of batteries according to local regulations. Refer to Appendix
E in the P4T/RP4T Users Guide for more information.
• Check quality of media.
5. Partial/missing print:
• Check Ribbon Cartridge and/or label media alignment.
• Clean printhead.
• Ensure printhead is properly closed and latched.
6. No print:
• Replace battery pack.
• Check cable to terminal.
• Wireless units only: Restore wireless connection.
• Units using Thermal Transfer media: Ensure a Ribbon Cartridge has been installed.
7. Reduced charge life:
• Check battery pack date code. If battery pack is one to two years old, short life may be due to normal aging.
icon ashing:
Troubleshooting
Contact Us
• If the battery pack has exceeded its maximum limit of charge cycles the printer will indicate that the battery pack needs re-conditioning
or replacing.
• Replace battery pack.
8.
9.
10. Skips labels:
11. Prints “wrinkle pattern” or partial characters:
12. Prints multiple “Void” messages:
or icon o :
• Units with Bluetooth or 802.11b/g option only: indicates no radio link has been established.
or ashing:
• Check that both label media and a Ribbon Cartridge are loaded and that the printhead is closed and securely latched.
• Ensure correct media is being used.
• Ensure bar/ or gap sensor is not blocked.
• Ensure thermal transfer ribbon has been tensioned prior to installation. Problem will self-correct after printing a few labels.
• Ensure label media tracks properly when emerging from printer. Use the alignment marks on the media cover to ensure wrinkle free
operation when loading media into the peeler assembly. Correct media alignment if necessary.
• RP4T printers only: Ensure you have installed RFID media. Printer cannot verify RF encoding on non-RFID media and will print “Void”
on a pre-set number of labels before stopping.
Section Continues
12

Quick Start Guide
P4T/RP4T
Troubleshooting Topics (continued)
13. Communication Error:
• Check that media is loaded, head is closed and all error indicators are off.
• Replace cable to terminal.
Introduction
Getting Started
Using the
Printer
14. Screen blank
• No application loaded. Attempt to re-load application and restart printer.
• No power. See Topic “1” of this section.
Troubleshooting
Contact Us
13

Quick Start Guide
Zebra Technologies Corporation
475 Half Day Road, Suite 500
Lincolnshire, IL 60069 USA
T
: +1 847.634.6700 or +1 800.423.0442
P4T/RP4T
Contact Us
Introduction
For product support, and the latest versions of all customer documentation, contact
Zebra Technologies at: www.zebra.com
Refer to Appendix D in the P4T/RP4T User Guide for more detailed contact information
IN THE AMERICAS CONTACT:
Getting Started
Using the
Printer
Troubleshooting
Zebra Technologies Corporation
475 Half Day Road, Suite 500
Lincolnshire, Illinois 60069 USA
Phone: +1.847.634.6700 or +1.800.423. 0422
Fax: +1.847.913.8766
IN EUROPE, AFRICA, THE MIDDLE EAST, AND INDIA CONTACT:
Zebra Technologies Europe Limited
Dukes Meadow
Millboard Road
Bourne End
Buckinghamshire SL8 5XF, UK
T: +44 (0)1628 556000
F: +44 (0)1628 556001
IN THE ASIA PACIFIC REGION CONTACT:
Zebra Technologies Asia Paci c, LLC
71 Robinson Road #05-02/03
Singapore 068895
T: +65-6858 0722
F: +65-6885 0838
Contact Us
14
 Loading...