


RFD8500i
USER GUIDE


RFD8500i
USER GUIDE
MN-002761-02
Revision A
November 2019

ii RFD8500i User Guide
No part of this publication may be reproduced or used in any form, or by any electrical or mechanical means,
without permission in writing from Zebra. This includes electronic or mechanical means, such as photo copying,
recording, or information storage and retrieval systems. The material in this manual is subject to change
without notice.
The software is provided strictly on an “as is” basis. All software, including firmware, furnished to the user is on
a licensed basis. Zebra grants to the user a non-transferable and non-exclusive license to use each software
or firmware program delivered hereunder (licensed program) . Except as n oted below, such licen se may not b e
assigned, sublicensed, or otherwise tran sfe rr e d by th e user without prior written consent of Zebra. No right to
copy a licensed program in whole or in part is granted, except as permitted under copyright law. The user shall
not modify , merge, or incorporate any for m or portion of a licensed program with other pro gram material, create
a derivative work from a licensed program , or us e a li censed program in a network without written permission
from Zebra. The user agrees to maintain Zebra’s copyright notice on the licensed programs delivered
hereunder , and to include the same on any au thorized copies it m akes, in whole or in part. The user agrees not
to decompile, disassemble, decode, or reverse engineer any licensed program delivered to the user or any
portion thereof.
Zebra reserves the right to make changes to any software or product to improve reliability, function, or design.
Zebra does not assume any product liability arising out of, or in connection with, the application or use of any
product, circuit, or application described herein.
No license is granted, either expressly or by implication, estoppel, or otherwise under any Zebra Technologies
Corporation, intellectual property rights. An implied license only exists for equipment, circuits, and su bsystems
contained in Zebra products.
Warranty
For the complete Zebra hardware product warranty statement, go to:
http://www.zebra.com/warranty
Revision History
Changes to the original manual are listed below:
Change Date Description
-01 Rev A 9/2016 Initial Release
-02 Rev A 11/2019 Added cautionary statement to “Charging the Battery in the Reader” on page 8.
.

TABLE OF CONTENTS
Warranty ......................................................................................................................................... ii
Revision History.............................................................................................................................. ii
About This Guide
Introduction..................................................................................................................................... v
Related Documents ........................................................................................................................ v
Configurations................................................................................................................................. vi
Chapter Descriptions ...................................................................................................................... vii
Notational Conventions................................................................................................................... vii
Service Information......................................................................................................................... viii
Chapter 1: GETTING STARTED
Introduction .................................................................................................................................... 1-1
Unpacking ...................................................................................................................................... 1-1
RFD8500i Features ........................................................................................................................ 1-2
Setting Up the RFD8500i ............................................................................................................... 1-4
Installing the Battery ................................................................................................................ 1-4
Removing the Battery .............................................................................................................. 1-6
Inserting the TC55 on the RFD8500i ............................................................................................. 1-7
Charging ........................................................................................................................................ 1-8
Charging the Battery in the Reader ......................................................................................... 1-8
Charging the Mobile Device Battery ........................................................................................ 1-9
Charging Temperature ............................................................................................................. 1-9
Battery Management ...................................................................................................................... 1-9
Low Battery Notification ........................................................................................................... 1-10
Battery Optimization ................................................................................................................. 1-10
Downloading Application Software ................................................................................................ 1-11
Zebra RFID Mobile Application for Android ............................................................................. 1-11
Requirements ..................................................................................................................... 1-11
Installing the Software ........................................................................................................ 1-11
Chapter 2: USING the RFD8500i
Introduction .................................................................................................................................... 2-1
Using the Features on the RFD8500i ............................................................................................ 2-1

iv RFD8500i User Guide
Using Buttons and the Scan Trigger ........................................................................................ 2-1
LED and Beeper Indicators ...................................................................................................... 2-2
Near Field Communication (NFC) Based BT Connection ............................................................. 2-3
General NFC Application Implementation ................................................................................ 2-3
Pairing With the TC55 Using NFC ........................................................................................... 2-4
Using the Locate Device Bar Code .................................................................................... 2-4
Reading Tags ................................................................................................................................ 2-5
Transferring Data ........................................................................................................................... 2-5
Transferring Data in Batch Mode ............................................................................................. 2-5
Transferring Data via Bluetooth ............................................................................................... 2-5
Chapter 3: ZEBRA RFID MOBILE APPLICATION for ANDROID
Introduction .................................................................................................................................... 3-1
Using the Zebra RFID Mobile Application for Android ................................................................... 3-1
Pairing ...................................................................................................................................... 3-2
Pairing/Connection Scenarios ............................................................................................ 3-2
Demo Application Status Upon Connection ............................................................................. 3-6
Disconnecting .......................................................................................................................... 3-6
Demo Application Screens ....................................................................................................... 3-7
Home Screen ..................................................................................................................... 3-7
Rapid Read ........................................................................................................................ 3-8
Inventory ............................................................................................................................ 3-9
Locate Tag ................................................................................................................. ........ 3-11
Settings .............................................................................................................................. 3-12
Access Control ................................................................................................................... 3-24
Pre Filters ........................................................................................................................... 3-25
About .................................................................................................................................. 3-26
Chapter 4: 123SCAN
Introduction .................................................................................................................................... 4-1
Communication with 123Scan ....................................................................................................... 4-1
123Scan Requirements ................................................................................................................. 4-1
Appendix A: TROUBLESHOOTING, TECHNICAL SPECIFICATIONS and MAINTENANCE
Introduction .................................................................................................................................... A-1
Troubleshooting ............................................................................................................................. A-1
Technical Specifications ................................................................................................................ A-2
Cleaning ......................................................................................................................................... A-2
Approved Cleanser Active Ingredients ..................................................................................... A-2
Harmful Ingredients .................................................................................................................. A-2
Cleaning Instructions ............................................................................................................... A-3
Special Cleaning Notes ............................................................................................................ A-3
Materials Required ........................................................................................................... ........ A-3
Cleaning Charge Connectors ................................................................................................... A-3
Cleaning Frequency ................................................................................................................. A-4
Maintenance .................................................................................................................................. A-4
RFD8500i ................................................................................................................................. A-4
Battery ...................................................................................................................................... A-4
Index

ABOUT THIS GUIDE
Introduction
The RFD8500i reader provides Radio Frequency Identification (RFID) capabilities and is purpose-built to work with
TC55 mobile computer. The unit can be used stand alone, or paired with a TC55 via NFC or Bluetooth®.
This guide provides information on using the RFD 85 0 0i an d its ac ces so rie s.
NOTES Some screens or windows shown in this guide may differ from the actual screens shown on the device.
This guide refers to screens and features from the Zebra RFID Mobile application. Refer to the
corresponding feature in the partner application you are using.
Related Documents
•
RFD8500 RFID Developer Guide, p/n MN002222AXX.
•
RFD8500i Quick Start Guide, p/n MN-002760-XX.
•
RFD8500i Regulatory Guide, p/n MN-002856-XX.
•
CRD1S-RFD8500 (1-Slot), CRDUNIV-RFD8500-1R (3-Slot), CRD4S-RFD8500 (4-Slot), Universal Charge
Only Cradles Regulatory Guide, p/n MN002224AXX.
•
TC55 User Guide, p/n MN000015AXX.

vi RFD8500i User Guide
Configurations
Table ii-1
RFD8500-1500100-US BT sled, US
RFD8500-1500100-EU BT sled, EU
RFD8500-1500100-JP BT sled, Japan
RFD8500-1500100-IL BT sled, Israel
RFD8500-1500100-IN BT sled, India
Table ii-2
Power Supply for 1-slot cradle PWRS-14000-148R
Power Supply for 4-slot cradle PWRS-14000-241R
DC Line Cord for power supply 241R 50-16002-029R
AC Line Cord for power supply 148R and 241R: US 23844-00-00R
AC Line Cord for power supply 148R and 241R: Australia, China, New Guinea 50-16000-217R
RFD8500i
Configuration Description
Cradle Accessories
Item Part Number
AC Line Cord for power supply 148R and 241R: Japan 50-16000-218R
AC Line Cord for power supply 148R and 241R: Hong Kong, Iraq, Malaysia,
Singapore, United Kingdom
AC Line Cord for power supply 148R and 241R: Europe, Abu Dhabi, Bolivia, Dubai,
Egypt, Iran, Korea, Russia, Vietnam.
AC Line Cord for power supply 148R and 241R: United States 50-16000-221R
AC Line Cord for power supply 148R and 241R: Korea. 50-16000-256R
AC Line Cord for power supply 148R and 241R: China 50-16000-257R
AC Line Cord for power supply 148R and 241R: India 50-16000-669R
AC Line Cord for power supply 148R and 241R: Italy 50-16000-671R
AC Line Cord for power supply 148R and 241R: Israel 50-16000-672R
4-way DC Cable for 4-slot cradle (optional) 25-85992-01R
2-way DC Cable 4-slot cradle (optional) 25-122026-02R
50-16000-219R
50-16000-220R

Chapter Descriptions
This guide includes the following topics:
•
Chapter 1, GETTING ST AR TED provides an overview of RFD8500i physical features, device illustrations
and the how to get the Zebra RFID Mobile application.
•
Chapter 2, USING the RFD8500i describes the basic operations of RFD8 500i including device beh avior,
Bluetooth pairing and RFID features.
•
Chapter 3, ZEBRA RFID MOBILE APPLICA TION for ANDROID details the features of the Zebra RFID
Mobile application for Android.
•
Chapter 4, 123SCAN includes an overview of the 123Scan utility.
•
Appendix A, TROUBLESHOOTING, TECHNICAL SPECIFICATIONS and MAINTENANCE includes
RFD8500i specifications, and information about troubleshooting and maintaining the reader.
Notational Conventions
About This Guide vii
This document uses the following conventions:
•
Italics are used to highlight chapters, screen names, fields, and sections in this and related documents.
•
bullets (•) indicate:
• Action items
• Lists of alternatives
• Lists of required steps that are not necessarily sequential
•
Sequential lists (e.g., those that describe step-by-step procedures) appear as numbered lists.
NOTE This symbol indicates something of special interest or importance to the reader. Failure to read the note
will not result in physical harm to the reader, equipment or data.
CAUTION This symbol indicates that if this information is ignored, the possibility of data or material damage may
occur.
WARNING! This symbol indicates that if this information is ignored the possibility that serious personal
injury may occur.

viii RFD8500i User Guide
Service Information
If you have a problem using the equipment, contact your facility's technical or systems support. If there is a
problem with the equipment, they will contact the Zebra Technologies Global Customer Support Center at:
http://www.zebra.com/support
When contacting Zebra support, please have the following information available:
•
Product name
•
Version number
•
Serial number
Zebra responds to calls by e-mail, telephone or fax within the time limits set forth in support agreements.
If your problem cannot be solved by Zebra support, you may need to return your equipment for servicing and
will be given specific directions. Zebra is not responsible for any damages incurred during shipment if the
approved shipping container is not used. Shipping the un its improperly can possibly void the warranty.
If you purchased your business product from a Zebra business partner, contact that business partner for
support.
.

Chapter 1 GETTING STARTED
Introduction
This chapter provides the features of the RFD8 50 0i and explains how to set it up for the first time.
Unpacking
Carefully remove all protective material from the RFD8500i and save the shipping container for later storage
and shipping. Verify the following items are in the box:
•
RFD8500i
•
4410 mAh Lithium-ion battery
•
Micro USB cable
•
Quick Start Guide (not included in Beta package)
•
Regulatory Guide (not included in Beta package).
Inspect the equipment for damage. If any equipment is missing or damaged, con tact the Zebra Support Ce nter
immediately. See Service Information on page viii for contact information.
1 - 2 RFD8500i User Guide
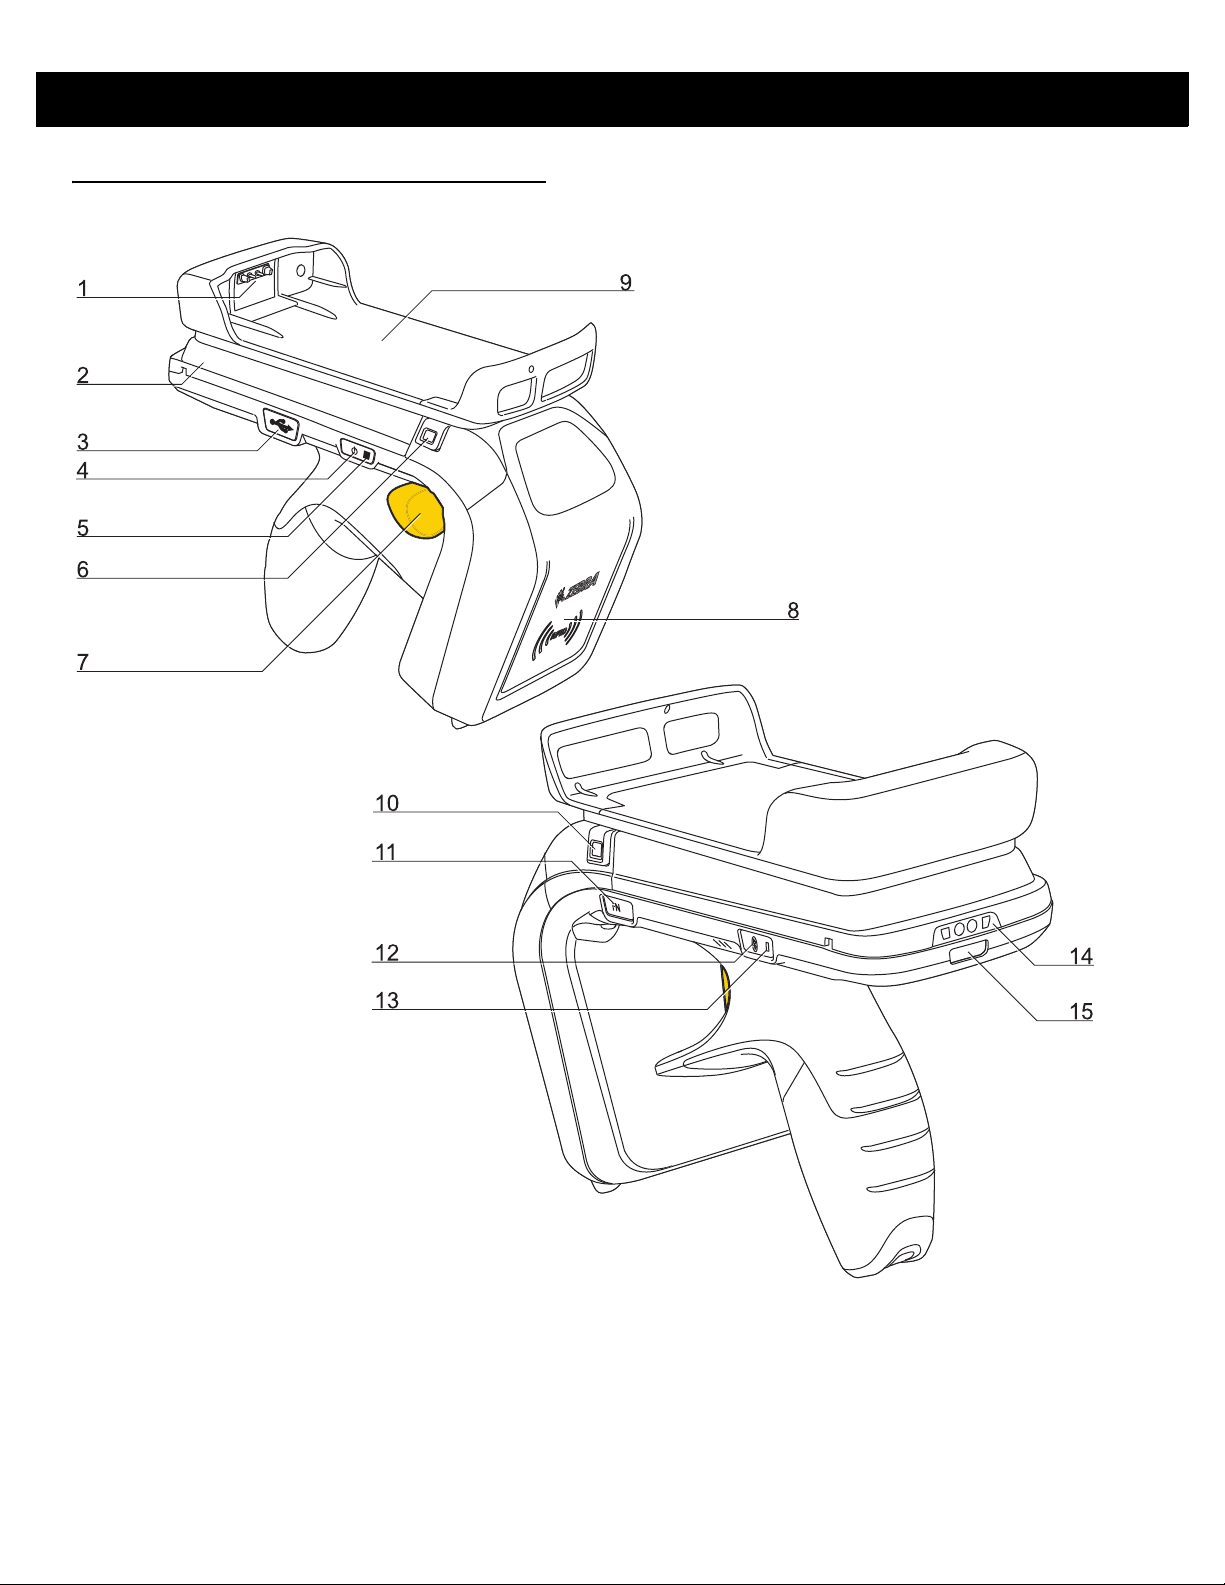
RFD8500i Features
Figure 1-1
Features of the RFD8500i

GETTING STARTED 1 - 3
See Trigger and Button Operations on page 2-1 for more information about using the features.
Table 1-1
Number Item Description
Feature Descriptions
1 Mobile Computer Contacts Connects the mobile computer to the
RFD8500i to charge the mobile computer in
the charging accessory.
2 Battery Cover/Compartment Battery cover for the RFD8500i battery.
3 USB Port/Cover USB port.
4 Power Button Turns the RFD8500i on and off.
5 Power/Charging Indicator Reflects the power state of the RFD8500i. See
LED and Beeper Indicators on page 2-2
indicator descriptions.
6 Battery Cover Release Button Depress buttons (items 6 and 10) to remove
the battery cover.
7 Trigger Press to read tags.
8 RFID Antenna Compartment Houses RFID antenna.
9 Mobile Computer Tray Tray holds/secures the TC55 mobile computer.
10 Battery Cover Release Button Depress buttons (items 6 and 10) to remove
the battery cover.
for
11 Function Button This button should be used by System
Administrators only. It halts the boot process
when pressed in conjunction with the
button. Halting the boot process allows the
system engineer to recover devices with an
improper firmware image (i.e, devices that
cannot boot up).
Press
Mode
and
Bluetooth
simultaneously for three seconds to perform a
soft reset.
12 Bluetooth Button Turns Bluetooth on and off, and enables
discover mode.
13 Bluetooth Indicator Indicates the Bluetooth status.
14 Charging Contacts Connects to a charging accessory.
15 Operation Indicator
buttons
Power
1 - 4 RFD8500i User Guide
1
2
Setting Up the RFD8500i
To start using the RFD8500i for the first time with the TC55:
•
Install the battery.
•
Charge the RFD8500i.
•
Power on the RFD8500i.
•
Pair the RFD8500i to the TC55 via Bluetooth or NFC.
•
Install the Andro id Demo Application, or the partner application.
•
Set the region and power level (using the Demo Application, or the partner application).
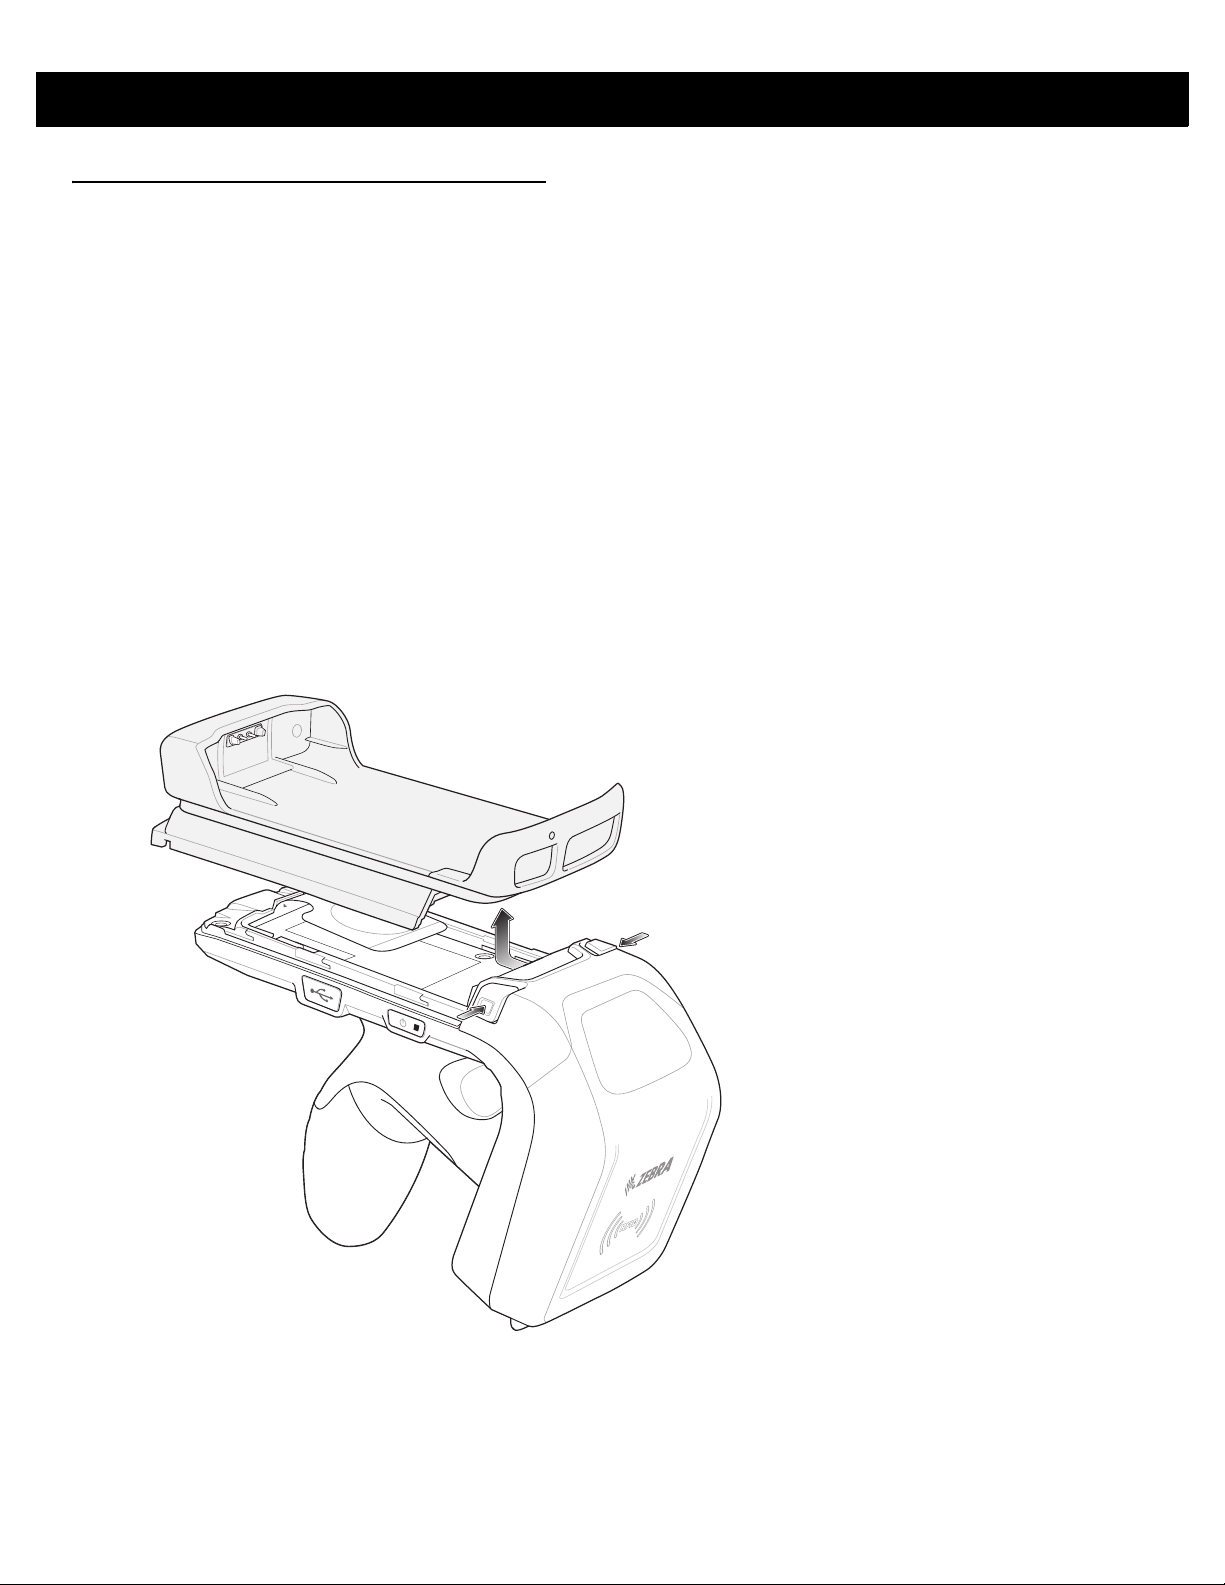
Installing the Battery
To install the battery:
1. Depress both battery cover release buttons.
2. Slide back, and remove battery cover.
Figure 1-2
Removing the Battery Cover
GETTING STARTED 1 - 5
1
2
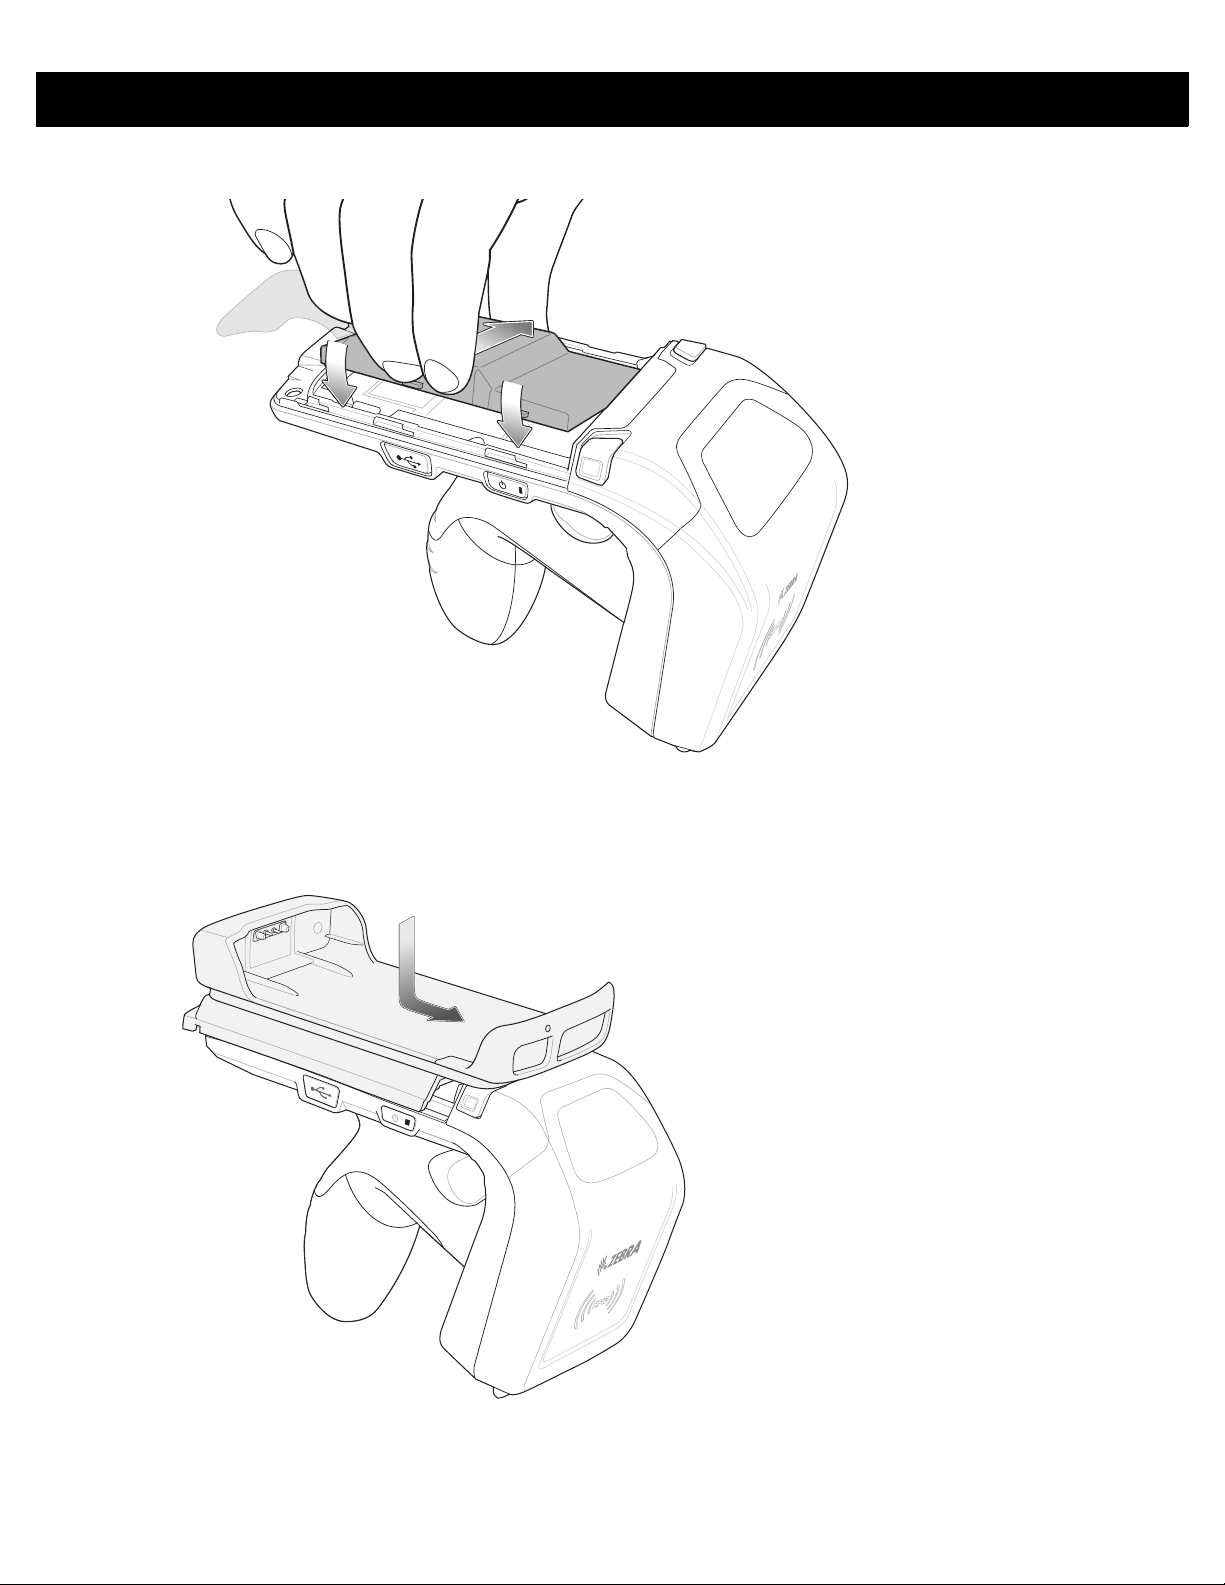
3. Align the three tabs on the bottom of the battery (Figure 5) with the three slots in the battery compartment.
Figure 1-3
4. Press the battery down and rotate until it locks into place.
5.
Replace the battery cover by lowering the cover over the battery and sliding it forward until it locks in place.
Inserting the Battery
Figure 1-4
6. The RFD8500i automatically powers on when the battery is in place.
Replacing the Battery Cover
1 - 6 RFD8500i User Guide
1
2
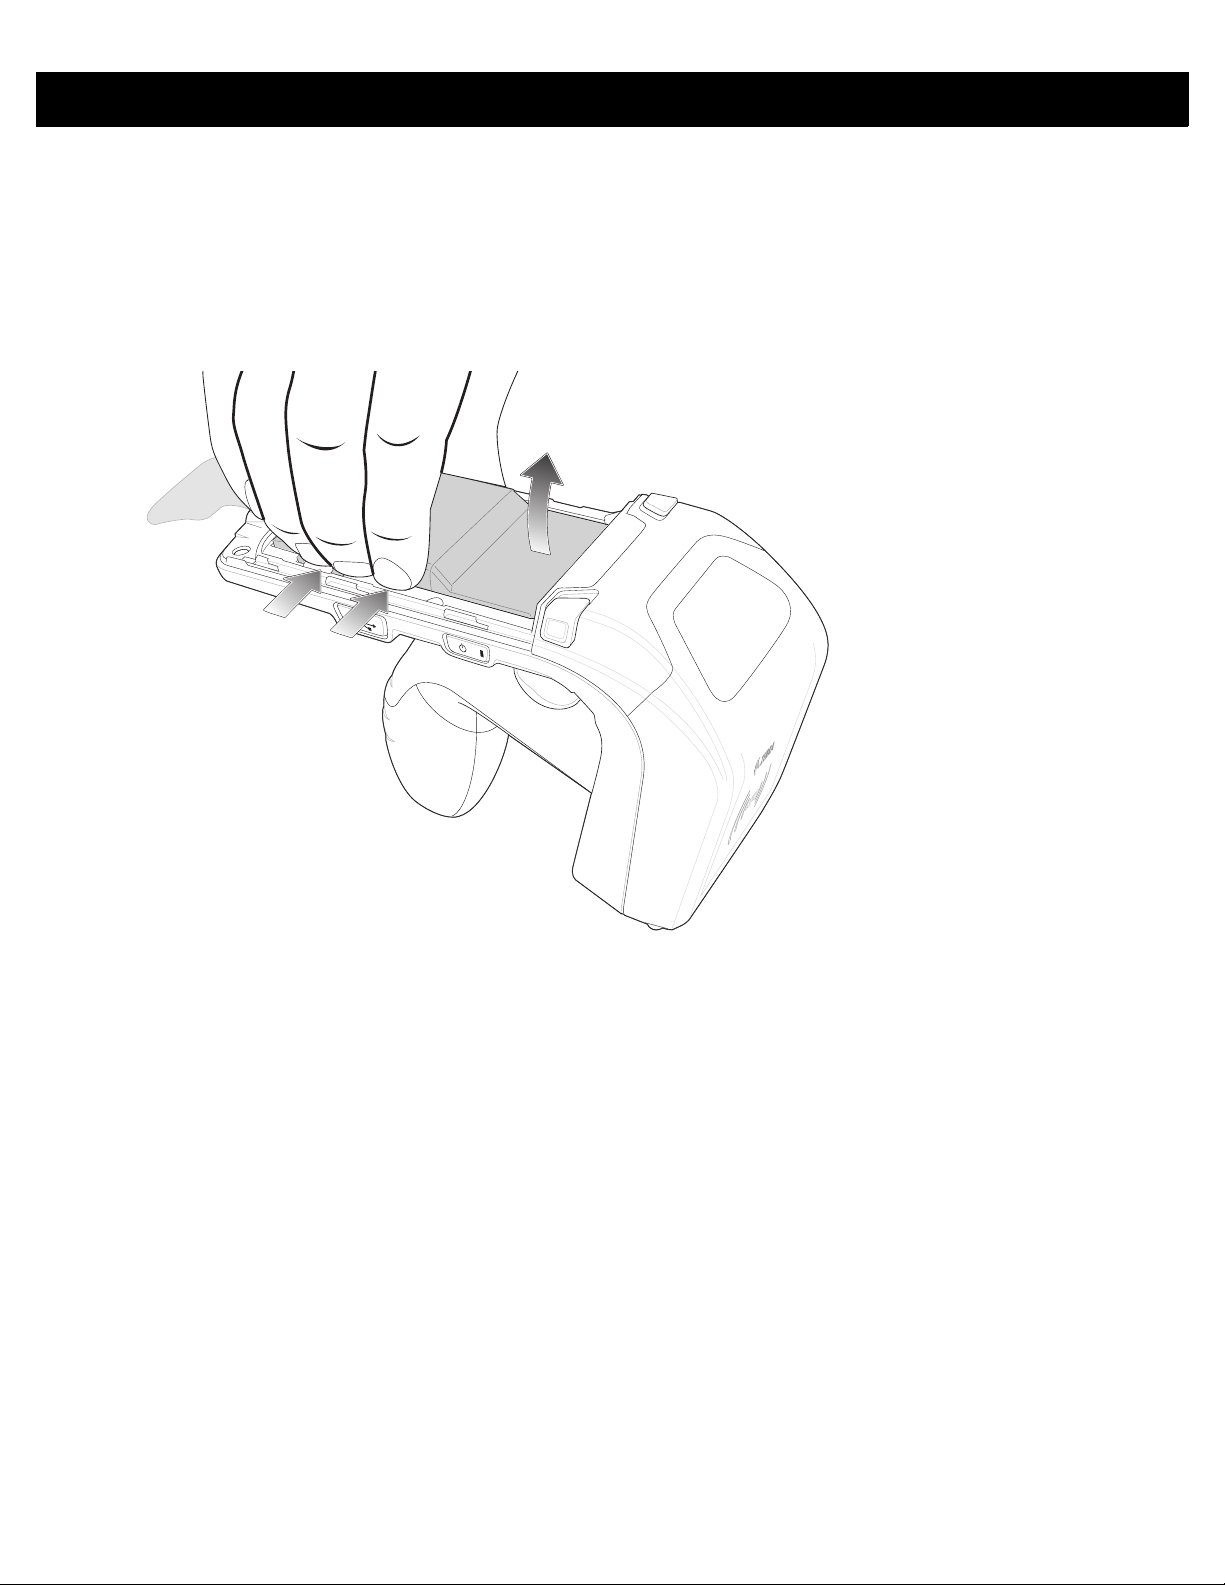
Removing the Battery
To remove the battery:
1. If powered on, press the Power button to power off the RFD8500i.
2. Remove the battery cover as shown in Figure 1-2 on page 1-4
3. Use your fingers to press the battery down.
.
Figure 1-5
4. Rotate the battery out of the compartment.
5. Replace the battery cover as shown in Figure 1-4 on page 1-5
6. The RFD8500i automatically powers on when the battery is in place.
Removing the Battery
.

Inserting the TC55 on the RFD8500i
To insert the TC55:
1. Insert the top of the TC55 into the front of the mobile computer tray. The tray expands slightly.
GETTING STARTED 1 - 7
Figure 1-6
2. Lower the TC55 into the back of the mobile computer tray. The tray contracts and the mobile computer
locks into place.
Inserting the TC55

1 - 8 RFD8500i User Guide
Charging
Before using the RFD8500i for the first time, charge the battery until the LED Power/Charging Indicator turns
solid green. To charge the RFD8500i, use the Micro USB cable, cup charger, or cradles. The One Slot and
Four Slot Charge Only cradles can be used to charge any combination of devices including the RFD8500i and
TC55.
Charging the Battery in the Reader
CAUTION Ensure that you follow the guidelines for battery safety described in Battery Management on page 1-9.
The Micro USB port on the RFD8500 is not intended for charging. The Micro USB port is for data
transfer and firmware upgrading only. For daily charging, use the cable cup or charging cradles.
Figure 1-7
Charging Accessories - AC Charge Cable and USB Cable.
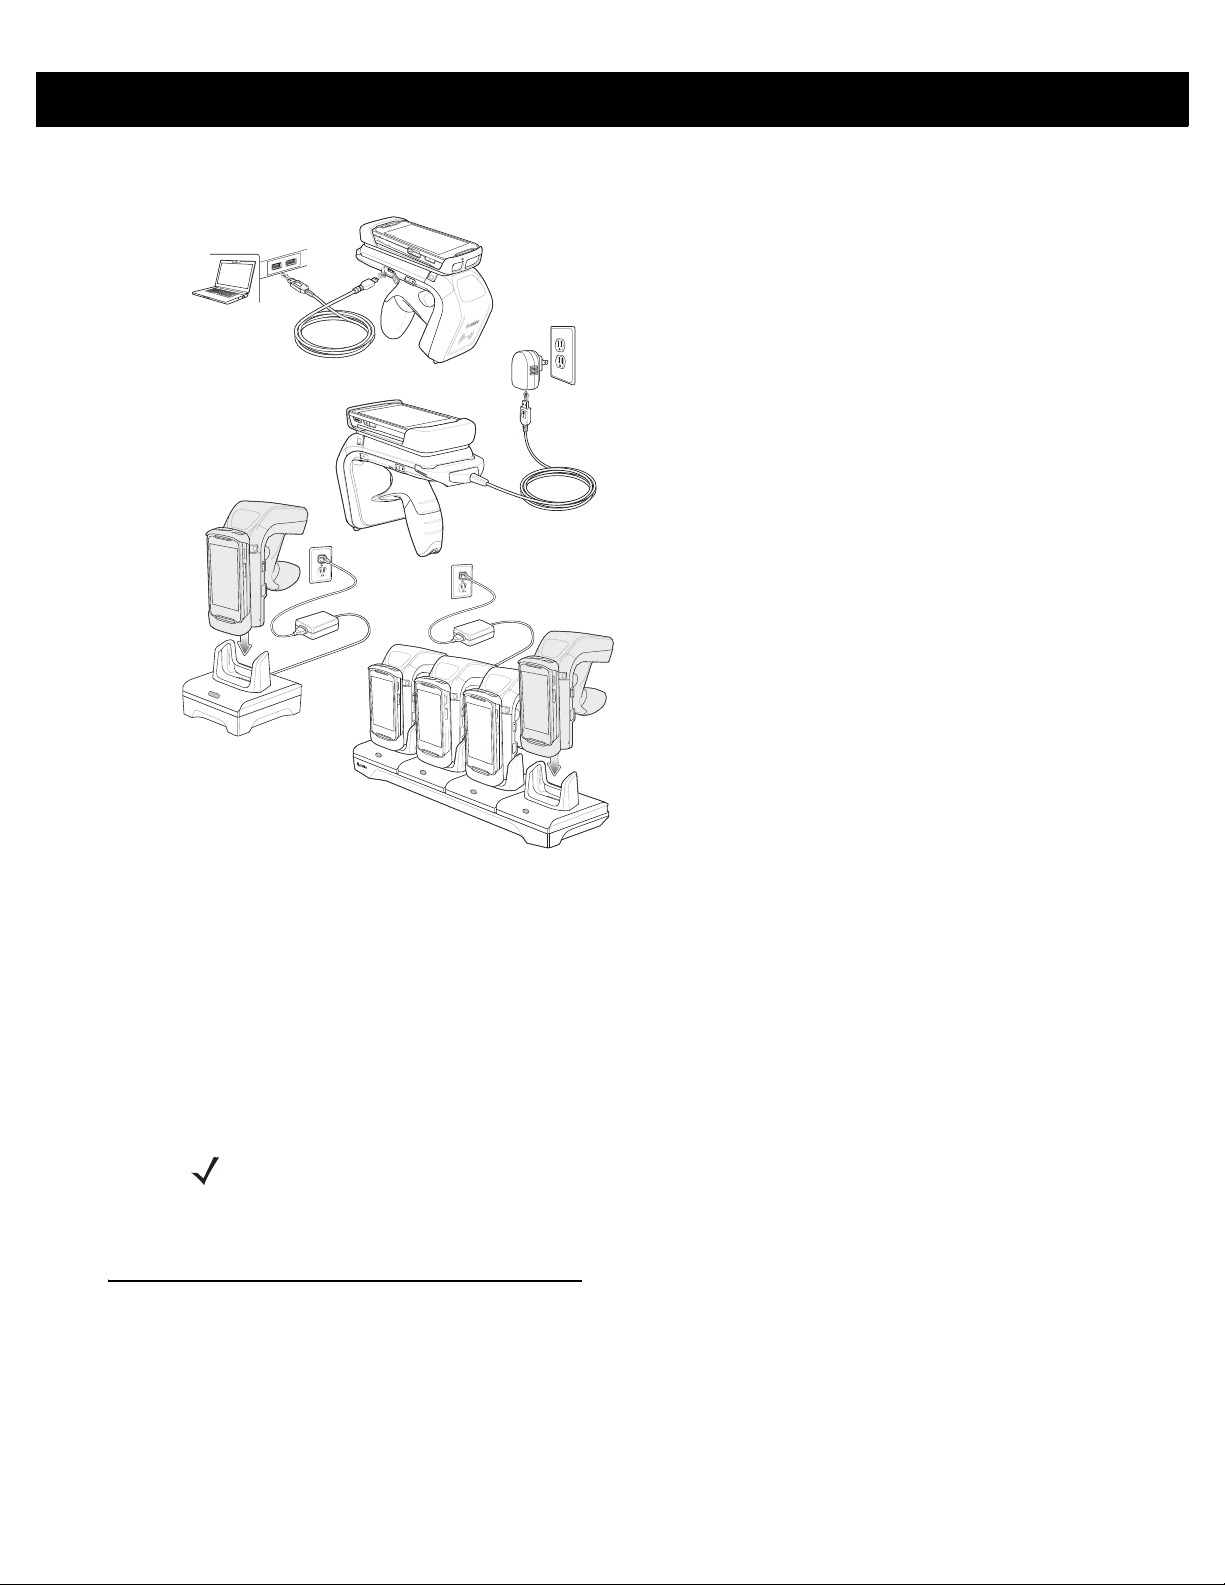
GETTING STARTED 1 - 9
Figure 1-8
Charging Accessories - AC Charge Cable, USB Cable, One Slot Cradle, and Four Slot Cradle
Charging the Mobile Device Battery
Follow the instructions in the mobile device User Guide for charging the battery in the mobile device.
Charging Temperature
Charge batteries in temperatures from 0° C to 40° C (32° F to 104° F). The RFD85 00i indicates when charging
is disabled due to abnormal temperatures via its power LED.
NOTE For safety reasons, ensure that the battery cover is properly installed.
When the battery is properly installed, the reader powers on and the power LED turns solid green.
Battery Management
Prior to checking the battery charge level, remove the RFD8500i from any AC power source (cradle or cable).
To check the charge status of the main battery, the RFD8500i should be connected to the mobile computer
over Bluetooth. When connected, run the appropriate Zebra RFID Mobile application and select Settings >
Battery Status.
Battery status indicates that the battery is discharging and the battery level indicates the battery charge (as a
percentage of fully charged). If using the partner application. refer to the partner application documentation.

1 - 10 RFD8500i User Guide
Low Battery Notification
When the reader has 20% battery remaining, the power LED becomes solid amber. No beeps sound
When the battery State of Charge (SOC) is equal or less than 10%, the powe r LED is solid red and shor t beep
sounds repeat ONLY when the device is NOT connected to a charger AND when the unit is active (not in low
power mode, or off mode).
When the reader has 5% battery remaining, the reader sounds high, medium, low beeps before automatically
powering off.
Battery Optimization
The RFD8500i supports intelligent performance and battery optimizations for your application needs. An API is
available to enable this setting. For more information refer to the RFD8500 RFID Developer Guide, p/n
MN002222AXX.
 Loading...