

Page 1

RFD8500i
USER GUIDE
Page 2

Page 3

RFD8500i
USER GUIDE
MN-002761-02
Revision A
November 2019
Page 4

ii RFD8500i User Guide
No part of this publication may be reproduced or used in any form, or by any electrical or mechanical means,
without permission in writing from Zebra. This includes electronic or mechanical means, such as photo copying,
recording, or information storage and retrieval systems. The material in this manual is subject to change
without notice.
The software is provided strictly on an “as is” basis. All software, including firmware, furnished to the user is on
a licensed basis. Zebra grants to the user a non-transferable and non-exclusive license to use each software
or firmware program delivered hereunder (licensed program) . Except as n oted below, such licen se may not b e
assigned, sublicensed, or otherwise tran sfe rr e d by th e user without prior written consent of Zebra. No right to
copy a licensed program in whole or in part is granted, except as permitted under copyright law. The user shall
not modify , merge, or incorporate any for m or portion of a licensed program with other pro gram material, create
a derivative work from a licensed program , or us e a li censed program in a network without written permission
from Zebra. The user agrees to maintain Zebra’s copyright notice on the licensed programs delivered
hereunder , and to include the same on any au thorized copies it m akes, in whole or in part. The user agrees not
to decompile, disassemble, decode, or reverse engineer any licensed program delivered to the user or any
portion thereof.
Zebra reserves the right to make changes to any software or product to improve reliability, function, or design.
Zebra does not assume any product liability arising out of, or in connection with, the application or use of any
product, circuit, or application described herein.
No license is granted, either expressly or by implication, estoppel, or otherwise under any Zebra Technologies
Corporation, intellectual property rights. An implied license only exists for equipment, circuits, and su bsystems
contained in Zebra products.
Warranty
For the complete Zebra hardware product warranty statement, go to:
http://www.zebra.com/warranty
Revision History
Changes to the original manual are listed below:
Change Date Description
-01 Rev A 9/2016 Initial Release
-02 Rev A 11/2019 Added cautionary statement to “Charging the Battery in the Reader” on page 8.
.
Page 5

TABLE OF CONTENTS
Warranty ......................................................................................................................................... ii
Revision History.............................................................................................................................. ii
About This Guide
Introduction..................................................................................................................................... v
Related Documents ........................................................................................................................ v
Configurations................................................................................................................................. vi
Chapter Descriptions ...................................................................................................................... vii
Notational Conventions................................................................................................................... vii
Service Information......................................................................................................................... viii
Chapter 1: GETTING STARTED
Introduction .................................................................................................................................... 1-1
Unpacking ...................................................................................................................................... 1-1
RFD8500i Features ........................................................................................................................ 1-2
Setting Up the RFD8500i ............................................................................................................... 1-4
Installing the Battery ................................................................................................................ 1-4
Removing the Battery .............................................................................................................. 1-6
Inserting the TC55 on the RFD8500i ............................................................................................. 1-7
Charging ........................................................................................................................................ 1-8
Charging the Battery in the Reader ......................................................................................... 1-8
Charging the Mobile Device Battery ........................................................................................ 1-9
Charging Temperature ............................................................................................................. 1-9
Battery Management ...................................................................................................................... 1-9
Low Battery Notification ........................................................................................................... 1-10
Battery Optimization ................................................................................................................. 1-10
Downloading Application Software ................................................................................................ 1-11
Zebra RFID Mobile Application for Android ............................................................................. 1-11
Requirements ..................................................................................................................... 1-11
Installing the Software ........................................................................................................ 1-11
Chapter 2: USING the RFD8500i
Introduction .................................................................................................................................... 2-1
Using the Features on the RFD8500i ............................................................................................ 2-1
Page 6

iv RFD8500i User Guide
Using Buttons and the Scan Trigger ........................................................................................ 2-1
LED and Beeper Indicators ...................................................................................................... 2-2
Near Field Communication (NFC) Based BT Connection ............................................................. 2-3
General NFC Application Implementation ................................................................................ 2-3
Pairing With the TC55 Using NFC ........................................................................................... 2-4
Using the Locate Device Bar Code .................................................................................... 2-4
Reading Tags ................................................................................................................................ 2-5
Transferring Data ........................................................................................................................... 2-5
Transferring Data in Batch Mode ............................................................................................. 2-5
Transferring Data via Bluetooth ............................................................................................... 2-5
Chapter 3: ZEBRA RFID MOBILE APPLICATION for ANDROID
Introduction .................................................................................................................................... 3-1
Using the Zebra RFID Mobile Application for Android ................................................................... 3-1
Pairing ...................................................................................................................................... 3-2
Pairing/Connection Scenarios ............................................................................................ 3-2
Demo Application Status Upon Connection ............................................................................. 3-6
Disconnecting .......................................................................................................................... 3-6
Demo Application Screens ....................................................................................................... 3-7
Home Screen ..................................................................................................................... 3-7
Rapid Read ........................................................................................................................ 3-8
Inventory ............................................................................................................................ 3-9
Locate Tag ................................................................................................................. ........ 3-11
Settings .............................................................................................................................. 3-12
Access Control ................................................................................................................... 3-24
Pre Filters ........................................................................................................................... 3-25
About .................................................................................................................................. 3-26
Chapter 4: 123SCAN
Introduction .................................................................................................................................... 4-1
Communication with 123Scan ....................................................................................................... 4-1
123Scan Requirements ................................................................................................................. 4-1
Appendix A: TROUBLESHOOTING, TECHNICAL SPECIFICATIONS and MAINTENANCE
Introduction .................................................................................................................................... A-1
Troubleshooting ............................................................................................................................. A-1
Technical Specifications ................................................................................................................ A-2
Cleaning ......................................................................................................................................... A-2
Approved Cleanser Active Ingredients ..................................................................................... A-2
Harmful Ingredients .................................................................................................................. A-2
Cleaning Instructions ............................................................................................................... A-3
Special Cleaning Notes ............................................................................................................ A-3
Materials Required ........................................................................................................... ........ A-3
Cleaning Charge Connectors ................................................................................................... A-3
Cleaning Frequency ................................................................................................................. A-4
Maintenance .................................................................................................................................. A-4
RFD8500i ................................................................................................................................. A-4
Battery ...................................................................................................................................... A-4
Index
Page 7

ABOUT THIS GUIDE
Introduction
The RFD8500i reader provides Radio Frequency Identification (RFID) capabilities and is purpose-built to work with
TC55 mobile computer. The unit can be used stand alone, or paired with a TC55 via NFC or Bluetooth®.
This guide provides information on using the RFD 85 0 0i an d its ac ces so rie s.
NOTES Some screens or windows shown in this guide may differ from the actual screens shown on the device.
This guide refers to screens and features from the Zebra RFID Mobile application. Refer to the
corresponding feature in the partner application you are using.
Related Documents
•
RFD8500 RFID Developer Guide, p/n MN002222AXX.
•
RFD8500i Quick Start Guide, p/n MN-002760-XX.
•
RFD8500i Regulatory Guide, p/n MN-002856-XX.
•
CRD1S-RFD8500 (1-Slot), CRDUNIV-RFD8500-1R (3-Slot), CRD4S-RFD8500 (4-Slot), Universal Charge
Only Cradles Regulatory Guide, p/n MN002224AXX.
•
TC55 User Guide, p/n MN000015AXX.
Page 8

vi RFD8500i User Guide
Configurations
Table ii-1
RFD8500-1500100-US BT sled, US
RFD8500-1500100-EU BT sled, EU
RFD8500-1500100-JP BT sled, Japan
RFD8500-1500100-IL BT sled, Israel
RFD8500-1500100-IN BT sled, India
Table ii-2
Power Supply for 1-slot cradle PWRS-14000-148R
Power Supply for 4-slot cradle PWRS-14000-241R
DC Line Cord for power supply 241R 50-16002-029R
AC Line Cord for power supply 148R and 241R: US 23844-00-00R
AC Line Cord for power supply 148R and 241R: Australia, China, New Guinea 50-16000-217R
RFD8500i
Configuration Description
Cradle Accessories
Item Part Number
AC Line Cord for power supply 148R and 241R: Japan 50-16000-218R
AC Line Cord for power supply 148R and 241R: Hong Kong, Iraq, Malaysia,
Singapore, United Kingdom
AC Line Cord for power supply 148R and 241R: Europe, Abu Dhabi, Bolivia, Dubai,
Egypt, Iran, Korea, Russia, Vietnam.
AC Line Cord for power supply 148R and 241R: United States 50-16000-221R
AC Line Cord for power supply 148R and 241R: Korea. 50-16000-256R
AC Line Cord for power supply 148R and 241R: China 50-16000-257R
AC Line Cord for power supply 148R and 241R: India 50-16000-669R
AC Line Cord for power supply 148R and 241R: Italy 50-16000-671R
AC Line Cord for power supply 148R and 241R: Israel 50-16000-672R
4-way DC Cable for 4-slot cradle (optional) 25-85992-01R
2-way DC Cable 4-slot cradle (optional) 25-122026-02R
50-16000-219R
50-16000-220R
Page 9

Chapter Descriptions
This guide includes the following topics:
•
Chapter 1, GETTING ST AR TED provides an overview of RFD8500i physical features, device illustrations
and the how to get the Zebra RFID Mobile application.
•
Chapter 2, USING the RFD8500i describes the basic operations of RFD8 500i including device beh avior,
Bluetooth pairing and RFID features.
•
Chapter 3, ZEBRA RFID MOBILE APPLICA TION for ANDROID details the features of the Zebra RFID
Mobile application for Android.
•
Chapter 4, 123SCAN includes an overview of the 123Scan utility.
•
Appendix A, TROUBLESHOOTING, TECHNICAL SPECIFICATIONS and MAINTENANCE includes
RFD8500i specifications, and information about troubleshooting and maintaining the reader.
Notational Conventions
About This Guide vii
This document uses the following conventions:
•
Italics are used to highlight chapters, screen names, fields, and sections in this and related documents.
•
bullets (•) indicate:
• Action items
• Lists of alternatives
• Lists of required steps that are not necessarily sequential
•
Sequential lists (e.g., those that describe step-by-step procedures) appear as numbered lists.
NOTE This symbol indicates something of special interest or importance to the reader. Failure to read the note
will not result in physical harm to the reader, equipment or data.
CAUTION This symbol indicates that if this information is ignored, the possibility of data or material damage may
occur.
WARNING! This symbol indicates that if this information is ignored the possibility that serious personal
injury may occur.
Page 10

viii RFD8500i User Guide
Service Information
If you have a problem using the equipment, contact your facility's technical or systems support. If there is a
problem with the equipment, they will contact the Zebra Technologies Global Customer Support Center at:
http://www.zebra.com/support
When contacting Zebra support, please have the following information available:
•
Product name
•
Version number
•
Serial number
Zebra responds to calls by e-mail, telephone or fax within the time limits set forth in support agreements.
If your problem cannot be solved by Zebra support, you may need to return your equipment for servicing and
will be given specific directions. Zebra is not responsible for any damages incurred during shipment if the
approved shipping container is not used. Shipping the un its improperly can possibly void the warranty.
If you purchased your business product from a Zebra business partner, contact that business partner for
support.
.
Page 11

Chapter 1 GETTING STARTED
Introduction
This chapter provides the features of the RFD8 50 0i and explains how to set it up for the first time.
Unpacking
Carefully remove all protective material from the RFD8500i and save the shipping container for later storage
and shipping. Verify the following items are in the box:
•
RFD8500i
•
4410 mAh Lithium-ion battery
•
Micro USB cable
•
Quick Start Guide (not included in Beta package)
•
Regulatory Guide (not included in Beta package).
Inspect the equipment for damage. If any equipment is missing or damaged, con tact the Zebra Support Ce nter
immediately. See Service Information on page viii for contact information.
Page 12
1 - 2 RFD8500i User Guide
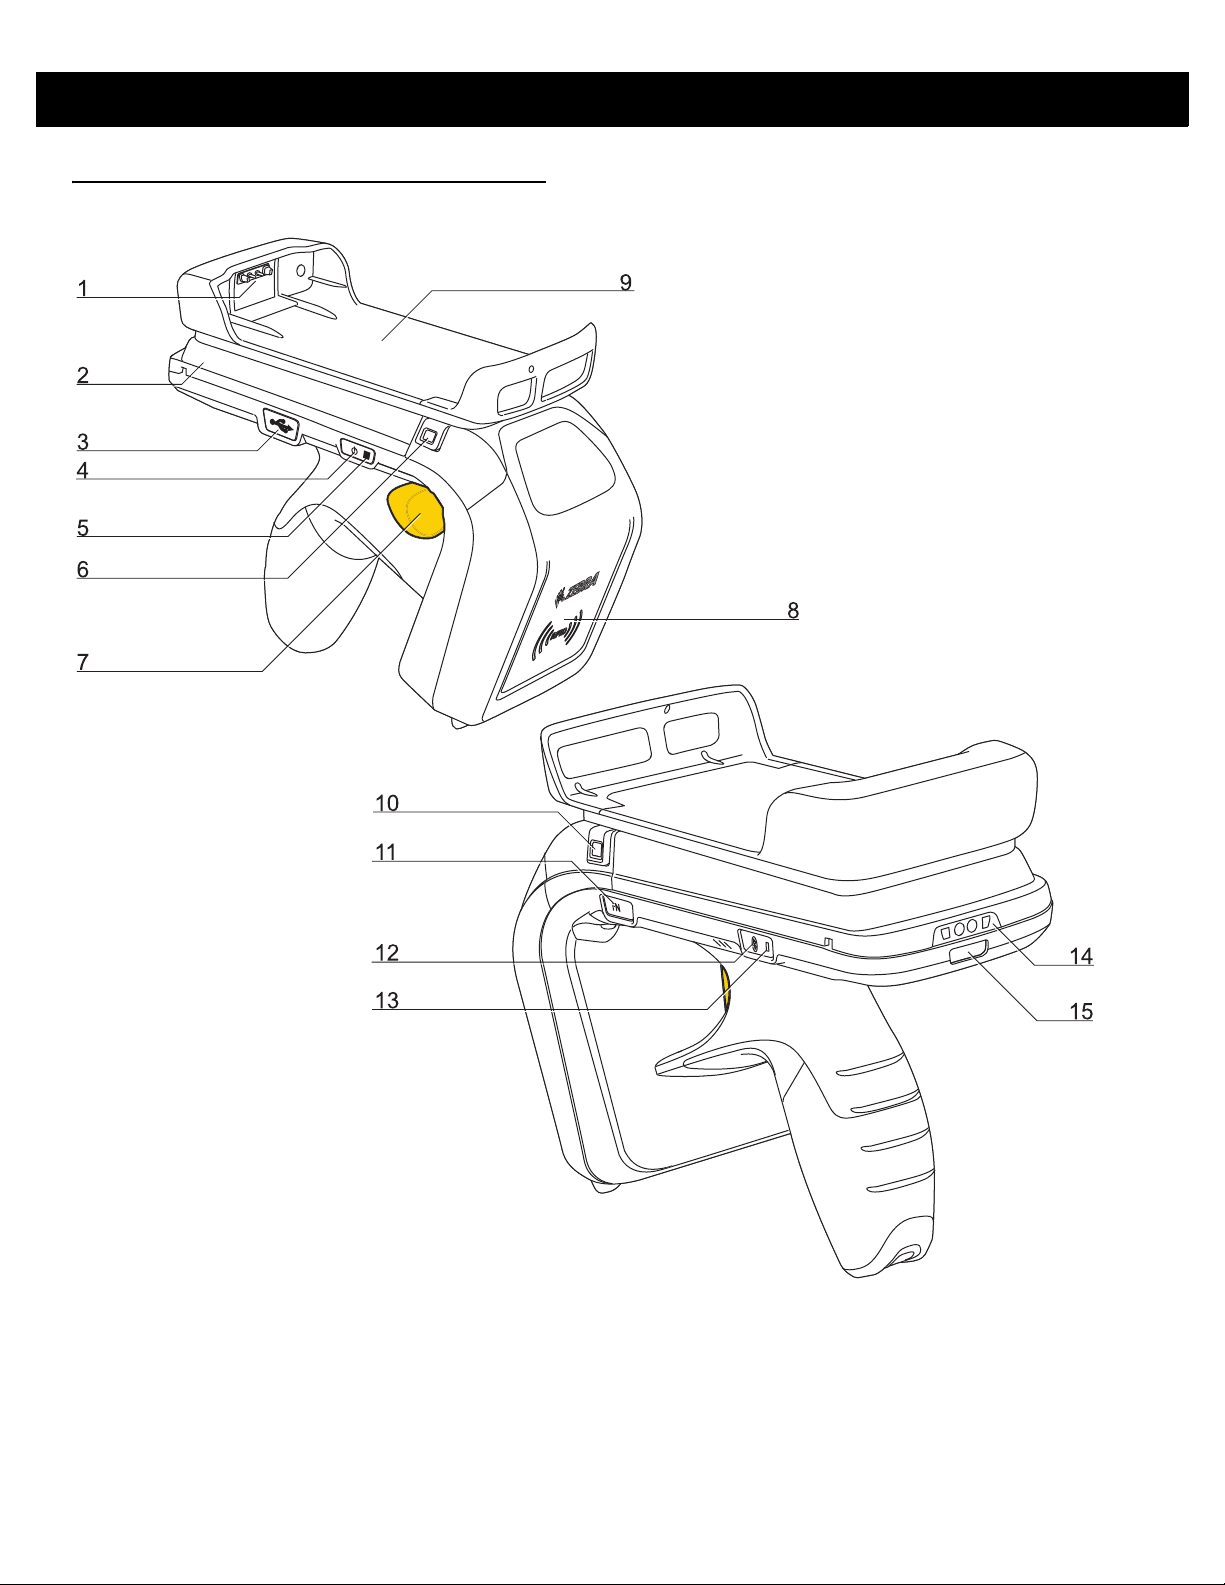
RFD8500i Features
Figure 1-1
Features of the RFD8500i
Page 13

GETTING STARTED 1 - 3
See Trigger and Button Operations on page 2-1 for more information about using the features.
Table 1-1
Number Item Description
Feature Descriptions
1 Mobile Computer Contacts Connects the mobile computer to the
RFD8500i to charge the mobile computer in
the charging accessory.
2 Battery Cover/Compartment Battery cover for the RFD8500i battery.
3 USB Port/Cover USB port.
4 Power Button Turns the RFD8500i on and off.
5 Power/Charging Indicator Reflects the power state of the RFD8500i. See
LED and Beeper Indicators on page 2-2
indicator descriptions.
6 Battery Cover Release Button Depress buttons (items 6 and 10) to remove
the battery cover.
7 Trigger Press to read tags.
8 RFID Antenna Compartment Houses RFID antenna.
9 Mobile Computer Tray Tray holds/secures the TC55 mobile computer.
10 Battery Cover Release Button Depress buttons (items 6 and 10) to remove
the battery cover.
for
11 Function Button This button should be used by System
Administrators only. It halts the boot process
when pressed in conjunction with the
button. Halting the boot process allows the
system engineer to recover devices with an
improper firmware image (i.e, devices that
cannot boot up).
Press
Mode
and
Bluetooth
simultaneously for three seconds to perform a
soft reset.
12 Bluetooth Button Turns Bluetooth on and off, and enables
discover mode.
13 Bluetooth Indicator Indicates the Bluetooth status.
14 Charging Contacts Connects to a charging accessory.
15 Operation Indicator
buttons
Power
Page 14
1 - 4 RFD8500i User Guide
1
2
Setting Up the RFD8500i
To start using the RFD8500i for the first time with the TC55:
•
Install the battery.
•
Charge the RFD8500i.
•
Power on the RFD8500i.
•
Pair the RFD8500i to the TC55 via Bluetooth or NFC.
•
Install the Andro id Demo Application, or the partner application.
•
Set the region and power level (using the Demo Application, or the partner application).
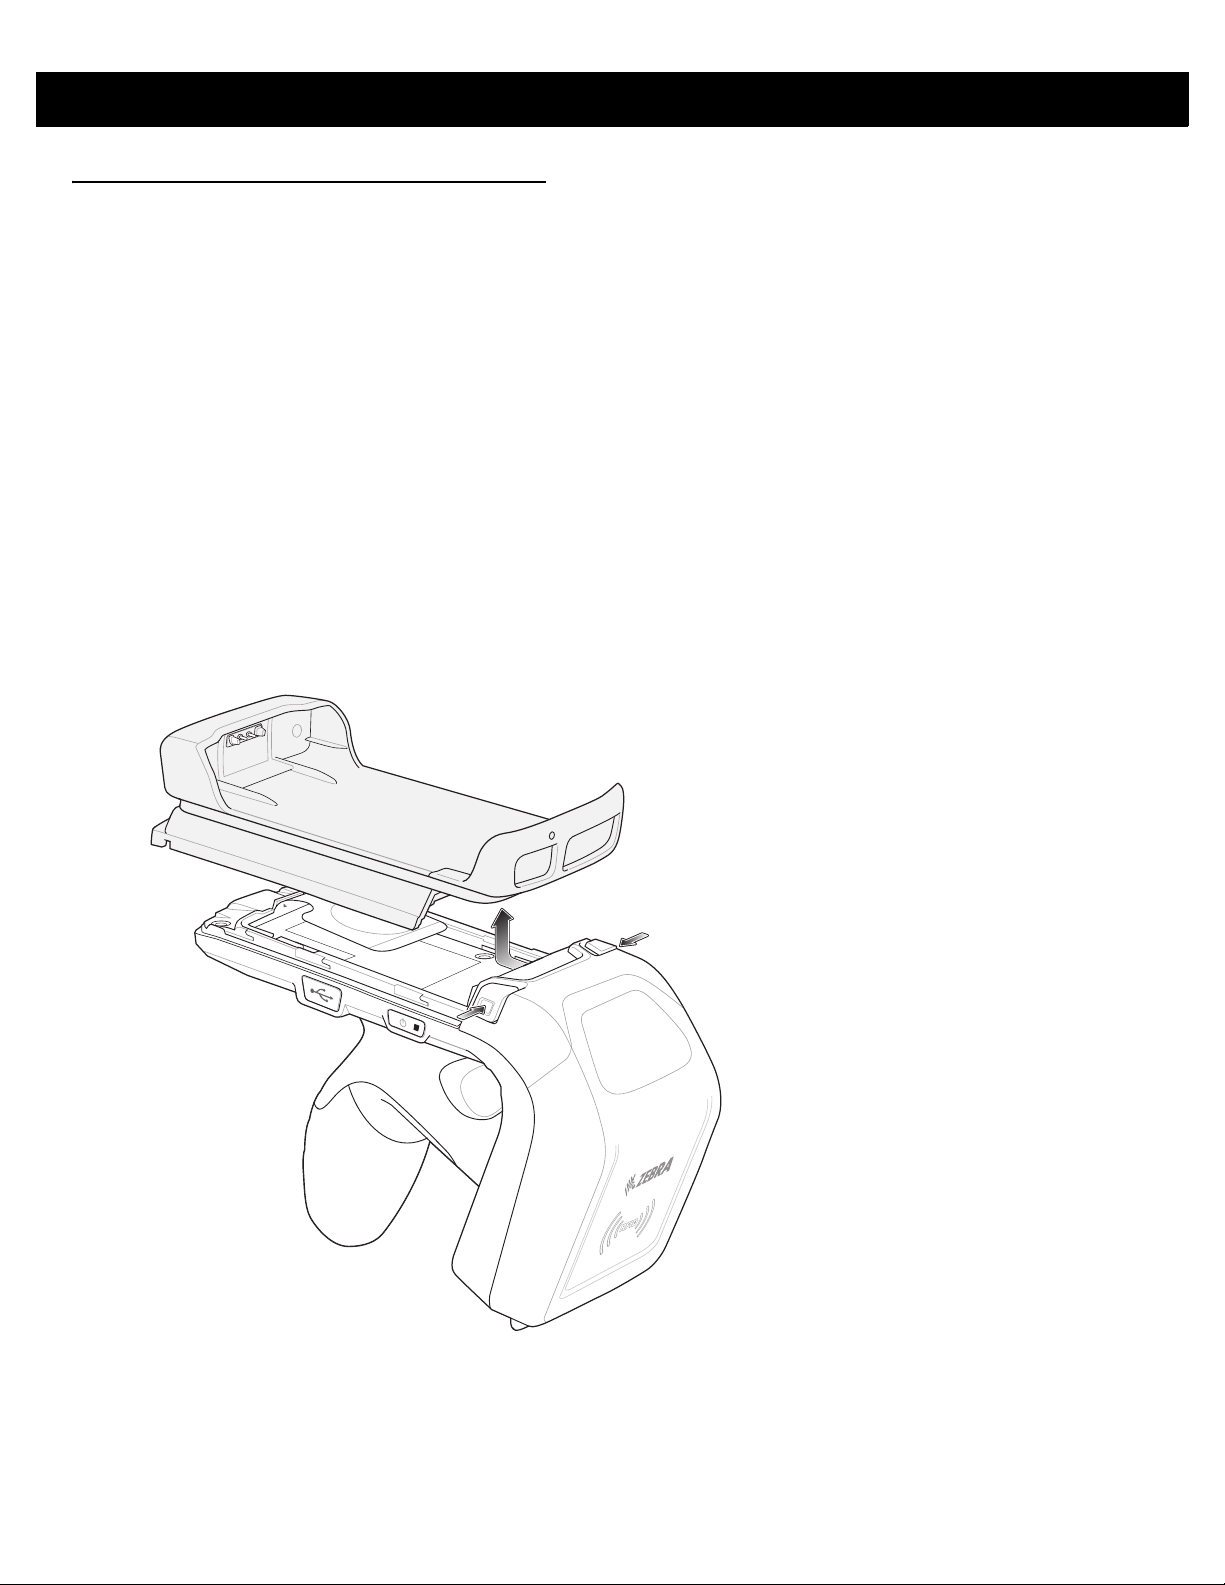
Installing the Battery
To install the battery:
1. Depress both battery cover release buttons.
2. Slide back, and remove battery cover.
Figure 1-2
Removing the Battery Cover
Page 15
GETTING STARTED 1 - 5
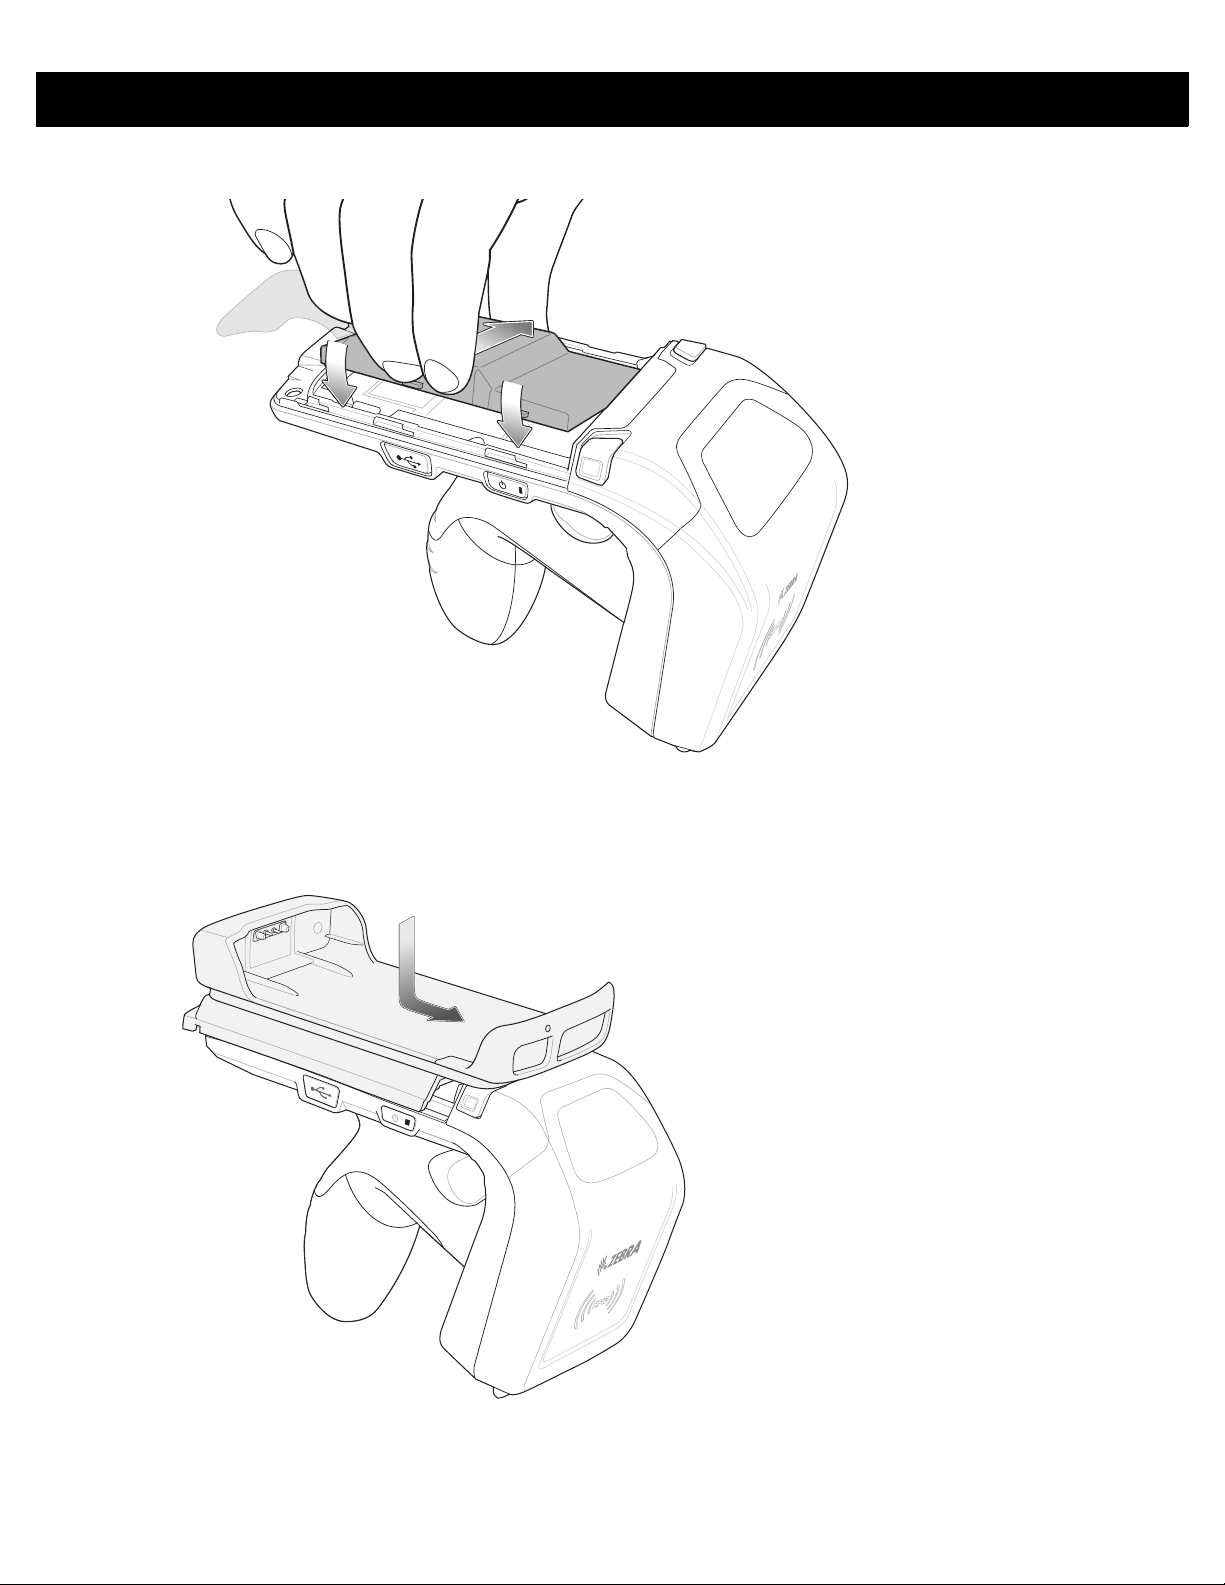
1
2
3. Align the three tabs on the bottom of the battery (Figure 5) with the three slots in the battery compartment.
Figure 1-3
4. Press the battery down and rotate until it locks into place.
5.
Replace the battery cover by lowering the cover over the battery and sliding it forward until it locks in place.
Inserting the Battery
Figure 1-4
6. The RFD8500i automatically powers on when the battery is in place.
Replacing the Battery Cover
Page 16
1 - 6 RFD8500i User Guide
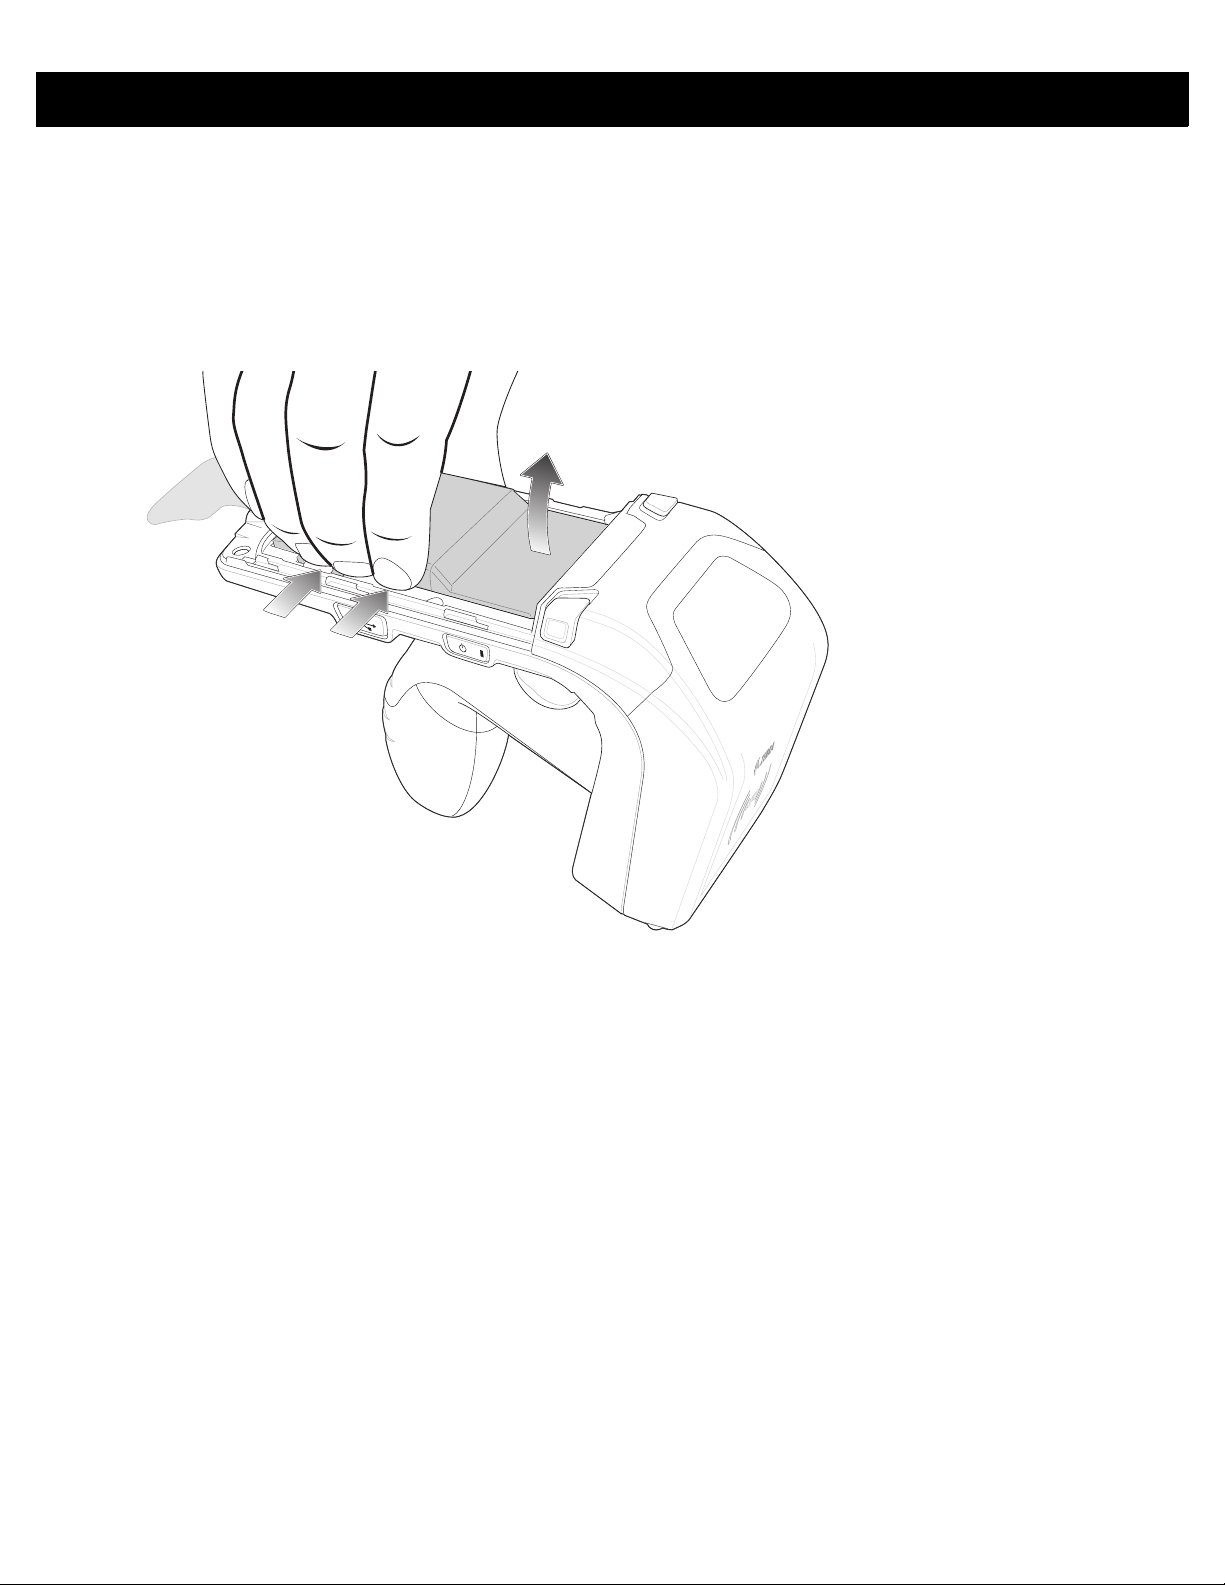
1
2
Removing the Battery
To remove the battery:
1. If powered on, press the Power button to power off the RFD8500i.
2. Remove the battery cover as shown in Figure 1-2 on page 1-4
3. Use your fingers to press the battery down.
.
Figure 1-5
4. Rotate the battery out of the compartment.
5. Replace the battery cover as shown in Figure 1-4 on page 1-5
6. The RFD8500i automatically powers on when the battery is in place.
Removing the Battery
.
Page 17

Inserting the TC55 on the RFD8500i
To insert the TC55:
1. Insert the top of the TC55 into the front of the mobile computer tray. The tray expands slightly.
GETTING STARTED 1 - 7
Figure 1-6
2. Lower the TC55 into the back of the mobile computer tray. The tray contracts and the mobile computer
locks into place.
Inserting the TC55
Page 18

1 - 8 RFD8500i User Guide
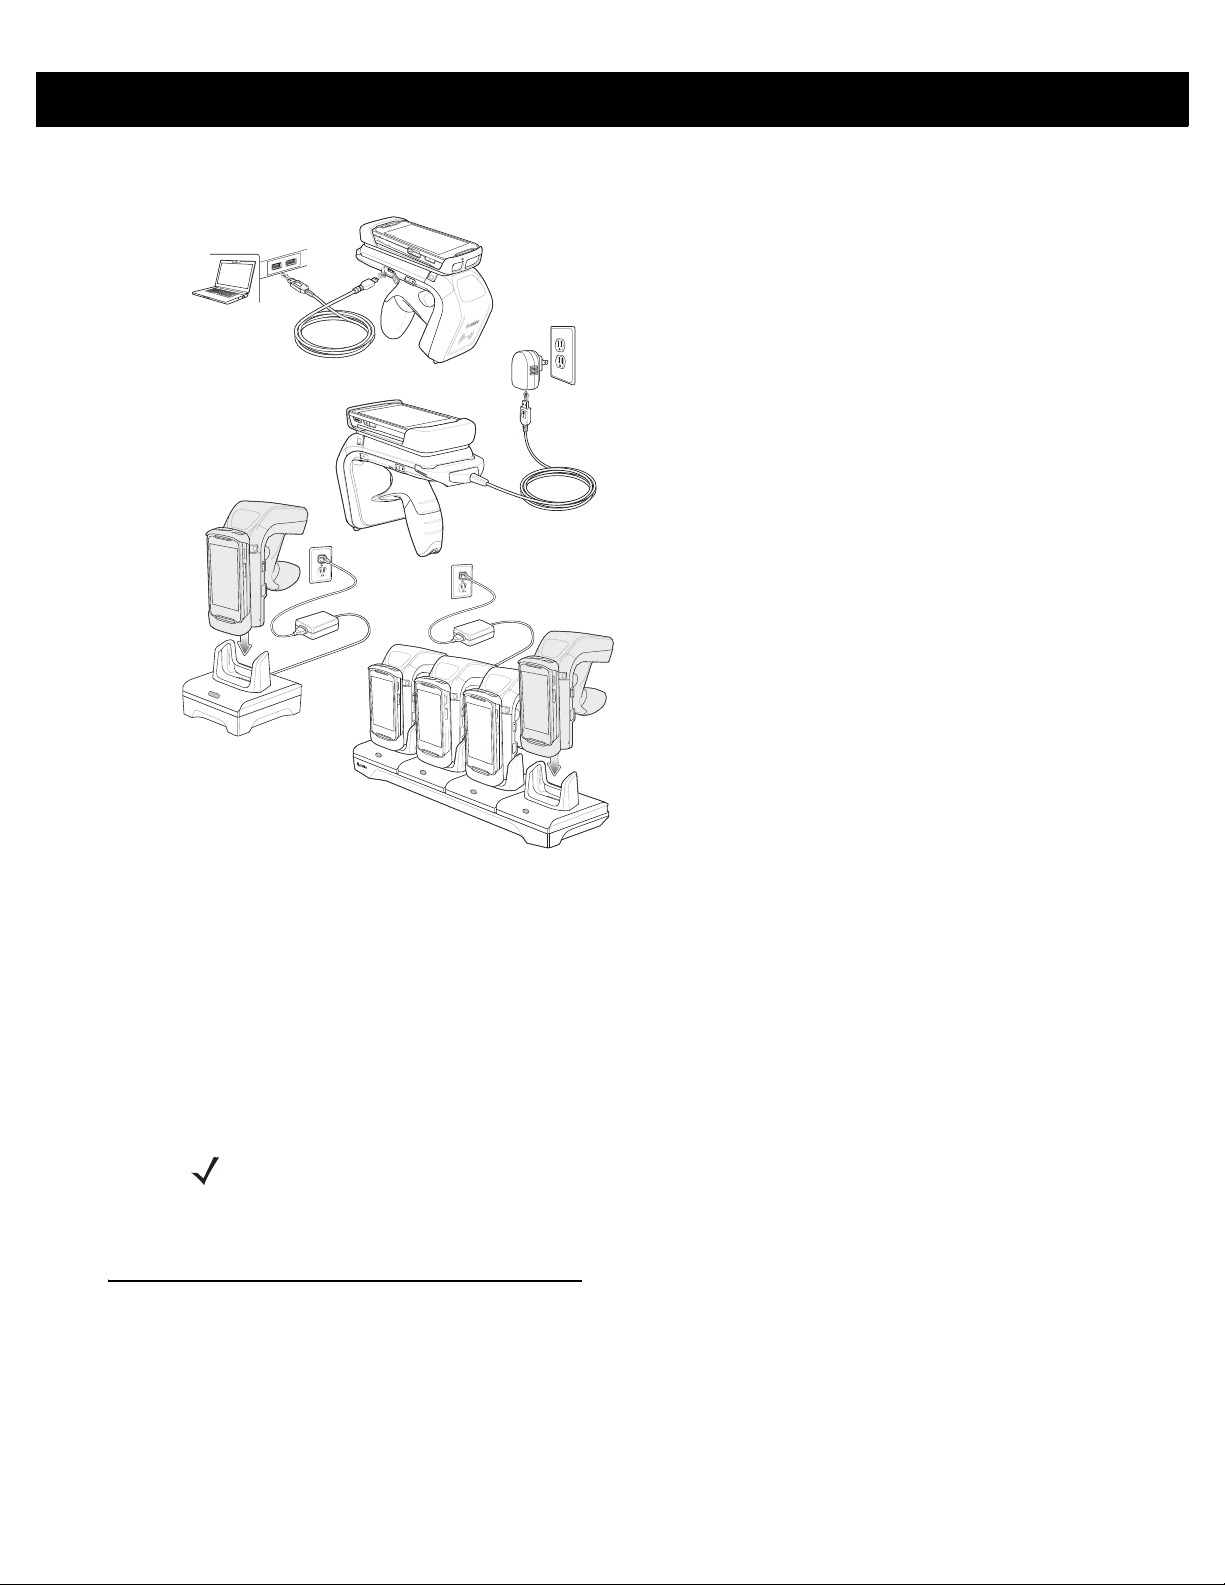
Charging
Before using the RFD8500i for the first time, charge the battery until the LED Power/Charging Indicator turns
solid green. To charge the RFD8500i, use the Micro USB cable, cup charger, or cradles. The One Slot and
Four Slot Charge Only cradles can be used to charge any combination of devices including the RFD8500i and
TC55.
Charging the Battery in the Reader
CAUTION Ensure that you follow the guidelines for battery safety described in Battery Management on page 1-9.
The Micro USB port on the RFD8500 is not intended for charging. The Micro USB port is for data
transfer and firmware upgrading only. For daily charging, use the cable cup or charging cradles.
Figure 1-7
Charging Accessories - AC Charge Cable and USB Cable.
Page 19
GETTING STARTED 1 - 9
Figure 1-8
Charging Accessories - AC Charge Cable, USB Cable, One Slot Cradle, and Four Slot Cradle
Charging the Mobile Device Battery
Follow the instructions in the mobile device User Guide for charging the battery in the mobile device.
Charging Temperature
Charge batteries in temperatures from 0° C to 40° C (32° F to 104° F). The RFD85 00i indicates when charging
is disabled due to abnormal temperatures via its power LED.
NOTE For safety reasons, ensure that the battery cover is properly installed.
When the battery is properly installed, the reader powers on and the power LED turns solid green.
Battery Management
Prior to checking the battery charge level, remove the RFD8500i from any AC power source (cradle or cable).
To check the charge status of the main battery, the RFD8500i should be connected to the mobile computer
over Bluetooth. When connected, run the appropriate Zebra RFID Mobile application and select Settings >
Battery Status.
Battery status indicates that the battery is discharging and the battery level indicates the battery charge (as a
percentage of fully charged). If using the partner application. refer to the partner application documentation.
Page 20

1 - 10 RFD8500i User Guide
Low Battery Notification
When the reader has 20% battery remaining, the power LED becomes solid amber. No beeps sound
When the battery State of Charge (SOC) is equal or less than 10%, the powe r LED is solid red and shor t beep
sounds repeat ONLY when the device is NOT connected to a charger AND when the unit is active (not in low
power mode, or off mode).
When the reader has 5% battery remaining, the reader sounds high, medium, low beeps before automatically
powering off.
Battery Optimization
The RFD8500i supports intelligent performance and battery optimizations for your application needs. An API is
available to enable this setting. For more information refer to the RFD8500 RFID Developer Guide, p/n
MN002222AXX.
Page 21

Downloading Application Software
Zebra RFID Mobile Application for Android
Requirements
•
The recommended Android version on the mobile computer is Kit Kat version 4.4.x.
•
Zebra Enterprise mobile computer - TC55.
Installing the Software
Install the Zebra RFID Mobile application for Android (or partner application) on the mobile computer from the
Zebra website. The procedure to install the software in an Android device depends on the Android version.
To install the software:
1. Connect the An dr oid device to yo ur comp uter. It should be connected as MTP Device and should show as
a drive on your computer.
2. Go to Device Settings > Security and check Unknown Sources to allow installation of applications from
unknown sources.
3. Copy the .apk file to the mobile device.
GETTING STARTED 1 - 11
4. Go to Settings > Security and select Unknown sources.
5. Use File Manager to locate the .apk file in the folder to which you copied it in Step 3., and select it.
6. In the pop-up window, select the Android App installer.
7. The installation begins.
8. Before using the application, pair the Android device using the Android BT Settings (see Pairing With the
TC55 Using NFC on page 2-4). Paring is initiated by the Android device.
Page 22

1 - 12 RFD8500i User Guide
Page 23

Chapter 2 USING the RFD8500i
Introduction
This chapter includes information abou t LED an d be e p er indicators, NFC based Bluetooth connections and
Bluetooth connections.
Using the Features on the RFD8500i
Using Buttons and the Scan Trigger
Table 2-1 shows the function s of the RF D8 50 0 i butt on s an d sca n trigg er.
Table 2-1
Start/Stop RFID Tag Read X n/a
Turn RFD8500i ON/OFF X Hold the
Enable Bluetooth X Hold the
Disconnect Bluetooth X When connected with a mobile device, hold the
Trigger and Button Operations
Option
Scan
Trigger
Power
Button
BT
Button
Comments
Power
button for three seconds to
turn the RFD8500i OFF.
Press the
RFD8500i ON.
turn on Bluetooth discovery. See
the TC55 Using NFC on page 2-4
information.
button for one second to disconnect from the
current device and return it to discovery mode
to connect with another device.
Power
button again to turn the
Bluetooth
button for one second to
Pairing With
for more
Page 24

2 - 2 RFD8500i User Guide
Table 2-1
Turn Off Bluetooth X Hold the button for five seconds to turn off
Soft Reset the RFD8500i X Hold the
Reset Device to Factory
Defaults
Trigger and Button Operations (Continued)
Option
Scan
Trigger
Power
Button
X X Hold the
BT
Button
Comments
Bluetooth.
Function
simultaneously for three seconds, then release
to initiate the reset process.
Power
simultaneously for five seconds, then release
to initiate the factory reset process.
and
and
Bluetooth
Bluetooth
LED and Beeper Indicators
The LED and beeper indicators provide an indication of the operating statuses of the RFD8500i. (See
RFD8500i Features on page 1-2 for the location of indicators.)
Table 2-2
Power State Indicator (Power Button)
Status Indicators
Condition Power LED Beeper
buttons
buttons
Low battery (20%) Solid amber No beep
Lower battery (10%) Solid red Short beep sounds repeated
Suspend Solid red, then turn off High/medium/low
Charging Blinking amber Short beep when charger is
connected
Charged Solid green One beep
Charging error Fast blink red Three beeps
Power on Green if battery charge > 20%
Amber if battery charge is between
10% - 20%
Red if battery charge < 10%
Decode/RFID Read Indicator
Good decode Solid green Short low beep
Transmit error Solid amber for 2 seconds Four beeps for RFID read
Good RFID read Solid green (for each read) Short medium beep
RFID error Amber No beep
Low/medium/high beeps
Other error message Solid red No beep
BT Indicator (BT Button)
BT off Off No beep
Page 25

USING the RFD8500i 2 - 3
Table 2-2
BT on/not connected Slow flash No beep
BT discoverable Medium flash No beep
BT on/pairing in process Fast flash No beep
BT application connected Solid blue Short low high beep
BT out of range Slow flash Short high low beep
Status Indicators (Continued)
Condition Power LED Beeper
Near Field Communication (NFC) Based BT Connection
NFC is a set of communication protocols that enable two electronic devices to establish communication by
bringing them close to each other.
NFC facilitates quick and seamless pairing and connection of the RF8500i with a TC55 using the Bluetooth
address of the reader.
For more details refer to the Bluetooth SIG Bluetooth Secure Simple Pairing Using NFC:
http://members.nfc-forum.org/apps/group_public/download.php/18688/NFCForum-AD-BTSSP_1_1.pdf
See Chapter 3, ZEBRA RFID MOBILE APPLICA TION for ANDROID for Android documentation related to
NFC.
.
General NFC Application Implementation
RFD8500i NFC tags are programmed with application/zeb.bluetooth.ep.oob custom mimety pe but it
is fully Bluetooth format compliant NFC forum type 2 (includes BT device address and friendly name).
The application can define the intent filter in the launcher activity to automatically lau nch whenever an NFC tag
is read by the RFD8500i reader.
<intent-filter>
<action android:name="android.nfc.action.NDEF_DISCOVERED"/>
<category android:name="android.intent.category.DEFAULT"/>
<data android:mimeType="application/zeb.bluetooth.ep.oob"/>
</intent-filter>
Also it can setup a foreground dispatcher to capture all NFC tag read events whenever the application is in the
foreground.
Page 26

2 - 4 RFD8500i User Guide
Pairing With the TC55 Using NFC
Pairing with the RFD8500i is completed from the Android Platform via Settings on the TC55. See Pa iring on
page 3-2 for additional information.
Prior to pairing the RFD8500i with the TC55 ensure the RFD8500i is charged.
IMPORTANT For successful pairing of the RFD8500i to the TC55, the yellow trigger on RFD8500i must be
pressed when the RFD8500i displays in the list of available discoverable devices, and the RFD8500i
Bluetooth LED starts flashing fast. See the step-by-step instructions for pairing.
To pair with the TC55:
1. Power on the TC55.
2. Touch the Settings icon on the mobile device.
3. Turn Bluetooth on.
4. Select More and ensure the check box next to NFC is checked.
5. Insert the TC55 into the Mobile Computer Tray on the RFD8500i.
6. Launch the Zebra RFID Demo app for Android or your app that supports NFC pairing (as specified in the
RFD8500 RFID Developer Guide, p/n MN002222AXX).
7. The application initiates the pairing between TC55 and RFD8500i.
8. Press the RFD8500i trigger to pair when the Bluetooth LED starts flashing fast.
9. The application automatically connects to the RFD8500i and indicates when connection is complete.
NOTE Refer to the TC55 User Guide, p/n MN000015A, for detailed information about the device.
Using the Locate Device Bar Code
The Locate Device bar code appears on the RFD8500i under the ante nna compartment. When you pair
several RFD8500i devices with your TC55 device via Bluetooth, use the serial number represented by the
Locate Device bar code to identify a specific paired RFD8500i. The bar code can also be used for pairing.
Refer to the RFD8500 RFID Developer Guide for details.
Page 27

Reading Tags
To read tags, see the Zebra RFID Mobile App information in Chapter 3, ZEBRA RFID MOBILE APPLICATION
for ANDROID.
USING the RFD8500i 2 - 5
Figure 2-1
Reading Tags
Transferring Data
Transferring Data in Batch Mode
When the RFD8500i is configured to batch data, it is capable of reading RFID tag data without connection to a
host device. It is recommended to stop reading functions before transferring the data via the Bluetooth
interface. The Delay before data transmission in batch mode parameter in the 123Scan RFD8500i plug-in
controls whether or not a delay should be enforced before transferring the data in HID mode. By default, this
parameter is zero. RFID data is not transferred automatically in ZETI mode
application using the gettags ZETI command. For more information, refer to the Zebra RFID Mobile App for
Android and the developer guide.
Transferring Data via Bluetooth
By default, the RFD8500i operates in auto batch mode. In this mode the RFD8500i pushes RFID data after a
read request is issued by the connected application. If the Bluetooth link quality degrades and breaks, the
RFD8500i (in auto batch mode) is capable of moving automatically to batch mode while simultaneously
allowing current RFID operations to be unaffected. If the Bluetooth connection is regained after the RFD8500i
entered batch mode, see Transferring Data in Batch Mode above to offload the data acquired while the unit
was operating in batch mode.
. Instead it has be requested by the
Page 28

2 - 6 RFD8500i User Guide
Page 29

Chapter 3 ZEBRA RFID MOBILE
APPLICATION for ANDROID
Introduction
This chapter describes the Zebra RFID Mobile Application for Android that can be used with the RFD8500i.
When using a partner application, the features/functionality might vary.
This application runs on Android mobile devices and demonstrates RFD8500i capability and tag operation
functionality.
The application allows the user to navigate to all screens whether or not the device is connected to the
RFD8500i reader. The Settings screens display the application defaults when there is no connection to the
reader . Wh en not conn ecte d, an atte mpt to pe rfor m any ope ra tion (Rapid Read, Inventory, Locate tag, Access
Operations, Save Configuration, Battery Status) displays No Active Connection with Reader.
The user can navigate to all screens when the inventory/locate operation is in progress. When the oper ation is
in progress, the device displays Operation in Progress if additional operations are initiated.
Using the Zebra RFID Mobile Application for Android
To use this application for RFID operations:
1. Ensure the Zebra RFID Mobile Application for Android is installed on the Android mobile device.
2. Pair the mobile device with the RFD8500i over Bluetooth (see Pairing With the TC55 Using NFC on page
2-4 and Pairing on page 3-2).
3. Launch the Zebra RFID Mobile Application for Android on the mobile device.
4. Select Settings > Readers List and select the RFD8500i device to connect.
5. Return to the Home screen and select Settings > Antenna. Power Level is set to 27.0 dBm by default.
Japan units are set to a different default power level depending on the SKU type.
6. Before using the device set the region in which the device is operating. To set the region, open the
application and select Settings > Regulatory (see Regulatory on page 3-19).
Page 30

3 - 2 RFD8500i User Guide
Pairing
IMPORTANT Before trying to connect/pair the reader using the NFC feature, the NFC option must be enabled
from the application page and from the Android Settings screen.
Under typical conditions, when the RFD8500i detects an NFC tag, the demo application starts the pairing
process automatically. Press the trigger on the RFD8500i to accept pairing and complete the process. There
may be situations in which other conditions occur and additional user input is required to complete the pairing
process (see Pairing/Connection Scenarios).
Figure 3-1
Automatic Pairing Message
Pairing/Connection Scenarios
The following scenarios describe circumstances that may require user input to pair/connect devices via the
NFC tag.
TC55 Seated in the Mobile Computer Tray on the RFD8500i - Devices Not Paired
1. Launch the demo application manually.
2. When the demo application detects the RFD8500i NFC tag, the application tries to connect with device.
Page 31

ZEBRA RFID MOBILE APPLICATION for ANDROID 3 - 3
3. Press the trigger on RFD8500 to complete connection.
Figure 3-2
Connection Successful
TC55 Not Seated in the Mobile Computer Tray on the RFD8500i - Devices Not Paired
When the demo application runs in the foreground on the TC55, move the RFD8500i into the range of the
Android device. When the demo application detects th e RFD8500i NFC tag it reads the NFC tag and connects
to the RFD8500i. The Connected to... message displays (Figure 3-2).
Page 32

3 - 4 RFD8500i User Guide
RFD8500i and TC55 Paired/Connected - User Attempts to Connect Another TC55
When the RFD8500i is connected to a TC55 and the user attempts to pair/connect another TC55 the dialog
shown in Figure 3-3 displays on the second TC55. Select Yes to disconnect the previously connected TC55
and connect to the new device. A disconnect message displays on the previously connected TC55.
Figure 3-3
Connection Already Exists
Page 33

ZEBRA RFID MOBILE APPLICATION for ANDROID 3 - 5
RFD8500i and TC55 Connected But Retain Bluetooth Connection
When the TC55 is removed from the RFD8500i the user has the option to either retain the Blueto oth
connection or disconnect. Select Yes to retain the connection and select No to disconnect the Bluetooth
connection.
Figure 3-4
Connection Messages
Page 34

3 - 6 RFD8500i User Guide
Battery Status Before Connection to
RFD8500i
Battery Status After Connection to
RFD8500i
Demo Application Status Upon Connection
The user can connect to the RFD8500i from any screen within the demo application. When the connection is
successful, the current screen populates with the values from the RFD8500i. For example, Figure 3-5 shows
the Battery screen before and after connection.
Figure 3-5
Connection Statuses
Disconnecting
When the RFD8500i moves out of the TC55 NFC read field range, the application prompts the user to retain
the Bluetooth connection, or not (see Figure 3-4).
Page 35

ZEBRA RFID MOBILE APPLICATION for ANDROID 3 - 7
Demo Application Screens
Home Screen
To access the Zebra RFID Mobile Application for Android, touch the RFID Reader icon ( ) on the mobile
device to display the Home screen. Touch the RFID Reader icon again to display the RFID Reader Menu.
Touch any menu item to access its screen.
Figure 3-6
Home and Menu Screens
Page 36

3 - 8 RFD8500i User Guide
Start/Stop
Toggle
Power Management Icon
Rapid Read
Touch Rapid Read from the Home or Menu screen.
Figure 3-7
The Rapid Read and Inventory screens display the following data (see Inventory on page 3-9).
•
•
•
•
Rapid Read and Inventory screens are two different views of the inventory operation on the reader. The
start/stop functionality can be used interchangeably on both screens. For examp le, when the user starts the
operation on the Rapid Read screen and navigates to the Inventory screen, the button available on the
Inventory screen is STOP. The same is true when the operation starts on the Inventory screen. During the rapid
read process the user can navigate to the Inventory screen to view tag details along with tag counts for each
tag. The statistics displayed are maintained on the Rapid Read and Inventory screens regar dless of the screen
used to start the process.
Touch START to start the rapid read inventory operation. Touch STOP to stop.
Moving to another screen does not halt the operation. However, attempting to make changes or perform
another operation while rapid read is in process results in an error.
Rapid Read Screen
Total tag count
Read time (mm:ss)
Tag read rate (ta g s/sec)
Unique tag count (displays in the center of screen).
NOTE The scan trigger on the RFD8500i can also start and stop the inventory operation. Press the trigger to
start, and press again to stop.
Page 37

Inventory
Power Management Icon
Content Area
Start/Stop
Toggle
Memory
Bank
Search Icon
Touch Inventory from the Home or Menu screen.
ZEBRA RFID MOBILE APPLICATION for ANDROID 3 - 9
Figure 3-8
Inventory Screen
Tag reading can be started and stopped on this screen as well as on the Rapid Read screen (see Rapid Read
on page 3-8). When the process starts, tag information displays on the screen.
Touch START to start the rapid read inventory operation. The button changes to STOP. Touch it to stop the
read inventory operation.
NOTE The scan trigger on the RFD8500i can also start and stop the inventory operation. Press the trigger to
start, and press again to stop.
The tag ID selected displays on the Locate Tag screen when navigating to that screen (see Locate Tag on
page 3-11).
Page 38

3 - 10 RFD8500i User Guide
Inventory Screen Features
Table 3-1
Action Bar
Tags Touch the Memory Bank section and select one of the following memory bank options
Search Touch the Search icon and enter a
Power Management Icon indicates if Dynamic Power is on. See
Features on the Inventory Screen
Item Description
from the drop-down menu:
•
None - Defaults to EPC.
•
User - Allows reading user memory bank data when the tag is inventoried.
•
Reserved - Allows reading reserved memory bank data when the tag is
inventoried.
•
TID - Allows reading TID memory bank data when the tag is inventoried.
•
EPC - Allows reading EPC memory bank data when the tag is inventoried.
When the next inventory operation starts, the details from the selected memory bank
displays. This menu is inactive if there is an ongoing operation on the connected
reader.
Default Display: None.
tag ID. Tags that match the entry display in the
content area.
Power Management on page 3-21
Touch the Power Management icon to open the Battery Status screen
.
.
Content Area (select
a tag)
Content Area (select
a tag)
Touching a Tag ID highlights the tag. The highlighted Tag ID is populated on the Tag
Location text area as well as the Tag Pattern area in the Access Control screen. Touch
START
From this scree return to the Menu or go to the Home screen and select Locate Tag.
The tags displayed in this area are based on the option selected from the memory
bank. Touch the tag ID to expand details about the tag. Touch the tag ID again to
collapse details.
Example Default Tag Display:
Tag ID Tag Count
AD99 1540419072596540040 4
Example Expanded Tag Display:
Note
Memory bank data is shown only when inventory is complete.
Tag ID Tag Count
AD99 1540419072596540040 4
EPC MEMORY 3000
RSSI
-50
Phase
1800
USER
1122334455667788AABBCCDDEEFF
1122334455667788AABBCCDDEEFF
1122334455667788AABBCCDDEEFF
to start searching for the tag. See
: Expanded tag detail can only display when the inventory operation is stopped.
Locate Tag on page 3-11
for more details.
Page 39

ZEBRA RFID MOBILE APPLICATION for ANDROID 3 - 11
Start/Stop
Toggle
Text Area
Power Management Icon
Locate Tag
Touch Locate Tag from the Home or Menu screen.
Figure 3-9
Locate Tag Screen
On this screen, enter the Tag ID in the text area or select a tag from the Inventory screen to pre-populate the
Tag ID to search.
Touch START to start the locate tag operation. Touch STOP to stop. The RFD8500i trigge r can also be used to
start and stop the operation.
NOTE The scan trigger on the RFD8500i can also start and stop the inventory operation. Press the trigger to
start, and press again to stop.
The color bar on the display shows the relative distance of the tag.
When the locate tag operation starts, moving to another screen does not stop the operation until Stop is
pressed.
Page 40

3 - 12 RFD8500i User Guide
Settings
Touch Settings from the Home or Menu screen.
Figure 3-10
Table 3-2
Settings Option Description Page
Readers List Displays all previous and new RFD8500i readers with which t he
Application Displays reader connection, notification, and data export
Antenna Displays antenna power lever and link profile.
Singulation Control Displays Session, Tag Population, Inventory State and SL Flag.
Start\Stop Triggers Allows
Tag Reporting Support for reporting unique tags as part of Tag reporting
Regulatory Allows region and channel selections.
Battery Displays the RFD8500i battery status.
Settings Screen
Settings Screen Options
mobile device paired.
settings.
options.
ST ART
and
STOP
button control.
3-13
3-14
3-15
3-16
3-17
3-18
3-19
3-20
Page 41

ZEBRA RFID MOBILE APPLICATION for ANDROID 3 - 13
Table 3-2
Power Management Turns Dynamic Power Optimization on and off.
Beeper Use to turn the beeper on/off, and set volume.
Save Configuration Allows the user to save all settings: Antenna, Singulation, Tag
Settings Screen Options
Settings Option Description Page
3-21
3-22
3-23
Reporting, START/STOP trigger, Be eper Volume, and
Regulatory.
when the user changes anything.
Note:
The settings are also automatically saved
Readers List
From the Settings screen, touch Readers List.
Figure 3-11
This screen displays all available Bluetooth paired RFD8500i readers. The list includes the readers’ serial and
model numbers.
Touch a reader name from the list to establish a session with the selected reader; touch again to terminate the
session. Touching a second reader in the list disconnects the currently connected reader and attempts to
establish a connection to the newly selected reader.
Settings - Readers List Screen
Page 42

3 - 14 RFD8500i User Guide
Application
From the Settings screen, touch Application.
Figure 3-12
The application always detects readers that were paired over Bluetooth.
•
•
•
•
Settings - Application Screen
Auto Reconnect Reader: When checked, the application does not attempt to reconnect to the reader if
the connection is lost within the session.
NFC: When checked, the application uses the NFC tag to connect to the reader via Bluetooth.
By default the Reader Battery Status notification is enabled.
Export Data: When checked, the application writes the inventoried RFID data to a file when the inventory
operation stops. On Android platform s the file is saved in a fixed directory. The user can check files in file
browsing in the Inventory directory (Sdcard/inventory/<files>), and these files can be copied to a PC.
Tag List Match Mode
When checked this application groups the inventories tags as matching, missing, and unknown based on the
set of tags present in the Taglist.csv file.
The Taglist.csv file should be placed at the root of the phone storage inside the rfid folder (in csv format).
NOTES 1. The folder name must be all lower case (i.e., rfid and not RFID).
2. For more information about Tag List Match Mode, refer to the RFD8500 User Guide p/n/
MN002065AXX.
Page 43

Antenna
ZEBRA RFID MOBILE APPLICATION for ANDROID 3 - 15
Figure 3-13
This screen displays:
•
•
The Power Level and Link Profile are blank when there is no connection to the reader.
Settings - Antenna
Power Level displays the current selection and includes a drop-down list of available power levels (as
reported by RFD8500i). 27.0 dBm is the default setting, and it is shown as 270 because the value used is
in units of tens of dBm. Japan units are set to a different default power level depending on the SKU type.
The minimum power level when DPO is enabled (dynamic power optimization) is 3.1 d Bm. When DPO is
disabled, the minimum power level is 0 dBm.
Link Profile displays the current selection and includes a drop -down list of available link pr ofiles (reported
by RFD8500i).
Link Profile display format is as follows: Return link bit data rate in bis per second (e.g., 60000 -> 60
Kbs); Miller Value (e.g., MV_4 -> Miller 4); modulation type (PR ASK is the only one supported); PIE
value has no units and is either 1.5 or 2 (e.g., 1.5 -> 1500 and 2 -> 2000); minimum Tari value in
thousands of micro seconds (e.g., 6250 -> 6.25 microseconds); maximum Tari value in thousands of
micro seconds; Tari step value in thousands of micro seconds. If the step value is zero, then Tari is fixed
for this link profile. If the step size is non zero, then the default Tari value is the minimum value.
Page 44

3 - 16 RFD8500i User Guide
Singulation Control
Figure 3-14
Use this screen to view/configure the singulation control settings for each antenna.
•
•
•
•
All values can be selected from the drop-down lists.
Settings - Singulation Control
Session options. The drop-down list includes the available options (S0, S1, S2, S3).
Tag Population. A numeric value of the estimated number of tags in the Field of View (FOV). Values
shown are 30,100,200,300,400,500,600.
Inventory State options. State A & State B, AB FLIP
SL flag options: ALL, DEASSERTED, ASSERTED
Page 45

Start\Stop Triggers
ZEBRA RFID MOBILE APPLICATION for ANDROID 3 - 17
Figure 3-15
The Start Trigger Periodic displays the Period input box allowing the user to enter the period in milliseconds.
The Stop Trigger Duration, Tag Observation and N attempts displays numeric value input boxes. All time
entries are in milliseconds.
If the user does not enter all the required details for saving trigger s to the reader, the application does not save
the trigger settings to the reader.
Required input for Start/Stop Trigger settings:
•
•
Settings - Start/Stop Triggers
Start Trigger
• Immediate.
• Hand-held - User should select either the Trigger Pressed or Trigger Released check box.
• Periodic - User should enter the period of time in milliseconds.
Stop Trigger
• Immediate.
• Hand-held - User should select either the Trigger Pressed or Trigger Released check box along with
Timeout in milliseconds.
• Duration - User should enter duration in milliseconds.
• Tag Observation - User should enter the tag count along with timeout in milliseconds.
• N Attempts - User should enter the number of attempts along with timeout in milliseconds.
If the start trigger type is HH trigger (pressed or released) or Periodic, the application sets the repeat for the
operation to ensure the use case if repeated operations can be demonstrated.
Page 46

3 - 18 RFD8500i User Guide
Tag Reporting
These selections drive what the user sees on the Inventory screen.
Figure 3-16
Table 3-3
PC Select to allow reporting the PC as part of the Tag Data.
RSSI Selection indicates whether or not the RSSI (Received Signal Strength Indication)
Phase Select to indicate whether or not the Phase is reported as part of the Tag Data.
Channel Index Select to indicate whether or not the Regulatory Channel Index is rep orte d as par t
Settings - Tag Reporting
Tag Reporting Screen Options
Option Description
is reported as part of the Tag Data.
of the Tag Data.
Page 47

ZEBRA RFID MOBILE APPLICATION for ANDROID 3 - 19
Table 3-3
Tag Seen Count Select to indicate whether or not the Tag Seen Count is reported as part of the Tag
Batch Mode Settings Batch mode settings can be configured for one of the following:
Report Unique Tags When checked this option configures the reader to report unique tags. In this mode
Tag Reporting Screen Options (Continued)
Option Description
Data.
•
Disable -Tags are reported in real time as they are inventoried. No data is
preserved if the application disconnects.
•
Enable - Tags are not reported in real time. The inventory must be stopped, and
the getTags command must be issued to get the Tag Data.
•
Auto - Tags are reported in real time as the long as the application that started
the inventory is still connected. On application disconnect the Tag Data is stored
on the reader, and the application can connect and get the tags using the
getTags command.
once a tag is reported it is not reported back unless the tags are purged from the
reader.
Regulatory
Figure 3-17
The region drop-down displays the current region to which the device is set. Choose the correct region before
using the device.
•
•
Settings - Regulatory
Channel selection is allowed only for the regions that allow channel setting.
Supported regions are reported by the RFD8500i.
Page 48

3 - 20 RFD8500i User Guide
•
If the region is not configured on the RFD8500i the Regulatory screen is the first screen displayed after
connecting to the RFD8500i.
Battery
Figure 3-18
This screen displays the status of the battery in the RFD8500i.
•
•
•
•
•
•
Settings - Battery
Level is 100% (in green): Status: Battery is fully charged.
Charging (in green): Status: Charging.
Discharging (in green): Status: Discharging.
Critical (in red): Status: Battery Level is Critical.
Low (in red): Status: Battery Level Low.
Reader is not connected (in grey): No Active Connection.
Page 49

Power Management
ZEBRA RFID MOBILE APPLICATION for ANDROID 3 - 21
Figure 3-19
Settings - Power Management
This screen provides an option to enable Dynamic Power Optimization (DPO) in the reader. Enabling DPO
enhances battery life when performing inventory operations.
NOTE DPO is enabled by default. With DPO enabled, access operations and filters/singulation setting changes
do not take effect.
If Dynamic Power is on, a green battery icon appears in the title bar of the application. Clicking on this opens
the Battery Status screen.
Page 50

3 - 22 RFD8500i User Guide
Beeper
Figure 3-20
This screen displays the current beeper settings. The user can turn the beeper off (by unchecking the Sled
Beeper check box), or set the volume to High, Medium or Low.
Settings - Beeper
Page 51

Save Configuration
ZEBRA RFID MOBILE APPLICATION for ANDROID 3 - 23
Figure 3-21
This screen can be used to save the settings and get a snapshot of current settings on the RFD8500i.
The settings persist on RFD8500i until the user performs a hard reset of the unit.
The Tag Pattern area is automatically filled in when a tag is selected/highlighted in the Inventory screen.
Settings - Save Configuration
Page 52

3 - 24 RFD8500i User Guide
Access Control
NOTE DPO must be disabled from the Power Management screen to allow access operation functionality.
Figure 3-22
Access Control Screens - Read/Write; Lock; Kill
Read/Write
•
Tag ID & Password values are in hex. Tag ID is edited.
•
Memory Bank options: EPC, RESERVED, TID and USER.
•
Offset and Length values are in 16-bit words.
•
Access operation screen maintains edited tag ID.
Lock
Lock privilege options:
•
Read and Write
•
Permanent Lock
•
Permanent Unlock
•
Unlock.
Kill
Permanently renders the tag unusable. A kill password must be provided.
Page 53

Pre Filters
NOTE DPO must be disabled from the Power Management screen to allow Pre Filter functionality.
ZEBRA RFID MOBILE APPLICATION for ANDROID 3 - 25
Figure 3-23
Pre Filters Screen
Options
•
Memory Bank: EPC, TID and USER.
•
Offset: Offset in the memory bank is specified in words.
•
Action:
• INV A NOT INV B or ASRT_SL_NOT_DSRT_SL
• INV A or ASRT SL
• NOT INV B or NOT DSRT SL
• INV A2BB2A NOT INV A or NEG SL NOT ASRT SL
• INV B NOT INV A or DSRT SL NOT ASRT SL
• INV B or DSRT SL
• NOT INV A or NOT ASRT SL
• NOT INV A2BB2A or NOT NEG SL
•
Target: SESSION S0, SESSION S1, SESSION S2, SESSION S3 & SL FLAG.
Up to two Pre Filters can be enabled.
Page 54

3 - 26 RFD8500i User Guide
About
Figure 3-24
This screen displays version information as reported by the RFD8500i.
About Screen
Page 55

Chapter 4 123SCAN
Introduction
123Scan is an easy-to-use, PC-based software tool that enables the quick and ea sy setup of Zebra scann er s,
and the RFD8500i reader.
123Scan uses a wizard tool to guide users through a st reamlined set up process. Once par ameters are set, the
values are saved to a configuration file that can be distributed via e-mail, electronically downloaded via a USB
cable. 123Scan can generate multiple reports that can be easily re-branded using Microsoft Word or Access.
Report options include programmed parameters, and asset tracking information.
Additionally , 123Scan ca n upgrade RFD8500i firmwar e, automatically check online to enable support for newly
released products, and stage scanners simultaneously via USB hub(s).
Communication with 123Scan
To communicate with the 123Scan program which runs on a host computer running a Windows XP SP2,
Windows 7, and Windows 8 operating system, use a USB cable to connect the device to the host computer.
123Scan Requirements
•
Host computer with Windows.
•
USB cable.
•
RFD8500i.
•
Plug-ins:
• Configuring RFD8500i requires only the RFD8500i plug-in.
For more information on123Scan, go to: http://www.zebra.com/123scan
For a 1 minute tour of 123Scan, go to: http://www.zebra.com/ScannerHowToVideos.
To download 123Scan software and access the Help file integrated in the utility, go to:
www.zebra.com/scannersoftware
.
.
Page 56

4 - 2 RFD8500i User Guide
Page 57

Appendix A TROUBLESHOOTING,
TECHNICAL SPECIFICATIONS
and MAINTENANCE
Introduction
This chapter includes instructions on clea nin g and maintenance, troubleshooting solutions for potential
problems, and the web address for technical specifications.
Troubleshooting
NOTE Always ensure the battery cover and battery are properly installed.
Table A-1
Amber power LED turns
on, or red power LED
blinks.
Reader does not fully
charge.
Bluetooth LED turns off. Reader is out of range of the
Unable to pair the
RFD8500i with the mobile
device.
Troubleshooting
Problem Possible Causes Possible Solutions
Battery is low. Charge the battery. See
Attempt to charge on a
non-powered USB hub.
Bluetooth host.
Bluetooth is off on the
mobile device.
Bluetooth on the RFD8500i
is off.
NFC on the TC55 is off. Enable NFC on the TC55.
Charging the Battery in
the Reader on page 1-8
Connect the reader to a powered USB power
adapter (5V, 1.2A max).
Move closer to the host and press any key to
re-pair with the host.
Turn on Bluetooth on the mobile device.
Turn on Bluetooth on the RFD8500i.
.
Page 58

A - 2 RFD8500i User Guide
Table A-1
Unable to discover the
RFD8500i.
No RFID data displays in
the application on the
mobile computer when
the RFD8500i starts
reading.
Device does not boot up. Press the
Troubleshooting (Continued)
Problem Possible Causes Possible Solutions
Technical Specifications
RFD8500i is turned off. Turn on the RFD8500i.
RFD8500i is not in discover
mode.
Batch mode is enabled. In the Batch mode setting, set RFD8500i to Auto or
Press the
RFD8500i into discover mode.
Disable from the Tag Reporting screen.
simultaneously to halt the boot process and recover
devices with an improper firmware image (i.e,
devices that cannot boot up).
Press
simultaneously for three seconds to perform a soft
reset.
Bluetooth
Function
Function
button for 1 second to put the
and
Power
buttons
and
Bluetooth
buttons
For the latest technical specification information for the RFD8500i, visit: http://www.zebra.com/RFD8500i.
Cleaning
CAUTION Always wear eye protection.
Read warning label on compressed air and alcohol product before using.
If you have to use any other solution for medical reasons please contact Motorola for more
information.
WARNING! Avoid exposing this product to contact with hot oil or other flammable liquids. If such
exposure occurs, unplug the device and clean the product immediately in accordance with
these guidelines.
Approved Cleanser Active Ingredients
100% of the active ingredients in any cleaner must consist of one or some combination of the following:
isopropyl alcohol, bleach/sodium hypochlorite, hydrogen peroxide or mild dish soap.
Harmful Ingredients
The following chemicals are known to damage the plastics on the RFD8500i and mo bile computers and should
not come in contact with the device: ammonia solutions, compounds of amines or
ammonia; acetone; ketones; ethers; aromatic and chlorinated hydrocarbons; acqueous or alcoholic alkaline
solutions; ethanolamine; toluene; trichloroethylene; benzene; carbolic acid and TB-lysoform.
Page 59

TROUBLESHOOTING, TECHNICAL SPECIFICATIONS and MAINTENANCE A - 3
Cleaning Instructions
Do not apply liquid directly to the RFD8500i and mob ile computers. Dampen a soft cloth or use pre-moistened
wipes. Do not wrap the device in the cloth or wipe, but gently wipe the unit. Be careful not to let liquid pool
around the display window or other places. Allow the unit to air dry before use.
IMPORTANT Do not clean the device or expose it to rain or moisture when the battery cover is removed. Without
the battery cover, the device is not water/dust sealed.
Special Cleaning Notes
Many vinyl gloves contain phthalate additives, which are often not recommended for medical use and are
known to be harmful to the housing of the RFD8500i and mobile computers. The RFD8500i should not be
handled while wearing vinyl gloves containing phthalates, or befo re hand s are washed to rem ove contaminan t
residue after gloves are removed. If products containing an y of the harmful ingredients listed above are used
prior to handling the RFD8500i, such as hand sanitizer that contain ethanolamine, hands must be completely
dry before handling the RFD8500i to prevent damage to the plastics.
Materials Required
•
Alcohol wipes
•
Lens tissue
•
Cotton tipped applicators
•
Isopropyl alcohol
•
Can of compressed air with a tube.
Cleaning Charge Connectors
To clean the connectors on a cradle:
1. Remove the DC power cable from the cradle.
2. Dip the cotton portion of the cotton tipped applicator in isopropyl alcohol.
3. Rub the cotton portion of the cotton tipped applicator along the pins of the connector. Slowly move the
applicator back-and-forth from one side of the connector to the other. Do not let any cotton residue on the
connector.
4. All sides of the connector should also be rubbed with the cotton tipped applicator.
5. Spray compressed air in the connector area by pointing the tube/nozzle about ½ inch away from the
surface.
CAUTION Do not point nozzle at yourself and others, ensure the nozzle or tube is pointed away from your face.
6. Ensure that there is no lint left by the cotton tipped applicator, remove lint if found.
7. If grease and other dirt can be found on other ar eas of the cradle, use lint free cloth and alcohol to remove.
8. Allow at least 10 to 30 minutes (depending on ambient temperature a nd humidity) fo r th e al co hol to air dr y
before applying power to cradle.
If the temperature is low and humidity is high, longer drying time is required. Warm temperature and dry
humidity requires less drying time.
Page 60

A - 4 RFD8500i User Guide
Cleaning Frequency
The cleaning frequency is up to the customer’s discretion due to the varied environments in which the mobile
devices are used. They may be cleaned as frequently as required.
Maintenance
For trouble-free service, observe the tips that follow when using the device.
RFD8500i
•
Although the device is water and dust resistant, do not expose it to rain or moisture for an extended
period of time. In general, treat the device as a pocket calculator or other small electronic instrument.
•
Do not clean the device or expose it to rain or moisture when the battery is removed. Without the battery,
the device is not water/dust sealed.
•
Do not drop the device or subject it to strong impact.
•
Protect the device from temperature extremes. Do not leave it on the dashboard of a car on a hot day,
and keep it away from heat sources.
•
Do not store or use the device in any location that is extremely dusty, damp, or wet.
•
Do not use window cleaning solution. Use a soft cloth dampened with a 50/50 solution of isopropyl
alcohol and water. See Cleaning on page A-2.
•
Do not allow the solution to form a pool of liquid anywhere on the screen or device.
•
Do not use a large amount of solution to cause the device to remain wet.
Battery
WARNING! Do not store the device with the battery installed. Doing so long term may cause irreversible
harm to the battery. Always stor e th e ba tte ry removed from the device. If a battery is
installed during long term storage, it may discharge to point at which it cannot be recovered.
Even when stored separately from device it is impo rtant to follow industry standard guidelines. When batteries
are stored over a year, battery cell manufacturers advise that some irreversible deterioration in overall battery
quality may occur. To minimize this loss, they recommend storing batteries half charged in a dry, cool place
between 41° and 77°F (5° and 25°C), the cooler the better . Batteries should be charge d to half capacity at least
once a year. In order to charge a battery to half capacity, take a fully discharged battery and charge it for two
hours. If an electrolyte leakage is observed, avoid any contact with the affected area and properly dispose of
the battery.
Page 61

INDEX
A
accessories
cables . . . . . . . . . . . . . . . . . . . . . . . . . . . . . . . . . ii-vi
charging . . . . . . . . . . . . . . . . . . . . . . . . . . . . . . . ii-vi
cradle . . . . . . . . . . . . . . . . . . . . . . . . . . . . . . . . . ii-vi
antenna housing . . . . . . . . . . . . . . . . . . . . . . . . . . . . 1-3
applications
download . . . . . . . . . . . . . . . . . . . . . . . . . . . . . 1-11
RFID for android
about screen . . . . . . . . . . . . . . . . . . . . . . . 3-26
access control screen . . . . . . . . . . . . . . . . 3-24
antenna . . . . . . . . . . . . . . . . . . . . . . . . . . . 3-15
application . . . . . . . . . . . . . . . . . . . . . . . . . 3-14
battery . . . . . . . . . . . . . . . . . . . . . . . . . . . . 3-20
beeper . . . . . . . . . . . . . . . . . . . . . . . . . . . . 3-22
home screen . . . . . . . . . . . . . . . . . . . . . . . . 3-7
inventory screen . . . . . . . . . . . . . . . . . . . . . . 3-9
locate tag screen . . . . . . . . . . . . . . . . . . . . 3-11
power management . . . . . . . . . . . . . . . . . . 3-21
pre filters screen . . . . . . . . . . . . . . . . . . . . . 3-25
rapid read screen . . . . . . . . . . . . . . . . . . . . . 3-8
readers list screen . . . . . . . . . . . . . . . . . . . 3-13
regulatory . . . . . . . . . . . . . . . . . . . . . . . . . . 3-19
save configuration . . . . . . . . . . . . . . . . . . . 3-23
settings screen . . . . . . . . . . . . . . . . . . . . . . 3-12
singulation control . . . . . . . . . . . . . . . . . . . 3-16
start/stop triggers . . . . . . . . . . . . . . . . . . . . 3-17
tag reporting . . . . . . . . . . . . . . . . . . . . . . . . 3-18
using RFID for android . . . . . . . . . . . . . . . . . . . . 3-1
notification . . . . . . . . . . . . . . . . . . . . . . . . . . . . . 1-10
optimization . . . . . . . . . . . . . . . . . . . . . . . . . . . . 1-10
removing . . . . . . . . . . . . . . . . . . . . . . . . . . . . . . . 1-6
battery cover release buttons . . . . . . . . . . . . . . . . . . . 1-3
beeper
indicators
conditions . . . . . . . . . . . . . . . . . . . . . . . . . . . 2-2
bluetooth
bluetooth button/indicator . . . . . . . . . . . . . . . . . . 1-3
disconnect . . . . . . . . . . . . . . . . . . . . . . . . . . . . . . 2-1
enable . . . . . . . . . . . . . . . . . . . . . . . . . . . . . . . . . 2-1
out of range . . . . . . . . . . . . . . . . . . . . . . . . . . . . .A-1
pairing . . . . . . . . . . . . . . . . . . . . . . . . . . . . . . . . . 2-4
buttons
battery cover release . . . . . . . . . . . . . . . . . . . . . . 1-3
power . . . . . . . . . . . . . . . . . . . . . . . . . . . . . . . . . . 1-3
C
charging
accessories . . . . . . . . . . . . . . . . . . . . . . . . . 1-8, 1-9
contacts for the mobile computer . . . . . . . . . . . . 1-3
contacts for the RFD8500i . . . . . . . . . . . . . . . . . . 1-3
temperature . . . . . . . . . . . . . . . . . . . . . . . . . . . . . 1-9
charging battery . . . . . . . . . . . . . . . . . . . . . . . . . . . . . 1-8
charging indicator . . . . . . . . . . . . . . . . . . . . . . . . . . . . 1-3
cradle accessories . . . . . . . . . . . . . . . . . . . . . . . . . . . ii-vi
D
B
battery
charging . . . . . . . . . . . . . . . . . . . . . . . . . . . . . . . 1-8
installing . . . . . . . . . . . . . . . . . . . . . . . . . . . . . . . 1-4
management . . . . . . . . . . . . . . . . . . . . . . . . . . . . 1-9
data transfer . . . . . . . . . . . . . . . . . . . . . . . . . . . . . . . . 2-5
downloading software
android application . . . . . . . . . . . . . . . . . . . . . . 1-11
dpo . . . . . . . . . . . . . . . . . . . . . . . . . . . . . 3-10, 3-13, 3-21
Page 62

Index - 2 RFD8500i User Guide
F
features
buttons, indicators, parts . . . . . . . . . . . . . . . . . . . 1-2
descriptions . . . . . . . . . . . . . . . . . . . . . . . . . . . . . 1-3
led and beeper indicators . . . . . . . . . . . . . . . . . . 2-2
using buttons and scan trigger . . . . . . . . . . . . . . 2-1
function button . . . . . . . . . . . . . . . . . . . . . . . . . . 1-3, A-2
I
installing battery . . . . . . . . . . . . . . . . . . . . . . . . . . . . . 1-4
L
led indicators
bluetooth . . . . . . . . . . . . . . . . . . . . . . . . . . . . . . . 1-3
charging . . . . . . . . . . . . . . . . . . . . . . . . . . . . . . . 1-3
conditions . . . . . . . . . . . . . . . . . . . . . . . . . . . . . . 2-2
power . . . . . . . . . . . . . . . . . . . . . . . . . . . . . . . . . 1-3
M
maintenance . . . . . . . . . . . . . . . . . . . . . . . . . . . . . . . A-4
mounting mobile device . . . . . . . . . . . . . . . . . . . . . . . 1-7
trigger . . . . . . . . . . . . . . . . . . . . . . . . . . . . . . . . . . . . .1-3
troubleshooting . . . . . . . . . . . . . . . . . . . . . . . . . . . . . .A-1
U
USB port/cover . . . . . . . . . . . . . . . . . . . . . . . . . . . . . .1-3
using
RFID for android . . . . . . . . . . . . . . . . . . . . . . . . .3-1
P
pairing . . . . . . . . . . . . . . . . . . . . . . . . . . . . . . . . .2-4, 3-2
power button . . . . . . . . . . . . . . . . . . . . . . . . . . . . . . . 1-3
power indicator . . . . . . . . . . . . . . . . . . . . . . . . . . . . . 1-3
power management . . . . . . . . . . . . . . . . 3-10, 3-13, 3-21
powering on/off . . . . . . . . . . . . . . . . . . . . . . . . . . . . . 2-1
R
reading tags . . . . . . . . . . . . . . . . . . . . . . . . . . . . . . . . 2-5
removing battery . . . . . . . . . . . . . . . . . . . . . . . . . . . . 1-6
reset
soft . . . . . . . . . . . . . . . . . . . . . . . . . . . . . . . . . . . 2-2
RFID antenna . . . . . . . . . . . . . . . . . . . . . . . . . . . . . . 1-3
S
set up . . . . . . . . . . . . . . . . . . . . . . . . . . . . . . . . . . . . . 1-4
soft boot . . . . . . . . . . . . . . . . . . . . . . . . . . . . . . . . . . . 2-2
software
installing . . . . . . . . . . . . . . . . . . . . . . . . . . . . . . 1-11
requirements . . . . . . . . . . . . . . . . . . . . . . . . . . . 1-11
T
tag reading . . . . . . . . . . . . . . . . . . . . . . . . . . . . . . . . . 2-5
transferring data . . . . . . . . . . . . . . . . . . . . . . . . . . . . 2-5
Page 63

Page 64

Zebra Technologies Corporation
Lincolnshire, IL U.S.A.
http://www.zebra.com
ZEBRA and the stylized Zebra head are trademarks of Zebra Technologies Corporation,
registered in many jurisdictions worldwide. All other trademarks are the property of their
respective owners. ©2019 Zebra Technologies Corporation and/or its affiliates. All rights
reserved.
MN-002761-02 Revision A - November 2019
 Loading...