


RFD4031 RFID
Premium/Premium+
Sled
Product Reference Guide
MN-004373-02EN Rev A

ZEBRA and the stylized Zebra head are trademarks of Zebra Technologies Corporation, registered in many
jurisdictions worldwide. All other trademarks are the property of their respective owners. ©2022 Zebra
Technologies Corporation and/or its affiliates. All rights reserved.
Information in this document is subject to change without notice. The software described in this document
is furnished under a license agreement or nondisclosure agreement. The software may be used or copied
only in accordance with the terms of those agreements.
For further information regarding legal and proprietary statements, please go to:
SOFTWARE: zebra.com/linkoslegal.
COPYRIGHTS: zebra.com/copyright.
WARRANTY: zebra.com/warranty.
END USER LICENSE AGREEMENT: zebra.com/eula.
Terms of Use
Proprietary Statement
This manual contains proprietary information of Zebra Technologies Corporation and its subsidiaries
(“Zebra Technologies”). It is intended solely for the information and use of parties operating and
maintaining the equipment described herein. Such proprietary information may not be used, reproduced,
or disclosed to any other parties for any other purpose without the express, written permission of Zebra
Technologies.
Copyright
Product Improvements
Continuous improvement of products is a policy of Zebra Technologies. All specifications and designs are
subject to change without notice.
Liability Disclaimer
Zebra Technologies takes steps to ensure that its published Engineering specifications and manuals are
correct; however, errors do occur. Zebra Technologies reserves the right to correct any such errors and
disclaims liability resulting therefrom.
Limitation of Liability
In no event shall Zebra Technologies or anyone else involved in the creation, production, or delivery of the
accompanying product (including hardware and software) be liable for any damages whatsoever (including,
without limitation, consequential damages including loss of business profits, business interruption, or loss
of business information) arising out of the use of, the results of use of, or inability to use such product, even
if Zebra Technologies has been advised of the possibility of such damages. Some jurisdictions do not allow
the exclusion or limitation of incidental or consequential damages, so the above limitation or exclusion may
not apply to you.

Contents
About this Document...................................................................................................................................... 5
Related Documents................................................................................................................................ 5
Notational Conventions......................................................................................................................... 5
Service Information................................................................................................................................. 6
Getting Started with the RFD4031................................................................................................................ 7
Unpacking.................................................................................................................................................. 7
Adaptor Installation................................................................................................................................. 8
Device Installation..................................................................................................................................10
Device Removal..............................................................................................................................12
Battery Replacement.............................................................................................................................13
Battery Removal............................................................................................................................. 14
Pairing the Sled with a Mobile Computer.......................................................................................15
Using theRubber Locking Foot.........................................................................................................16
Charging....................................................................................................................................................17
UI Indicators.............................................................................................................................................18
LED Definitions............................................................................................................................... 18
Beeper Indications........................................................................................................................20
Trigger Modes.................................................................................................................................21
Basic Data Formatting.........................................................................................................................22
123RFID Mobile Application for Android................................................................................................... 26
Installing the 123RFID Mobile Application for Android...............................................................26
Using the 123RFID Mobile Application for Android.................................................................... 26
Navigating 123RFID Mobile........................................................................................................ 27
3

Contents
Readers List (Available vs. Connected)..........................................................................................28
Connect a Reader..................................................................................................................................31
Connect to Reader Directly Using USB/Common IO................................................................. 32
Connect to Reader Using Bluetooth...............................................................................................32
Pair Reader Using NFC Tag (Tap and Pair)...........................................................................32
Scan and Pair - RFD40................................................................................................................34
RFID Operations............................................................................................................................ 38
123RFID Desktop Application......................................................................................................................86
Application Features............................................................................................................................ 86
Connect............................................................................................................................................ 87
Read.................................................................................................................................................. 88
Reader Configuration...................................................................................................................89
Parameter Settings....................................................................................................................... 92
Firmware Management..............................................................................................................100
Bluetooth Settings........................................................................................................................101
Connecting to the Multi-Slot Cradle.......................................................................................104
Maintenance..................................................................................................................................................108
Harmful Ingredients............................................................................................................................ 108
Approved Cleaners.............................................................................................................................109
Cleaning the Sled................................................................................................................................109
Technical Specifications............................................................................................................................... 111
Troubleshooting............................................................................................................................................ 112
4

About this Document
About this Document
This guide provides information about setting up and using the RFD4031 UHF FRID Premium/Premium+
sled.Some screens shown in this guide may differ from the actual screens shown on the device.
Related Documents
The following documents provide additional information about the RFD4031 sled:
• RFD4031 RFID Premium/Premium+ Quick Start Guide, p/nMN-004375-xx
Notational Conventions
The following conventions are used in this document:
Bold text is used to highlight the following:
• Dialog box, window, and screen names.
• Drop-down list and list box names.
• Checkbox and radio button names.
• Checkbox and radio button names • Icons on a screen.
• Key names on a keypad
• Button names on a screen
.
Bullets (•) indicate:
• Action items
• List of alternatives
• Lists of required steps that are not necessarily sequential
Sequential lists (for example, those that describe step-by-step procedures) appear as numbered lists.
5

Service Information
If you have a problem with your equipment, contact Zebra Global Customer Support for your region.
Contact information is available at: zebra.com/support.
When contacting support, please have the following information available:
• Serial number of the unit
• Model number or product name
• Software type and version number
Zebra responds to calls by email, telephone, or fax within the time limits set forth in support agreements.
If your problem cannot be solved by Zebra Customer Support, you may need to return your equipment for
servicing and will be given specific directions. Zebra is not responsible for any damages incurred during
shipment if the approved shipping container is not used. Shipping the units improperly can possibly void
the warranty.
If you purchased your Zebra business product from a Zebra business partner, contact that business partner
for support.
About this Document
6

Getting Started with the RFD4031
Getting Started with the RFD4031
The RFD4031 UHF RFID Premium sled provides RAIN Radio Frequency Identification (RFID) tag reading,
writing, and locating capability to supported Zebra mobile computers and other host devices.
To use the RFD4031 sled for the first time with a mobile computer:
1. Insert the battery into the device.
2. Charge the RFD4031 sled using the charging cradle, charging cup, or USB-C cable.
3. Replace the cover with the adaptor that is specific to the mobile computer to be used with the sled.
4. Place the mobile computer into the adaptor headfirst.
5. Secure the mobile computer into the adaptor by pressing down on the bottom of the mobile computer.
6. Set the region using 123RFID Desktop or 123RFID Mobile.
For the latest versions of guides and software, go to: zebra.com/support.
Unpacking
For detailed information, refer to the Product Reference Guide at: zebra.com/support.
This chapter provides information on RFD4031 RFID Premium sled parts, battery installation, mobile device
attachment, LED indications, and charging. Carefully remove all protective material from the RFD4031 RFID
Premium sled and save the shipping container for later storage and shipping.
Verify the following items are in the box:
• RFD4031 RFD Premium or Premium Plus Sled
• Battery
• Lanyard
• Quick Start Guide
Inspect the equipment for damage. If any equipment is missing or damaged, contact the Zebra Support
Center immediately.
For a full list of accessories that can be used with the RFD4031 Premium/Premium Plus sled, refer to the
product specific Technical Accessory Guide available at zebra.com/support.
7
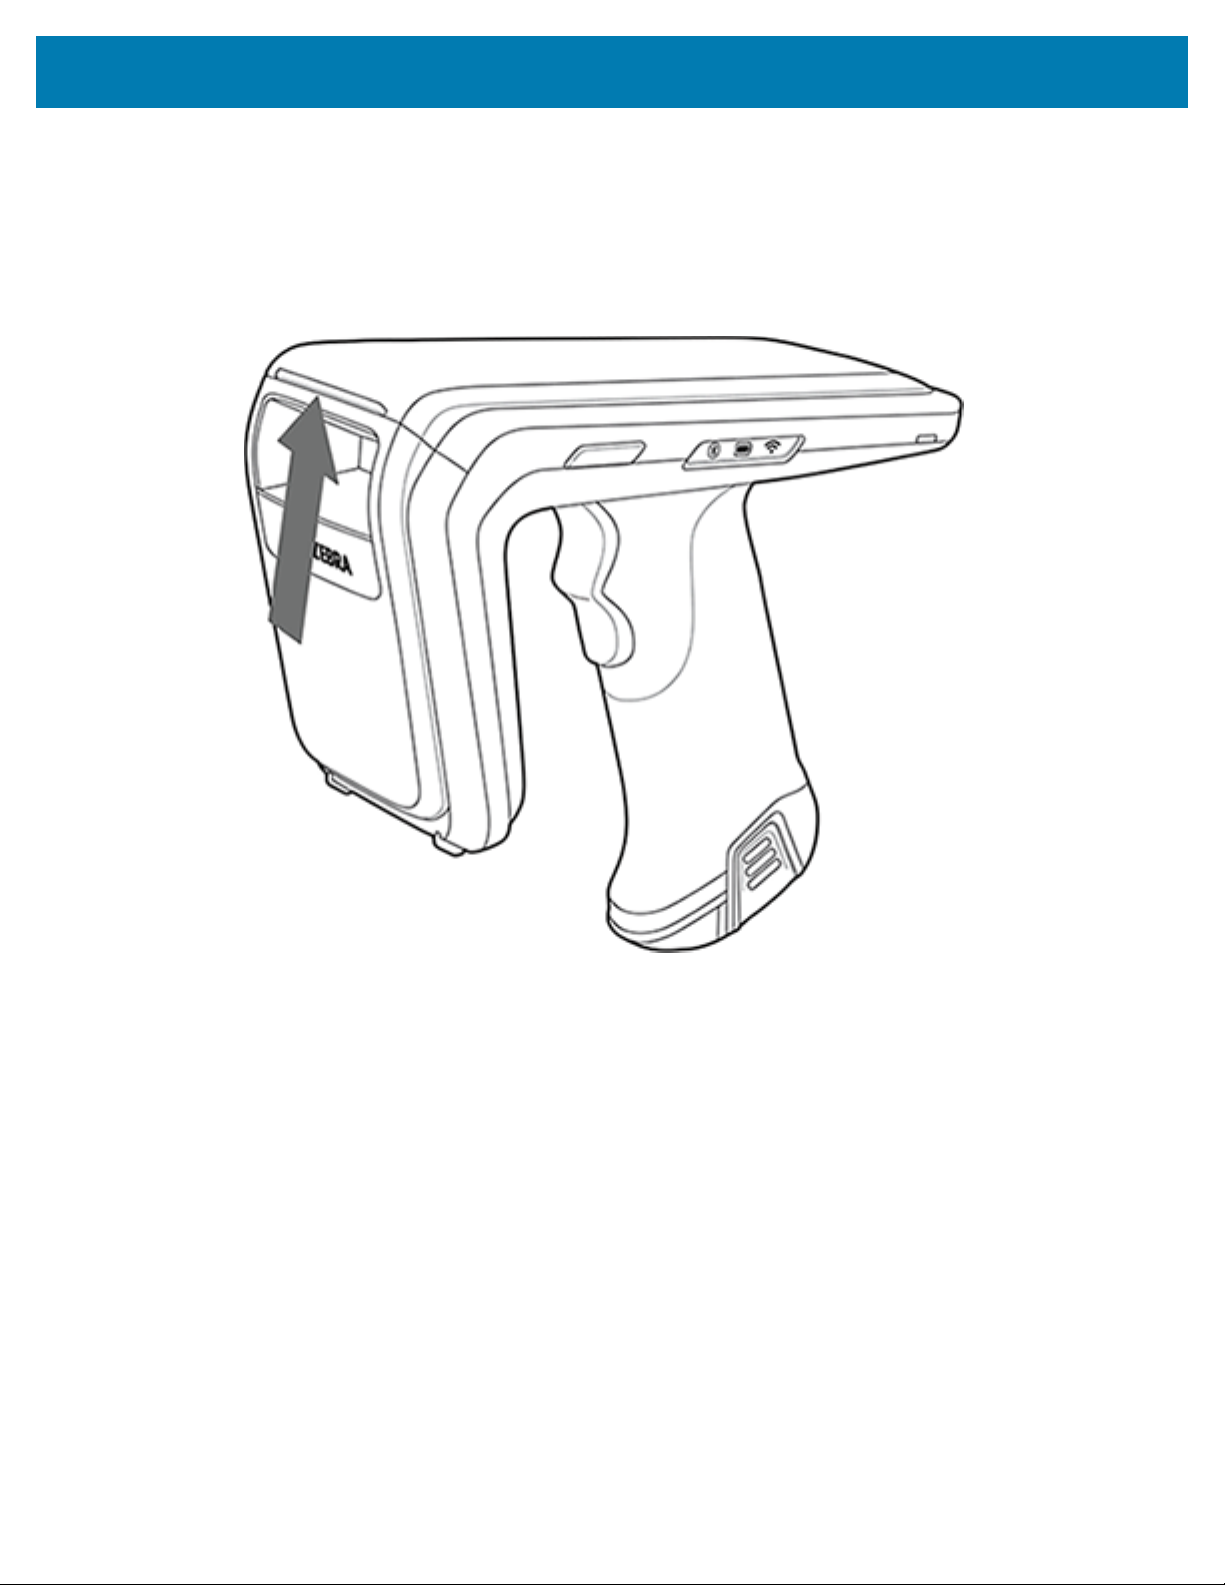
Adaptor Installation
RFD4031 Ultra-Rugged UHF RFID sleds can be used with various mobile devices by using an adaptor to
mount the device onto the sled.
To install the adaptor:
1. Remove the cover of the sled by pulling up on the lip.
Getting Started with the RFD4031
8

Getting Started with the RFD4031
2. Ensure that the pogo pins are aligned and insert the adaptor into the sled.
NOTE: When installing the adaptor, use caution and ensure that the pogo pins are lined up
directly prior to insertion into the sled.
9
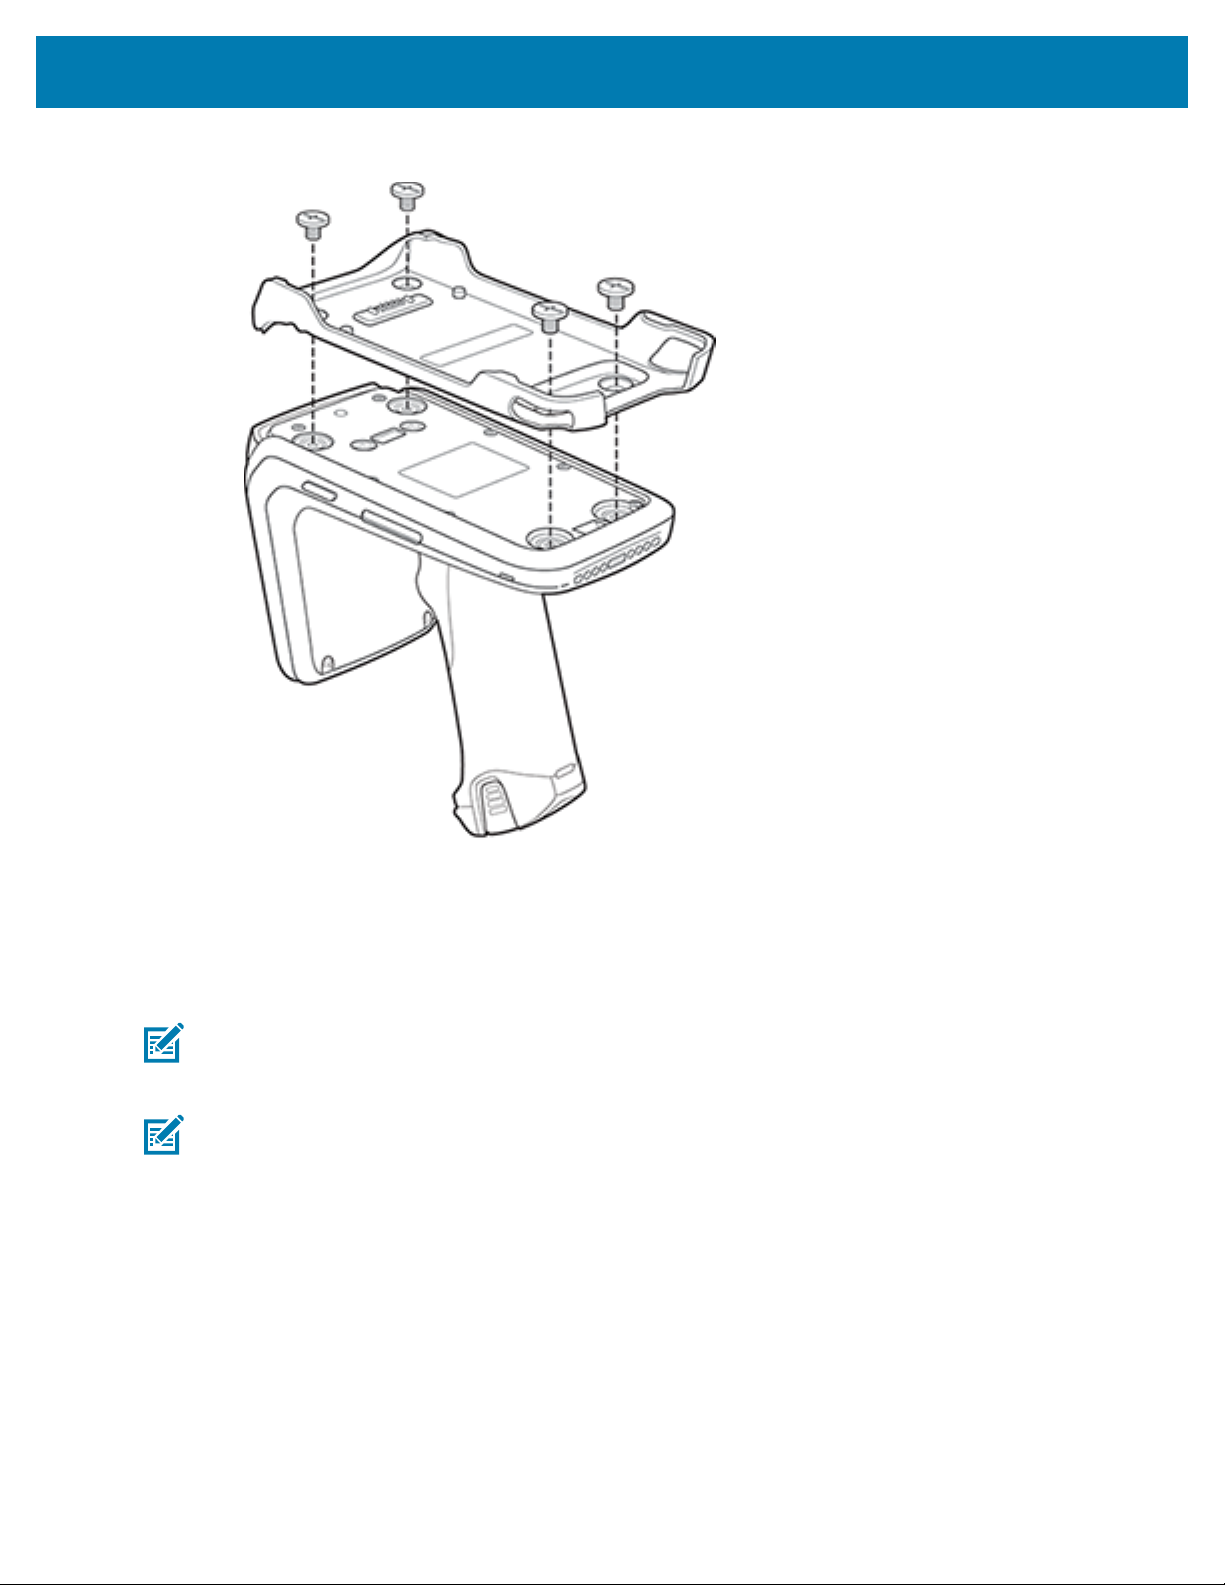
Getting Started with the RFD4031
3. Secure the adaptor onto the RFD4031 by fastening the four coin screws into the sled.
Device Installation
To secure a mobile computer to the RFD4031 sled, place the top of the device fully forward into the
RFD4031 sled adaptor and push down on the bottom of the mobile computer.
NOTE: Refer to the installation visual aide on the adaptor to view the correct device orientation
for installation. For additional installation information, scan the QR code on the label to view the
installation video.
NOTE: Use caution while installing the mobile computer into the adaptor and do not collide with
the eConnex Communication Port.
10

Getting Started with the RFD4031
Figure 1Device Insertion
11

Device Removal
To remove the mobile computer from the RFD4031 sled, firmly hold the sled handle and lift the device off
of the sled adaptor.
Figure 2Device Removal
Getting Started with the RFD4031
12
Battery Replacement
The following section outlines the procedure for replacing the battery in the RFD4031.
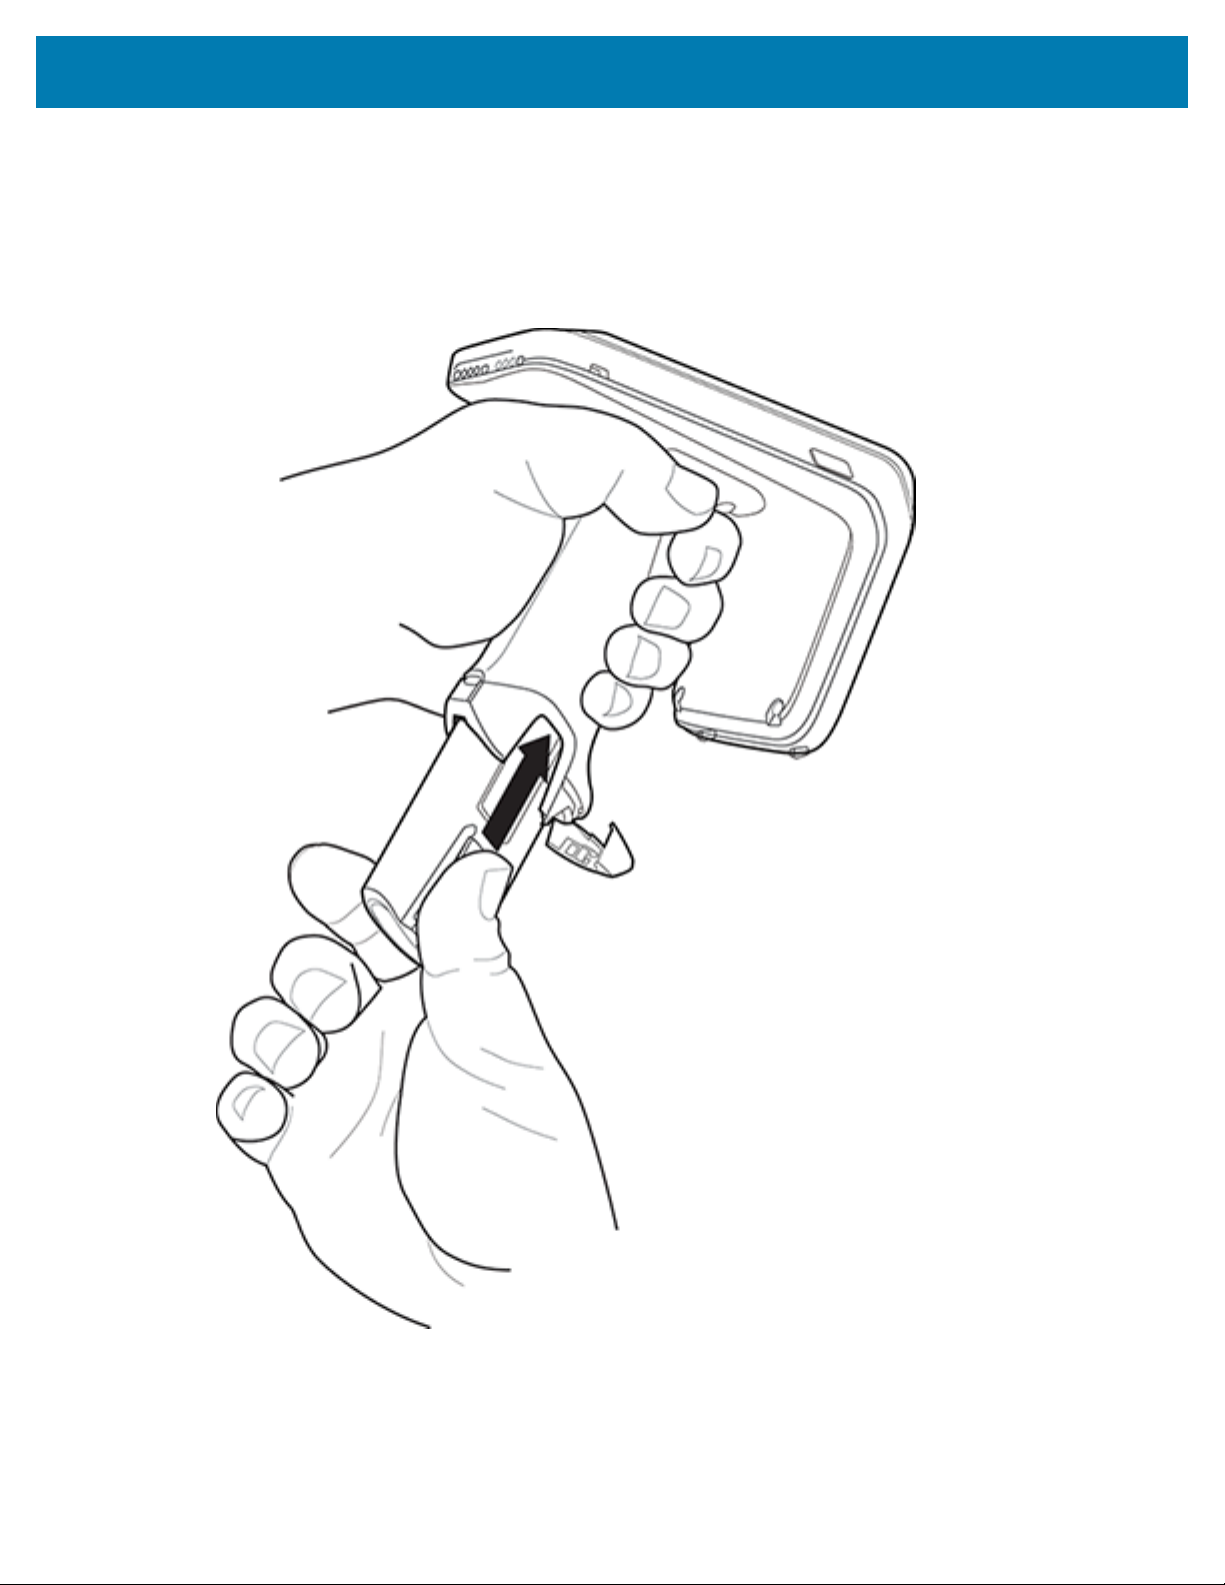
To install the battery:
Figure 3Battery Insertion
Getting Started with the RFD4031
1. Align the battery with the notch facing the back of the device
2. Slide the battery into the handle of the device.
13
3. Snap the battery into the place.
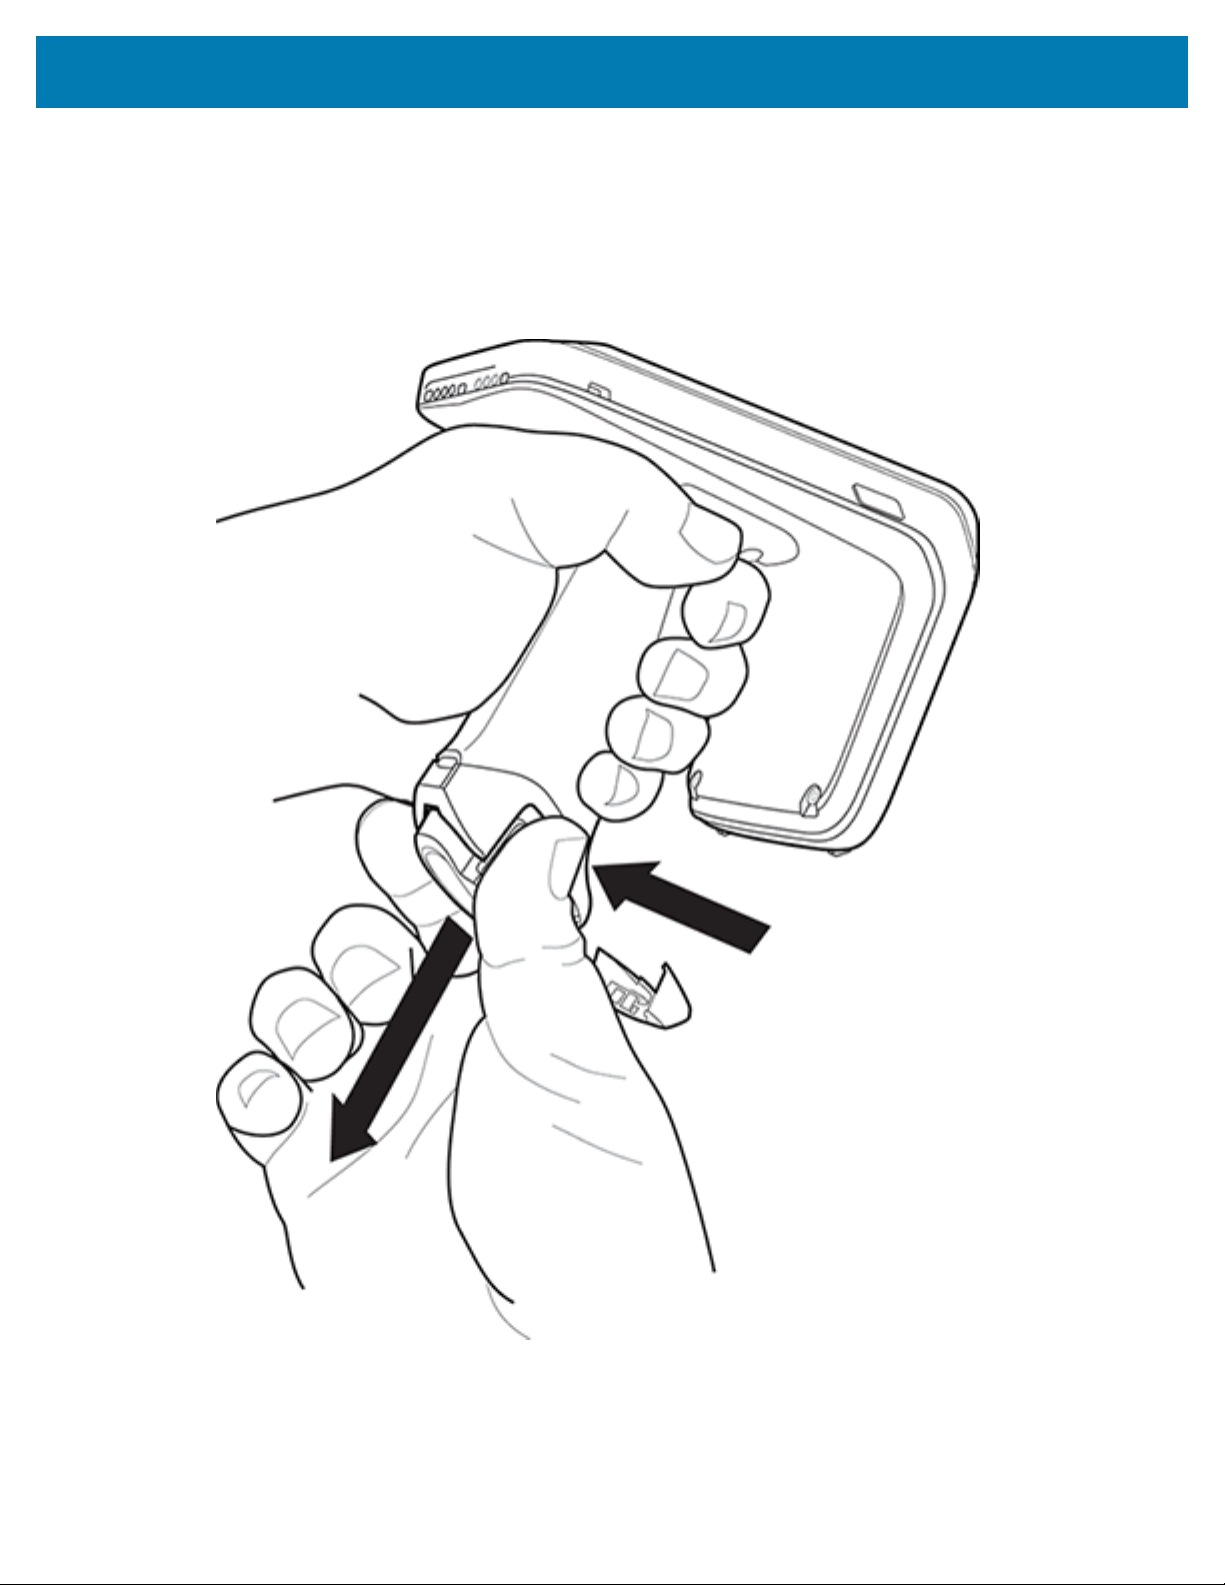
Battery Removal
To remove the battery:
Figure 4Battery Removal
Getting Started with the RFD4031
1. Pinch the clips on the battery to unlock.
2. Slide downwards to remove the battery from the device.
14

Getting Started with the RFD4031
Pairing the Sled with a Mobile Computer
Pair the sled with a mobile computer by connecting directly with the communication port, scanning the
barcode on the device, or by using the NFC feature on the RFD4031 to activate NFC Bluetooth pairing and
facilitate Bluetooth communication between the sled and the mobile computer.
• To connect via scan, scan the code on the sled using the mobile computer to obtain the Bluetooth MAC
address to pair the device to the sled.
Figure 5Scan Bluetooth MAC Address
• To connect via NFC, align the NFC area behind the handle of the sled with the NFC area on the back of
the mobile computer to pair.
15

Getting Started with the RFD4031
Figure 6Scan NFC Area to Pair Device
Once the sled has paired with a mobile computer, the sled recognizes the device going forward and
automatically connects using the 123RFID Mobile or 123RFID Desktop Reader Discovery feature.
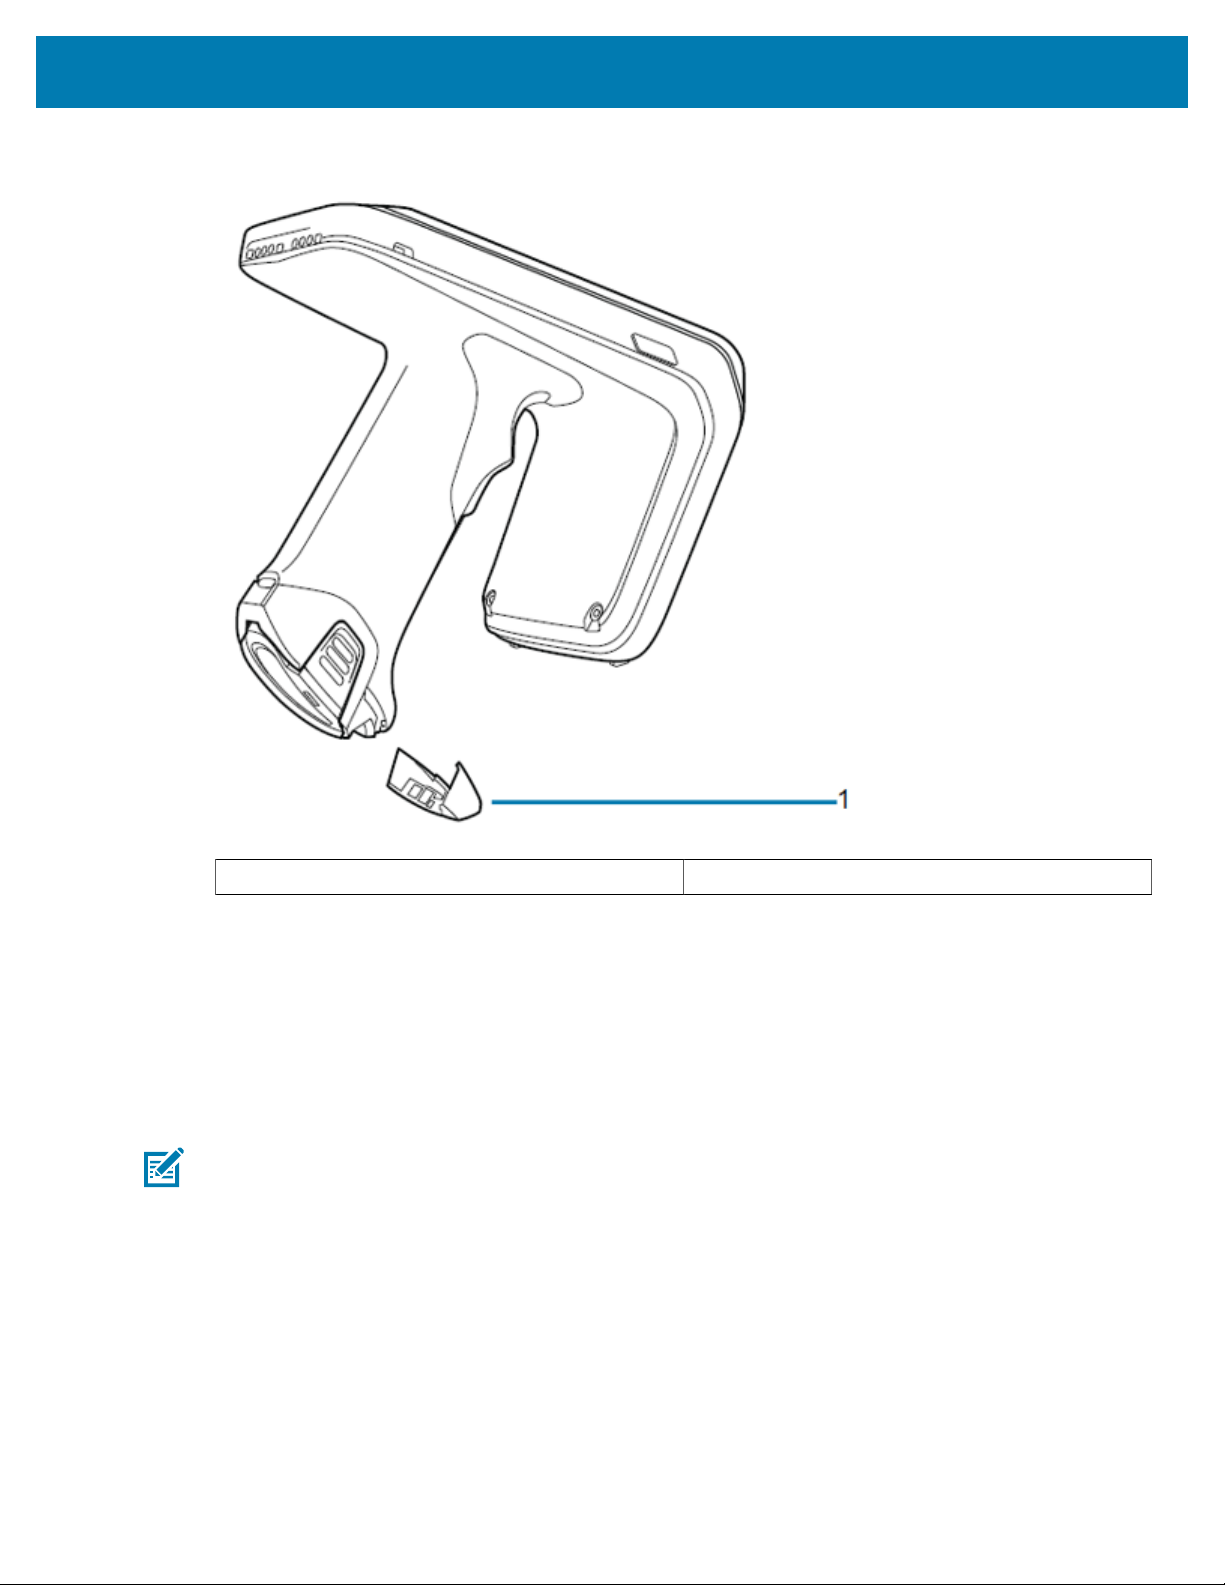
Using theRubber Locking Foot
The RFD4031 comes with a standard rubber foot on the bottom of the sled.An optional locking foot that is
used in place of the standard locking foot and secures the battery of the sled is available as a purchasable
accessory.For a full list of accessories that can be used with the RFD4031 RFID Premium sled, refer to the
product specific Technical Accessory Guide available at: zebra.com/support.
16
Getting Started with the RFD4031
Figure 7Rubber Locking Foot
Charging
1 Rubber Locking Foot
Before using the RFD4031 for the first time, fully charge the battery by placing it in the charging cradle until
the LED Power/Charging Indicator turns solid green. The RFD40 RFID sled and mobile computer may be
charged in the charging cradle individually or attached together.
When an RFD4031 RFID sled is removed from a charging cradle, it is automatically powered on. If a reader
is not used for a duration of thirty minutes, the reader enters Off mode.
NOTE: The cradle does not charge the device if the battery is completely deplete
17

Getting Started with the RFD4031
Figure 8Single-SlotCharging Cradle
NOTE: The cradle does not charge the device if the battery is completely depleted.
UI Indicators
The sled presents multiple forms of feedback to inform the user of various device states. The sled provides
LED definitions for decode and battery status as well as beeper indications to indicate battery charge
progress.
LED Definitions
The sled provides user feedback in the form of LED indications for decode, battery, Bluetooth, and Wi-Fi
states.
Decode LED Definitions
The following table outlines the context in which decode LED feedback is provided and the indication that
is presented for a given device state.
NOTE: The LED indicators on the sled differ from the LED indicators on the mobile computer
being used with the sled.
18

Getting Started with the RFD4031
Table 1Decode LED Indicators
Condition Indication
Good Scan Green
Scan Error Red
RFID Rag Read Indicator Enabled Green
Read Error Red
Battery LED Definitions
The following table outlines the context in which battery LED feedback is provided and the indication that
is presented for a given device state.
Table 2Battery LED Definitions While Charging
Conditions Indications
Pre-charging Amber (Fast, Fast, Slow)
Charging Amber (Blinking)
Fully Charged Green (Stays On)
Charging Error Amber (Fast Blinking)
Bluetooth LED Definitions
The following table outlines the context in which Bluetooth LED feedback is provided and the indication
that is presented for a given device state.
Table 3Bluetooth LED Definitions
Condition Indication
Looking to Pair Blue (Blinking)
Pairing Blue (Stays On)
Paired/Connected Blue (Stays On)
Error Red (Stays On)
Wi-Fi LED Definitions
The following table outlines the context in which Wi-Fi LED feedback is provided and the indication that is
presented for a given device state.
Table 4Wi-Fi LED Definitions
Condition Indication
Connecting Green (Blinking)
Connected Green (Stays On)
Transmission Error/Out of Range Red (Stays On)
19

Beeper Indications
The sled provides user feedback in the form of beeper tones for decode, battery, Bluetooth, and Wi-Fi
states.
Decode Beeper Indications
The following table outlines the context in which beeper feedback is provided and the indication that is
presented for a specific decode event
Table 5Decode Beeper Indications
Good Decode Short high tone
Decode Transmission Error No beep
Good RFID Decode Short medium tone
RFID Error No beep
Error Message (Other) No beep
Sled Memory Full (Batch Mode) Long tones for 5 seconds
Getting Started with the RFD4031
Condition Tone
Battery Beeper Indications
The following table outlines the context in which decode LED feedback is provided and the indication that
is presented for a given device state.
Table 6Battery Beeper Indications
Condition Tone
Low Battery (20%) Medium-length tones
Lower Battery (10%) Short tones - repeat
Suspend High/Medium/Low
Charging Short tone when the charger is connected.
Fully Charged One beep
Charging Error Three beeps (single occurrence)
Power On Low/Medium/High beep
Bluetooth Beeper Indications
The following table outlines the context in which beeper feedback is provided and the indication that is
presented for a specific Bluetooth state.
Table 7Bluetooth Beeper Indications
Condition Tone
On/Not Connected No beep
On/Pairing in Process No beep
20

Getting Started with the RFD4031
Table 7Bluetooth Beeper Indications(Continued)
Condition Tone
On/Connected Short/Low/High
Out of Range Short/High/Low
Pairing Error No beep
Off No beep
Wi-Fi Beeper Indications
The following table outlines the context in which beeper feedback is provided and the indication that is
presented for specific Wi-Fi states.
Table 8Wi-Fi Beeper Indications
Condition Tone
On/Not Connected No beep
On/Pairing in Process No beep
On/Connected Short/Low/High
Out of Range Short/High/Low
Pairing Error No beep
Off No beep
Trigger Modes
The following table outlines the supported trigger functions of the RFID sled.
NOTE: By default, the device assumes the upper trigger as the RFID decode trigger and the
lower trigger as the mobile computer decode trigger.
Table 9Trigger Modes
Condition Upper Trigger Lower Trigger Both Triggers Description
RFID Start/Stop X - - User
Barcode Start/
Stop
Configurable/
Signal Intent to
Mobile Device
Programmable
- X - User
Programmable
- - X Feature support is
determined by the
mobile computer
being used with
the device.
21

Basic Data Formatting
This section provides the steps necessary to do basic data formatting for barcode scan data.The 123Scan
tool is used to create parameter barcodes that perform basic data formatting. Advanced-Data formatting is
not supported.
NOTE: Do not use 123Scan and 123RFID Desktop simultaneously.
Download the latest 123Scan software (version 5.3 or higher), available at: zebra.com/us/en/support-
downloads/software/utilities/123scan-utility.html
1. Start by disabling passthrough mode by scanning the following parameter barcode:
2. Next,create a parameter barcode using 123Scan.
Getting Started with the RFD4031
3. Create a new configuration file.
4. Select My Scanner is not connected.
NOTE: 123scan is used to create offline parameter configuration for basic data formatting only.
123Scan is not used for any of the other online/offlineconfigurations.
5. Choose the PL5000 Imager, and select PL5000 -COMMON Models.
22

Getting Started with the RFD4031
6. Select Step 4 in the configuration wizard, Modify Data.
NOTE: 123scan is used to create offline parameter configuration for basic data formatting only.
As a result, Cable connection and Symbologies steps are not required for this procedure.
7. Select the Program complex data modifications or select a rule from your Data Formatting Library
radio button to view Basic and Advanced options.
8. Select Basic to view or edit formatting or create a rule.
9. Click view/edit to add a new rule or edit an existing rule, and click INSERT when finished.
10. Observe that the intended values for prefix or suffix are added and click Done.
23

Getting Started with the RFD4031
11. If the configuration file summary is correct, click Print bar code.
12. Users can save or print the generated parameter barcode.
24

Getting Started with the RFD4031
13. Scan the barcode below to re-enable passthrough mode:
25

123RFID Mobile Application for Android
123RFID Mobile Application for Android
This application runs on Android mobile devices and demonstrates capability and tag operation
functionality.
The application allows for navigating to all screens at any time, however, some actions are not permitted
while the device is charging. These actions include any operation that involves Tag reading or writing (for
example: Rapid Read, Inventory, Locate Tag, etc.).
Navigate to all screens when the inventory/locate operation is in progress. When the operation is in
progress, the device displays Operation in Progress if additional operations are initiated.
Installing the 123RFID Mobile Application for Android
Install the 123RFID Mobile Application on the mobile computer from zebra.com/support or from the Google
Play Store. The procedure to install the software on an Android device is dependent upon the Android
version.
To install the software:
1. Connect the Android device to your computer. It is connected as MTP Device and shown as a drive on
the computer.
For information on transferring files using Media Transfer Protocol, refer to the Mobile Computer
Integrator Guide at: zebra.com/support.
2. Navigate to Device Settings > Security and check Unknown Sources to allow installation of applications
from unknown sources.
3. Copy the 123RFID_Mobile_1.0.x.x.apk file to the mobile device.
4. Go to Settings > Security and select Unknown sources.
5. Use the File Manager to locate the 123RFID_Mobile_1.0.x.x.apk file in the folder to which it is copied in
Step 3 and select it.
6. In the pop-up window, select the Android App installer to begin installation.
Using the 123RFID Mobile Application for Android
To use the application for RFID operations:
1. Launch the 123RFID Mobile Application for Android on the mobile device.
26

123RFID Mobile Application for Android
2. From the Readers list, tap on the available device listed under Available Readers to connect and view
the Rapid Read screen.
3. Tap Settings > RFID > Advanced Reader Options > Antenna.
Power Level is set to 27.0 dBm by default.However, it is shown as 270 dbm because the value used
is in units of tens of dBm. Japan units are set to a different default power level depending on the SKU
type.
4. Tap the Back button and select Regulatory to set the region in which the device is operating.
NOTE: By default, the fastest read profile is selected and configures the reader for the maximum
power allowed based on the read profile. However, the dBm can be limited due to the regulatory
requirements of the specified region in which the sled is being used.
5.
Navigating 123RFID Mobile
Navigate using the Home screen, menu, or bottom navigation bar.Switch between the Inventory screen
and the Locate screen or the Inventory screen and the Rapid Read screen with a single tap of the
appropriate icon.
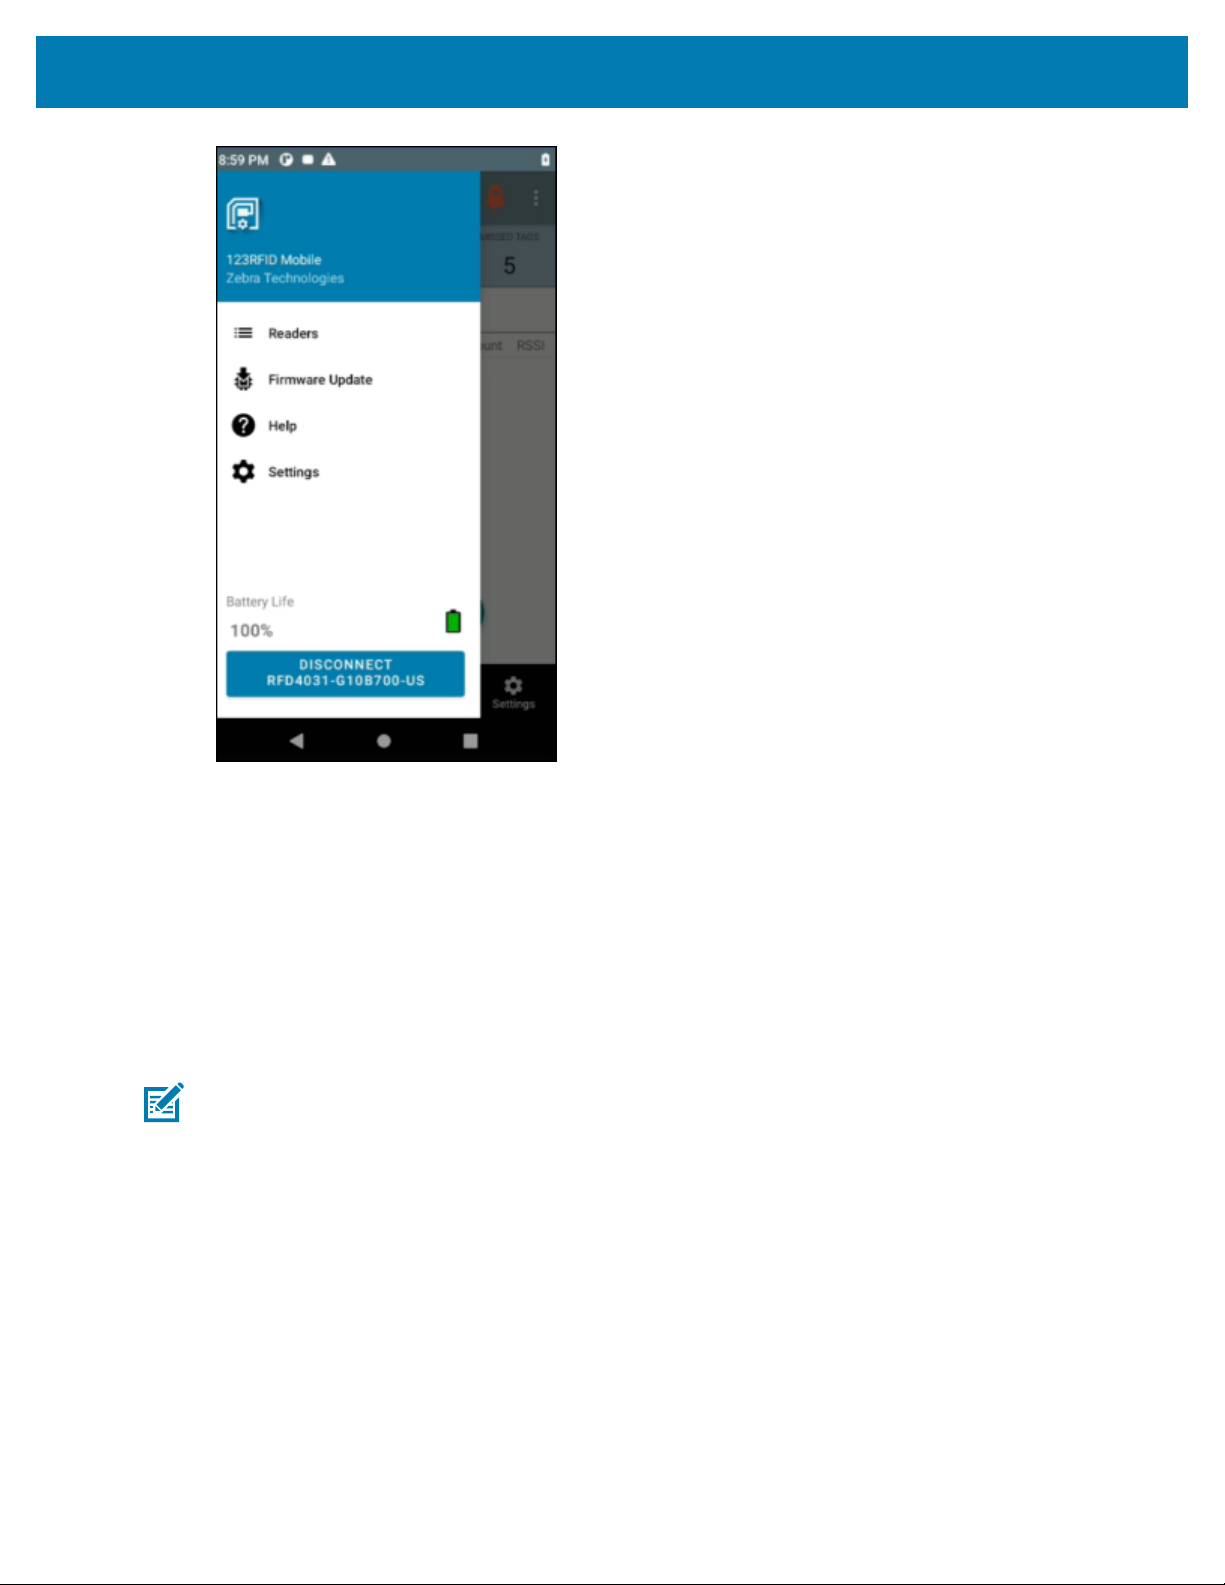
Menu
To exit the application, tap the Back button, and click OK on the confirmation screen.
To access the menu, tap . The menu options include:
• Readers
• Firmware Update
• Help
• Settings
To disconnect the connected reader, tap the Disconnect reader button.
NOTE: The battery life (% charged) displays on this screen.
27
123RFID Mobile Application for Android
Navigation Bar
The Navigation Bar consists of the following tabs:
• Readers - displays a list ofconnected readers and available readers. Upon initial launch of the
application, this is the tab that displays, unless the connection to the reader is over USB/CommonIO.
• RFID -select from RFID Settings, Locate Tag, Pre Filters, and Tag Write.This is thetab that displays
most of the time when launching the application. If the reader has been previously connected to the
app or the reader is connected over USB/Common IO.
• Scan -scan barcodes, view the list of scanned barcodes, or clear the scanned list.
NOTE: Available only on RFD40 Premium+ and RFD90 devices with a built-in scanner.
• Settings - configure General, RFID, Application, and Scan settings.
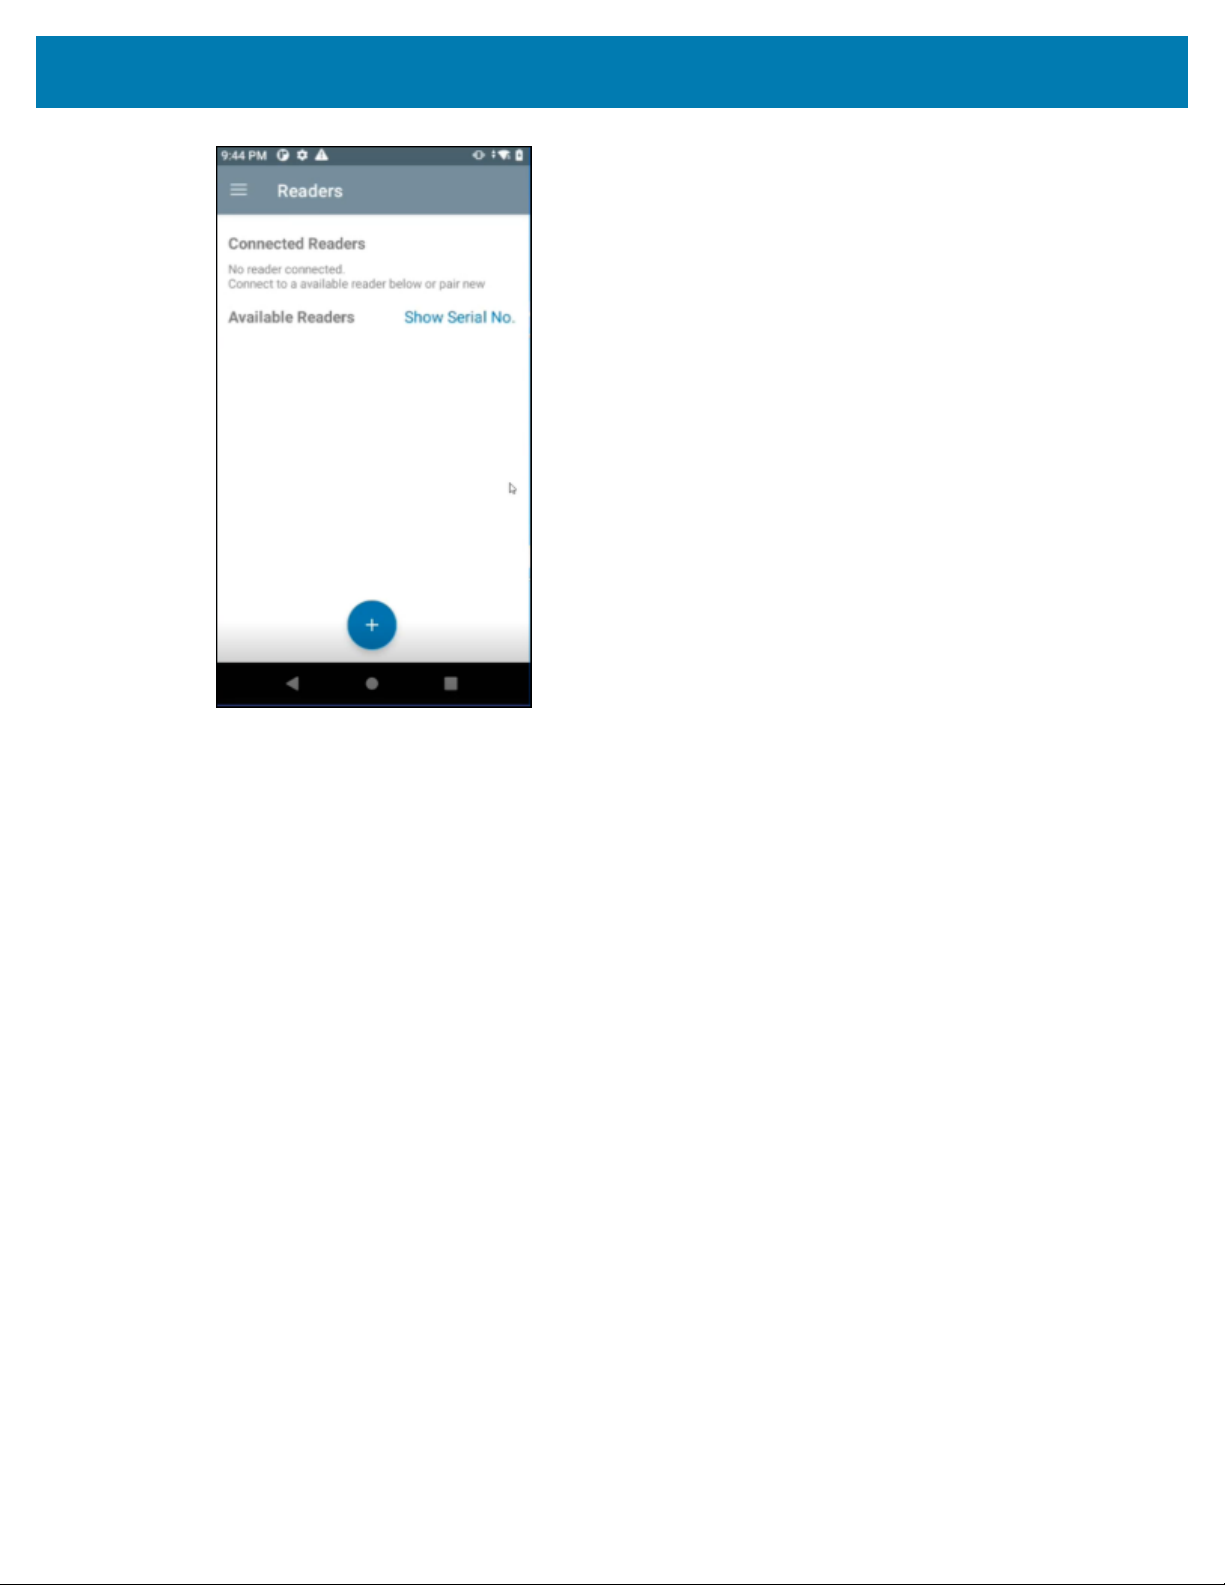
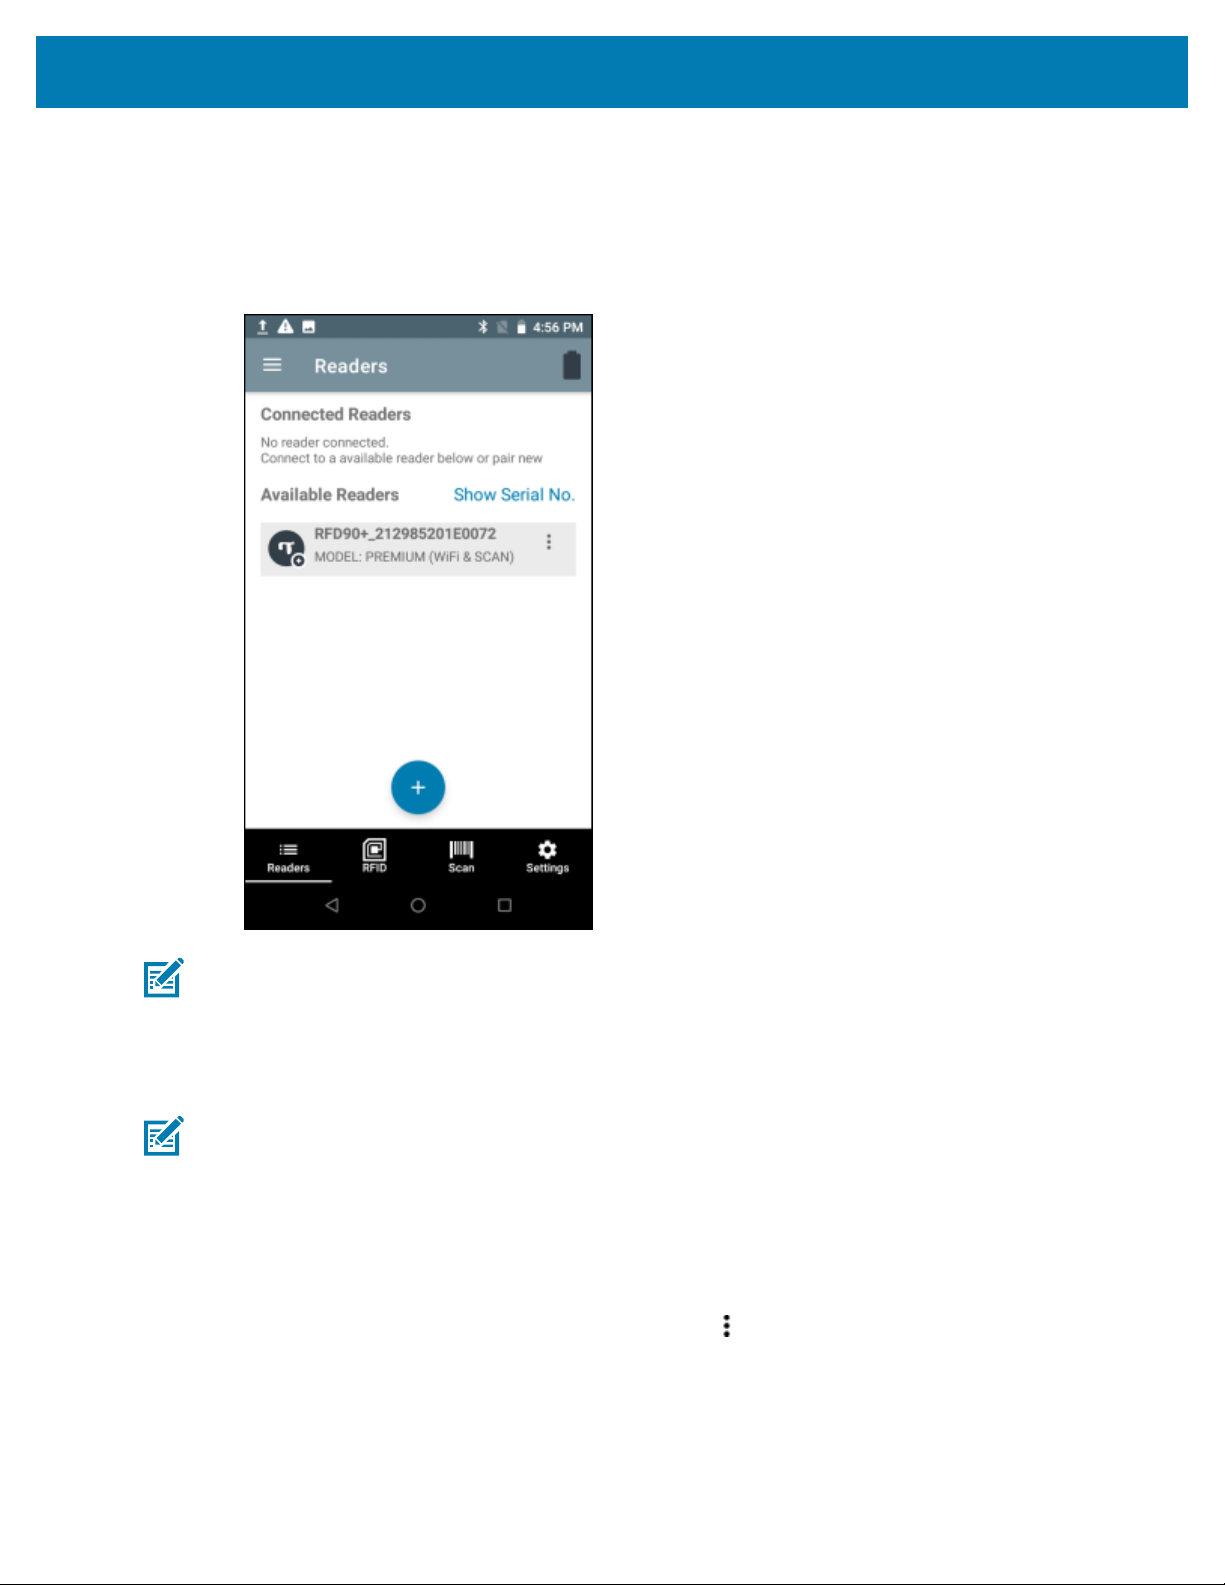
Readers List (Available vs. Connected)
The Readers list displays connected readers and available readers. After accessing 123RFID Mobile
application for the first time, when no readers are available or connected, the following screen displays.
28
123RFID Mobile Application for Android
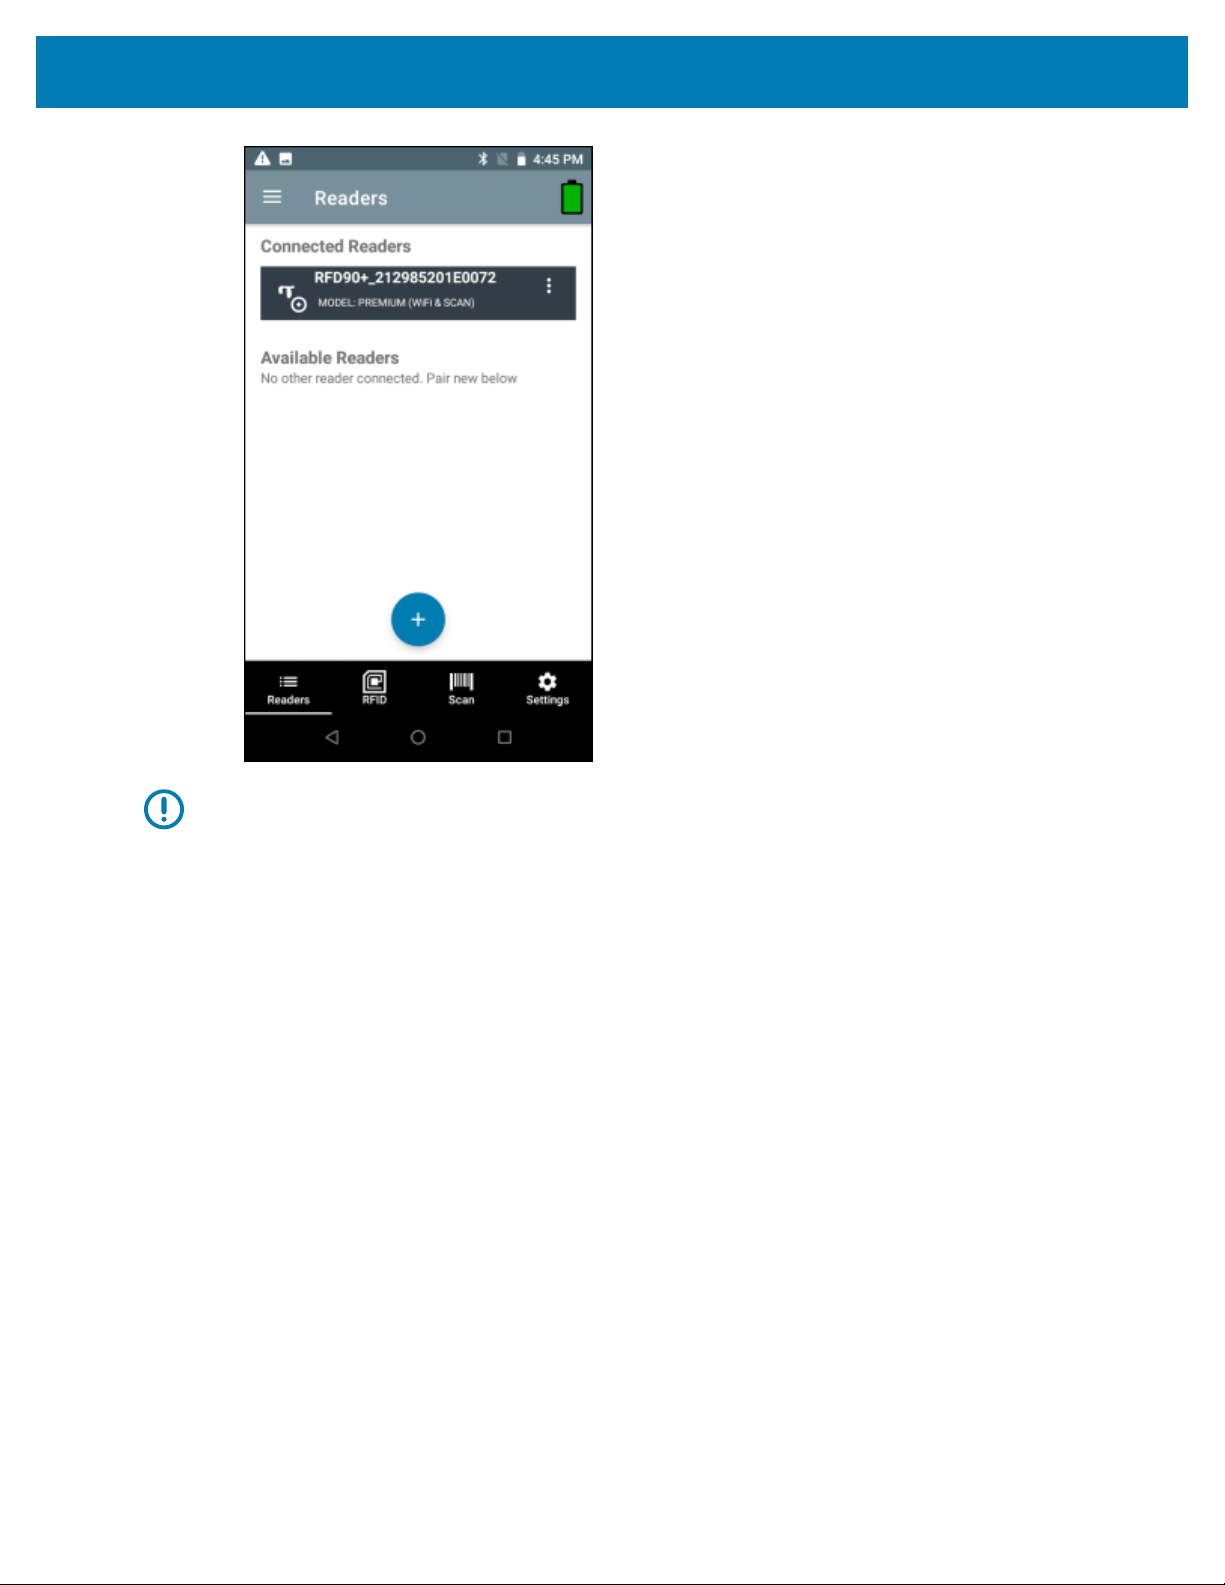
• Connected Readers - Lists the readers that are already connected and ready for use. Available options
include:
• Disconnect
• Perform a firmware update
• View reader details for a connected reader.
29
123RFID Mobile Application for Android
IMPORTANT: You can only connect to one device at a time.
30
123RFID Mobile Application for Android
• Available Readers - Lists the already paired devices that the user can choose to connect from.
Available options include:
• Connect
• Unpair
• View reader details for an available reader.
NOTE: The model name and description display under the reader name.To see the serial
number, tap Show Serial No.
Connect a Reader
NOTE: A reader can be connected directly to the 8 pin common IO port (RFD40/RFD90 sleds
only) or by using one of the three Bluetooth options.
To connect a reader:
1. From the bottom navigation bar, tap the Readers icon.
2. Tap a reader name from the Available Readers list to establish a session with the selected reader.
3. Tap again to terminate the session.
4.
To obtain additional information about the device, tap Reader Details within Connected Readers or
Available Readers.
31

123RFID Mobile Application for Android
See Also
Connect to Reader Directly Using USB
Connect to Reader Using Bluetooth
Connect to Reader Directly Using USB/Common IO
There is no need to go through any manual steps or pairing.When connecting the RFD40 using USB, it
connects directly.
NOTE: Use a USB eConnex pin if using the RFD40, or USB Serialconnection if using the
RFD2000.
1. Connect the RFD40 to USB.
2. Launch 123RFID Mobile App.
The RFID Rapid Read screen displays.
The RFD40 is directly connected.
Connect to Reader Using Bluetooth
Using Bluetooth, you can pair and connect to a reader in the following ways:
• Tap and Pair
• Scan and Pair
• Pair using Barcode
Pair Reader Using NFC Tag (Tap and Pair)
NOTE: Available only on RFD40 Premium and Premium +.
To pair a reader using the NFC tag:
1. From the bottom Navigation Bar, tap Readers.
2. Tap + icon.
32

123RFID Mobile Application for Android
3. To connect via NFC, align the NFC area behind the handle of the sled with the NFC area on the back of
the mobile computer to pair.
4. On the Pair with screen:
a) (Optional)Check Allow access to your contacts and call history.
b) Tap PAIR.
The reader is paired with the mobile computer and the reader displays in the Available Readers list..
Once the sled has paired with a mobile computer, the sled recognizes the device going forward and
automatically connects using the 123RFID Mobile Reader Discovery feature.
From the Readers list, select the checkbox for the paired reader and tap UNPAIR to unpair the reader
from the mobile computer.
33

Scan and Pair - RFD40
NOTE: Available only for Zebra Enterprise Mobile Computing devices and not third party Android
devices.
The RFD40 Premium + can connect to a host device over Bluetooth via Scan & Pair.
1. From the bottom Navigation Bar, tap Readers.
2. Tap + icon > Scan.
3. To connect via scan, scan the code on the sled using the mobile computer to obtain the Bluetooth MAC
address to pair the device to the sled or you can scan the serial number of the device.
123RFID Mobile Application for Android
4. Tap PAIR.
34

123RFID Mobile Application for Android
5. On the Pair with screen:
a) (Optional)Check Allow access to your contacts and call history.
b) Tap PAIR.
The reader is paired with the mobile computer and the reader displays in the Available Readers list..
Once the sled has paired with a mobile computer, the sled recognizes the device going forward and
automatically connects using the 123RFID Mobile Reader Discovery feature.
From the Readers list, select the checkbox for the paired reader and tap UNPAIR to unpair the reader
from the mobile computer.
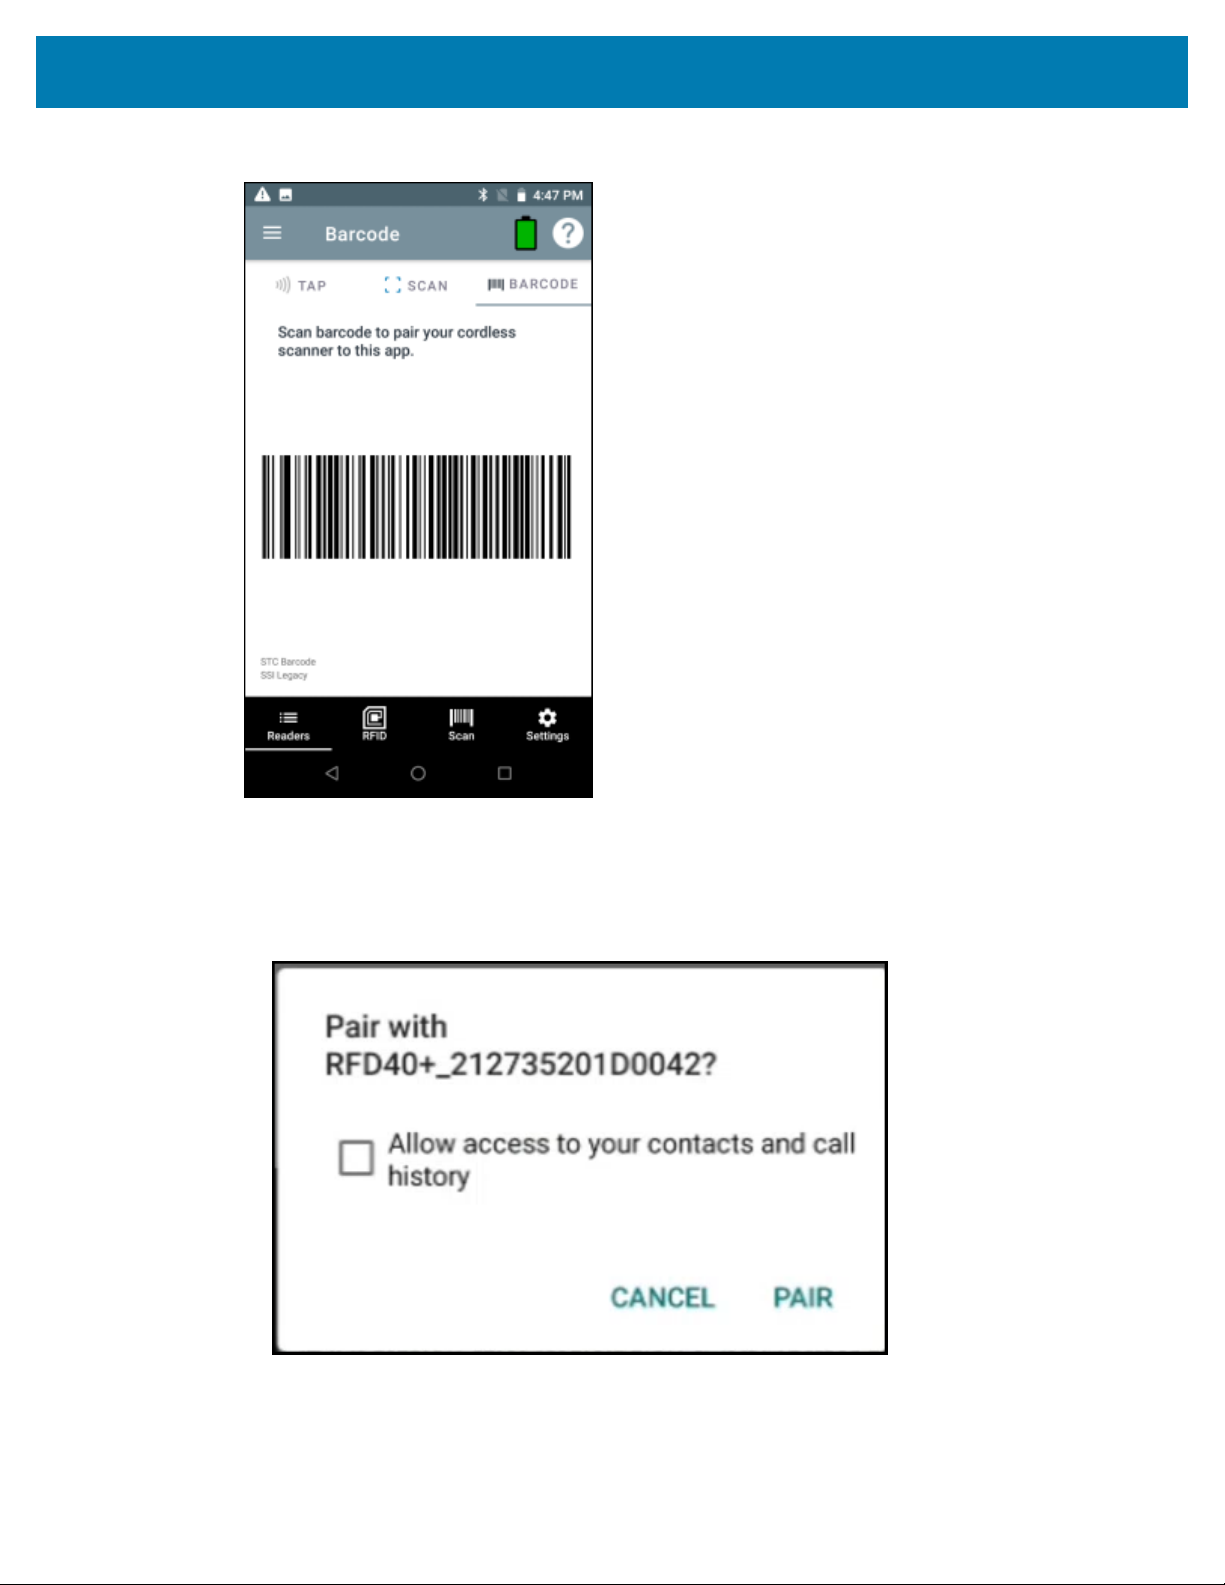
Pair Reader By Scanning a Barcode
NOTE: Available only on RFD40 Premium +.
To pair a reader by scanning a barcode:
1. From the bottom Navigation Bar, tap Readers.
2. Tap + icon > Barcode.
35

123RFID Mobile Application for Android
3. The very first time after you install the application, you will need to provide the Bluetooth address of the
mobile computer. Navigate to Settings > About Phone > Status > Bluetooth Address or click the click
here link on the Please Enter Your Bluetooth Address screen.
The Settings screen displays where you can locate the Bluetooth address.
4. Tap Bluetooth address and tap Copy.
5. Paste the Bluetooth address in the Bluetooth Address field on the Please Enter Your Bluetooth
Address screen.
6. Tap Continue.
Once you do that, it sets the Bluetooth address barcode for you.
36
123RFID Mobile Application for Android
7. Scan the barcode using the sled.
8. Tap PAIR.
9. On the Pair with screen:
a) (Optional)Check Allow access to your contacts and call history.
b) Tap PAIR.
The reader is paired with the mobile computer and the reader displays in the Available Readers list..
37

Once the sled has paired with a mobile computer, the sled recognizes the device going forward and
automatically connects using the 123RFID Mobile Reader Discovery feature.
From the Readers list, select the checkbox for the paired reader and tap UNPAIR to unpair the reader
from the mobile computer.
Pair Reader Manually
If you do not use the Tap and Pair, Scan and Pair, or Scan a Barcode method to pair the reader, you can
pair it manually.
1. Enable Bluetooth.
2. Discover Bluetooth devices.
3. Connect to a Bluetooth device.
See Also
Enabling Bluetooth
Discovering Bluetooth Devices
Connecting to a Bluetooth Device
123RFID Mobile Application for Android
RFID Operations
AccessRFID operations for the following:
• Rapid Read - Displays a view of the inventory operation on the reader, including total reads, unique tag
count, tag read rate, and read time.
• Inventory- Displays tag details, once tag reading begins.
• Locate Tag- Locates a single tag or multiple tags.Can be accessed from the Inventory screen.
• Tag Write- Allows you to write data to specified tags. Can be accessed from the Inventory screen.
• Pre-Filters - Allows you to set filters for tag data.Can be accessed from the Inventory screen.
• RFID Settings - Allows you to configure specific reader and antenna settings.Can be accessed from the
Rapid Read and Inventory screens, as well as from Settings.
Rapid Read
The Rapid Read screen displays the following data:
• Total Reads
• Unique tag count
• Read time (mm:ss)
• Tag read rate (tags/sec).
38

123RFID Mobile Application for Android
The Rapid Read and Inventory screens present two different views of the inventory operation on the
reader. The Start/Stop functionality can be used interchangeably on both screens. For example, when
operation starts on the Rapid Read screen and you navigate to the Inventory screen, the button available
on the Inventory screen is Stop. The same is true when the operation starts on the Inventory screen. During
the rapid read process, you can navigate to the Inventory screen to view tag details along with tag counts
for each tag. The statistics displayed are maintained on the Rapid Read and Inventory screens regardless
of the screen used to start the process.
See Also
Inventory
Inventory
Once tags begin reading, the tag details populate the Inventory screen.Tag reading is started and stopped
on this screen as well as on the Rapid Read screen. When the process starts, tag information displays on
the screen.
NOTE: When the tag does not have printable ASCII data when in ASCII mode, a yellow
highlighted background displays on the Inventory screen.
39

123RFID Mobile Application for Android
View Inventory Results
To view Inventory results:
1. Tap Inventory from the Home or Menu screen.
2. Tap Start to start the rapid read inventory operation.
The Start button changes to Stop.
3. Tap Stop to stop the read inventory operation.
NOTE: Thescan trigger on the device can also start and stop the inventory operation. Press
the trigger to start, continue to hold and release to stop.
4. To filter information by type, tap the Memory Bank dropdown menu and select User, Reserved, TID, or
EPC.
40

123RFID Mobile Application for Android
5.
The tag ID selected can be used to locate, set pre-filters and tag write.After selecting a tag, tap and
select Locate Tag, Pre Filters, or Tag Write.
Progressing to another screen does not halt the operation. However, attempting to make changes or
perform another operation while this operation is in process results in an error.
NOTE: Tags are fullyconvertible to ASCII format. ASCII mode may be enabled by selecting
Settings > Application Settings > ASCII Mode.
41
123RFID Mobile Application for Android
See Also
Rapid Read
42

123RFID Mobile Application for Android
Inventory Screen Features
The following table provides information on various metrics that can be captured using the Inventory
feature.
Table 10Inventory Screen Features
Item Description
Tags
Search Tap the Search icon and enter a tag ID. Tags that match the entry
Power Management Icon indicates if Dynamic Power is on. See Power Management.
Tap Memory Bank to select one of the following memory bank
options from the drop-down menu:
• None - Defaults to EPC.
• User - Allows reading user memory bank data when the tag is
inventoried.
• Reserved - Allows reading reserved memory bank data when
the tag is inventoried.
• TID - Allows reading TID memory bank data when the tag is
inventoried.
• EPC - Allows reading EPC memory bank data when the tag
is inventoried. When the next inventory operation starts, the
details from the selected memory bank displays. This menu
is inactive if there is an ongoing operation on the connected
reader.
• Default Display - None.
display in the content area.
Tap the Power Management icon to open the Battery Status
screen.
Content Area (select a tag) Tapping a Tag ID highlights the tag. The highlighted Tag ID is
populated on the Tag Location text area as well as the Tag Pattern
area in the Access Control screen. Tap Start to start searching for
the tag. See Tag List Match Mode Operation. From this screen,
return to the Menu or go to the Home screen and select Locate
Tag.
43

123RFID Mobile Application for Android
Table 10Inventory Screen Features(Continued)
Item Description
Content Area (select a tag)
The tags displayed in this area are based on the option selected
from RFID > RFID Advanced Settings > Tag Reporting.Tapthe
tag ID to expand details about the tag.Tapthe tag ID again to
collapse details.
Example Default Tag Display:
Tag ID Tag Count
AD99 15404190725965400404
Example Expanded Tag Display:
Note: Expanded tag detail can only display when the inventory
operation is stopped. Memory bank data is shown only when
inventory is complete.
Tag ID Tag Count
AD99 15404190725965400404
EPC MEMORY 3000
RSSI
-50
Phase
1800
USER
1122334455667788AABBCCDDEEFF
1122334455667788AABBCCDDEEFF
1122334455667788AABBCCDDEEFF
44

123RFID Mobile Application for Android
Table 10Inventory Screen Features(Continued)
Item Description
Tag List Match Mode Operation
When Tag List Match Mode is checked on the Application Settings screen, the application identifies
tags from a given set of tags in csv tag list format (comma separated values file). Browse to choose the
csv file.The contents of the csv file displays on the Inventory screen. By default, the application displays
friendly names from csv files, if Tag List Match Mode is enabled.If you do not want to show friendly
names, the setting can be disabled in Settings to show only EPC.
45
123RFID Mobile Application for Android
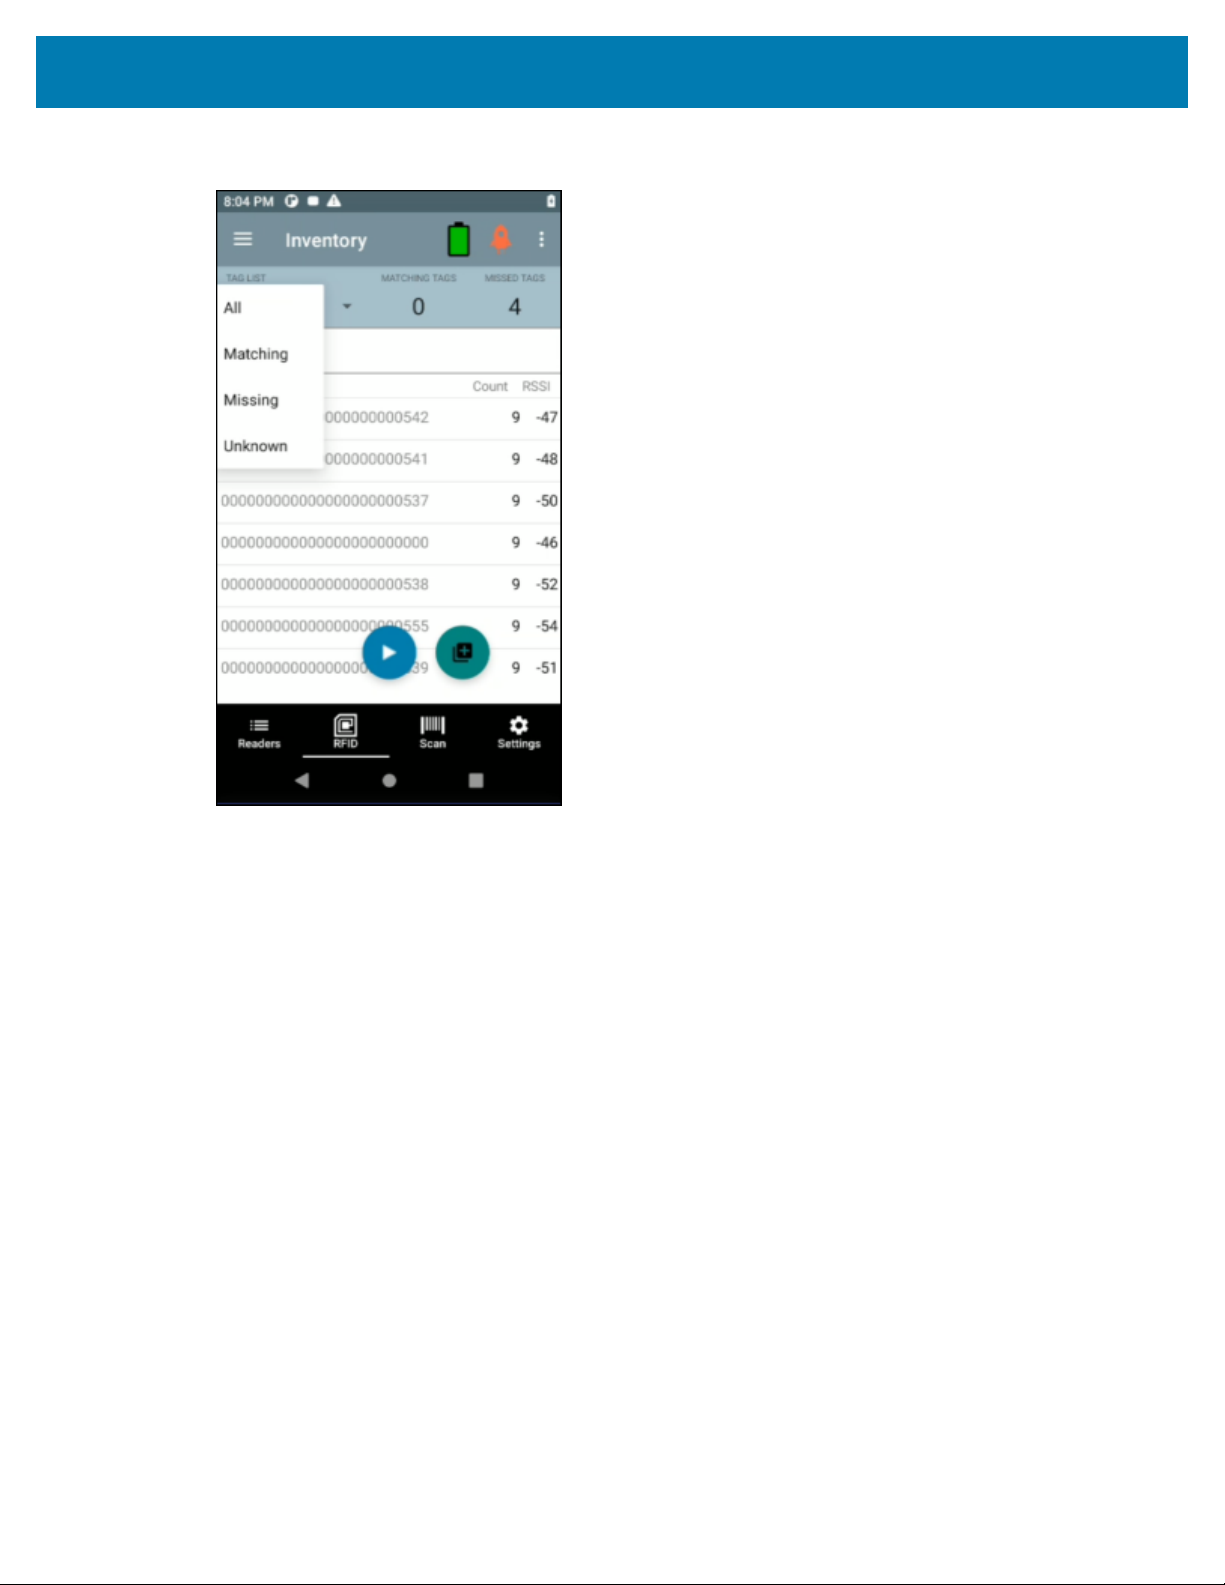
Before the inventory starts, the count is zero. The tag list can be sorted using the drop-down menu
choices. Select an option to display the type of tags to show when the inventory starts.
• All
• Matching
• Missing
• Unknown
46
123RFID Mobile Application for Android
Figure 9Tag List Match Mode Option Menu
47

123RFID Mobile Application for Android
Figure 10Tag List Match Mode Enabled with Friendly Names
If Tag List Match Mode is enabled, the text color changes accordingly:
• Matching = Green
• Missing/Expected = Red
• Unknown = Gray
NOTE: While running the inventory, you can re-import the csv file from the Inventory screen, by
clicking on the Re-import Tag list match mode csv file icon.
See Also
Sample 1 Inventory List: Tag List Enabled; Matching Tag Option Selected
Sample 2 Inventory List: Tag List Enabled; Missed Tag Option Selected
Sample 3 Inventory List: Tag List Enabled; Unknown Tag Option Selected
Sample 4 Inventory List: Tag List Enabled; All Tag Option Selected
Locate Tag
Use Locate Tag to locate a single tag or multiple tags (Multi Tag). From the Inventory screen, tap and
select Locate Tag.
Locate a Single Tag
To locate a single tag:
48

123RFID Mobile Application for Android
1. Tap Locate Tag from the Home or Menu screen.
2. Enter the Tag ID in the text area or select a tag from the Inventory screen to pre-populate the Tag ID to
search.
3. Tap Start to start the locate tag operation.
4. Tap Stop to stop the locate tag operation.
NOTE: Thescan trigger on the device can also start and stop the locate tag operation. Press
the trigger to start, continue to hold and release to stop.
The Locate Tag screen displays a color bar graph showing the proximity % (relative distance) of the tag.
The%gives the relative distance, for example,from 0% to 100% where the tag is very far or very close
respectively
Progressing to another screen does not halt the operation, until Stop is selected. However, attempting to
make changes or perform another operation while the locate tag operation is in process results in an error.
Locate Multiple Tags (Multi Tag)
Locate multiple tags by importing a csv file.
NOTE: Multi Tag Locate supports ASCII mode. Enable ASCII mode from Settings > Application >
Global Settings > Enable ASCII Mode.
To locate and track multiple tags:
1. Tap Locate Tag from the Home or Menu screen.
49

123RFID Mobile Application for Android
2. Select the Import csv file on the Multi Tag panel.
The csv file holds the EPC ID and RSSI value. The default RSSI for the EPC will be -33.
3. Select the file containing the specific tag information from the file manager to bring the file into the
application.
4. Tap the Reset Data icon to reset the tag count and RSSI proximity %.
5. Tap the Add Tag ID icon to add the EPC value of interest to the dynamic list of EPC's. It can only add
the value which is present in the imported csv file.
6. Tap the Remove Tag ID icon to remove the EPC value of non-interest from the dynamic list of EPC's. It
can only remove the value which is present in the csv file.
NOTE: Once you re-access the MultiTag Locate screen, the entire tag list from the csv file
displays, if values were deleted dynamically.
Pre Filters
1.
From the Inventory screen, tap and select Pre Filters.
50

123RFID Mobile Application for Android
2. Select Basic or Advanced.
3. Complete the following:
a) Memory Bank - EPC, TID and USER.
b) Offset (words) - Offset in the memory bank is specified in words.
c) Length (octets) - pattern length.
d) Select non matching TAGs - Inventory shows tags which are not matching with Tag pattern entered.
e) Action:
• INV A NOT INV B or ASRT_SL_NOT_DSRT_SL
• INV A or ASRT SL
• NOT INV B or NOT DSRT SL
• INV A2BB2A NOT INV A or NEG SL NOT ASRT SL
• INV B NOT INV A or DSRT SL NOT ASRT SL
• INV B or DSRT SL
• NOT INV A or NOT ASRT SL
• NOT INV A2BB2A or NOT NEG SL
f) Target - SESSION S0, SESSION S1, SESSION S2, SESSION S3 & SL FLAG.
NOTE: Up to two pre-filters can be enabled.
51
Tag Write
1.
2. Select Read/Write tags, Lock, Kill.
Read/Write
The Tag Pattern area is automatically filled in when a tag is selected in the Inventory screen. The Read/
Write access operation is simplified with offset and length fields are hidden. The user can tap the more/
advanced options icon to see offset and length fields. Tap the icon again to hide the advanced options.
Memory Bank options now have extended menu options to choose directly interested area of memory
bank. This avoids typing of offset and length etc.
NOTE: SDK 2.0.49 enabled with the Write + 1 retry feature, improves the efficiency during the
Tag Write operation.
Read/Write options are:
• Tag ID and Password values are in hex. Tag ID is edited.
• Memory Bank options - EPC, TID, USER, PC and CRC, Access Password, Kill Password.
123RFID Mobile Application for Android
From the Inventory screen, tap and select Tag Write.
• Offset and Length values are in 16-bit words. This is only available after tapping the Advanced Options
icon. To toggle visibility, tap AdvancedOptions again.
• Access operation screen maintains edited tag ID.
NOTE: The user can read/write to/from tags in ASCII mode.
52

123RFID Mobile Application for Android
Figure 11Read/Write Basic
53

123RFID Mobile Application for Android
Figure 12Read/Write Advanced
Lock
NOTE: U9 NXP tags are not supported.
Lock privilege options are as follows:
• Read and Write
• Permanent Lock
• Permanent Unlock
• Unlock
54

123RFID Mobile Application for Android
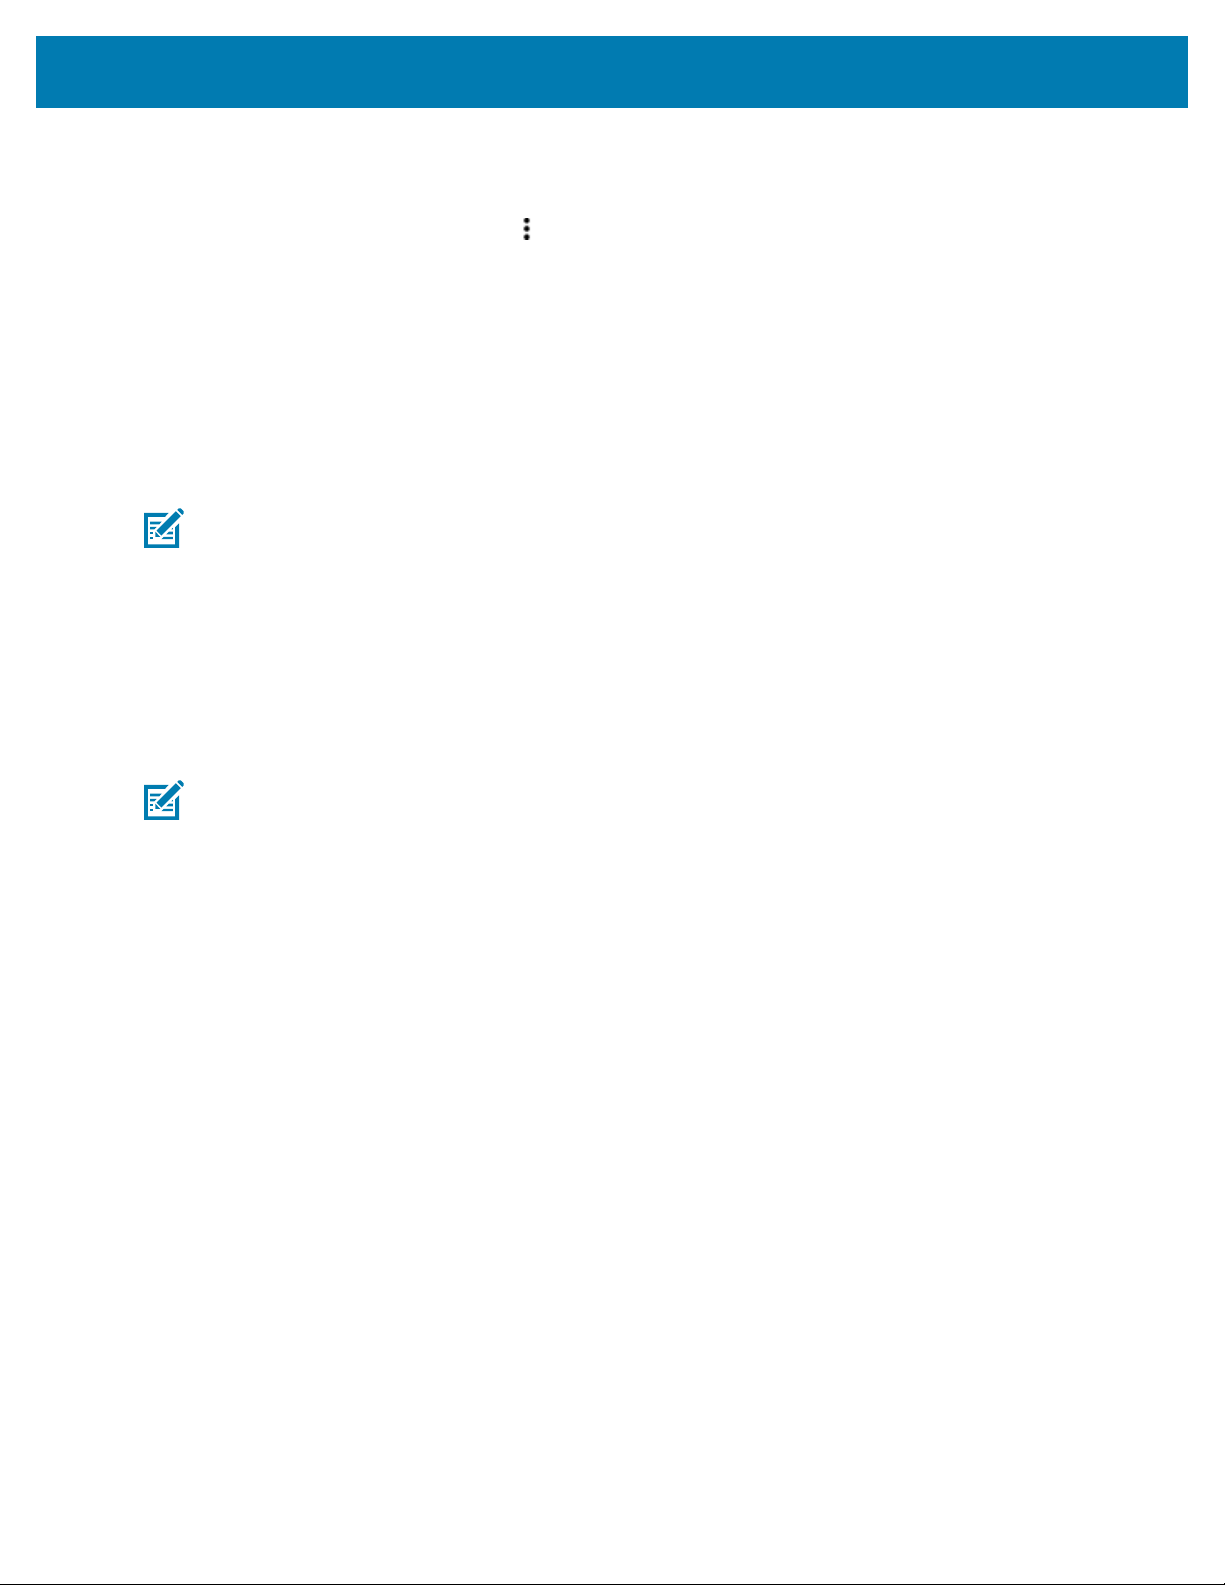
Kill
Permanently renders the tag unusable. A Kill Password must be provided.
55
123RFID Mobile Application for Android
General Settings
To accessGeneral Settings, from the bottom navigation bar, tap Settings > General or tap > Settings >
General.The General Settings screen options include:
• Firmware Update -Update the firmware on the reader.
• Factory Reset -Reset file settings on the reader to factory defaults.
• Enable Logging -Enable the logging of tag reads.
• Device Info -View information such as friendly name, serial number, and RFID/scan settings.
• Share File - Share a file with a paired device.
• Trigger Mapping -Change the mapping for the upper and lower trigger and designate the Upper
Trigger for RFID decode and the Lower Trigger for Host Scan or the Upper Trigger for Host Scan and
the Lower Trigger for RFID decode.
56

123RFID Mobile Application for Android
See Also
Firmware Update
Factory Reset
Enable Logging
Device Info
Share File
Trigger Mapping
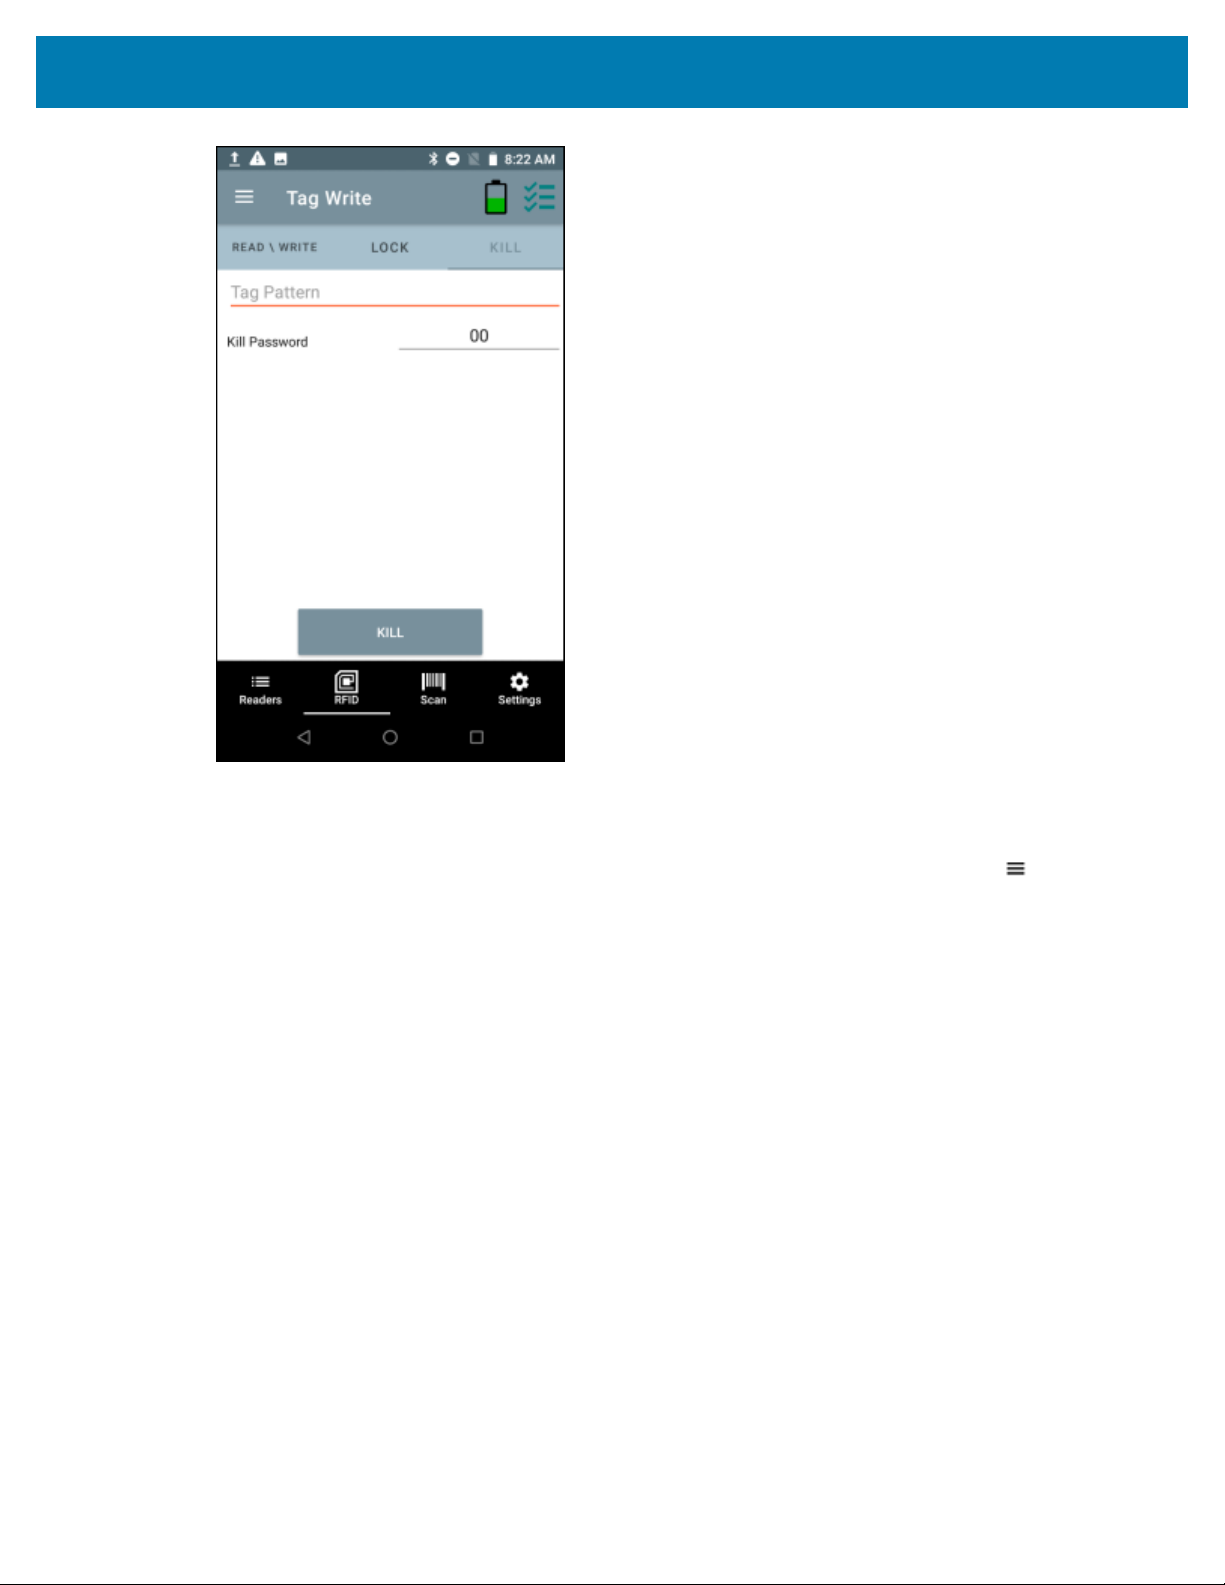
Update the Device Firmware
NOTE: Available only on RFD40.
To update device firmware:
1. To access Firmware Update, from the bottom navigation bar, tap Settings > General > Firmware
Update or tap > Settings > General > Firmware Update.
57
123RFID Mobile Application for Android
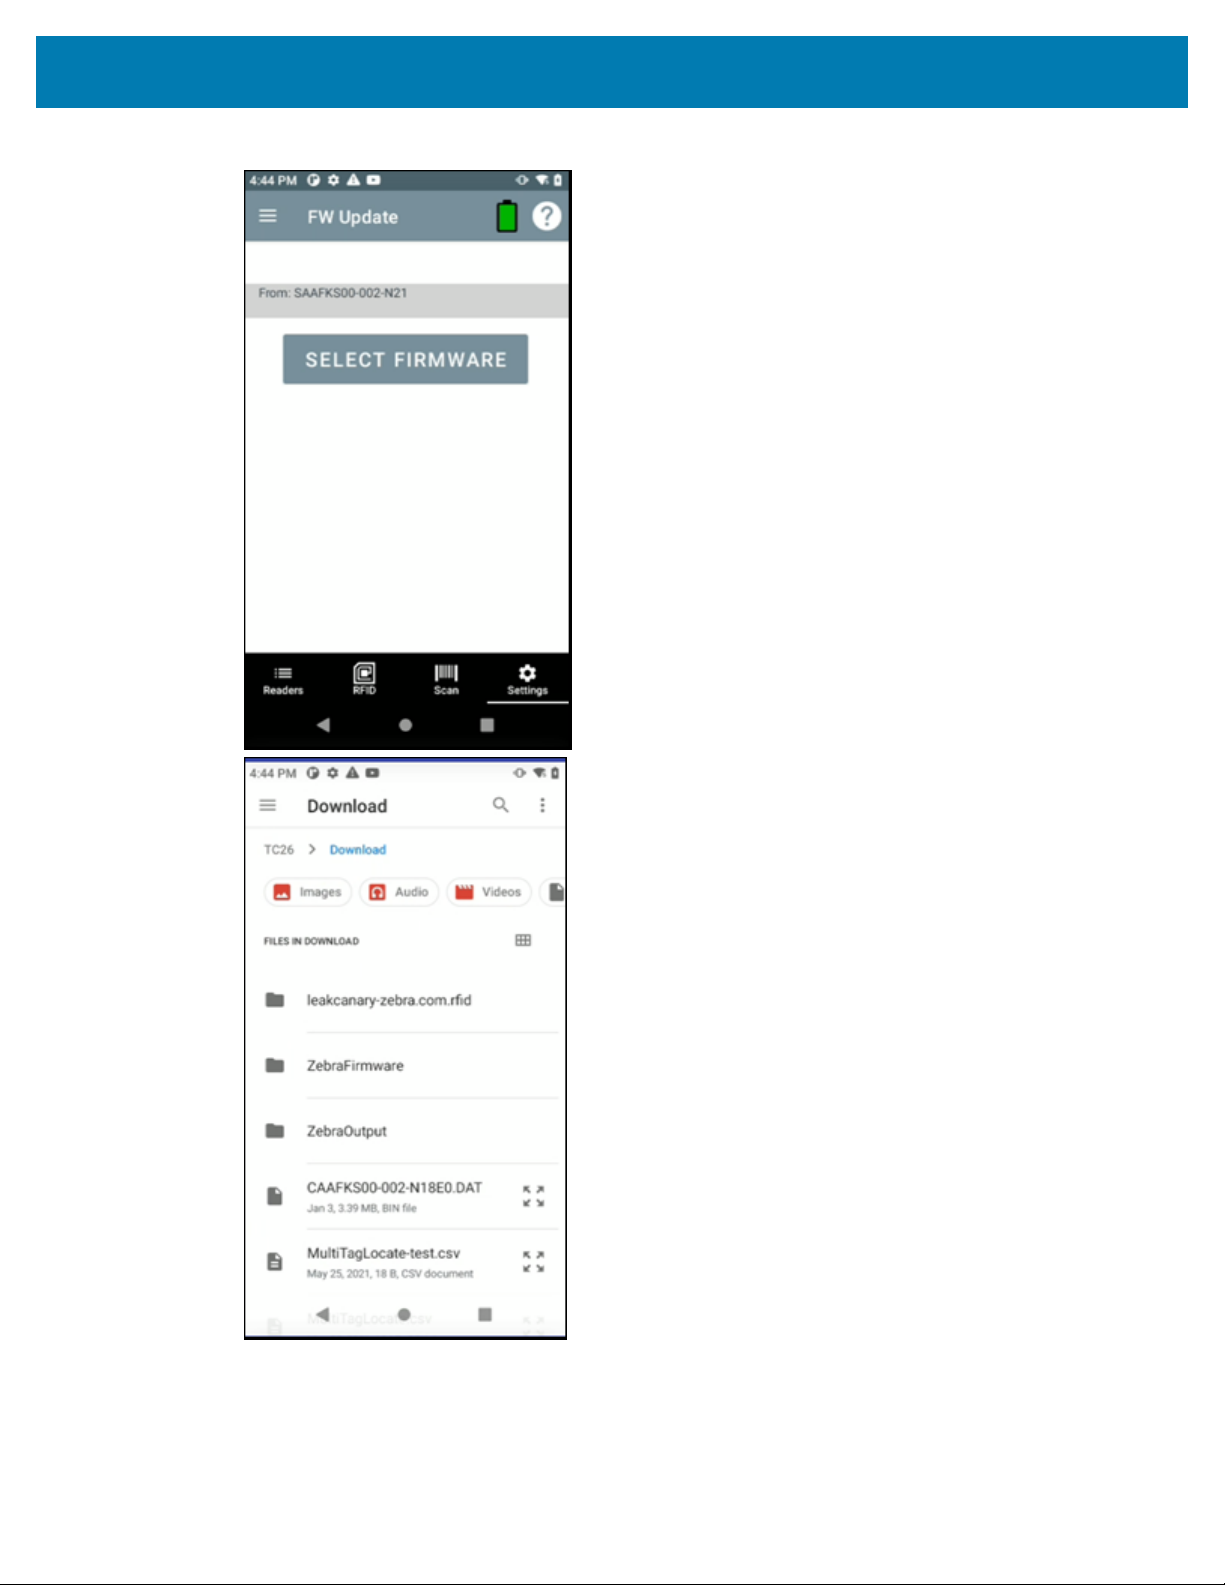
2. Select the firmware version to be loaded onto the device.
a) Copy the correct .DAT file to /SDcard/download.
b) Make sure the terminal is connected to the device.
58

123RFID Mobile Application for Android
3. Tap Update Firmware.
Factory Reset
Performing a factory reset will clear any saved settings and restart the reader. Region needs to be set
again.
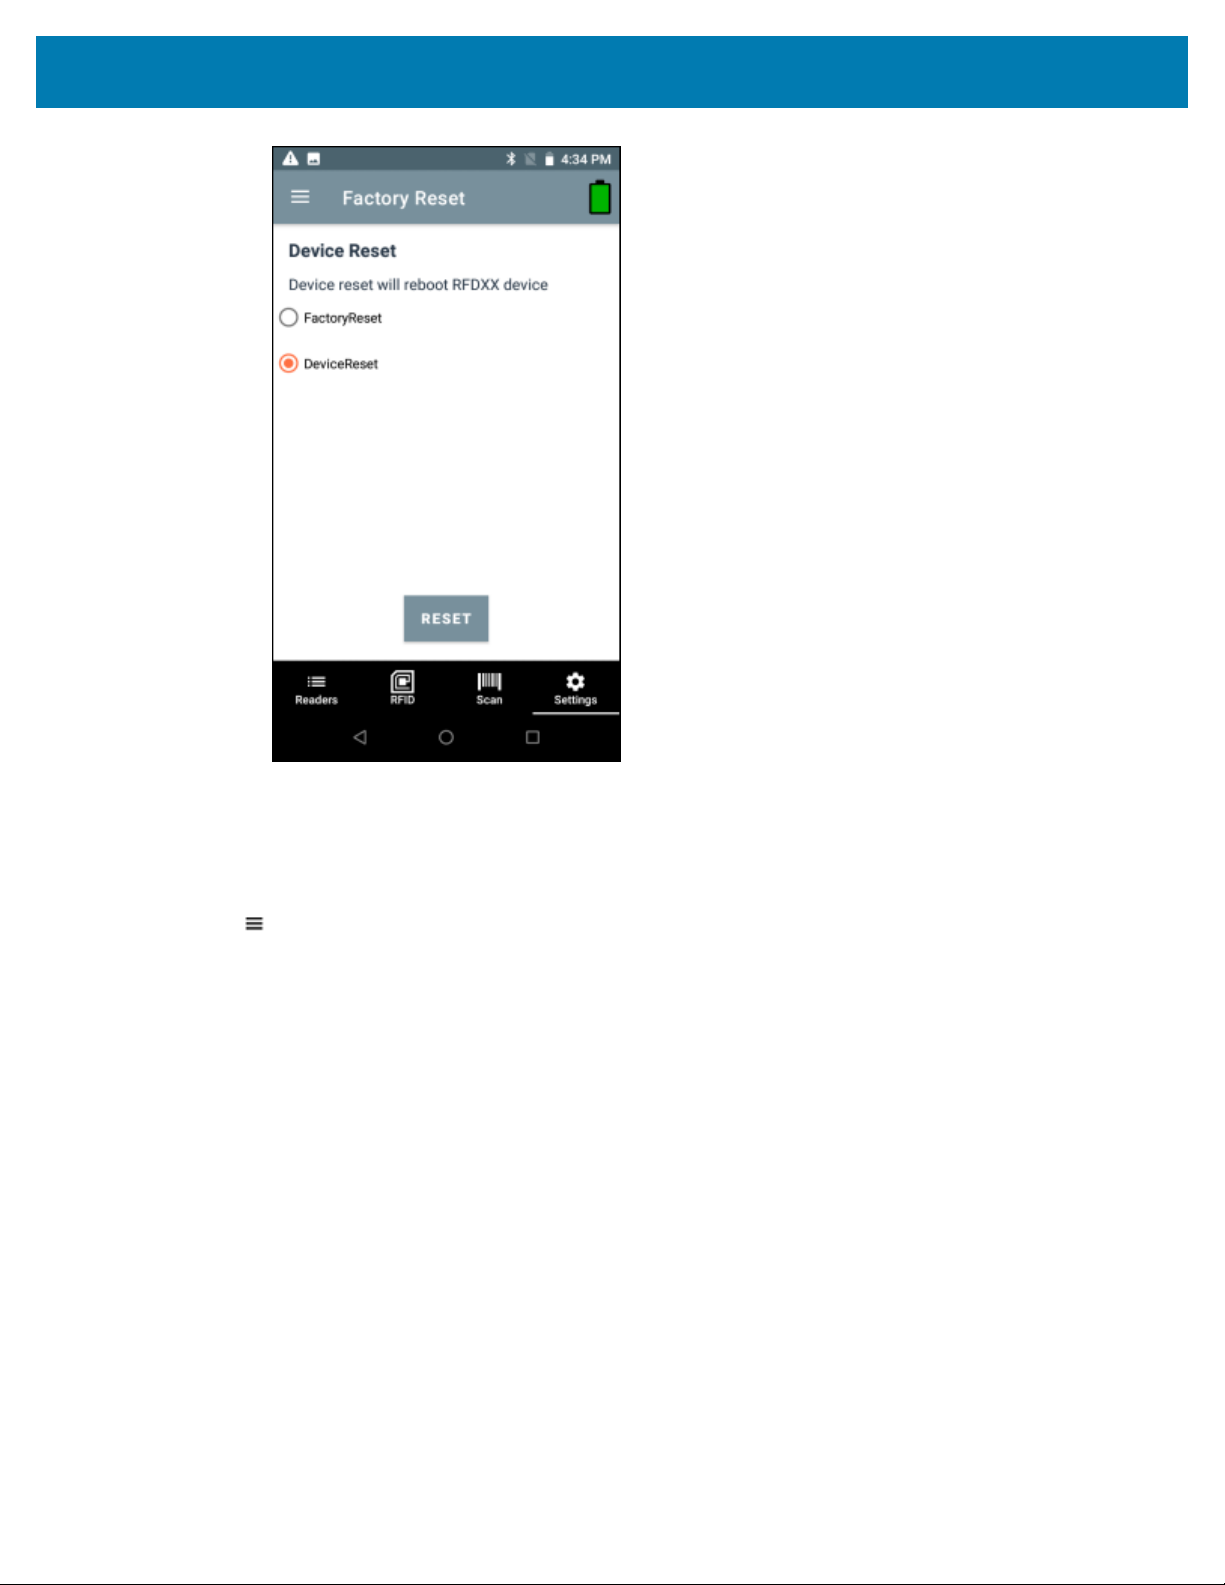
1. To reset to factory defaults, from the bottom navigation bar, tap Settings > General > Factory Reset or
tap > Settings > General > Factory Reset.
59

123RFID Mobile Application for Android
2. Select one of the following:
a) FactoryReset to perform a factory reset.
b) DeviceReset to perform a device reset, which reboots the RFDXX device.
60
123RFID Mobile Application for Android
3. Tap RESET.
Enable Logging
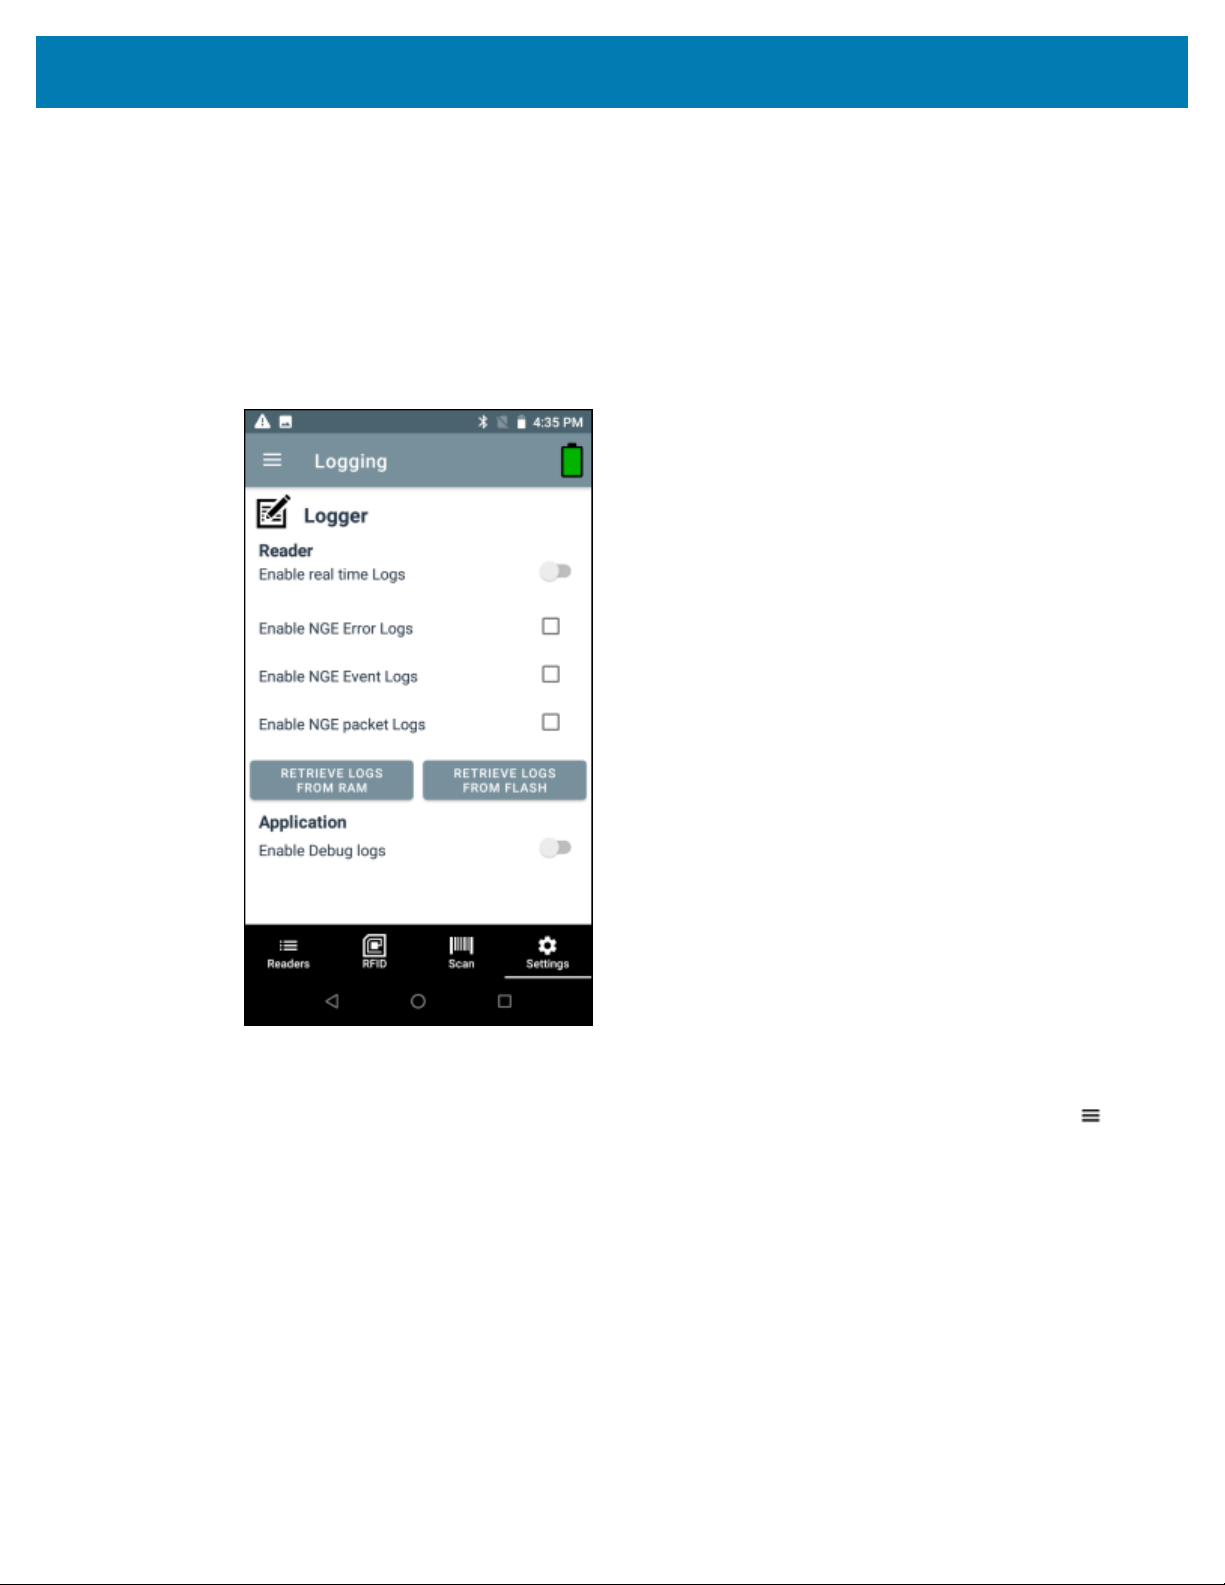
1. To enable logging, from the bottom navigation bar, tap Settings > General > Enable Logging or tap
> Settings > General > Enable Logging.All the enabled logs are captured in logcat which can be
retrieved through RxLogger for EMC devices.
61
123RFID Mobile Application for Android
2. Specify the following:
• Tap Enable real time Logs to toggle on or off.
• Tap Enable NGE Error Logs to select.
• Tap Enable NGE Event Logs to select.
• Tap NGE packet Logs to select.
• Tap RETRIEVE LOGS FROM RAM or RETRIEVE LOGS FROM FLASH.
• Tap Enable Debug logs to toggle on or off.
Device Info
To access Device Into, from the bottom navigation bar, tap Settings > General > Device Info or tap >
Settings > General > Device Info.
Device Info displays the following:
• Model Number
• Serial Number
• Firmware
• Manufacture Date
• Application Version
• SDK Version
62

123RFID Mobile Application for Android
Share File
1.
To share a file, from the bottom navigation bar, tap Settings > General > Share File or tap > Settings
> General > Share File.
File Explorer opens.
63

123RFID Mobile Application for Android
2. Select a single file or multiple files.
User has an option to share the file(s) to a nearby device via Bluetooth or any other file sharing
supported app.
3. Select from the provided options.
Trigger Remapping
To perform a Trigger-remapping operation using RFID3 API, start by creating a new project in Android
Studio. For additional information, refer to the Android Studio tutorial. To learn more about preparing
the basic environment to work with an RFID reader, refer to Hello RFID before following the steps in this
section.
NOTE: The following remapping functionality in the RFID SDK is supported for Android 2.0 and
later.
64

123RFID Mobile Application for Android
The RFID SDK allows users to configure the upper trigger and the lower trigger with the following options.
• RFID_SCAN
• SLED_SCAN
• TERMINAL_SCAN
• SCAN_NOTIFICATION
• NO_ACTION
NOTE: Terminal scan refers to the scanner on the EMC terminal, not on the RFID sled. In this
example, the RFID SDK or the application does not get involved. Terminal scan enables EMC
terminal scan trigger. Each hardware trigger can be independently configured with the options
listed above.
65

123RFID Mobile Application for Android
The user receives a scan notification through a trigger HANDHELD_TRIGGER_EVENT notification. The
trigger event has an extra field for trigger type to indicate whether it is an RFID trigger press or a scan
trigger press.
Trigger Type: 0 RFID Trigger
Trigger Type: 1 Scan Trigger
RFID_SCAN Configures the hardware trigger to initiate RFID
tag reads.
SLED SCAN For Premium+ devices to configure the hardware
trigger to simulate a barcode scan using the
imager inside the RFID sled.
SCAN_NOTIFICATION Posts the scan trigger notification to the user,
but does not initiate barcode decode or RFID tag
reads.
TERMINAL_SCAN Configures the hardware trigger to initiate
barcode scanning on the terminal. This is
applicable only for mobile computers connected
to the RFID sled through the eConnex connector.
NO_ACTION Mutes the hardware trigger functionality.
RFID Settings
To access RFID Settings, from the bottom navigation bar, tap Settings > RFID or tap > Settings > RFID
or from the Rapid Read or Inventory screens, tap > RFID Settings.RFID Settings options include:
• Profiles -Displays Fastest Read, Cycle Count, Dense Readers, Optimal Battery, Balanced Performance,
User Defined and Reader Defined profiles.
• Advanced Reader Settings -Antenna, Singulation Control, Start/Stop Triggers, Tag Reporting, Power
Management and Save Configuration.
• Regulatory -Allows selection of region and available channels.
• Beeper -Provides the option to change the volume of both the host and sled device.
• LED -Enables/Disables Terminal/Host tag read LED for inventory indications.
NOTE: Available only on RFD8500 and MC33.
66

123RFID Mobile Application for Android
Profiles
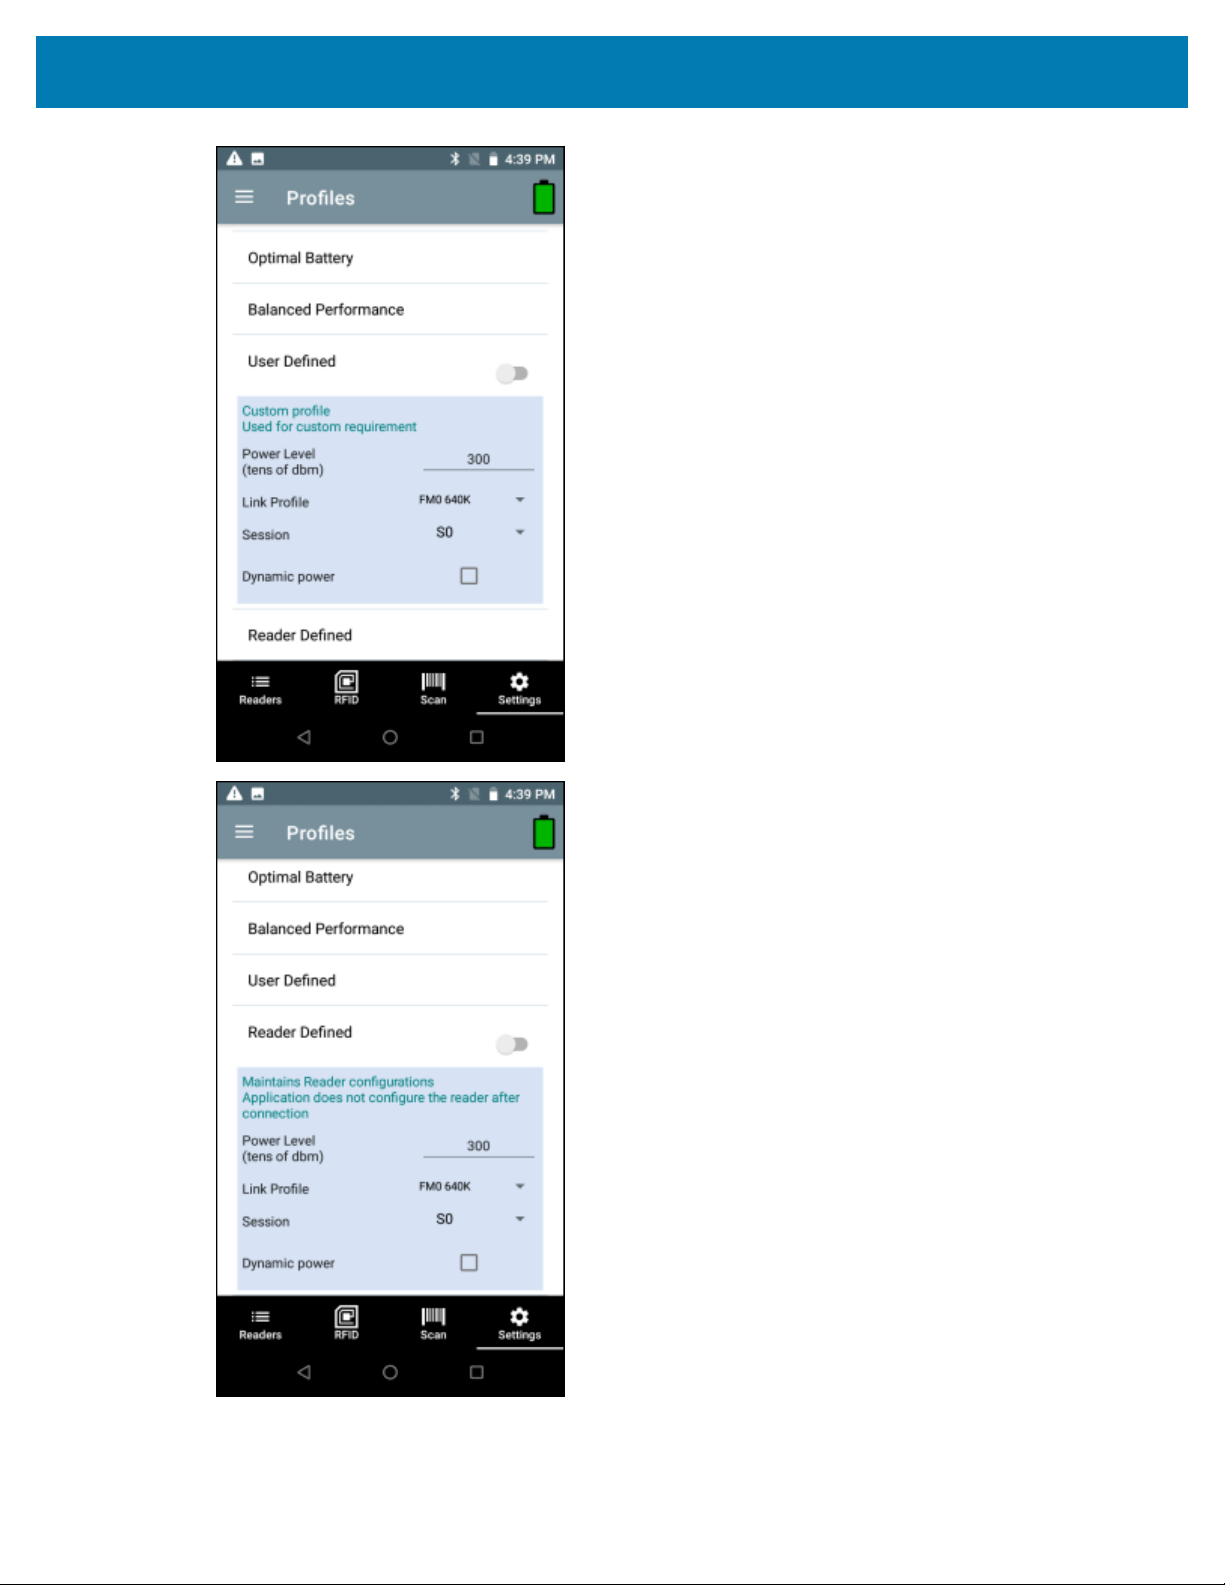
To display the list of profiles, from the bottom navigation bar, tap Settings > RFID > Profiles.
• The currently selected profile is highlighted in orange.
• Tap profile item to expand the profile and view applicable configurations.
• Profiles can be selected or disabled by using the slider switch to the right of the profile name.
NOTE: If Power Level, Link Profile, Session, or Dynamic Power are modified from each respective
screen, then the currently selected profile changes to User Defined profile and profile item
values are modified with same values.
Profile setting options include:
• Fastest Read - Read as many tags as fast as possible.
• Cycle Count - Read as many unique tags as possible.
• Dense Readers - Use when there are multiple readers within close proximity.
• Optimal Battery - Provides optimal battery life.
• Balanced Performance - Maintains balance between performance and battery life.
• User Defined - Custom profile used for custom requirements.
• Reader Defined - Maintains reader configurations.
67

123RFID Mobile Application for Android
68

123RFID Mobile Application for Android
69

123RFID Mobile Application for Android
70
123RFID Mobile Application for Android
71

123RFID Mobile Application for Android
Advanced Reader Options
To set advanced reader options, from the bottom navigation bar, tap Settings > RFID > Advanced Reader
Options.Advanced Reader Options include:
• Antenna
• Singulation Control
• Start/Stop Triggers
• Tag Reporting
• Save Configuration
• Power Management
See Also
Antenna
Singulation Control
Start/Stop Triggers
Tag Reporting
Save Configuration
Power Management
72

123RFID Mobile Application for Android
Antenna
To access the Antenna screen, from the bottom navigation bar, tap Settings > RFID > Advanced Reader
Options > Antenna.The Antenna screen displays the following:
• Power Level - Displays the current selection and a text box for available power levels (as reported by
thedevice). The default setting is 27.0 dBm (shown as 270; the value displayed is in units of tens of
dBm). Japan units are set to a different default power level depending on the SKU type. The minimum
power level when DPO is enabled is 3.1 dBm. When DPO is disabled, the minimum power level is 0
dBm.
• Link Profile - Displays the current selection and includes a drop-down list of available link profiles
(reported by thedevice). Link Profile display format is as follows: Return link bit data rate in bis per
second (e.g., 60000 -> 60 Kbs); Miller Value (e.g., MV_4 -> Miller 4); thus profile name M4 240K (240K
becomes BLF) modulation type (PR ASK is the only one supported).
• PIE value has no units and is either 1500 and 2000 minimum.
• Tari applicable Tari value in thousands of micro seconds (e.g., 6250 -> 6.25 microseconds).
NOTE: By default, the fastest read profile is selected and configures the reader for the maximum
power level allowed based on the read profile. However, the dBm can be limited due to the
regulatory requirements of the specified region in which the sled is being used.
NOTE: The Power Level and Link Profile are blank when there is no connection to the reader.
73
123RFID Mobile Application for Android
Singulation Control
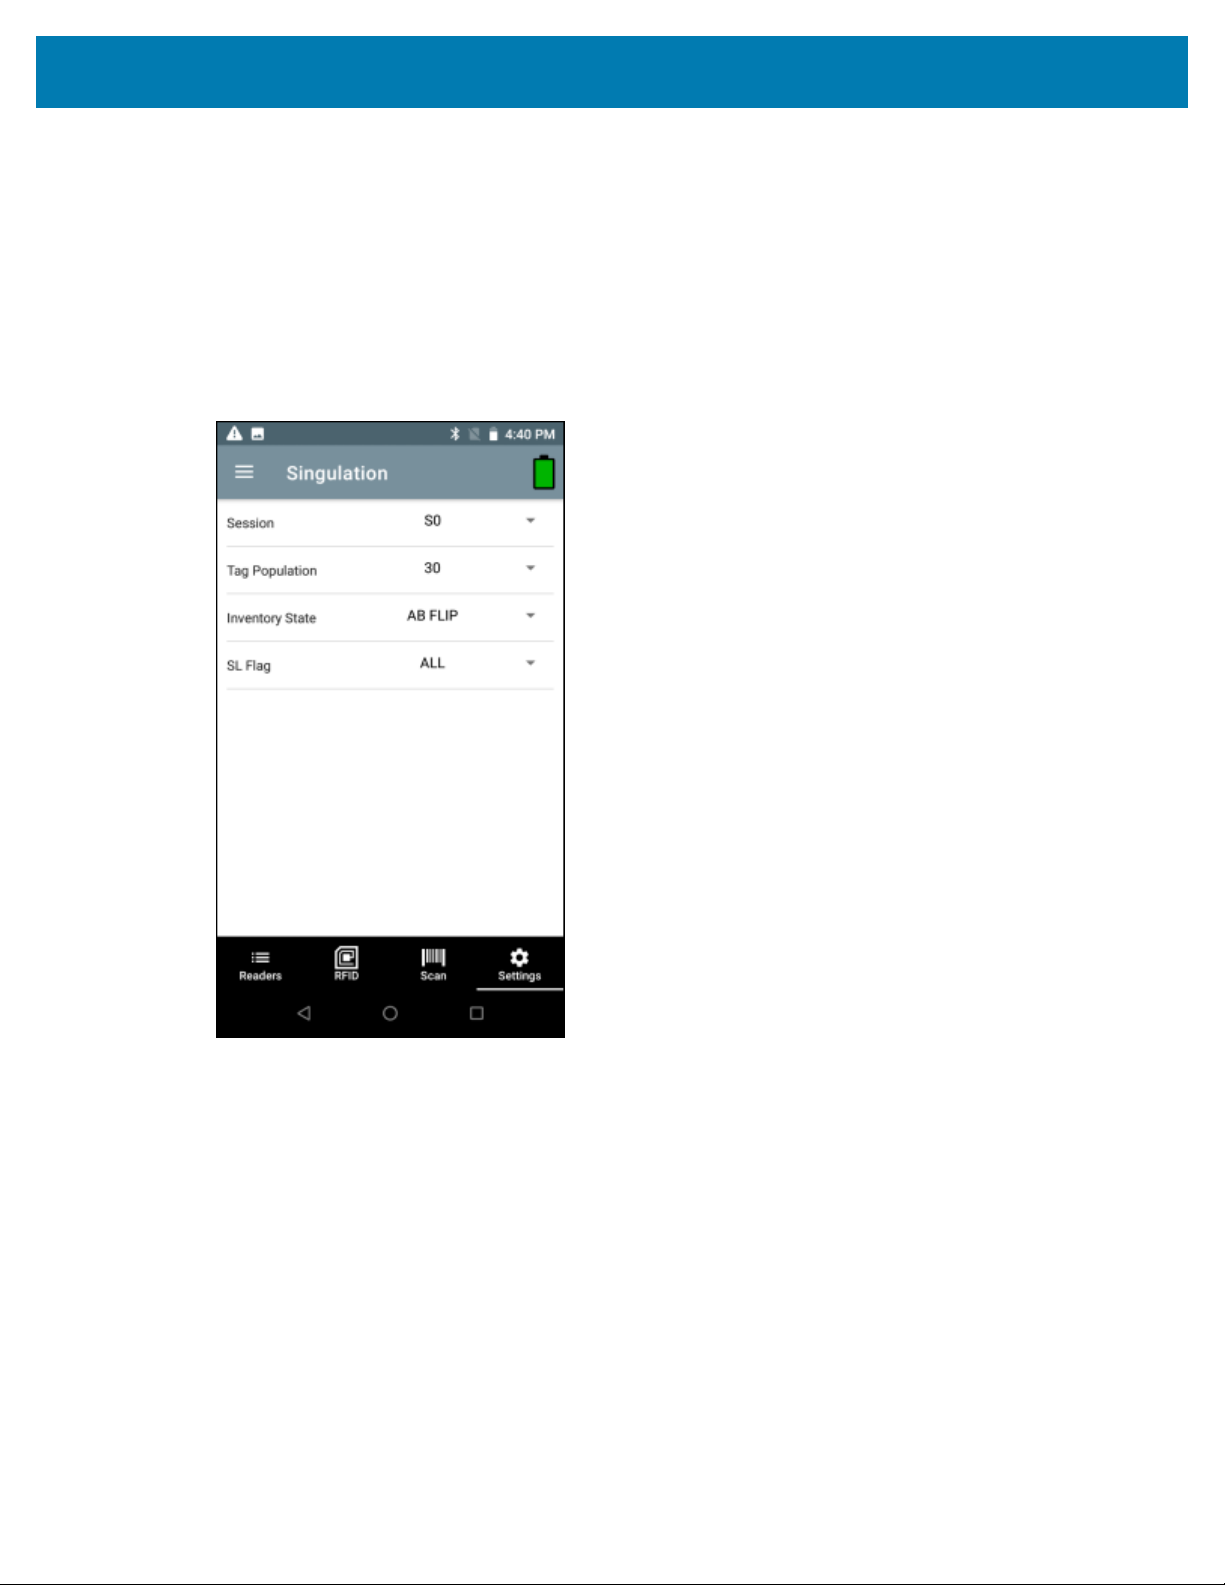
To access Singulation Control,from the bottom navigation bar, tap Settings > RFID > Advanced Reader
Options > Singulation Control.View or configure the singulation control settings for each antenna.
• Session - The drop-down list includes the available session options (S0, S1, S2, S3).
• Tag Population - A numeric value of the estimated number of tags in the Field of View (FOV). Values
shown are 30, 100, 200, 300, 400, 500, 600.
• Inventory State - State A, State B, AB Flip.
• SL flag - ALL, DEASSERTED, ASSERTED.
Start and Stop Triggers
To access the Start and Stop Triggers screen, fromthe bottom navigation bar, tap Settings > RFID >
Advanced Reader Options > Start/Stop Triggers.
The Start Trigger Periodic displays the Period input box (in milliseconds).
The Stop Trigger Duration, Tag Observation and N attempts display numeric value input boxes.
All time entries are in milliseconds All the required details for saving triggers to the reader must be entered
or the application does not save the trigger settings to the reader.
74

123RFID Mobile Application for Android
Required input for Start/Stop Trigger settings are as follows:
• Start Trigger
• Immediate (default)
• Handheld - Select either the Trigger Pressed or Trigger Released check box.
• Periodic - Enter the period of time in milliseconds.
• Stop Trigger
• Immediate (default)
• Hand-held - Select either the Trigger Pressed or Trigger Released check box along withTimeoutin
milliseconds.
• Duration - Enter duration in milliseconds.
• Tag Observation - Enter the tag count along with timeout in milliseconds.
• N Attempts - Enter the number of attempts along with timeout in milliseconds.
If the start trigger type is set to Hand-held trigger (pressed or released), the application sets the repeat for
the operation to ensure the use case if repeated operations can be demonstrated.
If any trigger is defined as Hand-held, the application does not act on immediate trigger type for a Handheld trigger action.
Tag Reporting
To access Tag Reporting,from the bottom navigation bar, tap Settings > RFID > Advanced Reader
Options > Tag Reporting.
75

123RFID Mobile Application for Android
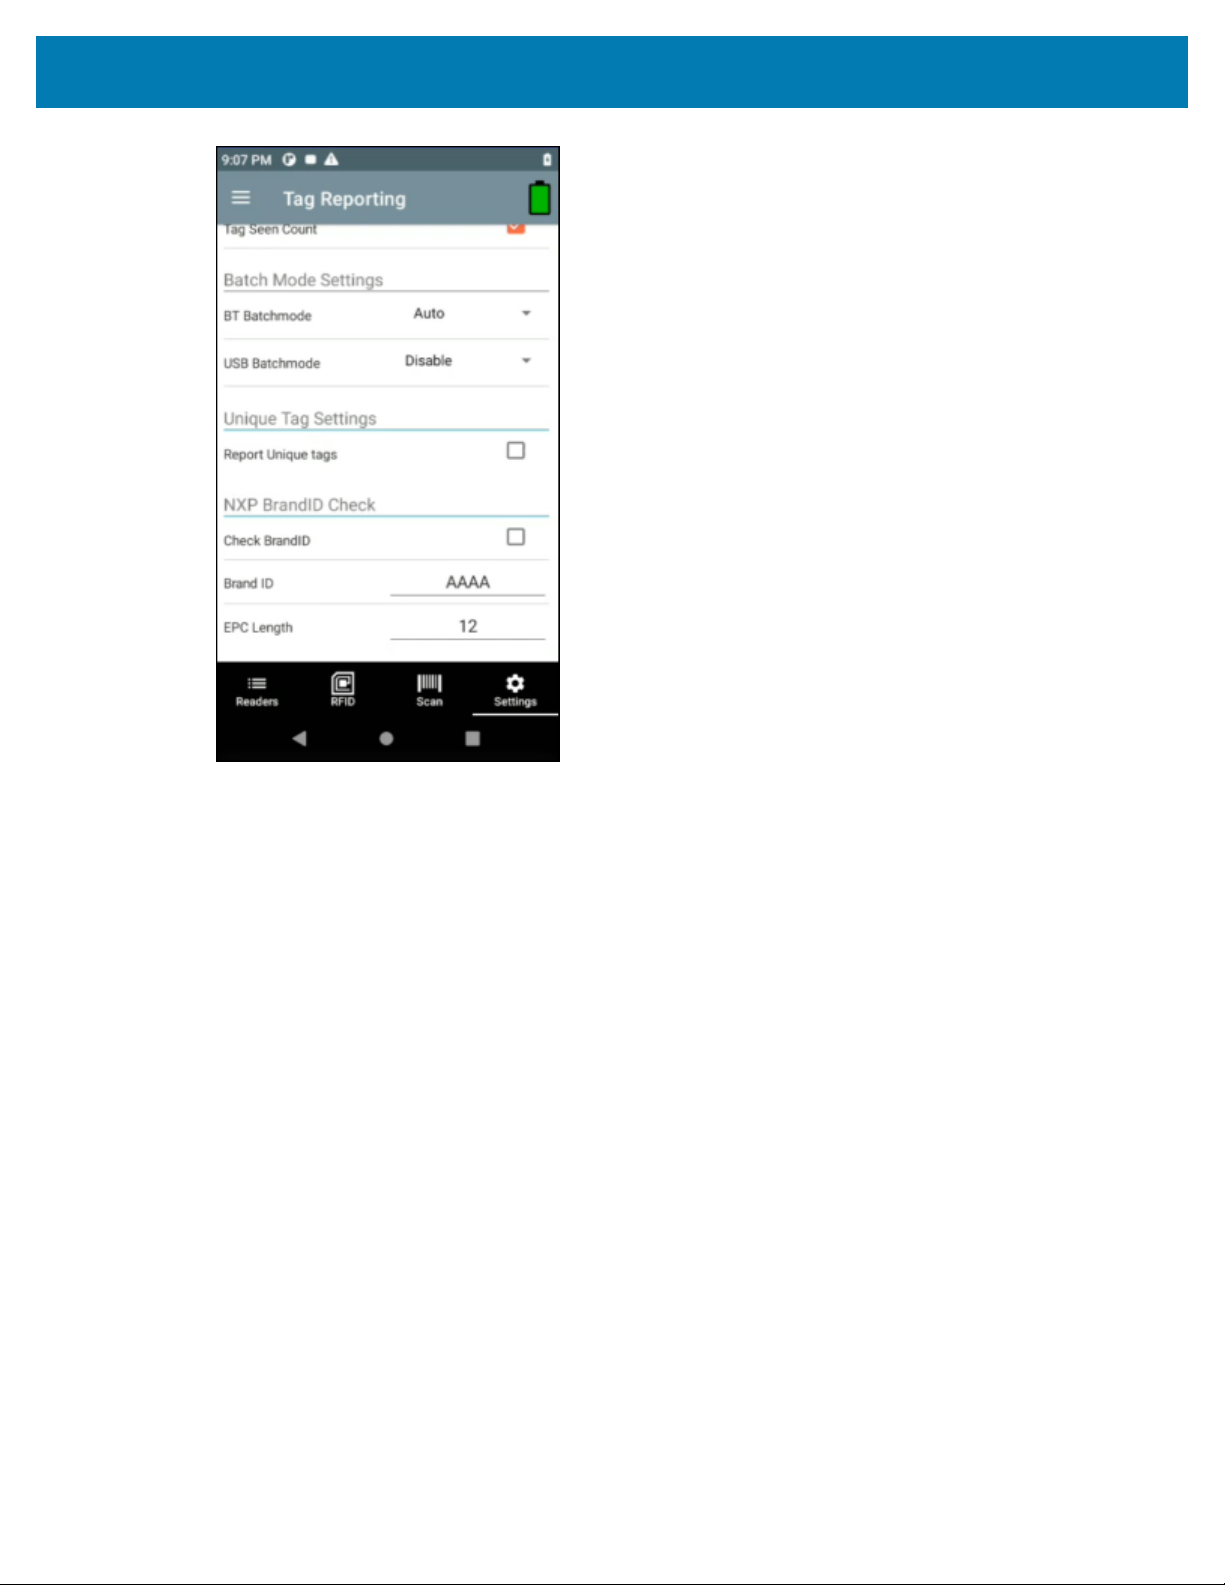
Tag Reporting screen options include:
• Channel Index -Select to indicate whether or not the Regulatory Channel Index is reported as part of
the Tag Data.
• Tag Seen Count -Select to indicate whether or not the Tag Seen Count is reported as part of the Tag
Data.
• Report Unique Tags -When this option is enabled, the reader reports only unique tag reads. The
Unique Tag reporting feature can be enabled when using Tag List Match mode.
• Check BrandID -Check box to enable the Brand ID option.
• Brand ID -Perform NXP BrandID check (supported only on NXP U-Code 8 and above tags that supports
this functionality). Brand ID check can be initiated by enabling BrandID. Reader performs an inventory
operation with additional verification on whether or not thetag inventoried matches the BrandID and
reports.
• EPC Length -The EPC length provided will consider the length of EPC data to be matched for Brand ID
tags from offset 0.
• PC -Select to allow reporting the PC as part of the Tag Data.
• RSSI -Selection indicates whether or not the RSSI (Received Signal Strength Indication) is reported as
part of the Tag Data.
• Phase -Select to indicate whether or not the Phase is reported as part of the Tag Data.
76
123RFID Mobile Application for Android
Save Configuration
To access Save Configuration, from the bottom navigation bar,tap Settings > RFID > Advanced Reader
Options > Save Configuration.This screen is used to save the settings and displays the current settings
on the device.
The settings are saved on the device until a reset to factory defaults is performed on the unit (see Settings).
The Tag Pattern form field is automatically populated with tag data when a tag is selected from the
Inventory Screen.
77

123RFID Mobile Application for Android
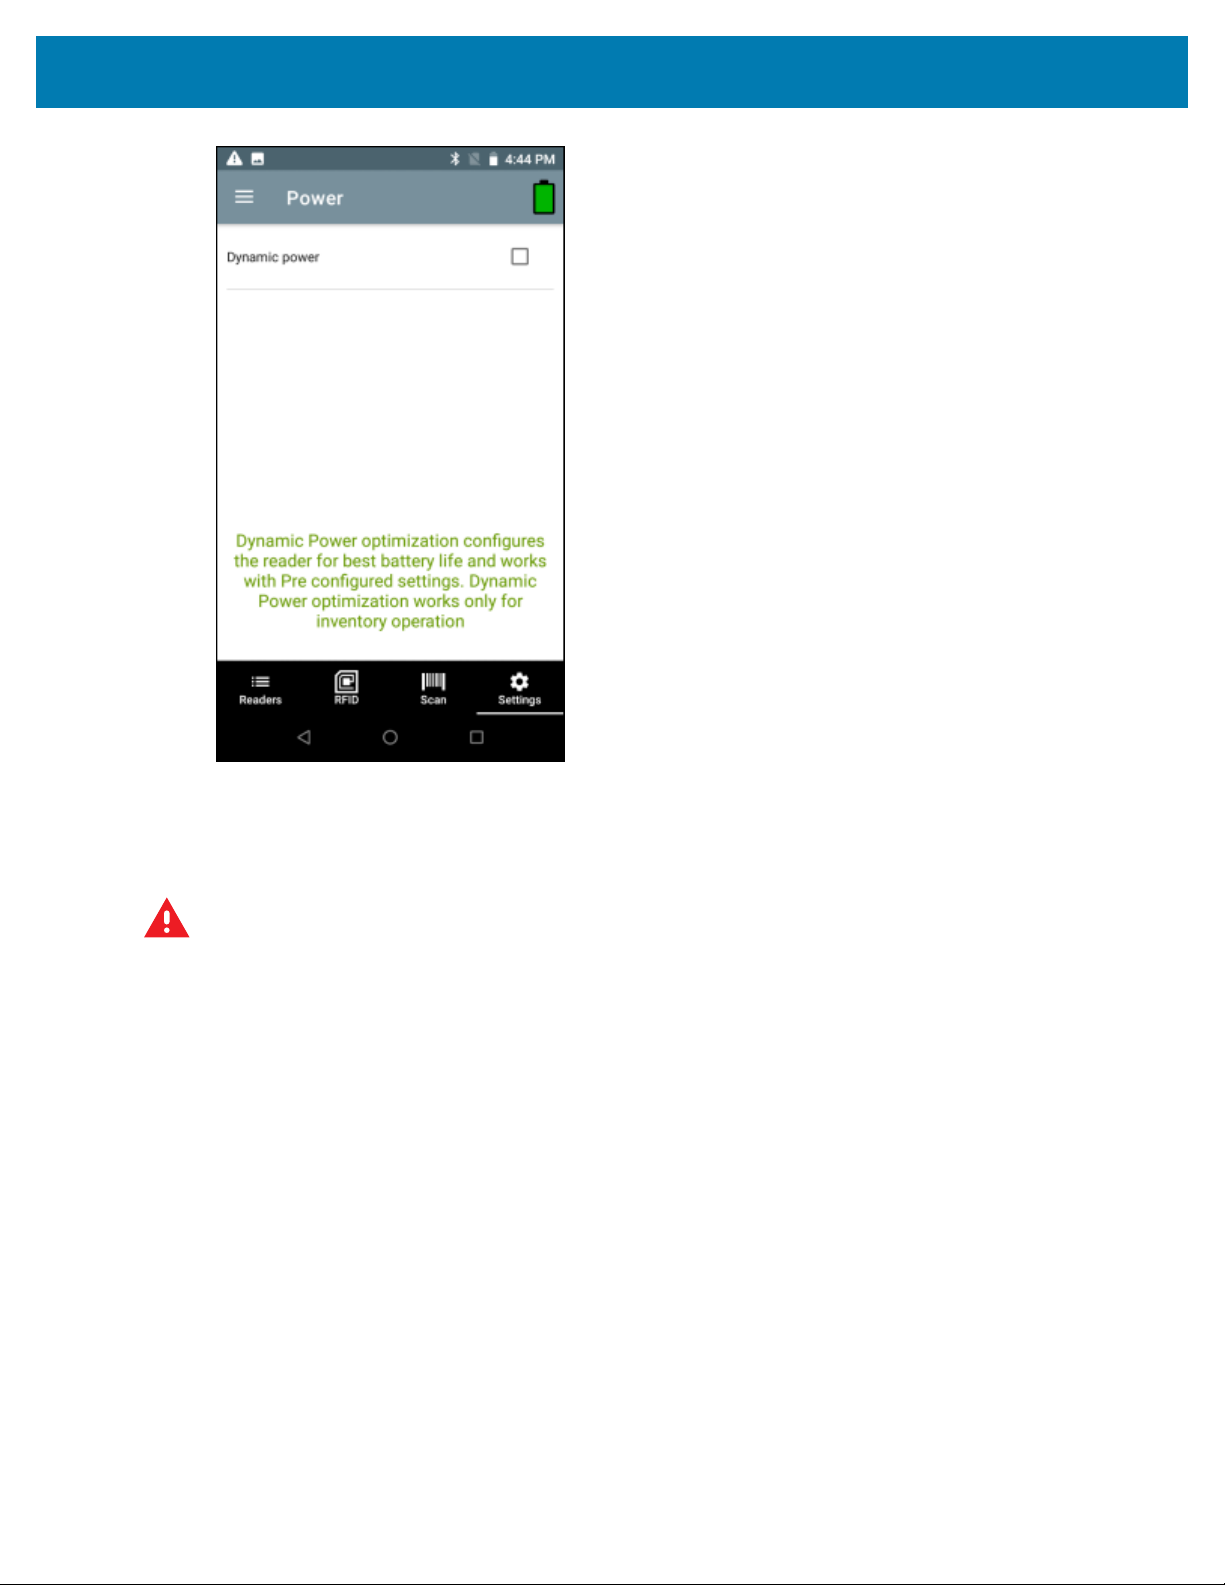
Power Management
To access Power Management, from the bottom navigation bar,tap Settings > RFID > Advanced Reader
Options > Power Management. This screen provides an option to enable Dynamic Power Optimization
(DPO) in the reader. Enabling DPO enhances battery life during inventory operations.
If Dynamic Power is On, a green battery icon appears in the title bar of the application. Tapping on this
opens the Battery Status screen.
78
123RFID Mobile Application for Android
Regulatory
1. To set regulatory options, from the bottom navigation bar, tap Settings > RFID > Regulatory.
WARNING: Select only the country in which you are using the reader.
2. Select the region from the drop-down list.
79

123RFID Mobile Application for Android
3. Select from the available channels.
Beeper
1. To set beeper options, from the bottom navigation bar, tap Settings > RFID > Beeper.
2. Enable/disable the beeper on the sled.
3. Enable/disable the beeper on the host.
80

4. Select the volume:
• High
• Medium
• Low
123RFID Mobile Application for Android
LED
1. To set LED options, from the bottom navigation bar, tap Settings > RFID > LED.
81

123RFID Mobile Application for Android
2. Enable/disable the LED on the host.
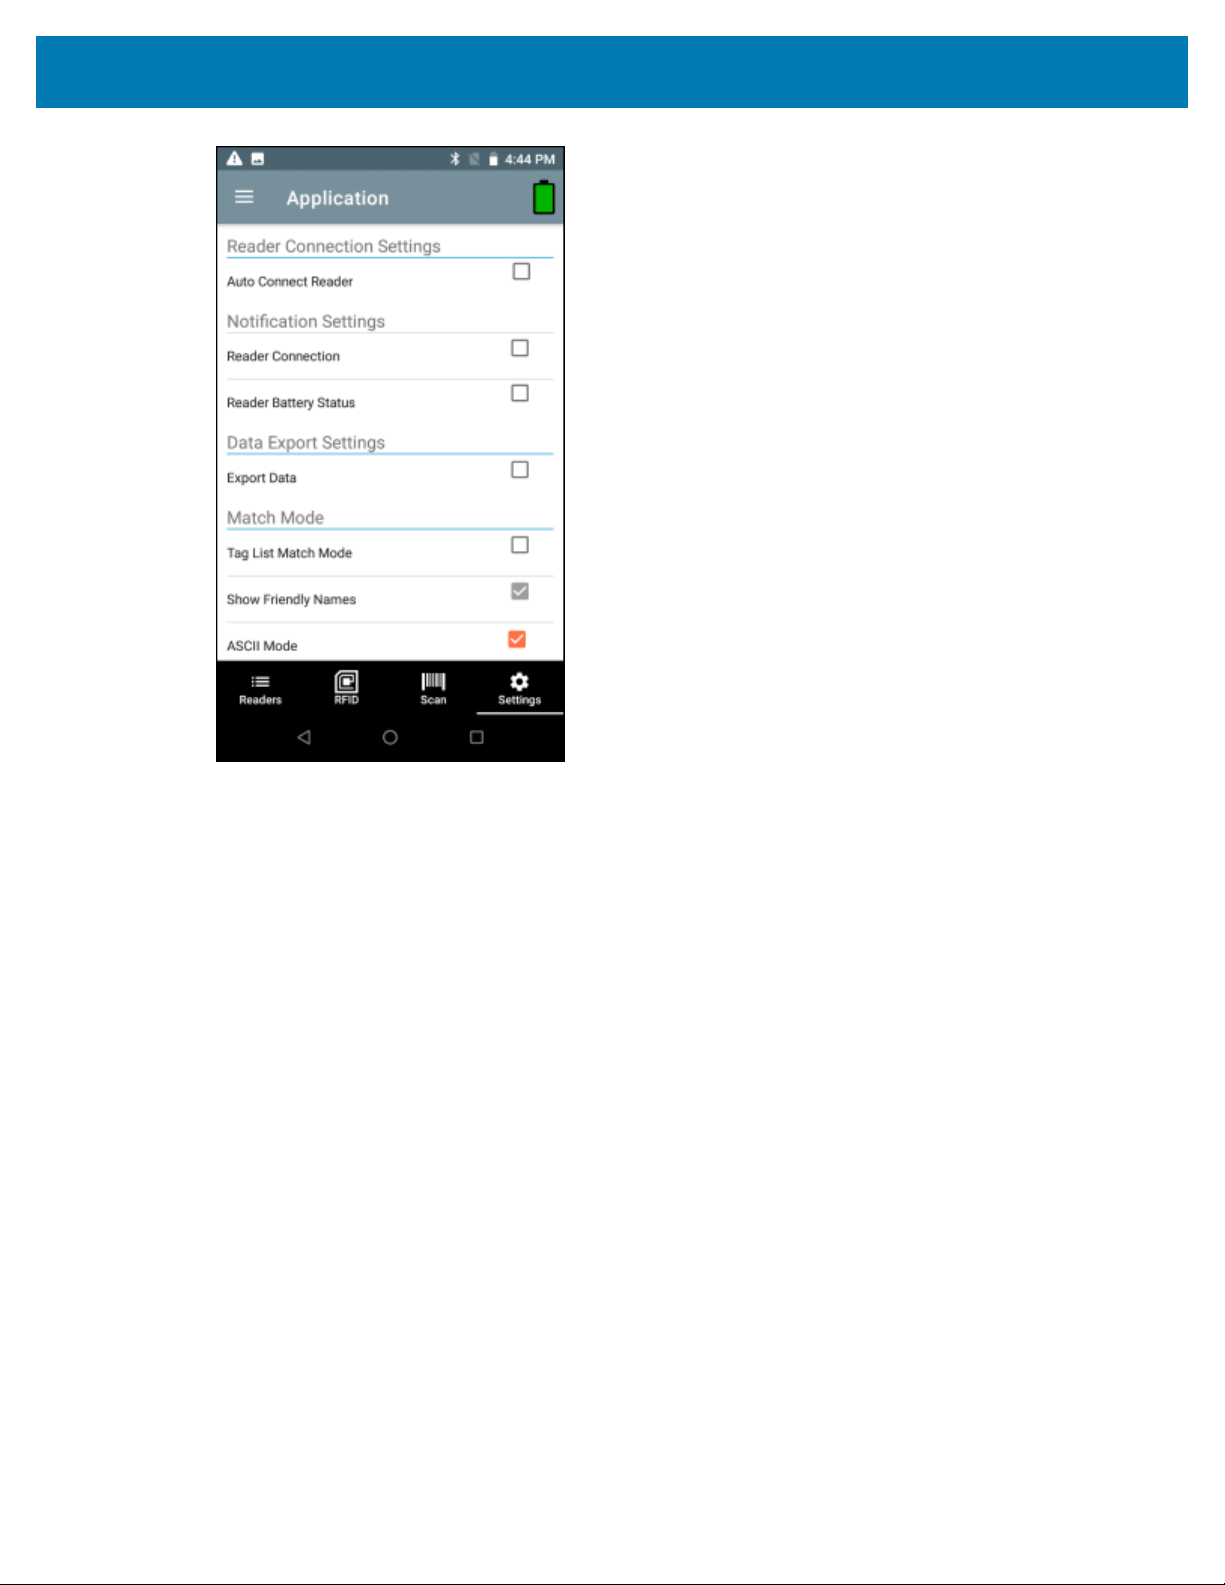
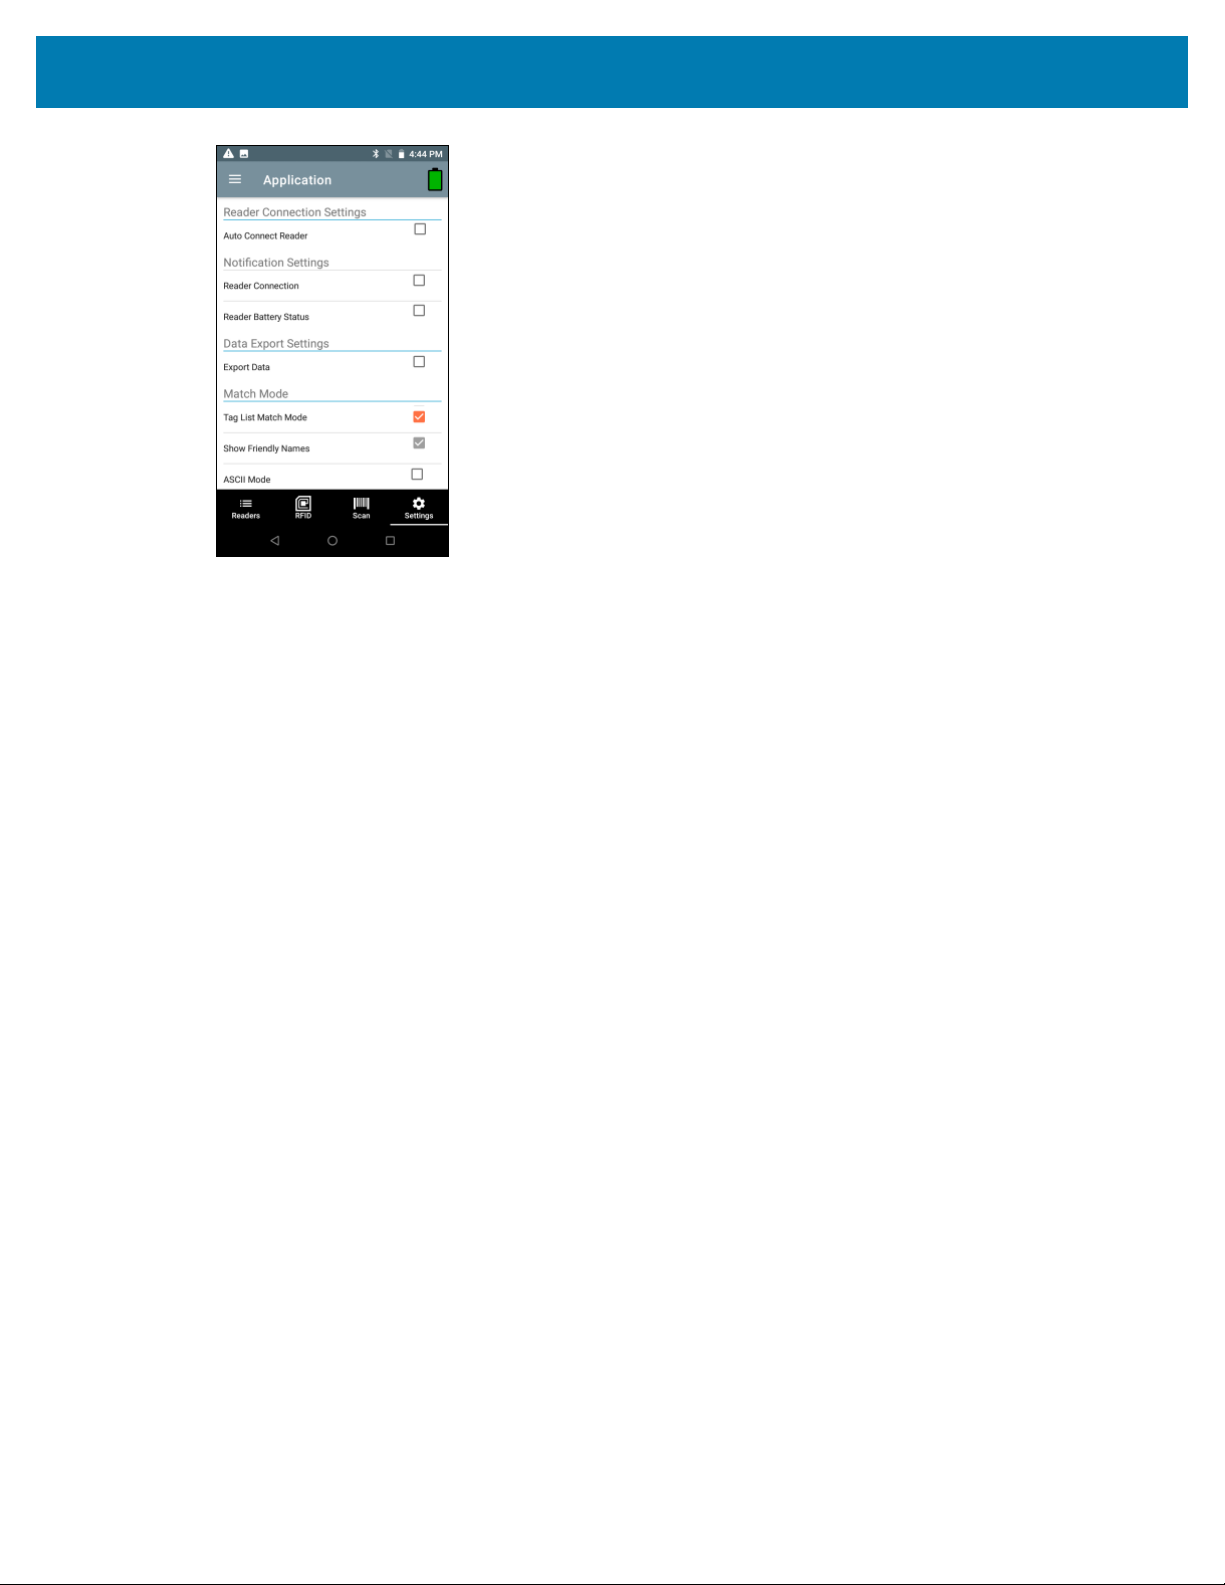
Application Settings
To access Application Settings, from the bottom navigation bar, tap Settings > Application or tap >
Settings > Application.
The Application Settings screen includes:
• Auto Reconnect Reader -When checked, the device connects to the RFID service which manages the
connection to the reader.
• Reader Connection Notification -When checked, the application notifies the user when the reader is
connected or disconnected.
• Reader Battery Status Notification -When checked, the application notifies the user when the battery
has reached specific critical states.
• Export Data -When checked, the application writes the inventoried RFID data to a file when the
inventory operation stops. On Android platforms the file is saved in a fixed directory. Check the files in
file browsing in the Inventory directory (Sdcard/inventory/<files>). The files may be copied to a PC.
When Profile is set to Cycle Count and Export Data is enabled:If you start/stop inventory multiple times
from the same screen, it will append cycle count data to existing data and generate a csv file (delete old
csv) rather that creating a new csv file on each start/stop.
• Tag List Match Mode -Check to enable matching mode.
• Show Friendly Names -Check to show the tag's friendly names instead of EPC ID. Show friendly names
is only available when Tag List Match Mode is enabled.
82

123RFID Mobile Application for Android
• ASCII Mode -Displays tag ID in ASCII format. If the full tag ID or memory bank data is convertible to
ASCII format, then the application only shows the same. Inventory, Locate, Access, and Pre Filters show
ASCII mode represented data in respective sections.
Scan Settings
To access Scan Settings, from the bottom navigation bar, tap Settings > SCAN or tap > Settings >
SCAN. Scan Settings options include:
• Beeper - allows you to change the beeper volume.
NOTE: Available only on hand-held devices with a scanner (RFD40 Premium and Premium+
and RFD8500 with imager).
-Provides the option to change the scanner beeper volume to high, medium, or low.
• Symbologies -Allows users to select/enable specific barcode types. Supported symbologies include
UPC-A,UPC-E,UPC-E1,EAN-8/JAN8,EAN-13/JAN13,Bookland EAN,Code 128,GS1-128,Code 39,Code
93,Code 11,Interleaved 2 of 5,Discrete 2 of 5,Chinese 2 of 5,Codabar,MSI,Code 32, Data Matrix,
PDF417,ISBN,UCC Coupon Extended Code,ISSN EAN,ISBT 128,Trioptic Code 39, Matrix 2 of 5,
Korean 3 of 5,GS1 DataBar-14,GS1 DataBar Limited,GS1 DataBar Expanded,MicroPDF417, Maxicode,
QR Code, Aztec,Han Xin Code, Australian Post, US PLANET, US POSTNET, Netherlands KIX, USPS
4CB, UK Postal, Japan Post, UPU FICS, MicroQR, Composite C, Composite AB, TLC39, Dot Code.
• Picklist Mode - Toggle to turn picklist mode on or off. Default is Off.
• Aim Guide - Provides an aimer light which can be switched on or off.
83

123RFID Mobile Application for Android
Getting Help
On-screen help is available within 123RFID Mobile Application.
To access the Help screen, tap > Settings > Help or when available, tap the ? icon in the upper right
hand screen.
84

123RFID Mobile Application for Android
85

123RFID Desktop Application
123RFID Desktop Application
123RFID Desktop is a setup and optimization tool for RFID sleds. This section describes the application and
its features.
Application Features
• Connect-allows users to search for readers on the local subnet, USB port, or Bluetooth.
• Read-allows users to start an inventory, view summary metrics on tag reads, and sort, filter, and export
tag data. Select an antenna and set the power level to begin building an inventory.
• Configure-allows users to configure reader and scanner settings. Settings can be saved to a file or as a
printed report.
• Firmware -allows users to update the firmware on up to five devices.
86

Connect
123RFID Desktop Application
Users can locate readers on the local subnet or via USB port by clicking the Find Readers button or by
entering the IP, hostname, COM port, or by Bluetooth and clicking Connect.
To discover readers on the network, view the Available Readers section of the application and click
Connect on one of the associated rows to connect to the specified reader.
87

Read
123RFID Desktop Application
The read feature allows users to start an inventory. Users can view summary metrics on tag reads by the
reader, sort, filter, and export tag data to a file. Select antenna and set the power level to do inventory.
Click the Start button to start reading tags and recording an inventory.
To download the inventory data for offline viewing,click the Export button to export tag data to excel.
• Export Summary - save a snapshot of all the tag reads displayed on the Read screen in excel.
• Export History – save timeline data for tags read in excel.
Right-click on a specific tag row to edit access operation information on the tag.
88

123RFID Desktop Application
To access specific tag location details, click the Tag Locate tab.
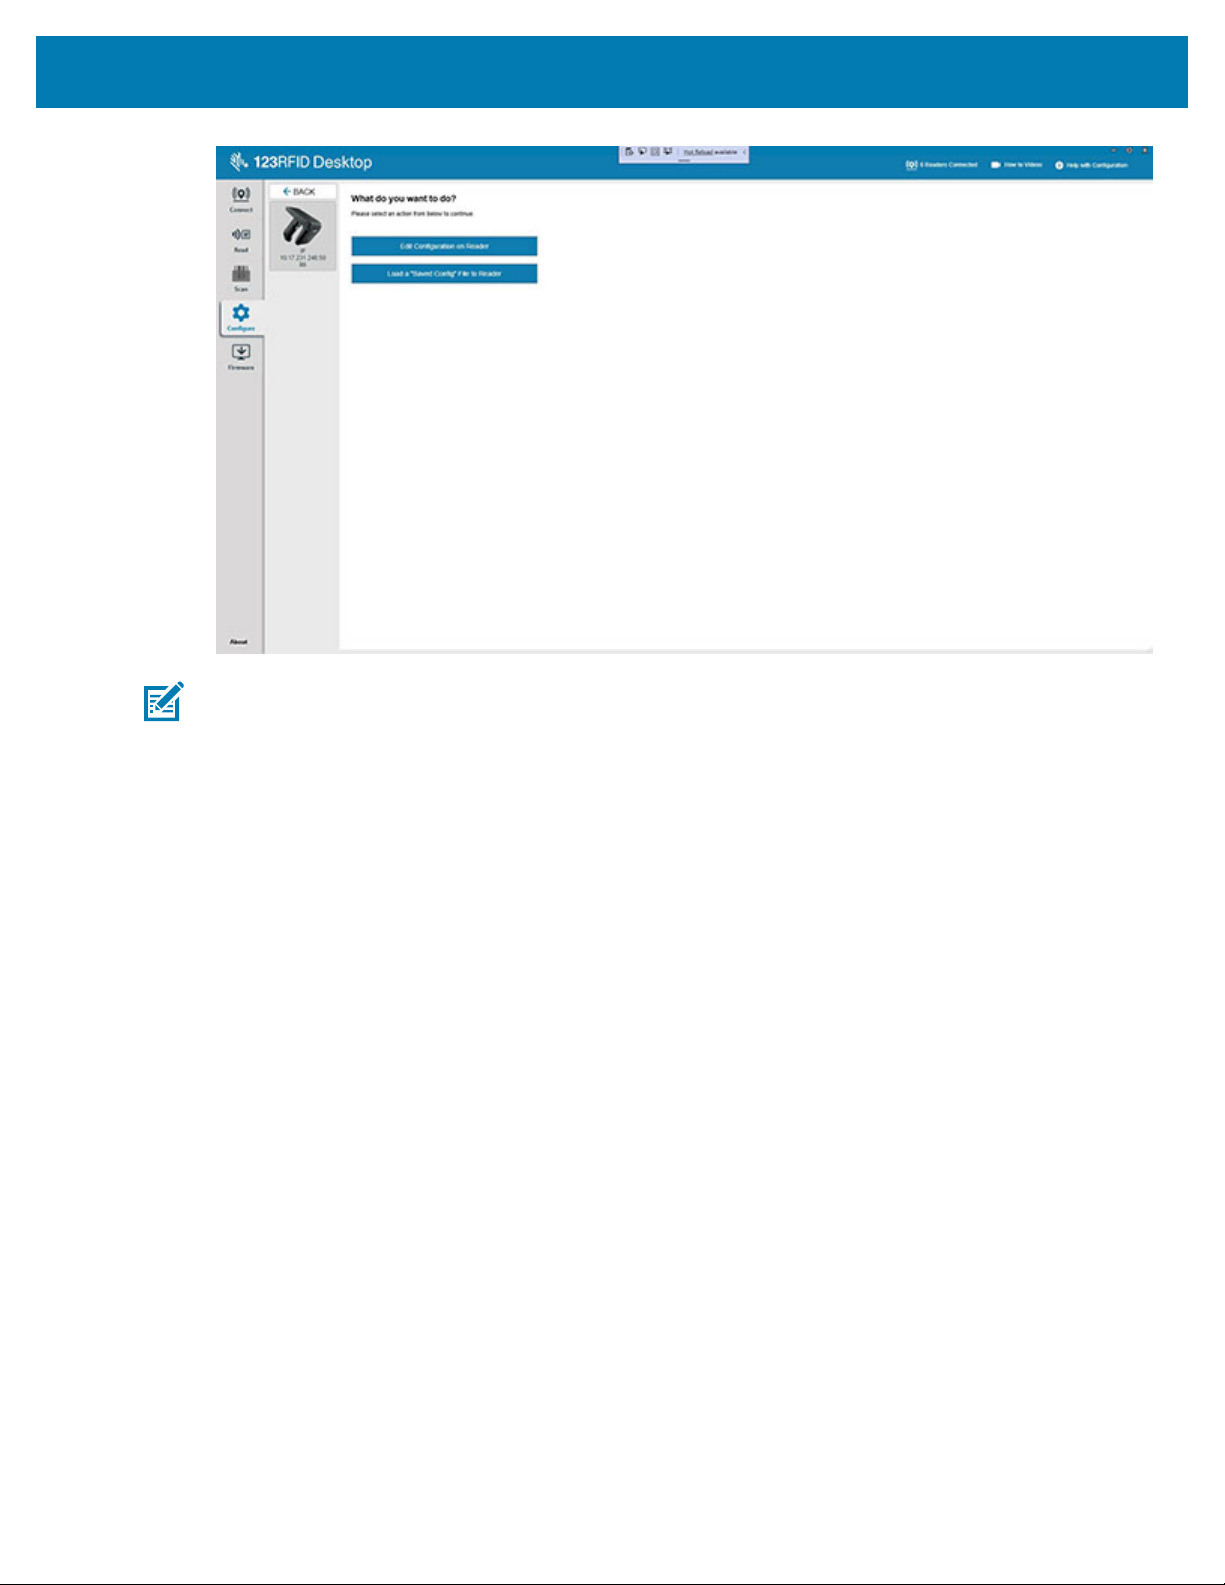
Reader Configuration
The Reader Configuration wizard configures the reader and antenna settings and saves them instantly.
Users can also save settings to a file on the PC or print a report.
Click Edit Configuration on Reader to edit the reader’s settings and use the wizard to do the following.
• Assign names to the reader and its connected antennas.
89

123RFID Desktop Application
• Set reader settings or reset them to factory defaults.
• Change the reader’s region configuration.
• Create rules for your GPIO (General Purpose Input/Output) accessories on when to trigger inventory
and output results.
• Save/print configurations to a file.
• Deploy the configuration file to a new device.
Click Open Configuration to load a saved configuration file to another connected reader from the PC.
Beeper volume, dynamic power, off mode timeout duration, and Bluetooth discovery settings are
configurable for online readers.
90

123RFID Desktop Application
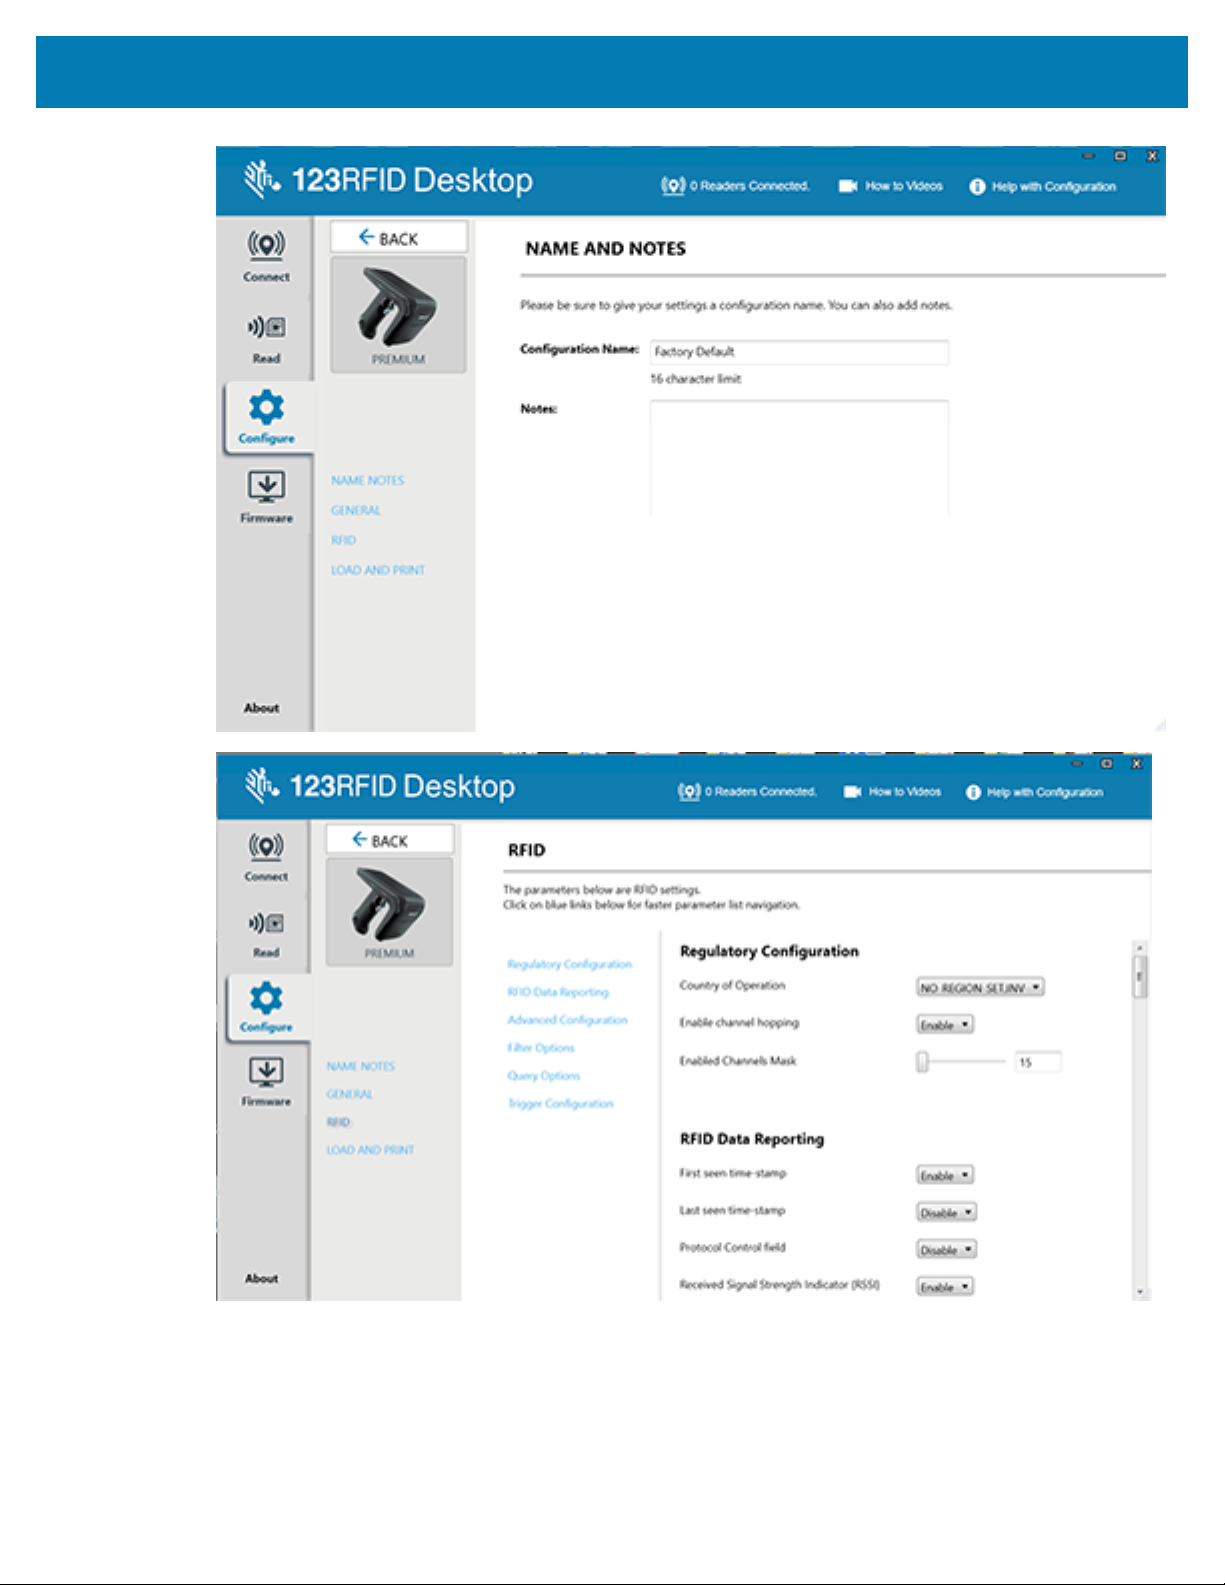
Reader Name
Add a description or name the reader by filling out the form fields on the name screen.
91

Parameter Settings
General Settings that are configurable include enabling Bluetooth Batch Mode, setting a delay before data
is transmitted in Batch Mode, setting the Bluetooth Host Type, and setting the USB Host Type.
HID Keyboard Options include selecting the country code and keystroke delay. Bluetooth settings include
enabling the device to attempt to reconnect automatically upon losing connection, beeper feedback when
the device reconnects, setting a timeout period for the device to become discoverable, and automatically
attempting to reconnect to the Bluetooth host. Beeper Settings include volume, tone, whether the sled
beeps to confirm a successful decode, and the ability to suppress power-up beeps.
123RFID Desktop Application
RFID Configuration (Online)
Configurable options for offline readers include regulatory configuration, RFID data reporting, filter and
querying options, trigger, and advanced options.
When connected via IP, Edit the configuration of the reader or load a saved configuration onto the device.
92
123RFID Desktop Application
NOTE: Ensure that the reader is configured for the correct region it is used in. Configuring the
device for a different region is illegal.
Online Configurable options include
• General Settings
• Regulatory Configuration options such as setting the country of operation and enabling or disabling
Channel Hooping and Channel Mask.
• Antenna
• Trigger Configuration such as defining RFID operations and the conditions in which they are initiated
and stopped.
• Pre-Filtering
• Advanced
• Scanner Configuration
93

123RFID Desktop Application
RFID Configuration (Offline)
Configurable options for offline readers include regulatory configuration, RFID data reporting, filter and
querying options, trigger, and advanced options.
NOTE: Ensure that the reader is configured for the correct region it is used in. Configuring the
device for a different region is illegal.
Offline Configurable options include:
• Regulatory Configuration options such as setting the country of operation and enabling or disabling
Channel Hooping and Channel Mask.
• RFID Data Reporting options such as first and last time seen time stamps, RSSI, phase difference,
unique tag reporting, and the total amount of tags seen.
• Advanced Configuration options such as enabling Link Profile, configuring the RFID Transmit Power
Level, and enabling dynamic power optimization.
• Filter Options for up to four filters, including Filter enable, target, action, memory bank, truncate, length,
start position, and mask.
• Query Options such as selecting which tags, session, and target the query is applied to.
• Trigger Configuration such as defining RFID operations and the conditions in which they are initiated
and stopped.
94
123RFID Desktop Application
95

Scanning Configuration
Configurable scanning settings include enabling or disabling specific symbologies and enabling/disabling
particular settings at the system level, such as transmitting the no-read message or the device’s trigger
mode.
NOTE: Scanning configuration is available on RFD4031 Premium+ UHF RFID sleds only.
• Symbology Settings – users can configure and enable/disable specific symbologies.
• System Settings – users can configure and enable/disable specific settings at the system level, such as
transmitting the no-read message or the device’s trigger mode.
123RFID Desktop Application
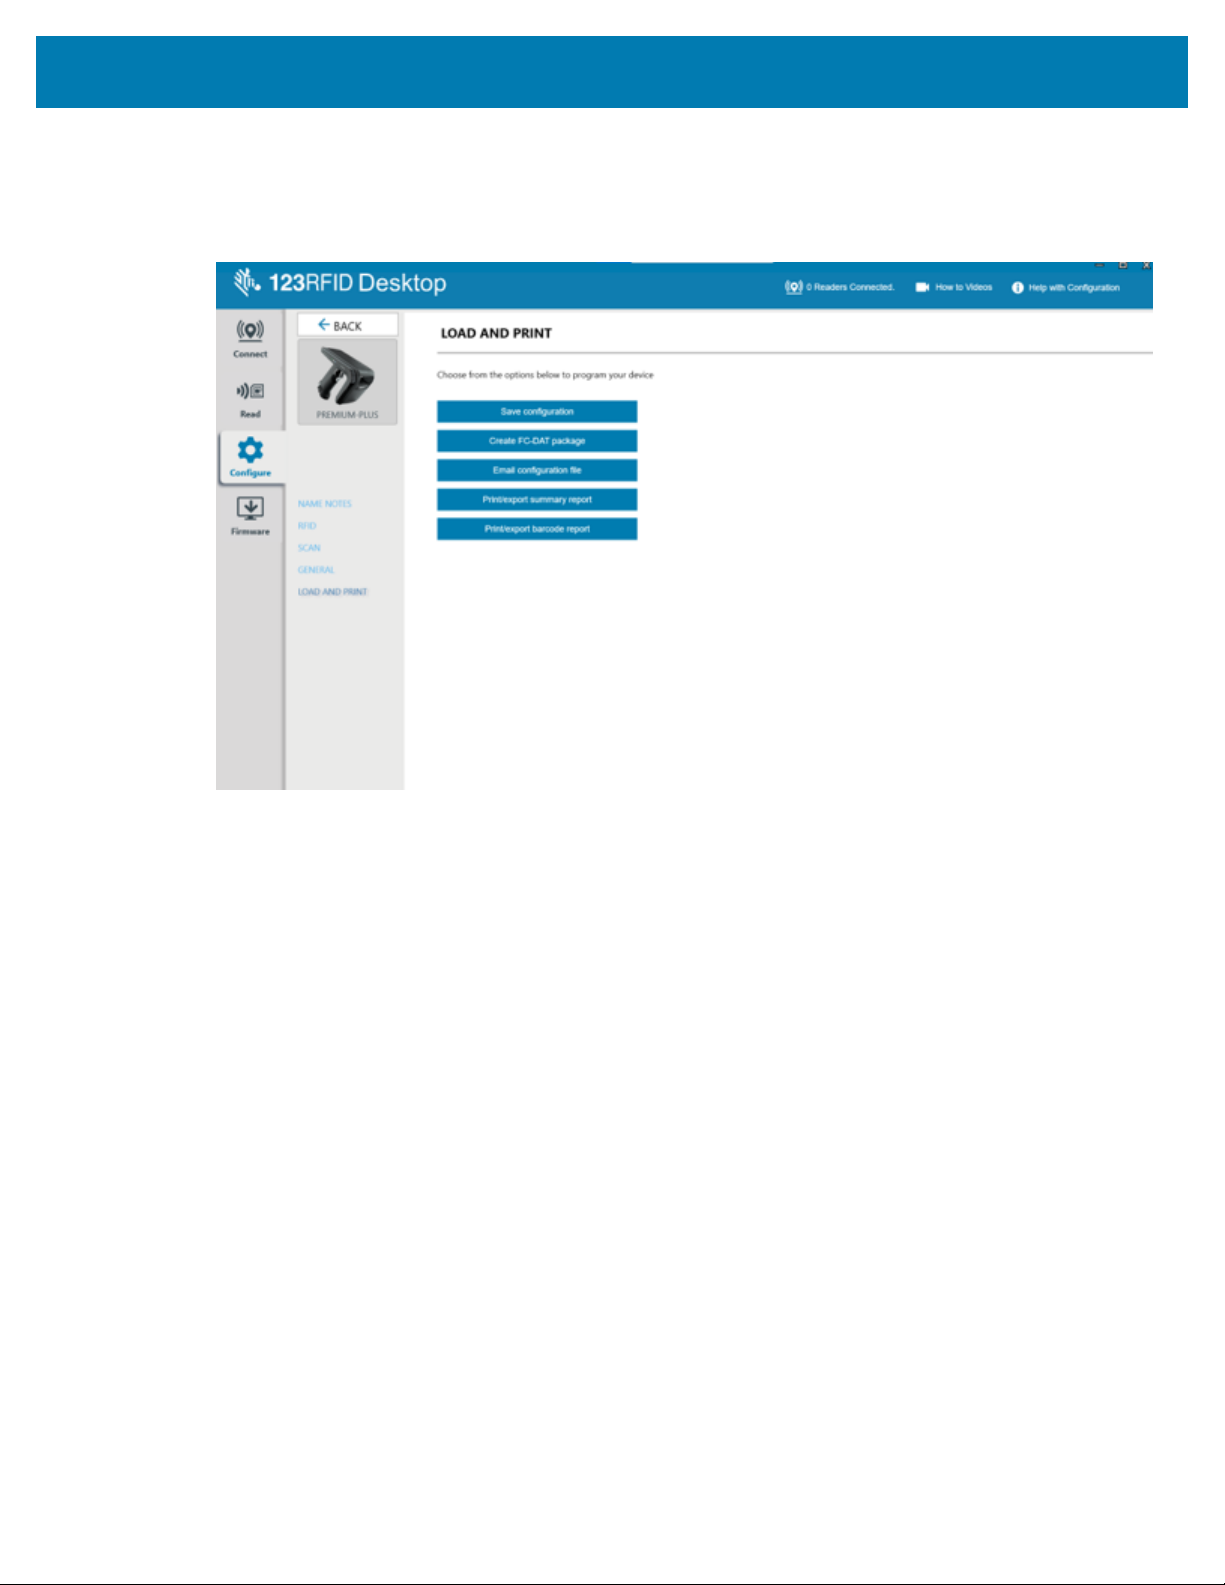
Configuration Creation
The 123RFID Desktop application provides users with the ability to create, save, and deploy configurations.
To create a new configuration file:
1. Launch the 123RFID Desktop application and open the Configuration tab.
2. Select Offline configuration.
3. Select the reader that the new configuration is to be deployed on.
4. AddConfiguration Name & Notes for the new configuration file & Giga-DAT File.
5. Select the proper region information for the regulatory section.
6. For RFD40 Premium+ and RFD90 devices only, configure the scanning parameters from the Symbology
and System settings.
7. Configure Bluetooth and Beeper Settings on the General Settings panel.
8. Save the configuration file locally on the PC by clicking Save configuration.
96

123RFID Desktop Application
To create a Giga-DAT package, begin by following steps 1-8 from the procedure above.
1. Click Create Giga DAT package.
2. Click Select Firmware file in the State Configuration window.
3. Navigate to the appropriate configuration file and click Open.The firmware file name displays in the
Stage Configuration window.
4. Click Save to save the Giga DAT file.
5. Determine the location to save the new Giga-DAT File with the configuration and click Save. The new
Giga-DAT File displays in this format: - GSAAFKS00-002-R04E0.DAT
97

123RFID Desktop Application
The Stage Configuration window updates to indicate that the new Giga-DAT File is successfully saved.
98
Print Configuration
Load the configuration file to the PC, push the antenna settings to the reader, or reset the antenna settings
to factory defaults at the end of the configuration workflow.
123RFID Desktop Application
99

Firmware Management
To update reader firmware on up to five devices simultaneously, select the devices on the table by clicking
the associated checkbox and clicking the Update Firmware button.
123RFID Desktop Application
Next, the Reader Firmware Update window displays. Click Browse to select the firmware version to be
enabled onto the selected device.
100
 Loading...