

PROMAN-CPCL Rev. Y April 2011

Index
Mobile Printing Systems
CPCL Programming Manual
PROPRIETARY STATEMENT
This manual contains proprietary information of Zebra Technologies Corporation. It is intended solely for the information and us e of par ties operating and maintaining the
equipment de scribed herein. Such proprietary information may not be used, reproduced, or disclosed to any other par ties for any other purpose wi thout the expresse d writ ten
permission of Zebra Technologies Corpora tion.
Product Improvements
Since continuous product improvement is a policy of Zebra Technologies Corporation, all speci fications and sign s are subject to change without notice.
Liability Disclaimer
Inasmuch as every ef for t has been made to supply accurate informa tion in this manual, Zebra Technologies C orporation is not liable for any erroneous information or omissions.
Zebra Technologies Corporation re serves the right to correct any such errors and disclaims liability result ing therefrom.
No Liability for Consequential Damage
In no event shall Zebra Technologies Corporat ion or anyone else involve d in the cr eation, production, or delivery of the accompanying product (including hardware and sof tware)
be liab le for any damages what soever (including, withou t limit ation, damages for loss of busines s prof its, busine ss interruption, loss of busines s information, or other pecuniary
loss) arising out of the use of or the results of use of or inability to use such product, even if Zebra Technologies Corporation has been ad vised of the po ssibility of such damages.
Because some states do not allow the exclusion of liability for consequential or incidental damages, the above limitation may not apply to you.
Copyrights
The copyrights in this manual and the l abel print engine described therein are owned by Zebra Technologie s Corporation. Unauthorized reproduction of this manual or the sof tware in the labe l print engine may result in imprisonment of up to one year and fines of up to $10,000 (17 U.S.C.50 6). Copyright violators may be subject to ci vil liabilit y.
This product may contain ZPL®, ZPL II®, and ZebraLinktm progr ams; Element Energy Equalizer® Circuit; E3®; and AGFA fonts. Soft ware © ZIH Corp. All rights reserved worldwide.
ZebraLink and all product names and number s are trademarks, and Zebra, the Zebra logo, ZPL, ZPL II, Element Energy Equalizer Circuit, and E3 Cir cuit ar e registere d trademarks
of ZIH Corp. All right s reserved worldwide.
Monot ype®, Intellifont® and UFS T® are trademarks of Monoty pe Imaging, Inc. registered in the United States Patent and Trademark Of fice and may be regis tered in certain jurisdictions.
AndyTM , CG PalacioTM, CG Century SchoolbookTM, CG TriumvirateTM, CG TimesTM, Monot ype KaiTM, Monot ype MinchoTM and Monotype SungTM are trademarks of Monoty pe Imaging, Inc. and may b e registere d in some jurisdictions.
HY Gothic HangulTM is a trademark of Hanyang Systems, In c.
AngsanaTM is a trademark of Unit y Progress Company (UPC) Limited.
Andale®, Arial®, Book Antiqua®, Corsiva®, Gill Sans®, Sorts® and Times New Roman® are trademarks of The Monot ype Corporation registered in the Uni ted States Patent and
Trademark Of fice and may be registered in cert ain jurisdic tions.
Century Gothic™, Bookman Old St yleTM and Century SchoolbookTM are trademarks of The Monot ype Corporation and may be r egistered in certain jurisdictions.
HGPGothicB is a trademark o f the Ricoh company, Ltd. and may be registered in some jurisdict ions.
UniversTM is a trademark of Heid elberger Druckmaschinen AG, which may be regist ered in cert ain jurisdic tions, exclusively licensed through Linotyp e Libra ry Gmb H, a wholly
owned subsidiary of Heidelberger Druckmaschinen AG.
Futura® is a trademark of Baue r Types SA re gistered in the United States Pat ent and Trademark Off ice and may be registered in some jurisdictions.
TrueType® is a trademark of Apple Computer, Inc. registered in the Uni ted States Patent and Trademark Of fice and may be registered in cert an jurisdictions.
All other brand names, product names, or trademarks belong to their respective holders.
©
2011 ZIH Corp.
Contents
pg. ii

Mobile Printing Systems
CPCL Programming Manual
Contents
pg. iii
Index
CONTENTS
PROPRIETARY STATEMENT ii
INTRODUCTION 1-1
PROGR AMMING L ANGUAGE EMULATION 1-1
Programming Language Recommendations 1-2
GETTING PRINTER INFORMATION 1-2
Getting Printer Information Example 1-4
Getting Printer Information Example (continued) 1-5
Communications Diagnostics Mode 1-6
LABEL COORDINATE SYSTEM 1-7
LABEL VISTA™ 1-8
PRINTER COMMANDS 2-1
TEXT 3-1
Resident Font Examples 3-1
Using Font Groups 3-6
SCAL ABLE TEXT 4-1
LINEAR BAR CODES 5-1
Introduction 5-1
Resident Linear Bar Code Samples 5-2
UPC and EAN/JAN Bar Codes 5-3
Code 39 or Code 3 of 9 Bar Codes 5-6
Code 93 or Code 9 of 3 Bar Codes 5-8
Interleaved 2 of 5 Bar Codes 5-9
Code 128 and the UCC-128 Shipping Standard 5-10
Codabar 5-11
MSI Plessey Bar Codes 5-12
Postnet and Facing Identification Marks 5-13
Bar Code Commands 5-14
REDUCED SPACE SYMBOLOGY AND COMPOSITE SYMBOLS 5-20
RSS SYMBOLOGY 5-20
continued

Index
Mobile Printing Systems
CPCL Programming Manual
RSS Limited 5-20
RSS-14 5-20
RSS Expanded 5-21
RSS Stacked 5-21
RSS-Truncated 5-21
RSS-14 Stacked Omnidirectional 5-21
RSS/Composite Symbologies 5-21
Composite Code A atop RSS Limited: 5-22
Composite Code B atop Code 128 5-22
Composite Code-C atop Code 128 5-22
TWO DIMENSIONAL BARCODES 6-1
Introduction 6-1
PDF417 6-1
MaxiCode 6-1
QR Code 6-2
Two Dimensional Barcode Commands 6-2
GRAPHICS 7-1
ADVANCED COMMANDS 8-1
Using Format Files 8-25
MCR Commands 8-32
LINE PRINT MODE 9-1
Introduction 9-1
Special Commands Using the Utility Function 9-3
Special ASCII Characters 9-10
Tearing or Cutting the Paper 9-14
Designing a Receipt 9-17
ADVANCED UTILITIES 10-1
Magnetic Card Reader (MCR) Command 10-23
DENSO BHT COMMANDS 10-38
PRINTER ESCAPE COMMANDS 11-1
SET AND READ CODE COMMAND 11-1
Contents
pg. iv
continued

Mobile Printing Systems
CPCL Programming Manual
Contents
pg. v
Index
STATUS/INFORMATION 11-2
USER LABEL COUNT 11-5
Power Off Command 11-6
WIRELESS NETWORK PRINTERS 12-1
Introduction 12-1
Network Printer Safety Consideration 12-1
Setting the IP Address for Network Printers 12-8
Network Printer Troubleshooting 12-10
Wireless LAN Report Example 12-11
Introduction: 13-1
Example 1: 13-1
Example 2: 13-5
Table 1: WML Tags used on QL and RW Series Printers 13-7
CONFIGURATION/CONTROL COMMANDS 14-1
Introduction 14-1
Command Format 14-1
Commands / Parameters 14-2
Bluetooth® Parameters 14-3
Comm Port Parameters 14-18
Device Parameters 14-20
Display Parameters 14-33
File Parameters 14-35
Printer Mechanism Parameters 14-39
Input Parameter 14-42
Media Parameters 14-46
Memory Parameters 14-49
Network Management Parameters 14-52
Setting Avalanche Parameters with CPCL 14-56
Odometer Parameters 14-64
Power Parameters 14-66
Test Function Parameters 14-77
Print Parameters 14-78
continued

Index
Mobile Printing Systems
CPCL Programming Manual
Networking Parameters 14-80
Frequency Hopping Spread Spectum (FHSS) Radio Compatibility. 14-133
WLAN Parameters 14-133
wlan.associated 14-134
Roaming Commands 14-186
International Mode 14-189
RFID Parameters 14-190
USB Parameters 14-196
Zebra Printer Mirror Process 14-200
Internal Wired Parameters 14-209
Interface Parameters 14-232
PRINTER CONFIGURATION AND SETUP 15-1
Using Label Vista for Printer Configuration 15-1
Using Label Vista for Wireless Configuration 15-4
Power Management 15-4
Batch Files 15-6
INDEX Index-1
APPENDIX A- FREQUENTLY ASKED QUESTIONS A-1
APPENDIX B- INTERFACE CABLES A-3
APPENDIX C- CHARACTER TABLES A-9
APPENDIX D - FONT INFORMATION A-13
Font Names A-13
Font Heights A-13
Fixed-Width Fonts A-14
Proportional Width Fonts A-14
APPENDIX E-BAR CODE QUICK REFERENCE A-17
APPENDIX F - PRODUCT SUPPORT A-19
Media Supplies A-19
Maintenance Supplies A-19
Contact Us A-20
Contents
pg. vi

Mobile Printing Systems
CPCL Programming Manual
INTRODUCTION
This manual details the various commands in the CPCL language which enable the programmer to utilize
the built in text, graphics, bar code printing and communications capabilities of Zebra mobile printers.
The following notation conventions are used throughout this manual:
{ } Required item
[ ] Optional item
( ) Abbreviated command
< > Literal item
A space character is used to delimit each field in a command line.
Many commands are accompanied by examples of the command in use. After the word “Input” in each
example, the set of commands are displayed followed by a sample printout (“Output”)resulting from the
printer processing those commands.
PROGRAMMING LANGUAGE EMULATION
Zebra Mobile Printers can emulate the EPL2™ and ZPL® programming languages used by other types of
Zebra printers. Some printers using emulation must be configured with more memory and have a special
emulation program loaded. For more information on the appropriate uses of these languages, refer to the
following language comparison chart:
Contents
pg. 1-1
continued

Mobile Printing Systems
CPCL Programming Manual
Programming Language Recommendations
Language Native in Reccommended Use
CPCL
ZPL
(emulation available
on QL series,standard.
on QL plus, RW & MZ
Series)
EPL
(emulation available
on QL or Cameo
series and standard
on RW , QL plus &
MZ series)
Note: QL Plus and RW printers have EPL and ZPL emulation built into their operating system. See the “device.languages” command under the “Device
Parameters” topic in Section 14 for more information on setting programming languages with these products.
QL, RW MZ, EZ320 and
older Comtec® models
PA/PT Series mobile,
printers, Zebra
High Per formance/
Industrial/Commercial
printers,R-140 RFID
printer,LP/TLP 2844-Z and
PAX applicator printers
Zebra Desktops, R402(RFID
printer), TR 220, PS 21xx
and PS 4000 series print
systems
• In new installations of mobile printers, where CPCL is easily
integrated into the host application
• When older Comtec models are being upgraded- so that the
customer can use existing application without code modifications
• When an installation already uses ZPL as a standard language and
needs to maintain a consistant language for all thermal printers.
• When certain printer functions are not available in CPCL or EPL,
such as: (ZBI, Datamatrix, Code 11, Micro PDF)
• When replacing a PA/PT 40x, or another Zebra printer using ZPL,
with a Zebra mobile printer
• When an installation already uses EPL as a standard language and
needs to maintain a consistant language for all thermal printers.
•If you are replacing Eltron Transport or Xport mobile printers, a Zebra
mobile with an EPL emulation will ease the transition.
Contents
pg. 1-2

Mobile Printing Systems
CPCL Programming Manual
GETTING PRINTER INFORMATION
The printer can produce a report containing information about the application resident in printer
memory. A report similar to the example printouts shown on the following pages can be obtained from
your printer by doing the following:
1. Turn the printer OFF.
2 While holding the FEED key down, turn the printer ON.
3 When printing begins, release the FEED key.
The printer prints a line of interlocking “x” characters and then produces two reports. The first report
indicates the printer model, ROM version, serial number, baud rate, etc.
The second report contains application information. The last digits in the application number indicate
the software version.(e.g. “Software: HTLK40d” indicates a software version of 40.) If no second report
appears, there is no application loaded.
The Wireless Communications report will appear if a Short Range Radio (SRRF), infrared (IrDA) or
wireless LAN (RF LAN) option has been installed in the printer. If no wireless options are installed, the
Wireless Communications Section will consist of a blank line.
The RF LAN Information section will only appear on Network Printers (units equipped with a WLAN
card). Network printers are covered in detail in Section 12 of this manual.
The Label section shown in the second report reports the maximum size label that can be printed, based
on a printer resolution of 203 dots/inch (8 dots/mm).
In the example, the Label Height is 65535 dots, which means for a label width of 384 dots (1.88 inches
or 48 mm), you can print labels up to 32.2 inches (8191 mm) long. Reducing the label width results in a
corresponding increase in the maximum label length.
Contents
pg. 1-3
continued
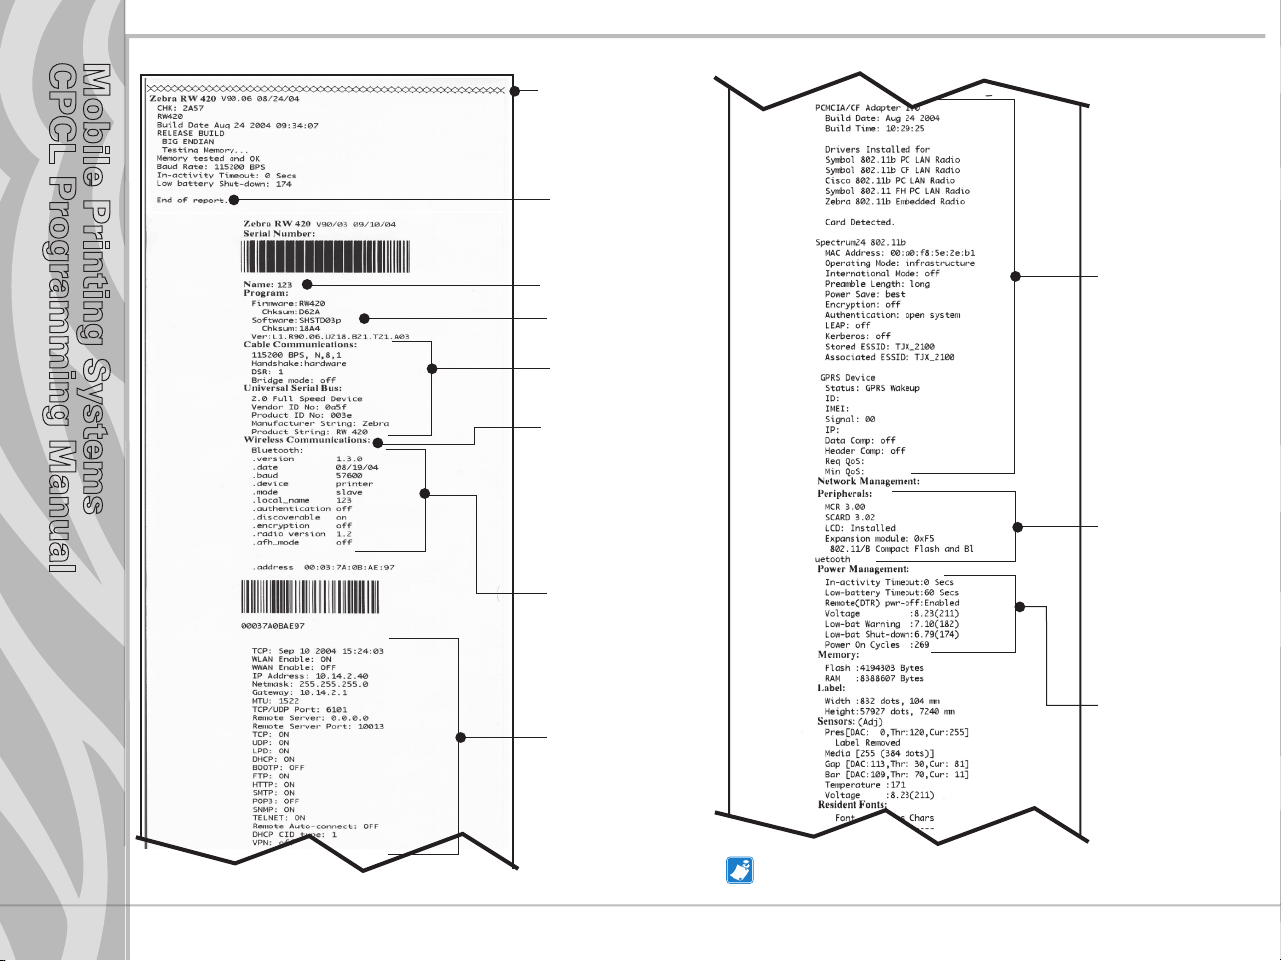
Getting Printer Information Example
Mobile Printing Systems
CPCL Programming Manual
Print Head Test
End of First Report
Unit Serial Number
Software and
Firmware installed
Settings for RS232 and
USB communications
via cable
Report appears only
on units with wireless
options installed.
Units with no wireless
options will print an
empty line and resume
printing
This example has
a Bluetooth radio
module installed.
Information on TCP/IP
and LAN addresses
and settings.
Information on any
installed 802.11x
wireless devices
In this example, an
802.11b WLAN card
has been detected.
List of peripherals
installed. In this
example the printer
has the Mag Card
and SmartCard
reader option,
and the wireless
expansion module
has an 802.11b and
Bluetooth wireless
module1.
List of power management settings.
Also includes a
count of the number
of times the unit has
been powered on.
Contents
pg. 1-4
Dual radio units as illustrated above are available only
on models RW 420, QL 220 plus and QL 420 plus.
continued

Getting Printer Information Example (continued)
Mobile Printing Systems
CPCL Programming Manual
Flash Memory Size
RAM Size
Maximum Label Size
Resident Fonts
Contents
pg. 1-5
(my 2010.CPF)
(my 2020.CPF)
myfont .FNT
myfont2 .FNT
myfont3 .FNT
my_2010 .CPF
my_2020 .CPF
Resident Pre-scaled Fonts
Files Loaded in Printer Memory (will
include Pre-scaled or Scalable Fonts)
Amount of Free Memory Available
End of Conguration
Instructions on entering
Communications Diagnostics
(Dump) Mode. Refer to page 6
of this section

Mobile Printing Systems
CPCL Programming Manual
Communications Diagnostics Mode
To aid the user in diagnosing communications problems, the printer features a Communications
Diagnostics Mode (Dump Mode). In the dump mode, the printer will print the ASCII hex codes of the data
sent to it, and their text representation (or the period ‘.’, if not a printable character). As a test of the printer
the “ALL CHRS.LBL” file on the MPU disk may be sent.
To enter Communications Diagnostics Mode:
1. Turn the printer OFF.
2. Hold FEED key down.
3. Turn the printer ON.
4. Release FEED key when printer starts printing the diagnostics.
5. At the end of 2nd diagnostics report, the printer will print: “Press FEED key to enter DUMP mode”.
6. Now press the FEED key. The printer will print: “Entering DUMP mode”.
Note: If the FEED key is not pressed within 3 seconds, the printer will print “DUMP mode not entered” and will resume normal
operation.
7. At this point, the printer is in DUMP mode and will print the ASCII hex codes of the data sent to it, and
their text representation (or “.” if not a printable character).
Additionally, a file with a “.dmp” extension containing the ASCII information will be created
and stored in the printer’s memory. It can be viewed, “cloned” or deleted using the Label Vista
application. (Refer to pg. P1-8 and the Label Vista documentation for more information.)
To cancel Communications Diagnostics Mode:
Contents
pg. 1-6
1. Turn the printer OFF.
2. Wait 5 seconds.
3. Turn the printer ON.
Mobile Printing Systems
CPCL Programming Manual
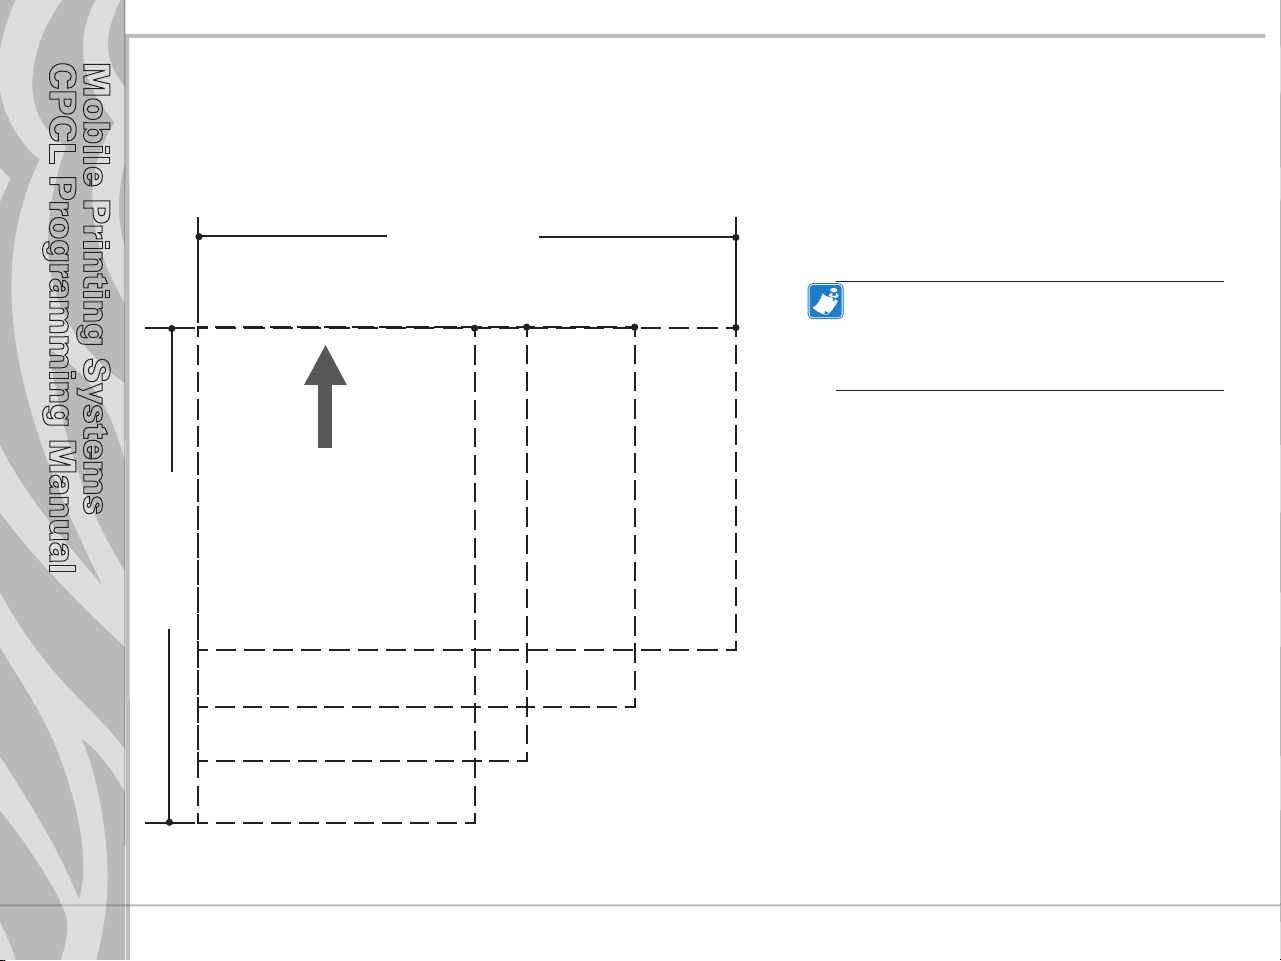
LABEL COORDINATE SYSTEM
The x and y coordinates are expressed here in terms of dots. Coordinates in ( ) are for 200 dot per inch
printers. On 200 d.p.i. printers, 8 dots (either horizontally or vertically) equal 1 millimeter and 203 dots
equate approximately to 1 inch.
Coordinates in [ ] are for 300 dot per inch
printers. On 300 d.p.i. printers 12 dots
Label Width
equal 1 millimeter, and 305 dots equate
approximately to 1 inch.
Notes: 1. Coordinates refer to the actual printing
area of the printers.
(0,0)
(575, 0)
(383, 0)
[574,0]
(447, 0)
[670,0]
[862,0]
(831, 0)
[1246,0]
2. ”y” =the available label height which can
vary with the resident application. (See Getting
Printer Information, Page 3 of this section.)
Contents
pg. 1-7
2” Printer
2.25” Printer
Label Height
Print Direction
(447, y)
[670,y]
(383, y)
[574,y]
3” Printer
(575, y)
[862,y]
4” Printer
(831,y)
[1246,y]
Mobile Printing Systems
CPCL Programming Manual
LABEL VISTA™
Label Vista is a stand-alone program for the Windows® operating system that allows users with little
or no programming background to design labels which can be printed on certain model Zebra portable
printers. It combines an intuitive graphically based user environment with powerful, but easily mastered,
editing tools.
Label Vista allows the creation of printable, fixed-size (pre-scaled) fonts derived from an included library
of TrueType™ fonts, which greatly enhances the versatility of this program.
In addition, Label Vista allows the easy creation of format files which can remain resident in the printer
and be merged with variable data files sent from the host. This provides a very efficient method of
printing labels that have a mixture of data fields that change from label to label and elements that remain
constant. Refer to Section 8 of this Manual for more information on format files.
Label Vista also provides a powerful set of diagnostics tools. It is recommended that the Label Vista
documentation package be consulted for a more detailed description of the printer diagnostics available in
this program.
Label Vista utilizes a subset of the full CPCL Programming Language described in this manual. Files
created in Label Vista are fully compatible with any other label files created using the complete set of
Mobile Printer commands.
Label Vista requires a personal computer, running Windows 95 or later. A system with the minimum
configuration to run Windows 95 will have sufficient memory to run Label Vista.
Note: Label Vista has proven to be compatible with Windows XP in informal testing, however, compatibility problems with certain
unusual combinations of hardware and software may arise.
Contents
pg. 1-8

Mobile Printing Systems
CPCL Programming Manual
PRINTER COMMANDS
A label file always begins with the “!” character followed by an “x” offset parameter, “x” and “y” axis
resolutions, a label length and finally a quantity of labels to print. The line containing these parameters is
referred to as the Command Start Line.
A label file always begins with the Command Start Line and ends with the “PRINT” command. The
commands that build specific labels are placed between these two commands.
A space character is used to delimit each field in a command line.
Note: Every line in the command session must be terminated with both carriage-return and line-feed characters. All Printer
Commands must be in uppercase characters ONLY.
Section 2
Printer
Commands
pg. 2-1
continued
Mobile Printing Systems
CPCL Programming Manual
Printer Commands
Format:
<!> {oset} <200> <200> {height} {qty}
where:
<!>: Use ‘!’ to begin a control session.
{offset}:The horizontal offset for the entire label. This value causes all fields to be offset horizontally
by the specified number of UNITS.
<200>:Horizontal resolution (in dots-per-inch).
<200>:Vertical resolution (in dots-per-inch).
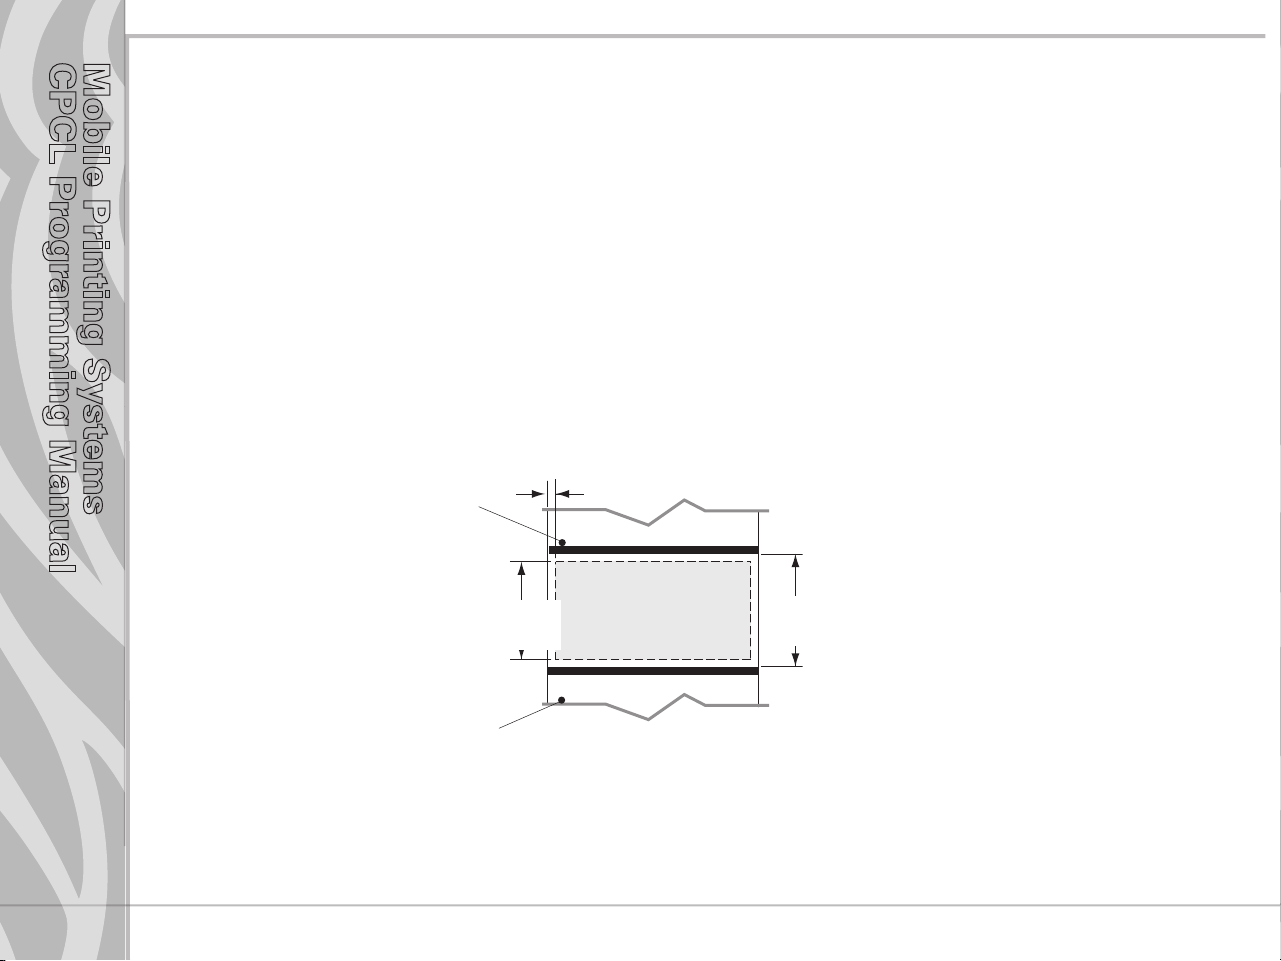
{height}:The maximum height of the label.
The maximum label height is calculated by measuring from the bottom of the first black bar
(or label gap) to the top of the next black bar (or label gap). Then 1/16” [1.5mm] is subtracted
from this distance to obtain the maximum height. (In dots: subtract 12 dots on 203 d.p.i
printers; 18 dots on 306 d.p.i. printers)
st
1
black bar or gap
Section 2
Printer
Commands
pg. 2-2
Max. label height “d”=
“h” - .062” [1.5mm]
nd
2
black bar or gap
“h” = height
between black bars
{qty}: Quantity of labels to be printed. Maximum = 1024.
continued

Mobile Printing Systems
CPCL Programming Manual
Printer Command Example
Input
! 0 200 200 210 1
TEXT 4 0 30 40 Hello World
FORM
PRINT
Output
PRINT Command
The PRINT command terminates and prints the file. This must always be the last command (except
when in Line Print Mode). Upon execution of the PRINT command, the printer will exit from a control
session. Be sure to terminate this and all commands with both carriage-return and line-feed characters.
Format:
{command}
where:
{command}: PRINT
Section 2
Printer
Commands
pg. 2-3
continued

Mobile Printing Systems
CPCL Programming Manual
END Command
The END command properly terminates a command and executes it without printing.
Format: END
{command}
where:
{command}: END
Example:
REM Send a blank label
! 0 200 200 240 1\r\n
PAGE-WIDTH 240\r\n
BOX 0 0 200 200 10\r\n
BOX 50 50 220 220 10\r\n
END\r\n
ABORT Command
The ABORT command terminates a current control session without printing.
Format:
Section 2
Printer
Commands
pg. 2-4
{command}
where:
{command}: ABORT
Mobile Printing Systems
CPCL Programming Manual
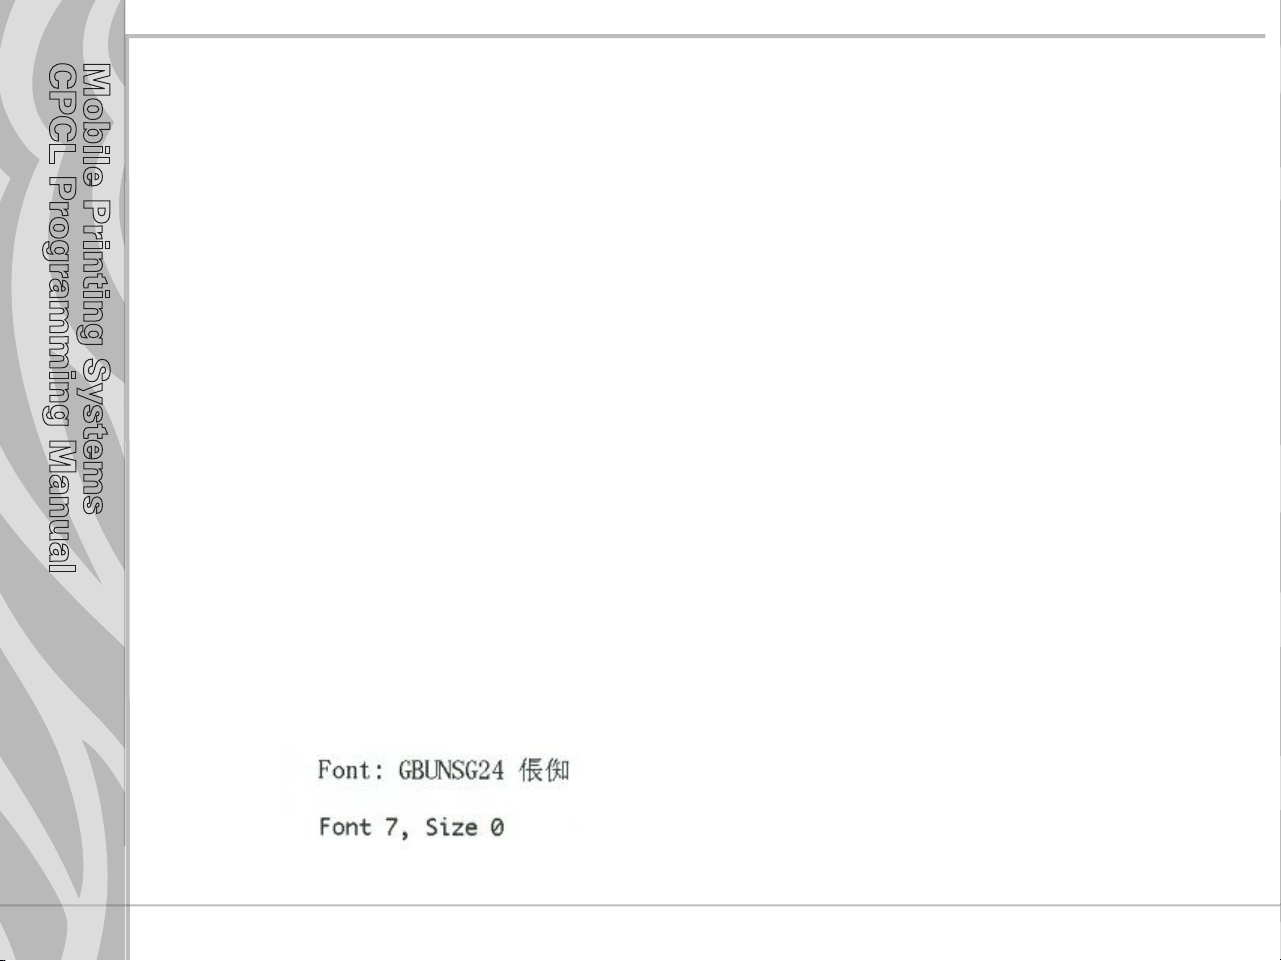
ENCODING Command
The ENCODING control command specifies the encoding of data sent to the printer.
Format:
{command} {name}
{command}: ENCODING
{name}: Choose from the following
“ASCII”
“UTF-8”
“GB18030”
ENCODING Example
Input (ENCODING.LBL):
! 0 200 200 200 1
ENCODING GB18030
TEXT GBUNSG24.CPF 0 20 30 Font: GBUNSG24 ‚t‚u
ENCODING ASCII
TEXT 7 0 20 80 Font 7, Size 0
PRINT
Section 2
Printer
Commands
pg. 2-5
Output

Mobile Printing Systems
CPCL Programming Manual
Section 2
Printer
Commands
pg. 2-6
FORM Command
The FORM command instructs the printer to feed to top of form after printing.
Format:
{command}
where:
{command}: FORM
In the following example, the printer will execute a form feed after the label is printed. See the SETFF
(set form feed) command in the section on designing receipts and lists for information on setting printer
behavior when the FORM command is executed.
Example
Input:
! 0 200 200 3 1
IN-CENTIMETERS
CENTER
TEXT 4 1 0 .5 Form Command
FORM
PRINT
JOURNAL Command
By default, the printer will check for correct media alignment if it encounters the eye-sense mark
(black horizontal bars on back of media) during a print cycle (LABEL mode). If necessary, the JOURNAL
command can be used to disable this automatic correction feature. The user’s program is responsible for
checking and assuring presence of paper in JOURNAL mode. Please refer to the status inquiry command
for details on checking for out-of-paper condition.
Format:
{command}
where:
{command}: JOURNAL
continued

Mobile Printing Systems
CPCL Programming Manual
UNITS Commands
The units commands are used to specify a measurement system for all subsequent command fields in a
control session. Coordinates, widths, and heights for all control commands can be entered with precision
to four decimal places. By placing a units command immediately after the first line in a control session,
the specified measurement system will also apply to the offset and height fields. The printer measurement
system will default to dots until a units command is issued.
Format:
{command}
where:
{command}: Choose from the following:
IN-INCHES Measurement in inches.
IN-CENTIMETERS Measurement in centimeters.
IN-MILLIMETERS Measurement in millimeters.
IN-DOTS Measurement in dots.
Section 2
Printer
Commands
pg. 2-7
continued
Mobile Printing Systems
CPCL Programming Manual
UNITS Examples
Input 1 :
! 0.3937 200 200 1 1
IN-INCHES
T 4 0 0 0 1 cm = 0.3937”
IN-DOTS
T 4 0 0 48 1 mm = 8 dots
B 128 1 1 48 16 112 UNITS
T 4 0 48 160 UNITS
FORM
PRINT
Input 2
! 0 200 200 2.54 1
IN-CENTIMETERS
T 4 0 1 0 1” = 2.54 cm
IN-MILLIMETERS
T 4 0 0 6 203 dots = 25.4 mm
B 128 0.125 1 6 12 14 UNITS
T 4 0 16 20 UNITS
FORM
PRINT
Section 2
Printer
Commands
pg. 2-8
Output 1:
Output 2
continued
Mobile Printing Systems
CPCL Programming Manual
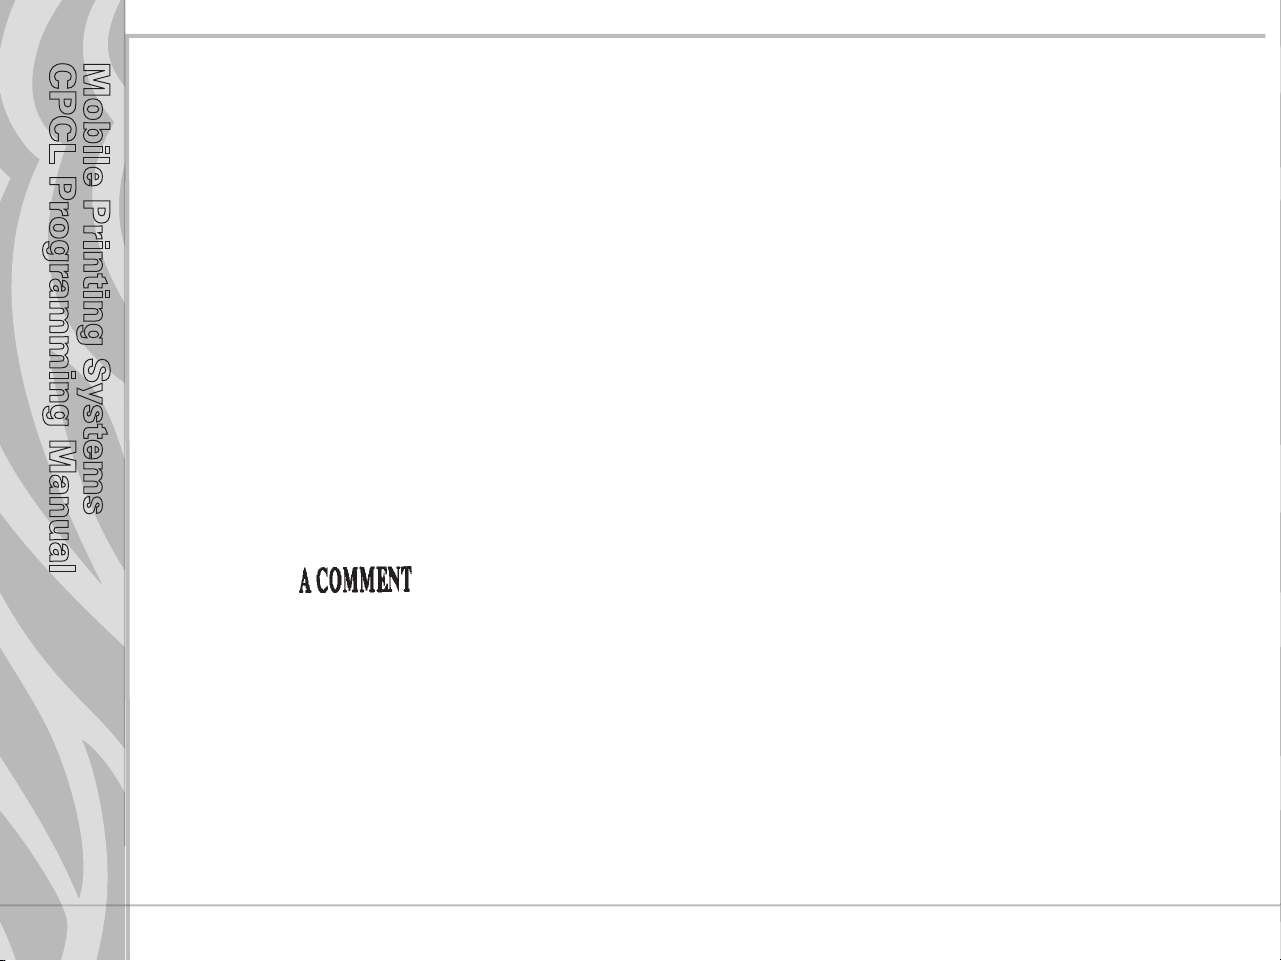
USING COMMENTS
Comments can be added between the first line of a command session and the “PRINT” command.
A comment is placed in the file by starting a line with the ‘;’ character in the first column. Any remaining
text to the end of the line will be ignored. Comments are illegal between the CONCAT and ENDCONCAT
commands.
Comments Example
Input:
! 0 200 200 25 1
IN-MILLIMETERS
JOURNAL
; Center justify text
CENTER
; Print the words ‘A COMMENT’
TEXT 5 1 0 5 A COMMENT
; Print the label and go to top of next form
FORM
PRINT
Output:
Section 2
Printer
Commands
pg. 2-9
continued
Mobile Printing Systems
CPCL Programming Manual
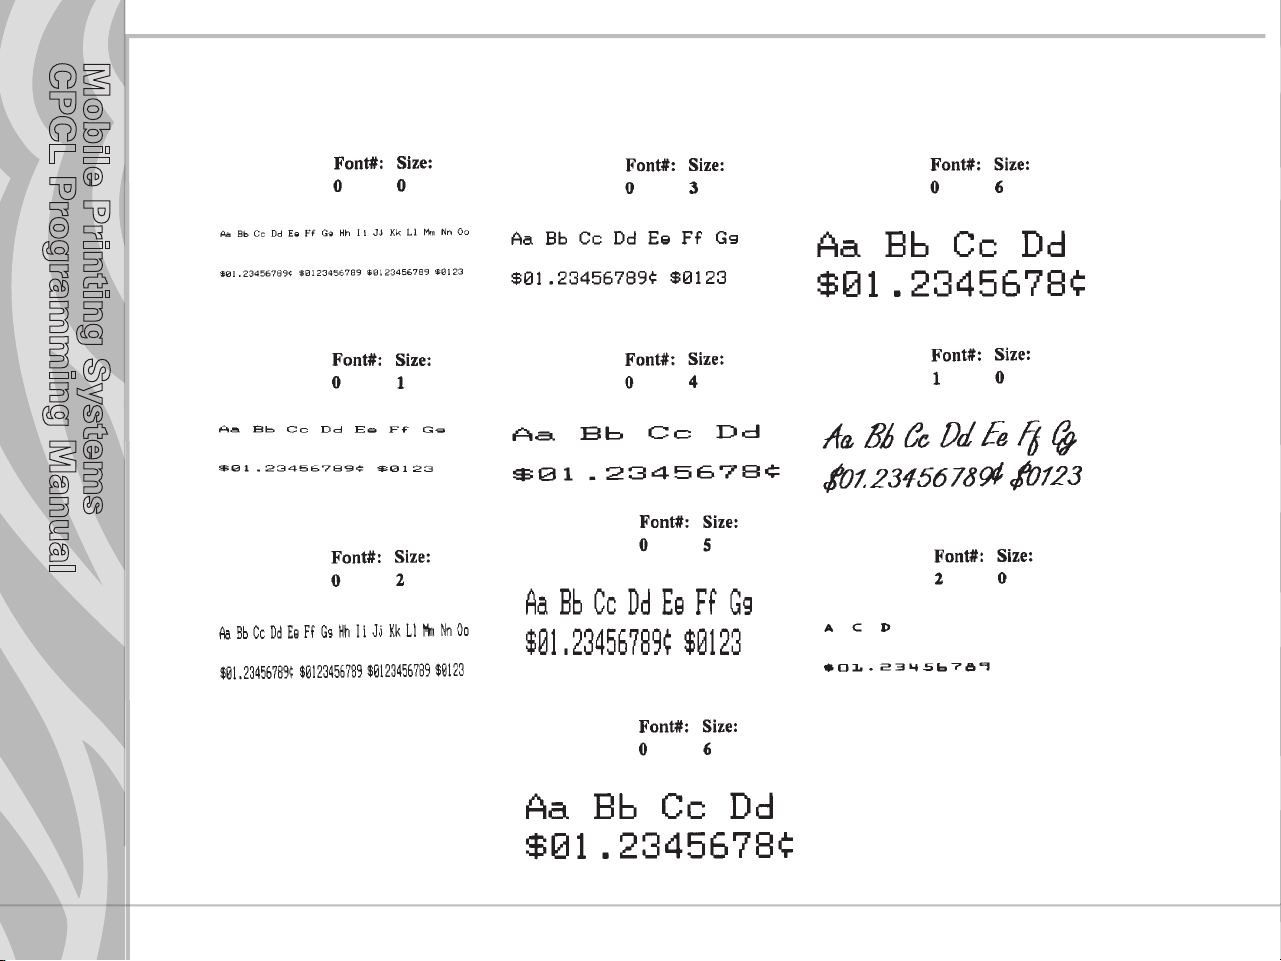
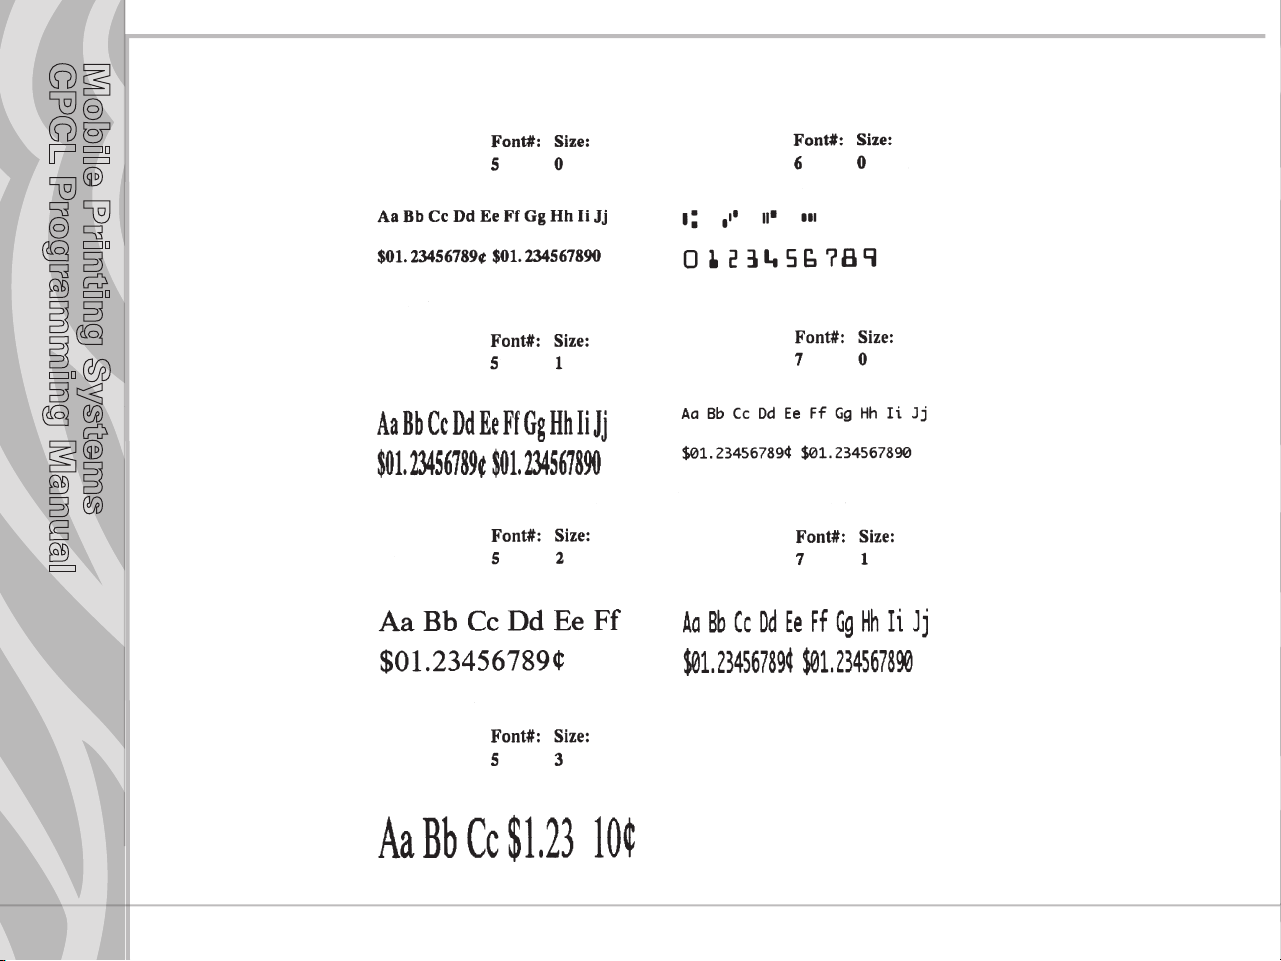
TEXT
Resident Font Examples
Section 3
Text
pg. 3-1
continued
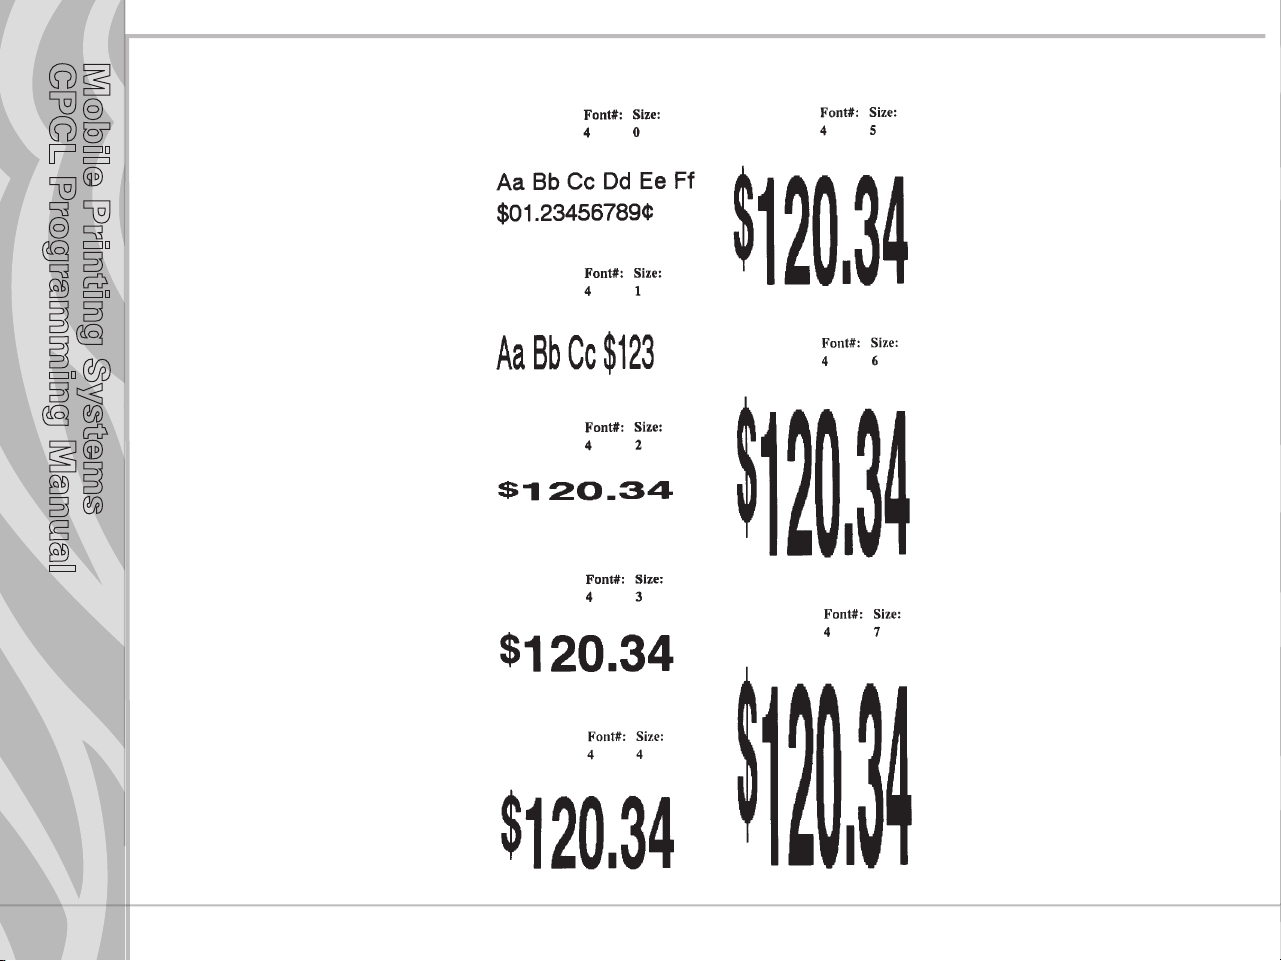
Mobile Printing Systems
CPCL Programming Manual
Resident Font Examples (continued)
Section 3
Text
pg. 3-2
continued
Mobile Printing Systems
CPCL Programming Manual
Resident Font Examples (continued)
Section 3
Text
pg. 3-3
continued
Mobile Printing Systems
CPCL Programming Manual
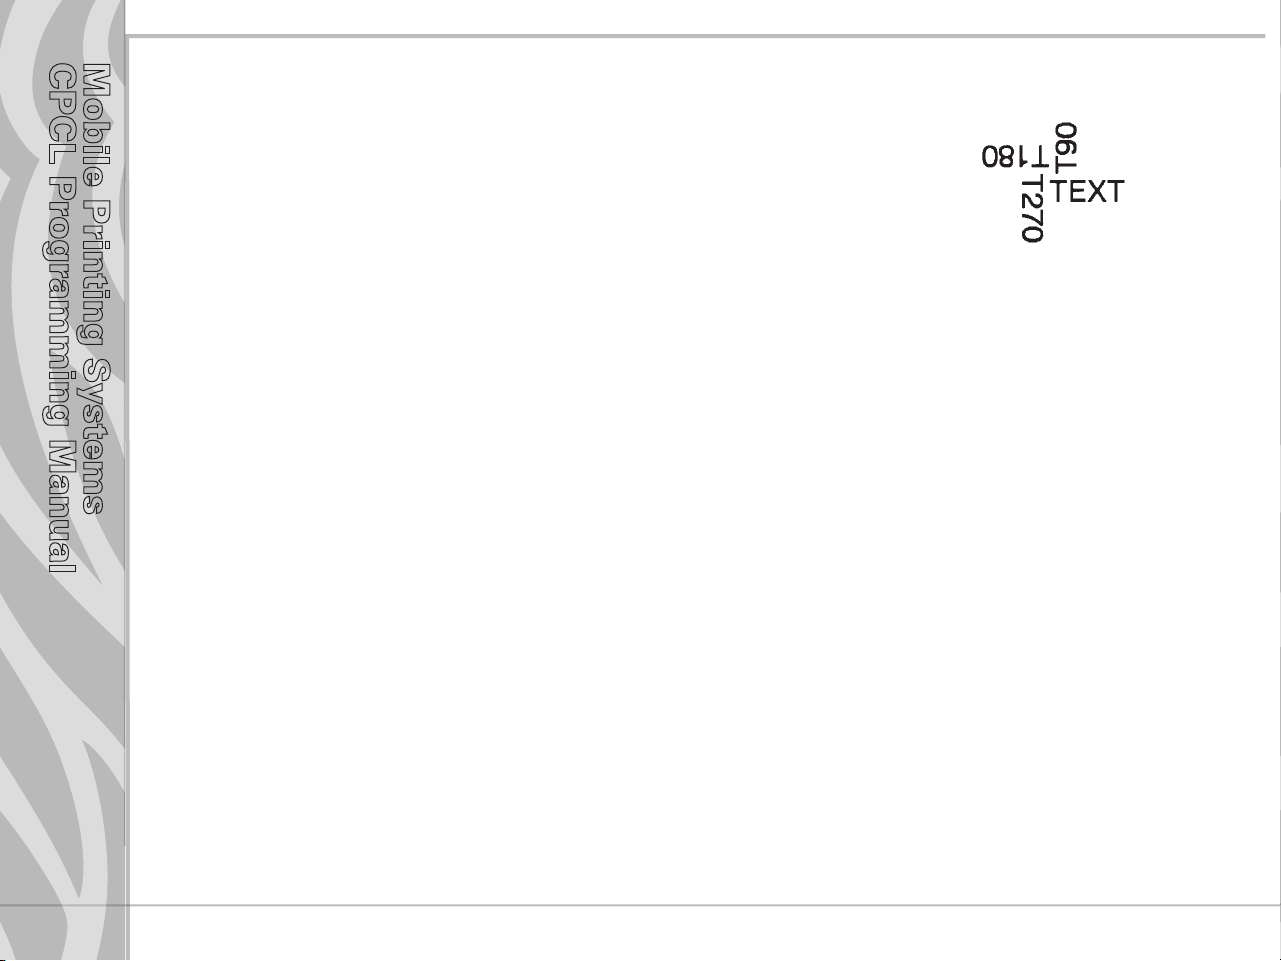
TEXT Commands
The TEXT command is used to place text on a label. This command and its variants control the specific
font number and size used, the location of the text on the label, and the orientation of this text. Standard
resident fonts can be rotated in 90˚ increments as shown in the example.
Format:
{command} {font} {size} {x} {y} {data}
where:
{command}: Choose from the following:
{command} Result
TEXT (or T) Prints text horizontally.
VTEXT (or VT) Prints text (vertically) rotated 90 degrees counterclockwise.
TEXT90 (or T90) (Same as VTEXT above.)
TEXT180 (or T180) Prints text (upside down) rotated 80 degrees counterclockwise.
TEXT270 (or T270) Prints text (vertically) rotated 270 degrees counterclockwise.
{font}: Name/number of the font.
{size}: Size identifier for the font.
{x}: Horizontal starting position.
{y}: Vertical starting position.
{data}: The text to be printed.
Section 3
Text
pg. 3-4
continued
Mobile Printing Systems
CPCL Programming Manual
Example
Input:
! 0 200 200 210 1
TEXT 4 0 200 100 TEXT
TEXT90 4 0 200 100 T90
TEXT180 4 0 200 100 T180
TEXT270 4 0 200 100 T270
FORM
PRINT
Output:
Section 3
Text
pg. 3-5
continued
Mobile Printing Systems
CPCL Programming Manual
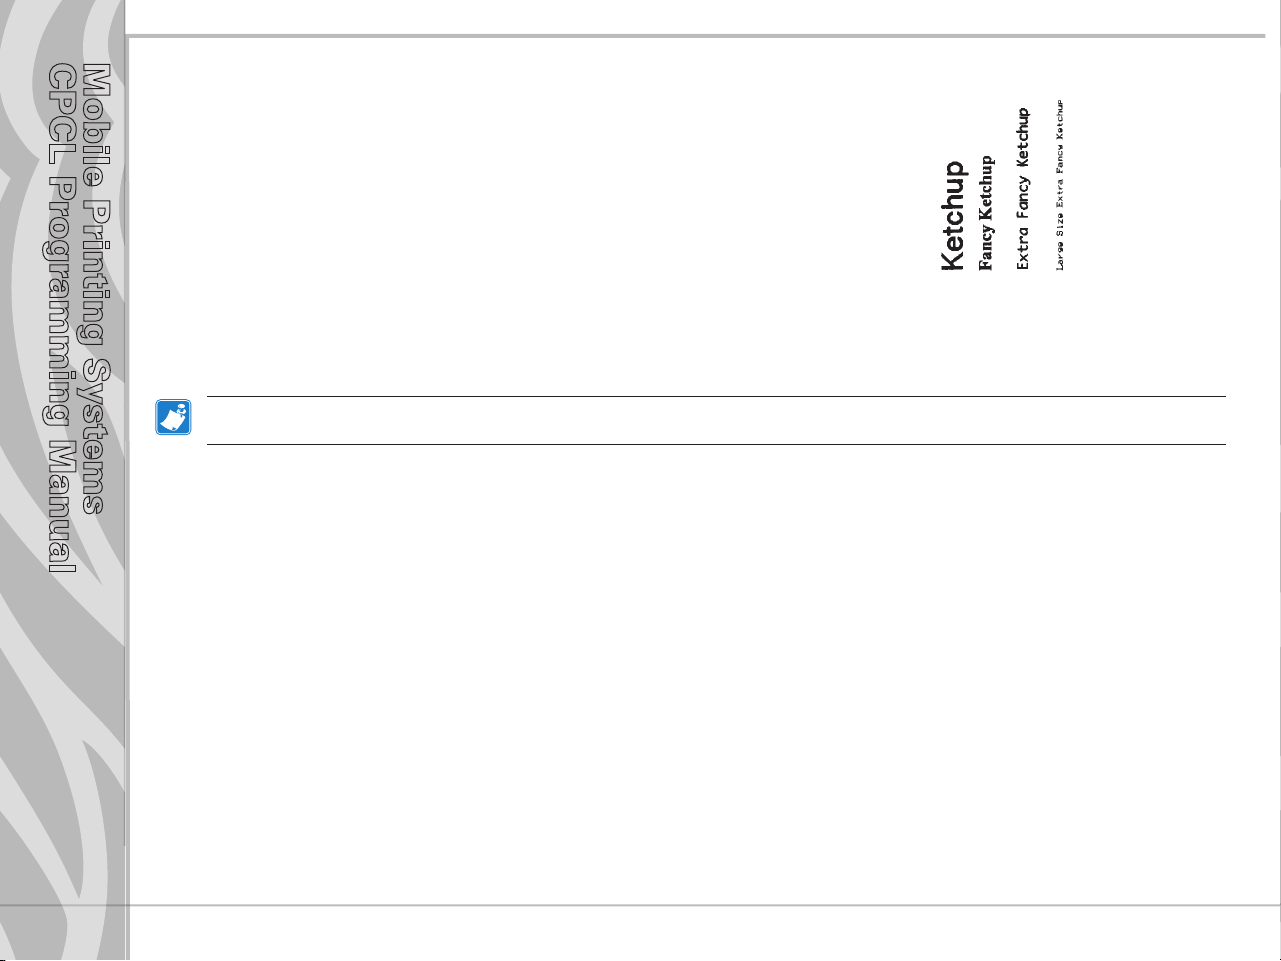
Using Font Groups
FONT-GROUP (FG) Command
The FG command gives a user the ability to group up to 10 pre-scaled font files into a single group. A
user can later specify the font group in a TEXT command. If a font group is used in a text command, the
printer will use the largest font specified in the font group that will produce the required text data and
still remain within the available width of the label for the text. When specified in the TEXT command, the
{font} parameter is specified as FG, and the {size} parameter is specified as the {fg}. Note that a user can
also specify an FG command within a CONCAT/ENCONCAT command.
Format:
{command} {fg fn fs} [fn fs] ...
where:
{command}: FG
{fg}: Font group number. Up to 10 font groups can be specified. Valid font groups range from 0 to 9.
{fn}: Name/number of the font.
{fs}: Size identifier for the font.
NOTE: Up to 10 font number/font size pairs can be assigned to a font group.
Section 3
Text
pg. 3-6
continued
Mobile Printing Systems
CPCL Programming Manual
Example
Input:
! 0 200 200 250 1
; Specify fonts 0-0, 7-0, 5-0, 4-0 as members
; of font group 3.
FG 3 0 0 7 0 5 0 4 0
VT FG 3 10 250 Ketchup
VT FG 3 70 250 Fancy Ketchup
VT FG 3 120 250 Extra Fancy Ketchup
VT FG 3 180 250 Large Size Extra Fancy Ketchup
FORM
PRINT
In this example, the descriptions will be printed with the largest font in the specied font group that is capable of tting the
requested text in a 250 dot label eld.
Output:
Section 3
Text
pg. 3-7
continued
 Loading...