

Page 1

MK500 MICROKIOSK
FOR CE .NET 5.0
PRODUCT REFERENCE
GUIDE
Page 2

Page 3

MK500 MICROKIOSK FOR CE .NET 5.0
PRODUCT REFERENCE GUIDE
72E-112998-05
Revision A
March 2015
Page 4

ii MK500 MicroKiosk for CE .NET 5.0 Product Reference Guide
© 2015 Symbol Technologies, Inc.
No part of this publication may be reproduced or used in any form, or by any electrical or mechanical means,
without permission in writing from Zebra. This includes electronic or mechanical means, such as photocopying,
recording, or information storage and retrieval systems. The material in this ma nual is subject to change
without notice.
The software is provided strictly on an “as i s” basis. All sof twar e, including firmware, furnished to the user is on
a licensed basis. Zebra grants to the user a non-transferable and non-exclusive license to use each software
or firmware program delivered hereunder (licensed program) . Except as n oted below, such license may not be
assigned, sublicensed, or otherwise tran sfe rr e d by th e user without prior written consent of Zebra. No right to
copy a licensed program in whole or in part is granted, exce pt as permitted unde r copyright law. The user shall
not modify , merge, or incorporate any for m or portion of a licensed program with other pro gram material, create
a derivative work from a licensed program , or us e a li censed program in a network without written permission
from Zebra. The user agrees to maintain Zebra’s copyright notice on the licensed programs delivered
hereunder , and to include the same on any authorized copies it makes, in whole or in part. The user agrees not
to decompile, disassemble, decode, or reverse engineer any licensed program delivered to the user or any
portion thereof.
Zebra reserves the right to make changes to any software or product to improve reliability, function, or design.
Zebra does not assume any product liability arising out of, or in connection with, the application or use of any
product, circuit, or application described herein.
No license is granted, either expressly or by implication, estoppel, or otherwise under any Zebra Techn ologies
Corporation, intellectual property rights. An implied license only exists for equipment, circuits, and subsystems
contained in Zebra products.
Zebra and the Zebra head graphic are registered trademarks of ZIH Corp. The Symbol logo is a registered
trademark of Symbol Technologies, Inc., a Zebra Technologies company.
Zebra Technologies Corporation
Lincolnshire, IL U.S.A.
http://www.zebra.com
Warranty
For the complete Zebra hardware product warranty statement, go to:
http://www.zebra.com/warranty
Page 5

Revision History
Changes to the original guide are listed below:
Change Date Description
-01 Rev A 2/2009 Initial release.
-02 Rev A 8/2009 Removed note stating wireless devices do not support wired Ethernet
-03 Rev A 5/2010 Updated Power-Over-Ethernet information.
-04 Rev A 8/2011 Removed EMDK for Java information.
-05 Rev A 3/2015 Zebra Re-Branding
iii
communication.
Page 6

iv MK500 MicroKiosk for CE .NET 5.0 Product Reference Guide
Page 7

TABLE OF CONTENTS
About This Guide
Introduction..................................................................................................................................... ix
Configurations................................................................................................................................. ix
Chapter Descriptions ...................................................................................................................... ix
Notational Conventions................................................................................................................... x
Related Publications....................................................................................................................... xi
Service Information......................................................................................................................... xi
Chapter 1: MK500 Introduction
Overview ........................................................................................................................................ 1-1
MK500 Parts .................................................................................................................................. 1-1
Touch Screen LCD .................................................................................................................. 1-1
Speakers .................................................................................................................................. 1-1
Scanner Window ...................................................................................................................... 1-1
Function Buttons ...................................................................................................................... 1-2
External Ports .......................................................................................................................... 1-3
MK500 Features ............................................................................................................................ 1-4
Programmable Function Buttons ............................................................................................. 1-4
Bar Code Scanner/Imager ....................................................................................................... 1-4
Software ................................................................................................................................... 1-4
Touch Screen ........................................................................................................................... 1-4
Memory .................................................................................................................................... 1-4
Connectivity Options ................................................................................................................ 1-4
Micro SD Card Slot .................................................................................................................. 1-4
Power Options ......................................................................................................................... 1-4
Mounting Options ..................................................................................................................... 1-4
Symbol Mobility Developer Kits (SMDKs) ................................................................................ 1-5
Bar Code Decoding ........................................................................................................................ 1-6
Scanning with the MK500 ........................................................................................................ 1-6
Imaging with the MK500 .......................................................................................................... 1-8
Page 8

vi MK500 MicroKiosk for CE .NET 5.0 Product Reference Guide
Chapter 2: Installation
Overview ........................................................................................................................................ 2-1
Unpacking the MK500 ................................................................................................................... 2-1
Removing the Screen Protector ..................................................................................................... 2-1
MK500 Mounting ............................................................................................................................ 2-2
Inserting a Micro SD Card ............................................................................................................. 2-2
Connecting the MK500 .................................................................................................................. 2-3
AC Power Supply .................................................................................................................... 2-3
USB Connection ...................................................................................................................... 2-3
Wired Ethernet Connection ...................................................................................................... 2-4
Optional Advertisement Insert ....................................................................................................... 2-6
Chapter 3: Configuration
Overview ........................................................................................................................................ 3-1
System Configuration Manager ..................................................................................................... 3-1
File Types ................................................................................................................................ 3-1
User Interface .......................................................................................................................... 3-2
File Deployment ....................................................................................................................... 3-4
Local Configuration Using the Microsoft Windows Control Panel .................................................. 3-4
Configuration via Registry File ....................................................................................................... 3-4
Rebooting the MK500 .............................................................................................................. 3-4
Chapter 4: System Features
Overview ........................................................................................................................................ 4-1
RegMerge and CopyFiles ...................................................................................................... ........ 4-2
Accessing the Windows® CE Desktop .......................................................................................... 4-2
Network Time Update: SNTP Client .............................................................................................. 4-2
Memory Management .................................................................................................................... 4-2
Flash: Nonvolatile (Persistent) Memory ................................................................................... 4-2
RAM: Volatile (Non-Persistent) Memory .................................................................................. 4-2
Browser Applications ..................................................................................................................... 4-3
Loading Additional Fonts on the MK500 ........................................................................................ 4-3
Using Additional Fonts in Native Applications .......................................................................... 4-4
Using Additional Fonts in Managed Applications ..................................................................... 4-4
Using Additional Fonts in Browser Applications ....................................................................... 4-4
Things to Consider when Using Additional Fonts .................................................................... 4-4
Input Panel (Virtual Keyboard) ....................................................................................................... 4-5
Microsoft Applications .................................................................................................................... 4-5
Chapter 5: Application Deployment
Overview ........................................................................................................................................ 5-1
Enterprise Mobility Developer Kit (EMDK) for C ...................................................................... 5-1
Enterprise Mobility Developer Kit (EMDK) for .NET ................................................................. 5-2
PocketBrowser for the Web ..................................................................................................... 5-2
Device Configuration Package ................................................................................................. 5-3
Platform SDK ........................................................................................................................... 5-3
Installing Enterprise Mobility Developer Kits ............................................................................ 5-3
Installing Other Development Software ................................................................................... 5-3
Page 9

Table of Contents vii
Deployment .................................................................................................................................... 5-4
ActiveSync ............................................................................................................................... 5-5
OS Update ............................................................................................................................... 5-7
Terminal Configuration Manager (TCM) .................................................................................. 5-8
Initial Program Loader (IPL) ..................................................................................................... 5-8
Rapid Deployment Client ......................................................................................................... 5-22
AirBEAM Smart ........................................................................................................................ 5-22
Flash Storage ................................................................................................................................. 5-23
FFS Partitions .......................................................................................................................... 5-23
Working with FFS Partitions ..................................................................................................... 5-23
Non-FFS Partitions .................................................................................................................. 5-24
Downloading Partitions to the MK500 ...................................................................................... 5-24
Appendix A: Technical Specifications
Technical Specifications ................................................................................................................ A-1
Appendix B: Wireless Configuration
Overview ........................................................................................................................................ B-1
Wireless Applications ..................................................................................................................... B-2
Signal Strength Icon ....................................................................................................................... B-3
Turning the WLAN Radio On and Off ............................................................................................ B-3
Find WLANs Application ................................................................................................................ B-4
Profile Editor Wizard ...................................................................................................................... B-6
Profile ID .................................................................................................................................. B-6
Operating Mode ....................................................................................................................... B-7
Ad-Hoc ..................................................................................................................................... B-9
Security Mode .......................................................................................................................... B-10
Authentication .......................................................................................................................... B-11
Tunneled Authentication .......................................................................................................... B-11
User Certificate Selection ........................................................................................................ B-14
Server Certificate Selection ..................................................................................................... B-15
Encryption ................................................................................................................................ B-20
IP Address Entry ...................................................................................................................... B-24
Transmit Power ........................................................................................................................ B-26
Battery Usage .......................................................................................................................... B-28
Manage Profiles Application .......................................................................................................... B-29
Manage Certificates ....................................................................................................................... B-32
Certificate Properties ............................................................................................................... B-32
Import a Certificate ................................................................................................................... B-33
Delete a Certificate .................................................................................................................. B-33
Manage PACs ................................................................................................................................ B-34
PAC Properties ........................................................................................................................ B-34
Delete PAC .............................................................................................................................. B-34
Wireless Status Application ........................................................................................................... B-35
Signal Strength Window ........................................................................................................... B-36
Current Profile Window ............................................................................................................ B-37
IPv4 Status Window ................................................................................................................. B-38
Wireless Log Window .............................................................................................................. B-39
Versions Window ..................................................................................................................... B-40
Page 10

viii MK500 MicroKiosk for CE .NET 5.0 Product Reference Guide
Wireless Diagnostics Application ................................................................................................... B-40
ICMP Ping Window .................................................................................................................. B-41
Graphs ..................................................................................................................................... B-41
Trace Route Window ............................................................................................................... B-41
Known APs Window .............................................................................................................. ... B-43
Options .......................................................................................................................................... B-44
Operating Mode Filtering ......................................................................................................... B-44
Regulatory Options .................................................................................................................. B-45
Band Selection ......................................................................................................................... B-45
System Options ........................................................................................................................ B-46
Auto PAC Settings ................................................................................................................... B-46
Change Password .................................................................................................................... B-47
Export ....................................................................................................................................... B-48
Cold Boot Persistence ................................................................................................................... B-49
Registry Settings ............................................................................................................................ B-49
Log On/Off Application ................................................................................................................... B-50
User Already Logged In ........................................................................................................... B-50
No User Logged In ................................................................................................................... B-51
Appendix C: Troubleshooting
Overview ........................................................................................................................................ C-1
Troubleshooting Notes ............................................................................................................. C-1
Troubleshooting ............................................................................................................................. C-1
MK500 Version Information ........................................................................................................... C-4
Appendix D: MK500 Demo
Overview ........................................................................................................................................ D-1
Price Check #1 .............................................................................................................................. D-1
Price Check #2 .............................................................................................................................. D-2
Special Order Pick Up ................................................................................................................... D-2
Loyalty Coupon Printing ................................................................................................................. D-3
Loyalty Coupon Redemption (Mailer) ............................................................................................ D-3
Cell Phone Coupon ........................................................................................................................ D-3
Lottery Win Verification .................................................................................................................. D-4
Employee Application .................................................................................................................... D-4
Slideshow Demo ............................................................................................................................ D-4
Video Demo ................................................................................................................................... D-5
Page 11

ABOUT THIS GUIDE
Introduction
The MK500 MicroKiosk for CE .NET 5.0 Product Reference Guide provides information on installing, operating,
and programming the MK500.
NOTE Unless otherwise noted, the term MK500 refers to all configurations of the device.
Configurations
This guide includes the following configurations:
•
MK500-00K0DB9GWTWR - Imager, Ethernet
•
MK500-00U0DB9GWTWR - Laser scanner, Ethernet
•
MK590-00K0DB9GWTWR - Imager, 802.11 a/b/g
•
MK590-00U0DB9GWTWR - Laser scanner, 802.11 a/b/g
Chapter Descriptions
Following are brief descriptions of each chapter in this guide.
•
Chapter 1, MK500 Introduction provides an overview of the MK500 that includes parts of the MK500,
features, and scanning modes.
•
Chapter 2, Installation describes the hardw are se tu p an d installation of the MK500.
•
Chapter 3, Configuration describes the configuration parameters of the MK500.
•
Chapter 4, System Features describes the wide range of capabilities used to support independent
application development on the MK500.
•
Chapter 5, Application Deployment describes the software development environments and how to install and
upgrade applications and images.
Page 12

x MK500 MicroKiosk for CE .NET 5.0 Product Reference Guide
•
Appendix A, Technical Specifications provides technical information about the MK500.
•
Appendix B, Wireless Configuration describes how to configure the Spectrum24 wireless connection.
•
Appendix C, Troubleshooting provides troubleshooting procedures for correcting problems encountered
with the MK500.
•
Appendix D, MK500 Demo provides information on the MK500 demo which illustrates device functions.
Notational Conventions
This document uses these conventions:
•
“User” refers to anyone using an application on the terminal.
•
“Device” refers to the MK500.
•
Italics are used to highlight specific items in the general text, and to identify chap ters and sectio ns in this
and related documents. It also identifies names of windows, menus, menu items, and fields within
windows.
•
Bold identifies buttons to be tapped or clicked.
•
Bullets (•) indicate:
• lists of alternatives or action items.
• lists of required steps that are not necessarily sequential.
•
Numbered lists indicate a set of sequential steps, i.e., those that describe step-by-step procedur es.
NOTE This symbol indicates something of special interest or importance to the reader. Failure to read the note
will not result in physical harm to the reader, equipment or data.
CAUTION This symbol indicates that if this information is ignored, the possibility of data or material damage may
occur.
WARNING! This symbol indicates that if this information is ignored the possibility that serious personal
injury may occur.
Page 13

Related Publications
Following is a list of documents that provide additional information about configuring the MK500:
•
MK500/MK4000 Quick Reference Guide, p/n 72-112230-xx
•
MK500 Platform Software Development Kit (PSDK)
•
Enterprise Mobility Developer Kit (EMDK) for C
•
Enterprise Mobility Developer Kit (EMDK) for .NET
•
Enterprise Mobility Developer Kit (EMDK) for .WEB
•
Microsoft Applications for Mobile and Win CE 5.0 User Guide, p/n 72E-78456 -xx
•
Application Guide for Zebra Devices, p/n 72E-68901-xx
•
AirBEAM® Package Builder Product Reference Guide, p/n 72-55769-xx.
•
AirBEAM® Smart Windows® CE Client Product Reference Guide, p/n 72-63060-xx
•
MSP 3.X User’s Guide, p/n 72E-100158-xx
About This Guide xi
For the latest version of these guides and software, visit: http://www.zebra.com/support
Service Information
If you have a problem with your equipment, contact Zebra support for your region. Contact information is
available at: http://www.zebra.com/support
When contacting Zebra support, please have the following information available:
•
Serial number of the unit
•
Model number or product name
•
Software type and version number
Zebra responds to calls by e-mail, telephone or fax within the time limits set forth in service agreements.
If your problem cannot be solved by Zebra support, you may need to return your equipment for servicing and
will be given specific directions. Zebra is not responsible for any damages incurred during shipment if the
approved shipping container is not used. Shipping the units improperly can possibly void the warranty.
If you purchased your business product from a Zebra business partner, please contact that business partner
for support.
Page 14

xii MK500 MicroKiosk for CE .NET 5.0 Product Reference Guide
Page 15

CHAPTER 1 MK500 INTRODUCTION
Overview
The MK500 MicroKiosk provides retail consumers access to data critical to making an informed purchasing
decision. The MK500 verifies prices on bar coded merchandise and obtains up-to-the-minute information on
in-store promotions. Its easy-to-read display can be used as an electronic billboard for instant in-store
merchandising and multimedia presentations to promote seasonal sales and upcoming events. The touch
screen and programmable function buttons enhance in-store applications and allow customer interaction.
MK500 Parts
MK500 parts include:
•
Touch screen
•
Speakers
•
Scanner window
•
Function buttons
•
External ports.
See Figure 1-1 on page 1-2 and Figure 1-2 on page 1-3 for illustrations.
Touch Screen LCD
The full color 3.5 inch diagonal full QVGA LCD (320 X 240 pixels) is ideal for presenting text, graphics, and
video. The touch screen accommodates greater user interaction and enhances custom designed applications.
Speakers
The MK500 speakers are ideal for multimedia applications.
Scanner Window
The scanner window protects the scan engine.
Page 16

1 - 2 MK500 MicroKiosk for CE .NET 5.0 Product Reference Guide
Touch Screen
Speakers
Scanner Window
Function Buttons
Function Buttons
The MK500 has three programmable function buttons (see Fig ure 1-1 on page 1-2) that correspond to Up
Arrow, Enter, and Down Arrow from left to right, by default. You can remap these buttons to other functions
using a registry file. See Registry Settings on page B-49.
Figure 1-1
MK500 Front View
Page 17

MK500 Introduction 1 - 3
Cable Run
Mounting Hole (4)
Cable Run
Cable Run
Power
Mini USB
RJ45 (Ethernet)
Micro SD Card Slot
Figure 1-2
MK500 Rear View
External Ports
The MK500 has the following external ports:
Power Port
A power supply connects to the power port (2.0 mm barrel jack connector) on the MK500. For more
information, see AC Power Supply on page 2-3.
Mini USB
A USB cable connects to the mini USB port on the MK500. For more information, see USB Connection on
page 2-3.
RJ45 Ethernet/Bias-T
Wired/Wireless Ethernet: Power through AC Outlet
The Ethernet / Bias-T (10-conductor RJ45) port accommodates Ethernet data connection. The MK500
receives power through the approved power supply.
Wired Ethernet: Power through Power-over-Ethernet
The MK500 supports Power-over-Ethernet (POE), 802.3af standard. An Ethernet (10/100Base-T) cable
connected to the Ethernet port provides both data communication and power to the MK500.
Page 18

1 - 4 MK500 MicroKiosk for CE .NET 5.0 Product Reference Guide
MK500 Features
Programmable Function Buttons
The MK500 has three function buttons you can program to perform various tasks such as navigation through
an application or choosing between various options. By default these buttons correspond to Up Arrow, Enter,
and Down Arrow from left to right. See Figure 1-1 on page 1-2.
Bar Code Scanner/Imager
The laser-based MK500 decodes all tradi tion a l 1D bar codes (including RSS bar code type). The
imager-based version decodes 1D bar codes as well as 2D symbologies such as PDF417. See Bar Code
Decoding on page 1-6.
Software
Standard well-supported operating system and development tools ease application development for the
Microsoft
Explorer 6.0, C#, VisualBasic.NET, and Windows CE Media Player.
®
Windows® CE .NET operating system: Embedded Visual C/C++ 4.0, Visual Studio.NET, Internet
Touch Screen
The touch screen provides user interaction and enhances the capabilities of custom applications.
Memory
The MK500 standard system configuration contains 64 MB flash/64 MB DRAM. The flash memory is
non-volatile and stores the system firmware, user applications, and data.
Connectivity Options
MK500 connectivity options include USB, wired 10/100 Mbps Ethernet, or wireless 802.11 a/b/g Mbps.
Micro SD Card Slot
The MK500 contains a slot for micro SD cards of up to 8 GB.
Power Options
To supply power, use the standard approved power supply or 802.3af Power-over-Ethernet certified
equipment.
Mounting Options
You can mount the MK500 on a desktop or wall using a co mmercially-availab le bracket or st an d that conforms
to the 75 mm VESA Flat Panel Monitor Physical Mounting Interface (FPMPMI™) mounting standards. See
MK500 Mounting on page 2-2.
Page 19

Symbol Mobility Developer Kits (SMDKs)
The following developer kits are available for the MK500:
•
EMDK for C (see Enterprise Mobility Developer Kit (EMDK) for C on page 5-1) for developing native
C/C++ applications
•
PocketBrowser (see PocketBrowser for the Web on page 5-2) for web development
•
EMDK for .NET (see Enterprise Mobility Developer Kit (EMDK) for .NET on page 5-2) for developing
managed .NET applications in C# or VB.NET.
MK500 Introduction 1 - 5
Page 20

1 - 6 MK500 MicroKiosk for CE .NET 5.0 Product Reference Guide
Bar Code Decoding
The MK500 decodes any traditional retail 1D or PDF417 (imager-based only) bar code presented in its field of
view.
Scanning with the MK500
When scanning a bar code using the laser-based MK500:
•
Hold the bar code at an angle which does not cause specular reflection (approximately 45o - see
Specular Reflection on page 1-7).
•
Hold the bar code close for small bar codes and farther away for large bar codes.
•
The MK500 beeps to indicate a successful decode.
Figure 1-3
The scan beam does not have to be perfectly parallel with the top and bottom of the symbol (up to a 4
permitted). Ensure the symbol is in good condition.
Scanning with the MK500
o
tilt is
Page 21

MK500 Introduction 1 - 7
No specular
reflection.
Decode can occur.
Side Views
Tilt Bar Code At Slight Angle (Up to 30°)
B
a
r
C
o
d
e
Specular reflection.
Reflected beam is
within specular dead
zone and prevents
decode.
3
0
°
B
a
r
C
o
d
e
Specular Reflection
When laser beams reflect directly back into the scanner from the bar code, they can “blind” the scanner and
make decoding difficult. This phenomenon is called specular reflection.
To avoid this, scan the bar code so that the beam does not bounce directly back. But do not scan at too oblique
an angle; the scanner needs to collect scattered reflections from the scan to make a successful decode.
Practice quickly shows what tolerances to work within.
Figure 1-4
When scanning a 1D bar code, there is only a small specular dead zone to avoid (+
Avoiding Specular Reflection
2o from the direct laser
beam). However , the scan ne r is not effective if its beams hit the bar code surface at an a ngle greater th an 30
o
.
Page 22

1 - 8 MK500 MicroKiosk for CE .NET 5.0 Product Reference Guide
1D bar code symbol
2D bar code symbol
Correct
Incorrect
Imaging with the MK500
When imaging, ensure the bar code is within the decode range and within the aiming pattern. The MK500
beeps to indicate a successful decode.
Place the symbol in any orientation within the aiming pa ttern. Ensure the entire symbol is within the rectan gular
area formed by the brackets in the aiming pattern. The red laser aiming pattern turns on to assist in aiming.
Figure 1-5
Figure 1-6
Imager Aiming Pattern: Bar Code Centered
Imager Aiming Pattern: Bar Code Not Centered
Page 23

CHAPTER 2 INSTALLATION
Overview
This chapter describes MK500 installation, including:
•
Unpacking
•
Mounting
•
Inserting a micro SD card
•
Providing power
•
Connecting to a host
•
Connecting peripherals
Unpacking the MK500
Remove the MK500 from its packing and inspect it for damage. Keep the packing, it is the approved shipping
container and should be used if the MK500 needs to be returned for servicing.
Removing the Screen Protector
A screen protector is applied to the MK500. Zebra recommends using this to minimize wear and tear. Screen
protectors enhance the usability and durability of touch screen displays.
To remove the screen protector, lift the corner using a thin plastic card, such as a credit card, then carefully lift
it off the display.
CAUTION Do not use a sharp object to remove the protector. Doing so can damage the display.
For a package of five replacement screen protectors, contract Zebra.
Page 24

2 - 2 MK500 MicroKiosk for CE .NET 5.0 Product Reference Guide
112.3
124.70
102.6
85.2
38.0
95.9
18.7
4.8
43.4
24.6
54.6
13.0
10.20
(4) M4x8.1 mm INSERTS
142.2
75.0
75.0
Note: Dimensions are in mm. To convert to inches, divide by 25.4.
MK500 Mounting
To mount the MK500 on a wall or counter top, use a mounting bracket that conforms to the 75 mm VESA
specification.
1. The device’s mounting inserts are M4 x 8.1 mm. When selecting an appropriate screw type, ensure its
length does not penetrate the device’s back housing more than 8.1 mm after going through the mounting
plate.
2. Align the VESA mounting holes with the mounting holes on the back of the device.
3. Insert the screws through each of the four aligned mounting holes.
Figure 2-1 provides MK500 dimensions for mounting reference.
Figure 2-1
Inserting a Micro SD Card
MK500 Mounting Dimensions
To use a micro SD card, insert it into the slot in the back of the MK500 as shown on the device. See Figure 1-2
on page 1-3 for slot location. To remove the card, press down gently on it to eject, then remove it from the slot.
Page 25

Connecting the MK500
The MK500 communication interfaces include both wired or wireless solutions:
•
USB Connection
• USB Client - ActiveSync connection to a desktop computer
• USB Host - Use a USB adapter cable, available from Zebra, to connect to peripherals
•
Wired Ethernet (10/100Base-T cable)
• Power through AC outlet (see page 2-4)
• Power through Power-over-Ethernet (see page 2-4)
To access the Windows
AC Power Supply
The universal AC power supply connects to the power port on the MK500 using a 2.0 mm barrel jack. The
power supply has a positive center pin and the outer tab is ground. It is compatible with:
•
120V 60 Hz (North America)
Installation 2 - 3
®
CE Desktop, see Accessing the Windows® CE Desktop on page 4-2.
•
230V 50 Hz (International excluding Japan)
•
100V 50/60 Hz (Japan).
USB Connection
Connecting to a Host
The MK500 can communicate with a host using a mini B USB cable connected to the mini USB port.
1. Insert the power supply barrel connector into the MK500 power port. See Figure 1-2 on page 1-3.
2. Route the power cable.
3. Plug the AC power supply into a wall outlet.
4. Connect the USB cable to the mini USB port on the MK500. See Figure 1-2 on p age 1-3 for port locations.
5. Connect the other end of the cable to a USB port on the host.
Connecting to Peripheral Devices
Use a mini A USB cable and a USB adapter cable (available from Zebra) to connect to a peripheral device
such as a printer, a han dheld scanner, a keyboard, or mouse.
1. Connect the mini A USB cable to the mini USB port on the MK500. See Figure 1-2 on page 1-3 for port
locations.
2. If necessary, connect the USB adapter cable to the mini A USB cable.
3. Connect the other end of the cable to the peripheral device.
Page 26

2 - 4 MK500 MicroKiosk for CE .NET 5.0 Product Reference Guide
Wired Ethernet Connection
With a wired Ethernet connection (10/100Base-T cable), the MK500 is powered via either the MK500 AC
power supply, or by Power-over-Ethernet through the Ethernet cable.
Wired Ethernet: Power through AC Outlet
The MK500 communicates to the host through a 10/100Base-T Ethernet cable and receives power through a
AC power supply.
1. Insert the power supply barrel connector into the MK500 power port. See Figure 1-2 on page 1-3.
2. Route the power cable.
3. Plug the AC power supply into a wall outlet.
4. Connect the Ethernet cable to the RJ45 port on the MK500. See Figure 1-2 on page 1-3.
5. Plug the other end of the Ethernet cable into the host system LAN port.
Wired Ethernet: Power through POE
The POE installation option allows the MK500 to commu nicate and receive power on the same 10/100Base-T
Ethernet cable.
1. Connect the Ethernet cable to the MK500 RJ45 port. See Figure 1-2 on page 1-3.
2. Plug the other end of the Ethernet cable into an 802.3af certified host system LAN port or 802.3af port
injector.
Page 27

Installation 2 - 5
Pin 8 Pin 1
RJ45/Ethernet Connector Pinouts
Figure 2-2 identifies the locations for the Ethernet port pins, and Table 2-1 lists pin descriptions.
Figure 2-2
Table 2-1
1TXD (+)
2TXD (-)
3RXD (+)
4Bias-T VCC
5Bias-T VCC
6RXD (-)
7Bias-T GND
8Bias-T GND
8-Pin RJ45 Connector Port
RJ45/Ethernet Pin Descriptions
Pin Description
Page 28

2 - 6 MK500 MicroKiosk for CE .NET 5.0 Product Reference Guide
3.54”
0.16” (thickness)
4.57”
Optional Advertisement Insert
Use an advertisement insert to attract customers to the MK500. The recommended material for this is
corrugated polyethylene. Slide the insert into the grooves on either side of the MK500, and mount ads, signs,
or instructions on this as needed.
The internal dimensions of the insert must be 3.54” (90 mm) high x 4.57 (116.5 mm) wide x 0.16” (4.0 mm)
thick.
Figure 2-3
Advertisement Insert Dimensions
Page 29

CHAPTER 3 CONFIGURATION
Overview
This chapter describes how to set up and configure the MK500 applications, communications, and network
settings which include parameters such as the device name, internet browser settings, date and time , and
several other key settings.
Configure these settings remotely using the System Configuration Manager (SCM), or locally on the MK500
using the Control Panel. These settings are saved in the configur ation registry file (mkconfig.reg ) in the MK500
Application folder to maintain them across cold boot cycles. For information on using the Control Panel, refer to
the Microsoft Applications for Mobile and Win CE 5.0 User Guide.
System Configuration Manager
The System Configuration Manager (SCM) is a Windows®-based utility that runs on a host computer and
creates/edits an MK500 configuration file (mkconfig.reg). Load this file onto the MK500 and reboot the MK500
to set configuration parameters for the device. The configurable options for the MK500 are de fined in an XM L
file that is available from Support Central at http://www.zebra.com/support SCM is also available at Support
Central.
SCM eliminates the potential user errors that occur when manually editing registry settings.
File Types
SCM uses three types of files:
•
Symbol Configuration Template (.SCT) files are XML files that define the configurable par ameters for a
device.
•
Registry Configuration Service Provider XML files for device provisioning.
•
CAB Provisioning Format (.CPF) file which is a .CAB archive that contains the provisioning XML. This file
is downloaded to the MK500 and merged upon a cold boot.
Page 30
3 - 2 MK500 MicroKiosk for CE .NET 5.0 Product Reference Guide
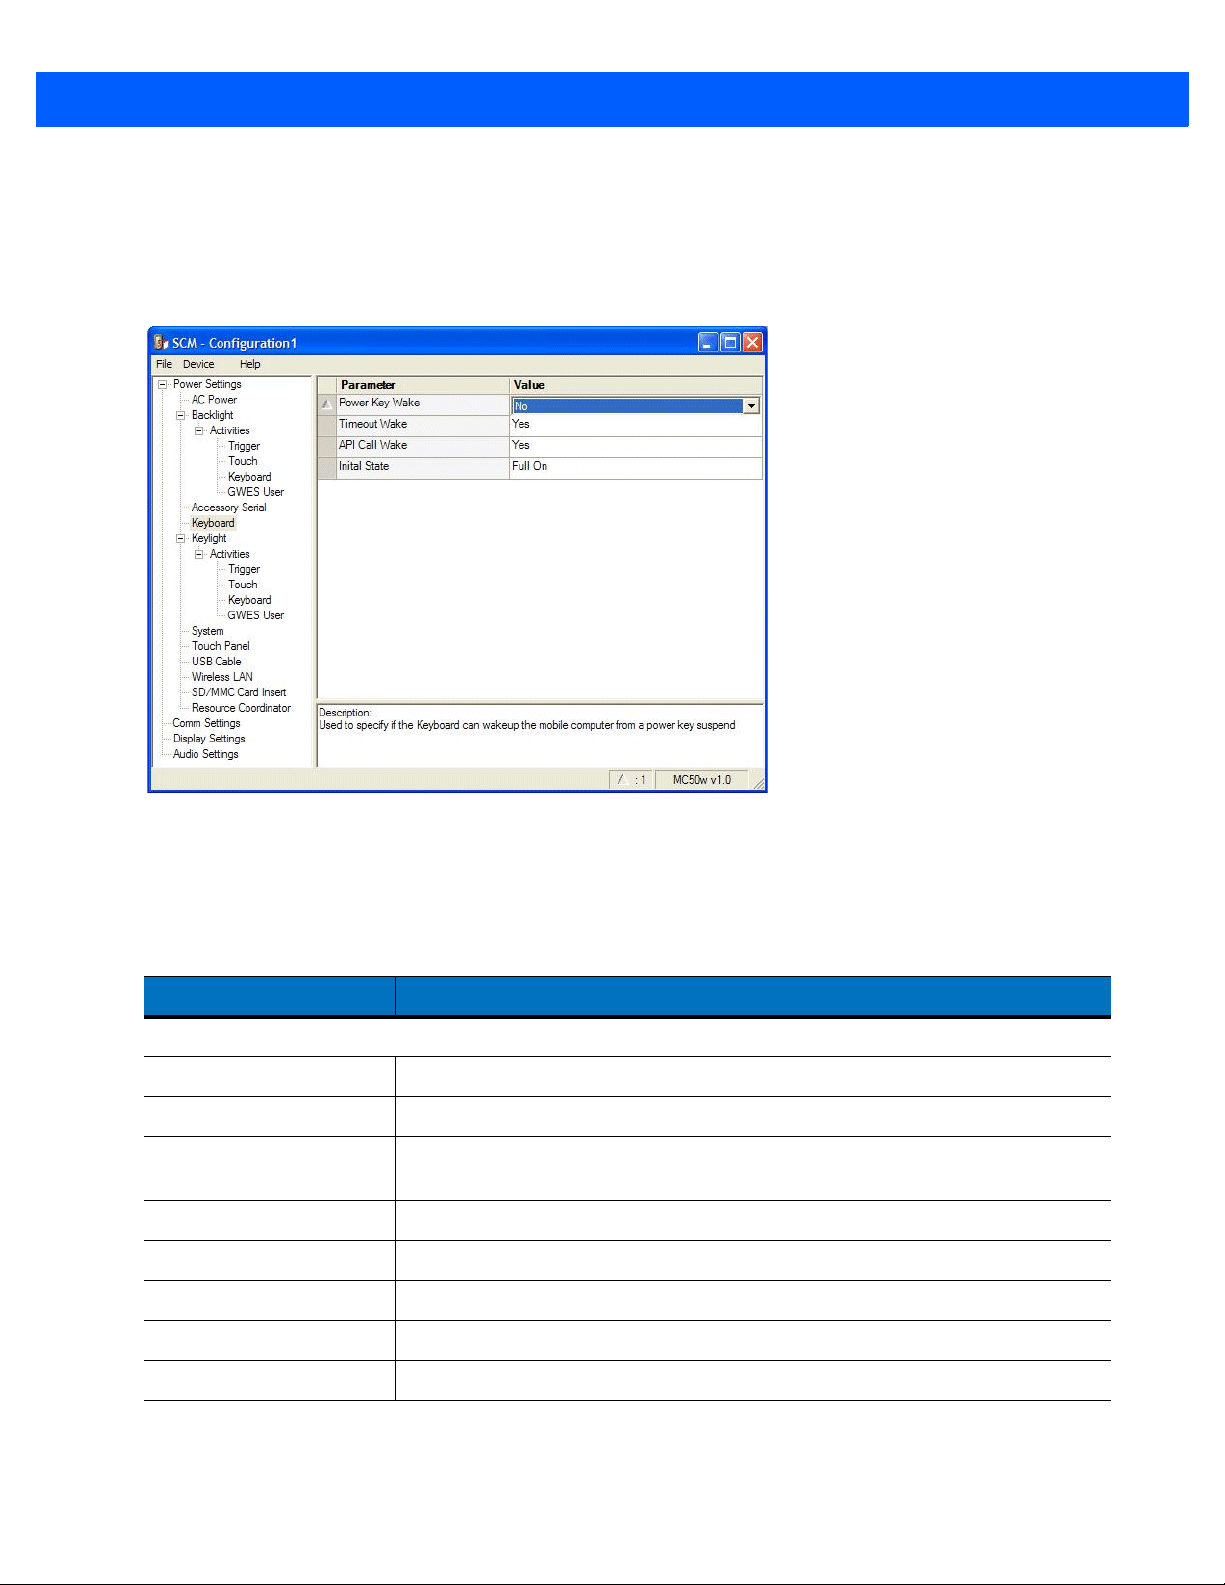
User Interface
SCM's user interface consists of a tree control on the left side of the window which displays all the
configuration categories, and a data grid table on the right which displays all the configurable controls for the
selected category. Figure 3-1 shows the main window for a device’s .sct file.
Figure 3-1
Main SCM Window
Menu Functions
Use the main menu to access the program functionality described in Table 3-1.
Table 3-1
File Menu
Open Config File Open a saved configuration file (.SCD).
Save Config Changes Save changes to the currently loaded configuration file.
Restore All Defaults Restore all parameter values to the default state. The default values are stored in
Export Changes to .xml Export the changed parameter values to an XML file.
Export Changes to .cpf Export the changed parameter values to an CPF file.
Export all to .xml Export all the parameter values to an XML file.
Export all to .cpf Export all the parameter values to an CPF file.
Exit Exit System Configuration Manager.
SCM Menu Functions
Menu Item Description
a Symbol Configuration template file.
Page 31

Configuration 3 - 3
Table 3-1
SCM Menu Functions (Continued)
Menu Item Description
Device Menu
Device type Change the current device type template. Each template (available from Support
Central) must reside in the SCM directory.
Help Menu
About
About Display the
dialog which shows the application version.
Parameter State Indicators
The first column of the data table displays parameter state indicators. The state indicators di splay one of the
states in Table 3-2 for a particular parameter:
Table 3-2
Icon Indicator Description
Parameter Status Indicators
Modified This parameter was changed from its initial factory setting.
Invalid This parameter is not valid for the selected device type. This can occur when a
configuration file for one type of device is loaded and the device type is changed
Device
using the
menu. Values marked “invalid” are not exported.
Window Status Bar
The SCM status bar on the bottom right corner of the window contains the items in Table 3-3 from left to right:
Table 3-3
Invalid Count Number of parameters not valid for the selected device.
Modified Count Number of parameters modified from the factory defaults.
Device Type Device type - version.
Figure 3-2
The sample status bar in Figure 3-2 shows that the current configuration file contains 1 Invalid Parameter and
2 Modified Parameters.
Window Status Bar Items
Status Bar Item Description
Sample Status Bar
Page 32

3 - 4 MK500 MicroKiosk for CE .NET 5.0 Product Reference Guide
File Deployment
Deploy the CPF file created using the SCM export function to the MK500.
1. Optionally, use the Authenticode tools to sign the .cpf file.
2. Make the .cpf file read-only, then copy it to the MK500.
3. Tap the filename to install.
4. Certain applications and settings require a cold boot to take affect. In these cases, cold boot the MK500.
Refer to the Windows Mobile Version 5.0 Help file for more information.
For more information on file deployment, see Deployment on page 5-4.
Local Configuration Using the Microsoft Windows Control Panel
Use the Control Panel on the MK500 Start menu to change settings locally. For information on using the
Control Panel, refer to the Application Guide for Zebra Devices.
Configuration via Registry File
Before downloading the configuration file (.reg file) to the MK500 Application folder, rename it mkconfig.reg.
Use one of the following methods to download the file to the MK500:
•
Copy the mkconfig.reg file to the MK500 Application folder using a USB ActiveSync connection (see
Downloading Files to the MK500 on page 5-6).
•
Send the file to the MK500 Application folder using FTP (see the instructions provided with the FTP
software) or AirBeam.
•
Copy the mkconfig.reg file to an SD card, then transfer the file into the MK500 Application folder.
Rebooting the MK500
After downloading the mkconfig.reg file, cold boot the MK500 to apply the new settings.
Cold Boot
Press and hold reset button on the side of the MK500 for 10 seconds, then release, OR remove and apply
power.
Warm Boot
Run the Warmboot application. Select Start > Programs > Warmboot. Alternatively, use the Application
Program Interface (API).
Page 33

CHAPTER 4 SYSTEM FEATURES
Overview
This chapter discusses the following operating system features:
•
RegMerge and CopyFiles on page 4-2
•
Accessing the Windows® CE Desktop on page 4-2
•
Network Time Update: SNTP Client on page 4-2
•
Memory Management on page 4-2
•
Loading Additional Fonts on the MK500 on page 4-3
•
Input Panel (Virtual Keyboard) on page 4-5
•
Microsoft Applications on page 4-5
Page 34

4 - 2 MK500 MicroKiosk for CE .NET 5.0 Product Reference Guide
RegMerge and CopyFiles
RegMerge and CopyFiles are two device drivers included in the Windows CE OS to assist developers in
configuring the MK500 following a cold boot. See Flash Storage on page 5-23 for more information.
Accessing the Windows® CE Desktop
If an MK500 is configured to launch an application on power-up, you can bypass the application at boot-up to
access to the Windows
®
CE desktop.
Network Time Update: SNTP Client
The MK500 Simple Network Time Protocol (SNTP) client can automatically set and update the MK500 time
and date through the network. Use this feature to set the system time an d date af ter reboot s or power out ages.
This feature also ensures consistent time and date stamping across a fleet of MK500s. The SNTP Client
program queries the specified SNTP server over the network to set the time and date.
The SNTP client shipped with MK500 WinCE 4.20 is the Microsoft default SNTP Client program. (This is a
change from the WinCE 4.1 operating system, which had a custom SNTP client).
Memory Management
Flash: Nonvolatile (Persistent) Memory
The MK500 64 MB configuration has 64 MB of available nonvolatile flash memory. 5 MB is committed for
platform partition use to install external driver packs such as RF drivers, and 27 MB is available for developer’s
applications within the application partition (folder). The data partition (folder) has no available memory. The
data stored in flash memory persists through cold boot cycles.
To increase usable persistent (flash) memory, use the Terminal Configuration Manager (TCM) to adjust the
allocation of memory between the application and data partitions. See Chapter 5, Application Deployment.
Add a PC card to the MK500 to increase the non-volatile memory available for file storage.
RAM: Volatile (Non-Persistent) Memory
The MK500 has 64 MB of DRAM volatile memory. Developers can automate control of the device’s RAM
(volatile) memory allocation (storage vs. memory used to run programs) to persist memory allocation settings
through cold boot cycles.
Page 35

Browser Applications
The PocketBrowser 2.1 development tool allo ws We b developers to quickly create robust appli cations that can
include a wide range of advanced data capture capabilities. The PocketBrowser 2.1 Developer Help provides
information on using each feature of the browser. Each feature includes a sample, however the sample does
not necessarily show the only way to implement each feature.
PocketBrowser extends the core rendering engine functionality of Microsoft PocketIE or Microsoft IE with
application programming interfaces (APIs). It provides interfaces to device hardware and features using meta
tags and Microsoft ActiveX
integration with bar code scanners, RFID readers, and other peripherals such as printers and magnetic stripe
readers (MSR) for complete transaction processing.
®
components designed specifically for Zebra systems. PocketBrowser offers easy
Loading Additional Fonts on the MK500
You can program the MK500 to support additional fonts such as Unicode and double-byte character font.
The MK500 supports the following system fonts as shipped from the factory. The font files corresponding to
these formats are located in the
\windows folder with .ttf extension.
System Features 4 - 3
•
Arial
•
Comic Sans MS
•
Courier New
•
Georgia
•
Symbol
•
Tahoma
•
Times New Roman
•
Verdana
•
Wingding.
The default system font path for these fonts is \windows.
Use one of the following options to load fonts not supplied with the MK500:
•
Change the system font path where the system looks for fonts. For example, to change default system
font path from
in
\application\fonts:
[HKEY_LOCAL_MACHINE\SOFTWARE\Microsoft\FontPath]
"FontPath"="\application\fonts"
Adding this registry changes the entire system fonts directory, so fonts supplied with the OS ar e no
longer available. To use both the provided system fonts and new fonts, copy the system default fonts to
the new font directory.
\windows to \application\fonts add the following registry to the system along with new fonts
•
Copy new/alternate fonts to the default \windows directory.
•
Copy alternate fonts to the \windows\fonts directory.
Copying new fonts to the \windows or \windows\fonts pr eserves existing fonts. However the new fonts
consume system RAM as they are part of the ObjectStore.
Page 36

4 - 4 MK500 MicroKiosk for CE .NET 5.0 Product Reference Guide
Using the third option, i.e., copying fonts to the \windows\fonts directory, makes it easier to manage the
system. Note that fonts copied to \windows or \windows\fonts do not persist over power cycles or cold boots.
Use the copy file feature to persist them over power cycles or cold boots.
Using Additional Fonts in Native Applications
Any application written in EVC can use the additional fonts using either MFC or Win32 APIs. If a spe cified font
is missing, the system uses an available font for display.
Using Additional Fonts in Managed Applications
All fonts installed in the system are available to the .Net Compact Framework during runtime.
Using Additional Fonts in Browser Applications
Regardless of how you installed the font in the system, to reference it using a browse r page, speci fy the font as
a STYLE, or use FONT tags. Use intuitive names for the fonts (use FontViewer on a Windows desktop and
locate the
Internet Explorer uses its default font to display the text.
Typeface Name line), and use quotes to enclose names with spaces. If the specified font is missing,
Things to Consider when Using Additional Fonts
•
Different font styles (e.g., bold and italic) often require separate TTF files; be sure to provide all required
styles. Do not reference styles by name (e.g., Arial Bold); set the style separately from the font (e.g.,
using a “b” or “strong” tag, or a style).
•
For best results, do not direct the system font path to a storage card (PCMCIA), as this can negatively
impact system performance. If this method is necessary, test the use of a storage card thoroughly for
fonts to ensure proper operation.
•
Most Web pages contain information that tells the browser what language encoding (the language and
character set) to use. If the page does not include that information, and the Language Encoding
Auto-Select feature is on, Internet Explorer can usually determine the appropriate language encoding. If
not, manually select it using
NOTE If the Auto-Select feature or a specific language pack is not installed, Internet Explorer prompts you to
download the files. Adding languages does not guarantee Web pages display in the preferred language.
View menu > Encoding > More, then select the appropriate language.
Page 37

Input Panel (Virtual Keyboard)
Use the input panel (virtual keyboard) on the touchscreen of the MK500 to enter information.
System Features 4 - 5
To access the
on the input panel. To close the
Figure 4-1
Input Panel, tap the icon in the icon tray. To enter information, use a stylus to select the keys
Input Panel (Virtual Keyboard)
NOTE Use Ctrl-C to copy text, and Ctrl-V to paste text.
Microsoft Applications
The MK500 includes Microsoft WordPad, Windows Media Player, and Internet Explorer. For information on
using these applications, refer to the Microsoft Applications for Mobile and Win CE 5.0 User Guide
Input Panel, double-tap the icon.
Page 38

4 - 6 MK500 MicroKiosk for CE .NET 5.0 Product Reference Guide
Page 39

CHAPTER 5 APPLICATION DEPLOYMENT
Overview
To develop applications to run on the MK500, use one or all of the following:
•
Enterprise Mobility Developer Kit (EMDK) for C for developing native C/C++ applications
•
Enterprise Mobility Developer Kit (EMDK) for .Net for developing managed .NET applications
•
PocketBrowser for support for web development
•
Device Configuration Package (DCP) for MK500.
Enterprise Mobility Developer Kit (EMDK) for C
The Enterprise Mobility Developer Kit for C is based on industry-standard Microsoft® Windows® CE
development tools and enables development of native C and C++ applications. Use this developer kit in
conjunction with Microsoft
Development Kit (PSDK).
®
Embedded Visual C++ 4.0 Service Pack 3 and MK500 Platform Software
EMDK for C includes the following components:
•
Standard C API Libraries
•
MK500-specific C API Libraries
•
Help file containing a C API Reference Guide
•
Sample applications with full source code.
Sample Applications
The sample applications are included as a learning tool, to show developers how to interface with the C API
functions. Some of the sample applications contained in the kit include:
•
Hello: A simple Hello World application.
•
DisplayTest: Displays various colors on the LCD screen.
•
KeyCheck: A keyboard checking utility that displays the keys pressed on the device and their associated
WM_MESSAGE.
Page 40

5 - 2 MK500 MicroKiosk for CE .NET 5.0 Product Reference Guide
•
ScanSamp2: Demonstrates the bar code scan engine (and external scanner).
•
MemTest: Displays the amount of available memory . Allocate and free blocks of memory to see how
available memory changes.
•
Win32PrintSamp: Prints a sample page to a connected printer.
NOTE The MK500 supports the Signature Capture API via the EMDK for C only. Refer to the Enterprise Mobility
Developer Kit version 1.4 or later, under MK Series C APIs - Signature Capture.
Enterprise Mobility Developer Kit (EMDK) for .NET
The Enterprise Mobility Developer Kit for .NET allows Microsoft® .NET Compact Framework developers to
create managed (C# and VisualBasic.NET) applications that harness value-add features on the MK500. Use
this developer kit in conjunction with the EMDK for C.
The EMDK for .NET includes the following components:
•
Class libraries
•
Sample applications
•
Documentation describing how to use the methods for each class library
ZebraPocketBrowser for the Web
The Zebra PocketBrowser is a web development kit that provides access to the functionalities of a Zebra
device. The PocketBrowser is used across all vertical marke ts and in a wide vari et y of applications, enabling
developers and integrators to provide advanced Web-based solutions for Zebra devices. Transfer a
PocketBrowser application from one Zebra device to another seamlessly without recompiling or rewriting it.
PocketBrowser features include:
•
Blocking users from the Microsoft operating system
•
Exposing the full screen area to the Web application designer
•
Seamless integration with bar code scanning
•
Wireless connectivity
•
Magnetic stripe readers.
Page 41

Application Deployment 5 - 3
Device Configuration Package
Use the Device Configuration Package (DCP) to create and download hex images that represent flash
partitions to the MK500. The DCP includes the user documentation, flash partitions, Terminal Configuration
Manager (TCM), and the associated TCM scripts.
To install the DCP for the MK500:
1. Download the DCP from the Support Central web site, http://www.zebra.com/support:
a. On http://www.zebra.com/support, select Software Downloads.
b. Select MicroKiosks and then select MK500.
c. Select the Device Configuration Package (DCP).
d. Save the .exe file to the development computer.
2. Locate the .exe file on the development computer, double-click the file, and follow the install screen
prompts.
3. Once installed, access the major components of the DCP from the Zebra Device Configuration Package
(DCP) for MK500 program group of the Windows Start Menu.
Platform SDK
To download and install the Platform SDK:
1. Download the appropriate Platform SDK fro m the Su pport Ce ntra l web site, http://www.zebra.com/support:
a. On http://www.zebra.com/support, select Software Downloads.
b. Select MicroKiosks and then select MK500.
c. Select the Platform SDK.
d. Save the .exe file to the development computer.
2. Run the file and follow the screen prompts to install.
Installing Enterprise Mobility Developer Kits
To install an EMDK:
1. Download the EMDK from http://www.zebra.com/support
a. On http://www.zebra.com/support, select Developer Downloads and sign in.
b. Select MicroKiosks and then select MK500.
c. Select the latest version of the Enterprise Mobility Developer Kit.
d. Download the .exe file to the development computer.
2. Double-click the executable file and follow the install screen prompts.
Installing Other Development Software
Developing applications for the MK500 may require installing other development software such as application
development environments on the development PC. Follow the installation instructions provided with this
software.
Page 42

5 - 4 MK500 MicroKiosk for CE .NET 5.0 Product Reference Guide
Deployment
With the appropriate accessory, software, and connection, the MK500 can share information with the host
device. This chapter provides information about installing software and files on the MK500.
Download and install software using one of the following methods:
•
ActiveSync (see page 5-5)
•
OS Update (via SD card) (see page 5-7)
•
Terminal Configuration Manager (TCM) (see page 5-8)
•
FTP server using Rapid Deployment (see page 5-22)
•
AirBEAM (see page 5-22).
Page 43

Application Deployment 5 - 5
ActiveSync
The MK500 communicates with a host computer using Microsoft® ActiveSync (version 4.5.1 or higher). Use
USB ActiveSync to transfer data between a host computer and the MK500. The ActiveSync software on the
MK500 allows copying and pasting (rather than synchronizing) files between the MK500 and host computer.
Installing ActiveSync
To install ActiveSync on the host computer, download the latest version of the software from
http://www.microsoft.com. Refer to the installation instructions included with the ActiveSync software.
Connecting the MK500 to the Host Computer
To configure ActiveSync for Guest access (suitable for copying files between the host computer and the
MK500):
1. Connect the USB cable to the mini USB port on the MK500 (see Figure 1-2 on page 1-3). Connect the
other end of the cable to a USB port on the host computer.
2. If the New Partnership window does not appear, on the host computer, select Start > Programs > Microsoft
ActiveSync
.
Figure 5-1
3. Click No and then Next. The Microsoft ActiveSync Guest Connected window displays.
Figure 5-2
New Partnership Window
Microsoft ActiveSync Guest Connected Window
Page 44

5 - 6 MK500 MicroKiosk for CE .NET 5.0 Product Reference Guide
Downloading Files to the MK500
To download files (such as the mkconfig.reg file) from the host computer to the MK500, use Windows Explorer
to copy the files:
1. On the host computer, select Explore.
Figure 5-3
2. Double-click the folder to expand the contents of the folder.
Figure 5-4
ActiveSync Explorer
My Pocket PC Contents
3. Use Explorer to locate the host computer directory that contains the file to download. Tap that directory in
the left pane to display its contents in the right pane.
Page 45

Application Deployment 5 - 7
4. Drag the desired file(s) from the host computer to the desired mobile device folder.
•
Program Files folder: files stored in this folder are discarded after a cold boot.
•
Application folder: files stored in this folder are retained after a cold boot.
NOTE Cold booting the MK500 erases all files in RAM. Be sure to save any critical files in the Application folder,
e.g., radio profile, time zone setting, license keys. See Downloading Files to the MK500 on page 5-6.
OS Update
To upgrade the operating system using an SD card,
1. Install the DCP onto the desktop computer.
NOTE If you use a firewall, the firewall may prevent some files from installing. To verify that the DCP installation
completes, ensure the following folder contains files, and is not empty:
<Your drive:>\Program Files\Symbol Device Configuration Package\mk500c50\<version number folder>
\OSUpdate\Images.
2. Insert an SD card with at least 16 MB of storage into the MK500. See the Inserting a Micro SD Card on
page 2-2.
3. Connect the MK500 to power and to the desktop computer via a USB cable, and set up a partnership
between the two computers using ActiveSync. See ActiveSync on page 5-5.
4. In the ActiveSync window on the desktop computer, select Explore.
5. On the drive in which you installed the DCP (typically C:), navigate to the directory:
\Program Files\Symbol Device Configuration Packages\mk500c50\V1.0\
6. Copy the OSUpdate folder into the My Device\SC Card\ folder on the MK500.
7. On the MK500, tap Start > Programs > Windows Explorer.
8. Navigate to \SD Card\OSUpdate folder.
9. Double-tap the MK500c50BenColor_SD.LNK file.
10. After the update completes and the MK500 reboots, remove the SD card .
Page 46

5 - 8 MK500 MicroKiosk for CE .NET 5.0 Product Reference Guide
Terminal Configuration Manager (TCM)
Terminal Configuration Manager (TCM) is an application that runs on the host computer and customizes flash
file system partitions for the MK500. The most common use is to create an application partition hex file that
contains the customer's application. Also use TCM to load hex files to the flash memory of the MK500.
TCM scripts control the customization of partitions. The scripts contain all the information for building an
image. The script is a list of copy commands specifying the files to copy from the development computer to the
partition.
TCM works with a pair of directory windows, one displaying the script and the other displaying the source files
on the development computer. Use standard Windows drag-and-drop operations to add and delete files from
the script window.
The DCP for MK500 includes scripts Zebra uses to build the standard factory-installed Platform and
Application partitions on the MK500. The standard Platform partition contains drivers and the Application
partition contains demo applications and optional compon en ts. The standard TCM scr ipts are in the follo win g
folder:
C:\Program Files\Symbol Device Configuration Packages\MK500 v1.0\TCM Scripts.
NOTE Before creating a script to build a hex image, identify the files required (system files, drivers, applications,
etc.) and locate the files’ source directories to ease the script building process.
The processes for building a hex image in TCM include:
•
Starting TCM
•
Defining script properties
•
Creating the script for the hex image
•
Building the image
•
Sending the hex image
•
Creating a splash screen
•
Flash storage.
Initial Program Loader (IPL)
Use IPL to download files to the MK500, to download customized flash file system partition s to the MK500, and
load hex files to the flash memory of device.
A typical partition is a group of files, combined into a single “partition” that represents a specific area of storage.
Examples of partitions are the flash file systems such as Platform or App lication. ( Using the d esktop comp uter
comparison, these partitions are roughly equivalent to a C: or D: hard disk drive.) In addition to the “hard disk”
partitions, some partitions are used for single items such as the operating system, monitor, or splash screen.
(Again using a desktop computer comparison, these partitions are roughly the equivalent of the BIOS or
special hidden system files.) Updating a partition erases all data previously in its storage region, i.e., it is not a
merge but a replacement operation.
Use TCM to create partition images for selected partitions. All partition images suitable for use by IPL are in
hex file format for transfer by TCM from the development computer to the MK500.
Upgrade requirements:
•
The hex files to download (on development computer)
•
A connection from the host computer and the MK500 (either serial or wireless)
Page 47

Application Deployment 5 - 9
•
TCM (on development computer) to download the files.
Upgrade the device by invoking IPL and navigating the menus. See Sending the Image on page 5-13 for
procedures on downloading a hex file to the MK500.
Starting TCM
Click the Windows start menu TCM icon (Zebra Device Configuration Packages, MK500) to start TCM. The
TCM window displays two child windows: Script1 and File Explorer. The Script1 window contains a new script
and the
File Explorer window contains a file explorer view for selecting files to place in the script.
Figure 5-5
Table 5-1 lists the comp onents of the TCM window.
Table 5-1
Icon Component Function
TCM Startup Window
TCM Components
Script Window Displays the files to use in creating the partition(s).
File Explorer Window Lists the files to add to the script.
Create button Creates a new script file.
Open button Opens an existing script file.
Save button Saves the current script file.
Large icons button Views the current script items as large icon.
Small icons button Views the current script items as small icon.
Page 48

5 - 10 MK500 MicroKiosk for CE .NET 5.0 Product Reference Guide
Table 5-1
TCM Components (Continued)
Icon Component Function
List button Views the current script items as a list.
Details button Views the current script items with more details.
About button Displays version information for TCM.
Properties button Views/changes the current script properties.
Build button Builds the current script into a set of hex files.
Check button Checks the script for errors (files not found).
Send button Downloads the hex image to the vehicle computer.
Tile button Arranges the sub-windows in a tiled orientation.
Build and Send Builds the current script into a set of hex images and sends the hex
images to the device.
Preferences button Views/changes global TCM options.
Defining Script Properties
Before creating a script, define the script properties, such as the type of device, flash type, number of disks
being created, and the memory configuratio n of each disk partition .
To define the script properties:
1. Select the Script window to make it active.
2. Click the Properties button. The Script Properties window > Partition Data tab appears.
Figure 5-6
3. In the T erminal drop-down list, select the terminal type.
Script Properties Window - Partition Data Tab
Page 49

Application Deployment 5 - 11
4. Use the default Flash T ype.
5. In the Disks drop-down list, select the number of disk partitions to create.
6. Select the (memory) Size for each partition. Note that adding space to one disk partition subtracts it from
another.
7. In the Access drop-down list for each disk partition, determine and select the Read/Write access option.
8. Click the Options tab. The Script Properties window Options tab appears.
Figure 5-7
9. Set the paths for the Script File, Flash File, and Hex File Build.
10. Click OK.
Script Properties Window - Options Tab
Creating the Script for the Hex Image
On start-up, TCM displays the TCM window with the Script1 window and File Explorer window pointing to the
following directory:
\Program Files\Symbol Device Configuration Packages\MK500\TCMScripts\
The Script1 window directory pane displays two partitions: Platform and Application. Depending on the type of
flash chip, the number of partitions can change. You can add files to each of the partitions. TCM functionality
includes:
•
Opening a new or existing script file
•
Copying components to the script window
•
Saving the script file.
Opening a New or Existing Script
You can create a script file from scratch or based on an existing script file. Click Create to create a new script
or click Open to open an existing script (for example, a script provided in the DCP for MC40x0c). If you open
an existing script and make changes, saving the changes overwrites the original script. To use an original or
Zebra supplied standard script as a base and save the changes in a new script, use the Save As function to
save the script using a different file name.
Page 50

5 - 12 MK500 MicroKiosk for CE .NET 5.0 Product Reference Guide
Updating TCM 1.X Scripts
You can upgrade script files created with older versions of TCM to TCM 2.0 scripts. Click Open to open an
existing script created with an older version of TCM. The Conversion window appears.
Figure 5-8
Conversion Window - Upgrading to TCM 2.0
Copying Components to the Script
Script contents are managed using standard file operations such as New Folder, Delete and Rename. Items can
be added to the script by clicking files and folders in the
window. The
holding the
File Explorer window supports standard windows; multiple files may be selected by clicking while
SHIFT or CTRL keys.
File Explorer window and dragging them to the Script
Saving the Script
Modifications to a script file can be saved using the Save or the Save As function. Saving changes to an existing
script writes over the original script. To use a Zebra-supplied standard script as a base and save the changes
in a new script, use the
Save As function.
Building the Image
After creating the script, build the hex image defined by the script.
As part of the build, TCM performs a check on the script which verifies that all files referenced in the script
exist. This check is important for previously created scripts to ensure that files referenced in the script are still
in the designated locations.
To build scripts:
1. Click Build on the TCM toolbar. The Configure Build window appears.
Figure 5-9
2. Select the items (partitions) to build using the check box(es) to the left of each named partition.
3. Use the Build Path to define where to store all built partitions.
Configure Build Window
Page 51

Application Deployment 5 - 13
4. Select (hex image) COMPRESSION to reduce the size and speed up the download.
5. Click OK and follow the on-screen instructions.
If one of the partitions is the ESSID, a prompt appears requesting the ESSID value. Deselect the HR (High
Rate) check box when building ESSID images for a device with an FH radio.
Figure 5-10
Build ESSID Partition Window
If one of the partitions is the Splash Screen, a prompt appears requesting both the source Bitmap file and
the destination HEX file.
6. TCM performs a check, and if there are no errors, creates the partition hex files.
If the build fails, TCM does not create the hex files and displays an error message. Two common reasons for a
build failure are:
•
TCM could not find the files defined in the script. This error can occur when the files referenced by the
script are no longer stored on the development computer or the folders where they are stored were
renamed.
•
The total amount of flash memory space that the script requires exceeds the image size. To correct this,
reduce the number of files in the partition or increa se the size of the partition. See Defining Script
Properties on page 5-10 for more information about setting the image size appropriately.
Sending the Image
After building the hex file, download it to the MK500 using IPL.
1. Hold the MK500’s right and left buttons until the mobile computer resets into IPL. The Initial Program
Loader
2. Connect the MK500 to the host computer.
menu appears.
Page 52

5 - 14 MK500 MicroKiosk for CE .NET 5.0 Product Reference Guide
Initial Program Loader
Platform
Application
Config Block
Windows CE
Monitor
Spla sh S creen
Partition Table
System Reset
Auto Select
Figure 5-11
3. Choose Auto Select or use the up and down scroll buttons to select the partition to download, then press
Initial Program Loader (IPL) Menu
CAUTION To insure a successful download, do not remove power from the mobile computer while in IPL mode.
NOTE If the platform or application partition sizes are changed, you must download a new partition table first.
Enter.
Table 5-2
IPL Menu Partitions
Partition Name Description
Platform Contains the files in the Platform folder.
Application Contains the files in the Application folder.
Windows CE Contains the operating system for the mobile computer.
Monitor Contains the Monitor and IPL programs.
Splash Screen Contains the splash screen that displays while booting the mobile computer.
Note: Splash screens are generated from .bmp images and must be less than or equal to
240 pixels wide and 296 pixels deep. For mono displays, the bmp image must be 4 bpp
and for color screens the color depth must be 8 bpp. Note: 8 bits per pixel only applies to
splash screen images. Once Windows CE is running, the color de nsity is 16 bits per pixel.
Page 53

Application Deployment 5 - 15
Table 5-2
IPL Menu Partitions (Continued)
Partition Name Description
Partition Table Contains the partition information for all other partitions.
Note: The partition table should never nee d changing unless the sizes of the pl atfo rm and
application images are changed within TCM. If this is done, then the new partition table
should be loaded first, followed by both platform and application in any order.
System Reset Selecting this item provides a simple method to exit IPL and to boot the operating system.
Auto Select Selecting this item allows one or more files to be downloaded without having to manually
select the destination. (The content of the files being downlo aded automatically directs the
file to the correct destination.) For technical reasons, Auto Select cannot be used to
download Monitor, Power Micro, or Partition Table. These items must be specifically
selected.
4. IPL displays the Select Transport menu which lists the available methods of downloading the file.
Select Transport
USB
Previous
Top
Figure 5-12
5. Use the up and down scroll buttons to select USB, then press Enter.
6. IPL displays the USB Configuration menu which lists the available methods of do wnloading the file.
Select Transport Menu
USB Configuration
USB Standard
Previous
Top
Figure 5-13
7. Use the up and down scroll buttons to select USB Standard, then press Enter.
Select Transport Menu
Page 54

5 - 16 MK500 MicroKiosk for CE .NET 5.0 Product Reference Guide
8. The Download File? menu appears.
Download File?
Download
Cancel
Show Parms
Previous
Top
Figure 5-14
9. Use the up and down scroll buttons to select Show Parms to verify the file to download. Press Enter to
display the
Download File? Menu
Parameters screen.
Download:
“Partition Name” via
USB USB Standard
Press Enter to Continue
Figure 5-15
Partition Name is the name of the partition selected in the Initial Program Loader menu.
10. Press Enter to return to the Download File? menu.
Parameters Screen
11. Use the up and down scroll buttons to select Download. Press Enter. The Downloading screen appears.
Page 55

Downloading:
“Partition Name”
via USB USB Standard
Waiting for input...
Application Deployment 5 - 17
Figure 5-16
12. On the development computer, click Load on the TCM toolbar. The Load T erminal window > Serial tab
Downloading Screen
appears.
Figure 5-17
13. Select the Image Files To Load.
14. In the Comm Port drop-down list, select USB: Zebra Device.
15. Click Download to begin the operation.
16. During download, the Downloading screen on the MK500 displays the Device Status and a progress bar.
Load Terminal Window - Serial and Ethernet Tabs
17. When complete, Device Status displays Result was: Success!, or in the case of an error, the cause of the
error.
Page 56

5 - 18 MK500 MicroKiosk for CE .NET 5.0 Product Reference Guide
Calibrating the Screen
Use the Calibration screen to align the touch screen:
1. Remove and restore power to the MK500 to reboot.
Figure 5-18
2. Carefully press and briefly hold the stylus tip on the center of the Calibration screen target. Repeat the
Calibration Screen
NOTE To access the Calibration screen from the Windows CE Control Panel, tap Start > Settings > Control
Panel. Double-tap the Stylus icon, tap the Calibration tab, and tap the Recalibrate button. The
Calibration screen appears.
procedure as the target moves and stops at different locations on the screen.
3. The Confirm Calibration screen displays. Tap the screen to accept the settings, or wait 30 seconds and the
MK500 returns to the Calibration screen.
TCM Error Messages
TCM validates the cells in the partition table when you click the Execute button. Cells highlighted in red
contain an error. Partition loading is disabled until all errors are corrected.
Table 5-3
Failed to build images: flash
file system DLL not loaded!
Failure finding directory xxx Building process failed because directory xxx was not found.
Failure creating volume Building process failed because a certain disk volume could not be created.
TCM Error Messages
Error Description/Solution
TCM could not load the DLL required to build images fo r the t argeting flash fi le
system. Reinstall TCM or recover the DLL.
Failure adding system file to
image
Build process failed because TCM failed to add a certain system file to the disk
image.
INVALID PATH The path for the image file to build is not valid.
Nothing Selected To Build In the Config Build window, no item is selected to build.
Illegal ESS ID In the Build ESSID Partition window, no ESS ID was entered or the ESS ID
entered was illegal.
Page 57

Application Deployment 5 - 19
Table 5-3
Disk Full TCM failed to create Hex image file at the selected path. Check available disk
Target Disk Full Build process failed because TCM failed to add file to the image of a disk
Hex file is READ ONLY The Hex image file to be created exists and is read-only. Delete the existing
Error opening the file xxx with
write access
Failure creating binary file TCM failed to open/create an intermediate binary file.
Hex File To load is missing or
invalid
Could not locate MK500
name in TCM.ini file
Incorrect disk sizes in TCM.ini
file
TCM Error Messages (Continued)
Error Description/Solution
space.
volume. Remove some files or increase the disk size.
file or change its attribute.
TCM could not open file xxx with write access. Check if file is in use.
In Load Terminal window, the file selected to load has invalid status.
While loading the Script Properties window, TCM could not find the TCM.ini
section corresponding to the MK500 type specified by the current opening
script. Either TCM.ini or the script file is invalid.
The total disk size specified in the script does not match the total disk size
defined in the corresponding TCM.ini section. Check if the script is corrupt or
the TCM.ini has changed after the script was created.
INVALID DIRECTORY In Script Properties window, the selected System File Path is not a valid
directory.
One of the disk sizes is one
sector in size
INVALID VOLUME NAME In Script Properties window, one of the volume labels is not valid.
Corrupt TCM.INI file! (Invalid
value of VolumeDivisor)
Invalid version of TCM script
file
Corrupt or missing TCM.ini
file
FAILED CONNECTION TO
COM PORT (Could not get
status)
FAILED CONNECTION TO
TERMINAL (Terminal Not
Connected Properly/Terminal
Not Ready to Receive)
In Script Properties window, one of the disks is too small (one sector in size).
This may cause problem while building images, especially when cushion is
enabled. Increase the disk size.
The VolumeDivisor entry is missing or invalid in the TCM.ini. Reinstall TCM or
recover TCM.ini.
The TCM script was not created by this version of TCM.
TCM could not find TCM.ini file.
While downloading images to MK500, TCM failed to connect to the selected
COM port. Check if the COM port is free and is properly configured.
While downloading images, TCM failed to connect to the MK500. Check if the
correct flow control protocol is selected and the MK500 is properly connected
and is in a listening state.
Page 58

5 - 20 MK500 MicroKiosk for CE .NET 5.0 Product Reference Guide
IPL Error Detection
While receiving data, IPL performs many checks on the data to ensure that the device received the data
correctly. If IPL detects an error, it immediately aborts the download and reports the error on an error screen.
This screen displays until you press any key, then IPL returns to the
for a new selection.
To find the probable cause of the error, use the error number and/or the error text displa yed on the screen to
look up the error in Ta b le 5-4.
Initial Program Loader main menu to wait
Table 5-4
Unknown error -1 A general error occurred. Retry the download. If the failure persists ,
Cancelled by user -2 The user canceled the download.
Can't open the source -7 An error occurred opening the source device (either radio card or
Can't open the
destination
Can't read from the
source device
Can't write to the
destination device
Transmission checksum
error
IPL Errors
Error Text
Error
Number
it is most likely due to a hardware failure; the mobile computer
requires servicing.
Serial port). Check source device connectivity and retry.
-8 An error occurred opening the destination device (either flash ROM
or Power Micro). Retry the download. If the failure persists, it is
most likely due to a hardware failure; the mobile computer requires
servicing.
-9 The source device (either radio card or Serial port) could not be
read from. Check source device connectivity and retry.
-10 The destination device (either flash ROM or Power Micro) could not
be written to. Retry the download. If the failure persists, it is most
likely due to a hardware failure; the mobile computer requires
servicing.
-11 An error occurred during transmission from the source device
(either radio card or Serial port) and the checksum check failed.
Check source device connectivity and retry.
Probable Cause
Readback checksum
error
There is no more heap
space available
Insufficient data available
to complete record
Invalid Symbol HEX file -23 A Symbol HEX file download was attempted but the HEX file is
Unrecognized or
unsupported HEX record
-12 A checksum, generated from reading back data that was written to
the destination device, was incorrect. An error during transmission
or a write error to the destination device could cause this.
-14 There is no more heap space available for the downlo ad procedure.
Restart IPL and retry the download. If the failure persists, contact
service with details of what is being downloaded.
-21 A Symbol HEX file download was attempted but the HEX file is
invalid. Ensure the file is in Symbol HEX file format.
invalid. Ensure the file is in Symbol HEX file format.
-24 The Symbol HEX file being downloaded contains an invalid or
unrecognized HEX record. Ensure the file is in proper Symbol HEX
file format.
Page 59

Application Deployment 5 - 21
Table 5-4
IPL Errors (Continued)
Error Text
Error
Number
Probable Cause
Invalid data in HEX file -25 The Symbol HEX file being downloaded contains invalid data.
Ensure the file is in proper Symbol HEX file format with valid HEX
data.
Exceeded max size -26 The download file is too large to fit into the space allocated for it.
Either make the file smaller or increase the sp ac e allocated for it by
altering the partition table.
Partition is not valid on
this device
-27 The downloaded file specifies a partition entry that doe s not exist on
the device. Only download files that are valid for this device, or
change the partition table so that the new file is valid on the device.
Wrong destination code -28 A specific partition was chosen from the Main Menu (not Auto
Select) but the file selected for download was for another partition.
Ensure that the partition selected from the Main Menu matches the
file selected for download.
File type does not support
IPL Auto Select
Non-contiguous record
found
-29 Monitor, Power Micro and Partition Table cannot be loaded with
Auto Select. Select the appropriate area, and try again.
-30 A Symbol HEX file download was attempted but the HEX file is
invalid. Ensure the file is in Symbol HEX file format.
Timed Out - No data -31 IPL was waiting for data from t he source device but timed out before
receiving any. Check the source device connectivity and retry.
Fail: Buffer Overrun -32 The serial port device could not keep up with incoming data. Retry
the serial download with a lower baud rate.
Partition Table not Valid -33 The size of flash memory is different than that described in the
partition table. Retry the download with the correct partition table
file.
Invalid file format -34 The file format is invalid. Only Symbol HEX files are supported by
IPL.
Creating a Splash Screen
The DCP for MK500 includes the source bitmap files that create the default splash screens. You can
customize the screen by modifying these files using any of the standard windows image editors.
To create a custom splash screen:
1. Use an image editor to open the Splashcolor.bmp file included with the DCP for MK500.
2. Modify the bitmap file and save.
3. Create a splash partition. See Building the Image on page 5-12.
If you don’t use the default files to create the new splash screens, be sure to preserve the image format of 320
x 216, 8 bits per pixel. Note that 8 bits per pixel only applies to splash scr een images. Once Windows CE is
running, the color density is 16 bits per pixel. See Sending the Image on pa ge 5-13 for information about
loading the splash screen using TCM.
Page 60

5 - 22 MK500 MicroKiosk for CE .NET 5.0 Product Reference Guide
Rapid Deployment Client
The Rapid Deployment (RD) Client facilitates software downloads to an MK500 from a Mobility Services
Platform (MSP) Console’s FTP server. The MSP Console is a web-based interface to the wireless
infrastructure monitoring and management tools provided by the MSP Lite or MSP Enterprise server.
When software packages transfer to the FTP server, an MK500 on the wireless network can download them by
scanning RD bar codes encoding the location of the software packages. Multiple MK500s can scan a single
RD bar code.
NOTE For detailed information about the Rapid Deployment Client and creating RD bar codes, refer to the MSP
3.X User’s Guide.
AirBEAM Smart
The AirBEAM Smart product transfers specially designed software packages between a host server and Zebra
wireless device. Before transfer, AirBEAM Smart checks and compares package version, so that only updated
packages load.
AirBEAM Smart resides on radio-equipped clien t de vice s and allows them to re qu e st, down load , an d install
software, as well as to upload files and status data. A single communications session can accomplish both
download and upload of files. The ability to transfer software over a radio network can greatly reduce the
logistical efforts of client software management.
In an AirBEAM Smart system, a network-accessible host server acts as the storage point for the software
transfer. The AirBEAM Smart Client uses the industry standard FTP or TFTP file transfer protocols to check the
host system for updates and, if necessary, to transfer updated software.
NOTE For more information about AirBEAM Smart, refer to the AirBEAM
Reference Guide and
AirBEAM Package Builder Product Reference Guide.
®
Smart Windows® CE Client Product
Page 61

Flash Storage
In addition to the RAM-based storage standard on Windows CE devices, the MK500 also includes a
non-volatile Flash-based storage area which can store data (partitions) that a cold boot cannot corrupt. This
Flash area is divided into two sections: Flash File System (FFS) Partitions and Non-FFS Partitions.
FFS Partitions
The MK500 includes two FFS partitions. These parti tions app ear to the MK500 as a hard d rive tha t the OS file
system can write files to and read files from. Data is retained even if power is removed.
The two FFS partitions appear as the following two separate folders in the Windows CE file system:
•
Platform: The Platform FFS partition contains Zebra-supplied programs and Dynamic Link Libraries
(DLLs). This FFS is configured to include DLLs that control system operation. Since the MK500 needs
these drivers for basic operation, only experienced users should modify the content of this partition.
•
Application: The Application FFS partition stores applicatio n pr og ra m s need ed to op er a te the MK500.
Working with FFS Partitions
Application Deployment 5 - 23
Because the FFS partitions appear as folders under the Windows CE file system, you can read and write to
them like any other folder. For example, an application program can write data to a file located in the
Application folder just as it would to the Windows folder. However, the file in the Application folder is in
non-volatile storage and is not lost on a cold boot (e.g., when power is removed for a long period of time).
You can use standard tools such as ActiveSync to copy files to and from the FFS partitions. They appear as
the Application and Platform to the ActiveSync explorer. This is useful when installing applications on the
MK500. Applications stored in the Application folder are retained even after a cold boot.
There are two device drivers included in the Windows CE image to assist developers in conf iguring the MK500
following a cold boot: RegMerge and CopyFiles.
RegMerge.dll
RegMerge.dll is a built-in driver that allows making registry edits to the Windows CE Registry. Regmerge.dll
runs very early in the boot process and looks for registry files (.reg files) in certain Flash File System folders
during a cold boot. It then merges the registry changes into the system registry located in RAM.
Since the registry is re-created on every cold boot from the default ROM image, the RegMerge driver is
necessary to make registry modifications persistent over cold boots.
RegMerge looks in the root of two specific folders for .reg files in the following order:
\Platform
\Application
Regmerge continues to look for.reg files in these folders until it checks all folders. This allows folders later in
the list to override folders earlier in the list. This way, it is possible to override Registry changes made by the
Platforms partitions folders. Take care when using Regmerge to make Registry changes. The DCP contains
examples of .reg files.
NOTE Regmerge only merges the .reg files on cold boots. A warm boot skips the merge process.
Page 62

5 - 24 MK500 MicroKiosk for CE .NET 5.0 Product Reference Guide
Typically, you would not modify the registry values for drivers loaded before RegMerge, although this may be
necessary during software development. Since these early loading drivers read these keys before RegMerge
can change them, you must cold boot the MK500. The warm boot does not re-initialize the registry and the
early loading driver reads the new registry values.
Do not use Regmerge to modify built-in driver registry values, or merg e th e same Reg i stry value to two files in
the same folder, as the results are not predictable.
CopyFiles
Windows CE expects certain files to be in the Windows folder, residing in volatile storage. Windows CE
maintains the System Registry in volatile storage. CopyFiles copies files from one folder to another on a cold
boot. Files can be copied from a non-volatil e p artitio n (Application or Pl at form) to the Win dows or othe r volatile
partition during a cold boot. During a cold boot CopyFiles looks for files with a .CPY extension in the root of the
Platform, then the Application FFS partitions. These files are text files containing the source and destination for
the desired files to copy, separ ated by “>”. The demo application partition included in the DCP contains the
following example from the file application.cpy. Alternatively, obtain this from the Support Central web site at
http://www.zebra.com/support
Files are copied to the Windows folder from the Flash File System using copy files (*.cpy) in the following
order:
\Platform
\Application
Example:
\Application\ScanSamp2.exe>\Windows\ScanSamp2.exe
This line directs CopyFiles to copy the ScanSamp2.exe application from the \Application folder to the
\Windows folder.
Non-FFS Partitions
Non-FFS Partitions include additional software and data pre-loaded on the MK500 that you can upgrade.
Unlike FFS Partitions, these partitions are not visible when the operating system is running. They also contain
system information. Non-FFS partitions include the following:
•
Windows CE: The complete Windows CE operating system is stored on Flash devices. If nece ssary, you
can download the entire OS image to the MK500 using Ze bra pr ovided files. The TCM installation
package includes the current OS partition on the M K500. Obt ain any upg rades from Zebr a. This par tition
is mandatory for the MK500.
•
Splash Screen: a bitmap smaller than 16 kb (and limited to 8 bits per pixel) appears as the MK500 cold
boots. To downlo ad a custom ized screen to display, see Creating a Splash Screen on page 5-21.
NOTE 8 bits per pixel only applies to splash screen images. Once Windows CE is running, the color density is
16 bits per pixel.
•
Partition Table: Identifies where each partition is loaded in the MK500.
Downloading Partitions to the MK500
Use TCM to specify a hex destination file for each partition and download each file to the MK500. This
download requires a program loader stored on the MK500.
Page 63

APPENDIX A TECHNICAL SPECIFICATIONS
Technical Specifications
For the latest technical specification information for the MK500, visit: http://www.zebra.com/MK500
Page 64

A - 2 MK500 MicroKiosk for CE .NET 5.0 Product Reference Guide
Page 65

APPENDIX B WIRELESS CONFIGURATION
Overview
Use the MK500’s Mobile Companion to configure the 11 Mbps wireless connection.
NOTE Mobile Companion supports WPA Home, but not WPA Enterprise.
Page 66

B - 2 MK500 MicroKiosk for CE .NET 5.0 Product Reference Guide
Signal Strength Icon
Wireless Applications
Wireless Local Area Networks (WLANs) allow MK500s to communicate wirelessly and send data to a host
device in real time. Before using the MK500 on a WLAN, the facility must be set up with the required hardware
to run the wireless LAN and you must configure the device. Refer to the documentation provided with the
access points (APs) for instructions on setting up the hardware.
To configure the MK500, a set of wireless applications provide the tools to configure and test the wireless radio
in the device. The
•
Find WLANs
•
Manage Profiles
•
Manage Certificates
•
Manage PACs
•
Options
•
Wireless Status
•
Wireless Diagnostics
Wireless Application menu on the task tray provides the following wireless applications:
•
Log On/Off
•
Enable/Disable Radio (Fusion 2.5 and above only).
Tap th e
Figure B-1
Signal Strength icon to display the Wireless Applications menu.
Wireless Applications Menu
Page 67

Signal Strength Icon
The Signal Strength icon in the task tray indicates the device’s wireless signal strength as follows:
Wireless Configuration B - 3
Table B-1
Icon Status Action
None No wireless LAN network
Wireless Applications Icons, Signal Strength Descriptions
Excellent signal strength Wireless LAN network is ready to use.
Very good signal strength Wireless LAN network is ready to use.
Good signal strength Wireless LAN network is ready to use.
Fair signal strength Wireless LAN network is ready to use. Notify the network
administrator that the signal strength is only “Fair”.
Poor signal strength Wireless LAN network is ready to use. Performance may not be
optimum. Notify the network administrator that the signal strength is
“Poor”.
Out-of-network range
(not associated)
No wireless LAN network
card detected.
card detected or Wireless
LAN disabled.
No wireless LAN network connection. Notify the network
administrator.
No wireless LAN network card detected or radio disabled. Notify the
network administrator.
No wireless LAN network card detected or Wire less LAN disabled or
radio disabled. Notify the network administrator.
Turning the WLAN Radio On and Off
To turn the WLAN radio off tap the Signal Strength icon and select Disable Radio.
Figure B-2
To turn the WLAN radio on tap the
Disable Radio
Signal Strength icon and select Enable Radio.
Page 68

B - 4 MK500 MicroKiosk for CE .NET 5.0 Product Reference Guide
Find WLANs Application
Use the Find WLANs application to discover available networks in the vicinity of the user and MK500. To open
the
Find WLANs application, tap the Signal Strength icon - Find WLANs. The Find WLANs window displays.
Figure B-3
The
•
Find WLANs Window
NOTE Find WLAN display is limited to 32 items (ESSIDs or MAC addresses). A combination of up to 32 ESSIDs/APs
may be displayed.
Manually enter valid ESSIDs not displayed in the Find WLANs window. See Figure B-4 on page B-6.
Find WLANs list displays:
WLAN Networks - Available wireless networks with icons that indicate signal strength and encryption
type. The signal strength and encryption icons are described in Table B-2 and Table B-3.
•
Network Type - Type of network.
•
Channel - Channel on which the AP is transmitting.
•
Signal Strength - The signal strength of the signal from the AP.
Table B-2
Signal Strength Icon
Icon Description
Excellent signal
Very good signal
Good signal
Fair signal
Poor signal
Out of range or no signal
Table B-3
Encryption Icon
Icon Description
No encryption. WLAN is an infrastructure network.
WLAN is an Ad-Hoc network.
WLAN access is encrypted and requires a password.
Page 69

Wireless Configuration B - 5
Tap-and-hold on a WLAN network to open a pop-up menu which provides two options: Connect and Refresh.
Select
starts the
profile, the device automatically connects to this new profile.
Refresh to refresh the WLAN list. Select Connect to create a wireless profile from that network. This
Profile Editor Wizard which allows you to set the values for the selected network. After editing the
Page 70

B - 6 MK500 MicroKiosk for CE .NET 5.0 Product Reference Guide
Profile Editor Wizard
Use the Profile Editor Wizard to create a new WLAN profile or edit an existing profile. If editing a profile, the
fields reflect the current settings for that prof ile. If crea tin g a new pro file , de fa ult value s ap p ear in the field s.
Navigate through the wizard using the
tap
No to return to the wizard or tap Yes to quit and return to the Manage Profiles window. See Mana ge Profiles
Application on page B-29 for instructions on navigating the
Next and Back buttons. Tap X to quit. On the confirmation dialog box,
Profile Editor Wizard.
Profile ID
In the Profile ID dialog box in the Profile Editor Wizard, enter the profile name and the ESSID.
Figure B-4
Table B-4
Profile Name The name and (WLAN) identifier of the network connection. Enter a user friendly name
Profile ID Dialog Box
Profile ID Fields
Field Description
for the device profile used to connect to either an AP or another networked computer.
Example: The Public LAN.
ESSID The ESSID is the 802.11 extended service set identifier. The ESSID is 32-character
(maximum) string identifying the WLAN, and must match the AP ESSID for the device to
communicate with the AP.
NOTE Two profiles with the same user friendly name are acceptable but not recommended.
Next. The Operating Mode dialog box displays.
Tap
Page 71

Wireless Configuration B - 7
Operating Mode
Use the Operating Mode dialog box to select the operating mode (Infra structure or Ad-Hoc) and the country
location.
Figure B-5
Table B-5
Operating Mode Select Infrastructure to enable the device to transmit and receive data with an AP.
Operating Mode Dialog Box
Operating Mode Fields
Field Description
Infrastructure is the default mode.
Select
communicate peer-to-peer without APs using a shared ESSID.
Ad Hoc to enable the device to form its own local network where devices
Page 72

B - 8 MK500 MicroKiosk for CE .NET 5.0 Product Reference Guide
Table B-5
Field Description
Country
Operating Mode Fields (Continued)
Country determines if the profile is valid for the country of operation. The profile cou ntry
must match the country in the options page or it must match the acquired country if
802.11d is enabled.
Single Country Use:
If using the device in a single country, set every profile country to
the
Options > Regulatory dialog box (see Figure B-41 on page B-45), select the specific
country in which the device is used, and deselect the
common and efficient configuration eliminates the initialization overhead associated with
acquiring a country via 802.11d.
Multiple Country Use:
If using the device in more than one country, select
Regulatory dialog box (see Figure B-41 on page B-45). This eliminates the need for
reprogramming the country (in
However, this only works if the infrastructure (i.e., APs) supports 802.1 1d (older firmware
versions on wireless infrastructures do not support 802.11d). When you select the
Enable 802.11d option, the
infrastructure WLANs. 802.11d feature is only valid for Infrastructure WLANs. Ad-hoc
WLANs use the country options and must match the profile.
For a single profile to use in multiple countries, with infrastructure that support s 802.11d
(including Zebra infrastructure), set the Profile Country to
Options > Regulatory, select Enable 802.1 1d. The Options > Regulatory > Country setting
is not used.
Allow Any Country . In
Enable 802.11d option. This
Enable 802.11d in the Options >
Options > Regulatory) each time you enter a new country .
Options > Regulatory > Country setting is not used for
Allow Any Country. Under
For a single profile to use in multiple countries, but with infrastructure that does not
support 802.11d, set the profile country to
Enable 802.11d. In this case, always set the Options > Regulatory > Country setting to the
Allow Any Country, and de-select (uncheck)
country the device is currently in. Y ou can use this efficient configuration option with any
infrastructure. However, you must manually change the
Options > Regulatory > Country
setting when entering a new country.
Note that using a single profile in multiple countries implies that there is a common
ESSID to connect to in each country. This is less likely than having unique ESSIDs in
each country, which requires unique profiles for each country.
For additional efficiency when using multiple profiles to use in multiple countries, set the
country setting for each profile to a specific country. If the current country (found via
802.11d or set by
Options > Regulatory > Country when 802.11d is disabled) does not
match the country set in a given profile, that profile is disabled. This can speed profile
roaming. For example, if you create and configure two profiles for Japan, and two more
for USA, then when in Japan only the first two profiles are active, and when in USA only
the last two are active. If you configure them all for
Allow Any Country , all four are always
active, making profile roaming less efficient.
Tap Next. If you selected Ad-Hoc mode, the Ad-Hoc Channel dialog box displays. If you selected Infrastructure
mode, the
Security Mode dialog box displays. See Authentication on page B-11 for instruction on setting up
authentication.
Page 73

Wireless Configuration B - 9
Ad-Hoc
Use the Ad-Hoc Channel dialog box to select the required information to create an Ad-Hoc profile. This dialog
box does not appear if you selected
1. Select a channel number from the Channel drop-down list.
Infrastructure mode.
Figure B-6
Table B-6
Ad-Hoc Channel Selection Dialog Box
NOTE If in a country where DFS is implemented in band 5150-5250 MHz, you cannot use ad-hoc and must move and
select a channel in the 2.4 GHz band.
Ad-hoc channels are specific to the country selected.
Ad-Hoc Channels
Band Channel Frequency
2.4 GHz 1 2412 MHz
2 2417 MHz
3 2422 MHz
4 2427 MHz
5 2432 MHz
6 2437 MHz
7 2442 MHz
8 2447 MHz
9 2452 MHz
10 2457 MHz
11 2462 MHz
12 2467 MHz
13 2472 MHz
14 2484 MHz
5 GHz 36 5180 MHz
40 5200 MHz
44 5220 MHz
48 5240 MHz
Page 74

B - 10 MK500 MicroKiosk for CE .NET 5.0 Product Reference Guide
2. Tap Next. The Encryption dialog box displays. See Encryption on page B-20 for encryption options.
Security Mode
Use the Security Mode dialog box to configure the Security and Authentication methods. If you selected
Ad-Hoc mode, this dialog box is not available and authentication is set to None by default.
Figure B-7
Security and Authentication Dialog Box
Select the security mode from the Security Mode drop-down list. This selection affects the availability of other
choices for Authentication Type and Encryption methods.
•
LEGACY (Pre-WPA) - This mode allows you to configure protocols not available in the other Security
Mode selections: Open authentication / encryption, Open authentication with WEP40 or WEP128, and
802.1X authentications that use WEP128 encryption.
•
WPA-Personal - This mode allows you to configure a WPA-TKIP-PSK protocol.
•
WPA2-Personal - This mode allows you to configure WPA2-PSK protocols with either the Advanced
Encryption Standard (AES) or TKIP encryption method.
•
WPA-Enterprise - This mode allows you to configure profiles with 802.1X Authentication that uses WPA
and TKIP encryption method.
•
WPA2-Enterprise - This mode allows you to configure profiles with 802.1X Authentication that uses
WPA2 with AES encryption method.
Table B-7
Legacy (Pre-WPA) None, EAP-TLS,
Security Modes
Security Mode
Authentication
Types
EAP-FAST, PEAP,
LEAP, TTLS
Encryption Types
Open,
WEP-40 (40/24),
WEP-104 (104/24),
Pass-phrase/Hexkey
Configuration
Enabled. User input required with
pass-phrase/hex key configuration.
TKIP, AES
WPA - Personal None TKIP Enabled. User input required with
pass-phrase/hex key configuration.
WPA2 - Personal None AES Enabled. User input required with
pass-phrase/hex key configuration.
WPA - Enterprise EAP-TLS, EAP-FAST,
PEAP, LEAP, TTLS
WPA2 - Enterprise EAP-TLS, EAP-FAST,
PEAP, LEAP, TTLS
TKIP Disabled. No user input required
for encryption key.
AES Disabled. No user input required
for encryption key.
Page 75

Wireless Configuration B - 11
Authentication
Select an available authentication type from the drop-down list. The options listed are based on the selected
Security Mode as shown in Table B-7.
The authentication types, other than None, all use IEEE 802.1x authentication to ensure that only valid users
and sometimes servers can connect to the network. Each authentication type uses a different scheme using
various combinations of tunnels, username/passwords, use r certificates, ser ver certificates, and Protected
Access Credentials (PACs).
Table B-8
Authentication Description
None Default setting when authentication is not required on the network.
EAP-TLS
EAP-FAST
PEAP Select this option to enable PEAP authentication. This type establishes a tunnel and,
LEAP Select this option to enable LEAP authentication. This type does not establish a tunnel.
TTLS
Tap
None displays the Encryption dialog box. Selecting EAP-TLS displays the Installed User Certs dialog box.
Selecting
Authentication Options
Select this option to enable EAP-TLS authentication. A user certificate is required;
validating the server certificate is optional.
Select this option to enable EAP-FAST authentication. This type uses a PAC (Protected
Access Credential) to establish a tunnel and then uses the selected tunnel type to verify
credentials. PACs are handled behind the scenes, tr ansp arent to the user. Automatic PAC
provisioning can, depending on the tunnel type, require a user certificate and the
validation of a server certificate. Manual PAC provisioning is currently not supported.
based on the tunnel type, uses a user certifica te and /o r a us er na m e/ password .
Validating the server certificate is optional.
It requires a username and password.
Select this option to enable TTLS authentication. This type establishes a tunnel and,
based on the tunnel type, uses a user certificate and/or a username/p a sswo r d. Validating
the server certificate is optional.
Next. Selecting PEAP, TTLS, or EAP-FAST displays the Tunneled Authentication Typ e dialog box. Selecting
LEAP displays the User Name dialog box.
Tunneled Authentication
Use the Tunneled Authentication dialog box to select the tunneled authentication options. The content of the
dialog differs depending on the
Figure B-8
To select a tunneled authentication type:
Tunneled Authentication Dialog Box
Authentication Type chosen.
Page 76

B - 12 MK500 MicroKiosk for CE .NET 5.0 Product Reference Guide
1. Select a tunneled authentication type from the drop-down list. See Table B-9 for the Tunnel authentication
options for each authentication type.
2. Select the User Certificate check box if a certificate is required. If you selected the TLS tunnel type that
requires a user certificate, the check box is already selected.
3. Tap Next. The Installed User Certificates dialog box appears.
Table B-9
Authentication
Tunneled Authentication Options
Tunneled
Authentication Type
PEAP TTLS EAP-FAST
Description
CHAP X Challenge Handshake Authentication Protocol (CHAP)
is one of the two main authentication protocols used to
verify the user name and password for PPP Internet
connections. CHAP is more secure than P AP beca use it
performs a three way handshake during the initial link
establishment between the home and remote mach ines.
It can also repeat the authentication anytime after the
link is established.
EAP-GTC X X
EAP-GTC is used during phase 2 of the authentication
process. This method uses a time-synchronized
hardware or software token generator, often in
conjunction with a user PIN, to create a one-time
password.
MD5 X Message Digest-5 (MD5) is an authentication algorithm
developed by RSA. MD5 generates a 128-bit message
digest using a 128-bit key , IPSec truncates the message
digest to 96 bits.
MS CHAP X Microsoft Challenge Handshake Authentication Protocol
(MS CHAP) is an implementation of the CHAP protocol
that Microsoft created to authenticate remote Windows
workstations. MS CHAP is identical to CHAP , except that
MS CHAP is based on the encryption and hashing
algorithms used by Windows networks, and the MS
CHAP response to a challenge is in a format optimized
for compatibility with Windows operating systems.
Page 77

Wireless Configuration B - 13
Table B-9
Authentication
MS CHAP v2 X X X Microsoft Challenge Handshake Authen tication Protocol
PAP X Password Authentication Protocol (PAP) has two
Tunneled Authentication Options (Continued)
Tunneled
Authentication Type
PEAP TTLS EAP-FAST
Description
version 2 (MS CHAP v2) is a password-based,
challenge-response, mutual auth entication protocol that
uses the industry-standard Message Digest 4 (MD4) and
Data Encryption Standard (DES) algorithms to encrypt
responses. The authenticating server challenges the
access client and the access client challenges the
authenticating server. If either challenge is not correctly
answered, the connection is rejected. MS CHAP v2 was
originally designed by Microsoft as a PPP authentica tion
protocol to provide better protection for dial-up and
virtual private network (VPN) connections. With
Windows XP SP1, Windows XP SP2, Windows Server
2003, and Windows 2000 SP4, MS CHAP v2 is also an
EAP type.
variations: PAP and CHAP PAP. It verifies a user name
and password for PPP Internet connections, but it is not
as secure as CHAP, since it works only to establish the
initial link. P AP is also more vulnerable to attack because
it sends authentication packets throughou t the network.
Nevertheless, PAP is more commonly used than CHAP
to log in to a remote host like an Internet service
provider.
TLS X X EAP TLS is used during phase 2 of the authentication
process. This method uses a user certificate to
authenticate.
Page 78

B - 14 MK500 MicroKiosk for CE .NET 5.0 Product Reference Guide
User Certificate Selection
If you checked the User Certificate check box on the T unneled Authentication dialog box or if TLS is the selected
authentication type, the
list of currently installed certificates before proceeding. The selected certificate’s name appears in the
drop-down list. If the required certificate is not in the list, install it.
Installed User Certificates dialog box displays. Select a certificate from the drop-down
Figure B-9
Installed User Certificates Dialog Box
User Certificate Installation
There are two methods available to install a user certificate for authentication. The first is to obtain the user
certificate from the Certificate Authority (CA). This requires connectivity with that CA. The second method is to
install the user certificate from a file placed on the device.
To install a user certificate from the CA:
1. Tap Install Certificate. The Import Certificate dialog box appears.
2. Select Import User Cert from Server and tap OK. The Install from Server dialog box appears.
3. Enter the User, Password, and Server information in their respective text boxes.
4. Tap Retrieve. A Progress dialog indicates the status of the certificate retrieval or tap Exit to exit.
After the installation completes, the
the drop-down for selection.
NOTE To successfully install a user certificate , th e mo bi l e computer must already be connected to a network from
which the server is accessible.
To install a user certificate from a file:
1. Tap Install Certificate. The Import Certificate dialog box appears.
Installed User Certs dialog box displays and the certificate is available in
2. Choose Import from File and tap OK. The Open dialog box appears.
3. In the Type drop-down list, select Personal Certs (*.pfx).
4. Browse to the file and tap OK. The Personal Certificate dialog box appears.
5. Enter the password and select OK. The certificate(s) are imported.
NOTE To install a user certificate from a file, the file must be of type “*.pfx”. Also, this file type requires you to supply
a password in order to be read by Fusion.
Page 79

Wireless Configuration B - 15
Server Certificate Selection
If you select the Validate Server Certificate check box, a server certificate is requ ired. Select a cer tificate on the
Installed Server Certificates dialog box. An hour glass may appear as the wizard populates the existing
certificate list. If the required certificate is not listed, install it:
1. Tap th e In stall Certificate button .
Figure B-10
The
2. A dialog box appears that lists the certificate files found with the default extension. Browse to the file and
tap
3. A confirmation dialog verifies the installation. If the information in this dialog is correct, tap the Yes button.
If the information in this dialog is not correct, tap the
Certs
Installed Server Certificates Dialog Box
Import Certificate dialog box appears. Choose Import from File (.cer, .pfx) and t ap OK.
OK.
No button. The wizard returns to the Installed Server
dialog box. Select the newly-installed certificate from the drop down list.
User Name
You can enter the user name and password when you create the profile, but is not required. If you do not enter
the username and password in the profile, then when attempting to connect, you are prompted to supply them.
The entered information (credentials) is saved (cached) for future reconnections.
Whether or not you enter the username and p asswor d into the p rofile af fect s how the p rofile is trea ted during a
Profile Roaming operation. Profiles are excluded from consideration if they require user entry of credential
information.
If the profile uses an authentication tunnel type of EAP-GTC and you selected Token (see Password), then you
can control certain behavior by whether you enter a value in the
this field, when the Fusion software prompts you to enter credentials, the username field in the interactive
credential dialog is initialized with the value you entered when cre ating the profile. If you en ter a dif ferent value
in the username field of the interactive credential dia log, it is cached and used to initialize the username field
the next time the interactive credential dialog is shown for that profile.
Enter User Name field. If you enter a value in
If you do not enter a value in the
Enter User Name field when you create an EAP-GTC token profile, the
username field in the interactive credential dialog is initialized to blank. After you enter a username in the
interactive credential dialog, it is cached as usual, but it is not used to initialize the username field the next time
the interactive credential dialog is shown for that profile; the username field is still initialized to blank.
In summary, you can control whether the username field in the interactive credential dialog box is initialized,
either with the last interactively-entered username for that profile or with the username en tered into the profile,
by whether any value is entered in the
Enter User Name field during profile entry.
Page 80

B - 16 MK500 MicroKiosk for CE .NET 5.0 Product Reference Guide
Figure B-11
Username Dialog Box
Password
Use the Password dialog box to enter a password. If EAP/TLS is the selected authentication type, the
password dialog box does not appear. Note that if you entered a username but no password, Fusion assumes
that no password is a valid password.
Figure B-12
1. Enter a password in the Enter Password field. If using the authentication tunnel type EAP-GTC, a Password
dialog box appears, with two radio buttons to allow you to choose a token or static password.
Password Dialog Box
• Choose the Token radio button when using the profile in conjunction with a token generator (hardware
or software). The system administrator supplies a token generator for use with EAP-GTC token
profiles. A token generator generates a numeric value to enter in the password field at connect time,
usually along with a PIN. Tokens usually expire within 60 seconds. The token generator is
time-synchronized with a token server. When authenticating, the RADIUS server asks the token
server to verify the token entered. The token server knows what value the token generator generates
given the time of day and the username. Since tokens expire, EAP-GTC token profiles are treated
differently. A prompt appears at the appropriate time to enter a token, even if you previously entered a
token. Tokens are never cached in the credential cache (though the username entered when the
token is entered is cached).
• If you choose the Static radio button, the Enter Password field is enabled and you can enter a
password if desired. A profile that uses an EAP-GTC tunnel type with a static password is handled in
the same manner as other profiles that have credentials that don't expire.
2. Select the Advanced ID check box if advanced identification is desired.
3. Tap Next. The Prompt for Login at dialog box displays. See Credential Cache Options.
Page 81

Wireless Configuration B - 17
Advanced Identity
Use the Advanced ID dialog box to enter the 802.1X identity to supply to the authe nticator . This value can be 63
characters long and is case sensitive. In TTLS and PEAP, entering an anonymous identity (rather than a true
identity) plus any desired realm (e.g., anonymous@myrealm) is recommended. A user ID is required before
proceeding.
NOTE When authenticating with a Microsoft IAS server, do not use advanced identity.
Figure B-13
Tap
Next. The Encryption dialog box displays.
Advanced Identity Dialog Box
Credential Cache Options
If you selected any of the password-based authentication types, you can select different credential caching
options. These options specify when the network credential prompts appear: at connection, on each resume,
or at a specified time.
Entering the credentials directly into the profile permanently caches the credentials. In this case, the device
does not require user login. If a profile does not contain credentials entered through the Profile Editor Wizard,
you must enter credentials when prompted, either when connecting to the profile in the Manage Profiles
window, or when logging onto the profile using the Log On/Off command.
Credential caching options only apply to a profile when you enter cre dentials throug h the login dia log box. This
includes using the Log On/Off command to log on to a profile for which the credentials were directly entered
into the profile (the username / password fields left blank).
Figure B-14
If the device does not have the credentials, you are prom pted to enter a user name and passwor d. If the device
has the credentials (previous entered via a login dialog box), it uses these credentials unless the caching
options require the device to prompt for new credentials. If you entered the credentials via the profile, the
device does not prompt for new credentials (except for profiles where the credentials expire, such as
EAP-GTC token profiles). Table B-10 lists the caching options.
Prompt for Login at Dialog Box
Page 82

B - 18 MK500 MicroKiosk for CE .NET 5.0 Product Reference Guide
Table B-10
Cache Options
Option Description
At Connect Select this option to prompt for credentials whenever the device tries to connect to a new
profile. Deselect this to use the cached credentials to authenticate. If the credentials are not
cached, you are prompted to enter credentials. This option only applies when logged in.
On Resume Selecting this reauthenticates an authenticated user when a suspend/resume occurs. Once
reauthenticated, the user is prompted for credentials. If the user does not enter the same
credentials that were entered prior to th e suspend/resume within three attempts , the user is
disconnected from the network. This option only applies when logged in.
At Time Select this option to perform a local verification on an authenticated user at a specified time.
The time can be an absolute time or a relative time from the authentication, and should be
in at least 5 minute intervals. Once the time has passed, the user is prompted for
credentials. If the user does not enter the correct cre dentials within three attempts, the user
is disconnected from the network. This option only applies when logged in.
Entering credentials applies these credentials to a particular profile. Logging out clears all cached credentials.
Editing a profile clears all cached credentials for that profile. If you configure the APs to use the Fast Session
Resume capability available with some authentication types (e.g., PEAP), do not check
Resume
if you want to avoid being prompted to re-enter credentials in circumstances in which Fast Session
At Connect or On
Resume would allow them not to be.
The following authentication types have credential caching:
•
EAP-TLS
•
PEAP
•
LEAP
•
TTLS
•
EAP-FAST.
Some exceptions to the credential caching rules apply for profiles where the credentials expire, such as
EAP-GTC token profiles. Since the token expires after a short period, you are prompted for credentials even
when credentials were already entered and cached for that profile. The
slightly different function. If do not check the
At Connect box, the Fusion software tries to authenticate without
At Connect caching option has a
prompting for a new token. If Fast Session Reconnect is enabled on the RADIUS server and the device was
previously connected and authenticated using the same profile, the device may be able to reconnect without
the entire authentication process. In this case, new credentials are not required (even though the old ones
have expired) and the Fusion software does not prompt for new credentials. If Fast Session Reconnect is not
enabled on the RADIUS server or if you checked the
At Connect checkbox, you are prompted to enter ne w
credentials. Note also that the On Resume caching option must always check for profiles where the credentials
expire, because the Fusion software does not support the use of Fast Session Reconnect across a
suspend/resume cycle, so new credentials are always needed.
Page 83

Selecting the At Time check box displays the Time Cache Options dialog box.
Wireless Configuration B - 19
Figure B-15
1. Tap th e Interval radio button to check credentials at a set time interval.
2. Enter the value in minutes in the Min box.
3. Tap th e At (hh:mm) radio button to check credentials at a set time.
4. Tap Next. The At Time dialog box appears.
Figure B-16
5. Enter the time using the 24 hour clock format in the (hh:mm) box.
6. Tap > to move the time to the right. Repeat for additional time periods.
7. Tap Next. The Encryption dialog box displays.
Time Cache Options Dialog Box
At Time Dialog Box
Page 84

B - 20 MK500 MicroKiosk for CE .NET 5.0 Product Reference Guide
Encryption
NOTE The only available encryption methods in Ad-hoc are Open, WEP40, and WEP104.
Use the Encryption dialog box to select an encryption method. This contains fields to configure the encryption
method and corresponding keys, if any. The drop-down list includes encryption methods available for the
selected security mode and authentic at ion type .
Figure B-17
Encryption Dialog Box
Based on the encryption method and the authentication type, you may have to manually enter pre-shared
encryption keys (or a passkey phrase). When you select any authentication type other than None, 802.1x
authentication is used and the keys are automatically generated.
Table B-11
Encryption Options
Encryption Description
Open Select Open (the default) when no data packet encryption is needed over the network.
Selecting this option provides no security for data transmitting over the network.
WEP-40 (40/24)
Select
WEP-40 (40/24)
to use 64-bit key length WEP encryption (the other 24 bits are
generated automatically). Other controls appear that allow you to enter keys. If you select
the
Use Passkey
checkbox, you are asked to enter a passphrase between 4 and 32
characters long on the next page. Saving the profile converts the passphrase into a key
and the passphrase is lost. Also, if using a passkey, only one key can be set.
If you do not select the
on the next page. Select the key to enter in the
Use Passkey
checkbox, you can enter up to four hexadecimal keys
Key Index
drop-down menu. This also
selects the key used for encryption. Note that Fusion sets default values for these key s, so
while that entry is not required, the keys must match the AP.
Page 85

Wireless Configuration B - 21
Table B-11
Encryption Options (Continued)
Encryption Description
WEP-104
(104/24)
Select
appear that allow you to enter keys. If you select the
WEP-104 (104/24)
to use a 128-bit key length WEP encryption. Other controls
asked to enter a passphrase between 4 and 32 characters long on the next page.
the profile converts the passphrase into a key and the p assphrase is lost. Also, if using a
passkey, only one key can be set
.
If you do not select the Use Passkey checkbox, you can enter up to four hexadecimal
keys on the next page
.
Select the key to enter in the Key Index drop-down menu. This
also selects the key used for encryption. Note that Fusion sets default values for these
keys, so while that entry is not required, the keys must match the AP
TKIP
Select
TKIP
for the adapter to use the Temporal Key Integrity Protocol (TKIP) encryption
method. This encryption method is available when the Security Mode is not set to Legacy.
If the Security Mode is set to WPA personal, you are asked to enter a passphrase between
8 and 63 characters long on the next page.
AES
(Fusion 2.5 only)
Select this option
for the adapter to use the
This encryption method is available for many of the Security Modes. If the Security Mode
selected is “personal”, you are asked to enter a passphrase betwee n 8 and 63 characters
long on the next page.
Table B-12
Encryption / Authentication Matrix
Use Passkey
checkbox, you are
Saving
.
Advanced Encryption Standard (AES) method.
Encryption
Authentication
Legacy (Pre-WPA)
WPA
Personal
WPA2
Personal
WPA
Enterprise
WPA2
Enterprise
Open WEP TKIP AES TKIP AES
None Yes WEP-40 or
Yes Yes
WEP-104
EAP-TLS WEP-104 Yes Yes
EAP-FAST WEP-104 Yes Yes
PEAP WEP-104 Yes Yes
LEAP WEP-104 Yes Yes
TTLS WEP-104 Yes Yes
If you selected either WEP-40 (40/24) or WEP-104 (104/24), the wizard displays the Key Entry dialog box
unless you selected the
The
Key Entry dialog box appears only if the authentication is set to None.
Use Passkey check box in the Encryption dialog box (see Figure B-17 on page B-20).
Page 86

B - 22 MK500 MicroKiosk for CE .NET 5.0 Product Reference Guide
WEP-40 Keys Dialog Box
WEP-104 Keys Dialog Box
Key Entry Page - Hexidecimal Keys
To enter the hexidecimal key information select the Hexidecimal Keys radio button in the Encryption dialog box.
To enter a hexidecimal key with characters hidden:
1. Select the For added security - Mask characters entered check box.
2. Tap Next.
Figure B-18
3. For WEP only, in the Edit Key drop-down list, select the key to enter.
4. In the Key field, enter the key. a. For WEP-40 enter 10 hexidecimal characters. b. For WEP-104 enter 26 hexidecimal characters. c. For TKIP enter 64 hexidecimal characters. d. For AES enter 64 hexidecimal characters.
5. In the Confirm Key field, re-enter the key. When the keys match a message appears indicating this.
6. Repeat for each WEP key.
7. For WEP only, in the Transmit Key drop-down list, select the key to transmit.
8. Tap Next. The IP Address Entry dialog box displays.
WEP-40 and WEP-104 Keys Dialog Boxes
To enter a hexidecimal key without characters hidden:
1. Tap Next.
2. For WEP only, in each Key field, enter the key. a. For WEP-40 enter 10 hexidecimal characters. b. For WEP-104 enter 26 hexidecimal characters. c. For TKIP enter 64 hexidecimal characters. d. For AES enter 64 hexidecimal characters.
3. For WEP only, in the Transmit Key drop-down list, select the key to transmit.
4. Tap Next. The IP Address Entry dialog box displays.
Page 87

Wireless Configuration B - 23
Pass-phrase Dialog
When you select None as an authentication and WEP as an encryption, you can cho ose to enter a p ass-phra se
by checking the
Pass-phrase radio button is only available if the authentication is None.
Pass-phrase radio button. You are prompted to enter the pass-phrase. For WEP, the
When you select
cannot enter a pass-phrase if the encryption is
When you select
cannot enter a pass-phrase if the encryption is
None as an authentication and TKIP as an encryption, you must enter a pass-phrase. You
TKIP and the authentication is anything other than None.
None as an authentication and AES as an encryption, you must enter a pass-phrase. You
AES and the authentication is anything other than None.
To enter a pass-phrase with characters hidden:
1. Select the For added security - Mask characters entered check box.
2. Tap Next.
3. In the Key field, enter the key.
a. For WEP-40 enter between 4 and 32 characters.
b. For WEP-104 enter between 4 and 32 characters.
c. For TKIP enter between 8 and 63 character s.
d. For AES enter between 8 and 63 characters.
4. In the Confirm Key field, re-enter the key. When the keys match a message appears indicating this.
5. Tap Next. The IP Address Entry dialog box displays.
To enter a pass-phrase key without characters hidden:
1. Tap Next.
2. In the Key field, enter the key.
a. For WEP-40 enter between 4 and 32 characters.
b. For WEP-104 enter between 4 and 32 characters.
c. For TKIP enter between 8 and 63 character s.
d. For AES enter between 8 and 63 characters.
3. Tap Next. The IP Address Entry dialog box displays.
Page 88

B - 24 MK500 MicroKiosk for CE .NET 5.0 Product Reference Guide
IP Address Entry
Use the IP Address Entry dialog box to configure network address parameters: IP address, subnet mask,
gateway, DNS, and WINS.
Figure B-19
Table B-13
IP Address Entry Dialog Box
IP Address Entry
Encryption Description
DHCP Select Dynamic Host Configuration Protocol (DHCP) from the IP Address Entry
drop-down list to obtain a leased IP addr ess and network configuration information from
a remote server. DHCP is the default setting for the device profile. Ad-hoc mode does
not support DHCP. Use only a Static IP address assignment.
Static Select
Static to manually assign the IP, subnet mask, default gateway, DNS, and WINS
addresses the device profile uses.
Select either
Entry
dialog box. Selecting DHCP displays the Transmit Power dialog box.
Use the
DHCP or Static from the drop-down list and tap Next. Selecting Static IP displays the IP Address
IP Address Entry dialog box to enter the IP address and subnet information.
Figure B-20
Static IP Address Entry Dialog Box
Page 89

Wireless Configuration B - 25
Table B-14
Static IP Address Entry Fiel ds
Field Description
IP Address The Internet is a collection of networks with users that communicate with each other.
Each communication carries the address of the source and destination networks and the
particular machine within the network associated with the user or host computer at each
end. This address is called the IP address (Interne t Protocol address). Each node on the
IP network must be assigned a unique IP address that is made up of a network identifier
and a host identifier. Enter the IP address as a dotted-decimal n ot ation with the decim al
value of each octet separated by a period, for example, 192.168.7.27.
Subnet Mask Most TCP/IP networks use subnets to manage routed IP addresses. All IP addresses
have a network part and a host part. The network par t specifies a physical networ k. The
host part specifies a host on that physical network. The subnet mask allows a network
administrator to use some of the bits that are normally used to specify the host to instead
specify physical sub-networks within an organization. This helps organize and simplify
routing between physical networks.
Select the Advanced check box, then tap NEXT to display the Advanced Address Entry dialog box. Enter the
Gateway, DNS, and WINS address. Tap
Transmit Power dialog box.
NEXT without selecting the Advanced check box to display the
Figure B-21
The IP information entered in the profile is only used if you selected the
Options > System Options dialog box (System Options on page B-46). If you didn’t select this, the IP
Advanced Address Entry Dialog Box
Enable IP Mgmt check box in the
information in the profile is ignored and the IP information ente red in the Microsoft interface applies.
Table B-15
IP Config Advanced Address Entry Fields
Field Description
G/W The default gateway forwards IP packets to and from a remote destination.
DNS The Domain Name System (DNS) is a distributed Internet directory service. DNS
translates domain names and IP addresses, and controls Internet email delivery. Most
Internet services require DNS to operate properly. If DNS is not configured, Web sites
cannot be located and/or email delivery fails.
WINS WINS is a Microsoft
®
Net BIOS name server. WINS eliminates the broadcasts needed
to resolve computer names to IP addresses by providing a cache or database of
translations.
Tap
Next. The Transmit Power dialog box displays.
Page 90

B - 26 MK500 MicroKiosk for CE .NET 5.0 Product Reference Guide
Transmit Power
The Transmit Power drop-down list contains different options for Ad-Hoc and Infrastructure mode. Automatic
(i.e., use the current AP settings) and Power Plus (use higher than the current AP settings) are available for
Infrastructure mode.
Adjusting the radio transmission power level enables you to expa nd or confine the transmission coverage ar ea.
Reducing the radio transmission power level reduces potential interference to other wireless devices that might
be operating nearby. Increasing the radio transmission power level increases the range at which other wireless
devices can “hear” the radio's signal.
Figure B-22
Table B-16
Transmit Power Dialog Box (Infrastructure Mode)
Transmit Power Dialog Box (Infrastructure Mode)
Field Description
Automatic Select Automatic (the default) to use the AP power level.
Power Plus Select
Power Plus to set the device transmission power one level higher than the level
set for the AP. The power level is set to conform to regulatory requirements.
Figure B-23
Table B-17
Transmit Power Dialog Box (Ad-Hoc Mode)
Power Transmit Options (Ad-Hoc Mode)
Field Description
Full Select Full power for the highest transmission power level. Sel ect Full power when operating
in highly reflective environments and areas wh ere other devices cou ld be operating ne arby,
or when attempting to communicate with devices at the outer edge of a coverage area.
30 mW Select
30 mW to set the transmit power level to 30 mW. The radio transmits at the mini mum
power required.
Page 91

Wireless Configuration B - 27
Table B-17
Power Transmit Options (Ad-Hoc Mode) (Continued)
Field Description
15 mW Select
15 mW to set the transmit power level to 15 mW. The radio transmits at the min imum
power required.
5 mW Select
5 mW to set the transmit power level to 5 mW. The radio transmits at the minimum
power required.
1 mW Select
1 mW for the lowest transmission power level. Use this level when communicating
with other devices in very close proximity, or in instances wher e you expect little or no radio
interference from other devices.
Tap Next to display the Battery Usage dialog box.
Page 92

B - 28 MK500 MicroKiosk for CE .NET 5.0 Product Reference Guide
Battery Usage
Use the Battery Usage dialog box to select power consumption of the wireless LAN. There are three settings
available: CAM, Fast Power Save, and MAX Power Save. Battery usage cannot be configured in Ad-Hoc
profiles.
Figure B-24
Table B-18
Battery Usage Dialog Box
NOTE Power consumption is also related to the transmit power settings.
Battery Usage Options
Field Description
CAM Continuous Aware Mode (CAM) provides the best network performance, but yields
the shortest battery life.
Fast Power Save
Fast Power Save (the default) performs in the middle of CAM and MAX Power Save
with respect to network performance and battery life.
MAX Power Save
Max Power Save yields the longest battery life while potentially reducing network
performance. In networks with minimal latency, Max Power Save performs as well
as Fast Power Save, but with increased battery conservation.
Page 93

Manage Profiles Application
The Manage Profiles window provides a list of user-configured wireless profiles. Define up to 32 profiles at any
one time. To open the
Manage Profiles window, tap the Signal Strength icon > Manage Profiles.
Wireless Configuration B - 29
Figure B-25
Icons next to each profile identify the profile’s current state.
Table B-19
Icon Description
No Icon Profile is not selected, but enabled.
Manage Profiles Window
Profile Icons
Profile is disabled.
Profile is cancelled. A cancelled profile is disabled until a connect or login function is performed
through the configuration editor.
Profile is in use and describes an infrastructure pr of ile no t usin g encr yp tio n.
Profile is in use and describes an infrastructure pr of ile us ing enc ryp tio n.
Profile is in use and describes an ad-hoc profile not using encryption.
Profile is in use and describes an ad-hoc profile using encryption.
Profile is not valid in the device current operating regulatory domain.
The profiles are listed in priority order for use by the automatic roaming feature. Change th e order by moving
profiles up or down. To edit existing profiles, tap and hold one in the list and select an option from the menu to
connect, edit, disable (enable), or delete the profile. Note that the
profile is already disabled.
Disable menu item changes to Enable if the
Page 94

B - 30 MK500 MicroKiosk for CE .NET 5.0 Product Reference Guide
Figure B-26
Manage Profiles Context Menu
Changing Profiles
A completed profile is a set of configuration settings that you can use in different locations to connect to a
wireless network. Create different profiles to have pre-defined operating parameters available for use in
various network environments. When the
Figure B-27
Tap and hold a profile and select
the device uses the authentication, encryption, ESSID, IP Config, and power consumption settings configured
for that profile.
Manage Profiles
Connect from the pop-up m enu to set this as the active profile. Once selected ,
WLAN Profiles window displays, existing profiles appear in the list.
Editing a Profile
Tap an d ho ld a pro file an d selec t Edit from the pop-up menu to display the Profile Wizard where you can
configure the profile settings. See Profile Editor Wizard on page B-6 for instructions on editing a profile.
Page 95

Wireless Configuration B - 31
Creating a New Profile
To create new profiles from the Manage Profiles window, tap-and-hold anywhere in this window.
Figure B-28
Select
ESSID, security, network address information, and the power consumption level. See Profile Editor Wizard on
page B-6 for instructions on creatin g a profile.
Manage Profiles - Add
Add to display the Profile Wizard wherein you can configure the profile settings, such as profile na m e,
Deleting a Profile
To delete a profile from the list, tap and hold and select Delete from the pop-up menu. A confirmation dialog
box appears.
Ordering Profiles
Tap and hold a profile from the list and select Move Up or Move Down to order the profile. If the current profile
association is lost, the device attempts to associate with the first profile in the list, then the next, until it
achieves a new association.
NOTE Profile Roaming must be enabled in the Options application. See System Options on page B-46.
Page 96

B - 32 MK500 MicroKiosk for CE .NET 5.0 Product Reference Guide
Export a Profile
To export a profile to a registry file, tap and hold a profile from the list and select Export from the pop-up menu.
The
Save As dialog box displays with the Application folder and a default name of WCS_PROFILE{profile
GUID}.reg (Globally Unique Identifier).
Figure B-29
If required, change the name in the
completes.
Save As Dialog Box
Manage Certificates
You can view and manage security certificates in the various certificate stores. Tap the Signal Strength icon >
Manage Certs. The Certificate Manager window displays.
Various certificate types display. Select the
All, only Root/Server, or only User/Client certificates.
The
Certificate Manager window contains command buttons at the bottom of the window. A button might be
disabled (gray) if the operation cannot be performed based on any selected object.
To hide the command buttons to allow more space for displaying certificates, tap-and-hold and/or double-tap in
the list area. In the pop-up menu, select
You can also use the pop-up menu to select the
Certificate Properties
To display the properties of a certificate, select a certificate in the list and tap the Properties button. Select a
property in the upper list to display the detailed information in the
Name field and tap Save. A confirmation dialog box appears a fter the expo rt
Certificate Type drop-down box to filter the certificate list to display
Hide Buttons. To display the buttons, select View Buttons.
Properties, Import, and Delete commands.
Expanded Value section.
Tap
ok, Escape, or X to exit (depending on the device).
Page 97

Wireless Configuration B - 33
Import a Certificate
Import a certificate from a file or from a server:
•
.CER file - DER encrypted Root/Server certificates.
•
.PFX file - Personal inFormation eXchange formatted file containing one or more Root/Server and/or
User/Client Certificates. These files are usually protected by a password you must enter. If there is no
password, enter nothing and select the
•
Server - Y ou can request User/Client certificates directly from a Certificate Authority (CA) on the network.
You must provide a User name, Password (optional), and the Server (an IP address) to obtain a
certificate for the User from the CA.
To import from a file:
1. Tap th e Import button or select from the context menu. The Import Certificate dialog box displays.
2. Select the Import from File (.cer, .pfx) radio button to import a certificate file.
3. Select the file to import from the Open window.
To import from a server:
OK button.
1. Tap th e Import button or select from the context menu. The Import Certificate dialog box displays.
2. Select the Import User Cert from Server radio button to import a certificate from a server. The Install From
Server
window displays.
3. Enter the user , password, and server information in the respective text boxes.
4. Tap th e Retrieve button to import the certificate.
Delete a Certificate
To delete a certificates:
1. Select the certificate to delete.
2. Tap th e Delete button or select Delete from the pop-up menu.
Page 98

B - 34 MK500 MicroKiosk for CE .NET 5.0 Product Reference Guide
Manage PACs
You can view and manage Protected Access Credentials (PACs) used by Cisco's EAP-FAST authentication
protocol. PACs are uniquely identified by referencing a PAC Authority Identifier (A-ID) (the server that issued
the PAC) and by the individual user identifier (I-ID). The PACs display sorted by A-ID (default) or by I-ID in a
tree display.
Tap th e
To hide the buttons on the
double-tap in the list area and select
performed based on any selected object.
To display the buttons, select
You can also use the pop-up menu to select the
Signal Strength icon > Manage PACs. The PAC Manager window displays.
PAC Manager window to allow more space for displaying certificates, tap-an d-hold or
Hide Buttons. A button is disabled (gray) if the operation cannot be
View Buttons from the pop-up menu.
Properties and Delete commands, or to sort by A-ID or I-ID.
PAC Properties
To display the properties of a PAC, select an item in a sub-tree, and select the Properties button or pop-up
menu. Select an entry in the upper list of the window to display the details of that property in the lower list.
To return to the main page, tap
Ok, Escape, or X.
Delete PAC
To delete a single PAC, tap a leaf item (right-most tree item) to select the PAC, then select the Delete button or
Delete on the pop-up menu. A confirmation dialog box appears.
To delete a group of PACs with the same A-ID or I-ID, sort the PACs by ID type, then tap on the parent item
(left-most tree item) to select the gro up. Se lect the
dialog box appears.
Delete button or Delete on the pop-up menu. A confirmation
Page 99

Wireless Status Application
To open the Wireless Status window, tap the Signal Strength icon > Wireless Status. The Wireless Status
window displays information about the wireless connection.
Wireless Configuration B - 35
Figure B-30
Wireless Status Window
The Wireless Status window contains the following options. Tap the option to display the option window.
•
Signal Strength - provides information about the connection status of the current wireless profile.
•
Current Profile - displays basic information about the current profile and connection settings.
•
IPv4 Status - displays the current IP address, subnet, and other IP related information assigned to the
device.
•
Wireless Log - displays a log of important recent activi ty, such as authentication, association, and DHCP
renewal completion, in time order.
•
Versions - displays software, firmware, and hardware version numbers.
•
Quit - exits the Wireless Status window.
Option windows contain a back button to return to the main
Wireless Status window.
Page 100

B - 36 MK500 MicroKiosk for CE .NET 5.0 Product Reference Guide
Signal Strength Window
The Signal Strength window provides information about the connection status of the current wireless profile
including signal quality, missed beacons, and transmit retry statistics. The BSSID address (shown as
Address
shows the BSSID of the Ad-Hoc network. Information in this window updates every 2 seconds.
) displays the AP currently associated with the connection. In Ad-Hoc mode, the AP MAC Address
AP MAC
To open the
Figure B-31
After viewing the
Table B-20
Signal Status window, tap Signal Strength in the Wireless Status window.
Signal Strength Window
Signal Strength window, tap the back button to return to the Wireless Status window.
Signal Strength Status
Field Description
Signal Displays the Relative Signal Strength Indicator (RSSI) of the signal transmitted
between the AP and device. As long as the Signal Quality icon is green the AP
association is not jeopardized. If the icon is red (poor signal), an association with a
different AP could be warranted to improve the signal. The signal strength icon
changes depending on the signal strength.
Excellent Signal
Very Good Signal
Good Signal
Fair Signal
Poor Signal
Out of Range (no signal)
The radio card is off or there is a problem communicating with the radio
card.
Status Indicates if the device is associated with the AP.
Signal Quality Displays a text format of the Signal icon.
Tx Retries Displays a percentage of the number of data packets the device retransmits. The
fewer transmit retries, the more efficient the wireless network is.
Missed Beacons Displays a percentage of the amount of beacons the device missed. The fewe r
missed beacons, the more efficient the wireless network is. Beacons are uniform
system packets broadcast by the AP to keep the network synchronized.
Signal Level The AP signal level in decibels per milliwatt (dBm).
Noise Level The background interference (noise) level in decibels per milliwatt (dBm).
 Loading...