


DS457 Fixed Mount Imager
Quick Reference Guide

2 DS457 Fixed Mount Imager
©2016 Symbol Technologies LLC, a subsidiary
of Zebra Technologies Corporation. All rights
reserved.
Zebra reserves the right to make changes to
any product to improve reliability, function, or
design.
Zebra does not assume any product liability
arising out of, or in connection with, the
application or use of any product, circuit, or
application described herein.
No license is granted, either expressly or by
implication, estoppel, or otherwise under any
patent right or patent, covering or relating to any
combination, system, apparatus, machine,
material, method, or process in which Zebra
products might be used. An implied license
exists only for equipment, circuits, and
subsystems contained in Zebra products.
Zebra and the Zebra head graphic are
registered trademarks of ZIH Corp. The Symbol
logo is a registered trademark of Symbol
Technologies, Inc., a Zebra Technologies
company.
Zebra Technologies Corporation
Lincolnshire, IL U.S.A.
http://www.zebra.com
Warranty
For the complete Zebra hardware product
warranty statement, go to:
http://www.zebra.com/warranty

Quick Reference Guide 3
For Australia Only:
For Australia Only. This warranty is given by
Zebra Technologies Asia Pacific Pte. Ltd., 71
Robinson Road, #05-02/03, Singapore 068895,
Singapore. Our goods come with guarantees that
cannot be excluded under the Australia Consumer
Law. You are entitled to a replacement or refund
for a major failure and compensation for any other
reasonably foreseeable loss or damage. You are
also entitled to have the goods repaired or
replaced if the goods fail to be of acceptable
quality and the failure does not amount to a major
failure. Zebra Technologies Corporation
Australia’s limited warranty above is in addition to
any rights and remedies you may have under the
Australian Consumer Law. If you have any
queries, please call Zebra Technologies
Corporation at +65 6858 0722. You may also visit
our website: http://www.zebra.com
updated warranty terms.
for the most
Introduction
The DS457 fixed mount imager is specifically
designed for standalone applications, and OEM
applications such as kiosks. The imager is
extremely compact, provides easy and flexible
integration of bar code imaging into a host device,
and offers high-performance imaging on 1D and
2D bar codes. The DS457 is ideal for embedded
medical diagnostic equipment and for conveyor
lines in manufacturing environments. The DS457
can also be used as a zero-footprint 2D array
imaging solution in retail POS environments.

4 DS457 Fixed Mount Imager
Connecting the DS457
To connect the DS457 to a host:
1. Plug the 9-pin D-connector with the end
marked SCANNER into the DS457.
2. If using an external switch and applicable host
cable, plug the trigger cable into the female
stereo connector on the flying lead of the 9pin D-connector.
3. Plug the host side connector into the
appropriate port on the host.
4. For RS-232 connection, plug the power supply
into an AC receptacle, and the output cable
from the power supply into the connector near
the host end of the interface cable.
5. Check all connections to ensure they are
secure.
6. Program the DS457 using the programming
bar codes in the DS457 Imager Integration
Guide.
Quick Reference Guide 5
1D bar code
symbol
2D bar code
symbol
2D dot peen
DPM symbol
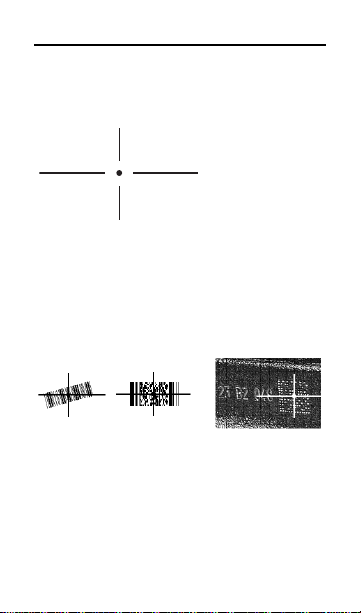
Capturing Data
When scanning, the imager projects a red laser
aiming pattern which allows positioning the bar
code within its field of view.
If necessary, the imager turns on its red LEDs to
illuminate the target bar code.
To scan a bar code, center the symbol in any
orientation within the aiming pattern. Be sure the
entire symbol is within the rectangular area
formed by the cross pattern.

6 DS457 Fixed Mount Imager
012345
012345
012345
012345
The imager can also read a bar code presented
within the aiming pattern but not centered. The top
examples in the following illustration show
acceptable aiming options, while the bottom
examples can not be decoded.
Upon successful decode, the DS457 beeps and
its LED turns green.

Quick Reference Guide 7
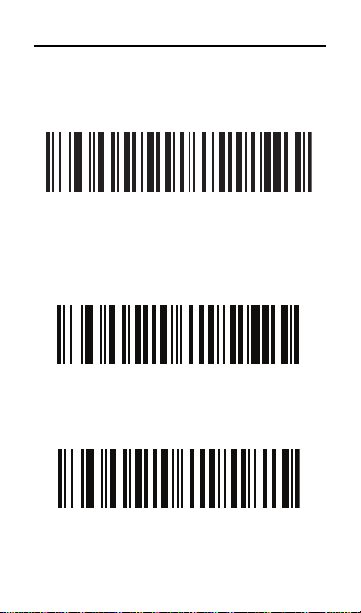
Programming Bar Codes
Following are some frequently used bar codes for
programming the DS457.
Set Defaults
• Restore Defaults - Scan this bar code to reset
all default parameters as follows.
- If you previously set custom defaults by
scanning Write to Custom Defaults in the
Integration Guide, scan Restore Defaults
to retrieve and restore the decoder’s
custom default settings.
- If you did not set custom defaults, scan
Restore Defaults to restore the factory
default values.
Restore Defaults
• Set Factory Defaults - Scan this bar code to
restore the factory default values. This deletes
any custom defaults set.
Set Factory Defaults

8 DS457 Fixed Mount Imager
Host Types
USB Device Type
HID Keyboard Emulation (Default)
Symbol Native API (SNAPI) with Imaging Interface
Symbol Native API (SNAPI)
without Imaging Interface

Quick Reference Guide 9
USB Device Type (continued)
CDC COM Port Emulation
SSI over USB CDC

10 DS457 Fixed Mount Imager
Serial Host Type
SSI Host
Standard RS-232
(Transmits Only ASCII Data)

Quick Reference Guide 11
Trigger Modes
Presentation (default)
When the DS457 detects an object in its field of
view, it triggers and attempts to decode. The
range of object detection does not vary under
normal lighting conditions. This applies to decode
mode only. In this mode the unit does not enter
Low Power mode.
Presentation (Default)
Level Trigger
Pressing the trigger on top of the imager or an
external trigger connected through the host cable
activates decode processing, which continues
until the trigger is released, a valid decode, or the
decode session timeout occurs.
Level
12 DS457 Fixed Mount Imager
Host
A host command issues the triggering signal. The
DS457 interprets a trigger press as a level
triggering option.
Host
Motion Enhancement for Presentation Mode
Select Disable Motion Enhancement to revert to
standard Presentation Mode behavior.
Disable Motion Enhancement (Default)
Select Enable Motion Enhancement to fine-tune
engine and decoder behavior for bar codes
moving quickly through the imager’s field of view.
Enable Motion Enhancement
Note: Do not enable Motion Enhancement if
scanning bar codes on mobile phones or
electronic displays.

Quick Reference Guide 13
Mobile Phone/Display Mode
This mode improves bar code reading
performance with target bar codes displayed on
mobile phones and electronic displays.
Disable Mobile Phone/Display Mode (Default)
Enable Mobile Phone/Display Mode

14 DS457 Fixed Mount Imager
Beeper and LED Indications
The beeper and LED indicate imager status as
follows:
Indication Beeper LED
Imager is on. N/A Red
A bar code is successfully
decoded.
A programming parameter
was entered successfully.
Transmission error. Bar
code data was not
received by the host.
1 beep Flash of
Fast warble Flash of
4 beeps Red
green
green

Quick Reference Guide 15
Troubleshooting
Problem Possible
No red
LED or
nothing
happens
during a
capture
attempt.
Imager
cannot
read the
bar code.
Cause
No power to
the imager.
Interface/
power cables
are loose.
Imager is not
programmed
for that bar
code type.
Incorrect
communication
parameters.
Bar code
symbol is
unreadable.
Possible Solutions
Check the system power.
Confirm that the correct
host interface cable is
used.
Connect power supply.
Check for loose cable
connections.
Secure cable
connections.
Program the imager to
read the type of bar code
to be scanned.
Set the correct communication parameters
(baud rate, parity, stop
bits, etc.)
Ensure the symbol is not
defaced. Try scanning
similar symbols of the
same code type.

16 DS457 Fixed Mount Imager
Regulatory Information
This guide applies to Model Number: DS457
All Zebra devices are designed to be compliant with
rules and regulations in locations they are sold and will
be labeled as required.
Local language translations are available at the
following website:
http://www.zebra.com/support
Any changes or modifications to Zebra equipment, not
expressly approved by Zebra, could void the user's
authority to operate the equipment.
Health and Safety Recommendations
Ergonomic Recommendations
CAUTION In order to avoid or minimize the
potential risk of ergonomic injury
follow the recommendations below.
Consult with your local Health &
Safety Manager to ensure that you are
adhering to your company's safety
• Reduce or eliminate repetitive motion
• Maintain a natural position
• Reduce or eliminate excessive force
• Keep objects that are used frequently within easy
reach
• Perform tasks at correct heights
• Reduce or eliminate vibration
• Reduce or eliminate direct pressure
• Provide adjustable workstations
programs to prevent employee injury.

Quick Reference Guide 17
• Provide adequate clearance
• Provide a suitable working environment
• Improve work procedures.
Laser Devices
COMPLIES WITH 21CFR1040.10 &
1040.11 EXCEPT FOR DEVIATIONS
PURSUANT TO LASER NOTICE NO. 50,
DATED JUNE 24, 2007 AND IEC/EN
60825-1:2007 AND/OR IEC/EN 60825-
1:2014.
The laser classification is marked on one of the labels
on the device.
Class 1 Laser devices are not considered to be
hazardous when used for their intended purpose. The
following statement is required to comply with US and
international regulations:
CAUTION Use of controls, adjustments or
performance of procedures other
than those specified herein may
result in hazardous laser light
Class 2 laser scanners use a low power, visible light
diode. As with any very bright light source, such as the
sun, the user should avoid staring directly into the light
beam. Momentary exposure to a Class 2 laser is not
known to be harmful.
exposure.

18 DS457 Fixed Mount Imager
LASER LIGHT - DO NOT STARE INTO BEAM. CLASS 2 LASER/1M LED PRODUCT
LASERLICHT-NICHT IN DEN STRAHL BLICKEN. LASER/1M LED KLASSE 2.
LUMIERE LASER-NE PAS REGARDER DANS LE FAISCEAU. APPAREIL
A LASER/1M LED DE CLASSE 2. 630-680nm,1mw
▔ܝ/('䕤ᇘ ࣓Ⳉ㾚ܝᴳ㉏▔ܝ0㉏/(' ѻક
LED Devices
Complies with IEC/EN60825-1:2001 & IEC/EN62471:2006
For devices with Class 1M LED's the following label is
used:
Scanner Labeling
Power Supply
Use ONLY a LISTED Type no.
PWRS-14000 (5.2Vdc, 850mA), or direct plug-in
power supply, marked Class 2 or LPS (IEC60950-1,
SELV). Use of alternative Power Supply will invalidate
any approvals given to this unit and may be
dangerous.
DS457 Class I, Division 2 Version
This device is open-type and intended to be fully mounted
inside of an enclosure suitable for the environment.
This equipment is suitable for use in Class I, Division 2,
Groups D or non-hazardous locations only.
WARNING - EXPLOSION HAZARD - Do not disconnect
equipment unless power has been removed or the area is
known to be non-hazardous.
WARNING - EXPLOSION HAZARD - Substitution of any
components may impair suitability for Class I, Division 2.
WARNING - HOT SURFACE

Quick Reference Guide 19
Tested to comply
with FCC Standards
FOR HOME OR OFFICE USE
Radio Frequency Interference Requirements - FCC
Note: This equipment has
been tested and found to
comply with the limits for a
Class B digital device,
FCC rules. These limits are designed to provide
reasonable protection against harmful interference
in a residential installation. This equipment
generates, uses and can radiate radio frequency
energy and, if not installed and used in
accordance with the instructions, may cause
harmful interference to radio communications.
However there is no guarantee that interference
will not occur in a particular installation. If this
equipment does cause harmful interference to
radio or television reception, which can be
determined by turning the equipment off and on,
the user is encouraged to try to correct the
interference by one or more of the following
measures:
• Reorient or relocate the receiving antenna
• Increase the separation between the equipment
and receiver
• Connect the equipment into an outlet on a circuit
different from that to which the receiver is
connected
• Consult the dealer or an experienced radio/TV
technician for help.
pursuant to Part 15 of the
Radio Frequency Interference Requirements - Canada
This Class B digital apparatus complies with Canadian
ICES-003.
Cet appareil numérique de la classe B est conforme à
la norme NMB-003 du Canada.

20 DS457 Fixed Mount Imager
GⱬG⇨G㙼G㣄G㟝G㇠GⷸG㦹Gὤ
iἽGὤὤG
Oᴴ㥉㟝Gⵝ㋕䋩㐔ὤὤPG
㢨Gὤὤ⏈G ᴴ㥉㟝OiἽP㡰⦐G 㤸㣄䑀㤵䚝☥⦑㡸G
䚐Gὤὤ⦐㉐G 㨰⦐G ᴴ㥉㜄㉐G ㇠㟝䚌⏈G ᶷ㡸G ⯝㤵G
㡰⦐G䚌⮤SG ⯜☔G 㫴㜡㜄㉐G ㇠㟝䚔G ㍌G 㢼㏩⏼␘UG
Marking and European Economic Area (EEA)
Statement of Compliance
Zebra hereby declares that this device is in
compliance with all applicable Directives,
2014/30/EU, 2014/35/EU and 2011/65/EU.
The full text of the EU Declaration of Conformity is
available at the following internet address: http://
www.zebra.com/doc.
Japan (VCCI) - Voluntary Control Council for Interference
Class B ITE
Korea Warning Statement for Class B ITE
Ukraine
This equipment corresponds to requirements of the
Technical Regulation No. 1057, 2008 on restrictions as
to the use of some dangerous substances in electric
and electronic devices.

Quick Reference Guide 21
(Parts)
(Pb) (Hg)
(Cd)
(PBB) (PBDE)
(Metal Parts)
(Circuit Modules)
(Cables and Cable Assemblies)
(Plastic and Polymeric Parts)
(Optics and Optical Components)
(Batteries)
䫻
⊔䭿
ཐ⓪㚊㤥
ཐ⓪ӂ㤥䟐
䜞Ԭ〦
䠇ኔ䜞Ԭ
⭫䐥⁗ඍ
⭫㔼⭫㔼㓺Ԭ
ງᯏૂ㚐⢟䜞Ԭ
ݿᆜૂݿᆜ㓺Ԭ
⭫⊖
•
6
ᴿᇩ⢟䍞
(Cr (VI))
This table was created to comply with China RoHS requirements.
ᵢ㺞Ṳדᦤ6-7Ⲻ㿺ᇐ㕌Ⱦ
2㺞⽰䈛ᴿᇩ⢟䍞൞䈛䜞Ԭᡶᴿൽ䍞ᶆᯏѣⲺ䠅ൽ൞*%7㿺ᇐⲺ䲆䠅
㾷≸ԛсȾ
;㺞⽰䈛ᴿᇩ⢟䍞㠩ቇ൞䈛䜞ԬⲺḆжൽ䍞ᶆᯏѣⲺ䠅䎻࠰*%7㿺ᇐ
Ⲻ䲆䠅㾷≸ȾԷѐ൞↚༺θṯᦤᇔ䱻߫ሯр㺞ѣᢉćhĈⲺᢶᵥഖ䘑
㺂䘑ж↛䈪᱄Ⱦε
XOO O O O
OO O O
OO O
OO O O OO
O
OO
X
O OO
OO
O
O
O O
O
O
OO
CMM Disclosure
Waste Electrical and Electronic Equipment (WEEE)
English: For EU Customers: All products at the
end of their life must be returned to Zebra for recycling.
For information on how to return product, please go to:
http://www.zebra.com/weee.
Български: За клиенти от ЕС: След края на полезния
им живот всички продукти трябва да се връщат на
Zebra за рециклиране. За информация относн о
връщането на продукти, моля отидете на адрес:
http://www.zebra.com/weee.
Čeština: Pro zákazníky z EU: Všechny produkty je nutné
po skonèení jejich životnosti vrátit spoleènosti Zebra k
recyklaci. Informace o zpùsobu vrácení produktu najdete
na webové stránce: http://www.zebra.com/weee.
Dansk: Til kunder i EU: Alle produkter skal returneres til
Zebra til recirkulering, når de er udtjent. Læs

22 DS457 Fixed Mount Imager
oplysningerne om returnering af produkter på: http://
www.zebra.com/weee.
Deutsch: Für Kunden innerhalb der EU: Alle Produkte
müssen am Ende ihrer Lebensdauer zum Recycling an
Zebra zurückgesandt werden. Informationen zur
Rücksendung von Produkten finden Sie unter
http://www.zebra.com/weee.
Eesti: EL klientidele: kõik tooted tuleb nende eluea
lõppedes tagastada taaskasutamise eesmärgil Zebra'ile.
Lisainformatsiooni saamiseks toote tagastamise kohta
külastage palun aadressi: http://www.zebra.com/weee.
Español: Para clientes en la Unión Europea: todos los
productos deberán entregarse a Zebra al final de su ciclo
de vida para que sean reciclados. Si desea más
información sobre cómo devolver un producto, visite:
http://www.zebra.com/weee.
Français : Clients de l'Union Européenne : Tous les
produits en fin de cycle de vie doivent être retournés à
Zebra pour recyclage. Pour de plus amples informations
sur le retour de produits, consultez : http://
www.zebra.com/weee.
Ελληνικά: Για πελάτες στην Ε.Ε.: Όλα τα προϊόντα, στο
τέλος της διάρκειας ζω ής τους, πρέπει να επιστρέφονται
στην Zebra για ανακύκλωση. Γι α περισσότερες
πληροφορίες σχετικά με την επιστροφή ενός προϊόντος,
επισκεφθείτε τη διεύθυνση: http://www.zebra.com/weee
στο ∆ιαδίκτυο.
Italiano: per i clienti dell'UE: tutti i prodotti che sono
giunti al termine del rispettivo ciclo di vita devono essere
restituiti a Zebra al fine di consentirne il riciclaggio. Per
informazioni sulle modalità di restituzione, visitare il
seguente sito Web:
http://www.zebra.com/weee.
Latviešu: ES klientiem: visi produkti pēc to kalpošanas
mūža beigā
m ir jānogādā atpakaļ Zebra otrreizējai
pārstrādei. Lai iegūtu informāciju par produktu
nogādāšanu Zebra, lūdzu, skatiet: http://www.zebra.com/
weee.
Lietuvių: ES vartotojams: visi gaminiai, pasibaigus jų
eksploatacijos laikui, turi būti grąžinti utilizuoti į
kompaniją „Zebra“. Daugiau informacijos, kaip grąžinti
gaminį, rasite: http://www.zebra.com/weee.
Magyar: Az EU-ban vásárlóknak: Minden tönkrement
terméket a Zebra vállalathoz kell eljuttatni
újrahasznosítás céljából. A termék visszajuttatásának

Quick Reference Guide 23
módjával kapcsolatos tudnivalókért látogasson el a http:/
/www.zebra.com/weee weboldalra.
Malti: Għal klijenti fl-UE: il-prodotti kollha li jkunu waslu
fl-aħħar tal-ħajja ta' l-użu tagħhom, iridu jiġu rritornati
għand Zebra għar-riċiklaġġ. Għal aktar tagħrif dwar kif
għandek tirritorna l-prodott, jekk jogħġbok żur:
http:/www.zebra.com/weee.
Nederlands: Voor klanten in de EU: alle producten
dienen aan het einde van hun levensduur naar Zebra te
worden teruggezonden voor recycling. Raadpleeg
http://www.zebra.com/weee voor meer informatie over
het terugzenden van producten.
Polski: Klienci z obszaru Unii Europejskiej: Produkty
wycofane z eksploatacji nale¿y zwróciæ do firmy Zebra
w celu ich utylizacji. Informacje na temat zwrotu
produktów znajduj¹ siê na stronie internetowej: http://
www.zebra.com/weee.
Português: Para clientes da UE: todos os produtos no
fim de vida devem ser devolvidos à Zebra para
reciclagem. Para obter informações sobre como
devolver o produto, visite: http://www.zebra.com/weee.
Românesc: Pentru clienţii din UE: Toate produsele, la
sfârşitul duratei lor de funcţionare, trebuie returnate la
Zebra pentru reciclare. Pentru informaţii despre
returnarea produsului, accesaţi: http://www.zebra.com/
weee.
Slovenski: Za kupce v EU: vsi izdelki se morajo po
poteku življenjske dobe vrniti podjetju Zebra za reciklažo.
Za informacije o vraèilu izdelka obišèite:
http://www.zebra.com/weee.
Suomi: Asiakkaat Euroopan unionin alueella: Kaikki
tuotteet on palautettava kierrätettäväksi Zebra-yhtiöön,
kun tuotetta ei enää käytetä. Lisätietoja tuotteen
palauttamisesta on osoitteessa http://www.zebra.com/
weee.
Svenska: För kunder inom EU: Alla produkter som
uppnått sin livslängd måste returneras till Zebra för
återvinning. Information om hur du returnerar produkten
finns på
http://www.zebra.com/weee.
Türkçe: AB Müşterileri için: Kullanım süresi dolan tüm
ürünler geri dönüştürme için Zebra'ya iade edilmelidir.
Ürünlerin nasıl iade edileceği hakkında bilgi için lütfen şu
adresi ziyaret edin: http://www.zebra.com/weee.

Service Information
Zebra Technologies Corporation
Lincolnshire, IL U.S.A.
http://www.zebra.com
Zebra and the stylized Zebra head are trademarks of ZIH Corp.,
registered in many jurisdictions worldwide. All other
trademarks are the property of their respective owners.
©2016 Symbol Technologies LLC, a subsidiary of Zebra
Technologies Corporation. All rights reserved.
72-144417-04 Revision A - June 2016
If you have a problem using the equipment, contact
your facility’s technical or systems support. If there is a
problem with the equipment, they will contact the Zebra
Global Customer Support Center at:
http://www.zebra.com/support
For the latest version of this guide go to:
http://www.zebra.com/support
 Loading...