

Page 1

DS3678-HP
Digital Scanner with
Keypad & Display
Product Reference Guide
Supplement
MN-003915-03EN Rev A
Page 2

ZEBRA and the stylized Zebra head are trademarks of Zebra Technologies Corporation, registered in
many jurisdictions worldwide. All other trademarks are the property of their respective owners. ©2022
Zebra Technologies Corporation and/or its affiliates. All rights reserved.
Information in this document is subject to change without notice. The software described in this document
is furnished under a license agreement or nondisclosure agreement. The software may be used or copied
only in accordance with the terms of those agreements.
For further information regarding legal and proprietary statements, please go to:
SOFTWARE:zebra.com/linkoslegal
COPYRIGHTS:zebra.com/copyright
WARRANTY:zebra.com/warranty
END USER LICENSE AGREEMENT: zebra.com/eula
Terms of Use
Proprietary Statement
This manual contains proprietary information of Zebra Technologies Corporation and its subsidiaries
(“Zebra Technologies”). It is intended solely for the information and use of parties operating and
maintaining the equipment described herein. Such proprietary information may not be used, reproduced,
or disclosed to any other parties for any other purpose without the express, written permission of Zebra
Technologies.
Product Improvements
Continuous improvement of products is a policy of Zebra Technologies. All specifications and designs are
subject to change without notice.
Liability Disclaimer
Zebra Technologies takes steps to ensure that its published Engineering specifications and manuals are
correct; however, errors do occur. Zebra Technologies reserves the right to correct any such errors and
disclaims liability resulting therefrom.
Limitation of Liability
In no event shall Zebra Technologies or anyone else involved in the creation, production, or delivery of the
accompanying product (including hardware and software) be liable for any damages whatsoever
(including, without limitation, consequential damages including loss of business profits, business
interruption, or loss of business information) arising out of the use of, the results of use of, or inability to
use such product, even if Zebra Technologies has been advised of the possibility of such damages. Some
jurisdictions do not allow the exclusion or limitation of incidental or consequential damages, so the above
limitation or exclusion may not apply to you.
Publication Date
April 15, 2022
2
Page 3

Table of Contents
List of Figures..................................................................................................................................... 7
List of Tables....................................................................................................................................... 9
About This Document ...................................................................................................................... 10
Introduction .................................................................................................................... 10
Configurations................................................................................................................ 10
Accessories.................................................................................................................... 10
Chapter Descriptions .................................................................................................... 11
Notational Conventions.................................................................................................. 11
Icon Conventions ........................................................................................................... 11
Related Documents and Software ................................................................................. 12
Service Information........................................................................................................ 12
Getting Started.................................................................................................................................. 13
Unpacking...................................................................................................................... 13
DS3678-HP Cordless Digital Scanner Features............................................................ 13
Cradle ............................................................................................................................ 14
Cradle Features ............................................................................................................ 15
Connecting the Cradle............................................................................................ 16
Supplying Power to the Cradle............................................................................... 17
DS3678 Battery............................................................................................................. 18
Inserting the Battery ............................................................................................... 18
Removing the Battery............................................................................................. 18
Charging the Battery .............................................................................................. 18
Inserting the Digital Scanner in the Cradle .................................................................... 19
Sending Data to the Host............................................................................................... 19
Pairing .................................................................................................................... 19
Lost Connection to Host ......................................................................................... 20
3
Page 4

Configuring the Scanner ................................................................................................ 20
Radio Communications.................................................................................................. 20
Operating the DS3678-HP with Keypad & Display........................................................................ 21
Keypad........................................................................................................................... 21
Keypad Functionality .............................................................................................. 22
Entering Information Using the Shift Function Keys......................................... 27
Screen Icons .................................................................................................................. 27
Home Screen Options................................................................................................... 29
Home Screen.......................................................................................................... 29
Scan & Enter Quantity ............................................................................................ 30
Quantity Timer.................................................................................................. 31
Scan & Enter Location............................................................................................ 32
Scan Inventory........................................................................................................ 34
Changing Location During Scan Inventory....................................................... 35
Submitting a Scanned Item List ....................................................................... 36
Reviewing a Scanned Item List........................................................................ 37
Exiting the Application Flow.................................................................................... 37
Outside/Inside Match.............................................................................................. 38
Deleting a Barcode ................................................................................................. 41
Image Viewer.......................................................................................................... 41
Configuration .......................................................................................................... 43
Configuring Display Timeout Global App Settings ........................................... 43
Configuring Manual Barcode Entry Global App Settings ................................. 44
Configuring Manual Quantity Entry Global App Settings ................................. 44
Configuring Auto Display Brightness Global App Settings............................... 44
Configuring Keypad Backlight Global App Settings ......................................... 45
Configuring Home Key Launch Global App Settings ....................................... 45
Configuring Display on Charge Global App Settings ....................................... 45
Configuring Scan & Enter Quantity Local App Settings ................................... 46
Configuring Scan & Enter Location Local App Settings................................... 46
Configuring Scan Inventory Local App Settings............................................... 47
Configuration Scanner Options ...................................................................................................... 49
Configuration Parameter Defaults................................................................................. 50
Global Configuration Parameters.................................................................................. 52
Display Timeout...................................................................................................... 52
Function Key Configurations .................................................................................. 53
Function Key 1 (F1).......................................................................................... 54
Function Key 2 (F2).......................................................................................... 56
Function Key 3 (F3).......................................................................................... 57
Function Key 4 (F4).......................................................................................... 58
4
Page 5

Function Key 5 (F5).......................................................................................... 59
Function Key 6 (F6).......................................................................................... 60
Function Key 7 (F7).......................................................................................... 61
Function Key 8 (F8).......................................................................................... 62
Function Key 9 (F9).......................................................................................... 63
Function Key String Parameters............................................................................. 64
Function Key String 1....................................................................................... 64
Function Key String 2....................................................................................... 64
Function Key String 3....................................................................................... 64
Function Key String 4....................................................................................... 65
Function Key String 5....................................................................................... 65
Function Key String 6....................................................................................... 65
Function Key String 7....................................................................................... 65
Function Key String 8....................................................................................... 67
Function Key String 9....................................................................................... 67
Max Quantity Value ................................................................................................ 68
Global Manual Barcode Entry................................................................................. 69
Global Manual Quantity Entry................................................................................. 69
Display Brightness.................................................................................................. 70
Keypad Backlight.................................................................................................... 71
Home Key Launch .................................................................................................. 72
Display on Charge .................................................................................................. 74
Quantity Transfer Mode.......................................................................................... 75
Global Quantity Delimiter........................................................................................ 75
Global Location Delimiter ....................................................................................... 77
Local Configuration Parameters..................................................................................... 78
Manual Barcode Entry for Scan & Enter Qty App................................................... 78
Manual Quantity Entry for Scan & Enter Qty App................................................... 79
Timeout for Scan & Enter Qty App ......................................................................... 80
Scan/Ent Qty Quantity Delimiter............................................................................. 82
Confirm Quantity Timeout....................................................................................... 84
Manual Barcode Entry for Scan & Enter Location App........................................... 85
Manual Quantity Entry for Scan & Enter Location App........................................... 86
LOC Delimiter for Scan & Enter Location App........................................................ 87
Scan & Enter Loc Quantity Delimiter ...................................................................... 89
Confirm Location Timeout ...................................................................................... 91
Manual Barcode Entry for Scan Inventory App ...................................................... 92
Manual Quantity Entry for Scan Inventory App ...................................................... 93
LOC Delimiter for Scan Inventory App ................................................................... 93
Inventory Store ....................................................................................................... 96
Scan Inventory Quantity Delimiter .......................................................................... 96
5
Page 6

Maintenance & Technical Specifications ....................................................................................... 99
Maintenance................................................................................................................... 99
Known Harmful Ingredients .................................................................................... 99
Approved Cleaners for the Scanner ....................................................................... 99
Cleaning the Scanner ............................................................................................. 99
Technical Specifications............................................................................................... 100
Troubleshooting ............................................................................................................................. 102
Alphanumeric Barcodes ................................................................................................................ 104
Numeric Barcodes.......................................................................................................................... 121
Cancel.......................................................................................................................... 122
6
Page 7

List of Figures
Figure 1: DS3678-HP Features ..................................................................................... 13
Figure 2: Cradle Top View ............................................................................................ 15
Figure 3: Cradle Bottom View ....................................................................................... 16
Figure 4: Cradle Connection ......................................................................................... 17
Figure 5: Inserting the Battery ...................................................................................... 18
Figure 6: Inserting the Scanner in the Cradle ............................................................... 19
Figure 7: DS3678-HP Keypad ....................................................................................... 21
Figure 8: Shift Function Key Icons ................................................................................ 27
Figure 9: Home Screen ................................................................................................. 29
Figure 10: Scan & Enter Quantity Ready State Screen ................................................ 30
Figure 11: Scan & Enter Quantity Screen During Decode ............................................ 31
Figure 12: Transaction Timer Time Out Screen ............................................................ 31
Figure 13: Quantity Timer ............................................................................................. 32
Figure 14: Scan & Enter Location App - Enter Location ............................................... 32
Figure 15: Scan & Enter Location App - Enter Barcode ................................................ 33
Figure 16: Scan & Enter Location App - Enter Quantity ................................................ 33
Figure 17: Scan & Enter Location App - Reminder Message ....................................... 33
Figure 18: Scan & Enter Location App - Submitted Confirmation Screen ..................... 33
Figure 19: Scan Inventory App ...................................................................................... 34
Figure 20: Scan Inventory App - Enter Location ........................................................... 34
Figure 21: Scan Inventory App - Enter Barcode ........................................................... 35
Figure 22: Scan Inventory App - Enter Quantity ........................................................... 35
Figure 23: Enter New Location ...................................................................................... 36
Figure 24: Enter New Location - Successful Screen ..................................................... 36
Figure 25: Submit Full List ............................................................................................ 36
7
Page 8

List of Figures
Figure 26: Submit Full List - Confirmation Screen ........................................................ 37
Figure 27: Reviewing Scanned Item List ....................................................................... 37
Figure 28: Quit App Confirmation Screen ..................................................................... 38
Figure 29: Outside/Inside Match App - Outside Ready State Screen ........................... 38
Figure 30: Outside/Inside Match App - Instruction Screens .......................................... 38
Figure 31: Outside/Inside Match App - Successful Decode Screen ............................. 39
Figure 32: Outside/Inside Match App - Outside Quantity Screen ................................. 39
Figure 33: Outside/Inside Match App - Outside Finish Screen ..................................... 39
Figure 34: Outside/Inside Match App - Inside Ready State Screen .............................. 39
Figure 35: Outside/Inside Match App - Match and Unexpected Scan Screens ............ 40
Figure 36: Outside/Inside Match App - Confirmation Screens ...................................... 40
Figure 37: Outside/Inside Match App - Scanned Items Screens .................................. 41
Figure 38: Outside/Inside Match App - Deleting a Barcode .......................................... 41
Figure 39: Image Viewer App - Host Confirmation Screen ........................................... 42
Figure 40: Image Viewer App - Host Support Screen ................................................... 42
Figure 41: Image Viewer App - Pull Trigger Screen ...................................................... 42
Figure 42: Image Viewer Send or Discard Capture Screen ......................................... 42
Figure 43: Image Sent Confirmation Screen ................................................................ 43
Figure 44: Global Configuration Option ......................................................................... 43
Figure 45: Configuration Delimiter Settings Selection ................................................... 48
8
Page 9

List of Tables
Table 1: Keypad Functionality ....................................................................................... 22
Table 2: Screen Icons ................................................................................................... 27
Table 3: Home Screen Options ..................................................................................... 29
Table 4: Configuration Parameter Defaults .................................................................. 50
Table 5: Technical Specifications ................................................................................ 100
Table 4: Troubleshooting ............................................................................................ 102
9
Page 10

About This Document
Introduction
This document provides unique information about the Zebra DS3678-HP with Display and Keyboard
product features and operating instructions. This guide is intended as a supplement only. Common
procedures and parameters are addressed in the DS36X8 Product Reference Guide located on Zebra
Support at: zebra.com/support.
IMPORTANT: If you have a problem with your equipment, contact Zebra Global Customer Support for
your region. Contact information is available at: zebra.com/support
Configurations
This guide covers the following configuration:
Configuration Description
DS3678-HP2F003VKWW Rugged, Digital Scanner, High Performance, Cordless, Industrial
Green, Vibration Motor, Keyboard, Display
.
Accessories
The digital scanner ships with the DS3678-HP Quick Start Guide. The following accessories may be
ordered:
• Interface cable.
• Universal power supply, if required.
For detailed information on DS3678-HP accessories, refer to the DS36X8 Product Reference Guide. For
additional information, go to Solution Builder or contact a local Zebra representative or business partner.
10
Page 11

Chapter Descriptions
Topics covered in this guide are as follows:
• Getting Started provides information on unpacking, device features, battery installation and charging,
and powering the cradles.
• Operating the DS3678-HP with Keypad & Display describes information for using and navigating the
device.
• Configuration Scanner Options provides configuration scanner programming barcodes for selecting
device configuration settings.
• Maintenance & Technical Specifications provides information on how to care for the digital scanner and
technical specifications.
• Troubleshooting provides information on possible problems, causes, and solutions.
• Alphanumeric Barcodes includes the barcodes to scan for parameters requiring specific alphanumeric
values.
Notational Conventions
About This Document
The following conventions are used in this document:
• “digital scanner” or “device” refers to the Zebra DS3678-HP Digital Scanner with Keypad and Display.
• Bold text is used to highlight the following:
• Dialog box, window and screen names
• Drop-down list and list box names
• Check box and radio button names
• Icons on a screen
• Key names on a keypad
• Button names on a screen.
• Bullets (•) indicate:
• Action items
• Lists of alternatives
• Lists of required steps that are not necessarily sequential.
• Sequential lists (such as those that describe step-by-step procedures) appear as numbered lists.
Icon Conventions
The documentation set is designed to give the reader more visual clues. The following graphic icons are
used throughout the documentation set. These icons and their associated meanings are described below.
NOTE: The text here indicates information that is supplemental for the user to know and that is not
required to complete a task.
IMPORTANT: The text here indicates information that is important for the user to know.
11
Page 12

About This Document
Related Documents and Software
The following documents provide more information about the DS3678-HP digital scanner.
• DS3678-HP Quick Reference Guide
• DS36X8 Product Reference Guide
For the latest version of this guide and all guides, go to zebra.com/support
Service Information
If you have a problem with your equipment, contact Zebra Global Customer Support for your region.
Contact information is available at zebra.com/support
When contacting support, please have the following information available:
• Serial number of the unit
• Model number or product name
• Software/firmware type or version number
Zebra responds to calls by email, telephone or fax within the time limits set forth in support agreements.
If your problem cannot be solved by Zebra Customer Support, you may need to return your equipment for
servicing and will be given specific directions. Zebra is not responsible for any damages incurred during
shipment if the approved shipping container is not used. Shipping the units improperly can possibly void
the warranty.
If you purchased your Zebra business product from a Zebra business partner, contact that business
partner for support.
.
.
12
Page 13

Getting Started
Unpacking
Carefully remove all protective material from around the equipment and inspect it for damage. If the
equipment is damaged during transit, contact Zebra Customer Support for your region (see Service
Information on page 12). KEEP THE PACKING. It is the approved shipping container and should be used
if the equipment ever needs to be returned for servicing.
DS3678-HP Cordless Digital Scanner Features
Figure 1 DS3678-HP Features
1
2
9
6
5
3
4
8
7
13
Page 14

Cradle
Getting Started
1 Display 5 System/decode LED
2 Keypad 6 Ambient light sensor
3 Battery latch 7 Scan window
4 Lanyard catch 8 Trigger
9 Sound port
NOTE: For optimal display and keypad backlighting, and power consumption, the Ambient Light Sensor
must remain free of debris. See Approved Cleaners for the Scanner on page 99.
The cradles serve as a charger, radio communication interface, and host communication interface for the
DS3678 cordless digital scanner. There are two versions of the cradle:
• The STB3678 cordless cradle sits on a desktop or mounts on a wall, and charges the DS3678 cordless
digital scanner. This cradle also provides host communication by receiving scanner data via a
Bluetooth radio, and sending that data to the host through an attached cable. An external power supply
or a powered host cable provides power to the cradle.
• The FLB3678 cordless cradle charges the DS3678 cordless digital scanner, and provides host
communication by receiving scanner data via a Bluetooth radio, and sending that data to the host
through an attached cable. The cradle attaches to a mounting bracket using three isolators, and the
bracket then mounts on the forklift surface. A portable power supply on the forklift or a host cable
provides power to the cradle.
For more information about communication between the digital scanner, cradle, and host, refer to the
Radio Communications chapter of the DS36X8 Product Reference Guide.
For more information about mounting options and procedures, refer to the documentation included with the
cradle.
14
Page 15

Cradle Features
Figure 2 Cradle Top View
Getting Started
1
PAIR
4
8
7
6
2
3
4
5
4
3
1 Canopy latch 5 Page button
2 Pairing barcode 6 Foot latch
3 Drain holes (4) 7 LEDs (2)
4 Mounting screw hole (3) 8 Charging/communications contacts
15
Page 16

Figure 3 Cradle Bottom View
4
6
5
Getting Started
1
2
3
1 Mounting screw hole (4) 4 Rubber feet (4)
2 Host cable guide 5 Host cable (under latch)
3 Foot latch release 6 Host cable latch
Connecting the Cradle
To connect the STB3678/FLB3678 cradles:
1. If necessary, connect the appropriate cable to the power supply and an AC power source.
2. Insert the interface cable into the host port.
NOTE: Different cables are required for different hosts. The connectors illustrated in each host chapter of
the DS36X8 Product Reference Guide are examples only. The connectors may be different from those
illustrated, but the steps to connect the digital scanner remain the same.
1
4
16
Page 17

Figure 4 Cradle Connection
Getting Started
Latch
3. Lift the latch, connect the interface cable to the cradle's host port, and then close the latch.
4. If applicable, thread the interface cable over the cable support hook and run the host cable into the
cable groove.
5. Pair the digital scanner to the cradle either by inserting it in the cradle (if pair on contacts is enabled),
or by scanning the pairing barcode.
Host Port
(Under Latch)
Cable Groove
6. If necessary, scan the appropriate host barcode (for non-autodetected interfaces). Refer to the specific
host chapter in the DS36X8 Product Reference Guide.
NOTE: Always disconnect the DC power supply BEFORE disconnecting the cable to the host end or the
cradle may not recognize the new host.
Supplying Power to the Cradle
The cradle receives power from one of two sources:
• An external power supply.
• When connected to the host through an interface cable that supplies power.
The cradle detects whether the host or the external supply is supplying power. It always draws power from
the external supply when available, regardless of the presence of power from a host.
NOTE: Supplying power from a USB host may take longer to charge the digital scanner.
17
Page 18

DS3678 Battery
For information on battery statistic capabilities, refer to the DS36X8 Product Reference Guide.
Inserting the Battery
NOTE: Batteries are shipped in an Off mode and do not power the scanner. After inserting a new battery
into the DS3678 digital scanner, insert the scanner into a cradle for the battery to turn On.
Alternatively, the battery can be placed in the four slot spare battery charger to charge, and then inserted
in the scanner for immediate use.
The battery resides in a chamber in the digital scanner handle. To insert the battery:
1. Lightly press down and slide the locking lever counterclockwise to unlock and release the battery door.
2. Open the battery door.
3. If a battery is already installed, turn the digital scanner upright to slide the battery out.
4. Slide the new battery into the chamber, with the rounded side toward the back and the contacts facing
into the chamber.
Getting Started
Figure 5 Inserting the Battery
Lock
5. Close the battery door.
6. Lightly press down and slide the locking lever clockwise to lock the battery door.
7. If using a brand new battery, insert the scanner into a cradle to turn the battery on.
Removing the Battery
To remove the battery:
1. Lightly press down and slide the locking lever counterclockwise to unlock the battery door (see
Figure 5).
Unlock
2. Open the battery door.
3. Turn the digital scanner upright to slide the battery out.
Charging the Battery
When using a new battery in the DS3678, the battery requires a charge to be enabled. Insert the battery
(see Inserting the Battery on page 18) in the DS3678 and place the DS3678 in the STB/FLB3678 cradle
(see Inserting the Digital Scanner in the Cradle on page 19).
18
Page 19

Getting Started
The battery begins charging when the cradle’s LED indicator starts blinking amber. The DS3678’s battery
has completed a charge when the cradle’s LED indicator is solid green. A complete charge of a fully
discharged battery can take up to three hours using external power and up to eleven hours using USB
power over the USB interface cable.
Refer to the DS36X8 Product Reference Guide for detailed Beeper and LED indicator definitions.
CAUTION: To avoid a battery temperature fault, always charge the battery in the digital scanner within the
recommended temperature of 0°C to 40°C (32°F to 104°F) nominal, 5°C to 35°C (41°F to 95°F) ideal.
Inserting the Digital Scanner in the Cradle
To insert the digital scanner in the cradle:
1. Insert the top of the digital scanner into the cradle.
2. Push the handle down until it clicks into place, engaging the contacts in the cradle and digital scanner.
Figure 6 Inserting the Scanner in the Cradle
Sending Data to the Host
The cradle receives data from the digital scanner via a wireless radio connection and transmits it to the
host computer via the host cable. The digital scanner and cradle must be paired for successful wireless
communication.
Pairing
Pairing registers a scanner to the cradle allowing the scanner and cradle to exchange information. The
STB3678 and FLB3678 operate in two modes: Point-to-Point and Multipoint-to-Point.
• In Point-to-Point mode, pair the digital scanner to the cradle either by inserting it in the cradle (if pair on
contacts is enabled), or by scanning the pairing barcode.
• In Multipoint-to-Point mode, you can pair up to seven scanners to one cradle. To use this feature, scan
the multipoint barcode in the Multipoint-to-Point Communication section of the DS36X8 Product
Reference Guide.
To pair the digital scanner with the cradle, scan a pairing barcode. A high-low-high-low beep sequence
followed by a low-high beep sequence indicates successful pairing and connection to the remote device. A
long low, long high beep sequence indicates unsuccessful pairing.
19
Page 20

NOTE: The pairing barcode that connects the digital scanner to a cradle is unique to each cradle. Do not
scan data or parameters until pairing completes.
Lost Connection to Host
If scanned data does not transmit to the cradle's host, ensure that all cables are firmly inserted and the
power supply is connected to an appropriate AC outlet, if applicable. If scanned data still does not transmit
to the host, reestablish a connection with the host as follows:
1. Disconnect the power supply from the cradle.
2. Disconnect the host interface cable from the cradle.
3. Wait three seconds.
4. Reconnect the host interface cable to the cradle.
5. If the host requires, reconnect the power supply to the cradle.
6. Reestablish pairing with the cradle by scanning the pairing barcode.
Configuring the Scanner
Getting Started
Use the barcodes in the DS36X8 Product Reference Guide or the 123Scan2 configuration program to
configure the digital scanner. Refer to the User Preferences & Miscellaneous Options and each host
chapter for information about programming the digital scanner using barcode menus. Refer to the 123Scan
and Software Tools chapter for information on configuring the digital scanner using this configuration
program. 123Scan2 also includes a help file.
Radio Communications
The digital scanner can communicate with remote devices via Bluetooth, or by pairing with a cradle. For
radio communication parameters, detailed information about operational modes, Bluetooth and pairing,
refer to the Radio Communications chapter of the DS36X8 Product Reference Guide.
20
Page 21

Operating the DS3678-HP with Keypad & Display
Keypad
The keypad contains alphanumeric characters, navigational arrows, shift function keys, enter, home, and
backspace keys. The keypad is color-coded (blue and green) to indicate the alternate shift function keys.
NOTE: An application can change the keypad functions so the device's keypad may not function exactly as
described. For detailed informations see, Keypad Functionality on page 22.
Figure 7 DS3678-HP Keypad
Green Shift Function Key
Numeric Keys 0-9,
Letters A-Z,
Special Characters
4-way Navigation Key
(Up, Down, Right, Left)
Blue Shift Function Key
Backspace
Enter
Home
21
Page 22

Operating the DS3678-HP with Keypad & Display
Keypad Functionality
NOTE: The display is a non-touch screen. Navigation and control is performed using the keypad.
The alphanumeric keypads produce the 26-character alphabet (A-Z), numbers (0-9), function keys and
assorted characters. As shown in Figure 7, the keypad’s default characters/functions are white, the alpha
character/functions are green and the function character/functions are blue.
NOTE: The Scan/Ent. Location and Scan/Ent. Barcode fields have a maximum number of 11 characters
before truncation. If a location name or barcode is longer than 11 characters, it is preceded with
(...).
Table 1 Keypad Functionality
Key Description
Green Shift Function Key Press this key once to enable letters and
Blue Shift Function Key Press this key once to enable the F1 - F9
4-way Navigation Key
Up, Down, Left, Right
Backspace, Escape Defaults to Backspace; ESC when the Blue
space.
Function keys, ESC, and to increase/decrease
backlight brightness.
Defaults to Scroll key allowing up, down, left,
and right navigation.
function key is enabled.
Depending on the screen, press ESC to:
Press
Blue Key
N/A N/A
N/A N/A
N/A N/A
ESC N/A
Green Key
Press
• return to the previous level in the display.
• close the menu and returns to the previous
screen.
• clear a highlighted field.
Enter Press ENT (Enter) to launch an application or
select a current/highlighted item.
Depending on the screen, press Enter to:
• close a display and return to the previous
screen
• lock in an entered quantity and highlight an
item field
• store data from an item field
• edit a highlighted item.
1, F1 Defaults to the number 1; F1 when the Blue
function key is enabled.
F1 N/A
22
Page 23

Operating the DS3678-HP with Keypad & Display
Table 1 Keypad Functionality (Continued)
Key Description
2, F2, a, b, c, A, B, C Defaults to the number 2; F2 when the Blue
function key is enabled; a, b, c, A, B, C when
the Green function key is enabled.
In alpha mode (enable Green function key),
the number of key presses determines the
letter and case.
1 key press = a
2 key presses = b
3 key presses = c
4 key presses = A
5 key presses = B
6 key presses = C
3, F3, d, e, f, D, E, F Defaults to the number 3; F3 when the Blue
function key is enabled; d, e, f, D, E, F when
the Green function key is enabled.
In alpha mode (enable Green function key),
the number of key presses determines the
letter and case.
1 key press = d
2 key presses = e
3 key presses = f
4 key presses = D
5 key presses = E
6 key presses = F
4, F4, g, h, i, G, H, I Defaults to the number 4; F4 when the Blue
function key is enabled; g, h, i, G, H, I when
the Green function key is enabled.
In alpha mode (enable Green function key),
the number of key presses determines the
letter and case.
1 key press = g
2 key presses = h
3 key presses = i
4 key presses = G
5 key presses = H
6 key presses = I
Press
Blue Key
F2 a, b, c, A, B,
F3 d, e, f, D, E,
F4 g, h, i, G, H,
Press
Green Key
C
F
I
23
Page 24

Operating the DS3678-HP with Keypad & Display
Table 1 Keypad Functionality (Continued)
Key Description
5, F5, j, k, l, J, K, L Defaults to the number 5; F5 when the Blue
function key is enabled; j, k, l, J, K, L when the
Green function key is enabled.
In alpha mode (enable Green function key),
the number of key presses determines the
letter and case.
1 key press = j
2 key presses = k
3 key presses = l
4 key presses = J
5 key presses = K
6 key presses = L
6, F6, m, n, o, M, N, O Defaults to the number 6; F6 when the Blue
function key is enabled; m, n, o, M, N, O when
the Green function key is enabled.
In alpha mode (enable Green function key),
the number of key presses determines the
letter and case.
1 key press = m
2 key presses = n
3 key presses = o
4 key presses = M
5 key presses = N
6 key presses = O
Press
Blue Key
F5 j, k, l, J, K, L
F6 m, n, o, M,
Press
Green Key
N, O
7, F7, p, q, r, s, P, Q, R, SDefaults to the number 7; F7 when the Blue
function key is enabled; p, q, r, s, P, Q, R, S
when the Green function key is enabled.
In alpha mode (enable Green function key),
the number of key presses determines the
letter and case.
1 key press = p
2 key presses = q
3 key presses = r
4 key presses = s
5 key presses = P
6 key presses = Q
7 key presses = R
8 key presses = S
24
F7 p, q, r, s, P,
Q, R, S
Page 25

Operating the DS3678-HP with Keypad & Display
Table 1 Keypad Functionality (Continued)
Key Description
8, F8, t, u, v, T, U, V Defaults to the number 8; F8 when the Blue
function key is enabled; t, u, v, T, U, V when
the Green function key is enabled.
In alpha mode (enable Green function key),
the number of key presses determines the
letter and case.
1 key press = t
2 key presses = u
3 key presses = v
4 key presses = T
5 key presses = U
6 key presses = V
Press
Blue Key
F8 t, u, v, T, U,
Press
Green Key
V
25
Page 26

Operating the DS3678-HP with Keypad & Display
Table 1 Keypad Functionality (Continued)
Key Description
9, F9, w, x, y, z, W, X, Y, ZDefaults to the number 9; F9 when the Blue
function key
is enabled; w, x, y, z, W, X, Y, Z when the
Green function
key is enabled.
In alpha mode (enable Green function key),
the number
of key presses determines the letter and case.
1 key press = w
2 key presses = x
3 key presses = y
4 key presses = z
5 key presses = W
6 key presses = X
7 key presses = Y
8 key presses - Z
0, Decrease Brightness,
Space
Defaults to the number 0; Decreases the back
light brightness when the Blue function key is
enabled; space when the Green function key
is enabled.
The space ( ) can be used to:
Press
Blue Key
F9 w, x, y, z,
Decrease
Brightness
Press
Green Key
W, X, Y, Z
Space
Home, Increase
Brightness, Special
Characters
• add a space
• select/clear check boxes
• select an item.
NOTE: When * Enable Auto Display
Brightness on page 70 is enabled,
brightness changes made using the
Blue function key may be subtle and
less noticeable.
Defaults to the Home screen; increases the
back light brightness when the Blue function
key is enabled; special characters when the
Green function key is enabled as follows:
• One key press - (.) period
• Two key presses - (,) comma
• Three key presses - (*) asterisk
• Four key presses - (-) dash
• Five key presses - (/) forward slash
Increase
Brightness
Special
Characters
26
Page 27

Entering Information Using the Shift Function Keys
To enter information using the Green and Blue shift function keys, press this key once to enable the Shift
function key. Press the key again to disable and return to default key use.
When enabled, a Green or Blue icon displays (see Figure 8) on the screen. When no Green or Blue icon
displays, the functionality is disabled.
Figure 8 Shift Function Key Icons
Screen Icons
Table 2 describes the icons that display on the screen.
Table 2 Screen Icons
Operating the DS3678-HP with Keypad & Display
Icon Description
Battery
Critical low battery (~ 0 - 15%); 4 short high beeps
Medium-low battery (~ 16% - 40%)
Medium battery (~ 41% - 65%)
Medium-high battery (~ 66% - 85%)
Full battery (~ 86% - 100%)
27
Page 28

Operating the DS3678-HP with Keypad & Display
Table 2 Screen Icons (Continued)
Icon Description
Connections
Bluetooth is inactive
Bluetooth is active
Keypad Functionality
Blue shift function key
Green shift function key
Home screen
Batch mode (in Scan Inventory app only)
28
Page 29

Operating the DS3678-HP with Keypad & Display
Home Screen Options
Home Screen
When the device powers on, the first screen to display is the Home (Main Menu) screen as shown in
Figure 9. This screen also launches when you press the Home key (see Table 1).
The Home key displays the Home screen (Main Menu) by default and is programmable. To select a
different screen to display when the Home key is pressed, see Home Key Launch on page 72.
Figure 9 lists the options available on the Home screen. Use the Up or Down navigation keys to highlight
an option in the list and press ENT to launch the screen. Alternatively, select a number on the physical
keypad associated with a menu item and press ENT. For example, to select Scan Inventory, press the 3
on the Home screen, and then press ENT.
Figure 9 Home Screen
Table 3 Home Screen Options
Number Option Description
1 Scan & Enter Quantity In this application, the user can enter a quantity, scan, display, and
transmit barcode data (see
2 Scan & Enter Location In this application, the user can enter a quantity, location, barcode
information to transmit the data a specified quantity of times, and
the location information (see
3 Scan Inventory In this application, the user can enter inventory information and
send it to a host device (see
4 Outside/Inside Match In this application, the user scans the barcode on the outside of a
container, and then matches it against the barcodes on the items
inside of the container (see
5 Image Viewer In this application, the user can preview and capture images (see
Image Viewer on page 41
6 Configuration In this application, the user has access to global and local app
settings (see
NOTE: To manually enter information, the feature must be enabled. If you are unable to enter information
manually, see Configuration on page 43 or Global Configuration Parameters on page 52 to enable the
desired feature.
Configuration on page 43
Scan & Enter Quantity on page 30
Scan & Enter Location on page 32
Scan Inventory on page 34
Outside/Inside Match on page 38
).
).
).
).
).
).
29
Page 30

Operating the DS3678-HP with Keypad & Display
Scan & Enter Quantity
The Scan & Enter Quantity app allows the user to transmit barcode data to the host PC and enter a
quantity.
NOTE: If Bluetooth is not connected and the scanner is not in batch mode, the following message
displays:
Press ENT to exit the screen, reconnect to Bluetooth, and scan again.
To scan an item and enter a quantity:
1. Start at the Home screen (see Figure 9 on page 29), scroll to Scan & Enter Quantity and press ENT.
Alternatively, press the number 1 for this Home screen menu option and press ENT.
Figure 10 Scan & Enter Quantity Ready State Screen
2. Enter the barcode one of the following ways:
• Scan a barcode. The data displays in the barcode field and the barcode data transmits to the host
PC.
• Enter a SKU or barcode data manually using the keypad and press ENT to transmit the data to the
host PC.
The display color flashes green during decode.
NOTE: When the user scans a barcode from the Home screen, the Scan & Enter Qty app automatically
launches and the barcode displays on the screen.
30
Page 31

Operating the DS3678-HP with Keypad & Display
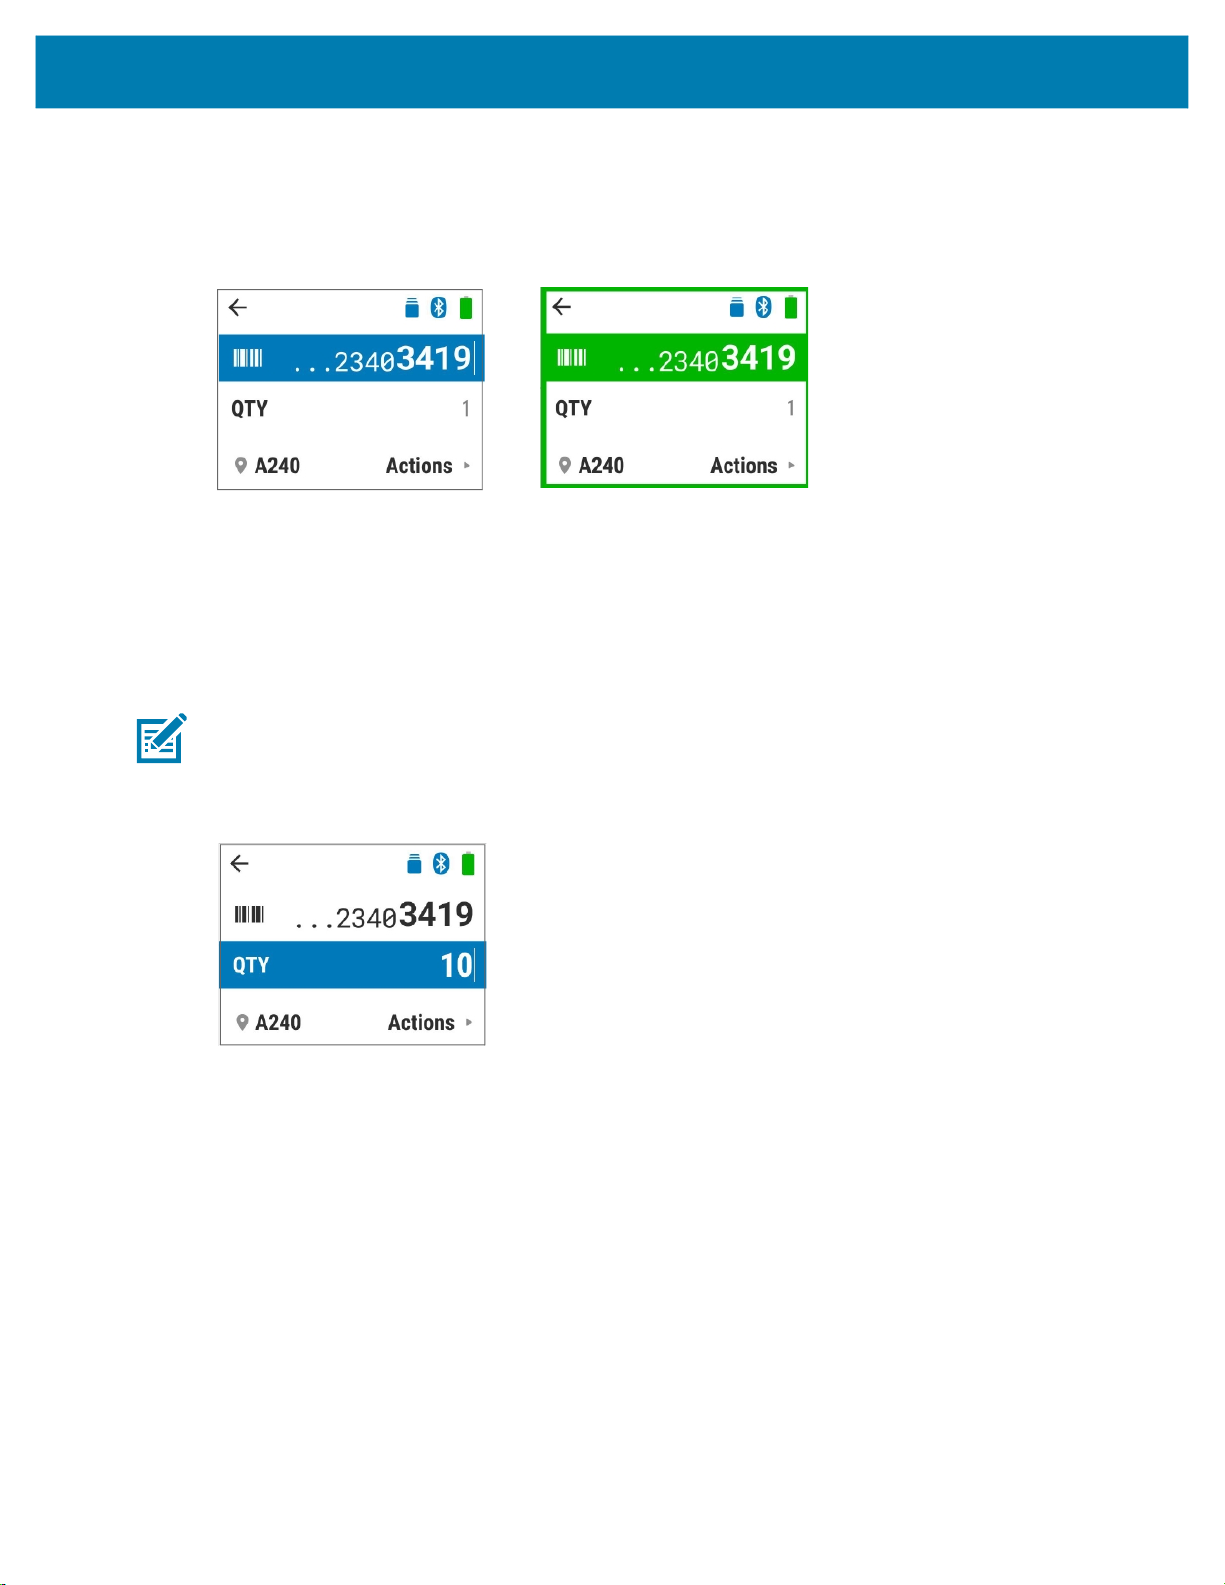
Figure 11 Scan & Enter Quantity Screen During Decode
3. The quantity defaults to a value of 1. To enter a quantity (QTY), do one of the following:
• If you only have 1 item, press ENT to go to the next screen immediately.
If you do not press ENT, a Quantity Timer (see Quantity Timer) begins and runs for a configurable
amount of time. The default is Six seconds. After the timer runs out, the App Ready screen displays.
If you do not scan another item before the Quantity Timer times out, a message (see Figure 12)
indicating the QTY was not entered in time and the default QTY of 1 was received displays for a few
seconds before redirecting to the App Ready screen.
Figure 12 Transaction Timer Time Out Screen
• If you have more than 1 item, use the numeric keys to manually enter a quantity (1 to 9999) in the
QTY field (see Figure 10 on page 30). Press ENT to go to the next screen immediately. If you do not
press ENT, a Quantity Timer (see Quantity Timer) begins and runs for the configurable amount of
time. After the timer runs out, the App Ready screen displays.
For example, if a quantity of 10 is entered, and ENT is pressed, then 10 barcodes are transmitted
and a confirmation screen displays to indicate the QTY transmitted. For larger quantities, a progress
bar screen displays and indicates the progress of the data transmission.
• When the Quantity Transfer Mode is set to BC<Delimiter>QTY, the scan data is not transmitted until
Ent is pressed from the Qty field. In this mode, the barcode data is sent in the format
BC<Qty Delimiter>QTY.
Quantity Timer
When data is entered into the Barcode or Quantity field, the quantity timer starts. The quantity timer has a
visual indicator that displays on the bottom of the screen and looks like a progress bar. When the quantity
timer expires, the data is submitted to the POS and the app returns to a ready state.
31
Page 32

Operating the DS3678-HP with Keypad & Display
Figure 13 Quantity Timer
Scan & Enter Location
The Scan & Enter Location app allows the
transmit the data a specified quantity of times.
NOTE: If Bluetooth is not connected and the scanner is not in batch mode, the following message
displays:
Press ENT to exit the screen, reconnect to Bluetooth, and scan again.
To scan and enter location:
1. Start at the Home screen (see Figure 9 on page 29), scroll to Scan & Enter Location and press ENT.
Alternatively, press the number 2 for this menu option.
2. Scan or enter a location in the Scan/Ent. Location field.
Figure 14 Scan & Enter Location App - Enter Location
user to enter the quantity, location, and barcode information to
3. Enter the barcode one of the following ways:
• Scan a barcode. The data displays in the barcode field and the barcode data transmits to the host
PC.
• Enter the barcode data manually using the keypad and press ENT to transmit the data to the host
PC.
The display color flashes green during decode.
32
Page 33

Operating the DS3678-HP with Keypad & Display
Figure 15 Scan & Enter Location App - Enter Barcode
4. Enter the quantity in the QTY field.
Figure 16 Scan & Enter Location App - Enter Quantity
NOTE: A reminder message may appear in fields that allow manual entering (as shown in Figure 17).
Reminder messages disappear after a few moments.
Figure 17 Scan & Enter Location App - Reminder Message
5. Press ENT. A submitted confirmation screen displays.
NOTE: The decode data is transmitted in the following format: <Barcode><Loc Delimiter><Location>.
When the Quantity Transfer Mode is set to BC<Delimiter>QTY, it is transmitted in the format:
BC<Qty Delimiter>QTY<Loc Delimiter>Location.
Figure 18 Scan & Enter Location App - Submitted Confirmation Screen
NOTE: When ADF Rule is programmed, the rule is applied to the entire data which includes Loc and Qty.
33
Page 34

Scan Inventory
Operating the DS3678-HP with Keypad & Display
The Inventory app allows the
NOTE: If Bluetooth is not connected and the scanner is not in Batch Mode, the following message
displays:
Press ENT to exit the screen, reconnect to Bluetooth, and re-submit inventory list.
To scan inventory:
1. Start at the Home screen (see Figure 9 on page 29), scroll to Scan Inventory and press ENT.
Alternatively, press the number 3 for this menu option.
The ready state screen appears and a Batch mode On reminder displays.
Figure 19 Scan Inventory App
user to enter inventory information and send it to a host device.
2. Enter the location one of the following ways:
• Scan the location. When successfully decoded, the screen flashes green.
• Manually enter the location and press ENT when finished.
Figure 20 Scan Inventory App - Enter Location
3. Enter the barcode one of the following ways:
• Scan a barcode. The data displays in the barcode field and the barcode data transmits to the host
PC.
34
Page 35
Operating the DS3678-HP with Keypad & Display
• Enter a SKU or barcode data manually using the keypad and press ENT to transmit the data to the
host PC.
The display color flashes green during decode.
Figure 21 Scan Inventory App - Enter Barcode
4. The quantity defaults to a value of One. For only one item, skip to step 5.
For a multiple quantities, change the quantity as follows:
a. Press the Down navigation arrow.
b. Enter the quantity in the QTY field using the keypad.
c. Press ENT to submit.
NOTE: If Manual Barcode Entry for Scan Inventory App on page 92 is disabled, the decoded data is added
to the inventory list as soon as the barcode is scanned. If enabled, press Enter on the QTY field to add the
decoded data to the inventory list.
Figure 22 Scan Inventory App - Enter Quantity
5. Continue to scan or enter the barcodes of items to inventory. The location previously entered remains
in the system and displays on the bottom of the screen. To change locations, see Changing Location
During Scan Inventory.
Changing Location During Scan Inventory
To change the location during a scan inventory:
1. The barcode field remains active during scan inventory. When the barcode line item is highlighted (see
Figure 21 on page 35), press the Right navigation arrow. The Actions list displays.
2. Select the number 1 for the Enter new location action or highlight the line item and press ENT.
35
Page 36

Operating the DS3678-HP with Keypad & Display
Figure 23 Enter New Location
3. Scan or enter a location in the Scan/Ent. Location field (see Figure 14 on page 32). The location
screen flashes green when scanning, indicating a successful location change.
Figure 24 Enter New Location - Successful Screen
Submitting a Scanned Item List
To submit a scanned item list:
1. The barcode field remains active during scan inventory. When the barcode line item is highlighted (see
Figure 21 on page 35), press the Right navigation arrow. The Actions list displays.
2. Select the number 2 for the Submit full list action or highlight the line item and press ENT.
Figure 25 Submit Full List
A confirmation message displays indicating a successful submission.
NOTE: Once the full list is submitted, it is transmitted in the following format: <Barcode><Loc
Delimiter><Location>. When the Quantity Transfer Mode is set to BC<Delimiter>QTY, when the full list is
submitted, it is transmitted in the format: BC<Qty Delimiter>QTY<Loc Delimiter>Location.
36
Page 37

Operating the DS3678-HP with Keypad & Display
Figure 26 Submit Full List - Confirmation Screen
Reviewing a Scanned Item List
To review a scanned item list:
1. The barcode field remains active during scan inventory. When the barcode line item is highlighted (see
Figure 21 on page 35), press the Right navigation arrow. The Actions list displays.
2. Select the number 3 for the Review List action or highlight the line item and press ENT.
Figure 27 Reviewing Scanned Item List
3. A list of scanned items displays (maximum of 200 items). Use the Down or Up navigation arrows to
scroll through the list.
Exiting the Application Flow
To quit the application flow:
1. Select one of the following options:
• Press ESC (Blue function key and BKSP) to exit the list.
• Navigate to the Back arrow on the top of the display using the navigation arrows and press ENT
(Figure 10 on page 30).
• Press the Home key (see Figure 7 on page 21).
• Select the number 4 for the Exit App action or highlight the line item and press ENT.
2. A confirmation message displays. Select one of the following options:
• To cancel, press the BKSP key.
• To quit, press the ENT key.
37
Page 38

Operating the DS3678-HP with Keypad & Display
Figure 28 Quit App Confirmation Screen
NOTE: The Quit App Confirmation screen only displays when there is data in the inventory list that has not
been sent to the host.
Outside/Inside Match
The user can scan the barcode on the outside of a container and then match it against the barcodes on the
items inside of the container.
To perform an outside/inside match:
1. Start at the Home screen (see Figure 9 on page 29), scroll to Outside/Inside Match and press ENT.
Alternatively, press the number 4 for this menu option.
The app is in ready state to scan the outside of the container (see Figure 29).
Figure 29 Outside/Inside Match App - Outside Ready State Screen
To view the instructions screen, select the Up navigation arrow. Use the Right navigation arrow to
scroll through the instruction screens.
Figure 30 Outside/Inside Match App - Instruction Screens
2. Scan the barcode located on the outside of the container. The display flashes green indicating a
successful decode and the barcode quantity count updates.
38
Page 39

Operating the DS3678-HP with Keypad & Display
Figure 31 Outside/Inside Match App - Successful Decode Screen
Continue to scan barcodes. To view the list of barcodes, select the Right navigation arrow to select
List. Use the Down navigation arrow to scroll down the list of barcodes.
Figure 32 Outside/Inside Match App - Outside Quantity Screen
3. Upon completion, press ENT to select Done Outside.
Figure 33 Outside/Inside Match App - Outside Finish Screen
4. The app is in ready state to scan the inside of the container (see Figure 34). The maximum allowable
amount of items is 200. When attempting to scan over 200 items, an error message displays and a
beep sounds.
Figure 34 Outside/Inside Match App - Inside Ready State Screen
To view the Instruction screen, select the Up navigation arrow. Use the Right navigation arrow to
scroll through the instruction screens.
5. Scan the items inside the container.
39
Page 40

Operating the DS3678-HP with Keypad & Display
• The Match counter flashes green when a successful match is made and the counter increases to
reflect the updated number of matches.
• The Unexpected counter flashes red when a scan does not match any of the outside barcodes and
the Unexpected counter is updated to reflect the number of unexpected scans.
Figure 35 Outside/Inside Match App - Match and Unexpected Scan Screens
6. Upon completion, press ENT to select Done Inside.
7. The Outside/Inside Match confirmation screen displays. It includes the percentage of barcodes
matched and additional non-match details. Select one of the following options:
• Press ENT to select Done.
Figure 36 Outside/Inside Match App - Confirmation Screens
• Press the Down navigation arrow to select Show Report. Press the Up and Down navigation
arrows to scroll through the report of scanned items (see Figure 37). The list may include the
following active and inactive items:
• Unexpected - There are barcode(s) inside the container that are not on the outside of the
container.
• Matched - The barcodes outside and inside the container match.
• Missing - There there are more barcodes outside the container than inside the container;
missing barcodes inside the container.
40
Page 41

Operating the DS3678-HP with Keypad & Display
Figure 37 Outside/Inside Match App - Scanned Items Screens
Unexpected Barcodes
NOTE: This app does not transmit data to the host. It is intended to view container contents and matches.
Deleting a Barcode
To delete a barcode:
1. Press the Down navigation arrow to select List (see Figure 32 on page 39).
Matched Barcodes
Missing Barcodes
2. Press the Down or Up navigation arrows to select the desired barcode to delete.
3. Press BKSP to delete.
Figure 38 Outside/Inside Match App - Deleting a Barcode
Image Viewer
In Image Viewer mode the user can preview and capture images.
To use image viewer:
1. Start at the Home screen (see Figure 9 on page 29), scroll to Image Viewer and press ENT.
Alternatively, press the number 5 for this menu option.
2. Ensure the host interface supports Image Viewer.
If the Image Viewer host confirmation screen displays as shown in Figure 39, select one of the following
options.
• Select Exit by pressing the BKSP key to exit the application.
41
Page 42

Operating the DS3678-HP with Keypad & Display
• Select OK by pressing the ENT key to proceed.
Figure 39 Image Viewer App - Host Confirmation Screen
If the host interface does not support image capture, the message Host interface doesn’t Support
Image Capture displays. To exit this screen, select the arrow at the top of screen using the navigation
arrows and press ENT or press the Home key.
Figure 40 Image Viewer App - Host Support Screen
3. Once the host is recognized, press the scan Trigger to capture the image.
Figure 41 Image Viewer App - Pull Trigger Screen
4. Press ENT to select send or BKSP to select discard.
Figure 42 Image Viewer Send or Discard Capture Screen
5. An Image Sent confirmation screen displays. After a few seconds, the Pull Trigger (see Figure 41)
screen displays and another image may be captured.
42
Page 43

Figure 43 Image Sent Confirmation Screen
Configuration
Configuration mode provides options for global and local app settings.
The global app configuration settings apply settings in all of the barcode applications. When an application
parameter is changed, it overrides the global default setting. For a complete list of global configuration
default settings, see Table 4 on page 50.
The local app settings may be changed and override the global default setting. To revert back to global
defaults settings, scan the desired Global Manual Barcode Entry and/or Global Manual Quantity Entry
barcodes on page 50.
Operating the DS3678-HP with Keypad & Display
Configuring Display Timeout Global App Settings
This parameter sets the amount of time after idle that the display turns off. The default is 12 seconds. To
change the Display Timeout duration:
1. Go to Display Timeout on page 52 and scan the desired timeout durations barcode. Alternatively, you
may change the setting directly on the device as follows:
a. Start at the Home screen (see Figure 9 on page 29), scroll to Configuration using the Down
navigation arrow, and press ENT (or press the number 6 for this menu option and press ENT).
b. Scroll to Global using the navigation arrows and press ENT (or press the number 1 for this menu
option and press ENT).
Figure 44 Global Configuration Option
c. Scroll to Display Timeout using the navigation arrows and press ENT (or press the number 1 that is
for this menu option and press ENT).
d. Scroll to the desired duration using the navigation arrows and press ENT.
NOTE: When Disable Display Timeout is selected, the display never turns off.
43
Page 44

Operating the DS3678-HP with Keypad & Display
Configuring Manual Barcode Entry Global App Settings
This parameter allows manual entry of barcode data in all of the barcode applications. When an application
parameter is changed, it overrides this setting. The default is Disable.
To change the default setting:
1. Go to Manual Barcode Entry for Scan & Enter Qty App on page 78 and scan the desired barcode.
Alternatively, you may change the setting directly on the device as follows:
a. Start at the Home screen (see Figure 9 on page 29), scroll to Configuration using the Down
navigation arrow and press ENT (or press the number 6 for this menu option and press ENT).
b. Scroll to Global using the navigation arrows and press ENT (or press the number 1 for this menu
option and press ENT).
c. Scroll to Manual Barcode Entry using the navigation arrows and press ENT (or press the number 3
for this configuration screen menu option and press ENT).
d. Scroll to the desired selection using the navigation arrows and press ENT.
To learn more about this option, press the Right navigation arrow to select About. The setting information
displays. Press ENT to return to the previous screen.
Configuring Manual Quantity Entry Global App Settings
This parameter allows manual entry of quantity data in all of the barcode applications. When an application
parameter is changed, it overrides the this setting. The default is Disable.
To change the default setting:
1. Go to Manual Quantity Entry for Scan & Enter Qty App on page 79 and scan the desired barcode.
Alternatively, you may change the setting directly on the device as follows:
a. Start at the Home screen (see Figure 9 on page 29), scroll to Configuration using the Down
navigation arrow and press ENT (or press the number 6 for this Home screen menu option and
press ENT).
b. Scroll to Global using the navigation arrows and press ENT (or press the number 1 for this
Configuration screen menu option and press ENT).
c. Scroll to Manual Barcode Entry using the navigation arrows and press ENT (or press the number 4
for this configuration screen menu option and press ENT).
d. Scroll to the desired selection using the navigation arrows and press ENT.
To learn more about this option, press the Right navigation arrow to select About. The setting information
displays. Press ENT to return to the previous screen.
Configuring Auto Display Brightness Global App Settings
The Auto Display Brightness (default) parameter automatically adjusts the brightness according to the
ambient lighting. When an application parameter is changed, it overrides this setting.
To change the default setting:
1. Go to Display Brightness on page 70 and scan the desired barcode. Alternatively, you may change the
setting directly on the device as follows:
a. Start at the Home screen (see Figure 9 on page 29), scroll to Configuration using the Down
navigation arrow and press ENT (or press the number 6 for this Home screen menu option and
press ENT).
44
Page 45

Operating the DS3678-HP with Keypad & Display
Scroll to Global using the navigation arrows and press ENT (or press the number 1 for this
b.
Configuration screen menu option and press ENT).
c. Scroll to Auto Display Brightness using the navigation arrows and press ENT (or press the
number 5 for this configuration screen menu option and press ENT).
d. Scroll to the desired selection using the navigation arrows and press ENT.
Configuring Keypad Backlight Global App Settings
The Auto Keypad Backlight (default) automatically adjusts to achieve optimal brightness and power
consumption based on the ambient light conditions. When an application parameter is changed, it
overrides this setting.
To change the default setting:
1. Go to Keypad Backlight on page 71 and scan the desired barcode. Alternatively, you may change the
setting directly on the device as follows:
a. Start at the Home screen (see Figure 9 on page 29), scroll to Configuration using the Down
navigation arrow and press ENT (or press the number 6 for this Home screen menu option and
press ENT).
b. Scroll to Global using the navigation arrows and press ENT (or press the number 1 for this
Configuration screen menu option and press ENT).
c. Scroll to Keypad Backlight using the navigation arrows and press ENT (or press the number 6 for
this configuration screen menu option and press ENT).
d. Scroll to the desired selection using the navigation arrows and press ENT.
Configuring Home Key Launch Global App Settings
The Home Key Launch feature is programmable and returns to the Navigator (Main Menu) by default.
When an application parameter is changed, it overrides this setting.
To change the default setting:
1. Go to Home Key Launch on page 72 and scan the desired barcode. Alternatively, you may change the
setting directly on the device as follows:
a. Start at the Home screen (see Figure 9 on page 29), scroll to Configuration using the Down
navigation arrow and press ENT (or press the number 6 for this Home screen menu option and
press ENT).
b. Scroll to Global using the navigation arrows and press ENT (or press the number 1 for this
Configuration screen menu option and press ENT).
c. Scroll to Keypad Backlight using the navigation arrows and press ENT (or press the number 7 for
this configuration screen menu option and press ENT).
d. Scroll to the desired selection using the navigation arrows and press ENT.
Configuring Display on Charge Global App Settings
Display on Charge configures when the display turns on while charging. The default is Full. When an
application parameter is changed, it overrides this setting.
To change the default setting:
1. Go to Home Key Launch on page 72 and scan the desired barcode. Alternatively, you may change the
setting directly on the device as follows:
45
Page 46

Operating the DS3678-HP with Keypad & Display
Start at the Home screen (see Figure 9 on page 29), scroll to Configuration using the Down
a.
navigation arrow and press ENT (or press the number 6 for this Home screen menu option and
press ENT).
b. Scroll to Global using the navigation arrows and press ENT (or press the number 1 for this
Configuration screen menu option and press ENT).
c. Scroll to Display on Charge using the navigation arrows and press ENT (or press the number 8 for
this configuration screen menu option and press ENT).
d. Scroll to the desired selection (Half Full, Three Quarters Full, or Full) using the navigation arrows
and press ENT.
Configuring Scan & Enter Quantity Local App Settings
This parameter allows manual entry of quantity data in the Scan & Enter Quantity local app. When this
application parameter is changed, it overrides the global settings.
To change the default setting:
1. Go to Manual Quantity Entry for Scan & Enter Qty App on page 79 and scan the desired barcode.
Alternatively, you may change the setting directly on the device as follows:
a. Start at the Home screen (see Figure 9 on page 29), scroll to Configuration using the Down
navigation arrow and press ENT (or press the number 6 for this Home screen menu option and
press ENT).
b. Scroll to Scan & Enter Quantity using the navigation arrows and press ENT (or press the number 2
for this Configuration screen menu option and press ENT).
c. Enter your Scan & Enter Quantity selections as desired:
• Manual Barcode Entry - The global default is Disable. Enabling this feature allows you to enter
barcodes manually using the keypad.
Scroll to Manual Barcode Entry using the navigation arrows and press ENT (or press the
number 1 for this configuration screen menu option and press ENT). Then scroll to the desired
selection using the navigation arrows and press ENT.
• Manual Quantity Entry - The global default is Enable. Enabling this feature allows you to enter
quantities manually using the keypad.
Scroll to Manual Quantity Entry using the navigation arrows and press ENT (or press the
number 2 for this configuration screen menu option and press ENT). Then scroll to the desired
selection using the navigation arrows and press ENT
• Quantity Timeout - When data is entered into the Quantity field, the quantity timer starts (the
global default is 6 seconds). When the quantity timer expires, the data is submitted to the POS
and the app returns to a ready state.
Scroll to Quantity Timeout using the navigation arrows and press ENT (or press the number 3
for this configuration screen menu option and press ENT). Then scroll to the desired selection
using the navigation arrows and press ENT.
Configuring Scan & Enter Location Local App Settings
This parameter allows manual entry of quantity data in the Scan & Enter Location local app. When this
application parameter is changed, it overrides the global settings.
To change the default setting:
46
Page 47

Operating the DS3678-HP with Keypad & Display
Go to Manual Barcode Entry for Scan & Enter Location App on page 85 and scan the desired barcode.
1.
Alternatively, you may change the setting directly on the device as follows:
a. Start at the Home screen (see Figure 9 on page 29), scroll to Configuration using the Down
navigation arrow and press ENT (or press the number 6 for this Home screen menu option and
press ENT).
b. Scroll to Scan & Enter Location using the navigation arrows and press ENT (or press the number 3
for this Configuration screen menu option and press ENT).
c. Enter your Scan & Enter Location selections as desired:
• Manual Barcode Entry - The global default is Enable which allows you to enter barcodes
manually using the keypad.
Scroll to Manual Barcode Entry using the navigation arrows and press ENT (or press the
number 1 for this configuration screen menu option and press ENT). Then scroll to the desired
selection using the navigation arrows and press ENT.
• Manual Quantity Entry - The global default is Enable which allows you to enter quantities
manually using the keypad.
Scroll to Manual Quantity Entry using the navigation arrows and press ENT (or press the
number 2 for this configuration screen menu option and press ENT). Then scroll to the desired
selection using the navigation arrows and press ENT
• Delimiter - The Delimiter is applied between the barcode and the location. The global default is
Tab.
Scroll to Delimiter using the navigation arrows and press ENT (or press the number 3 for this
configuration screen menu option and press ENT). Then scroll to the desired selection using the
navigation arrows and press ENT.
Configuring Scan Inventory Local App Settings
This parameter allows manual entry of Inventory data in the Scan Inventory local app. When this
application parameter is changed, it overrides the global settings.
To change the default setting:
1. Go to Manual Barcode Entry for Scan & Enter Location App on page 85 and scan the desired barcode.
Alternatively, change the setting directly on the device as follows:
a. Start at the Home screen (see Figure 9 on page 29), scroll to Configuration using the Down
navigation arrow and press ENT (or press the number 6 for this Home screen menu option and
press ENT).
b. Scroll to Scan Inventory using the navigation arrows and press ENT (or press the number 4 for this
Configuration screen menu option and press ENT).
c. Enter Scan Inventory selections:
• Manual Barcode Entry - The global default is Disable. When enabled, you can enter barcodes
manually using the keypad.
Scroll to Manual Barcode Entry using the navigation arrows and press ENT (or press the
number 1 for this configuration screen menu option and press ENT). Then scroll to the desired
selection using the navigation arrows and press ENT.
47
Page 48

Operating the DS3678-HP with Keypad & Display
• Manual Quantity Entry - The global default is Disable. When enabled, you can enter quantities
manually using the keypad.
Scroll to Manual Quantity Entry using the navigation arrows and press ENT (or press the
number 2 for this configuration screen menu option and press ENT). Then scroll to the desired
selection using the navigation arrows and press ENT.
• Delimiter - The Delimiter is applied between the barcode and the inventory. The global default is
Tab.
Scroll to Delimiter using the navigation arrows and press ENT (or press the number 3 for this
configuration screen menu option and press ENT). Then scroll to the desired selection using the
navigation arrows (User Specified, Carriage Return, Line Feed, Space, Tab (default), (,) comma, (:)
colon, (;) semi colon, (=) equals) and press ENT.
Figure 45 Configuration Delimiter Settings Selection
NOTE: Frequently storing data with the setting Permanent Inventory Store shortens the life of the
non-volatile memory.
• Inventory Store - The default for inventory storage is Temporary.
Scroll to Inventory Store using the navigation arrows and press ENT (or press the number 4 for this
configuration screen menu option and press ENT). Then scroll to the desired selection using the
navigation arrows and press ENT.
NOTE: If FIPS is enabled, the inventory data is not stored in non-volatile memory even though the
Inventory Store is set to Permanent.
48
Page 49

Configuration Scanner Options
You can program the digital scanner to perform various functions, or activate different features. This
chapter describes each user configuration scanner feature and provides programming barcodes for
selecting these features.
The digital scanner ships with the default settings shown in Configuration Parameter Defaults on page 50
and the DS36X8 Product Reference Guide located at zebra.com/support. If the default values suit
requirements, programming is not necessary.
To set feature values, scan a single barcode or a short barcode sequence. The settings are stored in
non-volatile memory and are preserved even when the digital scanner is powered down.
NOTE: Most computer monitors allow scanning the barcodes directly on the screen. When scanning from
the screen, be sure to set the document magnification to a level where you can see the barcode clearly,
and bars and/or spaces are not merging.
If a USB cable is not used, select a host type (see each host chapter for specific host information) after the
power-up beeps sound. This is only necessary upon the first power-up when connected to a new host.
Refer to the DS36X8 Product Reference Guide at zebra.com/support for detailed information regarding
host types.
To return features to default values, see Configuration Parameter Defaults on page 50 and refer to the
DS36X8 Product Reference Guide at zebra.com/support for detailed parameter defaults.
Throughout the programming barcode menus, asterisks indicate (
* High Volume
* Indicates Default
(0)
*) default values.
Feature/Option
Option Value
49
Page 50

Configuration Scanner Options
Configuration Parameter Defaults
Table 4 lists defaults for configuration scanner option parameters. Scan the appropriate barcodes in this
guide. These new values replace the standard default values in memory. To recall the default parameter
values, refer to the DS36X8 Product Reference Guide at zebra.com/support and scan the Set Defaults
parameter.
Table 4 Configuration Parameter Defaults
Parameter
Parameter
Number
1
SSI
Number
2
Default
Global Parameters
Display Timeout 2144 F8 08 60 12 Seconds 52
Function Key Configurations
Function Key 1 2145 F8 08 61 Unassigned 54
Function Key 2 2146 F8 08 62 Unassigned 56
Function Key 3 2147 F8 08 63 Unassigned 57
Function Key 4 2148 F8 08 64 Unassigned 58
Function Key 5 2149 F8 08 65 Unassigned 59
Function Key 6 2150 F8 08 66 Unassigned 60
Function Key 7 2151 F8 08 67 Unassigned 61
Function Key 8 2152 F8 08 68 Unassigned 62
Function Key 9 2153 F8 08 69 Unassigned 63
Function Key Strings
Function Key String 1 2171 F8 08 7B Undefined 64
Function Key String 2 2172 F8 08 7C Undefined 64
Function Key String 3 2173 F8 08 7D Undefined 64
Function Key String 4 2174 F8 08 7E Undefined 65
Function Key String 5 2175 F8 08 7F Undefined 65
Function Key String 6 2176 F8 08 80 Undefined 65
Function Key String 7 2177 F8 08 81 Undefined 65
Function Key String 8 2178 F8 08 82 Undefined 67
Function Key String 9 2179 F8 08 83 Undefined 67
Max Quantity Value 2190 F8 08 8E 9999 68
Global Manual Barcode Entry 2154 F8 08 6A Enable 69
Global Manual Quantity Entry 2155 F8 08 6B Enable 69
Display Brightness 2156 F8 08 6C Enable 70
Keypad Backlight 2157 F8 08 6D Auto 71
Home Key Launch 2158 F8 08 6E Main Menu 72
Display on Charge 2170 F8 08 7A Full 74
1
Parameter number decimal values are used for programming via RSM commands.
2
SSI number hex values are used for programming via SSI commands.
Page
Number
50
Page 51

Configuration Scanner Options
Parameter
Parameter
Number
1
SSI
Number
2
Default
Quantity Transfer Mode 2181 F8 08 85 BCxQTY 75
Global Quantity Delimiter 2182 F8 08 86 Tab 75
Global Location Delimiter 2183 F8 08 87 Tab 77
Scan & Enter Qty App Parameters
Manual Barcode Entry for Scan & Enter Qty
2159 F8 08 6F Enable 78
App
Manual Quantity Entry for Scan & Enter Qty
2160 F8 08 70 Enable 79
App
Timeout for Scan & Enter Qty App 2161 F8 08 71 6 Seconds 80
Scan/Ent Qty Quantity Delimiter 2184 F8 08 88 Tab 82
Confirm Quantity Timeout 2187 F8 08 8B 2 Seconds 84
Scan & Enter Location App Parameters
Manual Barcode Entry for Scan & Enter
2162 F8 08 72 Enable 85
Location App
Manual Quantity Entry for Scan & Enter
2163 F8 08 73 Enable 86
Location App
LOC Delimiter for Scan & Enter Location App 2164 F8 08 74 Tab 87
Scan/Ent Loc Quantity Delimiter 2185 F8 08 89 Tab 89
Confirm Location Timeout 2188 F8 08 8C 2 Seconds 91
Scan Inventory App Parameters
Manual Barcode Entry for Scan Inventory App 2165 F8 08 75 Enable 92
Manual Quantity Entry for Scan Inventory App 2166 F8 08 76 Enable 93
LOC Delimiter for Scan Inventory App 2167 F8 08 77 Tab 93
Inventory Store 2168 F8 08 78 Temporary 96
Scan Inventory Quantity Delimiter 2186 F8 08 8A Tab 96
1
Parameter number decimal values are used for programming via RSM commands.
2
SSI number hex values are used for programming via SSI commands.
Page
Number
51
Page 52

Configuration Scanner Options
Global Configuration Parameters
Display Timeout
Parameter # 2144 (SSI # F8 08 60)
This parameter sets the amount of time after idle that the display turns off. When Disable Display
Timeout is selected, the display never turns off. The default timeout is 12 Seconds. To select a display
timeout duration, scan one of the following barcodes.
Disable Display Timeout
(0)
6 Seconds
(6)
3 Seconds
(3)
52
Page 53

Configuration Scanner Options
* 12 Seconds
(12)
18 Seconds
(18)
NOTE: If Disable Display Timeout is selected, and the scanner display (outside of the charger) is not in
used for 5 minutes, the screen saver displays including the battery charge status.
Function Key Configurations
Each function key parameter sets the function key to one of the following options:
• Unassigned - Function key is not assigned. Pressing the function key [FN key + Number] does
nothing.
• Enter - Pressing the function key [FN key + Number] acts like pressing Enter.
• Back - Pressing the function key [FN key + Number] acts like pressing Backspace.
• Recall - Pressing the function key [FN key + Number] recalls the previously scanned barcode and
places it in the highlighted field.
• User Defined String - Pressing the function key [FN key + Number] displays the user defined string
programmed in the function key string parameter.
When the function key parameter is set to User Defined String, the string programmed in the ‘Function key
string’ parameter is used. By default, the function key parameter is Unassigned and the function key string
defaults to Undefined. The function key string must be configured correctly, before configuring the
corresponding function key to User Defined String.
53
Page 54

Configuration Scanner Options
Function Key 1 (F1)
Parameter # 2145 (SSI # F8 08 61)
* Unassigned
(0)
Recall
(2)
Enter
(1)
Back
(3)
User Defined String
(4)
54
Page 55

Configuration Scanner Options
55
Page 56

Configuration Scanner Options
Function Key 2 (F2)
Parameter # 2146 (SSI # F8 08 62)
* Unassigned
(0)
Recall
(2)
Enter
(1)
Back
(3)
User Defined String
(4)
56
Page 57

Configuration Scanner Options
Function Key 3 (F3)
Parameter # 2147 (SSI # F8 08 63)
* Unassigned
(0)
Recall
(2)
Enter
(1)
Back
(3)
User Defined String
(4)
57
Page 58

Configuration Scanner Options
Function Key 4 (F4)
Parameter # 2148 (SSI # F8 08 64)
* Unassigned
(0)
Recall
(2)
Enter
(1)
Back
(3)
User Defined String
(4)
58
Page 59

Configuration Scanner Options
Function Key 5 (F5)
Parameter # 2149 (SSI # F8 08 65)
* Unassigned
(0)
Recall
(2)
Enter
(1)
Back
(3)
User Defined String
(4)
59
Page 60

Configuration Scanner Options
Function Key 6 (F6)
Parameter # 2150 (SSI # F8 08 66)
* Unassigned
(0)
Recall
(2)
Enter
(1)
Back
(3)
User Defined String
(4)
60
Page 61

Configuration Scanner Options
Function Key 7 (F7)
Parameter # 2151 (SSI # F8 08 67)
* Unassigned
(0)
Recall
(2)
Enter
(1)
Back
(3)
User Defined String
(4)
61
Page 62

Configuration Scanner Options
Function Key 8 (F8)
Parameter # 2152 (SSI # F8 08 68)
* Unassigned
(0)
Recall
(2)
Enter
(1)
Back
(3)
User Defined String
(4)
62
Page 63

Configuration Scanner Options
Function Key 9 (F9)
Parameter # 2153 (SSI # F8 08 69)
* Unassigned
(0)
Recall
(2)
Enter
(1)
Back
(3)
User Defined String
(4)
63
Page 64

Configuration Scanner Options
Function Key String Parameters
To set the Function Key String:
1. Scan one of the below barcodes.
2. Scan the string characters from the alphanumeric keypad. See Alphanumeric Barcodes on page 104.
3. Scan End of Message on page 110.
NOTE: The maximum length of the string is 20 characters.
Function Key String 1
Parameter # 2171 (SSI # F8 08 7B)
Function Key String 1
Function Key String 2
Parameter # 2172 (SSI # F8 08 7C)
Function Key String 3
Parameter # 2173 (SSI # F8 08 7D)
Function Key String 2
Function Key String 3
64
Page 65
Configuration Scanner Options
Function Key String 4
Parameter # 2174 (SSI # F8 08 7E)
Function Key String 5
Parameter # 2175 (SSI # F8 08 7F)
Function Key String 4
Function Key String 5
Function Key String 6
Parameter # 2176 (SSI # F8 08 80)
Function Key String 7
Parameter #2177 (SSI # F8 08 81)
Function Key String 6
65
Page 66

Function Key String 7
Configuration Scanner Options
66
Page 67

Configuration Scanner Options
Function Key String 8
Parameter #2178 (SSI # F8 08 82)
Function Key String 9
Parameter #2179 (SSI # F8 08 83)
Function Key String 8
Function Key String 9
To configure the function keys using the UI on the display:
• Navigate to the Global Configuration and to the Function Key, then select the appropriate function
key to be configured [between F1 – F9].
• Function key value can be viewed using by selecting View.
• Function key value can be configured by selecting Edit/Assign.
• To specify a User Defined String:
i. Select Enter String > Enter.
ii. Enter the entire string.
iii. Press Enter.
The string is entered in the Function Key String parameter and the Function Key parameter is
configured as User Defined String.
• Optionally, the function key can be configured as Enter, Recall, or Back by selecting the
corresponding radio button in the menu.
• If the function key should be set to Unassigned, do not select any radio button and ensure the string
is empty under the Enter String option.
67
Page 68

Configuration Scanner Options
Max Quantity Value
Parameter # 2190 (SSI # F8 08 8E)
This parameter configures the maximum number of barcodes the user can transmit to the host. This is
applicable to the following standard applications:
• Scan & Enter Quantity
• Scan & Enter Location
• Scan Inventory
When the user inputs a quantity value greater than the Max Qty configured by this parameter, there is an
error pop-up message indicating that the quantity entered is out of bounds.
The default and the maximum value of this parameter is 9999. To set the Max Qty value to the desired
number, please scan the following barcode, followed by 4 digits from the Numeric Barcodes on page 121.
Max Quantity Value
For example, if you would like to set the Max Qty to 100, please scan the above barcode, followed by 4
digits 0, 1, 0, 0 from the numeric barcodes, sheet. To set the Quant ity t o t he maxi mu m val ue of 9999,
scan the below barcode.
Set Max Quantity Value to 9999
68
Page 69

Configuration Scanner Options
Global Manual Barcode Entry
Parameter # 2154 (SSI # F8 08 6A)
This parameter allows manual entry of barcode data in all of the barcode applications. When an application
parameter is changed, it overrides this setting. The default is Disable Global Barcode Entry.
Disable Global Barcode Entry
(0)
Global Manual Quantity Entry
Parameter # 2155 (SSI # F8 08 6B)
This parameter allows manual entry of quantity data in all of the barcode applications. When an application
parameter is changed, it overrides this setting. The default is Enable Global Quantity Entry.
Disable Global Quantity Entry
(0)
* Enable Global Barcode Entry
(1)
69
* Enable Global Quantity Entry
(1)
Page 70

Configuration Scanner Options
Display Brightness
Parameter # 2156 (SSI # F8 08 6C)
The Auto Display Brightness (default) parameter automatically adjusts the brightness according to the
ambient lighting. To disable the Auto Display Brightness feature and select a set display brightness level,
scan one of the following barcodes.
* Enable Auto Display Brightness
(1)
Dimmest Display Brightness
(3)
Medium Display Brightness
(2)
Dim Display Brightness
(4)
70
Page 71

Auto Display Brightness (continued)
Bright Display Brightness
(5)
Configuration Scanner Options
Brightest Display Brightness
(6)
Keypad Backlight
Parameter # 2157 (SSI # F8 08 6D)
The Auto Keypad Backlight (default) automatically enables or disables the backlight according to the
ambient lighting. To enable or disable the Keypad Backlight manually, scan Disable Keypad Backlight or
Enable Keypad Backlight.
Disable Keypad Backlight
(0)
71
Page 72

Keypad Backlight (continued)
* Auto Keypad Backlight
(2)
Configuration Scanner Options
Enable Keypad Backlight
(1)
Home Key Launch
Parameter # 2158 (SSI # F8 08 6E)
The Home Key Launch feature is programmable and returns to the Navigator (Main Menu) by default.
To select a different home screen, scan one of the following barcodes.
NOTE: When Disable Home Key Launch is selected, nothing happens when the Home key is pressed.
Disable Home Key Launch
(0)
72
* Navigator (Main Menu)
(1)
Page 73

Home Key Launch (continued)
Scan & Enter Quantity
(2)
Configuration Scanner Options
Scan, Quantity, Location
(3)
Scan Inventory
(4)
Image Viewer
(6)
O/I Match
(5)
73
Page 74

Configuration Scanner Options
Display on Charge
Parameter # 2170 (SSI # F8 08 7A)
Scan a barcode below to configure when the display turns on while charging. The default is Display on
Charge Full.
Display on Charge Half Full
(1)
Display on Charge Three Quarters Full
(2)
* Display on Charge Full
(3)
NOTE: The screen saver displays with the battery charge status after 1 minute in the charger and the
display being on.
74
Page 75

Configuration Scanner Options
Quantity Transfer Mode
Parameter # 2181 (SSI # F8 08 85)
When set to BC<Delimiter>QTY, the quantity is appended to the decode data, with the delimiter configured
by the QTY Delimiter parameter. When set to BCxQTY, the barcode is transmitted QTY times.
* BCxQTY
(1)
Global Quantity Delimiter
Parameter # 2182 (SSI # F8 08 86)
Delimiter between BC and QTY, when the Quantity transfer mode is set to BC<Delimiter>QTY. This is
applicable to all the applications, unless overridden by an app specific Quantity Delimiter.
CR (Carriage Return)
(13)
BC<Delimiter>QTY
(2)
75
LF (Line Feed)
(10)
Page 76

Space
(32)
Configuration Scanner Options
* Tab
(9)
, (Comma)
(44)
; (Semicolon)
(59)
: (Colon)
(58)
76
= (Equals)
(61)
Page 77

Configuration Scanner Options
Global Location Delimiter
Parameter # 2183 (SSI # F8 08 87)
This is applicable to all the applications, unless overridden by an app specific Location Delimiter.
CR (Carriage Return)
(13)
Space
(32)
LF (Line Feed)
(10)
* Tab
(9)
, (Comma)
(44)
77
Page 78

Global Location Delimiter (continued)
; (Semicolon)
(59)
Configuration Scanner Options
: (Colon)
(58)
Local Configuration Parameters
Manual Barcode Entry for Scan & Enter Qty App
Parameter # 2159 (SSI # F8 08 6F)
NOTE: When this parameter is disabled and a barcode is scanned, the barcode field is directly populated.
The default is Disable Manual Barcode Entry for Scan & Enter Qty App. This parameter overrides the
Global Manual Barcode Entry on page 69.
= (Equals)
(61)
78
Page 79

Configuration Scanner Options
Disable Manual Barcode Entry
for Scan & Enter Qty App
(0)
* Enable Manual Barcode Entry
for Scan & Enter Qty App
(1)
Manual Quantity Entry for Scan & Enter Qty App
Parameter # 2160 (SSI # F8 08 70)
The default is Enable Manual Quantity Entry for Scan & Enter Qty App. When enabled, and an item is
scanned, the quantity defaults to a value of one and the numeric keys may be used to manually enter a
different quantity. This parameter overrides the Global Manual Barcode Entry on page 69.
Disable Manual Quantity Entry
for Scan & Enter Qty App
(0)
79
* Enable Manual Quantity Entry
for Scan & Enter Qty App
(1)
Page 80

Configuration Scanner Options
Timeout for Scan & Enter Qty App
Parameter # 2161 (SSI # F8 08 71)
When data is entered into the Quantity field, the quantity timer starts (the default is 6 Seconds). When the
quantity timer expires, the data is submitted to the POS and the app returns to a ready state.
NOTE: When the manual entry of quantity is disabled, the timeout is not applicable.
Disable Timeout
for Scan & Enter Qty App
(0)
* 6 Seconds
(6)
3 Seconds
(3)
9 Seconds
(9)
80
Page 81

12 seconds
(12)
Configuration Scanner Options
18 seconds
(18)
81
Page 82
Configuration Scanner Options
Scan/Ent Qty Quantity Delimiter
Parameter # 2184 (SSI # F8 08 88)
Delimiter between BC and QTY, when the Quantity Transfer Mode is set to BC<Delimiter>QTY for
Scan/Ent QTY application.
CR (Carriage Return)
(13)
Space
(32)
LF (Line Feed)
(10)
* Tab
(9)
, (Comma)
(44)
82
Page 83

; (Semicolon)
(59)
Configuration Scanner Options
: (Colon)
(58)
= (Equals)
(61)
83
Page 84

Configuration Scanner Options
Confirm Quantity Timeout
Parameter # 2187 (SSI # F8 08 8B)
This parameter sets the duration that the quantity transmission confirmation message appears on the
screen after the barcode is transmitted. To disable the confirmation message, set the value to 0.
0 seconds (disable)
(0)
* 2 seconds
(2)
1 second
(1)
5 seconds
(5)
84
Page 85

Configuration Scanner Options
Manual Barcode Entry for Scan & Enter Location App
Parameter # 2162 (SSI # F8 08 72)
The default is Enable Manual Barcode Entry for Scan & Enter Location App. This parameter overrides
the Global Manual Barcode Entry on page 69.
Disable Manual Barcode Entry
for Scan & Enter Location App
(0)
* Enable Manual Barcode Entry
for Scan & Enter Location App
(1)
85
Page 86

Configuration Scanner Options
Manual Quantity Entry for Scan & Enter Location App
Parameter # 2163 (SSI # F8 08 73)
The default is Enable Manual Quantity Entry for Scan & Enter Location App. When an item is scanned,
the quantity defaults to a value of one and the numeric keys may be used to manually enter a different
quantity.
Disable Manual Quantity Entry
for Scan & Enter Location App
This parameter overrides the Global Manual Barcode Entry on page 69.
(0)
* Enable Manual Quantity Entry
for Scan & Enter Location App
(1)
86
Page 87

Configuration Scanner Options
LOC Delimiter for Scan & Enter Location App
Parameter # 2164 (SSI # F8 08 74)
The Delimiter is applied between the barcode and the location. The default is Tab.
CR (Carriage Return)
(13)
LOC Delimiter for Scan & Enter Location App (continued)
Space
(32)
LF (Line Feed)
(10)
* Tab
(9)
, (Comma)
(44)
87
Page 88

; (Semicolon)
(59)
Configuration Scanner Options
: (Colon)
(58)
= (Equals)
(61)
88
Page 89

Configuration Scanner Options
Scan & Enter Loc Quantity Delimiter
Parameter # 2185 (SSI # F8 08 89)
Delimiter between BC and QTY, when the Quantity Transfer Mode is set to BC<Delimiter>QTY for
Scan/Ent Loc application.
CR (Carriage Return)
(13)
Space
(32)
LF (Line Feed)
(10)
* Tab
(9)
89
Page 90
, (Comma)
(44)
Configuration Scanner Options
: (Colon)
(58)
; (Semicolon)
(59)
= (Equals)
(61)
90
Page 91

Configuration Scanner Options
Confirm Location Timeout
Parameter # 2188 (SSI # F8 08 8C)
This parameter sets the duration that the Location/Qty transmission confirmation message displays on the
screen after the barcode is transmitted. To disable the confirmation message, set the value to 0.
0 seconds (disable)
(0)
* 2 seconds
(2)
1 second
(1)
5 seconds
(5)
91
Page 92

Configuration Scanner Options
Manual Barcode Entry for Scan Inventory App
Parameter # 2165 (SSI # F8 08 75)
The default is Disable Manual Barcode Entry for Scan Inventory App. This parameter overrides the
Global Manual Barcode Entry on page 69.
Disable Manual Barcode Entry
for Scan Inventory App
(0)
* Enable Manual Barcode Entry
for Scan Inventory App
(1)
92
Page 93

Configuration Scanner Options
Manual Quantity Entry for Scan Inventory App
Parameter # 2166 (SSI # F8 08 76)
The default is Disable Manual Quantity Entry for Scan Inventory App. When an item is scanned, the
quantity defaults to a value of one and the numeric keys may be used to manually enter a different
quantity.
Disable Manual Quantity Entry
for Scan Inventory App
This parameter overrides the Global Manual Barcode Entry on page 69.
(0)
LOC Delimiter for Scan Inventory App
Parameter # 2167 (SSI # F8 08 77)
The Delimiter is applied between the barcode and the inventory. The default is Tab.
* Enable Manual Quantity Entry
for Scan Inventory App
(1)
93
Page 94

Configuration Scanner Options
CR (Carriage Return)
(13)
LOC Delimiter for Scan Inventory App (continued)
LF (Line Feed)
(10)
Space
(32)
, (Comma)
(44)
* Tab
(9)
94
Page 95

; (Semicolon)
(59)
Configuration Scanner Options
: (Colon)
(58)
= (Equals)
(61)
95
Page 96

Configuration Scanner Options
Inventory Store
Parameter # 2168 (SSI # F8 08 78)
The default for inventory storage is Temporary Inventory Store.
NOTE: Frequently storing data with the setting Permanent Inventory Store shortens the life of the
non-volatile memory.
* Temporary Inventory Store
(0)
Scan Inventory Quantity Delimiter
Parameter # 2186 (SSI # F8 08 8A)
Delimiter between BC and QTY, when the Quantity Transfer Mode is set to BC<Delimiter>QTY for Scan
Inventory application.
CR (Carriage Return)
(13)
Permanent Inventory Store
(1)
96
LF (Line Feed)
(10)
Page 97

Space
(32)
Configuration Scanner Options
* Tab
(9)
, (Comma)
(44)
Scan Inventory Quantity Delimiter (continued)
; (Semicolon)
(59)
: (Colon)
(58)
97
= (Equals)
(61)
Page 98

Configuration Scanner Options
98
Page 99

Maintenance & Technical Specifications
Maintenance
Known Harmful Ingredients
The following chemicals are known to damage the plastics on Zebra scanners and should not come in
contact with the device:
• Acetone
• Ammonia solutions
• Aqueous or alcoholic alkaline solutions
• Aromatic and chlorinated hydrocarbons
• Benzene
• Carbolic acid
• Compounds of amines or ammonia
• Ethanolamine
• Ethers
• Ketones
• TB-lysoform
• Toluene
• Trichloroethylene.
Approved Cleaners for the Scanner
• Isopropyl alcohol 70% (including pre-moistened wipes).
Cleaning the Scanner
Routinely cleaning the exit window is required. A dirty window may affect scanning accuracy. Do not allow
any abrasive material to touch the window.
To clean the scanner:
1. Dampen a soft cloth with one of the approved cleaning agents listed above or use pre-moistened
wipes.
99
Page 100

Maintenance & Technical Specifications
Gently wipe all surfaces, including the front, back, sides, top and bottom. Never apply liquid directly to
2.
the scanner. Be careful not to let liquid pool around the scanner window, trigger, cable connector or any
other area on the device.
3. Be sure to clean the trigger and in between the trigger and the housing (use a cotton-tipped applicator
to reach tight or inaccessible areas).
4. Do not spray water or other cleaning liquids directly into the exit window.
5. Wipe the scanner exit window with a lens tissue or other material suitable for cleaning optical material
such as eyeglasses.
6. Immediately dry the scanner window after cleaning with a soft non-abrasive cloth to prevent streaking.
7. Allow the unit to air dry before use.
8. Scanner connectors:
a. Dip the cotton portion of a cotton-tipped applicator in isopropyl alcohol.
b. Rub the cotton portion of the cotton-tipped applicator back-and-forth across the connector on the
Zebra scanner at least 3 times. Do not leave any cotton residue on the connector.
c. Use the cotton-tipped applicator dipped in alcohol to remove any grease and dirt near the connector
area.
d. Use a dry cotton tipped applicator and rub the cotton portion of the cotton-tipped applicator
back-and-forth across the connectors at least 3 times. Do not leave any cotton residue on the
connectors.
Technical Specifications
For a complete list of specifications, refer to the DS36X8 Product Reference Guide.
Table 5 Technical Specifications
Item Description
Physical Characteristics
Display Dimensions 2 in. diagonal QVGA display (1.5 in. x 1.25 in.)
Weight 510 g (including battery)
Power 3.2V @ 700mA (RMS typical)
Color Industrial Green
Performance
3.6V @ 620mA (RMS typical)
4.2V @ 530mA (RMS typical)
Light Source
Minimum Resolution
Aiming pattern: 655 nm Laser / Illumination: Warm white LEDs
Code 39 3 mil
UPC 40% 5.2 mil
PDF417 5 mil
Data Matrix 7.5 mil
100
 Loading...