

Page 1

Cloud Connect
for RFID
Deployment Guide
MN-004035-01EN Rev. A
Page 2

ZEBRA and the stylized Zebra head are trademarks of Zebra Technologies Corporation, registered in
many jurisdictions worldwide. All other trademarks are the property of their respective owners.
© 2020 Zebra Technologies Corporation and/or its affiliates. All rights reserved.
Information in this document is subject to change without notice. The software described in this document
is furnished under a license agreement or nondisclosure agreement. The software may be used or copied
only in accordance with the terms of those agreements.
For further information regarding legal and proprietary statements, please go to:
SOFTWARE:www.zebra.com/linkoslegal
COPYRIGHTS:www.zebra.com/copyright
WARRANTY:www.zebra.com/warranty
END USER LICENSE AGREEMENT: www.zebra.com/eula
Terms of Use
Proprietary Statement
This manual contains proprietary information of Zebra Technologies Corporation and its subsidiaries
(“Zebra Technologies”). It is intended solely for the information and use of parties operating and
maintaining the equipment described herein. Such proprietary information may not be used, reproduced,
or disclosed to any other parties for any other purpose without the express, written permission of Zebra
Technologies.
Product Improvements
Continuous improvement of products is a policy of Zebra Technologies. All specifications and designs are
subject to change without notice.
Liability Disclaimer
Zebra Technologies takes steps to ensure that its published Engineering specifications and manuals are
correct; however, errors do occur. Zebra Technologies reserves the right to correct any such errors and
disclaims liability resulting therefrom.
Limitation of Liability
In no event shall Zebra Technologies or anyone else involved in the creation, production, or delivery of the
accompanying product (including hardware and software) be liable for any damages whatsoever
(including, without limitation, consequential damages including loss of business profits, business
interruption, or loss of business information) arising out of the use of, the results of use of, or inability to
use such product, even if Zebra Technologies has been advised of the possibility of such damages. Some
jurisdictions do not allow the exclusion or limitation of incidental or consequential damages, so the above
limitation or exclusion may not apply to you.
Publication Date
September 22, 2020
2
Page 3

Contents
List of Figures..................................................................................................................................... 5
About This Document ........................................................................................................................ 6
Introduction ...................................................................................................................... 6
Supported Readers.......................................................................................................... 6
Chapter Descriptions........................................................................................................ 6
Notational Conventions .................................................................................................... 6
Icon Conventions ............................................................................................................. 7
Related Documents and Software ................................................................................... 7
Service Information .......................................................................................................... 7
Overview.............................................................................................................................................. 9
Introduction ...................................................................................................................... 9
System Overview ............................................................................................................. 9
Cloud Service ......................................................................................................... 10
Cloud Agent............................................................................................................ 10
Reader Manager..................................................................................................... 10
Radio Control.......................................................................................................... 10
Deployment Modes........................................................................................................................... 11
Introduction .................................................................................................................... 11
Pure Cloud Deployment................................................................................................. 11
Hybrid Deployment......................................................................................................... 12
Local Deployment .......................................................................................................... 12
Operation Modes .............................................................................................................................. 14
Introduction .................................................................................................................... 14
Simple ............................................................................................................................ 14
Inventory ........................................................................................................................ 14
3
Page 4

Contents
Portal.............................................................................................................................. 15
Conveyer........................................................................................................................ 15
Setting Up Cloud Connect for RFID ................................................................................................ 16
Introduction .................................................................................................................... 16
Enrolling the Reader ...................................................................................................... 16
Disenrolling the Reader.................................................................................................. 17
Configuring Deployment Modes..................................................................................... 18
Exporting/Importing Cloud Configuration ....................................................................... 18
Login....................................................................................................................... 18
Exporting the Cloud Configuration.......................................................................... 19
Importing Cloud Configuration................................................................................ 20
Cloud Connect for RFID Configuration .......................................................................... 21
Control Section ....................................................................................................... 21
Local Access via REST.................................................................................... 22
Zebra Data Services ........................................................................................ 22
Data Section ........................................................................................................... 23
Zebra Data Services ........................................................................................ 24
Local HTTP/HTTPS Post Server...................................................................... 25
Management Section.............................................................................................. 26
Local REST ...................................................................................................... 27
Zebra Data Services ........................................................................................ 28
Appendix ........................................................................................................................................... 29
Default Cloud Connect for RFID Configuration .............................................................. 29
Sample Configuration for Local Deployment.................................................................. 32
4
Page 5

List of Figures
Figure 1: Cloud Connect for RFID System Overview .................................................... 10
Figure 2: Pure Cloud Deployment ................................................................................. 11
Figure 3: Hybrid Deployment With On Premise Data Interface ..................................... 12
Figure 4: Local Deployment With On Premise Data, Control
and Management Interfaces ........................................................................... 13
Figure 5: Reader Pre-enrolled in Cloud Agent Service ................................................. 17
Figure 6: Reader Enrolled in Cloud Agent Service ....................................................... 17
Figure 7: JSON Schema for Control Interface Configuration ........................................ 21
Figure 8: JSON Schema for Data Interface Configuration ............................................ 23
Figure 9: JSON Schema for Management Interface Configuration ............................... 27
5
Page 6

About This Document
Introduction
This guide provides information about the Cloud Connect for RFID feature in the FX Series readers. It
explains the system’s overall architecture, deployment modes, and configuration of different deployment
modes.
IMPORTANT: If you have a problem with your equipment, contact Zebra Global Customer Support for
your region. Contact information is available at: zebra.com/support
Supported Readers
• FX7500
• FX9600
Chapter Descriptions
.
Topics covered in this guide are as follows:
• Overview provides a summary on Cloud Connect
and RFID tag data collection for the FX Series RFID readers.
• Deployment Modes provides information on the three different modes of deployment.
• Operation Modes provides information on configuring the radio to different modes of operation.
• Setting Up Cloud Connect for RFID provides information on setting up Cloud Connect for RFID.
• Appendix provides the default Cloud Connect for RFID configuration.
Notational Conventions
The following conventions are used in this document:
•Bold text is used to highlight the following:
• Dialog box, window and screen names
• Drop-down list and list box names
• Check box and radio button names
• Icons on a screen
™ for RFID, the cloud-based management, control,
6
Page 7

• Key names on a keypad
• Button names on a screen.
• Bullets (•) indicate:
• Action items
• Lists of alternatives
• Lists of required steps that are not necessarily sequential.
• Sequential lists (such as those that describe step-by-step procedures) appear as numbered lists.
Icon Conventions
The documentation set is designed to give the reader more visual clues. The following graphic icons are
used throughout the documentation set. These icons and their associated meanings are described below.
NOTE: The text here indicates information that is supplemental for the user to know and that is not
required to complete a task.
IMPORTANT: The text here indicates information that is important for the user to know.
About This Document
CAUTION: If the precaution is not heeded, the user could receive minor or moderate injury.
WARNING: If danger is not avoided, the user CAN be seriously injured or killed.
Related Documents and Software
The following documents provide more information about the readers.
• FX7500 RFID Reader Quick Start Guide
• FX9600 RFID Reader Quick Reference Guide
• FX Series RFID Fixed Reader Integration Reference Guide
• To download firmware, go to
https://www.zebra.com/apps/dlmanager?dlp=-227178c9720c025483893483886ea540bd07dd0f98737
52cf891686eb495040ba85f97bf163f9fd12080ee1978f57c98463270ae549b1b5c65e6acbef65100a197
8a205f64aae7c7ef1d957c10a43f885d113b42e079e0119302a877e3ec811eb70ea4125c716c46b3a33
2b59ddd9f8&c=us&l=en.
For the latest version of this guide and all guides, go to zebra.com/support
Service Information
.
If you have a problem with your equipment, contact Zebra Global Customer Support for your region.
Contact information is available at: zebra.com/support
When contacting support, please have the following information available:
• Serial number of the unit
• Model number or product name
7
.
Page 8

About This Document
• Software/firmware type or version number
Zebra responds to calls by email, telephone or fax within the time limits set forth in support agreements.
If your problem cannot be solved by Zebra Customer Support, you may need to return your equipment for
servicing and will be given specific directions. Zebra is not responsible for any damages incurred during
shipment if the approved shipping container is not used. Shipping the units improperly can possibly void
the warranty.
If you purchased your Zebra business product from a Zebra business partner, contact that business
partner for support.
8
Page 9

Overview
Introduction
Cloud Connect for RFID provides cloud-based management, control, and RFID tag data collection for the
FX Series RFID readers (FX7500, FX9600). The Cloud Connect for RFID feature enables connectivity to
the cloud platform to provide loT capabilities to the reader. Once connected to the cloud, the readers can
be managed and controlled using a REST API interface via the cloud. The reader tag data is also pushed
to the cloud to be consumed by the cloud service.
The Cloud Connect for RFID feature provides the three interfaces as listed below.
• Management interface: Used to perform management actions on the reader (for example, firmware
upgrade, getting reader configuration, and setting reader configuration).
• Control interface: Used to perform control actions on the reader (for example, configuring the radio
mode, starting/stopping the tag reads).
• Data interface: Used to consume the RFID tag data from the reader.
These interfaces can be configured independently to allow for access via cloud or locally within the private
network. Depending on how the Cloud Connect for RFID interfaces are configured, there are three
possible deployment modes as described in the chapter Deployment Modes.
System Overview
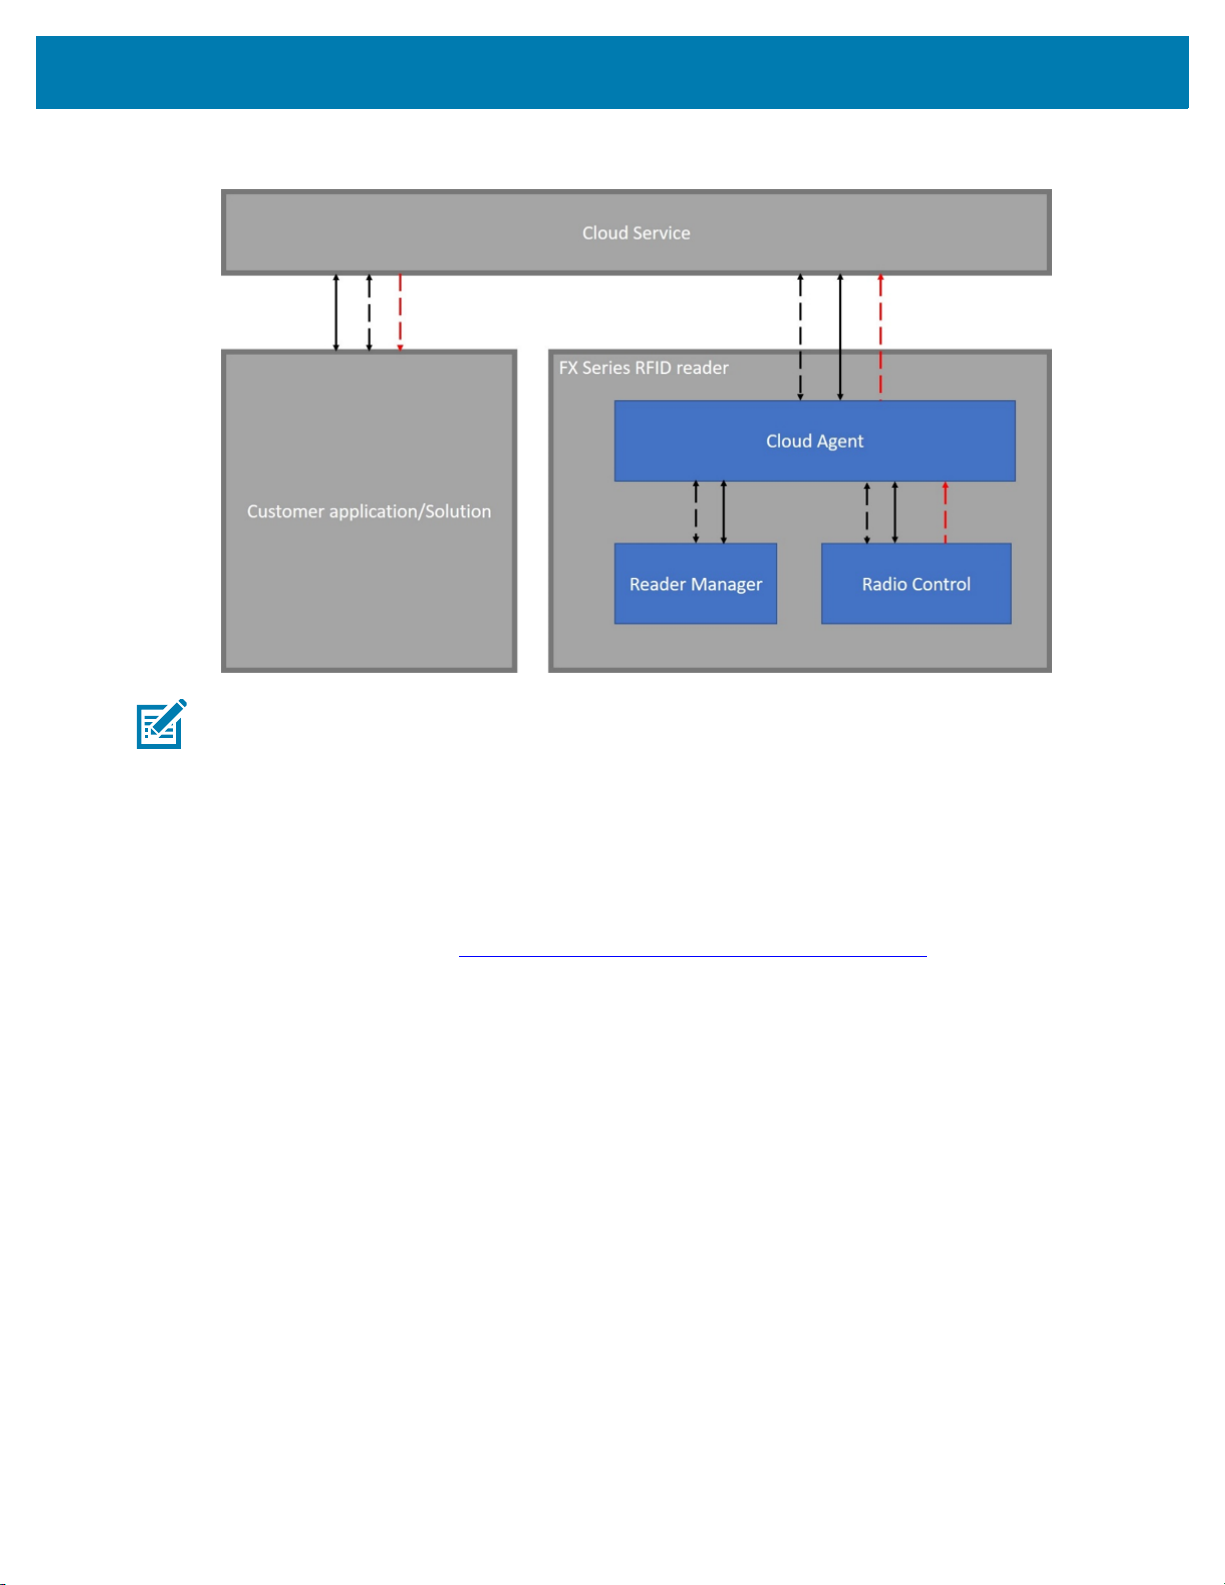
As illustrated in Figure 1, the Cloud Connect for RFID system has the following components.
• Cloud Service
• Cloud Agent
• Radio Control
9
Page 10
Overview
Figure 1 Cloud Connect for RFID System Overview
NOTE: The solid lines represent the Management interfaces, the dotted black lines represent the Control
interface and the dotted red lines represent the Data interface.
Cloud Service
The Cloud Connect for RFID feature enables the Cloud connectivity to a Cloud service and currently the
only cloud service that is supported is Zebra Data Services (Savanna Cloud). Zebra Data Services is
Zebra's proprietary cloud platform that empowers the user to build secure, scalable digital services with
ease and speed. This solution aggregates and analyzes data from multiple edge devices and services,
creating data-powered environments to provide real-time guidance and insights. For more information on
Zebra Data Services go to: https://developer.zebra.com/community/tools/eaidata
The Cloud Service exposes a REST API interface that can be used to manage, configure, and read tag
data from RFID readers.
Cloud Agent
The Cloud Agent is the reader-resident component responsible for connecting to the cloud service and
performing the actions that are requested by the REST APIs. The Cloud Agent also collects the tag data
from the radio control and pushes them out on the Data interface.
Reader Manager
Reader Manager is the process in the reader that is responsible for performing all reader configuration and
management operations. The Radio Control talks to the reader manager via a socket interface using the
RM XML commands.
.
Radio Control
Radio Control configures, controls, and maintains a connection to the RFID radio. Radio control receives
the tag read events from the radio and sends them to the Cloud Agent which in turn passes it onto the Data
interface.
10
Page 11

Deployment Modes
Introduction
Cloud Connect for RFID can be setup in three different modes of deployment.
• Pure Cloud deployment
• Hybrid deployment
• Local deployment
All of these deployment modes require that the reader be enrolled with the Zebra Data Services. For more
information on the enrollment go to https://developer.zebra.com/docs/enrolling-fx-reader
Pure Cloud Deployment
In a Pure Cloud deployment, the Management, Control, and Data interfaces of the Cloud Connect for RFID
feature are all configured to connect to the cloud services platform. The APIs provided by the Zebra Data
Services can be used to manage/control the reader and get the tag data. Figure 2 illustrates a Pure Cloud
deployment and the flow of different interfaces.
.
NOTE: The solid lines in Figure 2 represent the Management interfaces, the dotted black lines represent
the Control interface and the dotted red lines represent the Data interface.
Figure 2 Pure Cloud Deployment
11
Page 12

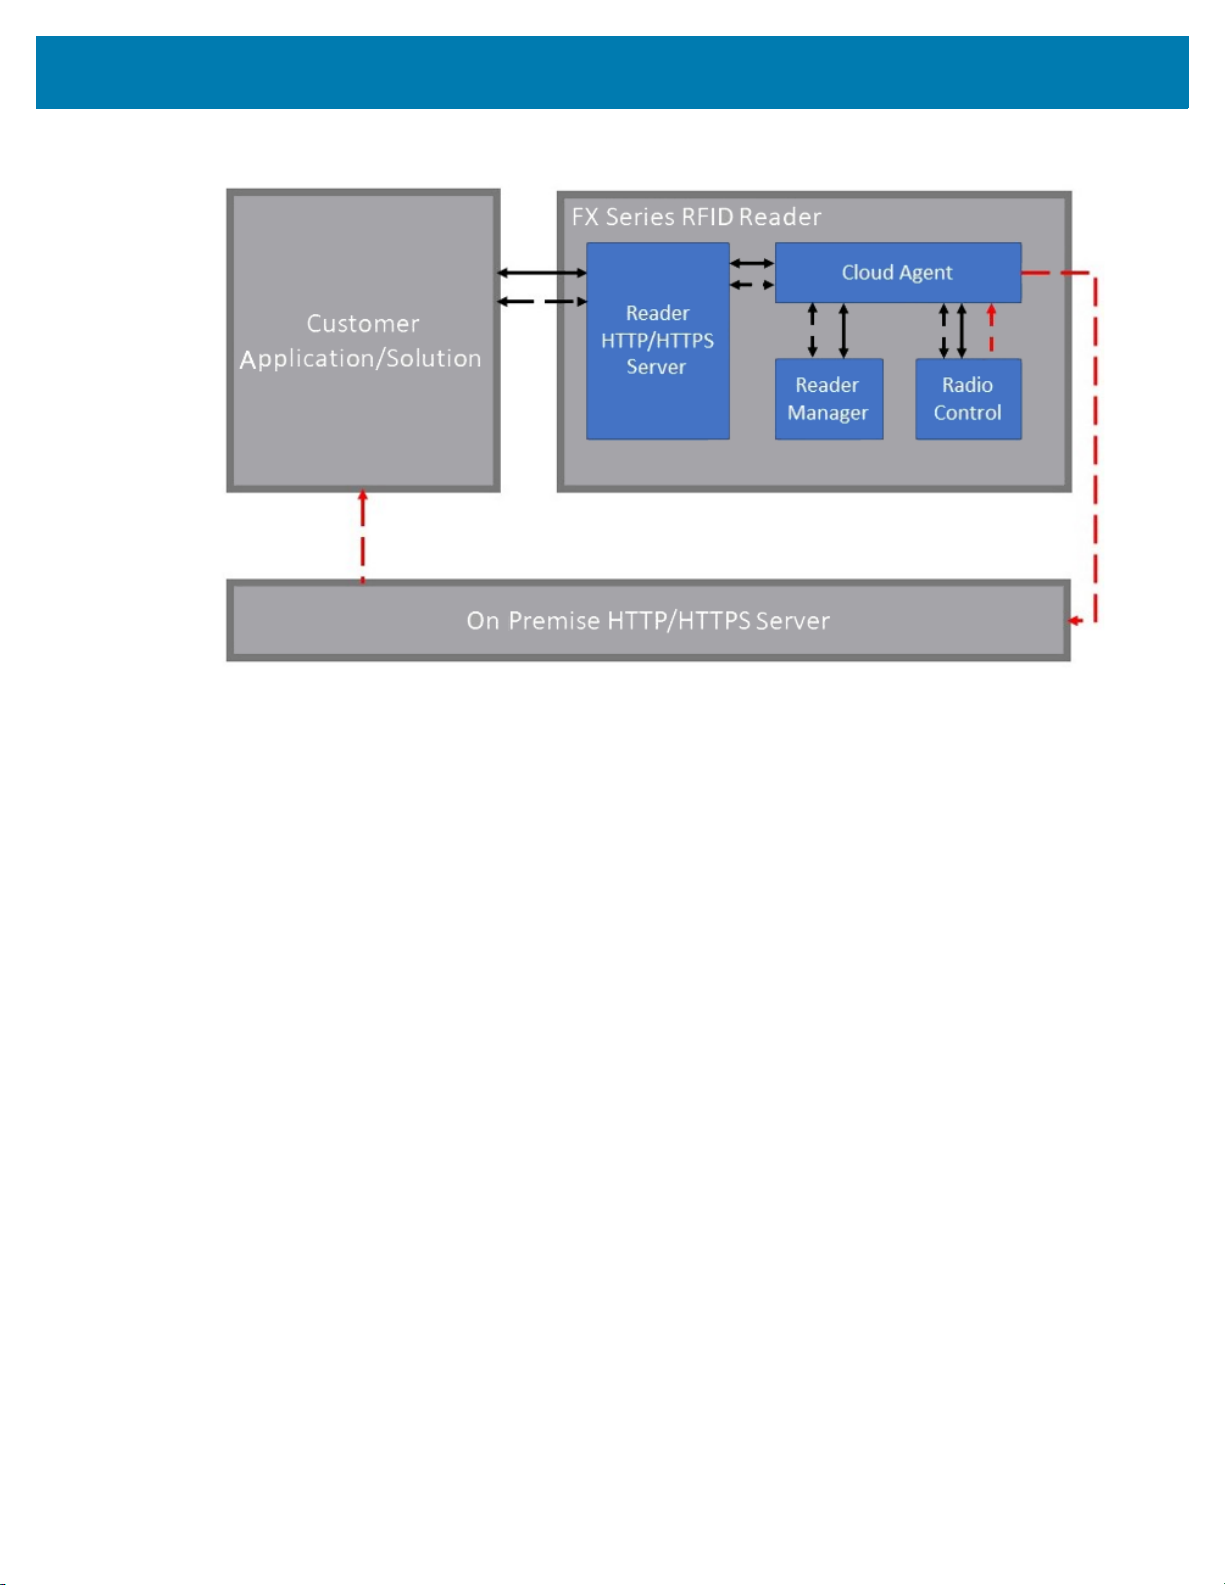
Hybrid Deployment
In a Hybrid deployment, the Control, Management, and Data interfaces can be configured to connect to
different endpoints. For example, the Control and Management interfaces can be connected to the cloud
services platform and the Data interface can be configured to connect to a local HTTP/HTTPS server. This
scenario is illustrated in Figure 3. When the Data interface is configured to connect to the local
HTTP/HTTPS server, the reader will send tag data information to the HTTP/HTTPS server as POST
requests.
NOTE: The solid lines in Figure 3 represent the Management interfaces, the dotted black lines represent
the Control interface and the dotted red lines represent the Data interface. The Control and management
functionalities can be exercised through the ZDS REST APIs.
Figure 3 Hybrid Deployment With On Premise Data Interface
Deployment Modes
Local Deployment
In a local deployment, the reader is setup to have all the interfaces (Management, Control and Data)
exposed locally so that once enrolled, the reader does not have to be connected to the Internet. When
setup this way the Control and Management interfaces are exposed as REST APIs on the reader that can
be directly accessed as shown in the figure below. The data is sent as HTTP/HTTPS POST request to the
specified server. This is illustrated in Figure 4.
NOTE: The solid lines in Figure 4 represent the Management interfaces, the dotted black lines represent
the Control interface and the dotted red lines represent the Data interface. The Control and Management
functionalities can be exercised through the local REST APIs.
12
Page 13
Deployment Modes
Figure 4 Local Deployment With On Premise Data, Control and Management Interfaces
13
Page 14

Operation Modes
Introduction
Cloud Connect for RFID provides the ability to configure the radio to different modes of operation that
optimize the radio configuration based on intended use case. Once configured, the mode can be started
using the START REST API and will continue to operate until the STOP REST API is called. The following
modes are supported in Cloud Connect for RFID.
• Simple
• Inventory
• Portal
• Conveyer
Simple
Simple mode configures the radio to read and report all unique tags in the field of view of the radio.
Inventory
By default:
• The radio attempts to read tags on all antennas. This can be adjusted using the Antennas object when
setting the mode.
• The radio reports all unique tags. This can be adjusted using the Filter object when setting the mode.
Inventory mode configures the radio to read tags and report all unique tags for each antenna on a periodic
interval. Additional meta-data (i.e., peak RSSI and number of reads for each antenna during the interval) is
reported.
By default:
• The radio attempts to read tags on all antennas. This can be adjusted using the Antennas object when
setting the mode.
• The radio reports all unique tags once. This can be adjusted using the Filter object when setting the
mode.
• The radio reports tags every second. This can be adjusted using the Interval object when setting the
mode.
14
Page 15

Portal
Conveyer
Operation Modes
Portal mode configures the radio to report all unique tags that pass by each antenna immediately following
a GPI event. The GPI event signals the beginning of the read period. As soon as the GPI event triggers the
radio, the radio continues to read tags until no new unique tags are read for a configurable stop interval.
Once the radio stops reading tags, it waits for the next GPI event to start the process again.
By default:
• The radio attempts to read tags on all antennas. This can be adjusted using the Antennas object when
setting the mode.
• The radio reports all unique tags once. This can be adjusted using the Filter object when setting the
mode.
• The radio waits for a LOW signal on GPI 1. This can be adjusted using the StartTrigger object when
setting the mode.
• The radio continues to read until no new unique tags have been read for 3 seconds. This can be
adjusted using the StopInterval object when setting the mode.
Conveyer mode configures the radio to read tags and report all unique tags for each antenna.
By default:
• The radio attempts to read tags on all antennas. This can be adjusted using the Antennas object when
setting the mode.
• The radio reports all unique tags once. This can be adjusted using the Filter object when setting the
mode.
15
Page 16

Setting Up Cloud Connect for RFID
Introduction
Setting up Cloud Connect for RFID is a two-step process.
1. Enroll the reader.
2. Configure the interfaces.
Enrolling the Reader
Enrollment is the first step whereby the reader is registered as an IoT device with the cloud service
provider. After enrollment, the reader is connected to cloud application by an IoT agent service on the
reader that enables control, management, and data channels for cloud app to communicate with the
reader.
Currently the reader is configured out of the box to enroll with the Zebra Data Services. To enroll the
reader to Zebra Data Services, follow the steps below.
1. Register and generate the Claim Code from the Zebra Data Services platform. Go to
https://developer.zebra.com/docs/enroll-fx-reader
token.
2. Open a web browser to connect to the FX reader using the host name or IP address.
3. Click Communication > Cloud.
4. The following parameters are required to enroll the reader. Values for these parameters are obtained
after creating and registering your Cloud application and need to be keyed into this page.
a. Claim Code - Secret code for enrolling the device (step 1).
b. Auto Connect - Automatically connect to service once reader is enrolled.
5. Enroll. Click enroll to Enroll the reader to Cloud with Claim Code entered.
After enrolling the reader, the Enrollment Status indicates the reader's current state of Cloud enrollment.
The Connection status indicates the status of communication channel from Cloud IoT agent on the reader
to cloud service.
Once enrolled, if reader's Cloud Agent service is disconnected, click Connect to establish a connection. An
existing connection may be terminated by clicking Disconnect.
Note: Connection will be terminated if reader is not enrolled.
NOTE: The connection is terminated if the reader is not enrolled.
for more information on how to generate the claim
16
Page 17

Setting Up Cloud Connect for RFID
Figure 5 Reader Pre-enrolled in Cloud Agent Service
Figure 6 Reader Enrolled in Cloud Agent Service
Disenrolling the Reader
To disenroll the reader from the Cloud:
1. From the Reader Communication Parameters screen, click Disenroll. The command is sent to the
reader and the device is un-enrolled from the Cloud.
2. To delete the device from the Zebra Data Services, see developer.zebra.com/devices/reader.
3. Click Delete on the line next to your reader on the My Devices page.
17
Page 18

Setting Up Cloud Connect for RFID
Configuring Deployment Modes
As described earlier, the Cloud Connect for RFID feature can be configured to one of the three deployment
modes. The deployment mode can be configured by importing a JSON file that configures the
management, control, and Data interfaces. Each of these interfaces can be configured to either connect to
a cloud service or allow local access.
To configure the interfaces to any of the deployment modes, the steps below must be performed.
1. Export the Cloud Connect for RFID configuration file from the reader by sending an RM command to
the reader.
2. Edit the Cloud Connect for RFID configuration file to configure the interfaces as required.
3. Import the Cloud Connect for RFID configuration file into the reader by sending an RM command that
contains the contents of the JSON file.
Exporting/Importing Cloud Configuration
The Cloud Connect for RFID configuration can be exported or imported via an RM command. In order to
either export or import the configuration, a login must be performed.
Login
To login to the reader the following RM command can be used. Save the following XML command in a file
called login.xml. Replace the username and password fields with the username and password of the
reader.
<?xml version="1.0" encoding="UTF-8"?>
<rm:command epcglobal:creationDate="2001-12-17T09:30:47.0Z"
epcglobal:schemaVersion="0.0"
xsi:schemaLocation="urn:epcglobal:rm:xsd:1 ../../../schemas/RmCommand.xsd"
xmlns:xsi="http://www.w3.org/2001/XMLSchema-instance"
xmlns:rm="urn:epcglobal:rm:xsd:1"
xmlns:epcglobal="urn:epcglobal:xsd:1"
xmlns:motorm="urn:motorfid:rm:xsd:1">
<rm:id>99</rm:id>
<rm:targetName>MyFX7500</rm:targetName>
<motorm:readerDevice>
<motorm:doLogin>
<motorm:username>admin</motorm:username>
<motorm:password>change</motorm:password>
<motorm:forceLogin>true</motorm:forceLogin>
</motorm:doLogin>
</motorm:readerDevice>
</rm:command>
To send the login command above to the reader, the following CURL command can be used.
curl --location --request GET 'http://<readerip>/control'
--header 'Content-Type: application/xml'
--data-binary "@login.xml"
18
Page 19

Setting Up Cloud Connect for RFID
The response from the reader includes a session ID that must be used in further RM commands. The XML
below is a sample response from the reader.
<g1:reply xmlns:g1="urn:epcglobal:rm:xsd:1"
xmlns:g2="urn:epcglobal:xsd:1"
g2:creationDate="2010-02-10T10:10:10Z"
g2:schemaVersion="1">
<g1:id>99</g1:id>
<g1:resultCode>0</g1:resultCode>
<g3:readerDevice xmlns:g3="urn:motorfid:rm:xsd:1">
<g3:doLogin>
<g3:sessionID>sessionID </g3:sessionID>
</g3:doLogin>
</g3:readerDevice>
</g1:reply>
Exporting the Cloud Configuration
The cloud configuration can be exported using the following RM command. Replace the sessionID with the
session ID obtained in the previous command and save the file as export.xml.
<?xml version="1.0" encoding="UTF-8"?>
<rm:command epcglobal:creationDate="2001-12-17T09:30:47.0Z"
epcglobal:schemaVersion="0.0"
xsi:schemaLocation="urn:epcglobal:rm:xsd:1 ../../../schemas/RmCommand.xsd"
xmlns:xsi="http://www.w3.org/2001/XMLSchema-instance"
xmlns:rm="urn:epcglobal:rm:xsd:1"
xmlns:epcglobal="urn:epcglobal:xsd:1"
xmlns:motorm="urn:motorfid:rm:xsd:1">
<rm:id>99</rm:id>
<rm:targetName>MyFX7500</rm:targetName>
<motorm:readerDevice>
<motorm:sessionID>SessionID</motorm:sessionID>
<motorm:exportCloudConfigFromReader></motorm:exportCloudConfigFromReader>
</motorm:readerDevice>
</rm:command>
To send the command to the reader, run the following command.
curl --location --request GET 'http://10.17.130.66/control' \
--header 'Content-Type: application/xml' \
--data-binary "@export.xml"
The response of the reader is an XML string with the JSON configuration data embedded in it
as shown below. Save the JSON config data in the response to a file called cloud.json.
<g1:reply xmlns:g1="urn:epcglobal:rm:xsd:1"
xmlns:g2="urn:epcglobal:xsd:1"
g2:creationDate="2010-02-10T10:10:10Z"
g2:schemaVersion="1">
<g1:id>99</g1:id>
<g1:resultCode>0</g1:resultCode>
<g3:readerDevice xmlns:g3="urn:motorfid:rm:xsd:1">
(continued on next page)
19
Page 20

Setting Up Cloud Connect for RFID
<g3:exportCloudConfigFromReader>
<g3:ConfigData>JSON CONFIG DATA</g3:ConfigData>
</g3:exportCloudConfigFromReader>
</g3:readerDevice>
</g1:reply>
Importing Cloud Configuration
After editing the cloud configuration JSON file appropriately it can be imported into the reader using the
following RM command. Replace the sessionID with the session ID obtained in the previous command and
replace the JSON CONFIG DATA with the contents of the updated cloud.json file. Save the file as
import.xml.
<?xml version="1.0" encoding="utf-8"?>
<rm:command epcglobal:creationDate="2001-12-17T09:30:47.0Z"
epcglobal:schemaVersion="0.0"
xsi:schemaLocation="urn:epcglobal:rm:xsd:1 ../../../schemas/RmCommand.xsd"
xmlns:xsi="http://www.w3.org/2001/XMLSchema-instance"
xmlns:rm="urn:epcglobal:rm:xsd:1"
xmlns:epcglobal="urn:epcglobal:xsd:1"
xmlns:motorm="urn:motorfid:rm:xsd:1">
<rm:id>99</rm:id>
<rm:targetName>MyFX7500</rm:targetName>
<motorm:readerDevice>
<motorm:sessionID>sessionID</motorm:sessionID>
<motorm:importCloudConfigToReader>
<motorm:CloudConfigData>JSON CONFIG DATA</motorm:CloudConfigData>
</motorm:importCloudConfigToReader>
</motorm:readerDevice>
</rm:command>
Use the following command to import the config into the reader.
curl --location --request GET 'http://10.17.130.66/control' \
--header 'Content-Type: application/xml' \
--data-binary "@import.xml"
The RM response on successful import is as given below.
<g1:reply xmlns:g1="urn:epcglobal:rm:xsd:1" xmlns:g2="urn:epcglobal:xsd:1"
g2:creationDate="2010-02-10T10:10:10Z" g2:schemaVersion="1">
<g1:id>99</g1:id>
<g1:resultCode>0</g1:resultCode>
<g3:readerDevice xmlns:g3="urn:motorfid:rm:xsd:1">
<g3:importCloudConfigToReader></g3:importCloudConfigToReader>
</g3:readerDevice>
</g1:reply>
20
Page 21

Setting Up Cloud Connect for RFID
Cloud Connect for RFID Configuration
The section describes the JSON object that can be sent to configure the interfaces.
For ease of explanation and representation, the JSON configuration file is split into three sections, each
representing the interface it configures.
• Control Section
• Data Section
• Management Section
NOTE: While importing the JSON configuration into the reader, it must be imported as a singe object.
Control Section
The control section of the Cloud Connect for RFID JSON configuration holds the JSON object for
configuring the Control interface. The JSON schema for the Control interface configuration is shown Figure
7.
Figure 7 JSON Schema for Control Interface Configuration
The Control interface can be configured to either connect to the cloud service (Zebra Data Services) or
allow local access. The sample configuration for either case is shown below.
21
Page 22

Local Access via REST
To allow the Control interface to be accesses locally from the REST, enable enableLocalRest field in the
configuration.
"control": {
"commandResponse": {
"enableLocalRest": true,
}
}
Zebra Data Services
The reader is by default configured to connect the Control interface to the Zebra Data Services. When
configured to connect to the ZDS the JSON object for Control interface is as shown below.
"control": {
"commandResponse": {
"enableLocalRest": false,
"connections": [
{
"type": "mqtt-GCP",
"options": {
"endpoint": {
"hostName": "mqtt.googleapis.com",
"port": 443
},
"enableSecurity": true,
"security": {
"keyFormat": "PEM",
"keyAlgorithm": "RS256",
"CACertificateFileLocation":
"/readerconfig/ssl/certs/cloud-trusted-ca-certs.crt",
"publicKeyFileLocation": "/readerconfig/ssl/server.crt",
"privateKeyFileLocation": "/readerconfig/ssl/server.key"
},
"additional": {
"keepAlive": 60,
"cleanSession": true,
"debug": false,
"reconnectDelay": 1,
"reconnectDelayMax": 1,
"qos": 0,
"clientId":
"projects/es-s2-emc-p/locations/us-central1/registries/RFIDREADER-es-s2-emc-p/devices/<de
viceId>"
},
"publishTopic": ["/devices/<deviceId>/events/command-responses"],
"subscribeTopic": ["/devices/<deviceId>/commands/#"]
}
}
]
}
}
Setting Up Cloud Connect for RFID
22
Page 23

Data Section
The data section of the Cloud Connect for RFID JSON configuration holds the JSON object for configuring
the Data interface. The JSON schema for the Data interface configuration is shown in Figure 8.
Figure 8 JSON Schema for Data Interface Configuration
Setting Up Cloud Connect for RFID
The Data interface can be configured to send data to either the Zebra Data Services or send it locally to a
HTTP/HTTPS server as POST requests. The sample configurations for both are shown below.
23
Page 24

Zebra Data Services
The reader is by default configured to send data to the Zebra Data Services. When configured to connect
to the ZDS the JSON object for Data interface is shown below.
"data": {
"event": {
"connections": [
{
"type": "mqtt-GCP",
"options": {
"endpoint": {
"hostName": "mqtt.googleapis.com",
"port": 443
},
"enableSecurity": true,
"security": {
"keyFormat": "PEM",
"keyAlgorithm": "RS256",
"CACertificateFileLocation":
"/readerconfig/ssl/certs/cloud-trusted-ca-certs.crt",
"publicKeyFileLocation": "/readerconfig/ssl/server.crt",
"privateKeyFileLocation": "/readerconfig/ssl/server.key"
},
"additional": {
"keepAlive": 60,
"cleanSession": true,
"debug": false,
"reconnectDelay": 1,
"reconnectDelayMax": 1,
"qos": 0,
"clientId":
"projects/es-s2-emc-d/locations/us-central1/registries/RFIDREADER-es-s2-emc-d/devices/FX9
600FCF36D"
},
"publishTopic": ["/devices/FX9600FCF36D/events/readEvents"],
"subscribeTopic": []
}
}
]
}
}
Setting Up Cloud Connect for RFID
24
Page 25

Setting Up Cloud Connect for RFID
Local HTTP/HTTPS Post Server
In a local or Hybrid deployment, the Data interface can be configured to send tag data to a HTTP/HTTPS
server via HTTP POST requests. When configured in this mode the configuration object for Data interface
is shown below.
HTTP Post Server with No Authentication
"data": {
"event":{
"connections":[
{
"type":"httpPost",
"options":{
"URL":"http://10.104.246.243:8080",
"security":{
"verifyPeer":false,
"verifyHost":false,
"authenticationType":"NONE"
}
}
}
]
}
}
HTTPS Post Server with Basic Authentication
"data": {
"event":{
"connections":[
{
"type":"httpPost",
"options":{
"URL":"http://10.17.130.220:8080",
"security":{
"verifyPeer":false,
"verifyHost":false,
"authenticationType":"BASIC",
"authenticationOptions":{
"username":"admin",
"password":"secret"
}
}
}
}
]
}
}
25
Page 26

Setting Up Cloud Connect for RFID
HTTPS Post Server with TLS-Client Authentication
"data": {
"event":{
"connections":[
{
"type":"httpPost",
"options":{
"URL":"https://10.17.130.220:8080",
"security":{
"verifyPeer":false,
"verifyHost":false,
"authenticationType":"TLS-Client",
"authenticationOptions":{
"publicKeyFileLocation":"/apps/server.crt",
"privateKeyFileLocation":"/apps/server.key"
},
"CACertificateFileLocation":"/apps/ca-crt.pem"
}
}
}
]
}
}
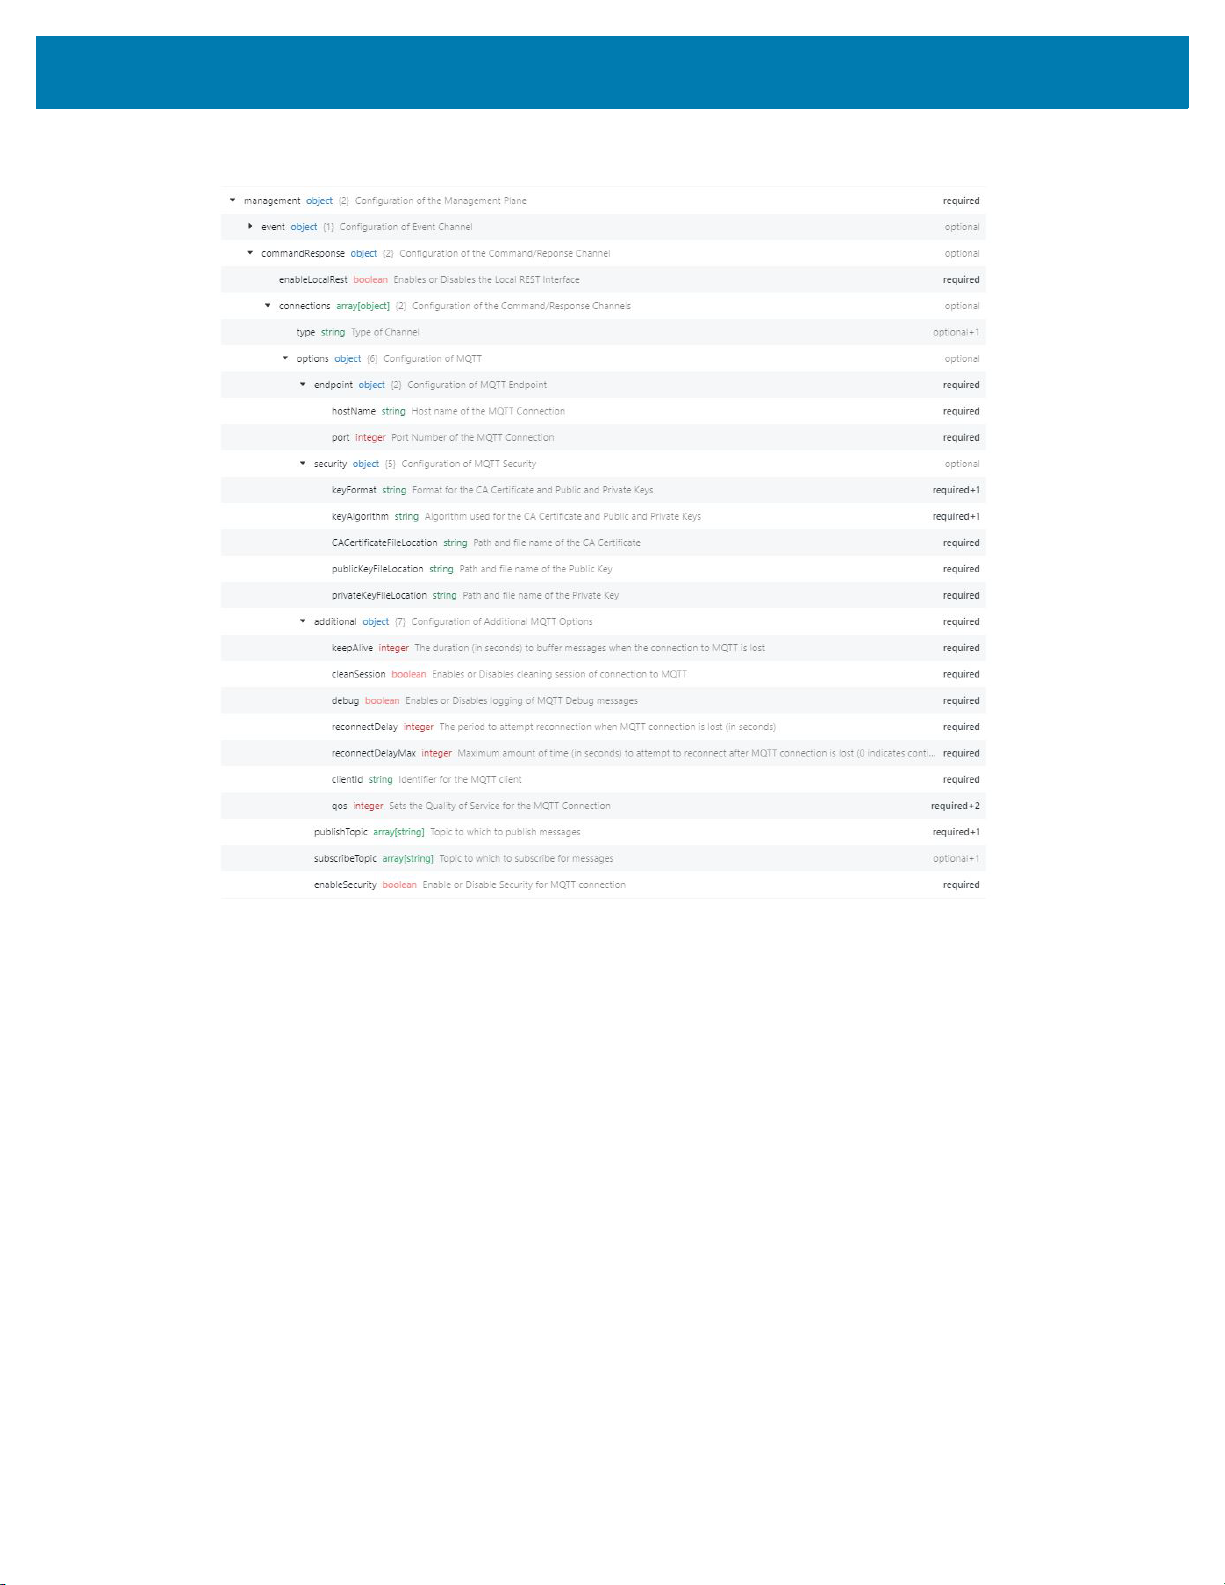
Management Section
The management section of the Cloud Connect for RFID JSON configuration holds the JSON object for
configuring the Management interface. The JSON schema for the Management interface configuration is
shown in Figure 9.
26
Page 27
Setting Up Cloud Connect for RFID
Figure 9 JSON Schema for Management Interface Configuration
The Management interface can be configured to connect to either the Zebra Data Services or to allow local
access via the REST Interface. The sample configurations for both are shown below.
Local REST
In hybrid and local deployments, the Management interface can be setup to allow access directly from the
reader REST interface. To configure the Management interface to allow local access, enable
enableLocalRest field in the configuration as shown below.
"management": {
"commandResponse": {
"enableLocalRest": false,
}
}
27
Page 28

Zebra Data Services
The reader is by default configured to allow management access from the Zebra Data Services. When
configured to connect to the ZDS the JSON object for Management interface is as shown below.
"management": {
"commandResponse": {
"enableLocalRest": false,
"connections": [
{
"type": "mqtt-GCP",
"options": {
"endpoint": {
"hostName": "mqtt.googleapis.com",
"port": 443
},
"enableSecurity": true,
"security": {
"keyFormat": "PEM",
"keyAlgorithm": "RS256",
"CACertificateFileLocation":
"/readerconfig/ssl/certs/cloud-trusted-ca-certs.crt",
"publicKeyFileLocation": "/readerconfig/ssl/server.crt",
"privateKeyFileLocation": "/readerconfig/ssl/server.key"
},
"additional": {
"keepAlive": 60,
"cleanSession": true,
"debug": false,
"reconnectDelay": 1,
"reconnectDelayMax": 1,
"qos": 0,
"clientId":
"projects/es-s2-emc-p/locations/us-central1/registries/RFIDREADER-es-s2-emc-p/devices/<de
viceId>"
},
"publishTopic": ["/devices/<deviceId>/events/command-responses"],
"subscribeTopic": ["/devices/<deviceId>/commands/#"]
}
}
]
}
}
Setting Up Cloud Connect for RFID
28
Page 29

Appendix
Default Cloud Connect for RFID Configuration
{
"control":{
"commandResponse":{
"enableLocalRest":false,
"connections":[
{
"type":"mqtt-GCP",
"options":{
"endpoint":{
"hostName":"mqtt.googleapis.com",
"port":443
},
"enableSecurity":true,
"security":{
"keyFormat":"PEM",
"keyAlgorithm":"RS256",
"CACertificateFileLocation":"/readerconfig/ssl/certs/cloud-trusted-ca-certs.crt",
"publicKeyFileLocation":"/readerconfig/ssl/server.crt",
"privateKeyFileLocation":"/readerconfig/ssl/server.key"
},
"additional":{
"keepAlive":60,
"cleanSession":true,
"debug":false,
"reconnectDelay":1,
"reconnectDelayMax":1,
"qos":0,
"clientId":"projects/es-s2-emc-p/locations/us-central1/registries/RFIDREADER-es-s2-emc-p/
devices/FX9600FB6625"
},
"publishTopic":[
"/devices/FX9600FB6625/events/command-responses"
(continued on next page)
29
Page 30

Appendix
],
"subscribeTopic":[
"/devices/FX9600FB6625/commands/#"
]
}
}
]
}
},
"data":{
"event":{
"connections":[
{
"type":"mqtt-GCP",
"options":{
"endpoint":{
"hostName":"mqtt.googleapis.com",
"port":443
},
"enableSecurity":true,
"security":{
"keyFormat":"PEM",
"keyAlgorithm":"RS256",
"CACertificateFileLocation":"/readerconfig/ssl/certs/cloud-trusted-ca-certs.crt",
"publicKeyFileLocation":"/readerconfig/ssl/server.crt",
"privateKeyFileLocation":"/readerconfig/ssl/server.key"
},
"additional":{
"keepAlive":60,
"cleanSession":true,
"debug":false,
"reconnectDelay":1,
"reconnectDelayMax":1,
"qos":0,
"clientId":"projects/es-s2-emc-p/locations/us-central1/registries/RFIDREADER-es-s2-emc-p/
devices/FX9600FB6625"
},
"publishTopic":[
"/devices/FX9600FB6625/events/readEvents"
],
"subscribeTopic":[
]
}
}
]
(continued on next page)
30
Page 31

Appendix
}
},
"management":{
"commandResponse":{
"enableLocalRest":false,
"connections":[
{
"type":"mqtt-GCP",
"options":{
"endpoint":{
"hostName":"mqtt.googleapis.com",
"port":443
},
"enableSecurity":true,
"security":{
"keyFormat":"PEM",
"keyAlgorithm":"RS256",
"CACertificateFileLocation":"/readerconfig/ssl/certs/cloud-trusted-ca-certs.crt",
"publicKeyFileLocation":"/readerconfig/ssl/server.crt",
"privateKeyFileLocation":"/readerconfig/ssl/server.key"
},
"additional":{
"keepAlive":60,
"cleanSession":true,
"debug":false,
"reconnectDelay":1,
"reconnectDelayMax":1,
"qos":0,
"clientId":"projects/es-s2-emc-p/locations/us-central1/registries/RFIDREADER-es-s2-emc-p/
devices/FX9600FB6625"
},
"publishTopic":[
"/devices/FX9600FB6625/events/command-responses"
],
"subscribeTopic":[
"/devices/FX9600FB6625/commands/#"
]
}
}
]
}
}
}
31
Page 32

Appendix
Sample Configuration for Local Deployment
{
"control": {
"commandResponse": {
"enableLocalRest": true,
}
},
"management": {
"commandResponse": {
"enableLocalRest": false,
}
},
"data": {
"event":{
"connections":[
{
"type":"httpPost",
"options":{
"URL":"http://10.104.246.243:8080",
"security":{
"verifyPeer":false,
"verifyHost":false,
"authenticationType":"NONE"
}
}
}
]
}
}
}
32
Page 33

www.zebra.com
 Loading...