

Page 1

CC600/CC6000
Customer Concierge
Quick Start Guide
for Android ™
MN-003315-02EN
Page 2

Copyright
ZEBRA and the stylized Zebra head are trademarks of Zebra Technologies Corporation, registered in many
jurisdictions worldwide. All other trademarks are the property of their respective owners.
©2019-2020 Zebra Technologies Corporation and/or its affiliates. All rights reserved. All other trademarks are
the property of their respective owners.
COPYRIGHTS & TRADEMARKS: For complete copyright and trademark information, go to www.zebra.com/
copyright.
WARRANTY: For complete warranty information, go to www.zebra.com/warranty.
END USER LICENSE AGREEMENT: For complete EULA information, go to www.zebra.com/eula.
Terms of Use
• Proprietary Statement
This manual contains proprietary information of Zebra Technologies Corporation and its subsidiaries
(“Zebra Technologies”). It is intended solely for the information and use of parties operating and maintaining
the equipment described herein. Such proprietary information may not be used, reproduced, or disclosed to
any other parties for any other purpose without the express, written permission of Zebra Technologies.
• Product Improvements
Continuous improvement of products is a policy of Zebra Technologies. All specifications and designs are
subject to change without notice.
• Liability Disclaimer
Zebra Technologies takes steps to ensure that its published Engineering specifications and manuals are
correct; however, errors do occur. Zebra Technologies reserves the right to correct any such errors and
disclaims liability resulting therefrom.
• Limitation of Liability
In no event shall Zebra Technologies or anyone else involved in the creation, production, or delivery of the
accompanying product (including hardware and software) be liable for any damages whatsoever (including,
without limitation, consequential damages including loss of business profits, business interruption, or loss of
business information) arising out of the use of, the results of use of, or inability to use such product, even if
Zebra Technologies has been advised of the possibility of such damages. Some jurisdictions do not allow
the exclusion or limitation of incidental or consequential damages, so the above limitation or exclusion may
not apply to you.
Revision History
Changes to the original guide are listed below:
Change Date Description
-01 Rev A 5/2019 Initial Release
-02EN Rev A 7/2020 - Removed Android operating system version.
- Labeled the proximity sensor in Figure 1.
- Updated the Barcode Capture with an Imager section.
2
Page 3

Introduction
Front
Facing
Camera
Touch
Screen and
Display
Speaker
NFC
Antenna
Speaker
Exit Window (Scanner)
Microphone
Proximity Sensor
This guide provides information regarding unpacking the device, features, setup, mounting, barcode capture, and resetting the device.
Unpacking
1. Carefully remove all protective material from the device and save the shipping container for later storage and
shipping.
2. Verify that the following are included:
• CC600 or CC6000 interactive kiosk.
• Regulatory Guide.
• CC600 only: Ferrite bead for EMI. Attaches to the DC power module.
3. Inspect the equipment for damage. If any equipment is missing or damaged, contact the Global Customer
Support center immediately.
4. Prior to using the device for the first time, remove the protective shipping film that covers the display.
CC600/CC6000 Customer Concierge Quick Start Guide
Features
NOTE: Although the orientations differ, the features on the CC6000 landscape and portrait devices are the same.
Figure 1 CC6000 Front View
1
Page 4

CC600/CC6000 Customer Concierge Quick Start Guide
Mounting
Bracket
Screw
Holders
Micro SD
Card Slot
Audio
Adjustment/
Programmable
Buttons
Reset Button
USB C Port
(Used for
External
display or
OTG)
Power
Port
Audio
Port
USB A
Port
USB A
Port
Ethernet with POE
Figure 2 CC6000 Back View
Figure 3 CC6000 Power and Cable Ports
2
Page 5

CC600/CC6000 Customer Concierge Quick Start Guide
Mounting
Bracket
Mounting
Bracket Screw
Holders
Mounting
Bracket
Locking
Screw
Wall Mount
Screw
Holes
Speaker
Exit Window
(Scanner)
Proximity Sensor
Microphone
Touch
Screen and
Display
Figure 4 CC6000 Back With Bracket View
Figure 5 CC600 Front Views
3
Page 6

CC600/CC6000 Customer Concierge Quick Start Guide
Reset Button
Mounting
Bracket
Screw
Holders
(4)
Micro SD
Card Slot
Audio
Adjustment/Programmable
Buttons
x
USB C Port
(Used for
External
display or
OTG and other
USB-2
peripherals)
Power
Port
Micro SD
Card Slot
Ethernet with POE
Figure 6 CC600 Back View
21
Figure 7 CC600 Power and Cable Ports
4
Page 7
CC600/CC6000 Customer Concierge Quick Start Guide
21
Mounting
Bracket
Mounting
Bracket Screw
Holders
Mounting
Bracket
Locking
Screw
Wall Mount
Screw
Holes
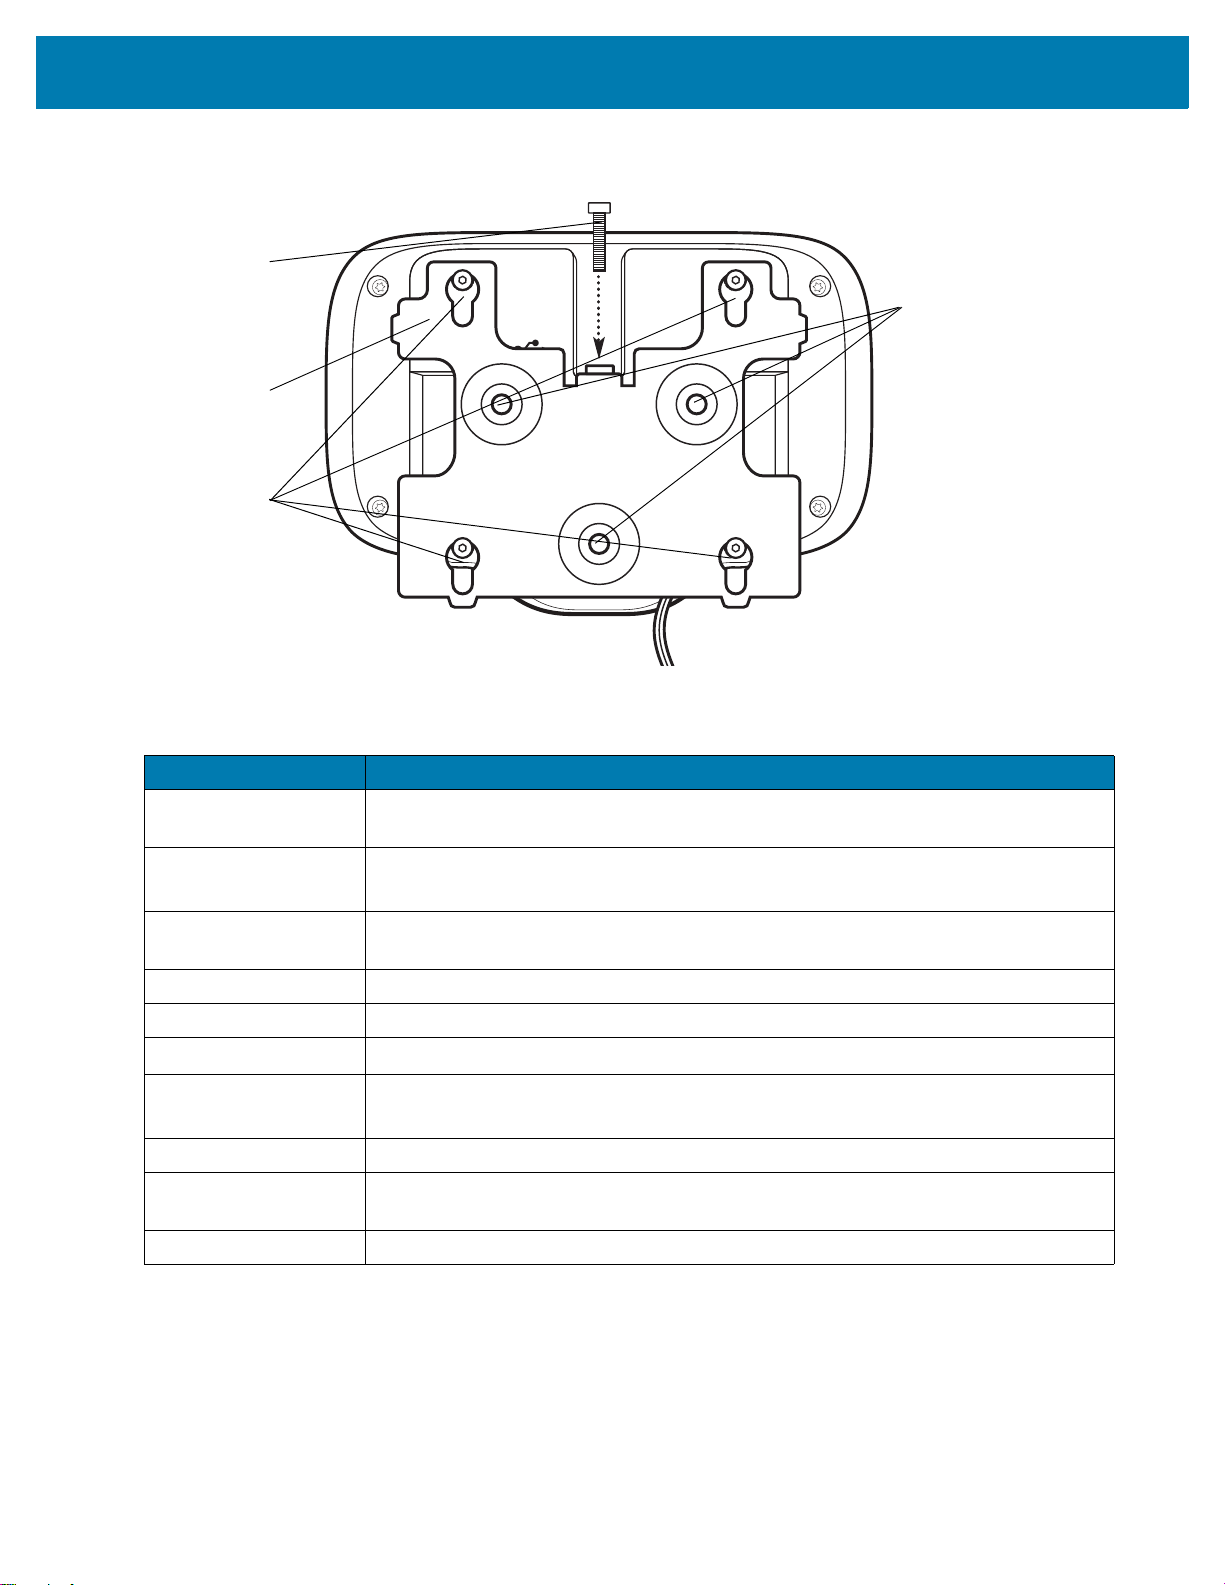
Figure 8 CC600 Back With Bracket View
Table 1 Feature Descriptions
Item Function
Touch Screen and
Displays all information needed to operate the device.
Display
Exit Window
(Scanner)
Provides data capture using the imager and reads a barcode.
Note: To read a barcode, a scan-enabled app is required on the device.
Speaker Provides audio output for video and music playback. Provides audio in
speaker-phone mode.
NFC Antenna Reads NFC tags. (CC6000 Only)
Proximity Sensor Identifies the proximity of a user for turning up the display.
Microphone Use for communications in Speakerphone mode.
Front Facing Camera Captures still photos and videos.
Note: Select CC6000 devices only.
Interface Connectors See Figure 3 and Figure 7.
Volume Up/Down
Button
External Display Designated for USB-C port utilization.
Increase and decrease audio volume (programmable).
5
Page 8

CC600/CC6000 Customer Concierge Quick Start Guide
Setup
Perform this procedure to start using the device for the first time.
• Install a micro secure digital (SD) card (optional).
• Connect the power supply to power on the device.
• Configure the device.
• Mount the device with the mounting bracket.
Inserting the microSD Card (Optional)
The microSD card slot provides secondary non-volatile storage. The slot is located on the back of the device to the
right of the audio jack. Refer to the documentation provided with the card for more information, and follow the
manufacturer’s recommendations for use.
CAUTION:Follow proper electrostatic discharge (ESD) precautions to avoid damaging the microSD card. Proper ESD
precautions include, but are not limited to, working on an ESD mat and ensuring that the operator is properly
grounded.
To install the microSD card:
• Remove the device from the mounting bracket, if installed.
• Slide the microSD card, connectors down, into the device as shown in Figure 9.
Figure 9 Inserting microSD Card
Mounting the Device
Each configuration of the device requires the appropriate mounting bracket to mount the device to a wall or other flat surface. The diameter of the holes for the wall screws is 5.8mm (0.228 in).
NOTE: Device measurements in Figure 10, Figure 11 and Figure 12 are in millimeters.
6
Page 9

CC600/CC6000 Customer Concierge Quick Start Guide
Figure 10 CC600 Measurements
Figure 11 CC6000 Portrait Measurements
7
Page 10

CC600/CC6000 Customer Concierge Quick Start Guide
21
Shoulder Screw Hole (4)
Wall Screw Hole (3)
Securing Screw
Securing Screw Hole
Figure 12 CC6000 Landscape Measurements
Figure 13 CC600 Mounting Bracket
8
Page 11

CC600/CC6000 Customer Concierge Quick Start Guide
Shoulder Screw Hole (4)
Power Supply
Wall Screw Hole (4)
Shoulder Screw Hole (4)
Wall Screw Hole (4)
Securing Screw
Securing
Screw Hole
Power Supply
Figure 14 CC6000 Mounting Bracket - Portrait Orientation
Figure 15 CC6000 Mounting Bracket (KT-152098-03) - Landscape Orientation
To mount the device:
1. Determine the CC600 or CC6000 mounting location.
2. Secure the mounting plate to the wall using the screws provided (three screws for the CC600 plate and four
screws for the CC6000).
9
Page 12

CC600/CC6000 Customer Concierge Quick Start Guide
To Wall
To Wall
Figure 16 Attaching the CC600 Bracket To Wall
Figure 17 Attaching the CC6000 Bracket To Wall
3. Insert the four shoulder screws, also provided, into the mounting holes in the back of the device.
10
Page 13

CC600/CC6000 Customer Concierge Quick Start Guide
Figure 18 Inserting Shoulder Screws
4. Connect the power supply to the power port. Connect any additional cables into the appropriate ports shown in
Figure 3 and Figure 7.
5. Mount the device by placing the shoulder screws through the four keyholes on the mounting plate, and slide
the device down to secure in place.
11
Page 14

CC600/CC6000 Customer Concierge Quick Start Guide
Locking
Screw
Locking
Screw
Locking
Screw
Figure 19 Attaching the Device to the Bracket
6. Insert the locking screw through the hole in the tab at the top of the mounting plate. Hand tighten the screw to
secure the device.
12
Page 15

CC600/CC6000 Customer Concierge Quick Start Guide
Barcode Capture
Scanning can be performed using the CC600 and CC6000 Customer Concierge or an imager such as the DS22X8 or DS81X8.
Barcode Capture with an Imager
To capture barcode data with the CC600/CC6000 Customer Concierge:
1. Ensure that an application is open on the device and a text field is in focus (text cursor in text field).
2. Place the barcode in the field of view of the device’s scan window. Ensure the barcode is within the scanner’s
aiming pattern.
3. By default, a beep sound indicates the barcode was decoded successfully. Note that when the device is in Pick
List Mode, the device does not decode the barcode until the center of the illuminated line or dot touches the
barcode.
To capture barcode data with the DS22X8 or DS81X8 imager:
1. Ensure that an application is open on the device and a text field is in focus (text cursor in text field).
2. Press and hold the trigger until either:
a. The imaging scanner reads the bar code. The imaging scanner beeps, the LED flashes, and the scan line
turns off.
or
b. The imaging scanner does not read the bar code and the scan line turns off.
Note that when the device is in Pick List Mode, the device does not decode the barcode until the center of the illuminated line or dot touches the barcode.
13
Page 16

CC600/CC6000 Customer Concierge Quick Start Guide
Resetting the Device
The device has a recessed reset button.
To activate the reset button, use the tip of a small paper clip (1mm in diameter), insert into the recess, push and hold for 3 seconds.
Device has a recovery console accessible via pressing the Button #1 on the back of the device upon power up or via ADB connection and command.
The following reset functions are supported:
• Soft reset (performed with an ADB command)
• Enterprise reset
• Factory reset
The device recovery mode supports the following functions:
• Flash image from zip file on an SD card or from internal flash.
• Apply a system update from an SD card or from internal flash.
14
Page 17

www.zebra.com
 Loading...