

CONCIERGE
CC5000-10
Set Up and Installation Guide

2 Concierge CC5000-10
Zebra reserves the right to make changes to any product to improve reliability,
function, or design. Zebra does not assume any product liability arising out of, or
in connection with, the application or use of any product, circuit, or application
described in this guide. No license is granted, either expressly or by implication,
estoppel, or otherwise under any patent right or patent, covering or relating to any
combination, system, apparatus, machine, material, method, or process in which
Zebra products might be used. An implied license exists only for equipment,
circuits, and subsystems contained in Zebra products.
Warranty
For the complete Zebra hardware product warranty statement, go to:
http://www.zebra.com/warranty.
For Australia Only
This warranty is given by Zebra Technologies Asia Pacific Pte. Ltd., 71 Robinson Road,
#05-02/03, Singapore 068895, Singapore. Our goods come with guarantees that
cannot be excluded under the Australia Consumer Law. You are entitled to a
replacement or refund for a major failure and compensation for any other reasonably
foreseeable loss or damage. You are also entitled to have the goods repaired or
replaced if the goods fail to be of acceptable quality and the failure does not amount to
a major failure. Zebra Technologies Corporation Australia’s limited warranty above is in
addition to any rights and remedies you may have under the Australian Consumer Law.
If you have any queries, please call Zebra Technologies Corporation at +65 6858 0722.
You may also visit our website: http://www.zebra.com/warranty for the most updated
warranty terms.
Service Information
If you have a problem using the equipment, contact your facility's Technical or
Systems Support. If there is a problem with the equipment, they will contact the
Zebra Customer Support Center at: http://www.zebra.com/support.
Setup and Installation Guide 3
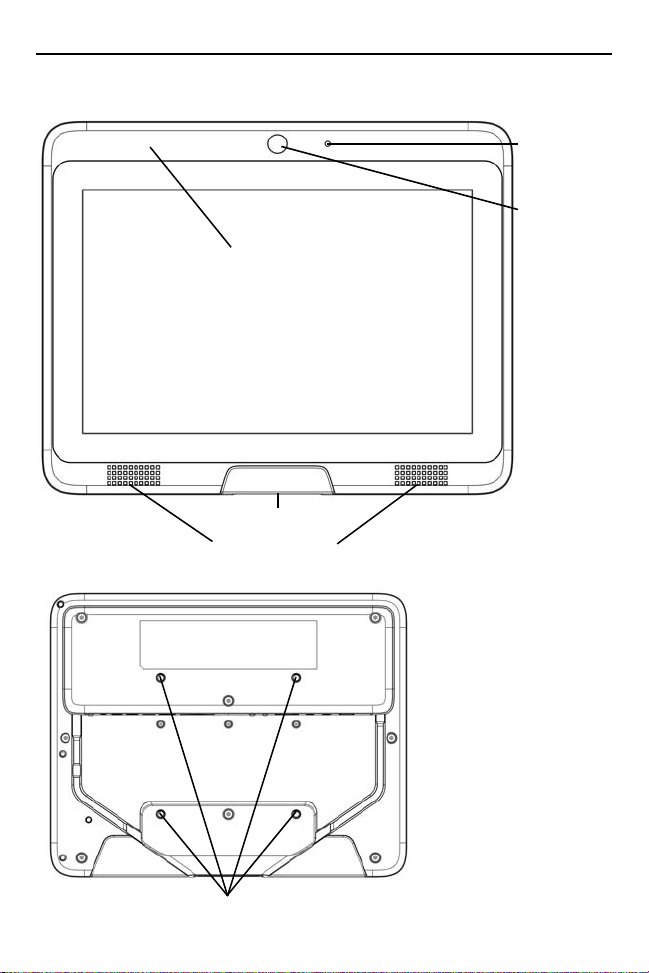
Bar Code Scanner
Audio
Microphone
10 in.Touchscreen Display
Front Facing
Video Camera
External Speakers
VESA Mounting Holes (M4 Threaded)
Concierge CC5000-10 Features
Figure 1.
Figure 2.
Front View
Rear View
4 Concierge CC5000-10
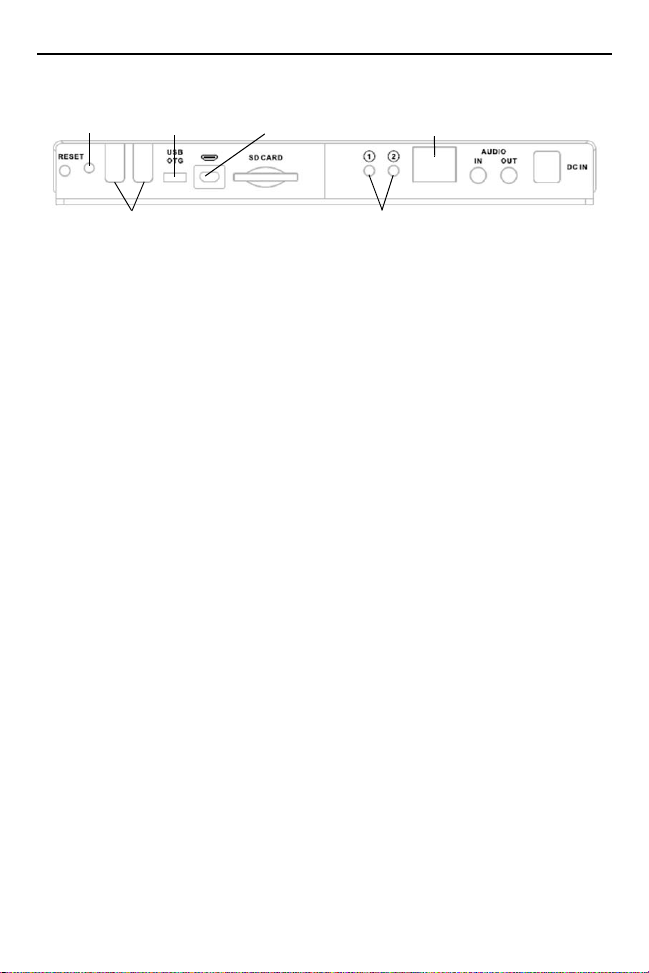
USB Ports
Diagnostic Mode
Buttons
RJ45 Ethernet Port,
PoE Enabled
Micro USB
OTG Port
Micro HDMI
Out Port
Activity
LED
Figure 3.
Ports
Overview
The Concierge CC5000-10 is a pre-assembled system consisting of the following:
• 10.1 in. touchscreen display
• Concierge Main PCB, 8MP Camera, Speakers, Mic, Flash Memory, Network
Interface, Peripheral Ports
• Bar code scanner
• Bezel enclosure
• Associated pre-wired cabling.
The final system hardware configuration may change based upon customer
preference, including additional accessories (sold separately).
The final system mounting/installation is determined by the customer (e.g.,
mounting the system on a wall, on a stand, or within a customer designed
enclosure).
Ensure the mounting configuration allows end-users to easily interact with the
Concierge CC5000-10 touchscreen, and allows adequate space for end-users to
scan products using the bar code scanner.
Unpacking
Carefully remove the Concierge CC5000-10 from the packaging to avoid
damaging the touchscreen display. Once removed from its packaging, inspect the
device for damage.
Retain the packaging as it is the approved shipping container, and should be used
if the Concierge CC5000-10 needs to be returned for servicing.

Setup and Installation Guide 5
Cleaning and Maintenance
• Always turn off the Concierge CC5000-10 before cleaning.
• The touchscreen surface may be cleaned using a soft clean cloth moistened
with mild window glass commercial cleaners.
• Use a soft cloth moistened with mild detergent to clean the display housing.
• Do not touch the display screen surface with sharp or hard objects.
• Do not use abrasive cleaners, waxes or solvents for cleaning.
• Do not operate the product under the following conditions:
• Extremely hot, cold, or humid environments.
• Near any appliance generating a strong magnetic field.
• In direct sunlight.
Configuration Notes
The instructions, and screen captures in this guide describe default software
applications included with the Concierge CC5000-10. Customers and/or partners
may develop, and install additional custom software applications which run on the
Concierge CC5000-10. In addition, customers and/or partners may choose to add
their own hardware accessories prior to installation. Therefore, actual software
and hardware configurations may vary at individual sites.
Mounting the Concierge CC5000-10
NOTE The instructions in this guide provide basic installation guidance for
the Concierge CC5000-10 system.
WARNING
IMPORTANT The wall outlet must be located near the Concierge
!Always utilize professional installers to safely install, mount,
and supply power to the Concierge CC5000-10. Always ensure
Concierge CC5000-10 mounting, and power routing meets
regional building codes.
CC5000-10, and be easily accessible.

6 Concierge CC5000-10
3.19 in (81 mm)
3.19 in (81 mm)
3.94 in (100 mm)
10.32 in (262 mm)
2.44 in (62 mm)
.51 in
(13 mm)
1.81 in (46 mm)
3.94 in (100 mm)
.08 in
(2 mm)
8.19 in (208 mm)
1.42 in
(36 mm)
1.34 in (34 mm)
Mounting brackets are not sold with the Concierge CC5000-10 system. Obtain the
appropriate mounting brackets to mount the Concierge CC5000-10 using a
mounting bracket which complies with the VESA mounting standard
(100 mm x 100 mm).
The total weight of the Concierge CC5000-10 system (without additional
accessories, or modifications is 3 lbs/1.4 kg).
For safety purposes, mounting brackets should be certified to support the total
weight of the final system (including additional accessories, or modifications by
the customer).
To mount the Concierge CC5000-10 using the appropriate mounting bracket:
1. The Concierge CC5000-10 mounting inserts are M4 x 10 mm. When selecting
the appropriate screw length, ensure its length safely engages the threads,
but does not penetrate the Concierge CC5000-10 bezel enclosure more than
0.39 in./10 mm.
Figure 4.
Concierge CC5000-10 Mounting Dimensions
2. Align the mounting holes on the selected mounting bracket with the mounting
holes on the Concierge CC5000-10 bezel enclosure.
3. Insert, and tighten the screws through each of the four aligned mounting
holes.
 Loading...