


Zanussi ZWF14109 User Manual

t^pefkd=j^`efkb=
ZWF 14109
fkpqor`qflk _llhibq
147 126 310

The symbols you will see on some paragraphs of this booklet have the following meaning:
The warning triangle and/or the key words (Warning!, Caution!) emphasize information that is particularly
important for your safety or correct functioning of the appliance.
The information marked with this symbol provides additional instructions and practical tips on the use of
the appliance.
Tips and information about economical and ecological use of the machine are marked with this symbol.
Our contribution to the protection of the
environment: we use environmentally
friendly paper.
2
Dear customer,
Please read these operating instructions carefully
and pay particular attention to the safety notes
indicated in the first pages. We recommend that you
keep this instruction booklet for future reference and
pass it on to any future owners.
Sorting the laundry 12
Temperatures 12
Before loading the laundry 12
Maximum loads 12
Laundry weights 12
Removing stains 12
Detergents and additives 13
Quantity of detergents to be used 13
Internationnal wash code symbols 14
Operating sequence 15-17
Washing programmes 18-19
Maintenance 20
Bodywork 20
Door Seal 20
Detergent dispenser drawer 20
Drain pump 20
Water inlet filter 21
Emergency emptying out 21
Frost precautions 21
Something not working? 22-23
Warnings 3
Disposal 4
Tips for environmental protection 4
Technical specifications 4
Installation 5
Unpacking 5
Positioning 5
Water inlet 5
Water drainage 6
Electrical connection 6
Your new washing machine 7
Description of the appliance 7
Detergent dispenser drawer 7
Use 8
Control panel 8
Controls 8-11
Washing hints 12
Contents
Transport damages
When unpacking the appliance, check that it is not
damaged. If in doubt, do not use it and contact the
Service Centre.

3
Installation
• All internal packing must be removed before using
the appliance. Serious damage may be caused to
the machine or adjacent furniture if the protective
transit devices are not removed or are not
completely removed. Refer to the relevant
paragraph in the instruction book.
• Any electrical work required to install this
appliance must be carried out by a qualified
electrician.
• Any plumbing work required to install this
appliance must be carried out by a qualified
plumber.
• After having installed the machine, check that it is
not standing on its electrical supply cable.
• If the appliance is placed on a carpeted floor,
ensure that air can circulate freely between the
feet and the floor.
Use
• This appliance is designed for domestic use. It
must not be used for purposes other than those
for which it was designed.
• Only wash fabrics which are designed to be
machine washed. Follow the instructions on each
garment label.
• Do not overload the appliance. Follow the
instructions in the instruction book.
• Make sure that all pockets are empty. Objects
such as coins, safety pins, pins and screws can
cause extensive damage.
• Do not machine wash garments saturated with
petroleum, methylated spirits, trichlorethylene, etc.
If such fluids have been used to remove stains
prior to washing, wait until they have completely
evaporated from the fabric before placing
garments in the appliance.
• Place small items such as socks, belts, etc. in a
cloth bag or pillowcase to prevent them getting
trapped between the drum and the tub.
Warnings
• Use only the recommended quantities of fabric
softener. An excessive amount could damage the
laundry.
• Leave the porthole door slightly ajar when the
appliance is not in use. This preserves the door
seal and prevents the formation of musty smells.
• Always check that water has emptied out before
opening the door. If not, drain the water following
the instructions in the instruction book.
• Always unplug the appliance and shut the water
tap after use.
General safety
• Repairs to the machine must be carried out only by
qualified personnel. Repairs carried out by
inexperienced persons could cause serious
danger. Contact your local Service Centre.
• Never pull the power supply cable to remove the
plug from the socket; always take hold of the plug
itself.
• During high temperature wash programmes the
door glass may get hot. Do not touch it!
Child safety
• Children are often not aware of how dangerous
electrical appliances can be. When the machine is
working, children should be carefully supervised
and not be allowed to play with the appliance.
• The packaging components (e.g. plastic film,
polystyrene) can be dangerous to children - danger
of suffocation! Keep them out of children’s reach.
• Keep all detergents in a safe place out of children’s
reach.
• When the appliance is to be scrapped, cut off the
electrical supply cable and destroy the plug with
the remaining cable. Disable the door catch in
order to prevent children from becoming trapped
inside while playing.
The following warnings are provided in the interests of overall safety. You must read them carefully
before installing or using the appliance.
4
Disposal
Tips for environmental protection
Packaging materials
The materials marked with the symbol are
recyclable.
>PE<=polyethylene
>PS<=polystyrene
>PP<=polypropylene
This means that they can be recycled by disposing of
them properly in appropriate collection containers.
Machine
Use authorised disposal sites for your old appliance.
Help to keep your country tidy!
To save water, energy and to help protect the
environment, we recommend that you follow these
tips:
• Normally soiled laundry may be washed without
prewashing in order to save detergent, water and
time (the environment is protected too!).
• The machine works more economically if it is fully
loaded.
• With adequate pre-treatment, stains and limited
soiling can be removed; the laundry can then be
washed at a lower temperature.
• Measure out detergent according to the water
hardness, the degree of soiling and the quantity of
laundry being washed.
Technical specifications
• The symbol on the product or on its packaging
indicates that this product may not be treated as
household waste. Instead it shall be handed over
to the applicable collection point for the recycling of
electrical and electronic equipment. By ensuring
this product is disposed of correctly, you will help
prevent potential negative consequences for the
environment and human health, which could
otherwise be caused bu inappropraite waste
handling of this product. For more detail
information about recycling of this product, please
contact your local city office, your household waste
disposal service or the shop where you purchased
the product.
DIMENSIONS ZWF 14109
Height 85 cm
Width 60 cm
Depth 60 cm
MAXIMUM LOAD Cotton 9 kg
Synthetics 3.5 kg
Delicates 3.5 kg
Woollens 2 kg
Handwash 2 kg
Silk 1 kg
SPIN SPEED max 1400 rpm
POWER SUPPLY VOLTAGE/FREQUENCY 220-240V / 50HZ
TOTAL POWER ABSORBED 2200W
MINIMUM FUSE PROTECTION 10A
WATER PRESSURE Minimum 50kPa
Maximum 800kPa
This appliance complies with the following EEC Directives:
73/23/EEC of 19/02/73 relating to low voltage
89/336/EEC of 03/05/89 relating to electromagnetic compatibility.

5
Unpacking
All transit bolts and packing must be
removed before using the appliance.
You are advised to keep all transit devices so that they
can be refitted if the machine ever has to be transported
again.
1. Using a spanner, unscrew and remove the two
rear bottom screws. Slide out the two plastic pins.
Lay the machine on its back, taking care not to
squash the hoses. This can be avoided by placing
one of the corner packing pieces between the
machine and the floor
2. Remove the polystyrene block(s) from the bottom
of the machine and release the two plastic bags.
3. Very carefully slide out the left polythene bag,
removing it towards the right and then
downwards.
4. Very carefully slide out the right polythene bag,
removing it towards the left and then upwards.
Remove the bottom cover placed into the drum of
your appliance, lay it’s hook as the arrow ’A’
indicates and push the top of the cover to seal it
closed
Important: You can find more detailed instructions
regarding the bottom cover assembling in it’s relative
bag.
5. Set the machine upright and remove the
remaining rear screw. Slide out the relevant pin.
6. Plug all the holes with the plugs which you will
find in the envolope containing the instruction
manual.
Positioning
Install the machine on a flat hard floor.
Make sure that air circulation around the machine
is not impeded by carpets, rugs etc. Check that
the machine does not touch the wall or cupboard
units. Carefully level by screwing the adjustable
feet in or out. Never place cardboard, wood or
similar materials under the machine to
compensate for any unevenness in the floor.
Water inlet
Connect the water inlet hose to a tap with 3/4” BSP
thread.
Use the hose supplied with the washing machine.
DO NOT USE OLD HOSES.
The other end of the inlet hose which connects to the
machine can be turned in any direction. Simply
loosen the fitting, rotate the hose and retighten the
fitting, making sure there are no water leaks.
P1051
Installation
P1129
P0001
P1128
P0002
1
2
3
P1123
P1126
P1127
P1088
P0021

6
The inlet hose must not be lengthened. If it is too
short and you do not wish to move the tap, you will
have to purchase a new, longer hose specially
designed for this type of use.
Water drainage
The end of the drain hose can be positioned in three
ways:
Hooked over the edge of a sink using the plastic
hose guide supplied with the machine. In this
case, make sure the end cannot come unhooked
when the machine is emptying.
This could be done by tying it to the tap with a piece
of string or attaching it to the wall.
In a sink drain pipe branch. This branch must be
above the trap so that the bend is at least 60 cm
above the ground.
Directly into a drain pipe at a height of not less
than 60 cm and not more than 90 cm.
The end of the drain hose must always be
ventilated, i.e. the inside diameter of the drain pipe
must be larger than the outside diameter of the drain
hose.
The drain hose must not be kinked. Run it along the
floor; only the part near the drainage point must be
raised.
For the correct functioning of the machine the
drain hose must remain hooked on the proper
support piece situated on the top part of back
side of the appliance
P0023
P0022
Electrical connection
This machine is designed to operate on a 220-240 V,
single-phase, 50 Hz supply.
Check that your domestic electrical installation can
take the maximum load required (2.2 kW), also
taking into account any other appliances in use.
Connect the machine to an earthed socket.
The manufacturer declines any responsibility
for damage or injury through failure to comply
with the above safety precaution.
Should the appliance power supply cable
need to be replaced, this must be carried out
by our Service Centre.
Important!
When the appliance is installed the power supply
cable must be easily accessible.

7
1. Detergent dispenser drawer
2. Control panel
3. Door handle
4. Drain pump
5. Adjustable feet
6. Door lock indicator
Detergent dispenser drawer
Pre-wash
Main wash
Fabric softener, starch
Your new washing machine
Description of the appliance
This new machine, which is fitted with the New Jet System, meets all modern requirements for effective
treatment of laundry with low water, energy and detergent consumption.
• The special Handwash programme with its new delicate wash system treats your delicate items with
extreme care.
• The special wool programme with its new delicate wash system treats your woollens with extreme care.
• The automatic cooling of the washing water from 90° to 60°C before draining will prevent old drain pipes
from being deformed.
• The balance control device ensures the machine is stable during the spin.
Maxi Load 9 kg
Off
Soak
Cottons
90°
Xpress 60°
Delicate Spin
60°
Cottons Economy
Spin
40°
30°
Drain
Synthetics
Temp.
Delicate Rinse
Delicates
Rinse
Wool
1400
Handwash
Minipr. 30
Silk
1400
1200
900
700
Spin Prewash Quick Rinse Easy Iron
Prewash
Wash
Rinse
Spin
End
Start
Delay
ZWF 14109
6
8
Use
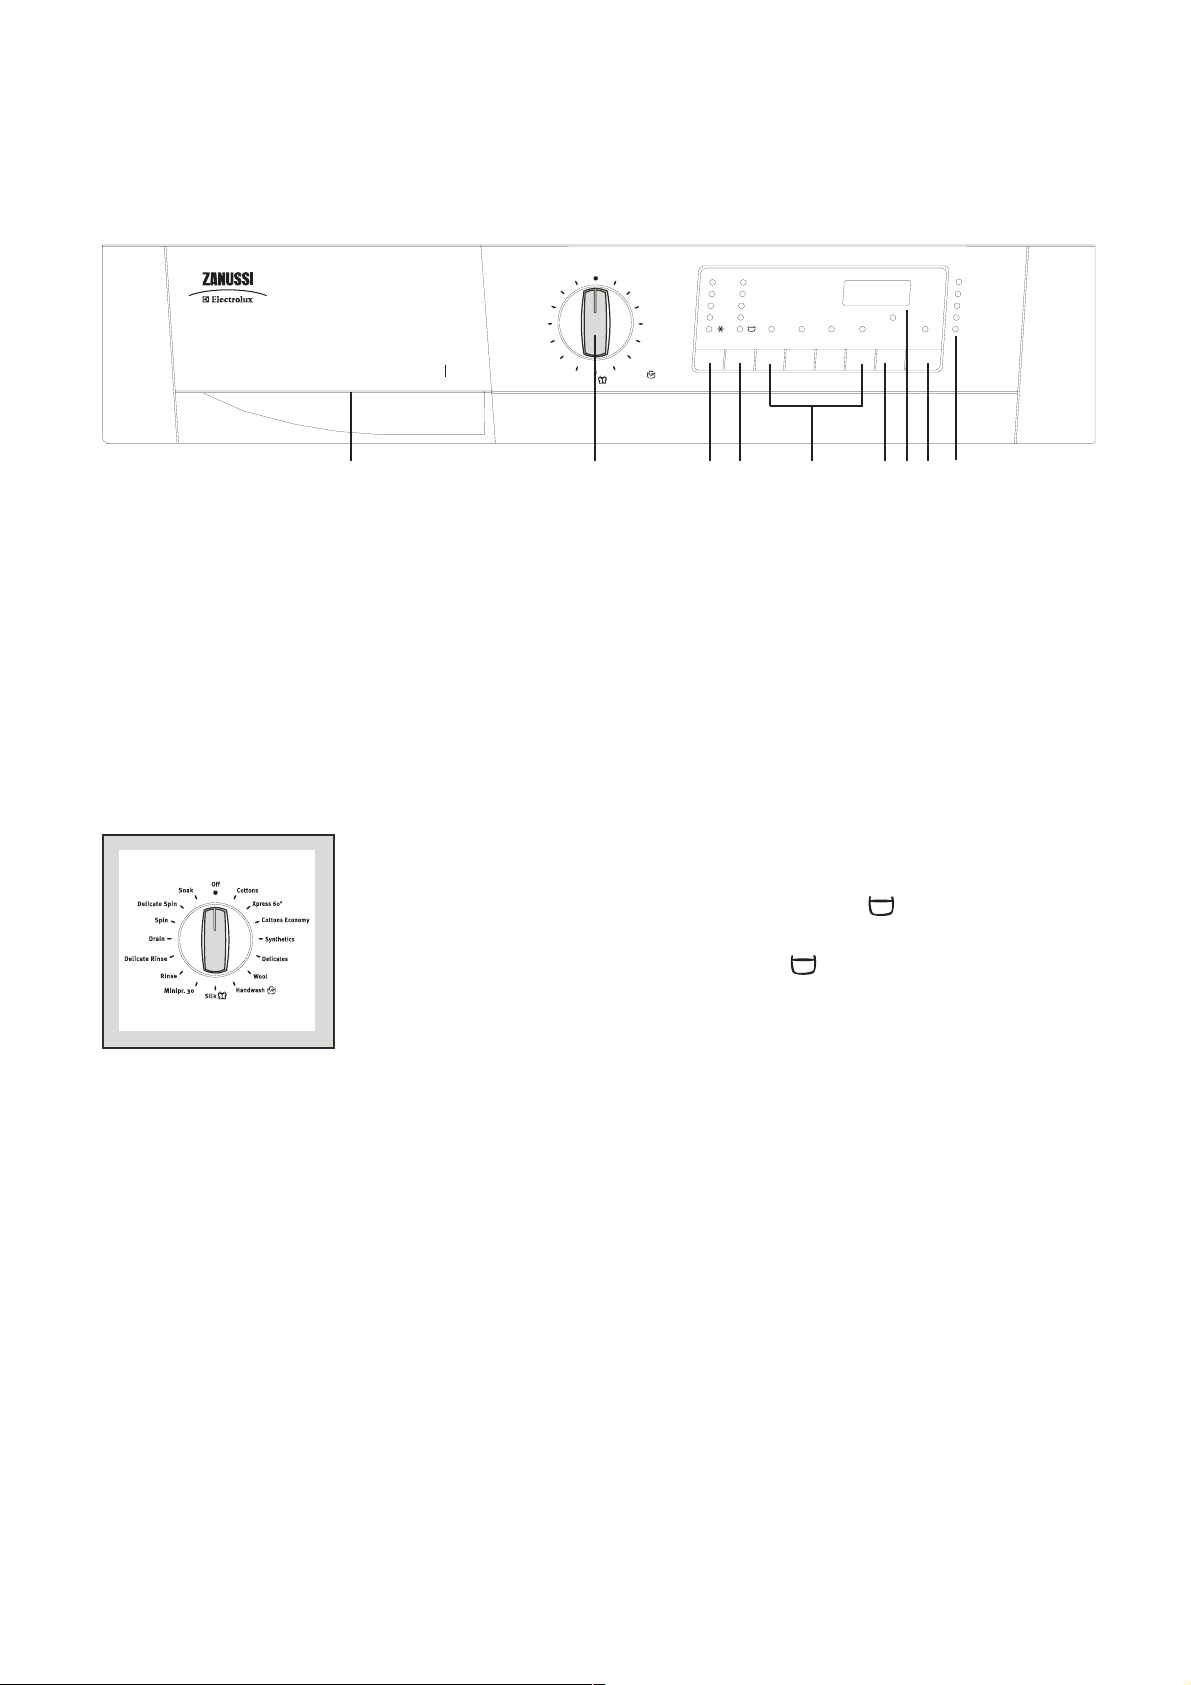
Control panel
1. Detergent Dispenser Drawer
2. Programme selector dial
The programme selector dial is divided into three
sections :
1. Cotton,Xpress60,Cottons Economy (Blue section)
2. Synthetics (Green section)
3. Delicates, Wool, Handwash, Silk, Minipr.30,
Rinse, Delicate Rinse, Drain, Spin, Delicate
Spin, Soak.(Grey section)
The selector dial can be turned either clockwise or
anti-clockwise. Position “Cotton Economy”
corresponds to an energy saving programme for
cotton. At the end of programme, the selector dial
must be turned to position “Off” to switch the
machine OFF.
4 Temperature button “Temp.”
Press this button repeatedly to increase or decrease
the temperature, if you want your laundry to be
washed at a temperature different from the one
proposed by the washing machine.
Maximum temperatures are 90°C for cotton, 60°C for
synthetic fabrics, 40°C for delicate fabrics, wool and
fabrics to be hand-washed, 30°C for silk and Mini
programme.
4. Spin Speed button “Spin”
Press this button repeatedly to change the spin
speed, if you want your laundry to be spun at a
speed different from the one proposed by the
washing machine and the relevent LED will light up.
Maximum speeds for ZWF 14109 are:
for cotton: 1400 rpm
for wool, synthetic and handwashed fabrics 900 rpm.
for delicate, silk fabrics and mini programme:700 rpm
By pressing the Spin speed button you can also
choose Rinse Hold option
Rinse hold option : when you choose this option,
the machine will not drain the water of the last rinse,
so as not to wrinkle the laundry.
At the end of cycle, the light of “Start/Pause” button
goes off, the light corresponding to rinse hold option
and “End” pilot light remain lit. A flashing zero appears
on the display to indicate that the water must be
drained.
Off
Soak
Maxi Load 9 kg
1400
Delicate Spin
Drain
Delicate Rinse
Spin
Rinse
Minipr. 30
Cottons
Xpress 60°
Cottons Economy
Synthetics
Delicates
Wool
Handwash
Silk
90°
1400
60°
1200
40°
900
700
30°
Spin Prewash Quick Rinse Easy Iron
Temp .
Delay
123456897
Prewash
Wash
Rinse
Spin
End
Start
ZWF 14109