

Page 1

User
information
Built-in oven
ZOB 991
1
Page 2

2
Page 3

Thank you for selecting our appliance
We wish you lots of enjoyment with your new appliance and we hope that you will consider our
brand again when purchasing household appliances.
Please read this user manual carefully and keep it throughout the product life cycle as a reference
document. The user manual should be passed on to any future owner of the appliance.
3
Page 4
Contents
Warnings and Important Safety Information - Built-in Oven 5
Description of the appliance 7
Control panel 8
When the appliance is first installed 11
Before using the oven for the first time 12
Programming the Oven 15
Safety and Energy Saving Functions 18
Practical Tips 23
Baking and Roasting Tables 25
Cleaning and Maintenance 27
If something is wrong 32
Technical Data 33
Instructions for the Installer 34
Building In 35
Customer Service 36
Guide to using the user instructions
Safety instructions
Step by step instructions
)
Hints and Tips
This appliance conforms with the following ECC Directives:
- 2006/95 (Low Voltage Directive);
- 89/336 (EMC Directive);
- 93/68 (General Directive);
and subsequent modifications.
4
Page 5

English
Important Safety Information
Always keep these user instructions with the appliance. Should the appliance be passed on
to third persons or sold, or if you leave this appliance behind when you move house, it is
very important that the new user has access to these user instructions and the accompanying
information.
These warnings are provided for the safety of the users and those living with them. So read
them carefully before connecting and/or using the appliance.
Installation
• The installation must be performed by a
qualified person in accordance with the rules
and regulations in force. The individual
operations for installing the appliance are
described under the instructions for the installer.
• Have the appliance installed and connected
by a qualified person with specialist knowledge, who will carry it out in accordance
with the directives.
• If any modifications to the power supply are
required because of the installation, these
should also be carried out by a qualified
electrician.
Operation
• This oven is designed for cooking foodstuffs;
never use it for other purposes.
• When opening the oven door during or at
the end of cooking be careful of the stream
of hot air, which comes out of the oven.
• Be very careful when using the cooker. The
extreme heat of the heating elements makes
the shelves and other parts very hot.
• If you should for whatever reason use aluminium foil to cook food in the oven, never
allow it to come into direct contact with the
floor of the oven.
• When cleaning the oven, proceed with care:
never spray anything onto the grease filter
(if fitted), the heating elements and the thermostat sensor.
• If is dangerous to make modifications of any
kind to this appliance or to its specifications.
• During the baking, roasting and grilling process, the oven window and the other parts
of the appliance get hot, so children should
be kept away from the appliance. T ake care,
if connecting electrical appliances to sockets near the oven, that cables do not come
into contact with hot rings or get caught in
the oven door.
• Always use oven gloves to take hot ovenproof dishes or pots out of the oven.
• Regular cleaning prevents the surface material from deteriorating.
• Before cleaning the oven, either turn the
power off or pull the mains plug out.
• Make sure that the oven is in the “ OFF”
position, when the oven is no longer being
used.
• This oven was made as a single appliance
or as a combination appliance with electrical hotplate, depending on the model, for
single-phase connection to 230 V.
• The appliance must not be cleaned with a
superheated steam cleaner or a steam jet
cleaner.
• Do not use abrasive cleaners or sharp metal
scrapers. These can scratch the glass in the
oven door, which may result in the shattering
of the glass.
5
Page 6
Child Safety
• This appliance is intended for use by adults. It
is dangerous to allow children to use it or play
with it.
• Children should be kept away while the oven
is working. Also, after you have switched the
oven off, it remains hot for a long time.
• Children and people, who are not able to
use the appliance safely because of their physical, sensory or mental capabilities or who do
not have sufficient experience and knowledge,
should not use this appliance without being
supervised or instructed by a responsible
person.
Customer Service
• Have checks and/or repairs carried out by
the manufacturer’s service department or by
a service department authorised by the manufacturer and use only original spare parts.
• Do not attempt to repair the appliance yourself
in the event of malfunctions or damage. Repairs carried out by untrained persons may
cause damage or injury.
The symbol
indicates that this product is not to be treated as
normal household waste. Instead it must be handed
over to a collection point for the recycling of electrical
and electronic equipment. The correct disposal of
this product will help to protect the environment and
human health. Environment and health are
endangered by incorrect disposal. For more
detailed information about recycling of this product,
please contact your local town hall, your household
waste disposal service or the shop where you
purchased the product.
on the product or its packaging
6
Page 7
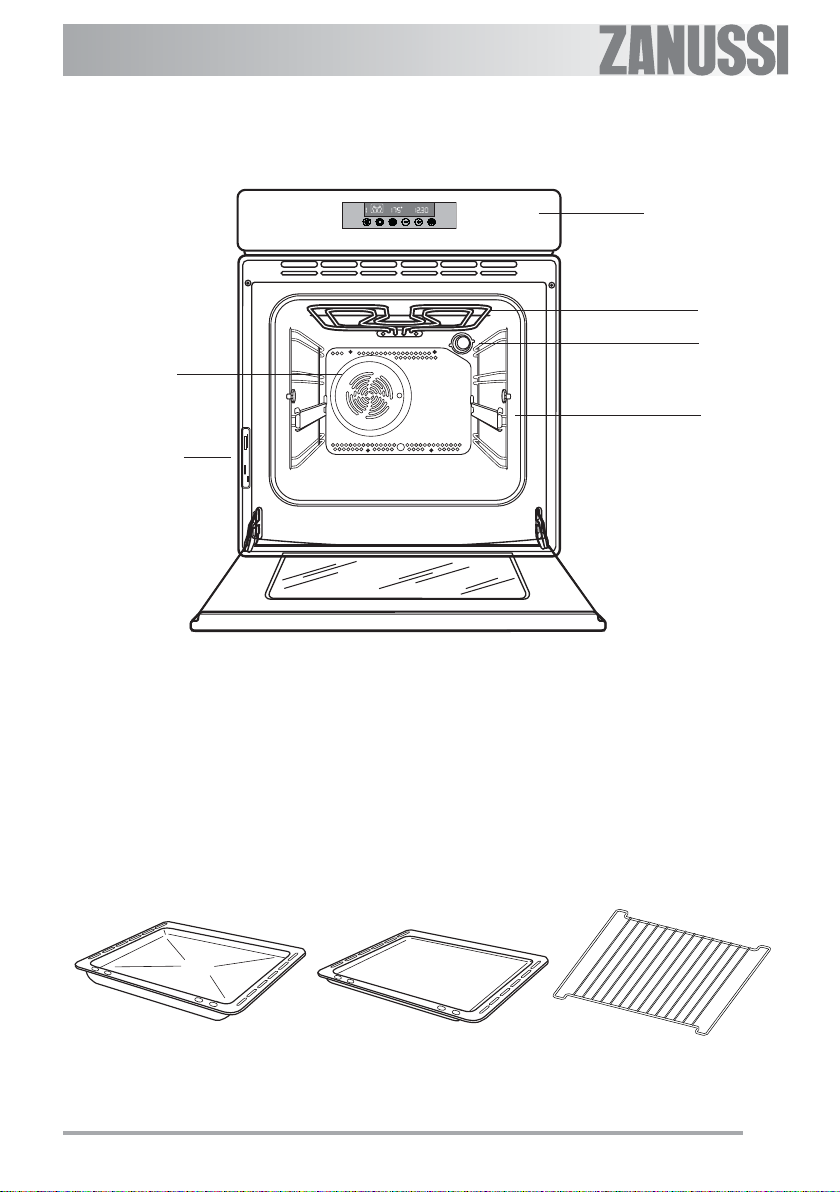
Description of the appliance
5
6
1. Control panel
2. Grill
3. Oven light
4. Telescopic pull-out rails
5. Hot air fan
6. Rating plate
1
2
3
4
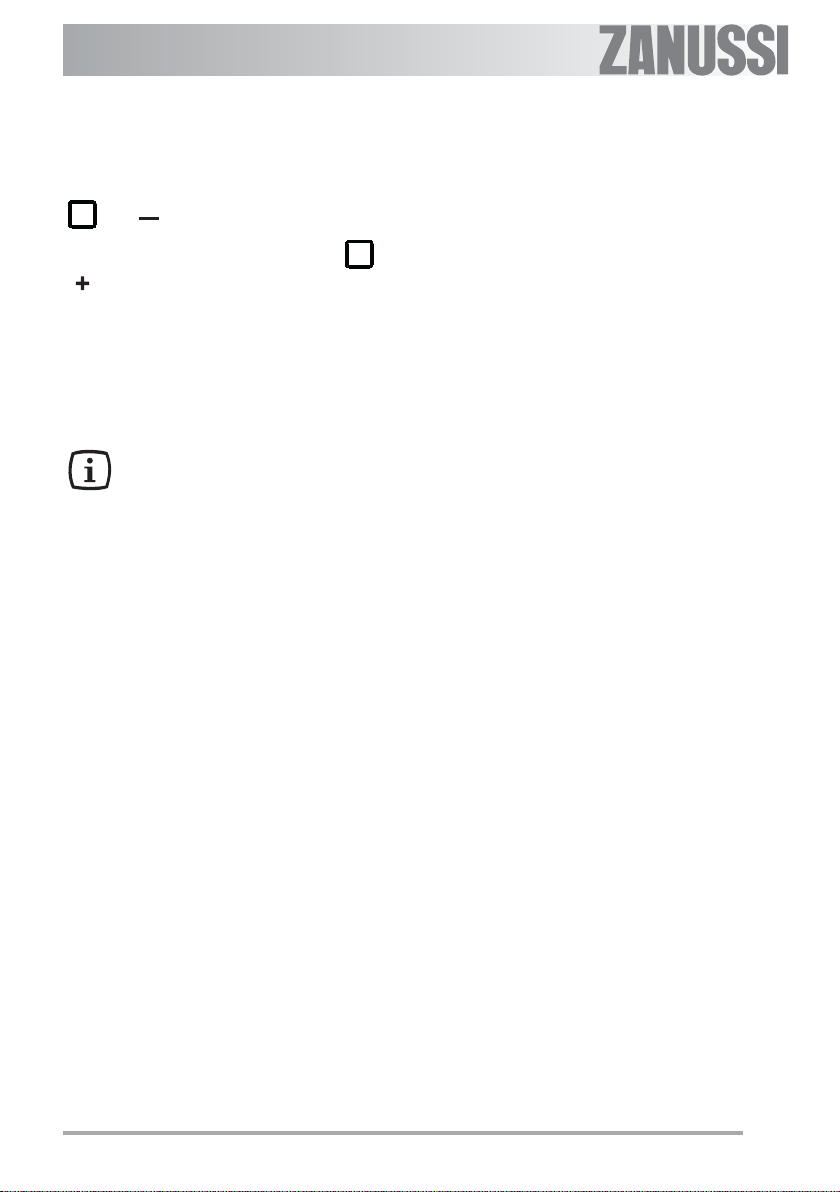
Oven accessories
Dripping pan
Cake tray
Anti-tip shelf
7
Page 8

Control panel
Cooking functions display
Temperature display
Time display
1 2 5 6 3
4
The electronic T ouch Controls on the oven
1. - “On/Off” TOUCH CONTROL
2.
3.
4.
5.
6.
- Touch Control for cooking functions
- Touch Control for the Fast Heat Up function
- Touch Control to Decrease (Time or Temperature)
- Touch Control to Increase (Time or Temperature)
- Touch Control for the time, Minute Minder, End of cooking time, Cooking duration
time, Time of day
How the electronic Touch Controls on the oven work
The T ouch Control buttons
All the oven functions are controlled electronically. You can select any combination of cooking function,
cooking temperature and automatic timing using the touch controls.
Make sure you touch just one control button at a time. If you touch the cooking function control for a
longer time, the next cooking function will be selected.
8
Page 9
Special functions
The following functions can be activated by touching two controls at the same time:
- Child Safety Function: Touch the controls
and “ ”.
- Beep on control: Touch the controls
“ ”.
- Demo mode: Please see the paragraph “Demo
Mode” on page 20.
For further details, see chapter “Safety and En-
ergy Saving Functions”.
In the event of a power failure, the
programmer will keep all the settings (time
of day, programme setting or programme
in operation) for about 3 minutes. If power
is not restored within 3 minutes, all the
settings will be cancelled. When the power
supply is restored again, the numbers in
the display flash. If this happens, the time
of day and timer must be re-set.
and
9
Page 10

”On/Off“ Touch Control
The oven must be switched on before setting
cooking functions or other programmes. If you
touch the
in the display and the oven light switches itself on
(Fig. 1).
To switch off the oven, touch the
cooking functions or programmes will stop, the
oven light will switch off and the time display will
show only the time of day.
control, the oven symbol appears
control. All
Fig. 1
10
Page 11
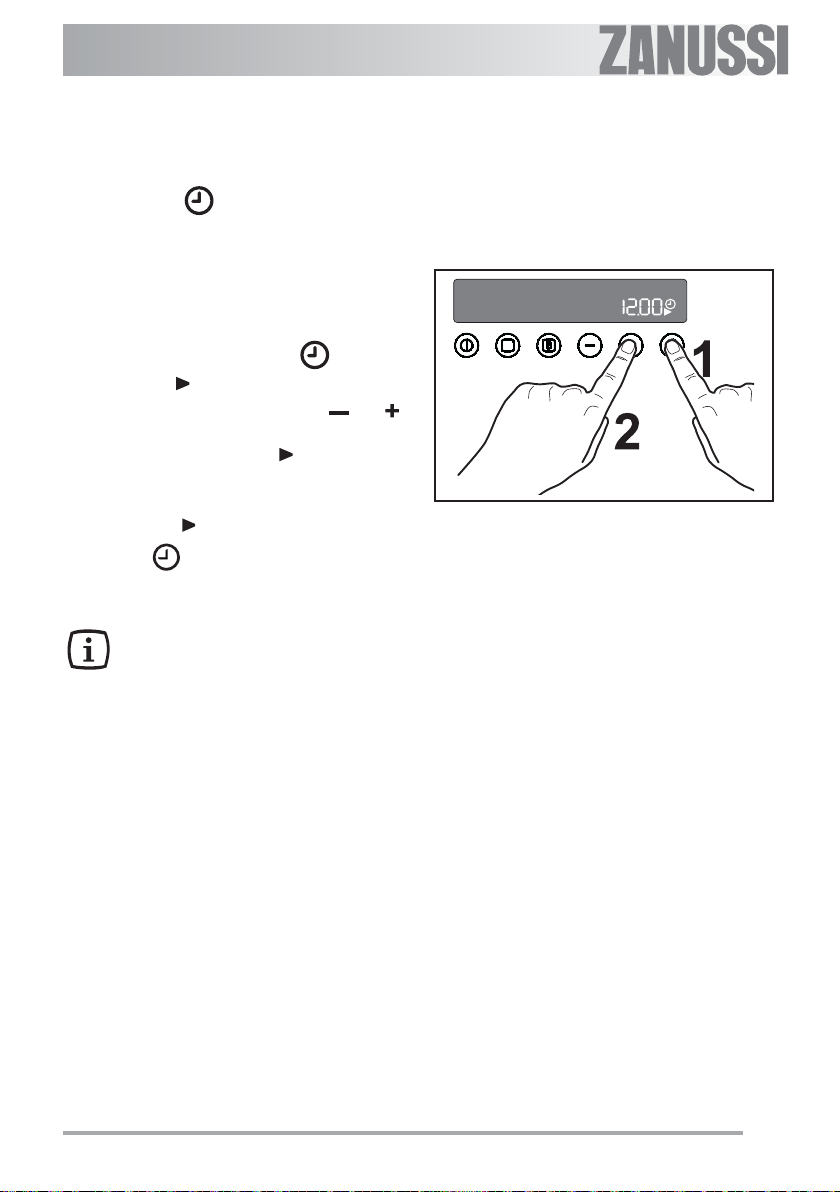
When the oven is first installed
When the oven is first connected to the electrical
supply , the display will automatically show 12:00
and the
symbol
Set the correct time of day before using the
oven for the first time.
How to set the correct time of day
for the first time:
1. Touch the time function control and, while
the symbol
of day by touching the controls
.
(Fig. 2)
The time arrow symbol
about 5 seconds after the correct time is
displayed.
2. If the symbol
control
Then, proceed as described in point 1.
It is possible to set the time of day
only when the oven is switched off.
will flash.
is flashing, set the correct time
“ ”
or
will disappear
stops flashing, touch the
twice.
“ ”
time
Fig. 2
11
Page 12

Before using the oven for the first time
Remove all packaging, both inside and
outside the oven, before using the oven.
The oven will work only if the time of
day has been set.
Before using for the first time, the oven should be
heated up without food.
During this time, an unpleasant odour may be
emitted. This is absolutely normal. It is caused by
manufacturing residues.
1. Set the time of day with the electronic programmer (see paragraph “How to set the correct time of day for the first time”).
Fig. 3
2. Switch the oven on using the
3. Touch the
function “Conventional cooking”
3).
4. Use the Touch Control “
perature to 250 °C.
5. Now allow the oven to run empty for approximately 45 minutes.
6. Open a window for ventilation during this time.
This procedure should be repeated with the “Full
Grill”
function for approximately 5-10 minutes.
Then let the oven cool down. Then
dampen a soft cloth with warm water and
a little mild washing-up liquid and use this
to clean the oven cavity.
Before using for the first time, carefully
wash the oven accessories as well.
control twice and select the
function and the “Fan Cooking”
control.
(fig.
” to set the tem-
Fig. 4
To open the oven door , always hold the
handle in the centre (Fig. 4).
12
Page 13
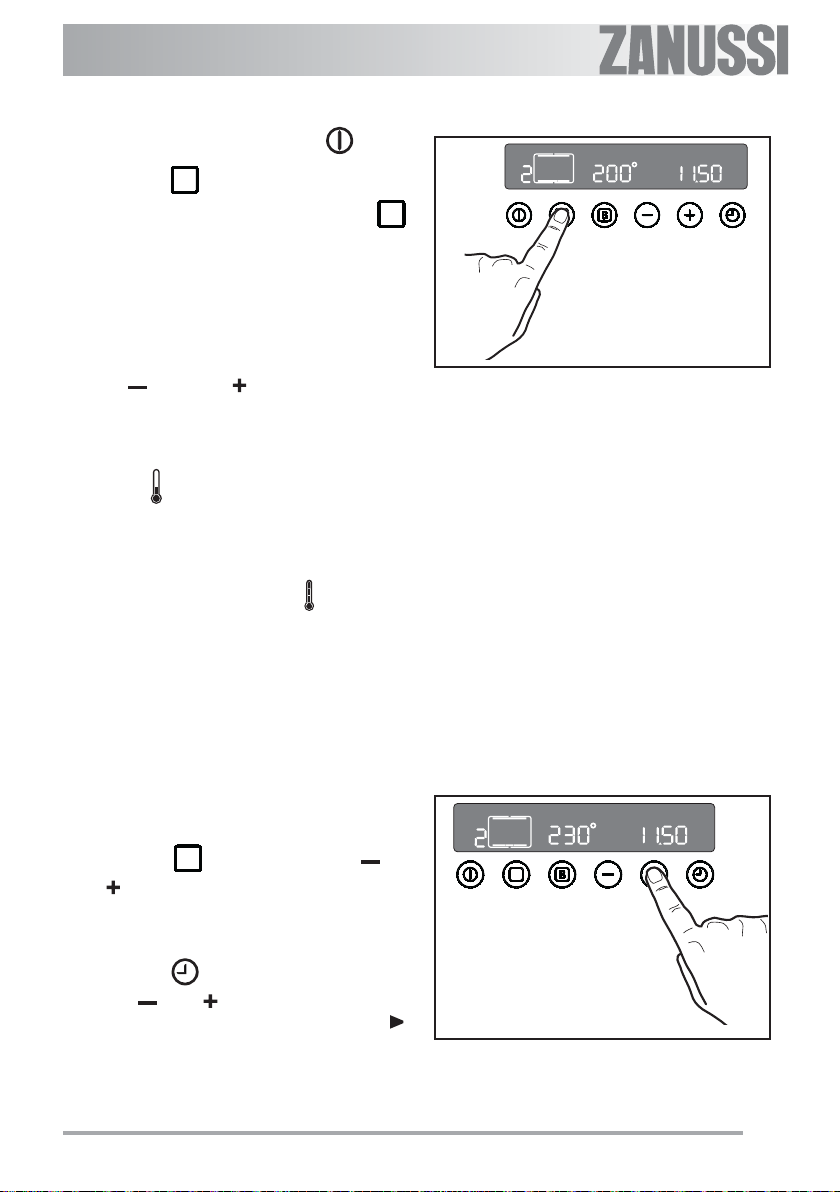
How to select a Cooking Function
1. Switch the oven on by touching the control.
2. Touch the
oven function. Each time you touch the
control, a cooking function symbol will appear
in the display and the corresponding cooking
function number will appear to the left of the
currently selected cooking function symbol
(Fig. 5).
3. If the pre-set temperature is not suitable, use
“ ”
the
perature. The temperature is adjusted in 5
degree steps.
- As the oven heats up, the thermometer
symbol
oven temperature.
When the required temperature is reached,
an acoustic alarm will sound for a short time
and the thermometer symbol
permanently.
control to select the required
control or
rises slowly, indicating the current
“ ”
control to set the tem-
will light up
How to set the temperature and
cooking time
Fig. 5
It is possible to set the temperature and cooking
time while the oven is working.
1. Touch the
“ ” control to increase or decrease the pre-
set temperature. The “°” symbol will flash
while you are doing this (Fig. 6).
2. Touch the
the “ ” or “ ” control to increase or
decrease the pre-set cooking time. The
symbol (next to the time display) will flash while
you are doing this.
control and then the “ ” or
time function control and then
Fig. 6
13
Page 14

Cooking Functions
The following list explains all the available cooking
functions in sequence.
1
2
3
4
Fan Cooking - This setting allows
you to roast or roast and bake
simultaneously using any shelf, without
flavour transference. Pre-set temperature: 175°C. Highest temperature:
250°C.
Conventional Cooking - The heat
comes from both the top and bottom
heating elements, ensuring an even
temperature inside the oven. Pre-set
temperature: 200°C. Highest temperature: 250°C.
Grill - Can be used for grilling smaller
quantities. Pre-set temperature: 250°C.
Temperature range: 200 °C - 250°C.
Thermal Grilling - This is an alternative method of cooking food items, which
are normally cooked with the normal
grill. The grill element and the oven fan
operate together, circulating hot air
around the food. Pre-set temperature:
180°C.
When using thermal grilling, select
a maximum temperature of 200°C.
6
7
8
9
Full Grill - The entire grill element
is switched on. Recommended for
large quantities. Pre-set temperature: 250 °C. Temperature range:
200°C - 250°C.
Bottom Heating Element - The
heat comes only from the heating
element in the bottom of the oven
only. This setting is very good for
finishing off dishes. Pre-set
temperature: 250°C.
Top Heating Element - The heat
comes only from the heating element
in the top of the oven. This setting is
very good for finishing off dishes.
Pre-set temperature: 250°C.
Defrosting - The oven fan
operates without heat and
circulates the air, at room
temperature, inside the oven. This
function is particularly suitable for
defrosting delicate food which could
be damaged by heat, e.g. creamfilled gateaux, ice cream cakes,
pastries, bread and other yeast
products.
5
Pizza Function - The bottom heating
element provides direct heat to the
base of pizzas, quiches or pies, while
the fan ensures air is circulated to cook
the topping or filling.
Pre-set temperature: 175°C. Highest
temperature: 250°C.
14
Page 15

Programming the Oven
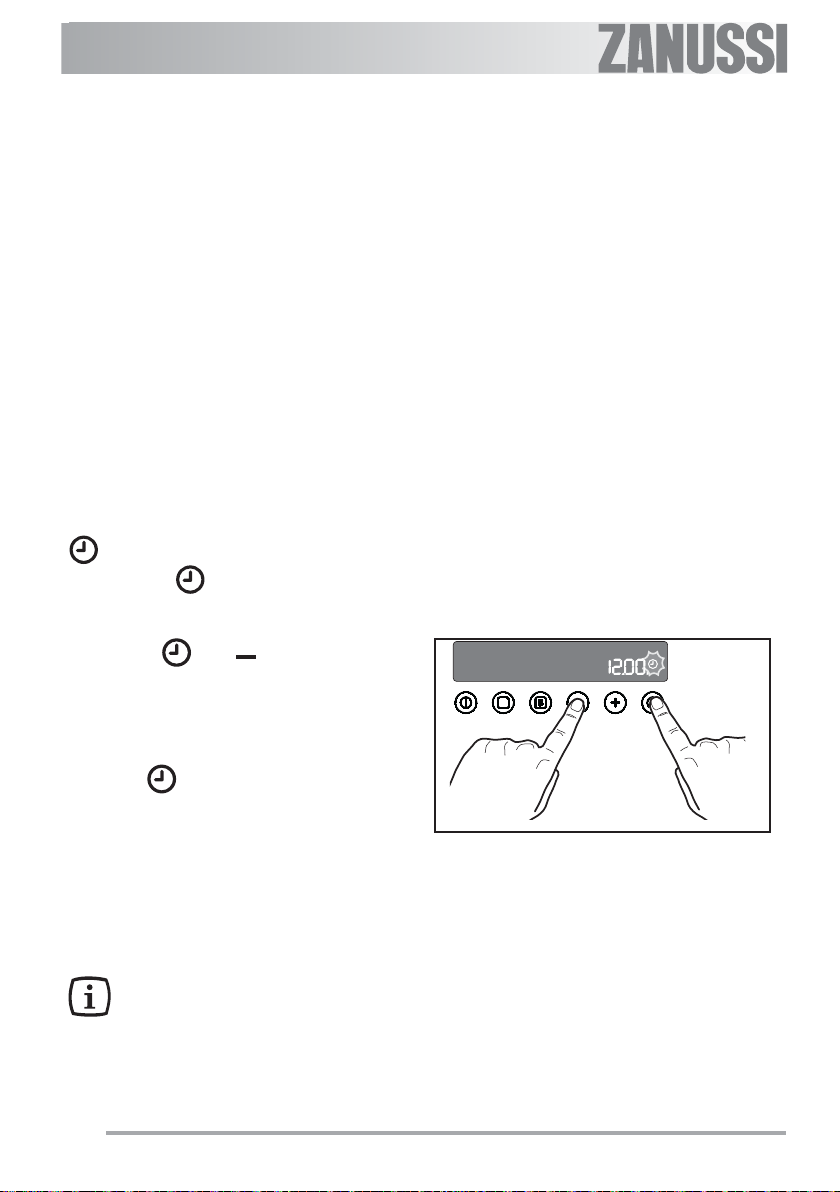
How to set the minute minder
1. Touch the time function control to select
the Minute Minder function. The relevant symbol
will flash and “0.00” appears in the control
panel (Fig. 7).
2. Touch the “
time. Maximum time is 23 hours 59 minutes.
After the setting is carried out, the Minute Minder
starts to run after a few seconds. The symbol
will flash during the programmed time.
3. When the programmed time has elapsed, an
acoustic alarm will be heard.
4. To switch off the acoustic alarm, touch any
control.
The acoustic alarm will switch off
automatically after approximately
one minute and the current time will
be displayed on the control panel.
The oven will NOT switch off if in use.
The Minute Minder function can also
be used when the oven is off.
” control and set the desired
Fig. 7
How to change the Minute Minder setting:
Touch the time function control
symbols
It is now possible to change the setting of the minu-
te minder using the “
How to cancel the Minute Minder:
Touch the time function control until the
symbols
Touch the “
display to re-set the time (Fig. 8).
and flash.
” or “ ” control.
and flash.
” control until “0.00” appears in the
until the
Fig. 8
15
Page 16

How to programme the Oven to
switch off
1. Switch the oven on, place food in the oven,
select the desired cooking function and
adjust the cooking temperature, if necessary.
2. Touch the time function control
the Cooking Duration function. The Cooking
Duration symbol
will appear in the display (Fig. 9).
3. While the
desired time using the “
Maximum time is 23 hours 59 minutes. The
programmer will wait a few seconds and
then start running.
4. When the programmed time has elapsed,
the oven will be switched off automatically.
An acoustic alarm will be heard and “0.00”
will appear on the control panel.
5. To switch off the acoustic alarm, touch the
control.
If you touch any other control, the alarm will
stop and the control panel will display the
symbols indicated in Fig. 10. Then, you need
to reset the programmer display by pressing
the
symbol is flashing, set the
control.
will flash and “0.00”
and select
” control.
Fig. 9
The acoustic alarm will switch off
automatically after approximately two
minutes. Then touch the
reset the programme.
How to cancel a programmed Cooking
Duration Time:
— Touch the time function control
symbol
— Touch the control “
the display shows “0.00” (Fig. 11).
flashes.
” to decrease the time until
control to
until the
16
Fig. 10
Fig. 11
Page 17

How to programme the Oven to switch
on and off
1. Set the Cooking Duration as described in the
relevant section.
2. Touch the time function control
function for the end of the cooking time is selected
and the corresponding symbol
The control panel will display the end of cooking
time (that is, the actual time + cooking duration
time) (Fig. 12).
3. Touch the “
end of the cooking time.
Remember that the cooking duration
time as such will not change.
4. After the setting is carried out, the programmer
will wait a few seconds and then start running.
5. The oven will switch on and off automatically.
When it switches itself off, an acoustic alarm will
sound.
6. T o switch off the acoustic alarm, touch the
control.
If you touch any other control, the alarm will
stop and the control panel will display the
symbols indicated in Fig. 10. Then, you need
to reset the programmer display by pressing
the
” control to select the desired
control.
until the
is flashing.
Fig. 12
The acoustic alarm will switch off
automatically after approximately two
minutes. Touch the
reset the programme.
If you want to cancel the programme, simply
cancel the Cooking Duration that has been
set (see the relevant section).
control to
17
Page 18

Special and Energy Saving Functions
Automatic Cut-Off Function
The oven is supplied with an automatic cut-off
function. If a cooking time has not been set and no
change of setting has been made, the oven will
switch off automatically according to the following
table (Fig. 13).
Temperature setting: Automatic switch off:
250 °C after 3 hours
200 to 245 °C after 5.5 hours
120 to 195 °C after 8.5 hours
below 120 °C after 12 hours
Child Lock Function
To av
oid children switching on the oven
accidentally, it is possible to lock the oven controls.
1. Switch the oven off by touching the
2. Touch the controls
time for about 3 seconds. An acoustic signal
will be emitted and the indication “SAFE” will
appear in the display (Fig. 14).
3. The oven is now locked. Neither individual
functions nor temperatures can be selected.
How to unlock the oven:
Touch the controls
for about 3 seconds. An acoustic signal will be
emitted and the indication ‘SAFE’ will go out. The
oven can now be operated again.
and “ ” at the same
and “ ” at the same time
control.
Fig. 13
Fig. 14
18
Page 19

Fast Heat Up Function (Booster)
After a cooking function has been selected and the
temperature has been set, the oven cavity will
gradually heat up until the desired temperature is
reached. This will take from 10 to 15 minutes,
depending on selected function and temperature.
If it is necessary to reach the required temperature
in a shorter time, the fast heat up function can be
used.
1. Switch the oven on by touching the
2. Set the desired cooking function and
temperature as explained in the previous pages.
3. Determine the exact temperature by touching
the controls “
appear in the display.
” or “ ”. The temperature will
control.
4. Touch the
will show “FHU” (Fig. 15).
5. Touch the
flash for approximately 10 seconds. Now it is
possible to select the desired temperature by
touching the controls “
6. When the desired temperature is reached, an
acoustic alarm will sound for a short time and
the temperature display will revert to the set
temperature.
This function can be used with any cooking function
or temperature.
control. The temperature display
control. The symbol “°” will
” or “ ”.
Fig. 15
19
Page 20
Residual Heat Function
When a Cooking Duration time is set, the oven will
automatically switch off a few minutes before the end
of the programmed cooking duration to finish your
dishes in the oven without further energy consumption. All current settings will be displayed until the
Cooking Duration time is over.
This function will not operate when the Cooking
Duration time is less than 15 minutes.
Demo Mode
This mode is intended to be used in shops to
demonstrate the oven functionality without any
power consumption except the interior light, the
display and the fan. This function can only be
switched on when the appliance is first connected.
If there is a power failure, when the power supply
is restored again, the Demo function can only be
switched on if in the display 12:00 and the symbol
are flashing automatically .
1.
Touch the control for approximately 2
seconds.
short time.
2.
Touch the
time. A short acoustic alarm will be heard
and the time
(Fig. 16)
When the oven is switched on
the
symbol appears in the display.
that the Demo function is activated.
All oven functions can be selected.
The oven is not really working and the heating
elements do not switch on.
Switch off the oven and follow the procedure
described above to switch off the demo mode
again.
An acoustic alarm will sound for a
and “ ”controls at the same
12:00 will appear in the display
.
This means
The Demo function remains saved in the
programme in the event of a power failure.
Fig. 16
20
Page 21

Beep on control
You can set the oven so that it beeps each time a
control is touched.
This function can only be activated when the oven
is switched off.
1. Touch the controls
time for about 3 seconds. The alarm signal
beeps once (Fig. 17).
How to disable the “Beep” Function:
1. With the oven switched on, touch the
control so that the oven switches off.
and “ ” at the same
Fig. 17
2. Touch the controls
time for about 3 seconds. The acoustic alarm
beeps once.
and “ ” at the same
Error Codes
The electronic programmer does a continuous
diagnostic check of the system. If parameters are
not correct, the activated functions are stopped
and the corresponding error code (the letter “F”,
followed by numbers) appears.
If an error code is displayed in the oven’s
electronic control panel, the light bar also lights
up.
For further details, see the section “If something is
wrong” on page 34.
21
Page 22
Safety Thermostat
To prevent dangerous overheating (through
incorrect use of the appliance or defective
components), the oven is fitted with a safety
thermostat, which interrupts the power supply. The
oven switches back on again automatically, when
the temperature drops.
Should the safety thermostat trigger due to incorrect
use of the appliance, it is enough to remedy the
error after the oven has cooled down; if on the
other hand, the thermostat triggers because of a
defective component, please contact Customer
Service.
Cooling fan
The purpose of this is to cool the electrical
components, the control switches and the door
handle.
The fan is switched on and off automatically when
the selection dial is turned.
To prevent dangerous overheating the
cooling fan runs after the oven has been
switched off until the temperature has
reached normal values.
The oven has four shelf levels and is
delivered with one shelf.
The positioning of the shelf levels is
indicated on the oven door.
The shelf positions are counted from the
floor of the oven upwards, as shown in
the figure.
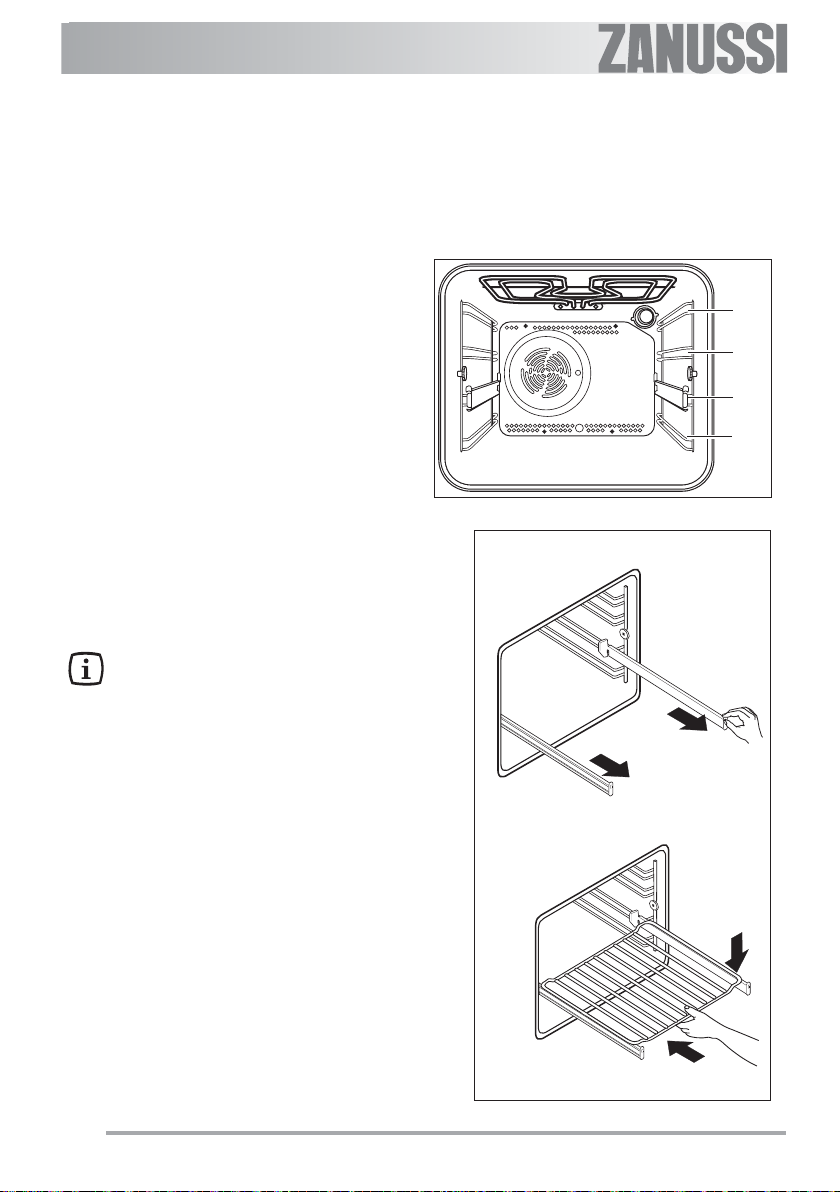
T elescopic pull-out rails
Important: Telescopic pull-out rails and
other accessories get very hot! Use oven
gloves or similar!
• Lay the grill shelf, baking tray or roasting tray
onto the extended rails and push it right back
into the oven as far as it will go (Fig. 19).
Do not close the oven door until the telescopic
rails are pushed all the way in.
4
3
2
1
Fig. 18
The oven has side rails with telescopic pull-out
rails on 1 level (Fig. 18).
• To insert a grill shelf, baking tray or roasting
tray, first pull out the telescopic rails on one
level (Fig. 19).
22
Fig. 19
Page 23

Practical Tips
Always keep the oven door closed
while cooking.
This oven is equipped with an exclusive cooking
system that creates a natural air stream and keeps
the cooking vapours circulating.
Food is therefore cooked in a constantly moist
atmosphere, which cooks the food so that it is
tender inside and crispy outside. The cooking times
and the energy consumption are reduced to a
minimum. Steam is created during cooking, which
can escape when the door is opened.
This is normal.
When opening the oven door during or at
the end of cooking, be careful of the stream
of hot air, which comes out of the oven.
When food is heated, steam is created,
like in a kettle. When the steam comes into
contact with the glass in the oven door, it
condenses and creates water droplets.
To reduce condensation, always preheat the
empty oven for 10 minutes.
We recommend you wipe the water droplets away
after every cooking process.
Conventional Cooking
Heat from above and below. Using the middle
shelf levels is recommended. Should the dish
require more heat from above or from below, then
use the upper or the lower shelf levels.
Fan Cooking
Here heat transfer is effected by hot air, which is
set in motion by the fan wheel in the back wall of
the oven (forced convection).
This distributes the heat quickly and evenly through
the oven. As a result several dishes can be
cooked at the same time on different levels (Fig.
20). The constant air movement means no smell
or taste is transferred between the different dishes.
With fan cooking up to 2 trays of biscuits can be
Fan Cooking
Fig. 20
inserted at the same time. When baking or roasting on only
use the lower levels, so that you can see better.
Fan cooking is particularly suitable for sterilising
and drying mushrooms or fruit.
one level it is recommended that you
Grilling
All types of meat are suitable for grilling, the only
exceptions being game and mince. Meat and fish
are brushed with oil before being grilled.
The flatter the meat, the nearer the grill element it
should be grilled and vice versa.
The grill can be inserted with the curve positioned
upwards or downwards. To achieve good
browning, insert the grill shelf into the 4th side
rails, i.e. close up under the grill element.
A little water in the roasting tray makes cleaning
easier. Insert the roasting tray into the first side
rails from the bottom. The oven door must remain
23
Page 24

closed during every baking, roasting or grilling
process.
While the oven is operating, the oven light remains
switched on.
Thermal Grilling
When using the thermal grill, set a maximum
temperature of 200 °C.
As a result, grill and fan start to work in alternation
(convection mode). This mode of operation means
that the heat can penetrate the food evenly, without
exposing the surface to the direct radiation of the
grill for too long a time.
This function is particularly suitable for:
preparing large pieces of meat, poultry and whole
fish such as trout, mackerel or grey mullet.
Hints and Tips
On baking:
Cakes and pastries usually require a medium
temperature (150°C-200°C) and therefore it is
necessary to preheat the oven for about 10
minutes.
Do not open the oven door before 3/4 of the baking
time has elapsed.
Shortcrust pastry is baked in a springform tin or
on a tray for up to 2/3 of the baking time and then
garnished before being fully baked. This further
baking time depends on the type and amount of
topping or filling. Sponge mixtures must separate
with difficulty from the spoon. The baking time would
be unnecessarily extended by too much liquid.
If two baking trays with pastries or biscuits are
inserted into the oven at the same time, a shelf
level must be left free between the trays.
If two baking trays with pastries or biscuits are
inserted into the oven at the same time, the trays
must be swapped and turned around after about
2/3 of the baking time.
On Roasting:
Do not roast joints smaller than 1 kg. Smaller pieces
could dry out when roasting. Dark meat, which is
to be well done on the outside but remain medium
or rare inside, must be roasted at a higher temperature (200°C-250°C).
White meat, poultry and fish, on the other hand,
require a lower temperature (150°C-175°C). The
ingredients for a sauce or gravy should only be
added to the roasting pan right at the beginning if
the cooking time is short. Otherwise add them in
the last half hour.
You can use a spoon to test whether the meat is
cooked: if it cannot be depressed, it is cooked
through. Roast beef and fillet, which is to remain
pink inside, must be roasted at a higher temperature in a shorter time.
If cooking meat directly on the oven shelf, insert
the roasting pan in the shelf level below to catch
the juices.
Leave the joint to stand for at least 15 minutes, so
that the meat juices do not run out.
To reduce the build up of smoke in the oven, it is
recommended to pour a little water in the roasting
pan. To prevent condensation forming, add water several times. The plates can be kept warm in
the oven at minimum temperature until serving.
Caution!
Do not line the oven with aluminium
foil and do not place a roasting pan
or baking tray on the floor, as otherwise the oven enamel will be damaged by the heat build-up.
Cooking times
Cooking times can vary according to the different
composition, ingredients and amounts of liquid in
the individual dishes.
Note the settings of your first cooking or roasting
experiments to gain experience for later preparation of the same dishes.
Based upon your own experiences you will be
able to alter the values given in the tables.
24
Page 25

Baking and Roasting Table
Conventional Cooking and Fan Cooking
Timings do not include pre-heating.
The empty oven should always be pre-heated for 10 minutes.
temp
°C
Cooking times in
minutes
NOTES
TYPE OF DISH
CAKES
Whisked recipies 2 170 2 (1and3)* 160 45-60 In cake mould
Shortbread dough 2 170 2 (1and3)* 160 20-30 In cake mould
Butter-milk cheese cake 1 175 2 165 60-80 In cake mould
Apple cake (Apple pie) 1 170 2lef+righ. 160 90-120 In cake mould
Strudel 2 180 2 160 60-80 In baking tray
Jam- tart 2 190 2(1and3)* 180 40-45 In cake mould
Fruit cake 2 170 2 150 60-70 In cake mould
Sponge cake 1 170 2(1and3)* 165 30-40 In cake mould
Christmas cake 1 150 2 150 120-150 In cake mould
Plum cake 1 175 2 160 50-60 In bread tin
Small cake 3 170 2 160 20-35 In baking tray
Biscuits 2 160 2(1and3)* 150 20-30 In baking tray
Meringues 2 135 2(1and3)* 150 60-90 In baking tray
Buns 2 200 2 190 12~20 In baking tray
Pastry: Choux 2or 3 210 2(1and3)* 170 25-35 In braking tray
Plate tarts 2 180 2 170 45-70 In cake mould
BREAD AND PIZZA
White bread 1 195 2 185 60-70
Rye bread 1 190 1 180 30-45 In bread tin
Bread rolls 2 200 2(1and3)* 175 25-40 In baking tray
Pizza 2 200 2 200 20-30 In baking tray
FLANS
Pasta flan 2 200 2(1and3)* 175 40-50 In mould
Vegetable flan 2 2 00 2(1and3)* 175 45-60 In mould
Quiches 1 210 1 190 30-40 In mould
Lasagne 2 200 2 200 25-35 In mould
Cannelloni 2 200 2 200 25-35 In mould
MEAT
Beef 2 190 2 175 50-70 On grid
Pork 2 180 2 175 100-130 On grid
Veal 2 190 2 175 90-120 On grid
English roast beef
rare 2 210 2 200 50-60 On grid
medium 2 210 2 200 60-70 On grid
well done 2 210 2 200 70-80 On grid
Shoulder of pork 2 180 2 170 120-150 With rind
Shin of pork 2 180 2 160 100-120 2 pieces
Lamb 2 190 2 175 110-130 Leg
Chicken 2 190 2 200 70-85 Whole
Turkey 2 180 2 160 210-240 Whole
Duck 2 175 2 220 120-150 Whole
Goose 2 175 1 160 150-200 Whole
Rabbit 2 190 2 175 60-80 Cut in pieces
Hare 2 190 2 175 150-200 Cut in pieces
Pheasant 2 190 2 175 90-120 Whole
Meat loaf 2 180 2 1 70 tot.150 in bread pan
FISH
Trout/Sea bream 2 190 2(1and3)* 175 40-55 3-4 fishes
Tuna fish/Salmon 2 190 2(1and3)* 175 35-60 4-6 fillets
4
3
2
1
temp °C
4
3
2
1
Conventional Cooking Fan Cooking
(*)
If you cook more than one dish at the same time, we recommend you place them on the levels quoted
between brackets.
25
Page 26

Conventional Grilling
Timings do not include pre-heating.
The empty oven should always be pre-heated for 10 minutes.
Cooking time in
minutes
1st side
2nd side
TYPE OF DISH
Quantity
Grilling -
4
3
temp.°CPieces g.
2
1
Fillet steaks 4 8 0 0 3 2 50 12~15 12~14
Beef-steaks 4 6 00 3 250 10~12 6~8
Sausages 8 / 3 250 12~15 10~12
Pork chops 4 600 3 2 5 0 12~16 12~14
Chicken (cut in two) 2 1000 3 250 30~35 25~30
Kebabs 4 / 3 250 10~15 10~12
Chicken (breast) 4 400 3 250 12~15 12~14
Hamburger* 6 600 2 2 50 20-30
*
Preheat 5’00'’
Fish (fillets) 4 4 0 0 3 25 0 12~14 10~12
Sandwiches 4~6 / 3 250 5~7 /
T oast 4~6 / 3 250 2~4 2~3
Thermal Grilling
With Fan Cooking plus set a maximum temperature of 200°C.
Cooking time in
minutes
1st side
2nd side
TYPE OF DISH
Quantity
Thermal Grilling
4
3
temp.°CPieces g.
2
1
Rolled joints (turkey) 1 1000 3 200 30~40 20~30
Chicken ( cut in two) 2 1000 3 200 25~30 20~30
Chicken legs 6 -- 3 2 0 0 15~20 15~18
Quail 4 500 3 20 0 25~30 20~25
Vegetable gratin -- -- 3 200 20~25 -St. Jacques shells -- -- 3 2 0 0 15~20 -Mackerel 2-4 -- 3 200 15~20 10~15
Fish slices 4- 6 8 0 0 3 200 12~15 8~10
Pizza Function
TYPE OF DISH
Pizza , large 1 200 15~25 on baking tray
Pizza , small 1 20 0 10~20
Bread rolls 1 20 0 15~25 on baking tray
The temperatures quoted are guidelines. The temperatures may have to be adapted to personal
requirements.
4
3
2
1
temp.°C
26
Pizza Function
Cooking time in
minutes
NOTES
on baking tray or on grid
Page 27

Cleaning and Maintenance
Before cleaning always allow the
cooling fan to cool the oven down
before switching off at the electricity
supply.
This appliance cannot be cleaned with
steam or with a steam cleaning
machine.
The oven should be kept clean at all
times. A build-up of fats or other
foodstuffs could result in a fire,
especially in the grill pan.
Important: Before carrying out any cleaning
operation, the appliance must be disconnected from
the power supply.
External cleaning
Regularly wipe over the control panel, oven door
and door seal using a soft cloth well wrung out in
warm water to which a little mild washing-up liquid
has been added.
T o prevent damaging or weakening the door glass
panels avoid the use of the following:
• Household detergent and bleaches
• Impregnated pads unsuitable for non-stick
saucepans
• Brillo/Ajax pads or steel wool pads
• Chemical oven pads or aerosols
• Rust removers
• Bath/Sink stain removers
Clean the outer and inner door glass using warm
soapy water. Should the inner door glass become
heavily soiled it is recommended that a cleaning
product such as Hob Brite is used. Do not use
paint scrapers to remove soilage.
Cleaning materials
Before using any cleaning materials on your oven,
check that they are suitable and that their use is
recommended by the manufacturer.
Cleaners that contain bleach should NOT be used
as they may dull the surface finishes. Harsh
abrasives should also be avoided.
Oven Cavity
The enamelled base of the oven cavity is best
cleaned whilst the oven is still warm.
Wipe the oven over with a soft cloth soaked in
warm soapy water after each use. From time to
time it will be necessary to do a more thorough
cleaning, using a proprietary oven cleaner.
DO NOT attempt to clean catalytic liners.
27
Page 28

Cleaning the Oven Door
Before cleaning the oven door, we recommend
you to remove it from the oven.
Proceed as follows:
1. open the oven door completely;
2. find the hinges linking the door to the oven
(Fig. 21);
3. unlock and turn the small levers located on the
two hinges (Fig. 22);
4. handle the door by its left- and right-hand sides,
then slowly turn it towards the oven until it is
half-closed (Fig. 23);
5. gently pull the oven door off its site (Fig. 23);
6. place it on a steady plan;
Clean the oven door glass with warm soapy water
and a softh cloth only. Never use harsh abrasives.
Once the cleaning is carried out, refit the oven
door, following the procedure in reverse.
Stainless steel or aluminium appliances:
We recommend that the oven door is only cleaned
using a wet sponge and dried after cleaning with a
soft cloth.
Never use steel wool, acids or abrasive products
as they can damage the oven surface. Clean the
oven control panel following the same precautions.
DO NOT clean the oven door while
the glass panels are warm. If this
precaution is not observed the glass
panel may shatter.
If the door glass panel becomes chipped or has
deep scratches, the glass will be weakened and
must be replaced to prevent the possibility of the
panel shattering. Contact your local Service Centre
who will be pleased to advise further.
Fig. 21
Fig. 22
Fig. 23
28
Page 29

T elescopic pull-out rails
The side rails with telescopic pull-out rails can be
completely removed for cleaning.
Removal
T ake hold of the side rails on one side of the oven
and undo the knurled nut at the front. Lift the side
rails at the back in order to unhook them (Fig.
24).
Do the same thing on the other side of the oven.
Cleaning
Clean the two sets of side rails with telescopic
rails on the outside only with commercially available detergents.
Important: The telescopic rails must not be cleaned in the dishwasher.
Attention, the rollers must not be greased.
Insertion
After cleaning, first insert the dry side rails with
the hook into the hole at the back, then fasten at
the front with the knurled nut.
Fig. 24
29
Page 30

Grill heating element
This model has been fitted with a hinged grill element to make the roof of the oven especially easy
to clean.
Before proceeding ensure the oven
is cool and disconnected from the
electricity supply.
1) Undo the screw fastening the grill element
(see Fig. 25). When carrying out this operation for the first time, we recommend using a
screwdriver.
2) Then gently pull the grill downwards to allow
access to the oven roof (see Fig. 25).
3) Clean the oven roof with a suitable cleaner
and wipe dry before returning the hinged grill
element to its original position.
4) Carefully push the grill element up into its origi-
nal position and re-tighten the retaining nut.
Ensure the retaining nut on the grill
element is properly tightened so that
it does not fall down when in use.
Replacing the Oven Light Bulb
If the oven bulb needs replacing, the new bulb
must have the following specifications:
- Electric power: 25 W,
- Voltage: 230 v (50 Hz),
- Resistant to temperatures of 300 °C,
- Connection type: E14.
These replacement bulbs can be purchased from
your dealer.
Fig. 25
To replace the oven light bulb (Fig. 26):
)
1. Ensure the oven is disconnected from the
electrical supply.
2. Turn the glass cover anti-clockwise.
3. Remove the faulty bulb and replace with the
new one.
4. Refit the glass cover.
5. Turn the power on again.
30
Fig. 26
Page 31

Special Grease Filter
Make sure that the power supply is
switched off before this action is
performed.
When roasting, the special grease filter (see Fig.
27) must be inserted to minimise the contamination
of the fan wheel in the back wall of the oven.
When the roasting process is completed, the
grease filter is to be removed as follows and
thoroughly cleaned.
Press the filter spring upwards and remove the
filter.
Important! The filter must be taken out when
baking.
Fig. 27
31
Page 32

If something is wrong
If the appliance is not working correctly, please check the following before contacting your local
Service Force Centre:
PROBLEM
The oven is not switching on.
The oven light does not come on.
It takes too long to cook the dishes or they
cook too quickly.
SOLUTION
Touch the
function.
control
, then select a cooking
or
Has the fuse in the domestic electrical installation been tripped?
or
Is the child safety device or the automatic On/Off
cut-off function switched on?
or
Was the Demo function accidentally activated?
or
Check whether the appliance is correctly connected and the socket switch or the mains supply to the oven is ON.
Set the oven function dial to a function.
or
Buy a new oven light bulb; if necessary, order
from the Electrolux Service Centre and install
according to the instructions in these User Instructions.
Following the advice contained in these instructions, especially the section “Practical Tips“.
Steam and condensation settle on the
food and in the oven cavity.
The error code “F.. appears in the display “.
32
When the cooking process is completed, do not
leave the dishes standing in the oven for longer
than 15-20 minutes.
Please take note of the error code and pass to
our nearest Customer Service office.
Page 33

Technical Data
Heating element ratings
Bottom oven element 1000 W
Top heating element 800 W
Full oven (Top+Bottom) 1800 W
Grill 1650 W
Full grill 2450 W
Thermal Grilling 1650 W
Fan Cooking heating 2000 W
Pizza function 3000 W
Oven light 25 W
Hot air fan motor 25 W
Cooling fan motor 25 W
Total rating 3080 W
Operating voltage (50 Hz)
230 V
Dimensions of the recess
Height mm 593
Width mm 560
Depth mm 550
Oven
Height mm 335
Width mm 395
Depth 400 mm
Oven capacity 53 l
Oven thermostat 30°C - 250°C
33
Page 34

Instructions for the Installer
Installation and connection must be done
in compliance with the regulations in force.
Any interventions must be carried out
when the appliance is switched off. Only
accredited engineers may work on the
appliance.
Connecting to the electrical supply
Before connecting to the electrical supply, please
make sure:
- The fuse and the domestic electrical installation
must be designed for the max. load of the
appliance (see rating plate).
- The domestic electrical installation must be
equipped with a proper earth connection in
accordance with the regulations in force.
- The socket or the multi-pole off switch must be
easy to access after the appliance has been
installed.
The appliance is supplied with the plug attached.
The mains cable and plug as supplied are to be
connected to a shockproof socket (230 V~, 50
Hz). The shockproof socket must be installed in
accordance with the regulations.
The following types of mains cable are suitable,
taking the necessary rated cross section into
account: H07 RN-F, H05 RN-F, H05 RR-F, H05
VV-F, H05 V2V2-F (T90), H05 BB-F.
If the appliance is connected without a plug, or if
the plug is not accessible, a multi-pole off switch
(e.g. fuses, circuit breaker) with a minimum gap of
3 mm between the contacts must be installed
between the appliance and mains cable. The
switch must not interrupt the earth wire at any
e yellow-green earth wire should be 2-3
point. Th
cm longer than all other cables.
The connection cable must in any case be laid out
so that at no point does it reach 50°C (over room
temperature).
After the connection has been carried out, the
heating elements must be tested by being operated
for about 3 minutes.
Terminal block
The oven is fitted with an easily accessible terminal
block which is designed to operate with a singlephase power supply of 230 V (Fig. 28).
The manufacturer disclaims any liability if
the safety measures are not observed.
Fig. 28
34
Page 35

Instructions for Building In
For problem-free functioning of the built-in
appliance, the kitchen unit or the recess into which
the appliance is built must have suitable
dimensions.
In accordance with the regulations in force, all parts
which ensure the shock protection of live and
insulated parts must be fastened in such a way that
they cannot be undone without tools.
These also include the fixing of any end walls at
the beginning or end of a line of built-in units.
The shock protection must in any case be ensured
by the building in of the appliance.
The appliance can be placed with its back or a
side wall against higher kitchen units, appliances
or walls. However, only other appliances or units
of the same height as the appliance can be placed
against the other side wall.
Fig. 29
Oven dimensions (Fig. 29)
Instructions for Building In
For problem-free functioning of the built-in
appliance, the kitchen unit or the recess into which
the appliance is built must have suitable
dimensions (Fig. 30-31).
Securing the Appliance to the Cabinet
- Open the oven door;
- fasten the oven to the cabinet placing the four
distance holders provided with the appliance
(Fig.32 - A) which fit exactly into the holes in
the frame and then fit four wood screws (Fig.
32 - B).
When installing a hob over the oven, the hob
electrical connection and the oven one have
to be carried out separately for security
reasons and to let the oven be taken off the
cabinet easier, if necessary. Any extensions
must be made with cables suitable for the
required power.
Fig. 30
Fig. 32
550 MIN
560 - 570
593
80÷100
Fig. 31
35
Page 36

Customer Service
If after the checks described here the problem
cannot be solved, call the nearest of the
manufacturer’s Customer Service departments
and quote the kind of problem, the appliance
model (Mod.), the production number (Prod.
No.) as well as the serial number (Ser. No.),
which you will find on the oven’s rating plate.
You will only find the manufacturer’s original
spare parts, which are identified with the
following trademark,
in our Customer
Service offices and at
authorised spare part
dealers.
36
Page 37

3738 39
Page 38

Page 39

Page 40

40
Page 41

36
Page 42

35
Page 43

34
Page 44

החמוגב הנקתה
רויא ואר32
• רונתה תלד תא וחתפ
• תמאתה ךות החמוגל רונתה תא ודימצה
A (ל םימיאתמה-4
חוורמ םי) רויא32-
רונתה תחטבאל םישמשמה םירוחה
B.(
ומוקמל) רויא32-
תא ורבח רונתה לע םייריכ םינקתומ םא
קתנל היהי ןתינש ךכ םייריכהמ דרפנב רונתה
דרפנב םהמ דחא לכ . עצובת םילבכה תכראה
םימיאתמ םילבכ תרזעב קר.
רויא32
תוריש
םינותנה לכ תקידב ירחא םא אל היעבה
הרתפנ , הבורקה תורישה תנחתל ורשקתה
Mod.( ,
ןאוביה לצא קר שוכרל ולכות םיפלחה תא
למסה תא םיאשונ םהשכ ןרציה לש השרומה
היעבה תא וראתו , םגדה רפסמ תא)
Prod. No. (סמה תאו ' ירודיסה
סמ ' רוצייה)
Ser. No. (תיוותה לע םימושרה.
)
33
Page 45

ןיקתמל תוארוה
ודיפקה תויעב עונמל ידכ תודימה לע
םירויאב תומושרה.
וא וקותינש ךכ רונתה תא ןיקתהל ודיפקה
םילכב שומיש ךירצי רחא לופיט לכ
םימיאתמ . לכ תא םג תללוכ וז הארוה
רונתה תנקתה תעב ונקתויש םירומיגה
החמוגב.
דצה ןפוד וא בגהשכ רונתה תא ןיקתהל ןתינ
ריקב וא חבטמה תונוראב םיעגונ . ודיפקה
נ ביכר לכה הבוגב היהי רונתל דמצומש ףסו
רויא29
החמוגה תודימ לע ודיפקה) םירויא30 ,31 (
דיתעב תויעב עונמל ידכ
רויא30
דבלב רונתה.
רונתה תודימ
רויא ואר29לאמשמ
רויא31
32
Page 46

ןיקתמל תוארוה
ע קר ועצובי ילמשחה רוביחהו הנקתהה" תונקתל םאתהבו ךמסומ יאנכט י
תומיאתמה .למשחהמ קתונמ רונתהשכ קר ועצובי תולועפה לכ.
וביחלמשחל ר
םיאבה םיטרפה תא ואדוו למשחל רונתה רוביח ינפל:
• תיותה לע תומושר ןהש יפכ רונתה לש למשחה תושירדל םיאתמ ךיתנהש ואדוו.
• ןיקת הקראה רוביח תללוכ רוביחה תדוקנש ואדוו.
• ומוקמב רונתה תנקתה ירחא םג םישיגנ קספמה וא עקשה.
230V/ 50Hz.(
ראומ עקשל רוביחל םיאתמה עקת םע עיגמ רונתה ק)
עקת אלל רונתה תא םירבחמ םא , אוה יעגמה ןיב חוורהש יבטוק וד קספמל ותוא ורבח
50°C.
מ הובג םוחל ףושח היהי אל לבכהש ודיפקה-
םיקלחה לכ תלועפ תא וקדב רוביחה תמלשה ירחא)וגםיררוואמהו םומיחה יפ (כ ךשמ-3
םיעגמה רוביח
תולקב השיגנ םירוביח תבית ללוכ רונתה
לש חתמב תחא הזאפל רוביחב לועפל דעוימו
אלו הדימב קזנ לכל יארחא היהי אל ןרציה
תוחיטבה תוארוה לע ודיפקה.
תוחפל3מ "מ . הקראהה דיגש ודיפקה)קורי-בוהצ (ב ךורא היהי-2-3ס "םידיגה רתימ מ.
תוקד.
230V) רויא28.(
רויא28
31
Page 47

ירשפא ןורתפ העפותה/היעבה
שער השוע ררוואמה
• תירוחאה ןפודל הדומצ אל תשרה וא תינבתהש ואדו.
לעופ אוהש ןמזב
F לנפב עיפומ
• חמל ורשקתהו הלקתה דוק תא ומשר ' הבורקה תורשה
ירשפאה םדקהב.
האיגש דוק
הגוצתה
נה תוקידבה תא םתעצבש רחאל םג תכשמנ היעבה םא"ל , הבורקה תורשה תנחתל ונפ
תורש תלבקל םכירוגמ רוזאל.
םיינכט םינותנ
רונתה לש םיקפסה
1000 W
800 W
1800 W
1650 W
2450 W
2000 W
1650 W
2000 W
3000W
25 W
25 W
25 W
3080 W
230 V
ןותחת םומיח ףוג
ןוילע םומיח ףוג
קפסה)ןותחתו ןוילע(
לירגה ףוג
לופכ לירג ףוג
םומיח ףוגירוחא
ימרת לירג
ררוואמ םע םומיח
הציפ רונת
םוח רוזיפ ררוואמ
תלדה ןוניצ ררוואמ
תימינפ הרואת
יברמ קפסה
הנזה חתמ
החמוגה תודימ
הבוג 59.3ס "מ
בחור 56.0ס "מ
קמוע 55.0ס "מ
רונתה
הבוג 33.5ס "מ
בחור 39.5ס "מ
קמוע 40.0ס "מ
חפנ)רטיל( 53.0רטיל
30-250°C
טטסומרטה לש הלועפה םוחת
30
Page 48

םינמושהו לזונה ףוסיאל ןנסמ
תנזה תא קתנל הבוח וז הלועפ עוציב ינפל
רונתל למשחה.
בייח םינמושה תריגא ןנסמ םירשב לושיב תעב
ידכ ןקתומ תויהל ףוג תאו ררוואמה תא תוסכל
יחהמתירוחאה םו.
ומצע ררוואמה לע ןמוש תורבטצה ענמי רבדה.
תושק יוקינ תוירכ םע םטאה תא תוקנל ןיא.
םילכ חידמב ןנסמה תא תוקנל ןתינ.
ררקתה רונתהש רחאלו תינכתה םויסב , וריסה
הלעמ יפלכ תינושלה תזזה ידי לע ןנסמה תא) רויא
27(.
רויא27
היילצ ינפל קר ןנסמה תא ביכרהל שי) ראשב
מה תא תוקנל שי ןובסו םימח םימ םע תינדי ןנס
)חידמב וא.(
שרדנ אל אוה תולועפה.(
היעב וא ישוק לש הרקמב
רונתה תלעפהב ישוק שיו הדימב ,הניקת הניא ותלועפש וא , תוקידבה תא עצבל ץלמומ
חמל ונפתש ינפל םכמצע תוחוכב תואבה 'תורשה
ןורתפירשפא העפותה/היעבה
• הלעפהה גתמ לע וצחל . תוינכתה ררובש ואדוו
םינווכמ טטסומרתהו.
וא
• ךיתנה םאה"ץפק"?
וא
• המיסחה הלעפוה םאה?
וא
• המגדהה תינכות הלעפוה םאה?
וא
• למשחה עקשל רבוחמ לבכה עקתש ואדו.
תקלוד אל רונתה תרואת
• ןצחל לע הציחלב רונתה תא וקילדה1.
וא
• הפורש הרונה .שי הפילחהל ) תפלחהב קסועה ףיעס האר
םדוקה דומעב הרונ.(
ידמ רתוי תכרוא תינכתה
• ע ולעפ" דחוימבו תרבוחב תולולכה הלעפהה תוארוה פ
ףיעסב תוארוהה לע ודיפקה"םיפיט"
• ךרעב רונתב לישבתה תא וריאשה15-20 םויס רחאל תוקד
תינכתה.
• רמייטה לש תוארוהה תא וקדב
לעופ אל רונתה
ןמז ידמ תוחפ וא
וחלו םידא םירצונ ת
רונתה ללחב
לעופ אל רמייטה
29
Page 49

וגלירגה לש םומיחה יפ
לע לקהל ידכ ריצ לע םיבכרומ םומיחה יפוג
הנוילעה ןפודה יוקינ.
יפוגש ואדוו הלועפ לכ ינפל
קתונמ רונתהשו םירק םומיחה
למשחהמ.
1. יפוג תא קיזחמה גרובה תא וררחש
םמוקמב םומיחה) רויא25 .( םעפב
גרבמב שמתשהל ץלמומ הנושארה.
כשמ יפלכ םומיחה יפוג תא תונידעב ו
2.
הטמ) רויא25.(
ינפל בטיה ובגנו הנוילעה ןפודה תא וקנ
3.
םמוקמל םומיחה יפוג תרזחה.
םמוקמל םומיחה יפוג תא וריזחה
4.
גרובה תא וקדהו.
רויא25
בטיה קדוהמ גרובהש ואדוו
ולפי אל םומיחה יפוגש ידכ ומוקמל
הלעפהה ןמזב.
הרונה תפלחה
םיאבה םיכרעב תויהל תבייח הרונה:
25W
ילמשח ךרע :
230 (50Hz)
חתמל תמאתומ
300ºC.
לש םוחב הדימע
E14
גירבת
קפסה לצא הרונה תא שוכרל ןתינ.
םיבלשה תא ועצב הרונה תפלחהל
םיאבה) רויא26(:
רויא26
השדח הרונב התוא.
למשחה.
1. למשחהמ קתונמ רונתהש ואדוו
דגנ בוביסב הרונה יוסיכ תא וררחש
2.
ויכןועשה ןו.
הפורשה הרונה תא וריסהו ופילחה
3.
הסכמה תא וריזחה.
4.
עקשל רונתה לבכ עקת תא ורבח
5.
28
Page 50

תוליסמה ןקתהו תותשרה תרסה
דצה ןפודמ
תותשרה יוקינל , םימח םימב םתוא ורשה
ןובס תסימתו .ובגנו ושביי.
דצה ןפודמ תוליסמה תרסה:
דיה םע ומוקמב תוליסמה ןקתה
היינשה) רויא24(
תוליסמה ןקתה תא.
םוקמל תוליסמה.
בל ומיש:
תוליסמה , לזונ תא ריסהל אל ודיפקה
תוליסמה ירוחאמש הכיסה
הלק הזזהל ינויח לזונה תויפוקסלטה
תויפוקסלטה תוליסמה לש.
1. תקזחה ךות ימדקה גרובה תא וריסה
אה ווה תא ודירפה ואיצוהו ןפודהמ ירוח
2.
יוקינה םויסב , ןקתה תא וריזחה
3.
• םילגלגה תא זרגל ןיא . ןקתה יוקינ ןמזב
רויא24
27
Page 51

םטאהו רונתה תלד יוקינ
התוא ריסהל ץלמומ תלדה יוקינ ינפל
רונתהמ.
תלדה תרסהל ,םיאבה םיבלשה תא ועצב
א. ףוסה דע תלדה תא וחתפ.
ב. התוא םירבחמה תלדה יריצ תא ואצמ
רויא21
םוינימולאמ וא הטסורינמ םימגד
רויא22
וא גופס םע רונתה תלד תא בגנל ץלמומ
טיה שביילו החל תילטמהשבי תילטמ םע ב.
הדלפ רמצב שמתשהל ןיא ,שטוקס- וא טיירב
תבכש תא טורשל תולולעה יוקינ תוירכ
רונתל)יא רו21:(
ג. םינטקה םיפונמה תא ובבוסו וררחש
לע םיאצמנה2 םיריצה ) רויא22(
ד. רונתה ןוויכל התוא ובבוסו תלדב וספת
היהתש דע ½ הרוגס) רויא23.(
ה. רונתהמ תלדה תא ואיצוהו וכשמ) רויא
23.(
יופיצה.
רויא23
26
תיכוכזהשכ רונתה תלדתה תא תוקנל ןיא
המח . לש רבשש וא קדסל םורגל לולע רבדה
השמשה.
דואמ הטורש וא הקודס השמשהש הרקמב
הפילחהל שיו שלחת איההנואת עונמל ידכ .
תורישל ורשקתה.
Page 52

בל ומיש:
למשחהמ רונתה תא קתנל ודיפקה יוקינ תלועפ לכ ינפל.
תובורק םיתיעל ותוא תוקנל ודיפקה רצומה לע רומשל ידכ.
• ררקתהש ירחא קר רונתה תא וקנ.
• ןובס ימב קר ליימאה יקלח תא וקנ
• םירמוחב שמתשהל ןיאםילכעמ .
• הכר תילטמב תיכוכזהו הטסורינה יקלח תא ושביי.
• םמוחמ ןבל ץמוחב וא רונתל יוקינ ירמוחב ושמתשה םיינשקע םימתכ תרסהל.
תוריפ יצימ םלוא קזחו דימע ליימאה יופיצ)ןומיל ץימ ןוגכ ,וכו םיפיזש' ( םילולע
םיהכ םימתכ ריאשהל .ונתה לש הניקתה הלועפל ועירפי אל הלא םימתכר . תא וקנ
שומיש לכ ירחא הדיפקב רונתה . ברצהל ךולכילל ורשפאת אלו רונתה לע ורמתש ךכב
תונפדה ךותל.
25
Page 53

רונתה ללח יוקינ
םירשופ םימו םילכ ןובס תסימת םע .
תולק רתיב ותוקנל ןתינ םח רונתהשכ .
לש רתוי ידוסי יתפוקת יוקינב ךרוצ שי
םיאתמ יוקינ רמוח םע רונתה.
תויטילטקה תונפדה תא תוקנל ןיא.
שי הקוזחת וא יוקינ תולועפ עוציב ינפל
ה לבכ תא קתנלעקשהמ למשח.
םח רונתהשכ רתוי בוט היהי יוקינה
ןיטולחל ררקתה םרטו.
לופיט ,הקוזחתו יוקינ.
יללכ
• לח תא תוקנל שי טעמ םח ודועב רונתה ל
וקותינ ינפל רונתה תא ררקל ררוואמל
דימת יקנ היהי רונתהש רומשל שי . תורבטצה
םורגל תולולע תורחא ןוזמ תויראש וא ןמוש
רוטיק וא ריווא ץחלב רונתה תא תוקנל ןיא.
יללכ
דיפקה יוקינ תלועפ לכ ינפל רונתה תא קתנל ו
רונתה לש הלעפהה לנפ תא תועיבקב בגנל שי ,
הכר תילטמ תרזעב תלדה םטאו תלדה
טנגרטד טעמו םימח םימב בטיה הטוחס.
םיאבה םירמוחה םע תוקנל ןיא:
ןובסו םימ םע תינוציחהו . קלחהו הדימב
דואמ ךלכולמ תיכוכזה לש ימינפה , תוקנל שי
והשלכ גוסמ יוקינ ירמוחב שומישה ינפל ,
ןרציה ידי לע שומישל םיצלמומ םה.
ןוגכ יוקינ ירמוחב שמתשהל ןיא וא תושרבמ
תויפיז וא תושק יוקינ תוירכ) טיירב שטוקס
פ עוציב ינפל רשפאל שי יוקינה תלוע
למשחה תשרמ.
הפירשל ,לירגה ידי לע לושיבב דחוימב.
בל ומיש:
למשחהמ.
ינוציח יוקינ
• הנבלה ירמוחו םיפירח םיטנגרטד.
• וא תושק יוקינ תוירכ וא תושרבמ
תויפיז)וכו טיירב שטוקס'.(
• םילכ לזרב.
• הדולח יריסמ.
• תינבא יריסמ
• יתורישו תויטבמאל יוקינ ירמוחם.
א תוקנל שית תימינפה תלדה תיכוכז
םיאתמ יוקינ רמוח םע.
יוקינ ירמוח
םא וקדב םאו םירונת יוקינל םימיאתמ םה
ל ןיא רמוח םיליכמה יוקינ ירמוחב שמתשה
ןיבלמ ,רונתה יופיצל קזנ םורגל םילולע םה .
וכו'.(
24
Page 54

ימרת לירג)(
תא ונווכ ררוואמ םע לושיבב לש םומיסקמל הרוטרפמטה200 ºC.
לושיבה יכשמ)תוקדב (
ןוילע קלח ןוילע קלח
פמט ')ºC(
המוק
תומכ)םרג(
ןוזמה גוס םיחתנ /
םייכרי)ודוה( 1 /1000 3 200 30-40 20-30
ףוע)ל קלוחמ-2( 2 /1000 3 200 25-30 20-30
ףוע םייקוש 6 /3- 3 200 15-20 15-18
וילש 4 /500 3 200 25-30 20-25
םימרקומ תוקרי - 3 200 20-25 -
םילרקמ - /3- 3 200 15-20 10-15
םגד יחתנ 4-6 /800 3 200 12-15 8-10
הציפל רונת)(
תורעה
ךשמ
לושיבה
)תוקדב (
הציפ
פמט '
ºC(
המוק
)
לקשמ
)ג(
700 1 200 12-15 הייפא תינבתב
500 1 200 15-25 תשר לע וא תינבתב
גוס
ןוזמה
הציפ
הלודג
הציפ
הנטק
תוינמחל 500 1 200 15-25 תינבתב
23
הצלמה ןה תורוטרפמטה .ע הרוטרפמטה תא ומיאתה"ךרוצה פ.
Page 55

םירשב
רקב 2 190 2 175 50-70 היילצ תשר לע
לגע 2 190 2 175 90-120 היילצ תשר לע
ןיולריס ילצ2 210 2 200 50-70 לירגב היילצ
הלט 2 190 2 175 110-130 לגע
ףוע 2 190 2 175 60-80 םלש
ודוה 2 180 2 160 210-240 םלש
זוורב 2 175 2 160 120-150 םלש
זווא 2 175 2 160 150-200 םיחתנ
םיגד
ןונמא/טשומ2 190 2) 1ו -3( 175 30-40 3-4םיגד
הנוט/ןומלס 2 190 2) 1ו -3( 175 25-35 4-6םיחתנ
ונב תורעהלושיבה יכשמ אש/הייפאה
• תומושרה תוליסמב תוינבתה תא סינכהל ץלמומ תינמז וב תחא הנממ רתוי םילשבמשכ
םיירגוסב.
לירג)(
םדקומ םומיח םיללוכ אל םינמזה .
רונתה תא םמחל ץלמומ10הנמה תסנכה ינפל תוקד .
ןוזמה גוס תומכ לירג לושיבה יכשמ)תוקדב (
ןוילע קלח קלח
ןותחת
פמט '
ºC(
)
םימרג המוק
רפסמ
םיחתנה
2 1000 3 סקמ' 30-35 25-30
6 600 3 סקמ' 10-15 8-10
הליפ קייטס 4 800 3 סקמ' 12-15 12-14
רקב קייטס 4 600 3 250 10-12 6-8
תויקינקנ 8 - 3 סקמ' 12-15 10-12
ףוע)ל ךותח-
2(
בבק 4 - 3 סקמ' 10-15 10-12
ףוע הזח 4 400 3 סקמ' 12-15 12-14
רגרובמה
םדקומ םומיח
5קד '
םיגד ,הליפ 4 400 3 סקמ' 12-14 10-12
ץיודנס' 4-6 - 3 סקמ' 5-7
טסוט 4-6 - 3 סקמ' 2-4 2-3
22
Page 56

לושיב תלבט
םידקמה םומיחה בלש תא םיללוכ םניא הלבטב םיעיפומה םינמזה . רונתה תא םמחל שי)כ-
10תוקד (לושיבה תליחת ינפל . תוליסמה םוקימ)תומוקה (הטמלמ ליחתמ.
ב ררוואמ םע לושיבו ילאנויצנבנוק לושי)וברוט(
תורעה
לושיב ךשמ
)תוקד (
ררוואמ)וברוט (
פמט '
170 40-60 הגועל תינבתב
המוק
)ºC(
לאמשו
יתרוסמ לושיב
פמט '
המוק
)ºC(
2 170 2) 1ו -3(160 45-60 הגועל תינבתב
2 170 2) 1ו -3(160 20-35 הגועל תינבתב
ןוזמה גוס
תוגוע
םע הלילב
םינובלח
הלילב
תחפות
הניבג תגוע 1 175 2 165 60-80 הגועל תינבתב
םיחופת תגוע 1 170 2 ןימי
לדורטש 2 180 2 160 60-80
הביר טראט 2 190 2) 1ו -3(180 40-50 הגועל תינבתב
גועתוריפ תוי 2 170 2 150 60-70 הגועל תינבתב
גופס תגוע 1 170 2) 1ו -3(160 30-40 הגועל תינבתב
םיפיזש תגוע 1 175 2 160 50-60 םחל תינבתב
טיווקסיב 2 160 2) 1ו -3(150 20-30 הגועל תינבתב
גנרמ 2 135 2) 1ו -3(150 60-90 הגועל תינבתב
תוינמחל 2 200 2 190 12-20 תבהיפא תינב
תויגוע 2 וא 3 210 2) 1ו -3(170 25-35
תוציפו םימחל
ןבל םחל 1 195 2 185 60-70
ןופיש םחל 2 190 1 180 30-45 םחלל תינבתב
תוינמחל 2 200 2) 1ו -3( 175 25-40 הייפא תינבתב
הציפ 2 210 2 200 20-30 הייפא תינבתב
ןאלפ
ינורקמ 2 200 2) 1ו -3( 175 40-50 תינבתב
תוקרי 2 200 2) 1ו -3( 175 45-60 תינבתב
םישיק 1 200 2) 1ו -3( 180 35-45 תינבתב
הינזל 2 180 2 175 40-55 תינבתב
21
Page 57

רונתב ןשע תורבטצה עונמל ידכ , ץלמומ
היילצה תינבתל םימ טעמ ךופשל . ופיסוה
תורבטצה עונמל ידכ םעפ לכב םימ טעמ
תובעתהו םידא . תומח תונמ תא רומשל ןתינ
השגהל דע ךומנ םוחב רונתב.
עונמל ידכ ופצת לא ליימאה יופיצל םיקזנ
תא וביצת לאו םוינימולא ריינב תונפדה תא
תיעקרקה לע היפאה תינבת.
לושיבה ןמז
ןוגכ םינוש םימרוגב םייולת לושיבה ינמז :
לכואה גוסב ,דועו ותומכבו ולש תופיפצב . שי
דע הלחתהב לושיבה ךילהת לע חיגשהל
רונתה תא ריכהל ודמלתש.
םכל רשפאי ןויסינהרפתשהל . האבה הלבטה
םיצלמומ םיכרעו תינמז תללוכ , ןתינ םלוא
םכמעטלו םכלש ןויסינל םאתהב םתונשל
ישיאה.
םיפיטו תוצע
ינוניב םוחב ללכ ךרדב תופאנ תויגועו תוגוע
תוחפל ףולח ינפל תלדה תא וחתפת לא3/4
תיציפק תינבתב תופאנה המרקה םע תויגוע
וא יופיצה יבועו תומכב יולת המילשמה
םילזונ תפסוה בקע ךראתי היפאה ךשמ
חוור וריאשה תויגוע ישגמ ינש תסנכה ןמזב
םישגמה ןיב תחא הליסמ לש . תא ופילחה
כ ירחא םישגמה םוקימ-2/3הייפאה ןמז .
מ תוחפ לש לקשמב תועלצ ולצת לא-1ק "ג .
ןמזב שבייתהל םילולע םינטק םיכתנ
היילצ הכירצמ יסיסע ראשי םינפה ךא ץוחב
200-250 ºC(
כ םתוא ופיסוה םירחא םירקמב-1/2 העש
רשבה תקידבל גלזמב ושמתשה . גלזמה םא
רתוי הובג םוחב ותוא ולצ רשבה תויסיסע
שגמה לע תורישי רשב תיילצב , תא וסינכה
רתוי הובג םוחב )
150-175 ºC .(רצק היילצה ןמז םא ,
לושיבה םות ינפל.
תולקב ץעננ אל ,ןכומ רשבה . לע רומשל ידכ
רתוי רצק היילצ ךשמבו.
םילזונה לכ תא ףוסאל.
היפא:
150-200 ºC (כ רונתה תא םמחל ץלמומ ןכלו-
היפאה ןמז.
םירתוימ.
)
10שארמ תוקד .
דע2/3 תורזחומ יופיצה תחירמ ירחאו ןמזה
ל רונתלהיפאה תמלשה . היפאה ךשמ
יולימה .הקידבה גלזמל וקבדי גופס תוגוע.
היילצ:
היילצה . בטיה יולצ היהיש ךכ רשב תנכה
ריהב רשב , ךומנ םוח םיכירצמ םיגדו תופוע
רתוי)
ופיסוהלושיבה תליחתב םיבטרה תא .
קה תינבת ידכ היילצה תינבתל תחתמ הטיל
20
Page 58

רויא20
היילצל תוצעו םיפיט)לירג(
חינהל ןתינתשרה לע תורישי םיגדו םירשב ,
וא ןמש לש הקד הבכשב םתחירמ רחאל
הנירגרמ .לירגה תינכתב , ףוגמ עיגמ םוחה
תגרד תא ןווכל שי ןכלו דבלב ןוילעה םומיחה
םיחתנה יבועל םאתהב םוחה.
הנותחתה המוקב תינבת חינהל דימת ורכז
םיפטפטמה םיצימהו םילזונה תריגאל .
הב וסינכה2 םימ תוסוכ תורצוויה עונמל ידכ
ןשע.
ימרת לירג
דע הרוטרפמטה תא ונווכ ימרת לירג בצמב
200 ºC .םעפ ידמ קספויו לעפוי ררוואמה .
ןוזמל הדיחא הרוצבו רתוי בוט רודחי םוחה.
שומוישל ץלמומ בצמה:
ףועו רשב לש תולודג תויומכ תנכהל , םיגד
םימלש)וכו לרקמ הטורט ןוגכ'.(
הרוגס תלד םע קר לשבל שי .
םידאו תוחל
רורחס רציימה ידוחיי ןונגנמ ללוכ רונתה
תוחלו םידא לש דיחא םרז ןכו יעבט ריווא
לשבל רשפאמ הז ןונגנמ הלוכ תינכתה ךשמב
לישבתה לע רומשלו ההובג תוחל םע הביבסב
ץוחבמ ךירפו םינפבמ ךר . םג הז ןונגנמ
תכירצ תא ןיטקמו לושיבה ךשמ תא םצמצמ
םומינימל היגרנאה.
האיציה יחתפמ הנופמ םידאהמ קלח , םלוא
אל ידכ קחרמ רומשל שי תלדה תחיתפ ןמזב
לע ינוציחה קלחהמ םימתכה תא בגנל שי
רונתה לש ינוציחה קרבה לע רומשל תנמ.
ליגר לושיב
םינותחתהו םינוילעה םיפוגה תא וממח .
תיעצמאה הליסמב שמתשהל ץלמומ .
הלעמלמ רתוי בר םוח שרדנ םהב םירקמב
ררוואמב שומיש
רונתה תרבגומ ריוא תעונתל םרוג ררוואמה
רהמו רתוי הדיחא הרוצב רזפתמ םוחהש ךכ
תוליסמ לע ןתוא םימקממ םתאש ךות תונמ
ןהל שרדנה םוחל םאתהב תונוש) רויא20 .(
ןוזמ לש תוחיר תוקבדה תענומ ריואה תעונת
ישגמ ינש דע תופאל ולכות הז בצמב המגודל
תונותחתה תוליסמב שמתשהל ץלמומ הדיחי
שוביי וא רוטסיפל דחוימב םיאתמ הז בצמ
לושיבה לע חגישהל ולכותש ידכ.
תינמז וב תויגוע. הליסמ לע היילצ וא לושיבב
םינילבתו תוריפ.
םיפיט
תווכיהל.
נמל ידכתובעתה עו , רונתה תא םמחל ץלמומ
כ-10וכותל ןוזמה תסנכה ינפל תוקד .
ב ושמתשההנוילעה הליסמ.
רתוי . רפסמ תינמז וב לשבל רשפאמ הז רבד
רחאב דחא.
19
Page 59

תופלשנ תויפוקסלט תוליסמ
בל ומיש : םיביכרו תיפוקסלטה הליסמה
לושיבה ןמזב םיטהלתמ םירחא .
וא תילטמב ושמתשה ידכ רחא רזיבא
לושיבה ירחא םהב לפטל.
תיפוקסלטה הליסמהשכ עיגמ רונתה
הליסמב תנקתומ1) רויא18.(
רויא18
הילצה שגמ , תא הליחת ואיצוה
המוקממ תיפוקסלטה הליסמה) . רויא
שנה הליסמה לע הילצה שגמ וא תפל
רונתה ךותל תינבתה תא ופחדו) . רויא
• לירגה תינבת תנקתהל , וא היפא תוינבת
19(
• לירגה תינבת תא וחינה , היפא תוינבת
19.(
רונתה תלד תא רוגסל וסנת לא
רונתל ץוחמ הליסמהשכ.
רויא19
18
Page 60

הלעפהה ירותפכל ןוניצ ררוואמ
מה ןוניצ ררוואמ ללוכ רונתה תא ןנצל דעוי
הלעפהה לנפ)םירותפכה ( רונתה תלד תאו
לעופ רונתהש העשב . םג לועפל יושע ררוואמה
לירגה וא רונתה יוביכ רחאל) דע45תוקד (
הריבס הגרדל דרת הרוטרפמטהש דע תאזו .
החותפ רונתה תלד תא ריאשהל ץלמומ
לש תוררקתהה ךילהת תא זרזל ידכ העמק
םינצחלה לילצ
הציחל לכש ךכ רונתה תא ןווכל ןתינ דחא לע
לילצ עימשת םינצחלה.
רונתהשכ קר היצקנופה תא ליעפהל ןתינ
יובכ.
לע הכורא הציחל וצחל לעו וב
1.
תינמז . הרצק הארתה עמשת) רויא17.(
רויא17
םינצחלה לילצ לוטיב
1. לע וצחל לעפומ רונתהשכ ידכ
ותוא תובכל.
לע הכורא הציחל וצחל לעו .
2.
הרצק הארתה עמשת.
האיגש דוק
נכתמה תופיצר תוקידב עצבמ ינורטקלאה ת
תכרעמה תוניקת לש.
ןוכנ לעופ וניא והשלכ רטמרפש הרקמב ,
הרושקה הלועפה תא קיספת הרקבה הדיחי
הלקתה דוק תא הגוצתב גיצתו הז םרוגל
םיאתמה.
הלבטב ונייע םיפסונ םיטרפל" לש הרקמב
היעב וא ישוק "תרבוחה ףוסב.
יתוחיטב טטסומרת
תהיתוחיטב קותינ טטסומרתב דיוצמ רונ .
בקעו לקלקתמ ישארה טטסומרתהש הרקמב
רונתב רתי םוח רצונ ךכ , הז תוחיטב ןקתה
רונתל למשחה תניז תא קתני.
תורש יאנכטל אורקל שי הז הרקמב.
םכמצע תוחוכב הלקתה תא ןקתל תוסנל ןיא.
רונתה.
ב דייוצמ רונתה -4 עיגמו סיסב תוליסמ
לע תונקתמה תויפוקסלט תוליסמ םע
תוליסמה תחא . ןייוצמ הנקתהה םוקימ
רונתה תלד לע.
תיתחתב הליחתמ תוליסמה תריפס.
17
Page 61

ףדועה םוחה תנוכתב שומיש
תינכתה ךשמ תא םתעבקש רחאל , רונתה
ןנכותמה םויסה דעומ ינפל תוקד רפסמ הבכי
תא םייסל ידכ רונתב ררושה םוחב שמתשיו
תינכותה . וכישמי םייחכונה םינוויכה לכ
םויסה דעומש דע ןולחב םיגצומ תויהל
עיגי ירוקמה.
ושיבה ךשמש הרקמב תלעופ אל וז הנוכת ל
מ ךומנ רתונש-15תוקד .
הגוצת בצמ
ידכ הריכמה תודוקנב המגדהל דעוימ הז בצמ
ךרוצ אלל רונתה לש תולועפה תא םיגדהל
טעמל למשח תכירצ אללו לעופב וליעפהל
רונתה תרואת . ןמזב קר הלעפהל ןתינ בצמה
למשחל ינושארה רוביחה . לש הרקמב
למשח תקספה ,םרזה תרזח ירחא , ןתינ
12;00ו -
הרצק הארתה.
רויא16
12:00
יוויחהו הרצק הארתה עמשת
תא ליעפהל יוויחההשכ קר בצמה
םיבהבהמ .
לע הכורא הצילוצחל . עמשת
1.
2.
ןצחל לע וצחל. לעותינמז וב .
גצוי0 רויא16.(
16
גצוי .
לעפומ המגדהה בצמש ושוריפ . ןתינ
אל םומיחה יפוגו תמאב לעפומ אל
רןונתה תלעפה תעב , יוויחה
וחבלרונתה לש היצקנופ לכב ר . רונתה
וממחתי.
בצמ לוטיבלו רונתה תא ובכ
המגדהה , םיבלשה תא בוש ועצב
ליעלש.
לש הרקמל ןורכזב רמשנ המגדהה בצמ
תלקת למשח.
Page 62

ריהמ םומיח
תנקתהו לושיבה תינכת תריחב רחאל
הרוטרפמטה , םמחתהל ליחתי רונתה
הרוטרפמטב בצייתי םוחהש דע הרגדהב
שארמ םתעבקש . ךשמב הרקי הז ךילהת5-
10 תוקד ) םוחה תגרדבו תינכתב יולת
הרחבנש.(
וי רהמ רונתה תא םמחל םיצור םתא םארת ,
הנוכתב שמתשהל ןתינ"ריהמ םומיח."
הלעפהה יבלש:
1. ןצחל לע הציחלב רונתה תא וקילדה
.
הרוטרפמטה תאו תינכתה תא וניקתה
2.
םימדוקה םידומעב טרופמש ןפואב.
3.
םינצחל םע הרוטרפמטה תא ונשו -
. ןולחב גצות הרוטרפמטה
הגוצתה.
4.
רויא15
"FHU") ויא ר15.(
םינצחל םע היוצרה הרוטרפמטה תא
ירפסמה ךרעה גצוי ןולחבו רצק לוצלצ
םתנוויכש הרוטרפמטה לש.
הארת
10ךרעל תוינש . רוחבל ןתינ הז בצמב
ו -.
ןצחל לע וצחל . הרוטרפמטה תגוצת
ןצחל לע וצחל . יוויחה ךשמב
5.
גשות היוצרה הרוטרפמטהשכ , עמשיי
6.
לושיב תינכת לכב וז הלועפ עצבל ןתינ
הרוטרפמט וא.
15
Page 63

ה בצמו יתוחיטב קותינ ןונגנמינוכסח הלעפ
יטמוטוא קותינ ןונגנמ
עוציב לש הרקמב תיטמוטוא הבכי רונתה
תואבה תויורשפאהמ דחאב םייוניש) רויא
13:(
הבכי רונתה
רויא13
גגושב תינכת ינותנ יוניש לש תורשפא תעינמל
"SAFE"
תונשל וא הרוטרפמט תונשל םג ןתינ
רחאל3תועש
רחאל5.5תועש
רחאל8.5תועש
רחאל12תועש
ךשמב םיצוחל םתוא וקיזחהו3 תוינש
רויא14
הרוטרפמטה םא
איה העבקנש:
250ºC
ןיב245ºC-200ºC
ןיב195ºC-120ºC
מ תוחפ-120ºC
תינכת ינותנ תליענ)המיסח(
םידליה ידי לע , לש םינצחלה תא לוענל ןתינ
רונתה.
ןצחל לע הציחלב רונתה תא ובכ.
םינצחל לע תינמז וב וצחלו -
תוחפל . הלימהו לוצלצ ועמשת
)םימוסח םינצחל ( הגוצתה ןולחב גצות
) רויא14.(
םייונישל םוסח היהי רונתה התע . אל
תינכתה תא.
המיסחה לוטיב)הליענה(
1.
2.
3.
14
םינצחל לע תינמז וב וצחלו -
ךשמב םיצוחל םתוא וקיזחהו3 תוינש
"SAFE"
ליעפהל ןתינ התע הגוצתהמ םלעית תא
תוחפל . הלימהו לוצלצ ועמשת
רונתה.
Page 64

םייטמוטוא יוביכו הלעפה
1. תינכתה ךשמ תא ועבק.
יחל וצחל ןצחל לע תורזוח תוצ
2.
ב ורחבו"תינכתה םויס " למס" םויס
בהבהל ליחתי . ךרעה
תא הארי הגוצתה ןולחב ירפסמה
הבכי רונתה הבש העשה) תא רמולכ
תיחכונה העשה + לש ןמזה תפסותב
רויא12
תינכתה םויס תעשו תינכתה ( רונתה
תיטמוטוא הבכיו קלדיי . םויסב
לוצלצ עמשיי תינכתה.
תינכתה
תינכתה ךשמ) ( רויא12.(
ןצחל םע היוצרה םויסה תעש תא ורחב
3.
.
ךשמהנתשי אל תינכותה.
4. המכ םויסמ תוינש ןוויכ םויס תעש
תינכתה ,לועפל ליחתי רמייטה.
ךמס לע2 וללה םירטמרפה ) ךשמ
5.
לוצלצה תקספהל , לע וצחל.
6.
תא קיספת רחא ןצחל לע הציחל
רת הגוצתהו הארתהה יוויחה תא הא
רויאב הארנה10 . וצחל הגוצתה סופיאל
13
.
לע
כ ירחא תטיטמוטוא קספות הארתהה-2
.
ךשמ תא ולטב הלוכ תינכותה לוטיבל
תוקד . לע וצחל הגוצתה סופיאל
תינכותה)םיאתמה ףיעסב ונייע םיטרפל.(
Page 65

יטמוטוא יוביכ לש תונכת
1. תינבתה תא וסינכה/וכו ילכה 'רונתל ,
ותוא וקילדה , לושיבה תינכות תא ורחב
הרוטרפמטה תא ונווכו היוצרה
היוצרה.
ןצחל לע תורזוח תוציחל וצחל
2.
רויא9
בהבהל ליחתי
ירפסמה ךרעהו תילאטיגידה הגוצתב
םע הבכת תינכתהש דע ףולחיש ןמזה
תיטמוטוא הבכי .. גצויש ירפסמה ךרעה
רויא10
כ ירחא תטיטמוטוא קספות הארתהה-2
ב ורחבו"תה ךשמתינכ) " רויא15 .( למס
"תינכתה ךשמ "
"0:00") רויא ואר9.(
היהי
3.
ץחהש ןמזבבהבהמ , ךשמ תא ורחב
ןצחל
. אוה ילאמיסקמה ןמזה
23:59תוקד .דימ לועפל ליחתי רמייטה.
ןמזה ףולחב ,הו לוצלצ עמשיי רונת
4.
"0:00".
היהי
5.
לוצלצה תקספהל , לע וצחל.
תא קיספת רחא ןצחל לע הציחל
יוויחה תא הארת הגוצתהו הארתהה
רויאב הארנה10 . וצחל הגוצתה סופיאל
.
לע
רויא11
12
.
תוקד .צתה סופיאל לע וצחל הגו
תינכתה ךשמ לוטיבל
• ןצחל לע תורזוח תוציחל וצחל דע
בהבהל ליחתי .
ץחהש
• ל ןמזה ךרע תא ואיבה הז בצמב-"0:00"
ןצחל םע) רויא11.(
Page 66

תרוכזתה לוטיב
ןצחל לע תורזוח תוציחל וצחל דע
תרוכזתה ןועש תונכת
תונכת
םילמסה הגוצתבש
ו - בהבהל וליחתי
תינמז וב.
"0:00" םע
רע תא ואיבה הז בצמבל ןמזה ך-
) רויא8.(
ןצחל
בהבהי
"0:00" גצוי
רפסמהו בהבהל ליחתי
ןצחל םע לוצלצה
. ןמזה ךשמ
אוה ילאמיסקמה23:59תועש . םויסב
תרוכזתה ןועש ןוויכ , יוויחה
תרוכזת) " רויא7 .( ןומעפה למס
הרקבה חולב.
הגוצתב
והשלכ.
רויא7
רונתהשכ םג תרוכזתה תא ליעפהלו
קספות תעמשנה הארתהה
גצוי ןועשהו הקדכ תיטמוטוא
הגוצתב.
לעופ רונתה םא , הבכי אל אוה
לעפוי לוצלצהשכ . ןווכל ןתינ
יובכ.
1. ןצחל לע וצחלב רוחבל ידכ " ןועש
עמשייש דע ףולחיש ןמזה ךשמ תא ורחב
2.
ןמזה ףולחישכ , עמשיילוצלצ.
3.
הלעפה ןצחל לע וצל לוצלצה יוביכל
4.
יש וא ןוויכ יונ
רויא8
11
ןצחל לע תורזוח תוציחל וצחל דע
ו - בהבהל וליחתי
םילמסה הגוצתבש
תינמז וב.
םינצחל םע םיכרעה תא תונשל ןתינ הז בצמב
וא -.
Page 67

הציפ :וז תינכתב , םומיחה ףוג םילעופ
ןותחתה)תוציפ לש סיסבה תא םמחמה ,
וואמהו תודיטשפ וא םישיק תא רזפמה רר
יולימה וא ןוילעה קלחה תא םמחמו םוחה
תודיטשפהו םישיקה לש . הרוטרפמטה
וז תינכתל העבקנש)לדחמה תרירב ( איה
175ºC . איה רתויב ההובגה הרוטרפמטה250
.
ºC
תוינכת ילמס לש המישר ןלהל
5 .
וברוט לושיב : תולצל וא תולצל רשפאמ
הנכס אלל ורחבתש המוקב תינמז וב תופאלו
ילכל ילכמ תוחיר וא םימעט רבעמ לש .
וז תינכתל העבקנש הרוטרפמטה) תרירב
175ºC. ההובגה הרוטרפמטה
250 ºC.
איה רתויב
1 .
לדחמה ( איה
לופכ לירג-םמחתמ לירגה ףוג לכ . וז תינכת
תומכלו םילודג םיחתנ לש היילצל המיאתמ
רשב לש הלודג .מטה העבקנש הרוטרפ
250ºC. חחוט
200-250ºC.
וז תינכתל)לדחמה תרירב ( איה
אוה םינוויכה
דבלב ןותחת םומיח ףוג . ףוגמ עיגמה םוחה
לושיבה תא םייסל רשפאמ ןותחתה םומיחה .
וז תינכתל העבקנש הרוטרפמטה) תרירב
250ºC.
לדחמה ( איה
דבלב ןוילע םומיח ףוג .ףוגמ קר עיגמ םוחה
ןוילעה םומיחה , הבכשל םוח קינעמ
הנוילעה/יופיצל . הרוטרפמטה ןאכ םג
וז תינכתל העבקנש)לדחמה תרירב ( איה
250ºC.
הרשפה :הרשפה : זוריזל תדעוימ וז תינכת
אופק ןוזמ לש הרשפה . בבותסמ ררוואמה קר
רדחה תרוטרפמטב.
6 .
ליגר לושיב : םומיחה יפוג ינשמ עיגמ םומיחה
2 .
)ןותחתו ןוילע .( דיחא םומיח חיטבמ רבדה
רונתה ללחב . תינכתל העבקנש הרוטרפמטה
200ºC. הרוטרפמטה
250 ºC.
איה רתויב ההובגה
7 .
דבלב ימינפה לירגה ףוג–תמ דחוימב םיא
וז)לדחמה תרירב ( איה
3 .
םינטק םיחתנ תיילצל . העבקנש הרוטרפמטה
250ºC. חווט
200-250 ºC.
8 .
וז תינכתל)לדחמה תרירב ( איה
איה ןוויכה
4 .
ימרת לירג : תפסונ הטיש איה וז הלועפ
תבלושמ איה ללכ ךרדב םירשב היילצל
ילאנויצנבנוקה לושיבב .וז תינכתב , לירגה ףוג
א ררחסמש ררוואמה םע דחי לעופ ריוואה ת
לישבתה ביבס םחה . העבקנש הרוטרפמטה
9 .
180ºC.
תא ונווכ וז תינכותב שומישה ןמזב
200 ºC.
וז תינכתל)לדחמה תרירב ( איה
דע הרוטרפמטה
10
Page 68

הלועפ תריחב/תינכת
1. וליעפה ןצחל לע הציחלב רונתה תא
.
2.
ןצחל לע תורזוח תוציחל וצחל
היוצרה תינכתה תא ורחבו . הציחל לכ
( האבה תינכתל ריבעת
הז ןצחל לע)
הגוצתב גצוי וזה תינכתה למסו
תינכתה רפסמ םע תילאטיגידה) דצב
רויא5
הגוצתב תינכתה למס לש לאמש) רויא
5.(
הניא שארמ העבקנש הרוטרפמטה םא
3.
לושיבה תינכתל המיאתמ , תא ונווכ
ו - .
הז בלשב רונתב ררושה הרוטרפמטה.
קלוד ראשיי םוחדמה למסו רצק ןמז
םינצחל םע הרוטרפמטה
ב ךרעה תא הנשמ הציחל לכ-5תולעמ .
• םמחתמ רונתהש ןמזב , םוחדמה למס
הבוג תא תירפסמ גיצמו אלמתמ
• טהשכפמ 'תגצומ , ךשמב לוצלצ עמשיי
הגוצתב עובק.
תאו הרוטרפמטה תא ןווכל ךיא
תינכתה ךשמ
1. לע וצחלו םע הרוטרפמטה תא ונווכ
ו - למסהש ןמזב
םינצחל
בהבהמ) רויא6 .( הרוטרפמטה
250ºC.
איה ןווכל ןתינש תילאמיסקמה
לע וצחלונווכו לושיבה ךשמ תא
2.
וא ץחה
רויא6
לע תוציחלב
ןוויכה ןמזב בהבהי.
9
Page 69

תא ואיצוהו רונתהמ תוזיראה לכ תא וריסה
וכותמ הזיראה ירמוח לכ
ןועשה ןוויכ ירחא קר לעפי רונתה.
ינפלןושארה שומישה , רונתה תא ליעפהל שי
"קיר לע " תויראש תא ףורשל ידכ קבדה
ןמזבו רוצייה םויסב החרמנש ןומישה תבכשו
רויא3
םידא רונתהמ וטלפי הזה םומיחה ןמזב
250ºC ןצחל םע .
הלבוההו הנסחאה.
םימיענ אל תוחירו .הלקת הניא וז.
רונתה.
) רויא ילאנויצנבנוק לושיב
תינכתב
לש תילאמיסקמ
ךשמב וז45 תוקד
בוש וז הלועפ עצבל שי) קיר לע רונתה םומיח
ןועשה תא ונווכ.
1.
2.
ןצחל לע וצחל תא ליעפהל ידכ
3.
ןצחל לע םיימעפ וצחל ורחבו
3.(
תה תא ונווכל רונ הרוטרפמט
4.
5.
רונתה תא וממח"קיר לע " הרוטרפמטב
רורווא ךרוצל חבטמב ןולחה תא וחתפ.
6.
) ררוואמ םע לושיב ( תינכתבו
ו ןומישהמ רטפיהליפוגב םג רבדה םומיח
תינכתב
) אלמ לירג ( ךשמב5 דע 10תוקד , ידכ
הלא.
ררקתהל רונתל וחינה . ימינפה ללחה תא וקנ
םילכ ןובס תסימתו םירשופ םימ םע בטיה.
הנושארה םעפב ןוזמ וסינכתש ינפל , תא וקנ
הריגא תינבת תאו תוינבתהו תושרה
םילזונה.
רויא4
רונתה תלד תחיתפל , תידי זכרמב וזחא
הזיחאה)ויא ר4לאמשמ .(
8
Page 70

ש הרקמבלמשח תקספה ל , ןורכיזב ורמשיי תינכתה ינותנ)העשהו ךיראתה , לש םינוויכה לכ
וכו תעכ תעצבתמה תינכת לש וא רתוי רחואמ דעומב הלעפהל תננכותמש תינכתה' (כ ךשמב-3
תוקד.
רתוי הכורא למשחה תקספה םא ,וקחמיי םינותנה לכ.
למשחה תקספה םויסב ,ובהבהי הגוצתה ןולחב םירפסמה . היהי תא שדחמ ןווכל ךרוצ
ןועשה/רמייטה.
הלעפה גתמOn/Off
לושיבה בצמ תנקתה ינפל רונתה תא וליעפה
תא ליעפת
תא ליעפתו גצב רונתה יוויח תא גיצתו רונתה
.
תינכתה תא קיספת הציחלה , תא לטבת וא
רויא1
תיחכונה העשה תגוצת קר גצות הגוצתה.
תע לכב רונתה תא תובכל ןתינ.
רחא ןוויכ לכ וא . לע הציחל
רונתה תרואת.
רונתה יוביכל ,לע תפסונ םעפ וצחל
לועפהתידימ ה .הבכת רונתה תרואת . ןולחב
ותבצהו רונתה תנקתה רחאל דימ
עקשל למשחה לבכ רוביח םע , היהת העשה
בהבהי .
שומישה ינפל תיחכונה העשה תא ןווכל שי.
העשה ןוויכ
בהבהמ) רויא1 .( העשה תא וניקתה
ו -) רויא
רויא5
םינצחל םע הממיב
הגוצתהמ םלעיי ) רויא3.(
12:00 ןועשה למסו
1. ל לע וצחל ןצח ץחהש ןמזב
2.(
כ-5העשה תנקתה םויסמ תוינש , ץחה
2.
ץחהש רחאלבהבהל קיספה , וצחל
ןועשה ןצחל לע םיימעפ
.
א בלש תא ועצב ןכמ רחאל 'ליעלש.
ןוויכיובכ רונתהשכ קר ירשפא ןועשה .
7
Page 71

הלעפהה ינצחל
1. הלעפה גתמ/יוביכ
תוינכתה ררוב
2.
ריהמ םומיח
3.
ךרעה תדרוה]הרוטרפמט וא ןמז[
4.
5.
ךרעה תלדגה]הרוטרפמט וא ןמז[
תרוכזת ןועש/תינכתה ךשמ/תינכתה םויס
6.
םיינורטקלאה םינצחלה תרזעב רונתה תלעפה
םיינורטקלא םינצחל
ורטקלא תורקובמ רונתה תולועפ לכתינ .לושיב יבצמ לש בוליש לכ רוחבל ןתינ , הרוטרפמט
םימיאתמה םינצחלה לע הציחל תרזעב רמייט תלעפהו.
תינמז וב דחא ןצחל לע קר םיצחול םתאש ואדוו . ריבעת לושיבה יבצמ ררוב לע הכורא הציחל
אבה בצמל.
תודחוימ תולועפ
לע הציחל ידי לע תואבה תולועפה תא ליעפהל ןתינ2םינצחלה תינמז וב םיאבה :
ו -"."
ו -"."
ןצחלב העיגנל ילוק יוויח תפסוה: ןצחל
קרפב ונייע תוחיטבה אשונב םיטרפל"למשחב ןוכסיחו תוחיטב תויצקנופ."
תינכת ינותנ תליענ: ןצחל
המגדה בצמ: ףיעסב ונייע"המגדה תלעפה "תרבוחה ךשמהב.
6
Page 72

רונתה יקלח
הלעפהה חול
1.
2.
לירגה ףוג
רונתה תרואת
3.
תופלשנ תויפוקסלט תוליסמ
4.
רונתב ריוואה רוזיפל ררוואמ
5.
ינותנ תיותם
6.
5
Page 73

םיניינעה ןכות
הלעפהה ינצחל...........................................................................................................6
םיינורטקלאה םינצחלה תרזעב רונתה תלעפה................................................................6
תודחוימ תולועפ.........................................................................................................6
תינכתה ךשמ תאו הרוטרפמטה תא ןווכל ךיא................................................................9
תוינכת ילמס לש המישר ןלהל.....................................................................................10
תרוכזתה ןועש תונכת.................................................................................................11
תרוכזתה לוטיב.........................................................................................................11
יטמוטוא יוביכ לש תונכת............................................................................................12
תינכתה ךשמ לוטיבל..................................................................................................12
םייטמוטוא יוביכו הלעפה...........................................................................................13
יטמוטוא קותינ ןונגנמ................................................................................................14
תינכת ינותנ תליענ)המיסח(........................................................................................14
המיסחה לוטיב)הליענה(.............................................................................................14
ףדועה םוחה תנוכתב שומיש........................................................................................16
םינצחלה לילצ...........................................................................................................17
יתוחיטב טטסומרת....................................................................................................17
הלעפהה ירותפכל ןוניצ ררוואמ...................................................................................17
תופלשנ תויפוקסלט תוליסמ........................................................................................18
ררוואמב שומיש.........................................................................................................19
היילצל תוצעו םיפיט)לירג(.........................................................................................19
םטאהו רונתה תלד יוקינ.............................................................................................26
דצה ןפודמ תוליסמה ןקתהו תותשרה תרסה.................................................................27
לירגה לש םומיחה יפוג...............................................................................................28
םינמושהו לזונה ףוסיאל ןנסמ.....................................................................................29
החמוגב הנקתה.........................................................................................................33
תוריש........................................................................................................................2
הלעפה גתמOn/Off.....................................................................................................7
העשה ןוויכ................................................................................................................7
הלועפ תריחב/תינכת...................................................................................................9
יוניש וא ןוויכ............................................................................................................11
ריהמ םומיח..............................................................................................................15
הגוצת בצמ................................................................................................................16
האיגש דוק................................................................................................................17
םידאו תוחל..............................................................................................................19
ליגר לושיב................................................................................................................19
ימרת לירג.................................................................................................................19
לושיבה ןמז...............................................................................................................20
יללכ.........................................................................................................................24
הרונה תפלחה............................................................................................................28
רונתה תודימ.............................................................................................................32
תוריש.......................................................................................................................33
4
Page 74

תוחיטב תוארוה
עוציב יבלש
תוצעו םיפיט
ינקת תא םאות הז רצומECC
םיאבה:
2006/95) ךומנ חתמ תונקת(
EMC(
89/336) תונקת
93.68) תויללכ תונקת(
הז רצומ רוזחימ תודוא םיפסונ םיטרפל , ונפ
ש הייריעלםכל ,הפשאה קוליס תורישל , וא
רצומה תא םתשכר הב תונחל.
הלעפהה תוארוה תרבוח תא רומשל שי
די גשיהב .םירחא ידיל רסמנ רונתה םא ,
םע רסמית וזה תרבוחהש גואדל שי
ועדי םירחאה םישמתשמהש ידכ רונתה
הנוכנ הרוצב וב לפטלו וליעפהל.
הלעפהה תוארוהב שומישל ךירדמ
יאבה םילמסה תוארוהה דיל ועיפוי ם
הכרדהה ךלהמב םכתא תוחנהל ידכ תונושה:
בושח
רונתה תיתחת לע םירחא לושיב ילכ וא םיריס חינהל ןיא.
רחא רמוח לכ וא ףסכ ריינב הייפאה את תונפד תא תופצל ןיא.
ימוגה םטאלו ליימאה יופיצל קזנ םורגל לוכי וז היחנה יולימ יא.
תוירחאב לולכ וניא הז קזנ!!
3
Page 75

תובושח תוחיטב תוארוה
תלעפה ינפלו הנקתהה ינפל הז דומעב תועיפומה תוארוהה תא ןויעב אורקל שי
הנושאר םעפב רונתה.
• בצמב םירותפכה לכש ואדוOFF
שומישב וניא רונתהשכ.
• ןוזמ ירמוח םיליכמה םילכ וריאשת לא ,
דבלב ךמסומ יאנכט.
אמגודל :ןמוש ,ןמש וא ,ו ךותב/ לעמ וא
רונתה ,חקלתהל םילולע םה יכ.
• םוח תוניסח תופפכב דימת ושמתשה
םידבוע םתא התיאש זגה תרבח.
םיריס םיאיצומשכ ,םילכ ,וכו תותבחמ '
רונתה ךותמ.
הקוזחתו יוקינ
למשחה לבכשו קוזינ אל רונתהש אדוול
םלשומ בצמב . ךכ רבדה ןיא םא
הנקתהה ינפל הרבחה גיצנ םע ורשקתה.
• תוארוהל םאתהב רונתה תא תוקנל שי
וז תרבוחב תועיפומה.
• רונתה ןויקינ לע רומשל שי . תורבטצה
םידלי תוחיטב
תורחא ןוזמ תויראש וא םינמוש םילולע
תוחקלתהל םורגל.
• יוקינ וא הקוזחת תולועפ עוציב ינפל , שי
אלל ותוא וליעפי אלשו רונתה תברקב
ררקתהל רונתל חינהל
תוריש
• דבל םינוקית עצבל ןיא . תודובע לכ
ידיב קר ועצובי םינוקיתהו תורישה
ךמסומ יאנכט.
• םיקלחב קר ףילחהל שי םימוגפ םיקלח
םישדחםיירוקמ םיקלחב קרו .
שומישב םהשכ דואמ םמחתהל . שי
רחאל דע םהמ םידלי קיחרהל
שומישל דעוימ אלירחסמ , יתיישעת
יבסה תוכיא הב
םכירוגמ רוזאב תוגוהנה תוארוהל.
יתלבל-ע שימש" למשחה לבכ ךותיח י
ולש.
הזיראה וא רצומה יבג לע
לומיסה
לאכ רצומל סחייתהל ןיאש ךכ לע דיעמ
לש הליגר הכלשה םוקמב
תיתיב תלוספ.
רצומה ,נל ואיבהל םכילע ףוסיא תדוק
וז הלועפ
ינורטקלאו ילמשח דויצ רוזחימל.
תלוספ רתאל אבוי רצומהש חיטבת םכלש
העיגפ עונמל ועייסת םתא ךכבו םיאתמ
םדא ינב תואירבבו הביבסב תירשפא , רשא
יתלב הכלשהמ האצותכ םרגיהל תולולע
הז רצומ לש תמלוה.
• םאתהב הזיראה ירמוח תא ךילשהל שי
• ןשי רונת םיכילשמשכ , וכפהל ודיפקה
ןקתמ ןיקתהל שי םיקיפסמ םניא
תוניקתב עוגפל םילולעש םיממחתמה
ןקתומ רונתה ובש חבטמב . גואדל שי
ףיצר רורוואל . חתפה םא)וכו ןולחה' (
ינאכמ רורווא)וכו הטנו'.(
םוקמ תברקב , ילבכש חיטבהל שי
יקלח םע עגמב ואובי אל למשחה רונתה
דימת רונתה ןויקינ לע רומשל .
תוחקלתהל םורגל םילולע.
2
הנקתה
ויכו"ב ( לש ךמסומ יאנכטו ידיב ועצובי
דבלב . וקחשי אל םכידליש וחיגשה
החגשה.
וררקתיש.
הלעפהה ןמזב
ויכו"ב.
םילבכה.
תורבטצה םינמושו ןוזמ תויראש לש
• ידי לע ומוקמב ןקתויו בצוי רונתה
• תודובע לכ זגה ) תרנצה תנקתה ללוכ
• שי הזיראה יקלח לכ תרסה רחאל
• רונתב םהשלכ םייוניש עצבל ןיא.
• ונתה םירגובמ ידיב שומישל דעוימ ר
• םייושע רונתב םימיוסמ םישיגנ םיקלח
• דבלב יתיב שומישל דעוימ רונתה . אוה
• תוביטרו םוח רצוי לושיבה ךילהת
• ףסונ ילמשח רישכמ םירבחמ םא
• תויתוחיטבו תוינייגיה תוביסמ , שי
Page 76

ZOB 991
356978101 08/07
ריבסהלו תוחנהל ודעונ שומישה תוארוה
הז ללכושמו שידח רונת םיליעפמ דציכ
תא לבקלו תלעותה אולמ תא קיפהל ידכ
אצותהרתויב תובוטה תו
עב תויונכוס ןז"מ , הדוצמה31 ,א.היישעת , דוקימ רוזא58001
1
 Loading...