

Zanussi ZOB 985 QP User Manual

FOUR A ENCASTRER
EINBAU-BACKOFEN
INBOUW-FORNUIS
BUILT-IN OVEN
ZOB 985 QP
NOTICE D’UTILISATION
GEBRAUCHSANLEITUNG
GEBRUIKSAANWIJZING
INSTRUCTION MANUAL

ENGLISH
Important Safety Information
These warnings are provided in the interest of safety. You
installing or using the appliance.
Installation
• It is mandatory that all operations required for the
installation are carried out by a qualified or competent
person, in accordance with existing rules and
regulations.
• It is dangerous to alter the specification in any way.
• Once you removed all packaging from the appliance,
ensure that it is not damaged and the electric cable is
in perfect conditions. Otherwise, contact your dealer
before proceeding with the installation.
During use
• This appliance has been designed for cooking edible
foodstuff only and MUST NOT be used for any other
purposes.
• Always stand back from the oven when opening
the oven door during cooking or at the end of it
to allow any build up of steam or heat to release.
• Ensure that all control knobs are in the OFF position
when not in use.
• The appliance becomes very hot with use, and retain
their heat for a long period after use. Care should be
taken to avoid touching heating elements inside the
oven.
• Should you connect any electrical tool to a plug near
this cooking appliance, ensure that electric cables are
not in contact with it and keep them far enough from
the heated parts of this appliance.
• If the appliance is out of order, disconnect it from the
electric supply.
• Do not leave untensils containing foodstuffs, e. g. fat
or oil in or on the appliance. This could cause damage
in case the appliance is inadvertently switched on.
• Always place the dripping pan in position to collect fat
when using the grill or when cooking meat. Pour a little
water into the dripping pan to avoid smoke and
unpleasant smells.
• Always use oven gloves to remove pans from the oven.
• For hygiene and safety reasons, this appliance should
be kept clean at all times. A build-up of fats or other
foodstuff could result in a fire.
• Disconnect the appliance from the electrical supply,
before carrying out any cleaning or manteinance work.
• Some parts of the appliance are covered by a shockproof plastic film. Remove this film before using the
oven.
• This appliance is meant to operate with a singlephased connection to 230V electrical supply. An
eventual 400V poliphasic connection without earth
wire will destroy the oven and the hob, if fitted.
MUST read them carefully before
• The manufacturer disclaims any responsability
should all the safety measures not be carried out.
Child Safety
• This appliance has been designed to be operated by
adults and children under supervision. Young children
MUST NOT be allowed to tamper with the controls or play
near or with the oven.
• Accessible parts of this appliance may become hot
when it is in use. Children should be KEPT AWAY until it
has cooled.
Service
• Under no circumstances should you attempt to repair
the appliance yourself. Repairs carried out by
unexperienced persons may cause injury or serious
malfunctioning. Refer to your local Service Centre.
Always insist on genuine spare parts.
Environmental Information
• After installation, please dispose of the packaging with
due regard to safety and the environment.
• When disposing of an old appliance, make it unusable,
by cutting off the cable.
It is most important that this instruction
book should be retained with the
appliance for future reference. Should
the appliance be sold or transferred,
always ensure that the book is left with
the appliance in order that the new owner
can get to know the functions of the
appliance and the relevant warnings.
Guide to use the instructions
The following symbols will be found in the text to guide
you throughout the Instructions:
Safety Instructions
Step by step instructions for an operation
Hints and Tips
Environmental Information
65
Contents
For the User
Important Safety Information 65
Description of the Oven 66
Control Panel 67
When the oven is first installed 68
Before the first use of the oven 68
Using the oven 69
Programming the Oven 70
Safety and Energy Saving Functions 72
Hints and Tips 74
Cooking tables 75
Cleaning the Oven 77
Pyrolitic cleaning 77
Cleaning the oven door 80
Something not working 82
Service and Spare Parts 82
Guarantee conditions 83
For the Installer
Technical data 84
Installation 84
Electrical Connection 84
Building In 85
This appliance complies with the following
E.E.C. Directives:
* 73/23 - 90/683
(Low VoltageDirective);
* 93/68 (General Directives);
* 89/336 (Electromagnetical
Compatibility Directive) .
and subsequent modifications
MANUFACTURER:
ELECTROLUX HOME PRODUCTS ITALY S.p.A.
Viale Bologna, 298
47100 FORLÌ (Italie)
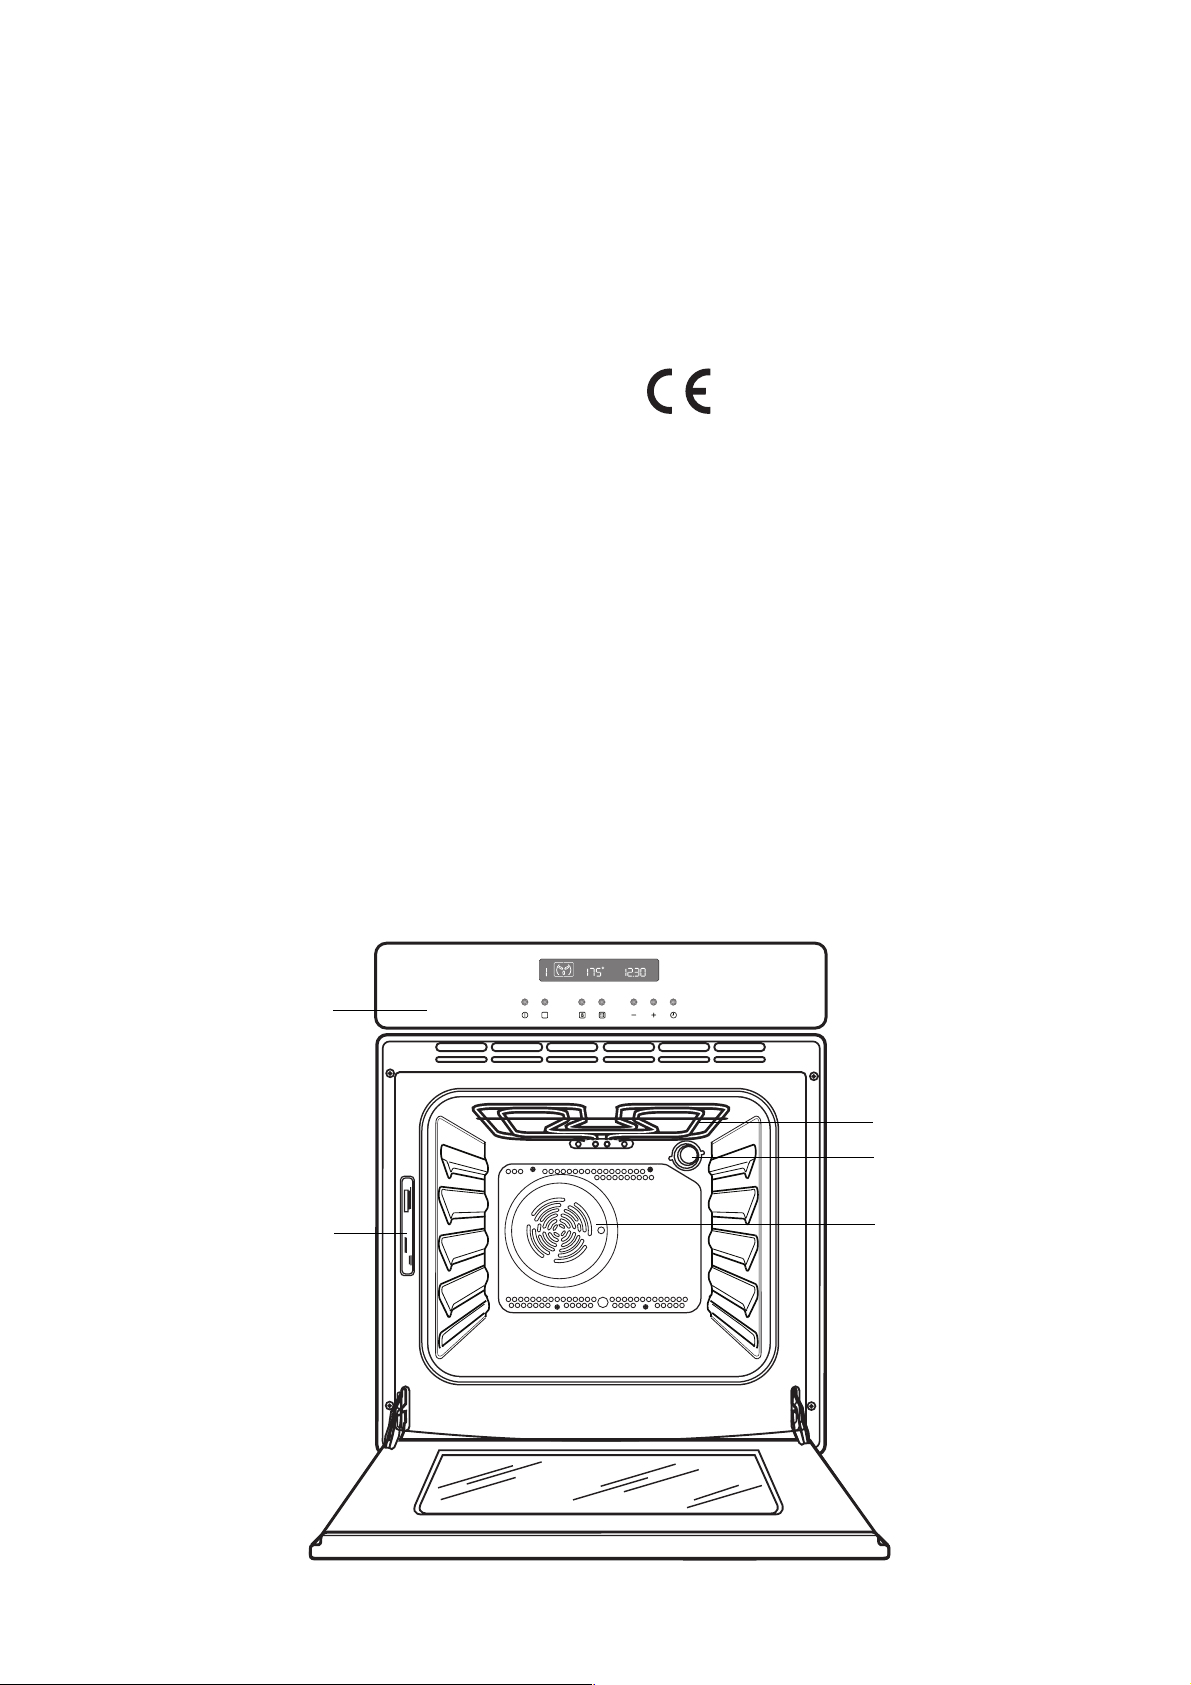
Description of the Oven
Control
Panel
Rating
Plate
Grill Element
Oven Light
Fan
66

Control Panel
Cooking Functions
display
Temperature
12 34 5 67
Push Buttons
1. - ON / OFF
2. - Cooking Functions Control
3. - Fast Heat Up Function
4. - Pyrolitic Function
5. - Decreasing Control (Time or Temperature)
6. - Increasing Control (Time or Temperature)
7. - Time Function
display
Time
display
All the oven functions are controlled by an electronic
programmer.
You can select any combination of cooking function,
cooking temperature and automatic timing.
Special functions
The following functions can be activated by pressing two
buttons at the same time:
- Child lock: press button and button “ “.
- Beep on touch: press button and button “ “.
"On/Off" Push Button
The oven must be switched on before setting any cooking
function or programme. When button is pressed, the
oven symbol will come on the display and the oven light
will switch on (Fig. 1).
To switch off the oven, you can press button at any
time. Any cooking function or programme will stop, the
oven light will switch off and the time display will show
the time of day only.
Fig. 1
- Demo mode: press button B and button “ “.
For further details, see chapter “Safety and Energy Saving functions”.
In the event of a power failure, the programmer will
keep all the settings (time of day, programme
setting or programme in operation) for about 3
minutes. If power is not restored within 3 minutes,
all the settings will be cancelled. When the power
is restored, the numbers in the display will flash,
and the clock/timer has to be reset.
Cooling fan
The cooling fan operates during cooking. Air is expelled
through vents between the oven door and the control panel,
as shown in the diagram.
The cooling fan may run on after the oven is switched off
to keep the controls cool. This is quite normal.
The Safety Thermostat
This oven is provided with a safety thermostat. In case of
malfunctioning of the main thermostat, and consequent
over-heating, the safety device will stop the power supply
to the appliance. If this happens, call your local Service
Force Centre. Under no circumstances should you
attempt to repair the appliance yourself.
67

When the oven is first installed
When the oven is first connected to the electrical
supply, the display will automatically show 12:00 and
the
symbol
Ensure the correct time of day is set before using the
oven.
will flash.
To set the correct time of day :
1. Press
2. If the symbol is not flashing anymore, press
time function
is flashing, set the correct time of day by
pressing buttons
The time arrow symbol will disappear about 5
seconds after the correct time is displayed.
function
Then, proceed as described in point 1.
button
It is possible to set the time of day only when
the oven is off.
button and, while the symbol
“ “
or
“ “ (Fig. 2)
twice.
.
time
Before the First Use of the Oven
Fig. 2
Remove all packaging, both inside and outside
the oven, before using the oven.
The oven will work only if the time of day has
been set.
Before first use, the oven should be heated without
food.
During this time, an unpleasant odour may be
emitted. This is absolutely normal, and is
caused by residues of manufacturing.
1. Set the time of day with the electronic programmer
(see paragraph "To set the correct time of day").
2. Press button to switch on the oven.
3. Press button twice and select the "Conventional
Cooking" function (Fig. 3).
4. Set the temperature to 250°C using the increasing
push button “ “.
5. Allow the oven to run empty for approximately 45
minutes.
6. Open a window for ventilation.
Fig. 3
This procedure should be repeated with the "Full Grill"
function for approximately 5-10 minutes.
Once this operation is carried out, let the oven
cool down, then clean the oven cavity with a
soft cloth soaked in warm water to which a little
mild washing-up liquid has been added.
Before cooking for the first time, carefully wash
the oven accessories.
To open the oven door, always hold the
handle in the centre (Fig. 4).
68
Fig. 4
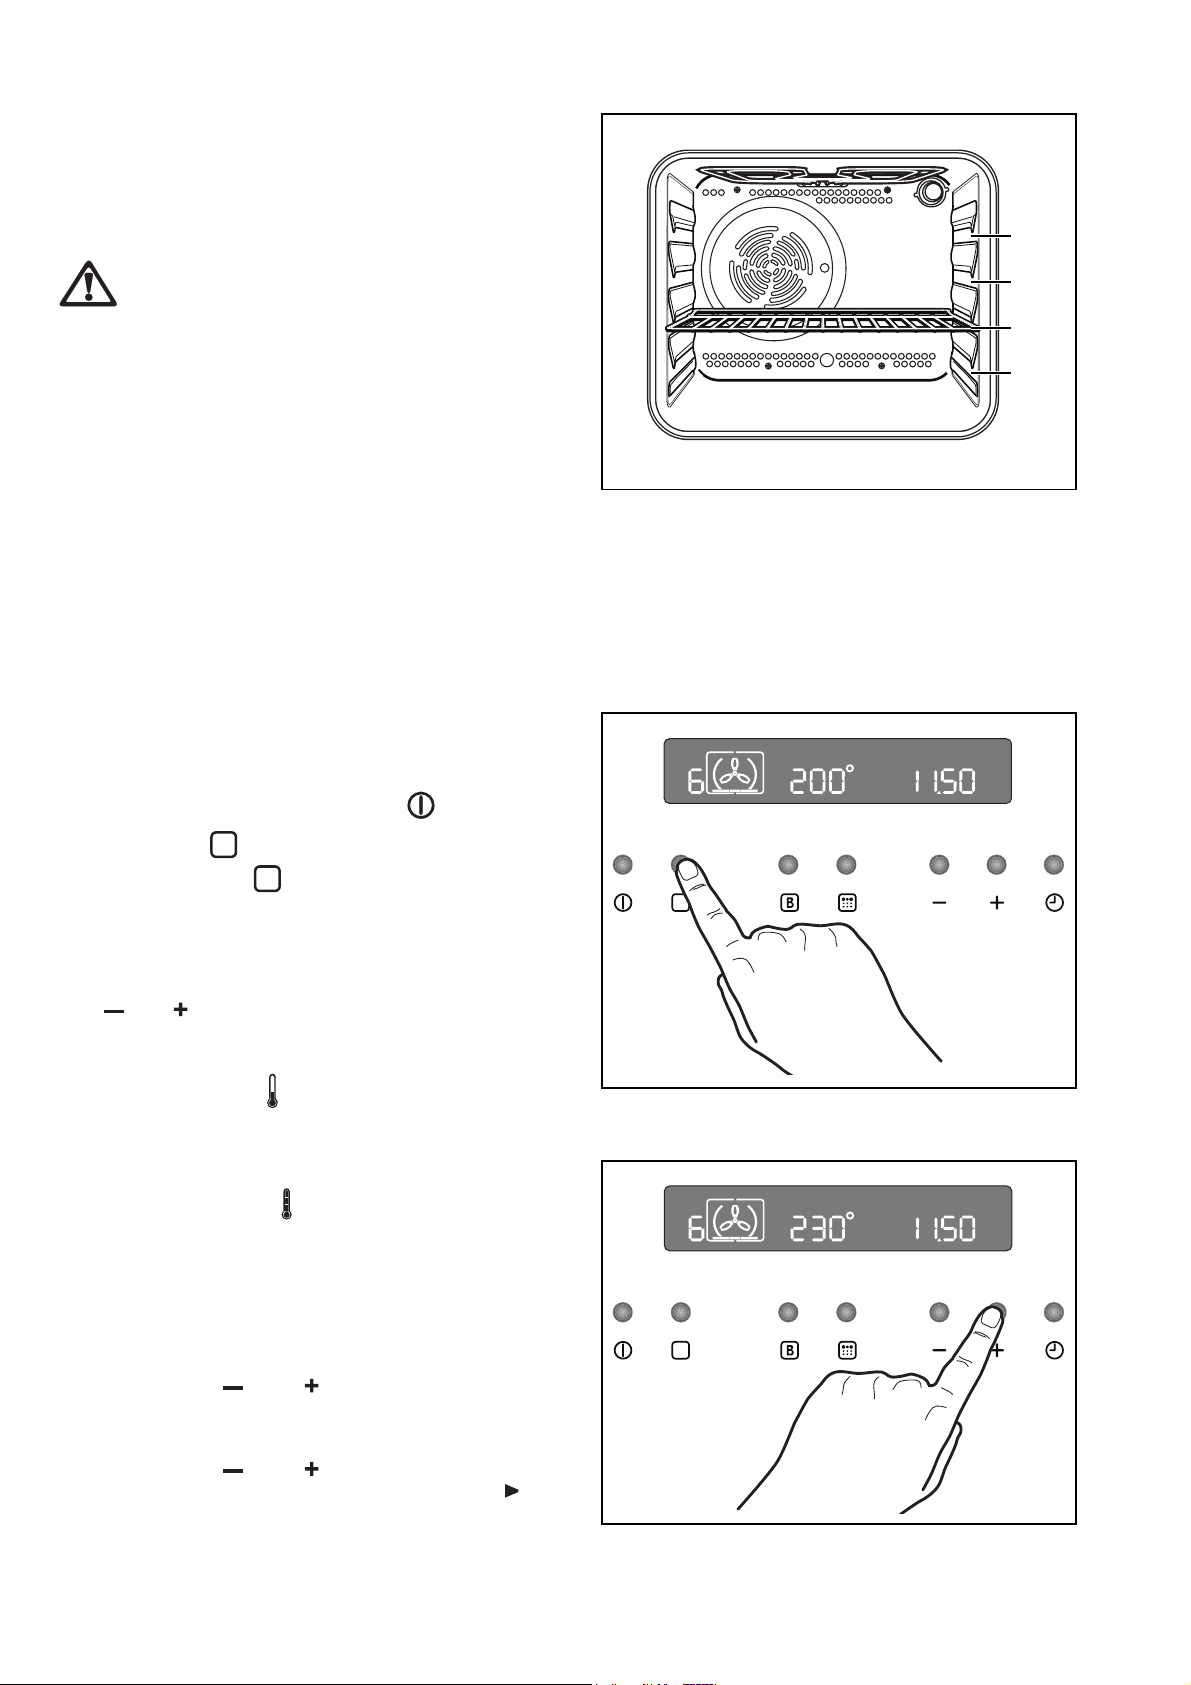
Using the Oven
Shelf Positions
The oven shelves can be placed at different heights to
obtain better cooking results.
The levels are shown in Fig. 5.
Always cook with the oven door
closed.
• Always use oven gloves to remove and replace food
in the oven.
• Always ensure that you are using oven proof baking
trays, oven dishes, etc.
• Do not place baking trays, cake tins or aluminium foil
directly on the base of the oven. This could cause a
heat build-up which could affect the performance of the
oven and damage the oven enamel.
• Carefully supervise cooking with fat or oil, since
these types of foodstuff can result in a fire, if overheated. For the same reason, be careful when placing
or removing food in the oven, not to let any fat or oil fall
on the oven base. If this happens, carefully clean the
oven to avoid unpleasant smells or smoke.
4
3
2
1
Fig. 5
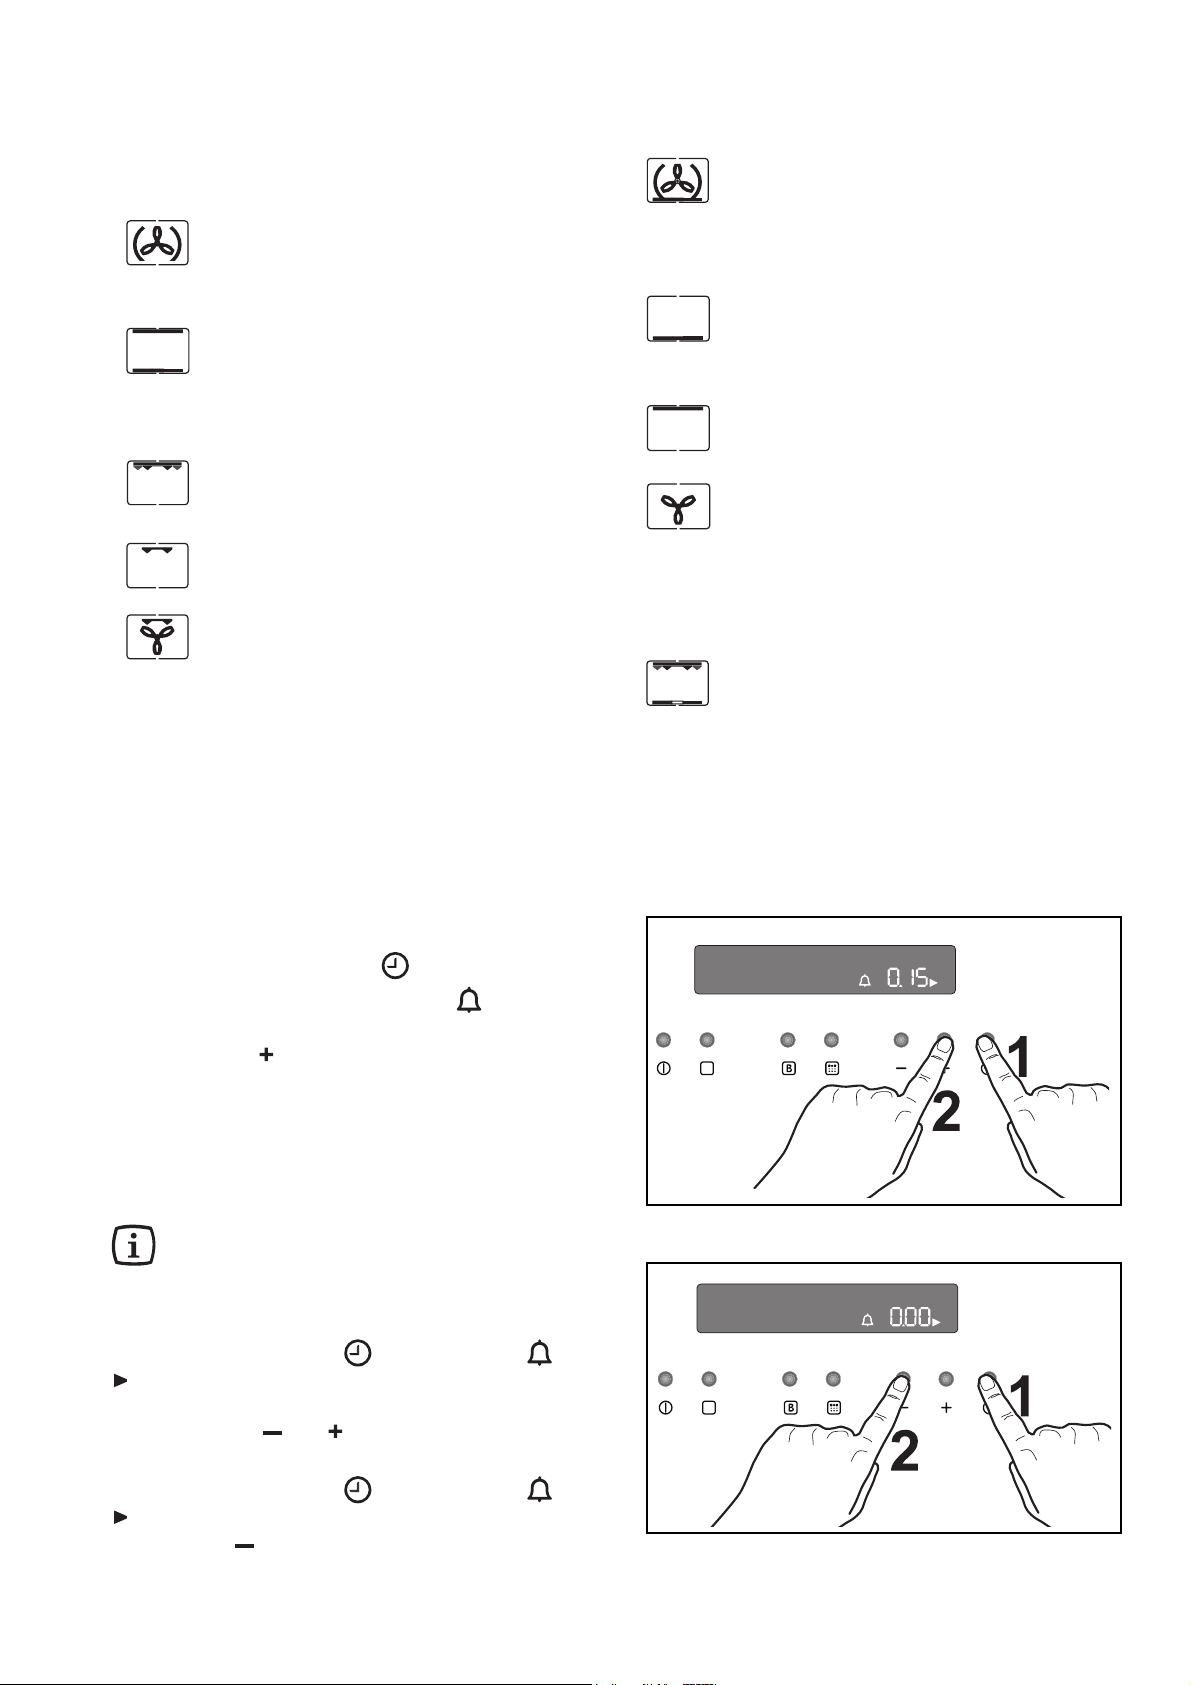
How to select a Cooking
Function
1. Switch on the oven by pressing the button.
2. Press button to select the required oven function.
Each time button is pressed, a cooking symbol
will appear in the display and the corresponding
cooking function number will appear to the left of the
currently selected cooking function symbol (Fig. 6).
3. If the pre-set temperature is not suitable, press button
“ “
or
“ “
to adjust the temperature in 5 degree
steps.
- as soon as the oven heats up, the thermometer
symbol rises slowly , indicating the degree to which
the oven is currently heated;
When the required temperature is reached, an
acoustic alarm will sound for a short time and the
thermometer symbol will light permanently.
How to set the temperature and
Fig. 6
cooking time
1. Press button “ “ and “ “ to increase or decrease
the pre-set temperature while the “°” symbol is flashing
(Fig. 7).
2. Press button “ “ and “ “ to increase or decrease
the pre-set cooking time while the symbol is
flashing.
Fig. 7
69
Cooking Functions
The following list displays in sequence all the cooking
functions available.
1
2
3
4
5
Fan cooking - This setting allows you to roast
or roast and bake simultaneously using any
shelf, without flavour transference. Pre-set
temperature: 175 °C.
Conventional cooking - The heat comes
from both the top and bottom element, ensuring
even heating inside the oven. Pre-set
temperature: 200 °C. The maximum setting
temperature is 285 °C.
Full Grill - The full grill element will be on.
Recommended for large quantities. Pre-set
temperature: 250 °C.
Grill - can be used for grilling small quantities.
Pre-set temperature: 250 °C.
Thermal Grilling - This function offers an
alternative method of cooking food items,
normally associated with conventional grilling.
The grill element and the oven fan operate
together, circulating hot air around the food.
Pre-set temperature: 180 °C.
Select a maximum temperature of 200 °C.
10
6
7
8
9
Pizza Oven - The bottom element provides
direct heat to the base of pizzas, quiches or
pies, while the fan ensures air is circulated to
cook the pizza toppings or pie fillings.
Pre-set temperature: 175 °C.
Bottom heating element - The heat comes
from the bottom of the oven only, to allow you
to finish your dishes. Pre-set temperature: 250
°C.
Top heating element - The heat comes from
the top of the oven only, to allow to you finish
your dishes. Pre-set temperature: 250 °C.
Defrosting – The oven fan operates without
heat and circulates the air, at room temperature,
inside the oven. This function is particularly
suitable for defrosting delicate food which could
be damaged by heat, e.g. cream filled gateaux,
iced cakes, pastries, bread and other yeast
products.
Pyrolytic cleaning - This function allows you
to clean thoroughly the oven cavity.
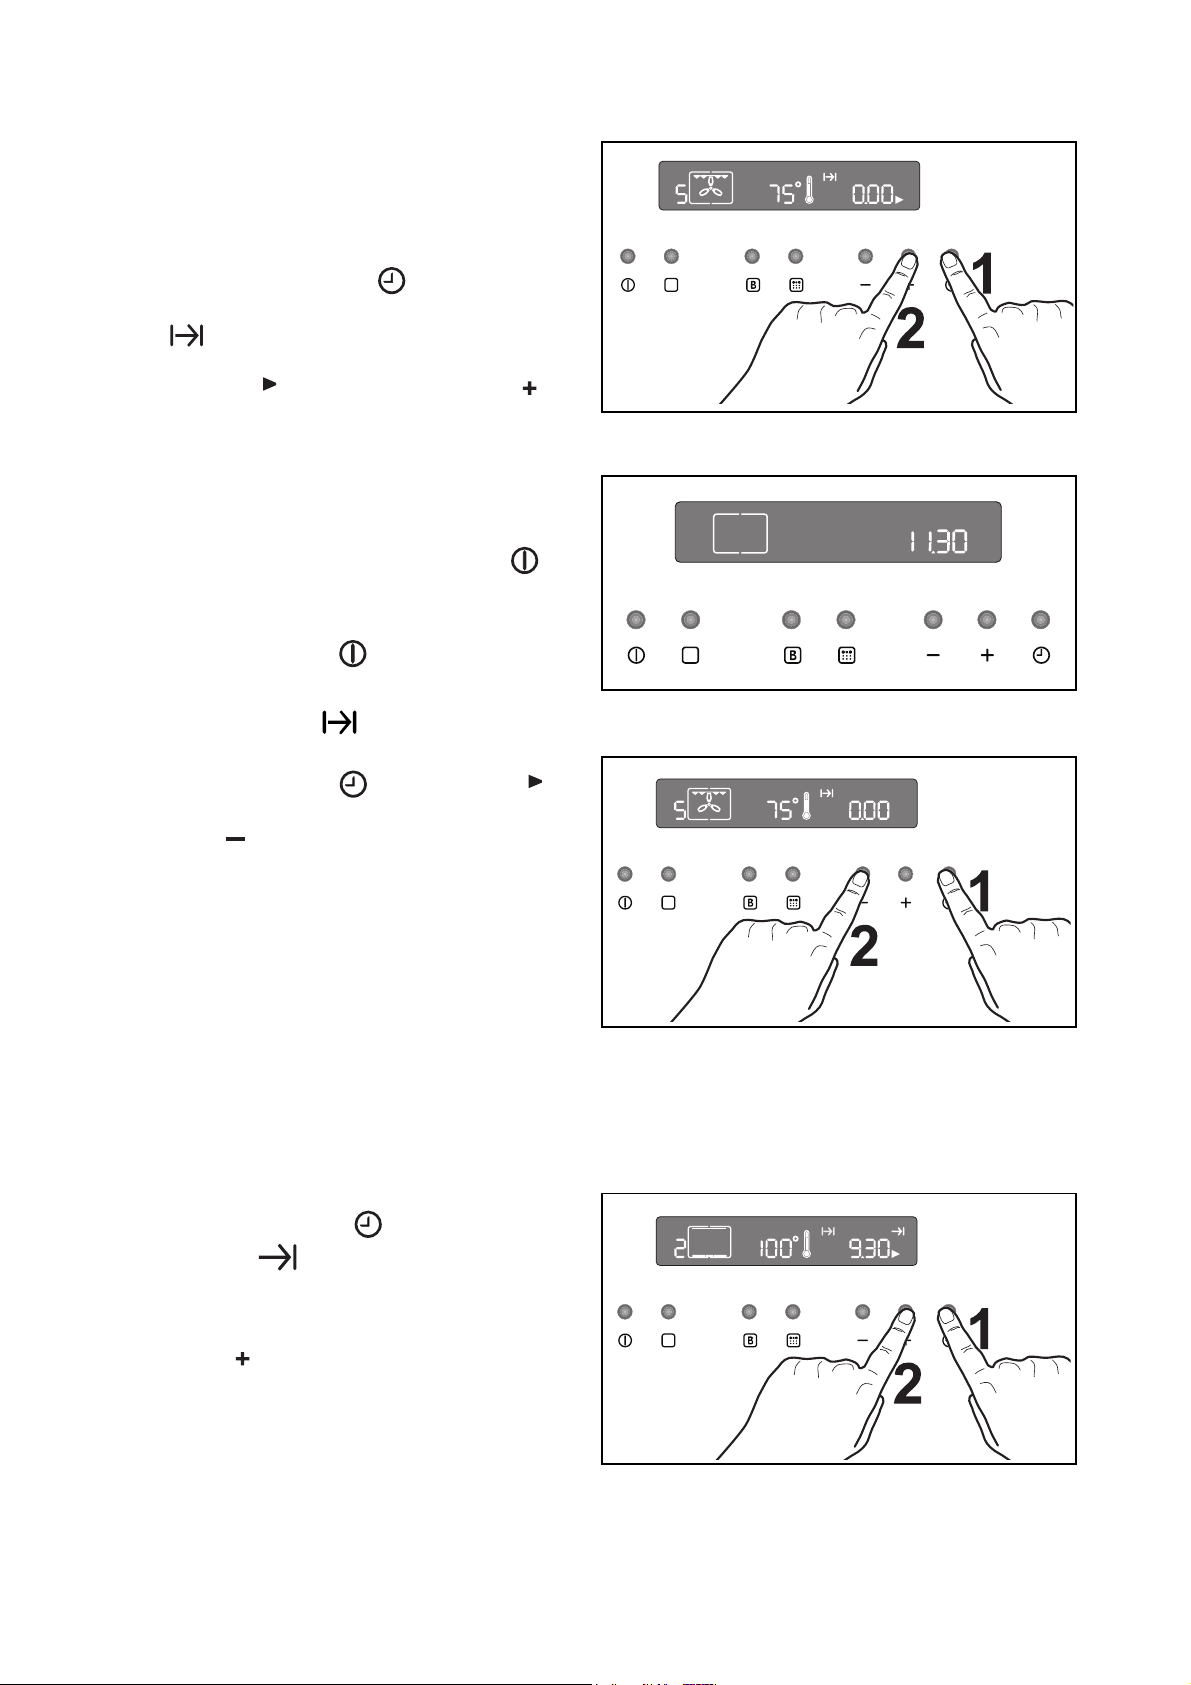
Programming the Oven
How to set the minute minder
1. Press time function button to select the Minute
Minder Function. The relevant symbol will flash and
the control panel will display "0.00" (Fig. 8).
2. Press button “ “ to select the required time. Maximum
time is 23 hours 59 minutes. After the setting is carried
out, the Minute Minder will wait 3 seconds and then
start running.
3. When the programmed time has elapsed, an acoustic
alarm will be heard.
4. To switch off the acoustic alarm, press any button.
The oven will NOT switch off if in use.
The Minute Minder function can also be used
when the oven is off.
To use or to change the Minute Minder setting:
press time function button until the symbols and
flash.
It is now possible to change the Minute Minder setting by
pressing button “ “ or “ “.
To cancel the Minute Minder:
press time function button until the symbols and
flash.
Press button “ “ to decrease the time until "0.00" shows
in the display (Fig. 9).
Fig. 8
Fig. 9
70
To programme the Oven to
switch off
1. Switch the oven on, place food in the oven, select
a cooking function and adjust the cooking temperature, if required.
2. Press time function button to select the
"Cooking Duration" function. The "Cooking Duration"
symbol will flash and the control panel will
display "0.00" (Fig. 10).
3. While the symbol is flashing, press button “ “
to select the required time. Maximum time is 23
hours 59 minutes. The programmer will wait 3
seconds and then start running.
4. When cooking time is over, the oven will be switched
off automatically and an acoustic alarm will be heard
while the control panel will display "0.00".
5. To switch off the acoustic alarm, press button .
If you press any other button the alarm will stop
(Fig. 11). Then, you need to reset the programmer
display by pressing button .
Fig. 10
The control panel will display the time of day and the
Cooking Duration symbol will go out.
To cancel the Cooking Duration Time:
—
press time function button until the symbol
flashes.
—
press button “ “ to decrease the time until the
display shows "0.00" (Fig. 12).
To programme the Oven to switch
on and off
1. Carry out the "Cooking Duration" setting as
described in the relevant chapter.
2. Press time function button until the "End of
Cooking" function is selected and the relevant
symbol flashes. The control panel will display the
end of cooking time (that is, the actual time +
cooking duration time) (Fig. 13).
3. Press button “ “ to select the required end of
cooking time.
4. After the setting is carried out, the programmer will
wait 3 seconds and then start running.
5. The oven will switch on and off automatically. The
end of cooking will be marked by an acoustic alarm.
6. To switch off the acoustic alarm, press any button.
To cancel the programme, simply cancel the
Cooking Duration Time.
Fig. 11
Fig. 12
Fig. 13
71
 Loading...