

Zanussi ZFK61/27RAL, ZFK61/27R User Manual

REFRIGERATORFREEZER
ZFK 61/27 R
ZFK 61/27 RAL
2222 076-62/1
INSTRUCTION BOOKLET
WARNINGS
IT IS MOST IMPORTANT THAT THIS INSTRUCTION BOOK SHOULD BE RETAINED WITH THE
APPLIANCE FOR FUTURE REFERENCE. SHOULD THE APPLIANCE BE SOLD OR
TRANSFERRED TO ANOTHER OWNER, OR SHOULD YOU MOVE HOUSE AND LEAVE THE
APPLIANCE, ALWAYS ENSURE THAT THE BOOK IS SUPPLIED WITH THE APPLIANCE IN
ORDER THAT THE NEW O WNER CAN GET TO KNO W THE FUNCTIONING OF THE APPLIANCE
AND THE RELEVANT WARNINGS.
THESE WARNINGS ARE PROVIDED IN THE INTEREST OF SAFETY. YOU MUST READ THEM
CAREFULLY BEFORE INSTALLING OR USING THE APPLIANCE.
ª
General Safety
ª
This appliance is designed to be operated by
adults. Children should not be allowed to tamper
with the controls or play with the product.
ª
It is dangerous to alter the specifications or modify
this product in any way.
ª
Care must be taken to ensure that the appliance
does not stand on the electrical supply cable.
ª
Before defrosting, cleaning or maintenance work
is carried out, be sure to switch off the appliance
and unplug it.
ª
Do not remove items from the freezer if your
hands are damp/wet, as this could cause skin
abrasions or “frost/freezer burns”.
ª
Ice lollies can cause “frost/freezer burns” if
consumed straight from the freezer.
Frozen food must NOT be re-frozen once it has
thawed out.
ª
Do not place carbonated or fizzy drinks in the
freezer as it creates pressure on the container,
which may cause it to explode, resulting in
damage to the appliance.
ª
The cooling plate or refrigerated freezer shelves in
this appliance contain channels through which the
refrigerant passes. If these are punctured this
would cause substantial damage to the appliance
and result in food loss. DO NOT USE SHARP
INSTRUMENTS to scrape off frost or ice. Under
NO circumstances should solid ice be forced off
the lining or shelves. Solid ice should be allowed
to thaw, when defrosting the appliance. See
Defrost instructions.
ª
Manufacturers’ storage recommendations should
be strictly adhered to. Refer to relevant
instructions.
GB
Service / Repair
ª
Any electrical work required to install this
appliance should be carried out by a qualified
electrician or competent person.
ª
This product should be serviced by an authorised
ZANUSSI Service Centre, and only genuine spare
parts should be used.
ª
Under no circumstances should you attempt to
repair the appliance yourself. Repairs carried out
by inexperienced persons may cause injury or
serious malfunctioning. Refer to your local
ZANUSSI Service Centre and always insist on
genuine spare parts.
Use
ª
ZANUSSI domestic refrigerators, freezers and
fridge/freezers are designed to be used specifically
for the storage of edible foodstuffs only.
2
Installation
ª
There are working parts in this product which heat
up. Always ensure that there is adequate
ventilation as a failure to do this will result in
possible food loss. See installation instructions.
ª
Parts which heat up should not be exposed.
Wherever possible, the back of the appliance
should be close to a wall but leaving the required
distance for ventilation as stated in the installation
instructions.
ª
The appliance should be left for 2 hours after
installation before it is turned on in order to allow
the refrigerant to settle.
ª
This appliance is heavy. Care should be taken
when moving it.
CONSERVATION
Environment Protection
ª
This appliance does not contain gasses which
could damage the ozone layer, in either its
refrigerant circuit or insulation materials. The
appliance shall not be discarded together with
the urban refuse and rubbish. Avoid damaging
the cooling unit, especially at the rear near the
heat exchanger. Information on your local
disposal sites may be obtained from your
municipal authorities.
The materials used on this appliance marked
with the symbol are recyclable.
When disposing of your old fridge, freezer or
fridge/freezer.
Help to keep your country tidy – use authorised
disposal sites for your old appliances.
GB
For maximum efficiency:
Make sure that the appliance is cleaned properly.
Make sure that the door is closed properly.
Do not position the appliance near to sources of heat.
Do not over-fill your appliance, air MUST be allo wed
to circulate.
05/97
2222 076-62/1
3
Description of the appliance
Installation
ª
Positioning
ª
Rear spacers
ª
The electrical connections
Technical specification
ª
Door reversal directions
Operation
ª
Setting the temperature
ª
The freezer compartment
ª
Freezing fresh food
ª
Thawing
ª
Making ice cubes
CONTENTS
5
What happens if something goes
wrong?
6
Guarantee conditions
6
6
7
8
9
10
10
10
10
10
10
GB
18
19
Health and safety guidelines
ª
Fresh food refrigeration
ª
Dual purpose meat box
ª
Positioning the door shelf
ª
Drink dispenser
ª
Use and features of the «CRISP’N FRESH»
filter
ª
Cleaning the filter
ª
Cool check temperature guide
ª
Starting the appliance
ª
Everyday use of the cool check temperature
guide
ª
Defrosting
Maintenance and cleaning
ª
Internal cleaning
ª
External cleaning
11
12
12
12
13
13
13
14
14
14
15
17
17
17
ª
When the appliance is not in use, Interior light 17
4
A
B
C
D
E
F
G
H
I
J
K
L
M
M
L
K
J
I
H
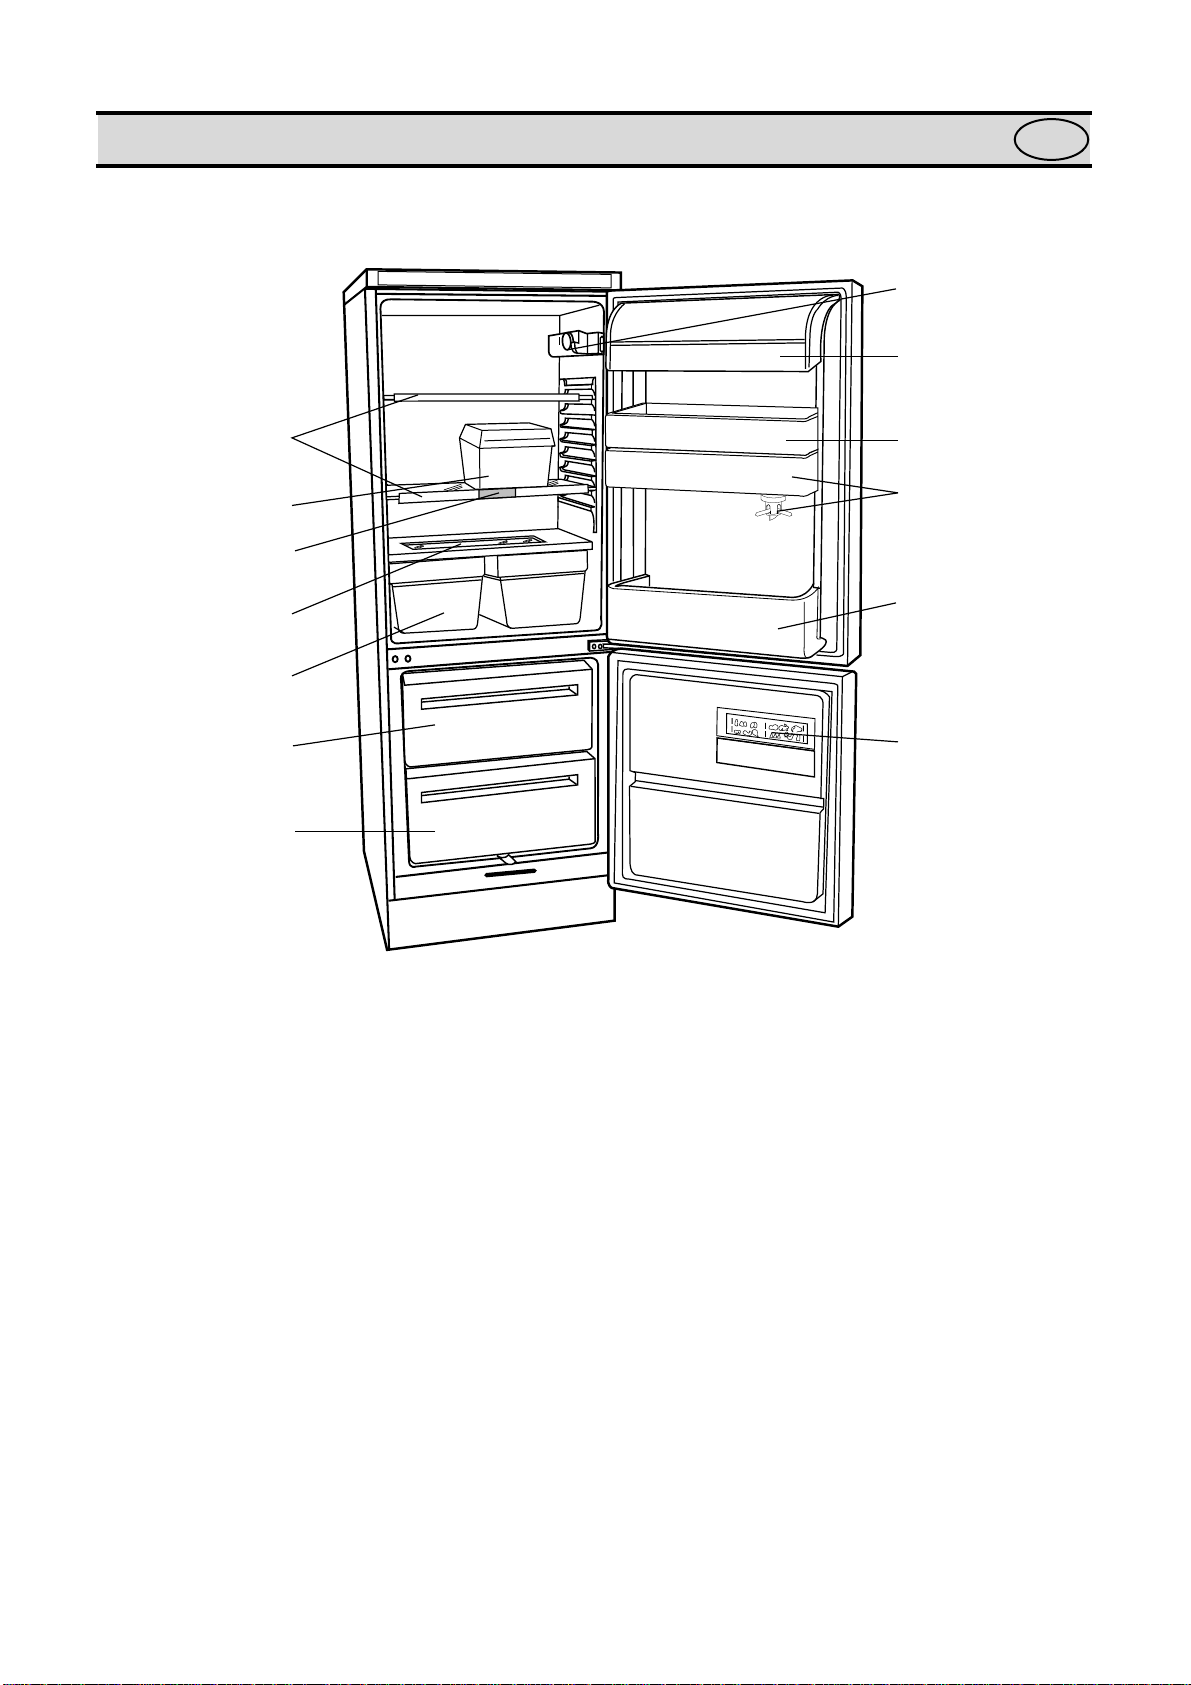
DESCRIPTION OF THE APPLIANCE
3
9
6
12
GB
A
B
C
D
E
F
G
- Thermostat control for fridge and freezer compartments
- Dairy compartment
- Can storage shelfs with egg trays
- Drink dispenser
- Bottle storage shelf
- Freezer calender (recommended storage times for frozen foods) and produce storage card (write on / wipe off
card for recording what has been stored in the freezer and when)
- Freezing fresh foods
- Storing frozen food
- Salad drawers
- Glass shelf (for storing fresh meat) with crisp’n fresh filter
- Cool check temperature guide
- Meat box
- Storage shelves
FAST FREEZE
5
°
°
INSTALLATION
Warning
IF Y OU ARE DISCARDING AN OLD APPLIANCE
THAT HAS A LOCK OR CATCH ON THE DOOR,
YOU MUST ENSURE THAT IT IS MADE
UNUSABLE TO PREVENT YOUNG CHILDREN
BEING TRAPPED INSIDE.
Depending upon the position which you choose for
your appliance, you may wish to reverse the way in
which the door opens. To do this, refer to instructions
on “Door reversal directions” paragraph.
Positioning
This appliance is designed to operate in ambient
temperatures between 10
It should be located in a dry atmosphere, out of direct
sunlight and away from extreme temperature e.g. not
next to a cooker or other sources of direct heat, or in a
very cold room e.g. an outhouse, where the
temperatures may fall below 10
temperatures are exceeded i.e. colder or warmer , then
the appliance may not operate correctly.
You should also ensure that air can circulate freely
around the back and the top of the cabinet. There must
also be at least 100 mm (4”) distance between the top
of the cabinet and any overhanging kitchen furniture
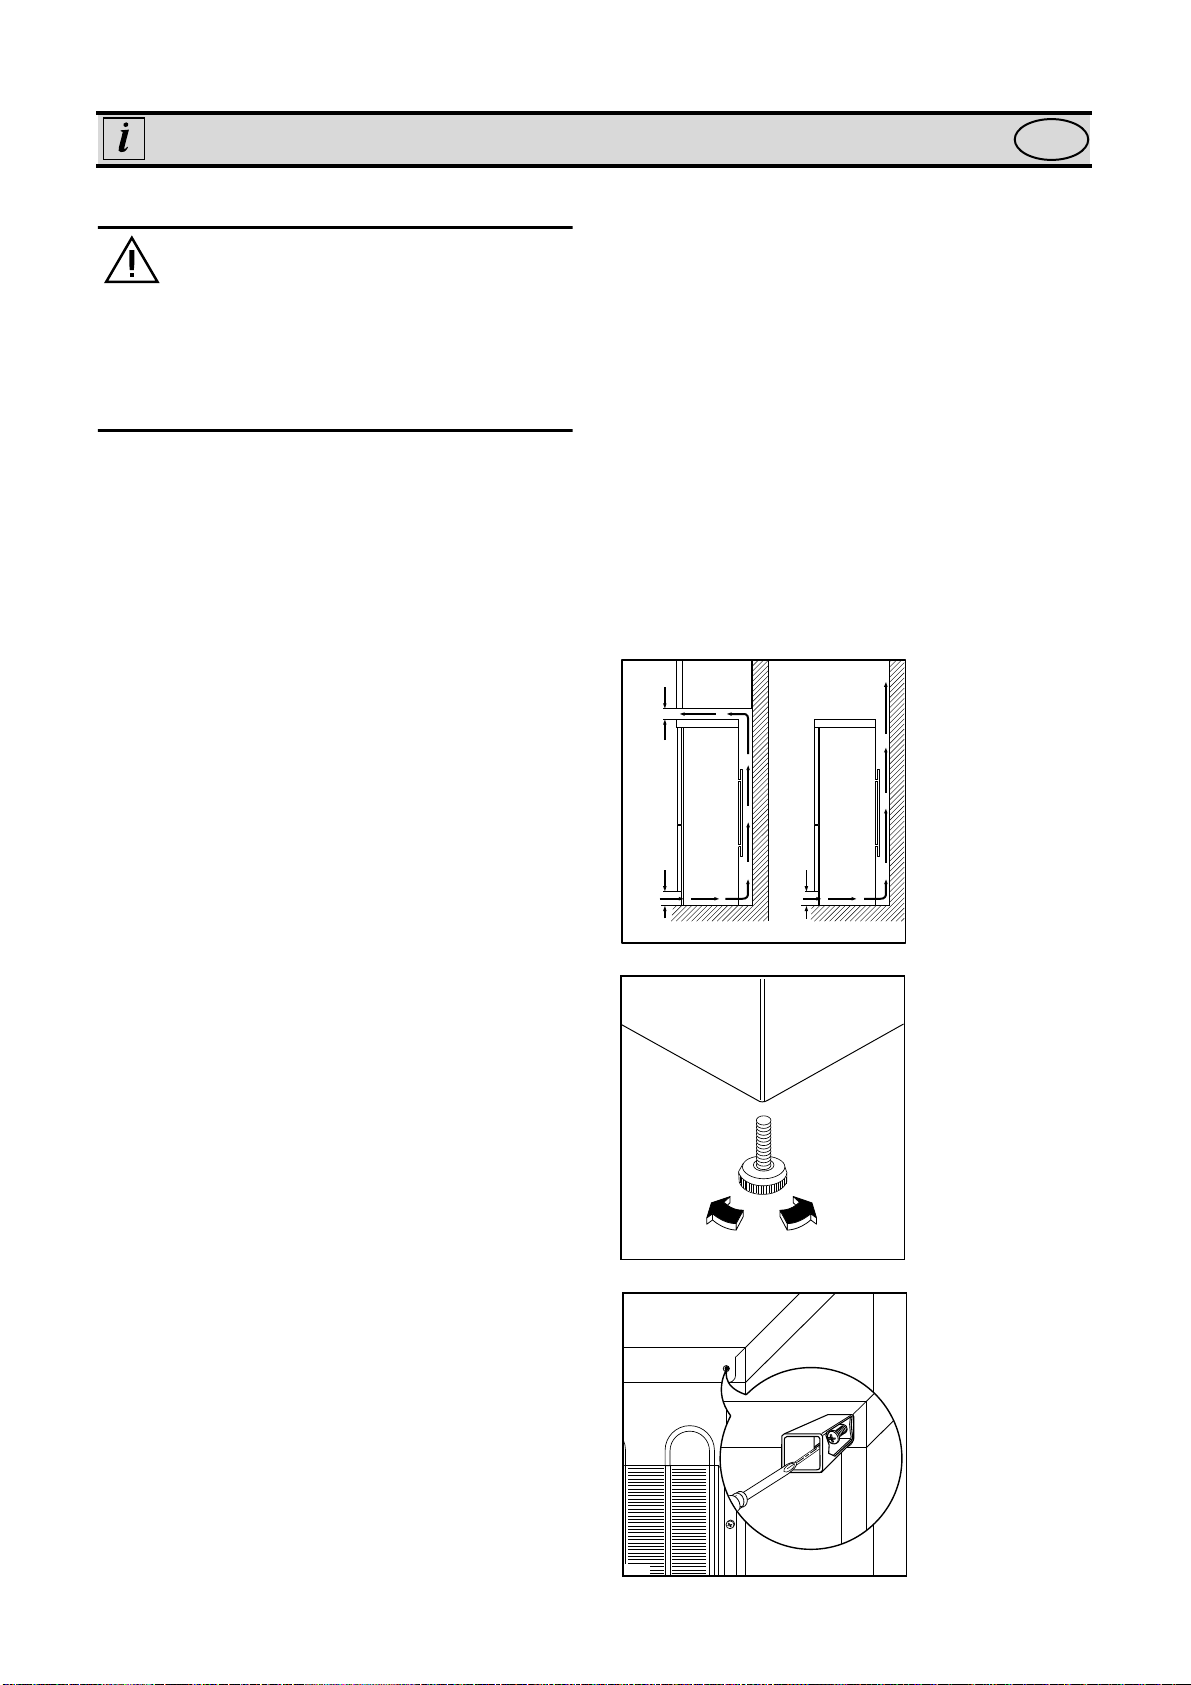
(Fig. 1-A). Ideally, the appliance should not be
positioned beneath overhanging furniture (Fig. 1-B).
There should also be a gap of 25 mm either side of the
appliance. Do not obstruct the space underneath. The
back of the cabinet may be placed close to the wall
but must not touch it. DO NOT install in places with
restricted ventilation.
C (50 ° F) and 32 ° C (90 ° F).
C (50 ° F). If these
A
NP002
GB
Fig. 1
100 mm 10 mm
B
10 mm
Fig. 2
Adjust the level of the appliance by screwing out the
adjustable foot, or feet, at the bottom of the cabinet
using your fingers or a spanner (see Fig. 2).
Rear spacers
In the bag with the documentation, there are two
spacers which must be fitted in the two top
corners.
Slacken the screws and insert the spacer under the
screw head, then re-tighten the screws.
6
(Fig. 3)
D200
Fig. 3
D594
 Loading...