

Page 1

EN
User manual 2
FR
Notice d'utilisation 18
ES
Manual de instrucciones 36
Dishwasher
Lave-vaisselle
Lavavajillas
ZDF4010
Page 2
Contents
Safety information _ _ _ _ _ _ _ _ _ _ _ _ _ _ _ _ 2
Control panel _ _ _ _ _ _ _ _ _ _ _ _ _ _ _ _ _ _ _ 3
Washing programmes _ _ _ _ _ _ _ _ _ _ _ _ _ _ _ 5
Use of the appliance _ _ _ _ _ _ _ _ _ _ _ _ _ _ _ 6
Setting the water softener _ _ _ _ _ _ _ _ _ _ _ _ _ 6
Use of dishwasher salt _ _ _ _ _ _ _ _ _ _ _ _ _ _ 7
Use of rinse aid _ _ _ _ _ _ _ _ _ _ _ _ _ _ _ _ _ _ 8
Loading cutlery and dishes _ _ _ _ _ _ _ _ _ _ _ _ 8
Use of detergent _ _ _ _ _ _ _ _ _ _ _ _ _ _ _ _ _ 10
Safety information
For your safety and correct operation of the appli-
ance, read this manual carefully before installation
and use. Always keep these instructions with the appliance even if you move or sell it. Users must fully know
the operation and safety features of the appliance.
Correct use
• The appliance is designed exclusively for domestic
use.
• Only use the appliance to clean household utensils
that are applicable for dishwashers.
• Do not put solvents in the appliance. Risk of explosion.
• Put the knives and all items with sharp points in the
cutlery basket with their points down. If not, put in a
horizontal position in the upper basket.
• Use only branded products for dishwashers (deter-
gent, salt, rinse aid).
• If you open the door while the appliance is in opera-
tion, hot steam can escape. Risk of skin burns.
• Do not remove dishes from the dishwasher before
the end of the washing programme.
• When the washing programme is completed, discon-
nect the mains plug from the mains socket and close
the water tap.
• Only an authorised service engineer can repair this
appliance. Use only original spare parts.
• Do not do repairs yourself to prevent injury and dam-
age to the appliance. Always contact your local Service Force Centre.
2
Multitab function _ _ _ _ _ _ _ _ _ _ _ _ _ _ _ _ 10
Setting and starting a washing programme _ _ _ _ 11
Care and cleaning _ _ _ _ _ _ _ _ _ _ _ _ _ _ _ _ 12
What to do if… _ _ _ _ _ _ _ _ _ _ _ _ _ _ _ _ _ 13
Technical data _ _ _ _ _ _ _ _ _ _ _ _ _ _ _ _ _ _ 15
Environment concerns _ _ _ _ _ _ _ _ _ _ _ _ _ _ 15
Installation _ _ _ _ _ _ _ _ _ _ _ _ _ _ _ _ _ _ _ 16
Water connection _ _ _ _ _ _ _ _ _ _ _ _ _ _ _ _ 16
Electrical connection _ _ _ _ _ _ _ _ _ _ _ _ _ _ _ 17
Subject to change without notice
General safety
• Persons (including children) with reduced physical
sensory, mental capabilities or lack of experience
and knowledge must not use the appliance. They
must have supervision or instruction for the operation of the appliance by a person responsible for
their safety.
• Obey the safety instructions from the manufacturer of
the dishwasher detergent to prevent burns to eyes,
mouth and throat.
• Do not drink the water from the dishwasher. Detergent residues can stay in your appliance.
• Always close the door when you do not use the appliance to prevent injury and not to stumble over the
open door.
• Do not sit or stand on the open door.
Child safety
• Only adults can use this appliance. Children must
get supervision to make sure that they do not play
with the appliance.
• Keep all the packaging away from children. There is
a risk of suffocation.
• Keep all detergents in a safe area. Do not let children
touch the detergents.
• Keep children away from the appliance when the
door is open.
Installation
• Make sure that the appliance is not damaged because of transport. Do not connect a damaged appliance. If necessary, contact the supplier.
• Remove all packaging before first use.
Page 3
• A qualified and competent person must do the electrical installation.
• A qualified and competent person must do the plumbing installation.
• Do not change the specifications or modify this product. Risk of injury and damage to the appliance.
• Do not use the appliance:
– if the mains cable or water hoses are damaged,
Control panel
– if the control panel, worktop or plinth area are dam-
aged, that you can get access to the inner side of
the appliance.
Contact your local Service Force Centre.
• Do not drill into the sides of the appliance to prevent
damage to hydraulic and electrical components.
Warning! Carefully obey the instructions for
electrical and water connections.
54
13
ABCDE
6
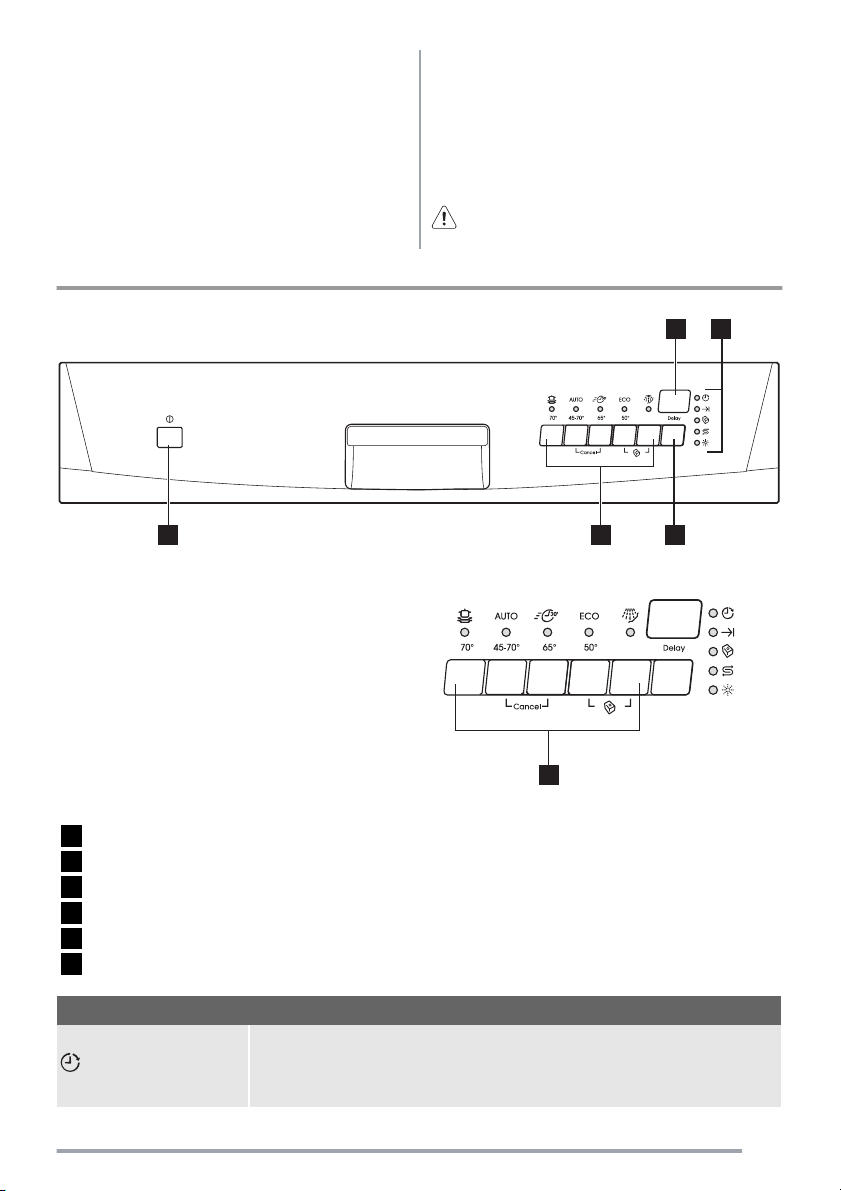
1 On/off button
2 Programme selection buttons
3 Delay start button
4 Indicator lights
5 Digital display
6 Function buttons
Indicator lights
Programme-in-progress – Comes on when you select a washing programme.
– Stays on for all the duration of the washing programme.
– Goes off at the end of the washing programme.
2
3
Page 4

Indicator lights
End-of-programme Comes on when the washing programme is completed.
Multitab Comes on when you activate the multitab function. Refer to 'Multitab function'.
Salt
1)
Comes on when it is necessary to fill the salt container. Refer to 'Use of dishwasher salt'.
After you fill the container, the salt indicator light can continue to stay on for some
hours. This does not have an unwanted effect on the operation of the appliance.
Rinse aid
1)
Comes on when it is necessary to fill the rinse aid container. Refer to 'Use of rinse
aid'.
1) When the salt and/or rinse aid containers are empty, the related indicator lights do not come on while a washing programme
operates.
Programme selection buttons
With these buttons you can select the washing programme. Press a programme button, the related indicator light comes on. Refer to 'Washing programmes' chapter for more data about the washing programmes.
Delay start button
Use the delay start button to delay the start of the washing programme with an interval between 1 and 19
hours. Refer to the chapter 'Setting and starting a washing programme'.
Digital display
The display shows:
• the set level of the water softener.
• Remaining time to the end of the programme.
• Activation/deactivation of the rinse aid dispenser (on-
ly with multitab function on).
• End of the washing programme. The display shows a
zero.
• Number of hours in delay start.
• Fault codes.
Function buttons
Use the function buttons for these operations:
• To set the water softener. Refer to the chapter 'Setting
the water softener'.
• To cancel the washing programme in progress or a
delay start in progress. Refer to the chapter 'Setting
and starting a washing programme'.
• To activate/deactivate the multitab function. Refer to
the chapter 'Multitab function'.
• To deactivate/activate the rinse aid dispenser, when
multitab function is active. Refer to the chapter 'Multitab function'.
Setting mode
The appliance must be in setting mode for these
operations:
• To set a washing programme.
• To set the water softener level.
• To deactivate/activate the rinse aid dispenser.
Press the on/off button. The appliance is in setting
mode when:
– All the programme indicator lights come on.
Press the on/off button. The appliance is not in setting
mode when:
– Only one programme indicator light comes on
– A washing programme is set. It is necessary to can-
cel the programme to go back to the setting mode.
Refer to the chapter 'Setting and starting a washing
programme".
4
Page 5

Washing programmes
Washing programmes
Programme Degree of soil Type of load Programme description
Heavy soil Crockery, cutlery,
pots and pans
1)
Any Crockery, cutlery,
pots and pans
2)
Normal or light
Crockery and cutlery Main wash up to 65°C
soil
3)
Normal soil Crockery and cutlery Prewash
Any Partial load (to be
completed later in
the day).
1) During the Auto programme, the soil level of the dishes is given by how cloudy the water is. The programme duration and
consumptions can change. This depends if the appliance is fully or not and on the level of soil on the dishes. The appliance
adjusts automatically the temperature of the water during the main wash.
2) This is the perfect daily programme to clean a not fully load. Ideal for a family of 4 persons who only want to load breakfast and
dinner crockery and cutlery.
3) Test programme for test institutes. Please refer to separate leaflet supplied, for test data.
Prewash
Main wash up to 70°C
2 intermediate rinses
Final rinse
Drying
Prewash
Main wash up to 45°C or 70°C
1 or 2 intermediate rinses
Final rinse
Drying
Final rinse
Main wash up to 50°C
1 intermediate rinse
Final rinse
Drying
1 cold rinse (to prevent food scraps to bond).
Detergent is not necessary with this programme.
Consumption values
Programme
1) The digital display shows the programme duration.
The pressure and temperature of the water, the variations of power supply and the quantity of dishes
can change these values.
Duration (in minutes)
- 1,6-1,8 22-24
- 1,1-1,8 12-23
- 0,9 9
- 1,0-1,1 13-15
- 0,1 4
1)
Energy (in kWh) Water (in litres)
5
Page 6
Use of the appliance
Refer to the following instructions for each step of procedure:
1. Make a check if the water softener level is correct
for the water hardness in your area. If necessary set
the water softener.
2. Fill the salt container with dishwasher salt.
3. Fill the rinse aid dispenser with rinse aid.
4. Load cutlery and dishes into the dishwasher.
5. Set the correct washing programme for the type of
load and soil.
6. Fill the detergent dispenser with the correct quantity of detergent.
7. Start the washing programme.
If you use combi detergent tablets ('3 in 1', '4 in
1', '5 in 1', etc.), refer to the chapter 'Multitab func-
tion'.
Setting the water softener
The water softener removes minerals and salts from the
water supply. Minerals and salts can have bad effect on
the operation of the appliance.
Water hardness is measured in equivalent scales:
• German degrees (dH°).
• French degrees (°TH).
Water hardness Water hardness setting
°dH °TH mmol/l Clarke manually electronically
51 - 70 91 - 125 9,1 - 12,5 64 - 88 2 10
43 - 50 76 - 90 7,6 - 9,0 53 - 63 2 9
37 - 42 65 - 75 6,5 - 7,5 46 - 52 2 8
29 - 36 51 - 64 5,1 - 6,4 36 - 45 2 7
23 - 28 40 - 50 4,0 - 5,0 28 - 35 2 6
19 - 22 33 - 39 3,3 - 3,9 23 - 27 2 5
15 - 18 26 - 32 2,6 - 3,2 18 - 22 1 4
11 - 14 19 - 25 1,9 - 2,5 13 - 17 1 3
4 - 10 7 - 18 0,7 - 1,8 5 - 12 1 2
< 4 < 7 < 0,7 < 5
1) No use of salt required.
• mmol/l (millimol per litre - international unit for the
hardness of water).
•Clarke.
Adjust the water softener to the water hardness in your
area. If necessary, contact your local water authority.
1)
1
1)
1
You must set the water softener manually and electronically.
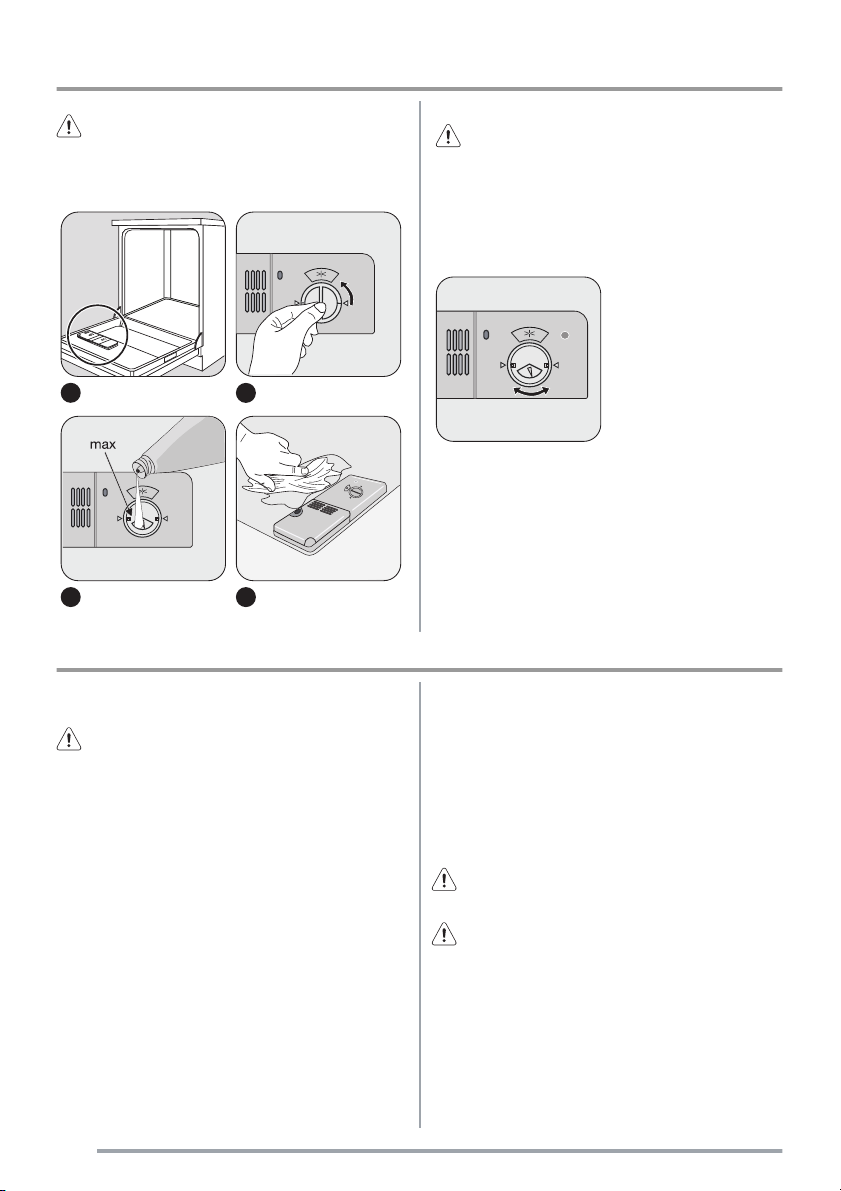
Manual adjustment
The appliance is set at the factory at position 2.
6
Page 7
1
2
Set switch to position 1
or 2.
Electronic adjustment
The water softener is set at the factory at level 5.
1. Switch on the appliance.
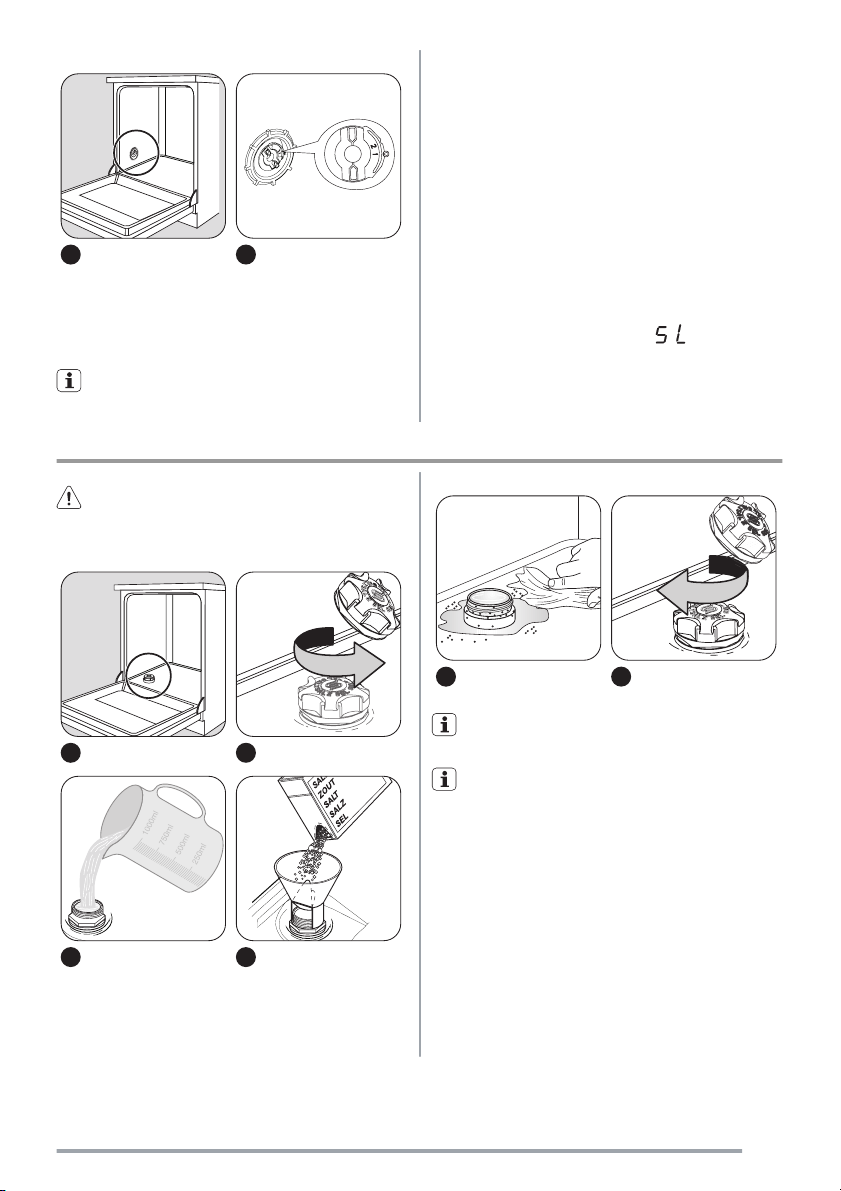
Use of dishwasher salt
Caution! Only use dishwashers salt. Types of salt
that are not applicable for dishwashers cause
damage to the water softener.
2. Make sure that the appliance is in setting mode.
3. Press and hold function buttons B and C until the
indicator lights of function buttons A, B and C start
to flash.
4. Release function buttons B and C.
5. Press function button A.
– The indicator lights for function buttons B and C
go off.
– The indicator light for function button A contin-
ues to flash.
– The digital display shows the current level.
Example: digital display shows
6. Press the function button A one time to increase the
water softener level by one step.
7. Press the on/off button to save the operation.
= level 5.
1
3
Fill the salt container with
1 litre of water (only the
first operation).
5
It is normal that water overflows from the salt con-
2
4
tainer when you fill it with salt.
Make sure that there is no grain of salt outer of
the salt compartment. Salt which stays on the tank
for a while drills the tank. It is recommended to start a
washing programme immediately after you fill the salt
container. This prevents of corrosion because of spilled
salt.
When you set electronically the water softener to level
1, the salt indicator light does not stay on.
6
7
Page 8
Use of rinse aid
Caution! Only use branded rinse aid for
dishwashers.
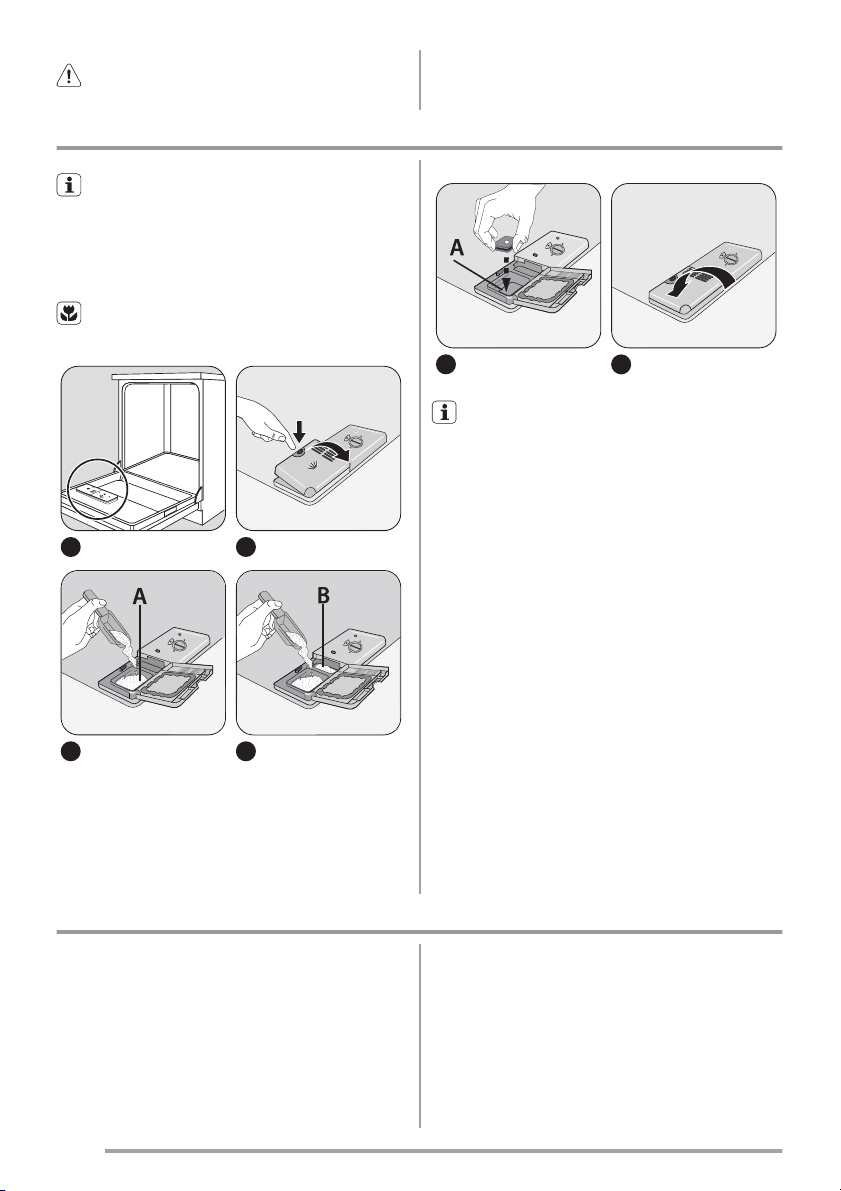
Do these steps to fill the rinse aid dispenser:
1 2
A
X
M
+
1
4
2
3
3
4
Loading cutlery and dishes
Helpful hints and tips
Caution! Only use the appliance for household
utensils that are applicable for dishwashers.
Do not use the appliance to clean objects that can absorb water (sponges, household cloths, etc.).
• Before you load cutlery and dishes, do these steps:
– Remove all food remainings and debris.
– Make burnt, remaining food in pans soft.
• While you load cutlery and dishes, do these steps:
– Load hollow items (e.g. cups, glasses and pans)
with the opening down.
– Make sure that water does not collect in the con-
tainer or in a deep base.
– Make sure that cutlery and dishes do not lie in-
side one another.
– Make sure that cutlery and dishes do not cover oth-
er cutlery and dishes.
Caution! Do not fill the rinse aid dispenser with
other products (e.g. dishwasher cleaning agent,
liquid detergent). There is a risk of damage to the appliance.
Adjusting the dosage of rinse aid
The rinse aid dial is set at
the factory at position 3.
A
X
M
+
1
4
2
3
– Make sure that glasses do not touch other glasses.
– Put small objects in the cutlery basket.
• Plastic items and pans with non-stick coatings can
keep water droplets. Plastic items do not dry as well
as porcelain and steel items.
• Put light items in the upper basket. Make sure that
the items do not move.
Caution! Make sure that the spray arms can move
freely before you start a washing programme.
Warning! Always close the door after you load or
unload the appliance. An open door can be
dangerous.
To increase or decrease
the dosage refer to 'What
to do if...'
8
Page 9
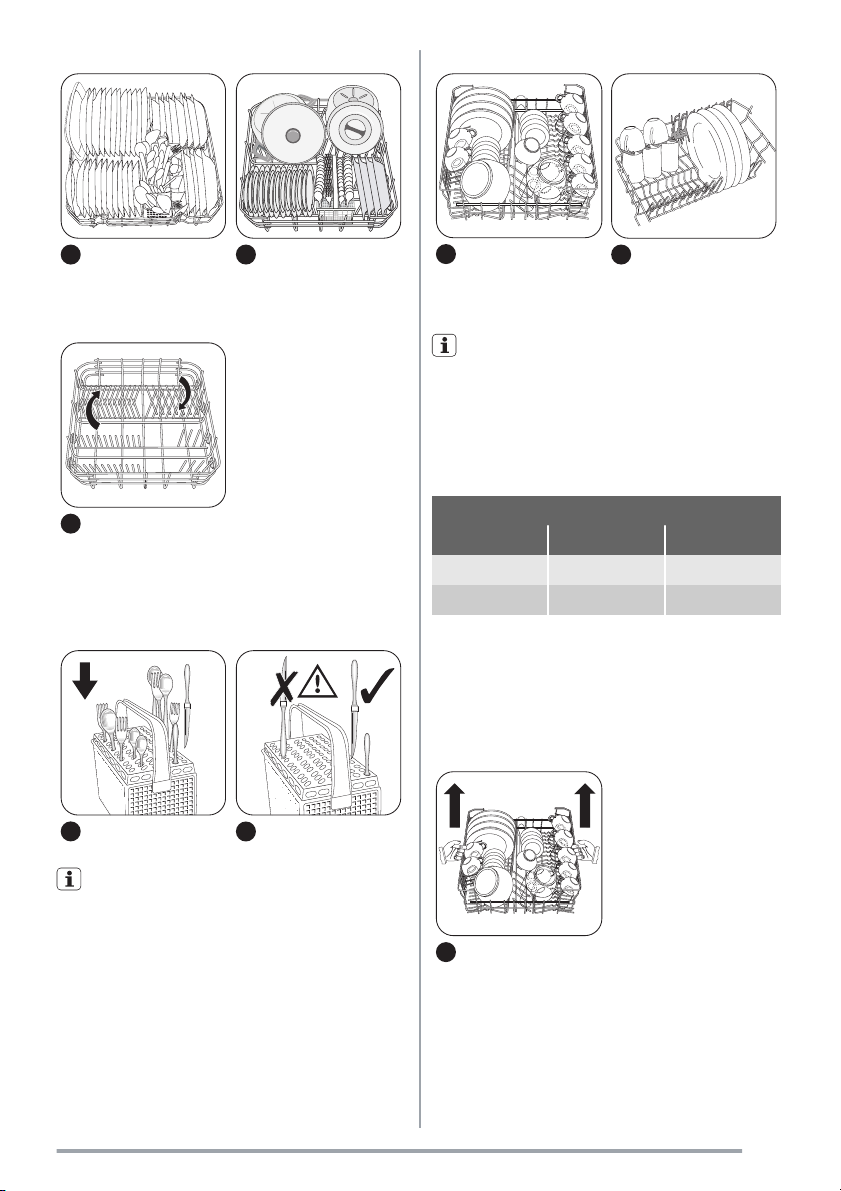
1
Arrange service dishes
and large lids around the
edge of the lower basket.
2
1
Arrange the items to let
water touch all surfaces.
Prevent to put plates in the first three sections in
the front part of the upper basket. Make sure the
plates tilt forward.
2
For longer items fold the
cup racks up.
Adjustment of the height of the upper basket
If you put large plates in the lower basket, first move the
upper basket to the upper position.
3
The rows of prongs in the
lower basket can be flat
to load pots, pans and
bowls.
1 2
Use the cutlery grid. If the dimensions of the cutlery prevent use of the cutlery grid, remove it.
Maximum height of the dishes
upper basket lower basket
Upper position 20 cm 31 cm
Lower position 24 cm 27 cm
Do these steps to move the upper basket to the upper
position:
1. Pull the basket out until it stops.
2. Carefully lift the two sides until the mechanism is
engaged and the basket is stable.
1
Do these steps to move the upper basket to the lower
position:
1. Pull the basket out until it stops.
2. Carefully lift the two sides upwards.
3. Hold the mechanism and let it fall back down slowly.
9
Page 10
Caution!
• Do not lift or lower the basket on one side only.
Use of detergent
Only use detergents (powder, liquid or tablet) that
are applicable for dishwashers.
Follow the data on the packaging:
• Dosage recommended by the manufacturer.
• Storage recommendations.
Do not use more than the correct quantity of deter-
gent to save an environment.
• If the basket is in the upper position, do not put cups
on the cup racks.
5
Different brands of detergent dissolve in different
times. Some detergent tablets do not have the
best cleaning results during short washing programmes. Use long washing programmes when you
use detergent tablets to fully remove the detergent.
6
1
3
Fill the detergent dispenser (A) with detergent.
2
4
If you use a washing programme with prewash
phase, put more detergent in the prewash detergent compartment (B).
Multitab function
The multitab function is for combi detergent tablets.
These tablets contain agents such as detergent, rinse
aid and dishwasher salt. Some types of tablets can contain other agents.
Do a check if these tablets are applicable for the local
water hardness. Refer to the instructions from the manufacturer.
When you set the multitab function, it stays on until you
deactivate it.
The multitab function stops automatically the flow of
rinse aid and salt. The rinse aid indicator light and salt
indicator light are deactivated.
The programme duration can increase if you use the multitab function.
10
Page 11
Activate or deactivate the multitab function before
the start of a washing programme.
You cannot activate or deactivate the multitab function
when the programme operates. Cancel the washing programme, then set the programme again.
To activate the multitab function:
• Press and hold the two multitab buttons (function but-
tons D and E). The multitab indicator light comes on.
To deactivate the multitab function:
• Press and hold the two multitab buttons (function but-
tons D and E). The multitab indicator light goes off.
Do these steps if the drying results are not satis-
factory:
1. Fill the rinse aid dispenser with rinse aid.
2. Activate the rinse aid dispenser.
3. Set the rinse aid dosage to position 2.
• You can only activate or deactivate the rinse aid dis-
penser when the multitab function is activated.
To activate/deactivate the rinse aid dispenser:
1. Switch on the appliance.
2. Make sure that the appliance is in setting mode.
3. Press and hold function buttons B and C.
– The indicator lights for function buttons A, B,
and C start to flash.
4. Release function buttons B and C.
5. Press function button B.
– The indicator lights for function buttons A and C
go off.
– The indicator light for function button B contin-
ues to flash.
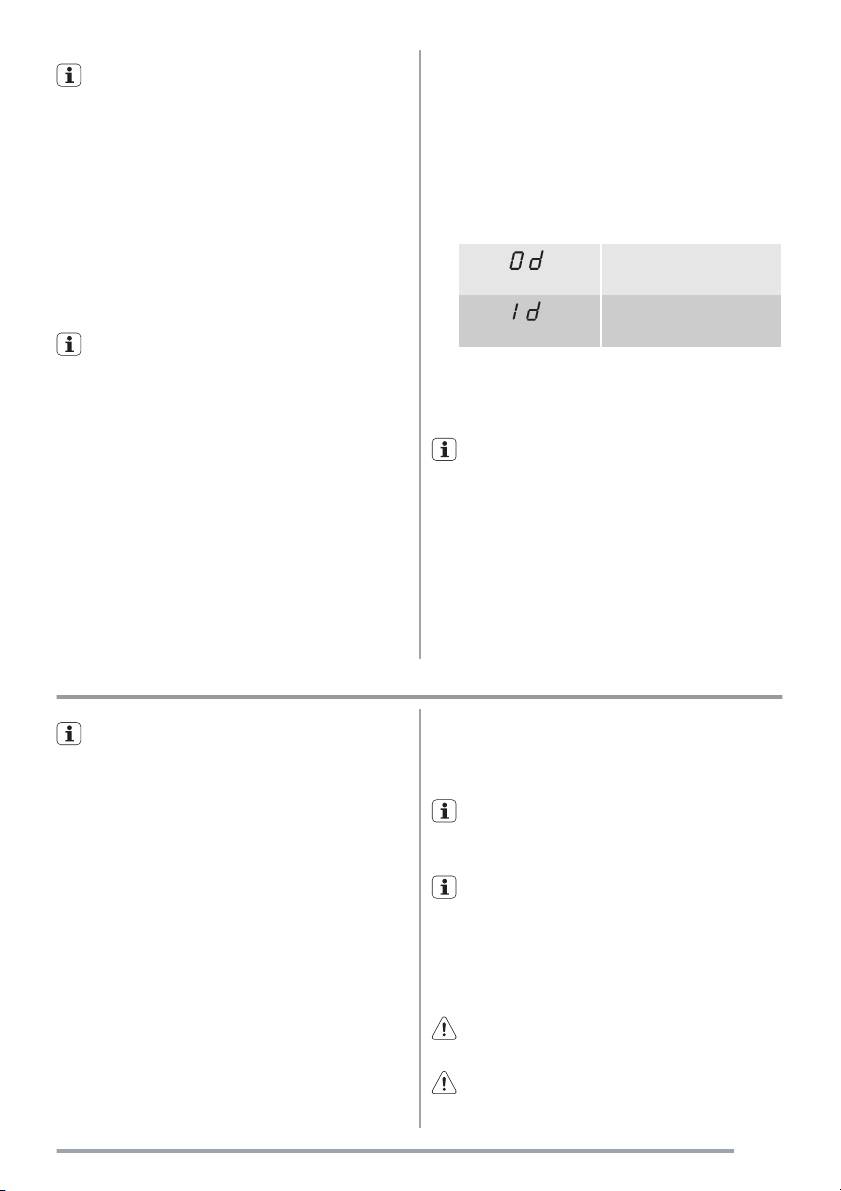
– The digital display shows the setting.
Rinse aid dispenser deactivated
Rinse aid dispenser activated
6. Press function button B again.
– The digital display shows the new setting.
7. Switch off the appliance to save the operation.
To use normal detergent again:
1. Deactivate the multitab function.
2. Fill the salt container and rinse aid dispenser.
3. Adjust the water hardness setting to the highest level.
4. Do a washing programme without dishes.
5. Adjust the water softener to the water hardness in
your area.
6. Adjust the rinse aid dosage.
Setting and starting a washing programme
Set the washing programme with the door ajar.
The washing programme only starts after you
close the door. Until then it is possible to modify the settings.
Do these steps to set and start a washing programme:
1. Switch on the appliance.
2. Make sure that the appliance is in setting mode.
3. Press one of the programme buttons. Refer to the
chapter 'Washing programmes'.
– The programme indicator light comes on.
– All other programme indicator lights go off.
– The digital display shows in flashing the pro-
gramme duration.
– The programme-in-progress indicator light
comes on.
4. Close the door.
– The washing programme starts automatically.
– The programme-in-progress indicator light re-
mains on.
When the washing programme operates, you cannot change the programme. Cancel the washing
programme.
You can select the washing programme and delay
start also with the door closed. When you press a
programme button you have only 3 seconds to select a
different washing programme or a delay start. After
these 3 seconds, the selected programme starts automatically.
Warning! Only interrupt or cancel a washing
programme if necessary.
Caution! Open the door carefully. Hot steam can
come free.
11
Page 12
Cancelling a washing programme
1. Press and hold function buttons B and C until:
– All the programme lights come on,
– The programme-in-progress indicator light goes
off.
2. Release function buttons B and C to cancel the washing programme.
At this time you can do these steps:
1. Switch off the appliance.
2. Set a new washing programme .
Fill the detergent dispenser with detergent before you
set a new washing programme.
Interrupting a washing programme
Open the door.
• The programme stops.
Close the door.
• The programme continues from the point of interrup-
tion.
Setting and starting a washing programme with
delay start
1. Press the on/off button.
2. Set a washing programme.
3. Press the delay start button until the display shows
on flashing the necessary delay start of the washing
programme.
4. Close the door.
– The number on the display comes on with fixed
light.
– The programme-in-progress indicator light goes
off.
– The countdown of the delay start starts.
– The countdown of the delay start decreases with
steps of 1 hour.
– When the countdown is completed, the washing
programme starts automatically.
– The programme-in-progress indicator light
comes on.
Do not open the door during the countdown to pre-
vent interruption of the countdown. When you
close the door again, the countdown continues from the
point of interruption.
Cancelling a delay start:
1. Press and hold function buttons B and C until:
– All the programme lights come on.
When you cancel a delay start, you also cancel the
washing programme.
2. Set a new washing programme.
End of the washing programme
• The appliance stops automatically.
• The display shows 0.
• The end-of-programme indicator light comes on.
• The programme-in-progress indicator light goes off.
1. Switch off the appliance.
2. Open the door.
3. For better drying results, keep the door ajar for
some minutes before you remove the dishes.
Let the dishes cool down before you remove them from
the appliance. Hot dishes are easily damaged.
Removing the load
• First remove items from the lower basket, then from
the upper basket.
• There can be water on the sides and door of the appli-
ance. Stainless steel becomes cool more quickly
than the dishes.
Standby mode
If you do not switch off the appliance at the end of the
washing programme, the appliance automatically goes
into standby mode. The standby mode decreases energy consumption.
Three minutes after the end of the programme, all indicator lights go off and the digital display shows one horizontal bar.
Press one of the buttons (not the on/off button), to go
back to end-of-programme mode.
Care and cleaning
Warning! Switch the appliance off before you
clean the filters.
12
Cleaning the filters
Important! Do not use the appliance without the filters.
Make sure that the installation of the filters is correct.
Page 13
Incorrect installation will cause unsatisfactory washing
results and damage to the appliance.
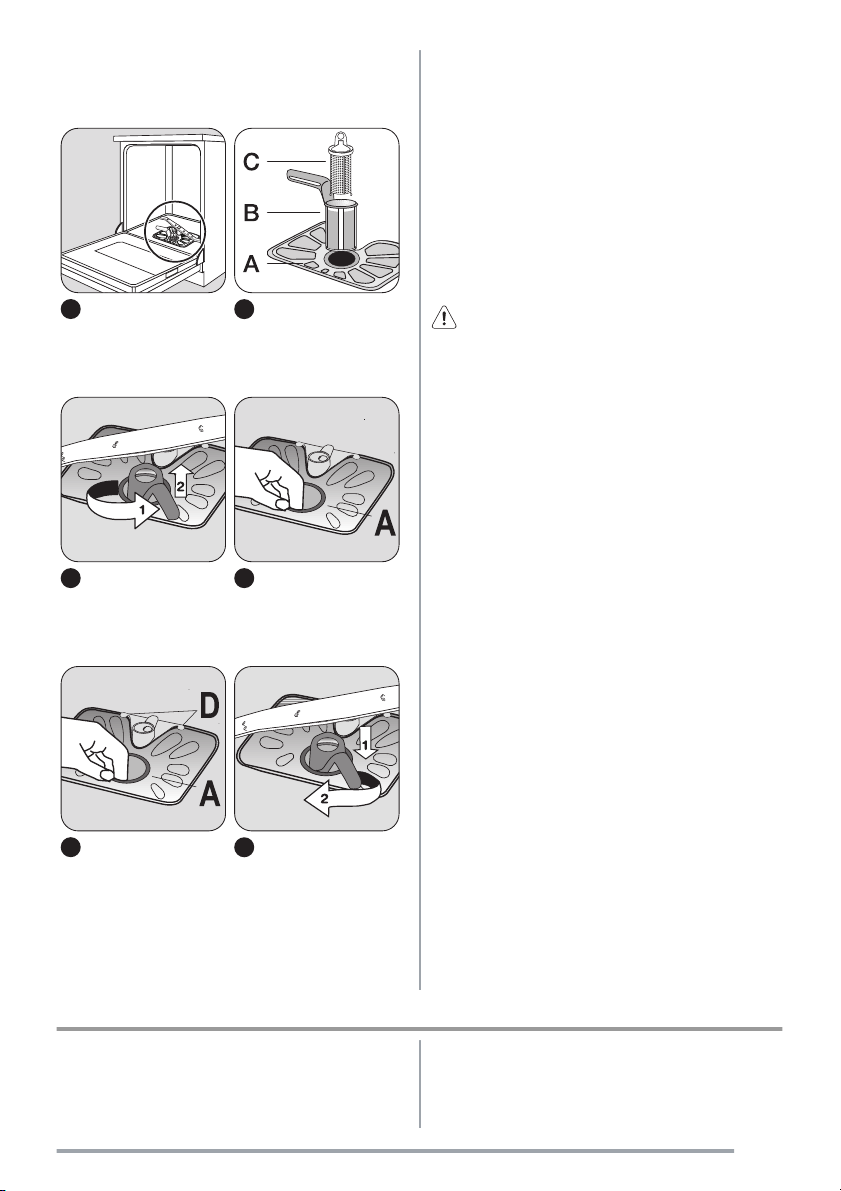
1 2
Fully clean the filters A, B
and C below running water.
Important! Do not remove the spray arms.
If the holes in the spray arms become clogged, remove
remaining parts of soil with a cocktail stick.
External cleaning
Clean the external surfaces of the appliance and control
panel with a damp soft cloth. Only use neutral detergents. Do not use abrasive products, scouring pads or
solvents (acetone, trichloroethylene etc...).
Frost precautions
Caution! Do not install the appliance where the
temperature is below 0 °C. The manufacturer is
not responsible for damage because of frost.
If not possible, empty the appliance and close the door.
Disconnect the water inlet hose and remove water from
the water inlet hose.
3
To remove filters B and
C, turn the handle approximately 1/4 anticlockwise.
5
Put the flat filter A in the
bottom of the appliance.
Install the flat filter correctly under the two
guides D.
4
Remove the flat filter A
from the bottom of the appliance.
6
Put the filter system in position. To lock the filter
system, turn the handle
clockwise until it locks in
position.
What to do if…
The appliance does not start or stops during operation. If there is a fault, first try to find a solution to the prob-
lem yourself. If you cannot find a solution to the problem yourself, contact the Service Force Centre.
13
Page 14
Caution! Switch off the appliance before you do
the below suggested corrective actions.
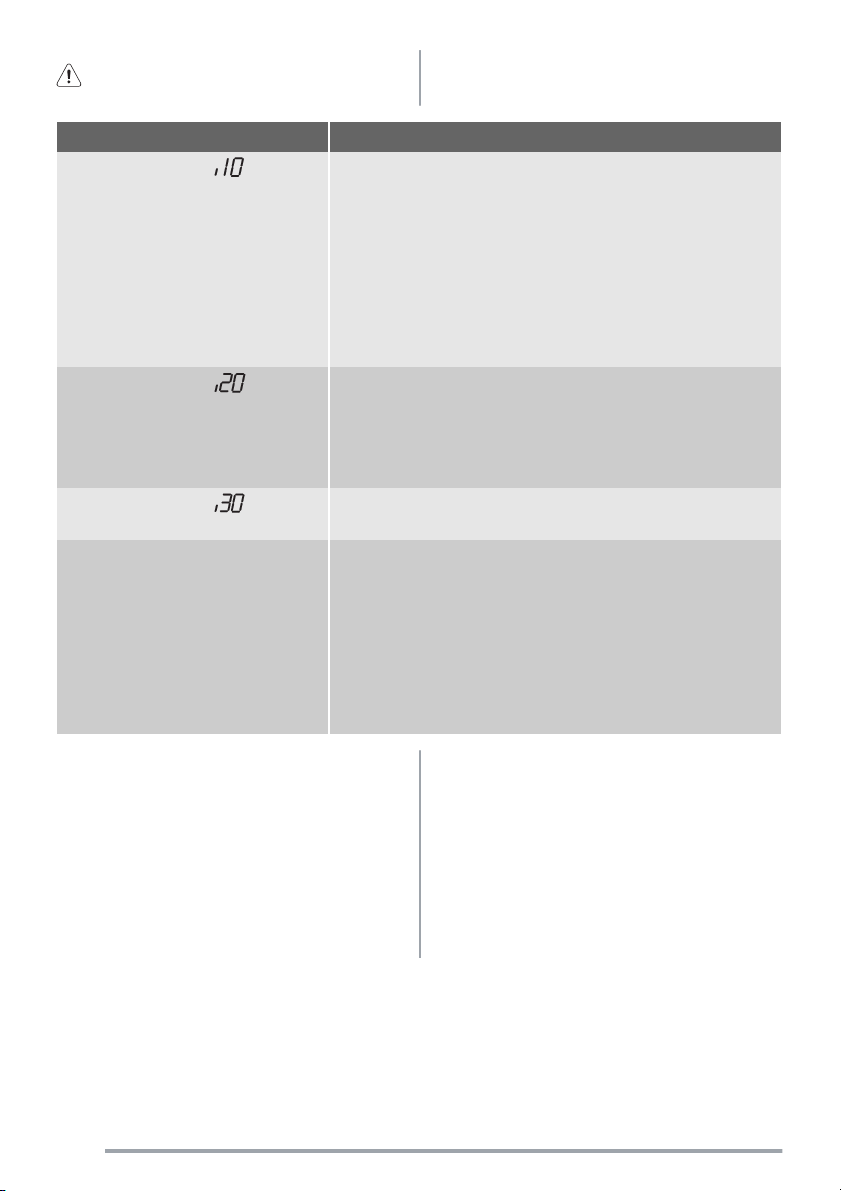
Fault code and malfunction Possible cause and solution
•
digital display shows
The dishwasher does not fill with water
•
digital display shows
The dishwasher will not drain
•
digital display shows
The anti-flood device operates
The programme does not start • The appliance door is not closed.
• The water tap is blocked or furred with limescale.
Clean the water tap.
• The water tap is closed.
Open the water tap.
• The filter in the water inlet hose is blocked.
Clean the filter.
• The connection of the water inlet hose is not correct. The hose can
be kinked or squashed.
Make sure that the connection is correct.
• There is a blockage in the sink spigot.
Clean the sink spigot.
• The connection of the water drain hose is not correct. The hose can
be kinked or squashed.
Make sure that the connection is correct.
• Close the water tap and contact your local Service Force Centre.
Close the door.
• Mains plug is not connected in.
Put in the mains.
• The fuse has blown out in the household fuse box.
Replace the fuse.
• Delay start is set.
Cancel the delay start to start the programme immediately.
After the check, switch on the appliance. The programme continues from the point of interruption. If the
malfunction shows again, contact your Service Force
Centre.
If the display shows a fault code, not described in the
chart, contact your Service Force Centre.
These data are necessary to help you quickly and correctly:
• Model (Mod.)
14
• Product number (PNC)
• Serial number (S.N.)
For these data, refer to the rating plate.
Write the necessary data here:
Model description : ..........
Product number : ..........
Serial number : ..........
Page 15
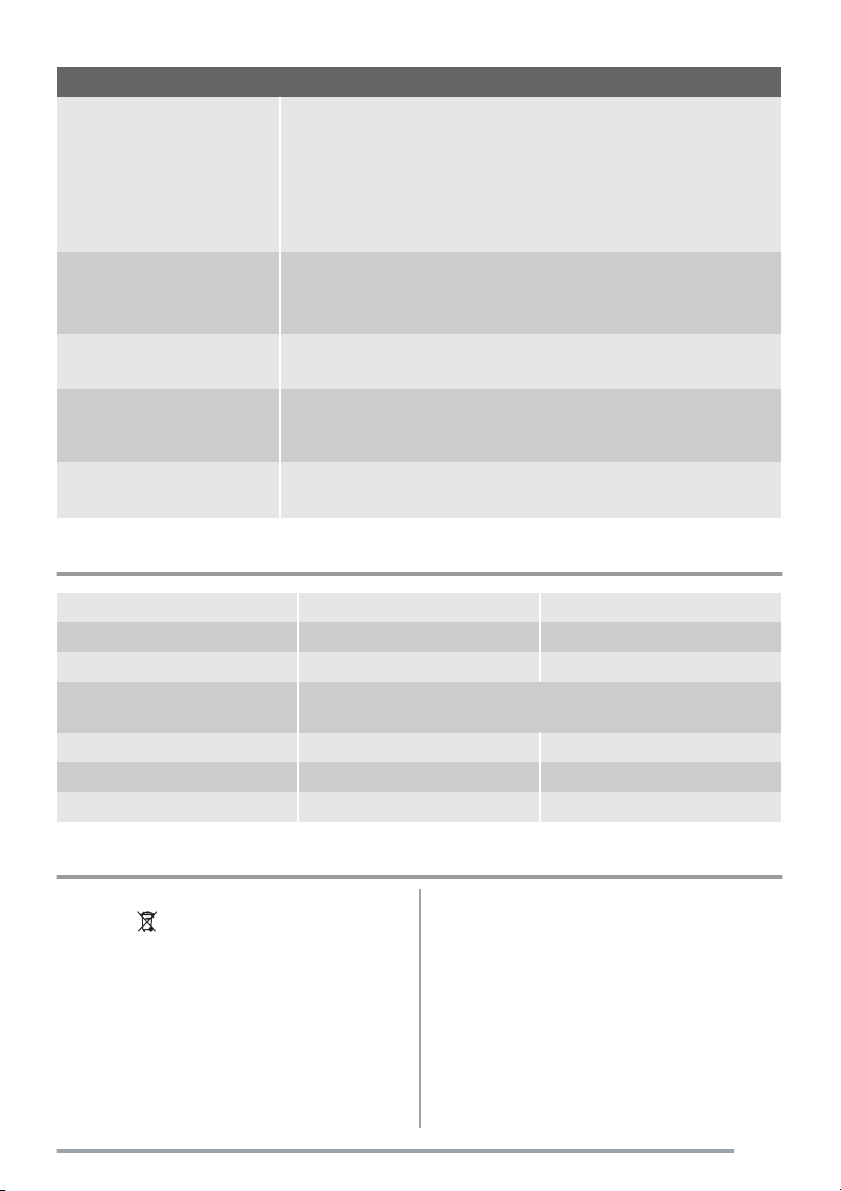
The cleaning results are not satisfactory
The dishes are not clean • The selected washing programme is not applicable for the type of load and
soil.
• The baskets are loaded incorrectly so that water cannot reach all surfaces.
• Spray arms do not turn freely because of incorrect arrangement of the load.
• The filters are dirty or not correctly installed.
• The quantity of detergent is too little or missing.
Limescales particles on the dishes • The salt container is empty.
• The water softener is adjusted on a wrong level.
• The salt container cap is not closed correctly.
The dishes are wet and dull • No rinse aid has been used.
• The rinse aid dispenser is empty.
There are streaks, milky spots or
a bluish coating on glasses and
dishes
Dry water drop signs on glasses
and dishes
• Decrease the rinse aid dosage.
• Increase rinse aid dosage.
• The detergent can be the cause.
Technical data
Dimensions Width cm 60
Height cm 85
Depth cm 61
Electrical connection - Voltage -
Overall power - Fuse
Water supply pressure Minimum 0,5 bar (0,05 MPa)
Maximum 8 bar (0,8 MPa)
Capacity Place settings 12
Information on the electrical connection is given on the rating plate on the
inner edge of the dishwasher door.
Environment concerns
The symbol on the product or on its packaging
indicates that this product may not be treated as
household waste. Instead it should be taken to the
appropriate collection point for the recycling of
electrical and electronic equipment. By ensuring this
product is disposed of correctly, you will help prevent
potential negative consequences for the environment
and human health, which could otherwise be caused by
inappropriate waste handling of this product. For more
detailed information about recycling of this product,
please contact your local council, your household waste
disposal service or the shop where you purchased the
product.
The packaging materials are environmentally friendly
and can be recycled. The plastic components are identified by markings, e.g. >PE<, >PS<, etc. Discard the packaging materials in the applicable container at the community waste disposal facilities.
15
Page 16
Warning! To discard the appliance, follow the
procedure:
• Pull the mains plug out of the socket.
• Cut off the mains cable and mains plug and discard
them.
Installation
Warning! Make sure that mains plug is
disconnected from the mains socket during
installation.
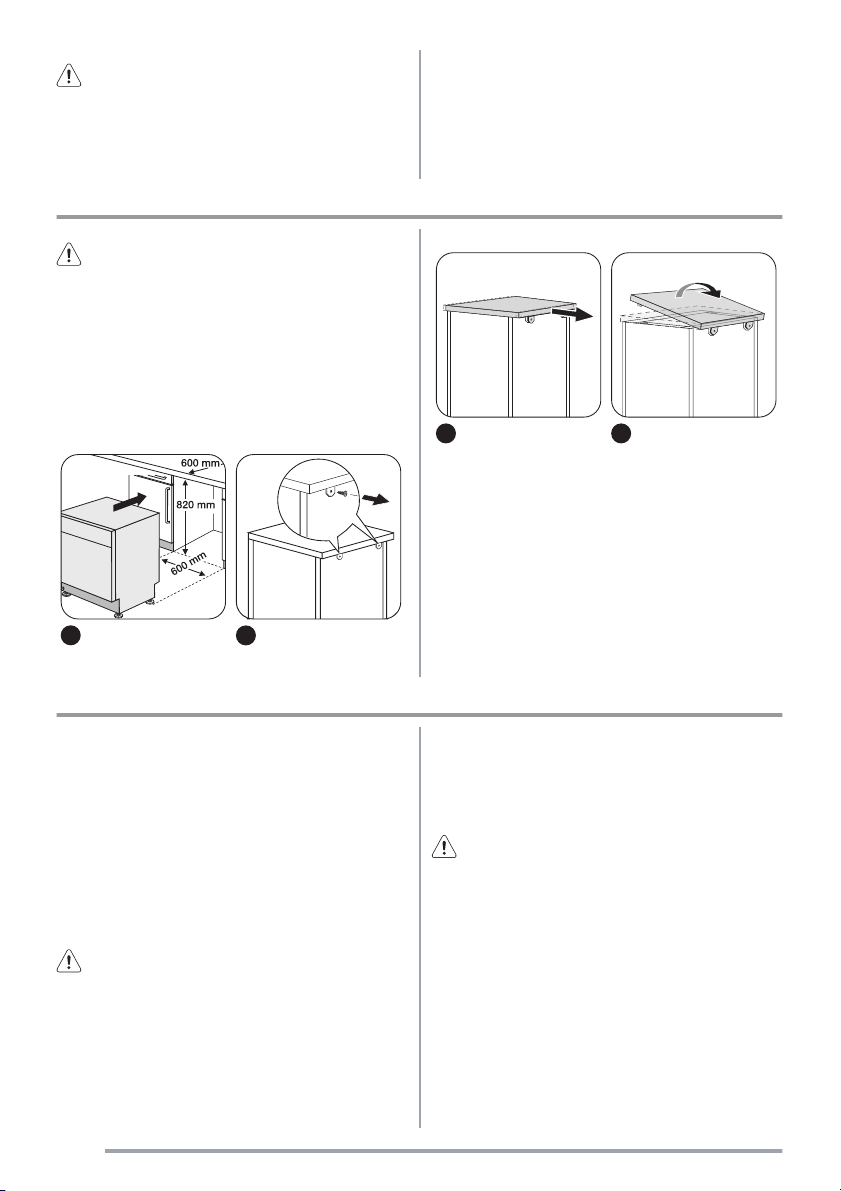
Fitting under a counter
Put the appliance adjacent to a water tap and a water
drain. Remove the appliance worktop to install it under
a sink unit or a kitchen worktop. Make sure that the dimensions of the recess agree with the given dimensions.
1 2
• Discard the door catch. This prevents the children to
close themselves inside the appliance and endanger
their lives.
3
Install the appliance worktop to the appliance if you
want to use the dishwasher as a freestanding appliance.
The plinth on freestanding appliance is not adjustable.
4
Adjusting the level of the appliance
Make sure that the appliance is level to close and seal
the door correctly. If the level of the appliance is correct, the door does not catch on the sides of the cabinet.
If the door does not close correctly, loosen or tighten
the adjustable feet until the appliance is level.
Water connection
Water inlet hose
Connected the appliance to a hot (max. 60°) or cold water supply.
If the hot water comes from alternative sources of energy that are more environmentally friendly (e.g. solar or
photovoltaic panels and aeolian), use a hot water supply to decrease energy consumption.
Connect the inlet hose to a water tap with an external
thread of 3/4”.
Caution! Do not use connection hoses from an
old appliance.
The water pressure must be in the limits (refer to the
chapter 'Technical data'). Make sure that the local water
authority gives you the average mains pressure in your
area.
16
Make sure that there are no kinks in the water inlet hose
and that the water inlet hose is not squashed or entangled.
Turn the inlet hose to the left or the right to suit the installation. Fit the locknut correctly to prevent water leaks.
Caution! Do not connect the appliance to new
pipes or pipes that are not used for a long time.
Let the water run for some minutes, then connect the
inlet hose.
Page 17

Drain hose
max 85 cm
min 40 cm
max 400 cm
The internal diameter must not be smaller than the diameter of the hose.
If you connect the water drain hose to a trap spigot under the sink, remove the plastic membrane (A). If you
do not remove the membrane, remaining food can
cause a blockage in the drain hose spigot.
Caution! Make sure that the water couplings are
tight to prevent water leakage.
1
2
Connect the water drain
hose to the sink spigot.
3
4
Electrical connection
Warning! The manufacturer is not responsible if
you do not follow these safety precautions.
This appliance needs to be earthed according to safety
precautions.
Make sure that the rated voltage and type of power on
the rating plate agree with the voltage and the power of
the local power supply.
Always use a correctly installed shockproof socket.
Do not use multi-way plugs, connectors and extension
cables. There is a risk of fire.
Do not replace the mains cable yourself. Contact the
Service Force Centre.
Make sure that the mains plug is accessible after
installation.
Do not pull the mains cable to disconnect the
appliance. Always pull the mains plug.
17
Page 18

Sommaire
Consignes de sécurité _ _ _ _ _ _ _ _ _ _ _ _ _ _ 18
Bandeau de commande _ _ _ _ _ _ _ _ _ _ _ _ _ 19
Programmes de lavage _ _ _ _ _ _ _ _ _ _ _ _ _ _ 21
Utilisation de l'appareil _ _ _ _ _ _ _ _ _ _ _ _ _ _ 22
Réglage de l'adoucisseur d'eau _ _ _ _ _ _ _ _ _ _ 22
Utilisation du sel régénérant _ _ _ _ _ _ _ _ _ _ _ 24
Utilisation du liquide de rinçage _ _ _ _ _ _ _ _ _ 24
Rangement des couverts et de la vaisselle _ _ _ _ _ 25
Utilisation du produit de lavage _ _ _ _ _ _ _ _ _ _ 27
Consignes de sécurité
Pour votre sécurité et le bon fonctionnement de
l'appareil, lisez attentivement ce manuel avant l'installation et l'utilisation. Conservez ces instructions à
proximité de l'appareil. Les utilisateurs doivent connaître parfaitement le fonctionnement et les fonctions de sécurité de l'appareil.
Utilisation réglementaire
• Cet appareil est exclusivement destiné à un usage do-
mestique.
• Ce lave-vaisselle est conçu pour laver la vaisselle et
les ustensiles de cuisine pouvant être lavés en machine.
• N'utilisez pas de solvants dans votre appareil. Ceux-
ci pourraient provoquer une explosion !
• Les couteaux et autres ustensiles pointus ou tran-
chants doivent être placés dans le panier à couverts
avec la pointe vers le bas. ou posez-les en position
horizontale dans le panier supérieur.
• N'utilisez que des produits (sel, produit de lavage, li-
quide de rinçage) spécifiques pour lave-vaisselle.
• Evitez d'ouvrir la porte pendant que l'appareil fonc-
tionne : une vapeur brûlante peut s'en échapper. Risque de brûlures !
• Ne sortez pas la vaisselle du lave-vaisselle avant la
fin du cycle de lavage.
• Lorsque le programme est terminé, débranchez l'ap-
pareil et fermez le robinet d'arrivée d'eau.
• Cet appareil ne peut être entretenu et réparé que par
un technicien autorisé, exclusivement avec des pièces d'origine.
Fonction "Tout en 1" _ _ _ _ _ _ _ _ _ _ _ _ _ _ _ 27
Sélection et départ d'un programme de lavage _ _ _ 28
Entretien et nettoyage _ _ _ _ _ _ _ _ _ _ _ _ _ _ 30
En cas d'anomalie de fonctionnement _ _ _ _ _ _ _ 31
Caractéristiques techniques _ _ _ _ _ _ _ _ _ _ _ 33
En matière de protection de l'environnement _ _ _ 33
Installation _ _ _ _ _ _ _ _ _ _ _ _ _ _ _ _ _ _ _ 33
Raccordement à l'arrivée d'eau _ _ _ _ _ _ _ _ _ _ 34
Branchement électrique _ _ _ _ _ _ _ _ _ _ _ _ _ 35
Sous réserve de modifications
• N'essayez en aucun cas de réparer le lave-vaisselle
vous-même. Les réparations effectuées par du personnel non qualifié peuvent provoquer des blessures
ou le mauvais fonctionnement du lave-vaisselle. Contactez votre service après vente. Exigez des pièces
d'origine.
Sécurité générale
• Les personnes (y compris les enfants) qui souffrent
de capacités mentales, physiques et sensorielles réduites ou qui ne se sont pas familiarisées avec le mode de fonctionnement de l'appareil, ne doivent pas
l'utiliser. Elles doivent être surveillées ou dirigées
par une personne responsable de leur sécurité.
• Respectez les consignes de sécurité du fabricant du
détergent pour éviter les brûlures aux yeux, à la bouche et la gorge.
• Ne buvez pas l'eau du lave-vaisselle. Des résidus de
produit de lavage peuvent rester dans l'appareil.
• Fermez toujours la porte de l'appareil lorsqu'il n'est
pas utilisé pour empêcher tout risque de blessure ou
de chute accidentelle.
• Ne vous asseyez pas ou ne montez pas sur la porte
ouverte.
Sécurité enfants
• Seuls les adultes doivent utiliser cet appareil. Veillez
à ce que les enfants ne jouent pas avec l'appareil.
• Rangez les emballages hors de la portée des enfants.
Ils présentent un risque de suffocation.
• Rangez les détergents dans un endroit sûr. Veillez à
ce que les enfants ne touchent pas les produits de lavage.
18
Page 19

• Ne laissez pas les enfants s'approcher de l'appareil
quand la porte est ouverte.
Installation
• Vérifiez que l'appareil n'a pas été endommagé pendant le transport. Ne branchez pas un appareil endommagé. Si nécessaire, contactez le fournisseur.
• Déballez l'appareil avant de l'utiliser pour la première
fois.
• Une personne compétente et qualifiée doit prendre
en charge l'installation électrique.
• Une personne compétente et qualifiée doit prendre
en charge le travail de plomberie.
• Ne modifiez ni les spécifications ni le produit. Risque de blessure ou d'endommagement de l'appareil.
Bandeau de commande
• N'utilisez pas l'appareil :
– si le câble secteur ou les tuyaux d'eau sont endom-
magés,
– si le bandeau de commande, le plan de travail ou
la plinthe sont endommagés, si vous pouvez accé-
der à l'intérieur de l'appareil.
Contactez le service après-vente de votre magasin
vendeur.
• Ne percez pas dans les côtés de l'appareil pour ne
pas endommager les composants électriques et hydrauliques.
Avertissement Respectez scrupuleusement les
consignes données pour les branchements
électriques et le raccordement de l'eau.
54
13
2
ABCDE
6
19
Page 20

1 Touche Marche/Arrêt
2 Touches de sélection des programmes
3 Touche Départ différé
4 Voyants
5 Afficheur numérique
6 Touches de fonction
Voyants
Programme en cours – S'allume quand vous sélectionnez un programme de lavage.
– Reste allumé pendant toute la durée du programme de lavage.
– S'éteint à la fin du programme.
Fin de programme S'allume lorsque le programme de lavage est terminé.
Tout en 1 S'allume lorsque vous activez la fonction « Tout en 1 ». Reportez-vous au chapitre
« Fonction « Tout en 1 » ».
Sel
1)
S'allume lorsque le réservoir à sel régénérant doit être rempli. Reportez-vous au
chapitre « Utilisation du sel régénérant ».
Le voyant de réapprovisionnement en sel régénérant peut rester allumé plusieurs
heures après le remplissage du réservoir à sel. Cela n'affecte pas le fonctionnement de l'appareil.
Liquide de rinçage
1)
S'allume lorsque le réservoir de liquide de rinçage doit être rempli. Reportez-vous
au chapitre « Utilisation du liquide de rinçage ».
1) Lorsque les réservoirs à sel et/ou à liquide de rinçage sont vides, les voyants correspondants ne s'allument pas pendant qu'un
programme est en cours.
Touches de sélection des programmes
Avec ces touches vous pouvez sélectionner le programme de lavage. Le voyant correspondant s'allume lorsque vous appuyez sur une touche. Pour plus de détails
sur les programmes de lavage, reportez-vous au chapitre "Programmes de lavage".
Touche Départ différé
Cette touche permet de différer le départ du programme
de lavage de 1 à 19 heures. Consultez le chapitre "Sélection et départ d'un programme de lavage".
Affichage numérique
L'affichage indique :
• le niveau courant de l'adoucisseur d'eau.
• Temps restant (approximatif) avant la fin du program-
me.
20
• Activation/désactivation du distributeur de liquide de
rinçage (seulement si la fonction "Tout en 1" est activée).
• Fin d'un programme de lavage. Un zéro apparaît sur
l'affichage.
• Décompte du départ différé.
• Codes d'anomalie de l'appareil.
Touches de fonction
Appuyez sur les touches de fonction pour :
• Régler l'adoucisseur d'eau. Reportez-vous au chapitre "Réglage de l'adoucisseur d'eau".
• Annuler le départ différé ou le programme de lavage
en cours. Reportez-vous au chapitre "Sélection et départ d'un programme de lavage".
• Activer/désactiver la fonction "Tout en 1". Reportezvous au chapitre "Fonction Tout en 1".
Page 21

• Activer/désactiver le distributeur de liquide de rinçage lorsque la fonction "Tout en 1" est activée. Reportezvous au chapitre "Fonction Tout en 1".
Mode Programmation
L'appareil doit être en mode Programmation pour
effectuer les opérations suivantes :
• Sélectionner un programme de lavage.
• Régler le niveau de l'adoucisseur d'eau.
• Activer/désactiver le distributeur de liquide de rinçage.
Appuyez sur la touche Marche/Arrêt. L'appareil se
trouve en mode Programmation lorsque :
– Tous les voyants du programme s'allument.
Programmes de lavage
Programmes de lavage
Programme Degré de salis-
sure
Très sale Vaisselle, couverts,
1)
Tous Vaisselle, couverts,
2)
3)
Normalement ou
légèrement sale
Normalement
sale
Type de vaisselle Description du programme
plats et casseroles
plats et casseroles
Vaisselle et couverts Lavage principal à 65 °C
Vaisselle et couverts Prélavage
Appuyez sur la touche Marche/Arrêt. L'appareil n'est
pas en mode Programmation lorsque :
– Un seul voyant de programme s'allume
– Un programme de lavage a été sélectionné. Pour re-
venir au mode Programmation, annulez le programme. Reportez-vous au chapitre " Réglage et départ
d'un programme de lavage ".
Prélavage
Lavage principal à 70° C
2 rinçages intermédiaires
Rinçage final
Séchage
Prélavage
Lavage principal à 45 °C ou 70 °C
1 ou 2 rinçages intermédiaires
Rinçage final
Séchage
Rinçage final
Lavage principal à 50 °C
1 rinçage intermédiaire
Rinçage final
Séchage
21
Page 22

Programme Degré de salis-
Type de vaisselle Description du programme
sure
Tous Charge partielle (à ef-
fectuer dans la journée).
1 rinçage à froid (pour éviter que les restes d'aliments ne collent).
Il n'est pas nécessaire d'utiliser de produit de lavage avec ce programme.
1) Au cours du programme « Auto », le degré de salissure de la vaisselle est déterminé par le degré de turbidité de l'eau. La durée
du programme et les consommations varient. Cela dépend de la quantité de vaisselle que contient alors l'appareil et du degré
de salissure de celle-ci. L'appareil règle automatiquement la température de l'eau pendant le lavage principal.
2) Programme de lavage quotidien parfait pour un lave-vaisselle modérément plein. Idéal pour une famille de 4 personnes qui
souhaite seulement laver la vaisselle et les couverts du dîner et du petit déjeuner.
3) Programme de test des organismes de normalisation. Veuillez consulter la brochure fournie séparément pour connaître les
résultats des essais.
Valeurs de consommation
Programme
1) La durée du programme de lavage apparaît sur l'afficheur numérique.
Durée (en minutes)
1)
Énergie (en kWh) Eau (en litres)
- 1,6-1,8 22-24
- 1,1-1,8 12-23
- 0,9 9
- 1,0-1,1 13-15
- 0,1 4
Ces valeurs peuvent changer en fonction de la pression et de la température de l'eau, des variations
Utilisation de l'appareil
Appliquez la procédure pas à pas en vous reportant aux
instructions suivantes :
1. Réglez l'adoucisseur d'eau en fonction du degré de
dureté de l'eau de votre région. Si nécessaire, ajustez le niveau de l'adoucisseur d'eau.
2. Remplissez le réservoir de sel régénérant avec du
sel spécial pour lave-vaisselle.
3. Remplissez le distributeur de liquide de rinçage.
4. Rangez les couverts et la vaisselle dans le lave-vais-
selle.
Réglage de l'adoucisseur d'eau
L'adoucisseur d'eau élimine les minéraux et les sels de
l'alimentation en eau. Les sels et les minéraux peuvent
affecter le fonctionnement de l'appareil.
La dureté de l'eau est mesurée par échelles équivalentes :
22
dans l'alimentation électrique et selon la quantité de vaisselle.
5. Sélectionnez le programme de lavage en fonction
de la charge et du degré de salissure.
6. Versez le produit de lavage dans le compartiment
correspondant.
7. Démarrez le programme de lavage.
Si vous utilisez des pastilles de détergent multifonctions ('3 en 1', '4 en 1', '5 en 1', etc.), reportez-
vous au chapitre "Fonction Tout en 1".
• °dH allemand.
• °TH français.
Page 23

• mmol/l (millimole par litre – unité internationale de
la dureté de l'eau).
gnie locale de distribution des eaux pour connaître le degré de dureté de l'eau de votre zone d'habitation.
•Clarke.
Ajustez l'adoucisseur en fonction de la dureté de l'eau
de votre région. Renseignez-vous auprès de la Compa-
Dureté de l'eau Réglage de la dureté de l'eau
°dH °TH mmol/l degrés Clarke manuel électronique
51 - 70 91 - 125 9,1 - 12,5 64 - 88 2 10
43 - 50 76 - 90 7,6 - 9,0 53 - 63 2 9
37 - 42 65 - 75 6,5 - 7,5 46 - 52 2 8
29 - 36 51 - 64 5,1 - 6,4 36 - 45 2 7
23 - 28 40 - 50 4,0 - 5,0 28 - 35 2 6
19 - 22 33 - 39 3,3 - 3,9 23 - 27 2 5
15 - 18 26 - 32 2,6 - 3,2 18 - 22 1 4
11 - 14 19 - 25 1,9 - 2,5 13 - 17 1 3
4 - 10 7 - 18 0,7 - 1,8 5 - 12 1 2
< 4 < 7 < 0,7 < 5
1) Ne pas approvisionner en sel régénérant.
1)
1
1)
1
Réglez manuellement et électroniquement l'adoucisseur d'eau.
Réglage manuel
L'adoucisseur est réglé d'usine sur 2.
1
2
Réglez le sélecteur sur la
position 1 ou 2.
Réglage électronique
L'adoucisseur d'eau est réglé d'usine sur la position 5.
1. Mettez l'appareil en fonctionnement.
2. Assurez-vous que l'appareil est en mode programmation.
3. Appuyez simultanément sur les touches de fonction
B et C, et maintenez-les appuyées jusqu'à ce que
les voyants des touches de fonction A, B et C clignotent.
4. Relâchez les touches B et C.
5. Appuyez sur la touche de fonction A.
– Les voyants des touches de fonction B et C s'étei-
gnent.
– Le voyant de la touche de fonction A continue de
clignoter.
– Le niveau réglé apparaît sur l'affichage numérique .
Exemple : l'affichage numérique indique
= ni-
veau 5.
6. Chaque pression de la touche de fonction A détermine le niveau suivant.
7. Appuyez sur la touche Marche/Arrêt pour mémoriser le réglage.
23
Page 24

Utilisation du sel régénérant
Attention Utilisez uniquement du sel spécial pour
lave-vaisselle. Tout autre type de sel non
spécialement étudié pour être utilisé dans un lavevaisselle, en particulier le sel de cuisine, peut
endommager l'adoucisseur d'eau.
1
3
Versez 1 litre d'eau à l'intérieur du réservoir à sel
(cette opération est nécessaire uniquement lorsque
vous remplissez le réservoir pour la première fois).
2
4
Utilisation du liquide de rinçage
Attention Utilisez exclusivement des liquides de
rinçage de marque, spéciaux pour lave-vaisselle.
Procédez comme suit pour remplir le distributeur de li-
quide de rinçage :
5
Il est normal que l'eau déborde du réservoir au moment où vous le remplissez de sel.
Assurez-vous qu'il n'y a pas de sel à l'extérieur du
compartiment. Le sel demeurant pendant un certain temps sur la surface du réservoir finit par percer le
réservoir. Approvisionnez en sel avant de démarrer un
programme de lavage complet. Cela évite les problèmes
de corrosion dus au sel répandu.
Quand vous réglez électroniquement l'adoucisseur sur
le niveau 1, le voyant Sel ne reste pas allumé.
6
24
1 2
Page 25

A
X
M
+
1
4
2
3
3
4
Attention Ne remplissez jamais le distributeur
de liquide de rinçage avec d'autres produits
(par ex. un agent de nettoyage pour lave-vaisselle, un
produit de lavage liquide). Vous risqueriez d'endommager l'appareil.
Rangement des couverts et de la vaisselle
Réglage du dosage du liquide de rinçage
Le liquide de rinçage est
réglé en usine sur la posi-
A
X
M
+
1
4
2
3
tion 3.
Pour augmenter ou diminuer le dosage, référezvous au chapitre "Que faire si…"
Conseils utiles
Attention Ce lave-vaisselle est conçu pour laver
la vaisselle et les ustensiles de cuisine pouvant
être lavés en machine.
Tout objet absorbant l'eau (chiffon, éponges de nettoya-
ge, ...) ne doit pas être lavé au lave-vaisselle.
• Avant de charger la vaisselle, veillez à :
– Enlever tous les restes d'aliments.
– Laisser tremper les casseroles au fond desquelles
adhèrent des restes d'aliments brûlés ou attachés.
• Lorsque vous chargez la vaisselle et les couverts :
– Chargez les articles creux tels que tasses, verres
et casseroles, etc. en les retournant.
– Assurez-vous que l'eau ne s'accumule pas dans
un creux ou dans un fond bombé.
– Assurez-vous que la vaisselle et les couverts ne
soient pas insérés les uns dans les autres, ou ne
se chevauchent.
– Assurez-vous que les couverts et la vaisselle ne re-
couvrent pas d'autres ustensiles.
– Vérifiez que les verres ne se touchent pas pour évi-
ter qu'ils ne se brisent.
– Placez les petites pièces dans le panier à couverts.
• La vaisselle en plastique et les poêles en matériau antiadhésif tendent à retenir les gouttes d'eau. Ces articles ne seront pas séchés aussi bien que les articles
en porcelaine et en acier.
• Placez les articles légers (bols,...) dans le panier supérieur. Disposez-les de façon à ce qu'ils ne puissent se retourner.
Attention Assurez-vous que la vaisselle et les
couverts n'entravent pas la rotation du bras
d'aspersion avant de lancer un programme de lavage.
Avertissement Fermez toujours la porte après
avoir chargé ou déchargé l'appareil. Une porte
ouverte est source de danger.
1
2
Placez les plats de service et les grands couvercles le long du bord du
panier inférieur.
25
Page 26

3
Abaissez les rangées d'ergots du panier inférieur
pour pouvoir charger les
grands plats, casseroles,
poêles et saladiers.
1 2
Utilisez le séparateur à couverts. Si la taille et la
forme des couverts ne le permettent pas, retirez le
séparateur.
Réglage de la hauteur du panier supérieur
Si vous placez des plats de grande dimension dans le
panier inférieur, verrouillez d'abord le panier supérieur
dans sa position la plus haute.
Hauteur maximale de la vaisselle dans
le panier supéri-
eur
Position haute 20 cm 31 cm
Position basse 24 cm 27 cm
Pour régler en hauteur le panier supérieur, procédez comme suit :
1. Tirez le panier jusqu'à la butée.
2. Soulevez délicatement les deux côtés jusqu'à ce
que le mécanisme s'enclenche et que le panier soit
stable.
1
le panier infé-
rieur.
1
Placez les ustensiles
dans l'appareil de façon à
ce que l’eau puisse accéder à toutes les surfaces.
Les assiettes ne doivent pas être placées dans les
trois premières sections situées à l'avant du pa-
nier. Vérifiez que les assiettes sont inclinées vers l'avant.
26
2
Pour les articles de plus
grande dimension, rabattez les supports pour tasses vers le haut.
Pour régler le panier supérieur vers le bas, procédez
comme suit :
1. Tirez le panier jusqu'à la butée.
2. Soulevez délicatement les deux côtés.
3. Tenez le mécanisme et laissez-le retomber lentement.
Attention
• Ne soulevez ou n'abaissez jamais le panier
d'un seul côté uniquement.
• Si le panier est en position haute, ne placez pas de
tasses sur les supports pour tasses.
Page 27

Utilisation du produit de lavage
Utilisez uniquement des produits de lavage (pou-
dre, liquide ou en pastilles) spécialement conçus
pour une utilisation au lave-vaisselle.
Veuillez respecter les indications du fabricant figurant
sur l'emballage :
• Le dosage recommandé par le fabricant.
• Les consignes de stockage.
En utilisant la quantité de produit de lavage stric-
tement nécessaire, vous contribuerez à la protection de l'environnement.
5
Le produit de lavage se dissout avec une rapidité
qui diffère selon la marque. Certaines pastilles ne
donnent pas le meilleur résultat possible avec des programmes de lavage courts. Utilisez des programmes de
lavage longs lorsque vous utilisez les pastilles afin d'éliminer complètement le détergent.
6
1
3
Versez le produit de lavage dans le distributeur
( A).
2
4
Si vous sélectionnez un
programme de lavage
avec prélavage, versez
une dose supplémentaire
dans le compartiment ( B).
Fonction "Tout en 1"
La fonction "Tout en 1" vous permet d'utiliser des produits de lavage combinés en pastille.
Ces produits combinent les fonctions de produit de lavage, de produit de rinçage et de sel régénérant. Ils peuvent également contenir d'autres substances.
Vérifiez que ces produits sont appropriés au degré de
dureté de l'eau d'alimentation. Consultez les consignes
du fabricant.
Dès que la fonction "Tout en 1" est sélectionnée, elle restera également activée pour les programmes de lavage
suivants.
27
Page 28

Lorsque cette fonction "Tout en 1" est sélectionnée, l'alimentation en liquide de rinçage et en sel à partir des réservoirs respectifs est automatiquement désactivée. Les
voyants respectifs du sel et du liquide de rinçage sont
également désactivés.
L'utilisation de la fonction "Tout en 1" peut entraîner
une modification de la durée du cycle.
Activez ou désactivez la fonction "Tout en 1" avant
le départ du programme de lavage.
Dès que le cycle a démarré, la fonction "Tout en 1" ne
peut plus être modifiée. Si vous souhaitez exclure cette
fonction, il vous faudra d'abord annuler le réglage du
programme de lavage, désactivez la fonction "Tout en
1". Dans ce cas, vous devrez régler à nouveau le programme de lavage.
Pour activer la fonction "Tout en 1" :
• Maintenez appuyées les deux touches de la fonction
"Tout en 1" (touches de fonction D et E). Le voyant
de la fonction "Tout en 1" s'allume.
Pour désactiver la fonction "Tout en 1" :
• Maintenez enfoncées les deux touches Tout en 1 (tou-
ches de fonction D et E). Le voyant de la fonction
"Tout en 1" s'éteint.
Procédez de la manière suivante si les résultats de
séchage ne sont pas satisfaisants :
1. Remplissez le distributeur de liquide de rinçage.
2. Activez le distributeur de liquide de rinçage.
3. Réglez le dosage du liquide de rinçage sur 2.
• L'activation/la désactivation du distributeur de liqui-
de de rinçage est possible uniquement si la fonction
"Tout en 1" est activée.
Pour activer ou désactiver le distributeur de liquide de
rinçage :
1. Mettez l'appareil en fonctionnement.
2. L'appareil doit se trouver en mode programmation.
3. Appuyez et maintenez appuyées les touches B et C.
– Les voyants des touches de fonction A, B et C
clignotent.
4. Relâchez les touches de fonction B et C.
5. Appuyez sur la touche de fonction B.
– Les voyants des touches de fonction A et C s'étei-
gnent.
– Le voyant de la touche de fonction B clignote.
– L'affichage numérique indique le réglage.
Distributeur de liquide de
rinçage désactivé
Distributeur de liquide de
rinçage activé
6. Appuyez à nouveau sur la touche de fonction B.
– Le nouveau réglage apparaît sur l'affichage nu-
mérique.
7. Mettez l'appareil à l'arrêt pour mémoriser l'opération.
Si vous souhaitez réutiliser des produits de lavage
traditionnels :
1. Désactivez la fonction "Tout en 1".
2. Remplissez le réservoir à sel et le distributeur de liquide de rinçage.
3. Réglez la position maximale du degré de dureté de
l'eau
4. Faites un lavage sans vaisselle.
5. Réglez ensuite le degré de dureté de l'eau en fonction de la dureté de l'eau de votre région.
6. Réglez le dosage du liquide de rinçage.
Sélection et départ d'un programme de lavage
Sélectionnez le programme de lavage en laissant
la porte légèrement ouverte. Le programme démarre uniquement après la fermeture de la porte. Vous pouvez effectuer toutes les modifications souhaitées jusqu'à
ce moment-là.
Procédez comme suit pour sélectionner et lancer un programme de lavage.
1. Mettez l'appareil en fonctionnement.
28
2. Assurez-vous que l'appareil est en mode programmation.
3. Appuyez sur la touche du programme correspondant. Reportez-vous au chapitre "Programmes de lavage".
– Le voyant du programme s'allume.
– Les voyants des autres programmes s'éteignent.
– La durée du programme de lavage clignote sur
l'affichage numérique.
Page 29

– Le voyant correspondant au programme en
cours s'allume.
4. Fermez la porte.
– Le programme de lavage démarre automatique-
ment.
– Le voyant correspondant au programme en
cours reste allumé.
Une fois le programme de lavage lancé, vous ne
pouvez plus le modifier. Vous devez pour cela an-
nuler le programme.
Vous pouvez également sélectionner le program-
me de lavage et le départ différé lorsque la porte
est fermée. N'oubliez pas dans ce cas que, lorsque vous
appuyez sur la touche d'un programme, vous disposez
de 3 secondes seulement pour sélectionner un autre programme ou un départ différé. Au bout de ces 3 secondes, le programme sélectionné démarre automatiquement.
Avertissement Annulez ou interrompez un
programme de lavage uniquement si cela est
absolument nécessaire.
Attention Ouvrez la porte avec précaution. Une
vapeur chaude peut s'échapper de l'appareil.
Annuler un programme de lavage
1. Appuyez sur les touches de fonction B et C et main-
tenez-les appuyées jusqu’à ce que
– Tous les voyants du programme s'allument.
– Le voyant correspondant au programme en
cours s'éteint.
2. Relâchez les touches de fonction B et C pour annu-
ler le programme de lavage.
À ce stade, vous pouvez procéder comme suit :
1. Mettez l'appareil à l'arrêt.
2. Sélectionnez un autre programme de lavage.
Vérifiez qu'il y a du produit de lavage dans le distributeur correspondant si vous souhaitez sélectionner un
nouveau programme de lavage.
Interruption d'un programme
Ouvrez la porte.
• Le programme s'arrête.
Fermez la porte.
• Le programme reprend à partir du moment de l'inter-
ruption.
Réglage et démarrage d'un programme de lavage
avec départ différé
1. Appuyez sur la touche Marche/Arrêt.
2. Sélectionnez un programme de lavage.
3. Appuyez sur la touche Départ différé jusqu'à ce que
le délai prévu avant le départ du programme clignote sur l'affichage.
4. Fermez la porte.
– Le chiffre s'allume sur l'affichage de manière fixe.
– Le voyant correspondant au programme en
cours s'éteint.
– Le décompte du départ différé démarre automati-
quement.
– Le décompte s'effectue d'heure en heure.
– Lorsque le décompte est terminé, le programme
de lavage démarre automatiquement.
– Le voyant correspondant au programme en
cours s'allume.
L'ouverture de la porte interrompt le décompte.
Lorsque vous refermez la porte, le décompte re-
prend là où il a été interrompu.
Annulation du départ différé :
1. Appuyez et maintenez appuyées les touches B et C
jusqu'à ce que :
– Tous les voyants du programme s'allument.
L'annulation d'un départ différé implique également
l'annulation du programme de lavage.
2. Sélectionnez un autre programme de lavage.
Fin du programme de lavage
• L'appareil se met à l'arrêt automatiquement.
• L’affichage indique 0.
• Le voyant de fin du programme s'allume.
• Le voyant correspondant au programme en cours
s'éteint.
1. Mettez l'appareil à l'arrêt.
2. Ouvrez la porte.
3. Pour améliorer le processus de séchage, laissez la
porte du lave-vaisselle entrouverte et attendez quelques minutes avant de décharger la vaisselle.
Attendez que la vaisselle refroidisse avant de la retirer
du lave-vaisselle. La vaisselle encore chaude est sensible aux chocs.
29
Page 30

Déchargement du lave-vaisselle
• Déchargez d'abord le panier inférieur, puis le panier
supérieur.
• Les côtés et la porte de l'appareil peuvent être mouillés. L'acier inox refroidit plus rapidement que la vaisselle.
Mode Veille
Si vous ne mettez pas l'appareil à l'arrêt à la fin du programme de lavage, il passera automatiquement en mo-
Entretien et nettoyage
Avertissement Mettez l'appareil à l'arrêt avant de
procéder au nettoyage des filtres.
Nettoyage des filtres
Important N'utilisez pas l'appareil sans les filtres.
Contrôlez que les filtres sont correctement installés. Si
les filtres ne sont pas correctement installés, les
performances de lavage peuvent être compromises et
l'appareil pourrait être endommagé.
de Veille. Le mode Veille fait diminuer la consommation
d'énergie.
Trois minutes après la fin du programme, tous les voyants s'éteignent et une barre horizontale apparaît sur l'affichage numérique.
Appuyez sur une des touches (à l'exception de la touche
Marche/Arrêt) pour retourner au mode Fin de programme.
3
Pour retirer les filtres B
et C, tournez la poignée
d'environ ¼ de tour dans
le sens contraire des aiguilles d’une montre.
4
Retirez le filtre plat A du
fond de l'appareil.
30
1
2
Nettoyez soigneusement
les filtres A, B et C sous
l’eau courante.
5
Réinstallez le filtre plat A
au fond de l'appareil. Veillez à ce qu'il soit bien installé sous les deux rails
D.
Important Ne retirez pas les bras d'aspersion.
Si les orifices des bras d'aspersion sont bouchés, élimi-
nez les résidus de salissure à l'aide d'un cure-dent.
6
Installez le système de filtre. Pour verrouiller le système de filtre, tournez la
poignée dans le sens des
aiguilles d’une montre jusqu’à ce qu’elle se verrouille.
Page 31

Nettoyage extérieur
Nettoyez les surfaces externes de l'appareil, de même
que le bandeau de commande, à l'aide d'un chiffon
doux humide. Utilisez uniquement des produits nettoyants neutres. N'utilisez aucun produit abrasif, éponges à
récurer ou solvants (acétone, trichloroéthylène etc.)
Précautions en cas de gel
Attention N'installez pas l'appareil dans une pièce
où la température descend au-dessous de 0 °C.
En cas d'anomalie de fonctionnement
Le fabricant n'est pas responsable des dommages
encourus à cause du gel.
Si cela est impossible, videz l'appareil et fermez la porte. Débranchez le tuyau d'arrivée d'eau et videz-la.
L'appareil ne démarre pas ou se met à l'arrêt en cours
de programme.
Certaines anomalies de fonctionnement peuvent dépendre d'opérations d'entretien non correctes ou d'oubli et
peuvent être résolues à l'aide des indications fournies
dans le tableau, sans faire appel au Service après-vente.
Si l'anomalie persiste, contactez le Service après-vente.
Code d'erreur et anomalie de fonctionne-
ment
•
l'affichage numérique indique
Le lave-vaisselle n'est pas approvisionné
en eau
•
l'affichage numérique indique
Le lave-vaisselle ne vidange pas
•
l'affichage numérique indique
Le système de sécurité anti-débordement
s'est déclenché
• Le robinet d'arrivée d'eau est obstrué ou incrusté de tartre.
Nettoyez le robinet d'arrivée d'eau.
• Le robinet d'arrivée d'eau est fermé.
Ouvrez le robinet d'arrivée d'eau.
• Le filtre situé dans le tuyau d'arrivée d'eau est bouché.
Nettoyez le filtre.
• Le tuyau d'arrivée d'eau n'a pas été installé correctement. Le tuyau
est plié ou écrasé.
Vérifiez le raccordement.
• Le robinet de l'évier est bouché.
Nettoyez le robinet de l'évier.
• Le tuyau de vidange n'a pas été installé correctement. Le tuyau est
plié ou écrasé.
Vérifiez le raccordement.
• Fermez le robinet d'arrivée d'eau et contactez le Service Après-vente.
Attention Mettez à l'arrêt l'appareil avant
d'effectuer les contrôles que nous vous suggérons
ci-après.
Cause possible et solution
31
Page 32

Code d'erreur et anomalie de fonctionne-
ment
Le programme ne démarre pas • La porte de l'appareil n'est pas fermée.
Fermez la porte.
• La prise du câble d'alimentation électrique de l'appareil n'est pas
branchée.
Insérez la fiche dans la prise secteur.
• Le fusible a grillé dans la boîte à fusibles.
Remplacez le fusible.
• La fonction Départ différé est sélectionnée.
Annulez le Départ différé pour démarrer le programme immédiatement.
Cause possible et solution
Après avoir effectué ces contrôles, mettez l'appareil en
fonctionnement. Le programme reprend là où il a été interrompu. Si l'anomalie se reproduit, contactez le Service Après-vente.
Si l'affichage indique un code d'erreur, non décrit dans
le tableau, contactez le Service Après-vente.
Les informations suivantes sont nécessaires pour une aide rapide et adaptée :
• Modèle (Mod.)
Les résultats de lavage ne sont pas satisfaisants.
La vaisselle n’est pas propre. • Vous n'avez pas sélectionné le programme approprié pour ce type de vais-
selle et de salissure.
• Les paniers sont mal chargés et l’eau n’atteint pas toutes les surfaces.
• La rotation des bras d'aspersion est entravée par de la vaisselle mal rangée.
• Les filtres sont encrassés ou mal installés.
• Vous avez utilisé trop peu de produit de lavage ou avez oublié d'approvisionner le distributeur de produit de lavage.
Des dépôts de tartre sont présents sur la vaisselle.
La vaisselle est mouillée et terne. • Vous n'avez pas utilisé de liquide de rinçage.
Les verres et la vaisselle présentent des rayures, des taches blanches ou un film bleuâtre.
Des gouttes d'eau ont séché sur
les verres et la vaisselle.
• Le réservoir de sel régénérant est vide.
• Le niveau de l'adoucisseur d'eau est mal réglé.
• Le bouchon du réservoir de sel régénérant n'a pas été vissé correctement.
• Le distributeur de liquide de rinçage est vide.
• Réduisez le dosage du liquide de rinçage.
• Augmentez le dosage du liquide de rinçage.
• Il se peut que le produit de lavage soit en cause.
• Référence produit (PNC)
• Numéro de série (S.N.)
Vous trouverez ces informations sur la plaque signalétique située sur l'appareil.
Inscrivez les informations ici :
Description du modèle : ..........
Référence du produit : ..........
Numéro de série : ..........
32
Page 33

Caractéristiques techniques
Dimensions Largeur (cm) 60
Hauteur (cm) 85
Profondeur (cm) 61
Branchement électrique - Tension -
Puissance totale - Fusible
Pression de l'eau d'alimentation Minimale 0,5 bars (0,05 MPa)
Maximale 8 bars (0,8 MPa)
Capacité Couverts 12
Les informations concernant le branchement électrique figurent sur la plaque signalétique apposée sur le bord intérieur de la porte du lave-vaisselle.
En matière de protection de l'environnement
Le symbole sur le produit ou son emballage
indique que ce produit ne peut être traité comme déchet
ménager. Il doit être remis au point de collecte dédié à
cet effet (collecte et recyclage du matériel électrique et
électronique).
En procédant à la mise au rebut de l'appareil dans les
règles de l’art, nous préservons l'environnement et
notre sécurité, s’assurant ainsi que les déchets seront
traités dans des conditions optimum.
Pour obtenir plus de détails sur le recyclage de ce
produit, veuillez prendre contact avec les services de
votre commune ou le magasin où vous avez effectué
l'achat.
Tous les matériaux d'emballage sont écologiques et recyclables. Les composants en plastique sont identifia-
Installation
Avertissement Avant toute intervention sur le lavevaisselle, il est nécessaire de débrancher l'appareil.
Encastrement sous un comptoir
Placez l'appareil à proximité d'un robinet d'arrivée d'eau
et d'une vidange. Enlevez le dessus de l'appareil pour
encastrer celui-ci sous un évier ou un plan de travail de
cuisine. Assurez-vous que les dimensions correspondent à celles du lave-vaisselle.
bles grâce aux sigles >PE<, >PS<, etc. Veuillez jeter les
matériaux d'emballage dans le conteneur approprié du
centre de collecte des déchets de votre commune.
Avertissement Le fabricant décline toute
responsabilité en cas de non-respect des
précautions de sécurité mentionnées dans ce chapitre.
• Retirez la fiche de la prise secteur.
• Coupez le câble d'alimentation et la prise et mettezles au rebut.
• Éliminez le dispositif de bloquage de porte. Ceci
pour empêcher que des enfants ne restent enfermés
à l'intérieur de l'appareil et ne mettent leur vie en danger.
1 2
33
Page 34

3
max 85 cm
min 40 cm
max 400 cm
4
Raccordement à l'arrivée d'eau
Installez le plan de travail sur l'appareil si vous souhaitez l'utiliser de manière indépendante.
Le socle d'un lave-vaisselle indépendant n'est pas réglable.
Mise à niveau de l'appareil
Assurez-vous que l'appareil est à niveau pour que la porte se ferme correctement. Si l'appareil n'est pas à niveau, la porte ne se fermera pas correctement. Dans ce
cas, vissez ou dévissez les pieds de l'appareil jusqu'à
ce qu'il soit à niveau.
Tuyau d'arrivée d'eau
Branchez l'appareil à une arrivée d'eau chaude (max.
60°) ou d'eau froide.
Si l'eau chaude est produite à partir de sources énergétiques alternatives plus respectueuses de l'environnement (par ex. panneaux solaires ou photovoltaïques et
énergie éolienne), utilisez un raccordement à l'eau chaude pour réduire la consommation énergétique.
Raccordez le tuyau d'alimentation à un robinet d'eau à
filetage pour tuyau 3/4".
Attention N'utilisez pas des tuyaux provenant
d'anciens appareils.
La pression de l'eau doit se situer dans les limites indiquées (reportez-vous au chapitre "Caractéristiques techniques"). Renseignez-vous auprès de la Compagnie locale de distribution des eaux pour connaître la pression
d'alimentation moyenne de votre région.
Veillez à ce que le tuyau d'arrivée d'eau ne soit pas enroulé, écrasé ou enchevêtré.
Orientez le tuyau d'arrivée d'eau vers la gauche ou la
droite, selon vos besoins. Fixez correctement le contreécrou pour éviter toute fuite d'eau.
Attention Ne raccordez pas l'appareil au moyen
de tuyaux neufs ou de tuyaux ayant peu servi.
Faites s'écouler l'eau pendant quelques minutes avant
de brancher le tuyau d'arrivée d'eau.
Tuyau de vidange
1
Raccordez le tuyau de vidange au robinet de sortie de l'évier.
3 4
Le diamètre intérieur ne doit pas être inférieur au diamètre du tuyau d'évacuation.
Lorsque vous raccordez le tuyau de vidange à un embout du siphon sous l'évier, n'oubliez pas d'enlever toute la membrane en plastique (A). Si vous oubliez d'enlever toute la membrane, les particules d'aliments risquent de s'accumuler avec le temps et de boucher l'embout du tuyau de vidange du lave-vaisselle.
Attention Vérifiez l'étanchéité des raccords.
2
34
Page 35

Branchement électrique
Avertissement Le fabricant ne peut être tenu
responsable en cas de non-respect de ces
mesures de sécurité.
Mettez l'appareil à la terre conformément aux instructions.
Assurez-vous que la tension nominale et le type
d'alimentation indiqués sur la plaque signalétique
correspondent à ceux de l'alimentation locale.
Utilisez toujours une prise à l'épreuve des chocs.
N'utilisez pas des multiprises, des adaptateurs ou des
rallonges. Ils présentent un risque d'incendie.
Ne remplacez pas le câble secteur vous-même.
Contactez le service après-vente de votre magasin
vendeur.
Assurez-vous que la prise est accessible après
l'installation.
Ne tirez pas sur le câble secteur pour débrancher
l'appareil. Tirez toujours sur la prise.
35
Page 36

Índice de materias
Información sobre seguridad _ _ _ _ _ _ _ _ _ _ _ 36
Panel de mandos _ _ _ _ _ _ _ _ _ _ _ _ _ _ _ _ 37
Programas de lavado _ _ _ _ _ _ _ _ _ _ _ _ _ _ 39
Uso del aparato _ _ _ _ _ _ _ _ _ _ _ _ _ _ _ _ _ 40
Ajuste del descalcificador de agua _ _ _ _ _ _ _ _ 40
Uso de sal para lavavajillas _ _ _ _ _ _ _ _ _ _ _ _ 41
Uso de abrillantador _ _ _ _ _ _ _ _ _ _ _ _ _ _ _ 42
Carga de cubiertos y vajilla _ _ _ _ _ _ _ _ _ _ _ _ 42
Uso de detergente _ _ _ _ _ _ _ _ _ _ _ _ _ _ _ _ 44
Información sobre seguridad
Por su seguridad y para garantizar el funciona-
miento correcto del aparato, antes de instalarlo y
utilizarlo por primera vez lea atentamente este manual.
Conserve siempre estas instrucciones con el aparato,
aunque lo cambie de lugar o lo venda. Los usuarios deben conocer a la perfección el funcionamiento y las características de seguridad del aparato.
Uso correcto
• Este aparato se ha diseñado exclusivamente para uso
doméstico.
• Utilice el aparato exclusivamente para el lavado de
utensilios del hogar adecuados para lavavajillas.
• No introduzca disolventes en el aparato. Riesgo de ex-
plosión.
• Los cuchillos y otros objetos con puntas afiladas de-
ben colocarse en el cesto para cubiertos con la punta
hacia abajo. Si no lo hace así, colóquelos en posición horizontal en el cesto superior.
• Utilice exclusivamente productos de marca (detergen-
te, sal y abrillantador) adecuados para lavavajillas.
• Si abre la puerta con el aparato en marcha, puede sa-
lir vapor caliente. Riesgo de quemaduras de piel.
• No retire platos del lavavajillas antes de que finalice
el programa de lavado.
• Cuando el programa de lavado haya concluido, de-
senchufe el cable de la toma de pared y cierre el grifo.
• Este aparato sólo debe ser reparado por un técnico
del servicio oficial. Utilice sólo recambios originales.
• Para evitar lesiones personales y daños al aparato,
no intente repararlo por sus medios. Póngase siempre en contacto con el Centro de Servicio técnico.
Función Multitab _ _ _ _ _ _ _ _ _ _ _ _ _ _ _ _ 44
Selección e inicio de un programa de lavado _ _ _ 45
Mantenimiento y limpieza _ _ _ _ _ _ _ _ _ _ _ _ 47
Qué hacer si… _ _ _ _ _ _ _ _ _ _ _ _ _ _ _ _ _ 47
Datos técnicos _ _ _ _ _ _ _ _ _ _ _ _ _ _ _ _ _ _ 49
Aspectos medioambientales _ _ _ _ _ _ _ _ _ _ _ 49
Instalación _ _ _ _ _ _ _ _ _ _ _ _ _ _ _ _ _ _ _ 50
Conexión de agua _ _ _ _ _ _ _ _ _ _ _ _ _ _ _ _ 50
Conexión eléctrica _ _ _ _ _ _ _ _ _ _ _ _ _ _ _ _ 51
Salvo modificaciones
Instrucciones generales de seguridad
• Las personas (incluidos niños) con discapacidad física, sensorial o mental, o con experiencia y conocimiento insuficientes, no deben utilizar el electrodoméstico. Sólo podrán utilizarlo bajo la supervisión o
instrucción de la persona responsable de su seguridad.
• Siga las instrucciones de seguridad respecto al detergente para lavavajillas suministradas por el fabricante para evitar quemaduras en ojos, boca y garganta.
• No beba el agua del lavavajillas. Podría haber restos
de detergente en el aparato.
• Cierre siempre la puerta del aparato cuando no lo utilice, para evitar que las personas sufran lesiones o
tropiecen con la puerta abierta.
• No se siente ni se ponga de pie sobre la puerta abierta.
Seguridad de los niños
• Este aparato sólo puede ser utilizado por adultos. Es
necesario supervisar a los niños para evitar que jueguen con el aparato.
• Mantenga todos los materiales de embalaje alejados
de los niños. Existe riesgo de asfixia.
• Mantenga los detergentes en un lugar seguro. No permita que los niños toquen los detergentes.
• Mantenga a los niños alejados del aparato cuando la
puerta esté abierta.
Instalación
• Compruebe que el aparato no ha sufrido daños en el
transporte. No conecte el aparato si está dañado. Si
es necesario, contacte al proveedor.
36
Page 37

• Retire todo el material de embalaje antes del primer
uso.
• La instalación eléctrica de este aparato debe estar a
cargo de un profesional cualificado y competente.
• La instalación de fontanería de este aparato debe estar a cargo de un profesional cualificado y competente.
• No altere las especificaciones ni modifique este producto. Existe el riesgo de lesiones personales y de
daños para el aparato.
• No utilice el aparato:
– si el cable de alimentación o los tubos de agua es-
tán dañados,
Panel de mandos
– si el panel de mandos, la superficie superior o la
zona inferior (base) presentan daños, de modo
que pudiera accederse fácilmente al interior del
aparato.
Póngase en contacto con el Centro de Servicio técnico.
• No perfore los lados del aparato para no producir daños en los componentes hidráulicos y eléctricos.
Advertencia Siga atentamente las instrucciones
sobre las conexiones eléctricas y de agua.
54
13
1 Tecla de encendido/apagado
2 Teclas de selección de programa
3 Tecla de inicio diferido
4 Indicadores luminosos
5 Visor digital
6 Teclas de función
2
ABCDE
6
37
Page 38

Indicadores luminosos
Programa en marcha – se enciende al seleccionar un programa de lavado.
– permanece encendido durante todo el programa de lavado.
– se apaga al finalizar el programa de lavado.
Fin de programa Se enciende cuando finaliza el programa de lavado.
Función Pastilla múltiple Se enciende cuando se activa la función Multitab. Consulte el capítulo 'Función
Multitab'.
Sal
1)
Se enciende cuando es necesario llenar el distribuidor de sal. Consulte el capítulo
'Utilización de sal para lavavajillas'.
Después de llenar el recipiente, el indicador de sal permanece encendido durante
algunas horas. Esto no tiene efecto negativo alguno en el funcionamiento del aparato.
Abrillantador
1)
Se enciende cuando es necesario llenar el distribuidor de abrillantador. Consulte
el capítulo 'Utilización del abrillantador'.
1) Si los recipientes de sal o abrillantador están vacíos, los indicadores correspondientes no se encienden durante el
funcionamiento del programa de lavado.
Teclas de selección de programa
Son las teclas que permiten seleccionar el programa de
lavado. Pulse una tecla de programa, se enciende el indicador correspondiente. Consulte el capítulo "Programas de lavado" para ver más detalles.
Tecla de inicio diferido
Utilice la tecla de inicio diferido para retrasar el inicio
del programa de lavado entre 1 y 19 horas. Consulte el
capítulo 'Ajuste e inicio de un programa de lavado'.
Visor digital
El visor muestra:
• el nivel de descalcificador seleccionado.
• Tiempo restante hasta la finalización del programa.
• Activación/desactivación del distribuidor de abrillan-
tador (sólo con la función Multitab activa).
• Finalización del programa de lavado. El visor digital
muestra cero.
• Número de horas de inicio diferido.
• Códigos de error.
Teclas de función
Utilice las teclas de función para las siguientes operaciones:
• Para ajustar el descalcificador de agua. Consulte el
capítulo 'Ajuste del descalcificador de agua'.
• Cancelar un programa de lavado o un inicio diferido
en marcha. Consulte el capítulo 'Ajuste e inicio de
un programa de lavado'.
• Para activar/desactivar la función Multitab. Consulte
el capítulo 'Función Multitab'.
• Para activar/desactivar el distribuidor de abrillantador cuando la función Multitab está activa. Consulte
el capítulo 'Función Multitab'.
Modo de ajuste
El aparato debe estar en modo de ajuste para las
siguientes operaciones:
• Para ajustar un programa de lavado.
• Para ajustar el nivel del descalcificador de agua.
• Para activar/desactivar el distribuidor del abrillantador.
Pulse la tecla de encendido/apagado. El aparato está en
modo de ajuste cuando:
– Se encienden todos los indicadores de programa.
Pulse la tecla de encendido/apagado. El aparato no está
en modo de ajuste cuando:
– Sólo se enciende un indicador de programa.
– Se selecciona un programa de lavado. Cancele el pro-
grama si desea volver al modo de ajuste. Consulte el
capítulo 'Ajuste e inicio de un programa de lavado'.
38
Page 39

Programas de lavado
Programas de lavado
Programa Grado de sucie-
dad
Gran suciedad Vajilla, cubertería, ca-
1)
Cualquiera Vajilla, cubertería, ca-
2)
Suciedad normal o ligera
3)
Suciedad normal Vajilla y cubertería Prelavado
Cualquiera Carga parcial (se
1) Durante el programa de lavado "Auto" es posible determinar la suciedad de la vajilla por la turbiedad del agua. La duración del
programa y el consumo pueden variar. Esto depende de la cantidad de carga del aparato y del grado de suciedad de la vajilla.
La temperatura del agua se ajusta automáticamente durante el lavado principal.
2) Este es el programa diario perfecto para cargas incompletas. Adecuado para las necesidades de una familia de cuatro personas
que sólo necesita cargar la vajilla y la cubertería del desayuno y la comida.
3) Programa de prueba para organismos de control. Para obtener información sobre los datos de prueba, consulte el folleto aparte
suministrado.
Tipo de carga Descripción del programa
Prelavado
cerolas y sartenes
Lavado principal de hasta 70 °C
2 aclarados intermedios
Aclarado final
Secado
Prelavado
cerolas y sartenes
Lavado principal de hasta 45 °C o 70 °C
1 o 2 aclarados intermedios
Aclarado final
Secado
Vajilla y cubertería Lavado principal de hasta 65 °C
Aclarado final
Lavado principal de hasta 50 °C
1 aclarado intermedio
Aclarado final
Secado
1 aclarado en frío (para evitar que se peguen los
completará a lo largo
del día).
restos de comida).
Este programa no necesita detergente.
Valores de consumo
Programa
1) La pantalla digital muestra la duración del programa.
Duración (en minutos)
- 1,6-1,8 22-24
- 1,1-1,8 12-23
- 0,9 9
- 1,0-1,1 13-15
- 0,1 4
1)
Consumo de energía (en
Agua (en litros)
kWh)
39
Page 40

La presión y temperatura del agua, así como de
las variaciones del suministro de energía y la can-
tidad de platos, pueden cambiar estos valores.
Uso del aparato
Consulte las instrucciones siguientes para cada paso
del procedimiento:
1. Haga una prueba para verificar si el nivel de descalcificador de agua es correcto para la dureza del
agua de su zona. Si es necesario, ajuste el descalcificador de agua.
2. Llene el recipiente de sal con sal para lavavajillas.
3. Cargue el distribuidor de abrillantador.
4. Cargue los cubiertos y la vajilla en el lavavajillas.
5. Seleccione el programa de lavado adecuado para el
tipo y suciedad de la carga.
6. Llene el distribuidor de detergente con la cantidad
de detergente adecuada.
7. Inicie el programa de lavado.
Si utiliza pastillas de detergente combinadas ('3
en 1', '4 en 1', '5 en 1', etc.), consulte el capítulo
'Función Multitab'.
Ajuste del descalcificador de agua
El descalcificador elimina los minerales y sales del suministro de agua. Los minerales y sales pueden tener
un efecto negativo en el funcionamiento del aparato.
La dureza del agua se mide en escalas equivalentes:
• Grados alemanes (dH°).
• Grados franceses (°TH).
Dureza del agua Ajuste de dureza del agua
°dH °TH mmol/l Clarke manualmente electrónicamente
51 - 70 91 - 125 9,1 - 12,5 64 - 88 2 10
43 - 50 76 - 90 7,6 - 9,0 53 - 63 2 9
37 - 42 65 - 75 6,5 - 7,5 46 - 52 2 8
29 - 36 51 - 64 5,1 - 6,4 36 - 45 2 7
23 - 28 40 - 50 4,0 - 5,0 28 - 35 2 6
19 - 22 33 - 39 3,3 - 3,9 23 - 27 2 5
15 - 18 26 - 32 2,6 - 3,2 18 - 22 1 4
11 - 14 19 - 25 1,9 - 2,5 13 - 17 1 3
4 - 10 7 - 18 0,7 - 1,8 5 - 12 1 2
< 4 < 7 < 0,7 < 5
1) No es necesario utilizar sal.
• mmol/l (milimol por litro, unidad internacional de la
dureza del agua).
•Clarke.
Ajuste el descalcificador de agua según la dureza del
agua de su zona. Si es necesario, solicite información a
la compañía local de suministro de agua.
1)
1
1)
1
El descalcificador de agua se debe ajustar manual
o electrónicamente.
Ajuste manual
El aparato se ajusta en fábrica en la posición 2.
40
Page 41

1
2
Sitúe el conmutador en la
posición 1 o 2.
Ajuste electrónico
El descalcificador de agua se ajusta en fábrica en
el nivel 5.
1. Encienda el aparato.
Uso de sal para lavavajillas
Precaución Utilice exclusivamente sal específica
para lavavajillas. El uso de cualquier otro tipo de
sal no específico para lavavajillas puede causar daños
al descalcificador de agua.
2. Compruebe que el aparato está en modo de ajuste.
3. Mantenga pulsadas a la vez las teclas de función B
y C hasta que las teclas de función A, B y C empiecen a parpadear.
4. Suelte las teclas de función B y C.
5. Pulse la tecla de función A.
– Se apagan los indicadores de las teclas de fun-
ción B y C.
– El indicador luminoso de la tecla de función A
sigue parpadeando.
– La pantalla digital muestra el nivel actual.
Ejemplo: el visor digital muestra
6. Pulse la tecla de función A una vez para aumentar
un incremento el nivel de descalcificador de agua.
7. Pulse la tecla de encendido/apagado para guardar
la operación.
= nivel 5.
1
3
Vierta un (1) litro de agua
en el depósito de sal (sólo antes de cargar la sal
por primera vez).
5
No se preocupe si el agua rebosa al cargar el depósito con sal; es normal que ocurra.
2
4
Asegúrese de que no haya ningún grano de sal fue-
ra del compartimento de la sal. La sal que permanece en la cuba durante un tiempo la acaba perforando.
Se recomienda iniciar un programa de lavado justo después de llenar el depósito de sal. Esto evita la corrosión
por la sal derramada.
Ajuste electrónicamente el nivel del descalcificador en
1; el indicador luminoso de la sal se apaga.
6
41
Page 42

Uso de abrillantador
Precaución Utilice exclusivamente abrillantador
de marca para lavavajillas.
Siga estos pasos para llenar el distribuidor de abrillantador:
1 2
A
X
M
+
1
4
2
3
3
4
Carga de cubiertos y vajilla
Precaución No llene el distribuidor de abrillan-
tador con otro producto (por ej., agente limpiador de lavavajillas o detergente líquido). Podría dañar
el aparato.
Ajuste de la cantidad de abrillantador
El selector de abrillantador se ajusta en fábrica
A
X
M
+
1
4
2
3
en la posición 3.
Para aumentar o reducir
la dosificación, consulte
"Qué puede hacer..."
Consejos útiles
Precaución Utilice el aparato exclusivamente con
utensilios del hogar adecuados para lavavajillas.
No utilice el aparato para lavar objetos que absorban
agua (esponjas, paños de limpieza, etc.).
• Antes de cargar cubiertos y vajilla, siga estos pasos:
– Elimine todos los restos de comida y desechos.
– Ablande los restos de comida pegada de las cazue-
las.
• Al cargar cubiertos y vajilla, siga estos pasos:
– Coloque los objetos huecos (tazas, copas y cazue-
las) boca abajo.
– Cerciórese de que el agua no se acumule en el re-
cipiente ni en los fondos.
– Compruebe que cubiertos y platos no quedan co-
locados unos dentro de otros.
42
– Compruebe que cubiertos y platos no quedan so-
lapados entre sí.
– Cerciórese de que las copas no se toquen entre sí.
– Coloque los objetos pequeños en el cesto de los
cubiertos.
• Los objetos de plástico y las sartenes con revestimiento antiadherente tienden a retener gotas de
agua. Los objetos de plástico no se secan tan bien
como los de porcelana y de acero.
• Coloque los objetos ligeros en el cesto supe rior. Compruebe que los objetos no se mueven.
Precaución Antes de iniciar un programa de
lavado, compruebe que los brazos aspersores
giran sin obstrucción.
Advertencia Después de cargar o descargar el
aparato, cierre siempre la puerta. La puerta abierta
puede ser peligrosa.
Page 43

1
Ordene los platos y las tapas grandes en el borde
del cesto inferior.
3
Pliegue los dos soportes
abatibles del cesto inferior para colocar ollas,
sartenes y ensaladeras.
2
1
Ordene los objetos de modo que el agua llegue a todas las superficies.
No coloque platos en las tres primeras secciones
de la parte frontal del cesto superior. Compruebe
que los platos se inclinan hacia delante.
2
Para los objetos más altos, pliegue los estantes
para tazas hacia arriba.
Ajuste de la altura del cesto superior
Si coloca platos grandes en el cesto inferior, desplace
primero el cesto superior a la posición más alta.
Altura máxima de los platos
cesto superior Cesto inferior
Posición más
alta
Posición más
baja
Siga estos pasos para subir el cesto superior:
1. Tire del cesto hasta el tope.
2. Levante con cuidado los dos lados hasta que el me-
canismo se encaje y el cesto quede estable.
20 cm 31 cm
24 cm 27 cm
1 2
Utilice la rejilla para cubiertos. Si el tamaño de
los cubiertos no permite utilizar la rejilla, retírela.
1
Siga estos pasos para bajar el cesto superior:
1. Tire del cesto hasta el tope.
2. Levante con cuidado los dos lados.
43
Page 44

3. Sujete el mecanismo y deje que descienda lentamente.
Precaución
• No suba ni baje el cesto sólo de un lado.
Uso de detergente
Utilice sólo detergentes adecuados (en polvo, lí-
quido o en pastillas) para lavavajillas.
Siga las instrucciones del fabricante indicadas en el envase:
• Dosis recomendada por el fabricante.
• Consejos sobre almacenamiento.
No utilice más de la cantidad correcta de detergen-
te para proteger el medio ambiente.
• Si el cesto está en la posición más alta, no coloque
tazas en los estantes para tazas.
5
Las distintas marcas de detergente no tardan lo
mismo en disolverse. Algunas pastillas de detergente no ofrecen los mejores resultados de limpieza en
los programas de lavado breves. Si utiliza pastillas de
detergente, emplee programas de lavado prolongados
para eliminar por completo los restos de detergente.
6
1
3
Llene el distribuidor de
detergente ( A).
2
4
Si utiliza un programa de
lavado con fase de prelavado, coloque más detergente en el compartimento de detergente para prelavado ( B).
Función Multitab
La función Multitab es para pastillas de detergente combinadas.
44
Son pastillas que contienen productos para lavavajillas,
como detergente, abrillantador y sal. Algunos tipos de
pastillas pueden contener también otros productos.
Page 45

Compruebe si las pastillas de detergente son adecuadas para la dureza del agua de su zona. Consulte las instrucciones del fabricante.
La función Multitab seleccionada permanecerá activa
hasta que la desactive expresamente.
La función desactiva automáticamente la entrada de abrillantador y sal. Los indicadores de abrillantador y sal
no se encienden.
La función Multitab puede aumentar la duración del programa de lavado.
Active o desactive la función Multitab antes de po-
ner en marcha un programa de lavado.
No es posible activar o desactivar la función Multitab
con un programa de lavado en marcha. Cancele el programa de lavado y vuelva a ajustarlo.
Para activar la función Multitab:
• Mantenga pulsadas las dos teclas Multitab (teclas de
función D y E). Se enciende el indicador luminoso
de la función.
Para desactivar la función Multitab:
• Mantenga pulsadas las dos teclas Multitab (teclas de
función D y E). Se apaga el indicador luminoso de la
función.
Si el resultado del secado no es satisfactorio, siga
estos pasos:
1. Cargue el distribuidor de abrillantador.
2. Active el distribuidor de abrillantador.
3. Ajuste la dosis de abrillantador en la posición 2.
• Sólo es posible activar o desactivar el distribuidor de
abrillantador cuando la función Multitab está activa.
Para activar o desactivar el distribuidor de abrillantador:
1. Encienda el aparato.
2. Compruebe que el aparato está en modo de ajuste.
3. Mantenga pulsadas las teclas de función B y C.
– Los indicadores de las teclas de función A, B y
C empiezan a parpadear.
4. Suelte las teclas de función B y C.
5. Pulse la tecla de función B.
– Se apagan los indicadores de las teclas de fun-
ción A y C.
– El indicador luminoso de la tecla de función B
sigue parpadeando.
– La pantalla digital muestra el ajuste.
Distribuidor de abrillantador desactivado
Distribuidor de abrillantador activado
6. Vuelva a pulsar la tecla de función B.
– El visor digital mostrará el nuevo ajuste.
7. Apague el aparato para guardar la operación.
Para volver a utilizar detergente normal:
1. Desactive la función Multitab.
2. Llene de nuevo el depósito de sal y el distribuidor
de abrillantador.
3. Ajuste el valor de dureza del agua al máximo.
4. Ejecute un programa de lavado con el aparato vacío.
5. Ajuste el descalcificador de agua de acuerdo con la
de su zona.
6. Ajuste la dosis de abrillantador.
Selección e inicio de un programa de lavado
Seleccione el programa de lavado con la puerta en-
treabierta. El programa de lavado sólo se inicia
tras cerrar la puerta. Hasta ese momento es posible modificar los ajustes realizados.
Siga estos pasos para ajustar e iniciar un programa de
lavado:
1. Encienda el aparato.
2. Compruebe que el aparato está en modo de ajuste.
3. Pulse una de las teclas de programa. Consulte el ca-
pítulo 'Programas de lavado'.
– Se enciende el indicador de programa.
– Se apagan los demás indicadores de programa.
– El visor digital muestra la duración del programa
de forma parpadeante.
– Se enciende el indicador del programa en marcha.
4. Cierre la puerta.
– El programa de lavado se inicia de manera auto-
mática.
– El indicador del programa en marcha permanece
encendido.
45
Page 46

Una vez iniciado, no es posible cambiar el programa de lavado en marcha. Cancele el programa de
lavado.
También puede seleccionar el programa de lavado
y el inicio diferido con la puerta cerrada. Cuando
pulsa una tecla de programa, solo dispone de 3 segundos para seleccionar un programa de lavado diferente o
un inicio diferido. Después de estos 3 segundos, el programa seleccionado se inicia automáticamente.
Advertencia Interrumpa o cancele un programa
de lavado sólo si es necesario.
Precaución Abra la puerta con cuidado. Puede
salir vapor caliente.
Cancelación de un programa de lavado
1. Mantenga pulsadas las teclas de función B y C has-
ta que:
– Se enciendan todos los indicadores de programa,
– Se apague el indicador del programa en marcha.
2. Suelte las teclas de función B y C para cancelar el
programa de lavado.
En ese momento puede realizar estas operaciones:
1. Apagar el aparato.
2. Seleccionar otro programa de lavado .
Llenar el distribuidor de detergente antes de ajustar un
nuevo programa de lavado.
Interrupción de un programa de lavado
Abra la puerta.
• El programa se detiene.
Cierre la puerta.
• El programa continúa a partir del punto en que se in-
terrumpió.
Ajuste e inicio de un programa de lavado con
inicio diferido
1. Pulse la tecla de encendido/apagado.
2. Ajuste un programa de lavado.
3. Pulse la tecla de inicio diferido hasta que el visor
muestre el tiempo que desea retrasar el programa
de lavado.
4. Cierre la puerta.
– El número del visor se enciende y no parpadea.
– Se apague el indicador del programa en marcha.
– Comienza la cuenta atrás para el inicio diferido.
– La cuenta atrás del inicio diferido retrocede en
tramos de 1 hora.
– El programa de lavado se pone en marcha de for-
ma automática cuando termina la cuenta atrás.
– Se enciende el indicador del programa en mar-
cha.
No abra la puerta del lavavajillas durante la cuenta
atrás para que no se interrumpa el proceso. Al cerrar la puerta de nuevo, la cuenta atrás continuará desde
el punto en que se haya interrumpido.
Cancelación del inicio diferido:
1. Mantenga pulsadas las teclas de función B y C has-
ta que:
– Se enciendan todos los indicadores de programa.
Si cancela un inicio diferido, también se cancelará
el programa de lavado.
2. Seleccionar otro programa de lavado.
Finalización del programa de lavado
• El aparato se detiene automáticamente.
• El visor muestra 0.
• Se enciende el indicador de fin de programa.
• Se apague el indicador del programa en marcha.
1. Apagar el aparato.
2. Abra la puerta.
3. Para mejorar los resultados del secado, mantenga
la puerta entreabierta durante unos minutos antes
de retirar la vajilla.
Espere a que la vajilla se enfríe antes de retirarla del aparato. Los platos calientes se dañan con facilidad.
Extracción de la carga
• Retire primero los objetos del cesto inferior y a conti-
nuación los del superior.
• Puede haber restos de agua en los lados y en la puer-
ta del aparato. El acero inoxidable se enfría con mayor rapidez que los platos.
Modo en espera
Si al finalizar el programa de lavado no se apaga de inmediato, el aparato pasa automáticamente al modo en
espera. El modo de espera reduce el consumo de energía.
Tres minutos después de finalizar el programa, se apagan todos los indicadores luminosos y el visor digital
muestra una barra horizontal.
46
Page 47

Pulse una de las teclas (salvo la de encendido/apagado) para volver al modo de fin de programa.
Mantenimiento y limpieza
Advertencia Apague el aparato antes de limpiar
los filtros.
Limpieza de los filtros
Importante No utilice el aparato sin filtros. Compruebe
que los filtros están bien colocados. Su instalación
incorrecta provocará resultados de lavado
insatisfactorios y dañará el aparato.
5
Coloque el filtro plano A
en la base del aparato.
Instale el filtro plano debajo de las dos guías D.
6
Coloque el sistema de filtro en su posición. Para
bloquear el sistema de filtro, gire el asa a la derecha hasta que encaje en
su posición.
1 2
Limpie a fondo los filtros
A, B y C bajo el agua corriente.
3
Para extraer los filtros B
y C, gire el asa aproximadamente 1/4 a la izquierda.
4
Extraiga el filtro plano A
de la base del aparato.
Qué hacer si…
El aparato no se pone en marcha o se detiene durante el
funcionamiento.
Si existe un desperfecto, intente corregirlo. Si no logra
solucionar el problema, póngase en contacto con el Centro de Servicio técnico.
Importante No extraiga los brazos aspersores.
Si los orificios de los brazos aspersores están obstrui-
dos, elimine la suciedad con un palillo.
Limpieza del exterior
Limpie las superficies externas de la máquina y del panel de mandos con un paño suave y húmedo. Utilice sólo detergentes neutros. No utilice productos abrasivos,
estropajos ni disolventes (acetona, tricloroetileno, etc.).
Precauciones contra la congelación
Precaución No instale el aparato en un lugar
donde la temperatura descienda por debajo de 0
°C. El fabricante no se hace responsable de daños
producidos por el hielo.
Si no es posible evitarlo, vacíe el aparato y cierre la puerta. Desconecte el tubo de entrada de agua y haga salir
el agua que pueda contener.
Precaución Apague el aparato antes de llevar a
cabo las acciones de corrección recomendadas.
47
Page 48

Código de error y fallo de funcionamiento Causa y soluciones posibles
•
La pantalla digital muestra
El lavavajillas no carga agua
•
La pantalla digital muestra
El lavavajillas no desagua
•
La pantalla digital muestra
El dispositivo antiinundación está funcionando
El programa no se inicia • La puerta del aparato no está cerrada.
• El grifo está bloqueado o tiene incrustaciones calcáreas.
Limpie el grifo.
• El grifo está cerrado.
Abra el grifo.
• El filtro del tubo de entrada de agua está obstruido.
Limpie el filtro.
• La conexión del tubo de entrada de agua no es correcta. El tubo
podría estar doblado o aplastado.
Compruebe que la conexión es correcta.
• El sumidero está obstruido.
Limpie el sumidero.
• La conexión del tubo de desagüe no es correcta. El tubo podría estar doblado o aplastado.
Compruebe que la conexión es correcta.
• Cierre el grifo y póngase en contacto con el Centro de servicio técnico.
Cierre la puerta.
• El enchufe no está bien conectado.
Conecte bien el enchufe.
• Se ha quemado el fusible de la caja de fusibles de la vivienda.
Cambie el fusible.
• El inicio diferido está activado.
Cancele el inicio diferido para que el programa comience de inmediato.
Después de la comprobación, encienda el aparato. El
programa continúa a partir del punto en que se interrumpió. Si reaparece el fallo de funcionamiento, llame al
Centro de servicio técnico.
Si la pantalla muestra un código de avería que no figura
en la tabla, póngase en contacto con el Centro de servicio técnico.
Estos datos son necesarios para poder ayudarle de manera rápida y correcta:
• Modelo (Mod.)
48
• Número del producto (PNC)
• Número de serie (S.N.)
Para conocer esos datos, consulte la placa de datos técnicos.
Escriba aquí los datos necesarios:
Descripción del modelo : ..........
Número del producto : ..........
Número de serie : ..........
Page 49

Los resultados de limpieza no son satisfactorios
La vajilla no está limpia • El programa de lavado seleccionado no es adecuado para el tipo y la sucie-
dad de la carga.
• Los cestos se han cargado de manera incorrecta y el agua no llega a todas
las superficies.
• Los brazos aspersores no giran libremente por la disposición incorrecta de
la carga.
• Los filtros están sucios o instalados de forma incorrecta.
• Se ha utilizado poco o ningún detergente.
Depósitos de cal en la vajilla • El recipiente de sal está vacío.
• Se ha ajustado un nivel de descalcificador incorrecto.
• La tapa del recipiente de sal no está bien cerrada.
La vajilla aparece mojada y deslucida
Se ven rayas, puntos blancos o
una película azulada en copas y
platos
Señales de gotas de agua secas
en copas y platos
• No se utilizó abrillantador.
• El distribuidor de abrillantador está vacío.
• Reduzca la cantidad de abrillantador.
• Aumente la dosis de abrillantador.
• La causa podría ser el detergente.
Datos técnicos
Medidas Ancho (cm) 60
Alto (cm) 85
Fondo (cm) 61
Conexión eléctrica - Voltaje - Poten-
cia total - Fusible
Presión del suministro de agua Mínima 0,5 bares (0,05 MPa)
Máxima 8 bares (0,8 MPa)
Capacidad Cubiertos 12
Los datos de la conexión eléctrica se indican en la placa de datos técnicos,
situada en el borde interno de la puerta del lavavajillas.
Aspectos medioambientales
El símbolo que aparece en el aparato o en su
embalaje, indica que este producto no se puede tratar
como un residuo normal del hogar. Se deberá entregar,
sin coste para el poseedor, bien al distribuidor, en el
acto de la compra de un nuevo producto similar al que
se deshecha, bien a un punto municipal de recolección
selectiva de equipos eléctricos y electrónicos para su
reciclaje. Al asegurarse de que este producto se
desecha correctamente, usted ayudará a evitar posibles
consecuencias negativas para el medio ambiente y la
salud pública, lo cual podría ocurrir si este producto no
se gestionara de forma adecuada. Para obtener
información más detallada sobre el reciclaje de este
49
Page 50

producto, póngase en contacto con el Ayuntamiento de
su Municipio, ó con la tienda donde lo compró.
Los materiales de embalaje son ecológicos y se pueden
reciclar. Los componentes plásticos se identifican con
marcas, por ej. >PE<, >PS<, etc. Deseche los materiales
de embalaje en los contenedores de uso público destinados a tal efecto.
Instalación
Advertencia Asegúrese de que el enchufe está
desconectado de la toma de red durante la
instalación.
Instalación debajo de una encimera
Coloque el aparato junto a un grifo y un desagüe. Retire
la placa superior del aparato para instalarlo debajo de
un fregadero o de una encimera de cocina. Compruebe
que las medidas de la cavidad coinciden con las del aparato.
1
2
Advertencia Para desechar el aparato, siga este
procedimiento:
• Extraiga el enchufe de la toma de red.
• Corte el cable y el enchufe y deséchelos.
• Deseche el cierre de la puerta. Esto evitará que los
niños al jugar queden atrapados dentro y pongan su
vida en peligro.
3
Instale la tapa superior del aparato si desea utilizarlo como unidad independiente.
El zocalo de los aparatos de instalación independiente
no es ajustable.
4
Ajuste del nivel del aparato
Compruebe que el aparato está nivelado para poder cerrar y ajustar la puerta de manera correcta. Si el nivel
del aparato es correcto, la puerta no rozará los laterales
del mueble. Si la puerta no cierra bien, afloje o apriete
las patas ajustables hasta obtener la nivelación correcta.
Conexión de agua
Tubo de entrada de agua
Conecte el aparato a una toma de agua caliente (máx.
60°) o fría.
Si el agua caliente procede de fuentes de energía alternativas más ecológicas (por ej., placas solares, fotovoltaicas o de energía eólica), utilice un suministro de
agua caliente que reduzca el consumo de energía.
Conecte el tubo de entrada a un grifo con rosca externa
de 3/4 pulgadas.
Precaución No utilice tubos de conexión de
aparatos antiguos.
La presión del agua debe estar dentro de los límites (consulte el capítulo 'Datos técnicos'). Solicite a la empresa
50
de suministro de agua información sobre la presión media de la red en su zona.
Compruebe que el tubo de entrada de agua no presenta
dobleces y que no está aplastado ni enredado.
Gire el tubo de entrada hacia la izquierda o la derecha,
según convenga a la instalación. Instale la contratuerca
correctamente para evitar fugas de agua.
Precaución No conecte el aparato a tuberías
nuevas o que no se hayan utilizado durante
mucho tiempo. Deje correr el agua durante unos
minutos y, a continuación, conecte el tubo de agua.
Page 51

Tubo de desagüe
max 85 cm
min 40 cm
max 400 cm
El diámetro interno no debe ser inferior al del tubo.
Si conecta el tubo de desagüe al sumidero, bajo el fregadero, retire la membrana de plástico (A). Si no retira
la membrana, los residuos de comida pueden bloquear
la salida del tubo de desagüe.
Precaución Cerciórese de que las conexiones de
agua están bien ajustadas para evitar fugas.
1
2
Conecte el tubo de desagüe al sumidero.
3
4
Conexión eléctrica
Advertencia El fabricante no se hace responsable
de las consecuencias de no seguir las
instrucciones de seguridad.
Conecte el aparato a tierra según las instrucciones de
seguridad.
Compruebe que el voltaje nominal y el tipo de
suministro eléctrico que figuran en la placa de datos
técnicos coinciden con los del suministro local.
Utilice siempre una toma con aislamiento de conexión a
tierra correctamente instalada.
No utilice enchufes o conectores múltiples ni cables
prolongadores. Existe riesgo de incendio.
No cambie personalmente el cable de alimentación.
Póngase en contacto con el Centro de servicio técnico.
Compruebe que el enchufe es accesible después de la
instalación.
No tire del cable de alimentación para desconectar el
aparato. Tire siempre del enchufe.
51
Page 52

www.zanussi.com/shop
156953230-A-302010
 Loading...