

Page 1

REFRIGERADOR
FRIDGE
KOELKAST
ZBA 7330
LIBRO DE INSTRUCCIONES
INSTRUCTION BOOKLET
GEBRUIKSAANWIJZINGEN
2223 363-04
Page 2

2
ADVERTENCIAS Y CONSEJOS IMPORTANTES
Es muy importante conservar este libro de instrucciones junto al aparato por si fuera necesario
consultarlo. Si el aparato se vendiese o transfiriese a otra persona, acuérdese de entregarlo junto con
él para que el nuevo propietario conozca el funcionamiento de la máquina y sus advertencias.
En caso de que este aparato, dotado de cierre magnético, sustituya uno con cierre automático,
aconsejamos que la cerradura de este último quede inservible, antes de deshacerse de él. Así se
evitará que los niños, jugando, puedan quedarse encerrados dentro, con grave peligro de sus vidas.
Estas advertencias han sido redactadas para su seguridad y para la seguridad de los demás. Le
rogamos, por lo tanto, leerlas atentamente antes de instalar y utilizar el aparato.
Seguridad
•Desenchufar el aparato antes de efectuar
cualquier operación de limpieza y mantenimiento
(como la sustitución de la bombilla de iluminación
en los aparatos que la poseen).
•Este aparato no está pensado para ser utilizado
por personas (incluidos los niños) con
capacidades físicas, sensoriales o mentales
reducidas, o que no tengan experiencia y
conocimiento, a menos que una persona
responsable de su seguridad les supervise o les
ofrezca instrucción en el uso del aparato.
Los niños deben ser supervisados para
asegurarse de que no jueguen con el aparato.
• Es peligroso modificar o intentar modificar las
características de este aparato.
• Quitar siempre el enchufe de la toma de corriente
antes de efectuar cualquier operación de limpieza o
manutención (como la substitución de la bombilla en
aquellos aparatos que la tienen).
•No consumir nunca los cubitos de hielo recién
sacados del congelador ya que podrían provocar
quemaduras.
•Estos aparatos son pesados.Tener cuidado en
los desplazamientos.
•Este aparato contiene hidrocarburos en el circuito
refrigerante; por lo tanto el mantenimiento y la
recarga deben ser efetuados exclusivamente por
personal autorizado de la empresa.
•Este aparato no contiene en el circuito
refrigerante y en el aislamiento, gases
refrigerantes nocivos para el ozono. El
aparato no debe ser eliminado junto con los
deshechos urbanos y chatarras. Se debe
evitar el daño del circiuto refrigerante, sobre
todo en la parte posterior cerca del
intercambiador.
Las informaciones sobre los centros de
recepción son suministradas por las
autoridades municipales.
•Prestar la máxima atención durante las
operaciones de desplazamiento para no dañar
las partes del circuito refrigerante a fin de
evitar las posibles salidas de líquido.
•El aparato no debe ser colocado cerca de
termosifones o cocinas a gas.
•Evitar la exposición prolongada del aparato a
los rayos solares.
•La parte posterior del aparato debe recibir
una circulación de aire suficiente y se debe
evitar cualquier daño al circuito refrigerante.
•Solamente para los congeladores (excluidos
los empotrados): su mejor ubicación es el
sótano.
Asistencia
• Cualquier modificación que eventualmente fuese
necesaria a la instalación eléctrica doméstica
para poder instalar el aparato tiene que ser
realizada sólo por personal competente.
• Para eventuales intervenciones dirigirse a un
Centro de Asistencia Técnica autorizado y exigir
las piezas de repuesto originales.
• En caso de necesitar reparaciones no intentar
hacerlas personalmente. Las reparaciones
efectuadas por personas no competentes pueden
provocar daños. Ponerse en contacto con el
Centro de Asistencia más cercano y emplear sólo
repuestos originales.
Uso
• Los frigoríficos y/o congeladores domésticos
están destinados sólo a la conservación y/o
congelación de alimentos.
•Las mejores prestaciones se obtienen con
temperaturas ambiente comprendidas entre
+18°C y +43°C (Clase T); +18°C y +38°C (Clase
ST); +16°C y +32°C (Clase N); +10°C y +32°C
(Clase SN); la clase de pertenencia está indicada
en la placa matrícula situada en la cámara al lado
del cajón verduras.
Atención: en caso de temperaturas ambiente
diferentes de las indicadas para la clase climática
a la cual pertenece este producto, es preciso
observar las indicaciones siguientes: cuando la
temperatura ambiente desciende por debajo del
valor mínimo puede suceder que la temperatura
de conservación en el vano congelador no esté
garantizada; por lo tanto, se aconseja que se
consuman a lo más pronto los alimentos
presentes en su interior.
Page 3

3
INDICE
Advertencias y consejos importantes 2
Uso 4
Limpieza de las partes internas 4
El tablero de control 4
Arranque 4
Dispay 4
Funcionamiento 5
Activacíon de las funciones 5
Apagado 5
Regulacíon de la temperatura 5
Función Shopping 5
Refrigeracíon de alimentos y bebidas 5
Alarma acústica con puerta abieta 6
Rejillas movibles 6
Ubicación estantes de la contrapuerta 6
Consejos 7
Consejos para refrigeración 7
Manutención 7
Limpieza periódica 7
Te mp o r ad a s l a r ga s d e i n ac t i vi d a d 7
Lámpara de iluminación 7
Desescarche 8
Como actuar si el aparato no funciona 8
Datos técnicos 8
Instalación 9
Colocación 9
Retenes-Repisas 9
Conexión elétrica 9
Reversibilidad de la puerta 9
Instrucciones para la instalación 10
Protección del
ambiente
Este aparato no contiene en el circuito refrigerante y en el aislamiento, gases refrigerantes
nocivos para el ozono. El aparato no debe ser
eliminado junto con los deshechos urbanos y
chatarras. Se debe evitar el dano del circinto
refrigerante, sobre todo en la parte posterior
cerca del intercambiador. Las informaciones
sobre los centros de recepciõn son
suministradas por las autoridades municipales;
Los materiales usados en este aparato
marcados con el simbolo son reciclables.
Desguace de aparatos viejos
El símbolo en el producto o en su embalaje
indica que este producto no se puede tratar como
desperdicios normales del hogar. Este producto se
debe entregar al punto de recolección de equipos
eléctricos y electrónicos para reciclaje. Al asegurarse
de que este producto se deseche correctamente,
usted ayudará a evitar posibles consecuencias
negativas para el ambiente y la salud pública, lo cual
podría ocurrir si este producto no se manipula de
forma adecuada. Para obtener información más
detallada sobre el reciclaje de este producto, póngase
en contacto con la administración de su ciudad, con
su servicio de desechos del hogar o con la tienda
donde compró el producto.
•En todos los aparatos de refrigeración y congelación
exist en superficies que se cubren con escarcha.
Según el modelo, la escarcha puede ser eliminada
automáticamente (desescarche automático) o
manualmente. No intentar nunca quitar la escarcha
con un objeto puntiagudo ya que se podría dañar
irremediablemente el evaporador. Utilizar para ello
sólo el rascador de plástico que se suministra con el
aparato. Por el mismo motivo no despegar nunca las
cubetas del hielo con un cuchillo o cualquier otro
objeto puntiagudo.
•No colocar en el compartimiento de la baja
temperatura (congelador o conservador) bebidas
gaseosas que podrían explotar
Instalación
• El aparato se calienta considerablemente en la
proximidad del condensador y del compresor, por lo
tanto hay que verificar que el aire pueda circular
libremente alrededor del mismo. Una ventilación
insuficiente puede causar un mal funcionamiento y
daños al aparato. Seguir cuidadosamente las
instrucciones que se dan para la instalación.
• Una vez instalado el aparato verificar que no esté
apoyado sobre el cable de alimentación.
Importante: en caso de que el cable de
alimentación se dañe, deberá ser sustituido con
un cable especial. Ambos cables pueden ser
solicitados al fabricante o al Servicio de
asistencia.
• Si el aparato es transportado en forma horizontal
es posible que el aceite contenido en el
compresor pase al circuito refrigerante. Esperar
por lo menos dos horas antes de poner en
marcha el aparato para dar tiempo a que el
aceite regrese al compresor.
Page 4
4
Limpieza de las partes internas
Antes del empleo limpiar todas las partes internas
con agua tibia y jabón neutro, a fin de eliminar el
característico olor de nuevo y secarlas luego
cuidadosamente.
USO
El tablero de control
No emplear detergentes o polvos
abrasivos que podrían dañar las
superficies.
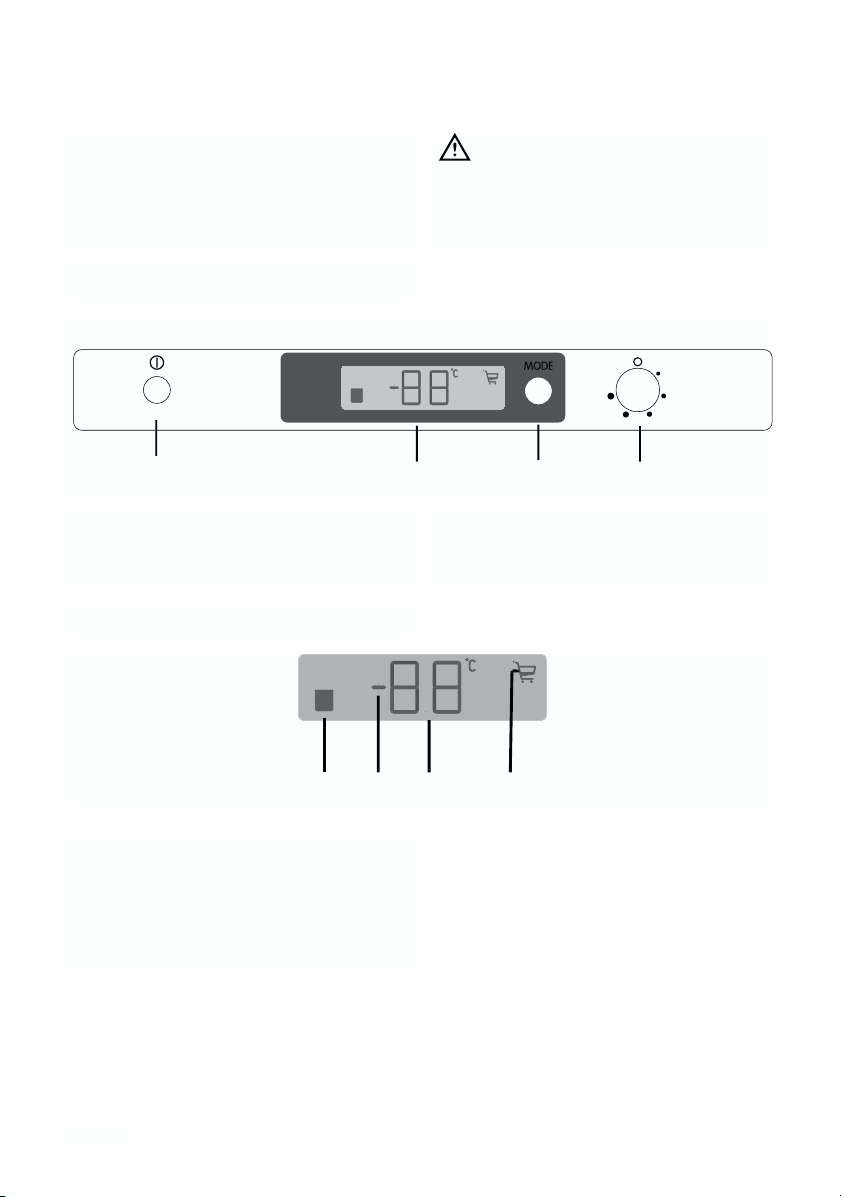
A - Tecla de encendido / apagado del aparato
B - Display de visualización de las temperaturas y
funciones
C - Tecla de activación de las funciones
D - Mando de regulación de la temperatura frigo
DISPLAY
1. Indicador de alarma puerta abierta
2. Indicador de temperatura positiva o negativa
3. Indicador de la temperatura
4. Si está encendido, indica que está activa la
función shopping
!
"
#
$
!
"
#
$
Page 5

5
Regulación de la temperatura
La temperatura se regula automaticámente y puede
ser aumentada (menos frío) girando el mando hacia
los ● o bien se puede disminuir (más frío) girándolo
hacia ● .De todos modos, la colocación del mando
se determina teniendo en cuenta que la temperatura
interna depende:
•de la temperatura ambiente;
•de la frecuencia de aperatura de la puerta;
•de la cantidad de alimentos conservados;
•de la colocación del aparato.
Se sugiere fijar el mando en la posición intermedia
para tener una temperatura interior de unos +5°C.
Importante:
En las posiciones de máximo frío, con
temperatura ambiente elevada, el
funcionamiento puede ser continuo, con
consiguiente formación de escarcha en la parte
posterior del compartimiento; en tal caso es
necesario girar el mando a una posición de
menor frío, a fin de consentir la eliminacíon
automática de la escarcha y, como
consecuencia, obtener un consumo menor de
energía eléctrica.
Uso del compartimento frigorífico
Funcionamiento
Después de haber introducido el enchufe en la toma
de corriente, si el display no se ilumina apretar la tecla
(A), encendido del aparato.
Una vez encendido el aparato, aparecerán las
siguientes indicaciones en el panel de mandos:
•El símbolo (2) será positivo para indicar que la
temperatura es positiva.
Colocando los mandos de regulación frigo (D) en una
posición intermedia, el aparato está preparado
para suministrar la siguiente temperatura:
unos +5°C en el frigorífico
Refrigeracíon de alimentos y bebidas
Para util izar de l a mejor manera el compartim iento
refrigerante, es necesario:
•no introducir comidas calientes o líquidos en en
evaporacíon;
•tapar o envolver los alimentos, especialmente si
son aromáticos;
•no colocar sobre las rejillas papeles, cartones o
plásticos que obstaculicen la circulacíon del aire.
Función Shopping
Si se debe introducir una gran cantidad de alimentos
calientes, por ejemplo después de haber hecho la
compra, se aconseja activar la función Shopping para
enfriarlo más rápidamente y para evitar que suba la
temperatura de los alimentos que ya están en el
frigorífico y/o en el congelador.
La función shopping se activa pulsando la tecla C (si
es necesario varias veces) hasta que aparezca el
icono correspondiente
La función shopping se apaga automáticamente
después de unas 6 horas.
Se puede desactivar la función en cualquier momento
pulsando la tecla C (véase párrafo "Activación de las
funciones").
Activación de las funciones
Cada vez que se pulsa la tecla C se activan en
sentido horario las siguientes informaciones:
Símbolo 4: la función shopping
Ningún símbolo: funcionamiento normal
Apagado
El apagado se obtiene manteniendo apretada la tecla
(A) durante más de 1 segundo. Después de esto, se
indicará una cuenta atrás de la temperatura de -3 -2 -
1.
Cuando se apaga el aparato se apaga también el
display (B).
Page 6
6
Ubicación estantes de la
contrapuerta
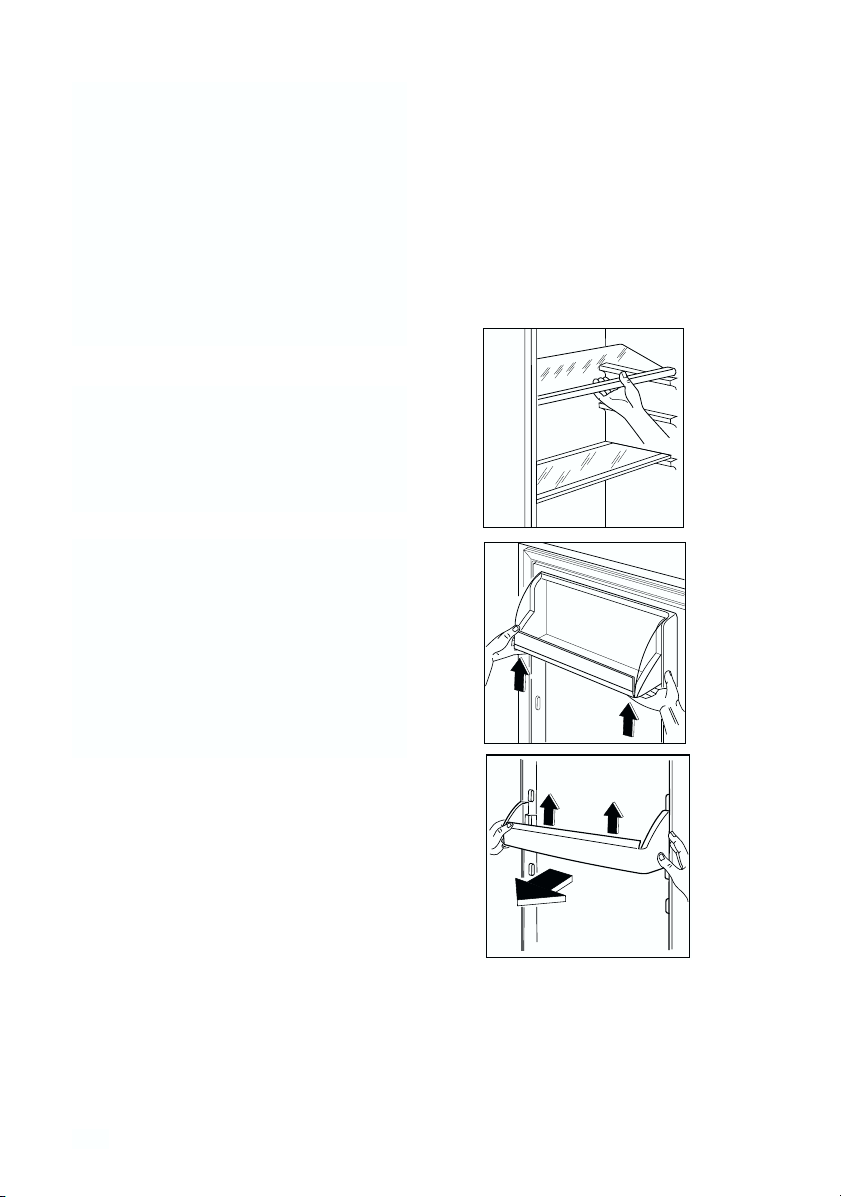
Para pode r colocar confeccio nes de var ios tamaño s
es posible colocar los estantes de la contrapuerta a
varias alturas.
La operación se efectúa de la siguiente manera:
Empujar gradualmente el estante en el sentido
indicado por las flechas hasta llegar a
desengancharlo, luego volverlo a montar en la
posición deseada.
Rejillas movibles
En las paredes del compartimento existen unas
guías que consienten poner las rejillas a distintas
alturas.
Alarma acústica con puerta abierta
Una alarma acústica les indica cuando la puerta se
ha quedado abierta durante 5 minutos.
La condición de alarma de puerta abierta se indica
con:
- parpadeo del símbolo (1);
- iluminación roja del display;
- sonido del timbre.
Para parar la alar ma acústi ca, apret ar la tecla (C ).
Cuando se restablecen las condiciones normales
(puerta cerrada):
- se apaga la señal acústica.
!""#
Page 7

7
CONSEJOS
Consejos para refrigeración
Para un c orrecto u so aconsejamos :
Carne: debe ser envuelta en saquitos de plástico y
colocada en el espacio situado sobre los cajones
verdura.
En esta posicíon la carne puede ser conservada
al máximo por 1 a 2 dias.
Alimentos cocinados , platos fríos, etc. tienen
que conservarse bien cubiertos y se pueden colocar
en cualquier bandeja del frigorífico.
Fruta y verdura: una vez lavada, ha de colocarse
en el cajón (cajones) inferior.
Mantequilla y queso: deben colocarse en los reci-
pientes adecuados o envueltos en hojas de aluminio
o politileno, a fin de evitar el contacto con el aire.
Leche embotellada: bien tapada, en la contropuerta.
Bananas, papas, cebollas y ajo, si no están
confeccionados, no se deben colocar en
frigorífico.
MANUTENCIÓN
Temporadas largas de inactividad
Durante los períodos en los cuales el aparato no
esté funcionando observar las siguientes
precauciones:
•desenchufarlo;
•sacar todos los alimentos;
•limpiar cuidadosamente el interior y todos los
accesorios.
•Dejar las puertas entornadas para facilitar la
circulación del aire, a fin de evitar la formación de
olores desagradables.
Desenchufar siempre el aparato antes de
proceder a cualquier operación de
limpieza.
Atención
Este aparato contiene hidrocarburos en el circuito
refrigerante; por lo tanto el mantenimiento y la
recarga deben ser efectuados exclusivamente por
personal autorizado por la empresa.
Limpieza periódica
Limpiar el interior con agua templada y bicarbonato
y las partes exteriores esmaltadas con cera a la
silicona; limpiar el condensador y el motocompresor
con un cepillo o un aspirador.
Esta operación mejorará el funcionamiento con el
consiguiente ahorro de energia.
Lámpara de iluminación
Para la s ustitució n even tual de la lám para oprim ir el
enganche posterior y al mismo tiempo sacar la tapa
en dirección de las flechas.
Atención:
Sustituir la lámpara por otra de igual potencia (la
potencia máxima está indicada en el difusor de luz).
Page 8

8
COMO ACTUAR SI EL APARATO NO FUNCIONA
Si el aparato presentase anomalías será oportuno
controlar:
•Que esté bien enchufado y que el interruptor de
la instalación eléctrica esté conectado.
•Que no haya un corte de energía eléctrica.
•Que el mando del termostato se encuentre en su
posición correcta.
•Si el compresor funciona sin interrupción,
verificar que el termostato no se encuentre en
una posición
•Además si el aparato hace demasiado ruido
verificar que los costados no estén en contacto
con muebles que pueden causar ruidos o
vibraciones y que la unidad refrigerante no vibre.
•Si se ven restos de agua en el fondo del
refrigerador comprobar que el orificio de
desagüe de la escarcha derretida no esté
obturado (ver cápitulo Desescarche).
Después de hacer las verificaciones anteriores, si la
anomalía persiste, llame al Centro de Asistencia
Té cn i c a m á s c e r ca n o.
Es importante en el momento de llamar
proporcionar la referencia del modelo y el
número de matrícula del aparato indicados en el
certificado de garantía o en la tarjeta matrícula.
Desescarche
La escarcha del evaporador del compartimento
refrigerante se elimina automáticamente a cada
interrupcion del motocompresor. El agua de la
escarcha derretida, mediante un canal adecuado, se
recoge en un pequeño depósito colocado en la
parte posterior sobre el motocompresor del aparato,
de donde evapora.
Se recomienda limpiar periódicamente el agujero
de desagüe del agua de desescarche, situado en
la parte central del canal en el compartimiento
refrigerante, utilizando el «limpiador» adecuado
que se encuentra en el agujero, para evitar que
el agua de desescarche caiga sobre los
alimentos.
Atención
Se recomienda no utilizar utensilios metálicos
para quitar la escarcha a fin de evitar graves
daños al aparato.
No usar dispositivo mecánico alguno u otro
medio artificial para acelerar el processo de
desescarche excepto los recomendados.
DATOS TÉCNICOS
330
0,482
176
Capacidad neta del frigorífico en litros
Consumo energético en kWh/día
Consumo energético en kWh/año
Los datos técnicos se indican en la placa-matrícula situada sobre el lado izquierdo interno del aparato.
!$"%
Page 9
9
Conexión eléctrica
Antes de enchufar el aparato, asegurarse de que la
tensión y la frecuencia indicadas en la tarjeta
matrícula, correspondan a las de la instalación
doméstica. Se admite una oscilación de 6% sobre la
tensión nominal.
Para el f uncionami ento a tension es distin tas, habrá
que utilizar un autotransformador de potencia
adecuada. Asegurarse de que la toma de corriente y
el enchufe sean compatibles entre sí sin tener que
interponer reducciones ladrones o adaptadores
varios. Si fuera necesario, cambiar la toma de la
instalación de la casa con una adapta.
Es indispensable conectar el aparato a una toma
de tierra eficaz.
INSTALACIÓN
Colocación
Situar el aparato lejos de fuentes de calor, como:
radiadores, estufas, exposición directa a los rayos
del sol, etc.
Se debe poder desenchufar el aparato; por lo tanto
una vez efectuada la instalación es necesario que el
enchufe no quede escondido
Para ello el enchu fe del cable de alimentación está
dotado de un adecuado contacto. Si la toma de
corriente de la instalación doméstica no estuviera
conectada a tierra, conectar el aparato a una
instalación de tierra, conforme a las leyes en vigor,
consultando para ello con un técnico especializado.
El fabricante declina toda responsabilidad en el
caso que esta norma no sea respetada.
Este aparato es conforme a las siguientes
Directivas Comunitarias:
- 87/308 CEE del 2/6/87 relativa a la supresión de
interferencias radio.
- 73/23 CEE 19/02/73 (Baja tensión) y
modificaciones sucesivas;
- 89/336 CEE 03/05/89 (Compatibilidad
electromagnética) y modificaciones sucesivas.
Reversibilidad de la puerta
Retenes-Repisas
Su aparato dispone de retenes-repisas que
permiten bloquear las repisas durante el transporte.
Para quit arlos actuar como sigue:
mover los retenes-repisas en la dirección de la
flecha, subir el vidrio por la parte trasera y
empujarlo hacia adelante hasta que queda libre,
seguidamente quitar los retenes.
El aparato se suministra con apertura de la
puerta hacia la derecha.
Para conseguir la apertura de la puerta en
el lado opuesto, efectúe las siguientes
operaciones antes de efectuar la
instalación
1. Destornillar el perno superior y quitar el
separador
2. Quitar la puerta.
3. Empleando una llave, desenrosque el perno
inferior y enrósquelo en el lado opuesto.
4. Vuelva a introducir la puerta, vuelva a colocar el
distanciador y vuelva a enroscar el perno
superior en el lado opuesto
.
!
#
"
Page 10

10
Instrucciones para la instalación
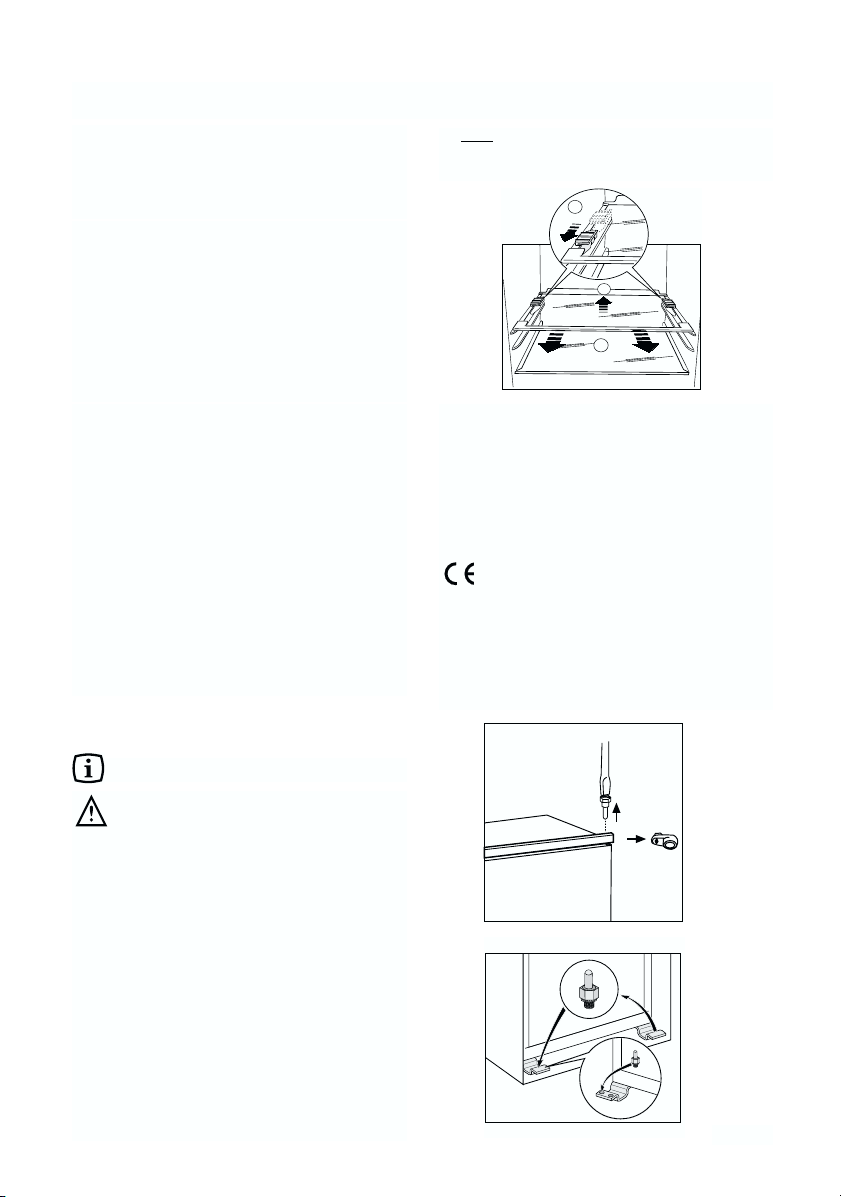
Dimensiones del hueco
Altura (1) 1780 mm
Profundidad (2) 550 mm
Anchura (3) 560 mm
Para una adecuada ventilació n seguir les
indicaciones de la Fig.
Atención: mantener las aperuras para la
ventilación libres de cualquier obstáculo.
Es necesario además que el hueco tenga un
conducto de ventilación con estas medidas:
profundidad 50 mm
ancho 540 mm
!%2$
3*/4)
("++
Ta la d r ar e l m u eb l e c o n u n ta l a dr o de p u nt a de Ø 2 , 5
(penetración máxima 10 mm);
Fijar la escuadra en el aparato.
Asegúrese de que haya una distancia de 44 mm
entre la parte inferior del mueble de cocina y el
borde del aparato. La tapa de la bisagra inferior,
incluida en la bolsa de accesorios, permite
garantizar la posición correcta del mueble de cocina
y el aparato. Asegúrese también de que éste no
aplaste el cable de alimentación.
!)1%
&'$(
)$*++
%$&
+,-.
/$$*0+
%&
#
"
/
+,-.
/
/$$*0+
!
E
Page 11
11
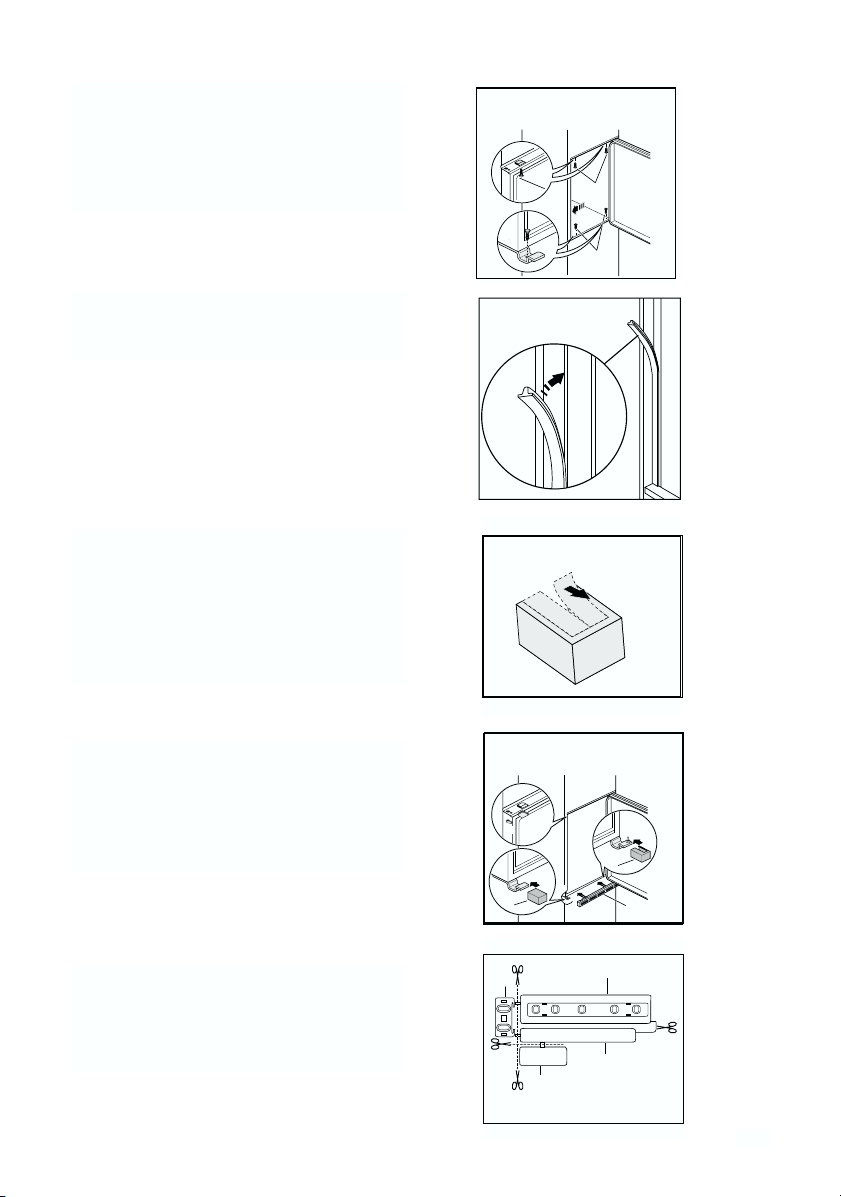
Colocar les tapas (C-D) sobre los extremos del perfil
y en los agujeros para la bisagra.
Colocar la parrilla de aireación (B) encajándola a
presión y engornar las tapas (E) en posición.
Colocar a presión el cubrejuntas entre el aparato y
el mueble.
Separar las piezas Ha, Hb, Hc, Hd según se indica
en la figura.
Fijar el aparato con los 4 tornillos en dotación.
To me l a c u b ie r t a d e pl á s ti c o ( E ) , u t i li z a da p ar a cu b r ir
la bisagra con el pasador de giro, y retire la pieza tal
y como se muestra en la imagen.
La parte interior de la tapa lleva una ranura que
facil ita la retirada del componente.
"Retire la pieza marcada con DX, si el pasador de
giro está insertado en la bisagra derecha; retire la
pieza SX en caso contrario".
I
I
!%/2
!#
&'/11
C
D
E
E
!%
B
!"
!$
Page 12

12
Terminada la operación de reversibilidad de la
puerta, controlar que la empaquetadura
magnética esté adherida al mueble. Si la
temperatura ambiente es fría (por ejemplo en
invierno), puede suceder que la empaquetadura
no adhiera perfectamente al mueble. En este
caso esperar que la empaquetadura se recobre
en forma natural o bien acelerar dicho proceso
calentando la parte interesada con un normal
secador de cabellos.
Abrir la puerta del aparato y la del mueble a 90°
aprox. Introducir la escuadrita (B) en la guía (A).
Mantener unidas la puerta del aparato y la del
mueble y marcar los agujeros según se indica en la
figura.
Quitar las escuadritas y hacer unos agujeros de 2
mm de Ø a 8 mm desde el borde exterior de la
puerta. Colocar otra vez la escuadrita sobre la guía
y fijarla con los tornillos presentes en el equipo
base.
Introducir la tapa (Hd), presionándola hasta oír el
resorte, en la guía (Hb)
En caso de que sea necesario alinear la puerta del
mueble, utilizar el juego de los agujeros de ojal.
Al término de las operaciones es preciso controlar
que la puerta del aparato esté cerrada
correctamente.
Introducir la tapa (Hc), presionándola hasta oír el
resorte, en la guía (Ha).
Apoyar la guía (Ha) sobre la parte interior de la
puerta del mueble se indica en la figura y marcar la
posición de los agujeros exteriores. Una vez que se
hayan hecho los agujeros, fijar la guía con los
tornillos presentes en el equipo base.
!"#$%&$''
%&'
/
(
+
+
&'""
&'(1%
!"#$%&$''
!$
!"
!#
)**
/
(
+
+
!"
&'(1#
&'(1%5(
'(
!#
!%
Page 13

13
WARNINGS
It is most important that this instruction book should be retained with the appliance for future
reference. Should the appliance be sold or transferred to another owner, or should you move house
and leave the appliance, always ensure that the book is supplied with the appliance in order that the
new owner can be acquainted with the functioning of the appliance and the relevant warnings.
If this appliance featuring magnetic door seals is to replace an older appliance having a spring lock
(latch) on the door or lid, be sure to make that spring lock unusable before you discard the old
appliance. This will prevent it from becoming a death-trap for a child.
These warnings are provided in the interest of safety. You must read them carefully before installing or
using the appliance.
General Safety
• This appliance is not intended for use by persons
(including children) with reduced physical,
sensory or mental capabilities, or lack of
exper ience and knowledge, unle ss they have
been given supervision or instruction concerning
use of the appliance by a person responsible for
their safety.
Children should be supervised to ensure that
they do not play with the appliance.
• It is dangerous to alter the specifications or
modify this product in any way.
• Before any cleaning or maintenance work is carried
out, be sure to switch off and unplug the appliance.
• This appliance is heavy. Care should be taken
when moving it
• Ice lollies can cause frost burns if consumed
straight from the appliance.
•Take utmost care when handling your
appliance so as not to cause any damages to
the cooling unit with consequent possible
fluid leakages.
•The appliance must not be located close to
radiators or gas cookers.
•Avoid prolonged exposure of the appliance to
direct sunlight.
•There must be adequate ventilation round the
back of the appliance and any damage to the
refrigerant circuit must be avoided.
•For freezers only (except built-in models):an
ideal location is the cellar or basement.
•Do not use other electrical appliances (such
as ice cream makers) inside of refrigerating
appliances.
Service/Repair
• Any electrical work required to install this
appliance should be carried out by a qualified
electrician or competent person
• This product should be serviced by an authorized
Service Centre, and only genuine spare parts
should be used.
• Under no circumstances should you attempt to
repair the appliance yourself. Repairs carried out
by inexperienced persons may cause injury or
more serious malfunctioning. Refer to your local
Service Centre, and always insist on genuine
spare parts.
•This appliance contains hydrocarbons in its
cooling unit; maintenance and recharging must
therefore only be carried out by authorized
technicians.
Use
•The domestic refrigerators and freezers are
designed to be used specifically for the storage
of edible foodstuffs only.
•Best performance is obtained with ambient
temperature between +18°C and +43°C (class T);
+18°C and +38°C (class ST); +16°C and +32°C
(class N); +10°C and +32°C (class SN).The
class of your appliance is shown on its rating
plate.
Warning: when t he ambien t temperature is not
included within the range indicated for the class
of this appliance, the following instructions must
be observed: when the ambient temperature
drops below the minimum level, the storage
temperature in the freezer compartment cannot
be guaranteed; therefore it is advisable to use the
food stored as soon as possible.
•Frozen food must not be re-frozen once it has
been thawed out.
•Manufacturers’storage recommendations should
be strictly adhered to. Refer to relevant
instructions.
•The inner lining of the appliance consists of
channels through which the refrigerant passes. If
these should be punctured this would damage the
appliance beyond repair and cause food loss. DO
NOT USE SHARP INSTRUMENTS to scrape off
frost or ice. Frost may be removed by using the
scraper provided. Under no circumstances should
solid ice be forced off the liner. Solid ice should be
allowed to thaw when defrosting the appliance.
Page 14

14
CONTENTS
Warnings 13
Use 15
Cleaning the interior 15
Control panel 15
Dispaly 15
Operation 16
Activation of function 16
Switching off 16
Te mp e r at u r e r e gu l a t io n 1 6
Shopping function 16
Fres h food refrigeration 16
Door open acoustic alarm 16
Movable shelves 17
Positioning the door s helve s 17
Hints 17
Hints for refrigeration 17
Maintenance 18
Periodi c cleaning 18
Periods of no oper atio n 18
Interior light 18
Defrosting 18
Customer service and spare parts 19
Technical inform ation 19
Installation 19
Location 19
Electrical connection 20
Shelf holders 20
Door Reversibility 20
Instruction for totally built-in appliances 21
Environment Protection
This appliance does not contain gasses which
could damage the ozone layer, in either its
refrigerant circuit or insulation materials.The
appliance shall not be discarded together with
the urban refuse and rubbish. Avoid damaging
the cooling unit, especially at the rear near the
heat exchanger. Information on your local
disposal sites may be obtained from municipal
authorities.The materials used on this appliance
marked by the symbol are recyclable.
Disposal of old Appliances
The symbol on the product or on its packaging
indicates that this product may not be treated as
household waste. Instead it shall be handed over to
the applicable collection point for the recycling of
electrical and electronic equipment. By ensuring this
product is disposed of correctly, you will help prevent
potential negative consequences for the
environment and human health, which could
otherwise be caused by inappropriate waste
handling of this product. For more detailed
information about recycling of this product, please
contact your local city office, your household waste
disposal service or the shop where you purchased
the product.
•Do not place carbonated or fizzy drinks in the
freezer as it creates pressure on the container,
which may cause it to explode, resulting in
damage to the appliance.
Installation
• During normal operation, the condenser and
compressor at the back of the appliance heat up
considerably. For safety reasons, minimum
ventilation must be as shown in the instructions.
Attention: keep ventilation openings clear of
obstruction.
• Care must be taken to ensure that the appliance
does not stand on the electrical supply cable.
Important: if the supply cord is damaged, it must
be replaced by a special cord or assembly available from the manufacturer or its ser vice agent.
• If the appliance is transported horizontally, it is
possible that the oil contained in the compressor
flows in the refrigerant circuit. It is advisable to
wait at least two hours before connecting the
appliance to allow the oil to flow back in the
compressor.
• There are working parts in this product which
heat up. Always ensure that there is adequate
ventilation as a failure to do this will result in
component failure and possible food loss. See
installation instructions.
• Parts which heat up should not be exposed.
Wherever possible the back of the product should
be against a wall.
Page 15

15
Cleaning the interior
Before using the appliance for the first time, wash
the interior and all internal accessories with lukewarm water and some neutral soap so as to remove
the typical smell of a brand-new product, then dry
thoroughly.
USE
Control panel
Do not use detergents or abrasive
powders, as these will damage the finish.
A - Applince button ON/OFF
B - Temperature and function indicator
C - Function button
D - Fridge Thermostat knob
DISPLAY
1. Door open alarm indicator
2. Positive or negative Temperature indicator
3. Temperature indicator
4. If on the shopping function is on
!
"
#
$
!
"
#
$
Page 16

Fresh food refrigeration
To o b t ai n t he b es t pe r fo r m a nc e :
•do not store warm food or evaporating liquids in
the refrigerator;
•do cover or wrap the food, particularly if it has a
strong flavour.
•Position food so that air can circulate freely round
it.
16
Temperature regulation
The temperature is automatically regulated and can
be increased to achieve a higher temperature
(warmer) by rotating the thermostat knob toward ●
settings or reduced (colder) rotating the knob
towards ● settings.
However, the exact setting should be chosen
keeping in mind that the temperature inside the
refrigerator depends on:
•room temperature;
•how often the door is opened;
•the quantity of food stored;
•location of appliance.
We su ggest placing the knob in the middle position to
obtain an internal temperature of approximately +5° C.
Important
If the ambient temperature is high or the
appliance is fully loaded, and the appliance is
set to the lowest temperatures, it may run
continuously causing frost to form on the rear
wall. In this case the dial must be set to a higher
temperature to allow automatic defrosting and
therefore reduced energy consumption.
Use of the fridge compartment
Operation
After plugging the plug into the power outlet, if the
display is not illuminated, press key (A), appliance on.
As soon as the appliance is turned on, the following
signals will appear on the control panel:
•symbol (2) will be positive, indicating that the
temperature is positive.
Place the refrigerator adjustment knobs (D) in a
middle position, and the appliance will be set up to
provide the following temperature:
roughly +5°C in the refrigerator.
Shopping Function
If you need to insert a large amount of warm food, for
examp le after doing the grocery shopping, we suggest
activating the Shopping function to chill the products
more rapidly and to avoid warming the other food
which is already in the refrigerator and/or freezer.
The shopping function is activated by pressing key C
(several times if necessary) until the corresponding
icon appears
The shopping function shuts off automatically after
approximately 6 hours.
It is possible to de-activate the function at any time by
pressing key C (see paragraph "Function Activation").
Switching off
The appliance is shut off by holding down key (A) for
more than 1 second. After this, a countdown of the
temperature from -3 -2 -1 will be shown.
When the appliance is shut off, display (B) also goes
off.
Activation of functions
Each time key C is pressed, the following functions are
activated in a clockwise direction:
Symbol 4 : shopping function
No Symbol: Normal operation
Door open acoustic alarm
An acoustic alarm will sound when the door is left
open for around 5 minutes.
The door open alarm conditions are indicated by:
- flashing symbol (1);
- red display illumination;
- beeping sound.
Press the button (C) to stop the acoustic alarm.
When normal conditions are restored (door closed):
- the acoustic alarm will stop.
17
Page 17

Positioning the door shelves
To p e r m it s to r a ge o f f o od p ac k ag e s of va r i o us s iz e s,
the door shelves can be placed at different heights.
To m a k e t h es e ad j u st m e nt s p ro c e ed a s f ol l o ws :
Gradually pull the shelf in the direction of the arrows
until it comes free, then reposition as required.
Movable shelves
The walls of the refrigerator are equipped with a
series of runners so that the shelves can be
positioned as desired.
HINTS
Hints for refrigeration
Useful hints:
Meat (all types): wrap in polythene bags and place
on the glass shelf above the vegetable drawer.
For safety, store in this way only one or two days
at the most.
Cooked foods, cold dishes, etc..: these should be
covered and may be placed on any shelf.
Fruit and vegetables: these should be thoroughly
cleaned and placed in the special drawer(s)
provided.
Butter and cheese: these should be placed in
special airtight containers or wrapped in aluminium
foil or polythene bags to exclude as much a ir as
possible.
Milk bottles: these should have a cap and should
be stored in the bottle rack on the door.
Bananas, potatoes, onions and garlic, if not
packed, must not be kept in the refrigerator.
!""#
Page 18

18
Defrosting
Fros t is aut omat ical ly eliminated from the evapora tor
of the refrigerator compartment every time the motor
compressor stops, during normal use. The defrost
water drains out through a trough into a special
container at the back of the appliance, over the
motor compressor, where it evaporates.
It is important to periodically clean the defrost
water drain hole in the middle of the refrigerator
compartment channel to prevent the water
overflowing and dripping onto the food inside.
Use the special cleaner provided, which you will
find already inserted into the drain hole.
MAINTENANCE
Periods of non-operation
When the appliance is not in use for long periods,
take the following precautions:
remove the plug from the wall socket;
remove all food;
defrost and clean the interior and all accessories;
leave the door ajar to allow air to circulate to prevent
unpleasant smells.
Interior light
If it becomes necessary to replace the lamp, press
on the rear hook and at the same time
slide the cover in the direction indicated by the arrow.
Attention:
Replace the lamp with one of the same power (the
maximum power is shown on the light diffuser).
Unplug the appliance before carrying out
any maintenance operation.
Warning
This appliance contains hydrocarbons in its cooling
unit; maintenance and recharging must therefore
only be carried out by authorized technicians.
Periodic cleaning
Many proprietary kitchen surface cleaners
contain chemicals that can attack/damage the
plastics used in this appliance. For this reason it
is recommended that the outer casing of this
appliance is only cleaned with warm water with a
little washing-up liquid added.
Clean the inside with warm water and bicarbonate of
soda.
Rinse and dry thoroughly.
Clean the condenser (black grill) and the
compressor at the back of the appliance with a
brush or a vacuum cleaner.This operation will
improve the performance of the appliance and save
electricity consumption.
Important:
Never use sharp metal tools to scrape off frost
from the evaporator as you could damage it.
Do not use a maechanical device or any artificial
means to speed up the thawing process other
than those recommended by the manufacturer.
!$"%
Page 19

19
CUSTOMER SERVICE AND SPARE PARTS
If the appliance is not functioning properly, check
that:
•the plug is firmly in the wall socket and the mains
power switch is on;
•there is an electricity supply (find out by plugging
in another appliance);
•the thermostat knob is in the correct position.
•If there are water drops on the bottom of the
cabinet, check that the defrost water drain
opening is not obstructed (see “Defrosting”
section).
•If your appliance is still not working properly after
making the above checks, contact the nearest
service centre.
To o b t ai n fa s t s e r v ic e , i t is e ss e n ti a l t h a t w h e n y ou
apply for it you specify the model and serial number
of your appliance which can be found on the
guarantee certificate or on the rating plate located
inside the appliance, on the bottom left-hand side.
TECHNICAL INFORMATION
330
0,482
176
Fridge Net Capacity lt.
Energy Consumption kWh/24h
Energy Consumption kWh/annuo
The Technical info are on the rating plate situated on the left inside the appliance.
INSTALLATION
Location
The appliance should be installed well away from
sources of heat such as radiators, boilers, direct
sunlight etc.
For building into kitche n units follow the special “
Building-in” instructions given.
Attention
It must be possible to disconnect the appliance from
the mains power supply; the plug must therefore be
easily accessible after installation.
Page 20

20
Electrical connection
Before plugging in, ensure that the voltage and
frequency shown on the serial number plate
correspond to your domestic power supply. Voltage
can vary by ±6% of the rated voltage.
For o peration with different voltages, a suitably sized
auto-transformer must be used.
The appliance must be earthed.
The power supply cable plug is provided with a
contact for this purpose.
If the domestic power supply socket is not earthed,
connect the appliance to a separate earth in
compliance with current regulations, consulting a
specialist technician.
The Manufacturer declines all responsibility if
the above safety precautions are not observed.
This appliance complies with the following
E.E.C. Directives:
- 87/308 EEC of 2/6/87 relative to radio interference
suppression.
- 73/23 EEC of 19.2.73 (Low Voltage Directive) and
subsequent modifications;
- 89/336 EEC of 3.5.89 (Electromagnetic
Compatibility Directive) and subsequent
modifications.
Door Reversibility
Shelf holders
Yo u r a p p l i a n c e i s e q u i p p e d w i t h s h e l f r e t a i n e r s t h a t
make it possible to secure the shelves during
transportation.
To r e m ov e t h e m p r o ce e d a s fo l lo w s :
Move the shelf holders in the direction of the arrow,
raise the shelf from the rear and push it forward until
it is freed and remove the retainers.
The appliance is supplied with the door
opening to the right.
For door opening in the opposite direction,
perform the following actions prior to
installation
1. Unscrew the upper pin and remove the spacer
2. Remove the door.
3. Unscrew with a key the lower pin and replace it
on the opposite side.
4. Reinsert the door, refit the spacer and rescrew
the upper pin
on the opposite side.
!
#
"
Page 21

21
Instructions for totally built-in
appliances
Dimensions of the recess
Height (1) 1780 mm
Depth (2) 550 mm
Width (3) 560 mm
For s afety reasons, minimum ventilation must be as
shown in Fig.
Attention: keep ventilation openings clear of obstruction.
Furthermore, it is necessary that the niche is provid
with a conduct of ventilation having the following
dimensions:
depth 50 mm
width 540 mm
!%2$
3*/4)
("++
Drill the unit using a Ø 2.5 mm drill (10 mm max.
penetration);
Fix the square fitting to the appliance.
Make sure that a distance of 44 mm is maintained in
the lower part between the kitchen furniture and the
border of the appliance.
The lower hinge cover inserted in the accessories
bag, is useful to guarantee the exact position of the
kitchen furniture and the appliance.
Also make sure that the appliance does not clamp
the mains cable
)$*++
+,-.
/$$*0+
/
&'$(
!)1%
%$&
+,-.
/
/$$*0+
%&
#
!
"
E
Page 22

22
Apply covers (C-D) on joint cover lugs and into hinge
holes.
Snap vent grille (B) and hinge covers (E) into
position.
Separate parts Ha, Hb, Hc, Hd as shown in the
figure.
Apply the sealing strip pushing it between the
refrigerator and the adjacent cabinet.
Fasten the appliance w ith 4 sc rews pro vide d in the
kit included with the appliance.
From the pla stic cove r (E ), w hich is used to cover the
hinge with the pivot pin, you must take away the part
as indicated in the drawing.
This operation is made easer since there is, in the
internal part of the cover hinge lid a groove that
facil ates the removal of this coomponent.
“Remove the part marked with DX, if the pivot pin is
inserted in the right hinge, SX in opposite case.”
I
I
!%/2
!#
&'/11
C
D
E
E
!%
B
!"
!$
Page 23

23
Place guide (Ha) on the inside part of the furniture
door, as shown in the figure and mark the position of
exter nal holes. Aft er having drilled holes, fix the
guide with the screws supplied.
After having reversed the opening direction of
the doors check that all the screws are properly
tightened and that the magnetic seal adheres to
the cabinet. If the ambient temperature is cold
(i.e. in Winter), the gasket may not fit perfectly to
the cabinet. In that case, wait for the natural
fitting of the gasket or accelerate this process by
heating up the part involved with a normal
hairdrier.
Should the lining up of the furniture door be
necessary, use the clearance of slots.
At the end of operations, it is necessary to check if
the door of the furniture closes properly.
Fix cover (Hd) on guide (Hb) until it clips into place.
Fix cover (Hc) on guide (Ha) until it clips into place
Open the appliance door and the furniture door at
90°. Insert the small square (Hb) into guide (Ha).
Put together the appliance door and the furniture
door and mark the holes as indicated in the figure.
Remove the squares and drill holes with ø 2 mm at 8
mm from the outer edge of the door. Place the small
square on the guide again and fix it with the screws
supplied.
!"#$%&$''
%&'
/
(
+
+
&'""
&'(1%
!"#$%&$''
!$
!"
!#
)**
/
(
+
+
!"
&'(1#
&'(1%5(
'(
!#
!%
Page 24

24
WAARSCHUWINGEN EN BELANGRIJKE A DVIEZEN
Het is uiterst belangrijk dat het bij het apparaat behorende instructieboekje bewaard blijft. Zou het
apparaat door u aan iemand anders gegeven of verkocht worden, of zou het apparaat in het huis van
waaruit u verhuist achterblijven, dan dient de nieuwe gebruik(st)er over het instructieboekje en de
daarin opgenomen waarschuwingen te kunnen beschikken.
Indien dit apparaat in de plaats van een oud model met haak- of veersluiting opgesteld wordt, dan is
het raadzaam de sluiting van het oude apparaat, dat terzijde gezet wordt, onbruikbaar te maken.
Hiermee wordt voorkomen dat spelende kinderen zich erin opsluiten, hetgeen levensgevaarlijk is.
Deze waarschuwingen zijn bedoeld voor uw en andermans veiligheid. U wordt geacht ze gelezen te
hebben, alvorens u het apparaat installeert en/of in gebruik neemt.
Algemene veiligheid
•
Dit apparaat is bedoeld en gemaakt voor het
gebruik door volwassenen. Het is gevaarlijk om
kinderen het apparaat te laten bedienen of als
speelgoed te laten gebruiken.
•
Het is gevaarlijk om, in welke vorm dan ook, dit
apparaat of de eigenschappen daarvan te
veranderen.
•
Neem vóór u aan onderhouds- of
schoonmaakwerkzaamheden begint altijd de
stekker uit het stopcontact.
•
Dit apparaat is zwaar.Wees voorzichtig bij het tillen.
•
Het direct vanuit een vriesvak, vriesgedeelte of
vriezer consumeren van ijslolly’s en dergelijke, kan
verbranding van de mondhuid tot gevolg hebben;
•
Heel goed oppassen, tijdens het verplaatsen,
dat de delen van het koelcircuit niet zodanig
worden beschadigd, dat de koelvloeistof naar
buiten zou kunnen lekken.
•
Plaats het apparaat niet in de nabijheid van
een centrale verwarming of een gasfornuis.
• Vermijd een installatieplaats met
rechtstreekse zoninval.
• Zorg dat er voldoende lucht aan de achterkant
van het apparaat kan circuleren. Vermijd
schade aan de koelkringloop.
• Alléén voor diepvrieskasten (uitgezonderd
ingebouwde): het apparaat kan zeer goed in
de kelder geplaatst worden.
• Plaats elektrische apparaten (bijv.
ijsmachines) nooit in het apparaat.
Onderhoud / Reparatie
•
Een eventueel noodzakelijke wijziging aan de
elektrische huisinstallatie ten behoeve van de
installatie van dit apparaat, mag uitsluitend door
een daartoe bevoegd persoon uitgevoerd worden.
•
Laat inspectie- en/of herstelwerkzaamheden
uitvoeren door een erkend servicecentrum en
laat geen andere dan originele
reserveonderdelen plaatsen.
• Tracht, in geval van storing of een defect, dit
apparaat niet zelf te repareren. Reparaties welke
door niet-deskundige personen uitgevoerd
worden, kunnen tot schade of een ernstigere
storing leiden. Raadpleeg het plaatselijke
servicecentrum en vraag altijd om originele
reserveonderdelen.
•
Dit apparaat bevat koolwaterstoffen in de
koudekringloop; het onderhoud en het bijvullen
dient daarom uitsluitend door deskundig
personeel uitgevoerd te worden.
Gebruik
• Huishoudelijke koel- en/of vriesapparaten zijn
uitsluitend bedoeld voor het bewaren en/of
invriezen van eet- of drinkbare producten.
•De beste resultaten worden bereikt bij een
omgevingstemperatuur tussen +18°C en +43°C
(klasse T); tussen +18°C en 38°C (klasse ST);
tussen +16°C en 32°C (klasse N); +10°C en
32°C (klasse SN); de klasse staat op het
typeplaatje vermeld.
Attentie: u dient niet alleen rekening te houden
met de omgevingstemperatuur voor dit type
product, maar tevens met de volgende
aanwijzingen: wanneer de
omgevingstemperatuur onder de aangeduide
minimum waarde daalt, wordt de
bewaartemperatuur in het vriesvak niet meer
gegarandeerd; u kunt de bewaarde
levensmiddelen dan het beste zo snel mogelijk
nuttigen.
• Ontdooide diepvriesproducten mogen niet
wederom ingevroren worden.
• Volg de raadgevingen van de fabrikant op met
betrekking tot waar en hoe u spijzen en dranken
bewaart of invriest.
•De vriezende binnenwanden of -vlakken in het
apparaat bevatten koelmiddel. Plaats geen
scherpe voorwerpen tegen zo’n wand of vlak .
Lekkage kan het gevolg zijn, hetgeen een
onherstelbare schade aan het apparaat en
bederf van de levensmiddelen veroorzaakt.
SCHRAAP EVENMIN MET SCHERPE
VOORW ERPEN rijp of ijs af Rijp k an verwijderd
Page 25

25
worden met een kunststof spatel.Verwijder ijs
niet met geweld. IJs wordt alleen verwijderd bij
het ontdooien van het apparaat.
• Plaats geen koolzuurhoudende of mousserende
dranken in het vriesvak, het vriesgedeelte of de
vriezer, omdat de blikjes of flessen onder druk
komen te staan; Hierdoor kunnen deze
explo deren, waardoor het apparaat beschadigd
wordt. Gebruik geen andere mechanische
toestellen of kunstmatige middelen om het
ontdooiingsproces te versnellen dan die, die door
de fabrikant aanbevolen worden. Gebruik geen
metalen voorwerpen om uw apparaat schoon te
maken, omdat het hierdoor beschadigd kan
worden.
Installatie
• Tijdens de normale werking worden de
condensator en de compressor aan de
achterkant behoorlijk warm. Uit
veiligheidsoverwegingen dient voor een minimum
aan ventilatie te worden gezorgd, zoals
aangeduid wordt in de instructies.
Let op: Zorg ervoor dat de
ventilatieopeningen niet bedekt worden.
• Kijk uit dat het apparaat niet op het aansluitsnoer
staat.
Belangrijk:Als het aansluitsnoer beschadigd
raakt, moet het snoer, eventueel met stekkers,
vervangen worden; deze onderdelen zijn
verkr ijgbaar bij de fabrikant of onze
serviceafdeling.
• Indien het apparaat horizontaal vervoerd wordt
kan olie vanuit de compressor in het koelcircuit
vloeien. Wacht, na het plaatsen van het apparaat,
ten minste twee uur alvorens de stekker in het
stopcontact te steken, zodat de olie terug kan
vloeien naar de compressor.
• Er zijn werkende delen die warm worden. Zorg
altijd voor een goede ventilatie, omdat anders
onderdelen kapot kunnen gaan en de inhoud van
de diepvriezer verloren kan gaan. Zie de
installatie-instructies.
• Delen die heet worden mogen niet toegankelijk
zijn. Plaats het apparaat waar mogelijk tegen een
muur.
Milieubescherming
Dit apparaat bevat, zowel in het koelcircuit als in de
isolatie, geen ozononvriendelijke stoffen.
Het apparaat mag niet samen met huisvuil of
gesloopte apparaten weggegooid worden. Vermijd
dat het koelcircuit wordt beschadigd, vooral aan de
achterkant in de buurt van de warmtewisselaar.
Informeer bij uw gemeente naar de dumpgebieden
in uw woonplaats. De materialen in dit apparaat die
voorzien zijn van het symbool zijn geschikt voor
recycling.
Weggooien van oude apparaten
Het symbool op het product of op de
verpakking wijst erop dat dit product niet als
huishoudafval mag worden behandeld, maar moet
worden afgegeven bij een verzamelpunt waar
elektrische en elektronische apparatuur wordt
gerecycled. Als u ervoor zorgt dat dit product op de
juiste manier wordt verwijderd, voorkomt u mogelijk
negatieve gevolgen voor mens en milieu die zich
zouden kunnen voordoen in geval van verkeerde
afvalverwerking. Voor gedetailleerdere informatie
over het recyclen van dit product, kunt u contact
opnemen met de gemeente, de gemeentereiniging
of de winkel waar u het product hebt gekoch.
Page 26

26
INHOUD
AANWIJZINGZN VOOR HET WEGWERPEN VAN
VERPAKKINGSMATERIAAL
Het verpakkingsmateriaal van onze grote elektische
huishoudelijke apparaten kan met uitzondering van
houten onderdelen, gerecycled worden en dus bij
het kringloopafval worden gezet.
Wij bevelen u aan om:
•Papier, karton en golfkarton in de speciale
papierbakken te werpen.
•Plastik verpakkingsmateriaal in de speciaal
daarvoor bestemde plastic-containers te gooien.
Indien dit soort bakken in uw buurt nog niet
voorkomen mag u hat materiaal aan de
vuilnisman meegeven.
Als verpakkingsmateriaal gebruiken wij slechts
recycleerbare kunststoffen, zoals bijv.:
In de voorbeelden staatt
PE voor Polyethyleen** 02 = ^ PE-HD; 04 = ^ PE-LD
PP voor Polypropyleen
PS voor Polystyrol
PLASTIC BESTANDDELEN
Om er gemakkelijker achter te komen hoe u het
materiaal van dit apparaat moet wegwerpen en /of
recycleren zijn er op verschillende punten
herkenbare symbolen op aangebracht.
Waarschuwingen en Belangrijke adviezen. . . . . . . . . . . . . . . . . . . . . . . . . . . . . . . . . . . . . . . . . . . . 24
Aanwijzingzn voor het wegwerpen van verpakkingsmateriaal . . . . . . . . . . . . . . . . . . . . . . . . . . . 26
Het gebruik - Reiniging van de binnenkant - Het bedieningspaneel - Display . . . . . . . . . . . . . . . . . . 27
Het gebruik - Werking - De functies inschakel - Het uitschaken - Temperatuurinstelling . . . . . . . . . . . .
shopping functie - Koelen van levensmiddelen -. . . . . . . . . . . . . . . . . . . . . . . . . . . . . . . . . . . . . . . . . . 28
Het gebruik - Geluidsalarm bij open deur - Verplaatsbare platen - Het verplaatsen . . . . . . . . . . . . . . .
van deurvakken - Tips - Tips het koelen - . . . . . . . . . . . . . . . . . . . . . . . . . . . . . . . . . . . . . . . . . . . . . . . 29
Onderhoud - Schoonmaken - Geprolongeerd stilstand - Vervangen ven de lamp - Het ontdooien . . . 30
Storing - Technische gegevens - Installatie - Plaats van opstelling - Plaatblokkering. . . . . . . . . . . . . . . 31
Installatie - Elektrische aansluiting - Verander de draaizin van de deuren . . . . . . . . . . . . . . . . . . . . . . . . . 32
Installatie - Aanwijzingen voor de geintegreerde inbouw . . . . . . . . . . . . . . . . . . . . . . . . . . . . . . . . . . . . . . 33
&"00
+1
++
&%
&2
+,
+,
,-.
-/,
Page 27

27
Reiniging van de binnenkant
Voo r u d e kas t in ge br uik n eem t, di en t u d e
binnenkant met lauw water en een neutraal
schoonmaakmiddel te reinigen om de typische geur
van een nieuw apparaat weg te nemen. Droog
vervolgens de wanden goed af.
Gebruik geen schurende
schoonmaakmiddelen, waarmee u de
afwerkingen van het apparaat zou kunnen
beschadigen.
HET GEBRUIK
A - Aan / uittoets van de apparatuur
B - Display om de temperatuur en functies af te
lezen
C - Inschakeltoets van de functies / alarmreset
D - Regelknop voor de temperatuur (koeler)
DISPLAY
1. Alarmindicator open deur
2. Indicator positieve of negatieve temperatuur
3. Temperatuurindicator
4. Als deze brandt, betekent dit dat de shopping
werkt
Het bedieningspaneel
!
"
#
$
Page 28

28
Temperatuurinstelling
De temperatuur wordt automatisch geregeld en kan
verhoogd worden (minder koud) door de knop of
verlaagd worden (kouder) door de knop naar met de
klok mee te draaien.
Bij het instellen van de juiste stand dient u er
rekening mee te houden dat de temperatuur in het
apparaat afhankelijk is van:
•de kamertemperatuur;
•de frekwentie waarmee de deuren geopend
worden;
•de hoeveelheid levensmiddelen in de kast;
•de plaats van het apparaat.
Aangeraden wordt de knop op de tussenstand te
draaien om een interne temperatuur van ongeveer
+5°C
Attentie
Het kan voorkomen dat, indien de
thermostaatknop in de koudste stand gedraaid
is, bijvoorbeeld ten gevolge van zeer warme
omgevingstemperatuur of het snel willen koelen
van grote hoeveelheden dranken, de kompressor
kontinu loopt, waardoor automatische
ontdooiing van de koelverdamper niet
plaatsvindt en zich daarop ijs afzet. Draai, in dat
geval, de thermostaatknop naar een wat minder
koude stand, zodat automatische ontdooing kan
plaatsvinden; hierdoor spaart u tevens energie.
Werking
Druk op toets (A) om de apparatuur in te schakelen,
als het display niet brandt nadat de stekker in het
stopcontact gedaan is.
Zodra de apparatuur ingeschakeld is, zijn de volgende
signaleringen op het bedieningspaneel te zien:
•Het symbool (2) zal positief zijn om aan te geven
dat de temperatuur boven nul is.
Door de knop van de koeler(D) op een tussenstand te
zetten, zal de diepvriezer de volgende temperatuur
verschaffen:
circa + 5°C in de koeler.
Het uitschakelen
De diepvriezer wordt uitgeschakeld door toets (A)
langer dan 1 seconde ingedrukt te houden. Hierna
wordt aangegeven dat de temperatuur vanaf -3 -2 -1
afgeteld wordt. Als de apparatuur uitgaat, gaat ook het
display (B) uit.
De functies inschakelen
Iedere keer dat op toets C gedrukt wordt, worden met
de klok mee de volgende functies ingeschakeld:
Symbool 4 : de shoppingsfunctie
Geen symbool : normale werking.
Gebruik van het koeler
Koelen van levensmiddelen
Voo r een o pti ma al ge br uik va n de ko elr ui mte
adviseren wij u de volgende eenvoudige regels in
acht te nemen:
•Plaats geen warme of dampende spijzen of
dranken in de koelruimte;
•dek vooral sterk geurend voedsel af of verpak
het;
•plaats de levensmiddelen zo, dat de lucht vrij
eromheen kan cirkuleren.
Shopping functie
Indien men grote hoeveelheden ongekoelde
voedingsmiddelen in de ijskast moet doen,
bijvoorbeeld nadat u boodschappen heeft gedaan,
wordt aangeraden de shopping functie in te schakelen
om ze sneller af te laten koelen en te voorkomen dat
de temperatuur van de andere voedingsmiddelen in
de ijskast oploopt.
U schakelt de shopping functie in door op toets C te
drukken (indien nodig meerdere keren) tot de
bijbehorende icoon
verschijnt.
De shopping functie gaat na 6 uur automatisch uit.
Tijdens de shopping functie wordt ook automatisch de
ventilator in de ijskast ingeschakeld.
De functie kan op ieder willekeurig moment
uitgeschakeld worden door op toets C te drukken (zie
paragraaf "De functies inschakelen").
Page 29

29
TIPS
Geluidsalarm bij open deur
Een geluidsalarm waarschuwt als de deur langer
dan 1 minuut openblijft.
De open deur alarmsituatie wordt aangeduid door:
- het knipperen van het symbool (1);
- de rode verlichting van het display;
- het geluidsalarm.
Om het geluidsalarm uit te schakelen, dient men op
toets (C) te drukken.
Als de normale omstandigheden weer hersteld zijn
(gesloten deur):
- gaat het geluidssignaal uit.
Het verplaatsen van deurvakken
De ruimte tussen deurvakken kan naar behoefte
aangepast worden. Ga daartoe als volgt te werk:
Tr ek h et v ak g el e i de l i jk n aa r d e d o or d e p i jl e n
aangegeven richting totdat het loskomt. Daarna
verplaats het vak naar de gewenste hoogte.
Tips het koelen
Enkele praktische tips:
Vlees (alle soorten): wordt in plastic zakjes op de
glazen plaat boven de groentelade geplaatst.
Bewaar vlees niet langer dan één of twee dagen.
Gekookt voedsel, koude schotels enz.: kunnen,
goed afgedekt, op elk rooster geplaatst worden.
Fruit en groente: worden schoongemaakt in de
groentelade(n) gelegd.
Boter en kaas: worden, om blootstelling aan de
lucht te voorkomen, in speciale koeldozen bewaard
of in plastic- of alluminiumfolie vepakt .
Flessen melk: worden, goed gesloten, in het
flessenrek geplaatst.
Bewaar niet-luchtdicht verpakte bananen,
aardappelen, uien of knoflook niet in de koelkast.
Verplaatsbare platen
De koelkastwanden zijn van richels voorzien, zodat
u de platen naar wens op verschillende hoogten
kunt plaatsen.
U krijgt meer ruimte in de koeler, wanneer u het
voorste deel van de rekjes omklapt.
!""#
Page 30

30
Schoonmaken
Gebruik nooit metalen voorwerpen voor het
schoonmaken van het apparaat; dit zou
beschadigingen tot gevolg kunnen hebben.
Reinig de binnenkant van de kast regelmatig met
lauw sodawater. Lap de wanden na met schoon
water en droog ze zorgvuldig.
Stop op de condensor verhoogt het energieverbruk.
Daarom eenmaal per jaar de condensor aan de
achterkant van het apparaat met een zachte borstel
of met de stopzuiger voorzichtig schoonmaken.
Neem vóór iedere handeling altijd eerst de
steker uit de wandkontaktdoos.
Belangrijk: Dit apparaat bevat koolwaterstoffen in de
koudekringloop; het onderhoud en het bijvullen dient
daarom uitsluitend door door het bedrijf aangewezen
deskundig personeel uitgevoerd te worden.
ONDERHOUD
Geprolongeerd stilstand
Wij adviseren u vóór de periode dat de koelkast niet
gebruikt wordt de volgende handelingen uit te
voeren:
•neem de steker uit de wandkontaktdoos;
•verwijder alle spijzen en dranken uit de kast;
•laat de kast geheel ontdooien en maak de
binnenwanden, rekken, korven en dergelijke
goed schoon;
•laat de deuren open staan, teneinde het ontstaan
van onaangename geur te voorkomen.
Vervangen van de lamp
Om de lamp eventueel te vervangen, dient men op de
achterste vasthechting te drukken en tegelijkertijd het
dekseltje in de richting van de pijltjes weg te nemen.
Let op:
Ver va ng de la mp met ee n e xem plaar va n gelij ke
sterkte (het maximum vermogen staat op de
lichtverspreider aangegeven).
Het ontdooien
Het ontdooien van de koelkast heeft automatisch
plaats elke keer dat de kompressor stopt. Het
dooiwater wordt via een afvoerkanaaltje opgevangen
in een bakje dat zich aan de achterkant van het
apparaat boven de kompressor bevindt. Hier
verdampt het water.
Wij raden u aan het gaatje in het afvoerkanaal
regelmatig schoon te maken, teneinde te
voorkomen dat het dooiwater de levensmiddelen
nat maakt. Gebruik voor het doorprikken het
staafje dat zich in het gaatje bevindt.
!$"%
Page 31

31
INSTALLATIE
Plaats van opstelling
Plaats het apparaat uit de buurt van
warmtebronnen: centrale verwarming, kachels, felle
zonnestralen enz.
Zie voor inbouw de betreffende aanwijzingen.
Attentie
Het apparaat moet
van het elektriciteitsnet
afgehaald kunnen worden; de stekker moet dus ook
na de installatie bereikbaar blijven.
STORING
Indien het apparaat niet of niet goed funkioneert,
kontroleer dan:
•of de steker goed in het stopkontakt zit;
•of de elektriciteit soms uitgevallen is;
•of de thermostaatknop op de juiste stand staat;
•en indien er water op de bodem van de koeler
ligt, of het afvoerkanaaltje soms verstopt is (zie
hoofdstuk “Het ontdooien”).
Kunt u de storing niet zelf lokaliseren en
verhelpen,raadpleeg dan de dichtsbijzijnde
servicedienst.
Geef daarbij altijd het model en het typenummer
van de kast op. Deze gegevens vindt u op het
garantiebewijs of op het typeplaatje dat zich
linksonder aan de binnenzijde van het apparaat
bevindt.
TECHNISCHE GEGEVENS
Deze gegevens vindt u op het garantiebewijs of op het typeplaatje van het apparaat.
Plaatblokkering
Uw apparatuur is voorzien van blokkeringen,
waardoor de platen tijdens het transport op hun
plaats blijven.
Handel als volgt om deze te verwijderen:
Beweeg de blokkeringen in de richting van de pijl, til
de glasplaat aan de achterkant op en duw deze in
de richting van de pijl tot deze los raakt en verwijder
de blokkeringen.
!
#
"
Page 32

32
Verander de draaizin van de deuren
Elektrische aansluiting
Overtuig u ervan dat de netspanning en de
netfrekwentie, welke op het typeplaatje in de kast
staan aangegeven, overeenkomen met de netspanning en de netfrekwentie in uw woning. Een afwijking
op de netspanning tot plus of minus 6% is
toegestaan.
Bij aansluiting op een andere spanning dient u een
geschikte transformator te gebruiken.
De steker mag alleen geplaatst worden in een
geaard stopkontakt.
De kast is daarom voorzien van een speciaal drieaderig snoer, geschikt voor een geaard stopkontakt.
Mocht het stopkontakt in uw woning niet geaard zijn,
dan dient een erkend installateur het apparaat
volgens de geldende normen te aarden.
Wij wijzen u er op dat schade of letsel,
veroorzaakt door het niet voldoen aan dit
veiligheidsvoorschrift, niet onder de
verantwoordelijkheid van de fabrikant valt.
Dit apparaat voldoet aan de volgende EG-
richtlijnen:
- 87/308 EG-richtlijnvan 2.6.87 met betrekking tot
de radio-ontstoring.
- 73/23 EG-richtlijn van 19/02/73 (Laagspanning)
en opeenvolgende wijzingen;
- 89/336 EG-richtlijn van 03/05/89
(Elektromagnetische compatibiliteit) en
opeenvolgende wijzingen.
De apparatuur wordt geleverd met deuren
die naar rechts opengaan. Om de deur
naar de tegenovergestelde kant te laten
openen, dient men de volgende
handelingen te verrichten alvorens de
installatie uit te voeren.
1. Draai de bovenste stift uit en verwijder de
afstandshouder.
2. Neem de deur los.
3. Schroef de onderste pen los met een sleutel en
monteer hem op de tegenoverliggende kant.
4. Zet de deur weer op zijn plaats, monteer het
afstandsstuk en schroef de bovenste pen vast op
de tegenoverliggende kant
.
Page 33

33
Aanwijzingen voor de
geïntegreerde inbouw
Nismaten
Hoogte (1) 1780 mm
Diepte (2) 550 mm
Breedte (3) 560 mm
Om veiligheidsredenen moet de ventilatie zodanig
zijn als aangegeven in Fig.
Attentie: zorg ervoor dat de ventilatie openingen
tijdens gebruik niet worden afgedekt.
De nis moet tevens voorzien zijn van een
luchtkanaal met de volgende afmetningen:
diepte 50 mm
breedte 540 mm
!%2$
3*/4)
("++
Doorboor het meubel met een boor die van een
boortje met Ø 2,5 voorzien is (maximaal 10 mm
diep);
Bevestig de haken aan het apparaat.
Zorg ervoor dat er een afstand van 44 mm vrij blijft
tussen het keukenmeubel en de rand van het
apparaat. Het onderste scharnierdeksel, dat in het
zakje met accessoires zit, is handig om de exacte
positie van het keukenmeubel en het apparaat te
bepalen. Zorg er ook voor dat het apparaat het
netsnoer niet afklemt.
!)1%
&'$(
)$*++
%$&
+,-.
/$$*0+
%&
#
"
/
+,-.
/
/$$*0+
!
E
Page 34

34
Onderdelen Ha, Hb, Hc, Hd scheiden zoals u in de
tekening ziet.
Breng, onder lichte druk, de voegafdichting tussen
apparaat en meubel aan.
Bevestig het apparaat met de vier rneegeleverde
schrm even.
U moet het gedeelte van het kunststof deksel (E),
dat gebruikt wordt om het scharnier af te dekken,
verwijderen, zoals aangegeven op de tekening. Deze
handeling wordt vergemakkelijkt omdat er aan de
binnenkant van het scharnierdeksel een groef is
aangebracht, waardoor u dit onderdeel makkelijker
kunt verwijderen. "Verwijder het onderdeel dat
gemarkeerd is met DX, als de scharnierpen in het
rechter scharnier is geplaatst, in het
tegenovergestelde geval het onderdeel gemarkeerd
met SX verwijderen."
Breng de afdichtstopsels (C-D) in de gaten in de
deklijsten aan.
Bevestig het ventilatierooster (B).
Breng, onder lichte druk, het dekseltje (E) aan.
I
I
!%/2
!#
&'/11
C
D
E
E
!%
B
!"
!$
Page 35

35
Controleer na de richting van de deuren
gewijzigd te hebben, dat alle schroeven goed
vastgedraaid zitten en dat het deurrubber goed
op de sponning sluit. In een koud vertrek (in de
winter) kan het gebeuren dat dat niet het geval
is. Na enkele dagen zal het rubber zich echter
aangepast hebben. Wilt u dat bespoedi-gen, dan
kunt u het rubber warm maken met een föhn.
Voo r het r ech ts tel le n van de k ast de ur ku nt u ge bruik
maken van de langwerpige gaten.
Te ns l o tt e d ie n t u t e c o nt r o le r e n o f d e d eu r va n h e t
apparaat goed sluit.
Afdekking (Hd) op geleider (Hb) vastklikken.
Afdekking (Hc) op geleider (Ha) vastklikken.
De deur van het apparaat en die van de kast met
een hoek van ongeveer 90° openen. IJzer (B) in
geleider (A) aanbrengen. De deuren samen
vasthouden en de gaten aangeven zoals in de
tekening. De ijzers weghalen en gaten van Ø2 mm.
boren op een afstand van 8 mm. van de buitenrand
van de deur.
Plaats het ijzer opnieuw op de geleider en bevestig
het met de bijgeleverde schroeven.
Plaats de geleider (Ha) zoals op de tekening staat
aangeven tegen de binnenkant van de kastdeur en
teken de positie van de buitenste gaten af. Nadat u de
gaten geboord heeft, kunt u de geleider met de
bijgeleverde schroeven vastzetten.
!"#$%&$''
%&'
/
(
+
+
&'""
&'(1%
!"#$%&$''
!$
!"
!#
)**
/
(
+
+
!"
&'(1#
&'(1%5(
'(
!#
!%
Page 36

www.electrolux.com
www.zanussi.com.es
www.zanussi.nl
 Loading...