

Page 1
Quick Start Guide
V1.0
Page 2

EN: Quick Start Guide
DE: Schnellstartanleitung
ES: Guía de inicio rápido
FR: Guide de démarrage rapide
IT: Guida rapida
Page 3
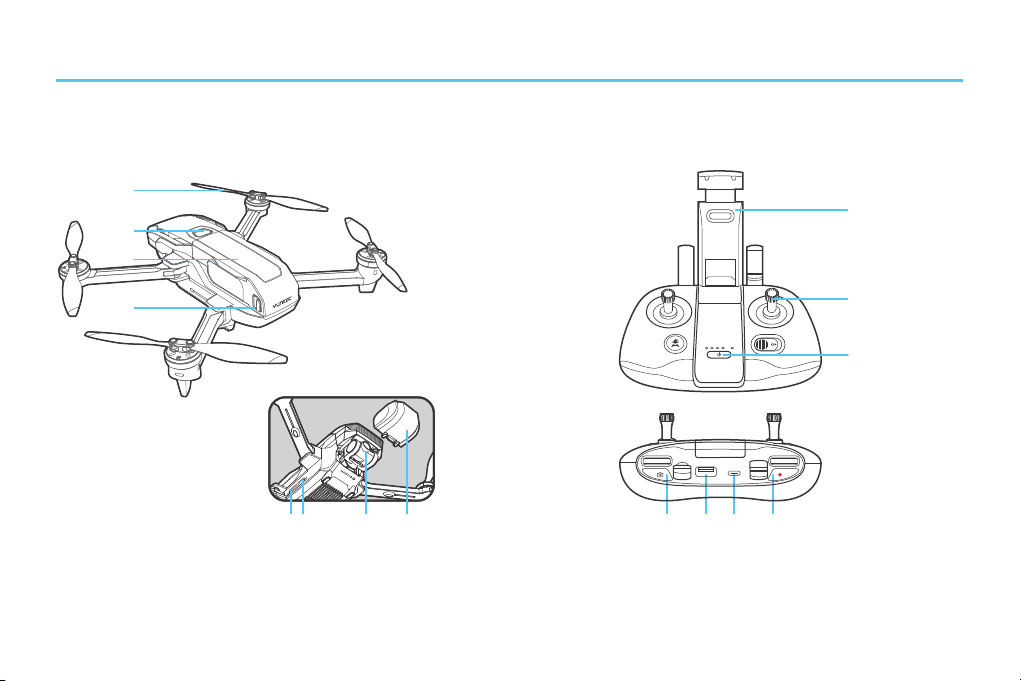
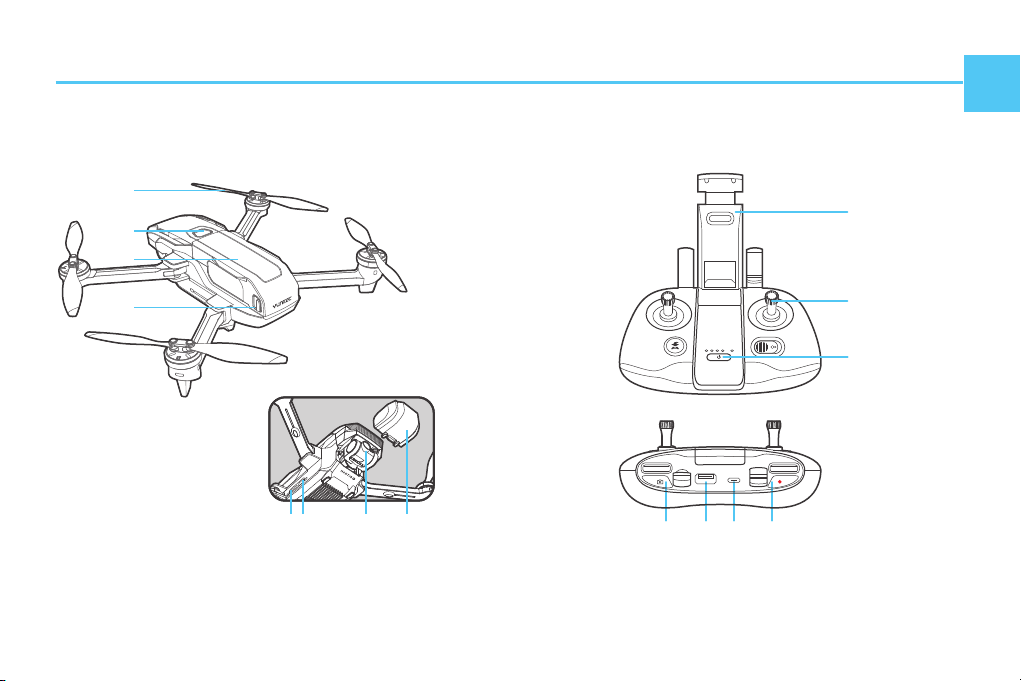
Product Overview
Aircraft
Product Name: Mantis G
Model: YUNMGA
01
02
03
04
01 Propellers
02 Power Button
03 Battery
04 Battery Lock
0806 05 07
05 USB Type-C
06 Micro SD Card Slot
07 Camera
08 Gimbal Protector
Controller
Product Name: Mantis Q Remote Controller
Model: YUNMQRCP
02
03
04 05 06 07
01 Phone Holder
02 Control Sticks
03 Power Button
04 Photo Button
05 Standard USB Port
06 USB Type-C
07 Video Recording Button
01
Page 4
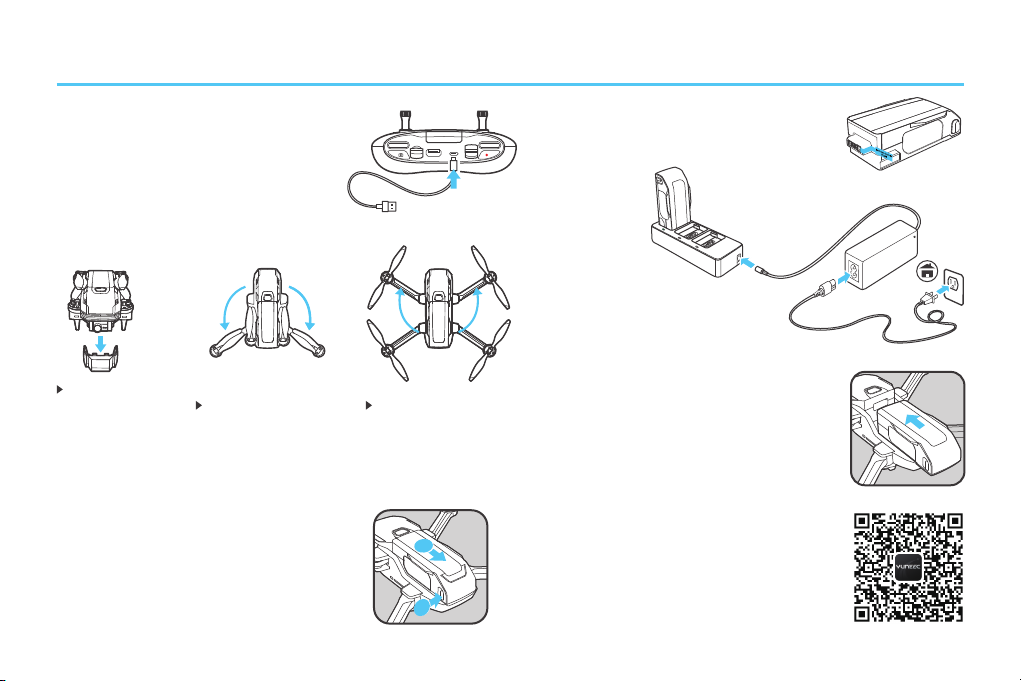
Before Flight
1
2
1.Charging the Remote Controller
• Use USB Type-C (only for charging)
to charge, approx. 2.5 hours.
2.Preparing the Aircraft
Remove the
gimbal protector
• Remove the gimbal protector.
• All arms and propellers must be unfolded before powering on.
• To fold the Mantis G, reverse the unfolding instructions.
Unfold the rear arms
Unfold the front arms
3.Charging the Flight Battery
• Press the lock button and remove
the flight battery.
• Remove the insulation strip on the
battery connector before use.
• Charge the flight battery to
“Solid Green”, approx. 1 hour.
• Push the flight battery into the
aircraft until hearing a ‘click’ .
4.App Download
• Download Yuneec Pilot App.
Mantis G supports iOS 10.0
(or later) or Android 5.0 (or later).
Page 5

First Flight Part 1
1.Installing the Smart Device
Pull out the
phone holder
Install the
smart phone
Connect the smart phone
with the remote controller
(Iphone and Android cable
not included)
2.Power On
To power on the Mantis G and the remote controller, press
and hold the power button for two seconds until you hear
two rising tones.
Power on the Mantis G Power on the controller
3.Connecting to Mantis G
• Launch Yuneec Pilot App.
• Tap the scan icon on the App screen and follow on-screen
instructions to connect the aircraft with your control device
(or manually select Mantis Wi-Fi in phone settings and
enter the password to complete the connection. The password can be found on the aircraft QR Code sticker).
4.Take Off
• To ensure safe flight, step back approximately 9ft
(3m) behind the Mantis G.
Option
1
Tap the icon [ ] on the app and then slide to take off.
Option 2
• Move the sticks for 1.5 seconds as shown below to
start the motors.
• Slowly raise Left Stick to take off.
Start the motors
Take off
Page 6
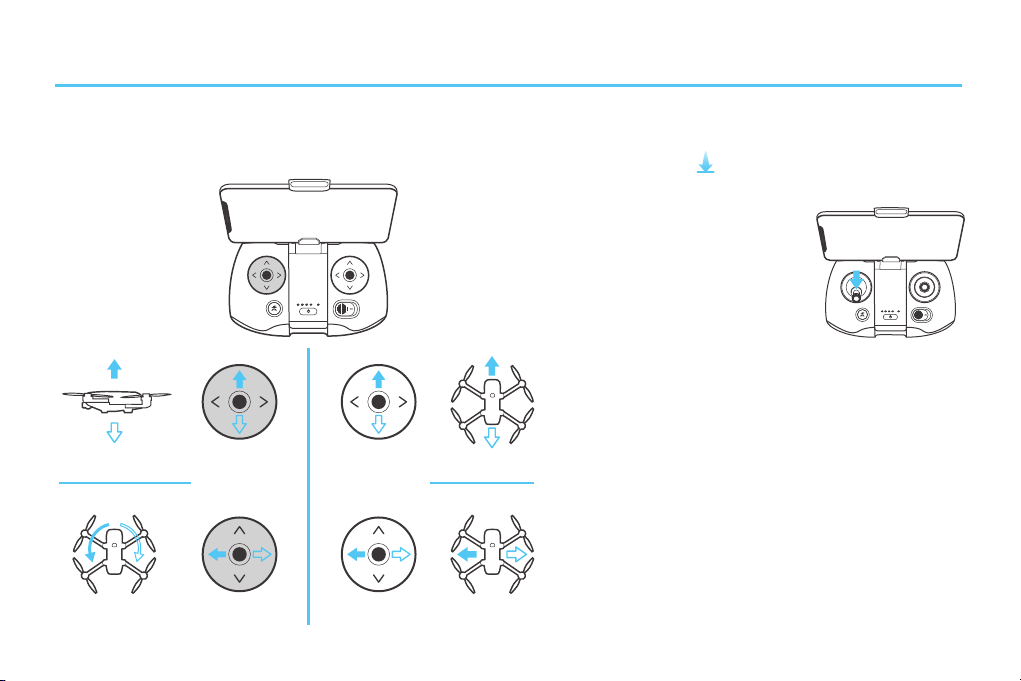
First Flight Part 2
Move the control sticks as below to control the direction of the Mantis G.
Rotate
Left
Up
Down
Rotate
Right
Left Stick
Right Stick
Forward
Back
Left Right
2.Landing1.Direction Control
Option 1
Tap the icon [ ] on the app and then slide to land.
Option 2
Slowly lower Left Stick to land.
To land properly, ensure that
the aircraft is away from any
obstacles or obstructions as it
will land directly below where
it is hovering.
3.Power Off
• To power off the Mantis, press and hold the power
button for two seconds.
• To power off the controller, press and hold the
power button at the center of the controller for two
seconds.
If you experienced a slight drift during your first
*
flight outdoor, it may be best to calibrate your
compass and wait for GPS signal lock before take
off.Please go to the Settings section within your
app and follow the on-screen instructions to
calibrate the compass.
Page 7
Produktübersicht
Fluggerät Steuergerät
Produktbezeichnung: Mantis G
Modell: YUNMGA
01
02
03
Produktbezeichnung: Mantis Q Fernsteuerung
Modell: YUNMQRC
DE
01
04
01 Propeller
02 Ein/Aus Schalter
03 Akku
04 Batteriefachverriegelung
0806 05 07
05 USB Typ C
06 Steckplatz für Micro SD Card
07 Kamera
08 Gimbal Protector
04 05 06 07
01 Telefonhalterung
02 Steuerknüppel
03 Ein/Aus Schalter
02
03
04 Foto-Taste
05 Standard USB-Anschluss
06 USB Typ C
07 Taste Videoaufzeichnung
Page 8

1
2
Vor dem Flug
1.Fernbedienung laden
• Verwenden Sie zum Laden USB Typ C
(nur zum Laden).
Dauer: etwa 2.5 Stunden.
2.Fluggerät vorbereiten
Den Gimbal
Protector entfernen.
• Vor dem Einschalten müssen alle Arme und Propeller aufgeklappt
werden.
• Gehen Sie zum Zusammenklappen der Mantis G in umgekehrter
Reihenfolge vor.
Klappen Sie die
hinteren Arme auf
Klappen Sie die
vorderen Arme auf
3.Flugakku laden
• Drücken Sie den Verriegelungsknopf
und entnehmen Sie den Flugakku.
• Entfernen Sie vor dem Gebrauch den
Isolationsstreifen am Batteriestecker.
• Laden Sie den Flugakku bis
die LED durchgehend grün
leuchtet. Dauer: etwa 1 Stunde.
• Schieben Sie den Flugakku in das
Fluggerät, bis Sie einen Klick hören.
4.App Download
• Laden Sie die Yuneec Pilot App
herunter. Mantis G unterstützt
iOS 10.0 (oder neuer)
oder Android 5.0 (oder neuer).
Page 9

Erstflug Teil 1
1.Befestigung des Smartphones
Ziehen Sie die
Telefonhalterung
heraus
Befestigen Sie Ihr
Smartphone
Verbinden Sie das
Smartphone mit
der Fernbedienung
(
iPhone und Android Kabel nicht im Liefer umfang enthalten)
2.Einschalten
Drücken und halten Sie zum Einschalten des Mantis G und
der Fernsteuerung die Ein/Aus Taste für etwa 2 Sekunden,
bis Sie zwei aufsteigende Töne hören.
Schalten Sie das Steuergerät ein Schalten Sie Mantis G ein
3.Mit Mantis Q verbinden
• Yuneec Pilot App starten.
• Tippen Sie in der App auf das Scan-Icon und folgen Sie
den Anweisungen, um die Drohne mit Ihrer Steuerung zu
verbinden (oder wählen Sie alternativ in den Einstellungen Ihres Telefons das Mantis Wi-Fi aus und geben Sie das
Passwort ein, um die Verbindung zu etablieren. Das Passwort befindet sich auf dem QR-Code-Sticker der Drohne.)
4.Abheben
• Treten Sie für einen sicheren Flug etwa 3 m (9 ft.) vom
Mantis Q zurück.
Option 1
Tippen Sie zum Abheben auf das Symbol [ ] in der
App und schieben Sie es nach oben.
Option 2
• Bewegen Sie die Steuer-knüppel für 1,5 Sekunden wie
unten dargestellt, umdie Motoren zu starten.
• Schieben Sie zum Abheben langsam den linken Steuerknüppel nach oben.
Starten Sie die Motoren Abheben
Page 10

Erstflug Teil 2
1.Richtungssteuerung
Bewegen Sie die Steuerknüppel wie unten dargestellt, um die Flugrichtung des Mantis G zu steuern.
Vorwärts
Zurück
Links Rechts
Links
herum
drehen
Auf
Ab
Rechts
herum
drehen
Linker
Steuerknüppel
Rechter
Steuerknüppel
2.Landung
Option 1
Tippen Sie zum Landen auf das Symbol [ ] in
der App und schieben Sie es nach unten.
Option 2
Schieben Sie zum Landen
den linken Steuerknüppel
langsam nach unten.Für eine
ordnungsgemäße Landung
stellen Sie sicher, dass sich
die Drohne nicht in der Nähe
von Hindernissen befindet, da
Sie direkt an der Stelle landet,
über der sie schwebt.
3.Abschalten
•
Zum Ausschalten des Mantis, drücken und halten Sie
den Power-Button für zwei Sekunden.
•
Zum Ausschalten der Fernsteuerung, drücken und
halten Sie den Power-Button in der Mitte des
Controllers für zwei Sekunden
Falls Sie bei Ihrem ersten Flug im Freien ein leichtes
*
Abdriften feststellen, kann es hilfreich sein, vor dem
nächsten Start den Kompass neu zu kalibrieren und zu
warten, bis sich das GPS-Signal eingestellt hat. Um
den Kompass zu kalibrieren, öffnen Sie die
Einstellungen in der App und befolgen Sie die
Anweisungen auf dem Bildschirm.
Page 11

Vista general del producto
Aeronave Control remoto
Nombre del producto: Mantis G
Modelo: YUNMGA
01
02
03
Nombre del producto: Control remoto Mantis Q
Modelo: YUNMQRC
ES
01
04
01 Hélices
02 Botón de encendido
03 Batería
04 Bloqueo de batería
0806 05 07
05 USB tipo C
06 Ranura para tarjeta Micro SD
07 Cámara
08 Protector del cardán
04 05 06 07
01 Soporte del teléfono
02 Mandos de control
03 Botón de encendido
02
03
04 Botón de foto
05 Puerto USB estándar
06 USB tipo C
07 Botón de grabación de vídeo
Page 12

1
2
Antes del vuelo
1.Carga del control remoto
• Use un USB tipo C (solo para la carga)
para cargarlo, aprox. 2.5 horas.
2.Preparación de la aeronave
Retire el protector
del cardán
• Todos los brazos y las hélices deben desplegarse antes de encenderse.
• Para plegar la Mantis G, invierta las instrucciones de despliegue.
Despliegue los
brazos traseros
Despliegue los
brazos delanteros
3.Carga de la batería de vuelo
• Presione el botón de bloqueo y retire la
batería de vuelo.
• Retire la tira de aislamiento en el
conector de la batería antes de usar.
• Cargue la batería de vuelo
hasta que la luz verde no
parpadee, aprox. 1 hora.
• Empuje la batería de vuelo dentro
de la aeronave hasta que escuche
un 'clic'.
4.Descarga de la aplicación
• Descargar la aplicación Yuneec
Pilot. Mantis G es compatible
con iOS 10. 0 (o posterior)
o Android 5. 0 (o posterior).
Page 13

Primer vuelo - Parte 1
1.Instalación del dispositivo inteligente
Saque el
soporte
del teléfono
Instale el
teléfono
inteligente
Conecte el teléfono
inteligente con el
control remoto
Cable para iPhone y
(
Android no incluido)
2.Encendido
Para encender la Mantis G y el control remoto, mantenga
pulsado el botón de encendido durante dos segundos hasta que oiga dos tonos ascendentes.
Encienda el control remoto Encienda la Mantis G
3.Conectando con Mantis G
• Abrir aplicación Yuneec Pilot.
• Pulse el icono de escaneo en la pantalla de la aplicación y
siga las instrucciones de la pantalla para conectar la aeronave
a su dispositivo de control (o seleccione manualmente el
Wi-Fi Mantis en la configuración del teléfono e introduzca la
contraseña para completar la conexión. La contraseña se
encuentra en la etiqueta del código QR de la aeronave).
4.Despegue
• Para garantizar un vuelo seguro, retroceda aproximadamente
9 pies (3 m) detrás de la Mantis G.
Opción 1
Pulse el icono [ ] en la aplicación y luego deslice para
despegar
Opción 2
• Mueva los mandos durante 1,5 segundos como se muestra
a continuación para arrancar los motores.
• Levante lentamente el mando izquierdo para despegar.
Inicie los motores Despegue
Page 14

Primer vuelo - Parte 2
1.Control de dirección
Mueva los mandos de control como se indica a continuación para
controlar la dirección de la Mantis G.
Arriba
Abajo
Giro a la
izquierda
Giro a la
derecha
Mando
izquierdo
Mando
derecho
Adelante
Atrás
Izquierda Derecha
2.Aterrizaje
Opción 1
Pulse el icono [ ] en la aplicación y luego
deslice para aterrizar.
Opción 2
Baje lentamente el control
izquierdo para aterrizar.Para
aterrizar correctamente,
asegúrate de que la aeronave está lejos de cualquier
obstáculo, ya que aterrizará
justo debajo de donde esté
planeando.
3.Apagado
• Para apagar el Mantis G, mantén pulsado el botón
de encendido durante dos segundos.
• Para apagar el controlador, mantén pulsado el
botón de encendido del centro del controlador
durante dos segundos.
Si ha notado una ligera desviación durante el
*
primer vuelo en exterior, es recomendable calibrar
la brújula y esperar a que se establezca una conexión GPS antes de despegar. Por favor, acceda a la
sección de Ajustes de su aplicación y siga las
instrucciones en pantalla para calibrar la brújula.
Page 15

Aperçu du produit
Drone Manette de contrôle
Nom du produit: Mantis G
Modèle: YUNMGA
01
02
03
Nom du produit: Mantis Q - Télécommande
Modèle: YUNMQRC
FR
01
04
01 Hélices
02 Bouton d'alimentation
03 Batterie
04 Verrouillage batterie
0806 05 07
05 USB Type-C
06 Fente pour micro carte SD
07 Caméra
08 Protège-cardan
04 05 06 07
01 Support téléphone
02 Manettes de commande
03 Bouton d'alimentation
02
03
04 Bouton photo
05 Port USB standard
06 USB Type-C
07 Bouton enregistrement vidéo
Page 16

Avant le vol
1
2
1.Recharge de la télécommande
• Utiliser USB Type-C
(uniquement pour le chargement)
pour la recharge, approx. 2.5 heures.
2.Préparation du drone
protège-cardan.
• Tous les bras et les hélices doivent être dépliés avant la mise sous
tension.
• Pour replier le Mantis G, suivez les instructions dans l'ordre inverse.
Déplier les
bras arrière
Déplier les bras avantRetirez le
3.Recharge de la batterie de vol
• Appuyer sur le bouton de verrouillage et
retirer la batterie de vol.
• Retirez la bande isolante du connec teur de la batterie avant utilisation.
• Recharger la batterie de vol
jusqu'au « Signal vert fixe »,
approx. 1 heure.
• Pousser la batterie de vol dans
le drone jusqu'à ce que vous
entendiez un « clic ».
4.Téléchargement de
l’application
• Télécharger l'appli Yuneec Pilot.
Mantis G est compatible avec
iOS 10.0 (ou version ultérieure) ou
Android 5.0 (ou version ultérieure).
Page 17

Premier vol Partie 1
1.Installation de l'appareil intelligent
Sortir le support
du téléphone
Installer le
smartphone
Connecter le smartphone
avec la télécommande
(Le câble pour iPhone et
Android n’est pas inclus)
2.Allumer
Pour allumer le Mantis G et la télécommande, appuyez sur le
bouton d'alimentation et maintenez-le appuyé pendant deux
secondes jusqu'à ce que vous entendiez deux tonalités croissantes.
Allumez la télécommande Allumez le Mantis G
3.Connexion à Mantis G
• Démarrez l’appli Yuneec Pilot.
• Appuyez sur l'icône de recherche sur l'écran de l'application et suivez les instructions inscrites à l'écran pour
connecter l'avion à votre appareil de contrôle (ou sélectionnez manuellement le WiFi Mantis dans les
paramètres du téléphone et entrez le mot de passe pour
terminer la connexion. Le mot de passe se trouve sur
l'étiquette du code QR de l'avion).
4.Décollage
• Afin d'assurer un vol en toute sécurité, reculez-vous d'environ 9 pieds (3 m) par rapport au Mantis G.
Option 1
Appuyez sur l'icône [ ] sur l'appli, puis faites glisser
pour décoller.
Option 2
• Actionnez les manettes pendant 1,5 seconde comme
indiqué cidessous pour démarrer les moteurs.
• Relevez doucement la manette gauche pour décoller.
Démarrez les moteurs Décollage
Page 18

Premier vol Partie 2
1.Contrôle de la direction
Actionnez les manettes de commande comme indiqué pour
contrôler la direction du Mantis G.
Rotation
à gauche
Haut
Bas
Rotation
à droite
Manette
gauche
Manette
droite
Avant
Arrière
Gauche Droite
2.Atterrissage
Option 1
Appuyez sur l'icône [ ] sur l'appli, puis faites
glisser pour atterrir.
Option 2
Abaissez doucement la
manette gauche pour atterrir.Pour atterrir correctement,
assurez-vous que le drone est
loin de tout obstacle ou de
toute obstruction, car il atterrira directement en dessous de
l’endroit où il se trouve en vol
stationnaire.
3.Éteindre
• Pour éteindre le Mantis G, appuyez sur le bouton
d’alimentation et maintenez-le appuyé pendant deux
secondes.
• Pour éteindre la manette, appuyez sur le bouton
d’alimentation situé au centre de la manette et
maintenez-le enfoncé pendant deux secondes.
Si vous avez observé une légère dérive lors de
*
votre premier vol en plein air, nous vous recommandons de calibrer votre boussole et d’ attendre
le verrouillage du signal GPS avant le décollage.
Veuillez vous rendre dans la section Paramètres de
votre application et suivre les instructions à
l’ écran pour calibrer la boussole.
Page 19

Panoramica prodotto
Velivolo Radiocomando
Nome prodotto: Mantis G
Modello: YUNMGA
01
02
03
Nome prodotto: Radiocomando Mantis Q
Modello: YUNMQRC
IT
01
04
01 Eliche
02 Pulsante di accensione
03 Batteria
04 Blocco batteria
05 USB tipo C
0806 05 07
06 Alloggiamento micro
scheda SD
07 Videocamera
08 Protezione della
sospensione cardanica
04 05 06 07
01 Supporto telefono
02 Manopole di comando
03 Pulsante di accensione
02
03
04 Pulsante foto
05 Porta USB standard
06 USB tipo C
07 Pulsante di videoregistrazione
Page 20

Prima del volo
1
2
1.Carica del radiocomando
• Per caricare utilizzare la USB tipo C
(solo per caricare) per circa 2.5 ore.
2.Preparazione del velivolo
Rimuovere la
protezione della
sospensione cardanica.
• Prima dell’accensione tutti i bracci e le eliche devono essere aperti.
• Per ripiegare il Mantis G seguire le istruzioni di apertura nell’ordine
contrario.
Aprire i bracci
posteriori
Aprire i bracci
anteriori
3.Carica della batteria di volo
• Premere il pulsante di blocco e rimuovere
la batteria di volo.
• Retirez la bande isolante del connec teur de la batterie avant utilizzo.
• Caricare la batteria di volo
finché la spia non si accen de in verde fisso (circa 1 ora).
• Inserire la batteria di volo nel
velivolo spingendola fino a
sentire un “clic”.
4.Scaricare l’app
• Scaricare l’App Yuneec Pilot.
Mantis G supporta iOS 10.0
(o successivi)
o Android 5.0 (o successivi).
Page 21

Primo volo Parte 1
1.Installazione dello smartphone
Estrarre il
supporto
per il telefono
Inserire lo
smartphone
Collegare lo smartphone
al radiocomando
Cavo IPhone e Android
(
non incluso)
2.Accensione
Per accendere il Mantis G e il radiocomando, premere il pulsante di accensione e tenerlo premuto per due secondi fino a
sentire due su oni crescenti.
Accendere il radiocomando Accendere il Mantis G
3.Connessione a Mantis G
• Lanciare l’app Yuneec Pilot.
• Toccare l’icona di ricerca nella schermata dell’app e seguire
le istruzioni visualizzate per collegare il velivolo al proprio
dispositivo di comando (oppure selezionare manualmente
Mantis Wi-Fi nelle impostazioni del telefono e immettere la
password per completare il collegamento. La password è
riportata sull’adesivo con il codice QR del velivolo).
3.Decollo
• Per garantire un volo sicuro arretrare di circa 3 metri (9 ft)
rispetto al Mantis G.
Opzione 1
Toccare l’icona [ ] dell’ App e poi scorrere per decollare.
Opzione 2
• Per avviare muovere lemanopole per 1,5 secondi come
illustrato di seguito.
• Per decollare sollevare lentamente la manopola sinistra.
Avviare i motori Decollo
Page 22

Primo volo Parte 2
Per controllare la direzione del Mantis G muovere le manopole di
comando come illustrato di seguito.
Avanti
Indietro
A sinistra A destra
Ruotare
a sinistra
Su
Giù
Ruotare
a destra
Manopola
sinistra
Manopola
destra
2.Atterraggio1.Controllo della direzione
Opzione 1
Toccare l’icona [ ] dell’App e poi scorrere per
atterrare.
Opzione 2
Per atterrare abbassare lentamente la manopola sinistra.Per atterrare correttamente,
assicurarsi che il velivolo sia
lontano da ostacoli od ostruzioni, poiché atterrerà direttamente sotto il punto in cui
staziona in hovering.
3.Spegnimento
• Per spegnere il Mantis, premere il pulsante di
accensione e tenerlo premuto per due secondi.
• Per spegnere il controller, premere il pulsante di
accensione al centro del controller e tenerlo premuto per due secondi.
Se si è riscontrata una leggera deviazione durante
*
il primo volo all’ aperto, si consiglia di regolare la
bussola e di attendere il segnale GPS prima del
decollo. Selezionare la sezione Impostazioni nella
propria app e seguire le istruzioni sullo schermo per
regolare la bussola.
Page 23

Any information might be changed due to the software update. For the latest documents, please check the official website:www.yuneec.com
 Loading...