


Version 2.1


TABLE OF CONTENTS
1 |
TABLE OF CONTENTS |
15 |
FLIGHT CONTROLS - ANGLE (PILOT) MODE |
2 |
INTRODUCTION |
16 |
FLIGHT CONTROLS - HOME MODE |
2 |
SPECIFICATIONS |
17 |
LED STATUS INDICATIONS |
3 |
NOTICES AND WARNINGS |
19 |
TAKING PHOTOS AND RECORDING VIDEO |
4 |
GENERAL SAFETY PRECAUTIONS AND WARNINGS |
20 |
INSTALLING THE FLIGHT BATTERY |
5 |
FCC INFORMATION |
20 |
GPS FUNCTIONALITY |
6 |
Q500 RTF CONTENTS |
21 |
PREPARING TO FLY |
7 |
BATTERY WARNINGS AND USAGE GUIDELINES |
22 |
FLYING |
8 |
CHARGING THE BATTERIES |
23 |
DISABLING GPS |
9 |
PREPARING THE CGO2-GB |
23 |
GRAPHICAL USER INTERFACE |
9 |
INSTALLING THE PROPELLERS |
24 |
COMPASS CALIBRATION |
10 |
Q500, CGO2-GB AND ST10 OVERVIEW |
26 |
ST10 AND RECEIVER BINDING |
11 |
ST10 DISPLAY |
27 |
ST10 AND CGO2-GB BINDING |
12 |
ST10 ACCESSORIES |
28 |
TROUBLESHOOTING |
12 |
FLIGHT CONTROLS |
29 |
WARRANTY INFORMATION |
13 |
FLIGHT CONTROLS - SMART MODE |
|
|
1 1

INTRODUCTION
Change your perspective with the Yuneec Q500 Typhoon aerial photography and videography (APV) system. The system arrives 100% factory-assembled and test flown including the innovative 3-axis CGO2-GB that records full HD 1080p (60, 50 or 48 fps) video and takes 12 megapixel still photos. And the built-in digital video downlink delivers streaming video that can be viewed right on the screen of the included ST10 transmitter and Personal Ground Station. With the Q500 it’s never been easier to capture amazing photographs and video footage for a wide variety of uses.
And although the Q500 is nearly ready to fly right out the box, please take the time to read through this entire instruction manual for more information on safety, battery charging, flight controls and more before making your first flight. Please also visit www.Yuneec.com for additional information including product updates, bulletins, videos and more.
SPECIFICTATIONS
Q500 |
CGO2-GB |
ST10 |
Height: 210mm (8.3 in) |
Height: 115mm (4.5 in) |
Number of Channels: 10 |
Length (without rotor blades): 420mm (16.5 in) |
Width: 75mm (2.9 in) |
RC Band: 2.4GHz |
Width (without rotor blades): 420mm (16.5 in) |
Depth: 135mm (1.4 in) |
RC Modulation: Yuneec |
Diameter (without rotor blades): 565mm (22.2 in) |
Weight: 185g (6.5 oz) |
Video Downlink Band: 5.8GHz |
Propeller/Rotor Blade Diameter: 330mm (13.0 in) |
Video Resolution: 1080p 60, 50 or 48 fps |
Telemetry/OSD: Yes |
Weight (without battery and payload): 1130g (40.0 oz) |
Photo Resolution: 12 megapixels |
SD Card Compatible: Yes |
Takeo Weight (with battery and CGO2-GB): 1700g |
Transmission Distance/Range: Up to 600m (1970 ft) |
LCD Screen Size: 4.5” |
(60.0 oz) |
depending on receiving device |
Touchscreen: Yes |
Battery: 5400mAh 3S 11.1V LiPo (included) |
Transmission Band: 5.8GHz |
|
Charger: DC 3S 11.1V LiPo balancing and AC adapter |
Storage (memory): microSD Class 10 up to 128GB |
|
(included) |
|
|
Transmitter: ST10 10-channel 2.4GHz with 5.8GHz |
|
|
video link (included) |
|
|
Flight Time: 20-25 minutes |
|
|
2

NOTICES AND WARNINGS
IMPORTANT NOTE: All safety precautions and warnings, instructions, warranties and other collateral information is subject to change at the sole discretion of Yuneec. For the most up-to-date information please visit the corresponding product page at www.Yuneec.com or contact the nearest Yuneec o ce or authorized distributor.
The following special language terms are used throughout the product literature to indicate various levels of potential harm when operating this product:
NOTICE: Procedures, which if not properly followed, create a possibility of property damage and/or little to no possibility of injury. CAUTION: Procedures, which if not properly followed, create the probability of property damage and/or a possibility of serious injury.
WARNING: Procedures, which if not properly followed, create the probability of property damage, collateral damage and/or serious injury or create a high probability of superficial injury.
WARNING: Read the ENTIRE quick start guide and instruction manual to become familiar with the features of the product before operating. Failure to operate the product correctly can result in damage to the product, property and/or cause serious injury.
WARNING: This is a sophisticated consumer product. It must be operated with caution and common sense, and requires some basic mechanical ability. Failure to operate this product in a safe and responsible manner could result in damage to the product, property and/or cause serious injury. This product is not intended for use by children without direct adult supervision. Do not use with incompatible components or alter this product in any way outside of the instructions provided by Yuneec. The quick start guide and instruction manual contain instructions for safety, operation and maintenance. It is essential to read and follow all the instructions and warnings prior to assembly, setup and/or use in order to operate the product correctly and avoid damage or serious injury.
AGE RECOMMENDATION: NOT FOR CHILDREN UNDER 14 YEARS. THIS IS NOT A TOY.
3

GENERAL SAFETY PRECAUTIONS AND WARNINGS
|
100˚ |
MAX 8000ft |
|
|
|
KEEP CLEAR OF THE |
DO NOT FLY NEARBY TALL |
THE MAXIMUM FLYING |
DO NOT FLY OVER |
DO NOT FLY NEAR |
DO NOT FLY IN WINDS |
SPINNING PROPELLERS! |
BUILDINGS/OBSTRUCTIONS |
ALTITUDE FOR THIS AIRCRAFT |
CROWDS! |
AIRPORTS! |
THAT EXCEED 8–12 MPH |
|
(100° MINIMUM CLEARANCE |
IS 8000FT ABOVE SEA LEVEL! |
|
|
(13–19 KPH)! |
|
REQUIRED) |
|
|
|
|
WARNING: Failure to use this product in the intended manner as described in the quick start guide and instruction manual can result in damage to the
product, property and/or cause serious injury. A Radio Controlled (RC) multirotor aircraft, APV platform, drone, etc. is not a toy! If misused it can cause serious bodily harm and damage to property.
WARNING: As the user of this product you are solely and wholly responsible for operating it in a manner that does not endanger yourself and others or result in damage to the product or the property of others.
•Keep your hands, face and other parts of your body away from the spinning propellers/rotor blades and other moving parts at all times. Keep items that could impact or become entangled away from the propellers/rotor blades including debris, parts, tools, loose clothing, etc.
•Always operate your aircraft in open areas that are free from people, vehicles and other obstructions. Never fly near or above crowds, airports or buildings.
•To ensure proper operation and safe flight performance never attempt to operate your aircraft nearby buildings or other obstructions that do not o er a clear view of the sky and can restrict GPS reception.
•Do not attempt to operate your aircraft in areas with potential magnetic and/or radio interference including areas nearby broadcast towers, power transmission stations, high voltage power lines, etc.
•Always keep a safe distance in all directions around your aircraft to avoid collisions and/or injury. This aircraft is controlled by a radio signal subject to interference from many sources outside your control. Interference can cause momentary loss of control.
•To ensure proper and safe operation of the automatic landing function in Home Mode you must start the motors with the aircraft in a position that has at least 10 feet (approximately 3 meters) of clear and open space around it and achieve a proper GPS lock.
•Do not attempt to operate your aircraft with any worn and/or damaged components, parts, etc. (including, but not limited to, damaged propellers/rotor blades, old batteries, etc.).
•Never operate your aircraft in poor or severe weather conditions including heavy winds, precipitation, lightning, etc.
4

•Always operate your aircraft starting with a fully charged battery. Always land as soon as possible after the first level low voltage battery warning or land immediately after the second level low voltage battery warning (as indicated by the vibrations and audible alerts from the transmitter/personal ground station).
•Always operate your aircraft when the voltage of the battery in the transmitter/personal ground station is in a safe range (as indicated by the battery charge status icon on the screen of the transmitter/personal ground station).
•Always keep the aircraft in clear line of sight and under control, and keep the transmitter/personal ground station powered on while the aircraft is powered on.
•Always move the throttle control stick down fully and turn o the motors in the event the propellers/rotor blades come into contact with any objects.
•Always allow components and parts to cool after use before touching them and flying again.
•Always remove batteries after use and store/transport them per the corresponding guidelines.
•Avoid water exposure to all electronic components, parts, etc. not specifically designed and protected for use in water. Moisture causes damage to electronic components and parts.
•Never place any portion of the aircraft or any related accessories, components or parts in your mouth as doing so could cause serious injury or even death.
•Always keep chemicals, small parts and electronic components out of the reach of children.
•Carefully follow the instructions and warnings included with this aircraft and any related accessories, components or parts (including, but not limited to, chargers, rechargeable batteries, etc.).
CAUTION: The electronic speed controls (ESCs) installed in the Q500 are not compatible with any other product, and the Q500 is not compatible with any other ESCs. Use of any other ESCs in the Q500 will cause a crash, which may result in damage to the product, property and/or cause serious injury.
FCC INFORMATION
Thisdevicecomplieswithpart15oftheFCCrules.Operationissubjecttothefollowingtwoconditions:(1)Thisdevicemaynotcauseharmfulinterference, and (2) this device must accept any interference received, including interference that may cause undesired operation.
CAUTION: Changes or modifications not expressly approved by the party responsible for compliance could void the user’s authority to operate the equipment.
Thisproductcontainsaradiotransmitterwithwirelesstechnologywhichhasbeentestedandfoundtobecompliantwiththeapplicableregulationsgoverning a radio transmitter in the 2.400GHz to 2.4835GHz frequency range.
Antenna Separation Distance:
Maintain a separation distance of at least 2 in (50mm) between your body (not including your fingers, hands and wrists) and the antennas to meet the RF exposure safety requirements determined by FCC regulations.
5

Q500 RTF CONTENTS
The Q500 RTF includes everything needed to fly right out of the box. There’s nothing extra to buy or provide!
|
|
4 |
|
|
|
|
15 |
|
1 |
|
11 |
|
|
|
|
||
|
|
|
|
|
|
|
|
|
14 |
|
|
|
2 |
|
|
|
13 |
|
|
|
|
|
|
|
|
|
5 |
|
|
|
|
|
|
|
10 |
|
|
|
6 |
|
9 |
|
7 |
|
8 |
|
|
|
|
|
|
|
|
|
3 |
|
|
|
12 |
1 |
Q500 RTF Airframe w/Installed CGO2-GB |
6 |
USB to Micro USB Cable |
11 |
DC Automobile Accessory Socket/ |
2 |
ST10 Transmitter and Personal Ground Station |
7 |
USB Interface/Programmer |
|
Cigarette Lighter Receptacle Adapter |
3 |
ST10 LCD Screen Sun Shade/Shield |
8 |
5400mAh 3S 11.1V LiPo Battery |
12 |
AC to DC Adapter/Power Supply |
4 |
ST10 Neck Strap |
9 |
3S 11.1V LiPo Balance Connector Charge Lead |
13 |
8GB microSD Card w/Adapter |
5 |
AC to DC USB Adapter/Charger |
10 DC 3S 11.1V LiPo Balancing Charger |
14 |
Motor Holder/Prop Installation Tool |
|
|
|
|
|
15 |
Propellers/Rotor Blades (2 sets) |
6

BATTERY WARNINGS AND USAGE GUIDELINES
WARNING: Lithium Polymer (LiPo) batteries are significantly more volatile than alkaline, NiCd or NiMH batteries. All instructions and warnings must be followed exactly to prevent property damage and/or serious injury as the mishandling of LiPo batteries can result in fire. By handling, charging or using the included LiPo battery you assume all risks associated with LiPo batteries. If you do not agree with these conditions please return the complete product in new, unused condition to the place of purchase immediately.
•You must always charge the LiPo battery in a safe, well-ventilated area away from flammable materials.
•Never charge the LiPo battery unattended at any time. When charging the battery you must always remain in constant observation to monitor the charging process and react immediately to any potential problems that may occur.
•After flying/discharging the LiPo battery you must allow it to cool to ambient/room temperature before recharging.
•To charge the LiPo battery you must use only the included charger or a suitably compatible LiPo battery charger. Failure to do so may result in a fire causing property damage and/or serious injury.
•If at any time the LiPo battery begins to balloon or swell, discontinue charging or discharging immediately. Quickly and safely disconnect the battery, then place it in a safe, open area away from flammable materials to observe it for at least 15 minutes. Continuing to charge or discharge a battery that has begun to balloon or swell can result in a fire. A battery that has ballooned or swollen even a small amount must be removed from service completely.
•Do not over-discharge the LiPo battery. Discharging the battery too low can cause damage to the battery resulting in reduced power, flight duration or failure of the battery entirely. LiPo cells should not be discharged to below 3.0V each under load.
•Store the LiPo battery at room temperature and in a dry area for best results.
•When charging, transporting or temporarily storing the LiPo battery the temperature range should be from approximately 40–120° F (5–49° C). Do not store the battery or aircraft in a hot garage, car or direct sunlight. If stored in a hot garage or car the battery can be damaged or even catch fire.
•Never leave batteries, chargers and power supplies unattended during use.
•Neverattempttochargelowvoltage,ballooned/swollen,damagedorwet batteries.
•Never allow children under 14 years of age to charge batteries.
•Never charge a battery if any of the wire leads have been damaged or shorted.
•Never attempt to disassemble the battery, charger or power supply.
•Never drop batteries, chargers or power supplies.
•Always inspect the battery, charger and power supply before charging.
•Always ensure correct polarity before connecting batteries, chargers and power supplies.
•Always disconnect the battery after charging.
•Always terminate all processes if the battery, charger or power supply malfunctions.
IMPORTANT NOTE: It’s safer and better for the longevity of the battery to store it only partially charged for any length of time. Storing the battery approximately 50% charged (which is around 3.85V per cell) is typically best,however,itwilltakesomecarefulmanagementofthechargetimeand the use of a volt meter to achieve this voltage. If you have the equipment and skills to achieve the 50% charge level for storage it is recommended. If not, simply be sure to not store the battery fully charged whenever possible. In fact, as long as the battery will be stored at approximately room temperature and for no more than a few weeks before the next use, it may be best to store the battery in the discharged state after the last flight (as long as the battery was not over-discharged on the last flight).
7
CHARGING THE BATTERIES
WARNING: Lithium Ion (LiIon) and Lithium Polymer (LiPo) batteries are significantly more volatile than alkaline, NiCd or NiMH batteries. All instructions and warnings must be followed exactly to prevent property damage and/or serious injury as the mishandling of LiIon/LiPo batteries can result in fire. By handling, charging or using the included LiIon/LiPo batteries you assume all risks associated with them. If you do not agree with these conditions please return the complete product in new, unused condition to the place of purchase immediately.
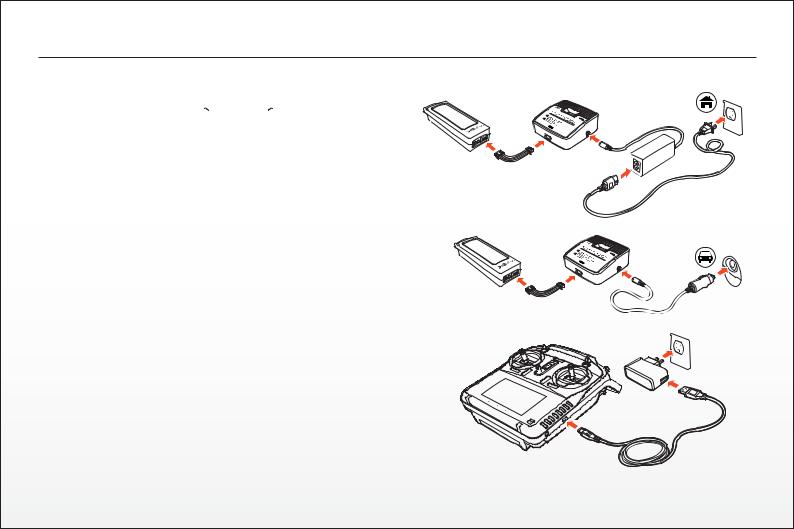
CHARGING THE LIPO FLIGHT BATTERY
YoucanpowertheSC3500-3chargerfroma100-240VACoutletusingthe AC adapter/power supply, or from a 12V DC accessory socket/cigarette lighter receptacle in a vehicle using the corresponding adapter. Once you’ve verified the charger is powered on and ready to charge (green blinkingLED),plugthebalanceconnectorchargeleadintothecharger,then connect the LiPo flight battery to the charge lead. The battery will begin charging (red blinking LED) and it will take approximately 2 hours to charge a fully discharged (not over-discharged) battery.
CHARGING THE LI-ION ST10 BATTERY
You can charge the LiIon battery installed in the ST10 from a 100-240V AC outletusingtheUSBadapter/charger,orfromasuitableUSBpowersource (2.0 amps max), with the USB to micro USB cable. While the ST10 is powered o connect the cable to the USB adapter/charger, then plug it into the USB connector/charging port on the right side. After approximately 30-45 seconds the LED indicator for the battery will blink blue while the battery is charging, and will glow solid blue when the battery is fully charged. It will take approximately 5.5 hours to charge a fully discharged (not over-discharged ) battery.
NOTE: The AC plug type will vary depending on the region in which the product was imported/purchased (AU = Australian; EU = European; UK = United Kingdom; US = United States).
8
 Loading...