

YUNEEC GB200 Quick Start Manual

QUICKSTART MANUAL (ENGLISH)
WARNINGS AND IMPORTANT NOTES
TABLE OF CONTENTS
1 ....................... Table of Contents
2 ....................... Warnings and Important Notes
4 ....................... Overview
6 ....................... How to switch Camera Mounts:
CGO1™ to GoPro3/3+
7 ....................... How to switch Camera Mounts:
GoPro3/3+® to CGO1™
9 ....................... Mounting CGO1™ on GB200™
9 ....................... Mounting GoPro® on GB200™
9 ....................... Mounting GB200™ on Blade® 350QX2
13 ...................... GB200™ LED Status
14 ...................... Spare Parts and compatible products
14 ...................... Troubleshooting Guide
16 ...................... Limited Warranty
Warning: Do not move, sway or shake the model during the
initialization process. Moving, shaking or swaying the model
during the initialization process may lead to initialization failure,
which will require you to cycle the power o and then back on to
repeat the process. Adjusting or modifying the GB200™ in anyway
is not recommended. Prior to using the GB200™, read and under-
stand the quick start guide and instruction manual completely.
Always power on your transmitter rst and then power on your
model and gimbal.
YUNEEC™ GB200™ gimbal is optimized for both the CGO1™
andGoPro3/3+® cameras. Please mount your camera to the
GB200™ without adjusting or modifying the GB200™. Do not
modify or add any other component / device (such as lters,
lens, plastic case, hood, etc.) to the camera. Also, it’s important
to make sure to use the original battery for your chosen camera, or
the change in weight and center of gravity of the camera may de-
crease performance of GB200™ or even cause internal malfunction.
Make sure your model’s autopilot system operates in the safest
manner when the main power battery is connected. We strongly
recommend that you remove all blades/propellers, use a suitable
ight battery, and keep a safe distance from children and other
people during gimbal setup. Please follow these important steps
to mount and connect the GB200™ gimbal on your model, and
respect the AMA’s National Model Aircraft Safety Code.

WARNINGS AND IMPORTANT NOTES
YUNEEC™ has no control over the use, setup, nal assembly or
modication (including use of non-specied YUNEEC™ parts i.e.
Warning: Do not move, sway or shake the model during the
initialization process. Moving, shaking or swaying the model
during the initialization process may lead to initialization failure,
which will require you to cycle the power o and then back on to
repeat the process. Adjusting or modifying the GB200™ in anyway
is not recommended. Prior to using the GB200™, read and understand the quick start guide and instruction manual completely.
Always power on your transmitter rst and then power on your
model and gimbal.
YUNEEC™ GB200™ gimbal is optimized for both the CGO1™
andGoPro3/3+® cameras. Please mount your camera to the
GB200™ without adjusting or modifying the GB200™. Do not
modify or add any other component / device (such as lters,
lens, plastic case, hood, etc.) to the camera. Also, it’s important
to make sure to use the original battery for your chosen camera, or
motors, ight controllers, motor controllers, blades/propellers, etc.)
or misuse. Therefore no liability shall be assumed nor accepted for
any resulting damage or injury. By the act of use, setup or assembly,
the user accepts all resulting liability. YUNEEC™ assumes no liability
for damage(s) or injuries incurred directly or indirectly from the
use of this product.
YUNEEC™ and GB200™ are trademarks or registered trademarks of
Yuneec International Co., Ltd.. This product and manual are copy-
rights of YUNEEC™ with all rights reserved. No part of this product
or manual shall be reproduced in any form without the prior
written consent or authorization from YUNEEC™. Furthermore,
no other liability is assumed with respect to the use of the product
or information contained herein. YUNEEC™ reserves the right to
update manuals and quickstart guides any time. For warranty infor-
mation, please visit www.Yuneec.com
the change in weight and center of gravity of the camera may decrease performance of GB200™ or even cause internal malfunction.
Make sure your model’s autopilot system operates in the safest
manner when the main power battery is connected. We strongly
recommend that you remove all blades/propellers, use a suitable
ight battery, and keep a safe distance from children and other
people during gimbal setup. Please follow these important steps
to mount and connect the GB200™ gimbal on your model, and
respect the AMA’s National Model Aircraft Safety Code.

YUNEEC™ has no control over the use, setup, nal assembly or
modication (including use of non-specied YUNEEC™ parts i.e.
motors, ight controllers, motor controllers, blades/propellers, etc.)
or misuse. Therefore no liability shall be assumed nor accepted for
any resulting damage or injury. By the act of use, setup or assembly,
the user accepts all resulting liability. YUNEEC™ assumes no liability
for damage(s) or injuries incurred directly or indirectly from the
use of this product.
YUNEEC™ and GB200™ are trademarks or registered trademarks of
Yuneec International Co., Ltd.. This product and manual are copyrights of YUNEEC™ with all rights reserved. No part of this product
or manual shall be reproduced in any form without the prior
OVERVIEW
written consent or authorization from YUNEEC™. Furthermore,
no other liability is assumed with respect to the use of the product
or information contained herein. YUNEEC™ reserves the right to
update manuals and quickstart guides any time. For warranty information, please visit www.Yuneec.com
DIFFERENCE BETWEEN ANGLE OR VELOCITY MODE:
Angle Mode allows the ‘pitch’ angle of the camera gimbal to be
changed relative to the PWM control stick/knob/slider input.
Velocity Mode controls the speed/rate of the ‘pitch’ angle of the
camera according to PWM control stick/knob/slider input. For
example, the more control input, the faster the rate of change
will be.
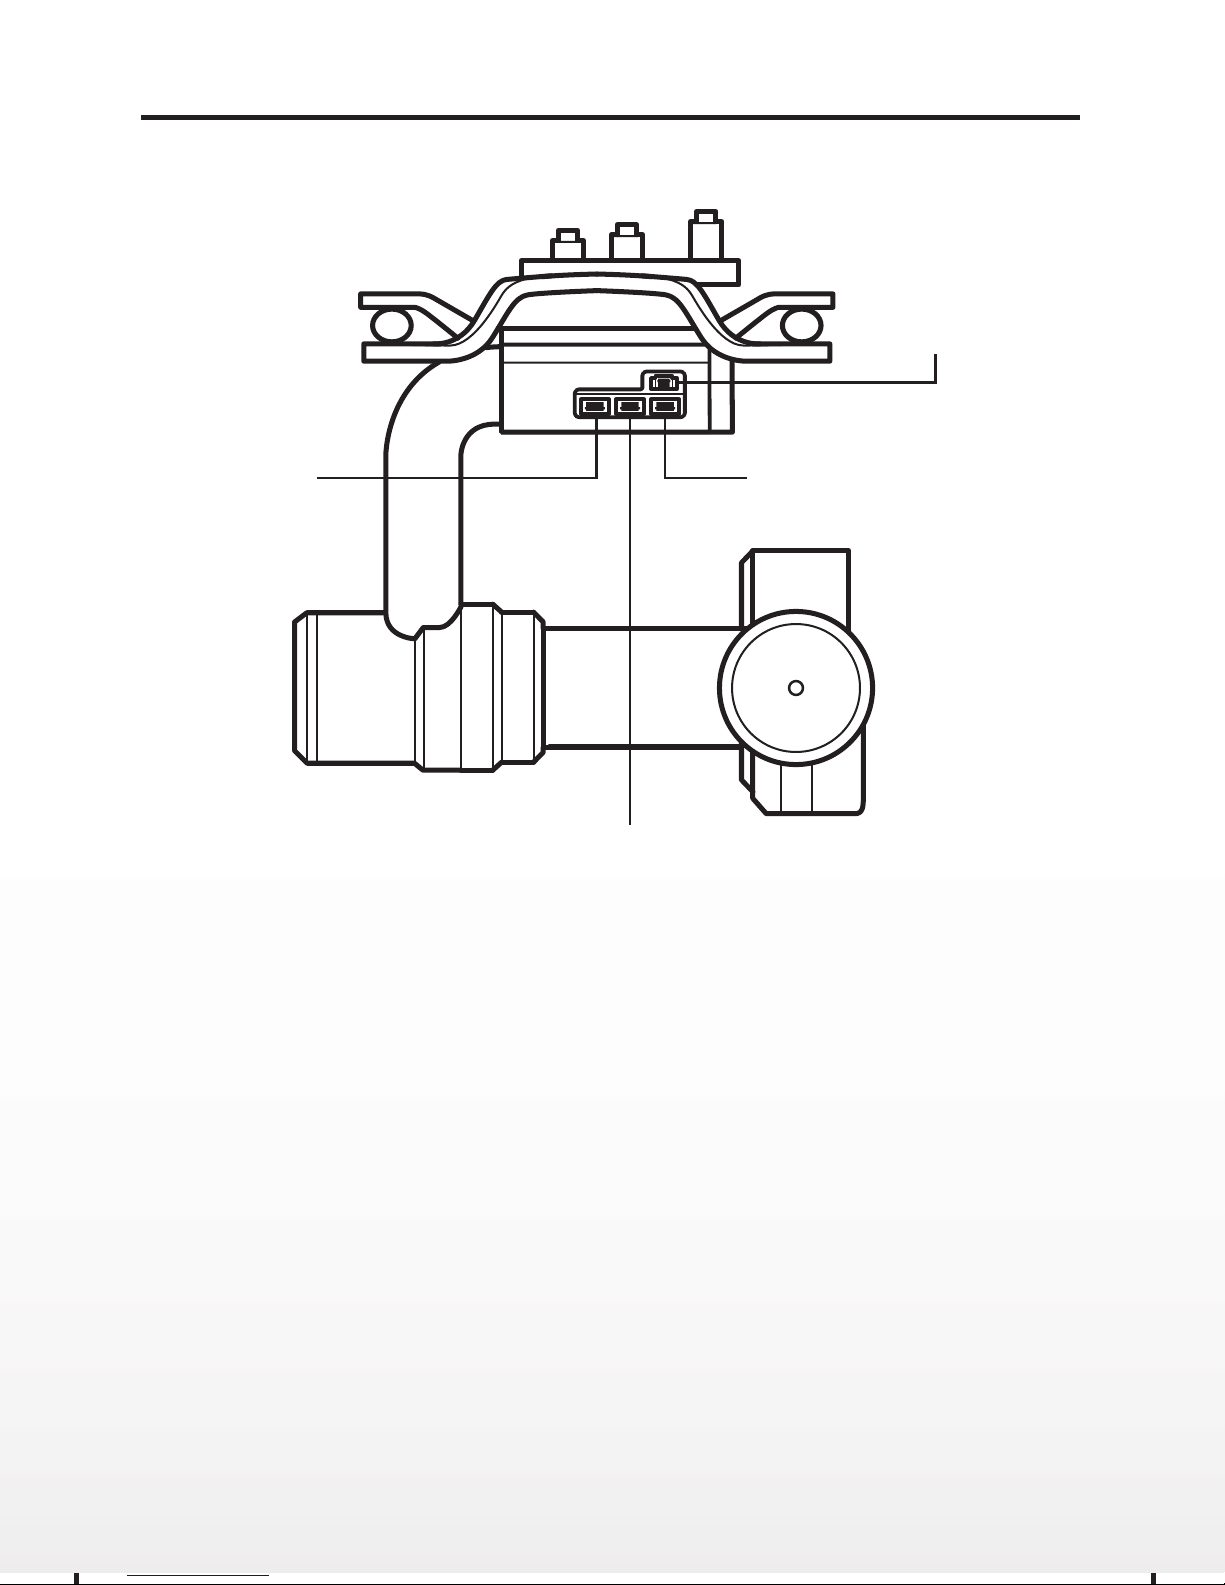
OVERVIEW
Universal
PWM Input
Volt Universal
Power Port
Mode Control Port
for Angle or Velocity
Control
Blade® 350QX
Camera Pitch
Control Port
DIFFERENCE BETWEEN ANGLE OR VELOCITY MODE:
Angle Mode allows the ‘pitch’ angle of the camera gimbal to be
changed relative to the PWM control stick/knob/slider input.
Velocity Mode controls the speed/rate of the ‘pitch’ angle of the
camera according to PWM control stick/knob/slider input. For
example, the more control input, the faster the rate of change
will be.

Software
Yuneec™
Update Port
Spektrum® Satellite
Receiver Port
Receiver Port
Roll Axis
Arm
Pitch Axis
Arm
CGO1™ Camera
Gimbal Mount
CGO1™
Mounting screw
HOW TO SWITCH CAMERA MOUNTS: CGO1™ to GoPro3/3+® (A)
Step 1: Rotate the CGO1™ camera mount - as shown in illustration
A - until the at spot inside the setscrew hole is facing up, and
loosen the setscrew using the allen wrench.
Step 2: Carefully remove the CGO1™ camera mount by sliding it
outward away from the gimbal motor and remove the gyro board
from the gyro board mount.
Step 3: Insert gyro board into the gyro board mount on the GoPro®
camera mount, and wrap the gyro board wire harness clockwise
one whole turn around the end of the camera mount toward the
gimbal motor.
 Loading...