

Page 1
QUICK START GUIDE V1.0QUICK START GUIDE V1.0
Page 2
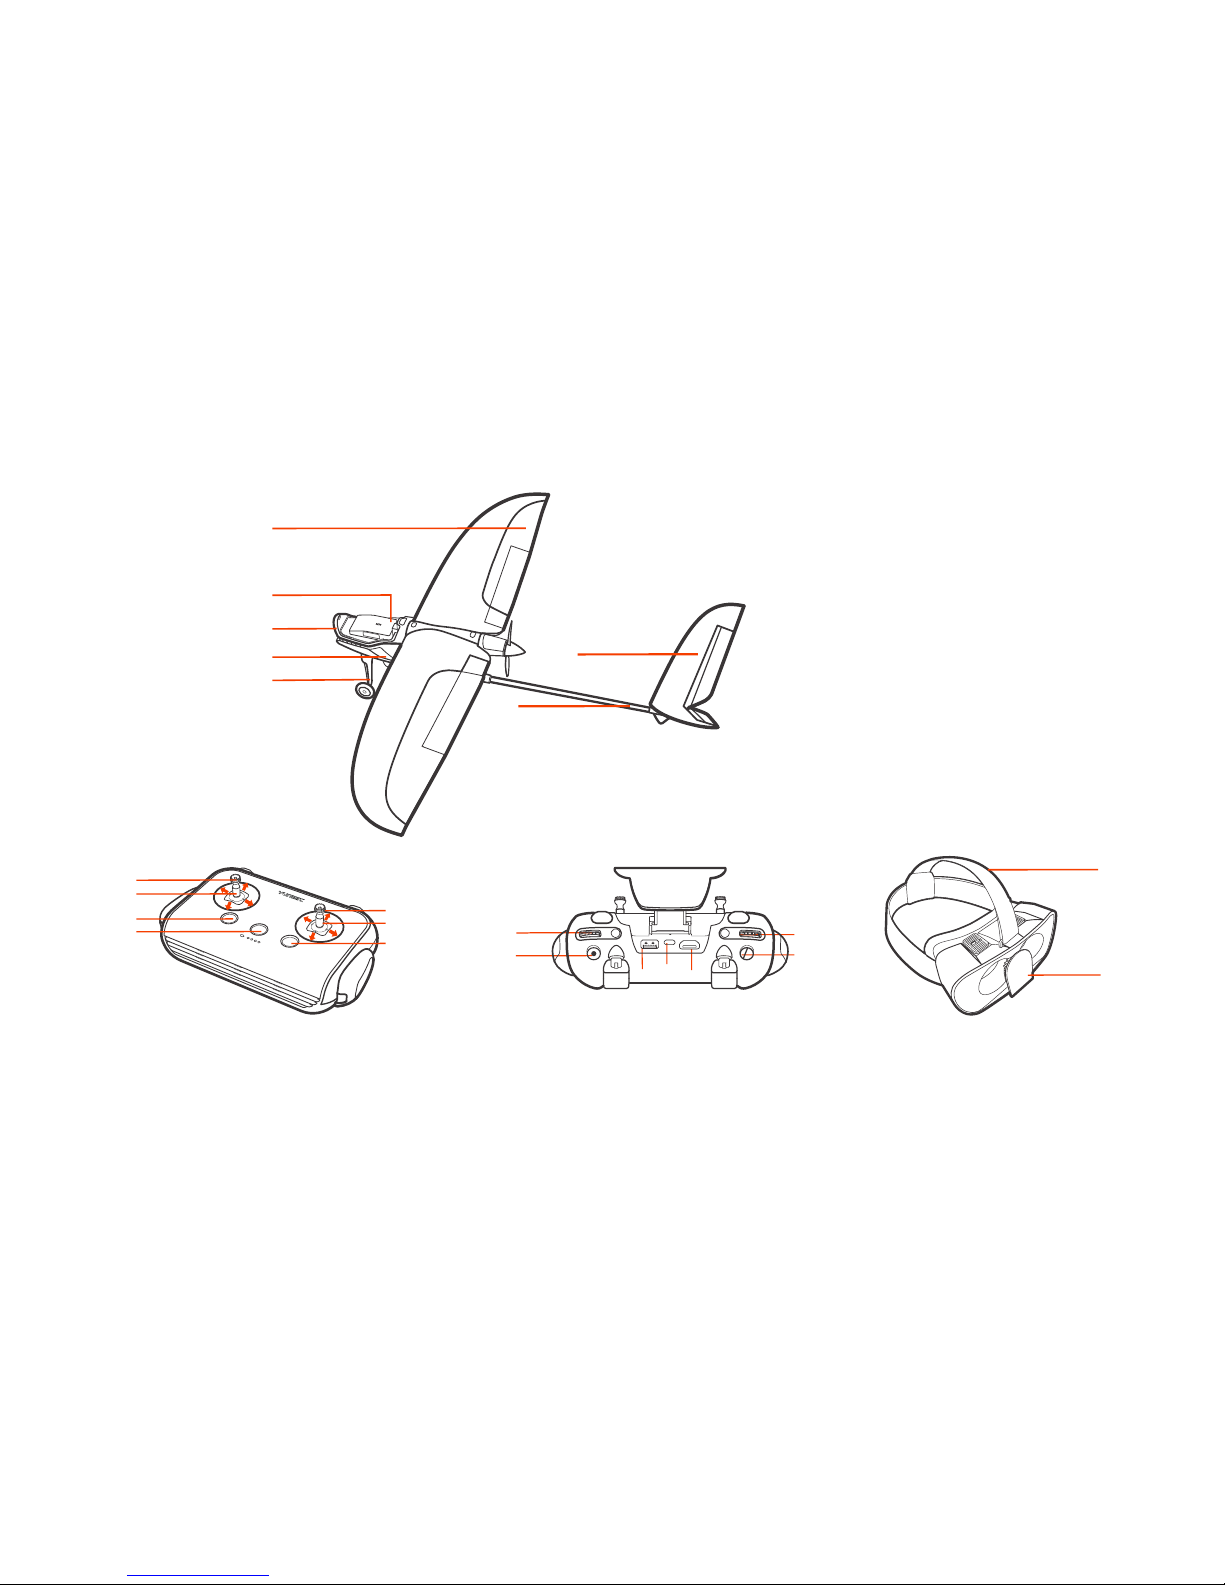
INTRODUCTION AND OVERVIEW
01 Wing
02 Power Switch
03 Camera
04 Fuselage
05 Landing Gear
06 V Tail
07 Tail Boom
01 Throttle Control
02 Rudder/Yaw Control
03 B1: Auto Landing
04 B2: Power Switch
05 Elevator/Pitch Control
06 Aileron/Roll Control
07 B3: Return Home and Loiter Button
08 K1: Menu Option Slider
09 S2:Video Recording Button
10 Standard USB Port
11 Mini USB Port
12 HDMI Port
13 K2 Camera Control Slider
14 S1:Photo Button
01 Head Band
02 Buckle for Smartphone
01
02
08
13
14
09
11
1210
01
05
06
07
02
03
04
03
04
01
06
07
02
05
Page 3
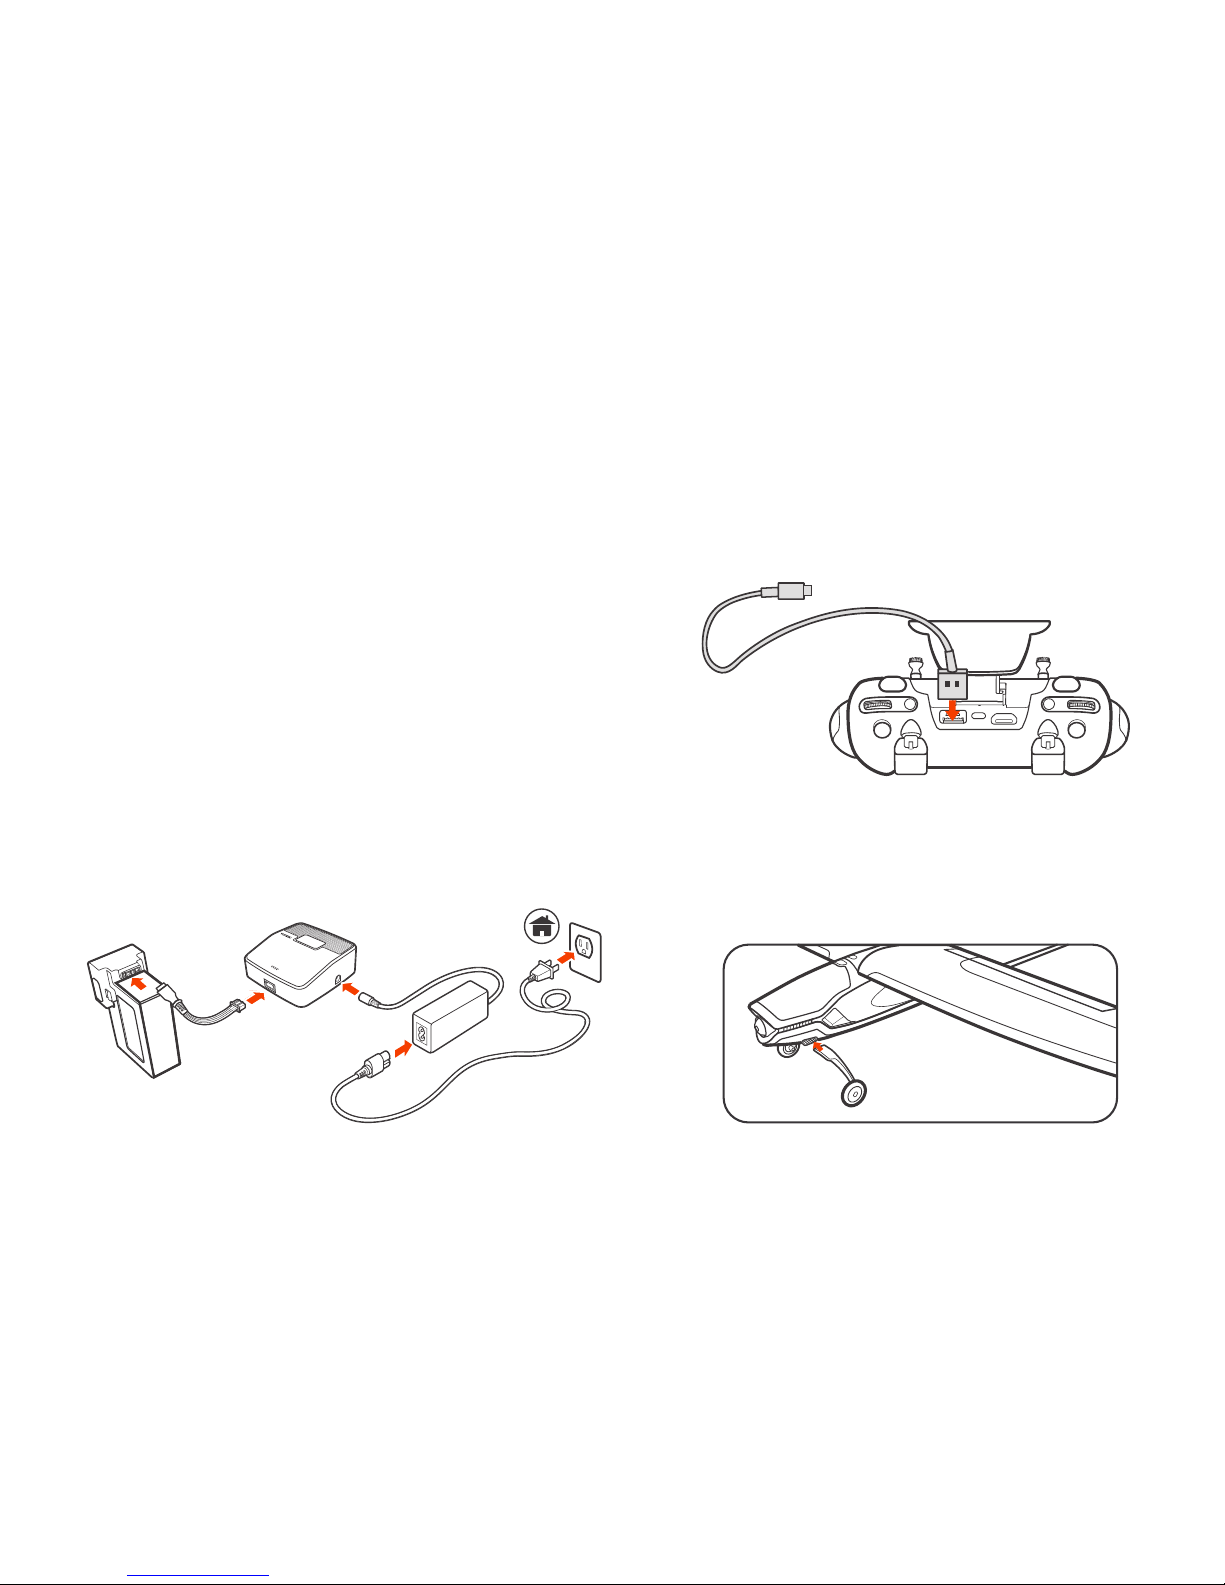
BEFORE FLIGHT
b
. Charge ST10C using Mini USB.
Find a safe and open outdoor area to fly. That area should be clear
of objects and people for approximately 500 feet (150m) in all
directions.
Download and install Yuneec Exp APP on your smart device.
Recommend that first flights are done without wearing the
goggles. After getting used to the flight characteristics of the
Firebird, install smart device in the goggles and try the full FPV
experience.
successful connection.
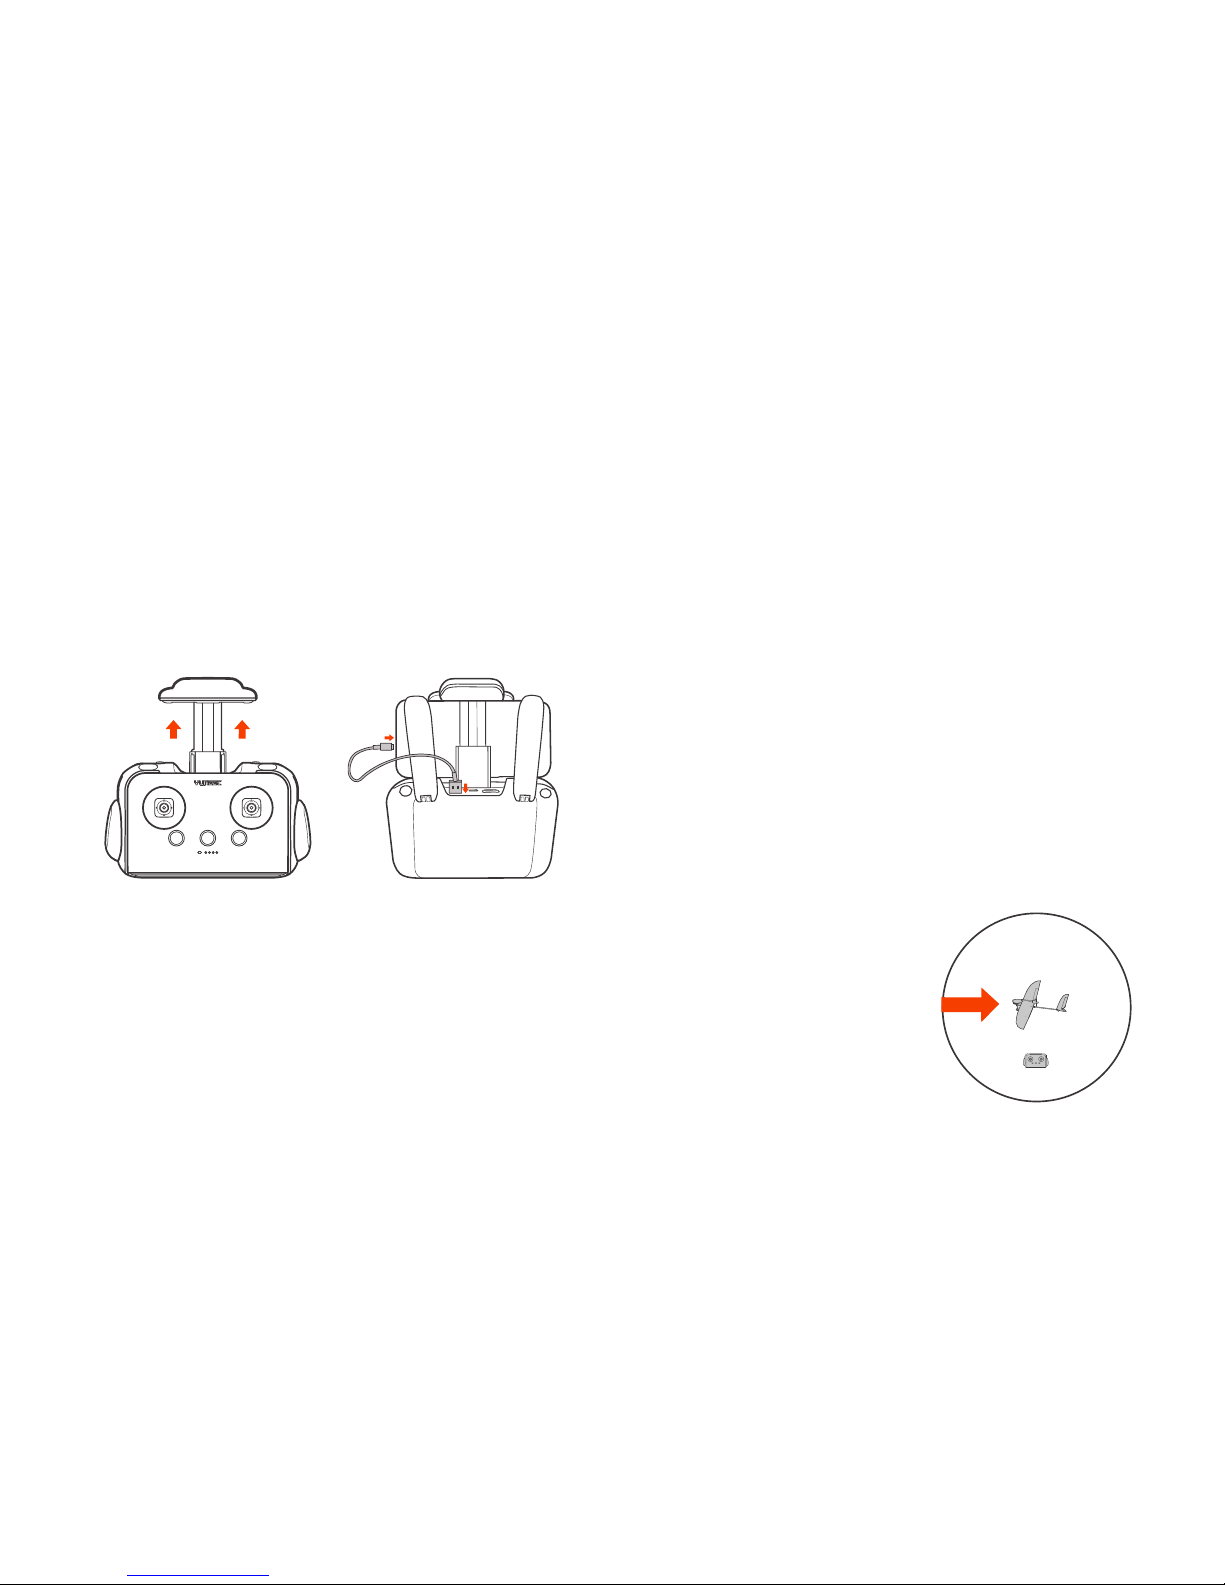
ASSEMBLING THE FIREBIRD
a
. Insert landing gear.
CHARGING THE
FLIGHT BATTERY AND ST10C
a
. Charge flight battery using supplied charger.
Page 4
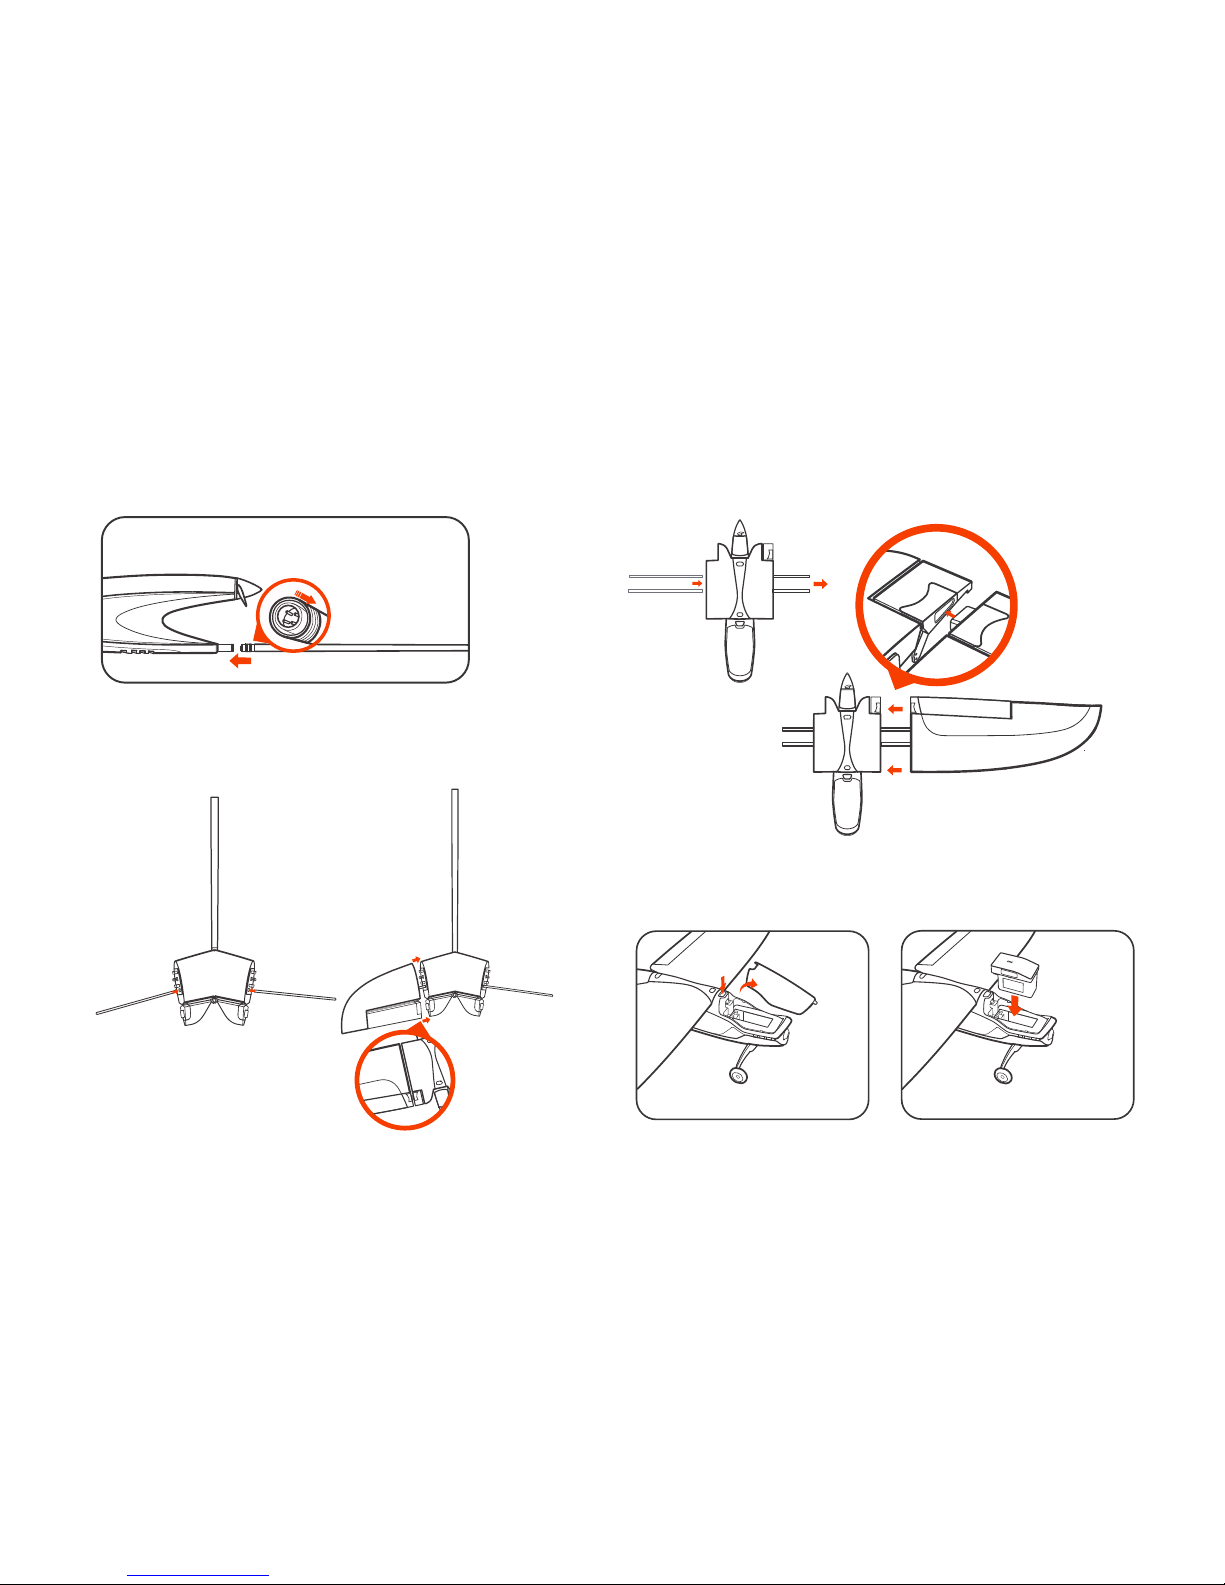
b. Install tail
c. Install carbon tubes on tail and install outer tail panels.
d. Install carbon tubes on tail and install outer tail panels.
e. Install carbon tubes on tail and install outer tail panels.
11
22
11
22
Page 5
NOTICE
To power off Firebird, short press the power switch until
motor vibrates, then press and hold the power switch for
3 seconds.
GPS Lock
a. After being powered on the Firebird will automatically
seek satellite lock, both elevators will move back and
forth.
b. Wait several seconds up to a minute for Firebird to gain
satellite lock. When it is ready the elevators will stop
moving and the ST10C will have control of the Firebird,
except the throttle joystick. The elevators will center when
GPS lock is established.
Set Home Point and Landing Direction
a. Set the Firebird on the ground, upright on its wheels at
the point that the Firebird will use as home for this flight
and pointing in the same direction that the Firebird will
land, which is always into the wind.
b. It will target this point
when Auto landing and it
will circle this point when in
Loiter and land in the same
direction it is pointing now.
TURNING ON THE FIREBIRD
Power ON / OFF
a. Place Firebird on a level and stable surface then long press
the power switch on the ST10C until it boots up.
b. Remove the battery compartment, press and hold the
power switch on the battery and then close the battery
compartment.
INSTALLING THE SMART DEVICE
a
. Pull out the smart phone holder from the ST10C.
b. Put your smart phone on the holder.
C. Plug one end of the connecting cable to the standard USB
port in the ST10C, and the other end to the data port of your
smart phone.
11
22
1640ft(500m) flying circle
Home point
pilot
Wind
Page 6
C. Simultaneously press the Home and Auto Land buttons on the
ST10C and hold for 4 seconds, until the control surfaces on the
Firebird move back and forth indicating the home point and
direction have been set.
FLYING
NOTICE
Before flying, the Firebird must acquire GPS lock and Home point
and Landing Direction must be set.
Always fly in Safety Mode unless you are an experienced pilot.
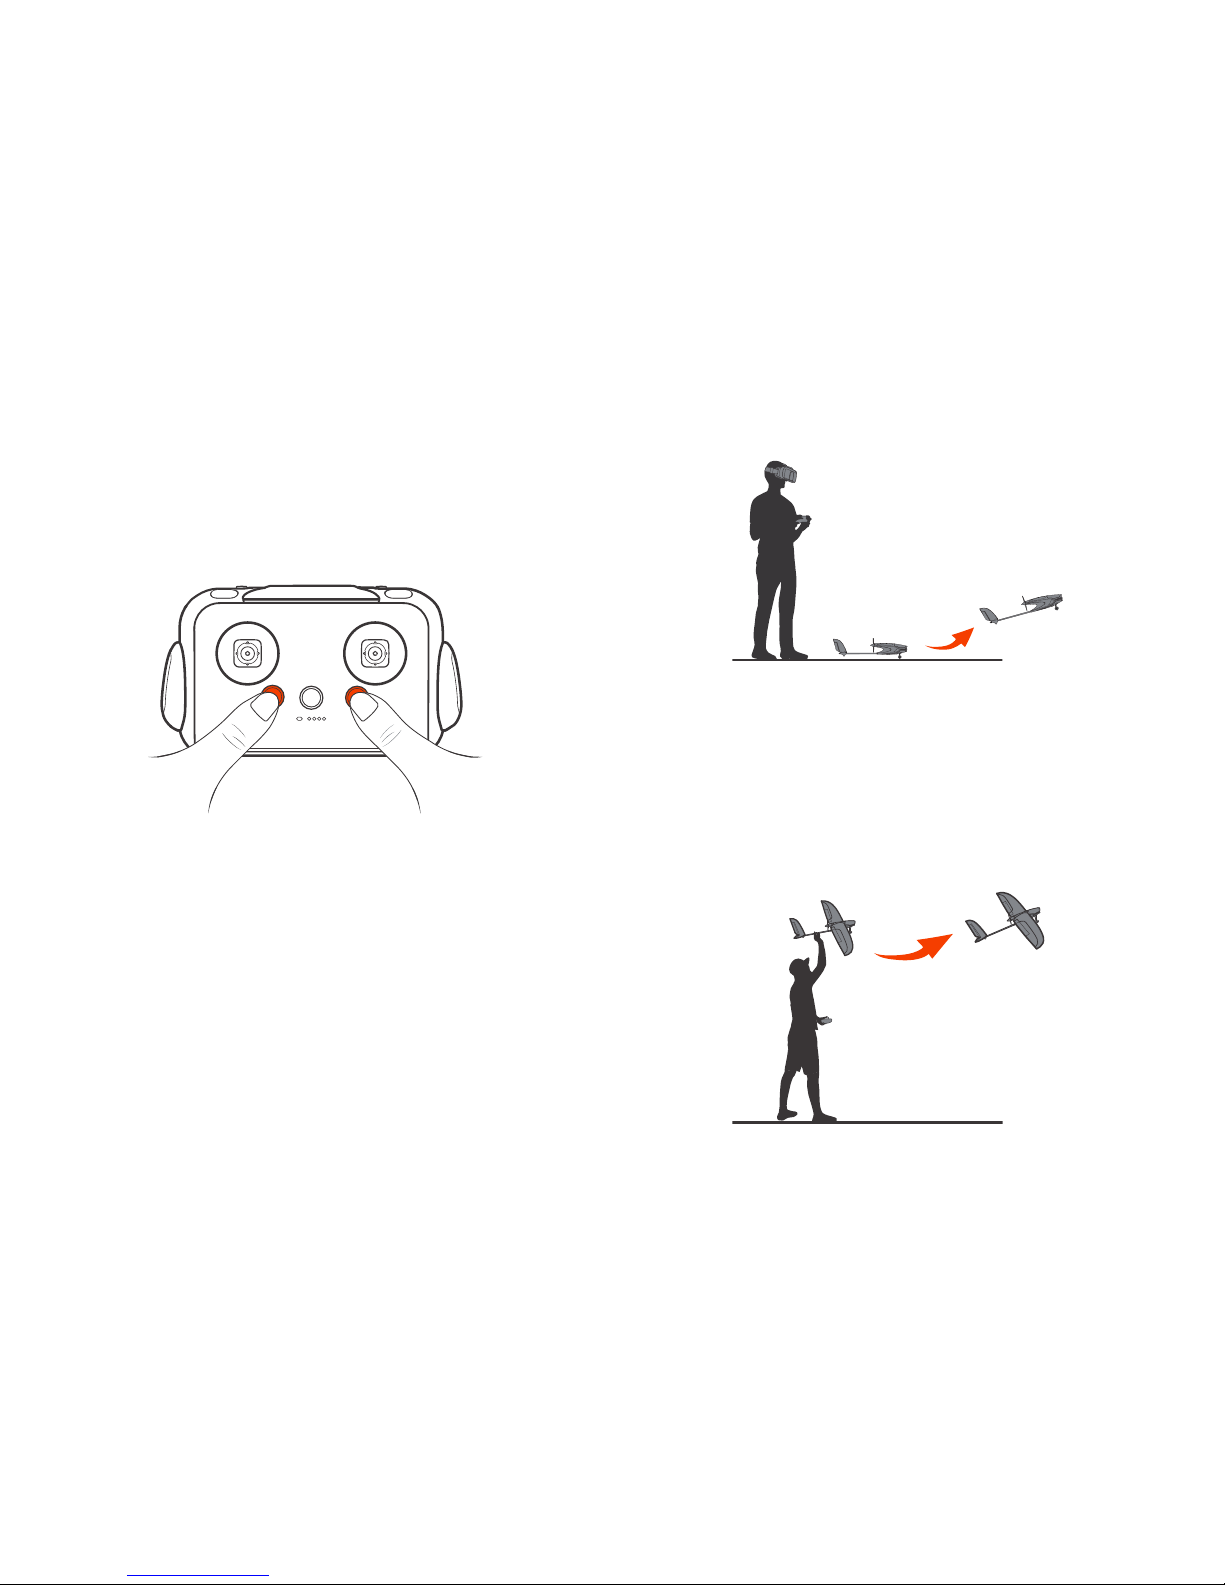
Takeoff
Ground Launch
Place the Firebird in a large, open area with the Firebird’s nose
facing into to the wind. Slowly move the throttle stick to FULL
(100%).
Hand Launch
a. Hold the Firebird in your dominant hand and the
ST10C in your other hand,
Carefully increase the throttle control of the ST10C to
FULL (100%).
b. Throw the Firebird slightly nose up and directly into
the wind FULL (100%).
Page 7

If you lose control, simply release the stick and the
Firebird will level itself when in Safety or Stability
Mode.
Flight Mode
Explore the flight characteristics of your Firebird.
Make small, gentle control stick movements to learn
how your Firebird responds.
Safety Mode & Stability Mode
Safety mode and Stability mode allow you to fly your
Firebird manually, but self-level the roll and pitch
axis.
Acro Mode
Acro Mode is a mode that provides rate based
stabilization with attitude lock for advanced pilots.
FPV Mode
The FPV Goggles will synchronize with the movement
of the Firebird to provide a first-person perspective
flying experience.
Loiter Mode
The Firebird will automatically return to a point near
takeoff area and circle at a safe altitude.
Geo Fence
Geo Fence will keep the Firebird within sight and
prevent it from flying outside the 1640ft (500m)
boundary.
NOTICE:
Safety Floor will prevent the Firebird from descending below the
minimum altitude so it can be safely flown without concern of
flying into the ground.
The Firebird will climb at 100% throttle, fly level at ½ throttle and
gently descend at low throttle.
Elevator Control
Pull the right joystick back to control the pitch up of
the Firebird, push forward to control the pitch
down of the Firebird.
Aileron Control
Push the right joystick to left and right, to control
rolling and turning left and right.
Rudder Control
Push the left joystick to left and right, to control the
left and right steering of the Firebird only in Acro
Mode. In Safety and Stability modes the rudder is
automatically applied when applying aileron
control.
Throttle Control
Push the left joystick forward to increase the speed
of the Firebird, pull back to decrease the speed of
the Firebird.
Throttle stick
Page 8

NOTICE
The Firebird has a maximum altitude limit of 400ft (122m),
and will not climb above this altitude in all modes. To
disable altitude limit see APP.
LANDING
Ground Launch
a. Decrease the throttle and bring the Firebird’s nose to the
wind.
b. Let it glide downward toward the take-off point until it
lands safely.
NOTICE
It is recommended for the experienced pilot.
Auto Landing
Press and hold the landing button for about 3 seconds. The
Firebird will enter Autoland and land itself.
NOTICE
Control interrupts can alter the course to avoid obstacles
by moving the aileron or elevator stick. The Firebird will
respond to these commands and then return to Auto
landing when sticks are released.
AFTER FLIGHT
Turn off and remove flight battery from the Firebird.
Power off the ST10C.
Inspect Firebird for damage.
Make notes from flight experience and plan for future
flights.
LED STATUS INDICATIONS
START-UP
Binding mode flash orange (5 times per second)
Binding fails flash white (1 time per second)
In a No-Fly Zone flash red and white alternately per second
BEFORE & DURING FLIGHT
In Safety Mode
In Stability Mode
In Acro Mode
In Loiter Mode
In Auto Landing
LOW VOLTAGE BATTERY WARNING
First Level Low Voltage Warning flash red once per second
Second Level Low Voltage Warning flash red twice per second
flash green once per second
flash blue and green alternately per second
flash blue once per second
flash green rapidly 3 times and green once
slowly per second
flash green rapidly 3 times and green once
slowly per second
Page 9

LED Status Indications & Flight Control Surfaces Movement
GPS lock failed
V tail control surface swings slowly Flash purple once per second
Purple and green flash alternately per second
Flash red and green alternately per second
Current flight mode:
Safety Mode -- flash green once per second
Stability Mode -- flash blue and green alternately
per second
Acro Mode -- flash blue once per second
Throttle pause when throttle joystick is
advanced
Elevators pitch up and down/wag quickly
for 3 times
Ailerons roll up and down
GPS lock but Home point not set
GPS and Home point locked.
Ready to fly
Compass calibration mode entered
Page 10

Page 11

DISCLAIMER AND SAFETY PRECAUTIONS
Page 12

caused by hazardous use without sufficient practical experience.
Damage and/or injury as well as violation of legal regulations
caused by flying in legally defined no-fly zones.
Further losses which do not fall within the scope of use defined by
Yuneec Electric Aviation as improper.
This product is designed for both professional use and personal,
private use. The national and international laws and regulations in
force as the time of taking off must be adhered to.
COLLECTION AND
PROCESSING OF DATA
Yuneec may collect navigation information such as GPS data to help
improve our products.
We may also collect Depth Map information and Infrared Image
information from your drone delivered to our service center for
repair and maintenance service or any other service.
We may also collect other information such as device information,
server log information, etc. We may also collect personal information used in registration if you choose to become a registered user
and any other information user provided to Yuneec. We may also
collect information which user send to other users, and the recipients and senders of such information.
legal rights of ourselves or any others.
We reserve the right to disclose your information if required to do so
by law or in the good-faith belief that such disclosure is needed to
comply with applicable laws, for example in response to a court
order, judicial subpoena, warrant or request from government, or
otherwise cooperating with government agencies or law enforcement.
We also reserve the right to disclose your information that we
believe in good faith is necessary or appropriate to: (i) protect
ourselves or others from fraudulent, unlawful, or abusive activities;
(ii) take precautions against potential liability;
(iii) protect the security of the Yuneec Apps embedded into or
downloaded onto your drone or any associated equipment and
services; (iv) protect the legal rights of ourselves or any others.
Any information we collected maybe disclosed or transferred to an
acquirer, successor or assignee as part of any potential merger,
acquisition, debt financing or other activities that involves transfer
of business assets.
We may make the aggregated non-personal information of the
users available to third parties for various purposes, including (i)
complying with various report obligations; (ii) marketing efforts;
(iii) analyzing product safety; (iv) understanding and analyzing our
users’ interests, habits, usage pattern for certain functionalities,
services, content, etc.
BATTERY WARNINGS
AND USAGE GUIDELINES
WARNING
Lithium Polymer (LiPo) batteries are significantly more volatile than
alkaline, NiCd or NiMH batteries. All instructions and warnings
must be followed exactly to prevent property damage and/or
serious injury as the mishandling of LiPo batteries can result in fire.
By handling, charging or using the included LiPo battery you
assume all risks associated with LiPo batteries. If you do not agree
with these conditions please return the complete product in new,
unused condition to the place of purchase immediately.
You must always charge the LiPo battery in a safe, well-ventilated
area away from flammable materials.
Never charge the LiPo battery unattended at any time. When
charging the battery you must always remain in constant observation to monitor the charging process and react immediately to any
potential problems that may occur.
After flying/discharging the LiPo battery you must allow it to cool to
ambient/room temperature before recharging.
To charge the LiPo battery you must use only the included charger
Page 13

or a suitably compatible LiPo battery charger. Failure to do so may
result in a fire causing property damage and/or serious injury.
If at any time the LiPo battery begins to balloon or swell, discontinue
charging or discharging immediately. Quickly and safely disconnect
the battery, then place it in a safe, open area away from flammable
materials to observe it for at least 15 minutes. Continuing to charge
or discharge a battery that has begun to balloon or swell can result
in a fire. A battery that has ballooned or swollen even a small
amount must be removed from service completely.
Do not over-discharge the LiPo battery. Discharging the battery too
low can cause damage to the battery resulting in reduced power,
flight duration or failure of the battery entirely. LiPo cells should not
be discharged to below 3.0V each under load.
Store the LiPo battery at room temperature and in a dry area for best
results.
When charging, transporting or temporarily storing the LiPo battery
the temperature range should be from approximately 40–120° F
(5–49° C). Do not store the battery or aircraft in a hot garage, car or
direct sunlight. If stored in a hot garage or car the battery can be
damaged or even catch fire.
Never leave batteries, chargers and power supplies unattended
during use.
Never attempt to charge low voltage, ballooned/swollen, damaged
or wet batteries.
Never allow children under 14 years of age to charge batteries.
Never charge a battery if any of the wire leads have been damaged
or shorted.
Never attempt to disassemble the battery, charger or power supply.
Never drop batteries, chargers or power supplies.
Always inspect the battery, charger and power supply before
charging.
Always ensure correct polarity before connecting batteries, chargers
and power supplies.
Always disconnect the battery after charging.
Always terminate all processes if the battery, charger or power
supply malfunctions.
GENERAL SAFETY
PRECAUTIONS AND WARNINGS
WARNING
Failure to use this product in the intended manner as described in
the quick start guide and instruction manual can result in damage
to the product, property and/or cause serious injury. A Radio
Controlled (RC) multirotor aircraft, APV platform, drone, etc. is not
a toy! If misused it can cause serious bodily harm and damage to
property.
WARNING
As the user of this product you are solely and wholly responsible
for operating it in a manner that does not endanger yourself and
others or result in damage to the product or the property of others.
Keep your hands, face and other parts of your body away from the
spinning propellers/rotor blades and other moving parts at all
times. Keep items that could impact or become entangled away
from the propellers/rotor blades including debris, parts, tools,
loose clothing, etc.
Always operate your aircraft in open areas that are free from
people, vehicles and other obstructions.
Never fly near or above crowds, airports or buildings.
To ensure proper operation and safe flight performance never
attempt to operate your aircraft nearby buildings or other obstructions that do not offer a clear view of the sky and can restrict GPS
reception.
Do not attempt to operate your aircraft in areas with potential
magnetic and/or radio interference including areas nearby broadcast towers, power transmission stations, high voltage power
lines, etc.
Always keep a safe distance in all directions around your aircraft to
avoid collisions and/or injury. This aircraft is controlled by a radio
signal subject to interference from many sources outside your
control. Interference can cause momentary loss of control.
Page 14

To ensure proper and safe operation of the automatic landing
function in Return Home Mode you must start the motors with the
aircraft in aopen space and achieve a proper GPS lock.
Do not attempt to operate your aircraft with any worn and/or
damaged components, parts, etc. including, but not limited to,
damaged propellers/rotor blades, old batteries, etc.
Never operate your aircraft in poor or severe weather conditions
including heavy winds, precipitation, lightning, etc.
Always begin to operate your aircraft with a fully charged battery.
Always land as soon as possible after the first level low voltage
battery warning or land immediately after the second level low
voltage battery warning.
Always operate your aircraft when the voltage of the battery in the
transmitter/personal ground station is in a safe range (as indicated
by the LED status indicator light of the transmitter/personal ground
station).
Always keep the aircraft in clear line of sight and under control, and
keep the transmitter/personal ground station powered on while the
aircraft is powered on.
Always move the throttle control stick down fully and turn off the
power in the event the propellers/rotor blades come into contact
with any objects.
Always allow components and parts to cool after use before touching them and flying again.
Always remove batteries after use and store/transport them per the
corresponding guidelines.
Avoid water exposure to all electronic components, parts, etc. not
specifically designed and protected for use in water. Moisture causes
damage to electronic components and parts.
Never place any portion of the aircraft or any related accessories,
components or parts in your mouth as doing so could cause serious
injury or even death.
Always keep chemicals, small parts and electronic components out
of the reach of children.
Carefully follow the instructions and warnings included with this
aircraft and any related accessories, components or parts (including,
but not limited to, chargers, rechargeable batteries, etc.).
GIMBAL CAMERA WARNINGS
AND USAGE GUIDELINES
NOTICE
For the latest product information, please check our official
website: www.yuneec.com.
WARNING
Do not expose the lens of the gimbal camera to extreme light
sources.
Do not operate the gimbal camera in the rain or in environments
with high humidity.
Do not try to repair the gimbal camera. Repairs must go to an
authorized service center.
WARNING
Read the entire instruction manual to become familiar with the
features of the product before operating.
Do not use with incompatible components or alter this product in
any way outside o the instructions provided by Yuneec.
Failure to use this product in the intended manner as described in
instruction manual can result in damage to the product, property
and/or cause serious injury.
FCC STATEMENT
This equipment has been tested and found to comply with the
limits for Part 15 of the FCC rules. These limits are designed to
provide reasonable protection against harmful interference in a
residential installation. This equipment generates, uses and can
radiate radio frequency energy and, if not installed and used in
Page 15

accordance with the instructions, may cause harmful interference to
radio communications. However, there is no guarantee that interference will not occur in a particular installation. If this equipment does
cause harmful interference to radio or television reception, which
can be determined by turning the equipment off and on, the user is
encouraged to try to correct the interference by one or more of the
following measures:
• Reorient or relocate the receiving antenna.
• Increase the separation between the equipment and receiver.
• Connect the equipment to an outlet on a circuit different from that
to which the receiver is connected.
• Consult the dealer or an experienced radio/TV technician for help.
This device complies with part 15 of the FCC rules. Operation is
subject to the following two conditions:
(1) This device may not cause harmful interference, and (2) this
device must accept any interference received, including interference
that may cause undesired operation.
NOTE
This equipment has been tested and found to comply with the limits
for a Class B digital device, pursuant to part 15 of the FCC Rules.
These limits are designed to provide reasonable protection against
harmful interference in a residential installation. This equipment
generates, uses and can ridiate radio frequency energy and, if not
installed and used in accordance with the instructions, may cause
harmful interference to radio communications.
However, there is no guarantee that interference will not occur in a
particular installation. If this equipment does cause harmful
interence to radio or television reception, which can be determined
by turning the equipment off and on, the user is encouraged to try to
correct the interference by one or more of the following measures:
—Reorient or relocate the receiving antenna.
—Increase the separation between the equipment and receiver.
—Connect the equipment into an outlet on a circuit different from
that to which the receiver is connected.
—Consult the dealer or an experienced radio/TV technician for help.
CAUTION: Any changes or modications not expressly approved by
user’s authority to operate this equipment.
RF EXPOSURE WARNING
This equipment must be installed and operated in accordance with
provided instructions
and must not be co-located or operating in
conjunction with any other antenna or transmitter. End-users and
installers must be provide with antenna installation instructions
and transmitter operating conditions for satisfying RF exposure
compliance.
IC RADIATION EXPOSURE
STATEMENT FOR CANADA
This device complies with Industry Canada license-exempt RSS
standard(s). Operation is subject to the following two conditions:
(1) this device may not cause interference, and (2) this device must
accept any interference, including interference that may cause
undesired operation of the device.
Le présentappareilestconforme aux CNR d'Industrie Canada
applicables aux appareils radio exempts de licence. L'exploitationestautorisée aux deux conditions suivantes : (1) l'appareil ne doit
pas produire de brouillage, et (2) l'utilisateur de l'appareildoit
accepter tout brouillageradioélectriquesubi, mêmesi le brouillageest susceptible d'encompromettre le fonctionnement.
This equipment complies with IC RSS-102 radiation exposure limit
set forth for an uncontrolled environment.
Cetéquipementrespecte les limitesd'exposition aux rayonnements
IC dénies pour un environnement non contrôlé.
Caution:
The device complies with the RF specifications when the device is
used at a distance of 10mm from your body. Keep your device
10mm away from your body to satisfy the requirement.
Page 16

NCC WARNING STATEMENT
Without permission, any company, firm or user shall not alter the
frequency, increase the power, or change the characteristics and
functions of the original design of the certified lower power
frequency electric machinery.
The application of low power frequency electric machineries shall
not affect the navigation safety nor interfere a legal communication, if an interference is found, the service will be suspended until
improvement is made and the interference no longer exists.
CE WARNING STATEMENT
This device meets the EU requirements on the limitation of the
general public to electromagnetic fields by way of health protection.
EU Operation Frequency (The Maximum Transmitted Power)
ST10C:
2.4G: 2405-2475MHz (20dBm)
5G Wifi: 5560-5580MHz (27dBm), 5680-5700MHz (27dBm)
Firebird:
2.4G: 2405-2475MHz (20dBm)
EU COMPLIANCE STATEMENT
Hereby, Yuneec International (China) Co., Ltd. declares that this
device is in compliance with the essential requirements and other
relevant provisions of the RED Directive 2014/53/EU. The full text of
the EU Declaration of Conformity is availble at the following
internet address: http://yuneec/de-downloads
Please visit the address above and enter into corresponding
product page.
Page 17

Page 18

DISCLAIMER
Yuneec Electric Aviation cannot be held liable for any damage, injury
or for use of the product in violation with legal regulations, especially in the following circumstances: Damage and/or injury as well
violation of legal regulations resulting from a failure to comply with
the operating instructions or the instructions at www.yuneec.com,
product information, user manual and other legally binding information.
Damage and/or injury as well violation of legal regulations brought
about by the influence of alcohol, drugs, medication or other narcotics which may impact on the concentration of the user.
The same applies to illnesses effecting the concentration of the
user(dizziness, tiredness, nausea etc.) or other factors compromising
mental and physical capabilities.
Intentionally caused damage, injury or violation of legal regulations.
Any request for compensation caused by an accident resulting from
use of the product.
Damage and/or injury as well as violation of legal regulations caused
by use of the product in a no-fly zone, e.g. next to an airfield, above
a motorway or a natural conservation area.
Malfunction of the product caused by retrofitting or replacement
with components which did not come from Yuneec Electric Aviation.
Damage and/or injury caused by the use of replica parts (non-original parts).
Damage and/or injury as well as violation of legal regulations caused
by incorrect operation or misjudgment.
Damage and/or injury caused by damaged spare parts or not using
original Yuneec Electric Aviation spare parts.
Damage and/or injury as well as violation of legal regulations caused
by ignoring the low voltage battery warning.
Damage and/or injury caused by knowingly and negligibly flying
with a damaged model or one which is unfit to fly, e.g. due to dirt,
water penetration, coarse particles, oil or a model which has not
been correctly or completely assembled or if the main components
exhibit visible damage, defects or missing parts.
Damage and/or injury as well as violation of legal regulations
caused by ignoring the low voltage battery warning.
Damage and/or injury caused by knowingly and negligibly flying
with a damaged model or one which is unfit to fly, e.g. due to dirt,
water penetration, coarse particles, oil or a model which has not
been correctly or completely assembled or if the main components
exhibit visible damage, defects or missing parts.
Damage and/or injury as well as violation of legal regulations
caused by operating the model in a magnetic field (e.g. high
voltage lines, electricity/ transformer stations, radio towers, mobile
phone masts etc.), a strong wireless signal environment, no-fly
zones, poor visibility and in the event of vision impairments or
other impacts on the pilot which are left unchecked etc.
Damage and/or injury brought about through a violation of the
legal regulations for operating the model, in unsuitable weather
conditions, e.g. rain, wind, snow, hail, storms, hurricanes etc.
Damage and/or injury as well as violation of legal regulations
caused by force majeure, e.g. collision, fire, explosion, flooding,
tsunami, landslide, avalanche, earthquake or other forces of
nature.
Damage and/or injury as well as violation of legal regulations
caused by the illegal or immoral use of the model, e.g. capturing
videos or recording data which infringes upon/harms the privacy
of other people.
Damage and/or injury as well as violation of legal regulations
caused by incorrect use of the batteries, protection systems,
chargers or aircraft.
Consequential damage caused by the incorrect operation of any
kind of system components and accessory parts, especially
memory cards, whereby image or video material from the camera
can become defect.
Any non-compliance with legal obligations, personal injury,
material damage and environmental damage caused by use and a
failure to comply with the local laws and regulations.
Damage and / or injury as well as violation of legal regulations
 Loading...