

Page 1

crUiSER guide
Page 2

INTRODUCTION
ENGLISH
INDEX
01.............................
02.............................
03.............................
04.............................
05.............................
06.............................
07.............................
08.............................
09.............................
10.............................
11.............................
12.............................
INTRODUCTION
GARAGE
FEATURES
QUICK START
SAFETY
RIDING TIPS
MAINTENANCE
TROUBLESHOOTING
REPLACEMENT PARTS
WARRANTY
TERMS AND CONDITIONS
ENGLISH
Congratulations, you have purchased an E-GO. You are now the owner of a portable, eco-
friendly mode of transport that is incredibly fun to use. Integrating state of the art
motor technology developed by YUNEEC for use in the aviation industry, E-GO brings to
the streets an experience and convenience that was never available in the past.
Setting aside dated conventions, E-GO focuses on what is essential to the design of a sus-
tainable transport unit that functions in modern urban areas. Combining high performance
with low consumption, E-GO CRUISER allows you to travel up to 40Km / 25M on one full charge.
Its lightweight design and compact dimensions make the E-GO the perfect wingman
wherever you go: just pick up your board and step into a taxi, bus, train or indoor location.
Boarding is often linked to extreme sports` activities like surfing, skating or snowboarding
and there are definetely similarities in the amount of freedom experienced when moving
through space. However, E-GO is foremost a city transport unit and distinguishes itself as such
especially by its incredible braking system, giving the rider the constant control over his /
her vehicle required to ensure the safety of other people as well as his / her own.
Keeping the latter in mind we would like to suggest you read through this user manual,
ensuring you understand fully how to properly set-up and use your E-GO CRUISER and what
general common sense to apply when riding in a public area. The general rule we personally
tend to follow: Ride with consideration and style. We hope you enjoy your E-GO experience!
1
Page 3
ENGLISH
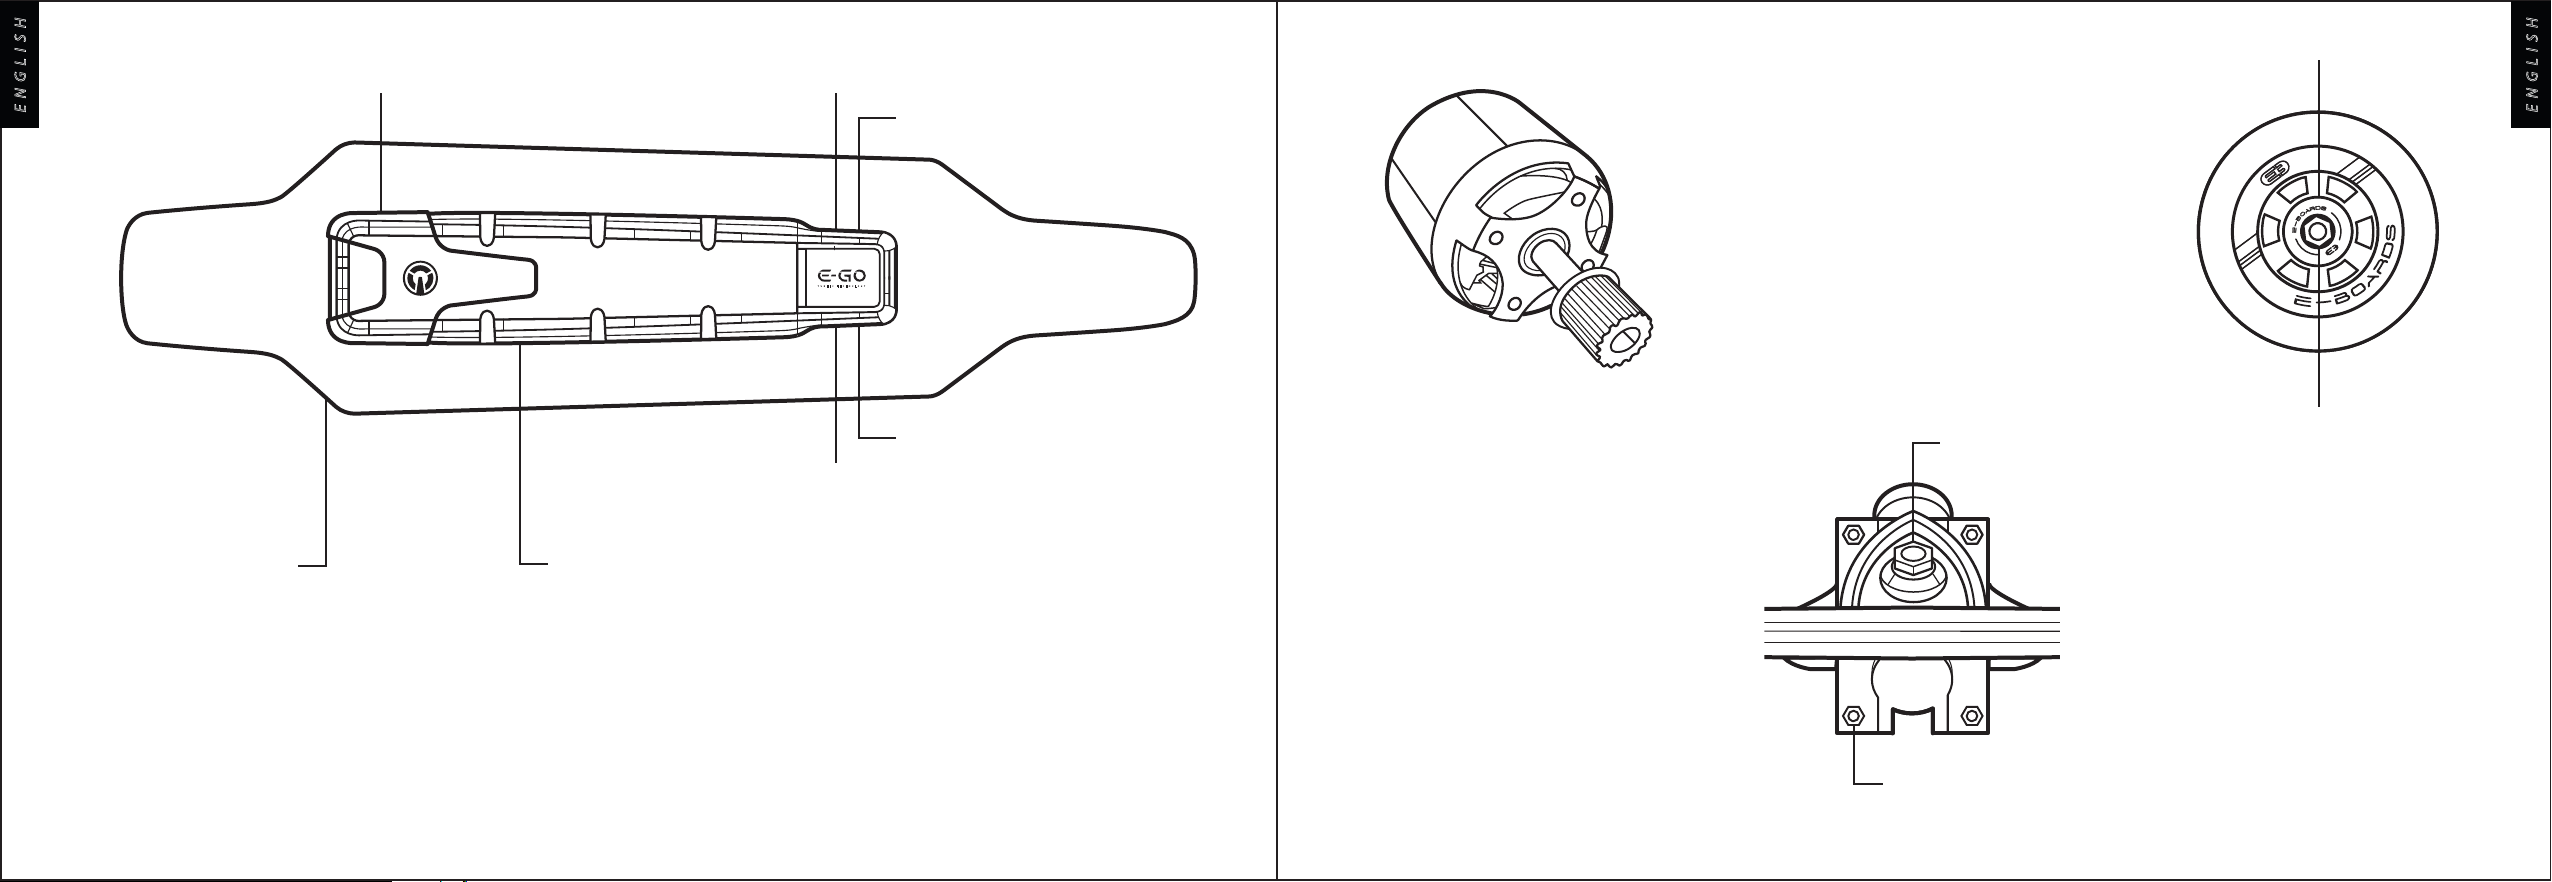
THE DECK
THE E-GO CRUISER FEATURES A 20
MM SIX LAYERED MAPLE WOOD DECK.
THIS MAKES IT STRONG, DURABLE
AND FLEXIBLE: ALL THE QUALITIES A
RIDER LOOKS FOR IN A BOARD. THE
TOP IS FINISHED WITH GRIP TAPE TO
MINIMIZE SLIPPING.
garage
1 2
YUNEEC TECHNOLOGY
THE BATTERY PACK
UNDERNEATH THE DECK WE FIND THE
E-GO`S MULTI CELLED BATTERY PACK,
CONTAINING THE LATEST BATTERY
TECHNOLOGY DEVELOPED AND PATENTED BY YUNEEC. ITS FLEXIBLE
CASING ALLOWS THE DECK TO BEND
WHILE RIDING.
bearing
3
ENGLISH
THE WHEELS
WITH A DIAMETER OF 90MM THE
E-GO`S WHEELS ARE BIG ENOUGH
TO SUSTAIN GRIP WHEN PUSHING
THE THROTTLE FORWARD BUT SMALL
ENOUGH TO INTEGRATE THE E-GO
CRUISER INTO THE URBAN TRANSPORT SYSTEM.
THE motor
5
4
DEVELOPED BY YUNEEC FOR USE
IN THE AVIATION INDUSTRY,THE
E-GO BRUSHLESS 450 WATT MOTOR
PROVIDES RELIABLE AND EFFICIENT POWER FOR YOUR CRUISER.
kingpin nut
axle nut
THE TRUCKS
charger port
1.
power button
2.
battery status
3.
indicator
USB port
4.
2.4G bluetooth
5.
baseplate nut
CONNECTING THE WHEELS TO THE
DECK ARE TWO ALLOW TRUCKS MADE
OF THE FINEST GRADE MATERIALS
AVAILABLE. THE TRUCKS CAN BE
TWEAKED USING THE TRUCK TOOL.
(For more on the truck tool
see page 5)
2
3
Page 4
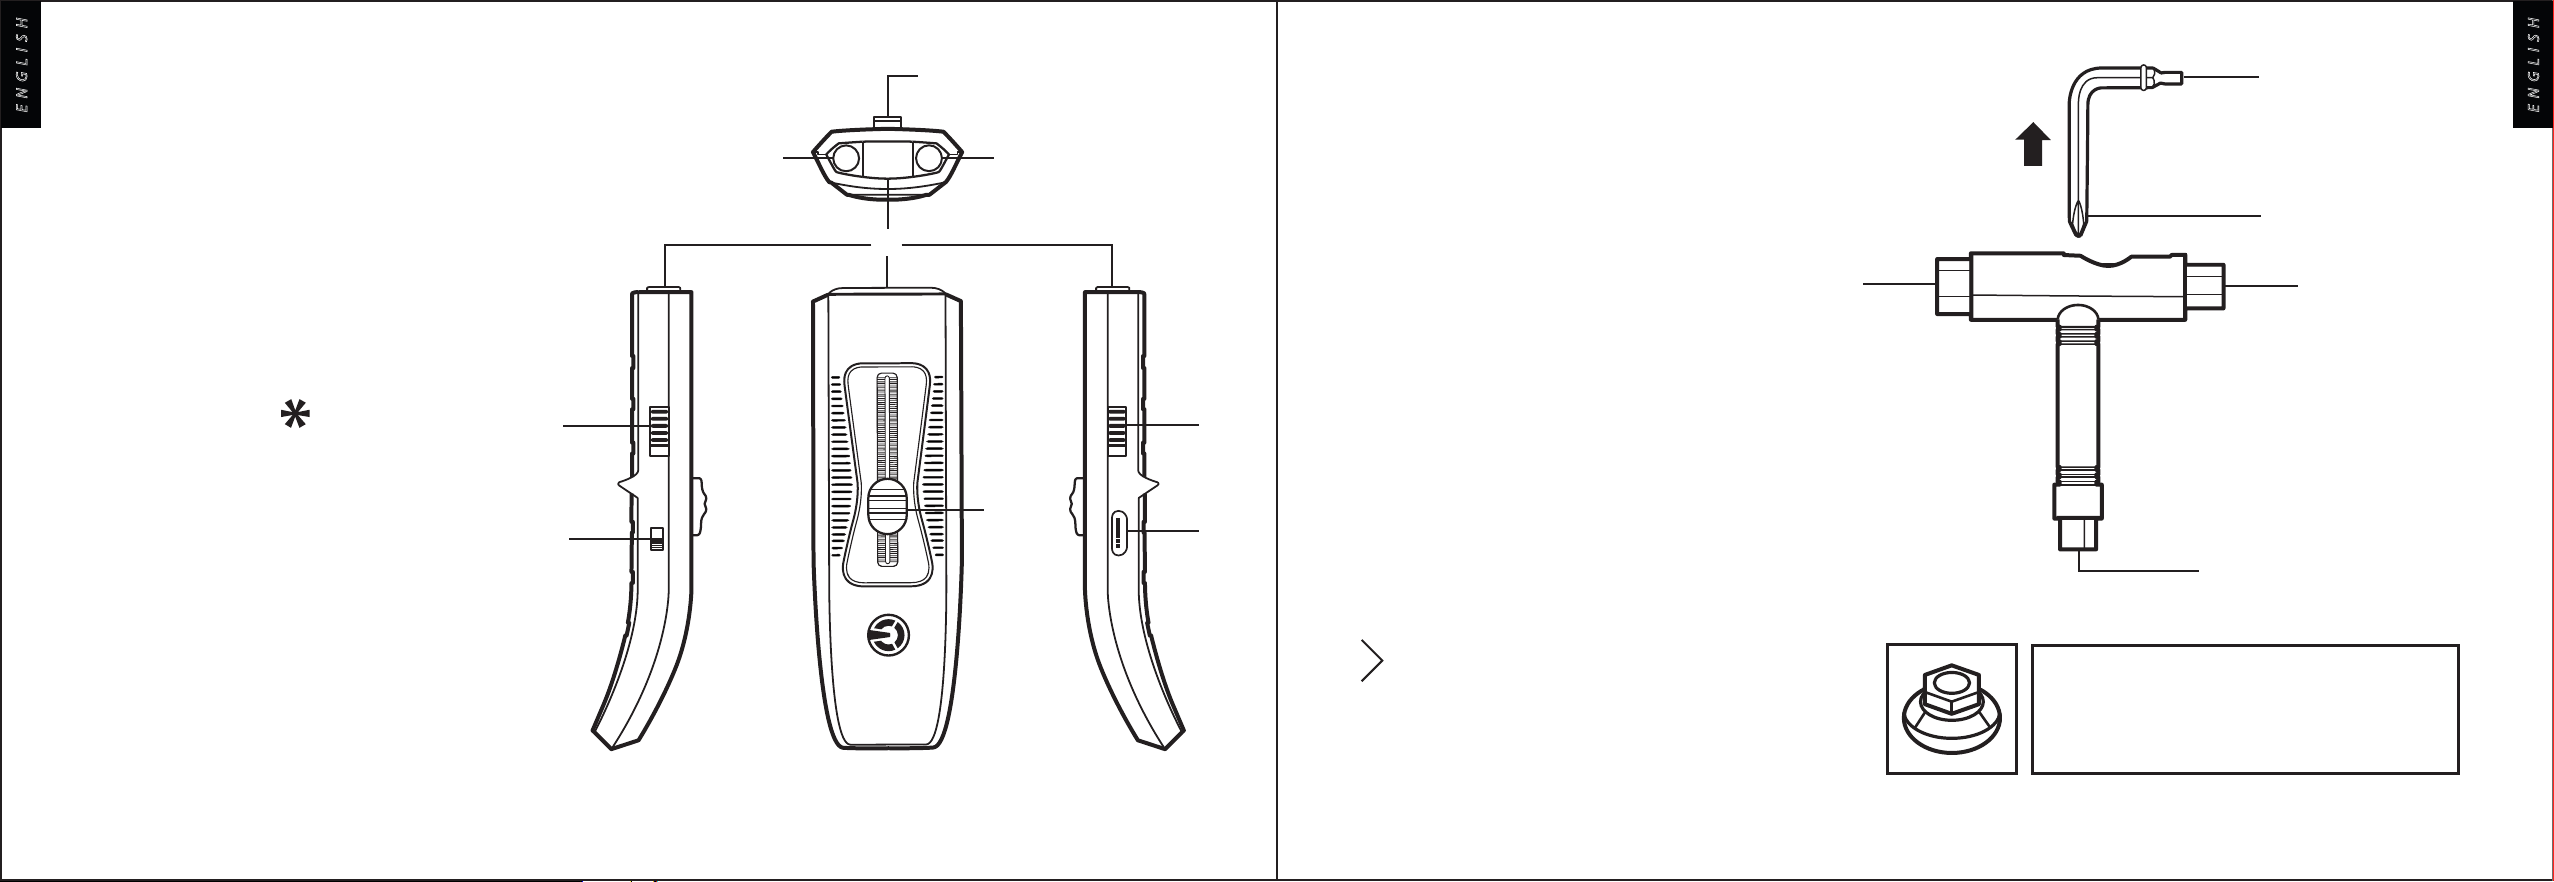
THE wireless
ENGLISH
CONTROLLER
A KEY FEATURE OF THE E-GO IS WITHOUT
A DOUBT ITS WIRELESS CONTROLLER
WHICH ALLOWS YOU TO INTUITIVELY CONTROL ITS` MOVEMENTS BY SIMPLY SLIDING
THE TROTTHLE / BRAKE SLIDER UP AND
DOWN. WHEN NOT RIDING ITS` SLICK AND
COMPACT DESIGN SLIPS RIGHT INTO YOUR
POCKET OR BAG, TAKING UP LESS SPACE
THEN MOST CELL PHONES.
THE BATTERY STATUS INDICATORS` BLUE LIGHT
INDICATES THE WIRELESS CONTROLLERS` BATTERY STATUS, ITS` GREEN LIGHT INDICATES THE
BOARDS` BATTERY STATUS. WHEN ACTIVATED
THESE LIGHTS WILL BLINK IN A SERIES OF 1, 2,
3 OR 4.EACH BLINK OF LIGHT STANDS FOR 25%
OF TOTAL BATTERY CHARGE.
THE THIRD LIGHT IS RED AND INDICATES EITHER
BATTERY DEPLETION (WHEN ACTIVATED BUT NOT
CHARGING) OR BATTERY CHARGE STATUS TO BE
LESS THEN 100% (WHEN CHARGING).
EXAMPLE: (WHEN ACTIVATED BUT NOT CHARGING)
THE BOARDS`BATTERY IS COMPLETELY EMPTY
AND THE CONTROLLERS` BATTERY HAS LESS THAN
75% OF ITS FULL CHARGE CAPACITY LEFT 4 RED
BLINKS WILL BE FOLLOWED BY 2 BLUE BLINKS.
10
11
7
8 9*
START
6
7
12
13
THE TRUCK TOOL
TO KEEP YOUR E-GO'S PERFORMANCE
UP TO MAXIMUM YOU WILL NEED TO
DO REGULAR MAINTENANCE CHECKS
(for more info on maintenance please
check page ?), MAKING SURE THE BOARD
IS NOT OBSTRUCTED BY DIRT AND ALL
NUTS AND BOLTS ARE PROPERLY TIGHTENED. TO TIGHTEN AND LOOSEN THESE
NUTS AND BOLTS, YOUR E-GO CRUISER
COMES WITH A SPECIFIC TOOL - THE
TRUCK TOOL -THAT ALLOWS YOU TO DO
THAT. IN GENERAL YOU SHOULD MAKE
SURE ALL PARTS ARE SCREWED ON THERE
NICE AND THIGHT, WITH THE EXCEPTION
OF THE KINGPIN NUT WHICH CAN BE
TWEAKED ACCORDING TO YOUR PERSONAL
RIDING STYLE.
START button
6.
throttle / brake
7.
torch light
8.
battery status indicator*
9.
direction switch
10.
gear switch
11.
torch light switch
12.
17
14
15
18
socket tool
14.
bolt tool
15.
nut tool
16.
kingpin bolt tool
17.
axle nut tool
18.
16
TIGHTENING THE KINGPIN WILL GIVE A MORE
STABLE, RIGID RIDE. LOOSENING THE KINGPIN
BOLT WILL MAKE THE BOARD MORE MANOUVERABLE AND DECREASE THE DIAMETER OF YOUR
TURN RADIUS, ALLOWING YOU TO TAKE SHARPER TURNS.
ENGLISH
4
mini USB port
13.
5
Page 5

ENGLISH
charge status
indicator
6
THE USB
CONNECTS THE WIRELESS CONTROLLER
TO THE BOARDS BATTERY PACK OR
TO ANY COMPUTER OR OTHER USB
PORT FOR RECHARGING PURPOSES.
THE CHARGER
THE E-GO CHARGER ALLOWS YOU TO
FULLY RECHARGE THE E-GO AND THE
CONTROLLERS` BATTERY IN 2 TO 3
HOURS, GIVING YOU A MAXIMUM RIDING CAPACITY OF 40 KM / 24 MILES
DISTANCE.
THE PIN TOOL
ALSO INCLUDED WITH THE E-GO IS A
SMALL PINSHAPED OBJECT WE CALL
THE PIN TOOL, WHICH ALLOWS YOU
TO ACCESS THE GEAR SWITCH ON THE
CONTROLLER AND THE BLUETOOTH
SWITCH ON THE E-GO.
quick start
TO ENSURE A HEALTHY BATTERY
LIFE, RECHARGE THE BATTERIES
FOR 4 HOURS STRAIGHT BEFORE
FIRST USE. THIS WILL CONDITION
THE BATTERIES AND GIVE BETTER
LONG TERM PERFORMANCE.
7
CHARGE SETUP
ENGLISH
Page 6

ENGLISH
P R
E
THE E-GO CRUISERS' FEATURES 3 GEARS OR SPEED MODES: 1 BEGINNER MODE (WITH
A LIMITED SPEED OF 15 KM/H OR 9 MPH) 1 EXPERT MODE (WITH A MAXIMUM SPEED
STORAGE AND MAINTENANCE
ENGLISH
OF 20 KM/H OR 12 MPH) AND 1 MODE THAT ALLOWS YOU TO RIDE IN REVERSE.
FOLLOW BATTERY CHARGING PROCEDURES BEFORE USING E-GO FOR THE FIRST TIME
WHEN FULLY CHARGED THE E-GO CRUISER HAS A RANGE OF ABOUT 40KM / 25M WHICH
TRANSLATES TO A RIDING TIME OF 2 TO 3 HOURS.
THE E-GO CRUISER WILL TAKE YOU ON INCLINES OF UP TO 10% (FOR A LIMITED DISTANCE:
EXPECTING THE BOARD TO TAKE YOU UP MONT BLANC WILL RESULT IN THE MOTOR OVERHEATING).
TO FULLY CHARGE THE E-GO CRUISERS BATTERY, A CHARGE TIME OF ABOUT 3 HOURS
TO A STANDARD A/C POWER PLUG IS NEEDED. TO FULLY CHARGE THE WIRELESS CONTROLLER A CHARGE TIME OF ABOUT 30 MINUTES TO A STANDARD A/C POWER PLUG
IS NEEDED.
THE E-GO CRUISER INCLUDES A REGENERATIVE BRAKING SYSTEM (RBS) THAT RECYCLES POWER USED WHEN BRAKING FOR BATTERY RECHARGING PURPOSES.
AT JUST 5.8 KG, THE E-GO CRUISER IS VERY LIGHT, WHICH MAKES IT VERY PORTABLE
AND EASY TO COMBINE WITH THE USE OF PUBLIC TRANSPORT.
WHEN DISTANCE IS CREATED BETWEEN THE RIDER AND THE BOARD, THE E-GO AUTO
SYNC LOCK WILL - MUCH LIKE A JETSKI - DISCONNECT THE SYNC BETWEEN BOARD
AND CONTROLLER, BRINGING THE E-GO CRUISER TO A STOP.
TURN OFF E-GO AND WIRELESS CONTROLLER WHEN NOT IN USE CHOOSE A COOL ENVIRONMENT FOR
STORING THE E-GO AND ITS` CHARGER KEEP YOUR BATTERY FULLY CHARGED WHEN
NOT IN USE RECHARGE THE BATTERIES IN A WELL VENTILATED AREA DO NOT RECHARGE THE
BATTERIES IN AN AREA THAT MIGHT ALLOW E-GO OR ITS CHARGING UNIT TO BECOME WET
DO NOT LEAVE E-GO CHARGING UNATTENDED KEEP CHILDREN AWAY FROM E-GO
WHEN CHARGING DO NOT KEEP THE BATTERY ON CHARGE ONCE IT HAS FULLY CHARGED STOP USE
OF THE PRODUCT OR CHARGING UNIT IF ANY WIRE IS WORN OR DAMAGED DO NOT MODIFY THE
ELECTRICAL CONTROLS OR WIRING ONLY USE A MOTOR, BATTERY OR CHARGING UNIT SUPPLIED
OR APPROVED BY E-GO DO NOT USE THE E-GO'S BATTERY TO POWER ANY OTHER EQUIPMENT
Page 7

SYNCING to a wireless controller
and the smartphone has been made.
ENGLISH
SYNCING to a smartphone
ENGLISH
1
Use the pin tool (page 10) to
slide down the gear switch
positioned on the left side of
the wireless controller.
4
2
Slide down the direction
switch positioned on the left
side of the wireless controller.
5
3
Turn on the board by switching
the power button on. The board
should now make a beeping sound
once and its battery status indicator
should be blinking rapidly.
1
Use the pintool to slide the
bluetooth switch first to the right,
then to the left. The boards`
battery status indicator should
now be blinking more slowly.
4
2
Turn on the board by switching
the power button on. The board
should now make a beeping sound
once and its battery status
indicator should be blinking
rapidly.
5
3
Open the E-GO APP on
your smartphone.
6
Use the pintool to slide the
bluetooth switch first to the right,
then to the left. The boards`
battery status indicator should
now be blinking more slowly.
Slide down the wireless controllers` throttle / brake and hold it
there. At the same time press down on the START button. After
a few seconds the board should now beep for a second time,
indicating that a succesfull synchronisation between the board
and the controller has been made.
Select `SKATE` in the main menu Select `SCAN` in the perimiter
menu.
After scanning select your E-GO
in the list. After a few seconds the
board should now beep for a second
time, indicating that a succesfull
synchronisation between the board
Page 8

ENGLISH
E-GO CRUISER IS DESIGNED FOR HUMAN RIDERS E-GO CRUISER IS DESIGNED FOR RIDERS 14 YEARS
AND OLDER E-GO CRUISER IS DESIGNED FOR RIDERS WITH A BODY WEIGHT UNDER 120 KG /
260 LBS E-GO CRUISER IS NOT DESIGNED FOR TANDEM USE E-GO CRUISER IS NOT DESIGN-
RIDER PROFILE
BRAKE WHEN GOING DOWNHILL TO MODERATE YOUR SPEED TAKING ON INCLINES OVER 10%
MIGHT OVERHEAT THE BATTERY REGULAR SHORT BURST OF FULL POWER AND BRAKING HEAVILY \
WILL DRAIN THE BATTERY FASTER THAN RIDING AT MODERATE CONSISTENT SPEED DO NOT ATTEMPT
JUMPS OR OTHER STUNTS, THIS MIGHT LEAD TO INJURY OR DEATH AND MIGHT DAMAGE YOUR E-GO.
ENGLISH
ED FOR CARGO TRANSPORTATIONS.
RIDING TIPS
FIRST TIME USING E-GO? START BY RIDING IN LOW GEAR INEXPERIENCED RIDERS ARE BEST TO
FIRST PRACTISE IN A SPACIOUS, NON TRAFFIC ZONE SLIDING THE BRAKE BUTTON BACK BEFORE
GETTING ON THE E-GO LOCKS THE WHEELS, MAKING IT EASIER TO STEP ON WHILE RIDING KEEP
YOUR BACK STRAIGHT AND USE YOUR ARMS TO MAINTAIN BALANCE BENDING YOUR KNEES LOWERS
YOUR BODY`S CENTER OF GRAVITY POINT WHICH INCREASES STABILITY SHIFT YOUR BODY WEIGHT
TO THE FRONT WHEN ACCELERATING SHIFT YOUR BODY WEIGHT TO THE BACK WHEN BRAKING
TO TURN / CARVE, DISPLACE YOUR BODY WEIGHT AND EXERT PRESSURE ON THE HEEL AND TOE
SIDE OF THE BOARD YOUR TURN RADIUS DEPENDS ON THE AMOUNT OF PRESSURE YOU EXERT ON
THE SIDE OF THE BOARD: MORE PRESSURE MEANS SHARPER TURNING CARVING WILL SLOW DOWN
YOUR SPEED AND MAKES FOR AN ENERGY EFFICIENT WAY OF BRAKING BE MINDFUL WHEN
TURNING / CARVING AT HIGH SPEED YOU CAN ADJUST MANOUVERABILITY BY TIGHTENING OR
LOOSENING THE TRUCKS (more info on page ?) ADAPT YOUR SPEED TO YOUR RIDING SKILL AND
ENVIRONMENT
WHEN RIDING IN PUBLIC AREAS
ABIDE BY THE LAWS AND REGULATIONS IN YOUR STATE OR COUNTRY RESPECT OTHER DRIVERS AND
PEDESTRIANS ON THE ROAD BEWARE THAT WET, FROZEN, OILY OR UNPAVED SURFACES ARE
UNSUITED FOR RIDING ON BEWARE THAT BRAKING DISTANCES VARY ACCORDING TO SURFACE
TEXTURE, HUMIDITY, TEMPERATURE, ETC... AVOID RIDING ON BUSY ROADS AND CROWDED AREAS
ADJUST YOUR SPEED WHEN RIDING ON THE SIDEWALK ADJUST YOUR RIDING STYLE WHEN
RIDING AT NIGHT OR IN CONDITIONS WITH LOW VISIBILITY MAINTAIN CONTROL OF YOURSELF
AND YOUR EQUIPMENT ALWAYS WEAR A HELMET AND OTHER SAFETY EQUIPMENT WHEN RIDING
DO NOT RIDE WHEN INTOXICATED AVOID RIDING OVER GUTTERS, THIS MIGHT DAMAGE E-GO
DO NOT EXPOSE E-GO TO WATER: DO NOT RIDE WHEN RAINING, DO NOT RIDE THROUGH
PUDDLES USE DIRECT HAND CONTACT WHEN OPERATING THE HANDHELD REMOTE, WEARING
GLOVES OR AN UNUSUAL GRIP MIGHT INTERFERE WITH YOUR ABILITY TO ACCURATELY USE THE
CONTROLS BE AWARE THAT A STRONG ELECTRO MAGNETIC FIELD IN YOUR AREA MIGHT INTERFERE
WITH THE FUNCTION OF THE REMOTE CONTROLLER DO FREQUENT MAINTENANCE CHECKS: BEFORE
RIDING MAKE SURE ALL SCREWS ARE TIGHT AND YOUR E-GO IS IN PERFECT WORKING ORDER
(MORE INFO PAGE 10)
Page 9

ENGLISH
ENGLISH
Page 10

FCC statement
This device complies with part 15 of the FCC Rules. Operation is subject
to the following two conditions: (1) This device may not cause harmful
interference, and (2) this device must accept any interference received,
including interference that may cause undesired operation.
This equipment has been tested and found to comply with the limits
for a Class B digital device, pursuant to part 15 of the FCC Rules.
These limits are designed to provide reasonable protection against
harmful interference in a residential installation. This equipment
generates, uses and can radiate radio frequency energy and, if not
installed and used in accordance with the instructions, may cause
harmful interference to radio communications. However, there is no
guarantee that interference will not occur in a particular installation.
If this equipment does cause harmful interference to radio or television
reception, which can be determined by turning the equipment off and on,
the user is encouraged to try to correct the interference by one or more
of the following measures:
—Reorient or relocate the receiving antenna.
—Increase the separation between the equipment and receiver.
—Connect the equipment into an outlet on a circuit different from
that to which the receiver is connected.
—Consult the dealer or an experienced radio/TV technician for help.
Page 11

NOTE: THE GRANTEE IS NOT RESPONSIBLE FOR ANY CHANGES OR MODIFICATIONS
NOT EXPRESSLY APPROVED BY THE PARTY RESPONSIBLE FOR COMPLIANCE. SUCH
MODIFICATIONS COULD VOID THE USER’S AUTHORITY TO OPERATE THE EQUIPMENT.
Page 12

crUiSER guide
www.e GO.com
 Loading...