


heritage x102
owner’s manual
yorkfitness.com
VERSION 4 - 28/05/2007

Congratulations on purchasing a cross trainer from York Fitness.
You have chosen a high quality, safe and innovative piece of equipment as your training partner and we are certain it will keep you motivated on the way to achieving your personal fitness goals.
Please take the time to read this owner’s manual as it will help you to get the most out of your new cross trainer. For more information visit www.yorkfitness.com
2

contents
safety information |
04 |
|
|
customer support |
05 |
|
|
assembly instructions |
06 |
|
|
user instructions |
11 |
-quick start
-console display and feedback
-button functions
-using workout programs
cross trainer features explained |
13 |
|
|
exercising with your cross trainer |
14 |
|
|
how to take care of your cross trainer |
15 |
|
|
troubleshooting |
15 |
|
|
your warranty |
16 |
|
|
exploded diagrams and parts list |
17 |
3

safety information
PLEASE READ THIS INSTRUCTION MANUAL BEFORE YOU BEGIN ASSEMBLY. GREAT CARE HAS BEEN TAKEN TO DESIGN THESE INSTRUCTIONS AND FOLLOWING THEM WILL HELP YOU WITH QUICKER ASSEMBLY AND MINIMISE THE RISK OF INJURY
YOU ARE RESPONSIBLE FOR YOUR OWN SAFETY - THIS LIST IS NOT EXHAUSTIVE.
•Always assemble and operate the product on a level surface
•Always use the product on a level surface, ensure that the product is stable before use.
•Always ensure that the equipment has adequate space on each side and front (the back can be near to a wall).
•The safety level of this equipment can only be maintained only if it is regularly examined for wear and tear.
•Replace defective components immediately, and/or keep the equipment out of use until it is repaired.
•Use only the adjustment settings as described in the instructions. Always use the correct adjustment pin/fixing.
•Always check that any pins / fixings are tight and secure before use and / or after adjustment.
•Never leave any adjustment devices projecting from the product.
•Always consult your doctor before undertaking any exercise program.
•Always wear suitable clothing and footwear e.g. tracksuit / shorts / training shoes
•Remove all personal jewellery before exercising.
•Ensure you warm-up well before using the equipment as this will help to prevent muscle strain.
•After eating, allow 1-2 hours before exercising as this will help to prevent muscle strain.
•Never overload the equipment – the maximum user weight of this cross trainer is 125kg.
•Never use the equipment in any other manner other than the ways explained in these instructions and/or any wall-chart supplied.
•Injuries to health may result from incorrect or excessive training.
•Parents and others in charge of children should be aware of their responsibility, because the natural play instinct and the fondness of experimenting of children can lead to situations and behaviour for which the training equipment is not intended
•If children are allowed to use the equipment,
their mental and physical development and above all their temperament should be taken into account. They should be controlled and instructed in the correct use of the equipment.
•The equipment is under no circumstances suitable as a children’s toy.
•Children should not be allowed on, or around the equipment - especially when it is not in use.
•This appliance is not intended for use by persons (including children) with reduced physical, sensory or mental capabilities, or lack of experience and knowledge, unless they have been given supervision or instruction concerning use of the appliance by a person responsible for their safety.
Safety Standards
This cross trainer meets the requirements of the EU’s EMC and Low Voltage directives (where applicable), ISO 20957 parts 1 and 9 and AS 4092-1993. Therefore the product carries the following marks:
This product is not suitable for therapeutic purposes.
!It is important that you keep these instructions for future reference.
4
Care & Maintenance
•Always place the equipment in a dry environment.
•Use a warm, damp cloth to keep the product clean.
•No wet cleaning of electrical components, unplug before any care and maintenance
•The safety level of the equipment can be maintained only if it is regularly examined for damage and wear. This includes any ropes, pulleys, nuts, bolts, moving parts, bushes, chains, wheels, bearings & connection points etc
•Ensure that you inspect the product regularly - at least once a week is recommended.
•Ensure that all fixings are tight before use.
•Always replace damaged / worn components with original parts from the manufacturer.
Protect the environment by not disposing of this product with household waste.
Check your local authority for recycling advice and facilities (Europe only).
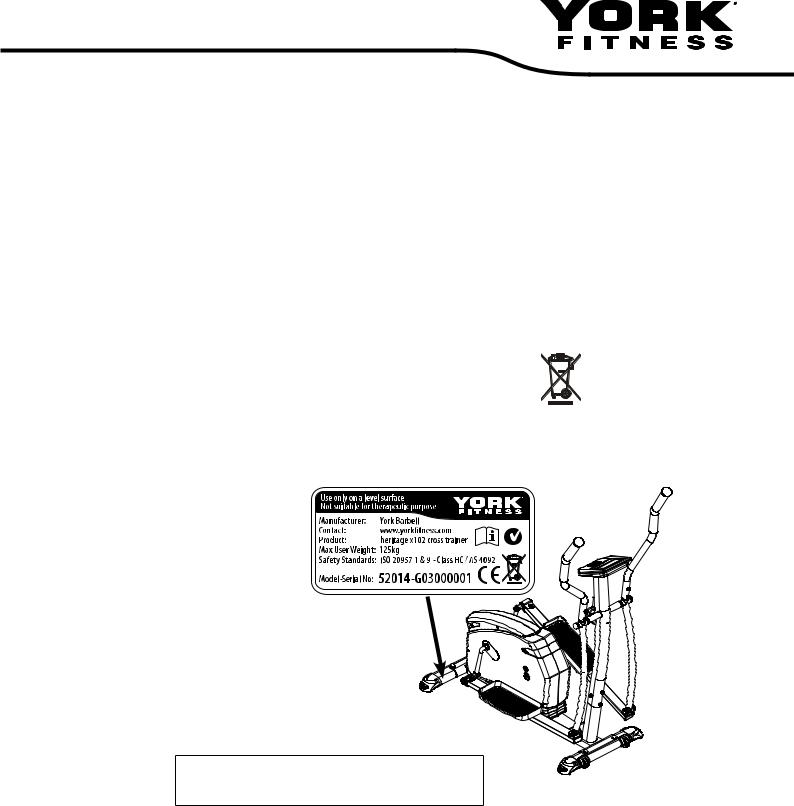
Customer Support
Should you require any assistance regarding this product please gather the following information, and then contact us using the details below:
1. serial no. - this can be found on
the sticker below, located as indicated. For future reference, please write down your serial number in the space provided below.
2. Original purchase date
3. Place of purchase
4. Information about the place and conditions of use
5. Precise description of the issue/defect
Your serial no. is:
Contact Us
ENGLAND
York Barbell (UK) Ltd. York Way, Daventry, Northants, England NN11 4YB
Tel: (01327) 701800 Helpdesk Tel: (01327) 701824 Fax: (01327) 706704 email: helpdesk@yorkfitness.co.uk
AUSTRALIA
Unit 1, Lot 2, Swaffham Road, Minto, N.S.W. 2566 Australia
Tel: (02) 9603 8333 Fax: (02) 9603 8555 email: service@yorkfitness.com.au
OTHER LOCATIONS
Please see website - www.yorkfitness.com
5

assembly instructions
1. Before you start
1. Prepare your work area - |
2. Work with a friend - |
3. Open the carton - |
it is important you assemble |
we recommend you have |
checking any warnings on |
the product in a clean and |
someone assist you with |
the carton and make sure you |
uncluttered space. |
the assembly as some of the |
have it the right way up. |
|
components are quite heavy. |
|
4.Unpack the carton
Make sure you have the following parts:
Part No.
14
Handle bar |
Upper moving |
handle bar x 2
Console x 1
|
|
|
|
|
Footplates mount tube & |
|
Part |
Part |
Left footplate |
Part |
Right footplate |
lower moving handlebar |
|
No. |
||||||
No. |
No. |
|
||||
34 |
28 |
x 1 |
29 |
x 1 |
x 2 |
|
Front |
|
|
|
|
|
|
post x 1 |
|
|
|
|
|
|
|
Part |
Rear stabilizer |
|
Front stabilizer |
No. |
x 1 |
Part |
7 |
||
No. |
x 1 |
|
|
8 |
|
|
Part |
|
|
No. |
|
Pivot rod x 1 |
4 |
Part |
|
Footplate axle |
No. |
|
44 |
|
|
x 2 |
|
|
Fixings
Part |
Large |
No. |
nylock |
6 |
nut |
|
|
Part |
52mm |
No. |
Carriage |
13 |
|
|
bolt |
Part |
Nylock |
No. |
nut |
16 |
|
Part |
Small |
No. |
plastic |
17 |
|
|
bolt cap |
Part |
Large flat |
No. |
washer |
20 |
|
|
- black |
Part Spring 21No. washer !- black
|
|
20mm |
x 2 |
Part |
|
No. |
allen head |
|
|
22 |
|
|
|
bolt |
|
|
|
|
|
Flat |
x 4 |
Part |
|
No. |
washer |
|
|
24 |
|
|
|
15mm |
|
Part |
|
x 4 |
No. |
screw |
40 |
||
|
|
Large |
|
Part |
|
x 4 |
No. |
plastic cap |
49 |
||
|
|
15mm |
|
Part |
|
x 2 |
No. |
allen head |
84 |
||
|
|
bolt |
|
|
|
|
|
20mm |
|
Part |
|
x 2 |
No. |
hex head |
85 |
||
|
|
bolt |
|
|
This cross trainer takes up
a floor space of 136cm by 65cm and weighs 39kg
Tools and Consumables
x 2 |
Part |
Spring |
x 14 |
|
|
||
No. |
washer |
|
|
||||
|
86 |
|
|
|
|||
|
Part |
Flat |
|
|
Part |
Part |
|
x 2 |
No. |
washer |
x 12 |
No. |
No. |
||
87 |
88 |
99 |
|||||
x 8 |
Part |
Flat |
|
x 8 |
|
|
|
No. |
wahser |
|
|
||||
|
89 |
|
Screw driver |
Multi spanner |
|||
|
|
Flat |
|
|
|||
x 2 |
Part |
|
x 4 |
and allen key |
(10, 13, 14, 15mm) |
||
No. |
wahser |
|
x 2 |
||||
|
95 |
|
|
||||
x 8 |
Part |
Spring |
x 4 |
Part |
Part |
||
No. |
washer |
No. |
|||||
|
96 |
|
No. |
98 |
|||
|
|
|
|
|
|
27 |
|
x 2 |
Part |
45mm |
|
|
spanner |
||
|
No. |
allen head |
x 4 |
Allen key |
(17 & 19mm) |
||
|
97 |
||||||
|
|
bolt |
|
|
|
|
|
|
! |
If you suspect you may have some parts missing, please contact |
|||||
|
|
us before going back to your retailer. Refer to the Customer |
|||||
|
|
|
Support section on page 5 for contact details. |
||||
6
 Loading...