

Page 1

Instruction
Manual
Models 4370
µR1800 Recorder
IM 4H3B1-01E
Yokogawa Electric Corporation
IM 4H3B1-01E
8th Edition
Page 2

INTRODUCTION
Thank you for purchasing the µR1800 Recorder.
To take full advantage of all functions of the µR1800 Industrial Recorder, and to operate
this instrument correctly and efficiently, please read this Instruction Manual carefully
before use.
NOTES • YOKOGAWA reserves the right to change this manual at any time without notice.
• If you find any ambiguities or errors in this manual, please inform YOKOGAWA.
• This manual is the eighth edition, July 1998.
Previous editions were released as follows:
November ’92 first edition
May ’93 second edition
October ’93 third edition
April ’94 fourth edition
October ’95 fifith edition
April ’96 sixth edition
May ’98 seventh edition
July ’98 eighth edition
Disk No. MR07
8th Edition : July 1998 (YG)
All Rights Reserved, Copyright © 1992, Yokogawa Electric Corporation
IM 4H3B1-01E
1
Page 3

SAFETY PRECAUTIONS
• The µR1800 is a Component Type instrument and should be mounted on a panel.
• The µR1800(except portable type) is a Safety ClassI instrument (provided with
terminal for protective earthing).
• The µR1800(except portable type) is an EN55011(EMI standard) Group 1, Class A
instrument.
• This instrument complies with Inatallation Category ll.
The following general safety precautions must be observed during all phases of
operation, service, and repair of this instrument. Failure to comply with these
precautions or with specific WARNINGS given elsewhere in this manual violates safety
standards of design, manufacture, and intended use of the instrument.
YOKOGAWA Electric Corporation assumes no liability for the customer’s failure to
comply with these requirements.
General definitions of safety symbols used on equipment and in manuals
Explanation: To avoid injury, death of personnel or damage to the instrument, the
operator must refer to an explanation in the instruction manual.
Protective grounding terminal: To protect against electrical shock in case of a fault.
This symbol indicates that the terminal must be connected to ground before operation of
equipment.
WARNING
CAUTION
High temperature: To avoid injury caused by hot surface, don't touch the heatsink.
A WARNING sign denotes a hazard. It calls attention to a procedure, practice,
condition or the like, which, if not correctly performed or adhered to, could result
in injury or death of personnel.
A CAUTION sign denotes a hazard. It calls attention to a procedure, practice,
condition or the like, which, if not correctly performed or adhered to, could result
in damage to or destruction of part of the product.
2 IM 4H3B1-01E
Page 4

WARNING
Power Supply
Ensure the source voltage matches the voltage of the power supply before
turning on the power.
Protective Grounding
Make sure to connect the protective grounding to prevent an electric shock
before turning on the power.
Necessity of Protective Grounding
Never cut off the internal or external protective grounding wire or disconnect the
wiring of protective grounding terminal. Doing so poses a potential shock
hazard.
Defect of Protective Grounding and Fuse
Do not operate the instrument when protective grounding or fuse might be
defective.
Fuse
To prevent a fire, make sure to use the fuse with specified standard (current,
voltage, type). Before replacing the fuse, turn off the power and disconnect the
power source. Do not use a different fuse or short-circuit the fuse holder.
Do not Operate in an Explosive Atmosphere
Do not operate the instrument in the presence of flammable liquids or vapors.
Operation of any electrical instrument in such an environment constitutes a
safety hazard.
Never Touch the Interior of the Instrument
Inside this instrument there are areas of high voltage; therefore, never touch the
interior if the power supply is connected. This instrument has an internal
changeable system; however, internal inspection and adjustments should be
done by qualified personnel only.
External Connection
To ground securely, connect the protective grounding before connecting to
measurement or control unit.
IM 4H3B1-01E
3
Page 5

CONTENTS
INTRODUCTION ................................................................................................. 1
SAFETY PRECAUTIONS .................................................................................. 2
HOW TO USE THIS MANUAL ......................................................................... 6
Chapter 1 FEATURES AND FUNCTIONS
1.1 Features ....................................................................................................... 1 - 1
1.2 Summary of Functions ............................................................................... 1 - 2
Chapter 2 BEFORE OPERATION
2.1 Handling Precautions ................................................................................. 2 - 1
2.2 Checking the Contents .............................................................................. 2 - 2
Chapter 3 INSTALLATION
3.1 Installation Site/Mounting .......................................................................... 3 - 1
3.2 Wiring ........................................................................................................... 3 - 4
!
!
!
!
!
!
Chapter 4 COMPONENT NAMES AND FUNCTIONS
4.1 Front Panel .................................................................................................. 4 - 2
4.2 Display.......................................................................................................... 4 - 4
Chapter 5 DAILY OPERATION
5.1 How to Switch the Power ON/OFF .......................................................... 5 - 1
5.2 How to Install (& Replace) Chart, Pens,
5.3 Basic Operation (Operation Mode) .......................................................... 5 - 7
5.4 How to Use the Key-lock .................................................................... 5 - 17
Chapter 6 HOW TO ENTER SETTINGS
6.1 Explanation of Modes ................................................................................ 6 - 1
6.2 Concept of Setting Parameters ................................................................ 6 - 2
6.3 Flow Charts ................................................................................................. 6 - 3
6.4 Setting Parameters in SET Mode ............................................................ 6 - 6
6.5 List of Initial Setting Values ................................................................ 6 - 7
Chapter 7 BASIC SETTINGS
7.1 How to Set Input Range and Recording Span....................................... 7 - 1
2.2.1 Checking Accessories and Appearance ..................................................... 2 - 2
2.2.2 Removing Packings ................................................................................ 2 - 3
2.2.3 Checking Model Code ............................................................................. 2 - 3
3.1.1 Installation Site ....................................................................................... 3 - 1
3.1.2 Mounting ............................................................................................... 3 - 2
3.1.3 Dimensional Drawings ............................................................................. 3 - 3
3.2.1 Rear Panel Arrangement ......................................................................... 3 - 4
3.2.2 Power Supply Wiring ......................................................................................... 3 - 5
3.2.3 Input Wiring ....................................................................................................... 3 - 6
3.2.4 Alarm Output Wiring .......................................................................................... 3 - 9
3.2.5 FAIL/Chart End Wiring ...................................................................................... 3 - 10
3.2.6 Remote Control Wiring ............................................................................ 3 - 11
Ribbon Cassette and Battery.................................................................... 5 - 2
5.2.1 How to Load (& Replace) the Chart ........................................................... 5 - 2
5.2.2 How to Install (& Replace) Pens and Ribbon Cassette................................. 5 - 4
5.2.3 How to Replace the Battery...................................................................... 5 - 6
5.3.1 How to Start/Stop the Recording ............................................................... 5 - 7
5.3.2 How to Feed the Chart ............................................................................ 5 - 7
5.3.3 How to Get a Manual Printout................................................................... 5 - 7
5.3.4 How to Get a List Printout ........................................................................ 5 - 8
5.3.5 How to Get a SET UP List Printout ............................................................ 5 - 10
5.3.6 How to Get a Message Printout ................................................................ 5 - 12
5.3.7 How to Acknowledge an Alarm ................................................................. 5 - 13
5.3.8 How to Select the Display ................................................................................. 5 - 14
5.3.9 How to Cope with FAIL/Chart End ............................................................ 5 - 16
6.3.1 Flow Chart of Operation Mode .................................................................. 6 - 3
6.3.2 Flow Chart of SET Mode ......................................................................... 6 - 4
6.3.3 Flow Chart of SET UP Mode .................................................................... 6 - 5
7.1.1 SKIP Setting .......................................................................................... 7 - 2
7.1.2 Voltage Measurement Setting (VOLT Setting) ............................................ 7 - 3
7.1.3 Thermocouple and Resistance Temperature Detector Setting
(TC, RTD Setting) ................................................................................... 7 - 4
7.1.4 Digital Input Setting (DI Setting) ................................................................ 7 - 5
7.1.5 Difference Computation Setting (DELT Setting) .......................................... 7 - 6
4 IM 4H3B1-01E
Page 6

7.1.6 Scale Setting (SCL Setting)...................................................................... 7 - 7
7.1.7 Setting to Obtain Square Root (SQRT Setting) ........................................... 7 - 8
7.2 How to Set Alarms ............................................................................. 7 - 10
7.3 How to Assign Units ................................................................................... 7 - 12
7.4 How to Set the Chart Speed ..................................................................... 7 - 13
7.5 How to Set the Clock ................................................................................. 7 - 14
7.6 How to Copy Channel Settings to Another Channel ............................. 7 - 15
7.7 How to Set the Remote RJC (For /N5 Model) .................................... 7 - 16
Chapter 8 AUXILIARY SETTINGS (AUX)
8.1 Settings for Analog Recording.................................................................. 8 - 1
8.1.1 How to Adjust the Trend Recording Format ................................................ 8 - 2
8.1.2 How to Set Zone Recording ..................................................................... 8 - 3
8.1.3 How to Set Partial Expanded Recording .................................................... 8 - 4
8.2 Settings for Digital Printing........................................................................ 8 - 6
8.2.1 How to Select the Periodic Printout ON/OFF .............................................. 8 - 6
8.2.2 How to Set a Tag .................................................................................... 8 - 8
8.2.3 How to Set Messages ............................................................................. 8 - 9
8.3 How to Set the Chart Speed Used When Change-on-alarm
or Remote Control is Selected ........................................................... 8 - 10
Chapter 9 CHANGING INITIAL SETTINGS
These settings are entered during manufacturing and seldom need to be changed.
9.1 How to Change Initial Settings for the Alarm Function......................... 9 - 1
9.1.1 How to Select the Reflash Function ON/OFF.............................................. 9 - 2
9.1.2 How to Select the Output Relay to be of AND/OR Type ............................... 9 - 3
9.1.3 How to Select the Output Relay to be Energizing/De-energizing on Alarm
9.1.4 How to Select the Alarm Output Relay to be of HOLD/NON-HOLD Type ....... 9 - 5
9.1.5 How to Select the Alarm Indicator to be of HOLD/NON-HOLD Type .............. 9 - 6
9.1.6 How to Set the Sampling Interval for Rate-of-change Alarms ........................... 9 - 7
9.1.7 How to Select Alarm Hysteresis ON/OFF ................................................... 9 - 8
9.2 How to Change Initial Settings for the Input ....................................... 9 - 9
9.2.1 How to Set the A/D Integration Time ......................................................... 9 - 9
9.2.2 How to Set Upscale/Downscale TC Burnout ..................................................... 9 - 10
9.2.3 How to Set Internal or External RJC .......................................................... 9 - 11
9.2.4 How to Select the Input Filter (Pen Model) ................................................. 9 - 12
9.2.5 How to Select a Moving Average (Dot Model) ............................................ 9 - 13
9.3 How to Change Initial Settings for Analog Recording .......................... 9 - 14
9.3.1 How to Select Pen Offset Compensation ON/OFF (Pen Model) .................... 9 - 14
9.3.2 How to Assign Different Colors to Channels (Dot Model) ............................. 9 - 15
9.4 How to Change Initial Settings for Digital Printouts .............................. 9 - 16
9.4.1 How to Select Channel Numbers or Tag Printout ........................................ 9 - 16
9.4.2 How to Select Scales Printout ON/OFF ..................................................... 9 - 16
9.4.3 How to Select the New Chart Speed Printout ON/OFF ................................ 9 - 17
9.4.4 How to Select the Record Start Time Printout ON/OFF ................................ 9 - 17
9.4.5 How to Select Alarm Settings and Alarm Printout ............................................. 9 - 18
9.4.6 How to Select to Trigger the Periodic Printout .................................................. 9 - 18
9.5 How to Select the Type of Bargraph ....................................................... 9 - 20
9.6 How to Change the Temperature Unit (for USA) ............................... 9 - 21
9.7 How to Initialize Settings ........................................................................... 9 - 21
9.8 How to Change Initial Settings for the REMOTE Option .................... 9 - 22
9.9 How to Select to Trigger the Recording to Start/Stop ........................ 9 - 23
9.10 How to Change Key-lock Settings ...................................................... 9 - 24
Chapter 10 GENERAL SPECIFICATIONS
Chapter 11 MAINTENANCE
11.1 Periodic Maintenance ................................................................................ 11 - 1
!
11.2 Fuse Replacement ..................................................................................... 11 - 2
11.3 Pen Adjustment (Pen Model) .................................................................... 11 - 3
11.4 Printer Carriage Adjustment (Dot Model) ............................................... 11 - 4
11.5 Calibration .................................................................................................... 11 - 5
11.6 Cleaning the Plotter Carriage Shaft (Pen Model) ................................... 11 - 7
11.7 Lubrication (Dot Model) ............................................................................. 11 - 7
Chapter 12 TROUBLESHOOTING
12.1 Error Message Table ................................................................................. 12 - 1
12.2 Troubleshooting Flow Chart ...................................................................... 12 - 2
.......
Chapter 1 Chapter 2 Chapter 3 Chapter 4 Chapter 5 Chapter 6 Chapter 7 Chapter 8 Chapter 9 Chapter 10 Chapter 11 Chapter 12
9 - 4
TERMINOLOGY
INDEX
IM 4H3B1-01E
TERMINOLOGY
INDEX
5
Page 7
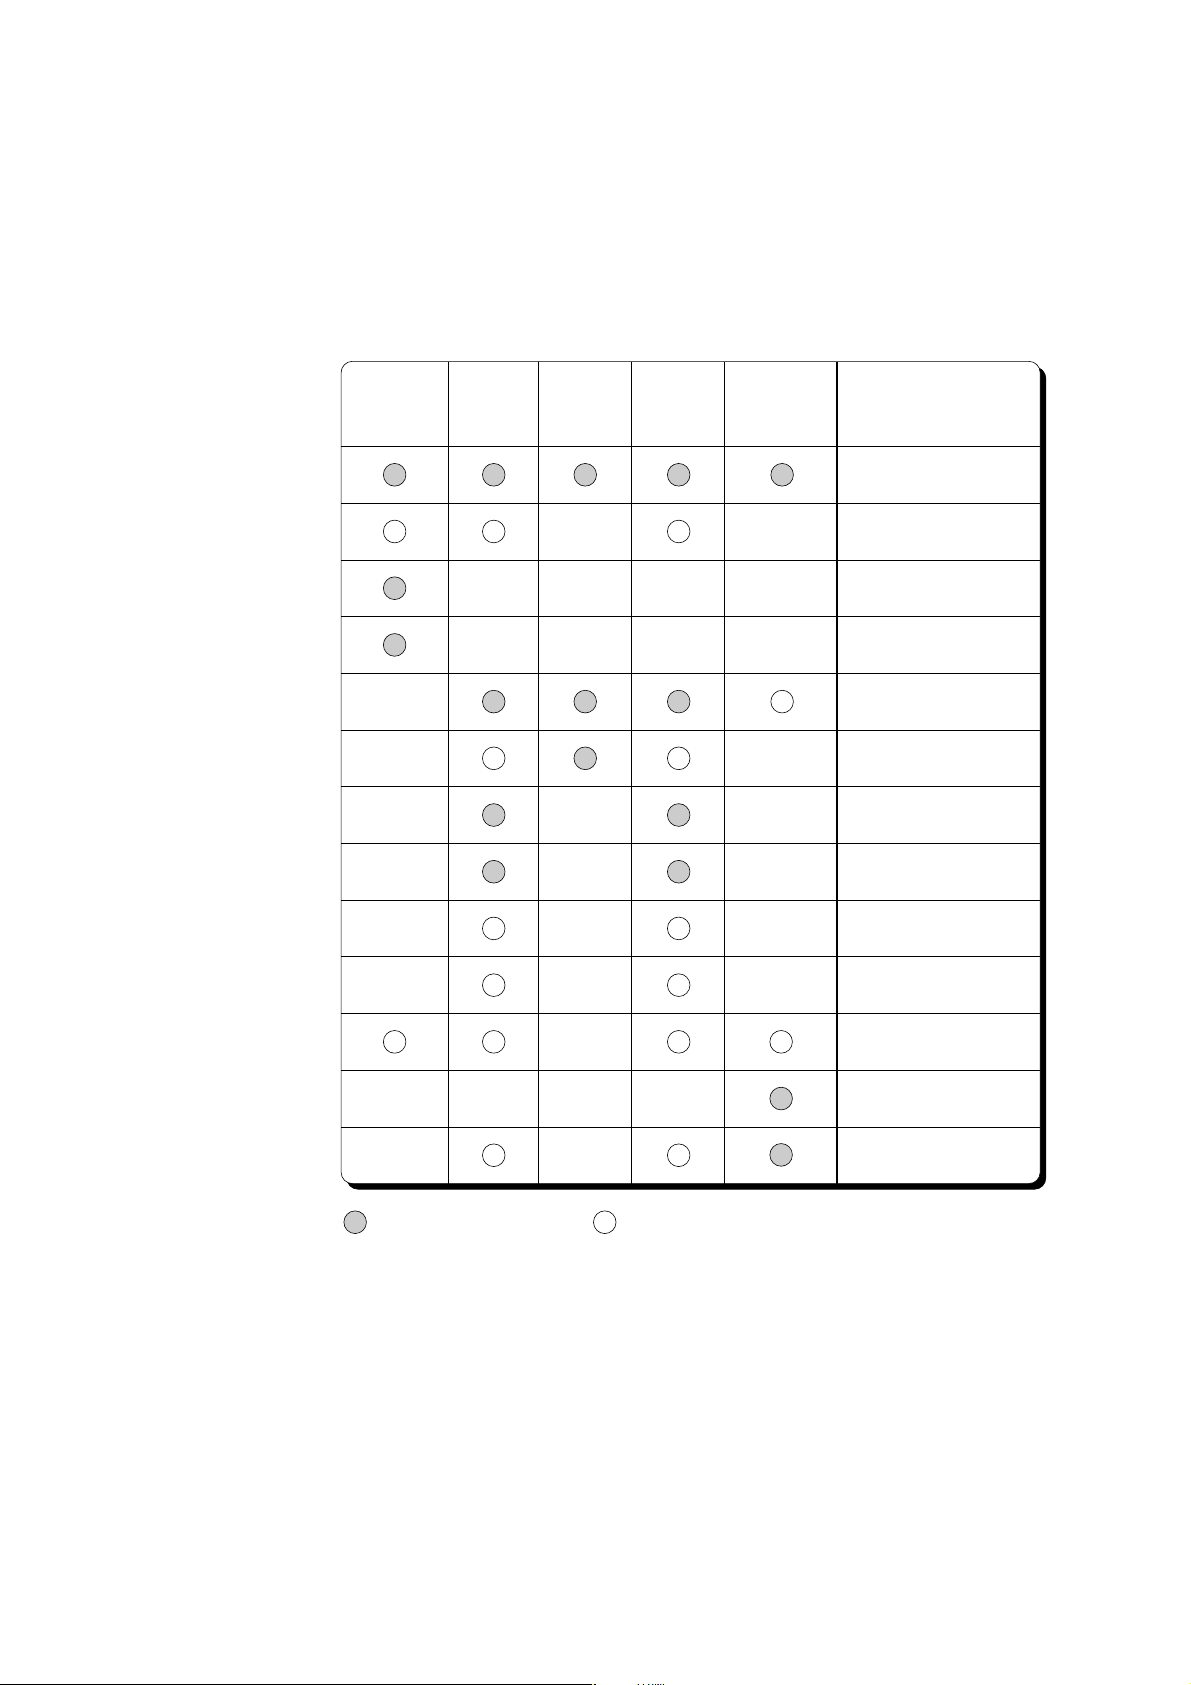
HOW TO USE THIS MANUAL
This manual describes the standard functions, operation procedures and some of the
optional functions of the pen model and dot printing model of the µR1800 recorder.
To use this manual in the most efficient way, please refer to the following table. In this
table the aim of the user is broken down into five broad categories. Please check which
are applicable to you and refer to the corresponding chapters.
Purchase &
Installation
First Time
Setting
Daily
Operation
Changing
Settings
Maintenance
& Trouble-
shooting
Chapters
Safety Precautions
1 Features and
Functions
2 Before Operation
3 Installation
4 Component Names
and Functions
5 Daily Operation
6 How to Enter
Settings
7 Basic Settings
8 Auxiliary Settings
(AUX)
9 Changing Initial
Settings
10 General
Specifications
11
Maintenance
Troubleshooting
12
necessary to read optional to read
::
For operation procedures of options, which are not described in this manual, refer to
specific option manuals.
6 IM 4H3B1-01E
Page 8

1.1 Features
Chapter 1 FEATURES AND FUNCTIONS
1.1 Features
This chapter describes the main features and functions of the µR1800 recorder. The
µR1800 is equipped with all the functions which can be expected in a modern recorder,
whereas its functions also reflect the latest user requirements.
The µR1800 recorder is a precision measuring instrument that is equipped with many
outstanding features:
Compact sized, high reliability: Its compact size (depth 220mm) allows you to
install the µR1800 where only a limited space is available. In case of the pen model, a
contact-free potentiometer and a brushless-DC servomotor contribute to its high
reliability. In case of the dot printing model, high reliability is obtained by the use of
high break down voltage solid-state relays.
Universal inputs: Inputs like DC-voltage, Thermocouple (TC), Resistance
Temperature Detector (RTD), and Digital Input (contact) can all be conveniently used.
There is no need to change any dipswitches; the type of input can be set using the keyboard.
Easy interactive setting: The setting procedure has been made very easy, by using
only panel keys. The µR1800 asks you to select the desired settings, without the need
for remembering difficult setting-codes.
Large informative operator display: The large sized, VFD, display shows the
measured data (including the engineering units) or clock, and bargraph at the same time.
There are two types of bargraph available: percentage-display, and center-zero display.
Because of its 1%-resolution, the bargraph displays very accurately.
1. FEATURES AND FUNCTIONS
Continuous pen recording for up to four channels (pen model only):
Depending on your µR1800 model type, the µR1800 can measure up to four channels
simultaneously. This allows you to decrease the number of recorders you require.
Universal power supply (except for /P1 model): The µR1800 accepts 90 to
250VAC (except 132 to 180VAC), and 50/60Hz without any problems, or need to turn
switches. Therefore the µR1800 is compatible with a wide variety of power supplies.
High performance: The sampling speed of the µR1800 pen model is high at 125 ms,
whereas the recording cycle of the µR1800 dot printing model is 6 ch./10 seconds, or
12ch./15sec., 18ch./20sec. or 24ch./30sec. depending on the model.
The µR1800 is equipped with many functions. Special functions can be ordered as an
option. Furthermore, its power consumption is low (4pen model; 30VA under normal
operation conditions).
Easy maintenance: Because of the use of many contact-free parts, the need for
maintenance has been decreased. The µR1800 is designed in modules, which decreases
the time needed for maintenance extensively.
Closed case: The closed case of the µR1800 allows it to be used in many
environments. The front door is in accordance with DIN 40050-IP54.
Computer interface and memory card: If equipped with this option, the µR1800
can store and retrieve measured data as well as setting data, using an IC memory card or
directly from your PC. The available interface is RS-422-A.
IM 4H3B1-01E
Based on international safety standards: The µR1800 (except portable type) is
based on international safety standards, such as the IEC 348.
1 - 1
Page 9
1.2 Summary of Functions
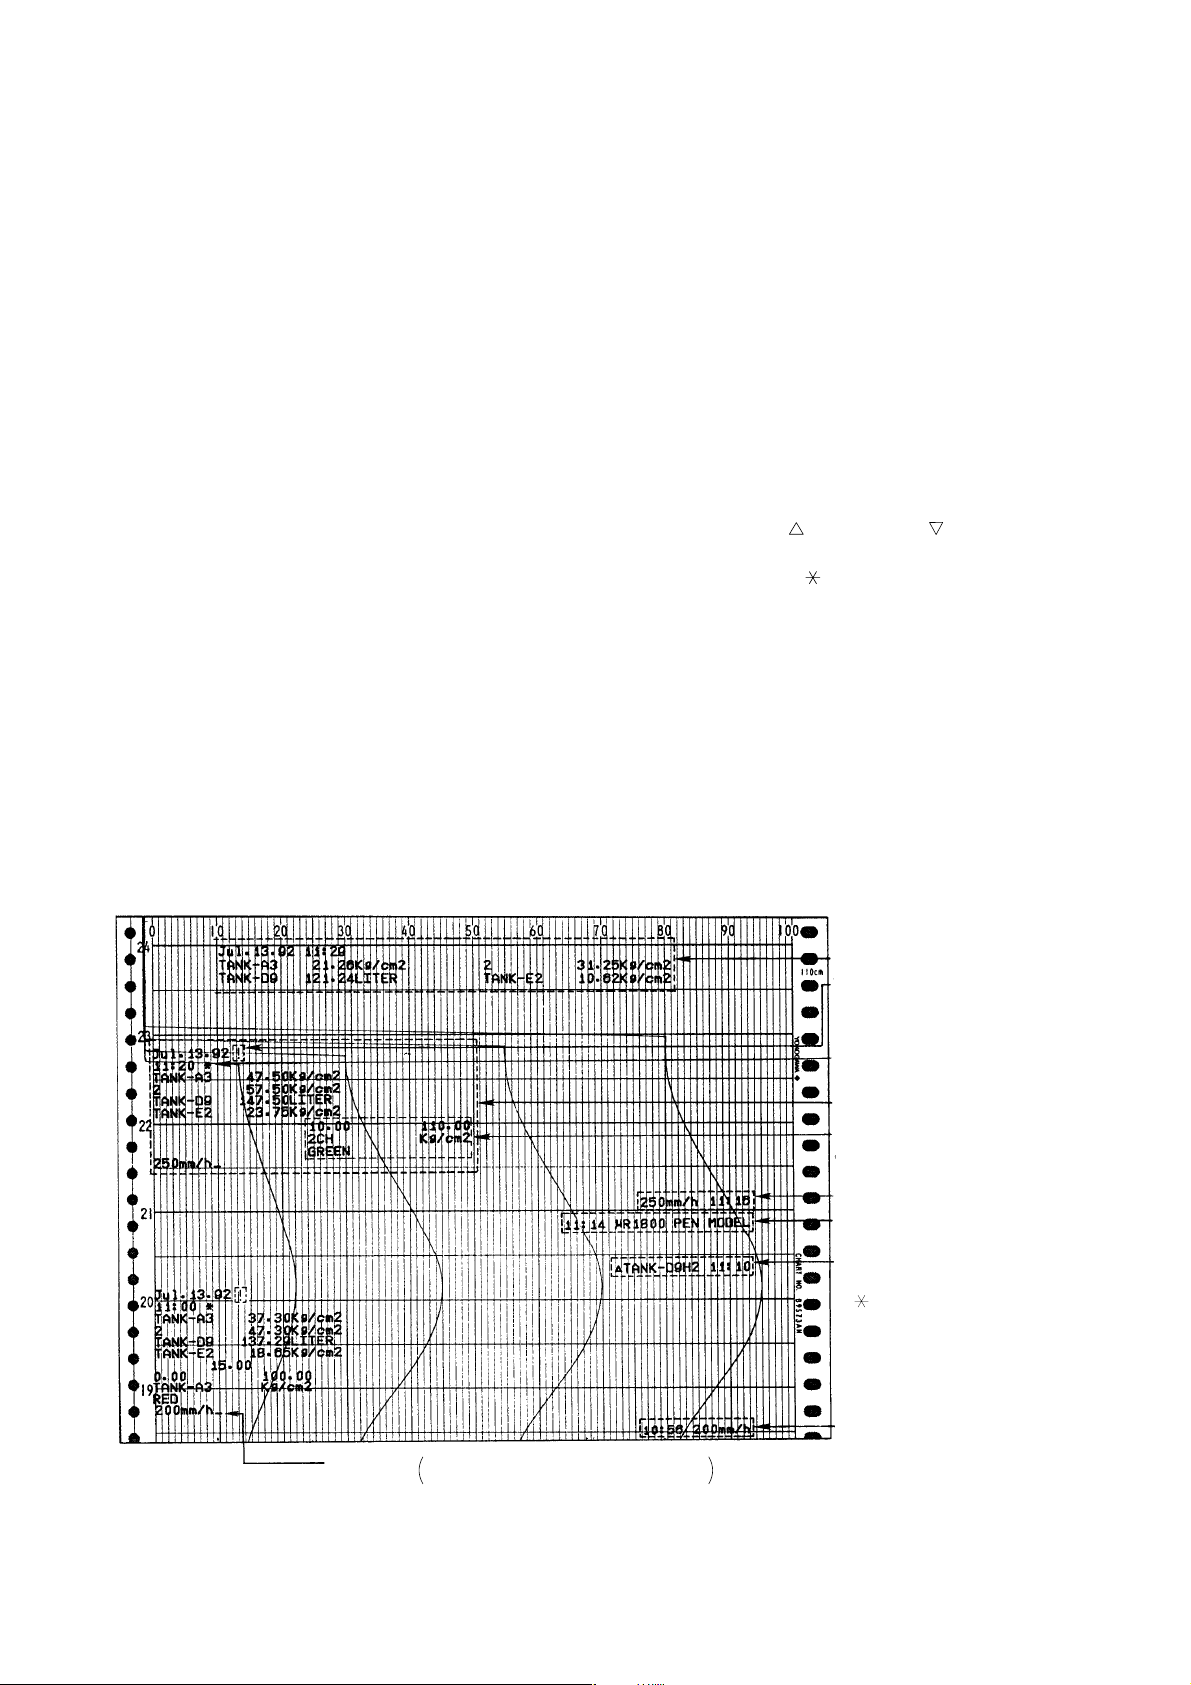
This paragraph describes a summary of the main functions, together with a recording
example.
RECORDING
Trend: records in a way that the dots do not overlap (dot model only)
Zone: records on different bands (zones) for individual channels
Partial: expands part of the recording range for detailed examination
POC: Pen Offset Compensation: removes the time-axis offset between pens (pen model only)
PRINTOUT
Channel printout: contains channel No. besides analog recording (dot model only)
List printout: contains date, time, chart speed (1 & 2), channel No. or tag, range, span values, scale
values, partial values and contents of messages (for example, see 5.3.4)
Manual printout: contains date and time, channel No., type of alarm, latest measured values, units (for all
channels)
Alarm printout: contains channel or tag No., type of alarm, level, mark ( for occurence, for recover;
in case of the dot model, red and blue respectively) and alarm ON/OFF-time
Periodic printout: contains date & time, tag or channel No., POC ON mark ( ; for pen model only), unit,
scale markings (may not be printed while alarm occurs), chart speed, measured values
and recording color (for pen model) and time tick (for dot model)
Message printout: contains time and message
Recording start printout: contains time when recording starts
Chart speed change: contains time and new chart speed
SET UP List printout: contains initial settings concerning analog recording, digital printing, alarms, burnout,
RJC and options (for example, see 5.3.5)
NOTE The alarm, channel (for dot model), periodic, message, recording start and chart speed
change printout depend on the chart speed. The size of the characters varies depending
on the chart speed.
Manual printout
Time tick cancel mark (!)
appears when chart feed/speed
has been changed during
periodic printout
POC ON mark
Periodic printout
Scale printout an Recording
color
Chart speed change printout
Message printout
Alarm printout
Note: When an asterisk appears
( ), the memory buffer is full
and some data will not be printed.
This asterisk may appear in the
alarm printout, message printout,
recording start time printout and
the chart speed change printout.
Recording start time
Time tick (–)
Figure 1.1 Recording Example for Pen Model
always corresponding to pen No.1 when POC is OFF.
Corresponding to all pens when POC is ON.
1 - 2 IM 4H3B1-01E
Page 10
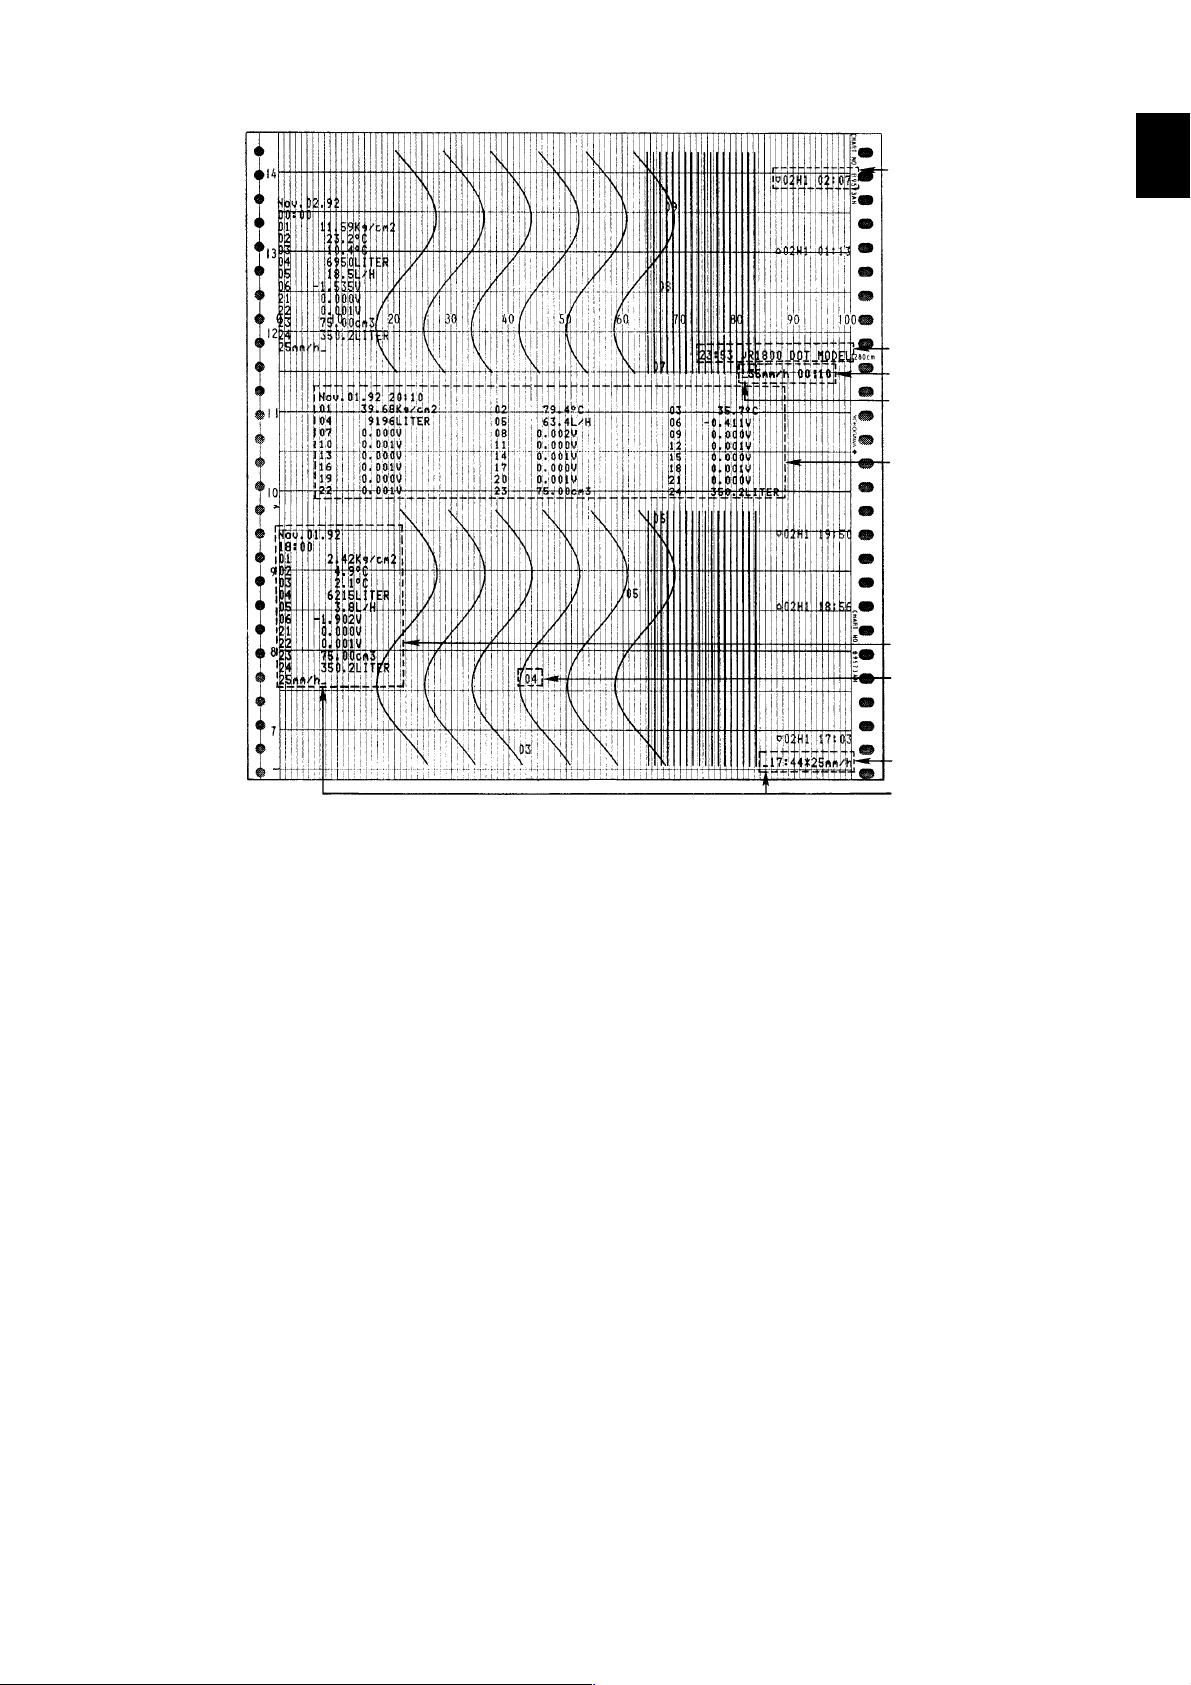
1.2 Summary of Functions
Alarm printout
Note: When an asterisk
appears (✴), the memory
buffer is full and some data will
not be printed. This asterisk
may appear in the alarm
printout, message printout,
recording start time printout
and the chart speed change
printout.
Message printout
Chart speed change
printout
Time tick (–)*
Manual printout
1
1. FEATURES AND FUNCTIONS
Periodic printout
Channel printout
Recording start time
✴1: will not be printed when the time does not correspond with the correct place on the chart.
Figure 1.2 Recording Example for Dot Model
Time tick (–)*
ALARM
Type of alarms: H: high limit
L: low limit
h: high difference limit
l: low difference limit
R: rate-of-change limit on increasing signal
r: rate-of-change limit on decreasing signal
Hysteresis: hysteresis value as a % of span which can be 0% or approx. 0.5%
Alarm output relay: when alarm occurs, the relay will be activated (optional)
Reflash: monitors repeating alarm occurrences among a group of alarms sharing the
same output relay (optional)
FAIL/Chart-end output: output relay is activated when chart reaches its end and/or when failure of
equipment occurs (optional)
INPUT
Type of inputs: TC: Thermocouple
RTD: Resistance Temperature Detector
DC-voltage
DC-current: using optional external shunt resistor
DI: Digital Input (contact)
Burnout: when TC-wire is broken, pens will move to left or right side
Filter: (signal damping) selects the time constant of signal damping (for pen model)
Moving average: selects the number of samples for moving average (for dot model)
1
IM 4H3B1-01E
1 - 3
Page 11

DISPLAY
Left-referenced bargraph: measured data are displayed as a %, on a 0 to 100% scale
Center-zero bargraph: center of the recording span is reference and deviation is displayed as a bargraph
Clock: year/month/day and hours/minutes/seconds
Measured data: AUTO: all channels will be shown alternately
MAN: a specified channel only will be shown
Alarm: channel No., type of alarm (display), channel No. (underneath bargraph, for dot model)
Status indicators: RCD: illuminated when recording is in progress
POC: illuminated when POC is being used (for pen model)
SET: illuminated when in SET Mode
AUTO:illuminated when AUTO display is used
MAN: illuminated when Manual display is used
CLK: illuminated when Clock display is used
ALM: illuminated/flashing when alarm occurs
CHT: illuminated when approx. 2cm are left till chart end (option)
BAT: illuminated/flashing when battery needs to be replaced
CALCULATION
Difference calc (DELT): takes the difference between the measured values of two channels
Linear scaling (SCL): sets different scale (and unit) to a specific range
Square root (SQRT): takes the square root of measured data
MATH: calculates basic arithmetic computations, SQRT, ABS, LOG, EXP, logical and
relational computation (optional)
TLOG: calculates statistic computation for time axis (optional)
COMPUTER INTERFACE (Optional)
RS-422-A
IC MEMORY CARD (Optional)
Storage and retrieval of setting parameters and measured data
REMOTE CONTROL (Optional)
Message printout, manual printout, periodic printout, recording ON/OFF, chart speed
change, TLOG START/STOP, IC memory card trigger.
1 - 4 IM 4H3B1-01E
Page 12

Chapter 2 BEFORE OPERATION
This chapter describes the preparations to be made before you can operate the µR1800
recorder. To use the µR1800, it is necessary to read this chapter first.
2.1 Handling Precautions
Cleaning
The µR1800 contains many plastic parts, like door window and panels. Therefore never
attempt to clean the µR1800 with chemicals like benzene or thinner.
Static electricity
Do not bring any objects charged with static electricity near the signal terminals. This
might cause malfunction.
Insecticide sprays, etc.
Do not allow any volatile substances such as insecticides etc. to come in contact with
the front door, the operation panel, etc. Do not allow rubber or vinyl to remain in
contact with the recorder for long periods.
After use
Ensure that the power switch is turned to the OFF position.
2.1 Handling Precautions
2. BEFORE OPERATION
In case of malfunction
Never continue to use the instrument if there are any symptoms of malfunction such as
unusual sounds, smell, or smoke coming from the instrument. Immediately disconnect
the power supply and stop further use of the instrument. If such abnormal symptoms
occur, contact your sales representative or nearest service center.
IM 4H3B1-01E
2 - 1
Page 13
2.2 Checking the Contents
This µR1800 was thoroughly inspected before it was shipped from the factory.
However, when you receive the µR1800, check that all accessories are present and in
the correct quantities. Also check the external appearance of the µR1800 to ascertain
that no damage has occurred.
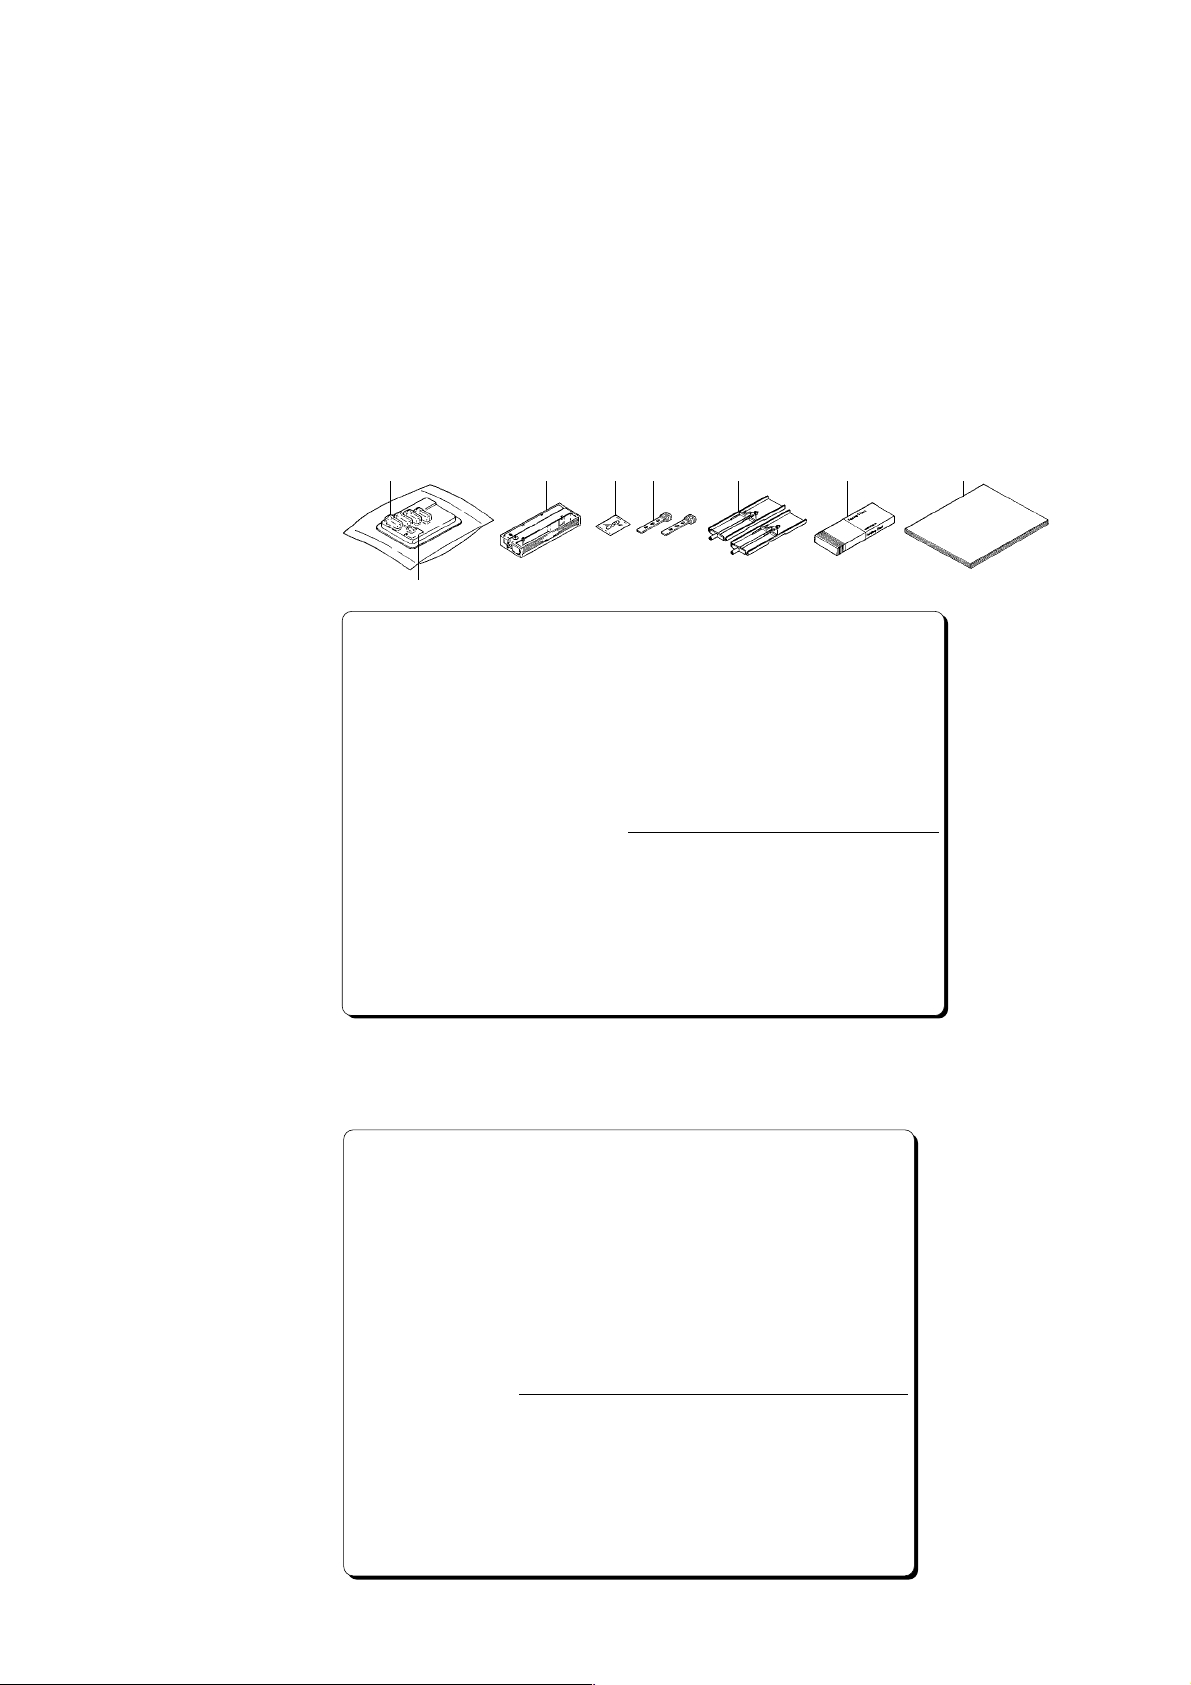
2.2.1 Checking Accessories and Appearance
The µR1800 should be accompanied by the accessories indicated in figure 2.1.
Check that all are present in the correct quantities. Also check the external appearance
of the µR1800 to ascertain that no damage has occurred. If you discover any problem
concerning the quantity of accessories or external appearance, please contact your sales
representative or the nearest service center. Addresses may be found on the back cover
of this Instruction Manual.
1
2
No. Description Quantity Remarks
1.
disposable felt pen (for pen model)
• 1 pen model
• 2 pen model
• 3 pen model
• 4 pen model
2.
plotter pen (for pen model)
3.
ribbon cassette (for dot model)
4.
fuse
key
5.
mounting brackets
6.
Z-fold chart paper
7.
Instruction Manual and Quick
8.
Reference power cord
3 4 5 6 7 8
red
1
red, green
2
red, green, blue
3
red, green, blue, violet
4
purple
1
1
250V 750mA time lag
1
(except for /P1 model)
250V 5A time lag
1
(for /P1 model)
Recorders with a gray power switch
250V 800mA time lag
1
(except for /P1 model)
250V 5A time lag
1
(for /P1 model)
Recorders with a white power switch
key-lock
2
2
approx. 20 meters
1
one each
1
for portable type
1
Figure 2.1 Accessories
Table 2.1 Spares
Name Part Number Description
Z-fold chart paper
disposable felt-pen
disposable felt-pen
disposable felt-pen
disposable felt-pen
plotter pen
ribbon cassette
fuse
mounting brackets
key (for key-lock)
lubricating oil
B9573AN
B9902AM
B9902AN
B9902AP
B9902AQ
B9902AR
B9906JA
A1438EF
A1102EF
A1512EF
A1513EF
B9900CW
B9900HZ
B9901AZ
(1 chart/unit), order quantity: 6 units
red (3 pcs./unit), order quantity: 1 unit
green (3 pcs./unit), order quantity: 1 unit
blue (3 pcs./unit), order quantity: 1 unit
violet (3 pcs./unit), order quantity: 1 unit
(3 pcs./unit), order quantity: 1 unit
(1 pc./unit), order quantity: 1 unit
(4pcs./unit), order quantity : 1 unit
250V 750mA time lag
(except for /P1 model)
(4pcs. /unit), order quantity : 1 unit
250V 5A time lag
(for /P1 model)
Recorders with a gray power switch
(4pcs. /unit), order quantity : 1 unit
250V 800mA time lag
(except for /P1 model)
(4pcs. /unit), order quantity : 1 unit
250V 5A time lag
(for /P1 model)
Recorders with a white power switch
(1 pc./unit), order quantity: 2 units
(1 pc./unit), order quantity: 2 units
(1 pc./unit), order quantity: 1 unit
2 - 2 IM 4H3B1-01E
Page 14
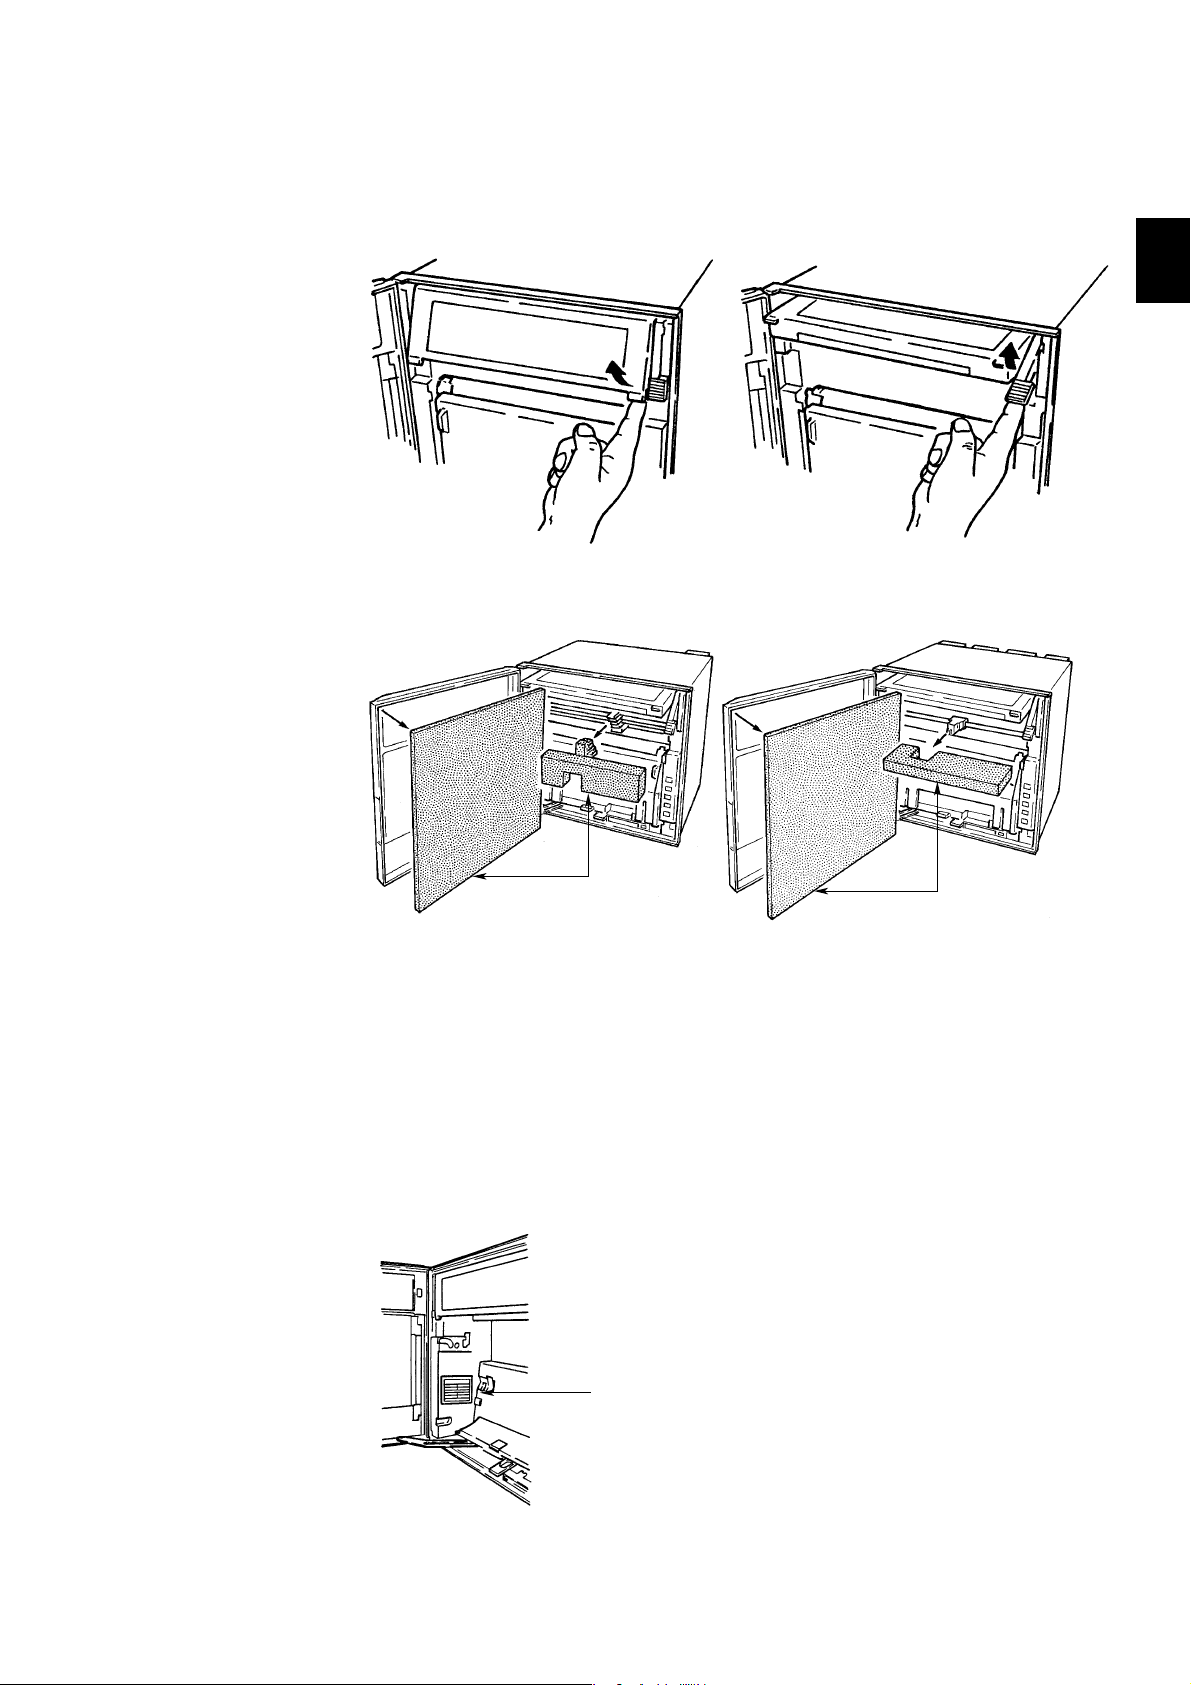
2.2.2 Removing Packings
The internal assembly is secured in position by packings to safeguard against damages
during transit. When you unpack the recorder, remove the packings as follows:
Open the µR1800 front door and swing open the display by grabbing the tabs located at
the lower right and left side of the display and pulling these tabs up. See figure 2.2a.
Figure 2.2a Swinging Up the Display Figure 2.2b Closing the Display
Then remove all the packings as shown in figure 2.3.
2.2 Checking the Contents
2. BEFORE OPERATION
Figure 2.3a Removing Packings in
After having removed the packings, close the display by pulling the 'release'-handle
until this handle is at the same level as the display. Then push the display back into
its normal position until the tabs click shut. See figure 2.2b.
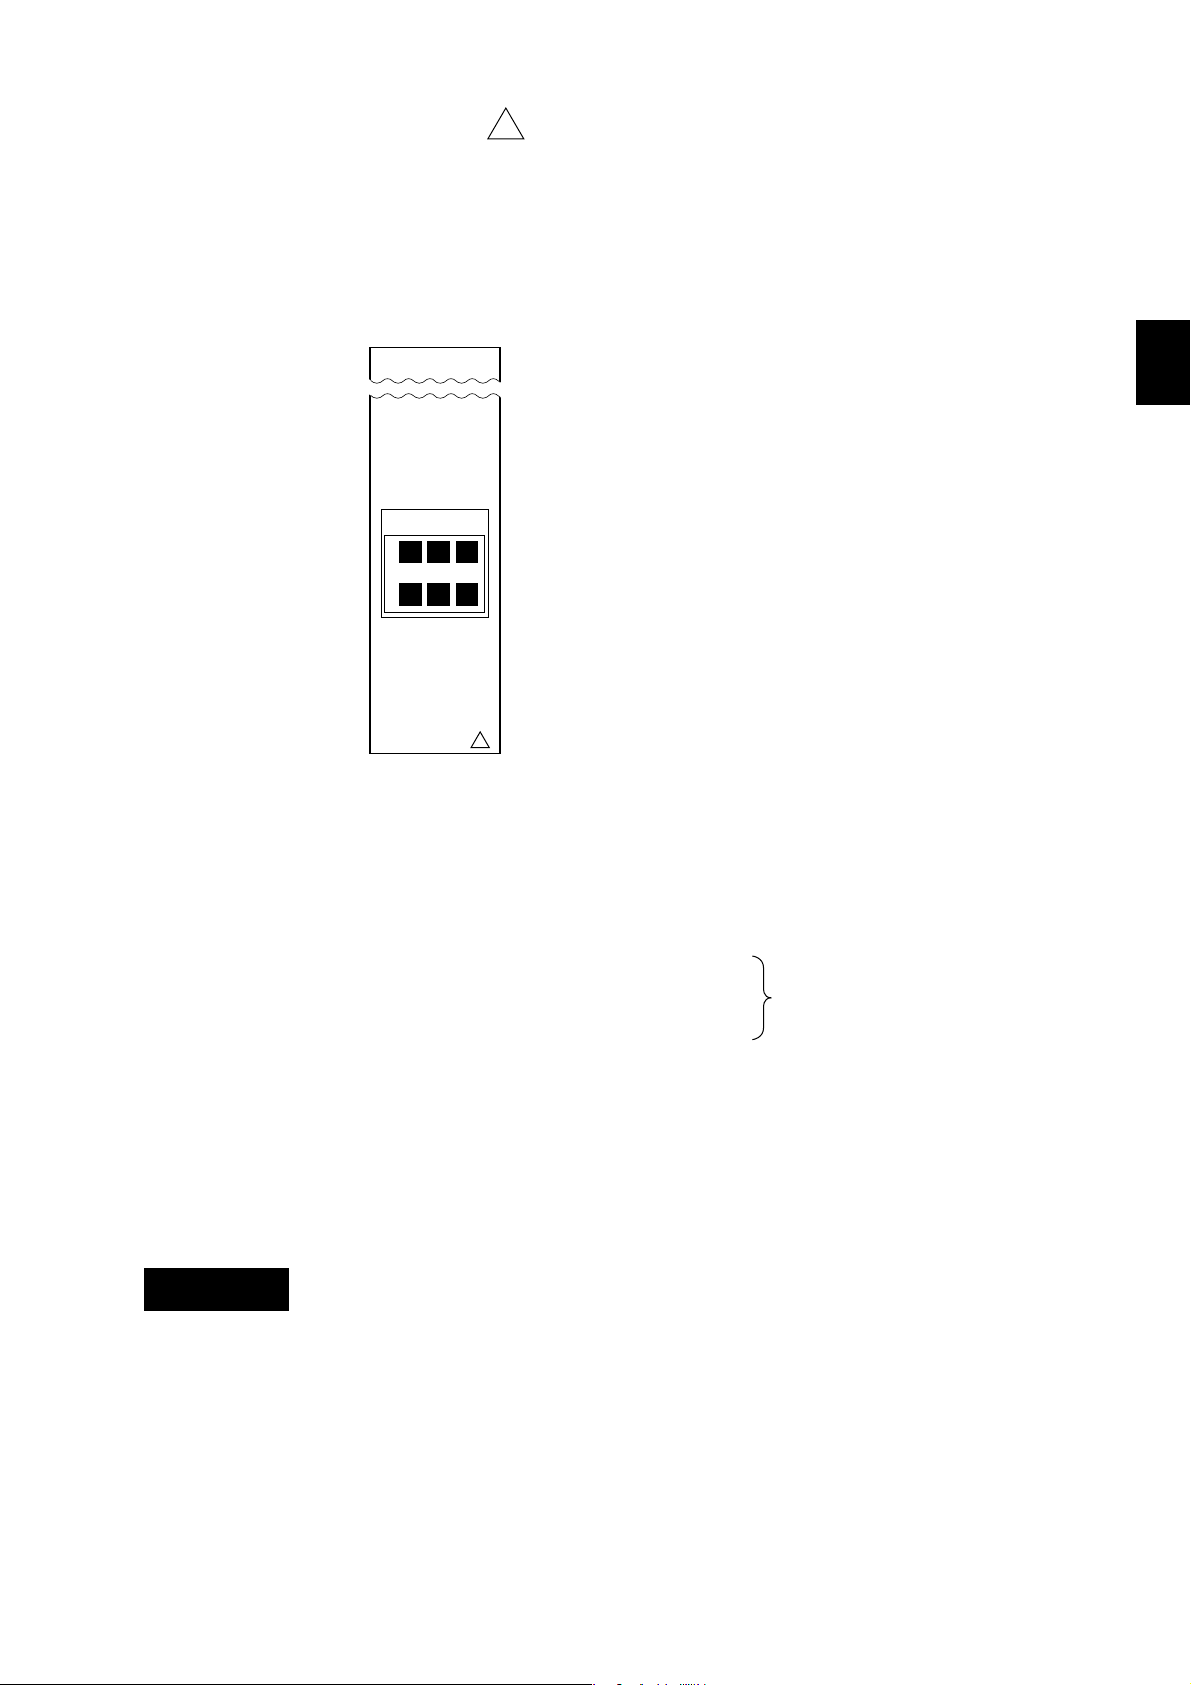
2.2.3 Checking Model Code
When you receive your µR1800, check the information on the nameplate to make sure
that it is as specified by your order. If you open the front door and remove the chart
cassette, you will find the model code mentioned on the nameplate located as shown in
figure 2.4. Please check if model code (MODEL) is correct.
case of Pen Model
Packings
Nameplate
Packings
Figure 2.3b Removing Packings in
case of Dot Model
IM 4H3B1-01E
Figure 2.4 Checking Model Code
2 - 3
Page 15

Chapter 3 INSTALLATION
This chapter describes the installation of the µR1800, like the installation site, the
mounting and wiring. To install the µR1800 properly, it is necessary to read this
chapter.
3.1 Installation Site/Mounting
3.1.1 Installation Site
The µR1800 installation site should be chosen to meet the following conditions as close
as possible:
Installation site should be panel-mounted only. The µR1800 is especially designed for
panel mounting.
The µR1800 should be placed in a well ventilated area.
The µR1800 will be adversely affected if the unit is exposed to direct sunlight or
installed near a heater. Choose a location near room temperature (23°C) with minimal
temperature fluctuations.
3.1 Installation Site/Mounting
3. INSTALLATION
To expose the µR1800 to soot, steam, moisture, dust, corrosive gases etc. will adversely
affect it.
To use the µR1800 within strong electro-magnetic fields may cause malfunction. Please
avoid installing near electro-magnetic objects.
To install the µR1800 in a location susceptible to mechanical vibrations will adversely
affect the mechanical parts and the quality of recording. Please choose an installation
site characterized by minimal mechanical vibrations.
This µR1800 must be installed horizontally (however, mounting may be inclined up to
30° backwards from vertical).
To use the µR1800 within domestic establishments and within establishments directly
connected to a low voltage power supply network which supplies buildings used for
domestic purposes may cause malfunction of other equipments. Please avoid using in
domestic environment.
IM 4H3B1-01E
3 - 1
Page 16
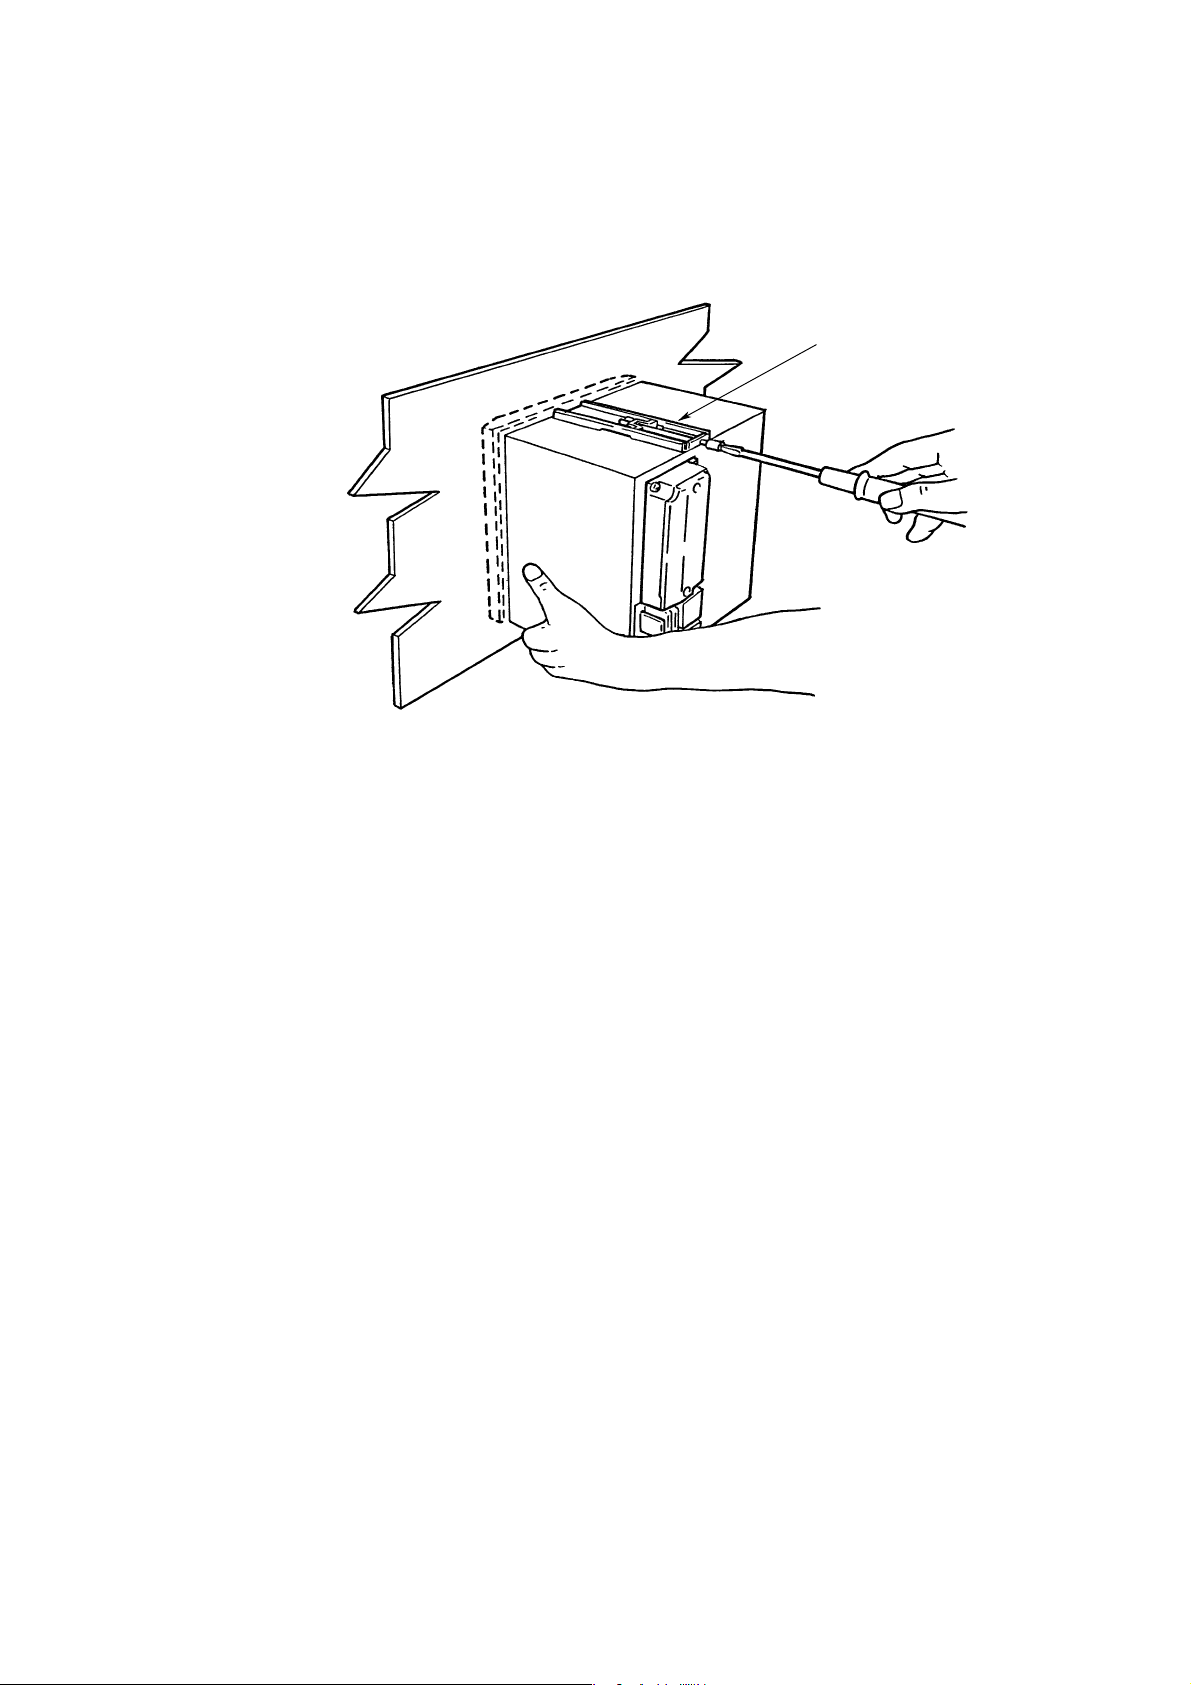
3.1.2 Mounting
1 The µR1800 should be mounted on at least 2mm (and up to 26mm) thick steel panel.
2 Insert the µR1800 into the panel cutout.
3 Hold the bottom of the µR1800 and mount it on the panel using the mounting brackets
supplied, as shown in figure 3.1. (If still in place, remove the seals covering the holes
for the mounting brackets.)
Mounting bracket
Figure 3.1 Mounting
3 - 2 IM 4H3B1-01E
Page 17

3.1.3 Dimensional Drawings
3.1 Installation Site/Mounting
3. INSTALLATION
Figure 3.2 Panel Cutout and Spacing (including mounting brackets)
NOTE • The µR1800 should be mounted by only two brackets, either on the top & bottom of
the recorder, or on the left & right side of the recorder.
• The portable type has different dimensions.
IM 4H3B1-01E
3 - 3
Page 18

3.2 Wiring
!
This paragraph describes the wiring at the rear panel.
3.2.1 Rear panel arrangement
3.2.2 Power supply wiring
3.2.3 Input wiring
3.2.4 Alarm output wiring
3.2.5 FAIL/Chart end output wiring
3.2.6 Remote control wiring
CAUTION
employ some kind of strain relief between the rear wall and the recorder.
3.2.1 Rear Panel Arrangement
Power supply
terminal Block
Make sure to fasten the wiring at the rear wall of the mounting panel and
for /P1 model
Each terminal block can be
removed for easy wiring
by loosening these screws.
To ensure proper contact,
make sure to fasten the
screws properly.
Used terminal screws:
ISO M4, length: 6mm
DC24V
+
−
/B
+/A
-/b
1
2
3
4
Figure 3.3a Rear Panel Arrangement in case of Pen Model
Power supply
terminal block
for /P1 model
Each terminal block can be
removed for easy wiring
by loosening these screws.
To ensure proper contact,
make sure to fasten the
screws properly.
Do NOT change the place of
the terminal block!
Used terminal screws:
ISO M4, length: 6mm
Figure 3.3b Rear Panel Arrangement in case of Dot Model
+
−
DC24V
3 - 4 IM 4H3B1-01E
Page 19

3.2 Wiring
3.2.2 Power Supply Wiring
1 Make sure the power switch is turned OFF and remove the transparent cover at the
rear of the µR1800.
2 Connect the power supply wires and the protective ground wire to the power terminals
and the ground terminals as shown in figure 3.4.
3 Replace the transparent cover.
for /P1 model
+
−
DC24V
Figure 3.4 Power Supply Wiring
NOTE • Do not apply power supply of 132 to 180VAC. This might affect the measuring
accuracy.
• In case of portable type, plug the female end of power cord into the socket on the rear
panel.
• To prevent an emission of electromagnetic disturbances, separate the power supply
wires from the other wires at least 0.1m. Over 0.5m is recommended.
!
Power supply wires
L
N
Protective ground wire
3. INSTALLATION
WARNING
To prevent an electric shock, ensure the main power supply is turned OFF and
connect the ground terminal using a class 3 resistance of 100Ω or less.
For power and ground wiring termination, use “crimp on” lugs (for 4mm screws)
with insulation sleeves (see figure 3.5).
To prevent fire, use 600V PVC insulated wire (AWG18) for power and ground
wiring (cross sectional area of 0.83mm2 or thicker, anti-galvanic corrosion finish,
insulation thickness should be more than 0.8mm, insulation resistance should
be more than 50MΩKm at 20°C, approved EN60 320 (VDE0625), and do not
remove the transparent cover.
Make sure to apply a power switch in the power supply cord with the following
characteristics:
Others than /P1 model
• rated power current > 1A
• rated rush current > 60A
• fuse(s) of 2A to 15A is (are) necessary.
/P1 model
• rated power current > 3A
• rated rush current > 70A
• fuse(s) of 5A to 15A is (are) necessary.
The power switch and fuse used in the power supply cord should be
• CSA approved (for use in North America)
• VDE approved (for use in Europe).
IM 4H3B1-01E
3 - 5
Page 20

3.2.3 Input Wiring
!
1 Make sure the power switch is turned OFF and remove the transparent cover at the
rear of the µR1800.
2 Connect the input wires to the input terminal.
3 Replace the transparent cover.
It is recommended that “crimp on” lugs (for 4mm screws) with insulation sleeves be
used for leadwire ends. See figure 3.5.
Figure 3.5 “Crimp on” Lugs
In case of clamped input terminals, do not use “crimp on” lugs.
Since the input terminal will be affected by changes in temperature (e.g. because of
wind), make sure to replace the transparent cover after wiring.
Even after replacement, take care not to expose the terminals to fans, etc.
Suggestions to minimize noise pickup:
• The measuring circuit wiring should be run as remote as possible from the power
and ground wires.
• It is recommended that shielded wires be used to minimize noise pickup from an
electrostatic induction source. The shielding wire of the cable should be connected
to the µR1800 ground terminal (only one ground line).
• To minimize noise from an electromagnetic induction source, twist the measuring
line cables in short and equal spaces.
• The to be measured object should be free from noise. However, if it isn’t, make
sure the measuring circuit is isolated and the to be measured object is grounded.
WARNING
CAUTION
If TC and RJC is used, the temperature of the input terminals should be as stable as
possible. Therefore, make sure to use the transparent cover. The thermal capacity of
the wiring should be small (recommended ø ≤ 0.3mm).
Refrain from wiring the input parallel. However, if you do, then
• do not use the burnout function
• ground the equipments at the same point
•turning ON/OFF the power might cause malfunction
• RTD cannot be wired parallel.
To prevent an electric shock, ensure the main power supply is turned OFF
and connect the ground terminal using a class 3 resistance of 100Ω or less.
If you have an input of DC ≤ 2V or a TC, don’t apply an input voltage exceeding ±10VDC.
Do not apply a max. common mode voltage more than 250VAC rms (50/
60Hz). The recorder and measured values will be adversely affected.
Add following to 'CAUTION'
This instrument complies with Inatallation Category ll.
NOTE To prevent an emission of electromagnetic disturbances, separate the input wires from
the other wires at least 0.1m. Over 0.5m is recommended.
3 - 6 IM 4H3B1-01E
Page 21
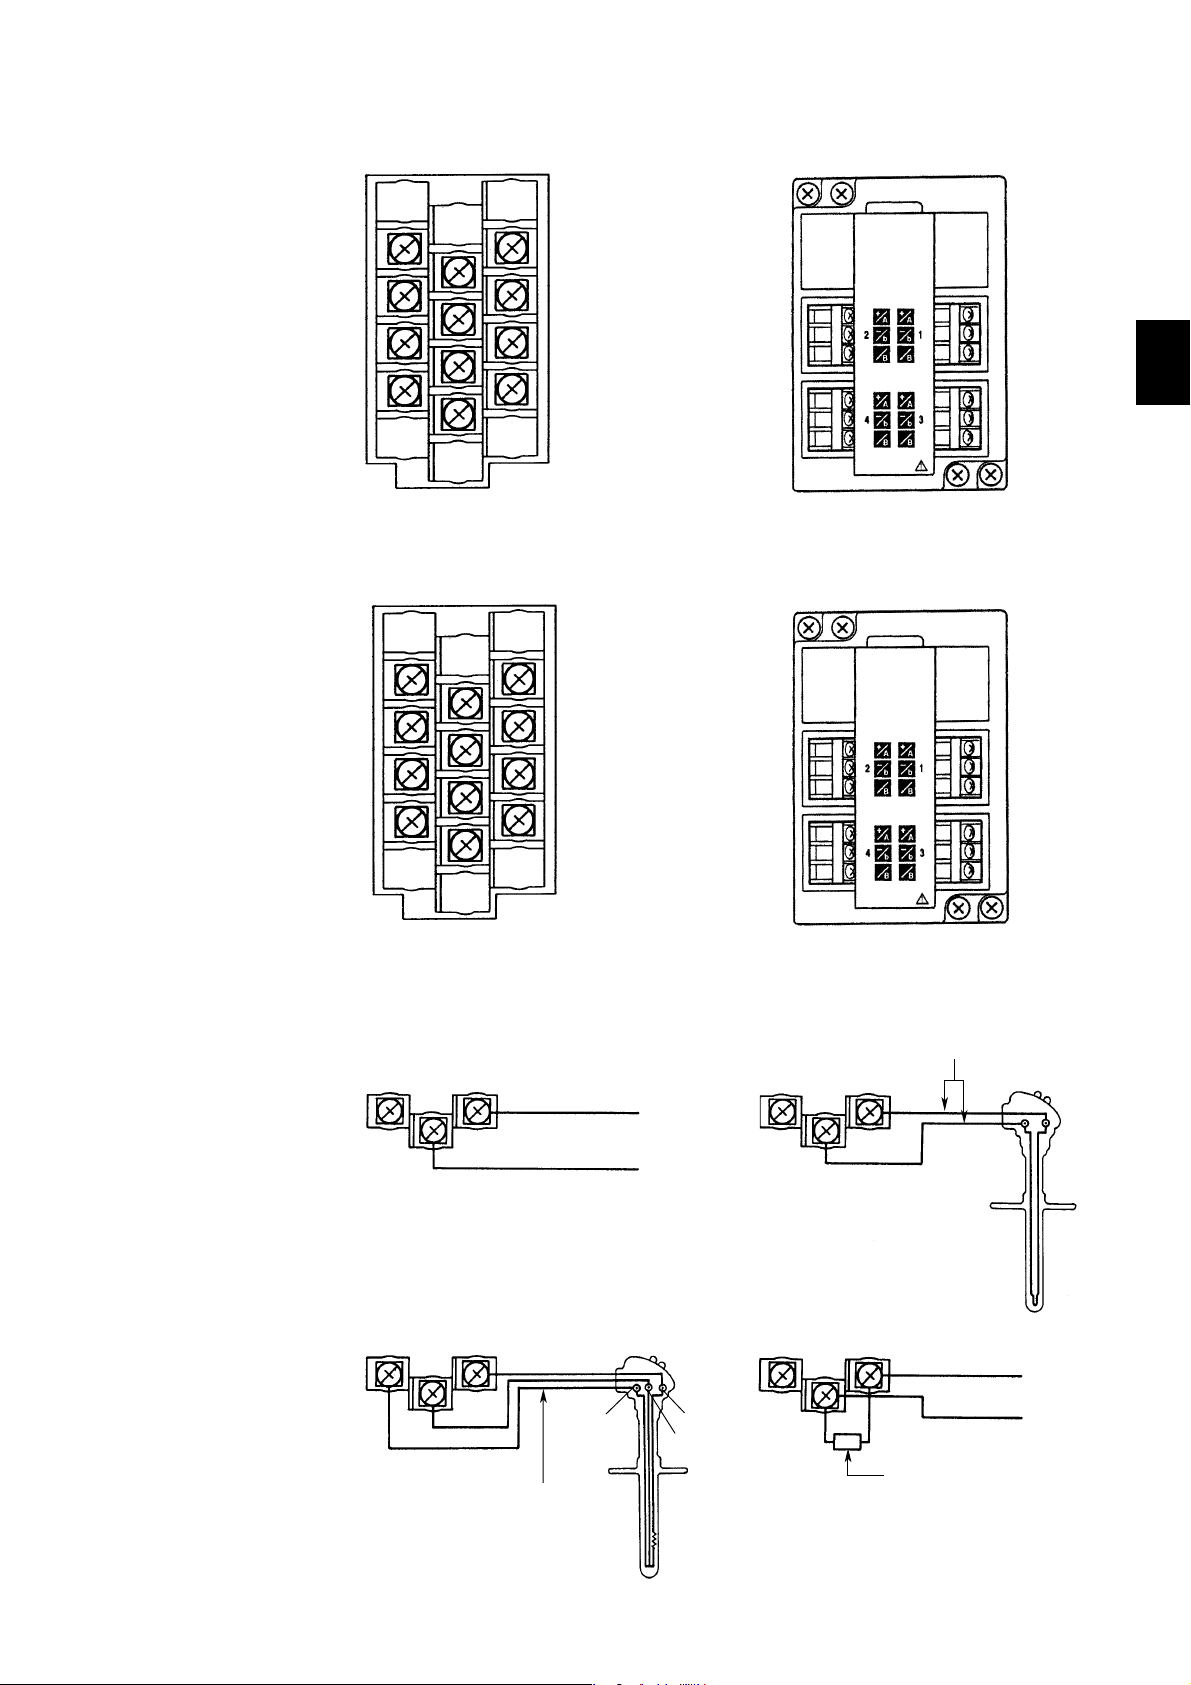
Pen Model
3.2 Wiring
+
–
max. wiring ø ≤ 2.5mm
1 ch.
2 ch.
+
2 ch.
3 ch.
4 ch.
Standard Input Terminal Clamped Input Terminal (/H2 option)
Figure 3.6 DC V, Thermocouple and Contact Input in case of Pen Model
A
b
B
–
+
4 ch. 3 ch.
–
max. wiring ø ≤ 2.5mm
+
–
+
–
1 ch.
1 ch.
2 ch.
A
b
1 ch.
B
3 ch.
2 ch.
A
b
B
3. INSTALLATION
4 ch.
4 ch.
A
b
B
Standard Input Terminal
Figure 3.7 Resistance Temperature Detector Input in case of Pen Model
DC Voltage Input/DI Input (contact)
+
–
Resistance Temperature Detector Input DC Current Input
B
A
b
+
DC voltage input
–
B
A
b
Clamped Input Terminal (/H2 option)
Thermocouple Input
+
–
+
–
A
b
B
Compensation lead
DC current input
3 ch.
+
–
IM 4H3B1-01E
Leadwire resistance:
10Ω max./leadwire
Three wire resistances
should be approx. equal.
Figure 3.8 Wiring Input Terminals in case of Pen Model
Shunt resistor
NOTE: For 4 to 20mA input, shunt resistance
value should be 250Ω ±0.1%.
3 - 7
Page 22

Dot Printing Model
+
–
max.wiring ø ≤ 2.5mm
1 ch.
+
1 ch.
–
2 ch.
2 ch.
+
–
3 ch.
4 ch.
5 ch.
4 ch.
6 ch.
+
–
+
–
6 ch.
Standard Input Terminal
Figure 3.9 DC V, Thermocouple and Contact Input in case of Dot Model
BAb
Clamped Input Terminal (/H2 option)
max.wiring ø ≤ 2.5mm
1 ch.
A
2 ch.
2 ch.
B
b
3 ch.
A
B
4 ch.
5 ch.
6 ch.
4 ch.
6 ch.
b
A
B
b
+
3 ch.
–
+
5 ch.
–
A
1 ch.
B
b
A
B
3 ch.
b
A
5 ch.
B
b
Standard Input Terminal
Figure 3.10 Resistance Temperature Detector Input in case of Dot Model
DC Voltage Input/DI Input (contact)
DC voltage input
Resistance Temperature Detector Input DC Current Input
Leadwire resistance:
10Ω max./leadwire
Three wire resistances
should be approx. equal.
Clamped Input Terminal (/H2 option)
Thermocouple Input
Compensation lead
NOTE: For 4 to 20mA input, shunt resistance
value should be 250Ω ±0.1%.
DC current input
Shunt resistor
NOTE: In case of 3 leg isolated RTD (/N2 option), there is no difference between B and b.
However, A and b are designated to be the current line for measurements.
Figure 3.11 Wiring Input Terminals in case of Dot Model
3 - 8 IM 4H3B1-01E
Page 23

3.2 Wiring
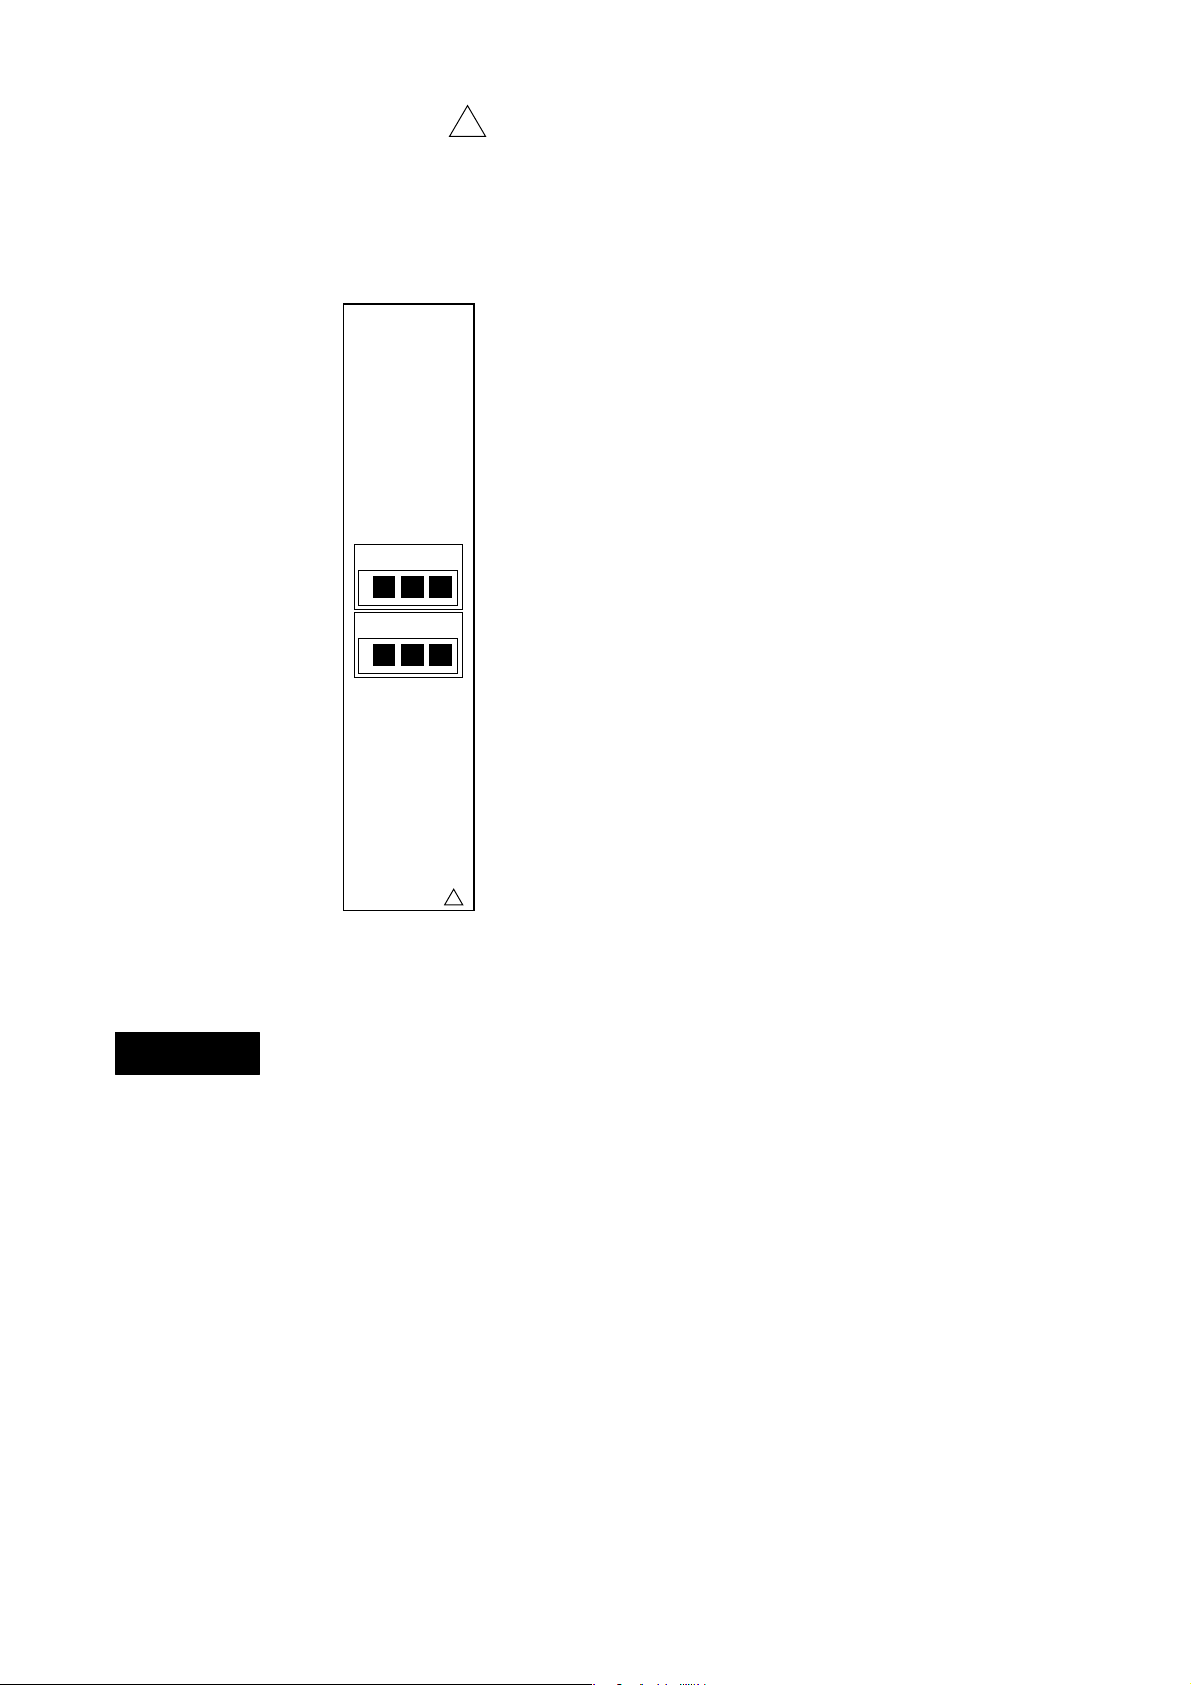
3.2.4 Alarm Output Wiring
1 Make sure the power switch is turned OFF and remove the transparent cover at the rear
of the µR1800.
2 Connect the alarm output wires to the alarm output terminal. Do NOT change the place
of the therminal block!
3 Replace the transparent cover.
Depending on your option, your alarm output terminal will be arranged like one of the
following:
ALARM
NO NCC
1
NO NCC
2
!
ALARM
NO NCC
1
NO NCC
2
NO NCC
3
NO NCC
4
ALARM
NO NCC
1
NO NCC
2
NO NCC
3
NO NCC
4
NO NCC
5
NO NCC
6
3. INSTALLATION
WARNING
!
option /A1
2 contacts
Figure 3.12 Alarm Output Terminals
option /A2
4 contacts
!
option /A3
6 contacts
!
CHARACTERISTICS:
Output type: relay transfer contact (energize/de-energize type switchable)
Output capacity: 250VAC (50 or 60Hz), 3A
250VDC, 0.1A (resistive load)
Dielectric strength: 1500VAC (50 or 60Hz) for one minute between output terminal
and ground terminal
To adjust initial settings, see 9.1.
• To prevent an electric shock, ensure the main power supply is turned OFF
during wiring and ensure the ground terminal is connected using a class 3
resistance of 100Ω or less.
• Ensure the ground terminal is connected using a class 3 resistance of 100Ω or
less.
• Use "crimp-on" lugs with insulation sleeves for all connections if a voltage of
more than 30 VAC or 60 VDC is applied to the alarm output or fail/memory end
output. Furthermore, use doubleinsulated wires (withstand voltage
performance: more than 2300VAC) for those wires which apply 30 VAC or
60VDC. All other wires can be basic-insulated (withstand voltage performance:
more than 1350VAC). To prevent electric shock, do not touch the terminal after
wiring and make sure to re-attach the cover.
IM 4H3B1-01E
NOTE To prevent an emission of electromagnetic disturbances, separate the alarm output wires
from the power supply and input wires at least 0.1m. Over 0.5m is recommended.
3 - 9
Page 24
3.2.5 FAIL/Chart End Wiring
1 Make sure the power switch is turned OFF and remove the transparent cover at the rear
of the µR1800.
2 Connect the FAIL/Chart end output wires to the FAIL/Chart end output terminal.
3 Replace the transparent cover.
The FAIL/Chart end terminals (option) are arranged as follows:
CHART
NO NCC
FAIL
NO NCC
!
WARNING
!
Figure 3.13 FAIL/Chart End Output Terminal
The FAIL/Chart End output relay is of the de-energize type. See 5.3.9 for details.
• To prevent an electric shock, ensure the main power supply is turned OFF
during wiring and ensure the ground terminal is connected using a class 3
resistance of 100Ω or less.
• Ensure the ground terminal is connected using a class 3 resistance of 100Ω or
less.
• Use "crimp-on" lugs with insulation sleeves for all connections if a voltage of
more than 30 VAC or 60 VDC is applied to the alarm output or fail/memory end
output. Furthermore, use doubleinsulated wires (withstand voltage
performance: more than 2300VAC) for those wires which apply 30 VAC or
60VDC. All other wires can be basic-insulated (withstand voltage performance:
more than 1350VAC). To prevent electric shock, do not touch the terminal after
wiring and make sure to re-attach the cover.
NOTE To prevent an emission of electromagnetic disturbances, separate the FAIL/Chart end
wires from the power supply and input wires at least 0.1m. Over 0.5m is recommended.
3 - 10 IM 4H3B1-01E
Page 25
3.2 Wiring
3.2.6 Remote Control Wiring
1 Make sure the power switch is turned OFF and remove the transparent cover at the rear
of the µR1800.
2 Connect the REMOTE output wires to the REMOTE output terminal. Make sure to
connect every terminal with the c(ommon) terminal. Use shielded wires to prevent
electromagnetic interference.
3 Replace the transparent cover.
The remote control terminal (option) is arranged as follows:
REMOTE
132
4C5
!
3. INSTALLATION
WARNING
!
Figure 3.14 Remote Control Terminal
CHARACTERISTICS:
Input signals: dry contact or open-collector (TTL or transistor)
Input types for each function
(1) recording start/stop level
(2) change chart speed level
(3) start/stop TLOG computation level
(4) printout messages trigger
(5) get a manual printout trigger
(6) get a periodic printout trigger
250 ms minimum
(7) trigger IC Memory Card trigger
Input conditions: ON voltage (0.5V maximum) (30mA DC)
Leakage current in OFF state (0.25mA maximum)
Signal duration (250 msec minimum)
Input type: Photocoupler isolation (one side common)
Internal isolated power source (5V ±5%)
Dielectric strength: 500VDC between input terminal and ground terminal, 1min.
To adjust initial settings, see 9.8.
To prevent an electric shock, ensure the main power supply is turned OFF
during wiring and ensure the ground terminal is connected using a class 3
resistance of 100Ω or less.
The outer conductor must be grounded at the ground terminal.
IM 4H3B1-01E
NOTE To prevent an emission of electromagnetic disturbances, separate the remote control
wires from the power supply and input wires at least 0.1m. Over 0.5m is recommended.
3 - 11
Page 26
Chapter 4 COMPONENT NAMES AND
FUNCTIONS
This chapter describes the names of components, together with a short summary of their
functions.
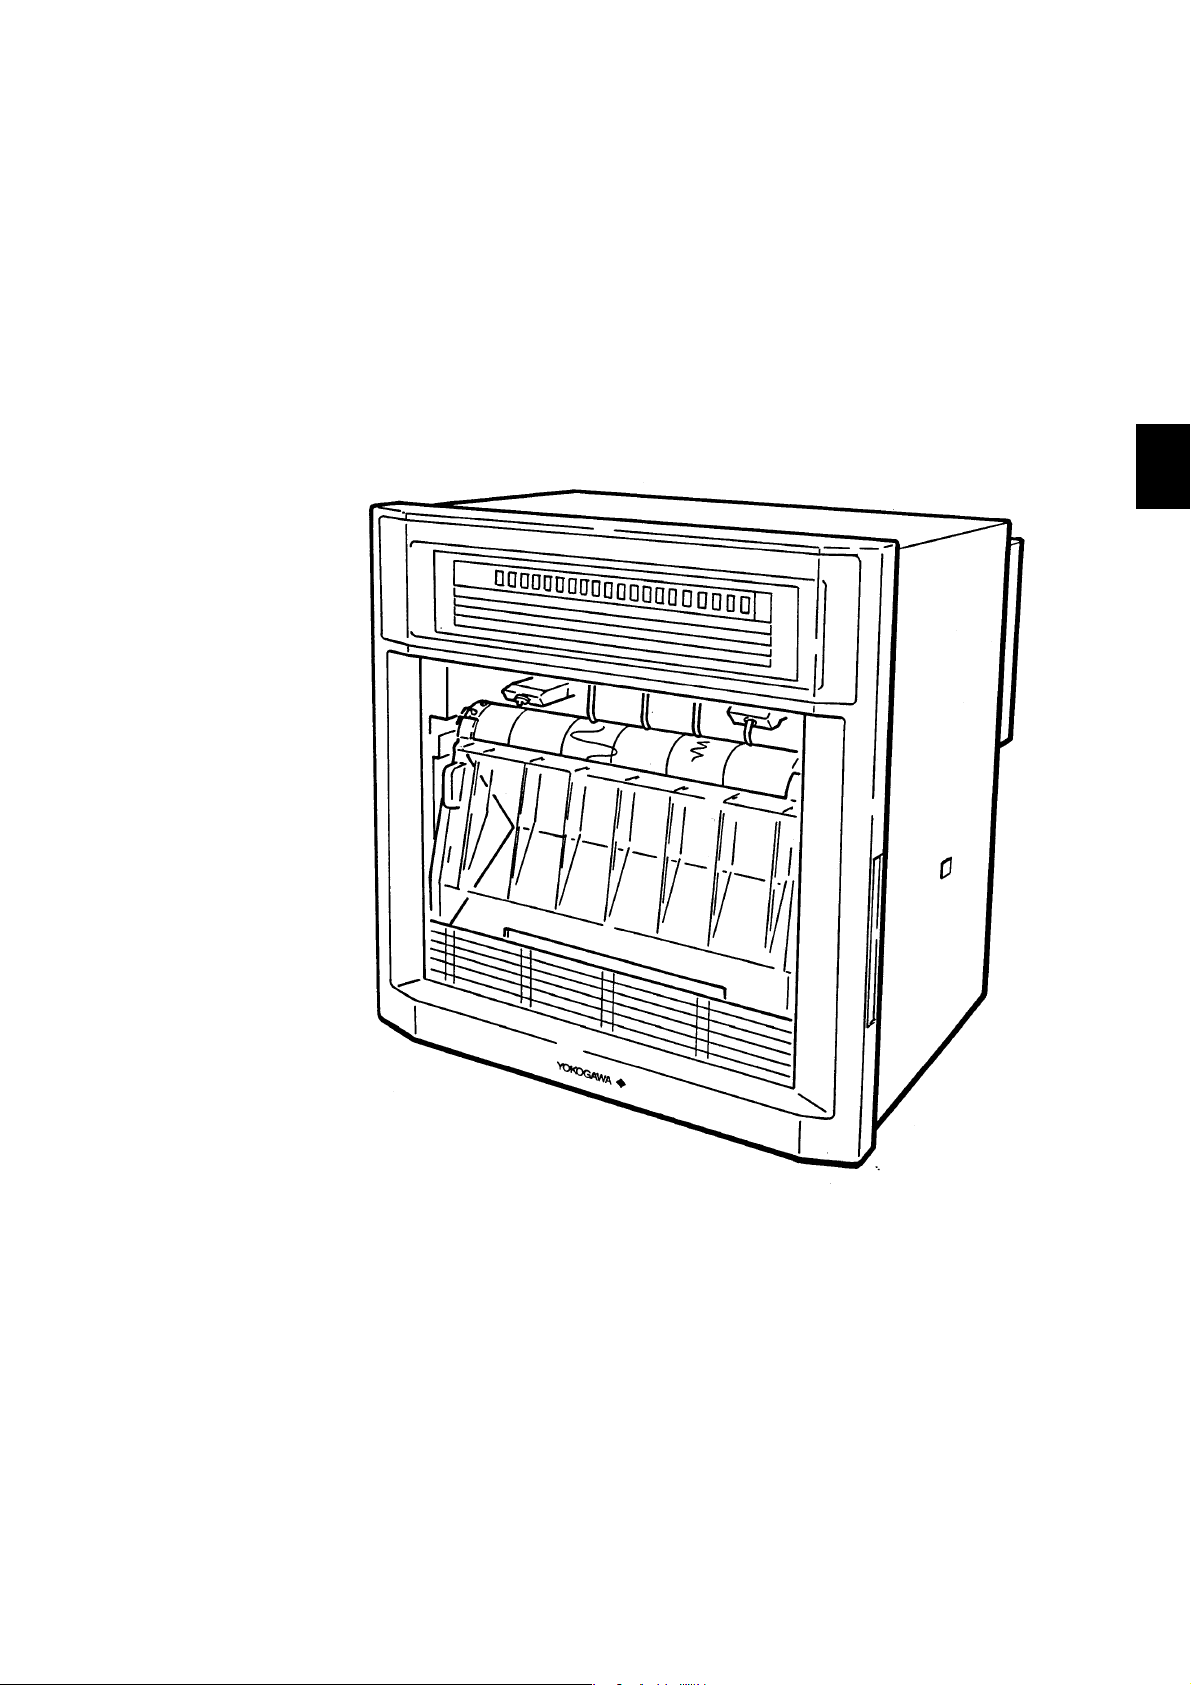
4. COMPONENT NAMES AND FUNCTIONS
IM 4H3B1-01E
Figure 4.1 External View (pen model)
4 - 1
Page 27
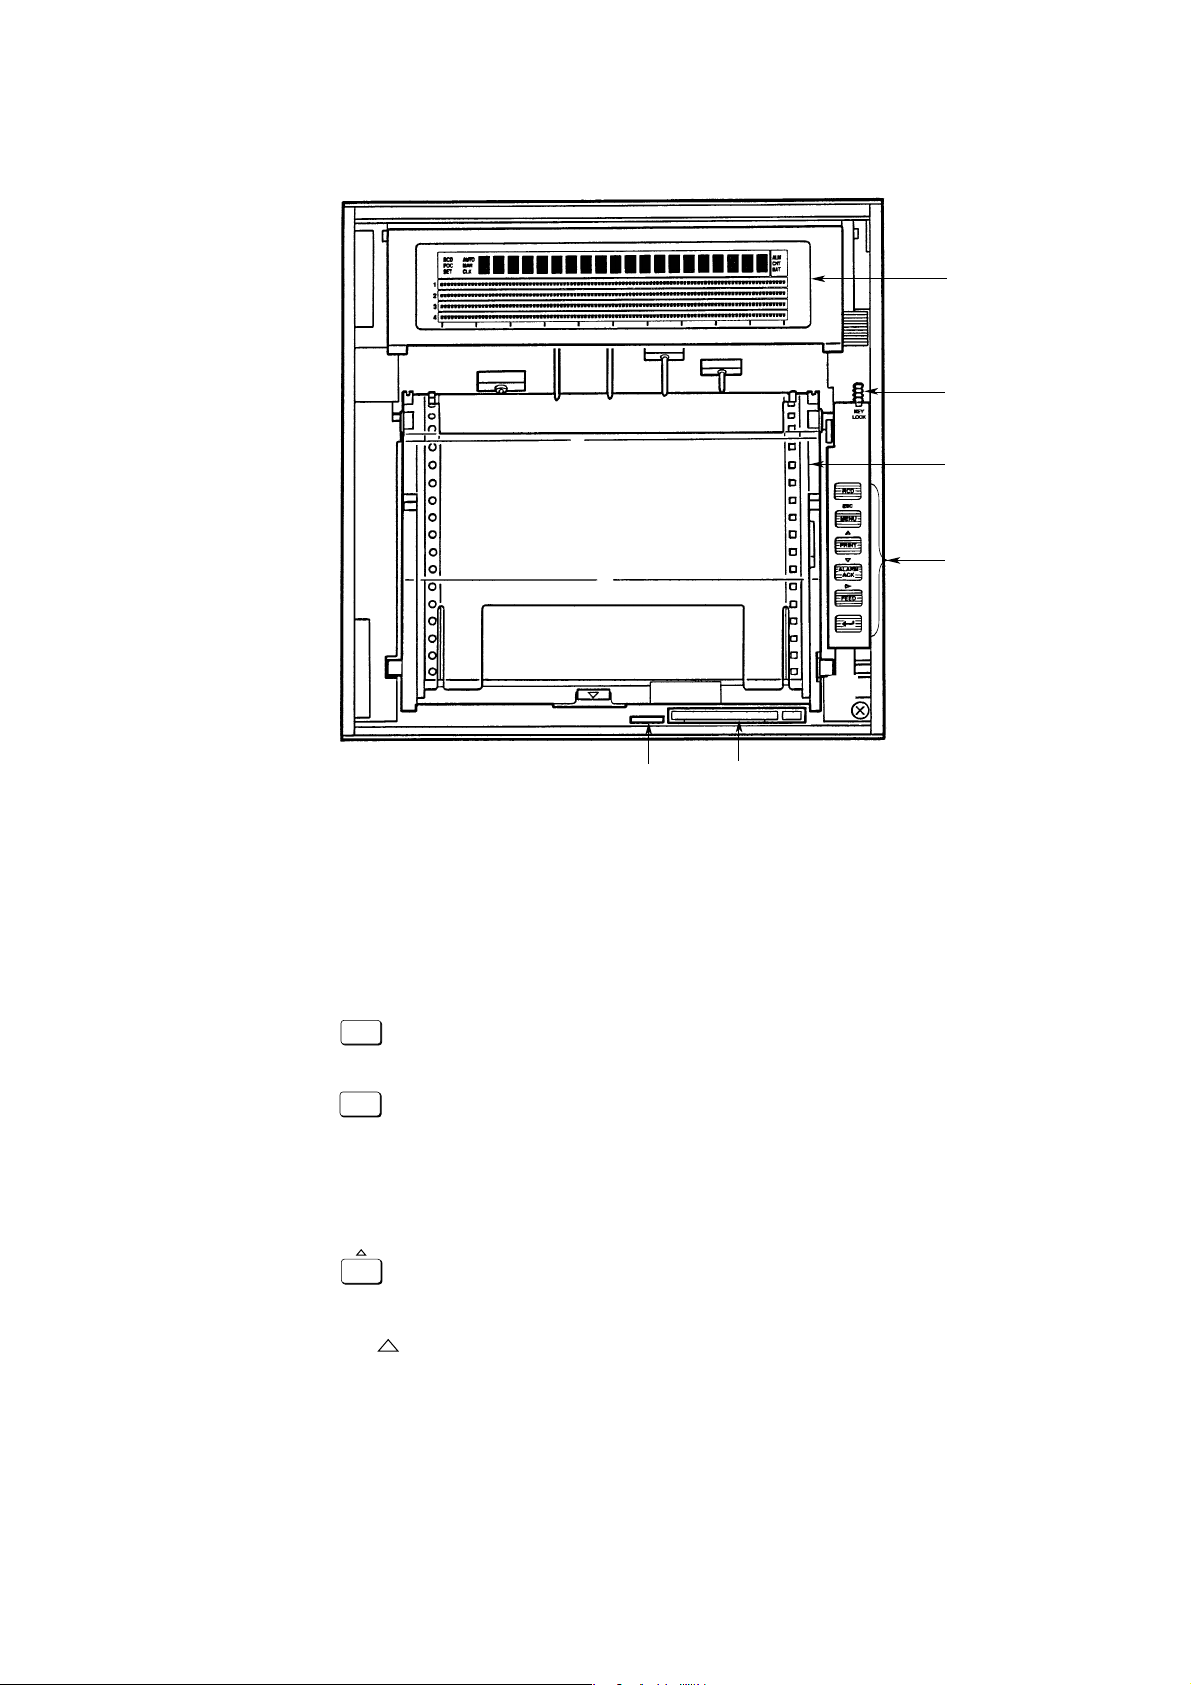
4.1 Front Panel
3
6
4
2
1
Figure 4.2 Front Panel (4 pen model)
5
1 Power switch
Pressing this button will result in switching the power ON or OFF.
2 Keyboard
The keyboard consists of six keys:
RCD
(RCD-key)
Pressing this key will result in starting or stopping the recording.
ESC
MENU
(Menu-key/Esc-key)
The MENU function is to select the type of display (see 5.3.8), to start SET UP List
printout and message printout (see 5.3.5, 5.3.6) etc., and to switch between Operation
and SET modes (see 6.1).
The ESC function is to escape to the previous level in the (setting) flow while entering
parameters.
PRINT
(Print-key/Cursor Up-key)
The PRINT function is used to get a manual printout or list printout printed onto the
chart (see 5.3.3, 5.3.4).
The function: The display is designed in an interactive way, which means that it
will ask you to enter the necessary data. In case there are several possibilities to
choose from (e.g. ON or OFF), use this key to show the next choice.
4 - 2 IM 4H3B1-01E
Page 28

4.1 Front Panel
ALARM
ACK
(Ack-key/Cursor Down-key)
The ‘ACK’-function is used to acknowledge alarms. Note that this function is only
effective if the alarm relay is in the hold-mode (see 5.3.7), and if the indicator status
is in the hold-mode (see 5.3.7). When you press this key in case an alarm occurs and
the ALM-indicator is flashing, the current alarm situation will be indicated and the
relay will be reset.
The function: The display is designed in an interactive way, which means that it
will ask you to enter the necessary data. In case there are several possibilities to
choose from (e.g. ON or OFF), use this key to show the previous choice.
FEED
(Feed-key/Move to Next Digit-key)
The ‘FEED’-function feeds the chart paper until this key is released (see also 5.3.2).
The function moves the cursor to the next digit while setting parameters. Please
note that there is not a back-space key provided. For that reason, the cursor moves
from the last digit to the first digit again (see 6.2).
(Ent-key)
The ‘ENT’-function allows you to keep the data you entered during the setting
procedure. Pressing ‘ENT’ results in moving to the next display in the same
(setting-) flow. Pressing ‘ENT’ after the ‘SET OK’-display appears, results in
starting the same (setting-) flow again.
3 Large sized VFD (Vacuum Fluorescent Display)
The display can show characters, bargraphs, and functions.
The backside of this display also illuminates the chart.
4 Chart and chart cassette
The recorder uses a Z-fold chart, 20 meter in length, with an effective analog trend
recording width of 180mm. The chart is stored inside a chart cassette.
5IC Memory card slot (optional)
IC Memory cards are inserted into this slot for use.
6 Key-lock
The key supplied with the recorder should be removed from the key-hole to lock the
recorder. See 5.4. To use the key-lock, see 9.10.
4. COMPONENT NAMES AND FUNCTIONS
IM 4H3B1-01E
4 - 3
Page 29

4.2 Display
1
AUTO
RCD
MAN
3
2
POC
CLK
SET
1
2
3
4
Figure4.3a Display (4 pen model)
1
AUTO
RCD
MAN
3
POC
SET
CLK
2
1
2 3 4 5 6 7 8 9 10 11 12 13 14 15 16 17 18 19 20 21 22 23 24
Figure 4.3b Display (dot model)
15 × 7 dot matrix (20 characters)
Used for data display, clock display, monitor display and setting display (see also 5.3.8).
Data display: Channel No. or tag, type of alarm, measured data, units
Clock display: (year, month, day) and (hour, minutes, seconds)
Monitor display: Operating conditions of IC Memory Card and TLOG function
Setting display: Every parameter can be set by interactive display.
ALM
CHT
BAT
ALM
CHT
BAT
3
3
2 Bargraph
Measured values of each channel will be displayed with 1% resolution (analog display).
The alarm set points will also be displayed. The colors of the bargraph correspond to
the colors of the pens. Two ways of display can be selected:
Left-referenced (%) bargraph Center-zero bargraph
(center of the recording span is reference
and the deviation is displayed as a bargraph)
1
2
The squares underneath the bargraph show the occurrence of an alarm in the
corresponding channel. They illuminate/flash in the same way as the ALM-indicator.
3Status indicators
RCD: Illuminated when recording is in progress.
POC: Illuminated when Pen Offset Compensation is being used (only for pen model).
SET: Illuminated when you are working in the SET Mode.
AUTO: Illuminated when the AUTO display is used.
MAN: Illuminated when the Manual display is used.
CLK: Illuminated when the Clock display is used.
ALM: This VFD will flash or illuminate when an alarm occurs.
Hold-mode: If the ACK-key is pressed, the flashing will stop and the VFD
will illuminate. After the alarm stops, the VFD will turn off. (If
the ACK-key is not pressed, the flashing stays even if the alarm
recovers, see also 5.3.7).
Non-hold-mode: VFD will illuminate until the alarm recovers (pressing the
ACK-key in this case will have no effect, see also 5.3.7).
CHT: Illuminated when there are approx. 2cm left till chart end (option).
BAT: Illuminated when the battery for setting data backup needs to be replaced.
Flashes when the battery of the IC Memory Card needs to be replaced.
4 - 4 IM 4H3B1-01E
Page 30
5.1 How to Switch the Power ON/OFF
Chapter 5 DAILY OPERATION
This chapter describes the daily operation of the µR1800, excluding settings.
Please read this chapter carefully before operation.
5.1 How to Switch the Power ON/OFF
The power switch is located behind the door, at the front side, in the middle of the lower
front (see figure 5.1a.). The power is supplied to the instrument when the power switch
is in the position as shown in figure 5.1b. The power is OFF when the power switch is
in the position as shown in figure 5.1b. The power can be turned ON/OFF by alternately
pressing the switch. When you do not use the instrument, please turn ‘OFF’ the power.
ON
5. DAILY OPERATION
CAUTION
Power switch
OFF
Figure 5.1a Figure 5.1b
NOTE After turning ON the power, the µR1800 will first perform a self diagnostic check for
several seconds.
The warm-up time is approx. 30 minutes. (However, just after finishing the
wiring, it might take longer. Especially if you removed the input terminals during
wiring.)
If the input wiring is connected parallel with other equipments, switching the
power ON/OFF should not be done.
If error message appears on the display or is printed on the chart, please refer
to the Error Message Table at sect.12.1.
IM 4H3B1-01E
5 - 1
Page 31

5.2 How to Install (& Replace) Chart, Pens, Ribbon Cassette and Battery
5.2.1 How to Load (& Replace) the Chart
1 Open the front door of the unit.
2 The power can be either ‘ON’ or ‘OFF’, but recording should be ‘OFF’.
3 Fan chart paper thoroughly at both ends before loading.
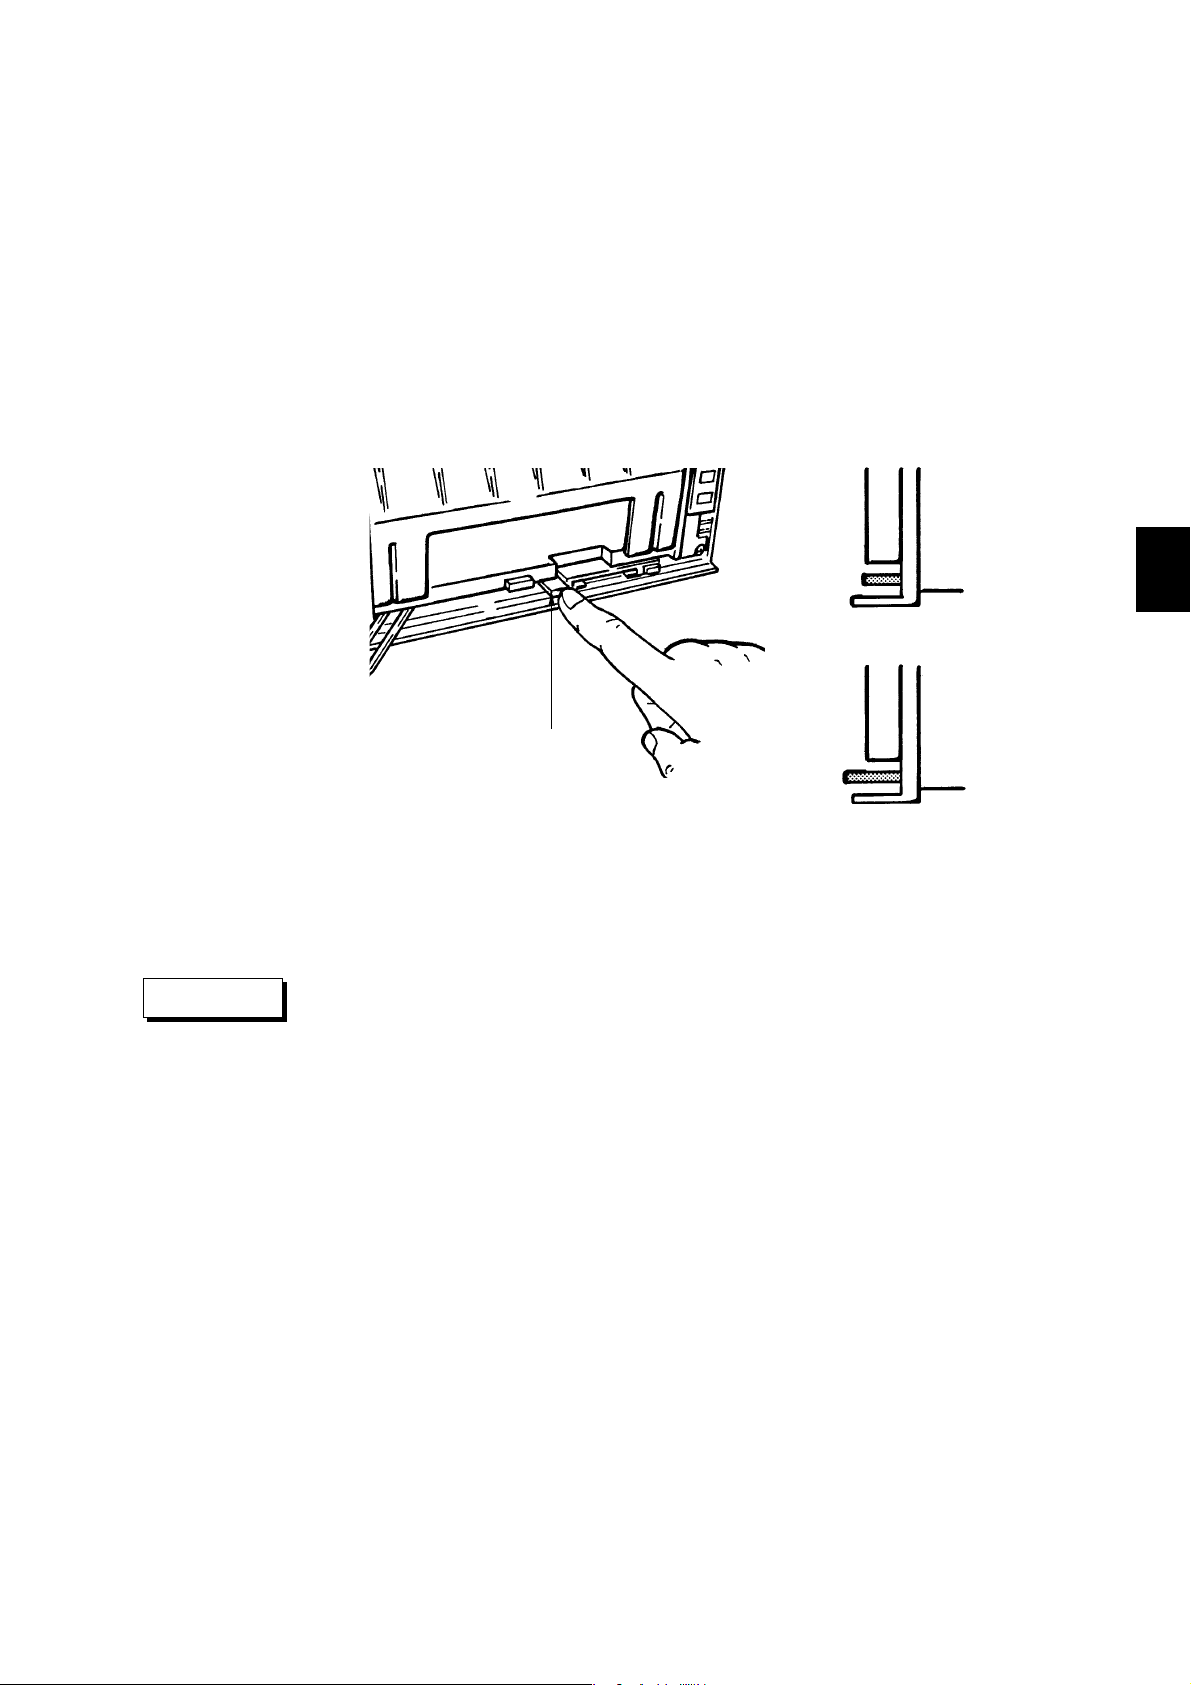
4 While gently pressing the chart paper compartment lock tab, located in the middle at the
lower front, in the direction of the arrow, swing and lift the compartment away from the
unit (see figure 5.2).
Lock tab
Figure 5.2
5 Press the tabs of the chart guide plate at the top rear of the chart compartment and swing
the guide plate up (see figure 5.3).
6 At the front, pull/swing the front transparent chart guide down and swing the small
transparent chart guides open (see figure 5.3).
Tabs
Top hopper
Small transparent
chart guides
Front transparent chart guide
Figure 5.3
7 Load the chart paper into the top hopper making sure that the sprocket teeth of the chart
drive are properly engaged in the chart paper perforation holes. Take care not to insert
the paper backwards (see figure 5.4).
Figure 5.4
5 - 2 IM 4H3B1-01E
Page 32

5.2 How to Install (& Replace) Chart, Pens, Ribbon Cassette and Battery
8 Place the rear chart guide plate back into position. Press the rear chart guide plate down
and towards you and load the chart.
9 Place the front transparent chart guides back into position (see figure 5.5).
Figure 5.5
10 Replace the chart paper compartment back into the unit. Slide the protruding knurls of
the chart paper compartment into the cutout grooves located on the support brackets.
Push/swing the compartment into the unit until the lock tab clicks shut (see figure 5.6).
5. DAILY OPERATION
Figure 5.6
11 Press the FEED-key (when the power is ON) until 2 leaves of paper are fed (or until the
chart is not curled anymore) and confirm that the chart is fed continuously. If not, repeat
the procedure from step 4.
NOTE A red band is printed at the end of the chart with the heading ‘RENEW CHART’ to
notify you when it is time to prepare a new chart.
IM 4H3B1-01E
5 - 3
Page 33

5.2.2 How to Install (& Replace) Pens and Ribbon Cassette
In case of felt-tip pens:
Normal procedure:
1 Open the front door and make sure the recording is not in progress (by pressing the
RCD-key; power can be either ‘ON’ or ‘OFF’).
2 Swing up the display by grasping and pulling the tabs located at the lower left and right
corner.
3 Grasp the protruding part of the felt-tip pen cartridge and gently pull/slide it out of the
cartridge holder (see figure 5.7).
4 Remove the pen cap before replacing the cartridge with a new one.
Insert a new felt pen cartridge in the pen cartridge holder (see figure 5.7). Start with the
smallest pen.
Felt pen
Figure 5.7
Pen cartridge holder
Pen 1 : red
Pen 2 : green
Pen 3 : blue
Pen 4 : violet
CAUTION
5 Close the display by pulling the 'release'-handle until this handle is at the same level as
the display. Then push the display back into its normal position until the tabs click shut.
6 To (re)start the recording, press the RCD-key.
2nd procedure when the pens are located at a place where it is difficult to replace them:
1 Open the front door and make sure the recording is not in progress (by pressing the
RCD-key; power must be ‘ON’).
2 Press the MENU-key. Use the UP/DOWN-keys to select the display
‘MENU=SELECT_FUNCTION’. Press the ENT-key.
3 Use the UP/DOWN-keys to select the display ‘CHANGE_PEN’. Press the ENT-key.
The pens will move to 55% of the chart, where it is easy to replace them. Note that this
will leave a line on the chart.
4 Handle as described in ‘Normal procedure’, steps 2, 3, 4 and 5.
5 The display ‘PRESS_ENT’ will appear. After finishing, press the ENT-key.
6 To (re)start the recording, press the RCD-key.
To protect the pens and the internal mechanism, never grasp the pen tip nor
apply excessive force to the cartridge holder. Always make sure to remove the
pen cap.
5 - 4 IM 4H3B1-01E
Page 34

5.2 How to Install (& Replace) Chart, Pens, Ribbon Cassette and Battery
In case of plotter pen:
1 Open the front door and make sure the recording is not in progress (by pressing the
RCD-key; power can be either ‘ON’ or ‘OFF’).
2 Swing up the display by grasping and pulling the tabs located at the lower left and right
corner.
3 While grasping the plotter holder, gently slide the plotter out of the holder (see figure
5.8).
4 Remove the pen cap and insert a new plotter pen in the holder (see figure 5.8).
If it is difficult to replace the plotter pen, try the 2nd procedure as described above.
5 Close the display by pulling the 'release'-handle until this handle is at the same level as
the display. Then push the display back into its normal position until the tabs click shut.
Plotter pen
Figure 5.8
Pen holder
In case of the ribbon cassette:
1 Open the front door and make sure the power is OFF.
2 Swing up the display by grasping and pulling the tabs located at the lower left and right
corner.
3 Hold the back section of the carriage assembly and move the assembly to the right.
4 Press the lock tab to the right and use the lower left part of the cassette as a handle to
pull it out of the holder. See figure 5.9.
Ribbon cassette
5. DAILY OPERATION
CAUTION
IM 4H3B1-01E
Printer carriage
Figure 5.9
5 Insert the right side of the new ribbon cassette into the cassette holder.
6 Insert the left side of the ribbon cassette into the cassette holder (clicking it into its
place). If the ribbon cassette does not click into its place easily, adjust the ribbon
feeding knob so that the peg fits the hole.
7 If necessary, turn the ribbon feeding knob to stretch/tighten the ribbon.
8 Close the display by pulling the 'release'-handle until this handle is at the same level as
the display. Then push the display back into its normal position until the tabs click shut.
If the ribbon cassette is not inserted correctly:
• data may be printed in the wrong color
• ribbon edge is used to print out data, which damages the ribbon.
5 - 5
Page 35

5.2.3 How to Replace the Battery
The ‘BAT’ indicator on the VFD-display can either remain illuminated or flash.
In case of illumination, the lithium battery needs to be replaced. However, this battery
will last for ten years under normal operation conditions. For replacement, please
contact the nearest Sales & Service Office. Addresses may be found on the back cover
of this manual.
In case of flashing, you have to replace your IC Memory Card battery (option).
In case of replacement, please refer to the IC Memory Card Instruction Manual IM
4H3B1-30E.
WARNING
To avoid injury, never replace the lithium battery yourself.
5 - 6 IM 4H3B1-01E
Page 36

5.3 Basic Operation (Operation Mode)
5.3.1 How to Start/Stop the Recording
Pressing the RCD-key will cause the recording to start or stop. However, if the Start/
Stop function is controlled by remote control, this key will not work.
(For the status of the initial recording settings, see 6.5)
5.3.2 How to Feed the Chart
The paper can be fed by operating the FEED-key. The paper will be fed as long as the
FEED-key is pressed.
5.3.3 How to Get a Manual Printout
A manual printout contains:
• date & time
• channel number or tag / type of occured alarm / latest measured values / units (for all
channels)
To get a manual printout, press the PRINT-key, select ‘MANUAL_PRINT_START’
using the PRINT-key and press the ENT-key.
When the writing of this printout starts, the display will return to the previous one.
When the writing of this printout is finished, the manual printout function is cancelled
automatically and the µR1800 returns to the recording previously in progress.
5.3 Basic Operation (Operation Mode)
5. DAILY OPERATION
When you want to cancel the manual printout function while in progress, press the
PRINT-key again, and the display ‘MANUAL_PRINT_STOP’ will appear. Press the
ENT-key, and the instrument returns to the recording previously in progress.
During the writing of the manual printout, the analog recording will stop. However,
scanning of the input and detection of alarms will still continue. When alarms occur
during the manual printout, the printing of these alarms will be done after the analog
recording (re)starts.
Figure 5.10a Manual Printout Example in case of the Pen Model (two columns appear when tags are
Figure 5.10b Manual Printout Example in case of the Dot Model (two columns appear when tags are
set, three columns appear in case of channel numbers)
set, three columns appear in case of channel numbers)
IM 4H3B1-01E
5 - 7
Page 37

5.3.4 How to Get a List Printout
A list printout contains:
•date, time and chart speed (1 & 2) and in case of the dot model, the trend recording
interval.
•Ch.No. / tag / range / span / scaling values / unit
• type of alarm and values, zone values, partial values, periodic printout ON/OFF
• contents of messages (for all channels).
To get a list printout, press the PRINT-key, select ‘LIST_PRINT_START’ using the
PRINT-key and press the ENT-key.
When the writing of this printout starts, the display will return to the previous one.
When the writing of this printout is finished, this list printout function is cancelled
automatically and the µR1800 returns to the recording previously in progress.
When you want to cancel this list printout function while in progress, press the PRINT-
key again, and the display ‘LIST_PRINT_STOP’ will appear. Press the ENT-key and
the µR1800 returns to the recording previously in progress.
During the writing of the list printout, the analog recording will stop. However,
scanning of the input and detection of alarms will still continue. When alarms occur
during this printout, the printing of these alarms will be done after the analog recording
(re)starts.
Figure 5.11a List Printout Example in case of Pen Model
5 - 8 IM 4H3B1-01E
Page 38

5.3 Basic Operation (Operation Mode)
5. DAILY OPERATION
Figure 5.11b List Printout Example in case of Dot Model
IM 4H3B1-01E
5 - 9
Page 39

5.3.5 How to Get a SET UP List Printout
A SET UP list printout contains:
• initial settings; analog recording
• initial settings; digital printing
• initial settings; alarms
• initial settings; burnout, RJC and others
• initial settings; options, if installed.
To get the SET UP list printout, proceed as follows:
Press the MENU-key and select the ‘MENU=SELECT_FUNCTION’ display using the
UP/DOWN- keys. Then press the ENT-key. Select the ‘PRINT_SETUP_LIST’
display using the UP/DOWN-keys. Press the ENT-key, and the printing will start.
When the writing of this printout starts, the display will return to the previous one.
When the writing of this printout is finished, this SET UP list printout function is
cancelled automatically and the µR1800 returns to the recording previously in progress.
When you want to cancel this SET UP list printout function while in progress, press the
MENU-key again, select the ‘MENU=SELECT_FUNCTION’ display and press the
ENT-key. Then the ‘STOP_SETUP_LIST’ display will appear and press the ENT-
key. The µR1800 returns to the recording previously in progress.
During the writing of the SET UP list printout, the analog recording will stop.
However, scanning of the input and detection of alarms will still continue. When alarms
occur during this printout, the printing of these alarms will be done after the analog
recording (re)starts.
Figure 5.12a SET UP List Printout Example in case of Pen Model
5 - 10 IM 4H3B1-01E
Page 40

5.3 Basic Operation (Operation Mode)
5. DAILY OPERATION
Figure 5.12b SET UP List Printout Example in case of Dot Model
IM 4H3B1-01E
5 - 11
Page 41

5.3.6 How to Get a Message Printout
The contents of a message must be entered first.
To set or change a message, see 8.2.3.
To get a message printed on the chart, proceed as follows:
Press the MENU-key and select the ‘MENU=SELECT_FUNCTION’ display using the
UP/DOWN-keys. Then press the ENT-key.
Select the ‘PRINT_MESSAGE’ display using the UP/DOWN-keys. Press the ENTkey, and select which message you want to print out, since up to five messages can be
set. Press the ENT-key and the printing will start.
Note that no messages will be printed when the chart speed exceeds 1500 mm/h, in case
of the pen model, or 100 mm/h in case of the dot model, or when recording is OFF.
When the writing of this printout starts, the display will return to the previous one.
When the writing of this printout is finished, the µR1800 returns to the recording
previously in progress.
You cannot cancel this printout once started.
Messages can be triggered by the keyboard, as described above, and by remote control
(option). When several messages are triggered by remote control in a short time, they
will be stored in a buffer memory before printing on the chart. It is possible to clear this
buffer, which can be useful for example in case the printing will take too much time.
When the buffer is full, this will be indicated by an asterisk ( ) in the latest message
printout. As a result the next message is lost and will not be printed.
To clear the buffer memory, proceed as follows:
Press the MENU-key.
Select the display ‘MENU=SELECT_FUNCTION’ using the UP/DOWN-keys. Press
the ENT-key.
Select the display ‘CLEAR_MESSAGE_BUFFER’ using the UP/DOWN-keys. Press
the ENT-key.
The buffer is cleared. The display will return to the previous one used.
Figure 5.13a Message Printout Example in case of Pen Model
Figure 5.13b Message Printout Example in case of Dot Model
Message printout
NOTE The µR1800 will store up to 5 messages in a buffer memory, regardless whether
recording is ON or OFF. If more messages are generated, the new ones will not be kept
in the buffer memory.
5 - 12 IM 4H3B1-01E
Page 42

5.3.7 How to Acknowledge an Alarm
HOLD
NON-HOLD
Alarm ON
Alarm OFF
ACK ACK
or
Relay set
Relay reset
or
Indicator flash
Indicator ON
Indicator OFF
or
(see 9.1.4, 9.1.5)
(see 9.1.4, 9.1.5)
ACK
When an alarm occurs, the output relays (if installed) will be activated and the alarm
indicator will behave as described below (see also figure 5.14):
Non-hold Type (for hold/non-hold selection, see 9.1.4 and 9.1.5):
when alarm occurs: the output relay will be activated
when alarm recovers: the output relay will be reset
Pressing the ACK-key has no effect.
Hold Type (for hold/non-hold selection, see 9.1.4 and 9.1.5):
when alarm occurs: the output relay will be activated
when alarm recovers: the output relay will be kept activated; however, pressing the
5.3 Basic Operation (Operation Mode)
the indicator will lighten
the indicator will stop lighting
the indicator will start flashing; however, pressing the
ACK-key results in showing the current alarm status (alarm in
progress = ON, alarm recovered = OFF)
ACK-key results in resetting the relay.
the indicator will keep flashing; however, pressing theACK-key
results in showing the current alarm status (alarm in progress =
ON, alarm recovered = OFF)
5. DAILY OPERATION
IM 4H3B1-01E
Figure 5.14
When an alarm occurs, you will see this on the display and alarm data will be printed on
the chart. See 1.2 for an example.
When several alarms are generated in a short time, they will be stored in a buffer
memory before printing on the chart. It is possible to clear this buffer, which can be
useful for example in case the printing will take too much time. When the buffer is full,
this will be indicated by an asterisk ( ) in the latest alarm printout. As a result the next
alarm is lost and will not be printed.
To clear the buffer memory, proceed as follows:
Press the MENU-key.
Select the display ‘MENU=SELECT_FUNCTION’ using the UP/DOWN-keys. Press
the ENT-key. Select the display ‘CLEAR_ALARM_BUFFER’ using the UP/DOWNkeys. Press the ENT-key.
The buffer is cleared. The display will return to the previous one used.
NOTE The µR1800 will store up to 8 (pen model) or 12 (dot model) alarms in a buffer
memory. If more alarms are generated, the new ones will not be kept in the buffer
memory.
5 - 13
Page 43

5.3.8 How to Select the Display
Four different displays can be selected. These are:
DISPLAY AUTO:
Channel number or tag, measured values and units will appear on the display
alternately. Every channel will be shown for approximately 2 sec. If the input is greater
than the upper limit of the recording span, + will appear.
If the input is less than the lower limit of the recording span, – will appear.
Depending on whether you set tags (and specified this as explained in 9.4.1), the display
will look like either one of the following:
Shows ‘d’ in case of DELTA-channel (1 digit)
channel number (2 digits)
data (7 digits)
type of alarm (1 digit)
*****
*****
1
engineering units (6 digits)
2
*
*
tag (7 digits) data (7 digits)
type of alarm (1 digit)
Shows ‘d’ in case of DELTA-channel (1 digit)
*1 Units are fixed for Voltage-input (mV/V) and for TC and RTD-input (°C/°F), and settable for SCL
(scale input) and SQRT (square root input).
*2 Type of alarm: H: high limit R: rate-of-change on increasing signal
L: low limit r : rate-of-change on decreasing signal
h: high difference limit l : low difference limit
2
*
engineering units
(4 digits)
1
*
DISPLAY MAN:
Channel number or tag, measured values and units will appear on the display for a
specific channel only. This display looks the same as the AUTO display (not available
on 1 pen model).
DISPLAY CLOCK:
Date and time will appear on the display. Leap years are provided.
datemonth
year
hours
secondsminutes
DISPLAY VIEW:
Status of the IC Memory Card (option) will appear on the display. If the option is not
installed, the display will be black. For details concerning the VIEW display, see the
option manual concerning the IC Memory Card (IM 4H3B1-30E) or the option manual
concerning the mathematical functions (IM 4H3B1-20E).
5 - 14 IM 4H3B1-01E
Page 44

5.3 Basic Operation (Operation Mode)
How to select the desired display is described below.
Starting from the basic operation display, press the MENU-key. Select the display
‘MENU=SELECT_DISPLAY’ using the UP/DOWN-keys. Then press the ENT-key.
You have now entered the following flow:
DISPLAY_AUTO
DISPLAY_MANUAL MANUAL CH=?
DISPLAY_CLOCK
DISPLAY_VIEW
Moving between the different displays can be done by using the UP/DOWN-keys.
Once you selected the desired display, press the ENT-key (In the case of the manual
display, select the channel number by using the UP/DOWN-keys. Then press the ENT-
key again).
After having pressed the ENT-key, the selected display will appear.
If you want to change the channel number while displaying the measured values on the
manual display, you can change the channel number by pressing the ENT-key.
5. DAILY OPERATION
IM 4H3B1-01E
5 - 15
Page 45

5.3.9 How to Cope with FAIL/Chart End
When equipped with this option and the chart reaches its end or a CPU-error occurs, the
output relay will be activated. There is one output relay for Chart end detection, and one
for FAIL detection. For the wiring, see 3.2.5.
CHART END:
When there are approx. 2cm left till chart end, the ‘CHT’ indicator will be illuminated
in the display and recording will stop. To change the chart, follow the steps as explained
in 5.2.1.
At the same time the output relay will be activated. This output relay is of the
energizing type and this cannot be changed. See also the explanation mentioned below.
FAIL:
When a CPU-error occurs, the output relay will be activated. This relay is of the deenergizing type and this cannot be changed. Therefore this relay will also be activated
when the power is off. The activating of this relay will not be shown on the display.
See also the explanation mentioned below.
When a CPU-error occurs, contact the nearest Sales & Service Office. Addresses may
be found on the back cover of this manual.
Explanation:
Chart end output relay (energize type):
NO C NC
Normal operation
NO C NC
Chart end occurs
FAIL output relay (de-energize type):
NO C NC
Normal operation
NO C NC
Chart end occurs
(FAIL)
NO C NC
Power OFF
NO C NC
Power OFF
5 - 16 IM 4H3B1-01E
Page 46

5.4 How to Use the Key-lock
In order to use this function, the settings for the key-lock must be set to ‘USE’. See
9.10.
The key-lock is located in the keyboard at the top side. The keyboard is disabled when
the plastic key is removed from the key-hole (see figure 5.15).
Figure 5.15 Key-lock
5.4 How to Use the Key-lock
key
CAUTION
When you do not intend to operate the keyboard for a long time, you may lock the
5. DAILY OPERATION
recorder to prevent operation by mistake. If the keys are disabled by the key-lock, you
can still
• change the displays (as explained in 5.3.8)
• enter the SET UP Mode (as explained in 6.1)
• use the ESC function (as explained in 6.2).
You can set which keys will be affected by the key-lock. See 9.10.
NOTE • If keys are disabled by the key-lock, you cannot enter the SET Mode (as explained in
6.1). Pressing the MENU-key for three seconds has no result.
• Remote control signals and communication signals (optional) are not affected by the
key-lock.
When locking, the key must be removed from the key-hole. Keep it in a safe
place. Settings cannot be changed when the key is lost.
IM 4H3B1-01E
5 - 17
Page 47

6.1 Explanation of Modes
Power ON
Power ON
while pressing the ENT-key
MENU-key
move between modes
by pressing this key
for three seconds
escape by selecting
‘SETUP = END’ and to
STORE or ABORT
(During the SET Mode, the SET-indicator on the display will be illuminated.)
Operation
Mode
SET
Mode
SET UP
Mode
Chapter 6 HOW TO ENTER SETTINGS
This chapter describes the idea behind the settings of the µR1800 Recorder. It is
important to read this chapter carefully before entering or changing settings for the first
time.
6.1 Explanation of Modes
To make the operation of the µR1800 Recorder as easy as possible, the operation and
setting are broken down into three modes. These are:
Operation Mode:
This mode is for basic operation, which is the operation on a daily basis, excluding
settings. It includes operations like recording, chart feed, acknowledging alarms,
printing out messages, lists and values.
When the power to the µR1800 is turned ON, the recorder will be automatically in the
operation mode. The operations within this mode are described in chapter 5.
SET Mode:
This mode will be used when setting parameters must be entered or changed. The
parameters include not only settings of range and span, units, alarms, chart speed and
clock, but also auxiliary settings which allow you to use the µR1800’s many functions.
To enter the SET Mode, press the MENU-key for three seconds. To return to the
operation mode, press the MENU-key for three seconds again.
The settings of range and span, units, alarms, chart speed and clock are all described in
chapter 7.
The auxiliary settings (like for example zone recording settings) are all described in
chapter 8.
6. HOW TO ENTER SETTINGS
SET UP Mode:
This mode will be used when initial settings must be changed. These settings are
entered during the manufacturing of the recorder and seldom need to be changed. These
settings include for example alarm relay adjustments, etc. To enter the SET UP Mode,
press the ENT-key while turning ON the power.
Note that when you are in the SET UP Mode, the recording cannot be ON, and alarms
will not be detected.
For a detailed overview of the initial settings, see 6.5.
For a description on how to perform the settings, see chapter 9.
The following figure shows the structure of modes.
IM 4H3B1-01E
6 - 1
Page 48

6.2 Concept of Setting Parameters
DISPLAY
The user interface is interactive, which means that you will be asked to enter the
necessary data. All data can be entered using the keyboard. When entering data, the
functions which are pictured above the actual keys are valid.
The display usually consists of two parts:
SET=RANGE
ESC
MENU
menu
to be set parameter
The parameters which need to be entered are shown in black with white letters in this
manual. These parameters will flash on the actual display.
In this manual, you can also find another type of display:
01:MODE=
menu
The blank means that the actual display will show your previously set data.
The display ‘*SET OK*’ will appear once all the necessary parameters have been
entered succesfully. Pressing the ENT, UP, DOWN or RIGHT-key at those times will
result in returning to the beginning of the same flow.
Pressing the ESC-key will result in returning to the previous level in the menu.
KEYS
Five keys on the keyboard can be used when entering data:
ESC
MENU
PRINT FEED
ALARM
ACK
(The MENU-key is used to enter the SET Mode.)
The ESC-key can be used to abort the setting before the ‘*SET OK*’ display appears.
The display will return to the previous level in the menu. After the ‘*SET OK*’ display
appears, pressing the ESC-key will take you to the beginning of the same setting again.
previously set parameter
ALARM
PRINT
The UP/DOWN-keys can be used for moving through a menu. In the case of setting e.g.
ACK
messages or units, these keys are used to select alphanumerical characters. UP shows
the next choice, DOWN shows the previous choice.
FEED
The RIGHT-key can be used for moving the cursor to the next digit while entering
parameters (e.g. in case of 0.000). Since there is no backspace key provided, this key
will move to the first digit after the last digit.
NOTE In the case the decimal point is fixed, make sure to enter all digits.
Example: you entered result will be
2. 0.02 (entered value will be placed at last digit)
2.00 2.00
The ENT-key is used for keeping the set parameters. After pressing this key, you will
be asked to enter the next parameters.
In the case you entered incorrect data, but haven’t pressed the ENT-key yet, use the UP/
DOWN/RIGHT-keys to correct your error.
If you have pressed the ENT-key already, press the ESC-key and enter all necessary
data again.
6 - 2 IM 4H3B1-01E
Page 49

MENUS
(5.3.3)
(5.3.4)
MANUAL PRINTOUT START
LIST PRINTOUT START
FUNCTION
MANUAL PRINTOUT STOP
LIST PRINTOUT STOP
DISPLAY
MANUAL CH=1
MESSAGE No.=1
(5.3.8)
MENU
ESC
PRINT
DISPLAY_AUTO
DISPLAY_MANUAL
DISPLAY_CLOCK
DISPLAY_VIEW
PRINT MESSAGE
PRINT SETUP LIST
STOP SETUP LIST
CHANGE PEN
CLEAR MESSAGE BUFFER
CLEAR ALARM BUFFER
(5.3.6)
(5.3.6)
(5.3.7)
(5.3.5)
(5.3.5)
(5.2.2)
(pen model only)
In the paragraphs where the setting procedures are explained, you will find menus, like
for example (as in chapters 7 and 8):
RANGE
ALARM
UNIT
CHART
CLOCK
COPY
AUX
01
02
03
04
SKIP
VOLT
TC
RTD
DI
DELT
SCL
SQRT
These menus will not be shown on the actual display. These are to make clear which
steps need to be taken to set that parameter. Once you are familiar with the way to
operate the µR1800, these menus may be sufficient to you. Note that most of the menus
used in this manual show the menu of the pen model.
6.3 Flow Charts
This paragraph describes the setting flows of the three modes. These are Operation
Mode (6.3.1), SET Mode (6.3.2) and SET UP Mode (6.3.3).
6.3.1 Flow Chart of Operation Mode
This flow can be entered by pressing the corresponding function keys.
6.3 Flow Charts
6. HOW TO ENTER SETTINGS
IM 4H3B1-01E
6 - 3
Page 50

6.3.2 Flow Chart of SET Mode
This flow can be entered by pressing the MENU-key for three seconds.
(7.1)
RANGE CH.No.
(7.2)
ALARM
(7.3)
UNIT
(7.4)
CHART
(7.5)
CLOCK
VOLT
TC
RTD
DI
DELTA
SCALE
SQRT
SKIP
(7.7)
OPT RRJC
CH.No.
CH.No.
CHART SPEED
DATE TIME
LEVEL(1-4)
UNIT CHARACTERS
RANGE SPAN LEFT
TYPE
TYPE
DI TYPE
REFERENCE CHANNEL
SCALING MODE
SCALE LEFT
RANGE
SQRT SCALE RIGHT
ALARM ON/OFF
SPAN LEFT
SPAN LEFT
RANGE
SCALE RIGHT
SPAN LEFT SPAN RIGHT
REF.CH. SPAN-L SPAN-R
TYPE VALUE RELAY ON/OFF
SPAN RIGHT
SPAN RIGHT
SPAN RIGHT
SPAN LEFT SPAN RIGHT
SPAN LEFT SPAN RIGHT
SQRT SCALE LEFT
RELAY No.
(7.6)
COPY
AUX
(8.1.2)
(8.1.3)
(8.2.1)
(8.2.2)
(8.2.3)
(8.3)
FROM CH? TO CH?
TREND AUTO/FIX (dot model only) (8.1.1)
ZONE
PRINT
TAG
MESSAGE
CHART2
CH.No.
CH.No.PARTIAL PARTIAL ON/OFF EXPAND FROM BOUNDARY
CH.No.
CH.No. TAG CHARACTERS
MESSAGE 1-5
2nd CHART SPEED
(not for 1 pen model)
ZONE LEFT ZONE RIGHT
PERIODIC PRINT ON/OFF
CHARACTERS
6 - 4 IM 4H3B1-01E
Page 51

6.3.3 Flow Chart of SET UP Mode
This flow can be entered by turning ON the power while pressing the ENT-key.
(9.1)
ALARM
REFLASH ON/OFF RELAY HOLD/NONHOLD
AND/OR RELAY
6.3 Flow Charts
ENERGIZE/DE-EN
(9.2.1)
(9.2.2)
(9.2.3)
(9.2.4)
(9.2.5)
(9.3.1)
(9.3.2)
(9.4)
(9.5)
INTEGRATION
BURNOUT
RJC
FILTER
MOVING
AVERAGE
POC
COLOR
RECORD
BAR
TEMP
INDICATOR HOLD/NONHOLD
ALARM HYSTERESIS
A/D FREQUENCY
UP/DOWN CH.No.
CH.No.
CH.No.
CH.No.
PEN OFFSET COMPENSATION
CH. No. PURPLE, RED, GREEN, BLUE, BROWN, BLACK
RECORD INT/EXT
ALARM ON1/ON2/OFF DIGITAL PRINT ON/OFF
CH.No.
˚C/˚F
RJC MODE
DIGITAL DAMPING TIME
SET MOVING AVERAGE
CH or TAG SCALES ON/OFF SPEED ON/OFF
NORMAL/CENTER ZERO
SAMPLE R TIME
BURNOUT ON/OFF
RJC VOLT(µV)
(pen model)
(dot model)
(pen model)
SAMPLE r TIME
STARTING TIME MODE
(dot model)
RCD ON/OFF
INTERVAL
6. HOW TO ENTER SETTINGS
(9.6)
(9.7)
(9.9)
(11.3)
INITIALIZE
REMOTE
LOCK
PRINT
ADJUSTMENT
END
YES/NO
CONTACT 1-5 SELECT TYPE
USE/NOT LOCK KEYS
ZERO/FULL
ZERO/FULL/HYS POSITION ADJUSTMENT
STORE/ABORT
CH.No.
POSITION ADJUSTMENT
(pen model)
(dot model)
IM 4H3B1-01E
6 - 5
Page 52

6.4 Setting Parameters in SET Mode
Setting Parameters Values Remarks
RANGE
MODE
VOLT
TC
RTD
DI
20mV
6V
R
E
W
JPT
LEVL
60mV
20V
S
J
L
PT
CONT
200mV
T
U
2V
KB
N
DC voltage input
Thermocouple input
Input by Resistance Temperature Detector
Digital Input
LEVL: voltage input CONT: contact input
ALARM
UNIT
CHART
CLOCK
COPY
AUX
DELT
SCL
SQRT
SKIP
LEVEL
Alarm
TYPE
Alarm value
Relay
Relay No.
TREND (dot model only)
ZONE
PARTIAL partial
rate
boundary
periodic printoutPRINT
TAG
MESSAGE
Chart speed 2
VOLT
20mV6V60mV
1234
ON OFF
H
R
ON OFF
I01 to I24
AUTO
ON
ON
MSG1 MSG2 MSG3 MSG4
MSG5
TC
20V
Lh l
r
FIX
OFF
OFF
RTD
200mV 2V
Differential computation
Assigning a different scale
Taking square root of measured data
Skips a channel
Alarm setting ON/OFF
h and l can only be selected in combination
with ‘DELT’ input.
Relay 1 to 24, depending on option
Assigning unit to scales. Only possible in case of
SCL or SQRT. Max 6 characters.
Setting chart speed
Setting date and time
Selecting analog recording interval
Zone recording
Partial compression ON/OFF
Compression rate
Boundary value
Periodic printout ON/OFF
Tag setting, max 7 characters
Max 5 messages, each up to 16 characters
Chart speed for change-on-alarm & remote
6 - 6 IM 4H3B1-01E
Page 53

6.5 List of Initial Setting Values
SET Mode
RANGE
ALARM
UNIT
CHART
TREND
ZONE
PARTIAL
PRINT
TAG
MESSAGE
CHART2
SET UP Mode
Function
REFLASH function
Output relay AND/OR
Output relay ENERG/DE-EN
Output relay HOLD/NONHOLD
Alarm indicator HOLD/NONHOLD
Sampling interval for rate-of-change alarm R
Sampling interval for rate-of-change alarm r
Alarm hysteresis
VOLT (–2.000V to 2.000V)
OFF
all spaces
25 mm/h
AUTO
0 to 180mm
OFF
ON
all spaces
all spaces
25 mm/h
REFLASH=
AND=
ALARM=
RLY=
IND=
R TIME=
r TIME=
ALM HYS=
Display
6.5 List of Initial Setting Values
Initial Value
OFF
NONE
ENERG
NONHOLD
NONHOLD
01
01
ON (approx. 0.5%)
A/D INTEGRATION TIME
BURNOUT
BURNOUT
RJC
Filter (pen model)
Moving Average (dot model)
Pen Offset Compensation (pen model)
Color (dot model)
Record trigger
CH/TAG Printout
Scale Printout
New chart speed Printout
Record start time Printout
Alarm Printout
Periodic Printout
Periodic Printout Mode
Periodic Printout Interval
Bargraph
Remote control
Key Lock
INTG=
B.OUT=
B.OUT=
RJC=
FILT=
M AVE=
POC=
COLOR=
RECORD=
CH/TAG=
SCL PR=
SPD PR=
RCD PR=
ALM PR=
DGT PR=
MODE=
INTVL=
BAR=
CONT.No.=
LOCK=
AUTO
UP
OFF for every channel
INT for every channel
OFF for every channel
OFF for every channel
OFF
1, 7, 13, 19=purple
2, 8, 14, 20=red
3, 9, 15, 21=green
4, 10, 16, 22=blue
5, 11, 17, 23=brown
6, 12, 18, 24=black
INT
CH
ON
OFF
OFF
ON1
INT, START 00:00
AUTO
1h
NORML for every channel
1=RECORD 2=CHART SPEED
3=MANUAL PR 4=MESSAGE1
5=MESSAGE2
NOT
6. HOW TO ENTER SETTINGS
IM 4H3B1-01E
6 - 7
Page 54

7.1 How to Set Input Range and Recording Span
Chapter 7 BASIC SETTINGS
This chapter explains how to perform the settings of:
(Initial values are given in parentheses.)
7.1 Input range and recording span (VOLT, –2V to +2V)
7.2 Alarms (OFF)
7.3 Units (all spaces)
7.4 Chart speed (25 mm/h)
7.5 Clock
The last paragraph (7.6) explains how settings can be copied to other channels.
7.1 How to Set Input Range and Recording Span
One of the following parameters can be set for every channel:
SKIP Prevents the specified channel from being measured, recorded and displayed
(7.1.1).
VOLT Measures and records DC-voltage (7.1.2).
TC Measures and records temperatures using Thermocouple (7.1.3).
RTD Measures and records temperatures using Resistance Temperature Detector
(7.1.3).
DI Accepts Digital Input (contact/voltage level) and performs ON/OFF
recording (7.1.4).
DELT Performs difference computation between two channels which have same
input range (7.1.5).
SCL Performs scaling on voltage, TC and RTD measurements (7.1.6).
Scaling results in appending a different scale to the measured values.
SQRT Takes the square root ( ) of DC-voltage measured data (7.1.7).
7. BASIC SETTINGS
IM 4H3B1-01E
7 - 1
Page 55

7.1.1 SKIP Setting
ESC
MENU
3sec
ALARM
PRINT
ACK
ALARM
PRINT
ACK
Unused channels can be skipped, which means that these channels will not be measured,
recorded or displayed.
MENU:
RANGE
ALARM
UNIT
CHART
CLOCK
COPY
AUX
01
02
03
04
SKIP
VOLT
TC
RTD
DI
DELT
SCL
SQRT
SETTING PROCEDURE:
SET=RANGE
Press the MENU-key for three seconds to enter the SET mode.
Select the ‘SET=RANGE’ display by using the UP/DOWN-keys.
Then press the ENT-key.
01:MODE=
Use the UP/DOWN-keys to select the desired channel.
Press the ENT-key.
PRINT
ESC
MENU
ALARM
ACK
3sec
01:MODE=SKIP
SET OK
**
Use the UP/DOWN-keys to select ‘SKIP’.
Press the ENT-key.
The setting is completed.
Press the ENT-key to return to the ‘01:MODE=SKIP’ display; or
press the ESC-key to go to the ‘SET=RANGE’ display; or press
the MENU-key for three seconds to return to the Operation mode.
7 - 2 IM 4H3B1-01E
Page 56

7.1 How to Set Input Range and Recording Span
20mV
60mV
200mV
2V
6V
20V
–20.00 to 20.00mV
–60.00 to 60.00mV
–200.0 to 200.0mV
–2.000 to 2.000V
–6.000 to 6.000V
–20.00 to 20.00V
Display
Range
7.1.2 Voltage Measurement Setting (VOLT Setting)
In the case that the measured signal is a DC-voltage, the range can be set as follows:
MENU:
RANGE2VLEFT
0.000
Press the MENU-key for three seconds to enter the SET mode.
Select the ‘SET=RANGE’ display by using the UP/DOWN-keys.
Then press the ENT-key.
PRINT
ESC
MENU
3sec
ALARM
ACK
RANGE
ALARM
UNIT
CHART
CLOCK
COPY
AUX
01
02
03
04
SKIP
VOLT
TC
RTD
DI
DELT
SCL
SQRT
SETTING PROCEDURE:
SET=RANGE
RIGHT
2.000
PRINT
PRINT
PRINT
PRINT
PRINT
ALARM
ACK
ALARM
ACK
ALARM
ACK
ALARM
ACK
ALARM
ACK
FEED
FEED
:MODE=
01
01:MODE=VOLT
01:RANGE=2V
01:LEFT=0.000
01:RIGHT=2.000
Use the UP/DOWN-keys to select the desired channel.
Press the ENT-key.
Use the UP/DOWN-keys to select ‘VOLT’.
Press the ENT-key.
Select the desired range using the UP/DOWN-keys and press the
ENT-key.
7. BASIC SETTINGS
Table 7.1 VOLT Input Ranges
Select the minimum value of the recording span (LEFT) using the
UP/DOWN and RIGHT-keys. Then press the ENT-key.
The display which appears will allow you to enter the maximum
value of the recording span (RIGHT). Select it the same way as for
the minimum value and press the ENT-key.
Note that the recording span cannot be beyond the input range, nor
can LEFT be equal to RIGHT.
IM 4H3B1-01E
ESC
MENU
3sec
SET OK
**
The setting is completed.
Press the ENT-key to return to the ‘01:MODE=VOLT’ display; or
press the ESC-key to go to the ‘SET=RANGE’ display; or press
the MENU-key for three seconds to return to the Operation mode.
7 - 3
Page 57

7.1.3 Thermocouple and Resistance Temperature Detector Setting (TC, RTD Setting)
In the case that the measured signal is a TC (Thermocouple) or RTD (Resistance
Temperature Detector) the range can be set the same way as if it were a DC-voltage.
MENU:
RANGE
ALARM
UNIT
CHART
CLOCK
COPY
AUX
01
SKIP
02
VOLT
03
TC
04
RTD
TYPE
N
DI
DELT
SCL
SQRT
LEFT
0.0
RIGHT
800.0
PRINT
PRINT
PRINT
PRINT
ESC
MENU
3sec
ALARM
ACK
ALARM
ACK
ALARM
ACK
ALARM
ACK
SETTING PROCEDURE:
SET=RANGE
Press the MENU-key for three seconds to enter the SET mode.
Select the ‘SET=RANGE’ display by using the UP/DOWN-keys.
Then press the ENT-key.
01:MODE=
Use the UP/DOWN-keys to select the desired channel.
Press the ENT-key.
01:MODE=TC
Use the UP/DOWN-keys to select ‘TC’, or ‘RTD’.
Press the ENT-key.
01:TYPE=
N
Select the desired type (R, S, B, K, E, J, T, N, W, L, U in case of
TC, or PT, JPT in case of RTD) using the UP/DOWN-keys and
press the ENT-key.
Table 7.2 TC Type Description and RTD Type Description
R
S
B
K
E
J
T
N
W
L (Fe-CuNi)
U (Cu-CuNi)
PLT (PRATINEL)*1
PR (PR40-20)*1
*1: For /N1 model
TC Type Description
0.0 to 1760.0°C
0.0 to 1760.0°C
0.0 to 1820.0°C
–200.0 to 1370.0°C
–200.0 to 800.0°C
–200.0 to 1100.0°C
–200.0 to 400.0°C
0.0 to 1300.0°C
0.0 to 2315.0°C
–200.0 to 900.0°C
–200.0 to 400.0°C
0.0 to 1400.0°C
0.0 to 1900.0°C
Range
32 to 3200°F
32 to 3200°F
32 to 3308°F
–328 to 2498.0°F
–328.0 to 1472.0°F
–328.0 to 2012.0°F
–328.0 to 752.0°F
32 to 2372°F
32 to 4199°F
–328.0 to 1652.0°F
–328.0 to 752.0°F
32 to 2552°F
32 to 3452°F
RTD Type Description
PT (pt100 )
Ω
JPT (Jpt100 )
Ω
JP50 (JPt50 )*1
Ω
CU1 to 6 (Cu10 )*2
Ω
CU25 (Cu25 )*2
Ω
*1: For /N3 model
*2: For /N1 model
The Pt and JPt type can’t be set together with the Cu types.
Cu1: Cu10 GE
Cu2: Cu10 L&N
Cu3: Cu10 WEED
Cu4: Cu10 BAILAY
Cu5: Cu10 α=0.0392 at 20°C
Cu6: Cu10 α=0.0393 at 20°C
Cu25: Cu25 α=0.00425 at 0°C
Ω
Ω
Ω
Ω
Ω
Ω
Ω
Range
–200.0 to 600.0°C
–200.0 to 550.0°C
–200.0 to 600.0°C
–200.0 to 300.0°C
–200.0 to 300.0°C
–328.0 to 1112.0°F
–328.0 to 1022.0°F
–328.0 to 1112.0°F
–328.0 to 572.0°F
–328.0 to 572.0°F
PRINT
ALARM
ACK
FEED
01:LEFT=0.0
01:RIGHT=800.0
Select the desired minimum value (LEFT) and maximum value of
the recording span (RIGHT) in the same way as described under
‘VOLT setting’.
Note that the recording span cannot be beyond the input range, nor
can LEFT be equal to RIGHT.
ESC
MENU
3sec
SET OK
**
The setting is completed.
Press the ENT-key to return to the ‘01:MODE=TC’ display; or
press the ESC-key to go to the ‘SET=RANGE’ display; or press
the MENU-key for three seconds to return to the Operation mode.
NOTE There is no need to set the temperature unit in case of TC or RTD input, since °C will
be automatically provided. To change the setting of the temperature unit, which can
only be changed in the SET UP Mode, see 9.6.
7 - 4 IM 4H3B1-01E
Page 58

7.1.4 Digital Input Setting (DI Setting)
If a Digital Input (contact input/voltage level input) is being used, the setting can be
done as follows:
MENU:
RANGE
ALARM
UNIT
CHART
CLOCK
COPY
AUX
01
02
03
04
SKIP
VOLT
TC
RTD
DI
DELT
SCL
SQRT
7.1 How to Set Input Range and Recording Span
TYPE
LEVL
PRINT
PRINT
PRINT
PRINT
ESC
MENU
ESC
MENU
3sec
ALARM
ACK
ALARM
ACK
ALARM
ACK
ALARM
ACK
3sec
SETTING PROCEDURE:
SET=RANGE
Press the MENU-key for three seconds to enter the SET mode.
Select the ‘SET=RANGE’ display by using the UP/DOWN-keys.
Then press the ENT-key.
01:MODE=
Use the UP/DOWN-keys to select the desired channel.
Press the ENT-key.
01:MODE=DI
Use the UP/DOWN-keys to select ‘DI’.
Press the ENT-key.
01:TYPE=LEVL
There are two types, namely LEVEL and CONTACT.
LEVL: (VOLT) Records ON/OFF status of a voltage input (0
CONT: (Contact) Records ON/OFF status of a contact (close is
Select the desired type using the UP/DOWN-keys and press the
ENT-key.
SET OK
**
The setting is completed.
Press the ENT-key to return to the ‘01:MODE=DI’ display; or
press the ESC-key to go to the ‘SET=RANGE’ display; or press
the MENU-key for three seconds to return to the Operation mode.
7. BASIC SETTINGS
to 2.4V is OFF (0), 2.4V and higher is ON
(1)).
ON (1), open is OFF (0)).
IM 4H3B1-01E
NOTE The above mentioned selections will result in a recording trace from 0mm to 180mm
between the contact statuses OFF and ON, which is from the extreme left side of the
chart to the extreme right side. If desired, a zone for the ON/OFF recording can be set.
See 8.1.2.
7 - 5
Page 59

7.1.5 Difference Computation Setting (DELT Setting)
To obtain the difference between the measured values of two channels, proceed as
follows. Note that this setting can only be applied if the reference channel is of the
VOLT, TC or RTD type.
MENU:
REFERENCE CH1LEFT
–2.000
Press the MENU-key for three seconds to enter the SET mode.
Select the ‘SET=RANGE’ display by using the UP/DOWN-keys.
Then press the ENT-key.
PRINT
ESC
MENU
3sec
ALARM
ACK
RANGE
ALARM
UNIT
CHART
CLOCK
COPY
AUX
SKIP
01
VOLT
02
TC
03
RTD
04
DI
DELT
SCL
SQRT
SETTING PROCEDURE:
SET=RANGE
RIGHT
2.000
PRINT
PRINT
PRINT
PRINT
PRINT
ALARM
ACK
ALARM
ACK
ALARM
ACK
ALARM
ACK
ALARM
ACK
FEED
FEED
02:MODE=
02:MODE=DELT
02:REFERENCE CH=
02:LEFT=–2.000
02:RIGHT=2.000
Use the UP/DOWN-keys to select the desired channel.
Note that channel No.1 cannot be of the ‘DELT’ type.
Then press the ENT-key.
Use the UP/DOWN-keys to select ‘DELT’.
Then press the ENT-key.
Enter the reference channel number using the UP/DOWN-keys.
01
Note that the reference channel number must be lower than that of
the channel being set. Therefore channel No.1 cannot be of the
‘DELT’ type.
Then press the ENT-key.
The display which appears will show the same minimum value of
the recording span as of the reference channel.
Use the UP/DOWN and RIGHT-keys to set the minimum value.
Press the ENT-key.
Note that in case of VOLT, the input range of the DELT-channel
must be within the range of the reference channel. The difference
in measured value from the reference channel will be recorded on
the DELT-channel.
The display which appears will show the same maximum value of
the recording span as of the reference channel.
Use the UP/DOWN and RIGHT-keys to set the maximum value.
Note that LEFT cannot be equal to RIGHT.
Press the ENT-key.
Note that in case of TC, RTD, the maximum span values can be
found by taking the ±value of the input range width. E.g. input
range of TC type L = –200 to 900°C: maximum span values will
be at ±1100°C.
ESC
MENU
3sec
SET OK
**
The setting is completed.
Press the ENT-key to return to the ‘02:MODE=DELT’ display, or
press the ESC-key to go to the ‘SET=RANGE’ display; or press
the MENU-key for three seconds to return to the Operation mode.
7 - 6 IM 4H3B1-01E
Page 60

7.1.6 Scale Setting (SCL Setting)
VOLT
RANGE2VLEFT
0.000
RANGE
ALARM
UNIT
CHART
CLOCK
COPY
AUX
01
02
03
04
SKIP
VOLT
TC
RTD
DI
DELT
SCL
SQRT
RIGHT
2.000
SCL LEFT
–100.0
SCL RIGHT
100.0
SCALING MODE
To assign a different scale to the measured data, the range can be set as described
below. Note that the measured data which can get a different scale must be of the
voltage (VOLT), Thermocouple (TC) or Resistance Temperature Detector (RTD) type.
To assign a unit to this new scale, refer to UNIT setting (7.3).
MENU:
SETTING PROCEDURE:
PRINT
PRINT
ESC
MENU
ALARM
ACK
3sec
ALARM
ACK
SET=RANGE
01:MODE=
7.1 How to Set Input Range and Recording Span
Press the MENU-key for three seconds to enter the SET mode.
Select the ‘SET=RANGE’ display by using the UP/DOWN-keys.
Then press the ENT-key.
Use the UP/DOWN-keys to select the desired channel.
Press the ENT-key.
PRINT
PRINT
PRINT
PRINT
PRINT
PRINT
ALARM
ACK
ALARM
ACK
ALARM
ACK
ALARM
ACK
ALARM
ACK
ALARM
ACK
FEED
FEED
FEED
01:MODE=SCL
01:SCALING MODE=VOLT
01:RANGE=2V
01:LEFT=0.000
2.00001:RIGHT=
01:SCL LEFT=–100.0
Use the UP/DOWN-keys to select ‘SCL’.
Press the ENT-key.
Select the input type using the UP/DOWN-keys and press the
ENT-key.
7. BASIC SETTINGS
Select the desired range (using the UP/DOWN-keys) and press the
ENT-key.
Set the minimum value of the recording span using the UP/
DOWN and RIGHT-keys. Then press the ENT-key.
Set the maximum value of the recording span using the UP/
DOWN and RIGHT-keys. Then press the ENT-key. Note that the
decimal point will be in the same position as for LEFT. LEFT
cannot be equal to RIGHT.
Set the minimum value of the scale corresponding to the minimum
value of the recording span using the UP/DOWN and the RIGHT-
keys. Note that the allowable range is –20000 to 20000. Then press
the ENT-key.
IM 4H3B1-01E
PRINT
ALARM
ACK
FEED
01:SCL RIGHT=100.0
Set the maximum value of the scale corresponding to the
maximum value of the recording span. Select it the same way as
the minimum value. Then press the ENT-key. Note that the
decimal point will be in the same position as for SCL LEFT. SCL
LEFT cannot be equal to SCL RIGHT.
ESC
MENU
3sec
SET OK
**
The setting is completed.
Press the ENT-key to return to the ‘01:MODE=SCL’ display; or
press the ESC-key to go to the ‘SET=RANGE’ display; or press
the MENU-key for three seconds to return to the Operation mode.
NOTE In this example, 0.000V input will be scaled to –100.0. 2.000V input will be scaled to 100.0.
7 - 7
Page 61

7.1.7 Setting to Obtain Square Root (SQRT Setting)
To obtain the square root of the measured value, proceed as follows:
Note that the measured data of which the square root can be taken, can only be of the
voltage type. To assign a unit, refer to UNIT setting (7.3).
MENU:
RANGE2VLEFT
0.000
Press the MENU-key for three seconds to enter the SET mode.
Select the ‘SET=RANGE’ display by using the UP/DOWN-keys.
Then press the ENT-key.
PRINT
ESC
MENU
3sec
ALARM
ACK
RANGE
ALARM
UNIT
CHART
CLOCK
COPY
AUX
01
SKIP
02
VOLT
03
TC
04
RTD
DI
DELT
SCL
SQRT
SETTING PROCEDURE:
SET=RANGE
RIGHT
2.000
SCL LEFT
–2000.0
SCL RIGHT
2000.0
PRINT
PRINT
PRINT
PRINT
PRINT
PRINT
ALARM
ACK
ALARM
ACK
ALARM
ACK
ALARM
ACK
ALARM
ACK
ALARM
ACK
FEED
FEED
FEED
01:MODE=
01:MODE=SQRT
01:RANGE=2V
01:LEFT=0.000
01:RIGHT=2.000
01:SCL LEFT=–2000.0
Use the UP/DOWN-keys to select the desired channel.
Press the ENT-key.
Use the UP/DOWN-keys to select ‘SQRT’.
Press the ENT-key.
Select the desired range (using the UP/DOWN-keys) and press the
ENT-key.
Set the minimum value of the recording span using the UP/
DOWN and RIGHT-keys. Then press the ENT-key.
Set the maximum value of the recording span using the UP/
DOWN and RIGHT-keys. Then press the ENT-key. Note that the
decimal point will be in the same position as for LEFT. LEFT
cannot be equal to RIGHT.
Set the minimum value of the scale corresponding to the minimum
value of the recording span using the UP/DOWN and the RIGHT-
keys. Note that the allowable range is –20000 to 20000. Then press
the ENT-key.
PRINT
ALARM
ACK
FEED
01:SCL RIGHT=2000.0
Set the maximum value of the scale corresponding to the
maximum value of the recording range. Select it the same way as
the minimum value. Then press the ENT-key. Note that the
decimal point will be in the same position as for SCL LEFT. SCL
LEFT cannot be equal to SCL RIGHT.
ESC
MENU
3sec
SET OK
**
The setting is completed.
Press the ENT-key to return to the ‘01:MODE=SQRT’ display;
or press the ESC-key to go to the ‘SET=RANGE’ display; or
press the MENU-key for three seconds to return to the Operation
mode.
7 - 8 IM 4H3B1-01E
Page 62

7.1 How to Set Input Range and Recording Span
EXPLANATION OF SQUARE ROOT:
The µR1800 uses the following square rooting-method:
Let us define the items as follows:
V= minimum value of recording span (LEFT)
min
V= maximum value of recording span (RIGHT)
max
F= minimum value of scale (SCL LEFT)
min
F= maximum value of scale (SCL RIGHT)
max
x
V= input voltage
x
F= scaling value
The relationship between V (input voltage) and F (scaling value) is as shown in the
x
x
graph below (the graph configuration is approximate).
F
F
max
b
– F
– V
min
min
) x 10%
) x 1%
F
min
(F
max
a
b'
(V
max
V
min
Between b and c in the graph, the following relation exists between F and V :
F = (F – F ) + F
max
x
min
c
V
max
V – V
x min
V – V
max
min
V
min
x
x
7. BASIC SETTINGS
And between a and b, the relation is:
10 (F – F )
max
F = (V – V ) + F
x
V – V
max
min
min
min
x
min
IM 4H3B1-01E
7 - 9
Page 63

7.2 How to Set Alarms
Alarms can be set on the measured data of any channel.
If an alarm is set, and an alarm occurs, the ALM indicator will be illuminated and alarm
printout will occur.
If equipped with the optional alarm output relays, these will be activated by the
occurrence of an alarm.
Up to four alarm levels can be set per channel.
Six types of alarms are available. These are:
H High limit alarm: alarm is generated when the measured value is higher than, or
equal to, the alarm value.
L Low limit alarm: alarm is generated when the measured value is lower than, or
equal to, the alarm value.
R Rate-of-change limit on increase: high alarm is generated when the measured
value variation in the ascending direction during a selected interval is greater
than, or equal to, the alarm setting.
r Rate-of-change limit on decrease: low alarm is generated when the measured
value variation in the descending direction during a selected interval is greater
than, or equal to, the alarm setting.
Measured
value
R alarm
T
2
Variation
T –T
T
1
21
Measured
value
T
1
Variation
T –T
T
2
21
t
1
Selected interval (Note)
t –t
21
t
2
Time
t
1
Selected interval (Note)
t –t
21
r alarm
t
Time
2
Note: the selected interval is determined during rate-of-change alarm set-up. See 9.1.6.
h Difference high-limit alarm: alarm is generated when the difference between the
measured values of two channels is more than the alarm setting. (This type of
alarm can only be set when the corresponding channel is of the DELT-type.)
l Difference low-limit alarm: alarm is generated when the difference between the
measured values of two channels is less than the alarm setting. (This type of
alarm can only be set when the corresponding channel is of the DELT-type.)
NOTE Alarm settings are automatically canceled on the affected channel, when any of the
following changes occur:
• the input type (VOLT, TC, etc.) or input range (2V, etc.) is changed.
• decimal point for linear scaling and square root is changed.
•minimum or maximum value of the recording span is changed (in case of linear
scaling and square root).
•minimum or maximum value of the scale is changed (in case of linear scaling and
square root).
Difference alarm settings (h, l) are canceled when any of the following changes occur:
• the reference channel is changed.
• the input type or range of the reference channel is changed.
7 - 10 IM 4H3B1-01E
Page 64

PRINT
ESC
MENU
ALARM
ACK
3sec
ALARM
UNIT
CHART
CLOCK
COPY
AUX
The initial value is ‘OFF’ for all channels and all levels.
To set an alarm, proceed as follows:
MENU:
01
LEVEL1ALARM ON/OFF
02
03
ON
04
TYPE
H
VALUE
2.000
SETTING PROCEDURE:
SET=ALARM
Press the MENU-key for three seconds to enter the SET mode.
Select the ‘SET=ALARM’ display by using the UP/DOWN-keys.
Then press the ENT-key.
RELAY ON/OFFRANGE
ON
7.2 How to Set Alarms
RELAY No.
I01
PRINT
PRINT
PRINT
PRINT
PRINT
PRINT
ALARM
ACK
ALARM
ACK
ALARM
ACK
ALARM
ACK
ALARM
ACK
ALARM
ACK
FEED
01:ALARM LEVEL=
01:ALARM LEVEL=1
01/1:ALARM=ON
01/1:TYPE=H
01/1: VALUE=2.000
01/1:RELAY=ON
Use the UP/DOWN-keys to select the desired channel.
Press the ENT-key.
Use the UP/DOWN-keys to select the desired level of the alarm.
Up to four levels can be set. Then press the ENT-key.
Select the status of the alarm (ON or OFF) using the UP/DOWN-
keys. Initially all are set to OFF. Then press the ENT-key.
When OFF is selected, setting is completed. Alarms cannot be set
for a SKIP or DI channel.
Enter the type of alarm using the UP/DOWN-keys. Six types are
available. After selection, press the ENT-key. h, l will appear only
if the corresponding channel is of the DELT-type.
Enter the alarm value using the UP/DOWN and RIGHT-keys.
After setting, press the ENT-key.
Specify whether an output relay should be activated (ON) or not
(OFF) using the UP/DOWN-keys. Note that output relays are
optional (/A1, 2 or 3). If the option is not installed, data entry will
be ignored. After selection, press the ENT-key.
7. BASIC SETTINGS
IM 4H3B1-01E
PRINT
ALARM
ACK
01/1:RELAY No.=I01
Specify the output relay number using the UP/DOWN-keys. Up to
24 output relays I01 to I24 can be specified, depending on the
option. Note that when you specify a relay, with which your
µR1800 is not equipped, data entry will be ignored.
Then press the ENT-key.
ESC
MENU
3sec
SET OK
**
The setting is completed.
Press the ENT-key to return to the ‘01:ALARM LEVEL=1’
display; or press the ESC-key to go to the ‘SET=ALARM’
display; or press the MENU-key for three seconds to return to the
Operation mode.
NOTE Provided that your µR1800 is equipped with the Remote Control /R1 option and the
/A1, 2 or 3 option, the chart speed can be changed when an alarms occurs. See 8.3.
The alarm relay can be of 2 types, the ‘HOLD’ type and ‘NON-HOLD’ type. See 9.1.4.
7 - 11
Page 65

7.3 How to Assign Units
When you are using scaling (SCL) or the square root setting (SQRT), it is possible to
assign a different unit to the scales. Up to six characters can be set. Note that only four
characters will be shown on the display when tags are specified.
The initial value is all spaces. To set, proceed as follows:
MENU:
01
ALARM
UNIT
CHART
CLOCK
COPY
AUX
02
03
04
CHARACTERSRANGE
Kg
PRINT
PRINT
PRINT
ESC
MENU
ALARM
ACK
MENU
ESC
ALARM
ACK
ALARM
ACK
3sec
FEED
3sec
SETTING PROCEDURE:
SET=UNIT
Press the MENU-key for three seconds to enter the SET mode.
Select the ‘SET=UNIT’ display by using the UP/DOWN-keys.
Then press the ENT-key.
01:UNIT=
Use the UP/DOWN-keys to select the desired channel, and press
the ENT-key. If the selected channel is not of the SCL or SQRTtype, data entry will be ignored.
01:UNIT=Kg
Enter the desired unit (up to six characters) using the UP/DOWN
and RIGHT-keys. Then press the ENT-key. Refer to table 7.3.
SET OK
**
The setting is completed.
Press the ENT-key to return to the ‘01:UNIT=Kg’ display; or
press the ESC-key to go to the ‘SET=UNIT’ display; or press the
MENU-key for three seconds to return to the Operation mode.
Table 7.3 Characters
-key
ABCDEFGHI J
KLMNOPQRST
UVWXYZ
abcd
-key
ef ghi j
opqr st
yz
8
.°µ
01 2 3 4
#%
9
Ω
()
Ω
kl mn
uvwx
567
+–
/
*
7 - 12 IM 4H3B1-01E
Page 66

7.4 How to Set the Chart Speed
The chart speed can be set within a range of 1 to 12000 mm/h, depending on your
model. The initial value is 25 mm/h. To set the chart speed, proceed as follows:
MENU:
SPEED
1000
Press the MENU-key for three seconds to enter the SET mode.
Select the ‘SET=CHART’ display by using the UP/DOWN-keys.
Then press the ENT-key.
PRINT
ESC
MENU
3sec
ALARM
ACK
RANGE
ALARM
UNIT
CHART
CLOCK
COPY
AUX
SETTING PROCEDURE:
SET=CHART
7.4 How to Set the Chart Speed
PRINT
ESC
MENU
ALARM
ACK
3sec
SPEED=1000
SET OK
**
mm/h
In case of the pen model, select the desired chart speed using the
UP/DOWN-keys, and press the ENT-key. The different possible
chart speeds are listed below in table 7.4.
In case of the dot model, set the desired chart speed using the UP/
DOWN and RIGHT-keys, and press the ENT-key.
Check in table 7.5 that all the printouts will be printed as expected.
Table 7.4 Chart Speeds in mm/h (pen model)
5
6
8
9
10
12
15
16
18
24
25
30
32
36
40
45
60
64
72
75
80
135
150
160
320
360
720
750
1500
1600
3600
4000
10800
12000
Table 7.5 Chart Speeds for which Printouts will not be performed
Model
pen
6/12 dot model
18/24 dot model
180
375
400
800
900
1800
2000
4320
4500
Periodic Printout
5 to 9 mm/h
1 to 9 mm/h, 101 to1500 mm/h
1 to 9 mm/h, 51 to1500 mm/h
200
450
960
2160
4800
90
225
480
1000
2250
5400
48
96
100
240
250
500
540
1080
1200
2400
2700
6000
7200
Alarm Printout/Recording Start/
Message Printout/Chart Speed Change/
Channel/Tag (dot model only)
1600 to 12000 mm/h
100 to 1500 mm/h
51 to1500 mm/h
50
120
270
600
1350
2880
8000
20
54
125
300
675
1440
3000
9000
The setting is completed.
Press the ENT-key to return to the ‘SPEED=1000 mm/h’
display; or press the ESC-key to go to the ‘SET=CHART’
display; or press the MENU-key for three seconds to return to the
Operation mode.
7. BASIC SETTINGS
IM 4H3B1-01E
NOTE Setting the chart speed which goes into effect following a remote control signal (/R1
option), or following an alarm occurrence (/A1, 2 or 3 option + /R1 option), is
performed under the AUX-settings. See 8.3.
If the chart speed is high (600 to 1500 mm/h) in case of the pen model, the time tick in
the periodic printout will contain an error (e.g. if speed is 1500 mm/h, error will be
approx. 2cm).
If you selected a chart speed of 1 to 5 mm/h, in case of the dot model, select AUTO for
the trend recording format to prevent chart paper damage (see 8.1.1).
7 - 13
Page 67

7.5 How to Set the Clock
To set the date and the time of the internal clock, proceed as follows:
MENU:
DATE
92/06/30
PRINT
ESC
MENU
3sec
ALARM
ACK
RANGE
ALARM
UNIT
CHART
CLOCK
COPY
AUX
SETTING PROCEDURE:
SET=CLOCK
TIME
13:30:00
Press the MENU-key for three seconds to enter the SET mode.
Select the ‘SET=CLOCK’ display by using the UP/DOWN-keys.
Then press the ENT-key.
PRINT
PRINT
ALARM
ACK
ALARM
ACK
ESC
MENU
FEED
FEED
3sec
DATE=92/06/30
TIME=13:30:00
SET OK
**
Enter the correct date, which is written as year/month/day (YY/
MM/DD) using the UP/DOWN/RIGHT-keys. Then press the
ENT-key. The date will be automatically updated, regardless
whether the power is turned ON or OFF. Leap years are
automatically provided.
Enter the correct time, which is written as hour:minute:second
(HH:MM:SS) using the UP/DOWN/RIGHT-keys and press the
ENT-key. When pressing the ENT-key, the clock will start.
The setting is completed.
Press the ENT-key to return to the ‘DATE=92/06/30’ display; or
press the ESC-key to go to the ‘SET=CLOCK’ display; or press
the MENU-key for three seconds to return to the Operation mode.
7 - 14 IM 4H3B1-01E
Page 68

7.6 How to Copy Channel Settings to Another Channel
7.6 How to Copy Channel Settings to Another Channel
It is possible to copy settings from one channel to another. If executed, all settings
concerning range, alarm, unit, zone recording, partial expanded recording, periodic
printout and tag will be copied. For the settings concerning zone recording, partial
expanded recording, periodic printout and tag, see 8.1, 8.2. These settings will then all
be copied; it is therefore impossible to copy e.g. alarm-settings only.
The exact contents of these settings will be copied to the specified channel.
Data entry will be ignored for the 1 pen model. To copy, proceed as follows:
MENU:
TO CH
4
Press the MENU-key for three seconds to enter the SET mode.
Select the ‘SET=COPY’ display by using the UP/DOWN-keys.
Then press the ENT-key.
PRINT
ESC
MENU
3sec
ALARM
ACK
RANGE
ALARM
UNIT
CHART
CLOCK
COPY
AUX
FROM CH
1
SETTING PROCEDURE:
SET=COPY
PRINT
PRINT
ESC
MENU
ALARM
ACK
ALARM
ACK
3sec
COPY FROM 01TO
COPY FROM 01 TO 04
SET OK
**
Enter the channel number from which you want to copy using the
UP/DOWN-keys. Note that you can only copy from a lower
channel number to a higher channel number.
Then press the ENT-key.
Then enter the channel number to which you want to copy using
the UP/DOWN- keys. Then press the ENT-key.
The setting is completed.
Press the ENT-key to return to the ‘COPY FROM TO ’
–
–
display; or press the ESC-key to go to the ‘SET=COPY’ display;
or press the MENU-key for three seconds to return to the
Operation mode.
7. BASIC SETTINGS
IM 4H3B1-01E
7 - 15
Page 69

7.7 How to Set the Remote RJC (For /N5 Model)
When measuring a temperature by thermocouple (TC) and the object of measurement is
located at a big distance, it is possible to measure the temperature without using a lot of
expensive TC wires by establishing a relay terminal near the measurement object.
The relay terminal and object of measurement are connected by TC. The relay terminal
and input terminal of the main unit are connected by a compensating copper wire.
One other input terminal of the main unit is connected with the relay terminal by TC
and by couducting standard setting compensation of the to be measured temperature,
which is done by measuring the temperature of the relay terminal, the temperature of the
measurement object can be calculated. (Refer to the figure below.)
main unit relay terminal (to be prepared by customer)
TC*
compensating
copper wire
input terminal
* Please use the same type of TC
compensating
coppwer wire
NOTES The input mode of the reference channel should be same as the used TC.
The range of each measuring channel will become same as the range of the reference
channel.
The limits of the span of the measuring channel are the same as for the usual TC input
(refer to page 7-4).
Scaling is not possible.
In case you change the range or input mode of the reference channel, the input mode of
the measurement channel being TC will not change, while the span becomes the upper/
lower value of the newly set range.
A
B
B
B
B
TC*
TC*
reference channel
measurement channels
7 - 16 IM 4H3B1-01E
Page 70

PRINT
ESC
MENU
ALARM
ACK
3 sec
MENU
ALARM
UNIT
CHART
CLOCK
COPY
AUX
1
2
3
4
SKIP
VOLT
TC
RTD
DI
DELT
SCL
SQRT
OPT
SETTING PROCEDURE:
SET=RANGE
Press the MENU-key for three seconds to enter the SET mode.
Select the ‘SET=RANGE’ display by using the UP/DOWN-keys.
Then press the ENT-key.
RRJC
MATH
7.7 How to Set the Remote RJC (For /N5 Model)
1
SPAN-LRANGE
SPAN-R
2
3
0.0 800.0
4
PRINT
PRINT
PRINT
PRINT
PRINT
FEED
PRINT
FEED
ALARM
ACK
ALARM
ACK
ALARM
ACK
ALARM
ACK
ALARM
ACK
ALARM
ACK
2:MODE=TC
2:MODE=OPT
2:OPTION MODE=
RRJC
2:RJC CH=1
2:LEFT= 0.0
2:RIGHT= 800.0
Use the UP/DOWN-keys to select the desired measuring channel.
Press the ENT-key.
Use the UP/DOWN-keys to select ‘OPT’.
Press the ENT-key.
Use the UP/DOWN-keys to select ‘RRJC’.
Press the ENT-key.
Use the UP/DOWN-keys to select the reference channel.
Press the ENT-key.
Note that the number of the reference channel must be lower than
that of the measuring channel. If not, an error will occur.
Select the minimum value of the recording span (SPAN L) using
the UP/DOWN and RIGHT-keys. Then press the ENT-key.
The display which appears will allow you to enter the maximum
value of the recording span (SPAN R). Select it the same way as
for the minimum value and press the ENT-key.
Note that the recording span cannot be beyond the input range, nor
can SPAN L be equal SPAN R.
7. BASIC SETTINGS
IM 4H3B1-01E
ESC
MENU
3 sec
SET OK
**
The setting completed.
Press the ENT-key to return to the ‘2:MODE=TC’ display for
other channel using the remote RJC; or press the ESC-key to go to
the ‘SET=RANGE’ display; or press the MENU-key for three
seconds to return to the Operation mode.
7 - 17
Page 71

8.1 Settings for Analog Recording
Chapter 8 AUXILIARY SETTINGS (AUX)
This chapter describes auxiliary settings, which are normally kept at their initial values
but, in order to use the many functions of the µR1800, might be changed. They are
grouped into
8.1 Settings for analog recording
8.2 Settings for digital printing
8.3 How to set the chart speed used when change-on-alarm or remote control is
selected.
8.1 Settings for Analog Recording
This paragraph describes:
8.1.1 How to adjust the trend recording format
8.1.2 How to set zone recording
8.1.3 How to set partial expanded recording.
Trend recording can be done depending on a fixed interval or an interval which depends
on the chart speed.
Zone recording enables you to define different bands (zones) for each channel, so the
recording traces will not overlap.
Partial expanded recording enables you to compress a part of the recording range, in
order to examine the other part of the range in more detail.
Initial values are:
TREND AUTO
ZONE 0 to 180mm
PART OFF
8. AUXILIARY SETTINGS (AUX)
IM 4H3B1-01E
8 - 1
Page 72

8.1.1 How to Adjust the Trend Recording Format
The µR1800 prints in FIX or AUTO mode.
In FIX mode, dot printing is performed with a constant interval regardless of the chart
speed (approx. 10s for 6 dot, 15s for 12 dot, 20s for 18 dot and 30s for 24 dot model).
AUTO mode is provided to prevent the chart from being damaged during repetitive dot
printing. This mode is useful for low chart speeds. The chart is protected from damage
because the printout timing changes with the chart speed (approx. 10 to 90 sec).
Single printout
(0.5mm dia.)
Repetitive dot
printing
FIX AUTO
The initial value is ‘AUTO’. To set the trend recording mode, proceed as follows:
MENU:
RANGE
ALARM
UNIT
CHART
CLOCK
COPY
AUX
TREND
ZONE
PART
PRINT
TAG
MSG
CHART 2
TREND PRINT
AUTO
PRINT
PRINT
PRINT
ESC
MENU
ALARM
ACK
ESC
MENU
ALARM
ACK
ALARM
ACK
3 sec
3 sec
SETTING PROCEDURE:
SET=AUX
Press the MENU-key for three seconds to enter the SET mode.
Select the ‘SET=AUX’ display using the UP/DOWN-keys, and
press the ENT-key.
MODE=TREND
Select the ‘MODE=TREND’ display using the UP/DOWN-keys.
Then press the ENT-key.
TREND PRINT=AUTO
Specify AUTO or FIX using the UP/DOWN-keys. Then press the
ENT-key.
SET OK
**
The setting is completed. Press the ENT-key to return to the
‘TREND PRINT=...’ display, or press the ESC-key to go to the
‘SET=AUX’ display; or press the MENU-key for three seconds to
return to the Operation mode.
8 - 2 IM 4H3B1-01E
Page 73

8.1.2 How to Set Zone Recording
Zone recording enables you to define different bands (zones) for each channel, so the
recording traces will not overlap during analog recording.
The initial value is ‘0 to 180mm’.
To set the zones, proceed as follows:
MENU:
PRINT
PRINT
ESC
MENU
ALARM
ACK
3sec
ALARM
ACK
RANGE
ALARM
UNIT
CHART
CLOCK
COPY
AUX
SETTING PROCEDURE:
MODE=ZONE
TREND
ZONE
PART
PRINT
TAG
MSG
CHART 2
SET=AUX
8.1 Settings for Analog Recording
01
02
03
ZONE LEFT
30 m m
ZONE RIGHT
50 m m
24
Press the MENU-key for three seconds to enter the SET mode.
Select the ‘SET=AUX’ display using the UP/DOWN-keys, and
press the ENT-key.
Select the ‘MODE=ZONE’ display using the UP/DOWN-keys.
Then press the ENT-key.
PRINT
PRINT
PRINT
ALARM
ACK
ALARM
ACK
ALARM
ACK
ESC
MENU
FEED
FEED
3sec
02 :ZONE LEFT= mm
Select the desired channel using the UP/DOWN-keys, and press
the ENT-key.
02:ZONE LEFT= mm
30
Then specify the left boundary value using the UP/DOWN and the
RIGHT-keys. On the chart paper this left boundary value will
correspond with the left span value. (For example, if your channel
2 has a recording span of –2V to 2V, and you specify the zone to
start from 30mm, then the recording at 30mm will correspond with
the value of –2V.) Then press the ENT-key.
Note that the minimum width of a zone is 5mm. The left boundary
must be less than the right boundary.
02:ZONE RIGHT=
50
Then specify the right boundary value using the UP/DOWN and
mm
the RIGHT-keys, and press the ENT-key.
Note that scales will only be printed for 40mm and bigger zones.
SET OK
**
The setting is completed. Press the ENT-key to return to the
‘02:ZONE LEFT=...mm’ display, or press the ESC-key to go to
the ‘SET=AUX’ display; or press the MENU-key for three
seconds to return to the Operation mode.
EXPLANATION:
The next figure shows the recording after zone recording has been set (example).
8. AUXILIARY SETTINGS (AUX)
IM 4H3B1-01E
Zone 1 Zone 2 Zone 3
Figure 8.1 Zone Recording Example
8 - 3
Page 74

8.1.3 How to set Partial Expanded Recording
Partial expanded recording enables you to compress a part of the recording span, in
order to examine the expanded (other) part of the range in more detail. The initial value
is ‘OFF’. To set partial expanded recording, proceed as follows:
MENU:
PRINT
PRINT
ESC
MENU
ALARM
ACK
3sec
ALARM
ACK
RANGE
ALARM
UNIT
CHART
CLOCK
COPY
AUX
TREND
ZONE
PART
PRINT
TAG
MSG
CHART 2
SETTING PROCEDURE:
SET=AUX
Press the MENU-key for three seconds to enter the SET mode.
Select the ‘SET=AUX’ display using the UP/DOWN-keys, and
press the ENT-key.
MODE=PART
Select the ‘MODE=PART’ display using the UP/DOWN-keys.
Then press the ENT-key.
partial expanded recording
01
02
ON
03
24
expand from
25 %
boundary value
0.000
PRINT
PRINT
PRINT
PRINT
ALARM
ACK
ALARM
ACK
01:PARTIAL=
01:PARTIAL=ON
Select the desired channel using the UP/DOWN-keys, and press
the ENT-key.
Select ON (or OFF in case you had set partial expanded recording
before and want to stop it now) using the UP/DOWN-keys. Then
press the ENT-key.
In the case you selected OFF, the setting is completed.
ALARM
ACK
01:EXPAND FROM= 25 %
Specify the percentage (1 to 99%) of the full recording span which
has to be compressed, using the UP/DOWN-keys. Press the ENT-
key.
ALARM
ACK
FEED
01:BOUNDARY=0.000
The display which appears prompts you to set the boundary value.
The boundary value corresponds to the previous set compressed
part. See also figure 8.3. Set this value by using the UP/DOWN
and the RIGHT-keys. Note that this boundary value must be
within the recording span. (If scaling is ON, this value must be
within the scaling range.) Then press the ENT-key.
ESC
MENU
3sec
SET OK
**
The setting is completed. Press the ENT-key to return to the
‘01:PARTIAL=...’ display, or press the ESC-key to go to the
‘SET=AUX’ display; or press the MENU-key for three seconds to
return to the Operation mode.
NOTE Partial Expanded settings are automatically canceled, when any of the following
changes occur:
• the input type (VOLT, TC, etc.) or input range (2V, etc.) is changed.
• decimal point for linear scaling and square root is changed.
•minimum or maximum value of the recording span is changed (in case of linear
scaling and square root).
•minimum or maximum value of the scale is changed (in case of linear scaling and
square root).
• the reference channel is changed.
• the input type or range of the reference channel is changed.
8 - 4 IM 4H3B1-01E
Page 75

8.1 Settings for Analog Recording
EXPLANATION:
The next figures show the recordings before and after the above settings have been
completed:
–6 –5 –4 –3 –2 –1 0 1 2 3 4 5
0
A
D
t
E
F
Recording
chart width
050100
(180mm)
Figure 8.2 Normal Recording Example
–6 –5 –4 –3 –2 –1
0 12345
A’
D’
C’
t
6 (V)
Measured value
B
C
% of full span
6 (V)
Measured value
B’
E’
F’
025 100
Recording
chart width
(180mm)
% of full span
Figure 8.3 Partial Recording Example
As can be seen from these figures, the left side of the boundary (D’) shows on 25% of
the chart the data in the range –6V to 0V. On the right side of the boundary you can see
the range 0V to 6V on 75% of the chart. Thus the scales differ on the left and right sides
of the boundary.
8. AUXILIARY SETTINGS (AUX)
IM 4H3B1-01E
8 - 5
Page 76

8.2 Settings for Digital Printing
This paragraph describes how to select the periodic printout ON/OFF, how to set a tag
and how to set a message.
Initial values are:
PRINT ON
TAG all spaces
MSG all spaces
8.2.1 How to Select the Periodic Printout ON/OFF
The printing of channel No., tag and the measured values in the periodic printout can be
selected ON/OFF per channel. However, the periodic printout of date, time, chart speed
and, for the pen model, pen color and POC ON mark ( ) cannot be OFF. The initial
value is ‘ON’.
Figure 8.4a Periodic Printout for the Pen Model
Figure 8.4b Periodic Printout for the Dot Model
8 - 6 IM 4H3B1-01E
Page 77

8.2 Settings for Digital Printing
To select this periodic printout ON or OFF, proceed as follows:
MENU:
RANGE
ALARM
UNIT
CHART
CLOCK
COPY
AUX
ZONE
PART
PRINT
TAG
MSG
CHART 2
01
Periodic Printout
02
ON
03
04
PRINT
SETTING PROCEDURE:
PRINT
PRINT
PRINT
ESC
MENU
ALARM
ACK
3sec
ALARM
ACK
ALARM
ACK
ALARM
ACK
SET=AUX
MODE=PRINT
01:DIGITAL PRINT=
01:DIGITAL PRINT=ON
Press the MENU-key for three seconds to enter the SET mode.
Select the ‘SET=AUX’ display using the UP/DOWN-keys, and
press the ENT-key.
Select the ‘MODE=PRINT’ display using the UP/DOWN-keys.
Then press the ENT-key.
Select the desired channel using the UP/DOWN-keys, and press
the ENT-key.
Select ON (or OFF in case you had set this periodic printout before
and want to stop it now) using the UP/DOWN-keys. Then press
the ENT-key.
ESC
MENU
3sec
SET OK
**
The setting is completed. Press the ENT-key to return to the
‘01:DIGITAL PRINT=...’ display, or press the ESC-key to go to
the ‘SET=AUX’ display; or press the MENU-key for three
seconds to return to the Operation mode.
NOTE If set, this printout appears on the chart with a certain regularity. To change the interval
between two printouts, see 9.4.6.
8. AUXILIARY SETTINGS (AUX)
IM 4H3B1-01E
8 - 7
Page 78

8.2.2 How to Set a Tag
The following setting enables you to set tags to be recorded instead of the usual channel
numbers. Tags will appear on the display, in the periodic printout, manual printout and
in the alarm printout. One tag can be set for every channel. The maximum length is
seven characters.
To set a tag, proceed as follows:
MENU:
RANGE
ALARM
UNIT
CHART
CLOCK
COPY
AUX
SETTING PROCEDURE:
ESC
MENU
3sec
ALARM
PRINT
ACK
ALARM
PRINT
ACK
ZONE
PART
PRINT
TAG
MSG
CHART 2
SET=AUX
MODE=TAG
01
TAG
02
TAG 1
03
04
Press the MENU-key for three seconds to enter the SET mode.
Select the ‘SET=AUX’ display using the UP/DOWN-keys, and
press the ENT-key.
Select the ‘MODE=TAG’ display using the UP/DOWN-keys.
Then press the ENT-key.
PRINT
PRINT
Select the desired channel using the UP/DOWN-keys, and press
the ENT-key.
Enter the desired characters using the UP/DOWN and the RIGHTkeys. Then press the ENT-key. Refer to table 8.1.
The setting is completed. Press the ENT-key to return to the
‘01:TAG=...’ display, or press the ESC-key to go to the
ALARM
ACK
MENU
ESC
ALARM
ACK
FEED
3sec
:TAG=
01
01:TAG=
TAG 1
SET OK
**
‘SET=AUX’ display; or press the MENU-key for three seconds to
return to the Operation mode.
NOTE It is also necessary to set the CH/TAG-setting in the SET UP Mode to get this tag
display and printout. See 9.4.1.
Table 8.1 Characters
-key
-key
ABCDEFGHI J
KLMNOPQRST
UVWXYZ
ef ghi j
abcd
kl mn
opqr st
yz
8
.°µ
01 2 3 4
#%
9
Ω
()
Ω
uvwx
567
+–
/
*
8 - 8 IM 4H3B1-01E
Page 79

8.2.3 How to Set Messages
-key
-key
ABCDEFGHI J
KLMNOPQRST
UVWXYZ
abcd
ef ghi j
kl mn
opqr st
uvwx
yz
01 2 3 4
567
8
9
#%
()
+–
*
/
.°µ
Ω
Ω
The following setting enables you to set the messages. Up to five messages can be set,
each of up to 16 characters. Messages can be printed onto the chart using the keyboard,
or by remote control which is optional. Note that the printing of the messages will not
be done when the chart speed is faster than 1500 mm/h (pen model) or 100 mm/h (dot
model) or when recording is OFF.
To set a message, proceed as follows:
MENU:
RANGE
ALARM
UNIT
CHART
CLOCK
COPY
AUX
ZONE
PART
PRINT
TAG
MSG
CHART 2
Message Number
MSG 1
8.2 Settings for Digital Printing
message
µR1800 pen model
PRINT
PRINT
SETTING PROCEDURE:
PRINT
PRINT
ESC
MENU
ALARM
ACK
ALARM
ACK
3sec
ALARM
ACK
ALARM
ACK
FEED
SET=AUX
MODE=MSG
MESSAGE No.=MSG 1
M1=
µR 1800 pen model
Press the MENU-key for three seconds to enter the SET mode.
Select the ‘SET=AUX’ display using the UP/DOWN-keys, and
press the ENT-key.
Select the ‘MODE=MSG’ display using the UP/DOWN-keys.
Then press the ENT-key.
Specify which message you want to set using the UP/DOWN-
keys. Up to five messages can be set. Then press the ENT-key.
Enter the desired characters (up to 16) using the UP/DOWN and
the RIGHT-keys. Then press the ENT-key.
See table 8.2 for the characters which can be used.
ESC
MENU
3sec
SET OK
**
The setting is completed. Press the ENT-key to return to the
‘MESSAGE No.=...’ display, or press the ESC-key to go to the
‘SET=AUX’ display; or press the MENU-key for three seconds to
return to the Operation mode.
NOTE If your µR1800 is equipped with the /R1 option, and you want them to be triggered by
remote control, the messages must be assigned to the /R1 terminals. See 9.8.
8. AUXILIARY SETTINGS (AUX)
Table 8.2 Characters
IM 4H3B1-01E
8 - 9
Page 80

8.3
How to Set the Chart Speed Used When Change-on-alarm or Remote Control is Selected
The following describes the way to use a second chart speed which is activated by
remote control or by the occurence of alarms. This function enables you to record data
in more detail following a remote control trigger or following the occurence of an
alarm. However, to use this second chart speed, it is necessary that your µR1800 is at
least equipped with the /R1 option. To be able to use the change-on-alarm function, it is
necessary to have alarm output relays installed as well (option /A1, 2 or 3). If your
µR1800 is not equipped with the /R1 option, data entry will be ignored.
This second chart speed will stay in effect until the remote control status changes back
again, or until the alarm turns OFF. The initial value is 25 mm/h.
To set this chart speed, proceed as follows:
MENU:
RANGE
ALARM
UNIT
CHART
CLOCK
COPY
AUX
ZONE
PART
PRINT
TAG
MSG
CHART 2
2nd SPEED
1500
SETTING PROCEDURE:
Press the MENU-key for three seconds to enter the SET mode.
Select the ‘SET=AUX’ display using the UP/DOWN-keys, and
press the ENT-key.
Select the ‘MODE=CHART2’ display using the UP/DOWN-
keys. Then press the ENT-key.
PRINT
PRINT
ESC
MENU
ALARM
ACK
3sec
ALARM
ACK
SET=AUX
MODE=CHART 2
PRINT
ALARM
ACK
2nd SPEED=
1500
In case of the pen model, select the desired chart speed using the
mm/h
UP/DOWN-keys. You can select any of the below shown chart
speeds. Then press the ENT-key.
In case of the dot model, set the desired chart speed using the UP/
DOWN and RIGHT-keys, and press the ENT-key.
Table 8.3 Chart Speeds in mm/h (pen model)
5
6
8
9
10
12
15
16
18
24
25
30
32
36
40
45
48
50
60
64
72
75
80
90
96
100
120
135
150
160
180
200
225
240
250
270
320
360
375
400
450
480
500
540
600
720
750
800
900
960
1000
1080
1200
1350
1500
1600
1800
2000
2160
2250
2400
2700
2880
3600
4000
4320
4500
4800
5400
6000
7200
8000
10800
12000
Note that the interval between digital printouts will change
according to the new chart speed. Therefore check in table 8.4 that
all the printouts will be printed as expected.
Table 8.4 Chart Speeds for which Printouts will not be performed
Alarm Printout/Recording Start/
Model
pen
6/12 dot model
18/24 dot model
Periodic Printout
5 to 9 mm/h
1 to 9 mm/h, 101 to1500 mm/h
1 to 9 mm/h, 51 to1500 mm/h
Message Printout/Chart Speed Change/
Channel/Tag (dot model only)
1600 to 12000 mm/h
100 to 1500 mm/h
51 to1500 mm/h
20
54
125
300
675
1440
3000
9000
ESC
MENU
3sec
SET OK
**
The setting is completed. Press the ENT-key to return to the
‘2nd_SPEED=...mm/h’ display, or press the ESC-key to go to
the ‘SET=AUX’ display; or press the MENU-key for three
seconds to return to the Operation mode.
8 - 10 IM 4H3B1-01E
Page 81

9.1 How to Change Initial Settings for the Alarm Function
Chapter 9 CHANGING INITIAL SETTINGS
Chapter9 CHANGING INITIAL SETTINGS
This chapter describes how to change initial settings. These settings are entered during
the manufacturing of the recorder and seldom need to be changed.
See 6.3.3 for flow chart.
Note that while you are changing any of the following settings, recording cannot be
performed and alarms will not be detected.
They are grouped into
9.1 How to change initial settings for the alarm function
9.2 How to change initial settings for the input
9.3 How to change initial settings for analog recording
9.4 How to change initial settings for digital printouts
9.5 How to select the type of bargraph
9.6 How to change the temperature unit
9.7 How to initialize settings
9.8 How to change initial settings for the REMOTE option
9.9 How to select to trigger the recording to start/stop
9.10 How to change key-lock settings
9.1 How to Change Initial Settings for the Alarm Function
CAUTION
This paragraph describes how to change initial settings for the alarm function.
9.1.1 How to select the reflash function ON/OFF (initial value = ‘OFF’)
9.1.2 How to select the output relay to be of AND/OR type (initial value = ‘NONE’)
9.1.3 How to select the output relay to be energizing/de-energizing on alarm (initial
value = ‘ENERG’)
9.1.4 How to select the alarm output relay to be of HOLD/NON-HOLD type (initial
value = ‘NONHOLD’)
9.1.5 How to select the alarm indicator to be of HOLD/NON-HOLD type (initial
value = ‘NONHOLD’)
9.1.6 How to set the sampling interval for rate-of-change alarms (initial value = ‘01’)
9.1.7 How to select alarm hysteresis ON/OFF (initial value = ‘ON’)
When exiting SETUP MODE using “SETUP=END” and “STORE” statement.
Do-not turn the power OFF until the Recorder has returned to the OPERATION
MODE. Calibration data might be affected.
9. CHANGING INITIAL SETTINGS
IM 4H3B1-01E
9 - 1
Page 82

9.1.1 How to Select the Reflash Function ON/OFF
Reflash is a function to indicate repeating alarm occurrences among a group of alarms
sharing the same output relay. When the optional alarm output relays are not installed,
data entry will be ignored. Note that only I01 to I03 (which should be assigned in the
alarm setting also) can be used for the reflash function.
The initial value is ‘OFF’.
Channel 1
(level 1)
Alarm status
Channel 2
(level 2)
Channel 3
(level 3)
(Suppose 01 is assigned)I
(Suppose 01 is assigned)I
(Suppose 01 is assigned)I
Relay status
(REFLASH=ON)
Relay status
(REFLASH=OFF)
Figure 9.1
Output relay
(option)
Output relay
(option)
Approx.
500ms
Approx.
500ms
( 01 output)I
( 01 output)I
SETTING PROCEDURE:
Enter the SET UP Mode by turning ‘ON’ the power while pressing and holding the
ENT-key until the SET UP display appears.
Use the UP/DOWN-keys to select the display ‘SETUP=ALARM’. Press the ENT-key.
The display ‘REFLASH=...’ will appear. Select ON or OFF. Press the ENT-key.
The reflash setting has been completed, but has not been stored yet. Before you can
adjust other settings in the SET UP Mode, you have to finish the alarm settings until the
‘*ALARM SET*’ display appears.
Before leaving the SET UP Mode, you have to store your new settings. Proceed with the
alarm settings until the display ‘*ALARM SET*’ appears. Press the ESC-key to return
to the ‘SETUP=ALARM’ display and then select the ‘SETUP=END’ display.
Press the ENT-key. Select ‘END=STORE’ to keep your new settings or
‘END=ABORT’ and press the ENT-key. After a few seconds, the Operation Mode will
appear.
NOTE When I01 to I03 are used for the reflash function, they cannot be used for the AND
function, see 9.1.2.
I01 to I03 will be exclusively used for the reflash function, regardless of the number of
alarm output relays.
9 - 2 IM 4H3B1-01E
Page 83

9.1 How to Change Initial Settings for the Alarm Function
9.1.2 How to Select the Output Relay to be of AND/OR Type
The (optional) output relays can be specified to be AND or OR type, which is necessary
when a group of alarms shares the same output relay. The initial value is ‘NONE’,
which means that all relays are OR output. When the optional alarm output relays are
not installed, data entry will be ignored. Note than when you set I01 to I03 to reflash,
only I04 to I24 can be specified for AND/OR.
Channel 1
Alarm status
Relay status
Figure 9.2
SETTING PROCEDURE:
Enter the SET UP Mode by turning ‘ON’ the power while pressing and holding the
ENT-key until the SET UP display appears.
(level 1)
Channel 2
(level 2)
AND
OR
Use the UP/DOWN-keys to select the display ‘SETUP=ALARM’. Press the ENT-key.
Press the ENT-key until the display ‘AND=...’ appears. Select which relays must be of
AND type. Depending on your options, you can specify up to 24 relays (I01 to I24).
Relays which are not selected will be of OR type. ‘NONE’ means that all relays are OR
output. After selection, press the ENT-key. Note that I01 will always be displayed at the
left side of the display.
The AND/OR setting has been completed, but has not been stored yet. Before you can
adjust other settings in the SET UP Mode, you have to finish the alarm settings until the
‘*ALARM SET*’ display appears.
Before leaving the SET UP Mode, you have to store your new settings. Proceed with the
alarm settings until the display ‘*ALARM SET*’ appears. Press the ESC-key to return
to the ‘SETUP=ALARM’ display and then select the ‘SETUP=END’ display.
Press the ENT-key. Select ‘END=STORE’ to keep your new settings or
‘END=ABORT’ and press the ENT-key. After a few seconds, the Operation Mode will
appear.
9. CHANGING INITIAL SETTINGS
IM 4H3B1-01E
9 - 3
Page 84

9.1.3 How to Select the Output Relay to be Energizing/De-energizing on Alarm
The alarm output relays can be selected to be energizing or de-energizing on alarm.
Using de-energizing, alarm output relay is activated either when an alarm occurs, or
when power off occurs (common for all relays). This enables simple monitoring of
power supply.
The initial value is ‘ENERG’.
Energize
De-energize
Figure 9.3
NO C NC NO C NC
NO C NC NO C NC NO C NC
Power OFF
Alarm OFF
NO C NC
Alarm ON
SETTING PROCEDURE:
Enter the SET UP Mode by turning ‘ON’ the power while pressing and holding the
ENT-key until the SET UP display appears.
Use the UP/DOWN-keys to select the display ‘SETUP=ALARM’. Press the ENT-key.
Press the ENT-key until the display ‘ALARM=ENERG’ appears. Select energize
(ENERG) or de-energize (DE_EN). After selection, press the ENT-key.
The energize/de-energize setting has been completed, but has not been stored yet.
Before you can adjust other settings in the SET UP Mode, you have to finish the alarm
settings until the ‘*ALARM SET*’ display appears.
Before leaving the SET UP Mode, you have to store your new settings. Proceed with the
alarm settings until the display ‘*ALARM SET*’ appears. Press the ESC-key to return
to the ‘SETUP=ALARM’ display and then select the ‘SETUP=END’ display.
Press the ENT-key. Select ‘END=STORE’ to keep your new settings or
‘END=ABORT’ and press the ENT-key. After a few seconds, the Operation Mode will
appear.
9 - 4 IM 4H3B1-01E
Page 85

9.1 How to Change Initial Settings for the Alarm Function
9.1.4 How to Select the Alarm Output Relay to be of HOLD/NON-HOLD Type
You can select whether or not to hold alarm output relays until reset.
The initial value is ‘NON-HOLD’, and common for all relays.
NON-HOLD:
Output relay turns ON and OFF together with alarm.
Alarm ON
Alarm OFF
Relay set
Relay reset
HOLD:
Once turned ON, the alarm output relay remains ON even if the alarm turns OFF.
The relay is turned OFF by pressing the ACK-key.
Alarm ON
Alarm OFF
Press ACK-key
Relay set
Relay reset
SETTING PROCEDURE:
Enter the SET UP Mode by turning ‘ON’ the power while pressing and holding the
ENT-key until the SET UP display appears.
Use the UP/DOWN-keys to select the display ‘SETUP=ALARM’. Press the ENT-key.
Press the ENT-key until the display ‘RLY=NONHOLD’ appears. Select HOLD or
NONHOLD. After selection, press the ENT-key.
The relay HOLD/NONHOLD setting has been completed, but has not been stored yet.
Before you can adjust other settings in the SET UP Mode, you have to finish the alarm
settings until the ‘*ALARM SET*’ display appears.
Before leaving the SET UP Mode, you have to store your new settings. Proceed with the
alarm settings until the display ‘*ALARM SET*’ appears. Press the ESC-key to return
to the ‘SETUP=ALARM’ display and then select the ‘SETUP=END’ display.
Press the ENT-key. Select ‘END=STORE’ to keep your new settings or
‘END=ABORT’ and press the ENT-key. After a few seconds, the Operation Mode will
appear.
9. CHANGING INITIAL SETTINGS
IM 4H3B1-01E
9 - 5
Page 86

9.1.5 How to Select the Alarm Indicator to be of HOLD/NON-HOLD Type
You can select whether or not to hold the indicator until reset.
The initial value is ‘NON-HOLD’, and common for all alarms.
NON-HOLD:
Indicator turns ON and OFF together with alarm.
Alarm ON
Alarm OFF
Ind. ON
Ind. OFF
HOLD:
Once flashing, the indicator remains flashing even if the alarm turns OFF. The indicator
shows the current alarm status by pressing the ACK-key (in alarm = ON, alarm
recovered = OFF).
Press ACK-key
Alarm ON
Alarm OFF
Press ACK-key
Ind. flash
Ind. ON
Ind. OFF
SETTING PROCEDURE:
Enter the SET UP Mode by turning ‘ON’ the power while pressing and holding the
ENT-key until the SET UP display appears.
Use the UP/DOWN-keys to select the display ‘SETUP=ALARM’. Press the ENT-key.
Press the ENT-key until the display ‘IND=NONHOLD’ appears. Select HOLD or
NONHOLD. After selection, press the ENT-key.
The indicator HOLD/NONHOLD setting has been completed, but has not been stored
yet. Before you can adjust other settings in the SET UP Mode, you have to finish the
alarm settings until the ‘*ALARM SET*’ display appears.
Before leaving the SET UP Mode, you have to store your new settings. Proceed with the
alarm settings until the display ‘*ALARM SET*’ appears. Press the ESC-key to return
to the ‘SETUP=ALARM’ display and then select the ‘SETUP=END’ display.
Press the ENT-key. Select ‘END=STORE’ to keep your new settings or
‘END=ABORT’ and press the ENT-key. After a few seconds, the Operation Mode will
appear.
9 - 6 IM 4H3B1-01E
Page 87

9.1 How to Change Initial Settings for the Alarm Function
Measured
value
R alarm
T
Time
Sampling interval
1
T
2
t
1
t
2
Variation
T –T
21
Measured
value
r alarm
T
Time
Sampling interval
2
T
1
t
1
t
2
Variation
T –T
21
9.1.6 How to Set the Sampling Interval for Rate-of-change Alarms
You can change the sampling interval for rate-of-change alarms by the following setting
(common for all alarms).
The initial value is ‘01’ sample (the actual time depends on the model and A/D
frequency; see also table 9.1 on page 9-9).
Figure 9.4
If you want to change the sampling interval for rate-of-change on increasing signal:
SETTING PROCEDURE:
Enter the SET UP Mode by turning ‘ON’ the power while pressing and holding the
ENT-key until the SET UP display appears.
Use the UP/DOWN-keys to select the display ‘SETUP=ALARM’. Press the ENT-key.
Press the ENT-key until the display ‘R_TIME=1’ appears. Select the sampling interval
(min. is 1 sample interval, max. is 15 sample interval). After selection, press the ENTkey.
The setting has been completed, but has not been stored yet.
Before leaving the SET UP Mode, you have to store your new settings. Proceed with the
alarm settings until the display ‘*ALARM SET*’ appears. Press the ESC-key to return
to the ‘SETUP=ALARM’ display and then select the ‘SETUP=END’ display.
Press the ENT-key. Select ‘END=STORE’ to keep your new settings or
‘END=ABORT’ and press the ENT-key. After a few seconds, the Operation Mode will
appear.
If you want to change the sampling interval for rate-of-change on decreasing signal:
SETTING PROCEDURE:
Enter the SET UP Mode by turning ‘ON’ the power while pressing and holding the
ENT-key until the SET UP display appears.
Use the UP/DOWN-keys to select the display ‘SETUP=ALARM’. Press the ENT-key.
Press the ENT-key until the display ‘r_TIME=1’ appears. Select the sampling interval
(min. is 1 sample interval, max. is 15 sample interval). After selection, press the ENTkey.
9. CHANGING INITIAL SETTINGS
IM 4H3B1-01E
The setting has been completed, but has not been stored yet.
Before leaving the SET UP Mode, you have to store your new settings. Proceed with the
alarm settings until the display ‘*ALARM SET*’ appears. Press the ESC-key to return
to the ‘SETUP=ALARM’ display and then select the ‘SETUP=END’ display.
Press the ENT-key. Select ‘END=STORE’ to keep your new settings or
‘END=ABORT’ and press the ENT-key. After a few seconds, the Operation Mode will
appear.
9 - 7
Page 88

9.1.7 How to Select Alarm Hysteresis ON/OFF
The alarm hysteresis is the difference between the levels of alarm occurence and reset.
You can choose between two levels of hysteresis: 0% (=OFF) and approx. 0.5% of the
recording span (=ON) (common for all alarms).
The inititial value is ‘ON’.
High Limit Alarm(H)
Alarm generated
Alarm setting value
1V
Measured value
Low Limit Alarm(L)
Measured value
1V
Alarm generated
Figure 9.5
Alarm release
Alarm release
- - Hysteresis (approx. 0.5%)
- - Hysteresis (approx. 0.5%)
Alarm setting value
SETTING PROCEDURE:
Enter the SET UP Mode by turning ‘ON’ the power while pressing and holding the
ENT-key until the SET UP display appears.
Use the UP/DOWN-keys to select the display ‘SETUP=ALARM’. Press the ENT-key.
Press the ENT-key until the display ‘ALM_HYS=ON’ appears. Select ON or OFF.
After selection, press the ENT-key. The display ‘*ALARM SET*’ will appear.
The alarm hysteresis setting has been completed, but has not been stored yet. You can
now adjust other settings in the SET UP Mode, by using the ESC-key.
Before leaving the SET UP Mode, you have to store your new settings. Press the ESCkey to return to the ‘SETUP=ALARM’ display and then select the ‘SETUP=END’
display.
Press the ENT-key. Select ‘END=STORE’ to keep your new settings or
‘END=ABORT’ and press the ENT-key. After a few seconds, the Operation Mode will
appear.
NOTE Hysteresis setting is only valid for High and Low alarms. Hysteresis setting for rate-of-
change alarms and difference alarms will be ignored.
9 - 8 IM 4H3B1-01E
Page 89

9.2 How to Change Initial Settings for the Input
9.2 How to Change Initial Settings for the Input
This paragraph describes how to change initial settings for the input.
9.2.1 How to set the A/D integration time (initial value = ‘AUTO’ for pen model, and
‘100 ms’ for dot model)
9.2.2 How to set upscale/downscale TC burnout (initial value = ‘UP’,‘OFF’)
9.2.3 How to set internal or external RJC (initial value = ‘INT’)
9.2.4 How to select the input filter (initial value = ‘OFF’) (pen model)
9.2.5 How to select a moving average (initial value = ‘OFF’) (dot model)
9.2.1 How to Set the A/D Integration Time
The purpose of the following setting is to specify which A/D integration time will be
used. Depending on the power supply, the integration time will affect the ability of
noise rejection and therefore the recording.
In case of the pen model
If the power supply of the recorder and of the measuring object are the same, the effect
of noise will be automatically minimized and the (initial) value of AUTO is the
recommended one.
If the power supplies are different, you should select from 50Hz or 60Hz integration
time. The choice depends on the power supply of the instrument with the highest noise
level.
There are three possibilities:
• AUTO: integration time depends on the power supply of the recorder. However, in
case of the /P1 model, the integration time is fixed to 50Hz.
• 50Hz
• 60Hz.
The initial value is ‘AUTO’.
In case of the dot model
The initial value is 100 ms, and this setting should only be changed when required
because of specific optional functions. For details, see the option manuals.
There are four possibilities:
• AUTO: integration time depends on the power supply of the recorder. However, in
case of the /P1 model, the integration time is fixed to 50Hz.
• 50Hz
• 60Hz
• 100 ms.
The initial value is ‘100 ms’.
SETTING PROCEDURE:
Enter the SET UP Mode by turning ‘ON’ the power while pressing and holding the
ENT-key until the SET UP display appears.
Use the UP/DOWN-keys to select the display ‘SETUP=INTG’. Press the ENT-key.
Select AUTO, 50Hz, 60Hz or 100ms according to your situation using the UP/DOWN-
keys.
Then press the ENT-key. The display ‘*INTG SET*’ will appear. Note that the
sampling time will differ according to this setting. See table 9.1.
The A/D integration time setting has been completed, but has not been stored yet.
You can now adjust other settings in the SET UP Mode, by using the ESC-key.
Before leaving the SET UP Mode, you have to store your new settings. Press the ESCkey to return to the ‘SETUP=INTG’ display and then select the ‘SETUP=END’
display.
Press the ENT-key. Select ‘END=STORE’ to keep your new settings or
‘END=ABORT’ and press the ENT-key. After a few seconds, the Operation Mode will
appear.
9. CHANGING INITIAL SETTINGS
IM 4H3B1-01E
Table 9.1 Sampling Time
A/D Frequency
pen model
6 dot model
12 dot model
18 dot model
24 dot model
—
2.5s
5s
10s
10s
50/60Hz100ms
125ms
2.5s
2.5s
2.5s
2.5s
9 - 9
Page 90

9.2.2 How to Set Upscale/Downscale TC Burnout
The purpose of the following setting is to specify where the pens will move in case of a
TC-burnout. You can choose from moving to the right (UP) or to the left (DOWN).
This is common for every channel. You can select ON or OFF for each channel.
The initial value is ‘UP’, and ‘OFF’ for every channel.
SETTING PROCEDURE:
Enter the SET UP Mode by turning ‘ON’ the power while pressing and holding the
ENT-key until the SET UP display appears.
Use the UP/DOWN-keys to select the display ‘SETUP=B.OUT’. Press the ENT-key.
Select UP or DOWN using the UP/DOWN-keys. Press the ENT-key.
This burnout processing is ON/OFF selectable per channel. Select the channel No. for
which you want to specify this burnout processing. Then press the ENT-key.
Select ON or OFF. Then press the ENT-key. The display ‘*B.OUT SET*’ will appear.
The burnout setting has been completed, but has not been stored yet. You can now
adjust other settings in the SET UP Mode, by pressing the ESC-key.
Before leaving the SET UP Mode, you have to store your new settings. Press the ESCkey to return to the ‘SETUP=B.OUT’ display and then select the ‘SETUP=END’
display.
Press the ENT-key. Select ‘END=STORE’ to keep your new settings or
‘END=ABORT’ and press the ENT-key. After a few seconds, the Operation Mode will
appear.
9 - 10 IM 4H3B1-01E
Page 91

9.2.3 How to Set Internal or External RJC
The purpose of the following setting is to select whether internal or external reference
junction compensation values are used.
In the case of INTernal, the reference junction compensation is based on the internal
RJC circuit.
In the case of EXTernal, the reference junction compensation is based on an external
voltage input.
The initial value is ‘INT’.
SETTING PROCEDURE:
Enter the SET UP Mode by turning ‘ON’ the power while pressing and holding the
ENT-key until the SET UP display appears.
Use the UP/DOWN-keys to select the display ‘SETUP=RJC’. Press the ENT-key.
Select the channel No. for which you want to specify this RJC setting. Then press the
ENT-key.
Select INT or EXT using the UP/DOWN-keys. Press the ENT-key.
If you selected INT:
The RJC setting has been completed, but has not been stored yet. The display
‘*RJC SET*’ will appear. You can now adjust other settings in the SET UP Mode, by
pressing the ESC-key.
9.2 How to Change Initial Settings for the Input
Before leaving the SET UP Mode, you have to store your new settings. Press the ESCkey to return to the ‘SETUP=RJC’ display and then select the ‘SETUP=END’
display.
Press the ENT-key. Select ‘END=STORE’ to keep your new settings or
‘END=ABORT’ and press the ENT-key. After a few seconds, the Operation Mode will
appear.
If you selected EXT:
Set the input voltage to use for reference junction using the UP/DOWN-keys (must be
within –20000µV to +20000µV range, initial value is 0µV). Then press the ENT-key.
The RJC setting has been completed, but has not been stored yet. The display
‘*RJC SET*’ will appear.You can now adjust other settings in the SET UP Mode, by
pressing the ESC-key.
Before leaving the SET UP Mode, you have to store your new settings. Press the ESCkey to return to the ‘SETUP=RJC’ display and then select the ‘SETUP=END’
display.
Press the ENT-key. Select ‘END=STORE’ to keep your new settings or
‘END=ABORT’ and press the ENT-key. After a few seconds, the Operation Mode will
appear.
9. CHANGING INITIAL SETTINGS
IM 4H3B1-01E
9 - 11
Page 92

9.2.4 How to Select the Input Filter (Pen Model)
Noise in the measured signal can be suppressed in the final measurement by using an
input filter. This is sometimes referred to as signal damping. The purpose of this setting
is to select for each channel whether or not to use a filter, and if so, to select a time
constant of damping.
A filter works as follows:
Filter OFF
meas.
values
Filter
ON
2, 5 or 10 sec.
If a filter is used, the response time can be selected from 2, 5 or 10 seconds.
You can choose from three filters:
•2 seconds
•5 seconds
• 10 seconds.
The initial value is ‘OFF’.
63.2%
SETTING PROCEDURE:
Enter the SET UP Mode by turning ‘ON’ the power while pressing and holding the
ENT-key until the SET UP display appears.
Use the UP/DOWN-keys to select the display ‘SETUP=FILTR’. Press the ENT-key.
Select the channel No. for which you want to specify a filter. Then press the ENT-key.
Select the type of filter you want to use. You can choose from no filter (OFF), 2
seconds, 5 seconds or 10 seconds. Press the ENT-key. The display ‘*FILTR SET*’ will
appear.
The filter setting has been completed, but has not been stored yet. Press the ENT-key to
continue the setting for other channels or the ESC-key to adjust other settings in the
SET UP Mode.
Before leaving the SET UP Mode, you have to store your new settings. Press the ESCkey to return to the ‘SETUP=FILTR’ display and then select the ‘SETUP=END’
display.
Press the ENT-key. Select ‘END=STORE’ to keep your new settings or
‘END=ABORT’ and press the ENT-key. After a few seconds, the Operation Mode will
appear.
9 - 12 IM 4H3B1-01E
Page 93

9.2.5 How to Select a Moving Average (Dot Model)
10.0mV
5.0mV
0.0mV
–5.0mV
–10.0mV erased
0.0mV
1
Average
15.0mV
10.0mV
5.0mV
0.0mV
–5.0mV
5.0mV
10.0mV
15.0mV
10.0mV
5.0mV
0.0mV
8.0mV
erased
new data new data
Buffer data for
nth sample
Buffer data for
(n+1)th sample
Buffer data for
(n+2)th sample
2
3
4
5
Noise in the measured signal can be suppressed in the final measurement by computing
a moving average. It is possible to record a moving average calculated over the previous
X samples, selectable from the previous 2 samples up to the previous 16 samples. The
purpose of the following setting is to select for each channel whether or not to compute
a moving average, and if so, over how many samples.
The initial value is ‘OFF’.
Example: (let us assume a moving average over 5 samples is selected)
9.2 How to Change Initial Settings for the Input
SETTING PROCEDURE:
Enter the SET UP Mode by turning ‘ON’ the power while pressing and holding the
ENT-key until the SET UP display appears.
Use the UP/DOWN-keys to select the display ‘SETUP=M_AVE’. Press the ENT-key.
Select the channel No. for which you want to compute a moving average. Then press
the ENT-key.
Select the number of samples. You can choose from 2 samples, 3 samples, ... up to 16
samples. Of course you can also select OFF. Press the ENT-key. The display
‘*M_AVE SET*’ will appear.
The moving average setting has been completed, but has not been stored yet. Press the
ENT-key to continue the setting for other channels or the ESC-key to adjust other
settings in the SET UP Mode.
Before leaving the SET UP Mode, you have to store your new settings. Press the ESCkey to return to the ‘SETUP=M_AVE’ display and then select the ‘SETUP=END’
display.
Press the ENT-key. Select ‘END=STORE’ to keep your new settings or
‘END=ABORT’ and press the ENT-key. After a few seconds, the Operation Mode will
appear.
9. CHANGING INITIAL SETTINGS
IM 4H3B1-01E
9 - 13
Page 94

9.3 How to Change Initial Settings for Analog Recording
This paragraph describes how to change initial settings for analog recording.
9.3.1 How to select pen offset compensation ON/OFF (initial value = ‘OFF’) (pen model)
9.3.2 How to assign different colors to channels (dot model)
Related settings concern the way to adjust the position of pens and printer carriage,
which is described in chapter 11 (see 11.3 and 11.4).
9.3.1 How to Select Pen Offset Compensation ON/OFF (Pen Model)
The POC function eliminates deviation (phase difference) between the pens on the time
axis. Figure 9.6 shows a side view of the recording status for the 2 pen model (3 & 4
pen models are similar).
The initial value is ‘OFF’.
Reference pen (2nd pen)
1st pen
Recording chart
Reference pen is
2nd pen for 2 pen model
3rd pen for 3 pen model
4th pen for 4 pen model
Figure 9.6 Side View of Recording Status
P
Chart feeding direction
Front of Recorder
Figure 9.6 shows that, in any pen recorder (in order to prevent collision between pens)
the pens must be offset by a distance p. Therefore, points recorded at the same time are
separated on the time axis.
In the case of Pen Offset Compensation, a delay memory is used to store measurement
data, equivalent to the time offset p of the pens (other than the reference pen).
The pens will start to record these stored data when the chart is fed by the amount of
p (time offset).
NOTE Immediately after the recording has been started, only the reference pen operates
normally. The other pens might not seem to operate correctly, but this is due to the time
offset.
When you stop the recording, the chart will stop and therefore data stored in the delay
memory will not be recorded anymore. Therefore, these data will be lost.
Pen Offset Compensation is meaningless for the 1 pen model. Therefore POC setting
will be ignored for the 1 pen model.
Note that an asterisk will be printed in the periodic printout when POC is ‘ON’.
SETTING PROCEDURE:
Enter the SET UP Mode by turning ‘ON’ the power while pressing and holding the
ENT-key until the SET UP display appears.
Use the UP/DOWN-keys to select the display ‘SETUP=POC’. Press the ENT-key.
Select ON or OFF. Then press the ENT-key. The display ‘*POC SET*’ will appear.
The POC setting has been completed, but has not been stored yet. You can now adjust
other settings in the SET UP Mode, by using the ESC-key.
Before leaving the SET UP Mode, you have to store your new settings. Press the ESCkey to return to the ‘SETUP=POC’ display and then select the ‘SETUP=END’
display.
Press the ENT-key. Select ‘END=STORE’ to keep your new settings or
‘END=ABORT’ and press the ENT-key. After a few seconds, the Operation Mode will
appear.
9 - 14 IM 4H3B1-01E
Page 95

9.3 How to Change Initial Settings for Analog Recording
9.3.2 How to Assign Different Colors to Channels (Dot Model)
You can assign any of the six provided colors to any channel. The initial setting is as
follows:
ch.1, 7, 13, 19 = purple
ch.2, 8, 14, 20 = red
ch.3, 9, 15, 21 = green
ch.4, 10, 16, 22 = blue
ch.5, 11, 17, 23 = brown
ch.6, 12, 18, 24 = black
SETTING PROCEDURE:
Enter the SET UP Mode by turning ‘ON’ the power while pressing and holding the
ENT-key until the SET UP display appears.
Use the UP/DOWN-keys to select the display ‘SETUP=COLOR’. Press the ENT-key.
Select the channel No. for which you want to change a color. Then press the ENT-key.
Select the color. Then press the ENT-key. The display ‘*COLOR SET*’ will appear.
The color setting has been completed, but has not been stored yet. Press the ENT-key to
set the color for other channels or press the ESC-key to adjust other settings in the SET
UP Mode.
Before leaving the SET UP Mode, you have to store your new settings. Press the ESCkey to return to the ‘SETUP=COLOR’ display and then select the ‘SETUP=END’
display.
Press the ENT-key. Select ‘END=STORE’ to keep your new settings or
‘END=ABORT’ and press the ENT-key. After a few seconds, the Operation Mode will
appear.
9. CHANGING INITIAL SETTINGS
IM 4H3B1-01E
9 - 15
Page 96

9.4 How to Change Initial Settings for Digital Printouts
This paragraph describes how to change initial settings for digital printouts.
(Note that the selection to trigger the recording to start/stop is explained in 9.9)
9.4.1 How to select channel numbers or tag printout (initial value = ‘CH’)
9.4.2 How to select scales printout ON/OFF (initial value = ‘ON’)
9.4.3 How to select the new chart speed printout ON/OFF (initial value = ‘OFF’)
9.4.4 How to select the record start time printout ON/OFF (initial value = ‘OFF’)
9.4.5 How to select alarm settings and alarm printout (initial value = ‘ON1’)
9.4.6 How to select to trigger the periodic printout (initial value = ‘INT’, ‘AUTO’)
9.4.1 How to Select Channel Numbers or Tag Printout
You can select channel numbers or tags printed out in the periodic, manual, channel and
alarm printout. This also results in displaying tags or channel numbers on the display.
The initial value is ‘CH’, and this setting is common for all channels.
SETTING PROCEDURE:
Enter the SET UP Mode by turning ‘ON’ the power while pressing and holding the
ENT-key until the SET UP display appears.
Use the UP/DOWN-keys to select the display ‘SETUP=RCD’. Press the ENT-key.
Press the ENT-key until the display ‘CH/TAG=...’ will appear. Select CH or TAG.
Press the ENT-key.
This setting has been completed, but has not been stored yet. Before you can adjust
other settings in the SET UP Mode, you have to finish the recording settings until the
‘*RCD SET*’ display appears.
Before leaving the SET UP Mode, you have to store your new settings. Proceed with the
recording settings until the display ‘*RCD SET*’ appears. Press the ESC-key to return
to the ‘SETUP=RCD’ display and then select the ‘SETUP=END’ display.
Press the ENT-key. Select ‘END=STORE’ to keep your new settings or
‘END=ABORT’ and press the ENT-key. After a few seconds, the Operation Mode will
appear.
9.4.2 How to Select Scales Printout ON/OFF
You can select to get scales printed on the chart.
Note that the scales will not be printed when the chart speed exceeds 1500 mm/h. (pen
model) or 100 mm/h. (dot model).
The initial value is ‘ON’.
SETTING PROCEDURE:
Enter the SET UP Mode by turning ‘ON’ the power while pressing and holding the
ENT-key until the SET UP display appears.
Use the UP/DOWN-keys to select the display ‘SETUP=RCD’. Press the ENT-key.
Press the ENT-key until the display ‘SCL_PR=...’ will appear. Select ON or OFF.
Press the ENT-key.
This setting has been completed, but has not been stored yet. Before you can adjust
other settings in the SET UP Mode, you have to finish the recording settings until the
‘*RCD SET*’ display appears.
Before leaving the SET UP Mode, you have to store your new settings. Proceed with the
recording settings until the display ‘*RCD SET*’ appears. Press the ESC-key to return
to the ‘SETUP=RCD’ display and then select the ‘SETUP=END’ display.
Press the ENT-key. Select ‘END=STORE’ to keep your new settings or
‘END=ABORT’ and press the ENT-key. After a few seconds, the Operation Mode will
appear.
9 - 16 IM 4H3B1-01E
Page 97

9.4 How to Change Initial Settings for Digital Printouts
9.4.3 How to Select the New Chart Speed Printout ON/OFF
You can select the new chart speed printed on the chart when the chart speed changes.
Note that the chart speed will not be printed when the chart speed exceeds 1500 mm/h.
(pen model) or 100 mm/h. (dot model).
The initial value is ‘OFF’.
SETTING PROCEDURE:
Enter the SET UP Mode by turning ‘ON’ the power while pressing and holding the
ENT-key until the SET UP display appears.
Use the UP/DOWN-keys to select the display ‘SETUP=RCD’. Press the ENT-key.
Press the ENT-key until the display ‘SPD_PR=...’ will appear. Select ON or OFF.
Press the ENT-key.
This setting has been completed, but has not been stored yet. Before you can adjust
other settings in the SET UP Mode, you have to finish the recording settings until the
‘*RCD SET*’ display appears.
Before leaving the SET UP Mode, you have to store your new settings. Proceed with the
recording settings until the ‘*RCD SET*’ display appears. Press the ESC-key to return
to the ‘SETUP=RCD’ display and then select the ‘SETUP=END’ display.
Press the ENT-key. Select ‘END=STORE’ to keep your new settings or
‘END=ABORT’ and press the ENT-key. After a few seconds, the Operation Mode will
appear.
9.4.4 How to Select the Record Start Time Printout ON/OFF
You can select to get the time printed on the chart when the recording starts. Note that
the time will not be printed when the chart speed exceeds 1500 mm/h. (pen model) or
100 mm/h. (dot model).
The initial value is ‘OFF’.
SETTING PROCEDURE:
Enter the SET UP Mode by turning ‘ON’ the power while pressing and holding the
ENT-key until the SET UP display appears.
Use the UP/DOWN-keys to select the display ‘SETUP=RCD’. Press the ENT-key.
Press the ENT-key until the display ‘RCD_PR=...’ will appear. Select ON or OFF.
Press the ENT-key.
This setting has been completed, but has not been stored yet. Before you can adjust
other settings in the SET UP Mode, you have to finish the recording settings until the
‘*RCD SET*’ display appears.
Before leaving the SET UP Mode, you have to store your new settings. Proceed with the
recording settings until the ‘*RCD SET*’ display appears. Press the ESC-key to return
to the ‘SETUP=RCD’ display and then select the ‘SETUP=END’ display.
Press the ENT-key. Select ‘END=STORE’ to keep your new settings or
‘END=ABORT’ and press the ENT-key. After a few seconds, the Operation Mode will
appear.
9. CHANGING INITIAL SETTINGS
IM 4H3B1-01E
9 - 17
Page 98

9.4.5 How to Select Alarm Settings and Alarm Printout
When alarms occur, the channel number, type of alarm and ON/OFF time can be printed
on the right side of the chart. It is selectable to get the ON/OFF time of alarms (ON1),
the ON time only (ON2) or to get no printout (OFF). Note that alarms will not be
printed when the chart speed exceeds 1500 mm/h. (pen model) or 100 mm/h. (dot
model).
The initial value is ‘ON1’, and this setting is common for all channels.
SETTING PROCEDURE:
Enter the SET UP Mode by turning ‘ON’ the power while pressing and holding the
ENT-key until the SET UP display appears.
Use the UP/DOWN-keys to select the display ‘SETUP=RCD’. Press the ENT-key.
Press the ENT-key until the display ‘ALM_PR=...’ will appear. Select ON1 (ON/OFF
time of alarms will be printed), ON2 (ON time only will be recorded) or OFF (no alarm
will be recorded). Press the ENT-key.
This setting has been completed, but has not been stored yet. Before you can adjust
other settings in the SET UP Mode, you have to finish the recording settings until the
‘*RCD SET*’ display appears.
Before leaving the SET UP Mode, you have to store your new settings. Proceed with the
recording settings until the ‘*RCD SET*’ display appears. Press the ESC-key to return
to the ‘SETUP=RCD’ display and then select the ‘SETUP=END’ display.
Press the ENT-key. Select ‘END=STORE’ to keep your new settings or
‘END=ABORT’ and press the ENT-key. After a few seconds, the Operation Mode will
appear.
9.4.6 How to Select to Trigger the Periodic Printout
The selections are structured as follows:
The first selection is to specify whether the periodic printout should be triggered
internally or externally.
If you select INTernal, you should set the reference time of the first periodic printout
(initial value is ‘00:00’). Next you have to specify which interval should be used
between two periodic printouts. You can choose from AUTO, which means that the
interval depends on the chart speed, and MAN, which means that you can specify the
interval yourself.
If you select EXTernal, you should also specify this at the settings for the REMOTE
option (see 9.8) and the setting is completed.
The initial value is ‘INT’, ‘AUTO’.
SETTING PROCEDURE:
Enter the SET UP Mode by turning ‘ON’ the power while pressing and holding the
ENT-key until the SET UP display appears.
Use the UP/DOWN-keys to select the display ‘SETUP=RCD’. Press the ENT-key.
Press the ENT-key until the display ‘DGT_PR=...’ will appear. Select INT (in the case
of internal triggering) or EXT (in the case of external triggering). Press the ENT-key.
9 - 18 IM 4H3B1-01E
Page 99

9.4 How to Change Initial Settings for Digital Printouts
If you selected INT:
The display ‘START=00:00’ will appear. Specify the reference time of the first
periodic printout using the UP/DOWN-keys. Press the ENT-key. Note that you cannot
specify minutes.
Specify which interval between the periodic printouts you prefer. Choose from AUTO
(and the interval depends on the chart speed) or MAN (and you can specify the interval
yourself). Then press the ENT-key. Note that in case of AUTO, the relation between the
chart speed and the printing intervals of periodic printouts will be as shown in the tables
below.
Pen Model
Chart Speed Printing Interval of Periodic Printout
5 to 9 mm/h
10 to 18 mm/h
20 to 36 mm/h
40 to 72 mm/h
75 to 135 mm/h
150 to 180 mm/h
200 to 320 mm/h
360 to 1500 mm/h
more than 1500 mm/h
no printout
every 8 hours
every 4 hours
every 2 hours
every hour
every 30 minutes
every 20 minutes
every 10 minutes
no printout
Dot Model
Chart Speed Printing Interval of Periodic Printout
6 dot 12 dot 18 dot 24 dot
1 to 9 mm/h no printout no printout no printout no printout
10 to 19 mm/h every 8 hrs. every 12 hrs. every 12 hrs. every 24 hrs.
20 to 39 mm/h every 4 hrs. every 8 hrs. every 8 hrs. every 12 hrs.
40 to 50 mm/h every 2 hrs. every 4 hrs. every 4 hrs. every 8 hrs.
51 to 79 mm/h every 2 hrs. every 4 hrs. no printout no printout
80 to 100 mm/h every hour every 2 hrs. no printout no printout
101 to 1500 mm/h no printout no printout no printout no printout
If you selected MAN:
Specify the interval using the UP/DOWN-keys. You can choose from 10, 15, 20, 30
min and 1, 2, 3, 4, 6, 8, 12, 24 hrs. Then press the ENT-key. Note that when the
printing takes more time than the specified interval, printouts may be skipped.
This setting has been completed, but has not been stored yet.
The display ‘*RCD SET*’ will appear. You can now adjust other settings in the SET
UP Mode, by using the ESC-key.
If you selected EXT:
The setting has been completed, but has not been stored yet. The display ‘*RCD SET*’
will appear. You can now adjust other settings in the SET UP Mode, by using the ESCkey. Make sure to specify this also at the settings of the REMOTE option (see 9.8).
Before leaving the SET UP Mode, you have to store your new settings. Press the ESCkey to return to the ‘SETUP=RCD’ display and then select the ‘SETUP=END’
display.
Press the ENT-key. Select ‘END=STORE’ to keep your new settings or
‘END=ABORT’ and press the ENT-key. After a few seconds, the Operation Mode will
appear.
9. CHANGING INITIAL SETTINGS
IM 4H3B1-01E
9 - 19
Page 100

9.5 How to Select the Type of Bargraph
The µR1800 can display two types of bargraphs:
1) Left-referenced (%) bargraph (NORML)
1
2
The left side of the bargraph represents the left span value, the right side of the bargraph
represents the right span value. The display will show the measured value as a
percentage of the span.
2) Center-zero bargraph (CENTR)
1
2
The center of the bargraph represents the center value of the span. The left side and the
right side of the bargraph represent the left and right span values respectively.
This bargraph will display the deviation between the actual measured value and the
center of span.
The type of bargraph can be selected for each channel individually.
The initial value for all channels is left-referenced bargraph (NORML).
SETTING PROCEDURE:
Enter the SET UP Mode by turning ‘ON’ the power while pressing and holding the
ENT-key until the SET UP display appears.
Use the UP/DOWN-keys to select the display ‘SETUP=BAR’. Press the ENT-key.
Select the channel No. for which you want to change the type of bargraph.
Press the ENT-key.
Select ‘NORML’ (for the left-referenced bargraph) or ‘CENTR’ (for the center-zero
bargraph) using the UP/DOWN-keys.
Press the ENT-key. The display ‘*BAR SET*’ will appear.
This setting has been completed, but has not been stored yet. Press the ENT-key to set
the bargraph for other channels or press the ESC-key to adjust other settings in the SET
UP Mode.
Before leaving the SET UP Mode, you have to store your new settings. Press the ESCkey to return to the ‘SETUP=BAR’ display and then select the ‘SETUP=END’
display.
Press the ENT-key. Select ‘END=STORE’ to keep your new settings or
‘END=ABORT’ and press the ENT-key. After a few seconds, the Operation Mode will
appear.
NOTE The bargraph has the same resolution as the data shown on the display. By adding/
deleting a digit of the displayed data (done during setting of the recording span), you
can affect the resolution of the bargraph. The maximum resolution is 1% (100 steps).
9 - 20 IM 4H3B1-01E
 Loading...