

Page 1
IM 01R01A30-01EN-B
YHC5150X FieldMate Handheld Communicator
User’s Manual
January, 2014 V 1.3
Page 2
Safety Information
Failure to follow all instructions could result i n i njury. Read, understand and follow all
safety warnings and instructions provided with t hi s product. Also, meet or exceed your
employer’s safety practices.
In no event shall Yokogawa be liable for any indirect, special, incidental, con sequential or punitive
damages or for any lost profits arising out of or relating to any services provided by Yokogawa or its
affiliates. It is not possible for Yokogawa to identify all foreseeable uses/misuses, therefore all persons
involved in commissioning, using or maintai ning this product must satisfy their self that each intended
application is acceptable.
Safety Warnings
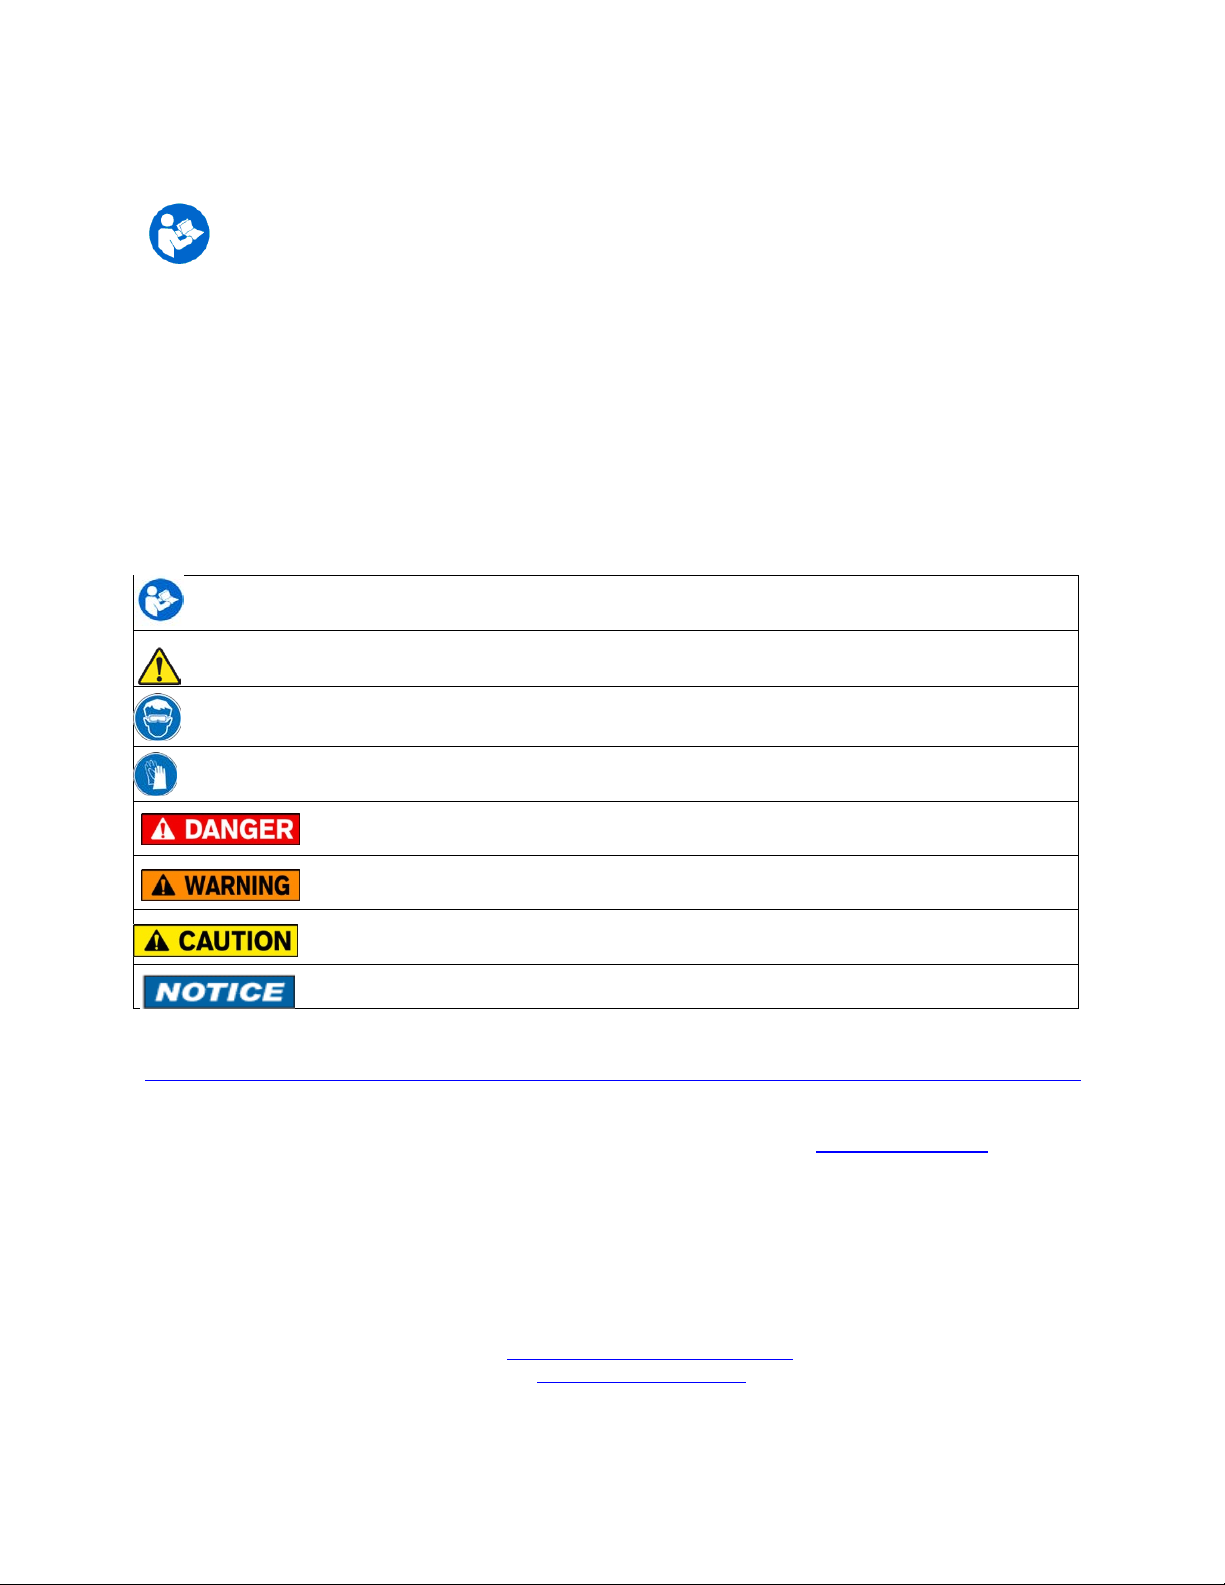
The table below defines the safety symbols, signal word s and corresponding safety messages used in the
manual to identify potential hazards and are intended to warn persons about hazards that could result in
personal injury or equipment damage.
This is the Read Instruction Manual symbol. T hi s symbol indicates
that you must read the instruction manual.
This is the Safety Alert symbol. T his symbol indicates a WARNING. Warnings alert you to actions that can
cause personal injury or pose a physical threat. Please read these carefully.
This is the Safety Glasses symbol. This symbol indicates that you must wear appr oved safety glasses during
the task.
This is the Safety Gloves symbol. Thi s symbol indicates that you must wear approved safety gloves during
the task.
Indicates a potentially hazardous situation which, if not avoided, will result in death or serious
injury.
Indicates a potentially hazardous situation which, if not avoided, could result in death or
serious injury.
Indicates a potentially hazardous situation which, if not avoided, could result in minor or
moderate injury.
Indicates information essenti al for proper product installation, operation or maintenance.
Information in this document is subject to change without notice. Check the Yokogawa web site:
http://www.yokogawa.com/us/products/field-instruments/ia-smart-communicators/yhc5150x.htm
for latest manual revision.
®
HART
For customer assistance please call your local Yokogawa representative or Yokogawa directly.
is a registered trademark of the HART Communicat ion Foundation www.hartcomm.org
Yokogawa Corporation of America
2 Dart Road
Newnan, GA. 30265
1-800-888-6400
E-mail: meters-instr@us.yokogawa.com
Web: www.yokogawa.com/us
Page 3

ATEX DOCUMENTATION
applies only to European Union countries.
GB
SK
DK
I
E
NL
SF
CZ
LT
LV
EST
PL
P
F
D
SLO
H
BG
Page 4
S
RO
GR
M
Page 5

YHC5150X FieldMate Handheld Communicator
USER’S MANUAL
TABLE OF CONTENTS
Subject Page
YHC5150X Series Communicator Overview ............................................................................................ 1
Touchscreen Display Overview .......................................................................................................... 2
Display Layout ............................................................................................................................... 2
Keypad Layout ................................................................................................................................ 4
General Operation ..................................................................................................................................... 5
Power Button ....................................................................................................................................... 5
Backlight ............................................................................................................................................. 5
Display Auto Dim Timer .................................................................................................................... 5
Auto Standby Timer ............................................................................................................................ 5
Portable Operation / Battery Life ........................................................................................................ 5
PC Communication / Recharging Cradle ............................................................................................ 6
Battery Pack Installation & Removal ................................................................................................. 7
Memory Card ..................................................................................................................................... 8
Kick Stand ........................................................................................................................................... 8
External Connections ......................................................................................................................... 9
Keyboard Functionality .................................................................................................................... 10
Touch Keyboard Functionality ......................................................................................................... 12
Navigating the communicator .................................................................................................................. 14
System Menus ................................................................................................................................... 14
General ........................................................................................................................................ 14
Main ............................................................................................................................................ 17
System Setup .............................................................................................................................. 18
Language .............................................................................................................................. 19
Touch Screen Calibration ..................................................................................................... 19
Date And Time Setup ................................................................................................................. 20
Power Management .................................................................................................................... 21
®
HART
System Information .................................................................................................................... 23
HART
HART
Function Buttons ......................................................................................................................... 26
HART
®
HART
Communication with the YHC5150X Communicator ............................................................... 28
Overview ........................................................................................................................................... 28
HART
HART
Device Specific & Generic HART
Using Generic HART
Managing Device Configuration Files .............................................................................................. 32
Communication Troubleshooting ...................................................................................................... 33
Setup ............................................................................................................................. 22
®
Menu .................................................................................................................................... 24
®
Navigation Menu ........................................................................................................... 25
®
Menu Path ..................................................................................................................... 28
®
Connections ......................................................................................................................... 29
®
Communication ................................................................................................................... 30
®
Communications ........................................................................................... 32
®
Communication ........................................................................ 31
Page 6

Updating Software ................................................................................................................................... 34
Hazardous Area Use ................................................................................................................................ 34
Intrinsically Safe Operation ............................................................................................................... 34
Returning for Repair ................................................................................................................................ 36
APPENDIX
Product Specifications ........................................................................................................................ 37
Safety Notices .................................................................................................................................... 38
Waste Electrical and Electronic Equipment (WEEE), Directive 2002/96/EC ................................... 38
Spare Parts List ................................................................................................................................... 39
Intrinsic Safety Control Drawing ....................................................................................................... 40
Page 7
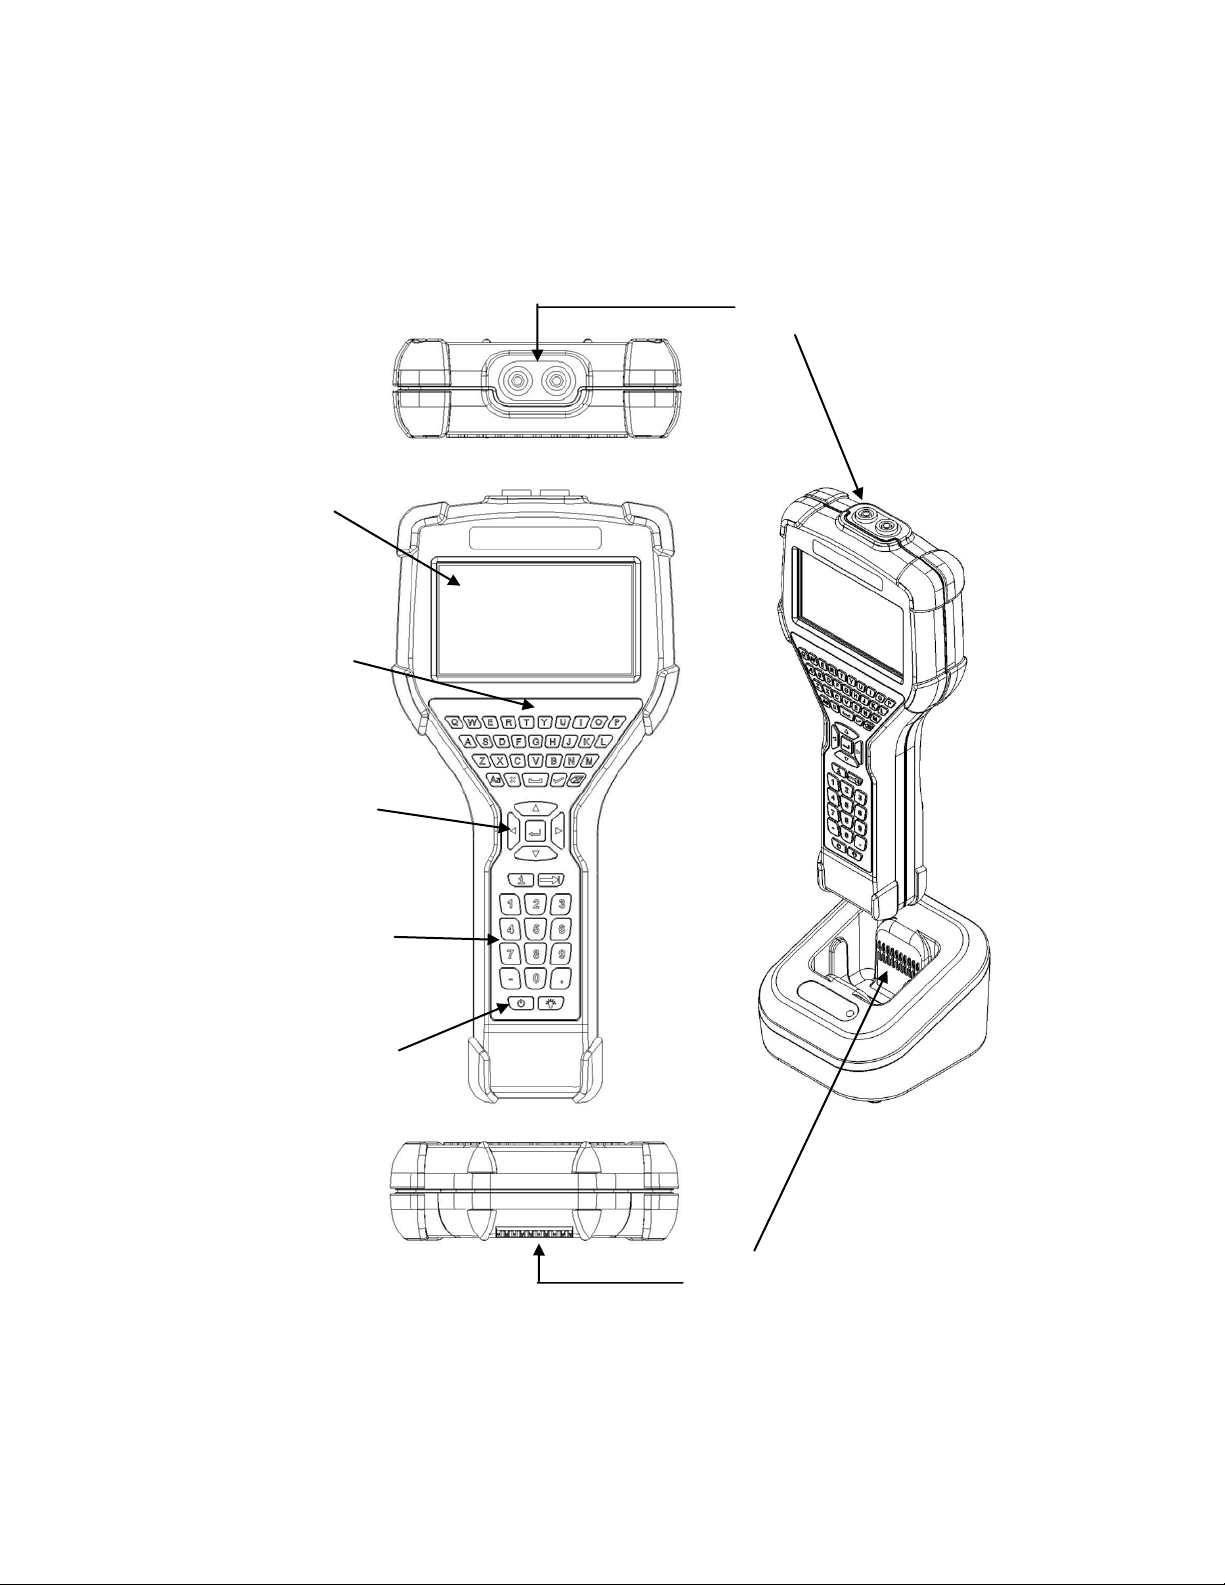
1
Charging Cradle
Display and
Full QWERTY
Navigation Keys
HART®
Dedicated Numeric
On/Off Key
1.0 YHC5150X Series HART
®
COMMUNICATOR OVERVIEW
The YHC5150X Series HART® Communicator is a full function HART® Communicator supporting
®
HART
configuration and maintenance operations.
communication Universal, Common Practice and Device Specific commands for commissioning,
Connections
Touchscreen
style alphabetic
Keyboard
Keypad
Connections
Page 8
2
Sample system display
System
Information
HART®
System
Focus Pane
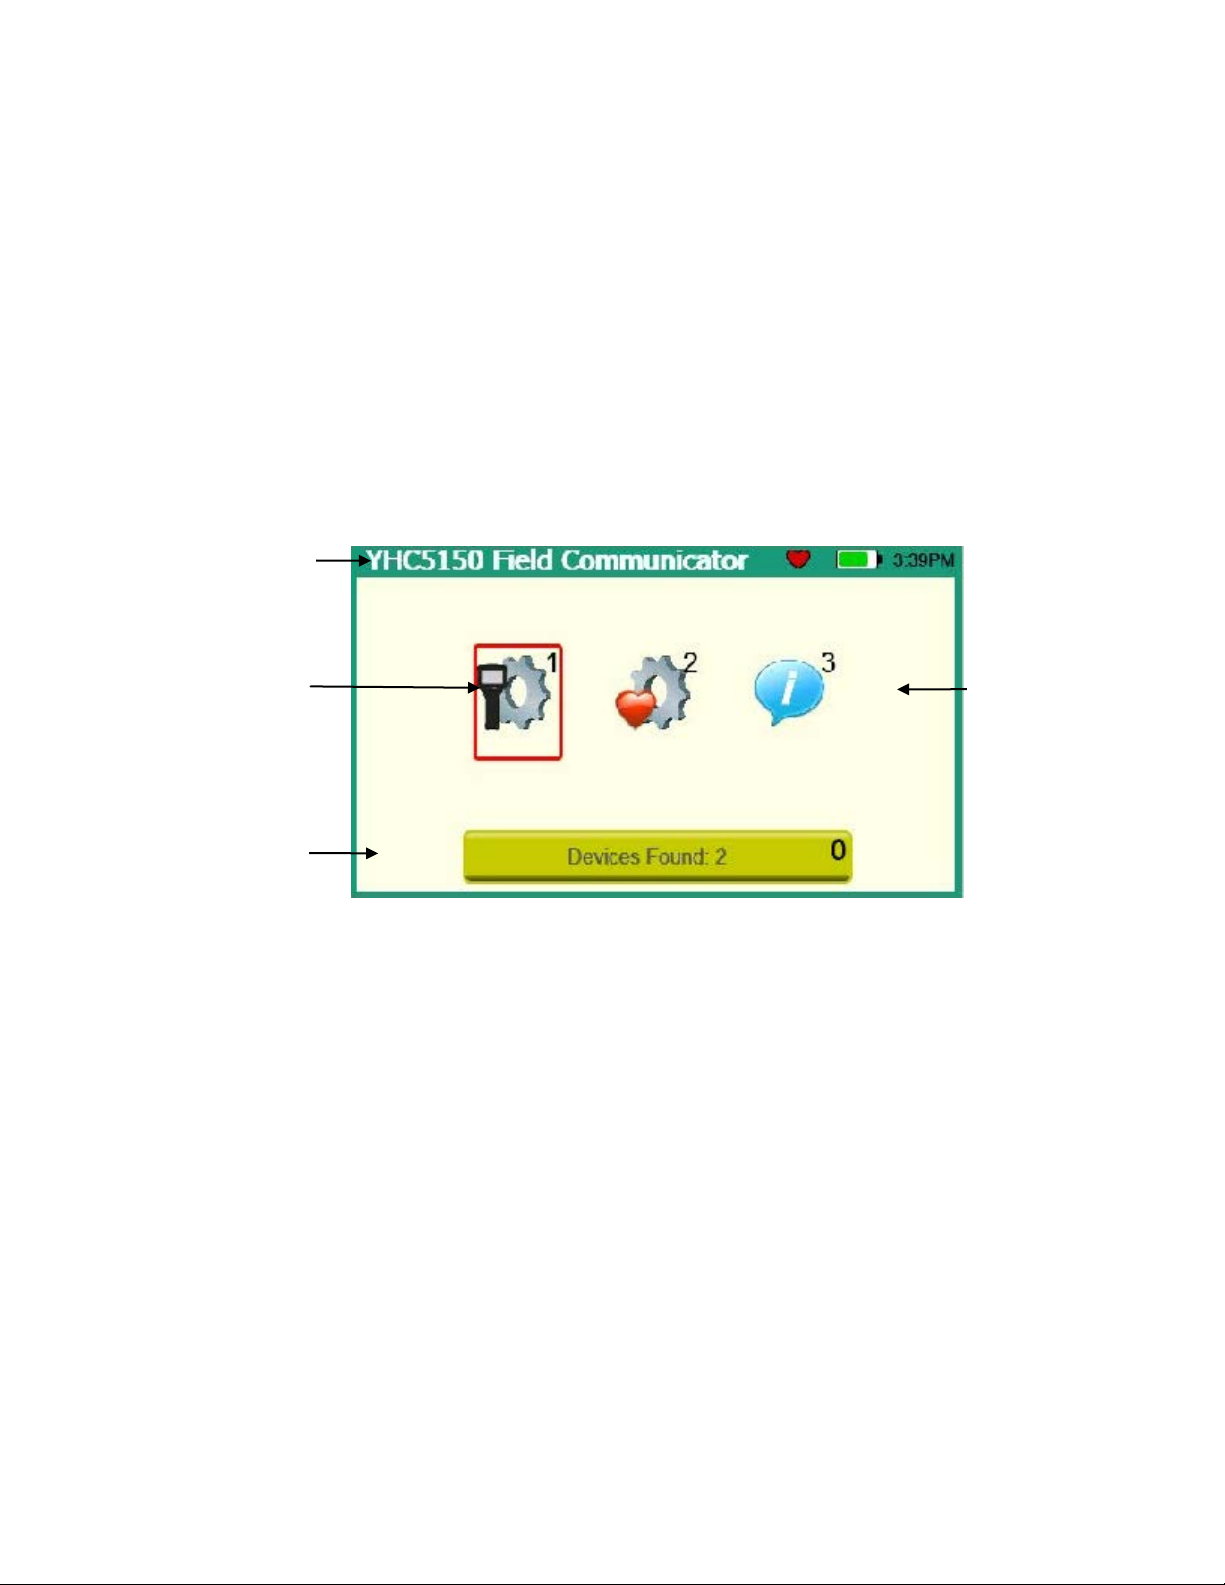
1.1 TOUCHSCREEN DISPLAY OVERVIEW
The communicator has a 4.3-inch widescreen backlit TFT color touchscreen display with 480 x 272
WQVGA pixel resolution. The entire vi ewable area of the screen is an active touch surface. The touchscreen
responds to and is optimized for finger presses ( even through gloves). NO stylus is necessary. Never touch
the screen with sharp objects – simply use your finger.
Display Layouts
There are two styles of displays presented on the communicator, system menu displays (Section 3.1) and
®
HART
The main system menu display is the initial menu at power turn on. It is also accessible from any HART
menu (see Function Buttons in section 3.2). There are three distinct areas on the system menus. The top of
the menu provides system information. The middle of the menu contains navigation icons to system actions
or new system menus. The bottom of the menu contains current HART
buttons.
menu displays (Section 3.2).
®
connection status and navigation
®
Connections
and
Navigation
Navigation
Page 9
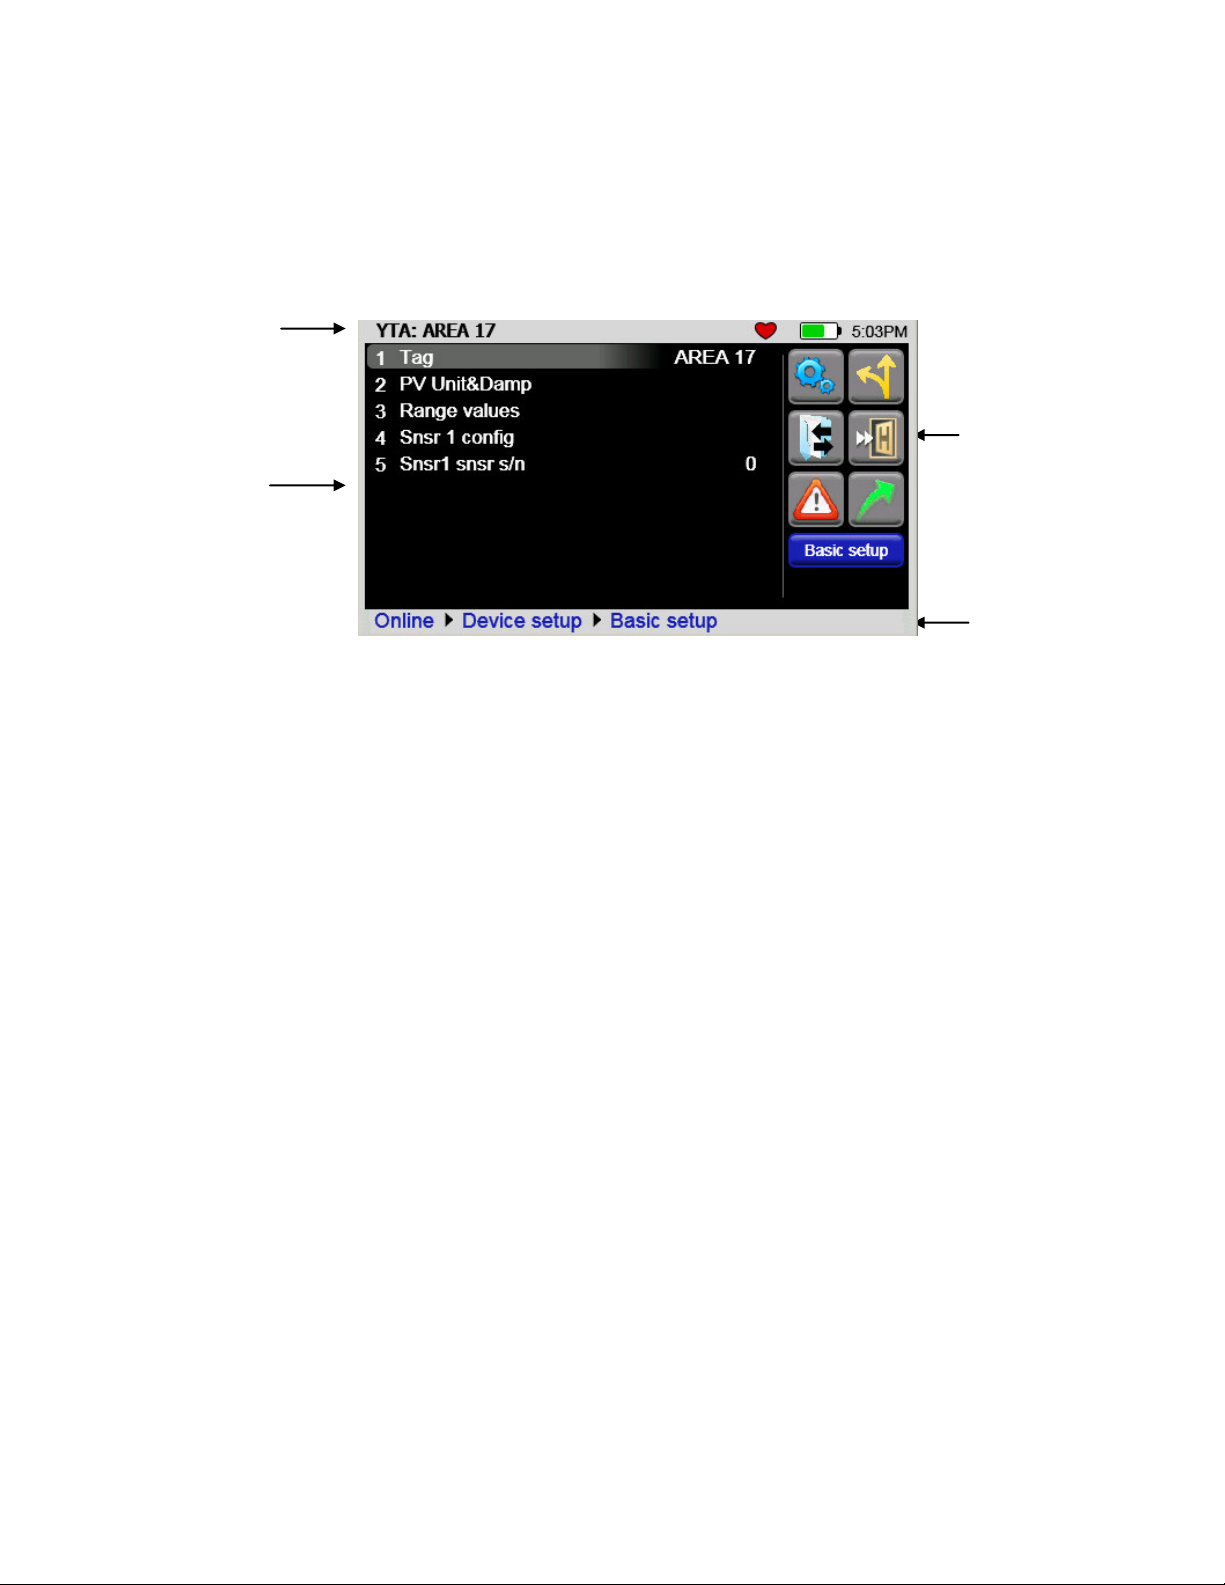
3
Function
Device and
HART
®
HART® Menu
Path
Sample HART® menu display
The HART® menus are only accessible when a HART® communication enabled device is connected and
communicating with the communicator. There are four distinct areas on a HART
menu provides information on the currently attached device as well as various status indicators. The middle
of the menu is divided into two functional areas, HART
bottom of the menu contains the HART
®
Menu Path.
®
Menu Navigation and Function Buttons. The
®
menu. The top of the
Status Line
Buttons
Navigation
Page 10
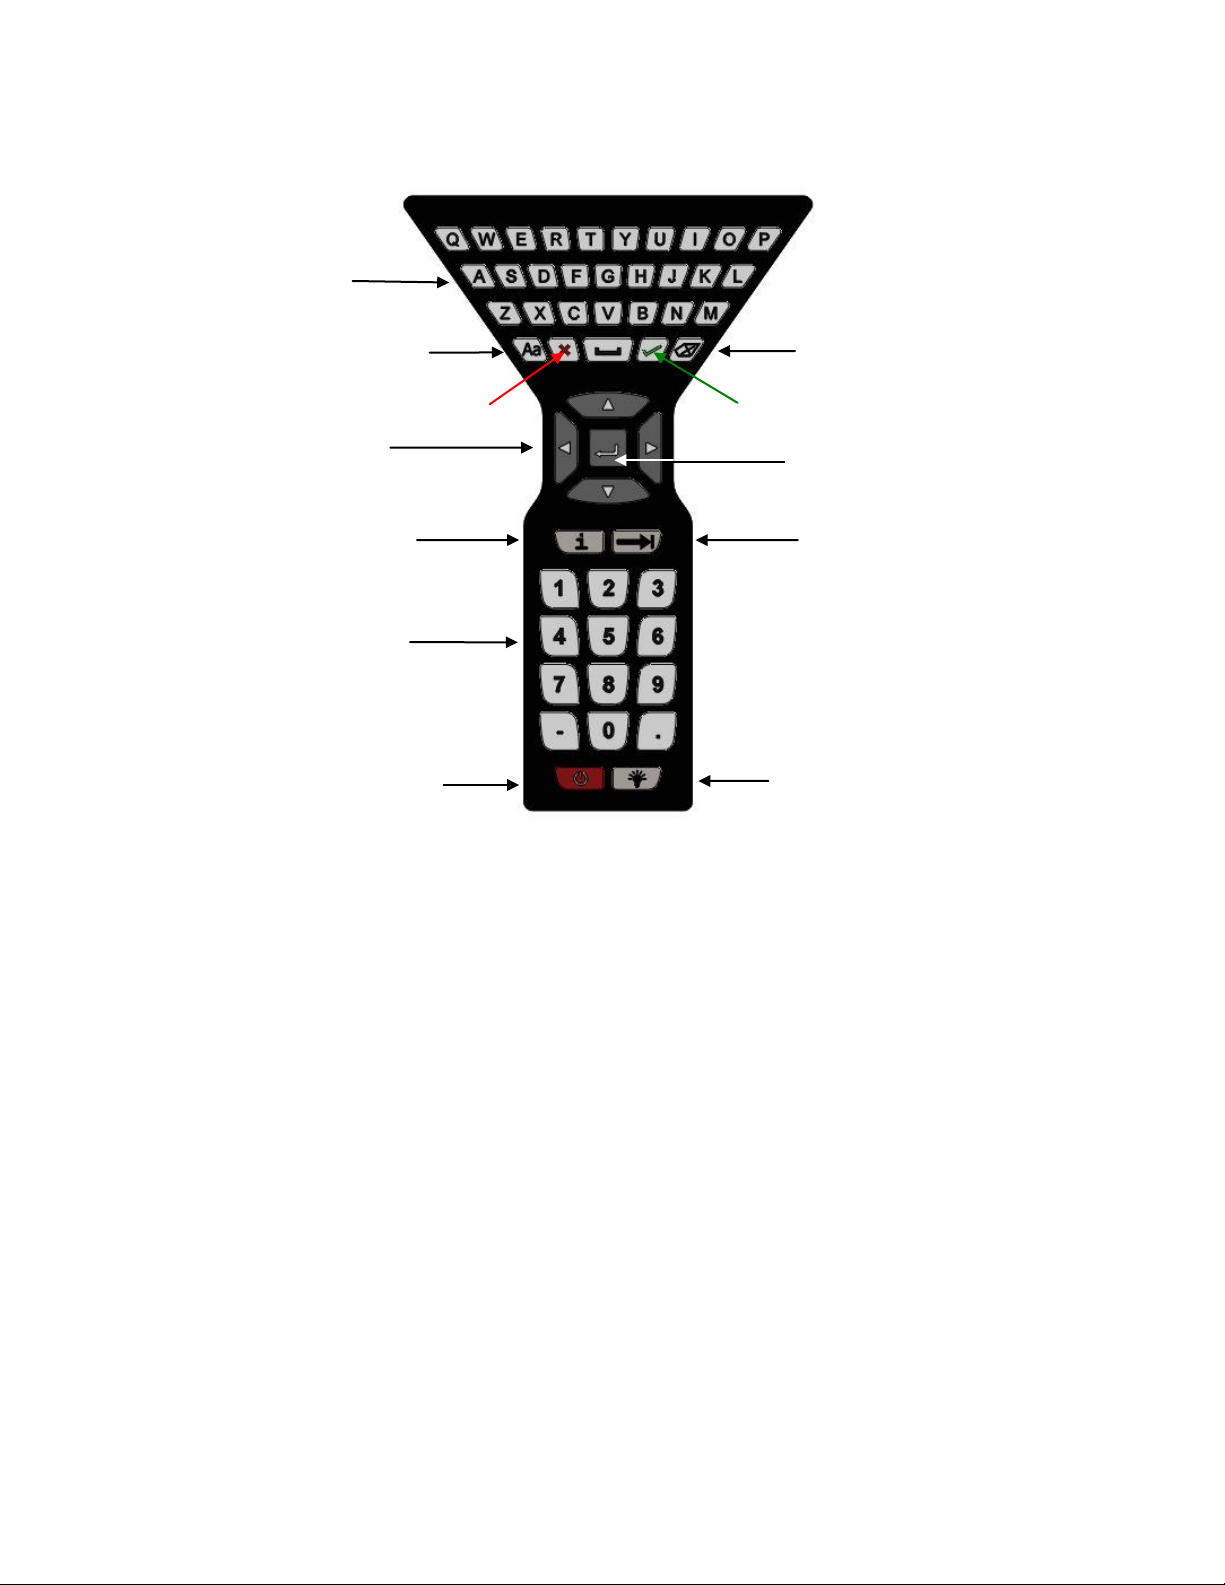
4
Alpha Entry
Upper/Lower case Toggle
Cancel
Backspace
OK or Accept
Advance or Switch
area on screen)
Navigation Ring
Enter or Select
Numeric Entry
(and Menu Accelerators)
Power
(Section 2.1)
Backlight
(Section 2.2)
Information
1.2 Keyboard Layout
or Help
(to next functional
The communicator provides a high functionality keyboard, combined with touch screen data k eys, to
simplify data entry and navigation. Most tasks can be completed by just using the dedicated keyboard. The
touch screen keys (only visible during text data entry) add the complete ISO Latin-1 (ISO 8859-1) character
set, except numerals, in a large, easy to select key size.
Page 11

5
2.0 GENERAL OPERATION
2.1 Power Button
The Power Button has two functions:
Power On – Whenever the communicato r is in an “Off” state, pressing the power key turns the
communicator on. This is a complete system start. The communicator will execute a complet e power op
sequence. Information regarding the time and date is briefly displayed to allow the user to verify the
communicator’s readiness
.
Standby Operation – When the communicator is fully on, and the power button is pressed briefly, the unit
enters the Standby state where allowed. In this state the display is off and most user input is ignored to
conserve battery power between uses. The on-board computer maintains the previous system state to
provided rapid recovery (Resume Operation).
Resume Operation - When the communicator is in Standby Operation, and the power button is pressed
briefly, the unit quickly resumes operation, returning to a fully “On” state of functional ity at the same menu
level that was interrupted.
Power Off – When the communicator is fully on, and the power button is pressed for three seconds, the unit
will power down completely where allowed. This conserves the most battery power but r equires a full
initialization when the unit is turned on again.
2.2 Backlight
The Backlight has 5 intensities from mini mum to full Brigh tness. The user can select intensities by pressing
the Backlight Button. Backlight intensity affects battery life. A lower intensity level will increase operation
time.
2.3 Display Auto Dim Timer
Display Auto Dim is a configurab le mode that allows the user to minimize the backlight when there is no
user or HART
adjustable using the Display Auto Dim Timer. A shorter period will decrease battery consumption when the
communicator is not being used.
2.4 Auto Standby Timer
Auto Standby is a configurable mode that allows the user to automatically put the communicator into a
standby state when there is no user or
period of time. The inactivity period is adjustable using the Auto Standby timer. In combination with the
Display Auto Dim Timer, shorter period wil l decrease battery consumption. The standby timeout begins
when the Auto Dim Timer times out. If the Auto Dim Timer is set to “Never” the standby timeout will not
begin.
2.5 Portable Operation / Battery Life
The communicator is powered by a rechargeable li-ion battery pack for portable operation. A full charge
typically allows for 20 hours of typical operation. See section 2.7 for instruction on battery removal and
replacement. Replacement battery packs are available from Yokogawa (1W-9A820-1).
®
activity detected by the communicator for a user defined period of time. This period is
HART
®
activity detected by the communicator for a user defined
Page 12
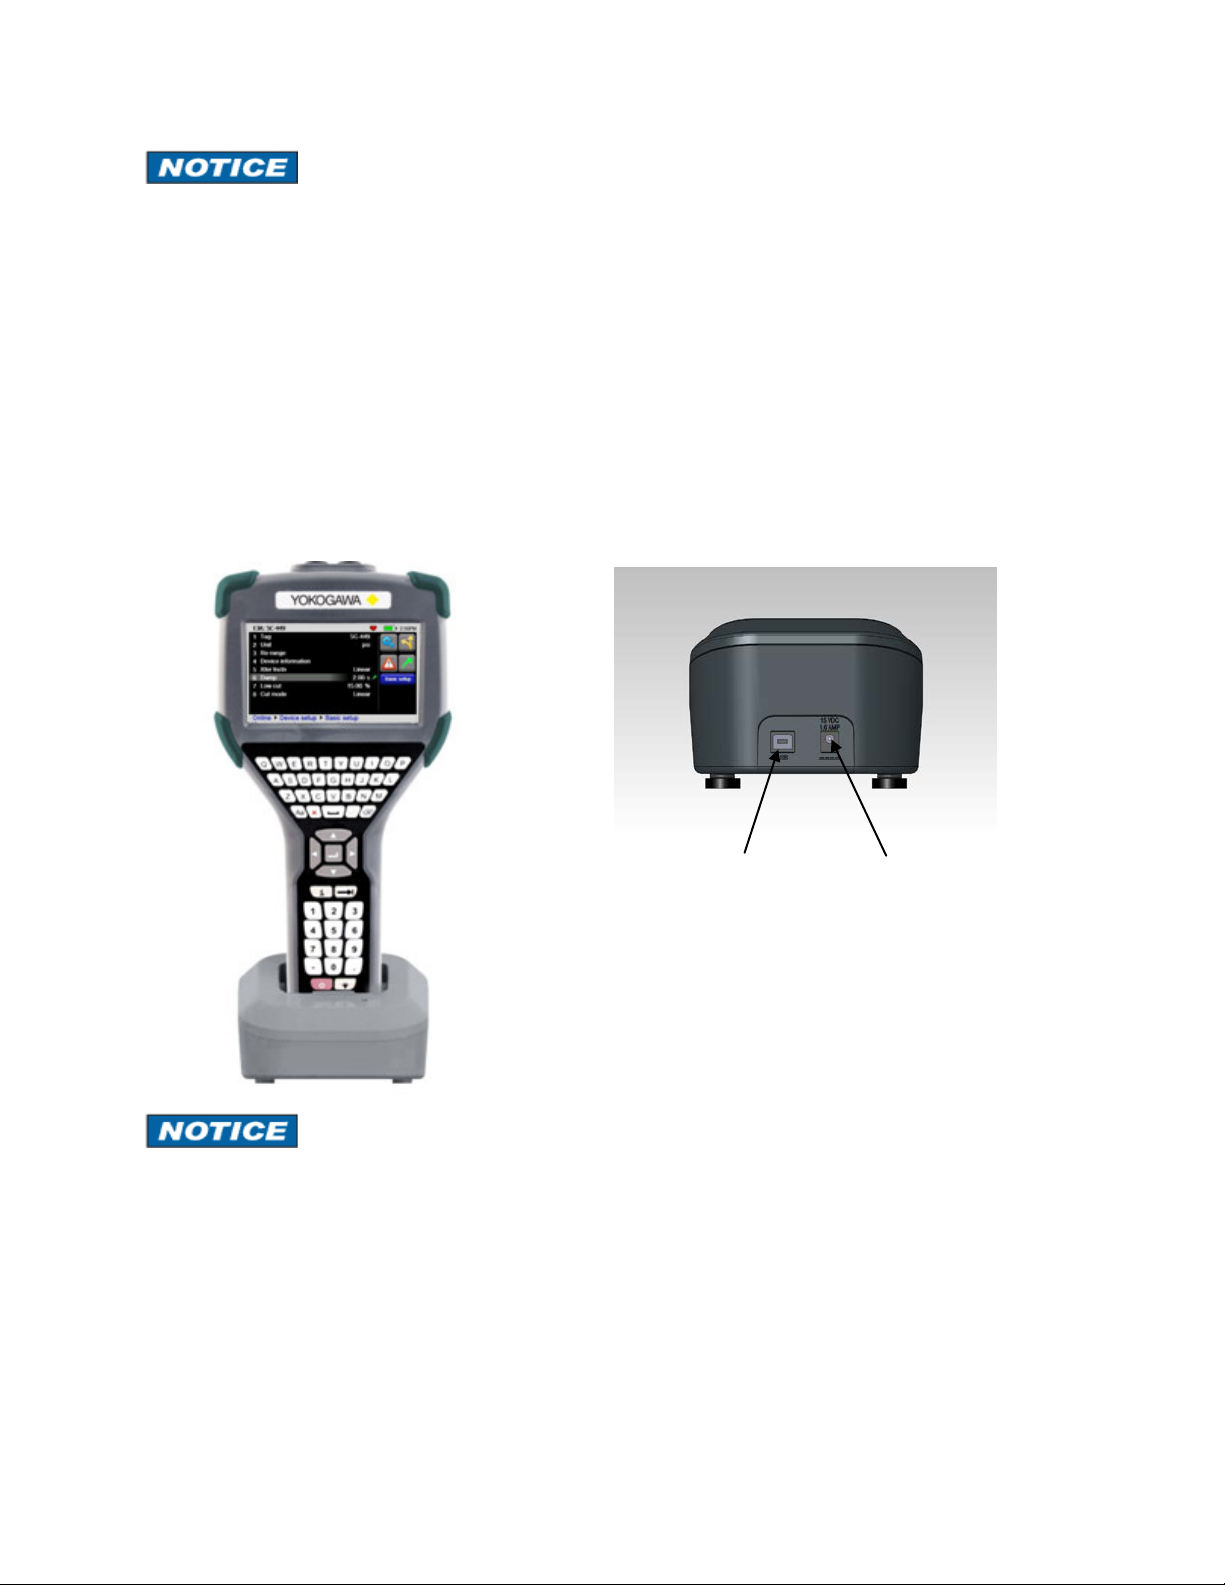
6
USB connection
to computer
Power jack for
Cradle Connection Details
YHC5150X in charging cradle
Rear of cradle
The battery pack contains an advanced b attery fuel gauge that actively monitors the battery capacity and
therefore does not require any “battery training” throughout the life of the battery pack.
2.6 PC Communication / Recharging Cradle
The Recharging Cradle, included with each unit, automatically recharges the l i-ion battery pack when the
communicator i s properly inserted into the energized cradle. To fully charge a depleted battery pack takes
about four and one half hours.
The recharging cradle also connects the communicator with a PC for file updates to the communicator when
it is properly inserted in the cradle and a USB cable is attached from the cradle to a PC with the proper USB
drivers and Yokogawa update package. See section 5 for update instructions.
AC adapter
The Recharging Cradle is not intended to recharge a battery separately. To properly charge a battery
pack it is required to be inserted into a communicator prior to being placed on the charger.
Charging Indicator
There is a multicolor LED on the recharging cradle. This LED indicates the current charging mode.
Off – No battery pack inserted, or power disconnected.
Solid Green – Battery is charged.
Flashing Amber – Battery is charging.
Solid Amber – Battery temperature out of charging range (10°C-40°C), charge suspended.
Flashing Red – Battery fault.
Solid Red –Charger fault.
Page 13
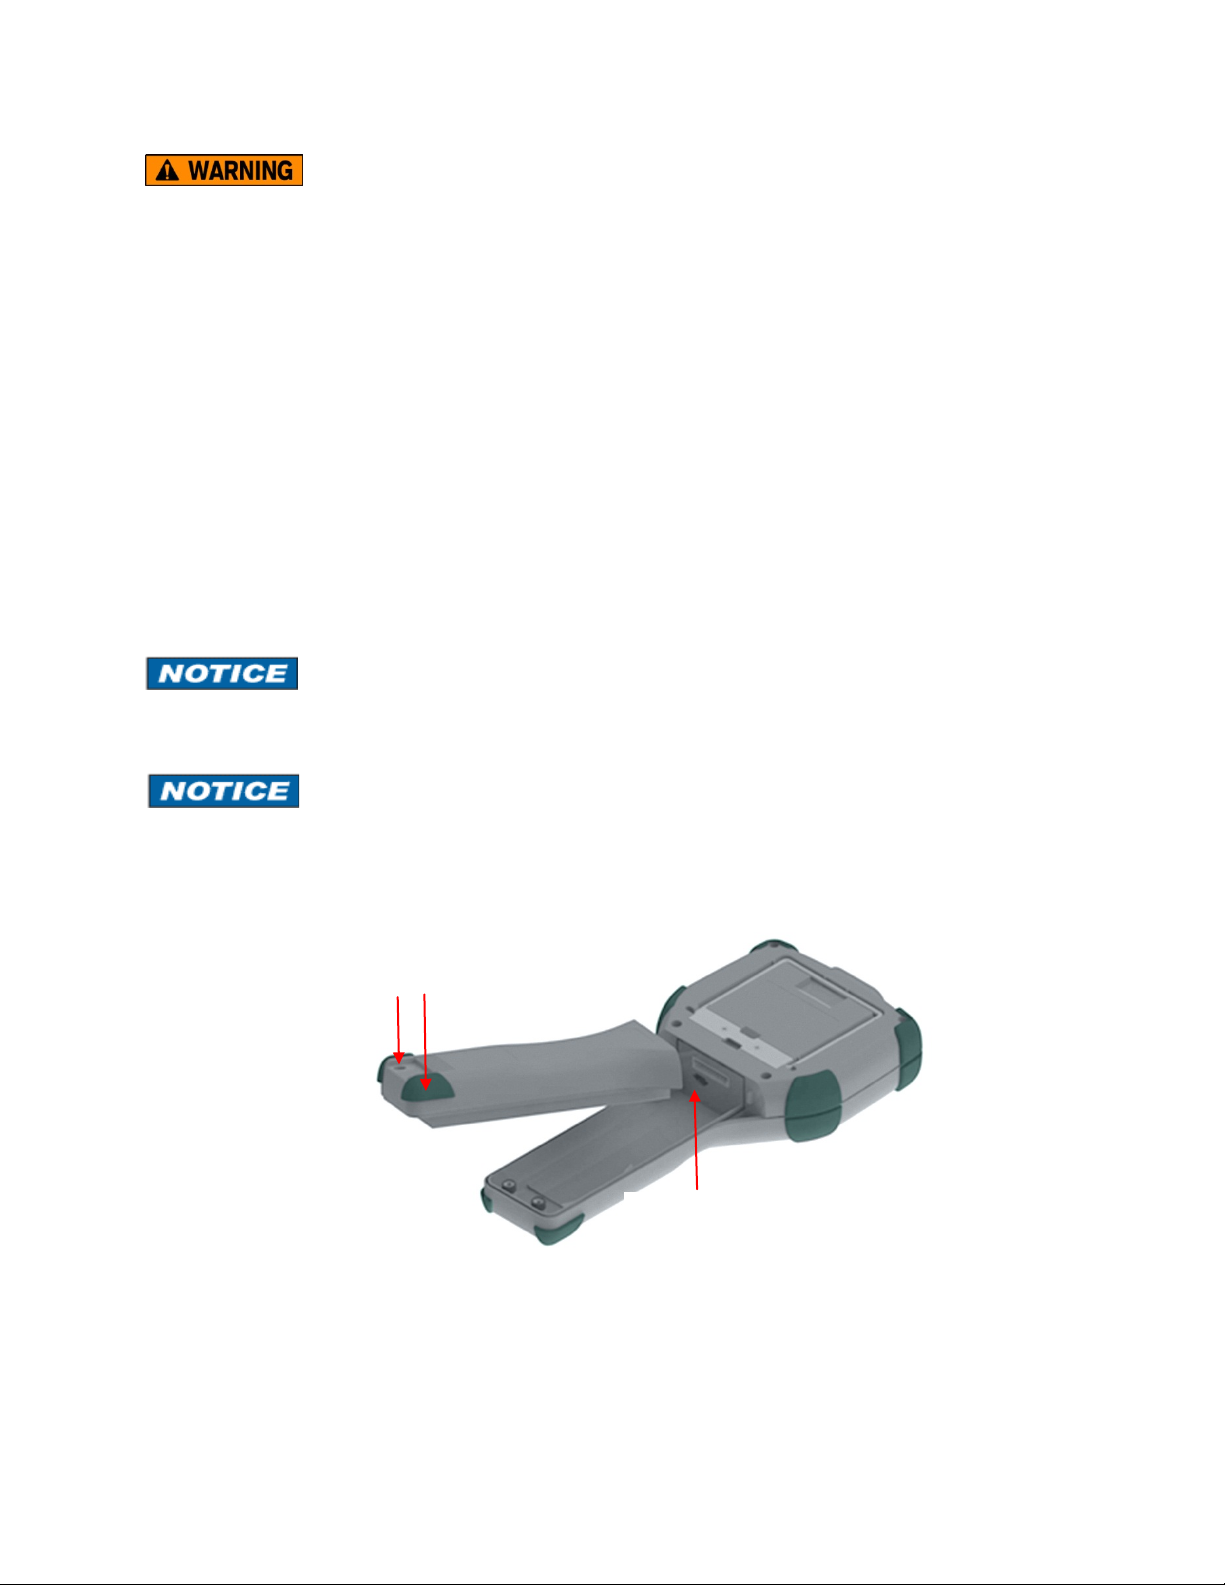
7
Battery pack removal
6-32 screws with
7/64” hexagonal socket
µSD memory
card access
The Recharging Cradle is not rated for intrinsic safety and should only be used in a non-hazardous area.
See the “Hazardous Area Use” section of this manual and the Intrinsic Safety Control Drawing in the
Appendix of this manual for more information.
2.7 Battery Pack Installation & Removal
The battery pack is held into the communicator by two standard 6-32 screws with hexagonal sockets that
require a 7/64” hex key wrench.
To install the battery pack set the communicator enclosure with the display downward on a flat stable
surface. Rest the battery pack in the battery pack compartment of the enclosure leaving a ½” gap between
the battery pack and the connector on the communicator enclosure. Slide the battery pack upward along the
enclosure until the connectors mate completely and the screws are aligned with the threaded inserts on the
communicator body. Thread the screws into the insert to complete the installation.
For disassembly, reverse the order of the operations.
Over-tightening the battery case screws when assembling can cause damage to the communicator.
Maximum torque should not exceed seven in-lb.
Battery should be charged completely (10 hours) before using the communicator the first time. See Section
2.9 for detail on using the charging cradle.
Page 14
8
2.7 Memory Card
The communicator is shipped standard with a µSD memory system card. The system card is used for storage
of required software, software updates, HART
use unrelated to the operation of the communicator. When the µSD memory system card is in the
YHC5150X, the user has no access to the card except with the Yokogawa provided P C software.
This card should only be replaced by Yokogawa part 1W-9P780, or its successor, and only under the
direction of Yokogawa personnel. Use of a non-system memory card will void safety certifications.
®
DD files and device configuration f iles. It is not intended for
To access the memory card, follow the Battery Pack removal instructions.
To remove the memory card - Once the battery pack has been removed, press gently on the memory card to
unlock it from the card holder. Carefully remove the memory card from the enclosure ( Note: tweezers or
small needle-nose pliers can be helpful in removal and insertion).
To replace the memory card – Insert the memory card carefully into the card holder, contacts toward the back
of the communicator and card label towards the front (scre en side) of the communicator. Be sure the
memory card is resting in the holder before releasing it. Gently press the card into the holder to lock it into
place. Replace the battery pack and secure it to the communicator enclosure.
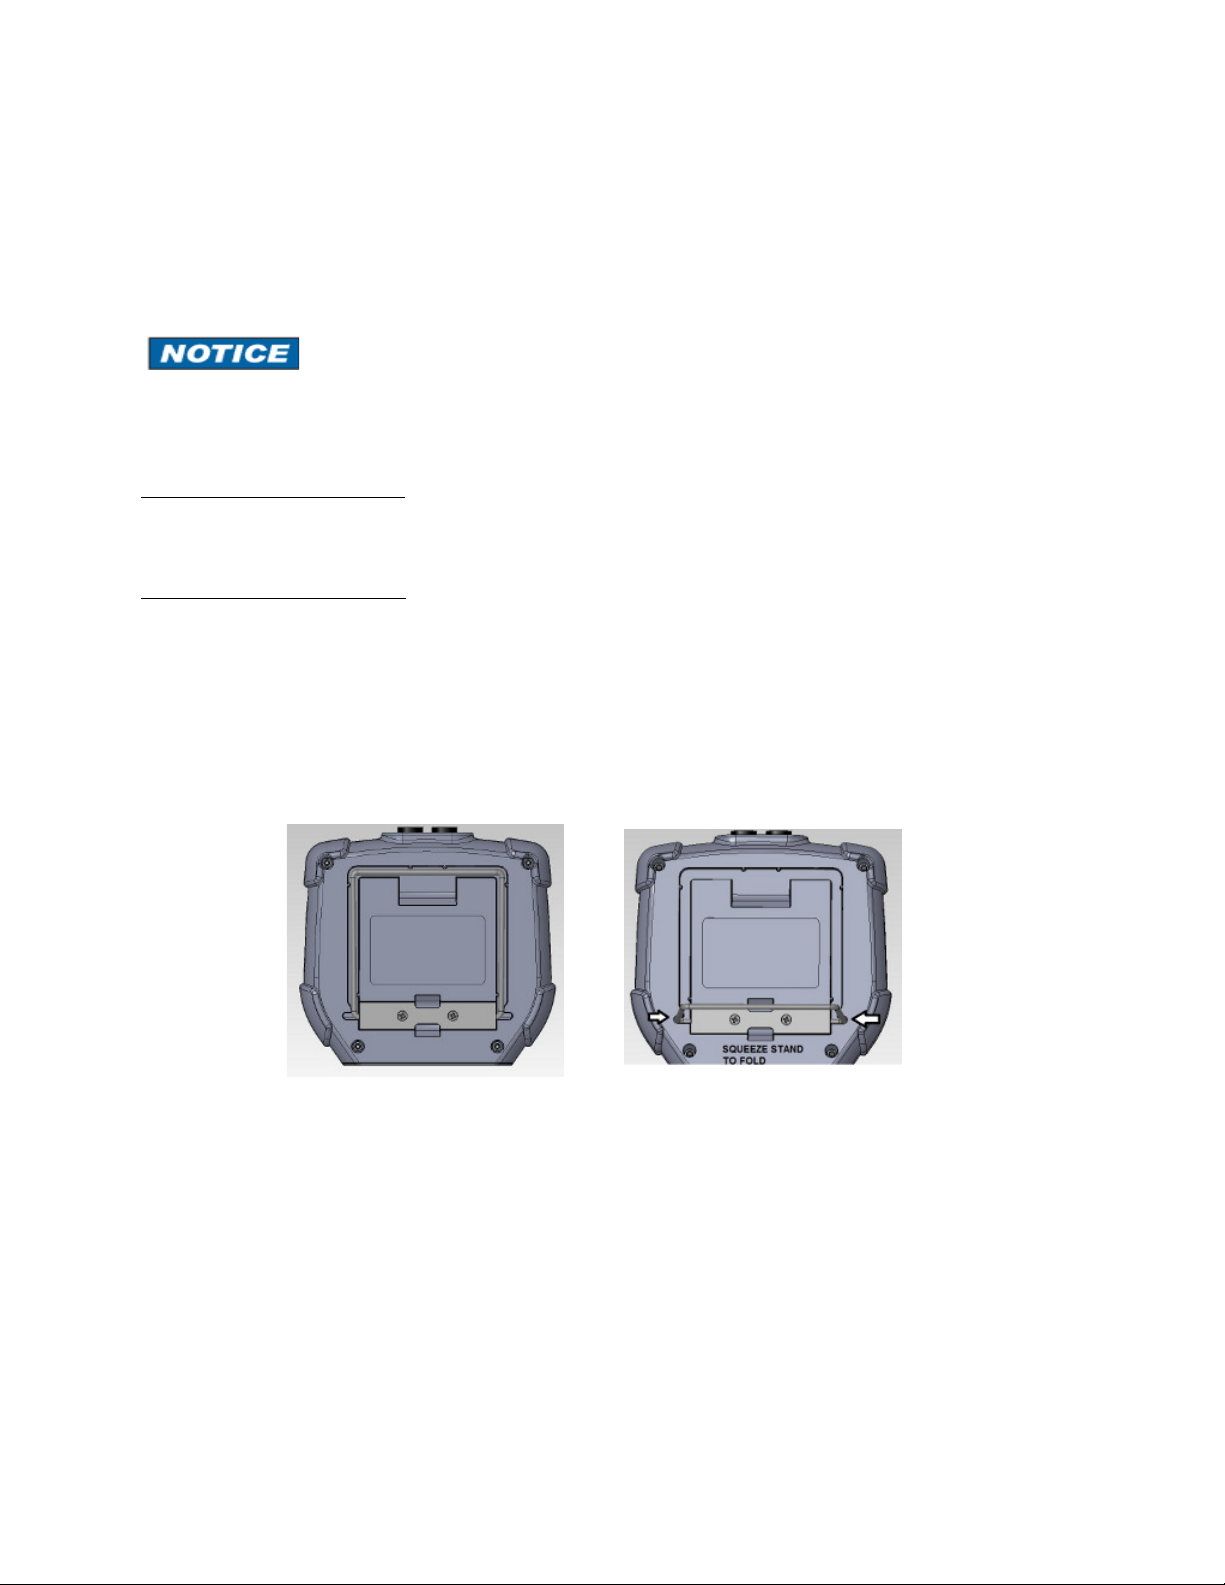
2.8 Kick Stand
The communicator is equipped with a kick stand to provide a better viewing angle. The stand latches in the
down/open position. To return the kick stand to the up/closed position squeeze the base inwards from both
sides to unlatch it.
Page 15

9
2.9 External Connections
Loop Communication Jacks / Lead Set – All models are equipped with a standard size banana jack on
0.75” center. The lead set supplied with the communicator has a standard banana plug on one end and minigrabbers on the other for convenient connections.
For Intrinsically Safe model YHC5150X, verify the instruments in the loop are installed in accordance
with intrinsically safe field wiring practices before making connection from the field device to the Unit’s
loop communication jack. See the Hazardous Area Use Section of this manual and the Intrinsic Safety
Control Drawing in the Appendix for more information.
Charging Cradle
Each unit has an electrical connector located at the bottom of the handheld. The connector provides fast and
secure connection to the Communication / charging cradle supplied with each handheld. Seat the connector
end of the communicator into the charging cradle with the front of the communicator facing the front of the
charging cradle. Inserting the communicator into an energized cradle begins the charge cycle and allows
communication with a PC. See section 5 for update instructions.
The Recharging Cradle is not rated for intrinsic safety and should only be used in a non-hazardous area.
See the “Hazardous Area Use” section of this manual and the Intrinsic Safety Control Drawing in the
Appendix of this manual for more information.
Connector
Page 16

10
Alpha &
Navigation &
Numeric
Fixed
Function
2.10 Keyboard Functionality
The keyboard is logically arranged into four areas based on the frequency of use. The alpha and fixed
function keys will be used less frequently than the navigation and numeric keys.
Decision
Information
The alpha keys contain all 26 characters of the ISO basic Latin alphabet. They are arranged in the same
order as a standard QWERTY keyboard. The alpha keys are used for text data entries as well as hexadecimal
(A to F) numeric data entries. When not entering data these keys are ignored.
Page 17

11
=
KEY BUTTON DECISION
Move focus up
Move
focus left
Move
focus right
Move focus
to next pane
Move
focus down
Select/Enter
menu item
Decision keys (hard key) are active when decision buttons appear on the screen. Their function is duplicat ed
by the decision buttons (touch screen button). Decision keys are also used for some auxiliary functions. See
sections 3.2 (Create shortcuts) for detail.
CANCEL/ESC
Navigation keys are used to move focus around the display and to select the item that is in-focus.
ACCEPT
in-focus
Information key provides on-screen help when available.
Numeric keys are used for text or numeric data entries.
Numeric keys are also used as accelerators t o advance menus and initiate actions when indicated by the onscreen icons.
The Fixed Function keys were discussed in Section 2.1 and 2.2
Page 18

12
Navigate to
keyset
Navigate to
keyset
Key Caps
Locked
Keyset #1
Cancel Space Accept
Select
case
Backspace
Clear
Edit Box
2.11 Touch Keyboard Functionality
The YHC5150X Series and HART
most text data entry. This character set co ntains 191 characters. Of th ese characters 65 are available on th e
communicator main keyboard. The remaining charact ers, and duplication of the ISO basic Latin alphabet
(lower + upper case) are availab le from the touch screen. Whenever a text edi t window appears the touch
keyboard is visible too. There are multiple keysets to allow larger keys, improving usability. Since the ISO
basic Latin alphabet characters are av ailable from the dedicated keybo ar d, they are the last touch keyset. The
touch keys are grouped by langu age usage wherever practical, and keysets are ordered based on estimated
usage. The first touch keys that are visible are commonly used symbols. To move to other keysets use the
“<<<” and “>>>” touch keys. Upper/Lower c ase selection (Cap Lock) does not affect k eyset #1 or keyset
#2 (symbols). Navigation of the keys on the text edit display is by touch screen or the Navigation Key set.
A red box surrounding the key signifies that the key has focus. Some text data parameters (“tag” for
example) do not support the full ISO Latin-1 (ISO 8859-1) character set. When this is the case, the nonfunctional touch screen characters will be gray. Since these data types do not support lower case alpha
characters, be sure the “Key Caps Locked” symbol is present, or the alpha hard keys will appear not to
function. When the characters entered in the edit box reach the string size limit fo r a sp ecific p ara meter, , th e
cursor disappears, a yellow block ap pears after the last character and additional charact er entry is ignored.
For example, “tag” is limited to eight characte rs. If the length of the d ata entry exceeds the fi eld size on the
screen the characters can be shif ted left or right by sliding your fin ger in the data field. Data entry alwa ys
shifts the characters full left so the end of the entry is visible.
®
communication support the ISO Latin-1 (ISO 8859-1) character set for
Previous
Next
Upper/lower
Page 19

13
Keyset #2
Keyset #3 (upper case)
Keyset #3 (lower case)
Keyset #4 (upper case)
Keyset #5 (upper case)
Keyset #4 (lower case)
Keyset #5 (lower case)
Page 20

14
Focus Pane - The focus pane is used in every system menu to indicate what
Navigation Number – The navigation number at the upper right of each
be on the item when returning to the menu.
THREE WAYS TO NAVIGATE
Touch screen – The communicator is equipped with a touch screen.
menu.
Communicator
Information
Communication
Battery Status
Current time
3.0 Navigating the Communicator
icon will be selected when the Select Key is pressed. Focus is changed by
use of the Arrow Keys. Select Key and the Arrow Keys are part of the
keyboard navigation ring.
icon indicates what icon will be selected when the corresponding
character on the keyboard is pressed. The focus pane does not need to
be surrounding the button for the action to occur. The focus pane will
Simply touch the icon on the menu to select the icon action. The
focus pane does not need to be surrounding the button for the action
to occur. The focus pane will be on the item when returning to the
3.1 System Menus
System menus are used to access information and settings relating to the operation of the communicator.
System Menus – General
System Information
Status
The top of the system menus contain system information. This field is not naviga bl e .
Communicator Information – Specifies the communicato r model on the main system menu.
Communication Status – Displays if HART® communication is active.
Page 21

15
Back
HART
®
Battery Status – Is a quick reference to the current condition of the battery. More detailed information is
available under system information.
Current Time – The current time offset from the initial user setting.
System Navigation
The function of the icons in this area will differ on every system display and wil l be covered in the
specific display sections following.
HART
®
Connection and Navigation
Connection Status
Back (“-“ key) – The Back Icon is selected to navigate away from the current menu
back to the previous menu.
HART® Connection status (“0” key) – The HART® Connection status bar indicates the cu r r ent state of the
HART® connection. When the bar is gray there i s no device connected. This is the case whe n no device
has been found, or while a device is connecting.
If you select the gray bar, no action will occur.
When the bar is green:
It indicates that a device is actively connected to the HART
of the navigation methods described above, the communicator will exit the system menus and go to the
online HART
®
menu.
®
network. If the green bar is selected, by any
Page 22

16
Multi-drop -
If the HART® connection status bar indicates there are multiple devices found select the bar to bring up a
list of those devices:
Select desired device to connect by using the Arrow Keys or touching the appropriate line. Finalize your
selection by pressing the Accept icon, or the Accept key () below the alpha keyboard. Cancel this
operation by pressing the Cancel Icon, or the Cancel/Esc key (
) located below the alpha keyboard.
When a device is connected to the co mmunic ator, as indicated by the green connectio n status
bar, selecting the Restart Poll search Icon will begin a new poll search for devices in th e poll address
range set by the user and the established HAR T
®
connection will be lost.
Page 23

17
System Setup
Provides access to the system setup menus for changing
HART®Setup
Provides access to the HART® setup menus for
System
Information
Provides access to information regarding model
System Menu - Main
communicator parameters.
changing HART® specific parameters.
number, software versions, battery life etc.
Page 24

18
Date and Time
Setup
Power
Language
Touch Screen
Calibration
Access to set the current date and time for
timestamps on files and system indicators.
Access to settings for adjusting power
User selects the preferred language of system
Allows user to calibrate the touch screen.
System Menu - System Setup
Management
consumption (backlight timers etc.)
menus and HART® menus (if supported).
Page 25

19
Language
Selecting this icon allows the user to change the language that will be used for System
menus, system messages, and HART
selected a list of supported languages is displayed:
Select desired language by using the Arrow Keys or touching the appropriate line. F inalize your selection
by pressing the Accept icon, or the Accept key () below the alpha keyboard. Cancel this operation by
pressing the Cancel Icon, or the Cancel/Esc key (
®
menus (if supported by the manufacturer DD). When the icon is
) located below the alpha keyboard.
System screen labels are static and will not change language until the next time a page is entered.
This applies to the main system screen label also. It will not change language until the
communicator power is cycled. HART® screens change language when a new connection is
established and only if the language is supported by the device description file. The connected
device indicated by the green connection bar, will continue to display the previously active
language until a new connection is made.
User defined text fields (such as HART® parameters like Tag and Long Tag, file names, and shortcut
labels) do not support multiple languages.
Touch Screen Calibration
Selecting this icon will display a standar d touch screen calibration screen. By the user
touching the cross when and where directed, the touch screen will be recalibrated.
Page 26

20
Date
Time
12 or 24
Adjust the system day, month, and year
Adjust the system minutes and hour
Choose standard (12 hour) or military (24
hour) time for display.
System Menu - Date And Time Setup
Hour Mode
Page 27

21
Display Auto
Dim Timer
Auto Standby
Timer
Set time before reducing the backlight to the minimum
setting (10%) during periods of inactivity.
Set time before switching system to standby mode during
System Menu - Power Management
periods of inactivity.
Page 28

22
Setup HART
®
Tag
User can select which tag to display on HART
®
HART
®
Polling
Selection
Allows user to select a range of addresses to poll,
System Menu - HART® Setup
The HART® Setup Menu provides access to the following:
Address Range
For Display
or to select a tag or long tag to use in polling for a
®
HART
enabled device.
status line. Choices are tag or long tag. If long tag
does not exist on the connected device, short tag
will always be displayed.
Page 29

23
System Menu - System Information
The System Information menu provides communicator reference data.
Page 30

24
Advance/Switch key
Connected HART
®
Device
HART
®
Tag or Long Tag
HART
®
Beat
Battery Life
Current Time
3.2 HART® Menu
®
HART
communication is established between th at device and the communicator. There are three navigable panes
on the HART
Menus can be accessed once a HART® device has been properly connected and the HART
®
Menus: The Navigation Menu, the Function Buttons, and the Menu Path. Focus is shifted
between these three panes by pressing the Advance/Switch key.
The selected item (in-focus) within the pane is highlighted by a red border (Function Buttons, and the
Menu Path) or a gray background (Navigation Menu).
Device and Status Line
The top of the system menus contain HART
®
communication and system information. This field is not
navigable.
®
Connected HART
®
Device – Displays the model name of the HAR T® device currently communicating
with the YHC5150X Series communicator.
®
HART
HART
Tag – Displays the tag information returned from the HART® device.
®
Beat –Indicates that this commun icator uses HART® protocol.
Battery Life – Remaining charge in percentage (green) of battery pack.
Current Time – Time of day.
Page 31

25
This line has
focus.
Use the numeric keys to select a menu item
Parameter has
HART® Menu - HART® Navigation Menu
The information in this area is controlled by the HART
®
HART
Communication Foundation. The last column at the right of the pane indicates item status. The small
green arrows indicate that the menu item value has not been committed to the device. This particular
status only applies to parameters.
device. This in turn is determined by the manufacturer of the device and the HART®
®
DD that is activated to communicate with the
been changed
by the user.
If the menu items exceed ten, the tenth item displayed will be “MORE”. This allows the user to continue
to navigate using numeric keys instead of requiring scrolling of the pane.
The three ways for navigation of system menus apply here as well. Arrow/Select keys to apply focus
(indicated by gray background), touch screen, or the numeric keys.
Page 32

26
Create
Shortcuts
Display
Status
System
Settings
Commit
User
Shortcut
Configuration
Options
Hot Key
HART® Menu - Function Buttons
Menu
Changes
There are two ways to navigate the function buttons. Use the navigation ring on the keyboard, or the
touch screen.
Create Shortcuts – The user would select this icon if he wished to create a User Shortcut to the
®
current HART
Buttons:
Navigation Menu. The user can customize the name that will appear with the Function
Once accepted the path appears in the Fu nction Button pane. There can be ten shortcuts for any device,
only the currently connected device typ e shortcuts will appear while connected to that device. To delete
all shortcuts for the current device, apply focus to the Create Shortcut button, and press Can cel. To delete
a single shortcut, apply focus to the specific User Shortcut button and press Cancel. To rename a shortcut,
apply focus to the specific User Shortcut button and press Accept.
Page 33

27
1. It is invalid to create a shortcut on the home men u (often labeled “Online”).
2. If a primary menu has submenus (designated by 0 –MORE- in the tenth line) the shortcut created will
be to the primary menu regardless of the submenu currently being dis pl a yed.
System Settings returns the user to the System Setup Main menu. The HART
maintained. The user just selects the green HART
when they have finished on the System Menus. Note: Some System Setting changes may require the
®
HART
connection to be re-established before the changes will occur.
®
Connection status bar to return to the HART® Menus
®
connection is
Configuration Options. Allows user to copy parameter data fro m a st ored configuration file
into the communicator HART
®
HART
navigation menus into a stored configuration file (see Section 4.6).
®
navigation menus and to copy parameter data from the communicator
Hot key navigates the user to the hot key menu. This is a menu of frequently modified
parameters defined by the manufacturer of the transmitter to simplify setup of the device. If the
manufacturer does not define a hot key menu for a device, this button will not be illuminated. Shortcuts
cannot be created within the hot key menu and the HART
®
menu path described below is disabled.
Selecting the Display Status icon when illuminated will display the current HART
®
device
status, communication status, and “more status available” indicators. This icon is only illuminated when
there is status available.
Commit Changes illuminates when parameters on the communicator have been modified by the
user, and those changes have not been sent to the device. Selecting this icon will begin the process of
updating the device to match the communicator parameters. To view a list of parameters that have been
changed apply focus to the Commit button and press the Accept key.
The User Shortcuts are device specific and appear when a user has created shortcuts to
®
simplify HART
navigation on that device.
Page 34

28
Online menu
(home)
Current menu
Intermediate menu
HART® Menu - HART® Menu Path
The HART® Menu Path displays current menu name and all the menu names along the menu path
traversed to reach the current menu.
The HART
®
Menu Path provides direct access to any of the menus along the menu path. Select the desired
menu, using touch screen or arrow keys, from those displayed on the Path Bar, and it will become the active
menu.
4.0 HART® Communication with the YHC5150X Series
4.1 Overview
The communicator provides device specific HART® communication functions that allow the user to poll,
configure and maintain supported HART
Practice and Device Specific commands to facilitate communication with a HART
®
field devices. The communicator uses Universal, Common
®
field device. The
communicator can be used to commission devices, reconfigure devices, or maintain devices through
analog and sensor trim adjustments. Many other features defined by the device manuf acturer are also
supported.
The communicator will communicate with any HART device through Universal and Common Practice
Commands using the standard Generic DD but must have the DD for a specific HART
before it can execute Device Specific Commands. When HART
®
device support for new devices becomes
®
device installed
available, the communicator software can be easi ly updated using a PC with an internet connection and
software provided.
Page 35

29
HART® connections are standard banana jacks
(3/4” center)
4.2 HART® Connections
HART® connections are made using two standard banana jacks (3/4” center) located at the top end of the
communicator. Refer to the following diagram. Polarity is not a concern for HART
jack collars are black. Yokogawa supplies a HART
®
lead kit (1W-A900529-00014) complete with mini-
grabber connections and a 250 Ω load resistor with each unit.
Consult the transmitter manual for proper connection in hazardous locations
®
connections so both
For low load loops (less than 250 Ω), a 250 Ω resistor may be needed in the loop to insure reliable HART
communication. Yokogawa supplies a 250 Ω load resistor in the form of a standard adaptor (1W-A36821).
Refer to the following diagram for connection details.
®
Page 36

30
Or the currently selected device is in the p r ocess of connecting.
When the bar is gray: there is no device connected;
When connecting the communicator to a loop with a resistive load greater than 250 Ωs, the HART® jacks
may be connected across the load, the loop + and -, or to the HART
®
device communication terminals. Refer
to the following diagram for connecting across the loop + and -.
.
Do not connect the communicator across the loop supply. This does not provide the
proper resistance and no HART
®
communication will be possible.
4.3 HART® Communication
Upon power up the communicator automatically polls for HART® devices in the range specified on the
®
HART
The HART
connection.
If you select the gray bar, no action will occur. The communicator will continue to send poll address
messages within the configured range as long as a device has not been selected for conn ection. If new
devices are added to the loop, within the configured range, they will be detected automatically.
Setup System menu (default range is zero).
®
Connection status bar on the system screens indicates the current state of the HART
®
Page 37

31
If the bar indicates devices have been found you can select which device to connect by selecting the bar.
This brings up a list box from which to pick your device.
Once you choose a device and press Accept, the box will collapse and the communicator will initiate
connection. Once the device is connected the bar will turn green.
If the poll address range is a single address, and a device is found at that address, the communicator will
immediately initiate connection, and additional polling is terminated. The bar will turn green when the
initialization is complete.
Whenever the bar is green:
It indicates that a device is actively connected to the HART
continue to poll for other devices. If the green bar is selected the communicator will initiate the online
®
HART
devices and the established HART
menus. If a different device is desired selecting the Restart Pol l icon will begin a new search for
®
connection will be lost.
®
network. The communicator does not
4.4 Device Specific & Generic HART® Communication
The communicator supports a large and growing number of Device Specific DDs (Device Object Files). To
facilitate communication with HART
do not require DD files, the communicator includes Generic HART Communication capability. This allows
the user to communicate with any HART
configure, and maintain HART
configuration and trim operations for analog outputs. Generic communications do not support Device Specific
commands for higher order HART
for more information on device specific command support.
®
devices that are not yet supported with Device Specific DD files or that
®
®
devices. Specific functions supported include most polling, tagging, device
®
device using Universal and Common Practice commands to poll,
functions. Review the User’s Manual for the HART® device of interest
Page 38

32
4.5 Using Generic HART® Communication
The Generic HART
®
Communication mode starts automatically when HART® communication is initiated
with a device for which no Device Specific DD (device object file) is stored in the handhelds flash memory.
When this occurs, line two of the display will indicate “Generic” and the device tag number.
In general, the Generic HART
®
mode operates similarly to its device specific DD counterpart (see HART®
Communication section of this manual for more details). However, the communicator does not display Device
Specific related communication menus or options when in the Generic communication mode. For example, the
Zero and Sensor trim menu options (nor mally executed by Device Specific commands) are not displayed for
pressure transmitters without DD support.
4.6 Managing Device Configuration Files
The current parameter settings for a connected HART® device can be stored into a file on the uSD system
card for later use. This file can then be used in duplicating settings to a new device of the same model,
restoring settings to a repaired device, and for documentation purposes. What para meter s are stored is
defined by the manufacturer of the HART
®
device.
If the Commit Changes button is illuminated, the communicator parameters should be committed
to the device before storing or retrieving a configuration. If the parameters are not committed and the
user chooses to store the parameters, th e user is warned that the parameters do not match the device. If
the user decides to continue with the store the fi le is marked as “As Modified”. Any online modifications
to parameters done prior to restoring a configuration that were not committed to the device are lost, if
those parameters are in the stored configuration.
Selecting the Configuration Options button will bring up a list of configuration actions.
To store a device configuration, the user selects Configuration Store.
Dialog boxes direct the user to appropriat e actions:
1. The user is prompted for a file name. The default file name is the tag parameter defined in the device. The
user may change this to any file name not currently in use for this device model. Unsupported characters are
grayed-out and ignored. If the user picks a n ame already in use, the communicator gives t hem an option of
cancelling or overwriting the current file.
2. If the configuration has not already been marked as “As Modified”, the user has to choose a configuration
type. The choices are “As Found” (device settings before modification) or an “As Left” (device settings after
modification).
The configuration file is saved in the communicator uSD card memory and can be restored to update any
transmitter of the same model and revision.
To restore a device configuration, the user selects Configuration Restore. The configuration files are
segregated by device model and revision. When a restore is requested, only the configurations that
pertain to the model of the connected device are presented. The user chooses a file and selects Accept
(). This will restore the stored parameters to the communicator’s
changed indicator beside affected param eters will appear, and the Commit Changes b utton is illuminated.
parameter cache. The parameter
Page 39

33
The user now has the option of making further modifications to the parameters on the HART® menu, or
committing them to the device.
4.7 Communication Troubleshooting
If a HART
not in the table of found devices:
When the message “Generic” is displayed after connecting to a HART
®
device is connected to the unit but “No Dev ices Found” notification is received, or the device is
1) Make sure all connections are correct and secure. Check for shorts, open circuits and multiple
grounds.
2) Determine if the loop resistance is greater than 250Ω and less than 1100Ωs. If less than 250 Ω
®
then use the supplied 250 Ω load resistor in series with the loop (see diagram HART
Connections
section).
3) Determine if any device is in burst mode. Disable burst mode if possible during troubleshooting.
4) Check the polling address type and range select ed from the system menus. If the polling address
set on the transmitter is outside of the range selected for the communicator, the device will not be
discovered. Set the poll type to “by address” and set the polling address range to the maximum (0-
®
15 for HART
and determine if the device is found.
5) If multiple HART
same address). Testing the devices individ ually is the best path.
6) Determine if there are multiple master devices on the loop. HART
Universal Revision 5 devices, 0-63 for newer HART® devices). Start a new poll
®
devices are in the loop, there could be an address conflict (two devices at
®
communication only permits
one primary and one secondary master. Remov e all other master devices from the loop for
troubleshooting.
®
device there are two possible causes:
1) No device specific DD for that device is curr ently installed in communicator memory. This
could occur if the device DD has not been released by the HART Communication Foundation
(visit their website for full list), or if the DD dat abase on your PC requires updates. See section
5 for update instructions. The connected HART
®
device supports only HART® Universal and
Common Practice commands (i.e. generic co mmands). There are several such devices on t he
market, particularly level type devices.
If multiple devices of the same name appear at different addresses, the cause is normally a HART
Universal Revision 5 device in the loop and the polling range selected on the communicator extending
beyond HART
®
polling address 15. Addresses beyond 15 were undefined until HART® Universal
®
Revision 6.
Page 40

34
Model Number
Use Description
Non-hazardous Area
Hazardous Area
YHC5150X
Intrinsically Safe
√
√
5.0 Updating Software
To update software a PC and a USB cable are required.
Details are shown in the website below:
http://www.yokogawa.com/us/products/field-instruments/ia-smart-communicators/yhc5150x.htm
6.0 HAZARDOUS AREA USE
Hazardous area use is permitted only when user complies with laws and regulations of
the country or region where the communi cator is used.
Intrinsically Safe Operation
The YHC5150X HART
Intrinsic Safety Control Drawing in the Appendix of this manual for more information. The following table
identifies model numbers and areas of acceptable use.
®
Communicator includes certification for Intrinsically Safe operation. Refer to the
Units with Intrinsically Safe certification can be identified by model number or by a special name plate on
rear of the unit. An example of the Intrinsically Safe name plate is shown below for reference.
Page 41

35
Note the following WARNINGS and REQUIREMENTS for YHC5150X models:
• Substitution of components may impair Intrinsic Safety
• To prevent ignition of flammable or explosive atmospheres;
Disconnect power before servicing
Do not use battery charger in a hazardous atmosphere.
DO NOT attempt to open the battery pack and rep lace the batteries.
Serious injury or death may result from explosions. Before making electrical connections to an
Intrinsically Safe model at the HART
accordance with intrinsically safe field wiring practices.
Note: Restrictions apply to the use of Intrinsically Safe units in hazardous areas. Refer to the Intrinsic
Safety Control Drawing in the Appendix of this manual for more information. Yokogawa reserves the
right to revise the Intrinsic Safety Control Drawing without notice. Contact Yokogawa (phone
800.888.6400) for the current Intrinsic Safety Control Drawing.
For Intrinsically Safe model YHC5150X, consult the Intrinsic Safety Control Drawing in the Appendix of
this manual for restrictions, for special instructions in use, and for electrical connections allowed.
®
jacks, verify the HART® instrument of interest is installed in
Page 42

36
7.0 RETURNING FOR REPAIR
In the event that a YHC5150X Series requires service and must be returned for repair, please contact
Yokogawa at the numbers listed below.
DO NOT send any unit in for repair without first contacting Yokogawa for a Return Material
Authorization (RMA) number. If this number has not been obtained and clearly marked on the
package being shipped back, the unit will be returned at the shipper’s expense. This number will be
provided by the Yokogawa Repair Department when you call, fax or e-mail your information. An RMA
number must accompany all incoming packages to insure proper tracking, processing and repair work.
To assist us in processing your repair request, please have the Model & Serial Number of the unit available
when you call. This information is located on the YHC5150X Series label.
Yokogawa Corporation of America
2 Dart Road
Newnan, GA. 30265
1-800-888-6400
E-mail: meters-instr@us.yokogawa.com
Web: www.yokogawa.com/us
Page 43

37
εΧ
CE compliance
APPENDIX
PRODUCT SPECIFICATIONS
BASE UNIT:
11.9" L, 5.6” W (at display), 2.50” W (at handle), 1.9” D.
PC/ABS alloy plastic case with shock absorbing bumpers, rated IP51, 2.1 lbs including battery. Passes one meter drop
test onto concrete
DISPLAY:
4.3-inch widescreen backlit TFT color touch screen display with 480 x 272 WQVGA pixel resolution.
POWER:
Li-ion battery pack, 3.6 volts nominal.
1.5A recharging cradle. 100-240Vac, 50/60Hz input.
BATTERY LIFE (Approximate):
20 hours typical use
TEMPERATURE SPECIFICATIONS:
Communicator:
Storage: -40° F to 140° F (-40° C to 60° C)
Operating: 14° F to 122° F (-10° C to 50° C)
Charging: 50° F to 104° F (10° C to 40° C)
CONNECTIONS:
Standard banana jacks (¾” center) for HART communication.
Communication (serial cable to PC port) / Battery charging. Connection via recharging cradle.
ATEX Intrinsically Safe II 1 G Demko 13 ATEX 1115457
IECEx Intrinsically Safe Ex ia IIC T4 Ga IECEx UL 13.0004
Canada Ex ia IIC T4
Listed Intrinsically Safe
cULus
US Class I, Div. 1, Groups A, B, C, D: T4
Class I, Zone 0, AEx ia IIC T4
-10º C < Ta < +50º C
Entity parameters: Pi = 1.25W, Ii = 200mA, Ci = 0, Li=0, Vi=30V, Um (USB) = 5V, Um
(battery) = 5V
MEMORY:
Dedicated µSD flash memory card for YHC5150X Series application software, DD and configuration storage.
Page 44

38
If an electric shock is felt when touching the charger or YHC5150X docked in the charger,
If there is any deformation, cracks or other damage to the charger base, power cord, or power
Do not disassemble or modify any component. This could cause failure or injury, invalidate
Plug power adapter directly into an outlet. Do not use power adapter with an extension
Do not subject the batteries to intense heat. This could cause overheating, fire, rupture or explosion.
SAFETY NOTICES
unplug charger immediately from outlet. Remove the YHC5150X from the charger
Waste Electrical and Electronic Equipment (WEEE), Directive 2002/96/EC
(This directive is only valid in the EU.)
This product complies with the WEEE Directive (2002/96/EC) marking requirement.
The following marking indicates that you must not discard this electrical/electronic product in domestic
household waste.
immediately after you determine it is safe.
adapter, unplug the charger and discontinue use.
certification and void the warranty.
cord.
Product Category
With reference to the equipment types in the WEEE directive Annex 1, this product is classified as a “Monitoring
and Control instrumentation” product.
Do not dispose of in domestic household waste.
When disposing of products in the EU, contact your local Yokogawa Europe B. V. office.
SPARE PARTS LIST
1W-A900529-00014 HART Test Lead Kit (included w/ unit) - standard banana plugs, mini-grabbers,
250 Ω shunt resistor
1W-A36821 Std size 250 Ω shunt resistor (incl’d w/ unit) - req'd for HART low resistance
loops
1W-9P790 Soft carrying case (included w/ unit) - custom soft case with adjustable shoulder
strap and HART lead compartment
1W-9P791 Hand strap (included w/ unit)
1W-9A820-1 YHC5150X Series Lithium Ion Battery Pack (included w/ unit).
1W-9A879 YHC5150X Series battery charger kit (included w/ unit), 100 – 240 Vac, 50/60
Hz Includes recharging cradle, power cord and USB cable.
1W-9P802 USB cable, Type A to B, 6.60 ft length (incl’d w/ unit); required for updates
1W-9P822 YHC5150X Series battery charger power cord (included w/ unit)
1W-9P823 7/64” Hex key wrench (included w/ unit). Fits the battery pack screws.
1W-9P780 YHC5150X Series µSD system memory card (included w/ unit). YHC5150X
software installed.
Page 45

INTRINSIC SAFETY CONTROL DRAWING
Page 46

εΧ
Authorized Representative in EU:
Adrian Page
apage@stockshed.com
Phone +011 8 328 2310
StockShed Limited
Stoneycroft House
Eversley
Mud Lane
Hampshire
Lower Common
RG27 0QS
This is to declare, in accordance with Directive 94/9/EC, that the following product(s) are designed and
manufactured in accordance with Annex II of Dir e c t ive 94/9/EC.
The manufacturer attests on their own responsibility that the apparatus has been constructed in accordance with the
principles of good engineering in safety matters, and that any routine verification and test required by Clause 27 of
EN 60079-0:2006 has been successfully completed.
Manufacturer:
Meriam Process Technologies, a Scott Fetzer Company
10920 Madison Avenue, Clevelan d, Ohio 44102, USA
Product Description:
Multifunction Calibrato r w ith HART Commu nication Terminals, Model 5150X series.
C E 0539 II 1 G
DEMKO 13 ATEX 1115457
Ex ia IIC T4 Ga
IECEx UL 13.0004
Intrinsically Safe, Exia
Class I, Div. 1 Groups A, B, C, D: T4
-10º C < Ta < +50º C Li = 0, Ci = 0
Certifying Agency:
UL International DEMKO A/S Testing & Certification (0539)
P.O. Box 514, Lyskaer 8, DK-2730 Herlev, Denmark
This Declaration is based on Compliance with the following Standards:
Regarding Hazardous Environments:
● EN 60079-11:2012 Electrical apparatus for explosive gas atmospheres - Intrinsic safe ty 'i'
● EN 60079-0:2012 Electrical apparatus for explosive gas atmospheres - General requirements
● EN 60079-26:2007 Special requirements for construction, test and marking of electrical
Regarding Electromagnetic Compatibility (EMC) for Handheld Class A device
Series 5150 hand held unit compliant with EMC Directive 2004/108/EC
● EN 61326-1:2006 Electrical equipment for measurement, control and laboratory use-EMC
requirements
● EN 60529:1992 Degrees of Protection Provided by Enclosures (IP Code:IP51)
For and on behalf of
Meriam Process Technologies,
John Balogh Date:
Standards Engineer
Meriam Process Technologies
EC Declaration of Conformity
apparatus of equipment group II, Category 1 G.
 Loading...