

Page 1

User’s
Manual
IM XL120E
XL100
(XL121/XL122/XL124)
Portable Data Station (Datum-Y)
(XL111/XL112/XL114)
Portable Data Logger (Datum-Y)
IM XL120E
1st Edition: April 2007 (MC)
Page 2

Introduction
Notes
Thank you for purchasing our XL100 Portable Data Station or Portable Data Logger.
This User’s Manual describes the functions of the XL100 as well as its operating
methods and handling precautions. Read this manual thoroughly before using the
XL100, to ensure correct use.
In addition to this manual, the Quick Setup Manual and Communication Function Manual
(contained in the CD-ROM as with this User’s Manual) are available separately.
The Quick Setup Manual briefly describes the main functions and the basic procedures
for performing such tasks as setup and measurement operations.
Use the Quick Setup Manual together with this in-depth User’s Manual. For details on
the communication functions, see the Communication Function Manual (contained in the
same CD-ROM). The Communication Function Manual is used on the XL121, XL122,
and XL124.
After reading this manual, keep it in an easily accessible place for later reference. This
manual will come in handy when you are unsure of how to operate the product.
• The contents of this manual are subject to change without prior notice.
• Figures and illustrations representing display views in this manual may differ from
actual views.
• Every effort has been made to ensure accuracy in the preparation of this manual.
However, should any doubts arise or errors come to your attention, please contact the
vendor from which you purchased the product.
• The contents of this manual may not be transcribed or reproduced, in part or in their
entirety, without prior permission.
Trademark Acknowledgements
The company and product names referred to in this document are either trademarks or
registered trademarks of their respective holders.
Revision Information
First Edition: April, 2007
1st Edition: April 2007 (MC)
All Rights Reserved, Copyright © 2005, Yokogawa Meters & Instruments Corporation
IM XL120E
1
Page 3
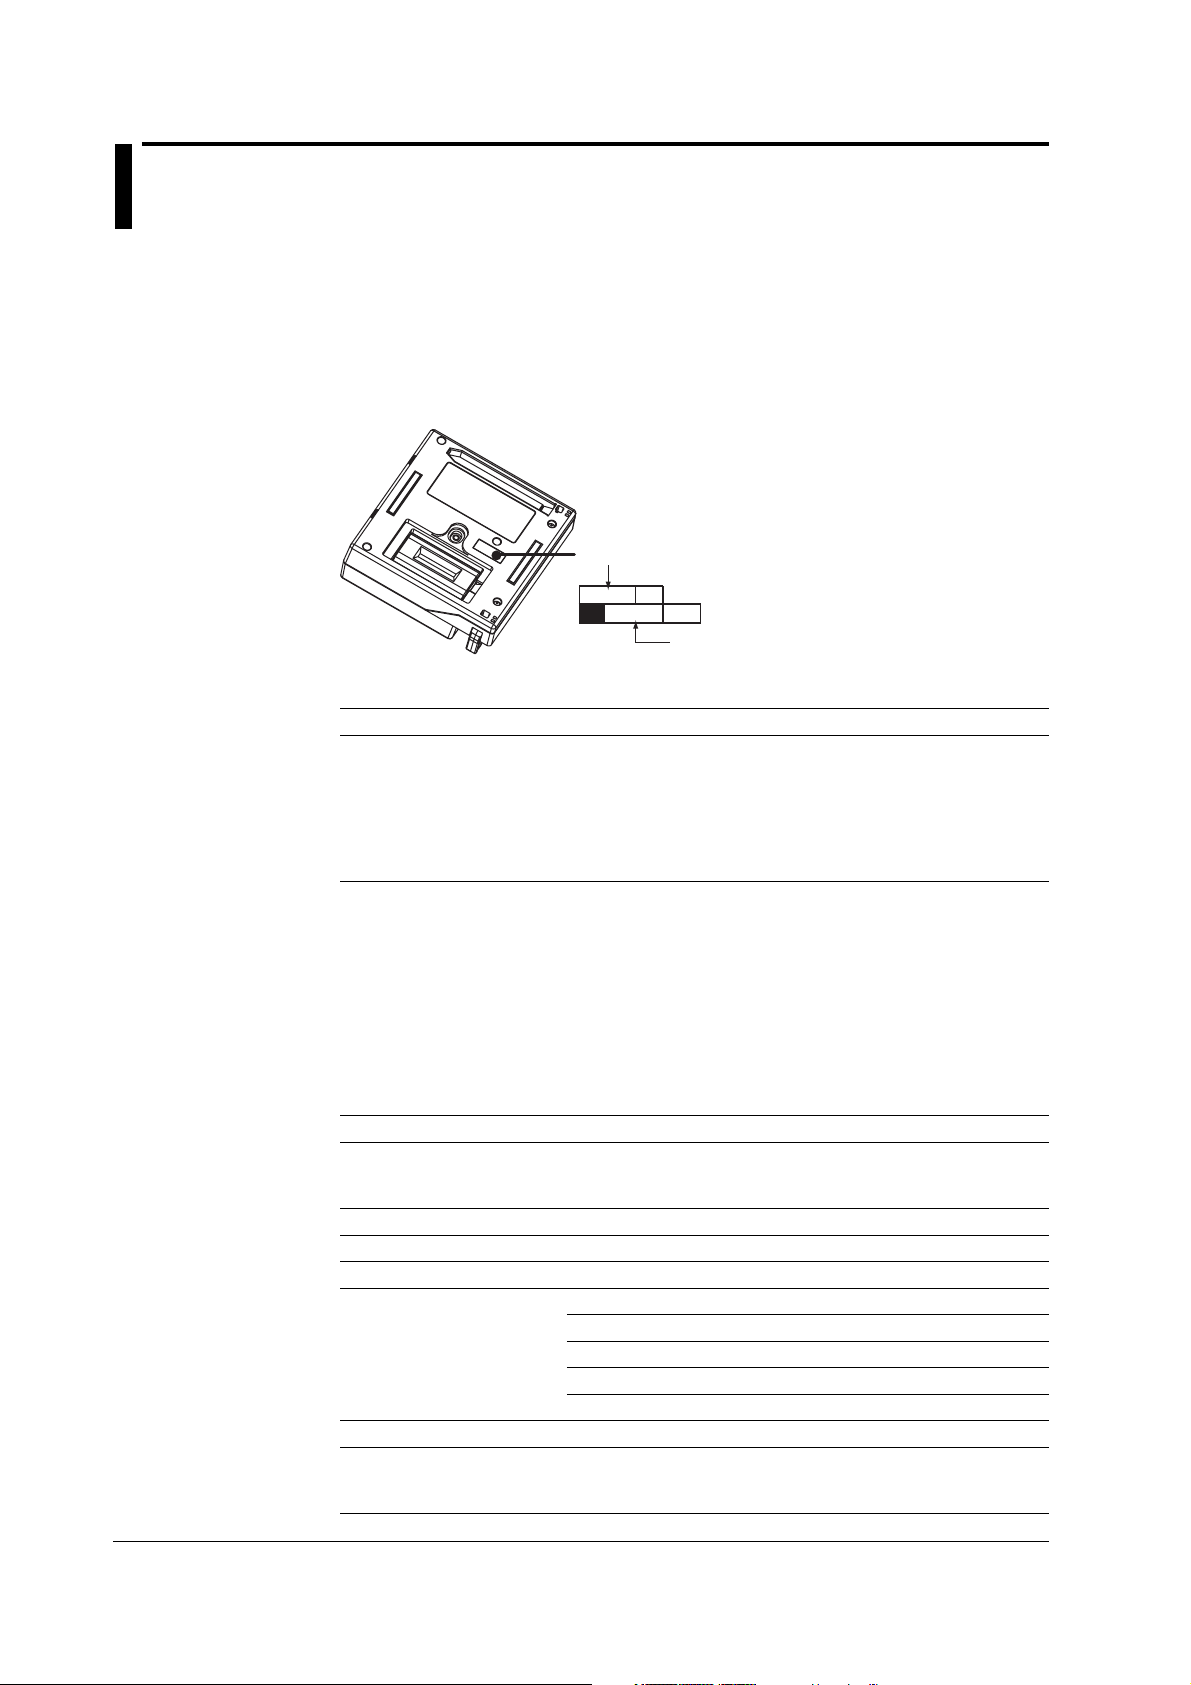
Checking the Contents of the Package
After opening the package, be sure to check the product as instructed below before use.
Should the product you have received be the wrong model, lack any items, or show any
problems in its appearance, contact the vendor from whom you purchased the product.
Instrument Main Unit
Check the model and suffix code printed on the nameplate on the rear panel to ensure
that the XL100 is exactly as specified in your purchase order.
Model
XL100
No.
When inquiring about the product to the vender,
please give the vendor the instrument number.
Model and Suffix Codes
Model Specifications
XL121 With a terminal block unit (8 channels)
XL122 With a terminal block unit (16 channels)
XL124 With a M3 screws terminal block unit (16 channels)
XL111 With a terminal block unit (8 channels), no SD card storage/communication function
XL112 With a terminal block unit (16 channels), no SD card storage/communication function
XL114 With a M3 terminal block unit (16 channels), no SD card storage/communication
* The XL111, XL112, and XL114 are only sold in Japan.
function
Accessories
Instrument Number
An instrument number is also printed on the nameplate. When inquiring about the
product to the vender, please also give the vendor this number.
Make sure that the package contains all the accessories listed below and that they are
all free from any damage.
No. Name Part No. Remarks
1 Terminal block unit 95052/95053 95052, 95053, and 95055 when the model is
/95055 XL111,XL112, and XL114 or XL121,XL122, and
XL124, respectively
2 Rubber boot 93036 For impact resistance
3 Side cover – Supplied with the XL121, XL122, and XL124
4 Screwdriver for terminals –
5 AC adapter 94010-D UL/CSA standard
-F VDE standard
-R SAA standard
-S BS standard
-H GB standard
6 Quick Setup Manual IM XL120P-E
7 CD-ROM – Contains Standard Software and PDF manuals
(User’s Manual (this manual), Quick Setup
Manual, and Communication Function Manual)
2
IM XL120E
Page 4

Checking the Contents of the Package
1.
+
c
h
1
-
b
+
c
h
2
-
b
+
c
h
3
-
b
+
c
h
4
-
b
+
c
h
5
-
b
+
c
h
6
-
b
+
c
h
7
-
b
+
c
h
8
-
2.
(Example: 95052)
5.
Note: Accessory items 1 to 3 come installed in the XL100.
Accessories and Spare Parts (Optional)
The products listed below are available as optional accessories and spare parts. For
technical and ordering inquiries concerning accessories and spare parts, contact the
vendor from whom you purchased the product.
Accessories
Name Part No. Remarks
Type-K TC 90060 5 m 4 sets
Carrying case 93037 For storing the XL100 and accessories
Lithium ion battery 94009 Voltage: 7.4 V. Capacity: 2400 mAh
Digital I/O cable 91029 For pulse input, logic input, and alarm output.
Communication cable 91011 For RS-232 communication with a PC. Number of
Printer 97010 With 1 thermal paper roll and battery pack
AC adapter (for printer, Europe) 94006
AC adapter (for printer, USA) 94007
RS-232C cable 91010 For connecting the printer. Number of pins: 9 pins
Thermal paper for printer 97080 10 rolls
Stand 93039 Supports tilted installation on the desktop, wall
Application software XL900 For online data acquisition and data analysis
(Datum-LOGGER)
3.
6.
7.
4.
Length: 3 m
pins: 9 pins
mounting, and DIN rail mounting
IM XL120E
Spare Parts
Name Part No. Remarks
Terminal block unit (8 channels) 95052 8 channels, clamp terminal type
Terminal block unit (16 channels) 95053 16 channels, clamp terminal type
M3 screws terminal block unit 95055 16 channels, M3 screws terminal type
(16 channels)
Rubber boot 93036 For impact resistance
AC adapter 94010-D UL/CSA standard
-F VDE standard
-R SAA standard
-S BS standard
-H GB standard
TIP
It is advisable that the packing box be saved, as it is useful when you transport the product.
3
Page 5
Safety Precautions
When operating the instrument, be sure to observe the cautionary notes given below to
ensure correct and safe use of the instrument. If you use the instrument in any way other
than as instructed in this manual, the instrument’s protective measures may be impaired.
Yokogawa Meters & Instruments Corporation is by no means liable for any damage
resulting from use of the instrument in contradiction to these cautionary notes.
The following safety symbols are used on the instrument and in this manual.
Danger! Handle with Care. This symbol indicates that the operator must refer to
an explanation in the User’s Manual or Service Manual in order to avoid risk of
injury or death of personnel or damage to the instrument.
This symbol indicates DC voltage/current.
This symbol indicates AC voltage/current.
This symbol indicates ON (power).
This symbol indicates OFF (power).
WARNING
Indicates a hazard that may result in the loss of life or serious injury of the user
unless the described instruction is abided by.
CAUTION
Indicates a hazard that may result in an injury to the user and/or physical damage
to the product or other equipment unless the described instruction is abided by.
Note
Indicates information that is essential for handling the instrument or, should be
noted in order to familiarize yourself with the instrument’s operating procedures
and/or functions.
TIP
Indicates information that complements the present topic.
SEE ALSO
Indicates the reference location(s) for further information on the present topic.
4
IM XL120E
Page 6

Safety Precautions
Strictly observe the following cautionary notes in order to avoid the risk of injury or death
of personnel or damage to the instrument due to hazards such as electrical shock.
WARNING
• Do Not Remove the Case
Do not remove the case from the instrument or disassemble/modify the
instrument.
For inspection and/or adjustment of the internal assembly, contact the vendor
from which you purchased the instrument.
• Do Not Operate in an Explosive Atmosphere
Do not operate the instrument in a location where any flammable or explosive
gas/vapor is present. It is extremely hazardous to operate it in such an atmosphere.
• Use the Correct Power Supply
Before turning on the instrument, always make sure the voltage of the power
source to be applied matches the instrument’s supply voltage.
• Unplug If Abnormal Behavior Occurs
If the instrument begins to emit smoke, becomes too hot, or gives off an
unusual smell, immediately turn it OFF and disconnect the power cord from
the outlet. Also turn off power to the object under measurement that is connected to the instrument’s input terminals. Never attempt to use the instrument
again. If any such anomalies as noted above occurs, contact the vendor from
which you purchased the instrument.
Do not attempt to repair the instrument yourself, as doing so is extremely
dangerous.
• Do Not Damage the Power Cord
•To prevent electric shock or fire, be sure to use the power cord supplied by
YOKOGAWA.
• Do not place any load on the power cord or allow the power cord to come into
contact with any heat source. When unplugging the power cord from the outlet,
hold its plug, rather than holding and pulling the cord itself.
• If the power cord is damaged, contact the vendor from which you purchased
the instrument.
IM XL120E
5
Page 7

Language Setting at Startup
Language Setting at Startup
When you start up the XL100 for the first time (the first time you turn on the XL100 after
purchase), you must set the language that you are going to use. Follow the procedure
below to set the language.
Once you set the language, the XL100 will start up using the specified language the next
time.
1. When you turn the power switch ON, the following screen appears.
2. Use the arrow keys to select the language, and press SELECT.
3. The language is set, and a self-test starts automatically.
TIP
To change the language once you set it, press SETTING, select HARDWARE >
LANGUAGE, and change the setting.
6
IM XL120E
Page 8

3
10
11
12
13
App
Index
Contents
1
Checking the Contents of the Package .......................................................................................... 2
Safety Precautions ......................................................................................................................... 4
Language Setting at Startup ........................................................................................................... 6
2
3
Chapter 1 Explanation of Functions
1.1 Overview of the XL100 ..................................................................................................... 1-1
1.2 Functions of the Input Section ......................................................................................... 1-2
1.3 Display Function .............................................................................................................. 1-5
1.4 Alarm Function ................................................................................................................. 1-9
1.5 Data Save/Load Function and File Operation Function ................................................. 1-11
1.6 Calculation Function ...................................................................................................... 1-13
1.7 Setup Function ............................................................................................................... 1-14
1.8 Communication Function (Supported only on the XL121, XL122, and XL124) ............. 1-17
1.9 Other Main Functions ..................................................................................................... 1-19
Chapter 2 Part Names and Functions
2.1 Front Panel and Terminal Block Unit ............................................................................... 2-1
2.2 Side Panel and Rear Panel .............................................................................................. 2-3
2.3 Data Display ..................................................................................................................... 2-4
2.4 Setup Display ................................................................................................................. 2-19
Chapter 3 Handling Precautions and Wiring
3.1 Handling Precautions ....................................................................................................... 3-1
3.2 Operating Environment .................................................................................................... 3-2
3.3 Wiring the Input Signal Cable .......................................................................................... 3-4
3.4 Wiring the Pulse Input, Logic Input, and Signal Cables .................................................. 3-7
3.5 Wiring the External I/O Signal Cables .............................................................................. 3-8
3.6 Connecting the Power Supply ........................................................................................ 3-10
3.7 Handling of the Lithium Ion Battery (Sold Separately) ................................................... 3-11
3.8 Connecting Communication Cables
(Supported only on the XL121, XL122, and XL124) ...................................................... 3-12
3.9 Connecting the USB Memory ........................................................................................ 3-16
4
5
6
7
8
9
10
11
12
Chapter 4 Basic Operation
4.1 Turning ON/OFF the Power Switch ................................................................................. 4-1
4.2 Basic Key Operations ...................................................................................................... 4-4
4.3 Setting the Date and Time ............................................................................................. 4-16
4.4 Resetting the System (Initializing the Settings) .............................................................. 4-18
4.5 Setting the Display Backlight ......................................................................................... 4-19
4.6 Locking the Keys ............................................................................................................ 4-20
4.7 Inserting and Removing the External Storage Media .................................................... 4-21
Chapter 5 Setting the Input Channels
5.1 Setting the Analog Input Channels .................................................................................. 5-1
5.2 Setting the Pulse Input Channel ...................................................................................... 5-5
5.3 Setting the Logic Input Channel ....................................................................................... 5-9
5.4 Directly Setting the Range, Span, and Scale Using the RANGE key ............................ 5-11
IM XL120E
13
App
Index
7
Page 9

Contents
Chapter 6 Setting Alarms
6.1 Setting the Alarm on Analog Input Channels ................................................................... 6-1
6.2 Setting the Alarm on Pulse Input Channels ..................................................................... 6-3
6.3 Setting the Alarm on Logic Input Channels ...................................................................... 6-5
6.4 Setting Alarms on Calculation and Communication Channels (Communication channels
are supported only on the XL121, XL122, and XL124) .................................................... 6-7
6.5 Setting Alarm Output and Display .................................................................................... 6-9
6.6 Searching Alarms ........................................................................................................... 6-11
Chapter 7 Setting the Displayed Contents and Operating the Displays
7.1 Switching the Operation Mode and Display ..................................................................... 7-1
7.2 Setting Groups ................................................................................................................. 7-3
7.3 Setting the Background Color, Grid, and Bar Graph Base Position ................................. 7-5
7.4 Setting Alarm Lines .......................................................................................................... 7-7
7.5 Switching the Time Scale ................................................................................................. 7-9
Chapter 8 Setting the Calculation of Measured Data
8.1 Setting the Calculation ..................................................................................................... 8-1
8.2 Setting the Statistical Calculation ..................................................................................... 8-4
Chapter 9 Setting and Controlling the Data Saving and Loading Operations
9.1 Setting the Save Operation of Measured and Calculated Data ....................................... 9-1
9.2 Loading Measurement or Calculation Data Files ............................................................. 9-8
9.3 Manually Saving Measured and Calculated Data ............................................................ 9-9
9.4 Saving the Alarm Summary Data ................................................................................... 9-10
9.5 Saving the Log Data ...................................................................................................... 9-11
9.6 Saving and Loading Setup Data .................................................................................... 9-12
9.7 Renaming Files .............................................................................................................. 9-13
9.8 Deleting Files ................................................................................................................. 9-14
9.9 Copying Data ................................................................................................................. 9-15
9.10 Formatting the External Storage Media or Internal Memory .......................................... 9-17
9.11 Initializing Log Information ............................................................................................. 9-18
9.12 Automated Measurement and Save Function................................................................ 9-19
Chapter 10 Setting the Communication Function
10.1 Selecting the Communication Interface ......................................................................... 10-1
10.2 Setting the Serial Communication (RS-232, RS-485, Modbus, and Communication
Channel) ........................................................................................................................ 10-3
10.3 Setting the USB ID ......................................................................................................... 10-7
10.4 Setting the Ethernet Interface ........................................................................................ 10-8
10.5 Setting the FTP Client .................................................................................................. 10-12
10.6 Setting the Web Server ................................................................................................ 10-14
10.7 Setting the E-mail Transmission .................................................................................. 10-16
8
IM XL120E
Page 10

3
10
11
12
13
App
Index
Contents
Chapter 11 Other Functions
11.1 Setting the Print Output and Executing the Print Operation (Supported only on the XL121,
XL122, and XL124) ........................................................................................................ 11-1
11.2 Setting the Beep Sound ................................................................................................. 11-4
11.3 Set the ID Number ......................................................................................................... 11-5
11.4 Setting the Language ..................................................................................................... 11-6
11.5 Setting the Temperature Unit ......................................................................................... 11-7
11.6 Registering Users .......................................................................................................... 11-8
11.7 Setting and Executing Key Login/Logout and ................................................................ 11-9
11.8 Displaying System Information .................................................................................... 11-11
11.9 Setting the Filter ........................................................................................................... 11-12
Chapter 12 Troubleshooting
12.1 Troubleshooting ............................................................................................................. 12-1
12.2 Messages and Their Corrective Actions ........................................................................ 12-2
12.3 Disposing the Product .................................................................................................... 12-6
1
2
3
4
5
6
Chapter 13 Specifications
13.1 Input Specifications ........................................................................................................ 13-1
13.2 Display Specifications .................................................................................................... 13-4
13.3 Data Storage Specifications........................................................................................... 13-6
13.4 Alarm Specifications ...................................................................................................... 13-8
13.5 Communication Specifications
(Supported only on the XL121, XL122, and XL124) ...................................................... 13-9
13.6 Specifications of Other Functions ................................................................................ 13-11
13.7 General Specifications ................................................................................................. 13-12
13.8 External Dimensions .................................................................................................... 13-14
7
8
9
Appendix
Index
Appendix 1 A List of Settings and User Registration Privileges ........................................... App-1
Appendix 2 System Reset and Initialized Items When the Terminal Block Is Changed .......App-8
10
11
12
13
App
Index
IM XL120E
9
Page 11
Chapter 1 Explanation of Functions
1.1 Overview of the XL100
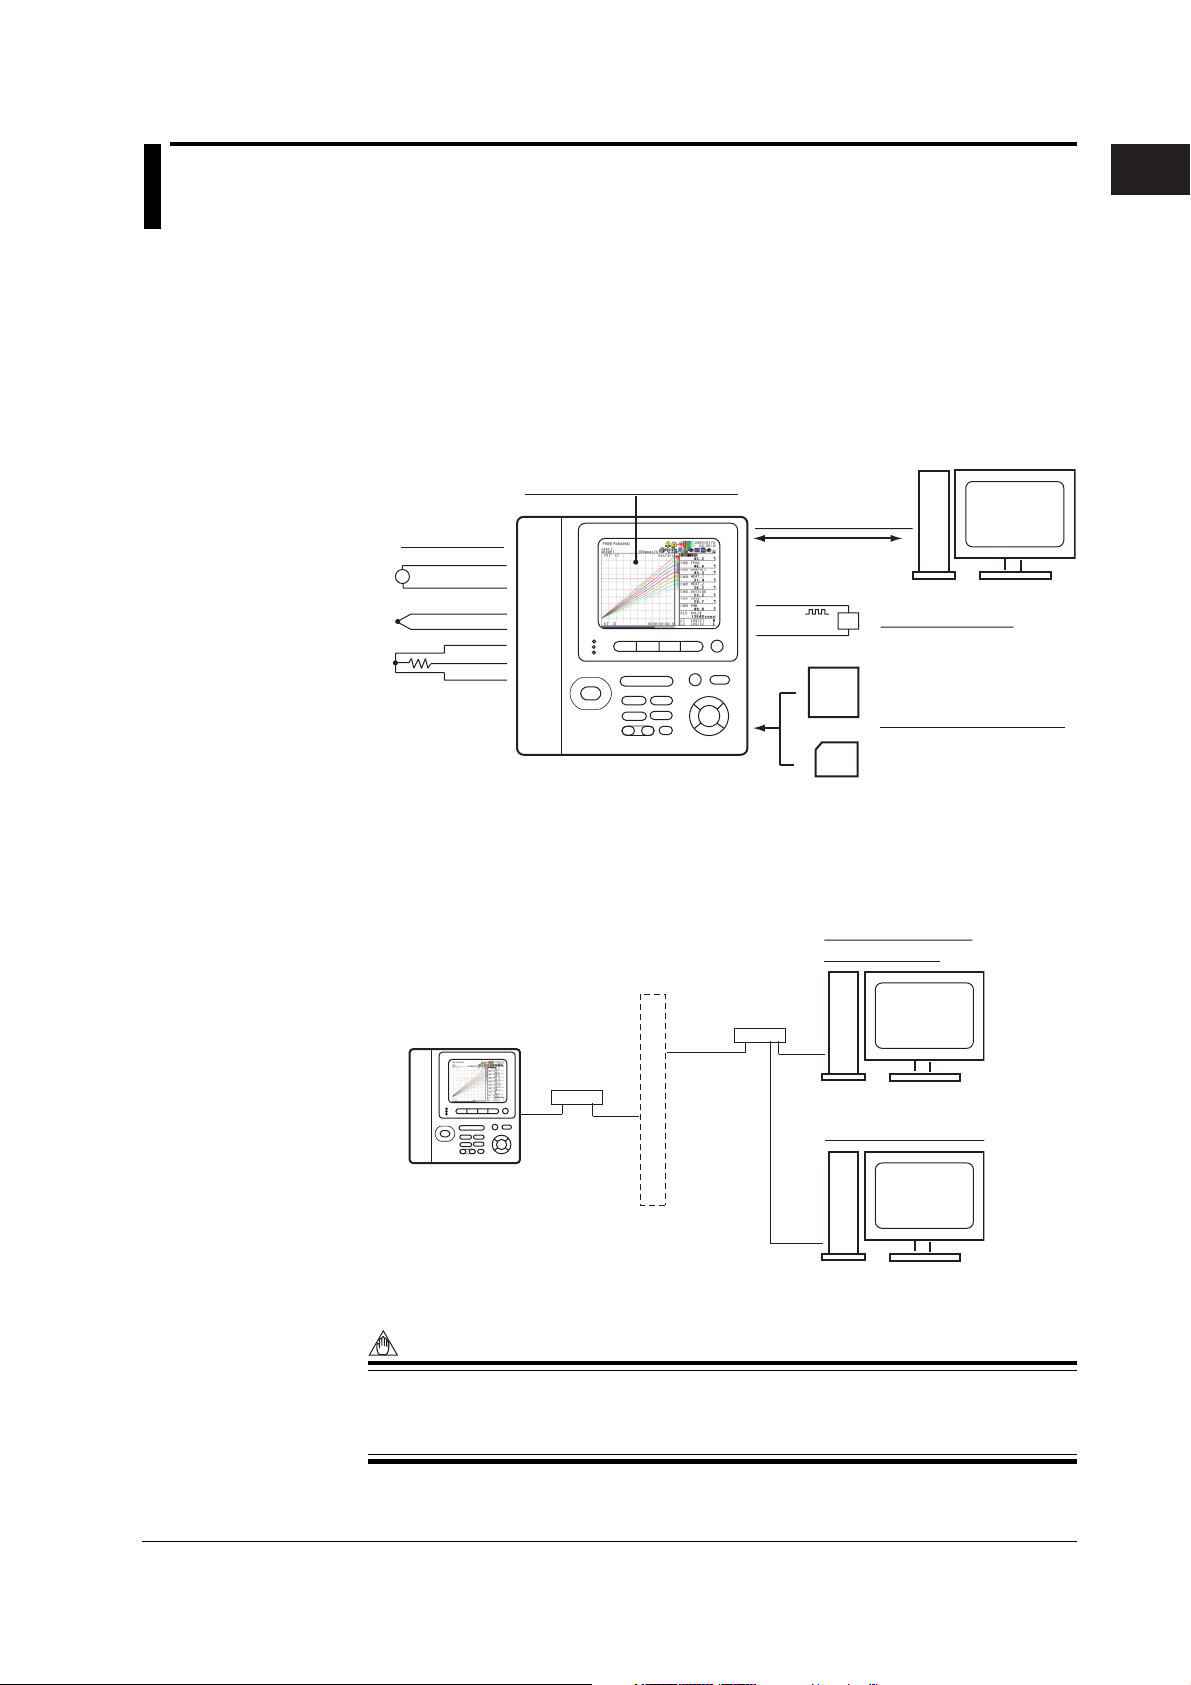
The XL100 is a handheld data logger that (1) periodically samples DC voltage or analog
input such as thermocouples and RTDs, (2) acquires the sampled measured data in the
internal memory, and (3) displays the measured data on a LCD in the form of
waveforms, digital display, and bar graphs. The measured data can also be saved to
external storage media such as CF cards and SD cards. The saved data can be loaded
into the XL100 to be displayed or displayed on a PC using the accompanying software
program.
Displays the measured data
Analog input
DC voltage
Thermocouple
RTD
V
Data communication
Pulse/Logic input
CF
Save the measured data
1
Explanation of Functions
PC
SD
By using the Ethernet interface that comes standard with the XL100, the measured data
can be automatically transmitted to a server on a network. The Ethernet interface can
also be used to retrieve the measured data saved on the XL100 internal memory or an
external storage medium into a PC on the network.
Automatically save
measured data
Ethernet
Hub
Hub
Load measured data
Server
PC
IM XL120E
Note
The function for saving the measured data to the SD card and general communication
functions including the Ethernet interface are supported only on the XL121, XL122, and
XL124.
1-1
Page 12

1.2 Functions of the Input Section
Number of Measurement Channels and Sampling Interval
There are two types of analog input terminals, 8 channels or 16 channels.
Terminal block unit (8 ch): 95052 Terminal block unit (16 ch): 95053
+
ch1
-
b
+
ch2
-
b
+
ch3
-
b
+
ch4
-
b
+
ch5
-
b
+
ch6
-
b
+
ch7
-
b
+
ch8
-
The sampling interval (scan interval and data storage interval) varies depending on the
number of input channels as shown in the table below.
Number of Channels Sampling Interval
8 100, 200 ,500 ms, 1 , 2, 5, 10, 20, 30 s, 1, 2, 5, 10, 20 , 30 min, or 1 h
16 200 ,500 ms, 1 , 2, 5, 10, 20, 30 s, 1, 2, 5, 10, 20 , 30 min, or 1 h
Input Type and Calculation
As shown in the table below, the available input types are analog input, which includes DC
voltage, thermocouple, and RTD, and other inputs, which consist of pulse signal (1 channel) and
logic signals (2 channels). Also, addition, subtraction, multiplication, and division between two
inputs can be calculated and assigned to a calculation channel and displayed in the same
fashion as measured values. The statistics of measured values can also be displayed.
Input/Calculation Description
DC voltage Measures a DC voltage in the range of ±100 mV to ±50 V.
Thermocouple Selectable from the following types: R, S, B, K, E, J, T, N, W, L, and U.
RTD Selectable from Pt100 and JPt100 types.
Pulse signal Displays the pulse input as number of revolutions, integrated value, or
Logic signal Displays the logic waveform by taking input voltage less than or equal to 0.9 V
Arithmetic calculation When the input type is set to DC voltage, thermocouple, RTD, or pulse
Statistical calculation Calculates and displays the maximum, minimum, average, peak (P-P),
Input Range and Measurable Range
Set the input range or type for analog inputs (DC voltage, thermocouple, and RTD) and
set the measurable range for a pulse signal digital input.
• DC voltage
Select from the input ranges listed in the following table.
Input Range Measurable Range Maximum Display Resolution
100 mV –100.00 to 100.00 mV 10 µV
500 mV –500.0 to 500.0 mV 100 µV
1 V –1.0000 to 1.0000 V 100 µV
5 V –5.000 to 5.000 V 1 mV
10 V –10.000 to 10.000 V 1 mV
50 V –50.00 to 50.00 V 10 mV
1-5V/f.s. 1.000 to 5.000 V 1 mV
f.s.: measurable range
1-2
instantaneous value.
to be OFF (0) and input voltage greater than or equal to 2.1 V to be ON (1).
input, addition, subtraction, multiplication, and division can be performed
with a measured value of another channel, and the result displayed as
the measured value of that channel.
or rms value of the measured value.
M3 screws terminal block unit (16 ch): 95055
IM XL120E
Page 13

1.2 Functions of the Input Section
• Thermocouple or RTD
Select from the thermocouple types or RTD types listed in the following table.
Input Type Type Measurable Range
Thermocouple R 0 to 1768 °C
S0 to 1768 °C
B 600 to 1800 °C
K–200.0 to 1372.0 °C
E–200.0 to 1000.0 °C
J–200.0 to 1200.0 °C
T–200.0 to 400.0 °C
N–200.0 to 1300.0 °C
W0 to 2315 °C
L–200.0 to 900.0 °C
U–200.0 to 400.0 °C
RTD Pt100 –200.0 to 850.0 °C
JPt100 –200.0 to 500.0 °C
• Pulse Signal
Measures the following items on the rising edge (from low to high) of the input pulse.
• Pulse (instantaneous value): Counts and displays the number of pulses per
sampling interval.
• Pulse (integrated value): Sums and displays the number of pulses per
sampling interval from the start of the logging
operation.
• Number of revolutions: Counts the number of pulses per second, converts
the number to number of revolutions, and displays
the result.
Input Type Range Maximum Number of Input Pulses
Pulse (instantaneous value) None 50 k/sampling interval
Pulse (integrated value) 50 kc/f.s. 50 k/sampling interval
500 kc/f.s.
5 Mc/f.s.
50 Mc/f.s.
500 Mc/f.s.
Number of revolutions 500 rpm/f.s. 50 k/sec
5 krpm/f.s.
50 krpm/f.s.
500 krpm/f.s.
f.s.: measurable range
1
Explanation of Functions
IM XL120E
• Logic Signal
Fixed as follows:
Low: 0.9 V or less or shorting of the input terminal
High: 2.1 V or more or opening of the input terminal
Scaling
For DC voltage, thermocouple, RTD and pulse input, the measured values can be scaled
to a value in the appropriate unit and displayed. Set the upper and lower limits of the
input’s display span, the upper and lower limits after scaling, and the unit. For pulse
input, set the conversion ratio, offset value, upper and lower limits of the scale after the
conversion, and unit.
Burnout
When measuring temperature using a thermocouple and the thermocouple burns out,
the measured result is fixed to positive over range (shown as “+*****”).
1-3
Page 14

1.2 Functions of the Input Section
Reference Junction Compensation (RJC)
When measuring temperature with a thermocouple, the XL100 uses its internal reference
junction compensation function.
Average Function
The average function performs moving average defined by the equation below on the
measured data to suppress the effects of noise riding on the signal. Use this function
when the displayed values of the measured data are fluctuating and difficult to read.
D
= (M
n
Dn: Displayed value obtained by linearly averaging m points of numeric data
M
n–(m–1):
•••
M
n–2:
M
n–1:
M
n:
m
:
Filter Function
Digital filter with the cutoff frequencies shown in the table below. The cutoff frequency
varies depending on the number of measurement channels and sampling frequency.
Set the frequency (50 Hz or 60 Hz) to match the frequency of the power supply that you
are using.
When the noise level is high due to the object under measurement or the environment,
this filter function can eliminate the noise components allowing correct measurements.
n–(m–1)
+ ... M
n–2+Mn–1+Mn
)/m
from the n–(m–1)th to nth time
Numeric data of the n–(m–1)th time
Numeric data of the n–2th time
Numeric data of the n–1th time
Numeric data of the nth time
Average count (select 1, 2, 5, 10, or 20)
Sampling Interval vs. Cutoff Frequency Table
Sampling interval 100 msec 200 msec 500 msec 1 sec 2 sec 5 sec 10 sec ≥ 20 sec
8 ch
16 ch
2560 Hz50 Hz
2560 Hz60 Hz 731 Hz 290 Hz 144 Hz 60 Hz 50 Hz 10 Hz 10 Hz
–50 Hz
–60 Hz 2560 Hz 731 Hz 290 Hz 144 Hz 60 Hz 60 Hz 10 Hz
2560 Hz8 ch Filter OFF 2560 Hz 2560 Hz 2560 Hz 2560 Hz 2560 Hz 2560 Hz 2560 Hz
2560 Hz16 ch Filter OFF 2560 Hz 2560 Hz 2560 Hz 2560 Hz 2560 Hz 2560 Hz 2560 Hz
731 Hz 290 Hz 144 Hz 50 Hz 50 Hz 10 Hz 10 Hz
2560 Hz 731 Hz 290 Hz 144 Hz 50 Hz 50 Hz 10 Hz
1-4
IM XL120E
Page 15
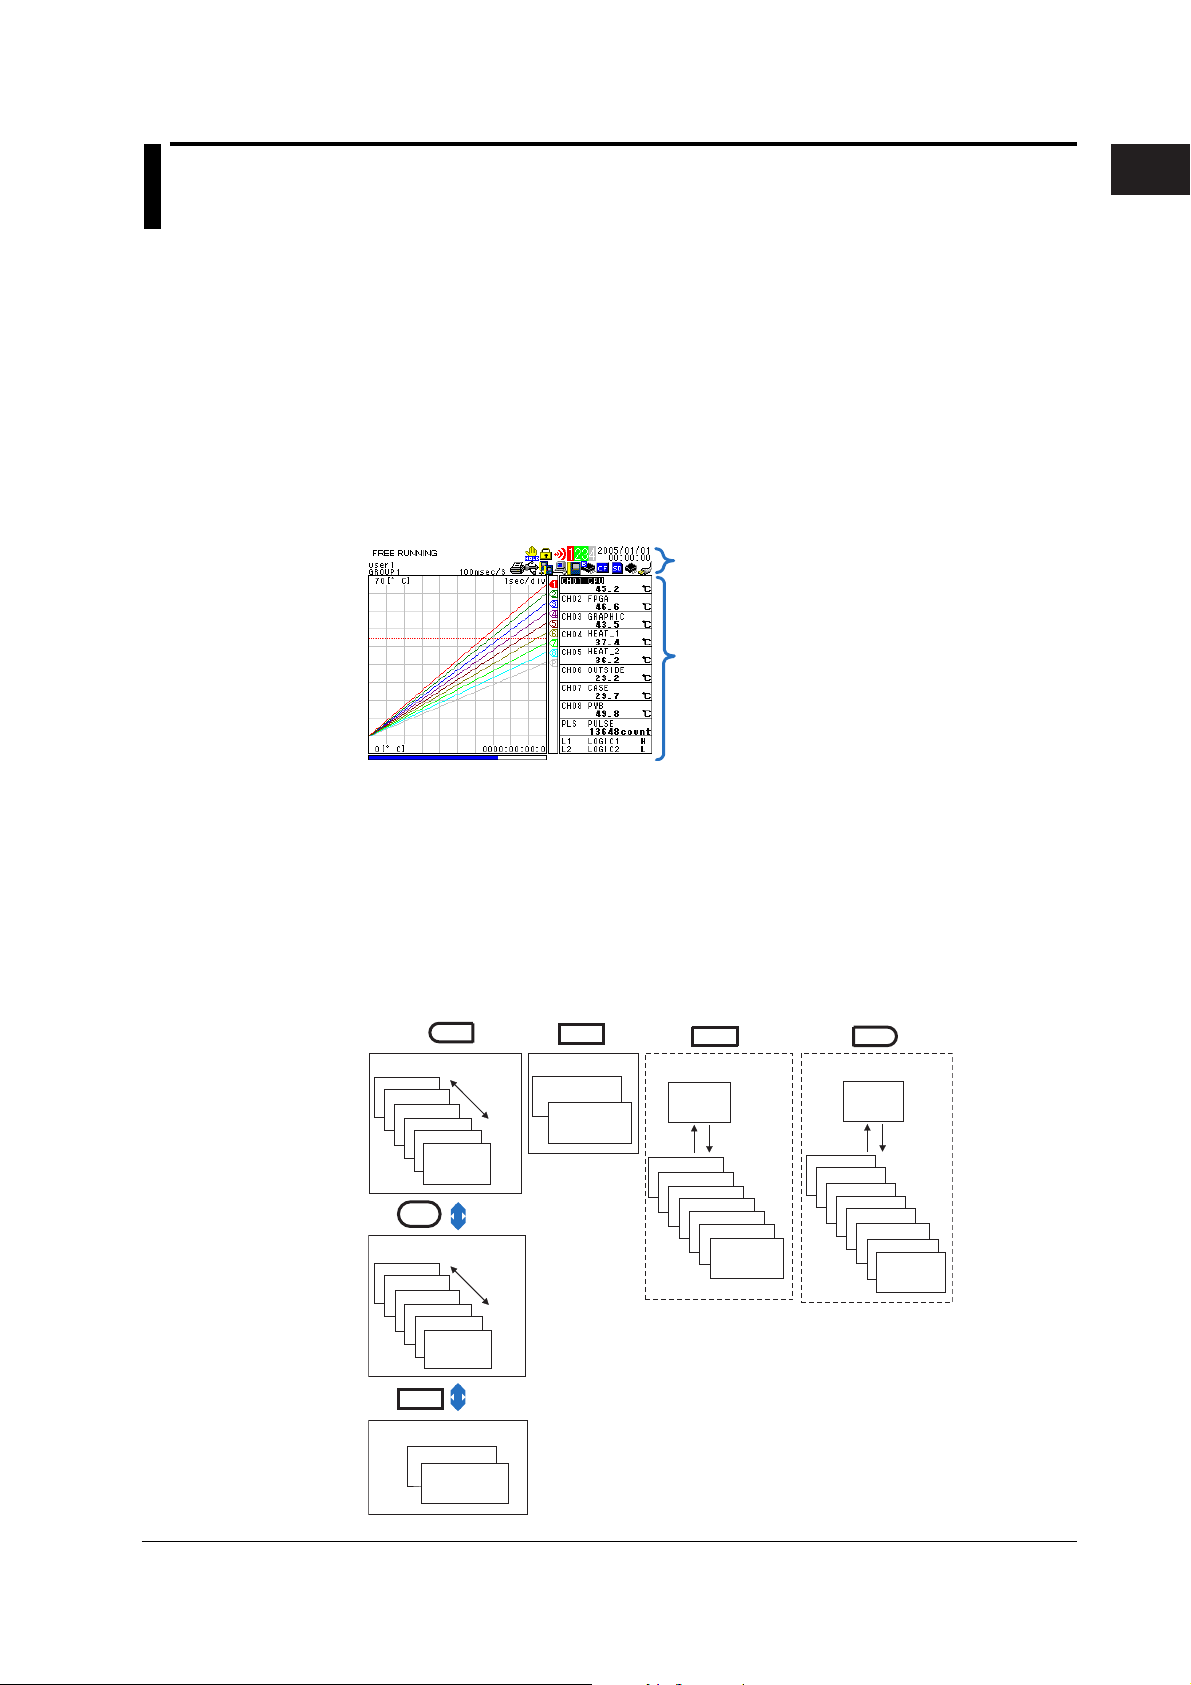
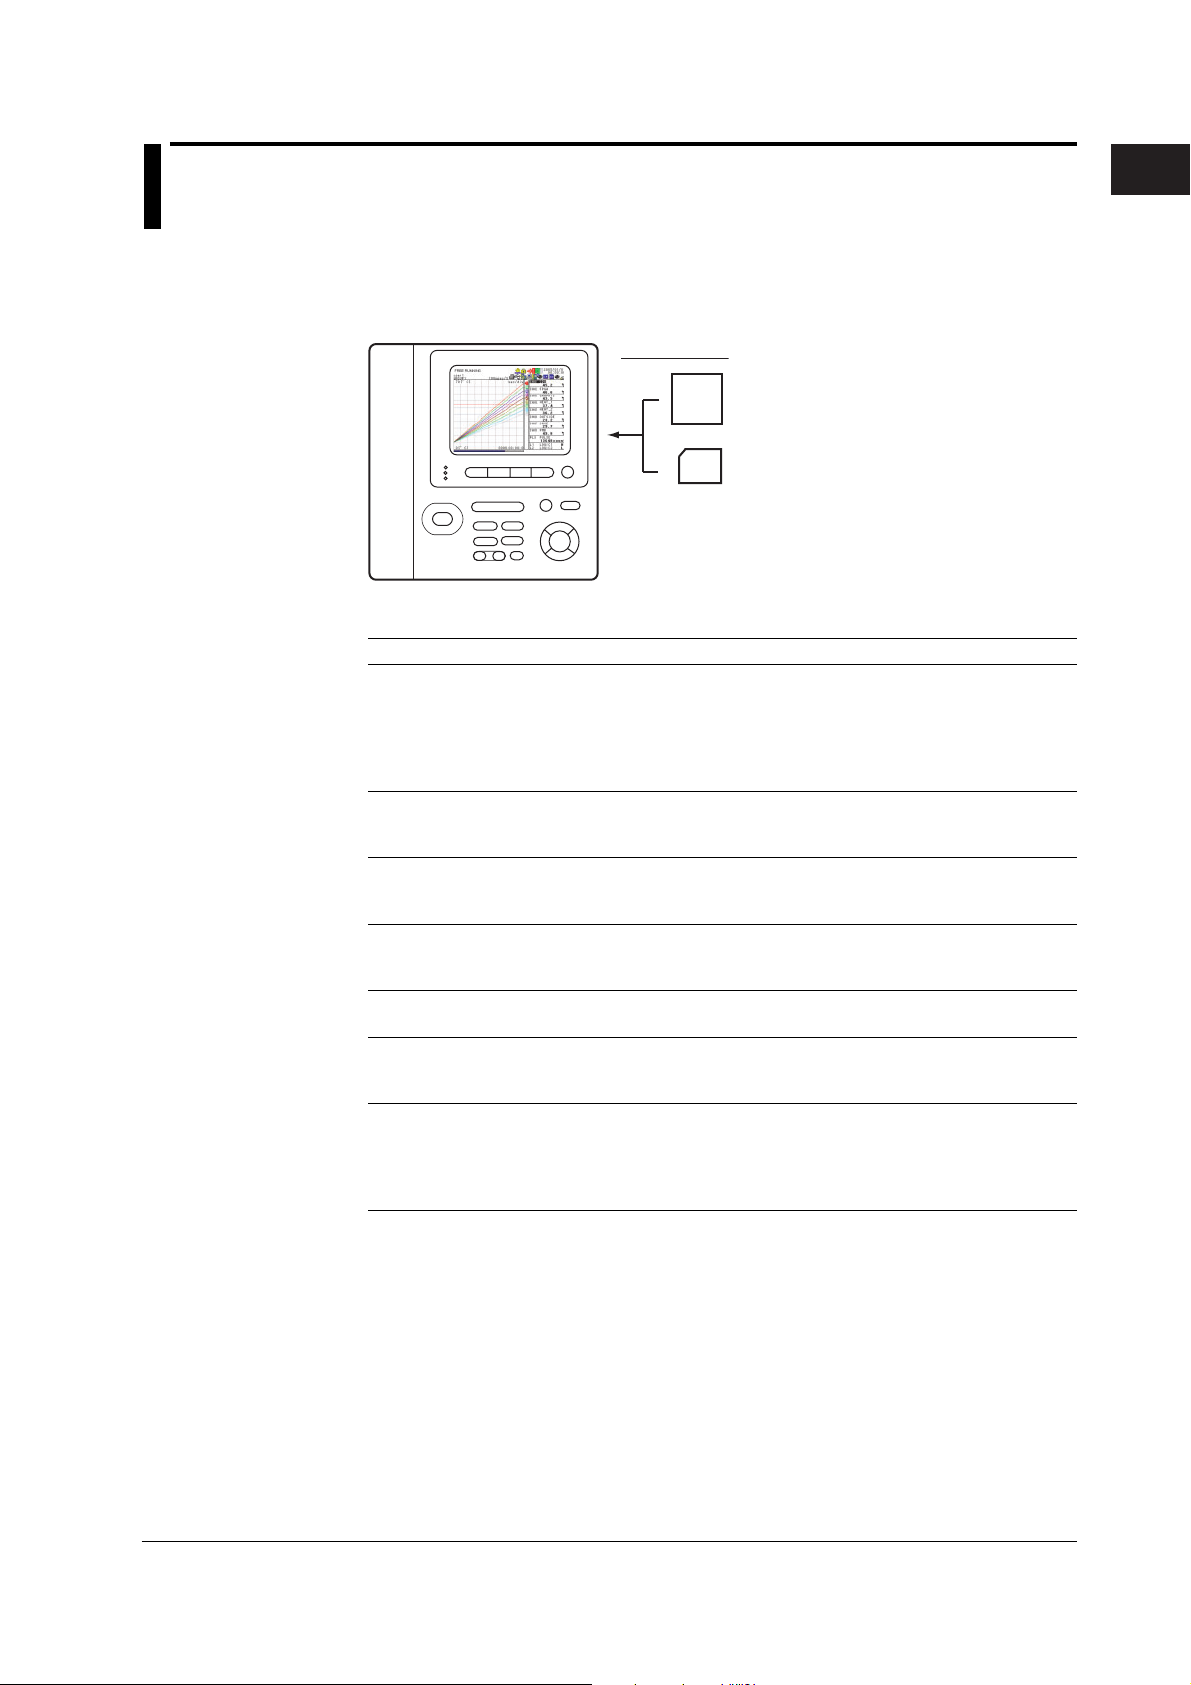
1.3 Display Function
Display
The XL100 is equipped with a 3.5-inch color LCD monitor (320 dots horizontal × 240 dots
vertical). The screen consists of the status display section and the data display section.
• Status Display Section
Displays the screen name, date/time, internal memory and external storage media
usage, communication condition, operation mode, alarm occurrence, key lock, user
name (key login function), calculation, power condition, etc.
• Data Display Section
Displays the waveform display, digital display, bar graph display as well as alarm, log,
and file information of the measured/calculated data. Displays the setting menu and
settings when configuring the functions of the XL100.
1
Explanation of Functions
Status display section
Data display section
Operation Mode and Display
As shown in the figure below, the XL100 has six operation modes: (1) Free Running
Mode in which instantaneous values are measured, (2) Logging Mode in which
continuous measurement is performed by setting the start and end of data saving, (3)
Logging & Review Mode in which past measured data can be viewed during continuous
measurement, (4) Review Mode in which saved data is analyzed, (5) File Operation
Mode in which file operations such as saving and loading of the setup data is performed,
and (6) Setting Mode in which various settings such as the measurement conditions are
specified. The displayed contents vary depending on the operation mode.
HOME
Free Running Mode
Waveform
Digital
Bar graph
Alarm summary
Log
System
information
START
/ STOP
Logging Mode
Waveform
Digital
Bar graph
Alarm summary
Log
System
information
Switch the
display
Switch the
display
REVIEW
Review Mode
Marker
measurement
Statistical
calculation
FILE
File Operation Mode
File operation
menu
Select
Set
Rename files
Delete files
Setup file
Copy data files
Copy backup memory
Format
Initialize log
SETTING
Setting Mode
Setting menu
Set
Input
Display
Data Save
Alarm
Calculation
Communication
Select
Hardware
System
IM XL120E
REVIEW
Logging & Review Mode
Marker measurement
Statistical
calculation
1-5
Page 16
1.3 Display Function
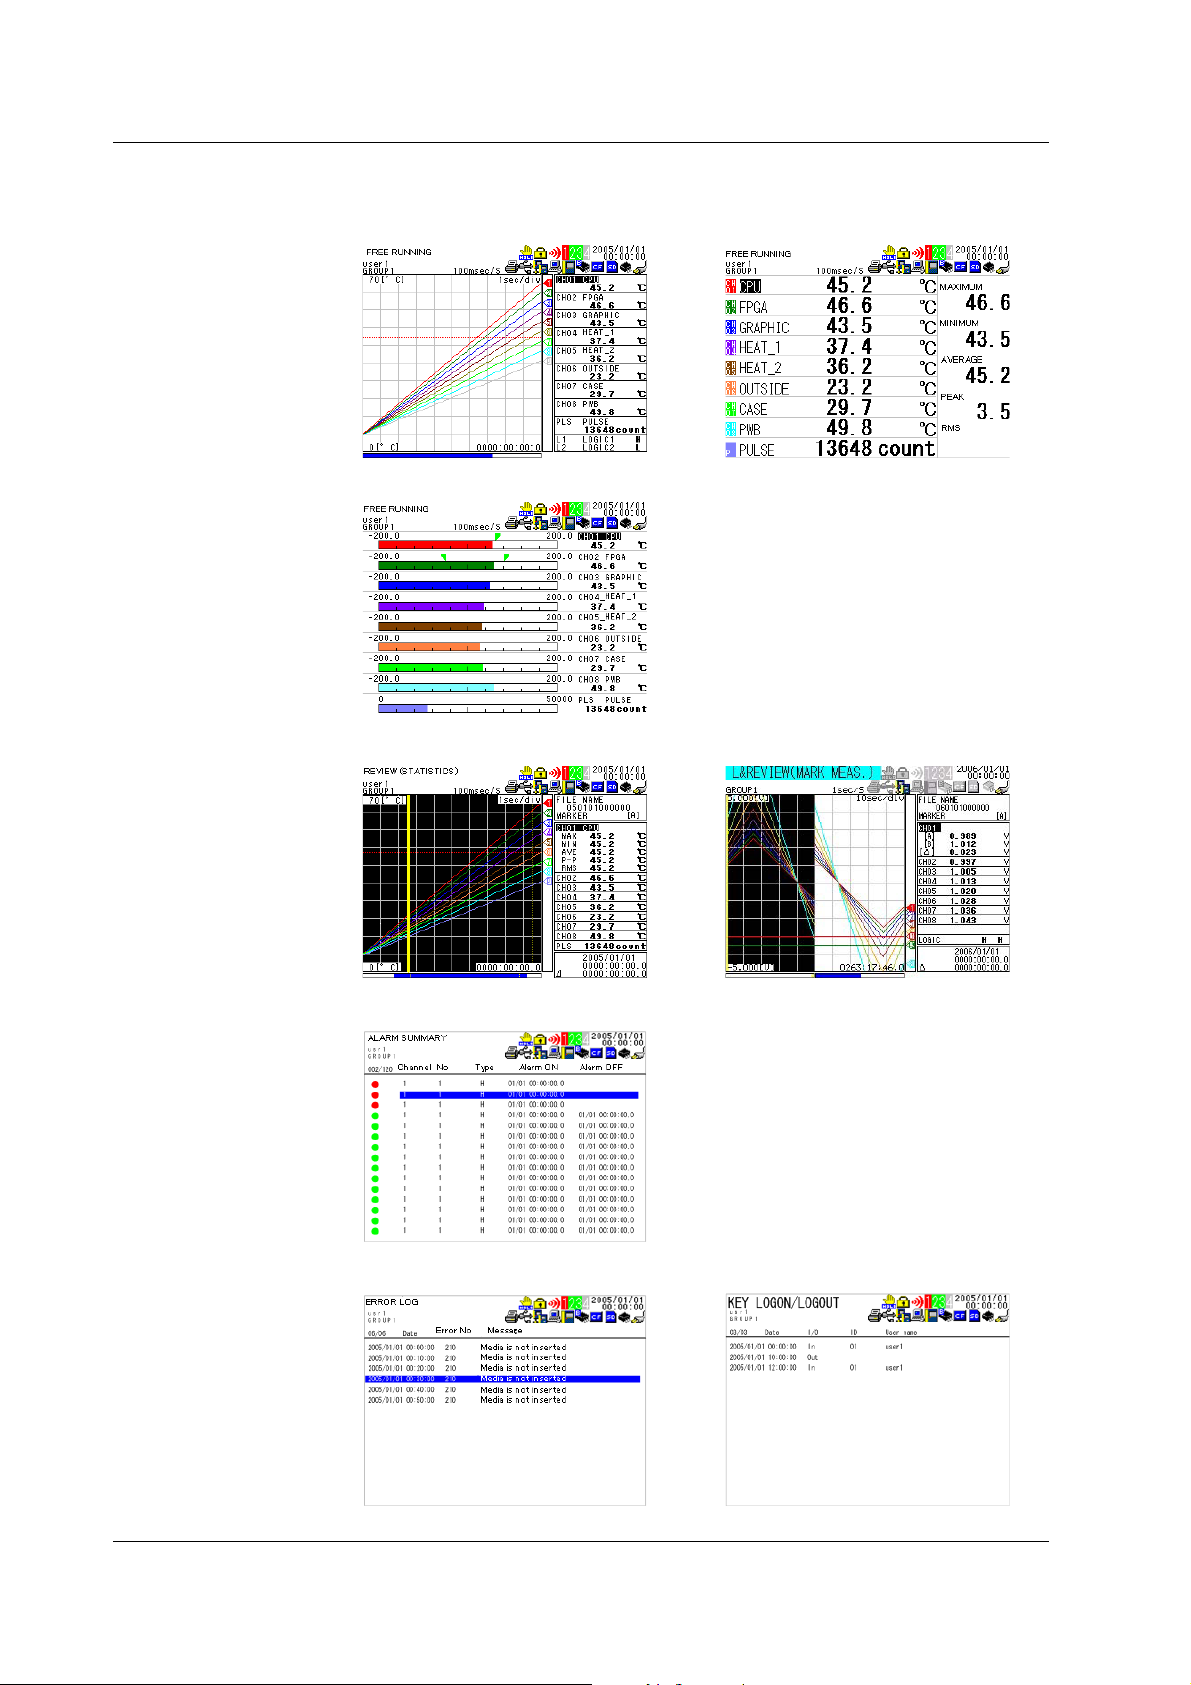
The displays shown below are available. For a description of the displayed contents, see
section 2.3, “Data Display” and 2.4, “Setup Display.”
• Waveform & Digital Display • Digital Display
• Bar Graph Display
• Review display • Logging & Review Display
• Alarm Summary Display
• Log (Error) Display • Log (Key Login/Logout) Display
1-6
IM XL120E
Page 17
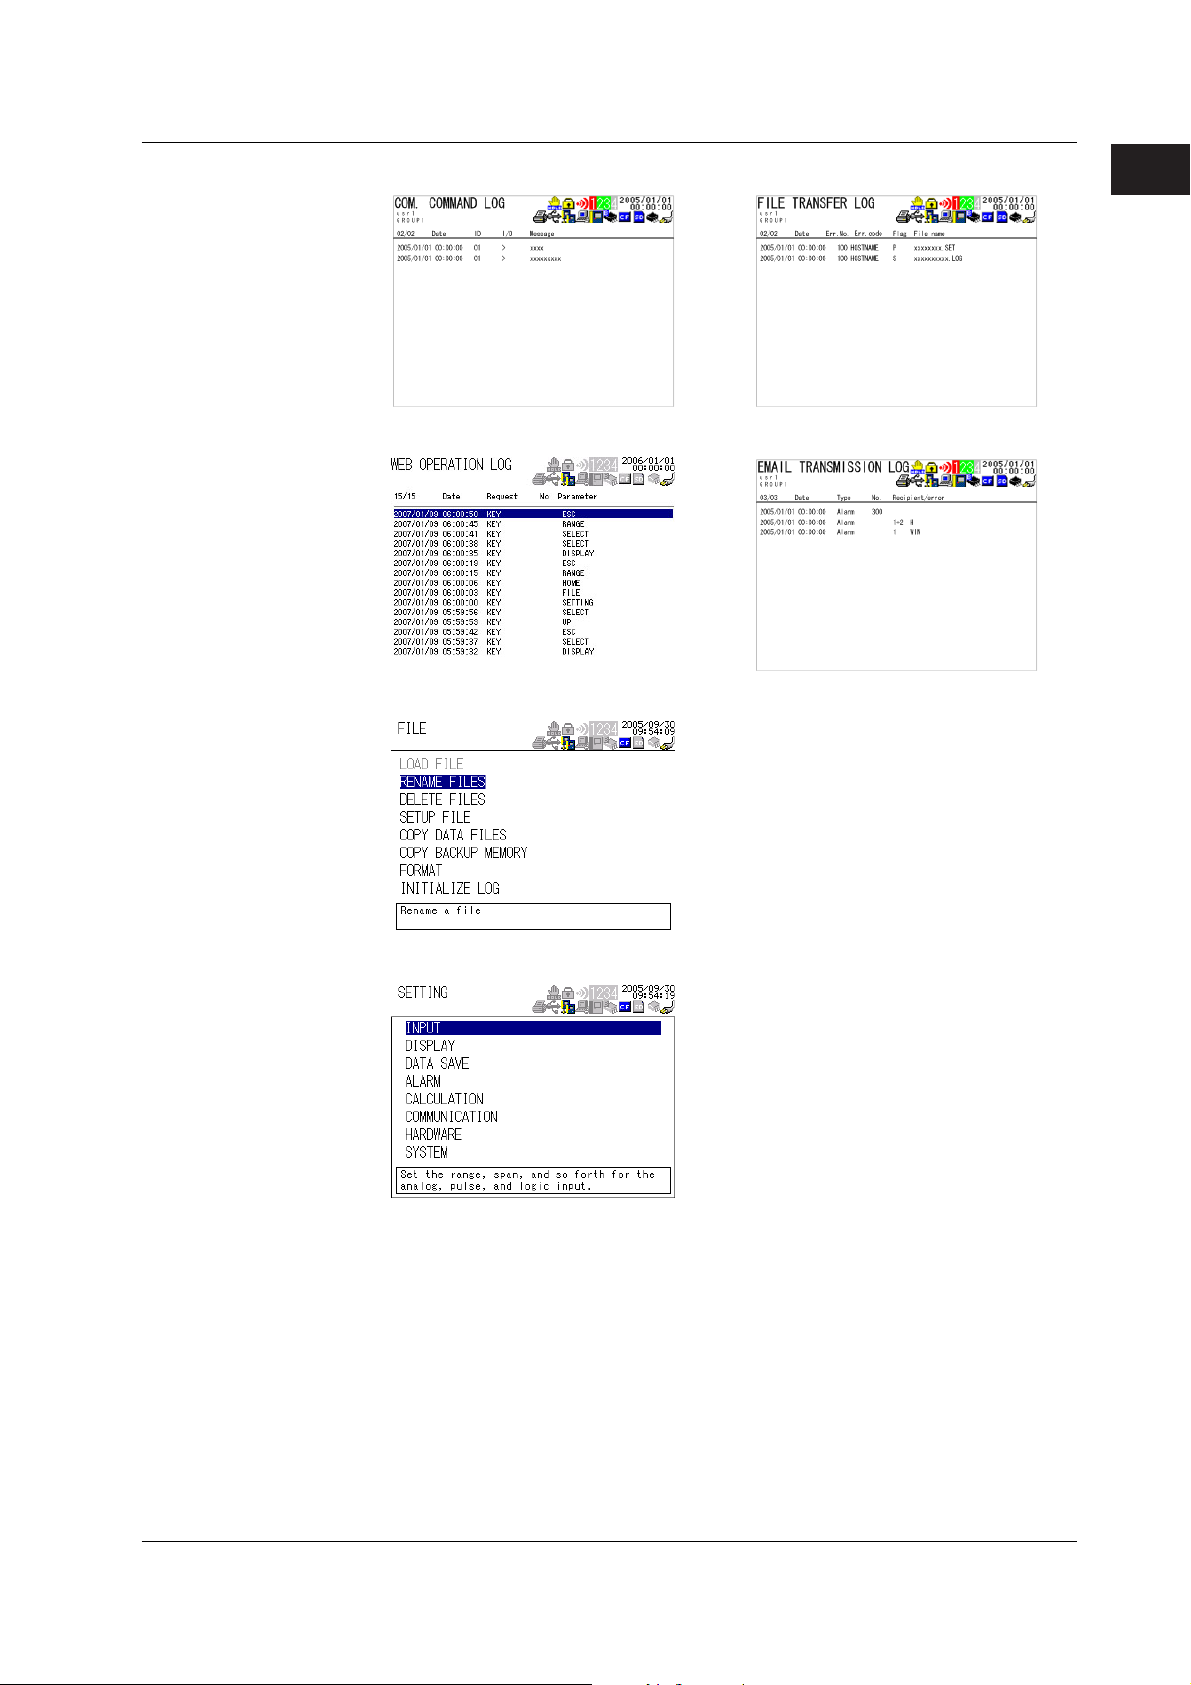
1.3 Display Function
• Log (Communication Command) Display • Log (FTP Client) Display
• Log (Web Operation) Display • Log (E-mail Transmission) Display
• File Operation Screen
1
Explanation of Functions
• Setup Display
IM XL120E
1-7
Page 18
s
1.3 Display Function
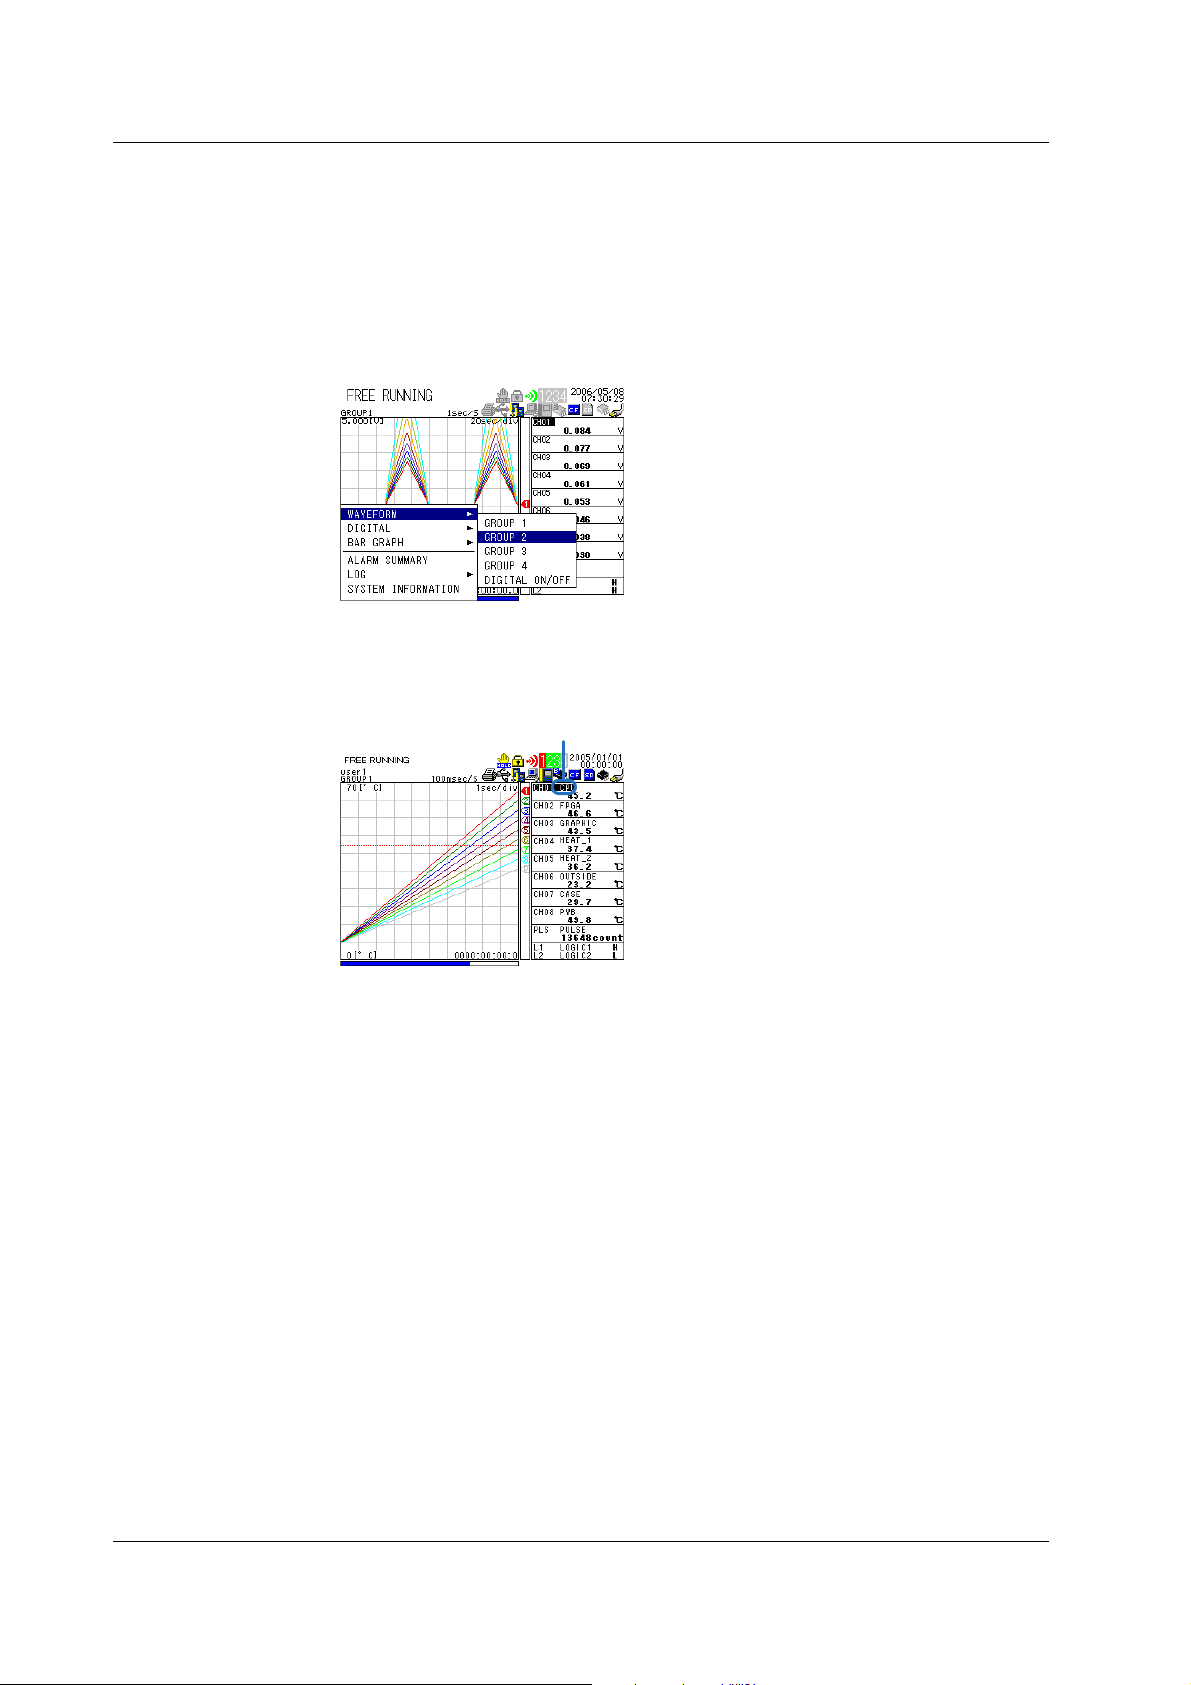
Group Display
On the waveform display, digital display, and bar graph display, the data of up to eight
channels can be shown on a single screen. The eight channels can consist of a
combination of analog input channels (hereafter referred to as “measurement channels”),
calculation channels (see section 1.6, “Calculation Function), and communication
channels (see section 1.8, “Communication Function). You can assign the measurement
channels, calculation channels, and communication channels to four groups and switch
the displayed group to show the data of 32 channels.
Tag Display
You can assign easily identifiable tags (using up to eight characters) to channels and
display them along with the channel numbers.
Display using tag
1-8
IM XL120E
Page 19
1.4 Alarm Function
This function generates an alarm when the measured/calculated value meets a certain
condition. When an alarm occurs, information notifying the alarm occurrence is displayed
on the screen. In addition, an alarm signal can be delivered from the output terminal
(digital I/O connector) on the rear panel of the XL100.
Number of Alarms
An alarm can be set for each channel.
Alarm Conditions
You can select from the conditions given in the following table.
Input Type Setting Alarm Condition
Level OFF Not set alarm conditions.
or Hi An alarm occurs when the measured/calculated value is
Pulse greater than or equal to the alarm value.
Lo An alarm occurs when the measured/calculated value is less than
Window IN An alarm occurs when the measured/calculated value is within
Window OUT An alarm occurs when the measured/calculated value is outside
Logic OFF Not set alarm conditions.
Hi An alarm occurs when the logic input changes from low
Lo An alarm occurs when the logic input changes from high
1
Explanation of Functions
or equal to the alarm value.
the lower limits and upper limits of the alarm range.
the lower limits and upper limits of the alarm range.
to high.
to low.
Hi
Alarm occurrence
Alarm release
Measured value
Window IN
Alarm occurrence
Measured value
Alarm value
Alarm value
Alarm release
Lo
Measured
value
Alarm occurrence
Window OUT
Measured
value
Alarm release
Alarm release
Alarm value
Alarm occurrence
Alarm value
Alarm Display
On the display, an alarm icon is shown in the status display section, and the alarm status
is shown in the data display section such as the waveform, digital, and bar graph
displays. In addition, the details of the alarm are shown on the alarm summary display.
There are two methods for displaying alarms. One method is to clear the alarm display
when the cause of the alarm is no longer met (non-hold display). The other method is to
keep displaying the alarm until the alarm acknowledge operation is carried out (hold
display).
IM XL120E
1-9
Page 20
1.4 Alarm Function
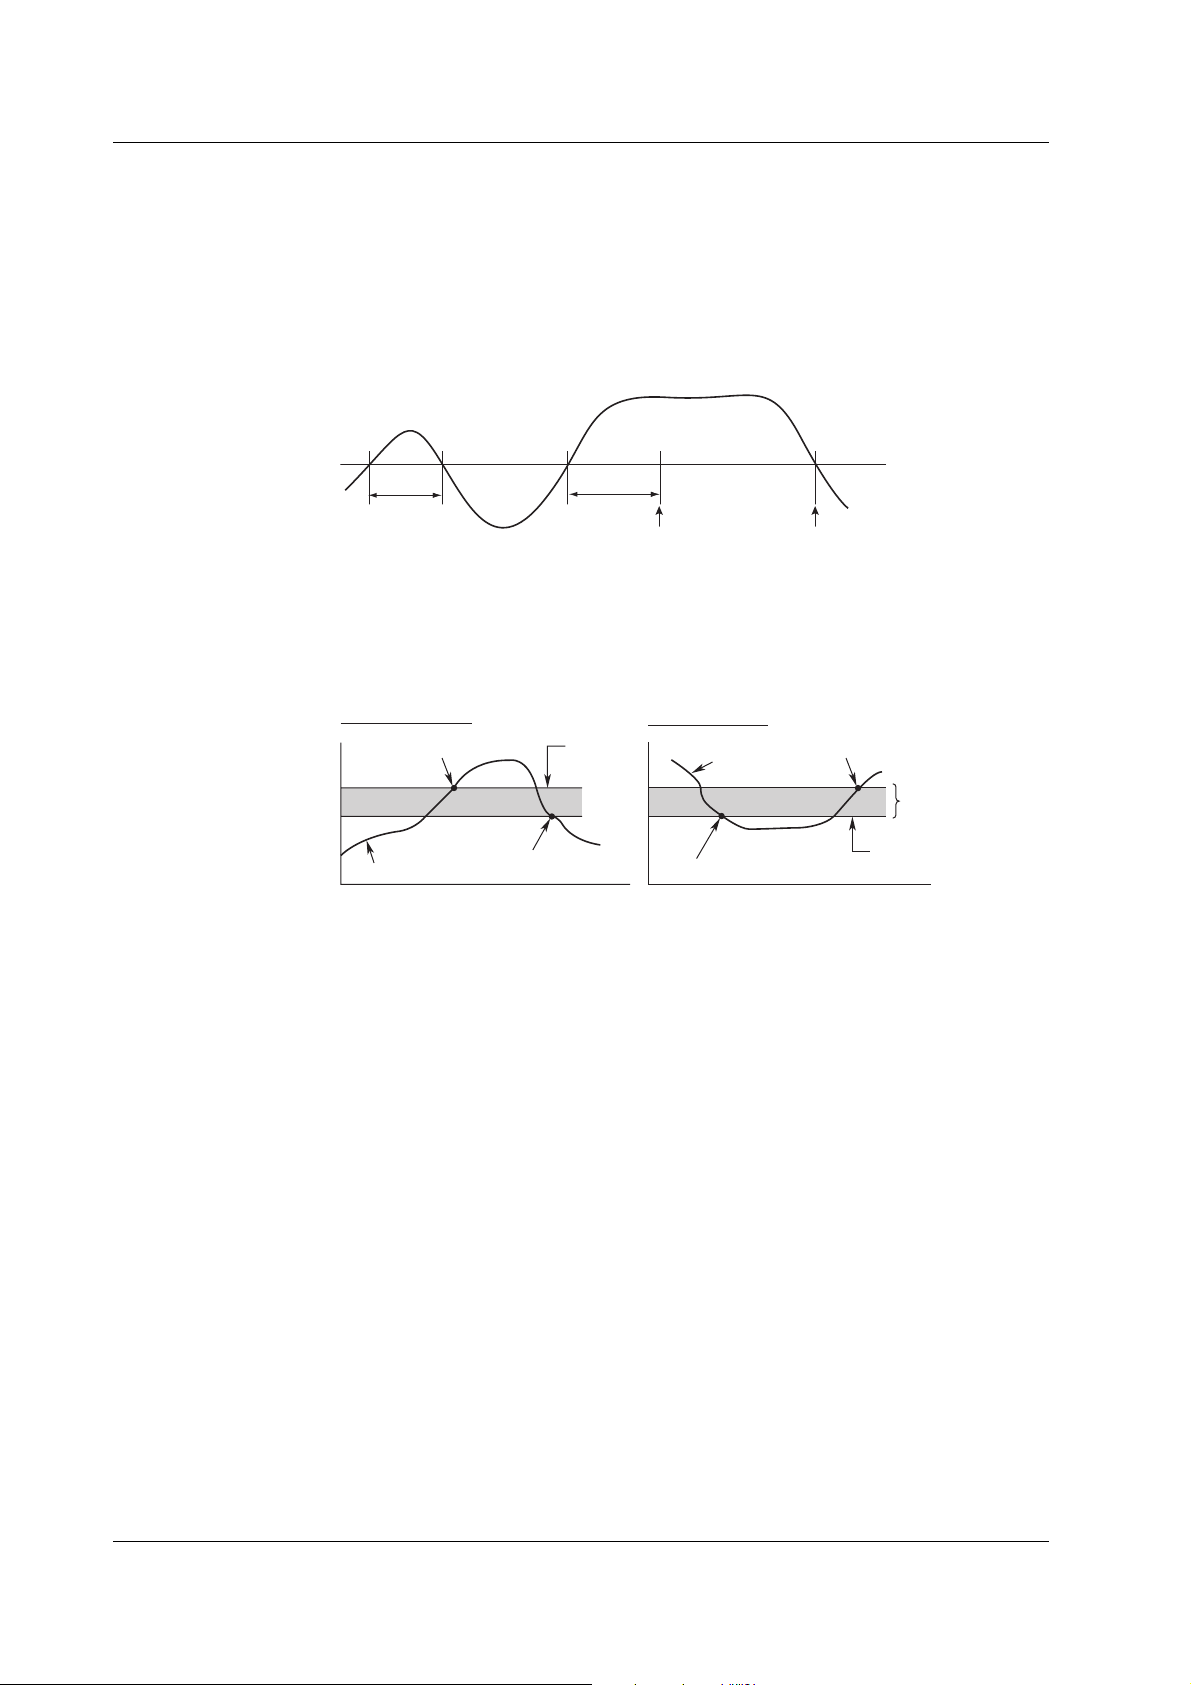
Delay Alarm
An alarm occurs when the measured/calculated value remains above (or below) the
alarm value for a specified time period (delay period).
In the figure below, the measured value exceeds the alarm value during period T1, but
no alarm is generated, because the condition does not last longer than the specified
delay period T. At time X2, the input exceeds the alarm value. However, no alarm is
generated, because the delay period has not elapsed. An alarm occurs at time X3 when
the delay period elapses.
Measured value or
calculated value
X1 X2 X3 X4
T1
T
Alarm value
Alarm releaseAlarm occurrence
Alarm Hysteresis
A width (hysteresis) can be specified to the values for activating and releasing the alarm.
Alarm hysteresis prevents frequent activation and release of alarms when the measured/
calculated value is unstable around the alarm value. The hysteresis is fixed to 0.5% of
the display span (display scale width if the range is set to scale).
When set to high
Alarm occurrence
Measured value
Alarm
value
Alarm release
When set to low
Measured value
Alarm occurrence
Alarm release
Hysteresis
(Approx. 0.5%)
Alarm
value
AND/OR of Alarm Output
When a single alarm output is shared among multiple alarms, you can select either of the
conditions below for activating the alarm output.
AND: Activated when all assigned alarms are occurring simultaneously.
OR: Activated when any of the specified alarms is occurring.
Hold/Non-Hold of Alarm Output
The method of clearing the alarm output from an alarm generated condition can be set to
either of the following settings.
Non-hold: Turn the output OFF when the alarm is cleared.
Hold: Hold the output ON until the alarm acknowledge operation is carried out.
Hold/Non-Hold of Alarm Display
The method of clearing the alarm display from an alarm generated condition can be set
to either of the following settings.
Non-hold: Clear the alarm display when the alarm is cleared.
Hold: Hold the alarm display until the alarm acknowledge operation is carried out.
1-10
Alarm Buzzer
A buzzer can be sounded when an alarm occurs.
Alarm Search
By using alarm markers in Review Mode, alarms can be searched on the review display.
IM XL120E
Page 21
1.5 Data Save/Load Function and File Operation Function
Measured data, calculated data, setup data, and so forth can be saved to the XL100
internal memory or an external storage medium (CF card or SD card) that is inserted in
the XL100
Save the data
CF
SD
Types of Data That Can Be Saved
Type Description
Logging data The instantaneous values of the measured/calculated data can be saved
at a specified sampling interval in Logging Mode. The data save operation
is started or stopped with the START/STOP key. The save operation can
also be started or stopped when a specific event (trigger) occurs. The
logging data contains alarm information.
Data format: Binary or ASCII
Manual sample data The measured/calculated data (instantaneous values) of all channels can
be saved by pressing the SAVE key in Free Running Mode.
Data format: ASCII
Alarm data The same information as the alarm summary display can be saved by
pressing the SAVE key during alarm summary display.
Data format: ASCII
Screen image data The image data of the screen being displayed can be saved by pressing
the SAVE key in Free Running Mode, etc.
Data format: BMP
Setup data The setup data of the XL100 can be saved in File Operation mode.
Data format: Binary
Log data The same information as the log display can be saved by pressing the
SAVE key during log data display.
Data format: ASCII
Backup file If the data save operation is not carried out normally to the internal
memory or external storage medium (CF card or SD card), the data is
saved to the backup memory of the XL100. The saved data can be copied
to an external storage medium.
Data format: Same format as the logging data
1
Explanation of Functions
IM XL120E
1-11
Page 22

1.5 Data Save/Load Function and File Operation Function
Triggers
In addition to using the keys to start or stop the logging (data save operation), a trigger
for starting (or stopping) the save operation of the logging data (measured/calculated
data) can be configured for automatic operation.
The trigger can be selected from the list below and configured. If multiple trigger
conditions are selected, the data save operation starts (or stops) when any of the trigger
conditions is met.
Type Description
None Not set trigger conditions.
External A trigger is activated by applying a signal to the external trigger
Level High limit A trigger is activated when the measured value is greater than or
Lower limit A trigger is activated when the measured value is less than or
Window IN A trigger is activated when the measured value is within the
Window OUT A trigger is activated when the measured value is outside the
Alarm A trigger is activated when any of the alarms occur.
Time A trigger is activated at the specified time.
Timer The time at which the data save operation is stopped can be
input terminal.
equal to the specified value.
equal to the specified value.
specified lower and high limits.
specified lower and high limits.
specified. Logging is stopped after the specified time elapses.
The XL100 has a pre-trigger function that saves data before a trigger is activated and a
trigger delay function that starts the data save operation the specified number of samples
after a trigger is activated.
In addition, you can select single-shot trigger that saves data once to a file when a
trigger is activated or continuous trigger that saves data to a new file each time a trigger
is activated.
File Operations
The following file operations are available.
Function Description
Rename Renames files saved on an external storage medium (CF card or
Save setup data Saves setting data to an external storage medium (CF card or SD
Load setup data Loads the setting data saved on an external storage medium (CF
Copy data Copies the files saved to the internal memory to an external
Copy backup memory Copies the files saved to the backup memory (memory to which
Format Formats an external storage medium (CF card or SD card),
Initialize log Clears all log data.
SD card) internal memory, or setting memory.
card) or setting memory.
card or SD card) or setting memory and changes the settings.
storage medium (CF card, SD card, or USB memory).
data is saved when data cannot be saved to an external storage
medium or internal memory) to an external storage medium (CF
card or SD card).
internal memory, or backup memory.
1-12
TIP
• The SD card is supported only on the XL121, XL122, and XL124.
• The XL100 has three types of memories, an internal memory for saving measured
data, a setting memory for saving setting data, and backup memory for saving
measured data when the measured data cannot be saved to the specified storage
medium.
IM XL120E
Page 23

1.6 Calculation Function
A
Arithmetic Calculation
Arithmetic calculation on variables such as measured data and calculated data (the
result of the calculation) and constants that you can arbitrarily define can be executed.
The result of the calculation can be displayed on (save to) any of the 32 channels
provided specifically for calculation (hereafter referred to as calculation channels). The
arithmetic calculation is executed every sampling interval. The available arithmetic
calculations are addition, subtraction, multiplication, and division.
Statistical Calculation
The statistical calculations below can be executed, and the result can be displayed on
(save to) the specified channel. The statistical calculation is executed every sampling
interval.
Calculated Item Description
Maximum Calculates the maximum value from the start of the logging operation to the
Minimum Calculates the minimum value from the start of the logging operation to the
Average Calculates the simple average from the start of the logging operation to the
Peak Calculates the peak value (maximum – minimum) from the start of the
Rms Calculates the rms value from the start of the logging operation to the end.
end.
end.
end.
=
VE
where di is the ith data and n is the number of data values
logging operation to the end.
=
RMS
where di is the ith data and n is the number of data values
1
Explanation of Functions
n
di
i=
1
n
n
2
di
i=
1
n
IM XL120E
1-13
Page 24
1.7 Setup Function
You can specify various settings shown below using keys in Setting Mode.
Setup TOP
Input
settings
Display
settings
Data Save
settings
Alarm
settings
Calculation
settings
Communication
settings
Hardware
settings
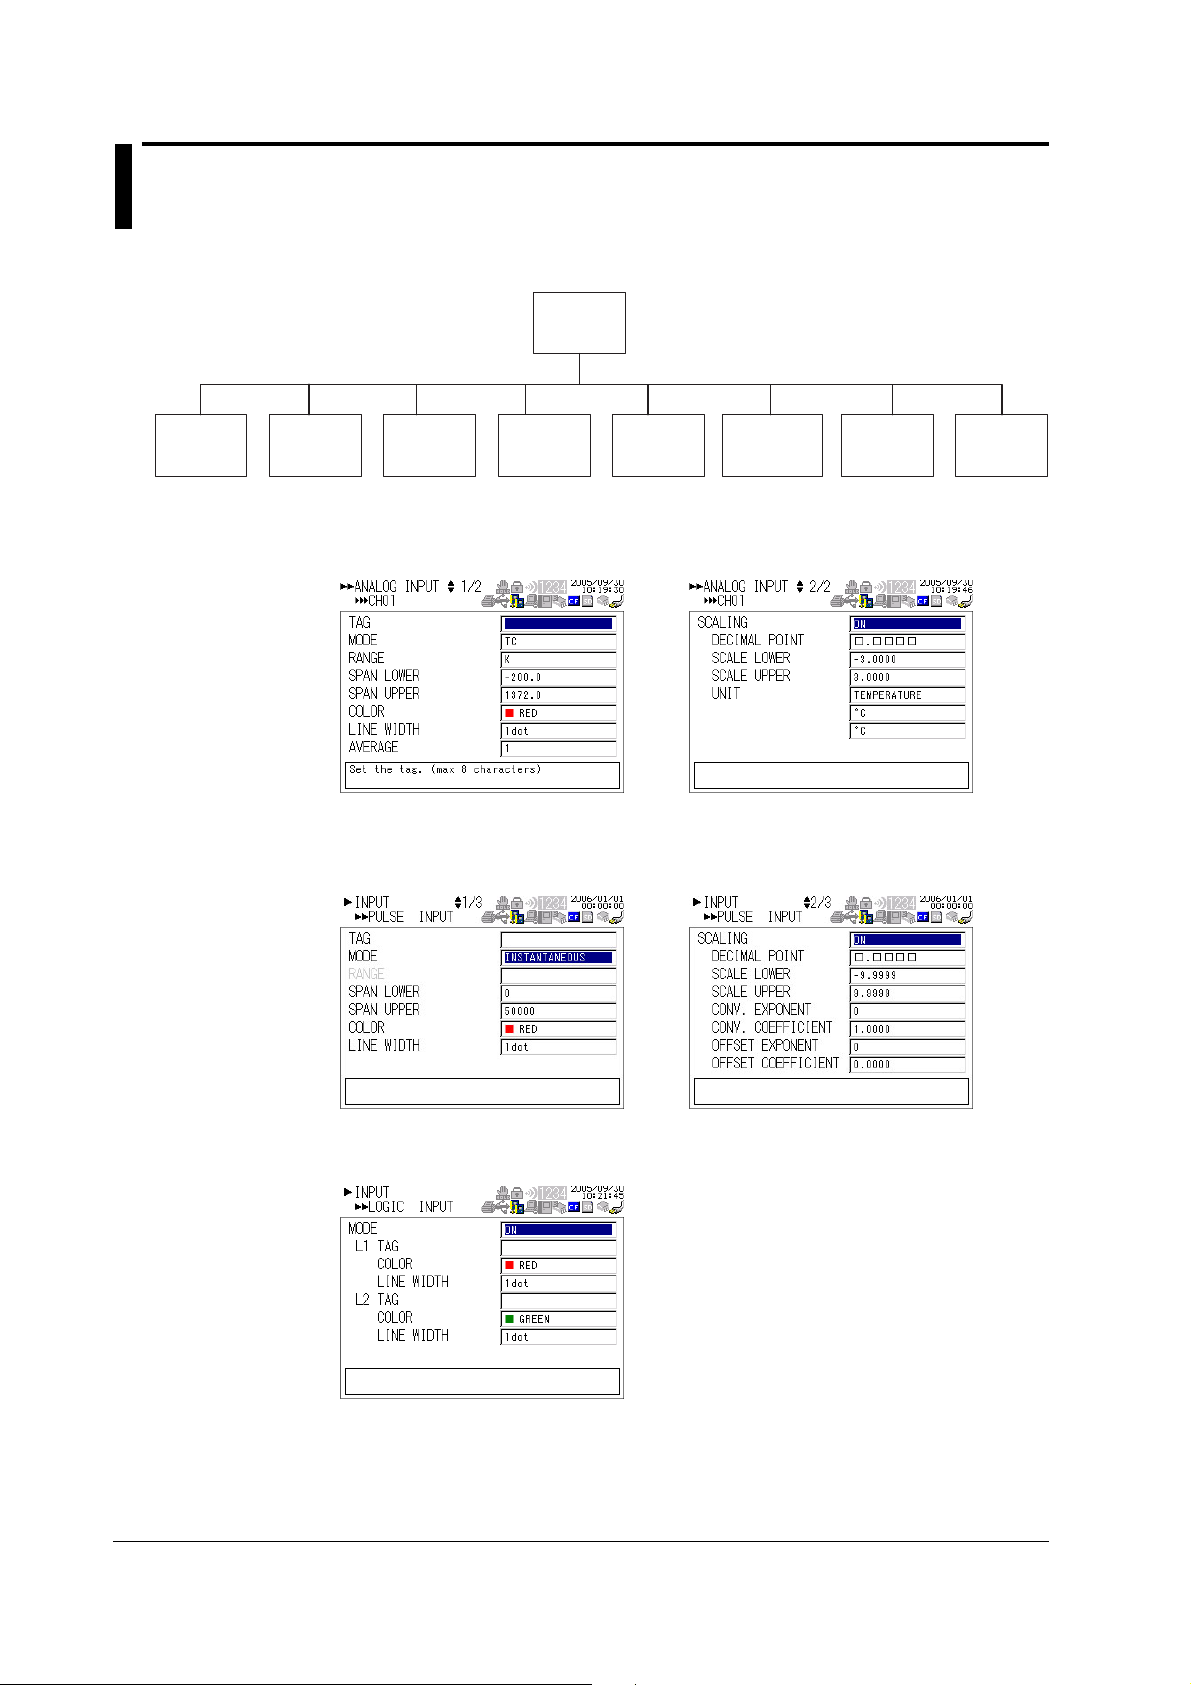
INPUT > ANALOG INPUT
Set the tag, input type (mode), input range, span upper and lower values, color, line
width, average, and scaling for the analog input.
INPUT > PULSE INPUT
Set the tag, input type (mode), span upper and lower values, color, line width, and
scaling for the pulse input.
System
settings
1-14
Input settings > Logic input settings
Set the tag name, color, and line width for the logic input.
IM XL120E
Page 25
1.7 Setup Function
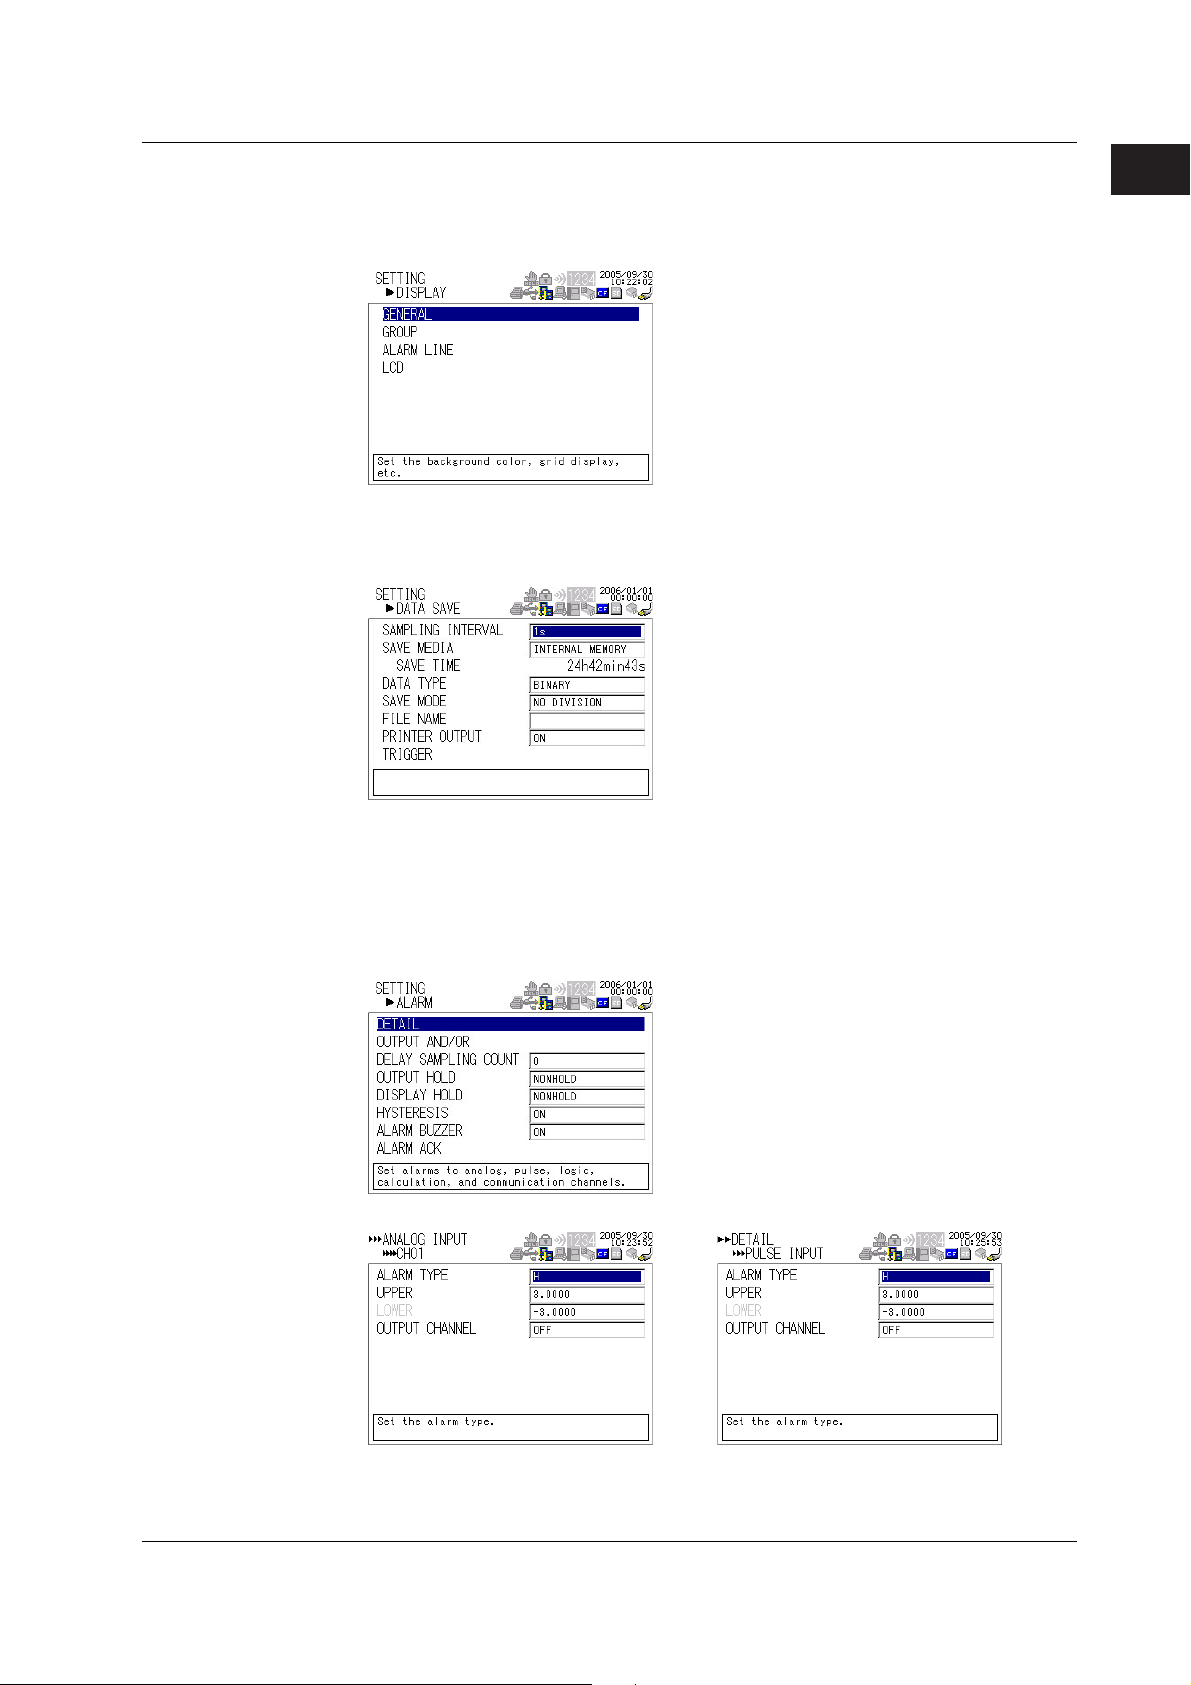
DISPLAY
Specify general display settings (background color, grid, and bar graph base position),
group settings (group name and channel assignments), alarm line settings (alarm line
display ON/OFF, color, and line width), and LCD setting (LCD backlight auto OFF).
DATA SAVE
Set the sampling interval, data save destination, data type, file name, printer output ON/
OFF, and trigger.
1
Explanation of Functions
ALARM
For the Alarm detailed settings, set the alarm type, alarm value, and output channel for
each of the measurement, calculation, pulse input, logic input, and communication input
channels. For other settings, set the output AND/OR, delay time, output/display hold,
hysteresis ON/OFF, and alarm buzzer ON/OFF. Carry out an alarm acknowledge
operation to clear alarms.
Alarm detailed settings of each channel
IM XL120E
1-15
Page 26
1.7 Setup Function
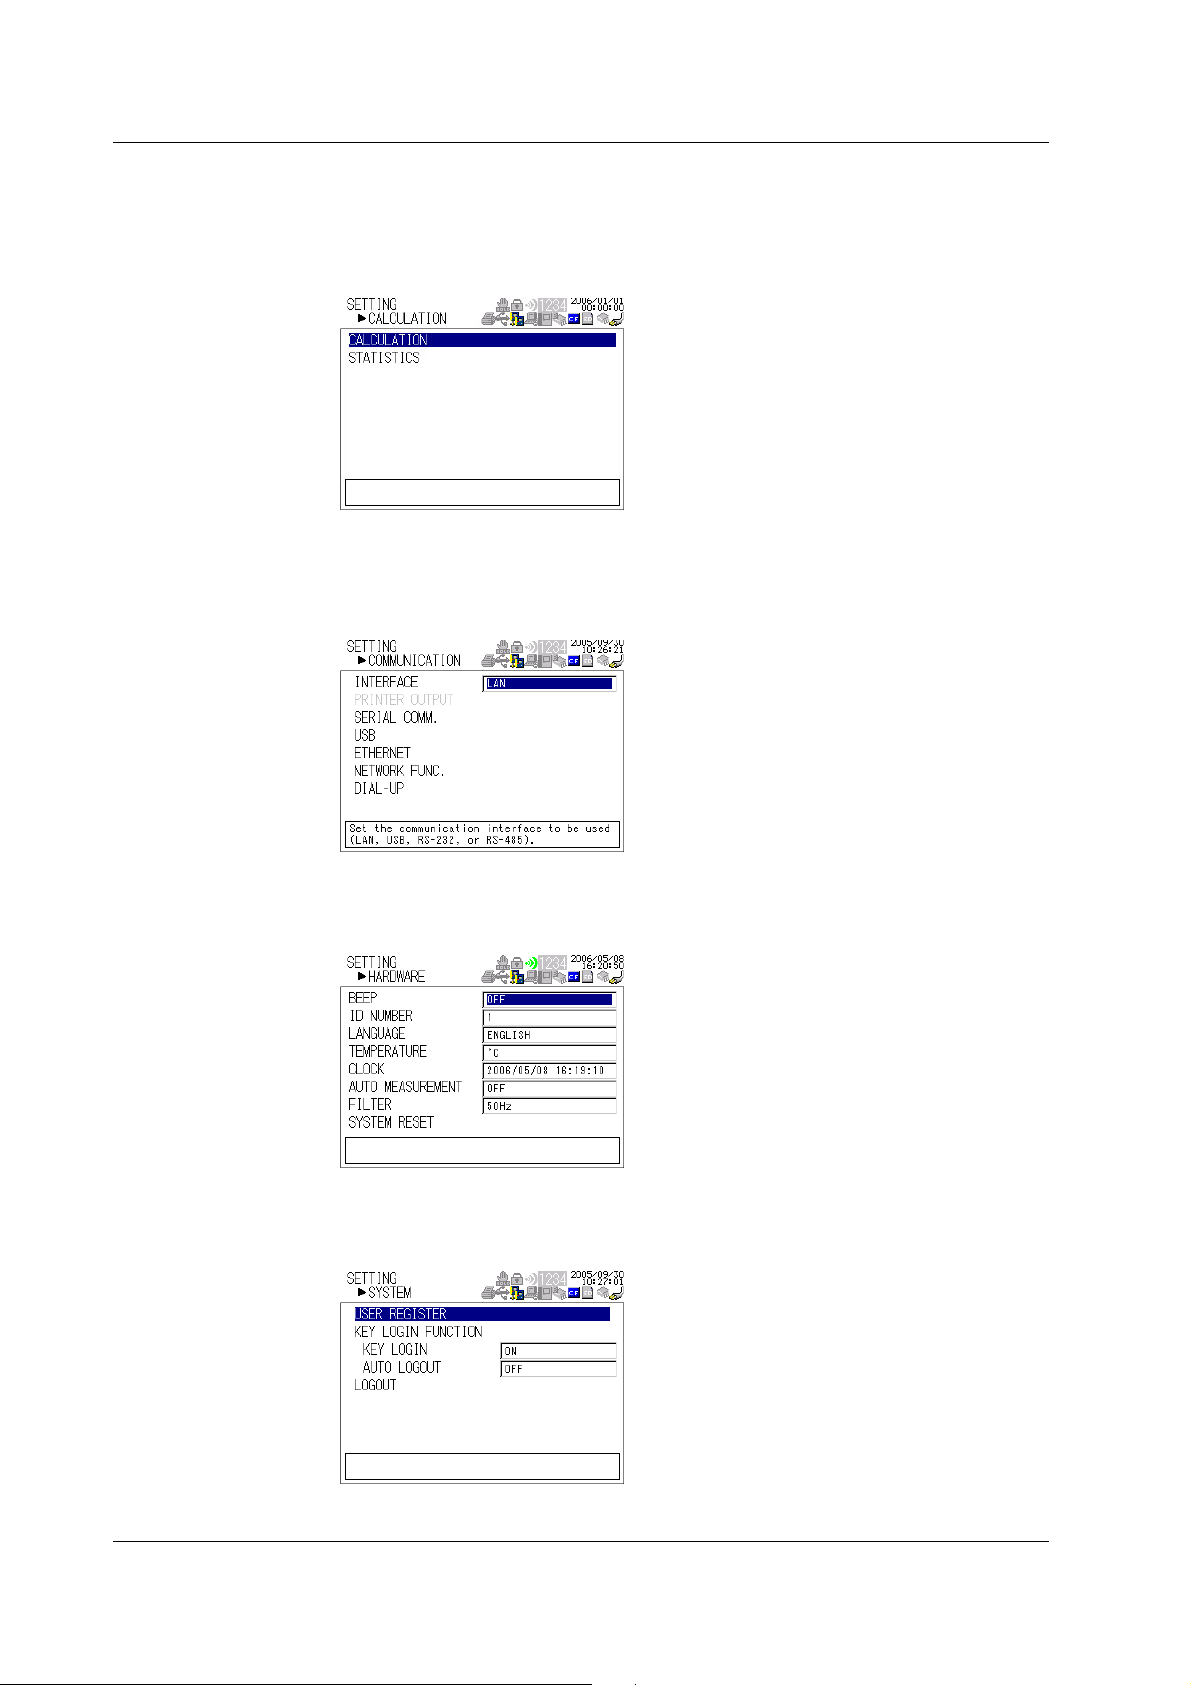
CALCULATION
Specify calculation settings (assignment of the calculation items 1 and 2, tag, calculation
method, constant exponent, and constant coefficient, decimal place, span upper and
lower values, unit, color, and line width) and statistical calculation settings (ON/OFF of
each statistical calculation item).
COMMUNICATION
Specify interface settings (communication interface selection), serial communication
settings, USB settings (USB ID number), Ethernet settings, and network function settings
(FTP client settings, Web server settings, and E-mail transmission settings).
HARDWARE
Set the beep sound, ID number, display language, date/time, automated measurement
function, and filter. Carry out system reset to reset the settings to their default values.
SYSTEM
Register users (registration of the administrator and users for the Ethernet login, Web
browsing, and key login functions) and set the key login/logout function.
1-16
IM XL120E
Page 27
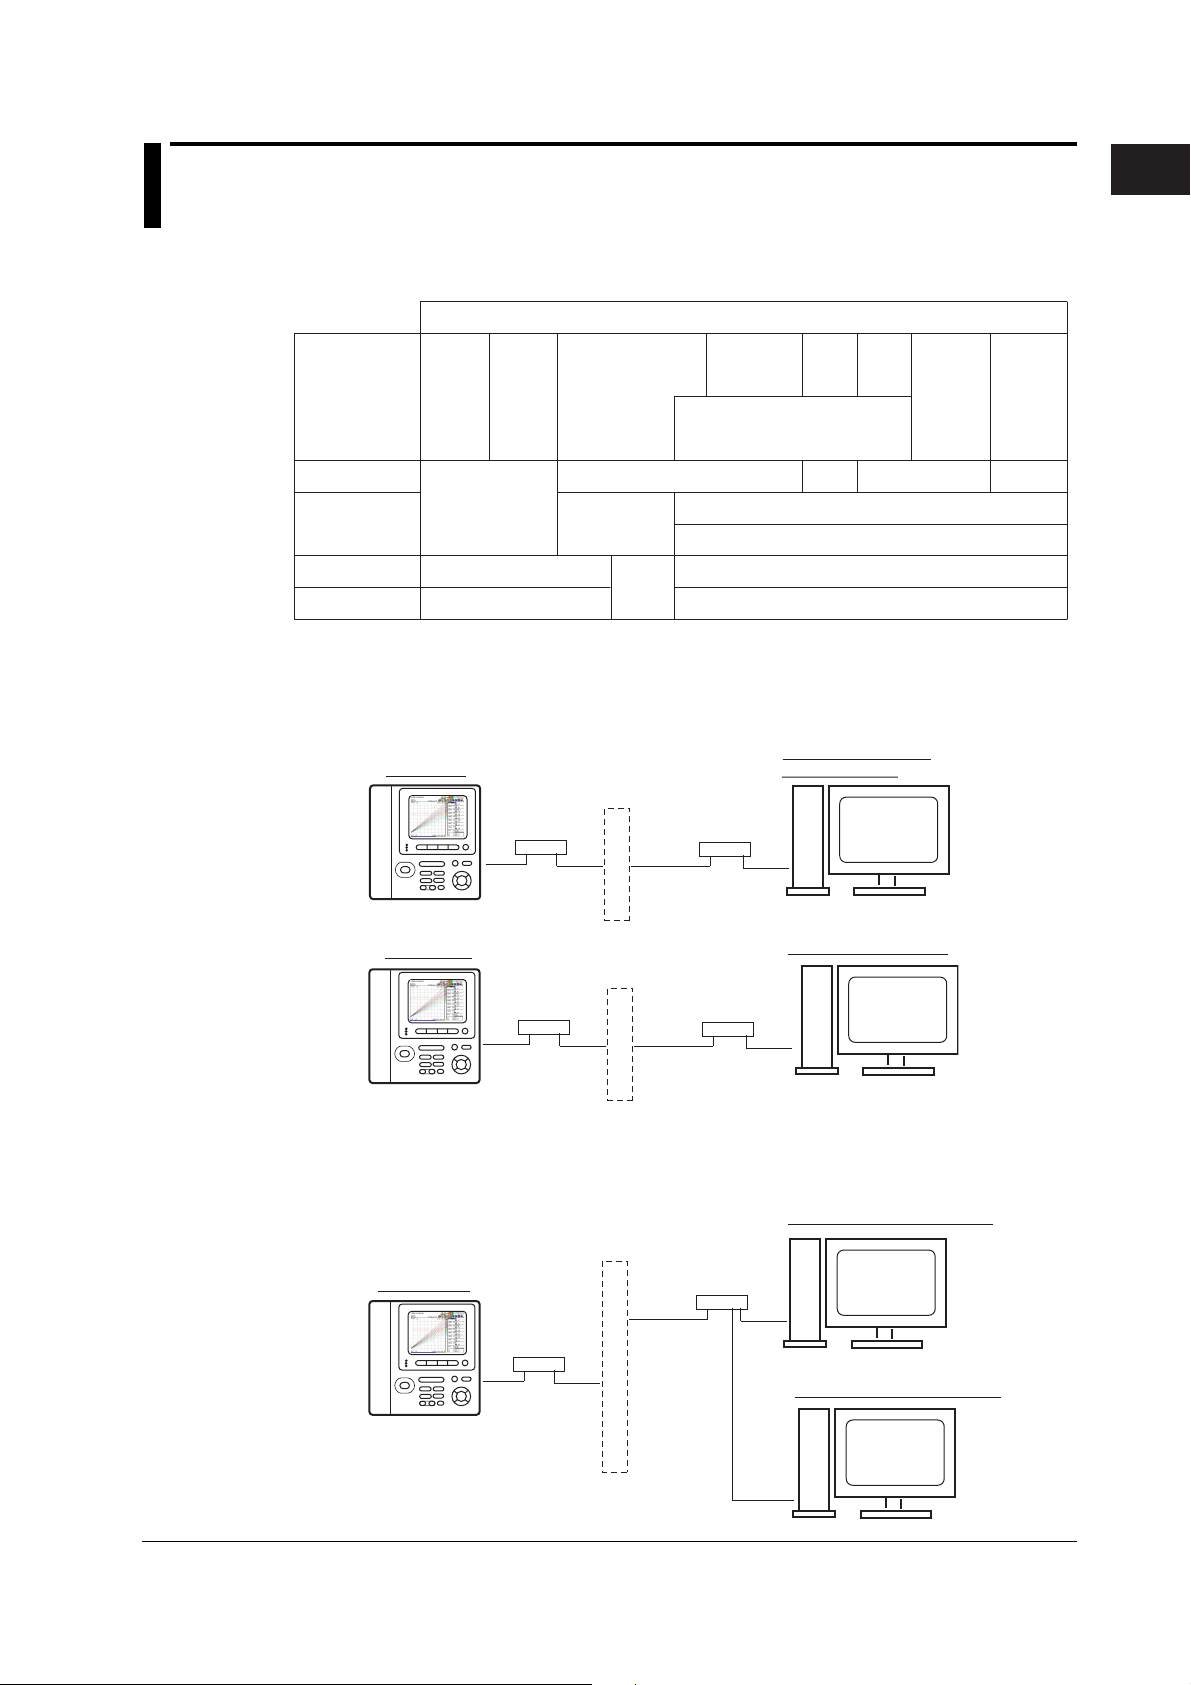
1.8 Communication Function
(Supported only on the XL121, XL122, and XL124)
The XL100 comes standard with an Ethernet interface, USB interface, and serial
interface (RS-232 and RS-485).
XL100 Communication Functions
Setting/Measurement
Application
Upper layer protocol
Lower layer
protocol
Upper interface
Lower interface
The Ethernet interface can be used to automatically transfer measurement data files to
an FTP server connected to the network or access the XL100 from a PC through FTP to
retrieve data on the external storage medium of the XL100.
MODBUS
Slave
MODBUS Protocol
MODBUS
Master
Serial
RS-232/RS-485
server
Standard protocol
Serial
communication
control
USB
Maintenance/
Test server
Login
(User authentication/
access privileges granting)
Web
server
HTTP
10BASE-T/100BASE-TX
FTP
server
TCP
IP
Ethernet
FTP client
FTP SMTP
E-mail client
1
Explanation of Functions
FTP client
measured data
Ethernet
Automatically save
Hub
FTP server
Hub
FTP server
Load measured data
Ethernet
Hub
Hub
PC
By configuring the XL100 to be a Web server, the XL100 screen can be shown on the
PC. You can monitor the measured data and control the XL100 (for example, switch the
display) from the PC.
Monitor the measured data
Ethernet
Web server
Hub
PC
IM XL120E
Hub
Monitor the measured data
PC
1-17
Page 28
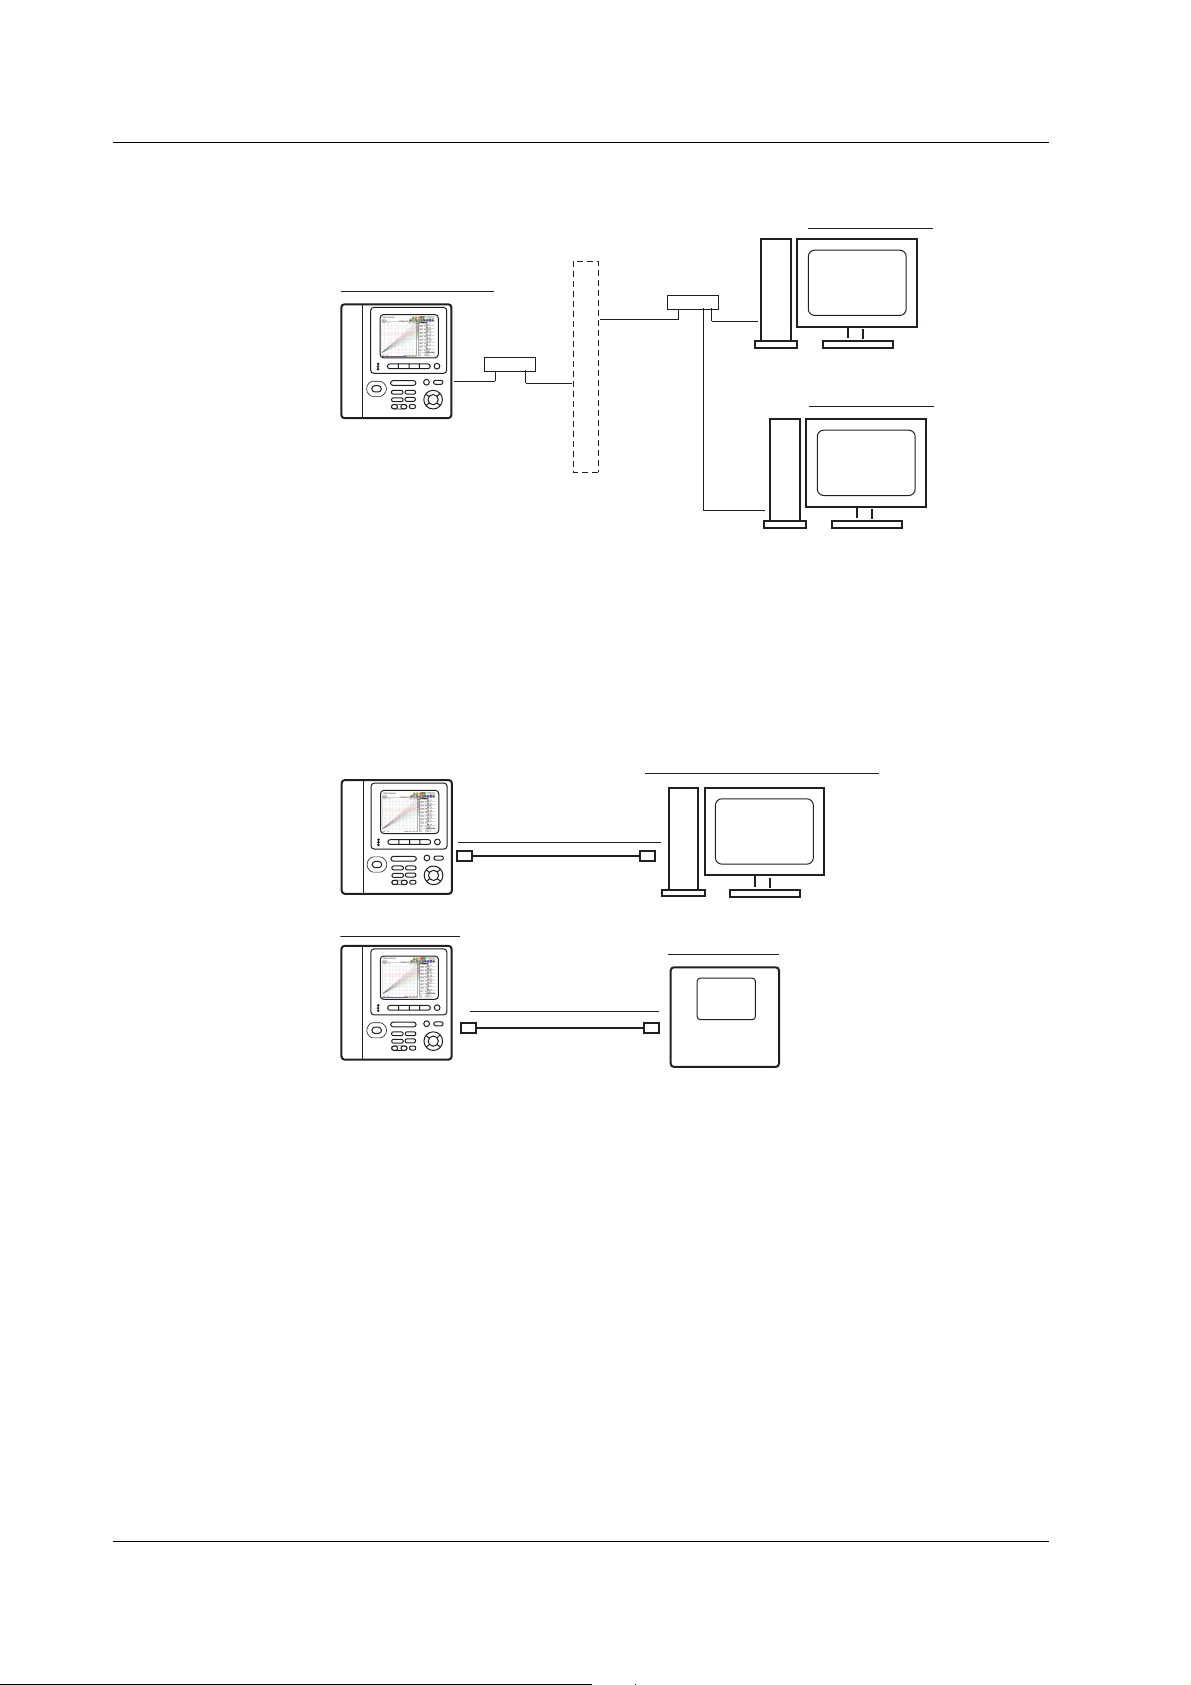
1.8 Communication Function
In addition, e-mail can be sent automatically from the XL100 when an alarm occurs.
E-mail reception
Ethernet
E-mail transmission
Hub
Hub
PC
E-mail reception
PC
The USB interface or serial interface can be used to change the XL100 settings from a
PC or retrieve data into the PC through command communication. In addition, Modbus
communication is possible on the serial interface. The Modbus master function enables
the measured data of a measuring instrument connected as a Modbus slave to be
retrieved as communication input data. The data can be displayed on a communication
input data channel (communication channel) on the XL100 in a similar fashion to
measurement and calculation channels.
Change settings and load data
Command communication
PC
Modbus master
USB, RS-232, RS-485
Modbus communication
RS-232, RS-485
Modbus slave
Measurement
instrument
1-18
IM XL120E
Page 29

1.9 Other Main Functions
Setting the Displayed Language
The displayed language can be switched between English and Japanese. If English is
specified, you can set the temperature unit to °C or °F.
Printer Output (Supported only on the XL121, XL122, and XL124)
Measured data and screen image data can be printed on a dedicated printer (97010)
sold separately by using the RS-232 interface.
Setting the Clock
The year, month, day, and time (hour:minute:second) are shown on the display
according to the specified clock time. If the XL100 is connected to a network through the
Ethernet interface, the clock can be corrected at any time by accessing the NTP server.
Display Hold
A displayed value can be held through a given key operation.
Key Login/Logout
You can set the XL100 so that only certain users can operate the instrument. A user is
identified by the user name and password registered in advance. Seven users,
administrator and user1 to user6, can be registered. The key login/logout status can be
confirmed on the log (key login/logout) display.
1
Explanation of Functions
Key Lock
Explanation of FunctionsAll key operations except the key lock release operation can be
disabled through a given key operation.
Lithium Ion Battery Operation
In addition to the AC power supply, the XL100 can operate on an internal lithium battery
(sold separately). The lithium ion battery is automatically charged when the AC adapter
is connected.
Automated Measurement Function
When the automated measurement function is turned ON, the XL100 automatically loads
the AUTRUN.SET file saved to the external storage medium (CF card, SD card, or USB
memory) and starts the logging operation (data save operation). After the logging
measurement is finished, the measured data that was saved is copied to the external
storage medium. (The SD card is supported only on the XL121, XL122, and XL124.)
Synchronized Logging Operation
The XL100 has an external trigger input/output function. By applying the external trigger
output signal to multiple XL100s as external trigger input, the logging (data save)
operation of measured data among multiple XL100s can be synchronized.
IM XL120E
1-19
Page 30
1
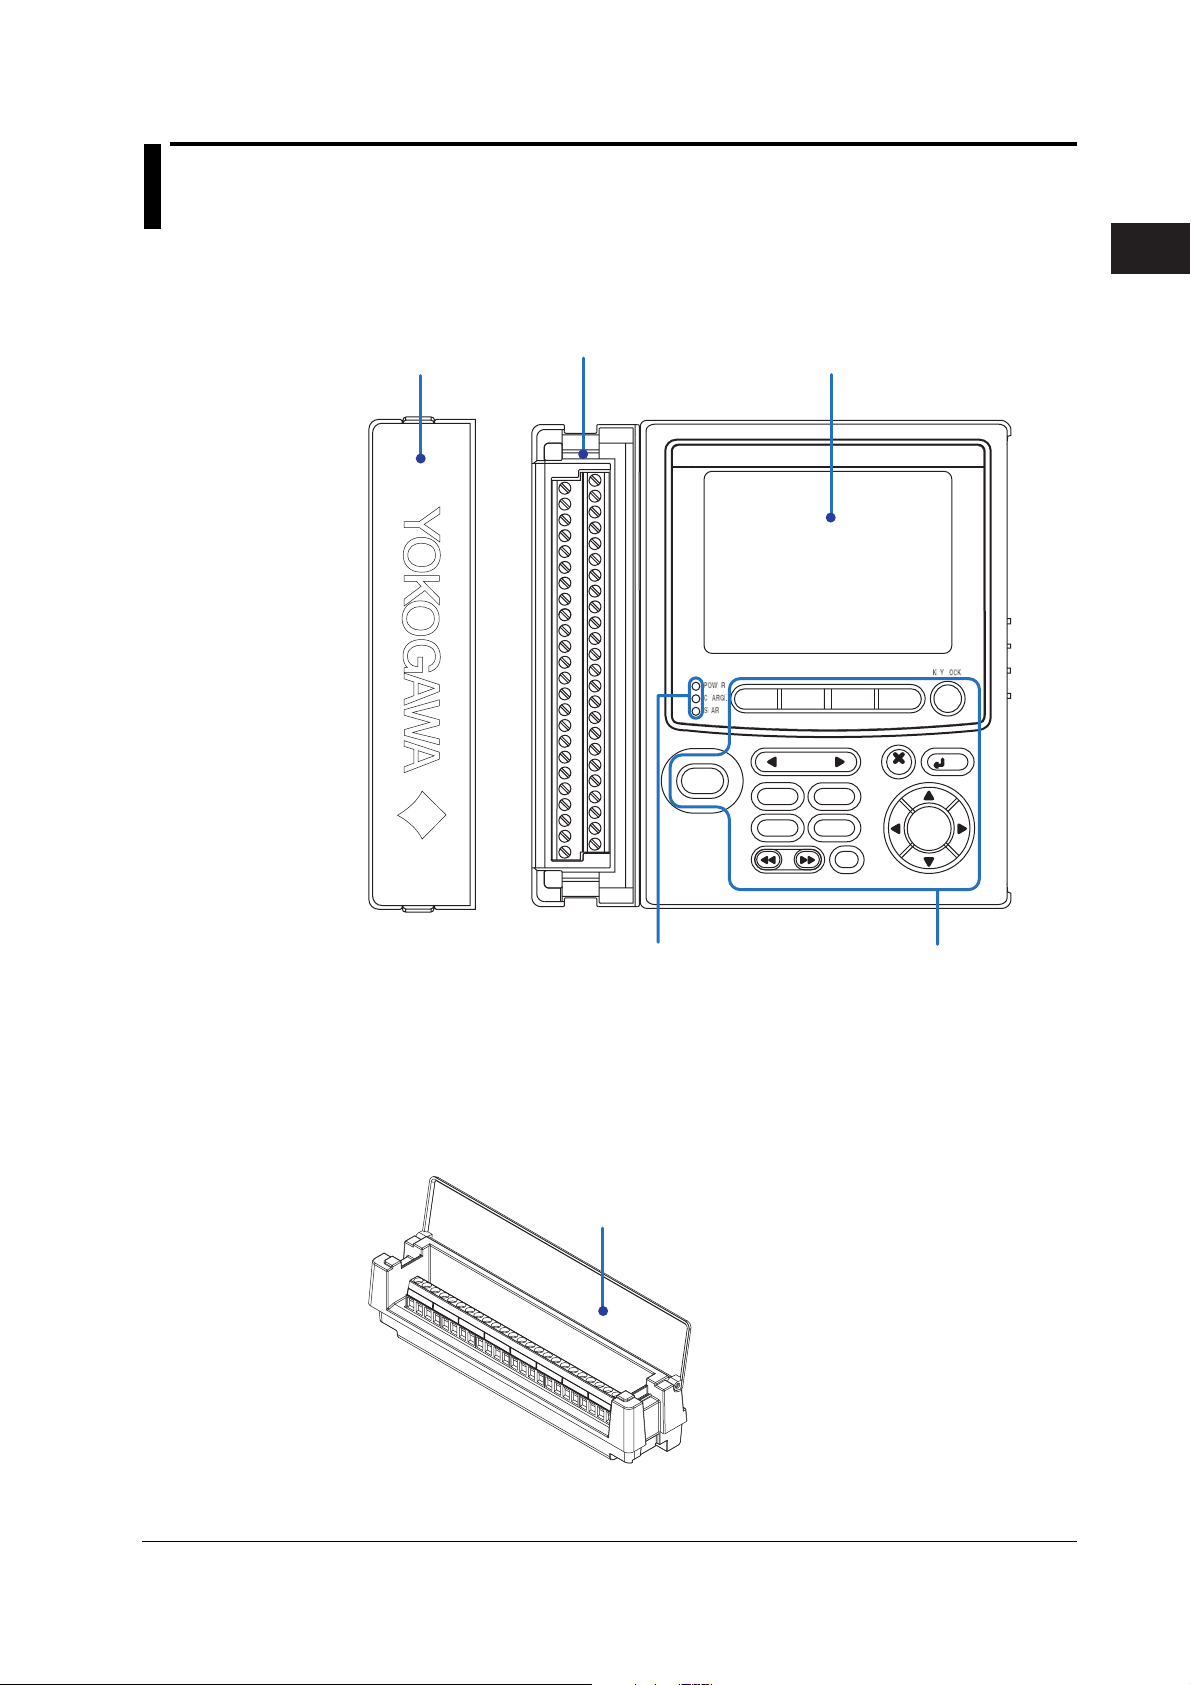
Chapter 2 Part Names and Functions
2.1 Front Panel and Terminal Block Unit
Front Panel
Terminal cover
(Cannot be removed
from the terminal
block unit)
Terminal block unit
A terminal block unit for connecting
analog input signal wires. Can be
removed from the XL100.
For the input signal wiring,
see section 3.3.
HOME REVIEW FILE
START
/ STOP
RANGE
SAVE
Display
Displays measured data, operation
status, setting menu, settings, etc.
The displayed contents vary
depending on the operation mode.
For the displayed contents,
see section 2.3.
HOLD
SETTING
TIME / DIV
DISPLAY
GROUP
MARK
SET
ESC
SELECT
2
Part Names and Functions
Operation status LED
POWER: Illuminates when the power is ON
CHARGE: Illuminates when the battery is being
charged
START: lluminates while logging
Keys
Name and function of
each key are described
on the next page.
(Blinks at logging standby)
Terminal Block Unit
8 ch (95052): Clamp screw 16 ch (95053): Clamp screw
16 ch (95055): M3 screw
Terminal cover
+
ch1
-
b
+
ch2
-
b
+
ch3
-
b
+
ch
4
-
b
+
ch
5
-
b
+
ch
6
-
b
+
ch
7
-
b
+
ch
8
-
IM XL120E
2-1
Page 31

2.1 Front Panel and Terminal Block Unit
Keys
1
HOME REVIEW FILE
3
2
4
SETTING
HOLD
9
START
/ STOP
10
12
RANGE
SAVE
TIME / DIV
14
6
DISPLAY
GROUP
MARK
15
13
11
7
5
SET
ESC
SELECT
16
8
1. HOME Key
Press this key to enable Free Running Mode for measuring instantaneous values.
2. REVIEW Key
Press this key to enable Logging & Review Mode in which past data can be viewed
while logging (saving measured data) or enable Review Mode in which saved data
can be analyzed.
3. FILE Key
Press this key to enable File Operation Mode in which file names can be changed,
measured data can be copied, setup data can be saved or loaded, and so on.
4. SETTING Key
Press this key to enter the setting mode and set conditions for saving measured
data, alarm conditions, etc.
5. HOLD Key
Press this key to hold the display so that the measured values are not updated or to
release the display. In addition, hold this key down to enable or disable key lock.
6. TIME/DIV Key
Press this key to switch the time scale (the time per grid (division)).
7. ESC Key
Press this key to cancel a key operation.
8. SET Key
Press this key to set settings entered through the keys.
9. START/STOP Key
Press this key to start/stop logging (saving the measured data).
10. RANGE Key
Press this key to change the input range or span (scale).
11. DISPLAY Key
Press this key to switch the displayed information in Free Running Mode or Logging
Mode. Press this key also to switch between marker display and statistical
calculation display in Review Mode.
12. SAVE Key
Press this key to manually save or print the measured data or screen data.
13. GROUP Key
Press this key to switch the displayed group of measurement channels.
14. Fast Forward Key
Press this key to move the marker to the left or right by 1 division on the review display.
15. MARK Key
Press this key to select a marker to be activated on the Review Mode display.
16. Arrow/SELECT Key
Press the arrow keys to select items on the display. Press this key also to move the
marker to the left or right on the review display. Press SELECT to confirm a selection.
2-2
IM XL120E
Page 32

1
2.2 Side Panel and Rear Panel
Side Panel
USB port for USB memory
For a description, see section 3.9.
Ethernet port*
For a description, see section 3.8.
USB port for connecting a PC*
For a description,
see section 3.8.
CF card slot
For a description, see section 4.7.
SD card slot*
For a description, see section 4.7.
USB
DC INPUT
20W MAX
12V
POWER
Power switch
For a description,
see section 4.1.
AC adapter jack
For a description,
see section 3.6.
USB
CF
SG
RS485 RS232LAN
LOGIC/PULSE
ALARM
SD
IN
GND
TRIGGER
OUT
Trigger input/output terminal
For a description, see section 3.5.
Digital I/O connector
For a description, see sections 3.3 and 3.4.
RS-232 connector*
For a description, see section 3.8.
RS-485 terminal block*
For a description, see section 3.8.
*Supported only on the XL121, XL122, and XL124.
2
Part Names and Functions
Rear Panel
Screwdriver for terminals (accessory)
Press the screwdriver towards the spring
(right in this figure) to detach it.
Name plate
Battery cover
Holds the lithium ion
battery sold separately
(94009).
For the procedure to load
the battery, see section 3.7.
IM XL120E
2-3
Page 33

2.3 Data Display
Status Display Section
2
3
1
Status display section
Data display section
5
7
4
6
8
1. Operation Mode
Displays the mode name: Free Running, Logging, Logging & Review, Setup, or File
Operation. For Logging and Logging & Review modes, the text background turns
light blue to indicate that logging is in progress.
2. User Name
Displays the login user name when the key login function is turned ON.
3. Group Name
Displays the group name of the displayed measurement channel.
4. Alarm Status
The status is displayed using different icon colors as follows:
Gray: No alarm setting
Yellow-green: Alarm setting enabled
Red: Alarm activated
5. Alarm Output Status
The status is displayed using different icon colors for each alarm output channel as
follows:
Gray: No alarm output setting
Yellow-green: Alarm output setting enabled
Red: Alarm outputting
6. Date/Time
Displays the year, month, day, hour, minute, and second. For the procedure to set
the date/time, see section 4.3, “Setting the Date/Time.”
7. Sampling Interval
Displays the sampling interval in the format “xxxyyyy/S” (where xxx is 1, 2, 5, 10, 20,
30, 100, 200, or 500 and yyyy is msec, sec, min, or h) when in Free Running,
Logging, or Logging & Review Mode.
2-4
IM XL120E
Page 34

1
2.3 Data Display
8. Various Icons
The following icons are used to display the operation status, interface usage status,
etc.
An icon shown when the data save destination is set to internal memory. The
icon blinks when there is access to the internal memory. The icon is gray when
the data save destination is not set to internal memory.
An icon shown when the data save destination is set to internal memory and the
save mode is set to DIVISION. The icon blinks when there is access to the
internal memory.
An icon shown when the data save destination is set to internal memory and the
memory full operation is set to REPEAT. The icon blinks when there is access to
the internal memory.
An icon shown when the data save destination is set to internal memory and the
memory full operation is set to DELETE. The icon blinks when there is access to
the internal memory.
An icon shown when the data save destination is set to internal memory, the
save mode is set to DIVISION, and the memory full operation is set to REPEAT.
The icon blinks when there is access to the internal memory.
2
Part Names and Functions
An icon shown when the data save destination is set to internal memory, the
save mode is set to DIVISION, and the memory full operation is set to DELETE.
The icon blinks when there is access to the internal memory.
An icon shown when the data save destination is set to CF card. The icon blinks
when there is access to the CF card. The icon is gray when the data save
destination is not set to CF card.
An icon shown when the data save destination is set to CF card and the save
mode is set to DIVISION. The icon blinks when there is access to the CF card.
An icon shown when the data save destination is set to CF card and the
memory full operation is set to REPEAT. The icon blinks when there is access to
the CF card.
An icon shown when the data save destination is set to CF card and the
memory full operation is set to DELETE. The icon blinks when there is access to
the CF card.
An icon shown when the data save destination is set to CF card, the save mode
is set to DIVISION, and the memory full operation is set to REPEAT. The icon
blinks when there is access to the CF card.
An icon shown when the data save destination is set to CF card, the save mode
is set to DIVISION, and the memory full operation is set to DELETE. The icon
blinks when there is access to the CF card.
An icon shown when the data save destination is set to SD card. The icon blinks
when there is access to the SD card. The icon is gray when the data save
destination is not set to SD card. (Supported only on the XL121, XL122, and
XL124.)
An icon shown when the data save destination is set to SD card and the save
mode is set to DIVISION. The icon blinks when there is access to the SD card.
(Supported only on the XL121, XL122, and XL124.)
IM XL120E
2-5
Page 35

2.3 Data Display
An icon shown when the data save destination is set to SD card and the
memory full operation is set to REPEAT. The icon blinks when there is access to
the SD card. (Supported only on the XL121, XL122, and XL124.)
An icon shown when the data save destination is set to SD card and the
memory full operation is set to DELETE. The icon blinks when there is access to
the SD card. (Supported only on the XL121, XL122, and XL124.)
An icon shown when the data save destination is set to SD card, the save mode
is set to DIVISION, and the memory full operation is set to REPEAT. The icon
blinks when there is access to the SD card. (Supported only on the XL121,
XL122, and XL124.)
An icon shown when the data save destination is set to SD card, the save mode
is set to DIVISION, and the memory full operation is set to DELETE. The icon
blinks when there is access to the SD card. (Supported only on the XL121,
XL122, and XL124.)
An icon shown when there is data saved in the backup memory. The icon blinks
when there is access to the backup memory. The icon is gray when there is no
data saved to the backup memory.
An icon shown when the interface is set to LAN, LAN/RS-232, or LAN/RS-485.
For other cases, the icon is gray. (Supported only on the XL121, XL122, and
XL124.)
An icon shown when the interface is set to USB. For other cases, the icon is
gray. (Supported only on the XL121, XL122, and XL124.)
An icon shown when the communication protocol is set to Modbus (slave). The
icon is gray when set to Modbus (master). (Supported only on the XL121,
XL122, and XL124.)
An icon shown when the communication protocol is set to Modbus (master). The
icon is gray when set to Modbus (slave). (Supported only on the XL121, XL122,
and XL124.)
An icon shown when the printer output is turned ON and the sampling interval is
greater than or equal to 1 minute. The icon is gray when the printer output is
OFF. (Supported only on the XL121, XL122, and XL124.)
An icon shown when the printer output is turned ON and the sampling interval is
less than or equal to 30 seconds. This indicates that only manual print is valid
using the SAVE key. (Supported only on the XL121, XL122, and XL124.)
An icon shown when the display update is held. The icon is gray when the
display is not held.
An icon shown when key lock is enabled. The icon is gray when key lock is
disabled.
2-6
An icon shown when the AC adapter is connected.
An icon shown when the AC adapter is not connected, and the XL100 is running
on a battery. Shows the remaining battery power using four levels
(
→ → → ).
IM XL120E
Page 36

1
Data Display Section
Waveform & Digital Display
8
2.3 Data Display
12
10
1
4
3
2
6
2
11
5
Part Names and Functions
7
1. Waveform
Waveforms of measured data, calculated data, and communication input data. The display
position of logic input waveforms is fixed to the bottom of the display as shown below.
2. Time Scale
The specified time scale (time per grid (division)) is displayed in the format “xxyyy/
div” (where xx is the value and yyy is sec, min, or h).
3. Alarm Line
Displayed with a dotted line using a specified color at the position of the alarm value
of the selected channel (active channel).
4. Scale Upper Limit
The scale upper limit of the active channel. If scaling is turned OFF, the span upper
limit is displayed.
5. Scale Lower Limit
The scale lower limit of the active channel. If scaling is turned OFF, the span lower
limit is displayed.
6. Pen
Displayed at the current value position of each channel. The active channel is shown
highlighted in reverse video.
7. Usage Indication Bar of the Storage Media
Displays using a blue bar the amount of space used with respect to the total space on
the storage medium that is specified to be the save destination of the measured data.
Total space on the save
destination medium
Used space
9
Free space
8. Grid
The grid can be turned ON/OFF.
9. Elapsed Time
The time elapsed from the start of the logging operation is displayed in the format
“wwww:xx:yy:z” (where wwww is the hour, xx is the minute, yy is the second, and z is
one-tenth of a second).
10. Digital Display
Displays the current values of the measured data, calculated data, and
communication input data using numeric values. When an alarm is occurring, the
value is shown in red in reverse video.
IM XL120E
2-7
Page 37

2.3 Data Display
11. Unit
Displays preset characters such as °C or an arbitrary specified characters (up to 6
characters).
12. Channel No./Tag
Displays the channel number and the specified tag (up to 8 characters). The active
channel is shown highlighted in reverse video.
Waveform Display
4
3
1
2
6
8
5
7
9
1. Waveform
Waveforms of measured data, calculated data, and communication input data.
2. Time Scale
The specified time scale (time per grid (division)) is displayed in the format “xxyyy/
div” (where xx is the value and yyy is sec, min, or h).
3. Alarm Line
Displayed with a dotted line using a specified color at the position of the alarm value
of the selected channel (active channel).
4. Scale Upper Limit
The scale upper limit of the active channel. If scaling is turned OFF, the span upper
limit is displayed.
5. Scale Lower Limit
The scale lower limit of the active channel. If scaling is turned OFF, the span lower
limit is displayed.
6. Pen
Displayed at the current value position of each channel. The active channel is shown
highlighted in reverse video.
7. Usage Indication Bar of the Storage Media
Displays using a blue bar the amount of space used with respect to the total space
on the storage medium that is specified to be the save destination of the measured
data.
8. Grid
The grid can be turned ON/OFF.
9. Elapsed Time
The time elapsed from the start of the logging operation is displayed in the format
“wwww:xx:yy:z” (where wwww is the hour, xx is the minute, yy is the second, and z is
one-tenth of a second).
2-8
IM XL120E
Page 38

1
2.3 Data Display
Digital Display
2
1. Digital Display
2. Channel No.
3. Tag
4. Unit
5. Statistical Calculation Value
34
Displays the current values of the measured data, calculated data, and
communication input data using numeric values. When an alarm is occurring, the
value is shown in red in reverse video.
Displays the channel number in the specified color.
Displays the specified tag (up to 8 characters). The active channel is shown
highlighted in reverse video.
Displays preset characters such as °C or an arbitrary specified characters (up to 6
characters).
Displays the maximum, minimum, average, peak (P-P), and rms values of the active
channel. Displays “OFF” when statistics is set to OFF.
1
5
2
Part Names and Functions
IM XL120E
2-9
Page 39

2.3 Data Display
Bar Graph Display
6
1
7
5
3
2
4
1. Bar
Displays the current values of the measured data, calculated data, and
communication input data using bars. The reference position of the bar can be set to
normal (left edge of the scale) or center. The color of the bars are the same as the
waveform colors.
When the reference position of the bar is set to center
2. Channel No./Tag
Displays the channel number and the specified tag (up to 8 characters). The active
channel is shown highlighted in reverse video.
3. Numeric Value
Displays the current values of the measured data, calculated data, and
communication input data using numeric values. When an alarm is occurring, the
value is shown in red in reverse video.
4. Unit
Displays preset characters such as °C or an arbitrary specified characters (up to 6
characters).
5. Scale Upper Limit
The scale upper limit for each channel. If scaling is turned OFF, the span upper limit
is displayed.
6. Scale Lower Limit
The scale lower limit for each channel. If scaling is turned OFF, the span lower limit
is displayed.
7. Alarm Mark
Displays arrow marks at the positions corresponding to the specified alarm values. If
an alarm is occurring, the alarm marks are displayed in red.
2-10
IM XL120E
Page 40

1
Review Display
4
10
11
12
5
22
2.3 Data Display
2
7
1
3
17
6
2
8
9
14
15
16
19
18
20
21
Part Names and Functions
13
1. Waveform
Waveforms of measured data, calculated data, and communication input data.
2. Time Scale
The specified time scale (time per grid (division)) is displayed in the format “xxyyy/
div” (where xx is the value and yyy is sec, min, or h).
3. Alarm Line
Displayed with a dotted line using a specified color at the position of the alarm value
of the selected channel (active channel).
4. Scale Upper Limit
The scale upper limit of the active channel. If scaling is turned OFF, the span upper
limit is displayed.
5. Scale Lower Limit
The scale lower limit of the active channel. If scaling is turned OFF, the span lower
limit is displayed.
6. Pen
Displayed at the current value position of each channel. The active channel is shown
highlighted in reverse video.
7. Grid
The grid can be turned ON/OFF.
8. File Name
Displays the file name of the data currently being reviewed.
9. Active Marker
Displays the marker name currently active.
10. Marker A
Displayed with a yellow solid line.
11. Marker B
Displayed with a yellow broken line.
12. Marker ALM
Displayed with a red solid line.
23
IM XL120E
2-11
Page 41

2.3 Data Display
13. Display Position and Marker Position
Shows the displayed range with respect to the entire data using a blue bar. Marker
positions are also displayed.
The entire saved data
Displayed range
Marker A
Marker ALM
Marker B
14. Measured Value at Marker A
Displays the measured value, calculated value, and communication input value at
the position of marker A.
15. Measured Value at Marker B
Displays the measured value, calculated value, and communication input value at
the position of marker B.
16. Measured Value and Calculated Value Difference
Displays the difference in the measured values and calculated values between
markers A and B.
17. Channel No./Tag
Displays the channel number and the specified tag (up to 8 characters). The active
channel is shown highlighted in reverse video.
18. Numeric Value
Displays the current values of the measured data, calculated data, and
communication input data using numeric values. When an alarm is occurring, the
value is shown in red in reverse video.
19. Unit
Displays preset characters such as °C or an arbitrary specified characters (up to 6
characters).
20. Marker Position Time
The time of the marker position currently active is displayed in the format
“wwww:xx:yy:z” (where wwww is the hour, xx is the minute, yy is the second, and z is
one-tenth of a second).
21. Time between Markers
The time difference between markers A and B is displayed in the format
“wwww:xx:yy:z” (where wwww is the hour, xx is the minute, yy is the second, and z is
one-tenth of a second).
22. Alarm Mark
Displayed at the position where the alarm occurred.
23. Measurement Time
The total measurement time of the data being reviewed is displayed in the format
“wwww:xx:yy:z” (where wwww is the hour, xx is the minute, yy is the second, and z is
one-tenth of a second).
2-12
Statistical Calculation Display When Showing the Review Display
Press the DISPLAY key to switch from the marker display to the statistical calculation
display. Press the DISPLAY key again to return to the marker display.
IM XL120E
Page 42

1
Logging & Review Display
5
24
4
1
2.3 Data Display
8
2
3
7
19
11
12
13
6
14
1. Past Waveforms
Waveforms of the past measured data, calculated data, and communication input
data.
2. Current Waveforms
Waveforms of the current measured data, calculated data, and communication input
data.
3. Time Scale
The specified time scale (time per grid (division)) is displayed in the format “xxyyy/
div” (where xx is the value and yyy is sec, min, or h).
4. Alarm Line
Displayed with a dotted line using a specified color at the position of the alarm value
of the selected channel (active channel).
5. Scale Upper Limit
The scale upper limit of the active channel. If scaling is turned OFF, the span upper
limit is displayed.
6. Scale Lower Limit
The scale lower limit of the active channel. If scaling is turned OFF, the span lower
limit is displayed.
7. Pen
Displayed at the current value position of each channel. The active channel is shown
highlighted in reverse video.
8. Grid
The grid can be turned ON/OFF.
9. File Name
Displays the file name of the data currently being reviewed.
10. Active Marker
Displays the marker name currently active.
11. Marker A
Displayed with a yellow solid line.
12. Marker B
Displayed with a yellow broken line.
13. Marker ALM
Displayed with a red solid line.
15
25
9
10
16
17
18
21
20
22
23
2
Part Names and Functions
IM XL120E
2-13
Page 43

2.3 Data Display
14. Display Position and Marker Position
Shows the displayed range with respect to the entire data using a blue bar. Marker
positions are also displayed.
The entire saved data
Displayed range
Marker A
Marker ALM
Marker B
15. Usage Indication Bar of the Storage Media
Displays using a blue bar the amount of space used with respect to the total space
on the storage medium that is specified to be the save destination of the measured
data.
16. Measured Value at Marker A
Displays the measured value, calculated value, and communication input value at
the position of marker A.
17. Measured Value at Marker B
Displays the measured value, calculated value, and communication input value at
the position of marker B.
18. Measured Value and Calculated Value Difference
Displays the difference in the measured values and calculated values between
markers A and B.
19. Channel No./Tag
Displays the channel number and the specified tag (up to 8 characters). The active
channel is shown highlighted in reverse video.
20. Numeric Value
Displays the current values of the measured data, calculated data, and
communication input data using numeric values. When an alarm is occurring, the
value is shown in red in reverse video.
21. Unit
Displays preset characters such as °C or an arbitrary specified characters (up to 6
characters).
22. Marker Position Time
The time of the marker position currently active is displayed in the format
“wwww:xx:yy:z” (where wwww is the hour, xx is the minute, yy is the second, and z is
one-tenth of a second).
23. Time between Markers
The time difference between markers A and B is displayed in the format
“wwww:xx:yy:z” (where wwww is the hour, xx is the minute, yy is the second, and z is
one-tenth of a second).
24. Alarm Mark
Displayed at the position where the alarm occurred.
25. Elapsed Time
The time elapsed from the start of the logging operation is displayed in the format
“wwww:xx:yy:z” (where wwww is the hour, xx is the minute, yy is the second, and z is
one-tenth of a second).
2-14
IM XL120E
Page 44

1
2.3 Data Display
Alarm Summary Display
5 6
4
1
2
1. Selected Alarm No./Total Number of Alarms
2. Alarm Status Mark (Red Circle When an Alarm Is Activated)
3. Alarm Occurring Channel No.
4. Alarm No.
5. Alarm Type
6. Alarm Occurrence Date/Time
7. Alarm Release Date/Time
3
Displays the number of the alarm selected with the arrow keys and the total number
of alarms (up to 120*).
* If the total number of logs exceeds 120, the log is deleted from the oldest one.
H/L: Level, IN/OUT: Window, PH/PL: Pulse level, PWIN/PWOUT: Pulse window, LX/
LH/LL: Logic
Displays the date/time when the alarm occurred.
Displays the date/time when the alarm was released.
7
2
Part Names and Functions
TIP
• All of the alarm information are cleared when the logging operation is started.
• Pressing the SET key displays the Alarm ACK window. Pressing the SET key with
this window displayed executes alarm acknowledge, and the alarm hold is released.
Log (Error) Display
3
1
1. Last Line Log No./Total Number of Logs
2. Error Occurrence Date/Time
3. Error Code
4. Error Message
2
Displays the log No. shown at the last line of the display and the total number of logs
(up to 50*).
* If the total number of logs exceeds 50, the log is deleted from the oldest one.
Displays the date/time when the error occurred.
4
IM XL120E
2-15
Page 45

2.3 Data Display
Log (Key Login/Logout) Display
1
2
5
4
3
1. Last Line Log No./Total Number of Logs
Displays the log No. shown at the last line of the display and the total number of logs
(up to 50*).
* If the total number of logs exceeds 50, the log is deleted from the oldest one.
2. Date/Time of Key Login/Logout
Displays the date/time when the user logged in or logged out using keys.
3. Login/Logout Distinction
IN: Login. OUT: Logout
4. User Number
Displays the user number that logged in.
5. User Name
The name of the user that logged in.
Log (Communication Command) Display
3
1
2
5
4
1. Last Line Log No./Total Number of Logs
Displays the log No. shown at the last line of the display and the total number of logs
(up to 200*).
* If the total number of logs exceeds 200, the log is deleted from the oldest one.
2. Date/Time of Access
Displays the date/time when the user connected and accessed the XL100.
3. Connection User ID Number
Displays the ID number (1 to 7) of the user connected to the XL100.
4. Input/Output Distinction
>: Input. <: Output
5. Message
Displays the message (up to 20 characters).
2-16
IM XL120E
Page 46

1
2.3 Data Display
Log (FTP Client) Display
3
1
1. Last Line Log No./Total Number of Logs
2. Date/Time of File Transfer
3. Error Code (If an Error Occurred)
4. Destination FTP Server
5. File Name
2
Displays the log No. shown at the last line of the display and the total number of logs
(up to 50*).
* If the total number of logs exceeds 50, the log is deleted from the oldest one.
Displays the date/time when the file was transferred to the FTP server.
For details on the error corresponding to each error code, see section 12.2,
“Messages and Their Corrective Actions.”
P: Primary. S: Secondary
Displays the name of the transferred file.
5
4
2
Part Names and Functions
Log (Web Operation) Display
3
1
1. Last Line Log No./Total Number of Logs
2. Date/Time of Web Screen Operation
3. Operation
4. Error Code (If an Error Occurred)
5. Operation Type
2
Displays the log No. shown at the last line of the display and the total number of logs
(up to 50*).
* If the total number of logs exceeds 50, the log is deleted from the oldest one.
For details on the error corresponding to each error code, see section 12.2,
“Messages and Their Corrective Actions.”
5
4
IM XL120E
2-17
Page 47

2.3 Data Display
Log (E-mail Transmission) Display
4
3
5
1
2
6
1. Last Line Log No./Total Number of Logs
Displays the log No. shown at the last line of the display and the total number of logs
(up to 50*).
* If the total number of logs exceeds 50, the log is deleted from the oldest one.
2. Date/Time of E-mail Transmission
Displays the date/time of e-mail transmission.
3. E-mail Transmission Timing
Displays the e-mail transmission timing (periodic, system, alarm, etc.).
4. Error Code (If an Error Occurred)
5. Destination Number
1: Destination 1. 2: Destination 2
6. Error Details (If an Error Occurred)
TIP
The log information can be cleared by carrying out “initialize log” in File Operation Mode.
For a description of the “initialize log” operation, see section 9.11, “Initializing Log
Information.”
Note
The following displays are supported only on the XL121, XL122, and XL124.
Log (Communication command) display, log(FTP client) display, Log (Web
operation) display, and log (E-mail transmission) display
2-18
IM XL120E
Page 48

1
2.4 Setup Display
Status Display Section
2
1
Status display section
Menu/Setting display section
A brief description of the selected item
3
45
2
Part Names and Functions
6
7
1. Setup Item 1
Displays the item that is one level higher than the current item that you are setting.
2. Setup Item 2
Displays the current item that you are setting.
3. Page
Displays “the current page number/total number of pages” when there are multiple
pages of the setup display.
4. Alarm Status
The status is displayed using different icon colors as follows:
Gray: No alarm setting
Yellow-green: Alarm setting enabled
Red: Alarm activated
5. Alarm Output Status
The status is displayed using different icon colors for each alarm output channel as
follows:
Gray: No alarm output setting
Yellow-green: Alarm output setting enabled
Red: Alarm outputting
6. Date/Time
Displays the year, month, day, hour, and minute. For the procedure to set the date/
time, see section 4.3, “Setting the Date/Time.”
7. Various Icons
Various icons are used to display the operation status, interface usage status, etc.
The icons that are displayed are the same as those on the data display. For a
description of each icon, see page 2-5.
IM XL120E
2-19
Page 49

2.4 Setup Display
Menu/Setting Display Section
The display content changes by selecting the desired item using the arrow/
SELECT key as shown below.
SELECT
SELECT
2-20
SELECT
IM XL120E
Page 50

1
A List of Setup Displays
Setup TOP
2.4 Setup Display
Input
Display
Data Save
Alarm
Calculation
Analog Input
Pulse Input
Logic Input
General
Group
Alarm Line
Sampling Interval
Save Media
Data Type
Output AND/OR
Detail
Delay Sampling Count
LCD
Save Mode
File Name
Printer Output
Output Hold
Display Hold
Hysteresis
Tag
Trigger
Analog Input
Alarm Buzzer
Alarm ACK.
2
Part Names and Functions
Mode
Range
Span Lower
Span Upper
Color
Avera ge
Scaling
File Division
Memory Full
Trigger Mode
Pre/Trigger Delay
Start Trigger
End Trigger
Pulse Input
Logic Input
Calc. Data
Comm. Data
Communication
Hardware
System
Calculation
Statistics
Interface
Printer Output
Serial Comm.
User Register
USB
Ethernet
Network
Func.
Communication settings apply only
to the XL121, XL122, and XL124.
Parameters
Modbus
Time Zone
IP Address
DNS
SNTP
Login Function
Comm. Timeout
FTP
Client
Prim. FTP Server
Web Se rver
E-mail
Modbus Master
Basic
Modbus Master
Command
Communication
Keepalive
Sec. FTP Server
Basic
Alarm Info.
Specified Time
Channel
Sys. Err.
Trans.
IM XL120E
2-21
Page 51

3
2
1
Chapter 3 Handling Precautions and Wiring
3.1 Handling Precautions
If you are a first-time user, make sure to thoroughly read “Safety Precautions” given on
pages 4 and 5.
• Do not place any objects on the instrument.
Do not place other devices or a container filled with water on the instrument,
otherwise a breakdown may occur.
• Moving the instrument
Before moving the instrument, check that the power cord and all other cables are
disconnected.
• Input terminals
Keep electrically charged objects away from the signal terminals. They may damage
the internal circuitry. Do not apply mechanical shock to the signal input terminals. It
may turn into electrical noise and enter the instrument.
• Protecting the case and operation panel
Do not pour volatile chemicals on the case or operation panel or leave any rubber or
PVC product in contact with the case or operation panel for long periods of time.
Otherwise, it may cause discoloring and deformation
• Cleaning
When cleaning the case and/or operation panel, disconnect the power cord from the
outlet and gently wipe the external surfaces with a soft clean cloth. Do not use
chemicals such as benzine or thinner since these may cause discoloring and
deformation.
3
Handling Precautions and Wiring
• Display
When the instrument is shipped from the factory, the LCD is covered with a protective
film. Remove it before using the instrument.
• After use
Disconnect the power cord from the wall outlet after use.
IM XL120E
3-1
Page 52

3.2 Operating Environment
g
O
t
ce
cable
etc.
on
board
C
I
t
C
I
C
V
C
I
Installation Location
Indoors.
Do not install the XL100 in a location that is:
• outdoors,
• exposed to direct sunlight or close to a heat source,
• exposed to a relatively large amount of lampblack, steam, dust, corrosive gas,
• close to a strong magnetic field sources,
• close to high-voltage equipment or power lines,
• exposed to frequent mechanical vibration, or
• unstable.
Operating Environment
Ambient Temperature and Humidity
Use the XL100 in the following environment:
• Ambient temperature: 0 to 50°C (0 to 40°C when battery driven)
• Ambient humidity: 5 to 85% RH
(no condensation)
Operating Altitude
2000 m max. above sea level.
Measurement Category (CAT.)
The measurement category of the XL100 is I.
WARNING
Do not use the XL100 for measurements in locations falling under Measurement
Categories II, III, and IV.
Measurement Category
Measurement Category Description Remarks
I CAT. I For measurement performed on
circuits not directly connected to MAINS.
II CAT. II For measurement performed on circuits Appliances, portable equipments, etc.
directly connected to the low voltage
installation.
III CAT. III For measurement performed in the Distribution board, circuit breaker, etc.
building installation.
IV CAT. IV For measurement performed at the Overhead wire, cable systems, etc.
Entran
source of low-voltage installation.
Internal wirin
Distributi
AT. II
AT. I
AT. I
Fixed equipment,
3-2
AT.
utle
Equipmen
IM XL120E
Page 53

3
2
1
3.2 Operating Environment
Pollution Degree
Pollution Degree applies to the degree of adhesion of a solid, liquid, or gas which
deteriorates withstand voltage or surface resistivity.
The pollution degree of the XL100 in the operating environment is 2. Pollution Degree 2
applies to normal indoor atmospheres. Normally, only non-conductive pollution is
emitted. However, a temporary electrical conduction may occur depending on the
concentration.
Note
•To measure the signals accurately, operate the XL100 in the 23 ± 5°C
temperature range and 55 ± 10% RH.
• Condensation may occur if the XL100 is moved to another place where the
ambient temperature and humidity are higher, or if the temperature changes
rapidly. If this happens, let the XL100 adjust to the new environment for at least
an hour before using it.
• Side cover
If you are not using the AC adapter or communications, the side cover (see
“Accessories” on page 2) can be attached to protect the card slots and
connectors from foreign particles such as dusts. Use the side cover as
necessary.
3
Handling Precautions and Wiring
Storage Location
• We recommend you store the XL100 in an environment with a temperature between 0
and 50°C and a relative humidity between 5 to 85% RH.
• When storing the XL100, avoid a location that is:
• exposed to direct sunlight,
•60°C or higher,
• 90% RH or higher,
• close to a heat source,
• exposed to severe vibrations,
• exposed to corrosive or explosive gas,
• exposed to excessive amount of soot, dust, salt, and iron, or
• exposed to water, oil, or chemicals.
IM XL120E
3-3
Page 54

3.3 Wiring the Input Signal Cable
Analog Input
CAUTION
• If a strong tension is applied to the cord wired to the terminal block, the
terminals and/or the cord can be damaged. Allow extra wire for the input signal
cable so that direct tension is not applied to the input terminals of the terminal
block.
•To prevent fire, use signal cables having a temperature rating of 70°C or more.
Wiring Precautions
Take the following precautions when wring the input signal cables.
Take measures so that noise does not enter the measurement circuit.
• Move the measurement circuit away from the power cable (power circuit) and ground
circuit.
• It is desirable that the object being measured does not generate noise. However, if
this is unavoidable, isolate the measurement circuit from the object. Also, ground the
object being measured.
• Shielded wires should be used to minimize noise caused by electrostatic induction. As
necessary, connect the shield to the earth terminal of the XL100 (make sure this does
not lead to grounding at two points).
• To minimize noise caused by electromagnetic induction, twist the measurement circuit
wires at short, equal intervals.
For thermocouple input, take measures to stabilize the temperature at the input
terminal.
• Make sure to close the input terminal cover when in use.
• Do not use thick wires which may cause large heat dissipation (cross sectional area of
0.5 mm
• Make sure that the ambient temperature remains reasonably stable. Large
temperature fluctuations can occur if a nearby fan turns ON or OFF.
Connecting the input wires in parallel with other devices can cause signal
degradation, affecting all connected device.
If you need to make a parallel connection, then
• Do not turn ON or OFF another instrument during operation. This can have adverse
effects on the other instruments
• RTDs cannot be wired in parallel.
2
or less recommended).
CAUTION
Do not apply an input exceeding the following values. Otherwise, the XL100 may
break down.
• Maximum input voltage
100 mV, 500 mV, and 1 V range and TC input: ±10 VDC
5 V, 10 V, 50 V, and 1-5V/f.s. range: ±60 VDC
• Maximum common mode noise voltage
30 VACrms (50/60 Hz) or ±60 VDC
3-4
IM XL120E
Page 55

3
2
1
3.3 Wiring the Input Signal Cable
Terminal Block Unit
The following two types of terminal block units are available.
8 ch (95052): Clamp screw
16 ch (95053): Clamp screw
16 ch (95055): M3 screw
+
ch1
-
b
+
ch2
-
b
+
ch3
-
b
+
ch4
-
b
+
ch5
-
b
+
ch6
-
b
+
ch7
-
b
+
ch
8
-
Wiring Procedure
<Clamp screw>
1. Open the terminal cover of the terminal block unit.
2. Wire the input signal cables to the input terminals.
As shown below, loosen the terminal screws using the screwdriver provided, insert the
signal wires, and fasten the terminal screws.
3. Close the terminal cover of the terminal block unit.
Terminal cover
Accessory screwdriver
for terminals
3
Handling Precautions and Wiring
Enlarged view
Signal wire
Terminal block unit
Note
For clamp terminals, use wires of the following specifications.
• Conductive cross-sectional area for single wire: 0.14 mm
wire: 0.14 mm
2
to 1.5 mm
2
AWG: 26 to 14
• Length of the stripped section of the wire: Approx. 7 mm
Input signal wires whose diameter is 0.3 mm or less may not be securely
fastened. Fold over the conducting section of the wire, for example, to make
sure that the wire is securely fastened to the clamped terminal.
<M3 screw>
Use a driver sold commercially when using the M3 screws terminal block unit (crimp-on
lugs or the like).
IM XL120E
(Do not use the accessory screwdriver for terminals (for clamp terminals).)
2
to 2.5 mm2, stranded
3-5
Page 56

3.3 Wiring the Input Signal Cable
Wiring Diagram
DC voltage input
TC input
+
ch
–
b
+
ch
–
b
DC voltage input
RTD input
A
b
+
–
A
B
b
+
ch
–
b
+
ch
–
b
B
Lead wire resistance per wire of 10 Ω or less.
Make the resistance of the three wires equal.
Extension leadwire
DC current input
+
DC current input
–
Shunt resistor
Example: For 4 to 20 mA input, use a
shunt resistor of 250 Ω ± 0.1%.
+
–
+
–
Note
•RTD input terminals A (+) and B (–) are isolated on each channel. Terminal b is
shorted internally across all channels.
•RTD input cannot be used on the M3 screws terminal block unit.
Attaching and Detaching the Terminal Block Unit
To detach the terminal block unit, check that the power is turned OFF, and open the
attach/detach lever to the outside. To attach the terminal block unit, align the connector,
and press the unit in until the attach/detach lever returns to the original position.
Terminal block unit
Attach/Detach lever
Connector
Attach/Detach lever
Note
The XL100 stops the operation if the terminal block unit is detached while the
power is turned ON. If this happens, the XL100 recovers by turning the power
ON again.
3-6
IM XL120E
Page 57

3
2
1
3.4 Wiring the Pulse Input, Logic Input, and Signal Cables
CAUTION
• Do not apply an input exceeding the following values.
Pulse input or logic input: 10 V. Alarm output: 40 V
• If a strong tension is applied to the cable wired to the terminal, the terminals
and/or the cable can be damaged. Allow extra wire for the input signal cable so
that direct tension is not applied to the input terminals of the terminal block.
• For wiring, use the dedicated digital I/O cable (91029).
Connector Position and Digital I/O Cable Connection
The pulse input, logic input, and alarm output signals are output from the digital I/O
connector as shown below. Attach the digital I/O cable connector to the digital I/O
connector.
Digital I/O connector
Connector of the digital
I/O cable
3
Handling Precautions and Wiring
Connector Pin Arrangement
No.1
No.8
No.7
No.14
Signal name Symbol Pin Number
Logic input 1 L1 8
Logic input 2 L2 1
Pulse input PLS 10
Alarm output 1 AL1 11
Alarm output 2 AL2 4
Alarm output 3 AL3 12
Alarm output 4 AL4 5
Common GND GND 6, 7, 13, 14
Digital I/O cable (sold separately. part number: 91029)
Connect the wires according to the figure below.
Gray : L1
Brown : L2
Black : PLS
Peach : AL1
Yellow : AL2
Light blue : AL3
Green : AL4
Blue : GND
Purple : GND
Bright green : GND
Light orange : GND
Shield
Logic input
Pulse input
Alarm output
Common GND
Output Signal Specifications
5-V pull-up resistance 100 kΩ
Contact capacity: 5 to 40 V, 100 mA
IM XL120E
3-7
Page 58

3.5 Wiring the External I/O Signal Cables
CAUTION
• Applying voltage outside the allowable input voltage (–0.5 to 10 V) to the signal
input terminal may damage the internal circuitry.
• If the trigger mode is set to Continuous, apply the trigger input signal at an
interval greater than or equal to 30 s.
• When connecting the cables, be sure not to reverse the connection to the
input and output terminals.
Position of the External Trigger I/O Terminal
The terminal is located on the right side panel at the position indicated below.
External trigger
input/output terminal
DC INPUT
12V
POWER
USB
20W MAX
USB
CF
SG
RS485 RS232LAN
LOGIC/PULSE
ALARM
SD
IN
OUT
GND
TRIGGER
Wiring Diagram
• When applying a trigger input signal to a single station
External signal
• When synchronizing multiple stations by applying an external trigger input signal
3-8
External signal
• When synchronizing stations 2 and 3 using the trigger output signal from station 1
Station 1 Station 2 Station 3
IM XL120E
Page 59

3
2
1
3.5 Wiring the External I/O Signal Cables
Trigger Input Signal Specifications
Apply the signal using 0 V (low) and 5 V (high).
• Input level: Low 0.0 to 0.8 V. High 2.0 to 5.0 V
• Allowable voltage: –0.5 to 10 V
Signal Wires That Can Be Used
• Compliant wire Single wire: φ1.0 (AWG 18). Stranded wire: 0.75 mm
• Allowable wire Single wire: φ0.4 to 1.0 (AWG 26 to 18)
Stranded wire: 0.3 to 0.75 mm
Stranded wire diameter: φ0.18 or greater
standard length of stripped wire: 10 mm
Connecting the Signal Wires
To connect the signal wire, insert the signal wire while pushing in the rectangular section
above the terminal with a flat-blade screwdriver and then pull the screwdriver out.
Screwdriver, etc.
Signal wire
2
(AWG 22 to 20)
2
3
Handling Precautions and Wiring
IM XL120E
3-9
Page 60

3.6 Connecting the Power Supply
Use the AC adapter supplied with the XL100 when connecting the XL100 to a power supply.
WARNING
• Use only the power cord supplied by YOKOGAWA Meters & Instruments for the XL100.
• Check that the power source voltage matches the supply voltage rating (100 to
240 VAC), and then connect the power cord.
• Check that the power switch of the XL100 is turned OFF and then connect the
power cord.
• If the XL100 is not used for a prolonged period, disconnect the AC adapter
power cord from the outlet.
• Use only the AC adapter (94010) for the XL100.
• Do not place any objects on the AC adapter or power cord, and do not let the
power cord come into contact with a heat generating object.
• When unplugging the power cord from the outlet, never pull the cord itself.
Always hold and pull by the plug. If the power cord is damaged, contact your
vendor for replacement.
Connecting the AC Adapter
Follow the steps below to connect the AC adapter.
1. Check that the power switch is OFF.
2. Connect the AC adapter to the AC adapter jack of the XL100.
3. Connect the plug of the power cord supplied with the AC adapter to the power
connector of the AC adapter.
4. Connect the other end of the power cord to the power outlet that meets the power
rating (requirements).
AC Adapter’s Power Rating
Supply voltage rating 100 to 240 VAC
Allowable supply voltage range 90 to 264 VAC
Power supply frequency rating 50/60 Hz
Allowable power supply frequency range 47 to 63 Hz
Maximum input current 1.4 A
Output voltage rating of AC adapter 12.0 VDC
Maximum output current rating of AC adapter 3.0 A
AC adapter jack
4. Connect.
Power cord
2. Connect.
AC adapter
1. Check that the power is OFF.
3-10
3. Connect.
IM XL120E
Page 61

3
2
1
3.7 Handling of the Lithium Ion Battery (Sold Separately)
Loading the Lithium Ion Battery
If you purchased a lithium ion battery (94009), follow the steps below to load it into the
XL100.
1. Loosen the battery cover attachment screw with a flat-blade screwdriver and remove the battery cover.
2. Load the battery in the direction shown in the figure below.
3
Handling Precautions and Wiring
Battery cover attachment screw
Charging the Battery
• Be sure to charge the battery with the XL100.
• For safety reasons, the battery is charged only when the ambient temperature
3. Put the battery cover back on, and tighten the attachment screw.
Lithium ion battery
Terminals
CAUTION
is between +10 and +35°C. Beware that the battery may not be charged even
when an AC adapter is connected.
To start charging the battery, simply connect the XL100 to a power supply with the AC
adapter with the power switch turned OFF.
While the battery is being charged, the CHARGE LED illuminates as shown below.
When it is fully charged, the LED turns OFF.
CHARGE LED
Illuminates when the
battery is being charged.
Indication of the Amount of Remaining Power during Battery Operation
If the AC power is not connected and the XL100 is running on the battery, the amount of
remaining power is indicated with an icon at the status display section (top section) on
the display. Four levels are indicated as follows:
→ → →
Indication of AC Power Operation
The icon shown below is displayed in the status display section (top section) on the
display. When this icon is displayed, the XL100 is running on AC power. If the battery is
IM XL120E
not fully charged, it is charged.
HOME REVIEW FILE
SETTING
HOLD
3-11
Page 62

3.8 Connecting Communication Cables
(Supported only on the XL121, XL122, and XL124)
Connecting to the Ethernet Interface
LAN Port Position and LAN Cable Connection
Connect a LAN cable to the LAN port on the rear panel of the XL100 as shown below.
LAN port
LOG
IC/PULS
E
RS232
ALAR
M
LAN cable
When Connecting Only the XL100 and the PC
Connect the XL100 and the PC via a HUB as shown in the following figure. If you are not
going through a hub, connect the XL100 and the PC with a cross cable.
Hub
PC
When Connecting to an Existing Network
The figure below shows an example of connecting the XL100 and the PC. When
connecting the XL100 or the PC to an existing network, communication parameters such
as the transfer rate and connector type must be matched. For details, consult your
system or network administrator.
Ethernet
Hub
PC
Hub
PC
Checking the Communication Status
There are two LEDs on the LAN port that indicate the communication status.
3-12
Green LED
Yellow LED
Blinks when data transmission
is normal.
Illuminates when communication is
possible with the connected destination.
LAN
Note
If the interface is not set to LAN, LAN/RS-232, or LAN/RS-485, do not connect the
LAN cable.
IM XL120E
Page 63

3
2
1
Connecting the Serial Interface
RS-232
• Position of the RS-232 Connector
3.8 Connecting Communication Cables
RS-232 connector
DC INPUT
12V
POWER
USB
20W MAX
USB
CF
LOGIC/PULSE
ALARM
SD
IN
OUT
GND
TRIGGER
SG
RS485 RS232LAN
• Connector type: Mini DIN, 8 pins
• Connector pin arrangement
Pin Number Signal Name Meaning
1 CS (Clear to Send) Handshaking signal when transmitting data to the
connected device. This is an input signal to the XL100.
2 RD (Received Data) Received data from the connected device. This is an
input signal to the XL100.
3 RS (Request to Send) Handshaking signal when receiving data from the
connected device. This is an output signal from the
XL100.
4 SD (Send Data) Transmitted data to the connected device. This is an
output signal from the XL100.
8 SG (Signal Ground) Signal ground.
* Pins 5, 6, and 7 are not used.
• Connection methods
• Connecting to a printer
XL100
Printer serial port (9-pin)
3
Handling Precautions and Wiring
SG
Printer
(sold separately. Part No.: 97010)
Connection cable
(sold separately. Part No.: 91010)
Power switch
Online switch
• Connecting to the PC
XL100
PC
S
G
Communication cable
(sold separately. Part No.: 91011)
(Female)
IM XL120E
3-13
Page 64

3.8 Connecting Communication Cables
• Connecting to another measuring instrument (Modbus communication)
The figure below shows an example when connecting the XL100 to our CW120/
CW121 Clamp-on Power Meter.
CW120/CW121XL100
HOME REVIEW FILE
TIME / DEV
START
/ STOP
RANGE
SAVE
Connection cable
(sold separately. Part No.: 91010)
HOLD
SETTING
SET
ESC
DISPLAY
GROUP
SELECT
MARK
Communication cable
(sold separately. Part No.: 91011)
For RS-485
• Position of the RS-485 Terminal Block
RS-485 terminal block
DC INPUT
12V
USB
20W MAX
POWER
USB
CF
LOGIC/PULSE
ALARM
SD
IN
OUT
GND
TRIGGER
SG
RS485 RS232LAN
• Terminal block type: Three terminals. Clamp on with screws.
• Signal names
Signal Name Meaning
+ Data (+).
– Data (–).
SG (Signal Ground) Signal ground.
3-14
• Connection methods
• Connecting to the PC
PC
RS-232
RS-232 / RS-485
Converter
+
–
SG
XL100
SG
SG
Terminator ON
XL100
SG
SG
Connect a 120 Ω
terminator
XL100
Communication cable Communication cable
Up to 31 stations
SG
Pair
IM XL120E
Page 65

3
2
1
3.8 Connecting Communication Cables
• Connecting to a measuring instrument (Modbus communication)
Another measuring
instrument
SG
SG
Connect a 120 Ω
terminator
Communication cable
Connect a 120 Ω
terminator
XL100
SG
Communication cable
Up to 31 stations
USB
• Position of the USB port for connecting to a PC
USB port for connecting a PC
DC INPUT
12V
POWER
USB
20W MAX
USB
CF
LOGIC/PULSE
ALARM
SD
OUT
IN
GND
TRIGGER
SG
RS485 RS232LAN
• Specifications of the USB port for connecting to a PC
Electrical/Mechanical specifications: Conforms to USB Rev 1.1
Connector type: 5-pin Mini-B receptacle
Another measuring
instrument
SG
SG
Pair
3
Handling Precautions and Wiring
• Connecting with the PC
XL100
S
G
PC
USB cable
IM XL120E
3-15
Page 66

3.9 Connecting the USB Memory
CAUTION
• Use USB memories that Yokogawa Meters & Instruments have checked for
compatibility.
• Before removing the USB memory, check that it is not being accessed. If you
remove the USB memory while it is being accessed, files stored on the USB
memory or the XL100 may be damaged.
• When transporting the XL100, remove the USB memory from the XL100.
Position of the USB Port
USB port for USB memory
12V
DC INPUT
POWER
USB
20W MAX
USB
CF
LOGIC/PULSE
ALARM
SD
IN
OUT
GND
TRIGGER
SG
RS485 RS232LAN
Specifications of the USB port for the USB memory
Electrical/Mechanical specifications: Conforms to USB Rev 1.1
Connector type: 4-pin type A receptacle
Connecting a USB Memory
By connecting a USB memory as shown below, the data stored to the internal memory,
CF card, and SD card can be copied to the memory. In addition, if the automated
measurement function is turned ON, the setup file stored in the USB memory
(AUTORUN.SET) is automatically loaded, and the logging operation automatically starts.
R
S
23
2
3-16
USB memory
IM XL120E
Page 67

3
2
1
Chapter 4 Basic Operation
4.1 Turning ON/OFF the Power Switch
Items to Be Checked before Turning ON the Power
• Check that the instrument is installed properly (see section 3.2, “Operating
Environment”).
• Check that the power cord and AC adapter are connected properly (see section 3.6,
“Connecting the Power Supply”).
Location of the Power Switch and ON/OFF Operation
The power switch is located on the right side panel of the XL100. To turn the power ON, press
the I (ON) side of the power switch. Press the O on the other side to turn the power OFF.
Power switch
• Power Switch Operation When the Side Cover Is Attached (The side cover is
supplied only with the XL121, XL122, and XL124.)
You can operate the power switch with the rubber boot and side cover attached by opening
the power switch cover. When attaching the accessory side cover, fasten the side cover
attachment screw to fix the cover to the XL100.
Side cover attachment screw
Open from this end.
Side cover
4
Basic Operation
Power switch cover
Rubber boot
Note
•To accurately measure the signals, let the XL100 warm up at least 30 minutes
after turning the power switch ON.
• When turning the power OFF, check that the external storage medium is not
being accessed.
Display at Power-On
When the power is turned ON, the XL100 shows a startup screen followed by the selftest screen. If the self-test completes normally, the XL100 shows “Self Test OK” followed
by the Waveform & Digital display of free running mode.
IM XL120E
4-1
Page 68

4.1 Turning ON/OFF the Power Switch
• If the Key Login Function Is Turned ON
When you press a key after the Free Running Mode display appears, a window for
entering a user name and password opens. If you enter the user name and password
correctly according to the explanation given in section 11.7, “Key Login/Logout Setup
and Operation.”
• If a Minor Error Occurs during the Self-Test
The XL100 displays the message “Self Test Confirm Push any key” and waits for you
to acknowledge the message. If you press any key, the Free Running Mode display
appears. If logging is in progress, it is aborted.
• If a Major Error Occurs during the Self-Test
The XL100 displays the message “Self Test NG” and stops the operation. If logging is
in progress, it is aborted.
• Error Messages during the Self-Test and Their Corrective Action
Test Item Error Display Corrective Action
FPGA FPGA Check Error A major hardware error.
SDRAM SDRAM Check Error Contact your vendor for repairs.
Flash Disk Flash Disk Unformatted The Flash file is not formatted. The XL100
RTC RTC Check Error An RTC error such as the stopping of the
EEPROM1 EEPROM1 Initialized There is a problem with the internal data, and
EEPROM2 EEPROM2 Initialized There is a problem with the internal data, and
Setting Settings Initialized An error in the internal settings. The XL100
* Files stored in the internal memory are cleared. Check that data can be saved correctly to the
internal memory and loaded.
→ Flash Disk Formatting automatically formats it.*
→ Flash Disk Format Completed
Flash Disk Recovered A file system error. The XL100 automatically
recovers.*
→ RTC Initialized clock. The XL100 automatically initializes it.
Set the date and time again, because they are
reset. If this error appears every time, the
internal backup battery is worn down. The
user cannot replace the backup battery.
Contact your vendor to have the battery
replaced. The lifetime of the backup battery is
approx. 10 years.
EEPROM1 Initialized(Invalid Data) the XL100 will not function properly. Contact
your vendor for repairs.
EEPROM1 Initialized There is a problem with the internal data, but
(Check Sum Error) the XL100 will function properly.
EEPROM2 Initialized(Invalid Data) the XL100 will not function properly. Contact
your vendor for repairs.
EEPROM2 Initialized There is a problem with the internal data, but
(Check Sum Error) the XL100 will function properly.
Invalid Settings Corrected automatically initializes. If this error appears
every time, contact your vendor for repairs.
(All settings are initialized.)
Settings Initialized The terminal block was changed. The XL100
(Terminal changed) automatically initializes.
Settings that are initialized are those related
to the terminal block change. For details, see
appendix 2.
4-2
IM XL120E
Page 69

3
2
1
4.1 Turning ON/OFF the Power Switch
TIP
• If you change the terminal block (if the number of channels changes), the settings are
initialized. The previous setting data (setting data before the terminal block is
changed) is automatically stored to the setting memory to a file named “year month
date hour minute second Cxx.SET” (where Cxx is C08 for the 8ch terminal block and
C16 for the 16ch terminal block).
• If you need the previous setting data, load the stored setting file using the SETUP
FILE menu in the file operation mode.
4
Basic Operation
IM XL120E
4-3
Page 70

4.2 Basic Key Operations
Operation Mode and Key Operations
There are six modes in the XL100 as shown below. You can switch the operation mode
using the five keys, HOME, REVIEW, FILE, SETTING, and START/STOP, at the top
section.
HOME
Free Running Mode
Waveform
Digital
Bar graph
Alarm summary
START
/ STOP
Log
System
information
Switch the
display
Logging Mode
Waveform
Digital
Bar graph
Alarm summary
REVIEW
Log
System
information
Switch the
display
Logging & Review Mode
Marker measurement
Statistical
calculation
REVIEW
Review Mode
Marker
measurement
Statistical
calculation
FILE
File Operation Mode
File operation
menu
Select
Set
Rename files
Delete files
Setup file
Copy data files
Copy backup memory
Format
Initialize log
SETTING
Setting Mode
Setting menu
Set
Input
Display
Data Save
Alarm
Calculation
Communication
Select
Hardware
System
4-4
IM XL120E
Page 71

3
2
1
Key Operations in Free Running Mode
• When Displaying the Waveform, Numeric Values, or Bar Graph
1
4.2 Basic Key Operations
3
2
HOME REVIEW FILE
SETTING
HOLD
5
6
START
/ STOP
TIME / DIV
RANGE
7
SAVE
9
DISPLAY
GROUP
MARK
ESC
8
10
4
SET
4
Basic Operation
SELECT
11
1. REVIEW Key
Switches to Review Mode in which saved data can be analyzed.
2. FILE Key
Switches to File Operation Mode in which saved measured data can be loaded, file
can be renamed, measured data can be copied, and setup data can be saved or
loaded.
3. SETTING Key
Switches to Setting Mode in which measurement conditions, save conditions of
measured data, and alarm conditions are specified.
4 HOLD Key
Stops the display updating. Press the key again to resume display updating.
Hold the key down to enable key lock. Hold the key down again to disable key lock.
5. TIME/DIV Key
Press this key to switch the time scale (the time per grid (division)).
6. START/STOP Key
Starts the logging operation (saving of the measured data) if a trigger is not set. If a
trigger is set, the XL100 enters the logging standby state. If you press this key while
the logging operation is in progress, the operation stops.
7. RANGE Key
Displays a window for setting the upper and lower limits of the range or span on the
active (selected) channel.
8. DISPLAY Key
Displays a pop-up menu for switching the display.
9. SAVE Key
Saves or prints the measured data (or screen data).
10. GROUP Key
Switches the channel display group each time you press the key in the following
order: Group 1, Group 2, Group 3, Group 4, Group 1, and so on.
11. Arrow Keys
↑/←: Switches the active channel to a channel of the next smaller number. If
the channel of the smallest number is active, the channel of the largest
number is activated.
↓/→: Switches the active channel to a channel of the next larger number. If
the channel of the largest number is active, the channel of the smallest
number is activated.
IM XL120E
4-5
Page 72

4.2 Basic Key Operations
• When Displaying the Alarm Summary/Log
1
2
3
START
/ STOP
HOME REVIEW FILE
TIME / DIV
RANGE
SAVE
5
DISPLAY
GROUP
SETTING
4
MARK
ESC
SELECT
HOLD
SET
8
7
6
1. REVIEW Key
Switches to Review Mode in which saved data can be analyzed.
2. FILE Key
Switches to File Operation Mode in which saved measured data can be loaded, file
can be renamed, measured data can be copied, and setup data can be saved or
loaded.
3. SETTING Key
Switches to Setting Mode in which measurement conditions, save conditions of
measured data, and alarm conditions are specified.
4. DISPLAY Key
Displays a pop-up menu for switching the display.
5. SAVE Key
• When displaying the alarm summary
Saves or prints the alarm summary data (or screen image data).
• When displaying the log
Saves or prints the log data (or screen image data).
6. Arrow Keys
• When displaying the alarm summary
↑/←: Switches the active alarm (highlighted alarm) to the next higher alarm.
If the highest alarm is active, the lowest alarm is activated.
↓/→: Switches the active alarm to the next lower alarm. If the lowest alarm
is active, the highest alarm is activated.
• When displaying the log
↑/←: Switches the active log item (highlighted log item) to the next higher
log item. If the highest log item is active, the lowest log item is
activated.
↓/→: Switches the active log item to the next lower log item. If the lowest
log item is active, the highest log item is activated.
7. SELECT Key
Shows the review display containing the selected alarm information when displaying
the alarm summary (valid only when the data type is binary for inputs other than logic
input).
8. SET key
The Alarm ACK window is displayed when displaying the alarm summary. Pressing
the SET key with this window displayed executes alarm ACK, and the alarm hold is
released.
4-6
IM XL120E
Page 73

3
2
1
Key Operations in Logging Mode
• When Displaying the Waveform, Numeric Values, or Bar Graph
4.2 Basic Key Operations
1
ESC
HOLD
2
SET
SELECT
4
START
/ STOP
HOME REVIEW FILE
3
TIME / DIV
RANGE
5
SAVE
DISPLAY
GROUP
SETTING
6
7
MARK
8
1. REVIEW Key
Switches to Logging & Review Mode in which the current and past data are shown on
split screens.
2 HOLD Key
Stops the display updating. Press the key again to resume display updating.
Hold the key down to enable key lock. Hold the key down again to disable key lock.
3. TIME/DIV Key
Press this key to switch the time scale (the time per grid).
4. START/STOP Key
Stops logging and switches to Free Running Mode.
5. RANGE Key
Displays a window containing the upper and lower limits of the range or span on the
active (selected) channel. The display span settings can be changed while the logging
operation is in progress.
6. DISPLAY Key
Displays a pop-up menu for switching the display.
7. GROUP Key
Switches the channel display group each time you press the key in the following
order: Group 1, Group 2, Group 3, Group 4, Group 1, and so on.
8. Arrow Keys
↑/←: Switches the active channel to a channel of the next smaller number. If the
channel of the smallest number is active, the channel of the largest number is
activated.
↓/→: Switches the active channel to a channel of the next larger number. If the
channel of the largest number is active, the channel of the smallest number is
activated.
4
Basic Operation
IM XL120E
4-7
Page 74

4.2 Basic Key Operations
• When Displaying the Alarm Summary/Log
1
START
/ STOP
HOME REVIEW FILE
TIME / DIV
RANGE
SAVE
3
DISPLAY
GROUP
SETTING
2
MARK
ESC
SELECT
HOLD
SET
6
5
4
1. REVIEW Key
Switches to Logging & Review Mode in which the current and past data are shown on
split screens.
2. DISPLAY Key
Displays a pop-up menu for switching the display.
3. SAVE Key
• When displaying the alarm summary
Saves or prints the alarm summary data (or screen image data).
• When displaying the log
Saves or prints the log data (or screen image data).
4. Arrow Keys
• When displaying the alarm summary
↑/←: Switches the active alarm (highlighted alarm) to the next higher alarm. If
the highest alarm is active, the lowest alarm is activated.
↓/→: Switches the active alarm to the next lower alarm. If the lowest alarm is
active, the highest alarm is activated.
• When displaying the log
↑/←: Switches the active log item (highlighted log item) to the next higher log
item. If the highest log item is active, the lowest log item is activated.
↓/→: Switches the active log item to the next lower log item. If the lowest log
item is active, the highest log item is activated.
5. SELECT Key
Shows the review display containing the selected alarm information when displaying
the alarm summary (valid only when the data type is binary for inputs other than logic
input).
6. SET key
The Alarm ACK window is displayed when displaying the alarm summary. Pressing
the SET key with this window displayed executes alarm ACK, and the alarm hold is
released.
4-8
IM XL120E
Page 75

3
2
1
Key Operations in Review Mode
1
4.2 Basic Key Operations
2
3
START
/ STOP
HOME REVIEW FILE
5
TIME / DIV
RANGE
6
SAVE
8
DISPLAY
10
GROUP
SETTING
7
9
MARK
11
ESC
SELECT
12
HOLD
4
SET
14
13
4
Basic Operation
1. HOME Key
Switches to Free Running Mode in which instantaneous values are measured.
2. FILE Key
Switches to File Operation Mode in which saved measured data can be loaded, file can be
renamed, measured data can be copied, and setup data can be saved or loaded.
3. SETTING Key
Switches to Setting Mode in which measurement conditions, save conditions of
measured data, and alarm conditions are specified.
4 HOLD Key
Hold the key down to enable key lock. Hold the key down again to disable key lock.
5. TIME/DIV Key
Press this key to switch the time scale (the time per grid).
6. RANGE Key
Displays a window containing the upper and lower limits of the span on the active
(selected) channel.
7. DISPLAY Key
Switches between the marker display and statistical calculation display each time
you press the key.
8. SAVE Key
Saves or prints the measured data (screen data) of the marker section (A for A&B)
currently active.
9. GROUP Key
Switches the channel display group each time you press the key in the following
order: Group 1, Group 2, Group 3, Group 4, Group 1, and so on.
10. Fast Forward Key
Moves the active marker left or right by 1 division.
11. MARK Key
Switches the active marker in the following order: A, B, A&B, and ALM.
12. Arrow Keys
↑/↓: Switches the active channel to a channel of the next smaller or larger
number. If the channel of the smallest or largest number is active, the
channel of thelargest or smallest number is activated.
←/→: Moves the active marker horizontally. Hold down the key to move the marker
quickly. If the active marker is ALM, pressing these keys moves the active
marker to the previous or next alarm.
IM XL120E
4-9
Page 76

4.2 Basic Key Operations
13. SELECT Key
Displays the review file load window when the SELECT FILE box is selected.
14. SET key
Pressing the SET key calculates statistics between cursors A and B when displaying
statistics.
(The statistics between logging start and logging stop are displayed immediately
after the screen is switched.)
4-10
IM XL120E
Page 77

3
2
1
Key Operations in Logging & Review Mode
1
4.2 Basic Key Operations
START
/ STOP
HOME REVIEW FILE
3
TIME / DIV
RANGE
4
SAVE
DISPLAY
GROUP
7
SETTING
5
6
MARK
8
ESC
HOLD
2
SET
SELECT
9
1. REVIEW Key
Switches to Logging Mode.
2. HOLD Key
Hold the key down to enable key lock. Hold the key down again to disable key lock.
3. TIME/DIV Key
Press this key to switch the time scale (the time per grid).
*1
4. RANGE Key
Displays a window containing the upper and lower limits of the range or span on the
active (selected) channel. The settings cannot be changed while the logging
operation is in progress.
5. DISPLAY Key
Switches between the marker display and statistical calculation display each time
you press the key.
6. GROUP Key
Switches the channel display group each time you press the key in the following
order: Group 1, Group 2, Group 3, Group 4, Group 1, and so on.
7. Fast Forward Key
Moves td_¿active marker left or right by 1 division.
8. MARK Key
Switches the active marker in the following order: A, B, A&B, and ALM.
9. Arrow Keys
↑/↓: Switches the active channel to a channel of the next smaller or larger
number. If the channel of the smallest or largest number is active, the
channel of the largest or smallest number is activated.
←/→: Moves the active marker horizontally. Hold down the key to move the marker
quickly. If the active marker is ALM, pressing these keys moves the active
marker to the previous or next alarm.
4
Basic Operation
CAUTION
TIME/DIV Setting
In Logging & Review Mode, time axis settings that would cause over 1000 sampled
data points to be displayed in the screen that shows the past measured data are
not allowed.
Specified time on the time axis ≤ sampling interval × 1000 points ÷ 10 grids
IM XL120E
Example: When the sampling interval is 100 ms
Specified time on the time axis ≤ 100 ms × 1000 points ÷ 10 grids
≤ 10000 ms
≤ 10 s
The time axis can be set less than or equal to 10 s/div.
4-11
Page 78

4.2 Basic Key Operations
Key Operations in the Setting Mode
1
2
3
START
/ STOP
HOME REVIEW FILE
TIME / DIV
RANGE
SAVE
6
DISPLAY
GROUP
SETTING
MARK
ESC
4
SELECT
HOLD
5
SET
8
7
1. HOME Key
Switches to Free Running Mode in which instantaneous values are measured.
2. REVIEW Key
Switches to Review Mode in which saved data can be analyzed.
3. FILE Key
Switches to File Operation Mode in which saved measured data can be loaded, file
can be renamed, measured data can be copied, and setup data can be saved or
loaded.
4. ESC Key
Cancels the settings and moves one level higher.
5. SET Key
Sets the settings.
6. SAVE Key
Saves or prints the screen image data.
7. Arrow Keys
↑/←: Switches the active item to the next higher item. If the highest item is active,
the lowest item is activated.
↓/→: Switches the active item to the next lower item. If the lowest item is active, the
highest item is activated.
8. SELECT Key
• When a menu item is selected using the arrow keys
Shows the setting display of the selected item.
• When a channel is selected using the arrow keys
Shows the detailed setting display of the channel.
• When an item that is set with the drop-down menu is selected
Shows a drop-down menu.
• When an item that is set by entering characters is selected
Shows the character entry window.
• When a numeric item is selected
Shows the numeric entry window.
4-12
IM XL120E
Page 79

3
2
1
Key Operations in File Operation Mode
2
1
4.2 Basic Key Operations
3
START
/ STOP
HOME REVIEW FILE
TIME / DIV
RANGE
SAVE
6
DISPLAY
GROUP
SETTING
MARK
ESC
4
SELECT
HOLD
5
SET
8
7
1. HOME Key
Switches to Free Running Mode in which instantaneous values are measured.
2. REVIEW Key
Switches to Review Mode in which saved data can be analyzed.
3. SETTING Key
Moves to the top setting display.
4 ESC Key
Cancels the selected procedure and moves one level higher.
5. SET Key
Executes the selected procedure and moves one level higher.
6. SAVE Key
Saves or prints the screen image data.
7. Arrow Keys
↑/←: Switches the active item to the next higher item. If the highest item is active,
the lowest item is activated.
↓/→: Switches the active item to the next lower item. If the lowest item is active, the
highest item is activated.
8. SELECT Key
Selects the active item and moves one level higher.
4
Basic Operation
IM XL120E
4-13
Page 80

4.2 Basic Key Operations
Key Operations for Entering Characters
When entering characters, a character entry window opens as shown below.
• Entering alphabet characters • Entering values and symbols
Character type selection area
(A: alphabet characters.
0: numeric characters and symbols)
The key operations when the character entry window is open are described below.
Character
entry area
Character
selection area
Backspace
Delete
1
2
START
/ STOP
TIME / DIV
RANGE
SAVE
3
DISPLAY
GROUP
MARK
ESC
4
SELECT
5
SET
6
1. ESC Key
Cancels the settings and closes the window.
2. SET Key
Sets the entered characters.
3. SAVE Key
Saves or prints the screen image data.
4. Fast Forward Key
Moves the cursor in the character entry area left or right by one character.
5. Arrow Keys
↑/←: Switches the active item (highlighted item) to the next higher item. If the
highest item is active, the lowest item is activated.
↓/→: Switches the active item to the next lower item. If the lowest item is active, the
highest item is activated.
6. SELECT Key
Confirms the character type that is selected using the arrow keys or enters the
character.
4-14
IM XL120E
Page 81

3
2
1
Key Operations for Entering Values
When entering values, a value entry window opens as shown below.
The key operations when the value entry window is open are described below.
4.2 Basic Key Operations
4
Basic Operation
1
2
START
/ STOP
TIME / DIV
RANGE
SAVE
3
DISPLAY
GROUP
MARK
ESC
SET
SELECT
4
1. ESC Key
Cancels the settings and closes the window.
2. SET Key
Confirms the value and closes the window. The value does not exceed the setting
range.
3. SAVE Key
Saves or prints the screen image data.
4. Arrow Keys
↑: Increments the value at the selected digit. Pressing this key when the value is
9 sets the value to 0.
↓: Decrements the value at the selected digit. Pressing this key when the value
is 0 sets the value to 9.
←: Moves the selected digit one digit to the left.
→: Moves the selected digit one digit to the right.
IM XL120E
4-15
Page 82

4.3 Setting the Date and Time
Procedure
1. Press SETTING to enter Setting Mode.
2. Use the arrow keys to select HARDWARE, and press SELECT.
→
3. Use the arrow keys to select CLOCK, and press SELECT.
→
4. Use the left and right arrow keys to select the desired digit, and use the up and
down arrow keys to select the value.
5. When the data and time are set to the desired values, press SET.
The date/time is updated, and the TIME SETTINGS window closes.
4-16
IM XL120E
Page 83

3
2
1
Explanation
4.3 Setting the Date and Time
Display Format and Position of the Date and Time
The date and time are shown at the upper right corner of the display in the form “year/
month/day hour:minute:second.”
Date/Time
4
Basic Operation
Selectable Range of Date and Time
2000/01/01 00:00:00 to 2099/12/31 23:59:59.
Note
The date/time setting does not change even when the system is reset (settings
are initialized).
IM XL120E
4-17
Page 84

4.4 Resetting the System (Initializing the Settings)
Procedure
1. Press SETTING to enter Setting Mode.
2. Use the arrow keys to select HARDWARE, and press SELECT.
→
Explanation
3. Use the arrow keys to select SYSTEM RESET, and press SELECT.
→
4. Press SET.
Resetting the System
When you carry out the steps above, the settings are reset to the factory default values.
However, the following settings are not changed even when the system is reset.
• Clock (date/time)
• ID number
• Language
• Communication settings (supported only on the XL121, Xl122, XL124)
4-18
IM XL120E
Page 85

3
2
1
4.5 Setting the Display Backlight
Procedure
1. Press SETTING to enter Setting Mode.
2. Use the arrow keys to select DISPLAY, and press SELECT.
→
4
Basic Operation
3. Use the arrow keys to select LCD, and press SELECT.
→
4. Press SELECT to show the BACKLIGHT AUTO OFF selection list.
5. Use the arrow keys to select the desired time, and press SELECT.
6. Press SET.
Explanation
Backlight Auto Off
This function automatically turns the LCD backlight OFF when there is no key operation
for the specified time. It can prolong the lifetime of the battery and backlight.
Select the time until the LCD backlight automatically turns OFF from the values listed
below. The default setting is 10 min.
OFF, 10 s, 1 min, 2 min, 5 min, 10 min, 30 min, and 60 min
TIP
• If OFF is selected, the backlight remains ON.
• Press any key when the backlight is OFF to turn the backlight ON.
IM XL120E
4-19
Page 86

4.6 Locking the Keys
k
Procedure
To lock the keys, hold down HOLD. Hold down HOLD also to unlock the keys.
The keys cannot be locked when displaying the alarm summary or log or during Setting
Mode or File Operation Mode.
Explanation
HOME REVIEW FILE
SETTING
HOLD
Enable/Disable key loc
START
/ STOP
RANGE
SAVE
TIME / DIV
ESC
DISPLAY
GROUP
MARK
SET
SELECT
Key Lock
When the keys are locked, all key operations except the unlock operation are disabled.
However, if the display backlight turns OFF while the keys are locked, pressing any key
turns the backlight ON.
4-20
IM XL120E
Page 87

3
2
1
4.7 Inserting and Removing the External Storage Media
Procedure
CAUTION
• Use cards that Yokogawa Meters & Instruments have checked for compatibility.
When using the card, format it on the XL100 first.
(See section 9.10, “Formatting the External Storage Media or Internal
Memory.”)
• Before removing the card, check the following items.
• That the XL100 is not logging.
• That the card is not being accessed (the
while the card is being accessed).
If you remove the card while it is being accessed, files stored on the card or
the XL100 may be damaged.
• When transporting the XL100, remove the card from the XL100.
You can use CF cards and SD cards for external storage media.
Inserting or Removing a CF Card
Insert the CF card firmly into the CF card slot on the side panel of the XL100.
To remove the CF card, press the CF card eject button to the left of the CF card slot, and
pull the CF card out.
or icon on the display blinks
4
Basic Operation
CF card eject button
CF card slot
CF card
TIP
The eject button can be in a popped out or retracted condition.
• When popped out: Pressing the button disengages the card from the slot. Pull the
card out.
• When retracted: Press the button to pop the button out, and then press the button
again. The card is disengaged from the slot. Pull the card out.
IM XL120E
4-21
Page 88

4.7 Inserting and Removing the External Storage Media
Inserting or Removing an SD Card (Supported only on the Xl121, XL122, and
XL124)
Insert the SD card firmly into the SD card slot on the side panel of the XL100.
To remove the SD card, press the SD card, and then pull it out.
SD card slot
SD card
Explanation
Estimated Amount of Stored Data
The table below indicates the estimated amount of binary data that can be stored when
the card capacity is 64 MB.
Sampling Number of Measurement Channels
Interval 1 ch 8 ch 16 ch 16 ch + 32 16 ch + 32 computationch
0.1 s 36.7 days 4.6 days – – –
0.2 s 73.5 days 9.2 days 4.6 days 22 hours 12 hours
0.5 s 184 days 23 days 9.2 days 2.3 days 30.6 hours
1 s 1 year 46 days 23 days 4.6 days 2.6 days
2 s 2 years 92 days 46 days 9.2 days 5.1 days
3 s 5 years 230 days 92 days 23 days 13 days
10 s 10 years 1.3 years 230 days 46 days 26 days
20 s Omitted 2.5 years 1.3 years 92 days 51 days
30 s Omitted 3.8 years 1.9 years 138 days 77 days
1 minute Omitted 7.6 years 3.8 years 276 days 153 days
2 minutes Omitted Omitted 7.6 years 1.5 years 306 days
5 minutes Omitted Omitted Omitted 3.8 years 2 years
The figures above have been derived through calculation, and may differ from actual values.
One year is calculated as 365 days.
computation ch + 32 communication ch
4-22
CF Card Type
The CF cards that can be used are Type II cards.
IM XL120E
Page 89

3
2
1
4
Chapter 5 Setting the Input Channels
5.1 Setting the Analog Input Channels
Procedure
1. Press SETTING to enter Setting Mode.
2. With INPUT selected, press SELECT.
5
Setting the Input Channels
3. With ANALOG INPUT selected, press SELECT.
4. Use the arrow keys to select the desired channel, and press SELECT.
On the 16-channel model, CH09 to CH16 are shown on page 2. To show page 2,
press the arrow (
↓↓
↓) key after selecting CH08.
↓↓
→
5. Use the arrow keys to select the desired item, and press SELECT.
Press SELECT to show a selection list or window for setting the item.
6. Select or enter the item on the displayed selection list or window.
7. Press SET.
IM XL120E
5-1
Page 90

5.1 Setting the Analog Input Channels
Setting All the Channels to the Same Settings
When the channel selection display is shown, use the arrow keys to select “Apply the
CH01 settings to other channels,” and press SELECT to select the check box. If this
check box is selected, all changes (except the color) made on CH01 are applied to the
other channels (CH02 to CH08). On the 16-channel model, the settings of CH9 on page
2 are applied to CH10 to CH16.
Explanation
Tag
This is the character string that can be shown along with the channel number. Up to 8
characters can be used to set the tags.
Mode
This is the input type. Select DCV (DC voltage), TC (thermocouple), RDT (resistance
temperature detector) The default setting is DCV. Set the channels without input signals
to OFF. If you change the mode, the range and span upper and lower limit settings are
reset to default values.
Range
Select the input range (type in the case of a thermocouple or RTD) from the following:
• DCV (DC voltage)
Input Range Measurable Range Maximum Display Resolution
100 mV –100.00 to 100.00 mV 10 µV
500 mV –500.0 to 500.0 mV 100 µV
1 V –1.0000 to 1.0000 V 100 µV
5 V (default setting) –5.000 to 5.000 V 1 mV
10 V –10.000 to 10.000 V 1 mV
50 V –50.00 to 50.00 V 10 mV
1-5 V/f.s. 1.000 to 5.000 V 1 mV
• TC (thermocouple)
Type Measurable Range Maximum Display Resolution
R0 to 1768°C1°C
S0 to 1768°C1°C
B 600 to 1800°C1°C
K (default setting) –200.0 to 1372.0°C 0.1°C
E –200.0 to 1000.0°C 0.1°C
J –200.0 to 1200.0°C 0.1°C
T –200.0 to 400.0°C 0.1°C
N –200.0 to 1300.0°C 0.1°C
W0 to 2315°C1°C
L –200.0 to 900.0°C 0.1°C
U –200.0 to 400.0°C 0.1°C
• RTD (resistance temperature detector)
Type Measurable Range Maximum Display Resolution
Pt100 –200.0 to 850.0°C 0.1°C
JPt100 (default setting) –200.0 to 500.0°C 0.1°C
Note
When the input type is DC voltage, over range occurs when the measured value
exceeds ±10% of the input range. For thermocouple or RTD input, over range occurs
when the measured value exceeds approximately ±10°C of the measurable range.
When an over range occurs, the display shows “+*****” or “–*****.”
5-2
IM XL120E
Page 91

3
2
1
4
5.1 Setting the Analog Input Channels
Span Upper/Lower
Set the upper and lower limits of the display span within the measurable range indicated
above. The default span lower limit is the lower limit of each range; the default span
upper limit is the upper limit of each range. The span lower limit and span upper limit
cannot be set to the same value.
Color
For each channel, select the color from the choices below: The color applies to both
waveform and bar graph.
Red, green, blue, blue purple, brown, orange, yellow-green, aqua, magenta, gray, lime,
blue green, navy, yellow, olive, and purple.
The default settings are as follows: CH1: red, 2: green, 3: blue, 4: blue purple, 5: brown,
6: orange, 7: yellow-green, 8: aqua, 9: magenta, 10: gray, 11: lime, 12: blue green, 13:
navy, 14: yellow, 15: olive, and 16: purple
Line width
Set the waveform line width to 1dot (thin), 2dot (medium), or 3dot (thick). The default
setting is 1dot.
Average
Sets the average function. Select the number of sampled data values for taking the
moving average. The default setting is 1.
1, 2, 5, 10, or 20
5
Setting the Input Channels
Scaling
Sets the items below. The decimal place, scale lower limit, scale upper limit, and unit take effect
when the scaling function is turned ON. The measured values are scaled to a span derived by
the difference between the scale upper limit and scale lower limit with the decimal point removed.
For example, if the scale is set to –5 to 5, the measured values are scaled to a span of 10. If the
scale is set to –5.0 to 5.0, the measured values are scaled to a span of 100. In this case, the
resolution of the value scaled to a span of 10 is lower than the value scaled to a span of 100.
Item Setting
Scaling function ON/OFF ON or OFF. The default setting is OFF.
Decimal place X.XXXX (default setting), XX.XXX, XXX.XX, XXXX.X, or
Scale lower limit* -30000 to 30000. The default setting is -3.0000.
Scale upper limit* -30000 to 30000. The default setting is 3.0000.
Unit Length mm (default setting), cm, m, or km
* The scale lower limit and scale upper limit cannot be set to the same value.
XXXXX
Area mm2 (default setting), cm2, m2, or km2
Volume mm3 (default setting), cm3, m3, ml, l, or kl
Velocity mm/s (default setting), mm/min, mm/h, cm/s, cm/min,
cm/h, m/s, m/min, m/h, km/s, km/min, or km/h
Acceleration m/s2 (default setting)
Frequency mHz (default setting), Hz, kHz, rpm, or rph
Weight mg (default setting), g, kg, t, or N
Work mW (default setting), W, kW, J, Wh, or Ws
Pressure Pa (default setting), kPa, MPa, N/m2, or bar
Flow rate m3/s (default setting), m3/min, m3/h, t/s, t/min, t/h, l/s,
l/min, l/h, kg/s, kg/min, kg/h, kl/s, kl/min, kl/h, ml/s,
ml/min, ml/h, g/s, g/min, or g/h
Temperature °C (default setting) or K
Voltage and current
mV (default setting), V, kV, MV, mA, A, kA, or MA
Power mW (default setting), W, kW, MW, mvar, var, kvar,
Mvar, mVA, VA, kVA, or MVA
Watt hour Wh (default setting), kWh, MWh, varh, kvarh, or Mvarh
Any Up to six characters.
IM XL120E
5-3
Page 92

5.1 Setting the Analog Input Channels
SEE ALSO
For a description of the analog input wiring, see “Analog Input” in section 3.3, “Wiring the
Input Signal Cable.”
5-4
IM XL120E
Page 93

3
2
1
4
5.2 Setting the Pulse Input Channel
Procedure
1. Press SETTING to enter Setting Mode.
2. With INPUT selected, press SELECT.
5
Setting the Input Channels
3. Use the arrow keys to select PULSE INPUT, and press SELECT.
→
4. Use the arrow keys to select the desired item, and press SELECT.
Press SELECT to show a selection list or window for setting the item.
5. Select or enter the item on the displayed selection list or window.
6. Press SET.
Explanation
Tag
This is the character string that can be shown along with the channel number (Pulse). Up
to 8 characters can be used to set the tags.
Mode
This is the input type. Select Instantaneous, Integrated Value, or Revolution. Set the
channels without input signals to OFF (default setting). If you change the mode, the
range and span upper and lower limit settings are reset to default values.
Note
IM XL120E
• The pulse input setting takes effect when the sampling interval is greater than
or equal to 1 s.
5-5
Page 94

5.2 Setting the Pulse Input Channel
Range
Select the input range from the table below.
Input Type Range Maximum Number Maximum Display
Pulse (instantaneous value) None 50 k/sampling interval 1 c
Pulse (integrated value)* 50 kc/f.s. 50 k/sampling interval 1 c
Number of revolutions 500 rpm/f.s. 50 k/sec
* Pulse (integrated value) returns to 0 when it counts to the upper limit of the range. The count
operation continues even after the count returns to 0.
Span Upper/Lower
Set the upper and lower limits of the display span within the measurable range indicated
above. The default span lower limit is the lower limit of each range; the default span
upper limit is the upper limit of each range. The span lower limit and span upper limit
cannot be set to the same value.
Color
Select the color from the choices below. The color applies to both waveform and bar graph.
Red (default setting), green, blue, blue purple, brown, orange, yellow-green, aqua,
magenta, gray, lime, blue green, navy, yellow, olive, and purple.
of Input Pulses Resolution
500 kc/f.s. 10 c
5 Mc/f.s. 100 c
50 Mc/f.s. 1 kc
500 Mc/f.s. 10 kc
5 krpm/f.s. (Counts the number of pulses per second and
50 krpm/f.s. converts the number to number of revolutions)
500 krpm/f.s.
Line width
Set the waveform line width to 1dot (thin), 2dot (medium), or 3dot (thick). The default
setting is 1dot.
5-6
IM XL120E
Page 95

3
2
1
4
5.2 Setting the Pulse Input Channel
Scaling
Sets the items below. The decimal place, scale lower limit, scale upper limit, conversion
exponent, conversion coefficient, offset exponent, offset coefficient, and unit take effect
when the scaling function is turned ON.
Item Setting
Scaling function ON/OFF ON or OFF. The default setting is OFF.
Decimal place X.XXXX (default setting), XX.XXX, XXX.XX, XXXX.X, or XXXXX
Scale lower limit* -30000 to 30000. The default setting is -3.0000.
Scale upper limit* -30000 to 30000. The default setting is 3.0000.
Conversion exponent -38 to +37. The default setting is 0.
Conversion coefficient -9.9999 to -1.0000, 0, 1.0000 to 9.9999. The default setting is 1.0000.
Offset exponent -38 to +37. The default setting is 0.
Offset coefficient -9.9999 to -1.0000, 0, 1.0000 to 9.9999. The default setting is 1.0000.
Unit Length mm (default setting), cm, m, or km
(The default setting is Any.) Area mm2 (default setting), cm2, or m2
Volume mm3 (default setting), cm3, m3, cc, ml, l, or kl
Velocity mm/s (default setting), mm/min, mm/h, cm/s, cm/min,
cm/h, m/s, m/min, m/h, km/s, km/min, or km/h
Acceleration m/s2 (default setting), km/h2, Gal, or G
Frequency mHz (default setting), Hz, kHz, or rpm
Weight mg (default setting), g, kg, t, N, or kgf
Work mW (default setting), W, kW, PS, HP, J, Wh, or cal
Pressure kg/cm2 (default setting), Pa, kPa, or MPa
Flow rate m3/s (default setting), m3/min, m3/h, t/s, t/min, t/h, l/s, lmin,
l/h, kg/s, kg/min, kg/h, kl/s, kl/min, kl/h, cc/s, cc/min, or cch
Temperature °C (default setting), K, °F
Voltage and current
mV (default value), V, kV, MV, mA, A, kA, MA
Power mW (default value), W, kW, MW, mvar, var, kvar, Mvar,
mVA, VA, kVA, MVA, deg
Watt hour Wh (default value), kWh, MWh, varh, kvarh, Mvarh
Any Up to six characters.
* The scale lower limit and scale upper limit cannot be set to the same value.
5
Setting the Input Channels
SEE ALSO
For a description of the pulse input wiring, see section 3.4, “Wiring the Pulse Input, Logic
Input, and Signal Cables.”
Note
If the Data Save > Sampling Interval is set to a value less than 1 s, you cannot set
pulse input channels.
To use pulse input channels, set the sampling interval greater than or equal to 1 s.
IM XL120E
5-7
Page 96

5.2 Setting the Pulse Input Channel
TIP
• The final scaling result is displayed as conversion ration × pulse count + offset
(reference).
• You must set the exponent and coefficient for the conversion ratio and offset values.
The relationship between the exponent and coefficient is given by
Conversion ratio or offset = Coefficient × E(exponent) where E = 10
exponent
Example
Display of the integrated pulse where the flow rate is 1.2 l/s per pulse and the offset
is 100l
• Set the mode to Integrated Value.
• Conversion coefficient = 1.2, conversion exponent = 0: 1.2 × E(0) = 1.2
• Offset coefficient = 1, offset exponent = 2: 1 × E(2) = 100
• Set the unit to volume (l).
The integrated pulse display after 60 s is 1.2 × 60 + 100 = 172 l.
x
and x is the
5-8
IM XL120E
Page 97

3
2
1
4
5.3 Setting the Logic Input Channel
Procedure
1. Press SETTING to enter Setting Mode.
2. With INPUT selected, press SELECT.
5
Setting the Input Channels
3. Use the arrow keys to select LOGIC INPUT, and press SELECT.
→
4. Use the arrow keys to select the desired item, and press SELECT.
Press SELECT to show a selection list or window for setting the item.
5. Select or enter the item on the displayed selection list or window.
6. Press SET.
Explanation
Mode
Turn ON/OFF the logic input channels (L1 and L2) to which voltage or contact signal is to
be applied. The default setting is OFF.
Tag
This is the character string that can be shown along with the channel number (L1 or L2).
Up to 8 characters can be used to set the tags.
IM XL120E
Color
For each channel, select the color from the choices below.
Red (default setting of L1), green (default setting of L2), blue, blue purple, brown, orange,
yellow-green, aqua, magenta, gray, lime, blue green, navy, yellow, olive, and purple.
5-9
Page 98

5.3 Setting the Logic Input Channel
Line width
Set the waveform line width to 1dot (thin), 2dot (medium), or 3dot (thick). The default
setting is 1dot.
Logic Input Waveform Display
The display position of the logic input waveforms is fixed to the lower section of the
display as indicated below.
SEE ALSO
For a description of the logic input wiring, see section 3.4, “Wiring the Pulse Input, Logic
Input, and Signal Cables.”
5-10
IM XL120E
Page 99

3
2
1
4
5.4 Directly Setting the Range, Span, and Scale Using the RANGE key
Procedure
1. In Free Running Mode, use the arrow keys to select the channel you wish to
configure.
2. Press RANGE.
• When scaling is OFF for analog input or pulse input channels
The following window opens.
• When scaling is ON for analog input or pulse input channels
The following SPAN SETTINGS window opens.
• For calculation or communication channels
The following SPAN SETTINGS window opens.
5
Setting the Input Channels
3. Use the arrow keys to select the desired item, and press SELECT.
Press SELECT to show a selection list or window for setting the item.
4. Select or enter the item on the displayed selection list or window.
5. Press SET.
Explanation
Directly Setting the Range, Span, and Scale
The settings change depending on the type of selected channel. For details on the
settings, see sections 5.1, 5.2, or 8.1.
• When scaling is OFF for analog input or pulse input channels
Range, span lower limit, and span upper limit
• When scaling is ON for analog input or pulse input channels
Scale lower limit, and scale upper limit
• For calculation or communication channels
Decimal place, span lower limit, and span upper limit
TIP
If you press RANGE in Logging Mode, Logging & Review Mode, or Review Mode, the
span upper and lower limits are shown on the window regardless of the type of channel
input, and the display span can be changed.
IM XL120E
5-11
Page 100

3
2
1
4
5
Chapter 6 Setting Alarms
6.1 Setting the Alarm on Analog Input Channels
Procedure
1. Press SETTING to enter Setting Mode.
2. Use the arrow keys to select ALARM, and press SELECT.
→
6
Setting Alarms
3. With DETAIL selected, press SELECT.
4. With ANALOG INPUT selected, press SELECT.
5. Use the arrow keys to select the desired channel, and press SELECT.
→
IM XL120E
6-1
 Loading...