

Page 1
DECT IP Multi-Cell Deployment ToolKit
Quick Start Guide
Contents
1. Overview
2. Package Contents
3. Adjusting the Stand Height
4. Setting up the Measuring Base Station
5. Setting up the Measuring Handset
6. Using the Measuring Handset
7. Configuring the Metering Mode
8. Taking Measurements
www.yealink.com
Page 2
Overview
The Yealink DECT IP multi-cell deployment toolkit helps you plan and install your DECT IP multi-cell system. It contains
one measuring base station, two measuring handsets and further helpful accessories for exact determination of the DECT
environmental conditions for the planned network.
You can use the measuring devices in the kit to determine the radio coverage at your location, establish the total number
of base stations required for a given installation and their optimal locations, and find sources of interferences in the
wireless network.
If you require more information on configuring and using your phone, refer to Yealink DECT IP Multi-Cell System
Deployment Guide online:
http://support.yealink.com/documentFront/forwardToDocumentFrontDisplayPage.
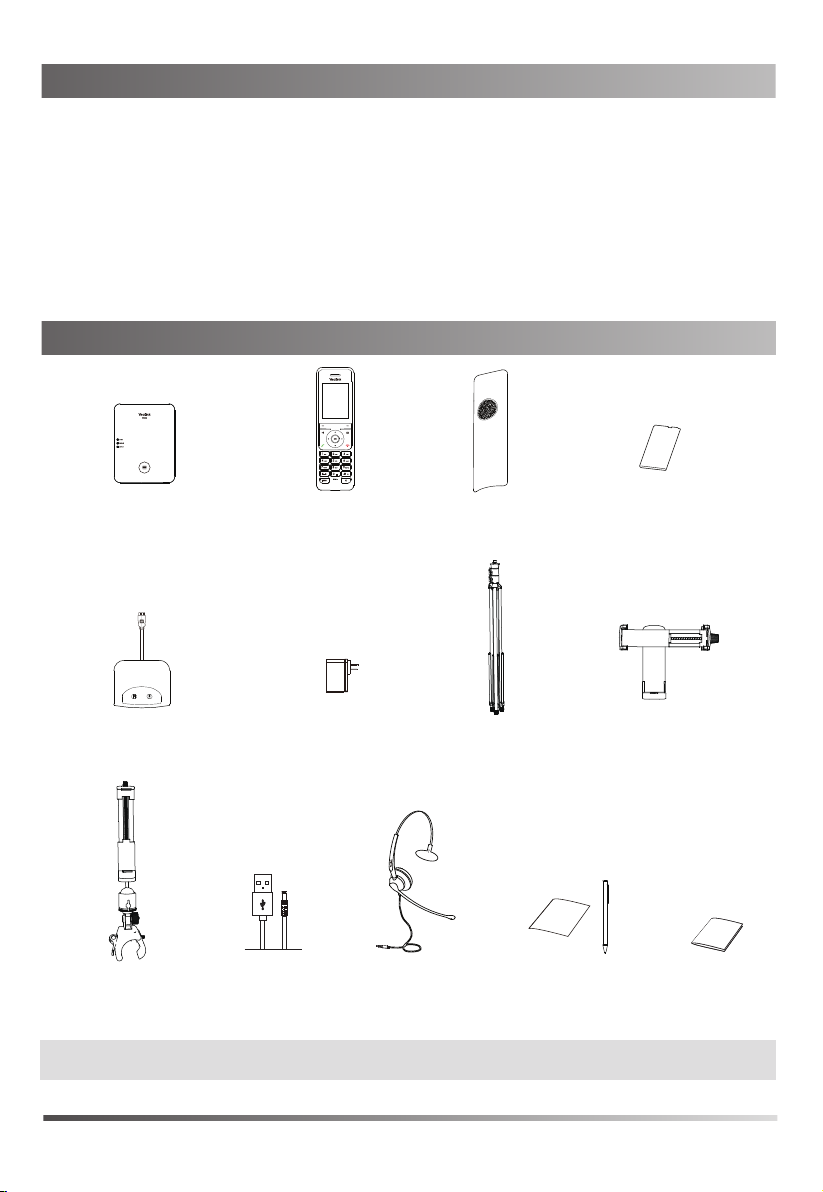
Package Contents
Deployment Toolkit
DTK
(Measuring Base Station) (Measuring Handsets)
USB Charging Cradle x 2
Mobile Power Clip
Note: We recommend that you use the accessories provided or approved by Yealink. The use of unapproved third-party accessories may
result in reduced performance.
W56H Handset x 2
Power Adapter x 2
USB-DC Cable UH33 Headset x 2
Battery Cover x 2
Stand
Notebook and Pen
Rechargeable Battery x 4
(Two are Reserves)
Base Station Clip
Quick Start Guide
1
Page 3
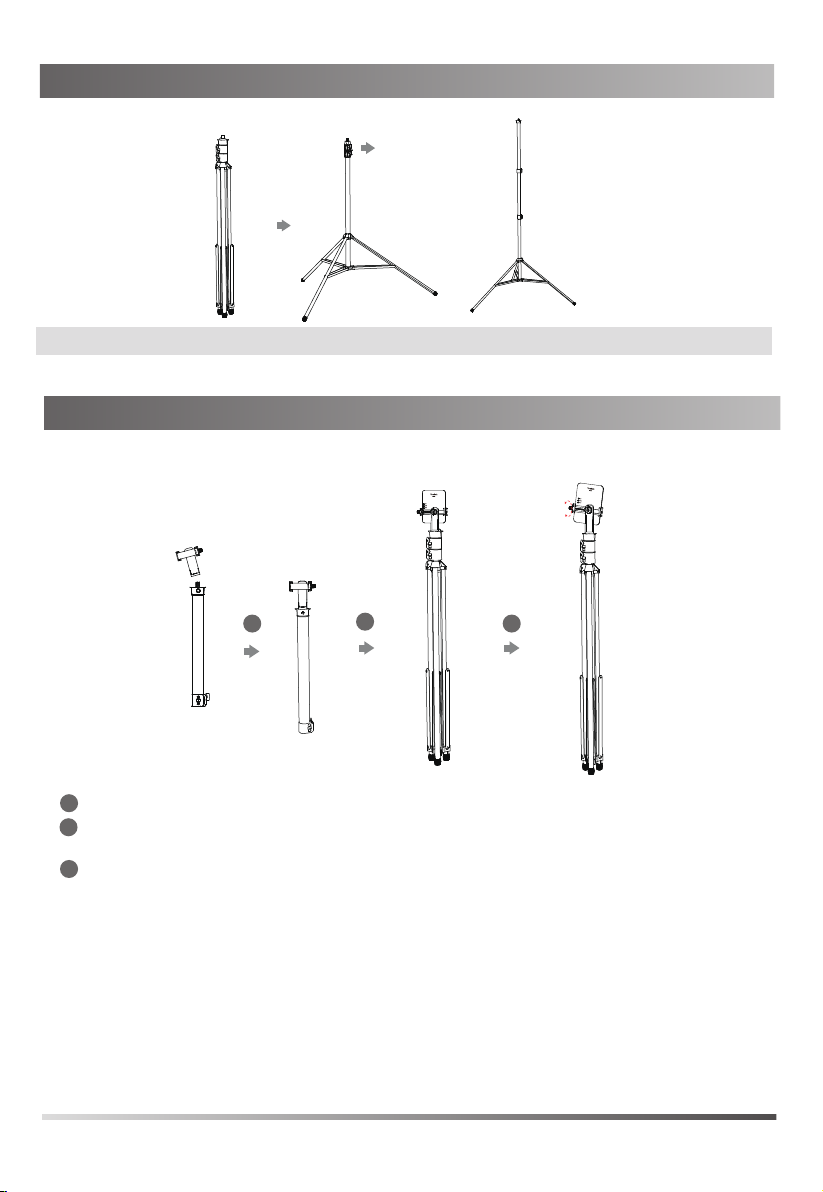
Adjusting the Stand Height
Note: The stand height can be adjusted from 3.28 feet (1.00 meter) to 9.19 feet (2.80 meters).
Setting up the Measuring Base Station
1. Mount the measuring base station on the stand
Deployment Toolkit
1
Position the thread of the base station clip on the stand and screw the base station clip into place.
1
Fix the base station on the base station clip.
2
Note: To make the base station more secure, make sure the front side of the base station faces to the buckle.
3
Adjust the angle of the base station to an appropriate position.
2
3
Deployment Toolkit
2
Page 4

2. Charge the base station
1
Range: 2.05-3.94 inch
Maximum
thickness: 0.59 inch
Deployment Toolkit
Adjust the angle
2
1
Fix the mobile power clip on the top section of the stand.
2
Fix the mobile power on the mobile power clip.
Note: You need to purchase the mobile power separately.
Adjust the angle of the mobile power and charge the base station. The power LED (the lowest
3
3
DTK
(Measuring Base Station)
Mobile Power
one) of the base station glows green.
Note: The network status LED (the middle one) flashes as no network is needed at this point. If the registered
handset is powered on, the registration LED (the top one) glows green.
3
Page 5

Starting up the Measuring Handset
1. Insert the battery into the handset.
battery
Note:
The handset will be powered on automatically when the battery is inserted to the handset.
2. Connect the charging cradle and charge the handset.
Note:
Use Yealink s
Determine whether to charge the handset according to the
The power LED glows red when the handset is charging.
upplied
power adapter (5V/600mA). A third-party power adapter may damage the handset.
battery status on the top-right corner of the LCD screen.
3. Connect a headset to the handset.
Note:
A headset icon on the handset LCD screen indicates the connection is successful.
4
Page 6
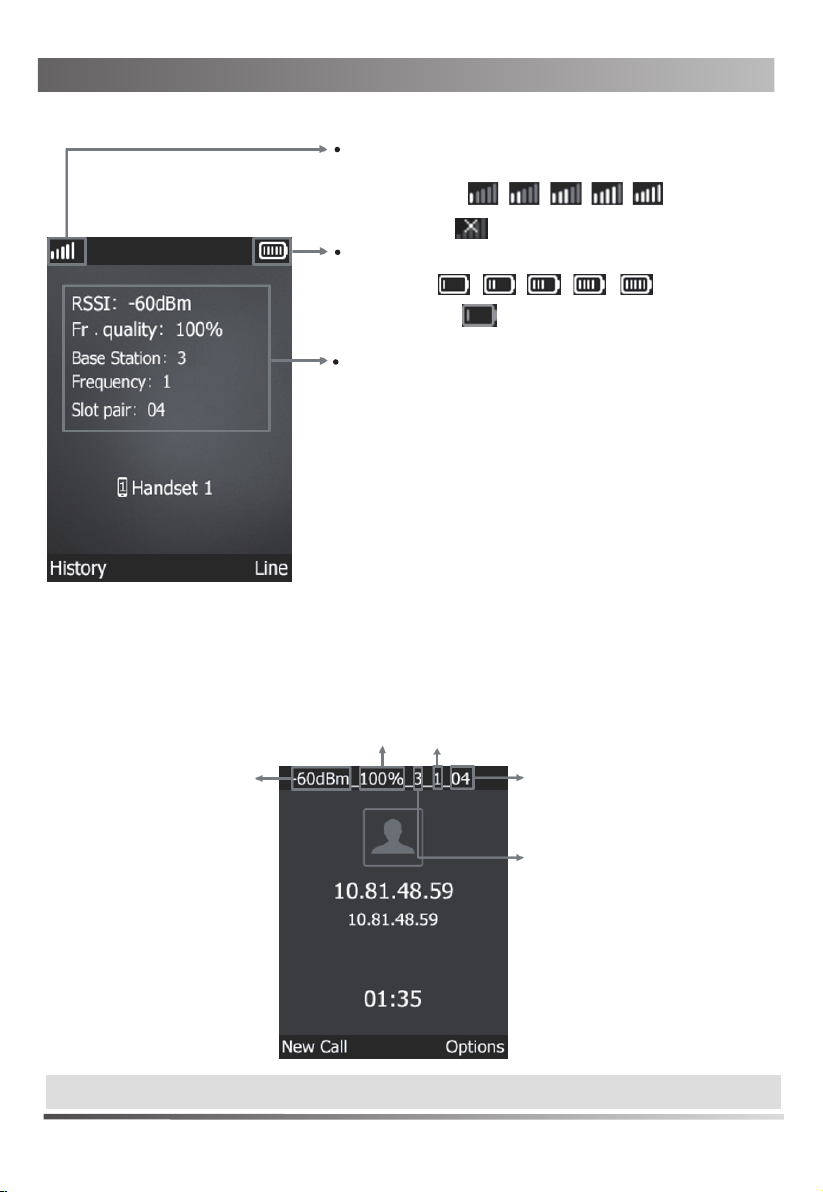
Using the Measuring Handset
The idle screen
The LCD screen shows the following information in the idle screen:
Indicates the signal strength between the base station and
registered handset.
Weak to strong:
No reception:
Indicates the current battery status.
Low to full:
Need charging: (red)
Values for determining the connection quality:
RSSI: Base station signal reception strength with the best
reception in dBm.
Recommended value: -27 to -85 dBm.
Note: The RSSI value is displayed in dBm as standard, you
can change it into a percentage value.
Fr. quality: Frame quality. Percentage rate of the packages
received without error in the last measuring interval.
Recommended value: 100%.
Base Station: RPN (Radio Fixed Part Number) of the base station.
Identifier for the base station to which the handset
is connected.
Frequency: Carrier frequency of the signal received.
Value range: 0-30.
Slot pair: Time slot for the reception channel on which the
measurement was performed.
Duplex Slot pair used (0-11).
The talking screen
If the handset is in the talking screen, it shows the measurement data at the top edge.
Fr. quality
Frequency
RSSI
Note:
If one handset is used, you can enter #*9 on the handset to perform an analog call.
5
Slot pair
Base Station
Page 7

Configuring Metering Mode
The measuring handsets are already in the metering mode out of the box.
Note: The handset backlight is always on in the metering mode, so the screensaver does not work.
To change the settings for metering mode:
1. Enter the code *1234203# in the idle screen to activate metering mode.
2. Press the OK key to enter the main menu, and then select Settings->Telephony->Metering Mode.
3. Select the desired unit (dBm or %) for RSSI.
4. Select the desired measurement interval.
Value range: 5-15 (0.8s-2.4s). Recommended value: 6.
5. Press the Save soft key.
To exit the metering mode:
1. Press the OK key to enter the main menu, and then select Settings->Telephony->Metering Mode.
2. Disable the metering mode.
3. Press the Save soft key.
Taking Measurements
1. Select the first measuring point, and mount the base station on a proper location of the stand.
Deployment Toolkit
2. Set up communications between two handsets, and measure the radio coverage.
You can connect headsets to the measuring handsets so that you can assess the quality of the sound
transmitted from the measuring base station. It also means that your hands are free to enter the locations
determined in the plan and you can read the LCD screen during the measurement.
Note: The handsets are already registered to the measuring base station out of the box. If two people perform the measurements, you
can check the voice quality by establishing a connection between the two measuring handsets. If you perform the measurements
alone, you can enter #*9 via the keypad to place an analog call.
3. Check the current status values of the connection to determine the second location of the base station.
The recommended RSSI value is between -27dBm and -85dBm, and the Frame quality is 100%.
4. Move the base station to the second location, and adjust the base station to a proper position of the stand.
5. Repeat steps 2 and 3 to determine more locations of the base station.
6
Page 8

Regulatory Notices
Operating Ambient Temperatures
Operating temperature: +32 to 104°F (0 to 40°C)
Relative humidity: 5% to 90%, noncondensing
Storage temperature: -22 to +160°F (-30 to +70°C)
Warranty
Our product warranty is limited only to the unit itself, when used normally
in accordance with the operating instructions and the system environment.
We are not liable for damage or loss resulting from the use of this product,
or for any claim from a third party. We are not liable for problems with
Yealink device arising from the use of this product; we are not liable for
financial damages, lost profits, claims from third parties, etc., arising from
the use of this product.
Explanation of the symbols
DC symbol
is the DC voltage symbol.
WEEE Warning symbol
To avoid the potential effects on the environment and human health
as a result of the presence of hazardous substances in electrical and
electronic equipment, end users of electrical and electronic
equipment should understand the meaning of the crossed-out wheeled bin
symbol. Do not dispose of WEEE as unsorted municipal waste and have to
collect such WEEE separately.
Restriction of Hazardous Substances Directive (RoHS)
This device complies with the requirements of the EU RoHS Directive. Statements
of compliance can be obtained by contacting support@yealink.com.
Safety Instructions
Save these instructions. Read these safety instructions before use!
General Requirements
Before you install and use the device, read the safety instructions
carefully and observe the situation during operation.
During the process of storage, transportation, and operation, please
always keep the device dry and clean, avoid collision and crash.
Please attempt not to dismantle the device by yourself. In case of any
discrepancy, please contact the appointed maintenance center for repair.
Please refer to the relevant laws and statutes while using the device.
Legal rights of others should be respected as well.
Environmental Requirements
Do not cover ventilation openings, this equipment is not intended to be
used on soft support.
The marking information is located at the exterior of the bottom.
Place the device at a well-ventilated place. Do not expose the device
under direct sunlight.
Keep the device dry and free of dusts.
Do not place the device on or near any inflammable or fire-vulnerable
object, such as rubber-made materials.
Keep the device away from any heat source or bare fire, such as a candle
or an electric heater.
Operating Requirements
Do not let a child operate the device without guidance.
Do not let a child play with the device or any accessory in case of
accidental swallowing.
Please use the accessories provided or authorized by the manufacturer
only.
The power supply of the device shall meet the requirements of the input
voltage of the device. Please use the provided surge protection power
socket only.
Before plugging or unplugging any cable, make sure that your hands are
completely dry.
Do not spill liquid of any kind on the product or use the equipment near
water, for example, near a bathtub, washbowl, kitchen sink, wet
basement or near a swimming pool.
During a thunderstorm, stop using the device and disconnect it from the
power supply. Unplug the power plug and the Asymmetric Digital
Subscriber Line (ADSL) twisted pair (the radio frequency cable) to avoid
lightning strike.
If the device is left unused for a rather long time, disconnect it from the
power supply and unplug the power plug.
About Yealink
Yealink is a global leading provider of enterprise communication and collaboration solutions, offering video conferencing service to
worldwide enterprises. Focusing on research and development, Yealink also insists on innovation and creation. With the outstanding
technical patents of cloud computing , audio, video and image processing technology, Yealink has built up a panoramic collaboration
solution of audio and video conferencing by merging its cloud services with a series of endpoints products. As one of the best
providers in more than 140 countries and regions including the US, the UK and Australia, Yealink ranks No.1 in the global market
share of SIP phones shipments.
Technical Support
Visit Yealink WIKI (http://support.yealink.com/) for the latest firmware, guides, FAQ, Product documents, and more. For better service,
we sincerely recommend you to use Yealink Ticketing system (https://ticket.yealink.com) to submit all your technical issues.
When there is smoke emitted from the device, or some abnormal noise
or smell, disconnect the device from the power supply, and unplug the
power plug immediately.
Contact the specified maintenance center for repair.
Do not insert any object into equipment slots that is not part of the
product or auxiliary product.
Before connecting a cable, connect the grounding cable of the device first.
Do not disconnect the grounding cable until you disconnect all other cables.
Battery Requirements
Do not immerse the battery into water, which could short-circuit and damage
the battery.
Do not expose the battery to an open flame or leave the battery where it
could be subjected to extremely high temperatures, which could cause the
battery to explode.
Do power the handset off before removing the battery.
Do not try to use the battery for the power supply of any device other than
this handset.
Do not open or mutilate the battery, released electrolyte is corrosive and
may cause damage to your eyes or skin.
Use only the rechargeable battery pack delivered with the handset or those
rechargeable battery packs expressly recommended by Yealink.
Defective or exhausted battery s hould never be disposed of as municipal
waste. Return old battery to the battery supplier, a licensed battery dealer or
a designated collection facility.
Cleaning Requirements
Before cleaning the device, disconnect it from the power supply.
Use a piece of soft, dry and anti-static cloth to clean the device.
Keep the power plug clean and dry.
Troubleshooting
The unit cannot supply power to Yealink device.
There is a bad connection with the plug.
1. Clean the plug with a dry cloth.
2. Connect it to another wall outlet.
The usage environment is out of operating temperature range.
1. Use in the operating temperature range.
The cable between the unit and the Yealink device is connected incorrectly.
1. Connect the cable correctly.
You cannot connect the cable properly.
1. You may have connected a wrong Yealink device.
2. Use the correct power supply.
Some dust, etc., may be in the port.
1. Clean the port.
Contact your dealer or authorized service facility for any further questions.
FCC Statement
This device complies with part 15 of the FCC Rules. Operation is subject to the following
two conditions: (1) this device may not cause harmful interference, and (2) this device must
accept any interference received, including interference that may cause undesired operation.
Any Changes or modifications not expressly approved by the party responsible for
compliance could void the user's authority to operate the equipment.
IC Statement
1.This device complies with Industry Canada’s licence-exempt RSSs. Operation is subject to
the following two conditions:
(1) this device may not cause interference; and
(2) this device must accept any interference, including interference that may cause undesired
operation of the device. CAN ICES-3(B)
Le présent appareil est conforme aux CNR d’Industrie Canada applicables aux appareils radio
exempts de licence. L’exploitation est autorisée aux deux conditions suivantes :
(1) l’appareil ne doit pas produire de brouillage;
(2) l’utilisateur de l’appareil doit accepter tout brouillage radioélectrique subi, même si le
brouillage est susceptible d’en compromettre le fonctionnement.NMB-3(B)
2.The handset device meets CS03 Part V.
''This device meets the applicable Innovation, Science and Economic Development
Canada technical specifications. / Ce produit répond à la innovation, des sciences
et de .Développement économique Canada spécifications techniques applicables.”
Radiation Exposure Statement
This equipment complies with FCC and IC radiation exposure limits set forth for an
uncontrolled environment. This equipment should be installed and operated with minimum
distance 20cm between the radiator and your body.
Cet émetteur ne doit pas être Co-placé ou ne fonctionnant en même temps qu'aucune
autre antenne ou émetteur. Cet équipement devrait être installé et actionné avec une
distance minimum de 20 centimètres entre le radiateur et votre corps.
Contact Information
YEALINK NETWORK TECHNOLOGY CO.,LTD.
309, 3rd Floor, No.16, Yun Ding North Road, Huli District, Xiamen City, Fujian, P.R.C
YEALINK (EUROPE) NETWORK TECHNOLOGY B.V.
Strawinskylaan 3127, Atrium Building, 8th floor, 1077ZX Amsterdam, The Netherlands
YEALINK (USA) NETWORK TECHNOLOGY CO., LTD.
999 Peachtree Street Suite 2300, Fulton, Atlanta, GA, 30309, USA
Made in China
Depl oyme nt T oolK it-EN
YEALINK(XIAMEN) NETWORK TECHNOLOGY CO.,LTD.
Web: www.yealink.com
Copyright
©2019
TECHNOLOGY CO.,LTD
YEALINK(XIAMEN) NETWORK
.All rights reserved.
 Loading...