

Page 1

Version: 85.65 I Date: Sep. 2020
Page 2

Contents
Before You Begin...................................................................................................... 5
Related Documentation.........................................................................................................................................5
Getting Started..........................................................................................................5
Hardware Overview..............................................................................................................................................5
W60B Base Station Hardware..................................................................................................................5
DD Phone Hardware.................................................................................................................................7
Screen and Icons...................................................................................................................................................8
Idle Screen................................................................................................................................................ 8
Icons on the Idle Screen...........................................................................................................................8
Entering Characters...............................................................................................................................................9
Entering Data............................................................................................................................................ 9
| Contents | ii
Handset Registration.............................................................................................. 10
Putting the Base Station into Registration Mode...............................................................................................10
Registering a New Handset to a Base Station................................................................................................... 10
Registering a Handset to Another Base Station.................................................................................................10
Possible Reasons for Registration Failure..........................................................................................................11
Deregistering a Handset......................................................................................................................................11
Call Features........................................................................................................... 11
Placing Calls....................................................................................................................................................... 11
Placing Internal Calls..............................................................................................................................11
Placing External Calls............................................................................................................................ 12
Placing a Call from the Call History..................................................................................................... 12
Placing a Call from the Directory..........................................................................................................12
Speed Dial on the DD Phone.................................................................................................................12
Redial.......................................................................................................................................................13
Placing an Anonymous Call...................................................................................................................13
Answering Calls..................................................................................................................................................13
Assigning Incoming Lines to the Handset.............................................................................................13
Answering a Call....................................................................................................................................14
Answering a Call When in a Call..........................................................................................................14
Disabling Call Waiting....................................................................................................................................... 14
Silencing or Rejecting Incoming Calls.............................................................................................................. 14
Silencing a Call.......................................................................................................................................14
Rejecting a Call Manually......................................................................................................................14
Rejecting Anonymous Calls...................................................................................................................15
Rejecting Calls with Do Not Disturb (DND)........................................................................................ 15
Ending Calls........................................................................................................................................................15
Muting/Unmuting Audio.................................................................................................................................... 15
Holding and Resuming Calls..............................................................................................................................15
Holding a Call.........................................................................................................................................15
Resuming a Held Call............................................................................................................................ 16
Call Forward....................................................................................................................................................... 16
Forwarding Incoming Calls....................................................................................................................16
Page 3

| Contents | iii
Transferring Calls............................................................................................................................................... 16
Performing a Blind Transfer...................................................................................................................16
Performing a Semi-Attended/Attended Transfer.................................................................................... 16
Conference Calls.................................................................................................................................................17
Local Conference....................................................................................................................................17
Network Conference............................................................................................................................... 17
Multicast Paging................................................................................................................................................. 18
Sending Multicast Paging.......................................................................................................................18
Receiving Multicast Paging....................................................................................................................19
Managing a Paging Call......................................................................................................................... 19
Advanced Call Features......................................................................................... 19
Call Park and Call Retrieve............................................................................................................................... 19
Parking or Retrieving a Call in the FAC Mode.....................................................................................19
Parking or Retrieving a Call in the Transfer Mode............................................................................... 20
Retrieving a Call with a Retrieve Key...................................................................................................20
Shared Call Appearance (SCA)..........................................................................................................................20
Placing Calls on a Shared Line..............................................................................................................20
Answering Calls on a Shared Line........................................................................................................ 21
Placing a Call on Public Hold............................................................................................................... 21
Placing a Call on Private Hold.............................................................................................................. 21
Retrieving a Held Call on a Shared Line...............................................................................................21
Barging in an Active Call on a Shared Line......................................................................................... 21
Pulling a Shared Call on a Shared Line................................................................................................ 21
Voice Mail...........................................................................................................................................................21
Setting the Voice Mail Code.................................................................................................................. 22
Leaving Voice Mails...............................................................................................................................22
Listening to Voice Mails........................................................................................................................ 22
Directory.................................................................................................................. 22
Local Directory................................................................................................................................................... 22
Adding Contacts......................................................................................................................................22
Viewing Contacts.................................................................................................................................... 22
Editing Contacts......................................................................................................................................22
Deleting Contacts....................................................................................................................................23
Searching for Contacts............................................................................................................................23
Blocklist...............................................................................................................................................................23
Adding a Blocklist Contact.................................................................................................................... 23
Viewing Blocklist Contacts.................................................................................................................... 23
Editing a Blocklist Contact.................................................................................................................... 23
Deleting Blocklist Contacts....................................................................................................................24
Remote Phone Book...........................................................................................................................................24
Searching for Remote Phone Book Contacts.........................................................................................24
Viewing Remote Phone Book Contacts................................................................................................. 24
Saving a Remote Phone Book Contact to the Local Directory............................................................. 24
Updating Remote Phone Book...............................................................................................................25
Call History............................................................................................................. 25
Call History Icons...............................................................................................................................................25
Viewing History Records....................................................................................................................................25
Saving a History Record to Local Directory..................................................................................................... 25
Saving a History Record to Blocklist................................................................................................................ 25
Deleting History Records................................................................................................................................... 26
Page 4

Deleting a Call Record...........................................................................................................................26
Deleting All Call Records...................................................................................................................... 26
Customizing Your Phone....................................................................................... 26
Changing the Base PIN......................................................................................................................................26
Changing the Wallpaper..................................................................................................................................... 26
Changing the Brightness.....................................................................................................................................27
Changing the Language......................................................................................................................................27
Time & Date.......................................................................................................................................................27
Setting the Time and Date Manually..................................................................................................... 27
Changing the Time and Date Format.....................................................................................................27
Locking Your DD Phone....................................................................................................................................27
Setting the Phone Lock.......................................................................................................................... 28
Locking Your Phone Manually.............................................................................................................. 28
Unlocking Your Phone........................................................................................................................... 28
Changing Your Phone Unlock PIN........................................................................................................ 28
Renaming the Phone...........................................................................................................................................29
Audio Settings......................................................................................................... 29
Adjusting the Volume.........................................................................................................................................29
Setting the Ring Tone.........................................................................................................................................29
Setting the Ring Tone for the External Calls.........................................................................................29
Maintaining Your Phone........................................................................................29
Restarting the Base Station................................................................................................................................ 29
Resetting the Base Station..................................................................................................................................30
Resetting the Handset.........................................................................................................................................30
Triggering the Auto Provisioning.......................................................................................................................30
Appendix.................................................................................................................. 31
Appendix A- Menu Structure.............................................................................................................................31
Appendix B - Input Modes and Characters....................................................................................................... 32
Page 5

Before You Begin
This guide provides information you need to quickly use your new phone.
Firstly, verify with your system administrator that the IP network is ready for phone configuration. Also, be sure to
read the Quick Start Guide which can be found in your phone package before you set up and use the phone. As you
read this guide, keep in mind that some features are only configurable by your system administrator or determined by
your phone environment. As a result, some features may not be enabled or may be operated differently on your phone.
Additionally, the examples and graphics in this guide may not directly reflect what is displayed or is available on your
phone screen.
Related Documentation
You can view more types of documents to make the phone to perform more functions.
The following types of related documents are available on each support page on Yealink support page:
• Release Notes, which details bug fixes and feature enhancements when an update is released.
• Quick Start Guide, which describes how to assemble your phone and configure the basic phone features.
• Administrator Guide, which provides detailed information on how to configure phone features for the system
administrator.
• Regulatory Notice, which provides information about all regulatory and safety guidance.
| Before You Begin | 5
You can also view other user documents which provide descriptions and examples for phone settings and features on
the Yealink support page.
Getting Started
Before you use your phone, take some time to get familiar with its features and user interface.
Hardware Overview
Understanding the phone hardware helps you easily use the phone's features.
W60B Base Station Hardware
After the base station starts up successfully and the handset is registered to the base station, all LEDs on the base
station glow green in sequence.
Page 6
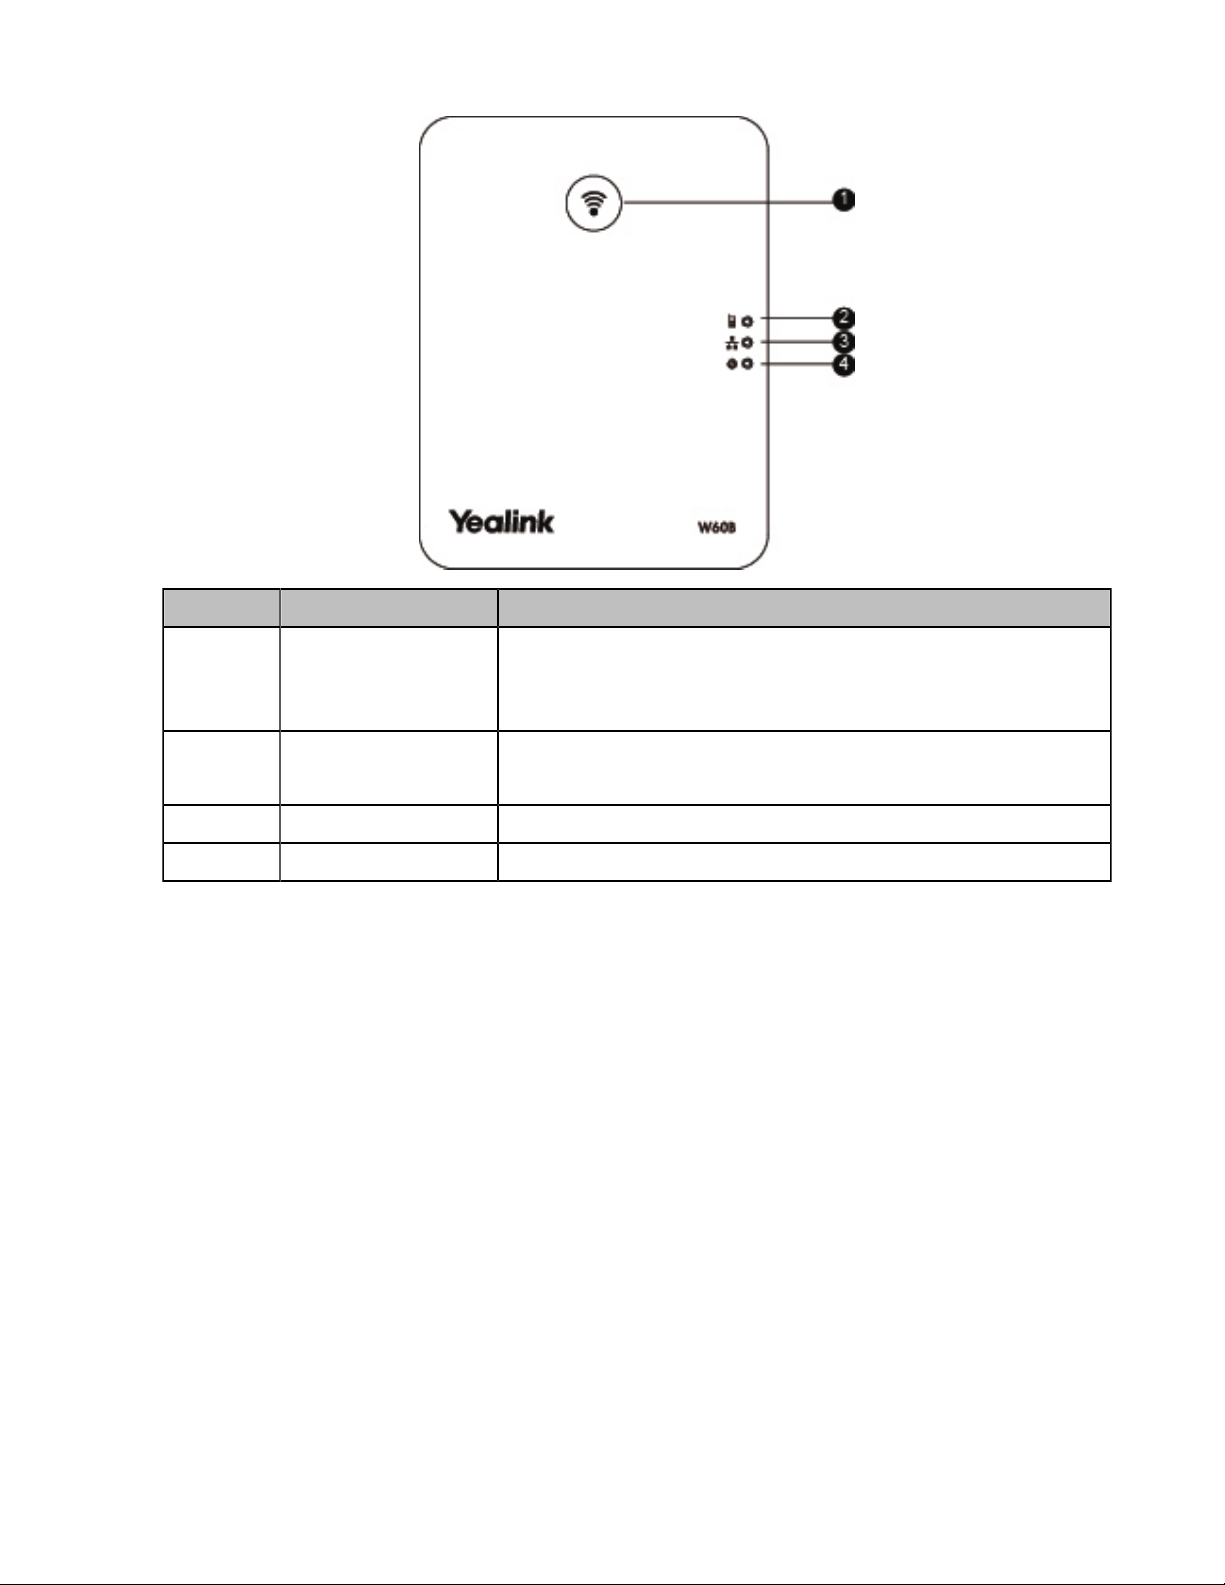
No. Item Description
| Getting Started | 6
1 Paging Key
2 Registration LED
3 Network Status LED Indicates the network status.
4 Power LED Indicator Indicates the power status of the base station.
• Locates a misplaced handset.
• Toggles the registration mode.
• Resets the base station to factory settings.
Indicates the handset registration status or the base station is in the paging
mode.
Page 7
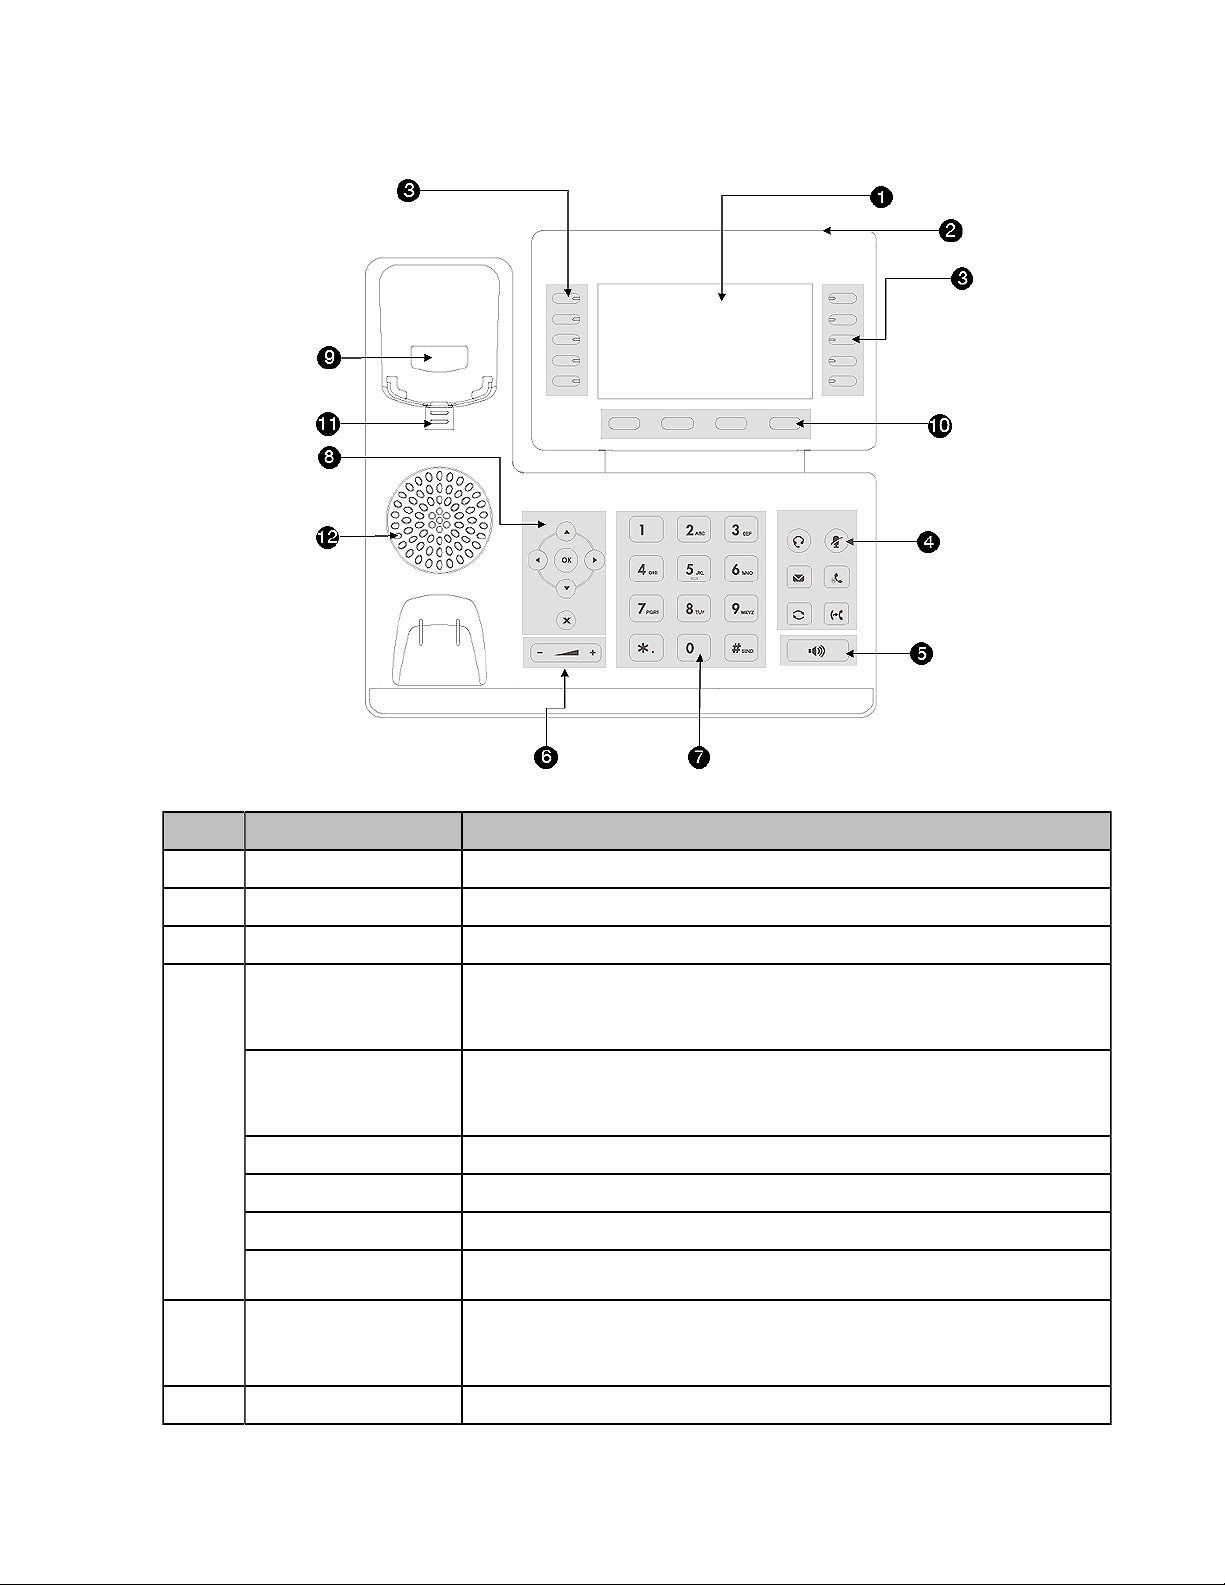
DD Phone Hardware
| Getting Started | 7
NO. Item Description
1 Phone Screen Shows a screen with backlight that enables you to view menus and data.
2 Power LED Indicator Indicates call status, message status, and system status.
3 Line Keys Access your phone outgoing lines and features.
4
5 Speakerphone Key
6 Volume Key Adjusts the volume of the handset, headset, and speaker.
HEADSET Key
MUTE Key
MESSAGE Key Accesses your voice messages.
HOLD Key Places an active call on hold or resume the call.
REDIAL Key Redials a previously dialed number.
FORWARD Key
Toggles the headset on or off.
The LED indicator glows green when the headset is activated.
Toggles the microphone on or off.
The LED indicator glows red when the mute feature is activated.
Forward incoming calls of the line to another party.
Toggles the speakerphone (hands-free) mode on or off.
The LED indicator glows green when the speakerphone is activated.
Page 8

| Getting Started | 8
NO. Item Description
7 Keypad Keys Allow you to enter numbers, letters, and special characters. If a menu item has
an index number, you can use the keypad keys to select the item.
8
9 Soft Keys Hookswitch Connects or disconnects the phone from the phone line. The hookswitch is
10 Soft Keys Access the function displayed on the screen above the soft keys. The soft keys
11 Reversible Tab Secures the handset in the handset cradle when the phone is mounted
12 Speaker Provides ringer and speakerphone audio output.
Navigation Keys
OK Key Confirms actions or answers incoming calls.
Cancel Key Cancels actions or rejects incoming calls.
• Scroll through information or options displayed on the screen.
• Access History and Directory respectively.
automatically activated when a user lifts the handset from the cradle to get a
dial tone.
change depending on what you are doing at the time.
vertically. For more information on how to adjust the reversible tab, refer to
Yealink Wall Mount Quick Installation Guide for Yealink IP Phones.
Screen and Icons
The user screens and icon indicators can help you navigate and understand the important information on the phone's
status.
Idle Screen
The idle screen is made up of the signal strength, battery status, status bar, handset name, and soft keys. The time &
date is displayed in the middle of the screen.
DD Phone:
• Signal Strength:
Weak to strong:
No reception:
• Status Bar: Displays the feature status icons. The status icons are displayed when features are activated.
• Handset Name: Displays the registered handset name.
• Soft Keys: The soft key labels on the screen directly above the soft keys show the functions available at that
particular moment.
Icons on the Idle Screen
By viewing the icons on the idle screen, you can easily get the current phone status, such as message status.
DD Phone:
Icons Description Icons Description
The ringer volume is 0 and the phone is
in the silent mode.
The phone has enabled the Do Not Disturb
(DND) feature.
Page 9
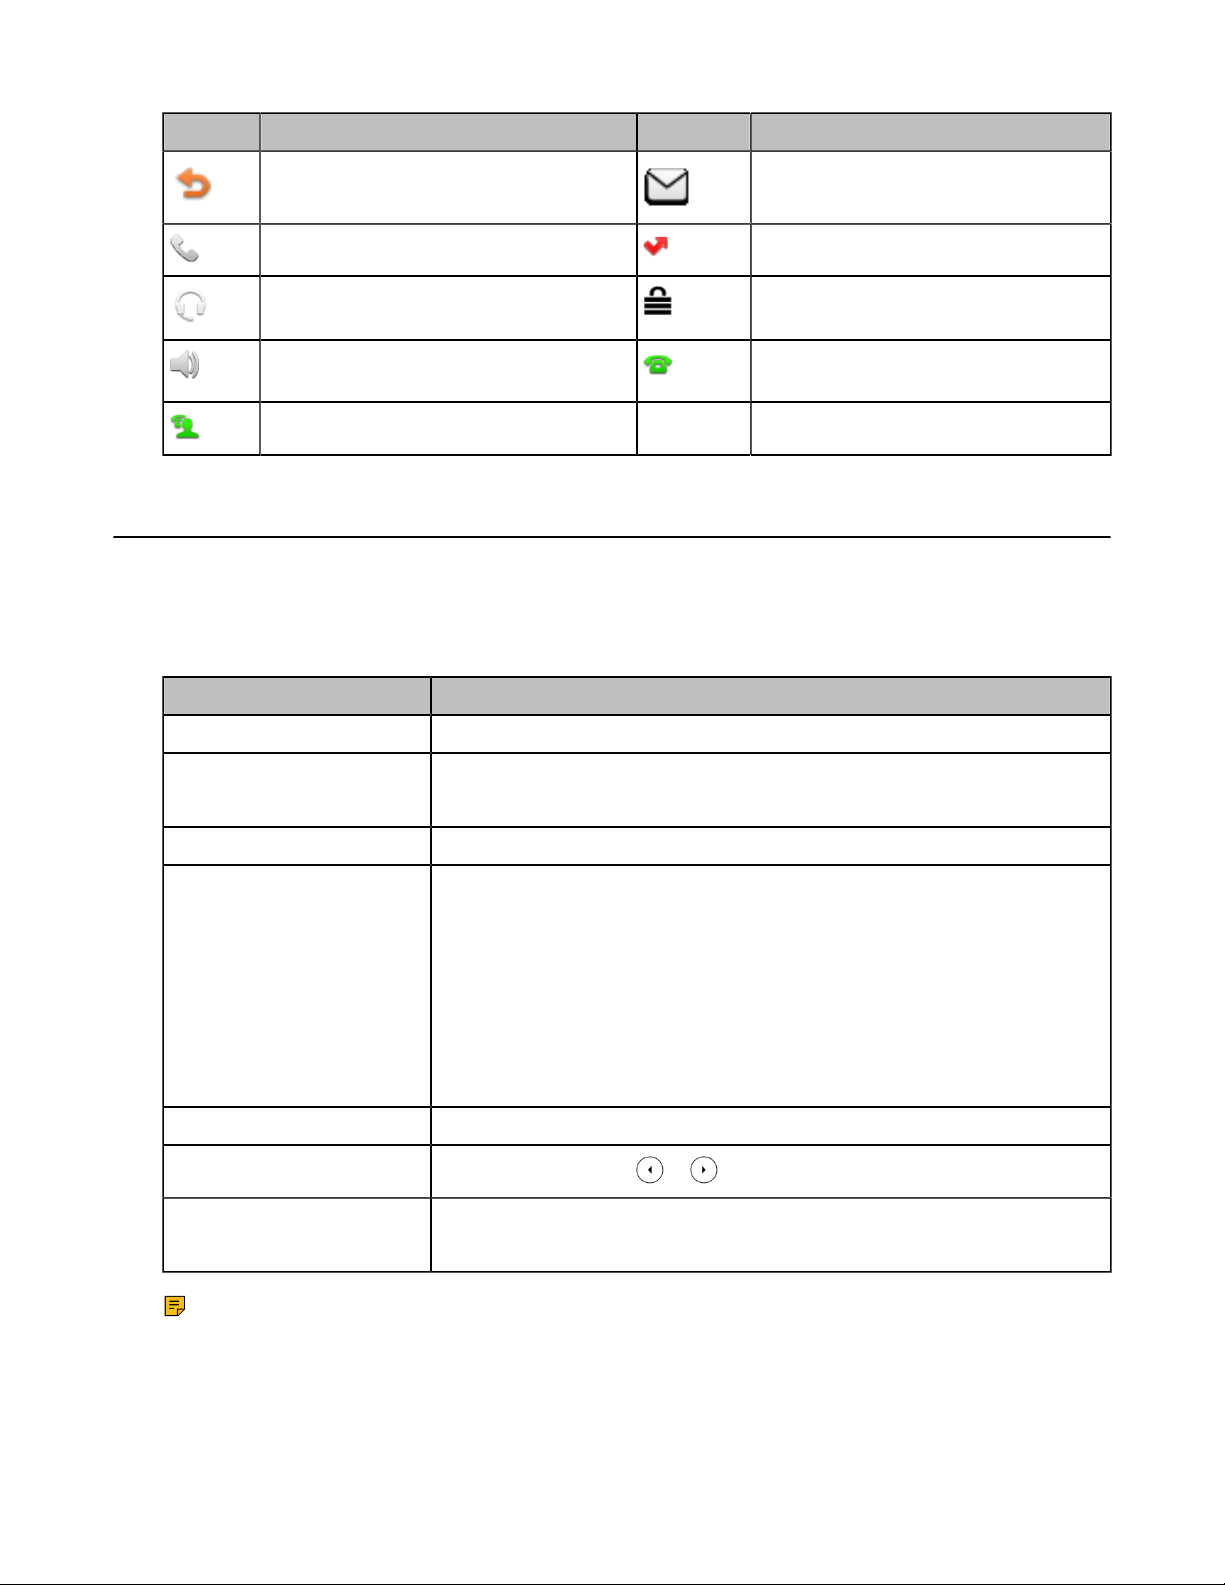
Icons Description Icons Description
| Getting Started | 9
The phone has enabled the Call Forward
feature.
The phone is in the handset mode. The phone has missed calls.
The phone is in the headset mode. The phone is locked.
The phone is in the Speakerphone (handsfree) mode.
The shared line registers successfully.
The phone has new voice mails.
The private line registers successfully.
Entering Characters
You can enter and edit data in the corresponding field using the keypad.
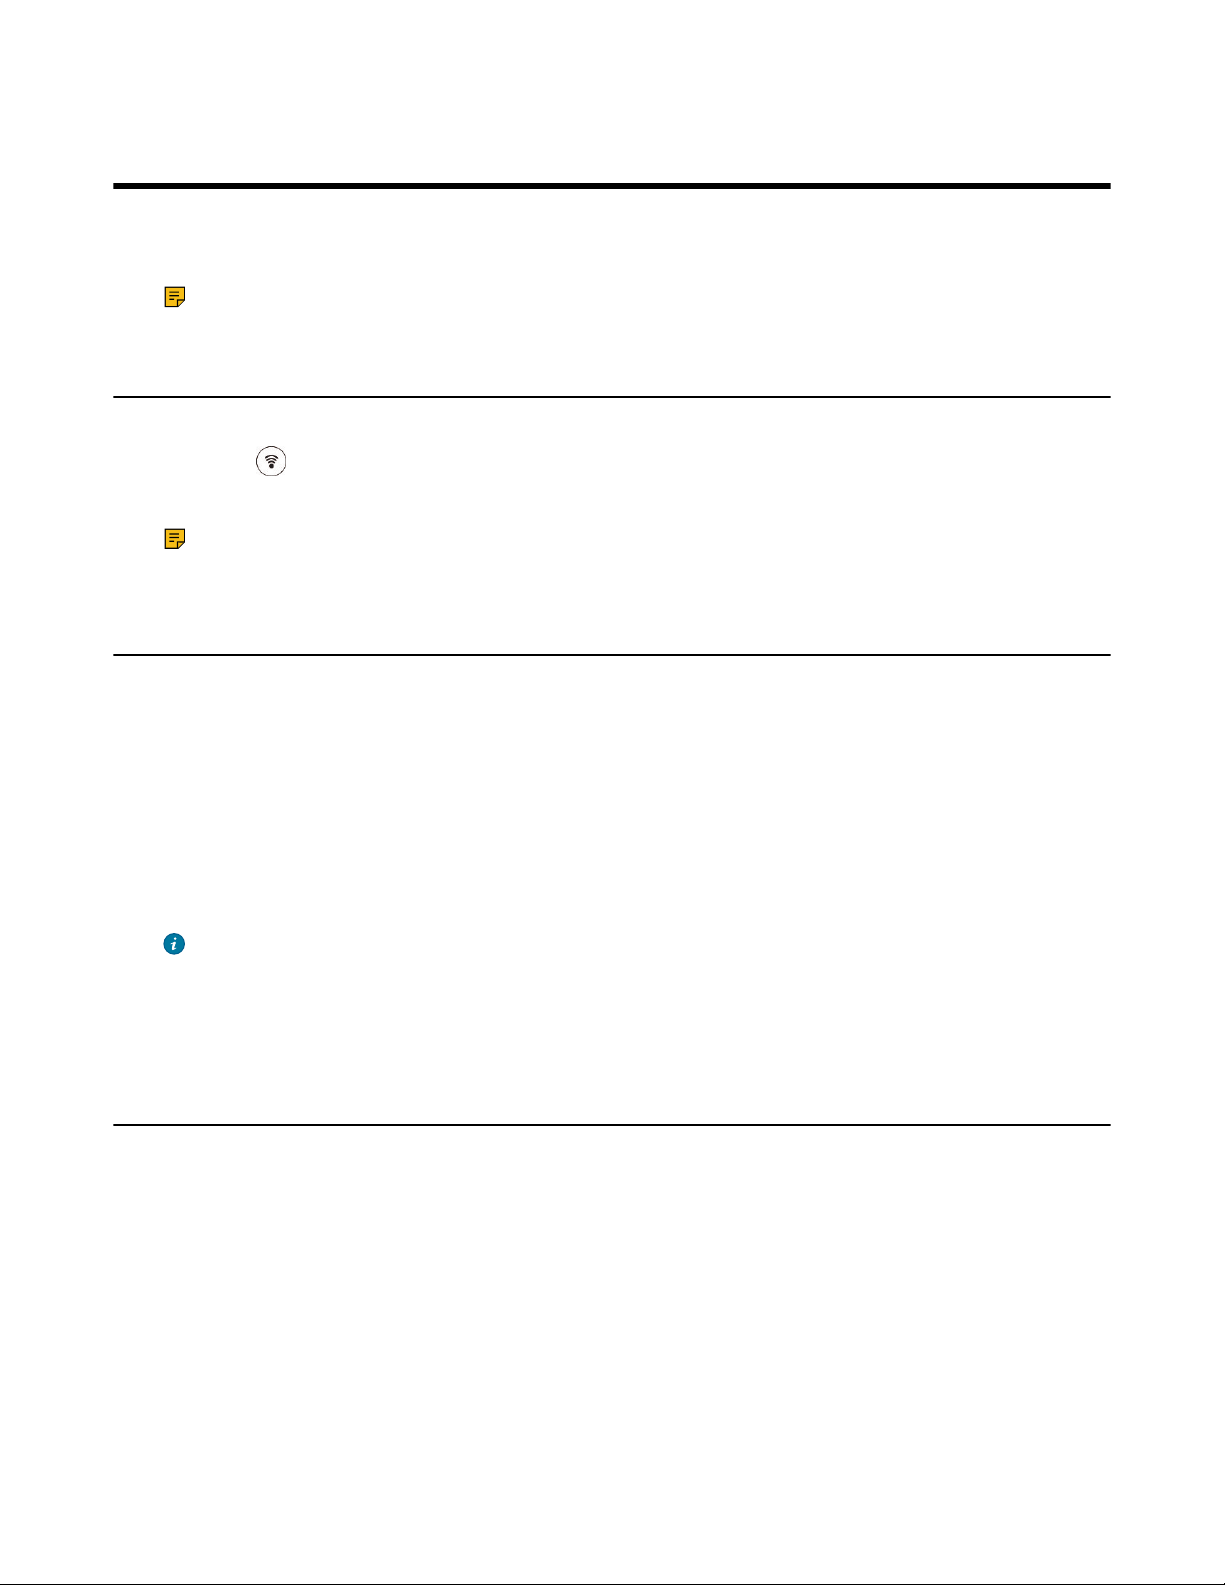
Entering Data
The following table describes how to enter different characters using the keypad keys.
Task Action
Switch input modes Press the ABC, abc, Abc, 2aB, or 123 soft key to switch the input modes.
Enter alphas
Enter numbers Select 123 mode, press the corresponding keys.
Enter special characters
Insert space Select ABC, abc, 2aB, or Abc mode, press the 0 key.
Move cursor
Delete one or more characters
Note: 2aB is only applicable to the DD phone.
Select ABC, abc, 2aB, or Abc mode.Press the keys labeled with letters until your
desired letter appears.
Select ABC, abc, 2aB, or Abc mode, press * key or # key one or more times to
enter one of the following special characters:
* key (DD phone): *.,'?!\-()@/:_;+&%=<>£$¥¤[]{}~^¡¿§#"|
* key: *.,'?!\-()@/:_;+&%=<>$[]{}~
# key: #
On the DD phone, in 123 mode, you can press the * key to choose the following
special characters: .*:/@[].
On the DD phone, press or to position the cursor.
On the DD phone, position the cursor to the right of the character, and select the
Delete soft key.
Page 10
| Handset Registration | 10
Handset Registration
You need to register your handset to a base station, if you want to use the basic functions of the DECT phone. You can
register a handset to 4 different base stations at most. You can select the desired base to use.
Note: Up to 8 handsets can be registered to one base station.
Putting the Base Station into Registration Mode
Before registering the handset, you have to put the base station into registration mode.
Long press on the base station till the registration LED flashes.
The base station is now in registration mode.
Note: If the base station does not identify a DECT phone within 90 seconds, the registration mode will
switch off automatically.
Registering a New Handset to a Base Station
With one touch, you can quickly register your new handset to a base station.
Make sure the base station is in the registration mode, and the phone prompts "Unregistered!".
Press the Reg soft key to register the handset.
The handset is searching for a base station in registration mode.
After the handset is registered successfully, the phone prompts “Handset Subscribed” and “Base NO. (The last 4
characters of the connected Base’s MAC address)”.
After the handset initialized successfully, an icon with the internal handset number and handset name appears on the
phone screen.
Tip: You can also press and then select the desired base to register the handset. You need to enter the base
PIN (default: 0000) after a base is found.
Related tasks
Putting the Base Station into Registration Mode
Registering a Handset to Another Base Station
You can register the handset to another base station if you want to discard the current registration.
Make sure the base station is in the registration mode.
1.
Go to Menu > Basic Settings > Registration > Register Handset.
2.
Select the desired base and then press OK.
The handset begins searching for the base station which is in registration mode.
3.
Press OK after a base is found.
Page 11

4.
Enter the base PIN (default: 0000), and then press Done to complete the registration.
After registration, the phone prompts “Handset Subscribed” and “Base NO. (the last 4 characters of the
connected Base’s MAC address)”.
After the handset initialized successfully, an icon with the internal handset number and handset name appears on
the phone screen.
Related tasks
Putting the Base Station into Registration Mode
Possible Reasons for Registration Failure
Some scenarios may cause registration failure.
• Incorrect base PIN (check with your system administrator).
• Base station is out of range.
• Base station is not in registration mode.
Note: If registration was not successful, the handset screen will prompt you that the registration is failed.
| Call Features | 11
Deregistering a Handset
You may need to de-register your own handset if you want to replace a base station.
1.
Go to Menu > Basic Settings > Registration > Delete Register Handset.
2.
Enter the base PIN (default: 0000), and then press OK.
The handset screen displays the handsets names that are registered to the same base station. The name of the
handset itself is highlighted and followed by a left arrow.
3.
Select the desired handset, and then press OK.
The handset screen prompts you whether to de-register the handset.
4.
Confirm the action.
Call Features
You can use the phone to place and answer calls, ignore incoming calls, transfer a call to someone else, conduct a
conference call and perform other basic call features.
Placing Calls
After the handset is registered successfully, you can use your handset to place an internal or external call.
The handset can keep 2 calls at one time at almost, one (associated with the audio) active and the other one on hold.
Note: The base station can handle up to eight calls, but for Opus, only six calls. For more information,
contact your system administrator.
Placing Internal Calls
Intercom is a useful feature in the office to quickly contact with the operator or the secretary. Internal intercom calls
are made between handsets registered to the same base station.
Placing an Internal Call
You can place an internal call to a desired handset or all handsets.
Page 12

1.
Go to Menu > Intercom.
2.
Select the desired handset or All Handsets.
3.
Select OK or Off-hook key.
If you select All Handsets, all other subscribed handsets will ring simultaneously.
Placing an Internal Call During an External Call
During an external call, you can place a call to an internal line.
1.
Select Conference > Intercom.
2.
Select the desired handset, and then press OK key or Send.
Placing External Calls
You can place external calls on the handset. External calls based on the public telephone network require the SIP
lines.
Placing an External Call
1.
Enter the desired number using the keypad.
2.
Press the OK key or Send to dial out.
| Call Features | 12
Placing Multiple External Calls
When you are in a call, you can hold your current call and place a new call.
Enter the contact number and press the OK key.
Note: You can select Conference > Directory to select a contact from the directory to dial out.
Placing a Call from the Call History
You can place calls to contacts from the History list, which contains the calls that were recently placed, answered, or
missed.
1.
Press History.
2.
Select the desired call list.
3.
Highlight a contact and press the Send key.
Placing a Call from the Directory
You can place a call to a contact directly from your directory.
1.
Go to Directory or Menu > Directory.
2.
Select the desired directory.
3.
Highlight the desired contact and press Send.
If the selected contact has multiple numbers, highlight the desired number, and select OK.
Speed Dial on the DD Phone
You can quickly dial a number by using a speed dial key without entering the directory.
Configuring a Speed Dial Key
You can set a line key as a Speed Dial key for a contact number.
1.
Go to Menu > Features > Dsskey.
2.
Select the desired line key.
3.
Select the SpeedDial from the Type field.
4.
Optional: Enter the string that will appear on the LCD screen in the Label field.
5.
Enter the number you want to dial out in the Value field.
Page 13

6.
Confirm the action.
Redial
You can redial a call from the redial list.
Redialing a Number
The handset keeps a record of all the placed calls. You can call the recently dialed phone number.
1.
Press when the phone is idle to access the redial number list.
2.
Select a record to dial out.
Redialing the Last Dialed Number
Press twice.
A call to your last dialed number is attempted.
Deleting a Redial Record
You can delete any record from the redial list.
1.
Press when the phone is idle to access the redial number list.
2.
Highlight the desired record.
3.
select Delete.
| Call Features | 13
Deleting All Redial Records
You can delete all redial records at once.
1.
Press when the phone is idle to access the redial number list.
2.
Select Delete All.
Placing an Anonymous Call
You can hide your name and number when you place a call. As a result, the callee receives an anonymous call without
caller identity.
Contact your system administrator to find out if this feature is available on your phone.
1.
Go to Menu > Features > Anonymous Call.
2.
Enable local anonymous.
3.
Confirm the action.
4.
Place a call.
The callee is prompted with an incoming call from anonymity.
If the callee enables anonymous rejection feature, you may be prompted that the callee does not accept calls from
an anonymous number.
Answering Calls
When you receive a call, you can choose to answer it manually or automatically.
Assigning Incoming Lines to the Handset
You can assign one or more incoming lines for the handset. The handset can only receive incoming calls of the
assigned incoming line(s).
1.
Go to Menu > Advanced Settings(default PIN: 0000) > Incoming Lines .
The handset screen displays all registered handsets. The handset itself is highlighted and followed by a left arrow.
2.
Select the desired handset.
Page 14

3.
Select Accept from the desired line fields.
4.
Confirm the action.
Answering a Call
When you receive an incoming call, the phone rings and the screen displays the information of the incoming call.
Do one of the following:
• Pick up the handset.
•
Press the Speakerphone key .
•
If a headset is connected, press the HEADSET key .
If you are during an active call, an incoming call arrives on the phone. Press the Answer soft key.
Answering a Call When in a Call
You can answer a call when there is already an active call on your phone.
When you are in an active call and an incoming call arrives on the phone, a call waiting tone beeps, and the incoming
call information is displayed.
Select Answer.
| Call Features | 14
The active call is placed on hold, and the incoming call becomes active.
Note: You can disable the call waiting feature to reject the incoming call automatically during a call.
Related tasks
Disabling Call Waiting
Disabling Call Waiting
If the call waiting feature is disabled, when there is already a call, the new incoming call will be rejected
automatically.
1.
Go to Menu > Features > Call Waiting.
2.
Disable call waiting.
3.
Confirm the action.
Silencing or Rejecting Incoming Calls
When you receive an incoming call, you can choose to silence or reject the call instead of answering.
Silencing a Call
You can silence a call to stop your phone from ringing. Even if you silence the call, the incoming call notification
continues to be displayed on your phone.
Select Silence.
Rejecting a Call Manually
You can reject a call manually, and the call may be sent to voice mail. The rejected calls are displayed in the Received
Calls list in your History list.
Select Reject.
Page 15

Rejecting Anonymous Calls
You can reject incoming calls from the callers who have hidden their identities. As a result, your phone will not ring
and you will not be notified of an attempted call.
1.
Go to Menu > Features > Anonymous Call.
2.
Enable local anonymous rejection.
3.
Confirm the action.
Rejecting Calls with Do Not Disturb (DND)
You can enable DND to reject all incoming calls automatically when you do not want to be interrupted.
Check with your system administrator to find out if the DND feature is available on your phone.
1.
Go to Menu > Features > DND.
2.
Enable DND.
3.
Confirm the action.
The status bar displays the DND icon.
Note: On the CP930W/DD phone, to activate or deactivate DND quickly, select DND when the phone is
idle.
| Call Features | 15
Ending Calls
You can end the current call at any time.
Do one of the following:
•
If you are using the handset, press or the End Call soft key or hang up the handset.
•
If you are using the headset, press or the End Call soft key.
•
If you are using the speakerphone, press , or the End Call soft key.
Note: When a call is placed on hold, you cannot press , to end it. You should press the Resume soft key
to resume the call, and then press , to end it.
Muting/Unmuting Audio
You can mute the microphone during an active call so that the other party cannot hear your discussion with your
colleagues.
1.
Press the mute key during a call to mute the microphone.
The mute icon appears on the phone screen. The mute key LED glows red.
2.
Press the mute key again to unmute.
The mute icon disappears from the phone screen.The mute key LED goes out.
Holding and Resuming Calls
You can place an active call on hold and resume the call when you are ready. When you place a call on hold, the held
party may hear the music played by its sever.
Holding a Call
You can place an active call on hold on your phone.
During a call, select Hold.
Page 16

Note: When you have multiple calls on the phone and the current call is held, you can press the up or down
navigation key to swap to the active call.
Resuming a Held Call
You can view and resume a held call on the phone.
Select Resume.
If multiple calls are placed on hold, select the desired call first.
Note: When you have multiple calls on the phone and the current call is active, you can press the up or down
navigation key to swap to the held call.
Call Forward
The handset will forward incoming calls to another party according to the forwarding type.
There are three forwarding types:
• Always Forward: Incoming calls are immediately forwarded. There is no prompt on the phone screen when the
line receives an incoming call.
• Busy Forward: Incoming calls are forwarded when the line is busy.
• No Answer Forward: Incoming calls are forwarded if not answered after a period of time.
| Call Features | 16
Forwarding Incoming Calls
When you are not available to handle calls, you can forward incoming calls to a specific contact.
1.
Go to Menu > Features > Call Forward.
2.
Select the desired forwarding type and enable it.
3.
Enter the destination number in the Forward to field.
4.
If you select the No Answer Forward, select the desired ring time to wait before forwarding from the After Ring
Time field.
5.
Confirm the action.
Transferring Calls
During a call, you can transfer the call to another contact.
You can use one of three ways:
• Blind Transfer: Transfer a call directly to the third party without consulting.
• Semi-Attended Transfer: Transfer a call when receiving ringback.
• Attended Transfer (Consultative Transfer): Transfer a call with prior consulting.
Performing a Blind Transfer
You can transfer a call to another contact immediately without consulting with her/him first.
1.
Select Transfer.
2.
Enter the number you want to transfer the call to or select Directory to choose a contact.
3.
Select B Transfer to complete the transfer.
Performing a Semi-Attended/Attended Transfer
You can transfer a call to another contact immediately when receiving ringback or after consulting with her/him first.
1.
Select Transfer.
2.
Enter the number you want to transfer to and dial out.
Page 17

3.
4.
Do one of the following:
• When you hear the ringback tone, press the Transfer soft key to finish a semi-attended transfer.
• After the contact answers the call, press the Transfer soft key to finish an attended transfer.
Conference Calls
During the conference, follow these tips:
• Mute your microphone when you are not speaking, especially in noisy environments.
• Avoid tapping or rustling papers near the microphone.
• Speak in your normal voice without shouting.
Local Conference
Setting Up a Local Conference Call
You can set up a local conference call with up to two contacts.
1.
Place a call to the first party.
2.
When the first party answers the call, select Conference.
The active call is placed on hold.
3.
Dial the second party’s number.
4.
When the second party answers the call, select Conference to invite two parties to join the conference.
| Call Features | 17
Muting/Unmuting a Conference Call
When you mute the local microphone during a conference call, other participants can hear each other except you.
1.
Press the MUTE key to mute the conference.
2.
Press the MUTE key again to unmute the conference.
Ending a Conference Call
You can end the current conference call at any time.
Press or End Call.
Network Conference
If your system administrator has set a network conference feature on your phone, you can initiate a conference with
two or more contacts.
Setting Up a Network Conference
You can set up a network conference with two or more contacts.
1.
Place a call to the first party.
2.
Select Conference.
The active call is placed on hold.
3.
Dial the second party’s number.
4.
When the second party answers the call, select Conference to add the second party to the conference.
5.
Select Conference to place a new call.
The conference call is placed on hold.
6.
Enter the number of the new party, and then press the OK key.
7.
When the new party answers the call, select Conf to add the new party to the conference.
Page 18

| Call Features | 18
8.
Repeat steps 5 to 7 until you add all parties.
Note: The procedures for setting up a network conference call on specific servers may be different.
Contact your system administrator for more information.
Inviting another Party into an Active Conference Call
Any party in the conference call can invite other party into an active conference call.
1.
Select Conference or Hold > New Call.
2.
Enter the desired number and dial out.
3.
When the new party answers the call, select Conference.
The new party is joined the conference call.
Holding/Resuming a Conference Call
Any party in the conference call can place himself/herself on hold, but other parties can continue the conference call
normally.
Note: The conference call will only be held when all parties in the conference call place themselves on hold.
1.
Select Hold.
2.
Select Resume to resume the held conference call.
Ending a Conference Call
You can end the current conference call at any time.
Press or End Call.
Multicast Paging
Multicast Paging allows you to broadcast instant audio announcements to users who are listening to a specific
multicast group on a specific channel.
The phone supports the following 31 channels:
• 0: Broadcasts are sent to channel 0.
• 1 to 25: Broadcasts are sent to channel 1 to 25. We recommend that you specify these channels when broadcasting
with Polycom IP phones which have 25 channels you can listen to.
• 26 to 30: Broadcasts are sent to channel 26 to 30. We recommend that you specify these channels when
broadcasting with Yealink IP phones running firmware version 81 or later running new firmware version (new
paging mechanism).
Note: All IP phones in the multicast paging group must be deployed in the same subnet since a broadcast
is used. The phone can only send/receive broadcasts to/from the listened channels. Other channels’
broadcasts will be ignored automatically by the IP phone.
Sending Multicast Paging
You can send paging to the phones with pre-configured multicast addresses on specific channels.
Your system administrator has set the paging group for your phone.
1.
Go to Menu > Features > Pagine List.
If your system administrator has set only one paging list, the paging is sent directly.
2.
Select the desired paging group.
3.
Select Paging.
Note: Multicast RTP is the one-way paging only from the sender to the multicast address(es) (receiver).
For outgoing RTP multicasts, all other existing calls on the phone will be placed on hold.
Page 19

| Advanced Call Features | 19
Receiving Multicast Paging
Your system administrator has set a listening paging group for you, you can automatically receive a paging call when
the phone is idle.
When there is a voice call or a paging call in progress, or when DND is activated on your phone, the phone handles
the new paging call differently according to the multicast listening settings configured by your system administrator.
Managing a Paging Call
During a paging call, you can manage it manually at any time.
You can do the following:
• Select Hold to place the current paging call on hold.
The paging call is placed on hold and the receiver releases the session.
• Select Resume to resume the held paging call.
The multicast RTP session is re-established.
• Select End Call to end the paging call.
Advanced Call Features
By using the advanced features, your handset would perform more functions that make your work more efficiently.
If you require additional information or assistance with your new phone, contact your system administrator.
Call Park and Call Retrieve
You can park a call, and then retrieve the call either from your phone or another phone. After parked, the call is placed
on hold, you can continue the conversation after retrieving it.
Note: Call park is not available on all servers. Check with your system administrator to find out if it is
available on your phone.
Parking or Retrieving a Call in the FAC Mode
You can park the call to the local extension or the desired extension through dialing the park code.
Parking a Call in the FAC Mode
You can park a call in the FAC mode directly. When you park a call to the local extension or the desired extension, the
call is held in the same network on your phone.
Your system administrator has set call park in the FAC mode.
1.
During a call, select Park.
The phone will dial the call park code which is pre-configured.
2.
Do one of the following:
• If you want to park the call against the local extension, press the # key.
• If you want to park the call against the desired extension, enter the extension (for example, 4606) where you
want to park the call and press the # key.
If the call is parked successfully, you will hear a voice prompt that the call is parked.
Retrieving a Parked Call in the FAC Mode
You can retrieve a parked call in the FAC mode from any phone within your network.
Page 20

Your system administrator has set call park in the FAC mode. There is a call parked on the extension. Get the park
retrieve code from your system administrator.
1.
Dial the park retrieve code or select Retrieve on the dialing screen.
2.
Follow the voice prompt to retrieve:
• Press the # key on the phone where the call is parked.
• Enter the desired extension followed by # (for example, 4606#) on any phone.
Parking or Retrieving a Call in the Transfer Mode
You can park the call to the shared parking lot through a blind transfer.
For some servers, the system will return a specific retrieve park number (park retrieve code) after parking
successfully.
Parking a Call in the Transfer Mode
You can park a call in the transfer mode directly. When you park a call to the shared parking lot, the call is held on
your phone.
Your system administrator has set call park in the Transfer mode.
During a call, select Park.
| Advanced Call Features | 20
The call will be directly transferred to the shared parking lot.
Retrieving a Parked Call in the Transfer Mode
You can retrieve a parked call in the transfer mode from any phone in the same network.
Your system administrator has set call park in the Transfer mode. There is a call parked on the shared parking lot.
Dial the park retrieve code.
The phone will retrieve the parked call from the shared parking lot.
Note: When the phone is idle, you can use a Retrieve key to retrieve a parked call directly.
Related tasks
Retrieving a Call with a Retrieve Key
Retrieving a Call with a Retrieve Key
You can easily use a retrieve key to retrieve a parked call quickly.
Check with your system administrator if the FAC or Transfer mode is set on your phone, and if the call park feature
has set for your phone.
1.
Go to Menu > Features > Dsskey.
2.
Highlight the desired Line key and press Enter.
3.
Press the navigation keys or press Switch key in Type field switching to Retrieve Park.
When there is a call parked on the extension or the shared parking lot, you can press the Retrieve key on the idle
screen, and the handset will dial the configured park retrieve code.
Shared Call Appearance (SCA)
Yealink phone supports using Shared Call Appearance (SCA) to share a line. So that this line can be registered on
more than one phone at the same time. Your system administrator can set your phone to use the shared line.
Placing Calls on a Shared Line
You can place one or multiple calls on a shared line.
Page 21

| Advanced Call Features | 21
Related information
Placing Calls
Answering Calls on a Shared Line
You can answer one or two calls on the shared line.
When an incoming call arrives on the shared line, all the registered phones will ring simultaneously, and the call can
be answered on any one of the phones.
Related information
Answering Calls
Placing a Call on Public Hold
You can place a call on public hold that any shared line phone can retrieve the held call.
During a call, select Hold.
Placing a Call on Private Hold
You can place a call on private hold that only you on shared line can retrieve the held call.
During a call, select More > PriHold.
Then the call is held on your phone, and the other phones registered with shared line show the call is in the busy state.
Other users on the shared line cannot resume your held call.
Retrieving a Held Call on a Shared Line
If you place a call on hold on a shared line, you can resume this call at any time. When the shared line key shows a
call that is in a held state, you can resume the held call remotely from other user's phone.
There is at least one call placed on public hold on the shared line.
Select Resume.
Barging in an Active Call on a Shared Line
In the SCA scenario, you can barge into an active call on the shared line. After you barge into a call, the call turns into
a three-party conference.
There is at least one active call on the shared line. Only one user can barge into an active call on the shared line at a
time.
1.
Select SCA and then select an active call.
2.
Select BargeIn (Barge In) to interrupt the active call.
Pulling a Shared Call on a Shared Line
In the SCA scenario, both you and other users can pull an existing call from another shared phone that is active or
held.
There is an active or held call on the shared line. Contact your system administrator for the call pull feature access
code.
1.
Enter the call pull feature access code (for example, *11).
2.
Press the OK key to dial out.
Voice Mail
Voice Mail feature allows you to leave voice mails for someone or listen to your voice mail messages on your IP
phones. This feature is set up on the server-side and not all servers support this feature.
Page 22

Setting the Voice Mail Code
If you want to connect to the message center, you need to set the voice mail code on your phone.
1.
Go to Menu > Message > Voice Mail > Set Voice Mail Code.
2.
Enabled from the Status field.
3.
Enter the voice mail code.
4.
Confirm the action.
Leaving Voice Mails
You can leave a voice mail to someone who is busy or inconvenient to answer the call.
1.
Follow the voice prompts to leave a voice mail.
2.
Hang up to complete the voice mail.
Listening to Voice Mails
You can listen to your voice mails on the handset directly.
You need to set the voice mail code in advance.
1.
Go to Menu > Message > Voice Mail > View Voice Mail.
| Directory | 22
2.
Follow the voice prompt from the system server to listen to your voice mails.
Directory
The phone provides several types of phone directories, which can be customized by your system administrator.
Local Directory
You can store up to 100 contacts in the handset's Local Directory, as well as add, edit and delete a contact.
Adding Contacts
When you add a contact to your Local Directory, you can choose how much information you want to enter for your
contact. You are required to enter a contact name at least for each new contact.
1.
Select Directory or go to Directory > Local Directory.
2.
Select Add.
3.
Enter the contact's information.
4.
Confirm the action.
Viewing Contacts
You can view the local contacts from the Local Directory on your phone.
1.
Select Directory or go to Directory > Local Directory.
2.
Use the navigation keys to look through the contacts.
The contact names are displayed in alphabetical order.
Editing Contacts
You can modify or add more information to your contacts.
1.
Select Directory or go to Directory > Local Directory.
Page 23

2.
Highlight the desired contact and select Options (Option) > Detail.
3.
Edit the contact information.
4.
Confirm the action.
Deleting Contacts
You can delete one or all contacts from the Local Directory.
Deleting a Contact
You can delete any contact from the Local Directory.
1.
Select Directory or go to Directory > Local Directory.
2.
Highlight the desired contact and select Options(Option) > Delete.
The phone prompts you whether to delete this contact.
3.
Confirm the action.
Deleting All Contacts
You can delete all contacts from the Local Directory.
1.
Select Directory or go to Directory > Local Directory.
2.
Highlight the desired contact and select Options (Option) > Delete All.
The phone prompts you whether to delete all contacts.
3.
Confirm the action.
| Directory | 23
Searching for Contacts
In the Local Directory, you can enter search criteria to find your desired contact quickly.
1.
Select Directory or go to Directory > Local Directory.
2.
Enter your search criteria in the search field.
Blocklist
Incoming calls from the Blocklist are rejected automatically. You can store up to 30 contacts in the blocklist to block
unwanted callers.
Adding a Blocklist Contact
You can add a blocklist contact on the phone to prevent someone from calling you.
1.
Go to Menu > Directory > Blocklist.
2.
Select Add.
3.
Enter the contact's information.
4.
Confirm the action.
Viewing Blocklist Contacts
You can view the blocklist contacts from the blocklist on your phone.
1.
Go to Menu > Directory > Blocklist.
2.
Use the navigation keys to look through the blocklist contacts.
Editing a Blocklist Contact
You can update your blocklist contacts' information.
1.
Go to Menu > Directory > Blocklist.
2.
Highlight the desired blocklist contact and select Options (Option) > Detail.
Page 24

3.
Edit the contact information.
4.
Confirm the action.
Deleting Blocklist Contacts
You can delete one or all blocklist contacts. If a contact is removed from the blocklist, you can answer the call from
the contact normally.
Deleting a Blocklist Contact
If you want to answer a call from a specific contact, you need to remove it from the blocklist.
1.
Go to Menu > Directory > Blocklist.
2.
Highlight the desired blocklist contact and select Options > Delete.
Deleting All Blocklist Contacts
You can delete all contacts from the Blocklist when you are ready to answer calls from them again.
1.
Go to Menu > Directory > Blocklist.
2.
Highlight the desired blocklist contact and select Options(Option) > Delete All.
The phone prompts you whether to delete all contacts.
3.
Confirm the action.
| Directory | 24
Remote Phone Book
If the Remote Phone Book feature has been enabled by your system administrator, you can access your corporate
directory directly from your phone.
Searching for Remote Phone Book Contacts
In the Remote Phone Book, you can enter search criteria to find your desired contact quickly.
1.
Go to Directory > Remote Phone Book.
2.
Select the desired remote phone book.
3.
Enter your search criteria directly by tapping the keypad.
Viewing Remote Phone Book Contacts
You can view the contact list of the Remote Phone Book on your phone.
1.
Go to Directory > Remote Phone Book.
2.
Select the desired remote phone book.
3.
Use the navigation keys to look through the contacts.
Saving a Remote Phone Book Contact to the Local Directory
You can save any remote phone book contact to the Local Directory, to conveniently call this contact when you
cannot access the Remote Phone Book.
1.
Go to Directory > Remote Phone Book.
2.
Select the desired remote phone book.
3.
Highlight the desired contact and select Option > Add to Contacts.
4.
Edit the contact information.
5.
Confirm the action.
Tip: You can select Add To Local > Update Existing to update the existing contact information.
Page 25

Updating Remote Phone Book
You can manually update the contacts of RemotePhoneBook.
1.
Tap Directory.
2.
Select the desired remote phone book.
3.
Tap Update.
Call History
The call history list includes Missed Calls, Placed Calls and Received Calls, and each list holds 100 entries.
Call History Icons
The call history icon in the Call History indicates the corresponding call history types.
DD phone:
| Call History | 25
Icon Description
Received Calls
Missed Calls
Placed Calls
Viewing History Records
The history record saves the call information such as the caller's name and number, local line and call duration.
1.
Press History.
2.
Select the desired list.
3.
Highlight the desired entry and select Options(Option) > Detail.
Saving a History Record to Local Directory
To identify someone's call the next time, you can save a history record to the Local Directory.
1.
Press History.
2.
Select the desired list.
3.
Highlight the desired entry and select Option > Add to Contacts.
4.
Edit the contact information.
5.
Confirm the action.
Tip: You can select Add To Local > Update Existing to update the existing contact information.
Saving a History Record to Blocklist
You can prevent someone from calling you again by saving a history record to the blocklist.
Page 26

1.
Press History.
2.
Select the desired list.
3.
Highlight the desired entry and select Options > Add To Blocklist.
The phone prompts you whether to add it or not.
4.
Confirm the action.
Deleting History Records
You can delete one or all call records from the call history list.
Deleting a Call Record
You can delete any call record from the call history list.
1.
Press History.
2.
Select the desired list.
3.
Highlight the desired entry and select Delete.
The selected entry is deleted successfully.
| Customizing Your Phone | 26
Deleting All Call Records
You can delete all call records from the call history list.
1.
Press History.
2.
Select the desired list.
3.
Select Options(Option) > Delete All.
The phone prompts you whether to delete all records.
4.
Confirm the action.
Customizing Your Phone
You can make your phone more personalized by customizing various settings.
Changing the Base PIN
To avoid unauthorized registration or access to some features on the handset, you should keep the base PIN secret.
The default base PIN is “0000”, you can change it.
1.
Go to Menu > Basic Setting > Change PIN.
2.
Enter the Old PIN in the Old PIN, the new PIN in the New PIN and Confirm PIN field respectively.
3.
Confirm the action.
Note: We recommend that you set a new random 4-digit PIN that may not be easily guessed.
Changing the Wallpaper
You can change the wallpaper that is displayed on the idle screen.
1.
Go to Menu > Basic Setting > Display > Wallpaper.
2.
Press the navigation keys to select the desired image.
Page 27

| Customizing Your Phone | 27
3.
Confirm the action.
Changing the Brightness
The handset backlight in charger or out of charger can be configured independently.
When in charger/out of charger is enabled, the backlight will be turned off after the handset is idle for about 30
minutes when the handset is or is not in the charging cradle. When an incoming call arrives, a key is pressed or the
handset status changes, the backlight is automatically turned on.
1.
Go to Menu > Basic Setting > Display > Backlight.
2.
Select the desired value from the Active Level field.
3.
Confirm the action.
Changing the Language
Your phone supports several languages that you can choose to use on the phone.
Contact your system administrator to find out exactly which languages are supported on your phone.
1.
Go to Menu > Basic Setting > Language.
2.
Select the desired language.
The phone prompts you whether to change the language.
3.
Confirm the action.
The phone language is changed to the selected one.
Time & Date
You can set the time and date manually. The time and date formats are also variable.
Setting the Time and Date Manually
If your phone cannot obtain the time and date automatically, you can set it manually.
1.
Go to Menu > Basic Setting > Time&Date > Manual Settings.
2.
Edit the date and time.
3.
Confirm the action.
The time and date set on the handset will be changed accordingly.
Changing the Time and Date Format
You can set the phone to display the time in 12-hour or 24-hour format. You can also change the date format,
including the options to display the day (D), month (M), and year (Y).
1.
Go to Menu > Basic Setting > Time&Date > Time&Date Format.
2.
Select the desired time format or date format.
3.
Confirm the action.
Locking Your DD Phone
Phone lock helps you protect your phone from unauthorized use.
Page 28

| Customizing Your Phone | 28
Setting the Phone Lock
You can manually lock the phone or wait a specified time to automatically lock the phone.
What unauthorized users can do depends on the settings of the phone lock type.
The phone supports the following phone lock types:
• Menu key: it prevents unauthorized users from accessing the menu, changing the personal settings for your
phone.
• Function key: it only allows users to use the keypad for placing a call, answering or rejecting an incoming call
and ending a call, and it prevents unauthorized users from other operations.
• All keys: it only allows users to use the keypad for dialing an emergency number or authorized numbers that
set up by your system administrator, answering or rejecting an incoming call and ending a call, and it prevents
unauthorized users from other operations. The phones only support All Keys type of phone lock.
Note: The Volume key always available when you lock the phone.
1.
Menu > Basic Settings > Phone Lock.
2.
Enter the desired PIN (default PIN: 123) in the Unlock PIN field and confirm the action.
3.
Select Enabled from the Lock Enable field.
4.
Select the desired type from the Lock type field.
5.
Enter the desired interval (0 - 3600 seconds) in the Auto Lock field.
If the value is set to 0, the phone will not be automatically locked.
6.
Confirm the action.
Locking Your Phone Manually
You can lock the phone manually before the phone is automatically locked.
Make sure that the phone lock is set.
Long press # key when the phone is idle.
The lock icon appears on the phone screen.
Unlocking Your Phone
You can use an unlock PIN to unlock the phone.
If you forget the unlock PIN, you can enter the administrator password to unlock your phone, and then automatically
access the PIN change screen.
1.
Press any locked key, the phone prompts you to enter an unlock PIN.
2.
Enter the desired PIN (default: 123) in the Unlock PIN field.
3.
Confirm the action.
The lock icon disappears from the phone screen.
Changing Your Phone Unlock PIN
The default unlock PIN is “123”. For security reasons, you should change the default unlock PIN as soon as possible.
1.
Go to Menu > Basic Settings > Change PIN.
2.
Enter your old and new unlock PIN respectively.
The unlock PIN length must be within 15 digits.
3.
Confirm the action.
Page 29

Renaming the Phone
The will be named automatically if successfully registered to the base station. You can personalize the name.
1.
Go to Menu > Basic Settings > Phone Name.
2.
Edit the current name in the Phone Name field.
3.
Confirm the action.
Audio Settings
You can change the basic audio settings on your phone.
Adjusting the Volume
You can adjust the volume of the ringer, media, and audio during a call.
Press the Volume key .
| Audio Settings | 29
Setting the Ring Tone
Ring tones are used to indicate the incoming calls.
Setting the Ring Tone for the External Calls
You can select a unique ring tone for the external calls so that you can identify callers when the phone rings.
1.
Go to Menu > Basic Settings > Sound > Ring Tones > Common.
2.
Select the desired ring tone.
The ring tone is played automatically.
3.
Confirm the action.
Maintaining Your Phone
When your phone cannot operate properly, you need to investigate or troubleshoot issues along with other tasks that
your administrator may ask you to perform.
Restarting the Base Station
The improper operation may cause malfunction. If a malfunction occurs, your system administrator may ask you to
restart the base station to refresh the settings.
Go to Menu > Advanced Settings (default PIN: 0000) > Reboot Config > Base Reboot.
After the above steps, the registration LED and network status LED on the base station go out simultaneously. After a
period of time, the LED indicators will glow green again when the base station restarts successfully.
Page 30

| Maintaining Your Phone | 30
Resetting the Base Station
Your system administrator may ask you to reset your phone to factory after you have tried all troubleshooting
suggestions but still do not solve the problem.
Except the registrations, the phone will reset all settings to the factory defaults after the resetting. Check with your
system administrator if the personalized settings are kept before resetting your phone to factory.
Go to Menu > Advanced Settings (default PIN: 0000) > Reset Config > Base Reset.
All individual settings of the base station will be reset to factory defaults. The power LED indicator and network LED
indicator on the base station slowly flash in sequence during the resetting. LEDs on the base station glow green after
startup.
Important: Base station reset may take a few minutes. Do not power off until the base station starts up
successfully.
Resetting the Handset
You can reset individual settings that you have configured on the handset.
Except the settings of directory, call history, voice mail, and the handset registration, the handset will reset all
customized settings to factory after the resetting.
1.
Go to Menu > Advanced Settings (default PIN: 0000) > Reset Config > Handset Reset.
The phone prompts you whether to reset the handset.
2.
Confirm the action.
Triggering the Auto Provisioning
Your system administrator may ask you to update your phone configurations. You can trigger the auto provisioning
using the wizard.
1.
Go to Menu > Advanced Settings (default PIN: 0000) > Auto Provision.
2.
Enter the user name, select OK.
3.
Enter the password, select OK.
The phone prompts whether to update immediately.
4.
Confirm the action.
Page 31

Appendix
Appendix A- Menu Structure
| Appendix | 31
Page 32

Appendix B - Input Modes and Characters
Abc
| Appendix | 32
(initials
in
capitals)
1 1 1 1 1 1 1 1 1 1 1 1
ABCabc2 2 ABC2 abc2 ΑΒΓ2
DEFdef3 3 DEF3 def3 ΔΕΖ3
GHIghi4 4 GHI4 ghi4 ΗΘΙ4
JKLjkl5 5 JKL5 Jkl5 ΚΛΜ5 JKL5 jkl5 JKLŁĹĽ5 jklłĺľ5 МНОП5 мноп5 לךכי
MNO
mno6
PQRS
pqrs7
TUVtuv8 8 TUV8 tuv8 ΤΥΦ8
WXYZ
wxyz9
123 ABC abc ΑΒΓ AÄÅ aäå SŚŠ sśš абв АБВ גבא
AАБВГД
ЕЖBCЗ2
DEÈÉÊ
ËẼF3
GĞHIÌÍ
ÎÏĨİĬ4
6 MNO6 mno6 ΝΞΟ6
7 PQRS7 pqrs7 ΠΡΣ7 PQRSŞß7 pqrsşß7
9 WXYZ9Wxyz9 ΧΨΩƔ9
MNСOТ
УФХЦШ6
TUÙÚÛ
ÜŨV8
WŴX
YŶZ9
aабвгде
жbcз2
deèé
êëẽf3
gğhiìí
îïĩıĭ4
mnсoт
уфхцш6
tuùúû
üũv8
wŵx
yŷz9
AÁÄĄB
CĆČ2
DĎEÉ
ĘĚF3
GHIÍ4 ghií4 ИЙКЛ4 ийкл4 ןנםמ
MNŃŇO
ÓÖŐ6
PQRŔŘ
SŚŠ7
TŤUÚÜ
ŰŮV8
WXYỲÝ
ZŹŻŽ9
aáäąb
cćč2
dďeé
ęěf3
mnńňo
óöő6
pqrŕř
sśš7
tťuúü
űův8
wxyỳý
zźżž9
АБВГ2 абвг2 והד
ДЕЖЗ3 дежз3 גבא
РСТУ6 рсту6 טחז
ФХЦЧ7 фхцч7 תשר
ШЩ
ЪЫ8
ЬЭЮЯ9 ьэюя9 ףפעס
шщъы8 קץצ
space . , ? !
0
space = /
\ ^ ; : . ,
- + * # §
% @ ? !
¿ ¡ ( ) { }
[ ] < > ¥ $
| ~ ¤
£
0
space
_’ ”
= / \
^ ; : . ,
- + *
# § %
@ ? !
¿ ¡ ( )
{ } [ ]
< > ¥
$ £ |
~ ¤
0 . , ? !
space
space
_’ ” = /
\ ^ ; : . ,
- + *
# § %
@ ? !
¿ ¡ ( )
{ } [ ]
< > ¥ $
| ~ ¤
£
0 . , ? !
space
space
_’ ”
= / \
^ ; : . ,
- + *
# § %
@ ? !
¿ ¡ ( )
{ } [ ]
< > ¥
$ £ |
~ ¤
space 0 space 0 space 0 space 0
space
_’ ” = /
\ ^ ; : . ,
- + *
# § %
@ ? !
¿ ¡ ( )
{ } [ ]
< > ¥ $
| ~ ¤
£
space _’
” = / \
^ ; : . , + * # §
% @ ? !
¿ ¡ ( ) { }
[ ] < > ¥
$ £ | ~ ¤
space
_’ ” = /
\ ^ ; : . ,
- + * # §
% @ ? !
¿ ¡ ( )
{ } [ ] <
> ¥ $
£
| ~ ¤
space _’
” = / \
^ ; : . , + * # §
% @ ? !
¿ ¡ ( ) { }
[ ] < > ¥
$ £ | ~ ¤
space
0
space
_’ ”
= / \
^ ; : . ,
- + *
# § %
@ ? !
¿ ¡ ( )
{ } [ ]
< > ¥
$ £ |
~ ¤
0 ҐЄІЇЎ 0ґєіїў
space _’
” = / \
^ ; : . , + * # §
% @ ? !
¿ ¡ ( ) { }
[ ] < > ¥
$ £ | ~ ¤
space _’
” = / \
^ ; : . , + * # §
% @ ? !
¿ ¡ ( ) { }
[ ] < > ¥
$ £ | ~
¤
space
0
space
_’ ” = /
\ ^ ; : . ,
- + *
# § %
@ ? !
¿ ¡ ( )
{ } [ ]
< > ¥ $
| ~ ¤
£
 Loading...