

Page 1
Page 2

Contents
Introduction of MeetingBar A20 for Zoom Rooms................................... 4
Hardware Overview............................................................................................................................. 4
MeetingBar A20........................................................................................................................ 4
CTP18 Collaboration Touch Panel........................................................................................... 5
Related Documents............................................................................................................................. 6
Technical Specifications.......................................................................................................................6
Deployment and Connection...................................................................... 6
Deployment and Connection of MeetingBar A20................................................................................7
Deployment and Connection of CTP18.............................................................................................. 7
Recommended Deployment Solution.................................................................................................. 7
Recommended Deployment Solution of MeetingBar A20 for Zoom Rooms.............................8
MeetingBar A20 Installation......................................................................................................8
Recommendations of CTP18 Installation............................................................................... 10
| Contents | ii
Powering on or off.................................................................................... 10
Initial Setup................................................................................................ 10
Pairing CTP18 with MeetingBar A20................................................................................................ 10
Signing into/Signing out of Your Zoom Rooms Account...................... 11
Signing into Your Zoom Rooms Account.......................................................................................... 12
Signing out of Your Zoom Rooms Account.......................................................................................13
Basic Features for Zoom Rooms Systems............................................. 13
Setting the Camera....................................................................................14
Controlling MeetingBar A20.............................................................................................................. 15
Enabling/Disabling Auto Framing............................................................................................15
Controlling the Camera...........................................................................................................15
Creating/Resetting Presets in a Meeting................................................................................15
Renaming Presets in a Meeting.............................................................................................16
Setting Camera to the Preset Position...................................................................................16
Adjusting the Camera Exposure....................................................................................................... 16
Configuring Auto Exposure Mode.......................................................................................... 16
Configuring Manual Exposure Mode...................................................................................... 17
Configuring the Mode of Shutter Priority................................................................................18
Configuring the Mode of Brightness Priority.......................................................................... 19
Adjusting the White Balance............................................................................................................. 20
Adjusting the Display Image of the Camera..................................................................................... 20
Setting the Hangup Mode................................................................................................................. 22
Adjusting the Camera Pan Direction................................................................................................. 22
Resetting the Camera....................................................................................................................... 22
Page 3

| Contents | iii
Content Sharing......................................................................................... 22
Wired Content Sharing...................................................................................................................... 22
Network Settings....................................................................................... 23
Configuring IPv4 Network................................................................................................................. 23
Connecting to the Wireless Network.................................................................................................24
Connecting to the Wireless Network......................................................................................24
Connecting to a Hidden Wireless Network............................................................................ 24
Configuring QoS................................................................................................................................ 25
Configuring LLDP.............................................................................................................................. 26
Configuring the 802.1x Authentication.............................................................................................. 27
System Security......................................................................................... 28
System Lock Settings........................................................................................................................28
Changing the Administrator Password.............................................................................................. 28
System Settings......................................................................................... 29
Setting the Language........................................................................................................................ 29
Setting the Time and Date................................................................................................................29
Customizing the Time and Date.............................................................................................29
Editing Time and Date............................................................................................................29
Single and Dual External Display..................................................................................................... 30
Single Screen Layouts............................................................................................................30
Dual Screen Layouts.............................................................................................................. 31
Using Web User Interface................................................................................................................. 31
Configuring the Web Server Type.......................................................................................... 31
Logging into the Web User Interface..................................................................................... 32
Troubleshooting......................................................................................... 32
Upgrading the Firmware....................................................................................................................33
Upgrading Firmware via the Web User Interface...................................................................33
Logs................................................................................................................................................... 33
Setting the Severity Level of the Local Log........................................................................... 33
Exporting Logs to the Local................................................................................................... 34
Rebooting the System....................................................................................................................... 34
Resetting to Factory Settings............................................................................................................35
Repairing with MeetingBar A20........................................................................................................ 35
Checking the Status of MeetingBar A20 and CTP18....................................................................... 36
General Issues.................................................................................................................................. 36
Zoom Rooms Cannot be Connected and Verified after Resetting CTP18............................. 36
Forget the IP Address of MeetingBar A20 after Restoring CTP18 to the Factory?................ 36
Page 4

| Introduction of MeetingBar A20 for Zoom Rooms | 4
Introduction of MeetingBar A20 for Zoom Rooms
Yealink MeetingBar A20 is the video conferencing system released by Yealink that revolutionizes the Zoom
Rooms meeting experience. Perfectly integrated with Zoom Rooms and Yealink cutting-edge audio &
video solutions, the Yealink MeetingBar A20 and its controller CTP18 is deemed to cover all the usage
scenarios and provide you with the excellent meeting experience in the conference room. Featuring
20MP camera and 133° super wide-angle lens, MeetingBar A20 delivers outstanding video quality.
Together with the electric lens cap, its AI technologies allow users to experience a smarter and safer video
conference. MeetingBar A20 is capable of content sharing and whiteboard that making the meeting more
communicative and collaborative. Simple and flexible deployment but powerful features deliver excellent
video collaboration performance.
This guide is applicable to the following MeetingBar A20 and CTP18 running in the following firmware
version. Moreover, the firmware version of MeetingBar A20 and CTP18 should match each other.
• MeetingBar A20: 133.30.0.35.rom or later
• CTP18: 133.30.0.30.rom or later
• Hardware Overview
• Related Documents
• Technical Specifications
Hardware Overview
This chapter mainly introduces the hardware of MeetingBar A20 for Zoom Rooms.
• MeetingBar A20
• CTP18 Collaboration Touch Panel
MeetingBar A20
Page 5
Port Name Description
| Introduction of MeetingBar A20 for Zoom Rooms | 5
①
②
③
④
⑤
⑥
⑦
⑧
Reset Key Resets to factory defaults.
DC48V port Connects to the power source via a power adapter.
HDMI 1 port Connects to a monitor for displaying video images.
VC Hub/Phone Connects to the PoE port on VCH51 via the standard 7.5
Internet port Connects to the network device.
HDMI 2 port Connects to a monitor for displaying video images.
Security Slot Creates a secure connection to the device with a universal
USB port Connects to a wired mouse or a wireless USB dongle to
meter network cable for wired content sharing.
security cable to lock the device down.
use wireless mouse.
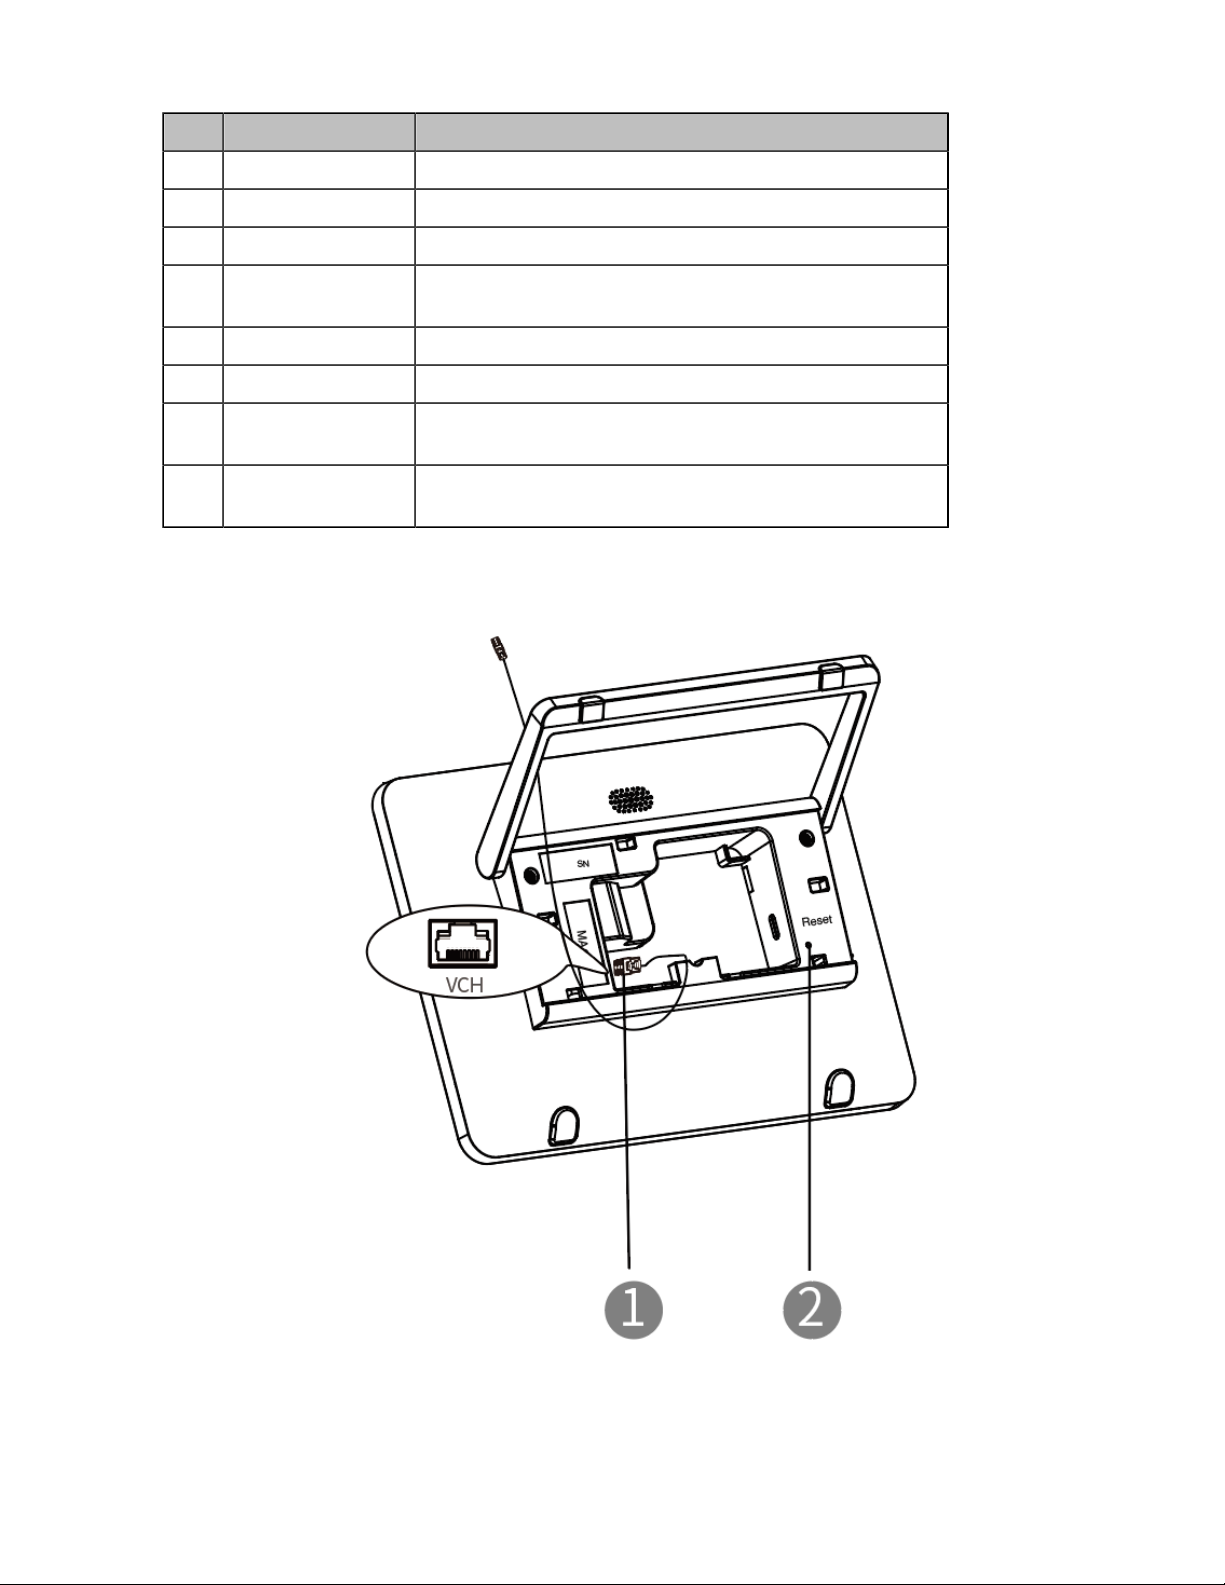
CTP18 Collaboration Touch Panel
Page 6
Port Name Description
| Deployment and Connection | 6
①
②
VCH port Connects to PoE adapter for power supply and for the
Reset Key Resets to factory defaults.
network and data transmission.
Related Documents
The following related documents are available:
• Yealink CTP18 Quick Start Guide (EN, CN, DE, ES, FR) V1.0.pdf
• Yealink MeetingBar A20 Teams&Zoom Quick Start Guide (EN, CN, DE, FR, ES) V1.0.pdf
Technical Specifications
Operating System Android 9.0
Software Zoom Rooms
Processor/SSD/
RAM
Port
Qualcomm Snapdragon 845 chip
• 2 x HDMI HD video output (CEC supported)
• 1 x RJ45VCH port for connecting VCH51
• 1 x USB2.0 port
• 1 x 10/100/1000M Ethernet port
• 1 x Power port
• 1 x Reset slot
• 1 x Security slot
CTP18
• Android 9.0
• 8-inch IPS FHD capacitive touch screen
• Power over Ethernet
• Conference control
• Presentation
Deployment and Connection
This chapter mainly introduces the deployment and connection of MeetingBar A20 for Zoom Rooms.
CTP18 is connected to MeetingBar A20 in the same LAN through IP pairing, and acts as the controller of
MeetingBar A20 for Zoom Rooms.
• Deployment and Connection of MeetingBar A20
• Deployment and Connection of CTP18
• Recommended Deployment Solution
Page 7
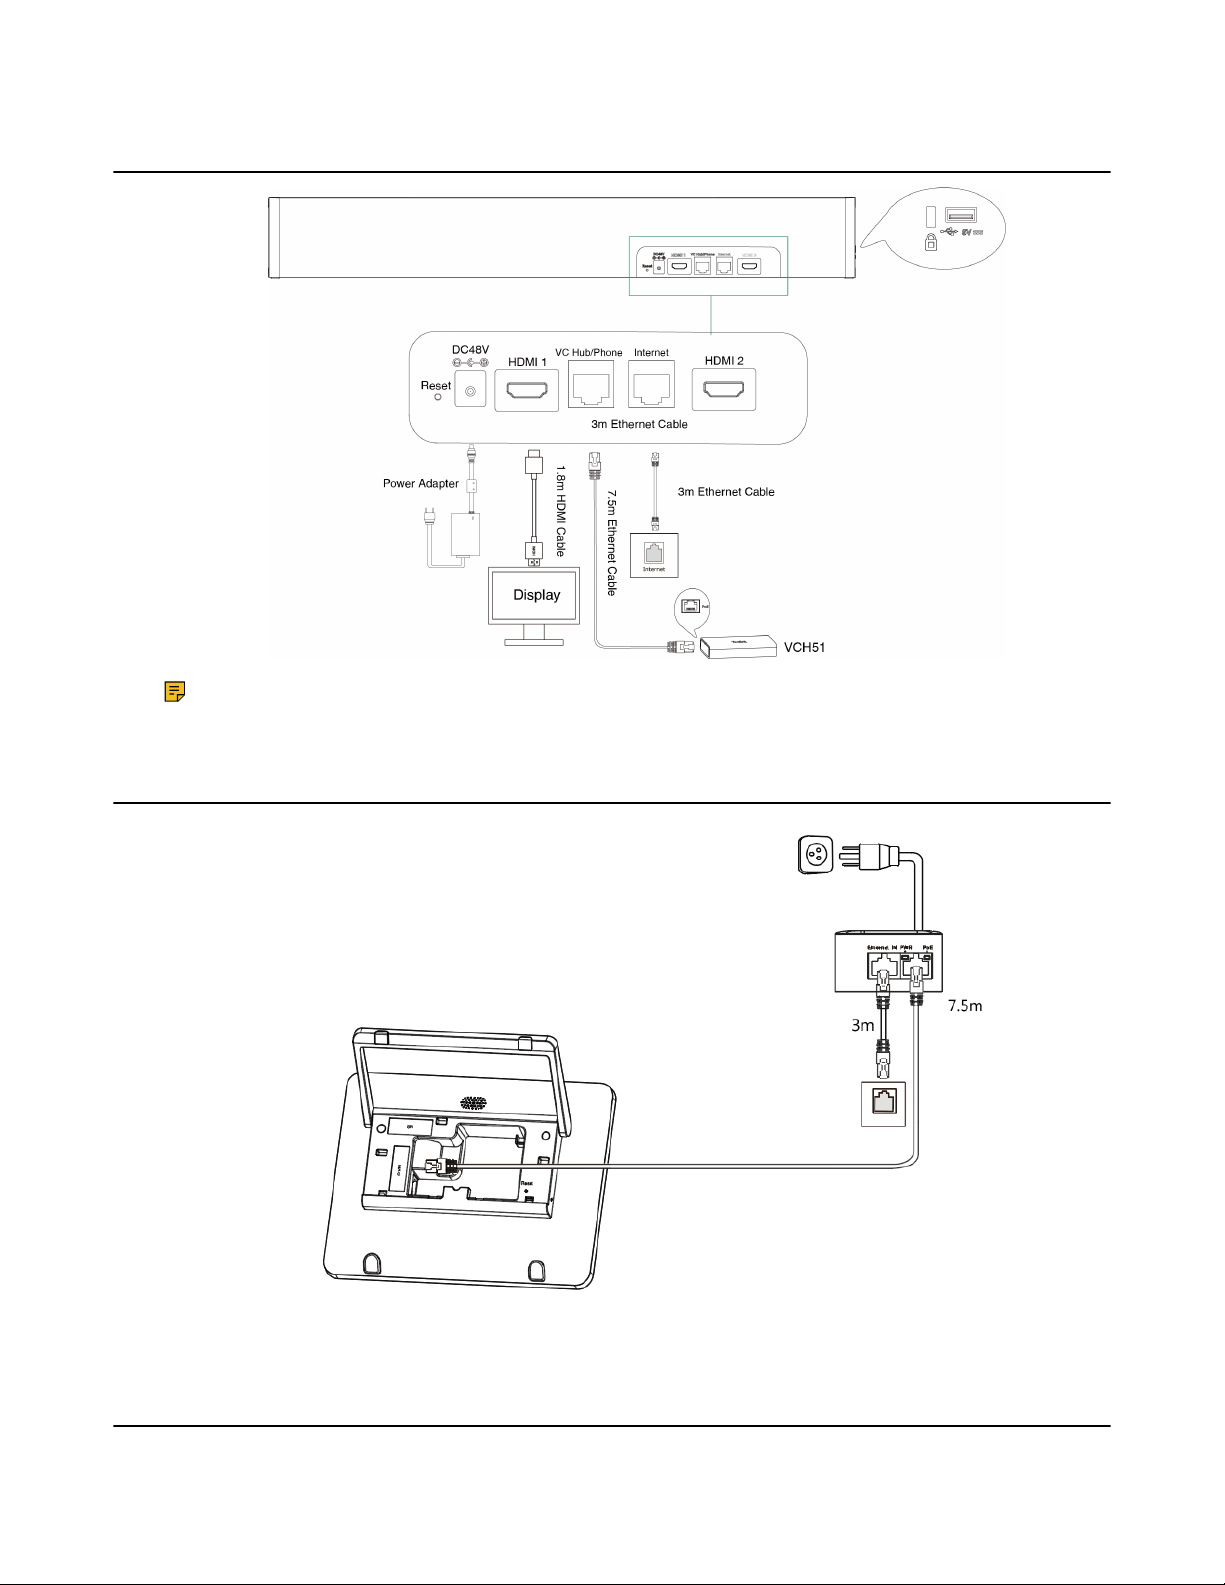
Deployment and Connection of MeetingBar A20
| Deployment and Connection | 7
Note: If you only connect a display, connect it to the HDMI1 port.
Deployment and Connection of CTP18
CTP18 will be automatically powered on after connected to the PoE.
Recommended Deployment Solution
Page 8
| Deployment and Connection | 8
• Recommended Deployment Solution of MeetingBar A20 for Zoom Rooms
• MeetingBar A20 Installation
• Recommendations of CTP18 Installation
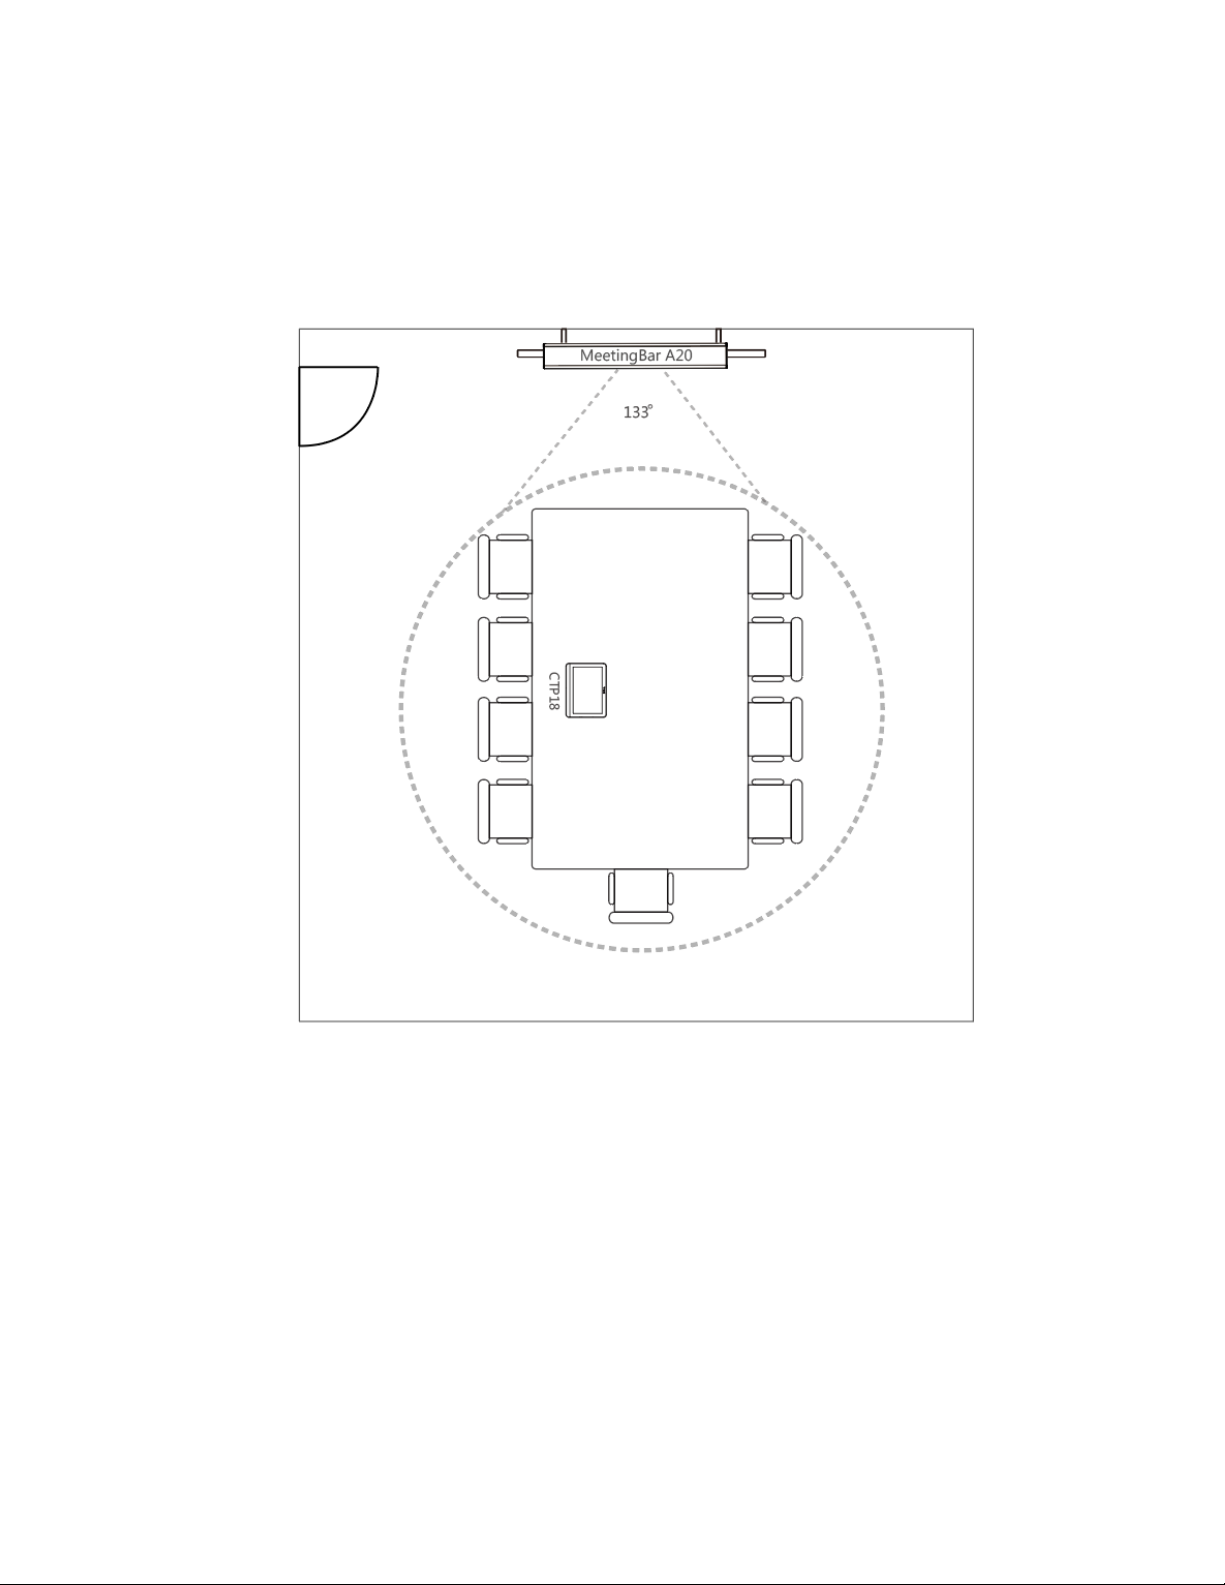
Recommended Deployment Solution of MeetingBar A20 for Zoom Rooms
As a highly integrated audio-video collaboration endpoint, MeetingBar A20 for Zoom Rooms is suitable for
focus and small meeting room.
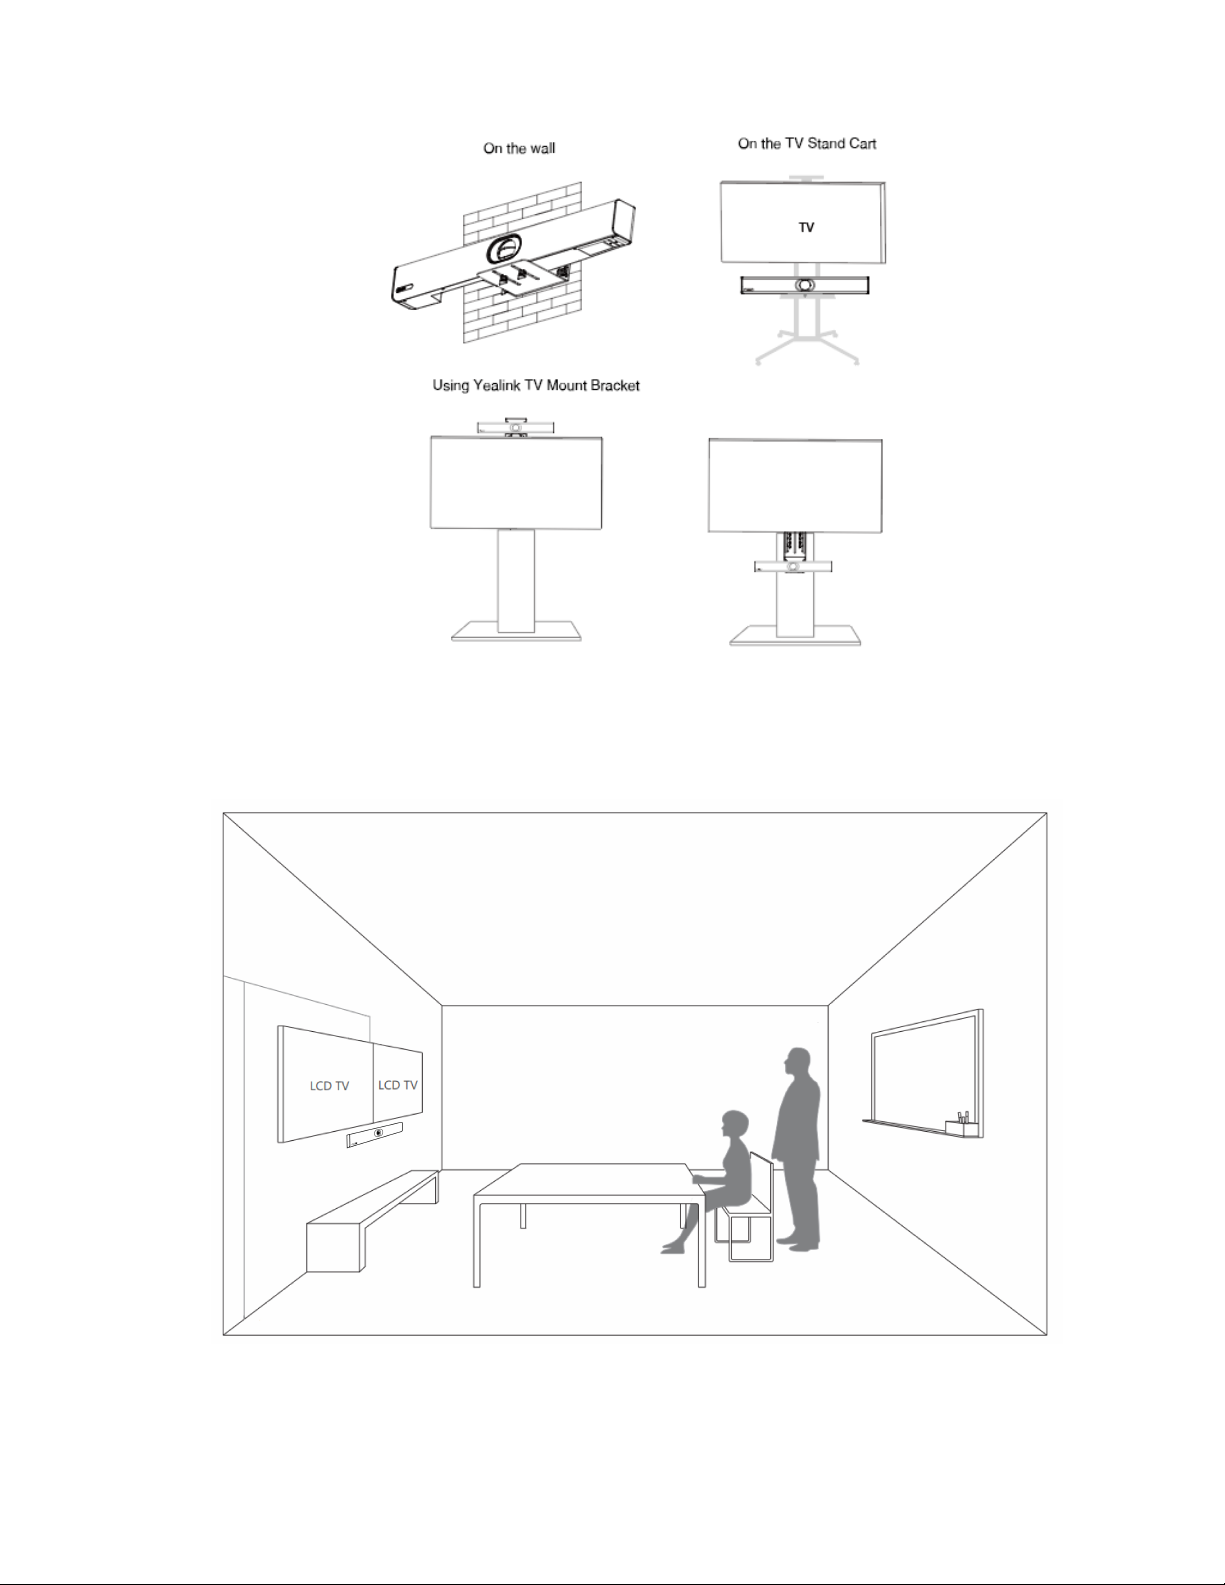
MeetingBar A20 Installation
You can mount MeetingBar A20 on a TV stand cart, on the wall or using Yealink TV mount bracket.
The installation methods are as follows:
Page 9
| Deployment and Connection | 9
• Recommendations of Camera Installation
Recommendations of Camera Installation
The recommended camera installation is as below:
• Install the LCD TV and video camera relative to the center of the participants. Ensure that the
participants face the camera and LCD TV directly during calls.
• If the mounting height of LCD TV is more than 120cm, install the camera below the LCD TV. If not,
install the camera above the LCD TV.
Page 10

• The distance between the camera and the LCD TV is about 10cm.
• The camera should not face the light source directly, to prevent bad experience caused by dazzling
light.
Recommendations of CTP18 Installation
You can place CTP18 on the table or install is on the wall.
For more information about installing CTP18, refer to Yealink CTP18 Quick Start Guide (EN, CN, DE, ES,
FR) V1.0.
| Powering on or off | 10
Powering on or off
After you connect the system (MeetingBar A20 and CTP18) to a power supply, it will automatically power
on. The system does not have a power button, so you must unplug the power cable to turn off the power.
Initial Setup
After MeetingBar A20 and CTP18 are powered on for the first time (or reset to factory), you need to
complete the initial settings on CTP18 to use CTP18 as the controller of MeetingBar A20.
Procedure
1. Pair CTP18 and MeetingBar A20 via IP address.
2. Select the corresponding language and tap Next to go to the Zoom Rooms page.
• Pairing CTP18 with MeetingBar A20
Pairing CTP18 with MeetingBar A20
Before using CTP18 as a Zoom Rooms controller, you need to pair CTP18 (pre-installed with Zoom Rooms
Controller) and MeetingBar A20 (pre-installed with Zoom Rooms) via IP address.
Before you begin
Make sure that CTP18 and MeetingBar A20 are in the same LAN.
Page 11
| Signing into/Signing out of Your Zoom Rooms Account | 11
Procedure
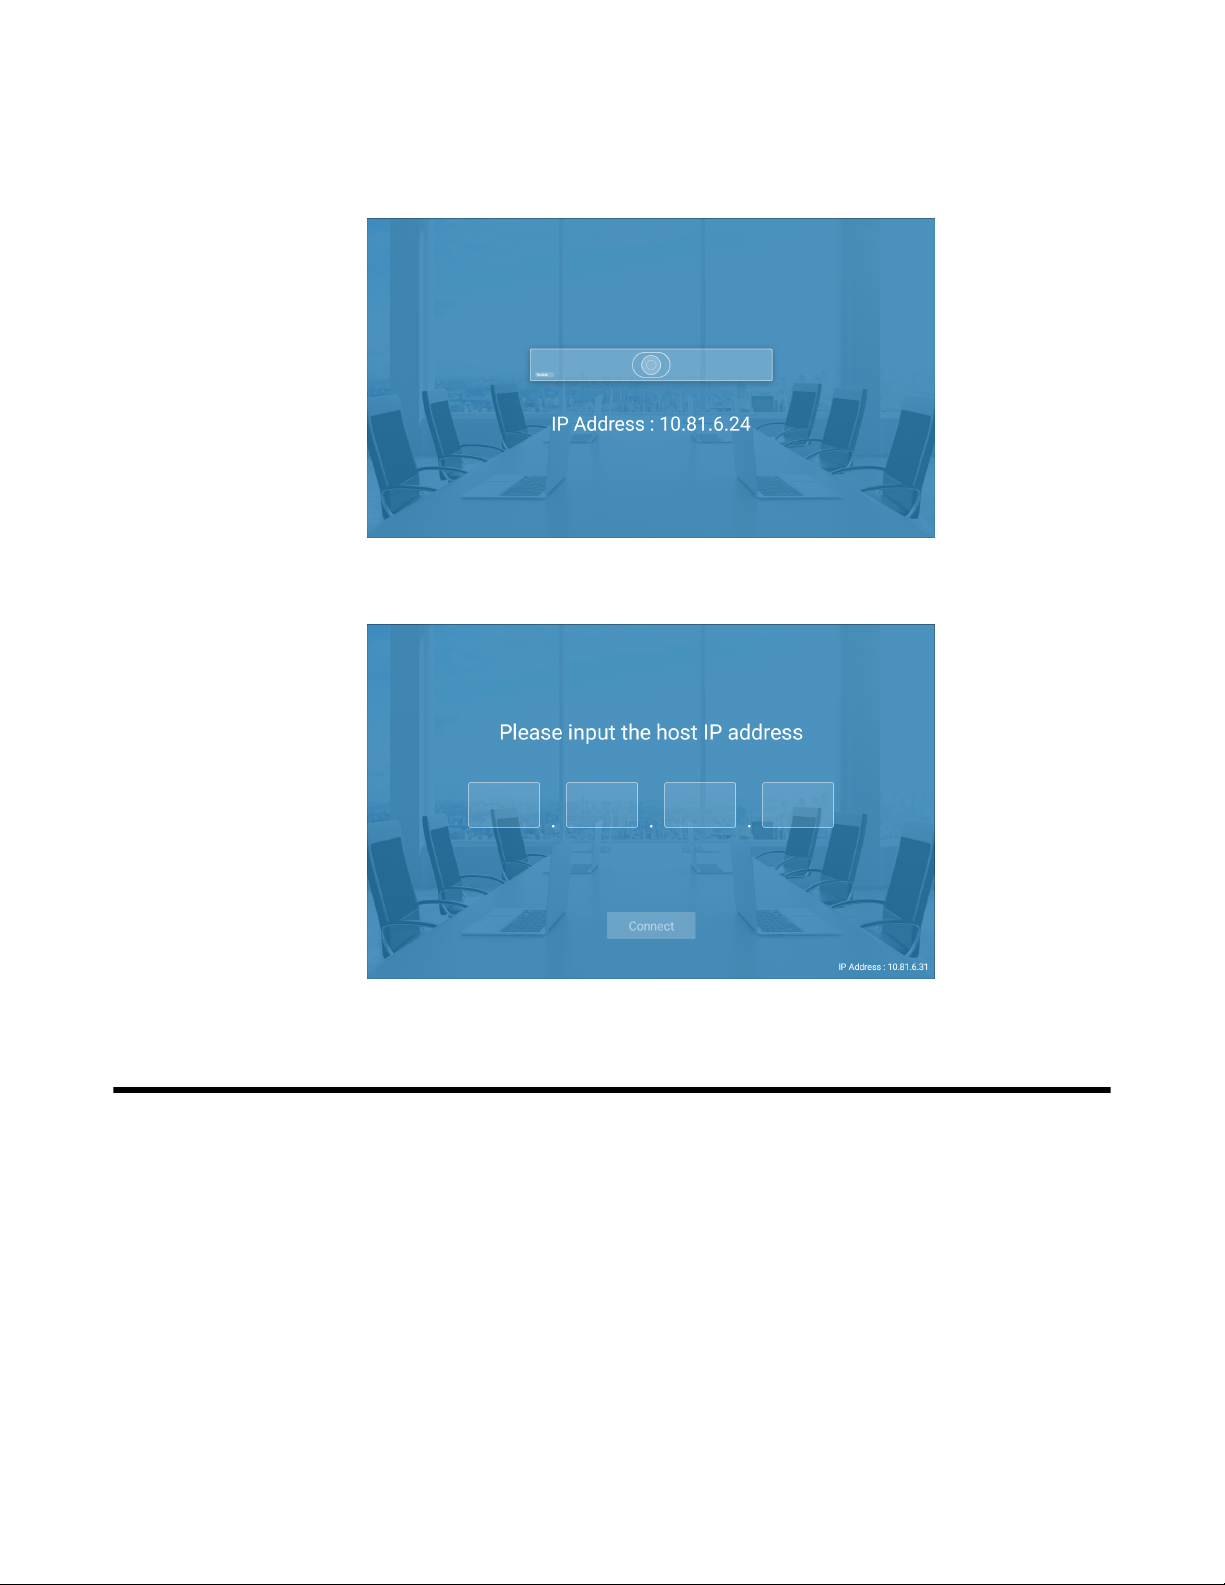
1. After starting MeetingBar A20, the Zoom Rooms app will start automatically.
The IP address is displayed on the initial interface of the display connected to MeetingBar A20.
2. Enter the IP address of MeetingBar A20 on CTP18.
CTP18 (Zoom Rooms Controller) is successfully paired with MeetingBar A20 (Zoom Rooms).
Signing into/Signing out of Your Zoom Rooms Account
• Signing into Your Zoom Rooms Account
• Signing out of Your Zoom Rooms Account
Page 12

| Signing into/Signing out of Your Zoom Rooms Account | 12
Signing into Your Zoom Rooms Account
After pairing CTP18 with MeetingBar A20, you can sign into Zoom Rooms account on CTP18. At the same
time, the Zoom Rooms account will be automatically signed in on MeetingBar A20.
Procedure
1. Tap Sign In on the Meet Now screen.
Page 13

| Basic Features for Zoom Rooms Systems | 13
2. Select the desired method: enter the email and password.
• Sign into the Zoom Rooms account on the web page (https://zoom.us/pair) and enter the pairing
code displayed on CTP18 according to the web page prompts.
Zoom Rooms account will be signed in.
• Select Sign In with Email at the bottom, enter the email and password on CTP18, and select Sign
In.
After sign into the account, select the corresponding room.
The Zoom Room account will be signed into CTP18 and MeetingBar A20 simultaneously.
Signing out of Your Zoom Rooms Account
Procedure
1. Tap Settings on the touch screen.
2. If the system has enabled the lock settings feature, enter the room password.
3. Tap Sign Out.
Note: If you need to switch the Zoom Rooms account, you need to enter the pairing code
displayed on the MeetingBar A20 on CTP18 to pair, and then sign into the new account.
Basic Features for Zoom Rooms Systems
After you sign into your account on CTP18, the touch screen console is displayed as below.
Page 14

| Setting the Camera | 14
• Meet Now: tap Meet Now to initiate a meeting immediately.
• Meeting List: tap Start to join the scheduled meeting.
• Join: tap Join and enter the meeting ID or personal link name to join a meeting.
• Phone: Tap Phone to dial a number.
• Presentation: Tap Presentation to start sharing your screen.
• Settings: Tap Settings to check the status of the connected microphone, speaker, and camera or
configure system settings.
Go to Settings > About and you view the controller version, controller IP, and the privacy policy.
• In Meeting Control screen, you can do the following:
• Mute/unmute microphones
• Show/hide the local video
• Record the meeting to the cloud
• Share content
• Control camera
• View/manage meeting participants
• Invite other participants to the meeting
• Change view
• Device settings (select the microphone, speaker, camera and so on)
• Control the meeting volume
• Leave/end the meeting
• Security
• View chat
For more information on Zoom Rooms, please visit Zoom Rooms Help Center.
Setting the Camera
About this task
Note: If the system has enabled the lock settings feature, you need to enter the room password
before entering the system settings.
Page 15

• Controlling MeetingBar A20
• Adjusting the Camera Exposure
• Adjusting the White Balance
• Adjusting the Display Image of the Camera
• Setting the Hangup Mode
• Adjusting the Camera Pan Direction
• Resetting the Camera
Controlling MeetingBar A20
• Enabling/Disabling Auto Framing
• Controlling the Camera
• Creating/Resetting Presets in a Meeting
• Renaming Presets in a Meeting
• Setting Camera to the Preset Position
Enabling/Disabling Auto Framing
With the real-time face detection and position tracking, the auto framing feature can automatically adjust
the camera according to the number and the position of the participants, covering every participant in the
conference.
| Setting the Camera | 15
About this task
This feature will be automatically disabled if you manually use the PTZ feature or adjust the presets after
enabling this feature. If you need to use this feature, re-enable it.
Procedure
1. On the idle screen, tap Settings > General > System Settings > Others.
During a meeting, tap Camera Control.
2. Enable/disable Auto Framing (Auto-framing).
Controlling the Camera
Procedure
1. On the idle screen, tap Settings > General > System Settings > Control.
During a meeting, tap Camera Control.
2.
Tap ( )/ ( ) to zoom in or zoom out the camera.
3. Tap the navigation keys pan or tilt the camera.
Creating/Resetting Presets in a Meeting
Presets are the pre-saved settings of both the angle and the focal length for the camera. You can use it to
quickly point a camera at a pre-defined location.
Procedure
1. During a meeting, tap Camera Control.
2.
Tap / to adjust the focal length.
3. Tap the navigation keys pan or tilt the camera.
Page 16

4. Long press Preset 1/Preset 2/Preset 3, select Save position to create or reset the preset.
Renaming Presets in a Meeting
Procedure
1. During a meeting, tap Camera Control.
2. Long press Preset 1/Preset 2/Preset 3, select Rename.
3. Enter the name for the preset.
4. Tap OK.
Setting Camera to the Preset Position
Procedure
1. During a meeting, tap Camera Control.
2. Select Preset 1/Preset 2/Preset 3.
The camera will be set to the corresponding preset position.
| Setting the Camera | 16
Related tasks
Creating/Resetting Presets in a Meeting
Adjusting the Camera Exposure
• Configuring Auto Exposure Mode
• Configuring Manual Exposure Mode
• Configuring the Mode of Shutter Priority
• Configuring the Mode of Brightness Priority
Configuring Auto Exposure Mode
The auto-exposure feature can achieve the desired brightness level (or so-called target brightness level) in
different lighting conditions and scenes, so that the videos or images captured are neither too dark nor too
bright.
Procedure
1. On the idle screen, tap Settings > General > System Settings > Exposure Settings.
2. Select Auto Exposure from the pop-up menu of Exposure mode.
3. Configure and save the following settings:
Parameter Description
Exposure Compensation
Configure the value of exposure compensation.
The exposure compensation is used to compensate the camera
effectively when the camera is shooting in a backlit environment. If the
environment light is dark, you can increase the compensation value.
Note: The value can be any integer from -6 to 6. The default value is 0.
Page 17

Parameter Description
| Setting the Camera | 17
Flicker
Gain Limit
Wide Dynamic Range
Configure the value of camera flicker frequency.
The supported types are as follows:
• 50 Hz
• 60 Hz
• Off
The indoor lights powered by a 50 Hz or 60 Hz power source may
produce a flicker. You can adjust the camera flicker frequency according
to the power source that the light is powered by.
Default: 50 Hz.
Specify the value.
The value can be any integer from 1 to 15.
Default: 15.
Off or Specify the WDR. The value represents the compression degree
of the dynamic range
Cameras with WDR technology can work perfectly both in the bright
and the dark conditions and present clear images that balances
different lighting, so that you can identify the details.
• Off-do not use WDR.
• 1~5
Default: Off.
Metering
Configure the value of metering.
• Average
• Central
• Bottom
• Top
Default: Average.
Configuring Manual Exposure Mode
Manual exposure mode allows you to achieve a combined exposure of the camera aperture size and the
shutter speed.
Procedure
1. On the idle screen, tap Settings > General > System Settings > Exposure Settings.
2. Select Manual Exposure from the pop-up menu of Exposure Mode.
3. Configure and save the following settings:
Parameter Description
Gain Limit
Specify the value.
Default: 2.
Page 18

Parameter Description
| Setting the Camera | 18
Wide Dynamic Range
Shutter
Off or Specify the WDR. The value represents the compression degree of
the dynamic range
Cameras with WDR technology can work perfectly both in the bright and
the dark conditions and present clear images that balances different
lighting, so that you can identify the details.
• Off-do not use WDR
• 1~5
Default: Off.
Configure the value of the shutter.
Value: 1/60, 1/90, 1/100, 1/125, 1/180, 1/250, 1/350, 1/500, 1/725,
1/1000, 1/1500, 1/2000, 1/3000, 1/4000, 1/6000, 1/10000
Default: 1/100.
Configuring the Mode of Shutter Priority
Shutter priority allows you to choose a specific shutter speed while the camera adjusts the aperture to
ensure adequate exposure.
Procedure
1. On the idle screen, tap Settings > General > System Settings > Exposure Settings.
2. Select Shutter Priority from the pop-up menu of Exposure Mode.
3. Configure and save the following settings:
Parameter Description
Exposure Compensation
Gain Limit
Wide Dynamic Range
Configure the value of exposure compensation.
The exposure compensation is used to compensate the camera
effectively when the camera is shooting in a backlit environment. If the
environment light is dark, you can increase the compensation value.
Note: the value is from -6 to 6. The default value is 0.
Specify the value.
The value can be any integer from 1 to 15.
Default: 15.
Off or Specify the WDR. The value represents the compression degree
of the dynamic range
Cameras with WDR technology can work perfectly both in the bright
and the dark conditions and present clear images that balances
different lighting, so that you can identify the details.
• Off-do not use WDR.
• 1~5
Default: Off.
Page 19

Parameter Description
| Setting the Camera | 19
Metering
Shutter
Configure the value of metering.
• Average
• Middle Zone
• Bottom
• Top
Default: Average.
Configure the value of the shutter.
Value: 1/60, 1/90, 1/100, 1/125, 1/180, 1/250, 1/350, 1/500, 1/725,
1/1000, 1/1500, 1/2000, 1/3000, 1/4000, 1/6000, 1/10000
Default: 1/100.
Configuring the Mode of Brightness Priority
Procedure
1. On the idle screen, tap Settings > General > System Settings > Exposure Settings.
2. Select Brightness Priority from the pop-up menu of Exposure mode.
3. Configure and save the following settings:
Parameter Description
Wide Dynamic
Range
Brightness
Flicker
Off or Specify the WDR. The value represents the compression degree of the
dynamic range
Cameras with WDR technology can work perfectly both in the bright and the
dark conditions and present clear images that balances different lighting, so
that you can identify the details.
• Off-do not use WDR.
• 1~5
Default: Off.
Configure the value of brightness.
Note: the valid value is from 0 to 14 and the default value is 6.
Configure the value of camera flicker frequency.
The supported types are as follows:
• 50 Hz
• 60 Hz
• Off
The indoor lights powered by a 50 Hz or 60 Hz power source may produce
a flicker. You can adjust the camera flicker frequency according to the power
source that the light is powered by.
Default: 50 Hz.
Page 20

Parameter Description
| Setting the Camera | 20
Metering
Configure the value of metering.
• Average
• Middle Zone
• Bottom
• Top
Default: Average.
Adjusting the White Balance
To display high-quality video image, you can adjust camera white balance.
Procedure
1. On the idle screen, tap Settings > General > System Settings > White Balance Settings.
2. Select the desired value from the pop-up menu of White Balance Mode and save it.
Parameter Description
Auto We recommend that you use this setting for most situations. It calculates the
best white balance setting based on lighting conditions in the room.
Indoor /
Outdoor /
One push /
ATW Automatically adjust the white balance according to the picture took by the
camera.
Manual Setting Manually adjust the color temperature.
Temperature Configure the value of the color temperature.
Note: the value is from 2800K to 6800K. The default value is 5000K. You
can set this parameter only when the white balance mode is configured to
Manual Setting.
Adjusting the Display Image of the Camera
To display high-quality video image, you can adjust display mode of the camera or customize the image
display.
Procedure
1. On the idle screen, tap Settings > General > System Settings > Graphics.
Page 21

2. Configure and save the following settings:
Parameter Description
| Setting the Camera | 21
Display Mode
Saturation
Sharpness
Configure the display mode of the camera.
• High Definition
• Standard
• Warm
• Custom
Default: Standard.
Configure the saturation of the camera's image.
The saturation means the maximum intensity of
color in the image.
Note: the value is from 0 to 100. The default value
is 50.
Configure the sharpness of the camera's image.
The sharpness is an indicator that reflects the
definition of the image plane and the sharpness
of image edge. Increasing the sharpness will
improve the definition of the image. However, if
the sharpness is set too high, the image will look
distorted and glaring.
Note: the value is from 0 to 100. The default value
is 15.
Brightness
Contrast
Noise Reduction(2D)
Configure the brightness of the camera's image.
Note: the value is from 0 to 100. The default value
is 50.
Configure the contrast of the camera's image.
Note: the value is from 0 to 100. The default value
is 50.
Specify the noise reduction (2D) mode.
The available modes are described as below:
• Off
• Low
• Middle
• High
Default: Middle.
Page 22

Setting the Hangup Mode
If this mode is enabled, the picture took by the camera is upside down. This mode is applicable to install
the camera on the meeting room ceiling.
Procedure
1. On the idle screen, tap Settings > General > System Settings > Others.
2. Enable/disable the Hangup Mode.
Adjusting the Camera Pan Direction
You can set the camera pan direction as normal or reversed. If you set it as reversed, the camera pan
direction will be reversed when pressing the left and right navigation keys.
Procedure
1. On the idle screen, tap Settings > General > System Settings > Others.
2. Select Normal or Reversed from the drop-down menu of Camera Pan Direction.
| Content Sharing | 22
Resetting the Camera
Procedure
1. On the idle screen, tap Settings > General > System Settings > Others.
2. Tap Reset Camera to reset the camera to factory settings.
Content Sharing
You can present the content while the device is idle or during a meeting.
• Wired Content Sharing
Wired Content Sharing
You can connect MeetingBar A20 to the PC via VCH51 for wired content sharing.
Procedure
Do one of the following:
• Tap Presentation on the idle screen.
• Generally, you can see the PC content on the display after connecting MeetingBar A20 to the PC. If you
want to stop sharing, tap Share Content > Start Sharing.
Note: For more information on how to connect the VCH51 to the endpoint, refer to Yealink
VCH51 Quick Start Guide.
Page 23

Network Settings
This chapter introduces how to configure the network of MeetingBar A20 and CTP18.
About this task
Note: If the system has enabled the lock settings feature, you need to enter the room password
before entering the system settings.
• Configuring IPv4 Network
• Connecting to the Wireless Network
• Configuring QoS
• Configuring LLDP
• Configuring the 802.1x Authentication
Configuring IPv4 Network
MeetingBar A20 and CTP18 only support IPv4 network mode. You can configure IPv4 network for
MeetingBar A20 and CTP18 respectively.
| Network Settings | 23
Before you begin
Make sure that MeetingBar A20 and CTP18 are in the same LAN.
Procedure
1. On the idle screen, tap Settings > General > System Settings > Network.
2. Enter the administrator password (default: 0000) and tap Enter.
3. Select Collar Bar/Touch Console.
4. Configure and save the following settings:
Parameter Description
DHCP
IP Address
Subnet Mask
Enable or disable the endpoint/touch panel to obtain network
settings from the DHCP server.
Note: it defaults to enabled. Change causes system to restart or
reboot.
Assign an IP address to the endpoint/touch panel.
Note: it is configurable only when you disable the DHCP.
Change causes system to restart or reboot.
Configure the subnet mask of the endpoint/touch panel.
Note: it is configurable only when you disable the DHCP.
Change causes system to restart or reboot.
Gateway Configure the gateway of the endpoint/touch panel.
Note: it is configurable only when you disable the DHCP.
Change causes system to restart or reboot.
Page 24

Parameter Description
| Network Settings | 24
IPv4 Static DNS
IPv4 Pri DNS
IPv4 Sec DNS
Enable or disable DNS feature.
Note: it defaults to disabled.
Change causes system to restart or reboot.
Configure the IP address of the primary DNS server.
Note: in the DHCP environment, you can configure this
parameter only when you enable the IPv4 Static DNS feature.
Change causes system to restart or reboot.
Configure the IP address of the secondary DNS server.
Note: in the DHCP environment, you can configure this
parameter only when you enable the IPv4 Static DNS feature.
Change causes system to restart or reboot.
Connecting to the Wireless Network
You can use the following two methods to connecting MeetingBar A20 and CTP18 to the wireless network:
• Connecting to an available wireless network
• Connecting to a hidden wireless network
• Connecting to the Wireless Network
• Connecting to a Hidden Wireless Network
Connecting to the Wireless Network
Procedure
1. On the idle screen, tap Settings > General > System Settings > Wi-Fi .
2. Enter the administrator password (default: 0000) and tap Enter.
3. Select Collar Bar/Touch Console.
4. Enable Wi-Fi.
The system will automatically search for available wireless networks in your area.
5. Select the desired wireless network (SSID) and connect to it.
If the network is secure, enter its password to connect to the network.
Connecting to a Hidden Wireless Network
Some wireless networks do not broadcast their SSIDs, which makes them unavailable to find. In order to
connect to one of those networks, you need to connect to one of them manually.
Procedure
1. On the idle screen, tap Settings > General > System Settings > Wi-Fi .
2. Enter the administrator password (default: 0000) and tap Enter.
3. Select Collar Bar/Touch Console.
4. Enable Wi-Fi.
The system will automatically search for available wireless networks in your area.
Page 25

5.
Tap in the top-right corner.
6. Select Add.
7. Enter the name (SSID) of the wireless network in the pop-up window.
8. Select the desired mode in pop-up menu of Security Mode.
9. Configure the corresponding parameters.
10.Save the change.
Configuring QoS
MeetingBar A20 for Zoom Rooms is subject to the bandwidth and the delay. Therefore, the QoS is very
important for the network having limited bandwidth. QoS is a major issue in VoIP implementations,
regarding how to guarantee that packet traffic is not delayed or dropped due to interference from other
lower priority traffic. The endpoint supports the DiffServ model of QoS.
About this task
• Audio priority: the loss of audio packets, the delay and so on may cause poor audio quality. To solve
this, you can configure DSCP priority for the audio packets.
• Video priority: some issues, such as the video packet loss and delay may cause the video images
distorted and unclear. To ensure acceptable visual quality for video, video packets emanated from the
system should be configured with a high transmission priority.
• Video priority: to ensure better presentation, data packets (PC content) emanated from the system
should be configured with a high transmission priority. DSCPs for audio, video and data packets can be
specified respectively.
| Network Settings | 25
Procedure
1. On the idle screen, tap Settings > General > System Settings > Network.
2. Enter the administrator password (default: 0000) and tap Enter.
3. Select Collar Bar.
4. Configure and save the following settings:
Parameter Description
QoS Enable
Audio priority (0-63)
Video priority (0-63) Configure the DSCP (Differentiated Services
Enable or disable the QoS feature.
Note: it defaults to disabled.
Change causes system to restart or reboot.
Configure the DSCP (Differentiated Services
Code Point) for audio packets.
Note: it defaults to 63. The greater the number is,
the higher the priority is. Change causes system
to restart or reboot.
Code Point) for video packets.
Note: it defaults to 34. The greater the number is,
the higher the priority is. Change causes system
to restart or reboot.
Page 26

Parameter Description
Data priority (0-63) Configure the DSCP (Differentiated Services
Code Point) for data packets.
Note: it defaults to 63. The greater the number is,
the higher the priority is. Change causes system
to restart or reboot.
Configuring LLDP
LLDP (Linker Layer Discovery Protocol) is a vendor-neutral Link Layer protocol, which allows the endpoint/
touch panel to advertise its device identification and performance in the local subnet. Also, this protocol
allows the endpoint/touch panel to save the information of itself and neighboring devices for managing the
network and communication status.
About this task
When LLDP feature is enabled, the endpoint/touch panel periodically advertises their information to the
directly connected LLDP-enabled switch. The endpoint/touch panel can also receive LLDP packets from
the connected switches and obtain their VLAN IDs, and then start communications with the call control.
The switch assigns a VLAN ID to the endpoint/touch panel through the LLDP protocol.
| Network Settings | 26
Procedure
1. On the idle screen, tap Settings > General > System Settings > Network.
2. Enter the administrator password (default: 0000) and tap Enter.
3. Select Collar Bar/Touch Console.
4. Configure and save the following settings:
Parameter Description
Activated
Contracting interval(1-3600s)
Enable or disable the LLDP feature on the
system.
Note: it defaults to disabled.
Change causes system to restart or reboot.
Configure the interval (seconds) for the system to
send LLDP requests.
Note: it defaults to 60 seconds. The value can be
any integer from 1 to 3600.
Change causes system to restart or reboot.
Page 27

Configuring the 802.1x Authentication
The 802.1X protocol can restrict unauthorized devices from accessing the LAN through the access port.
Before the system/controller obtains all the businesses, the 802.1x authentication authenticates the device
connected to the port.
About this task
The system/controller supports the following protocols for 802.1X authentication:
• EAP-MD5
• EAP-TLS (Device and CA certificates are required, password is not required)
• PEAP-MSCHAPv2 (CA certificates are required)
• EAP-TTLS/EAP-MSCHAPv2 (CA certificates are required)
Note: If you choose the protocol that requires CA certificate, you can go to the web user
interface of the system/controller to upload certificates (go to Network > Advanced > 802.1x ).
Procedure
1. On the idle screen, tap Settings > General > System Settings > Network.
2. Enter the administrator password (default: 0000) and tap Enter.
3. Select Collar Bar/Touch Console.
4. Configure and save the following settings:
| Network Settings | 27
Parameter Description
802.1xMode
Identity
MD5 Password
Disable the 802.1x authentication or select the
desired mode.
• Disabled
• EAP-MD5
• EAP-TLS
• PEAP-MSCHAPv2
• EAP-TTLS/EAP-MSCHAPv2
Note: it defaults to disabled.
Change causes system to restart or reboot.
Configure the user name for 802.1x
authentication.
Note: it defaults to blank.
Change causes system to restart or reboot.
Configure the password for 802.1x authentication.
Note: it defaults to blank.
Change causes system to restart or reboot.
Related tasks
Logging into the Web User Interface
Page 28

System Security
• System Lock Settings
• Changing the Administrator Password
System Lock Settings
The system lock setting is used to restrict users from changing system-related settings, restart the system
or log out of the system account.
Procedure
1. Tap Settings > Lock Setting .
2. Enable Lock Settings.
3. Enter the room password according to the on-screen prompts.
4. Confirm the action.
| System Security | 28
Changing the Administrator Password
The default administrator user name and password of MeetingBar A20 and CTP18 are "admin" and "0000”
respectively. Only the administrator can configure the network settings, log settings, re-pair the MeetingBar
A20 with CTP18, and modify the administrator password. For security reasons, we recommend that you
change the default administrator password as soon as possible.
About this task
Note: If the system has enabled the lock settings feature, you need to enter the room password
before entering the system settings.
Attention: If you change the administrator password after pairing CTP18 and MeetingBar A20,
the password takes effect to both end. If you change the administrator password on MeetingBar
A20 or CTP18 before pairing, the password of CTP18 will be synchronized with the password of
MeetingBar A20 after pairing.
Procedure
1. On the idle screen, tap Settings > General > System Settings > Admin Password.
2. Enter the administrator password (default: 0000) and tap Enter.
3. Enter the Old Password, the New Password, the Confirm Password, and save the change.
Page 29

System Settings
The system settings support basic (language, date and camera, etc.) and advanced settings (network and
log, etc.) for CTP18 and MeetingBar A20.
About this task
Note: If the system has enabled the lock settings feature, you need to enter the room password
before entering the system settings.
• Setting the Language
• Setting the Time and Date
• Single and Dual External Display
• Using Web User Interface
Setting the Language
| System Settings | 29
Procedure
1. Tap Settings > General > System Settings > Language .
2. Select the desired language.
It prompts whether or not you are sure perform the action.
3. Confirm the action.
Setting the Time and Date
You can manually set the current the time and date. The format of the time and date is configurable.
• Customizing the Time and Date
• Editing Time and Date
Customizing the Time and Date
About this task
If the system cannot automatically obtain the precise time, you can manually enter the current time and
date.
Procedure
1. Tap Settings > General > System Settings > Time & Dates.
2. In the Type field, select Manual.
3. Set the time and date.
Editing Time and Date
You can change the time display format in 12-hour or 24-hour format. Also, you can change the date
format, including the date, month and year.
About this task
The built-in date format is as follows:
Page 30

Date Format/Date Example(2019-10-12)
WWW MMM DD Sat Oct 12
DD-MMM-YY 12-Oct-19
YYYY-MM-DD 2019-Oct-12
DD/MM/YYYY 12/Oct/2019
MM/DD/YY Oct/12/19
DD MMM YYYY 12 Oct 2019
WWW DD MMM Sat 12 Oct
Procedure
Tap Settings > General > System Settings > Time & Date > Date & Time Format.
Single and Dual External Display
| System Settings | 30
To fully enjoy the video and content sharing in the meeting, we recommend that you connect at least two
external display to MeetingBar A20. If you connect two external displays, the second screen will display the
shared content in full screen.
• Single Screen Layouts
• Dual Screen Layouts
Single Screen Layouts
The following introduces the default layout when you connect one display screen.
Only Video Calls
Video Calls with a Presentation
The PC content is given prominence in the largest pane and other participants are displayed beside the PC
content.
Page 31

Dual Screen Layouts
The following introduces the default layout when you connect two displays.
On one display, the remote video and the PC content is displayed in PiP mode with the remote video in
full screen and the PC content in a small window. On the other display, the PC content is displayed in full
screen.
| System Settings | 31
Using Web User Interface
MeetingBar A20 and CTP18 allow the administrator to access the web user interface, including configuring
the network settings, upgrading firmware, and export the log, and so on.
• Configuring the Web Server Type
• Logging into the Web User Interface
Configuring the Web Server Type
The web server type determines the protocol used for accessing the web user interface of the endpoint/
touch panel. Both HTTP and HTTPS are available. It defaults to HTTPS. The HTTPS ensures that
the configuration of all login information (such as user names and passwords) is transmitted using an
encrypted channel. If you disable the desired protocol, you cannot access the web user interface via this
protocol.
Procedure
1. On the idle screen, tap Settings > General > System Settings > Network.
2. Enter the administrator password (default: 0000) and tap Enter.
Page 32

3. Tap Web service type, select the desired web service type, and save the change.
Parameter Description
| Troubleshooting | 32
HTTP
HTTPS
HTTP&HTTPS
Disabled Disable the user to access the web user interface via the HTTP and
Enable or disable the user to access the web user interface via the HTTP.
Default: Off.
Enable or disable the user to access the web user interface by using the
HTTPS.
Default: enabled.
Enable or disable the user to access the web user interface via the HTTP
and HTTPS.
Default: Off.
HTTPS.
Logging into the Web User Interface
After powering on MeetingBar A20 and CTP18, open a browser. The default administrator username is
“admin” (case-sensitive) and password is “0000”.
About this task
Note: We recommend that you use the Chrome or Internet Explorer 11 to access the web user
interface. Some features may not work properly if you are using other or older browsers.
Procedure
1. Open a web browser and enter the device IP address in the address bar. For example,
http(s)://10.82.24.11/, and press Enter.
To get the IP address, refer to Checking the Status of MeetingBar A20 and CTP18.
2. Enter the administrator username and the password.
3. Click Login.
Attention: The web user interface will be locked after 3 failed login attempts. Please contact
your support team or try again 3 minutes later.
Troubleshooting
This section describes solutions to common issues that may occur while using Yealink Zoom Rooms.
Upon encountering a case not listed in this section, contact Yealink reseller or technical support for father
support.
• Upgrading the Firmware
• Logs
• Rebooting the System
• Resetting to Factory Settings
• Repairing with MeetingBar A20
• Checking the Status of MeetingBar A20 and CTP18
• General Issues
Page 33

Upgrading the Firmware
We support the following two methods for upgrading the firmware of MeetingBar A20 and CTP18:
• Upgrading Firmware via the Web User Interface
• Upgrading via Yealink Management Cloud Service or Yealink Device Management Platform
Note: If you want to upgrade your device firmware from other version to Zoom Room, for example,
from Teams to Zoom Rooms, you need to do the following: ① Logging into the Web User Interface;
go to Security > License > Import License to import the license, then you can use the device.
②
Contact Yealink for the license.
For more information about how to upgrading firmware on Yealink Management Cloud Service or
Yealink Device Management Platform, refer to Yealink Device Management Platform Administrator
Guide and Yealink Management Cloud Service Administrator Guide.
• Upgrading Firmware via the Web User Interface
Upgrading Firmware via the Web User Interface
You need to upgrade the firmware of MeetingBar A20 and CTP18 independently.
| Troubleshooting | 33
Procedure
1. Logging into the Web User Interface.
2. Go to Settings > Upgrade.
3. On the right side of Upgrade Firmware, click Browser to upload the desired firmware.
4. Click Upgrade.
Logs
Log files are essential when troubleshooting the MeetingBar A20 and CTP18 issues. Log files contain
information about phone activities and the phone configuration profile. You can also export logs to the local
PC or to a specific syslog server.
• Setting the Severity Level of the Local Log
• Exporting Logs to the Local
Setting the Severity Level of the Local Log
About this task
Note: If the system has enabled the lock settings feature, you need to enter the room password
before entering the system settings.
Procedure
1. Do on of the following:
• Tap Settings > General > System Settings > Debug.
Enter the administrator password (default: 0000) and tap Enter.
Select Collar Bar/Touch Console.
• Log into the web user interface of the collaboration bar/touch console, Settings > Configuration >
Local Log.
Page 34

2. Configure and save the following settings:
Parameter Description Configuration Method
| Troubleshooting | 34
Local Log Level
Max Log File Size
Specify the log level for the
endpoint/touch panel.
0-emerg: the system is
unavailable
1-aler: action must be taken
immediately
2-crit: critical condition
3-err: error conditions
4-warning: warning conditions
5-notice: normal but significant
condition
6-info: informational
Note: it defaults to 6. The
smaller the number is, the higher
the priority is. Higher value
indicates more detailed content.
Limit the maximum size (kb) of
local log files.
Default: 20480.
Web user interface
Touch panel
Web user interface
Exporting Logs to the Local
Procedure
1. Logging into the Web User Interface.
2. On your web user interface, go to Settings > Configuration > Local Log.
3. In the Enable Local Log field, select On.
4. Reproduce the issue.
5. Click Export.
Note: The severity level of the exported Module Log will not be greater than the local Log Level.
For example: If you set Local Log Level to 3 and set Talk log Level to 6, the exported Talk log
Level will still be 3 in your exported local log. If you set Local Log Level to 5 and set Talk log
Level to 4, the exported Talk log Level will be 4 in your exported local log.
Rebooting the System
You can reboot MeetingBar A20 via CTP18.
About this task
Note: If the system has enabled the lock settings feature, you need to enter the room password
before entering the system settings.
Page 35

Procedure
1. Tap Settings > General > System Settings > Reboot > Reboot phone.
2. Tap OK to reboot MeetingBar A20 and CTP18.
Resetting to Factory Settings
Generally, some common issues may occur while using the system. You can reset your MeetingBar A20 or
CTP18 to factory settings after you have tried all troubleshooting suggestions.
About this task
After resetting MeetingBar A20 to factory settings, you need to complete the initial setup on CTP18 and
then MeetingBar A20 and CTP18 will be automatically paired.
Note: If the system has enabled the lock settings feature, you need to enter the room password
before entering the system settings.
Procedure
1. Tap Settings > General > System Settings > Debug.
2. Enter the administrator password (default: 0000) and tap Enter.
3. Select Collar Bar/Touch Console.
4. Select Reset to factory.
The page prompts whether or not you are sure to reset.
5. Tap OK.
| Troubleshooting | 35
Related tasks
Forget the IP Address of MeetingBar A20 after Restoring CTP18 to the Factory?
Related information
Zoom Rooms Cannot be Connected and Verified after Resetting CTP18
Repairing with MeetingBar A20
If you want to use CTP18 to control other MeetingBar A20, you need to unpair the current paired
MeetingBar A20 first and re-pair the new MeetingBar A20.
Procedure
1. Tap Settings > General > System Settings > Debug.
2. Enter the administrator password (default: 0000) and tap Enter.
3. Select Collar Bar/Touch Console.
4. Select Repair.
The page prompts whether or not you are sure to repair.
5. Confirm the action.
Related tasks
Pairing CTP18 with MeetingBar A20
Page 36

Checking the Status of MeetingBar A20 and CTP18
You may need to provide some system information to Yealink technical support, such as the network status
and firmware version of MeetingBar A20 and CTP18.
About this task
Note: If the system has enabled the lock settings feature, you need to enter the room password
before entering the system settings.
Procedure
1. Tap Settings > System Setting > About.
2. Select Collar Bar/Touch Console.
General Issues
• Zoom Rooms Cannot be Connected and Verified after Resetting CTP18
• Forget the IP Address of MeetingBar A20 after Restoring CTP18 to the Factory?
| Troubleshooting | 36
Zoom Rooms Cannot be Connected and Verified after Resetting CTP18
If you reset only CTP18 to factory settings, CTP18 will be unpaired with MeetingBar A20. After entering the
IP of MeetingBar A20 on CTP18 to complete the pairing, you need to sign into Zoom Rooms account on
CTP18 again.
You can choose the following two solutions:
• Sign into CTP18 with the same account as MeetingBar A20 for automatic connection.
• If you want to use another account to sign in, you need to sign out of the Zoom Rooms account on
MeetingBar A20 first, and sign into a new account on CTP18.
Procedures on how to sign out of Zoom Rooms account on MeetingBar A20
1. Connect a mouse to the left USB port of MeetingBar A20.
2. Click Sign Out on the display to sign out.
The interface prompts whether to sign out.
3. Click OK.
The page displays the pairing code for the controller, and CTP18 (Zoom Rooms controller) will be
automatically paired with the Zoom Rooms of MeetingBar A20.
Related tasks
Pairing CTP18 with MeetingBar A20
Signing into Your Zoom Rooms Account
Forget the IP Address of MeetingBar A20 after Restoring CTP18 to the Factory?
Procedure
1. Connect a mouse to the left USB port of MeetingBar A20.
2. Click Settings > General > System Settings > About to view.
 Loading...