

Page 1

MODEL
STOCK NO.
5010-1 3 H.P.
08.28-08':'48~08-28-
5020.1 4 H.P.S030~1
5 H~P~
EARTH:8.1RD TfLLERS
50C-4
;:f,..t.(.)',,~."" :"~/U~(.':
'""/C- .~ ~ ~
"iC~:;!;
( " -I " /'
..,
I " '
r'.,
-'" ,
,
300,1400-8
YAR-D ':' MAN CO.
p, O. BOX 36940
,CLEVELAND) OHIO 44136
PRINTEO IN U.S.A.
Page 2
R UtES---F'OR' S:AF'E O'PER A nO'N
Yo\)r EARTHBI AD Tiller "is a precision piece of tilling equipment, engineering skill and experience have been combined tq prpvide
the L/ltima~fJ' in ae~f;!.ty andetficiency. However, as wj~h any type of power equipment. carelessnf!sS or::error on th~par' of the oper~t.
or can result in injury, 'There.fo~e. exercis~ e~treme c~6t.iQn at all times.
1.
KNOW YOUR MA~H.lNe'R'&ad, ~he Owner's Manual carefully -learn how
to operate your EAJ:'I;THBIRO pr~perly and haw to stop quickly, ,
2.
MAKE SURE THE AREA tS CLE;AR of bottles. stones. wire and:ptl1er
haz~rdous items before t~'j\ng. Such items ,~re dangerous to both t~e oper~tqr
a/ld machine, :'
ADD FUEL before $(arting ~ri9ine ". never ~h8n ei'lgine is hut or (\,Inning.
Replace fuel tank cap:securely. " ' '
ALWAYS STOP ENGINE ~f1d discorynect sparki:l"u9 wire be'r~re atte~Ptil:l9
any repairs or adjustMents. ',' "
DIS~NGAGE ALL CLvtCHES:an~ shift ;n~o neutral bef91'6' ~tarting'.m'otQr.
Keep hands, feet and cjt)tl'\iri9aw~y from power cjrlVt:nparts,
ST ART THE ENGINE tAREF~t:LV A!W8Y:S s~and at side of maCl:1lne: Do
not operate engine indoor$witlio~~pioper ve~.t:ila~i~n:,-, ,: " :,
, ' " ,
';,' ", , '
DISENGAGE POWER AND SrOPMOTO(:t'before re:m~v,inQ'Qbstatles.-Qr when
leaving oPfJrQting Position. ' ,',-'
DO NOT ALLOW MINO~S toopera:t~ ,m:achirie urile:5$~tiorou9hJV iostructed
and properly supeNised, ": c,
KEEP CHILDREN AND PETS ~W~Y,f~m~Qtati~i3 f,ft'tes. Keep ~safedi~:t~hC~
9.
away from fences with totatingtiryes; ,
NEveA WeAR SANDALS or open tO$d shoes when operat;n9'm~chin~. ':: '
iO.
ADJUST DEP1'H BAR for de$irad tilling depth before startinQ:engrne.
EXERCISE CAUTION 10 avoid slrpping or falling when op~r~ting machine.
" .' :,
, " ," " , " , '
..
;" '
t
3.4.6.6.7.$,
1'.12.
Page 3

SUG'GESTI,p'NS FOR MORE 'EFF1CIENT, AN:O MAINTENANCE-
, ::, FREE OPERAr.JON'
GrNERAl TILLING:
Keep area to be tilled cl.t!ared of vines. glass, wire, and stones. ' ..': ':' ';
2.
Always start engine with machine on level surface with master' clutch disengaged, Aftecr: starting, let engine warm up several
mInutes at slow speed before:starting ,to; till. : " '-: ,,::',
AlwaY5 preset d~pth bar i(1to ti)e grqund befot~en9~g1ti~"m~st~r:~IL!tch~9ntrOI.: :,' c'..' ' ,
When tilling, run machine at throttl~ ~~ti(l)g'~esi 'su~i~d ~,o ~ro,\Jnd: .corldjtion~.::Alwavs lower t.he tines "slowly" in to the soil,
hold\I'I:9 ba~1< on '\he hand\&s until th~ d~r~d:'ill\~9',d~~ ,i~ ieath~: the~ alJ~w the:til{~~" tti:'move forward slowly using the
depth 'bar drag setting, ' :", '
In hard sod or on rough ground it is u5ualJy ~asier to ma-inUiri.' a $tr,ight forward motion with a slight movement of the
handlt:!1! from side to side, When making the first 1;ut1hi9ugh ~I'I; a,.~a the tiller will track ..Sctraight line. but wh.erl cuttif\9
the second path the~ witl be a tendency to mol/e' 1owardsthe iQ6se: soil. Moving the handle from side to side Will aid in
followrng the edge of the first cut in making a wide str:aigh.t tilled area. After's )ittl~practjceprQfjcjency in the op~ration of
, .' .-'. '.. " " ,
the tlll~r u'n-der aH '~Qnd.itjoj'\sw-llibe Qai~ed: ", '.
'" .-, ,
,
,
MAINTEHAHC£:
You, EA~TH8\,RD '\jkeiJ1.1" math\\1e~w~I'h !:I'oving parts, f'!)U$t receive c~re and mamt,ef)Qnce, The following tip$. it u~~d, .."iill con.
itibute manytrouble,1ree:~ou(sto yOur macryine,
1, CneCl<ojl ;t~,vel ~eqiJe'~tIY. 61' slIerv: 5; hours ot use, Wher'l changing oil, ma~e sure dirt and debris is cleaned from oil drain
,araa bttore:temavihQO!' P\u.9:/ ':
2, Keep tines ~nd 1:lhespoois/ ~1~ar: '
" " ,
:i: Chec~ :all nuts, bolts ~n9sc~e~s o!:c~sjori!l.liy for tightness to be sure mach ine isin QoOddperating condition.
4, Tt,e mat-hineis pta.llibr,iccitedat ~r~ f~c~bfy:Howev~;! lubrication With'each usage ~i11 prolong 11f6 of wor~ing pa.rts.
.' , " ,
5. If you are.9oin~to store your EARTHBIRD1or atl¥ length of time (30 days or longer) it is important that the follOw.
Ing steps be takel1.
a, Drain the gas tank and carburetor, Allow t,heengjne to fUrl out of gas.g,!~oline
left'in the engine will leave 9ul!1/deposit~ in.th'ei:srburetor ~nd gas tank.
b. Cle:a~en~i(\e o~ all f?~ej~f1 ~~tttr,
c. LUbi'ic8te,cYl(n~er by removing the sparkpJlJg a:nd pol,Jring one oun~e ofctean
lubricating o-il through t:h~ s~arl:Cplug ho,le into the cylinder. Cr~nk engine sioWly
to spread oil a~Q tepl:ace sparkp1ug,
6.
The tf.an:smissiqn; is p~~.lubricated, Every 10;15 hours of bperation chec!< the oil .Ievel.by remQving the oil level plug. Use SAE
~Ciextta duty tral'l~mission oil to fill if level IS below plug openitlY. Change oifevery 25 hours.
Thebeit t~nslbri'js -q!:ljustable, The tensioning of belt should be cht?cked every 5-10 hours of operation. Refer to adjustmentss~ion;for
resettiilg,
8;
J~st.asvour ~utQmQbi\~ n'e'eq~ protessiOn6\ mechanica~ ma;ntenal'lce from time to time, ~o does your air cooled engine. A yearly
t~f.e:'l.Ip'and Gt}ec.1< ~1aqM~I;~:ied service ce;nter is recommended to avoid breakd<;Jwns- and u~n!1cess~rY dejays dt,iTing the tilling
seasol'l, .' ..
3
3.4,5.
7.
Page 4

UN,' ';(111 6 AND SiT.UP
1, Be sure carton is right side up. cut end panels out and
fold flat on flo~r '. Re~Ql/e i(!ner pack and roll unit out 9f
carton,: '
2. Assemble the right and left handle tubes to the unit with
the rigl1t and left hatJdJe socket caps and bO;Jts. 00 not
tigh'en.'
3. AsSemble the handle panel as$embly over the right and
lefthilr'ldle tubes :and secure with four slotted round head
bolts ~~d lock nUts. Tighten 811 1;he bolt$ on th~ handle
assembly. Place th.~ h~dl~ grips ov~r: th~ end~ o(the hand)e
tubes.
4, Place ;one ,end af ~e IT)ast~r clutch .rod tt)roughtt:ie,hol~
at the bo~tom of the master clutch con1:rol and the other end
thr9ugb the hole in '!he tlipper heat the end of the left
handlE! tube and $ecur¥. with the two cotter pins.
5, The tilling width is, ass~mbl~d fot 22" as, shippeq. For
11" tilling width r&move hair-pin and clevis pin arid piJll
Qutsrd~:Spool AS$smt;Jlies fr:6m stiaft;Replace clevis pina!'ld
hair-pin thru in5id~ Spool Assemblies and Shaft,
6. Attath the depth bat releas~ handle to tbehandJei near
the right handle grip with 8' slC)tte~ headscr~w ~rid nut.
Attach the upper dep'thbeT' relebse rod to the handle by
hooking the loop~ end th~Qugh the ~at on the handle from
the outside, Attach the opposite end down through the
round h?le In t~e depth bar pivot plate, SecL)re witt1 i
cotter pJn. Atta<J!:1 the double bend enQ of ".the lower trip
rod down through the slotted hole in the p.ivot plate:
S~cure ~)th ~ wa~her andc9tter pin.. Thread~~f! Adjust;
ment Link on t:he opposite end and ad;ustto align With
hole in .Oepth Bar La~ch. Secure w.ith a cotter pm. Che9K
operat\on of Oep'th Bi)t Release Handl& aft~r: attaching rods,
With Depth ~at Release Hanc!le @!i the wuy uP. Depth B~r
latch should release. for faiture to relea~. re-adjust the
Adju$1ment ~jnk,
7. Attach the depth ~r Into the bracket at the rear of the
tiller frame using the short clevis p\n through one of the
holes m the 'bar, s~cur'ing loVith the hair pin cotter. Use the
pointed end of the d~Pth bar in the ground except when
~h~ IoIse of 1he furrow plow IS ~esired,
Page 5
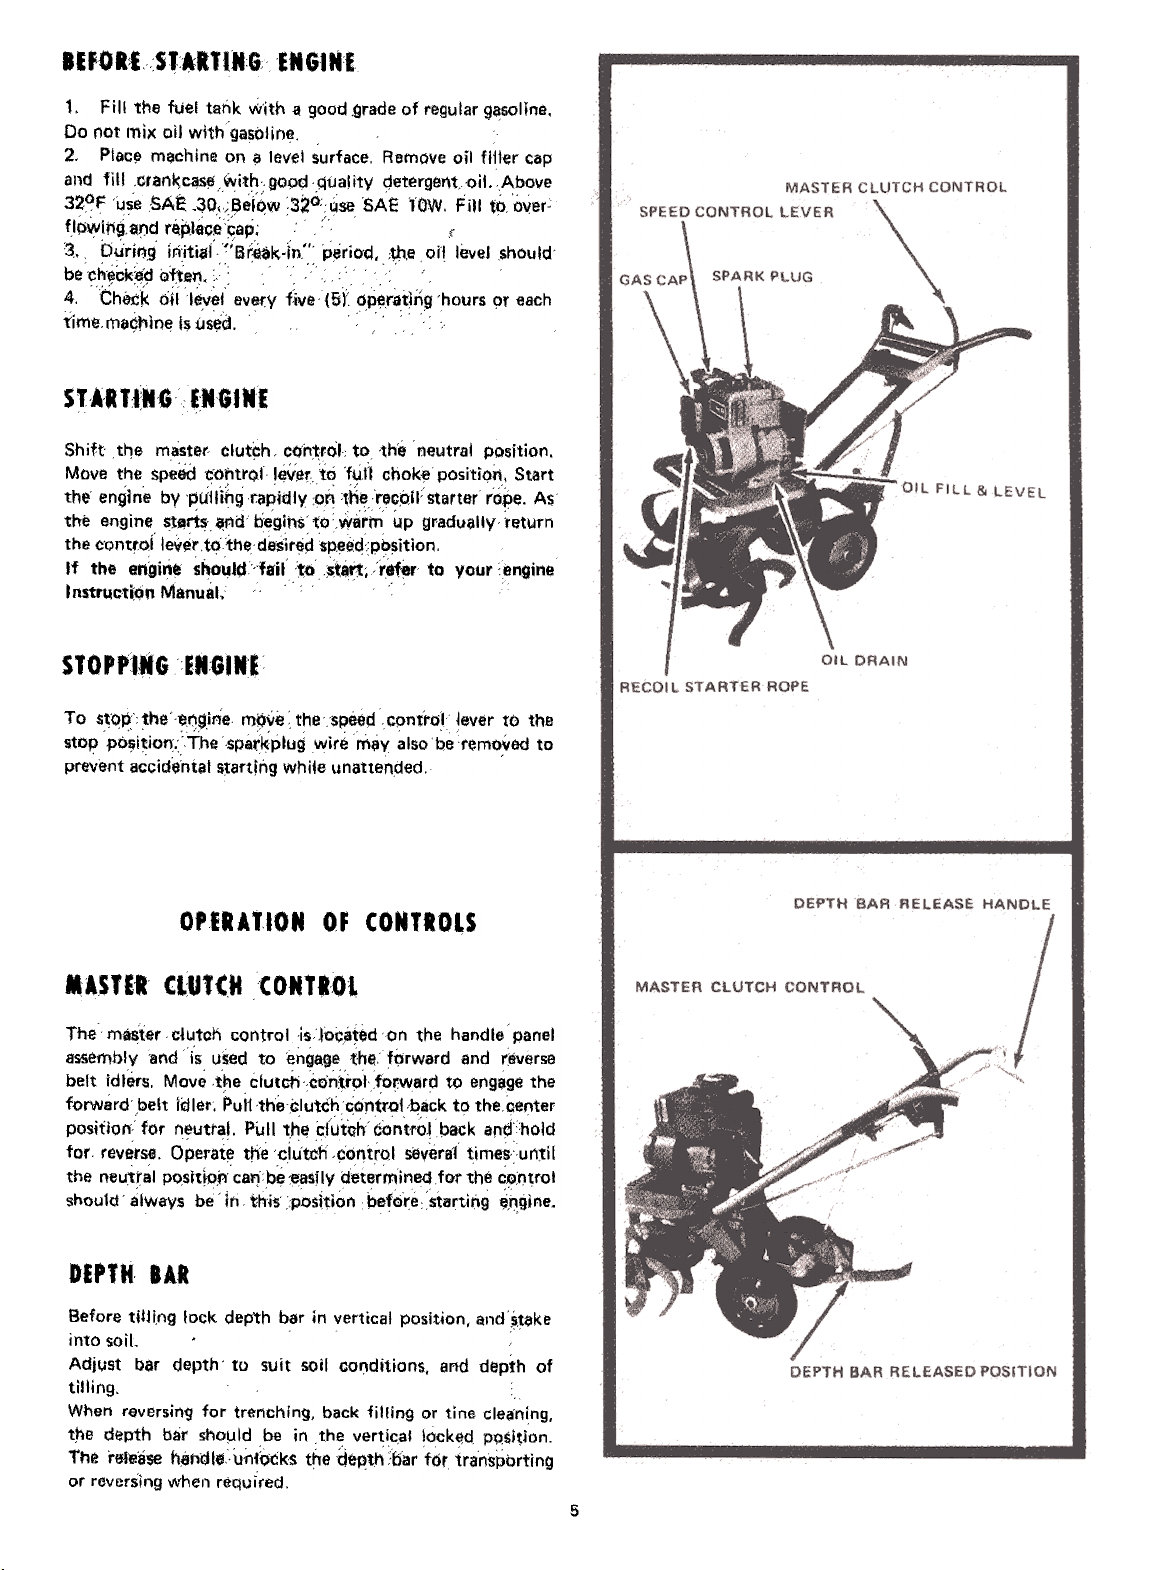
BlfGR:£stARTlHG £"61"1.
1. Fill the fuel tank With ~ good ,grade of regular 9a.sollne.
Do not mix oil with gasoline.
2. Plac~ m~chine on 9 level surface, Remove oil filler cap
and fill cr~n~~s!'J'..""ith909(;j quality geterger'lt..oit. Above
32~F use :SAE .~O~;,~el~w 32°;:yse SAE l()W. Fill t6 over:
f.ll::i~i!iga:~d r~p.lace~ap; : "
3. b~rir:,g Irijti~(:iBr:eak.in.',': p~riO'q, ;W,e off lel/el should
be ch~ck~9 oftery. ~ ; -': "~4.
Che£1<. Oil 'I$y:&1 evef:Y five {5Y, op~rat!n~ 'hours 9r eachtime,I'rI&(i"'jn~
i$ usl:id. ,
"NtINE
Shift the master, clut~h, C4h:t;rol to ,th'e neutral position.
Move the speed c::ontrQI- l~ve1'to 'fUI'1 chok~ posi'tiQr1\ Start
the engine by -pJllih9 tapidly 91'1 ~h~,r~cpil;starter rciee- A$
the engine ~t~rt~ ~1id' begins towariri up gradually teturn
the c:ontroi lev,rt<i1hede;sir~~ tp~~~;po~ition,
If the engin~ shouJd-fa:il ~o ~t_~;:rff:er to your :engine
Instruct{()" Manual; ..
5TOP";'-6 E"GJN'f
S~()P: the'~~Sin:e m~\ie the:spee~ cpntrC1t Jever t(> thestOI?
po~i~ion:.'YhQ sparkplug wir~ mii~ also be rerno,vE!d to
prevent accid~ntal s:rarting while llnattended.
OF CONTROLS
MASTII CLUT(M (0"TI01
maSter clutch control is'\oc~red '-on the handle panel
assembly a~d is used to engage ,th~: f~rward and reverse
belt idlers. Move ,t~e clutch :con~r9Ifu~ward tP engage theforward
,belt Idle/'" Pul1the"clutch~cir'ltr~1 'h:ick to thecel:'ter
position: for neutral. Pull the c(uttthcontroj back and:hold
for reverse. Operat~ t!ie 'ciutcti ,~ol1trQI several times'until
the neutral poslt!on' cal'j be :~asjly determined for the cOf)~rol
should always be in this ;Pos1tion befo~estartil:'lg ~,rygine.
,
'- "
DEPTH 8AR
Before tilling lock depth bar in vertical position, al,ds~$ke
imosoil.
Adjust bar depth'to suit soil col:lditions, and depth of
tilling.
When reversin9 for tr~nching, back filling or tine clea-n(ng,t.he
depth bar sho~ld be in the vertical !ock~d ppsj~jon,
The release liiifldl~u:nfQCkS the depth :D13r for transporting
or reversing when required.
ST,AtT:I:NG
To
O'£I'"10N
The
5
Page 6
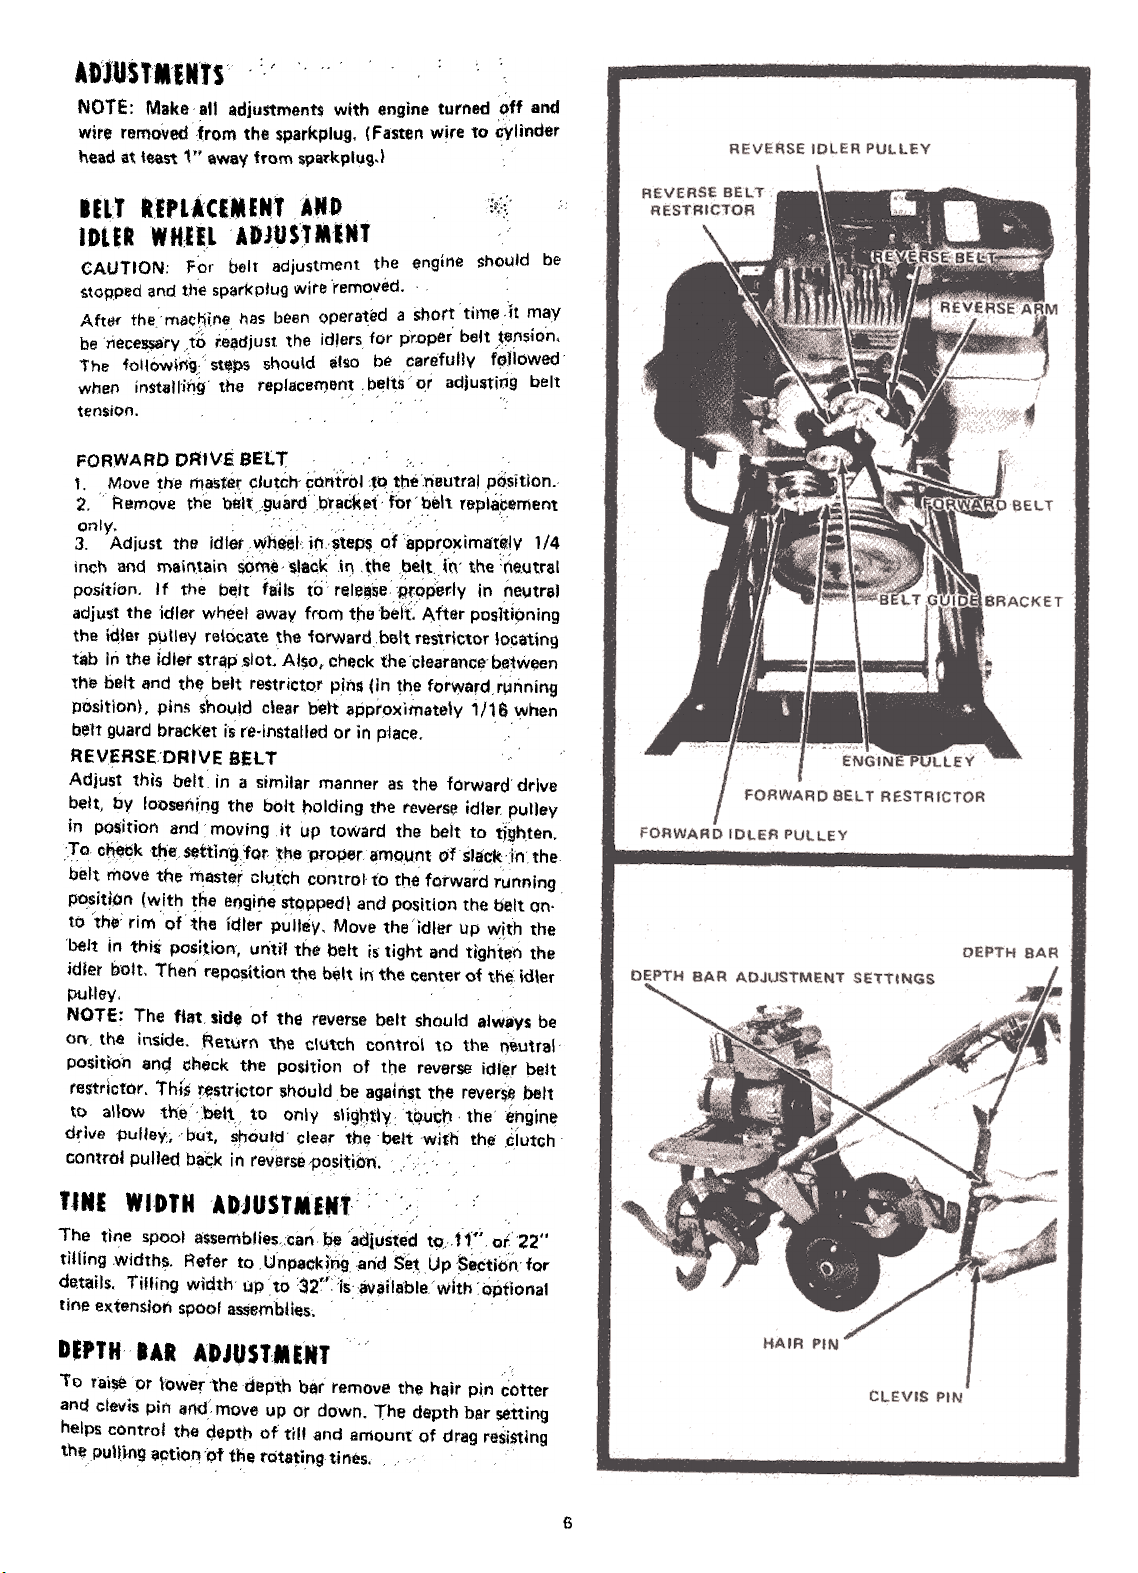
fliNTS:' ' '. ..
NOTE: Make all adju$tment~ with engine turned off and
wire removed ~rom the sparkplug, (Fasten wire to ~Ylinder
head ~t t$Q$'t 1" Qway from spirkpl\J9.1
tEll aIPlA«MINT .NO .":I;:~":
IDlIR WHEE.lADJUS1MINT'
CAUTION: For belt adjustment the engine :;hQuld be
stopped and tile sPIlrl<p!ug wire 'removed.
Aftl'lf themac~Jne has been Qperated a short til'l1elt may
be riece~ry to re~djust. the idlers for proper bett ,~~n$i()n,
The fOlI6wif19;' st~J>s should also be carefully f~Jlowed
when installii1Y the replacerT)en~ b~lts OJ adju$ting belt
ten$ion.
FORWARD OR1VE 8ELT':- :.-
1, Move the master clutch' ~o.nt'rol fQ tpeneutra! p,6sition.
2. Rerno~e the b~It:~~ard t;irac1<~t for' ~&It repla,cement
~nlYAdiust the jdlet~n~)i(T~tep~ Qf 8pproxima'f0!V 1/4
inch and mamtilin $Oi1'l:e, ~18Ck if) the belt \(\' the :rieutral
position. If the b~lt f~jl$ to rele~sePf9perly in ne~tr81
adjust the idler wh~el away fr<lm the beft: After positi9ning
the i~ler piJlley relocate the forward belt restrictor lo~at\ng
tab In the idler str~p: slot.. AI$o, check theclearancl;' be1ween
the belt and thq belt restrictor p!il$ (in the forwardr\.Jnning
position), pins should clear belt approximately ;/1&~hen
b~'It guard bracket IS re.iJ1stalled or in piace,
REVERSE:DRIVE BELT
Adjust this belt in a similar manner as the forward drive
belt, bv loQser\rryg the bolt t'!olding the revers!;! idler pulley
in pos:ition and movtng it up toward the belt to tj~hten.
! Q c~i?k the ~ttiNgfot' ~he 'proper a:mQunt of slack:l'n the
belt move the master cll.!tch control to t/:1e fQTward running
p~~itiQn (with the engine stpppedl and position the belt an.
to the rim of the idler pulley. Move the 'idler up with the
belt In thiS: po$i~iorr, unti'f the belt is tight and tlght~h the
idler bolt, Then recpO~ttion t~e belt i() the ~enter of the idler
pu~ley,
NOTE: The fiat side of the reverse belt shoultj always be
01\ the inside. RetlJl'I"I 'the clutch cor\~rol to the !)~utral
positron ar\~ c:heck the position of the reverse idj~r b~lt
restrlctor. Th;~ :!:f!strictor should be again~t t~e rever~~ belt
I:t> allow the:bel~, to only sl.i9b~ly tQuct:t the :e~gine:
drive pulley; bt:it, sj'lciUld clear th~ belt w!th th~ riJutch
control pulled b~k in rev~rsepositib'n. ,:c ,
fJNE WJDfN ADJUSTMitff:":,:', -.
The tine spool a:ssemblie$c:canbJ adjusted t9,,11:"of'22"
tiliing wjdth~, Refer to Unpacking ari~ $e~ Up ~ecti()n for
de.t'ails. Tilling width up to ~2~';jsitv~llable.' With '~ptional
fine extension spoof aS$~mblies.
DEPTH 8AI ADJUSTMENT
To ra\~ pr \'ower'the dsp'th bar remove the hair pin cotter
and clevis pin and move up or down. The depth bar setting
helps control the depth of till ~nd amount of drag re$i$1ing
th~pu"i-n9 ~~tior:,~f the t:Qta~ingtines..
'~lUS
6
Page 7
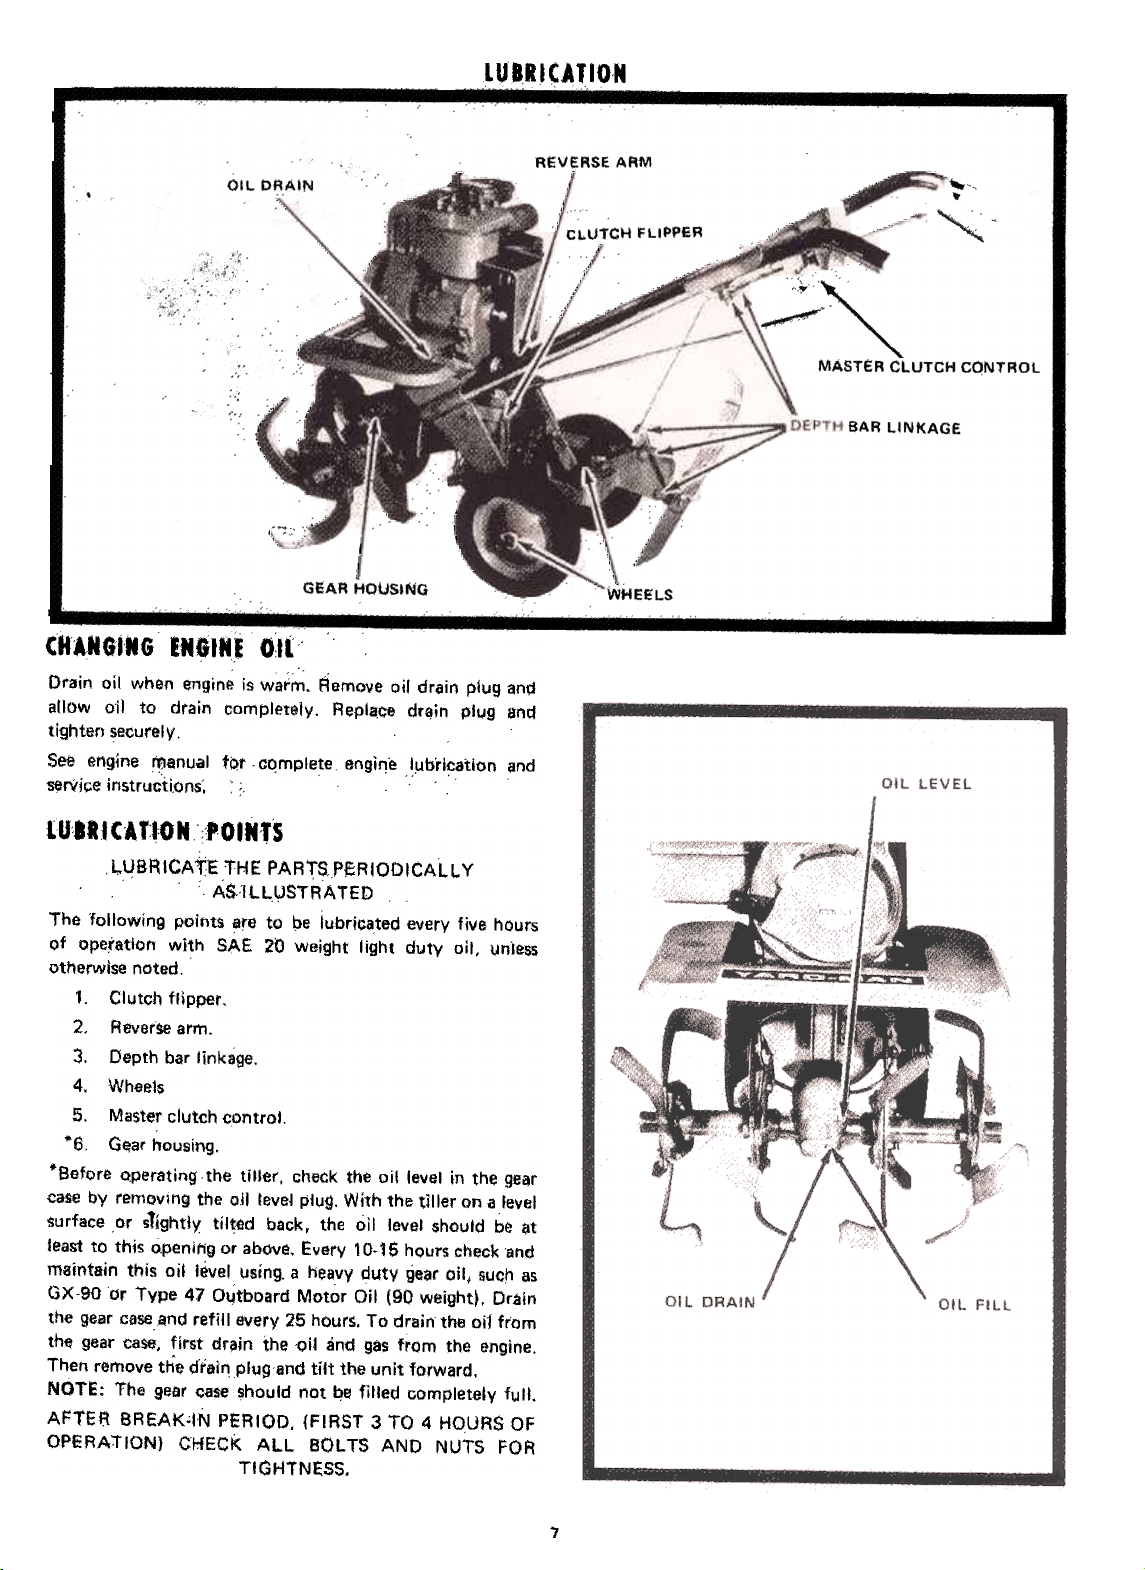
CH'AMGING tN&IN} 0:1('
Drain oil when engine is warm. ~emove oil drain plug and
allow oi! to drain completely. Replat;e drQin plug and
tighten securely.
s~ engine ~anual fpt. cQmplete englr'!e l.ubric8tion and
~rVjce instructions" ;.
(U'RJCAT:~N 'POINtS
,l,.UBRICATE THE PARTS,PERIODICALLY
AS,:llL~STRATED
The following points are to be lubricated every five hour~
of operation with SAE 20 weight light duty oil, uniess
otherwise noted,
1, Clutch flipper,
2, Reverse arm.
3. Depth bar linkage.
4. Wheel$
5. Master clutch control.
*6. Ge;ar housit19.
.Before operating the tiller. check the oil level in the gear
case by removing the ojl level plug. With the tiller on a level
surface or sTightly til~fJ.d back, the oil level should be (it
least to this o.penit;g or above. Every 10.15 hours check and
maintain this oil level using. a heavy duty gear oil, such as
GX-90 dr Type 47 04tboard Motor Oil (90 weight~. Drain
the gear case and refill every 25 hours, To drain the oi1 from
th~ gear case, first dr~in the oil and gas from the engine.
Then remove the drait1Plugand tilt the unit forward.
NOTE: The gear case $hould not i:!e filled completely full.
AFTER BREAK,;IN PERIOD. {FIRST 3 TO 4 HOURS OF
OPERATION} CHECK ALL BOLTS AND NUTS FDA
TIGHTNESS.
.lV..JCATION
'7
Page 8

Page 9
Page 10

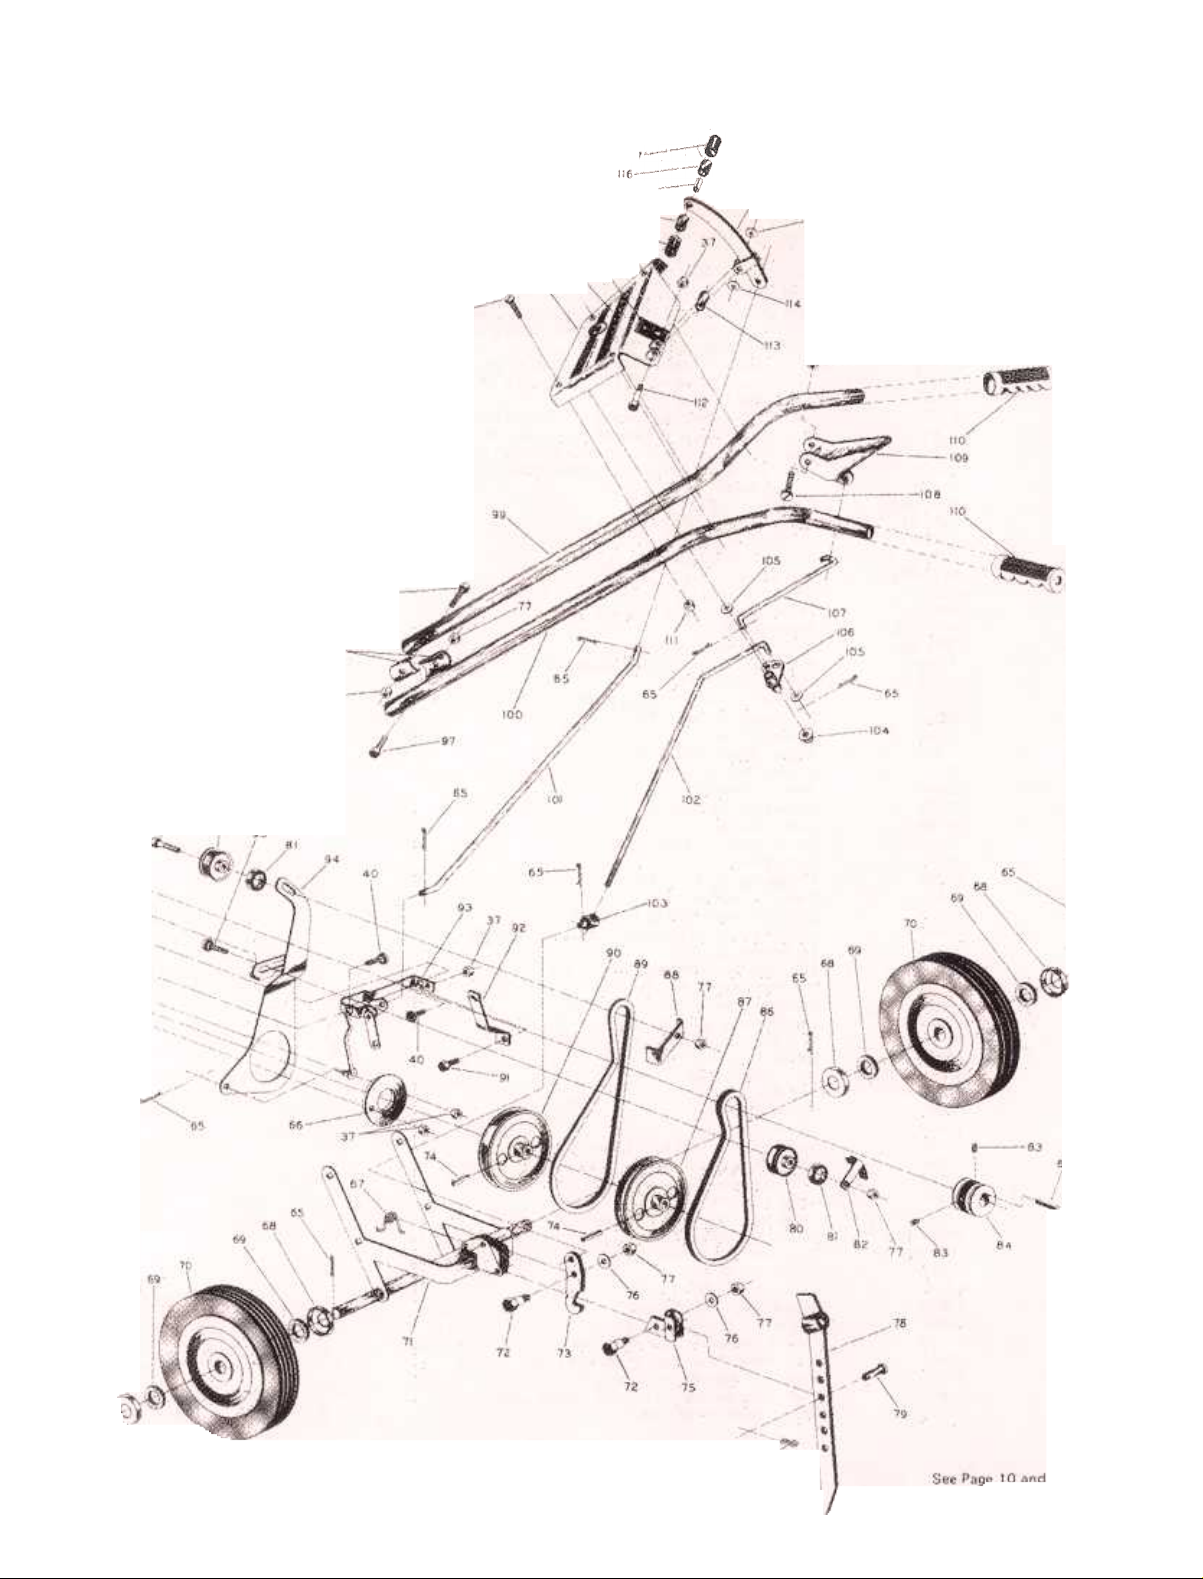
PARTS I.IST
Your Tiller is Right Hand IA.H.t or Left Hand (L,H.I as You Operate Machine.
NOTE: Unless othe,wis~ specified parts listed are used on all Models.
REF
NO.
I
,
:2
2
5
5
6
7
8
A
10
11
12
13
1&
16
17
18
19
20
21
22
23
24
25
26
27
28
29.
30
313.2
33
34
~5
36.
3'1
38
39
40
41
42
43
44
45
46
47
48
49
50
50
50
51
62
52
S2
53
53
54
55
56
PA RT No.
40~:!.3
42050
403~5
4;20..49
61832
61836
61818
61834
61838
61829
6183::1
61837
618~1
6'835
1$41-5
1546.29
15Q9-91
1542-8
41:;}'42
1632.142
40299
t652-90
~O1.135
0115.3342340
40060
42122
40048
40164
40163
40023
20644
20612
40099
1547.42-
20301
40250
1663.23
40305
4Q~96
40149
, 42:3$0
401$~
501;139
4~1'pO
41133
403'18
61814
1534.20
40303
4Qo25
40317
42;3;51
4Q893
42331
16'01).439
1601).440
'606-441
22:517
4~2!49
42250
42251
6t839
61841
161t3.317
164~.42
42334
OE~CRIP-rtON
Tine, 6010 (L,H,) 5/,6x 1~1/4 It 14" dia. (5020.1.5030-1 only)
Tine, Bol6 \L.H.j'13/6.4 x 1:1/4 x 14" dia (5010.1 only)
Til~e, BOlo (R.H.I 5/'G'~'1,'f4'11 14" die, 15020-1,5030-1 only)
Tine, BOlO !A,ti:f '.13164 X 1.1(4 x 14" dia. (5010-1 only)
Assy, SpoOl, Outside~/Tln_s'iL,H,1 (5010-1 o'nlvt
Assv., Spool. OutsidewfTir)es:ll.H.) (5020.1.5030-1 onlv)
Assy..SpObl, O'J!side: :'
Assy.,SpOOI,ln$idew/TinesiL,H'.) (50'0.1 only>
A, SSy ' , Spool, Insidew/Tinos !L,H.) (6020-1.5030.' only)
AUy.. Spool. Inside
AMY.. S"OOI,I"$;<11o wjTines l~H.J (5010.1 only)
A$SY., SpoQJ, Insi~ w/Tinec' (A.H.) (6Q20.1, 50.30-1 only)
A$Sy,'SpOOI;O\.ltside w/Tines (A,H,) 15010-' ()nly)
A$$V., SJ)oOI, Outside w/Tines (R.til (5020-1,5030-' ontv~
HaIrpIn totter, 3/;12 die,
P\N;Clevis, 3/8 dia )( 2"
Bolt; Hex Head; ~/a-16 It ,., /4
Lockw.~er, 3/8 ISptlng Type)
Ntj!, ttex {ES\..OK)3/~:;6
Shaft, Tine, 1" dia
Oil SRel, Do\.lble Lip
Se~ring, Nefl9le. "'" 1-1/4 x 1" L.'
G~ar H!>usi~g
AS$Y., Transmission, Cumplete
Plu9, Pipe. 1/8 NPT.F' (Spetiel Vent,d}
PII!~, Pipe, 1/4 NPrf'
Nut,tie" Flexlock, ThIn, 5/16-18
P,in, Spring, 1/4 die. x 1"
Bearing, Thrust
Washer, Thrust
Bearing, Ball
Worm, 3T. (RH:I
WormGear,~8T. (R.H,)
Spacer, Worm
Pin, Grooved. 5/16 die. ~ 2"
Shaft, Pullev
Pin, Spring, 1/8dta. 1\ 3/8
Gasket, Geer Housing
Bolt, Hex H$ad; 5116-18 x 1.1/2 (NY LOCK)
Lid, Gear HousIng (includes Bushing Aef, No. 4p')
LOCkw~er" 5/16
Bo"t, Hex Head ((1rade 5) 5/16-18 x 4"
Nut, Hax lack (2.w~y) 5{16-18
Bolt, Hex He.d, 5/16-18 !t2"
Bolt. Carriage. 5/1&18 x 3/4
8~lt,"Cartiag., 5i1~.i8)( 1"
Spring, Exten,ioh
Assy., enQin~ 8,se
Nut, Hex, 5/1£':18 ",:'
!:"xtension $iock
Seal,OII
6ushiflQ, Qilltt, .191 ".817 x ;.1/8'"
Bolt, Hex Head-{Gr8d~ ~t 5/1ti~18 x 1~112
Bolt; Hex Head,5/16.18 ~ 1.5/8
Decal, Tine Shield C
Det;81, Mod~1 No. (5Q10-1 only)
Decal, Mod~.tNo~ (5020.10;11fyl :' ,
D~I.. Model 'No. (503~.1 onlyl :
Cover, Tine Shield
Er'lginl:;3 H:P.(6010.1 anivl
/ET)gine, 4 H.P,(50~9-1 q"WI
Engil'le. 5 HP.i$O3Q.1 only!
A.ssy., Pulley Colier Support ~racket(502o.1. 5030-' only)
A5$V, Pulley COll~!' Bracket ('5010-1 only)
Decal, Belt Adjustment Warning
Knob, Throttle Cohtrtll (5020-1.5030-' onlyl
Decal, Engine {5010., only)
QTY
B
8
8
8
T
,
2
,
1
2
,
,
1
1
3
2
T6
16
16
T
2
2
1
1
1
1
2
1
1
2
2
1
1
1
1
2
1
2
1
8
2
12
5
1
10
Page 11

PAl'S LIST
Your Tiller i$ Right Hand (A.H.) or left Hand tl.H.) as You OperauMachint.
NOTE: Unless ot!1erwi,e specified P8Y:ts listed ate used on all Models.
R~F,
NO.
56
57
58
59
6t)
6'
62
63
64
65
66
67
68
69
70
11
72
73
14
75
1671
76
79
80
81
82
83
84
86
86
87
68
~9
90
91
92
93
94
95
96
97
98
99
100
101
102
103
104
105
1Q6
107
108
109
110
111
112
113
114
"5
116
117
118
119
120
PART NO.
56
4233,5
42336
401,$2
1616,280
264341
2610-14
1552.12
2706.25
162S:25
1650'36
40035
6167j
40324
21410
40302
4029~
11&8..45
1513-91
60312
4005'2
6030$
151
42373
20500
40319
1626-69
20142
2'2446
1161
1626-72
20265
40041
4OU3~
2153:'
40201
40032
'509,31
22568
60319
S'84tJ
1529':39
60199
15Q9~112
20100
42238
42239
22520
16$3~15
1625-27
1539.24
4()148
603:02
2251'8
40225
60n,
40211
400e;5
42210
422Q1
422)1
6115~
40286
4Q.120
42332-
42330
61822
Decal, El1gine 15020-1 OI1IV)
Decal, C ngine 1$030.1 Ol1lyl
atilt, Hex Head, 5/16.18)( 1-1/2
Decal, Air ClfJaner label (5010.1 onlVI
Knob, Throttle Control (5010-1 only)
Bu$hing, Adapter (FiltarJ (S01Q-1 only)
Wasner, Wave, 1.46~ x 1-82)( .015 (6010-1 onlyl
Lel/er, TtJrottle ConrrQI (5010.1 onl'",)
Link, Throttle ConlrQI (5010-1 onlyl
Ring, Ret.ining,1~3/B (6010-1 Orlly)
Pih, Cotter, 1/8)( 1"
AsSY., Reverse Arm Retainer Washer
Spring, Torsion
Washer, Cup
Washer, Felt, 5/8 )C 1-1/4 x 1/4
Wheel, 101\ 1.75 x 5/8
Au",., Frame
601t. Shoulder (Special)
Assv.. Depttl ear Lock Torlgue
Piry, Spring, 5/16 dIll. ~ 1.t/2
A5SV, Depth e.r Gllide
Wilsher. Flal SI"J, .320 x 3/4)( 16 Ga.
NU1. H~x lock (ESNA} 6/16-18
Depth Bar
Pin, Clevis, 3/~ dla. >I 1-1/8
Pulley, Idler w/H...b
Washer, Idler Pullev
Bracket, 6elt Restrictor
$crQw, Set. 5/16..18)( 3/8
Pu1ley: e ngin. (po\Jblel
Key, Pulley, 3(16 sq. 1\ 1.1/2 L8elt,4t.-4001Spec;ial)
"V" Pulley
Bracket, Belt Restrictor (Reyerse)
Belt, 4L.450 (SPecial~
Pullev, Flat
6olt, ~e~ He~. 5/16-18 x 5/8
~racket, Belt Guide
Auy., Clutch lOCk,Out
AS$y" Reyef5e Arm
Bolt, Carri~ (Sh. Sq, Nacl<l 5/16 x 2"
AsSV.,ldlerPutley (Flatl
BOlt, Hel< H~eQ (Grade 5) 5/16.18 )( 2"
Cap, Handle Socket
H'Indie (RH.I
Handle (L..H.I
ROd, Clutch
ROd, Lower TriP
Link, Rod AdJu$tment, 6/16.18 T
Pu~h Nut. 5/16
Washer, Wrought, 5/16
Auv., Trip Pla1e
Rod, Upper Trip
S~"ew, Rou"d Head Stove, 1/4.20 x 1-3/4
Auy., Trip Handle
Grip, Handle. 1.1/4
NlAt, Hex NylOck, 1/4.20
SQlt, Hex Head ($petial) 5/16.18)( 1-3:/4
Tube, Spirt, 1 ~/32 O.D. x 16 Ga. x 118
Washer, SpecIal Spring
Assy., Clutcl\ Harldle
Handle Pin
Cap, Ptettic 1White)
~cal. Shift (Handle PanelJ
Decal, Handle Panel
A$SV.. Handle Panei
DEscRIPTION
QTV.
1
,
4
1
1
,
1
1
1
10
1
1
4
4
2
,
~
1
3
1
2
6
f
1
,
2
1
2
1
1
1
1
1
1
1
,
,
1
,
1
1
Z
2
1
1
1
1
,
,
2
1
1
5
f
2
5
1
1
2
1
2
2
1
1
,
 Loading...