

Page 1
Contents
Getting Started .............................
Playing Your New PortaTone .......
Voice Mode ...................................
Style Mode ....................................
Song Mode ....................................
Troubleshooting ........................
Percussion Assign List
(Voices 40 and 00) ......................
Jam Track Chord Progression List
....
One Touch Settiing List ..............
Song Scores ...............................
S pecifications ............................
2
3
5
6
9
10
10
11
12
13
23
OW NER S MANUAL
Page 2
1
You now ow n a port able keyboard that packs advanced functions and great sound in a highly compact
size. Its outstanding features also make it an ex ceptionally ex pressive and versatile instrument.
Read this Ow ner’ s M anual carefully w hile playing your new PortaTone in order to take full advantage of its
various features.
Main Features
The PortaTone is a sophisticat ed musical instrument w ith the follow ing features and functions:
● Exceptionally realistic sounds with 100 AWM (Advanced Wave Memory) Voices, utilizing digital recordings
of actual instruments.
● Dynamic, versatile rhythms and accompaniment with 100 music Styles.
● 20 Songs, for listening enjoyment or for playing along with when using the Minus One function.
● 20 Jam Track patterns, providing specially programmed rhythms and chord progressions for playing along
with.
● One Touch Setting, for automatically calling up an appropriate Voice for playing with the Style, Song or Jam
Track you select.
● High-quality amplifier/speaker system.
Congratulations on your purchase of the Yamaha PortaTone
Cleaning
● Clean the exterior with a soft, dry cloth. To
remove stubborn stains, use a slightly moistened
cloth.
● Never use alcohol, thinner, or other chemical
solvents, since they will damage the finish. Also,
do not leave vinyl chloride material on the PortaTone
for a long time, since it may adhere to the exterior.
NOTE
Yamaha is not responsible for damage caused by improper
usage.
Precautions — Taking Care of Your PortaTone
Your new PortaTone is a fine musical instrument — and should be treat ed as such. Handle it w ith care and
common sense, and it w ill give you years of enjoyment.
Location
● Avoid exposure to direct sunlight or other sources
of heat. Never leave it inside a car where it can get
very hot. Also avoid highly humid or dusty places.
Interference From Electromagnetic Fields
● Do not use your PortaTone close to television sets,
radios or similar equipment since this may cause
interference noise in the other appliance.
Handling
● Protect your PortaTone from strong impact. Be
careful not to drop it or place heavy objects on it.
Avoid applying excessive force to the controls and
keys.
When Not Using the Porta T one
● After use, always turn off the POWER switch. When
not using your PortaTone for long periods, be sure
to remove the batteries to avoid damage through
battery leakage.
Page 3
Power Requirements
Your PortaTone can run either on batteries (sold separately) or on normal household current by using the
optional Yamaha PA-3/4/40 Power Adaptor.
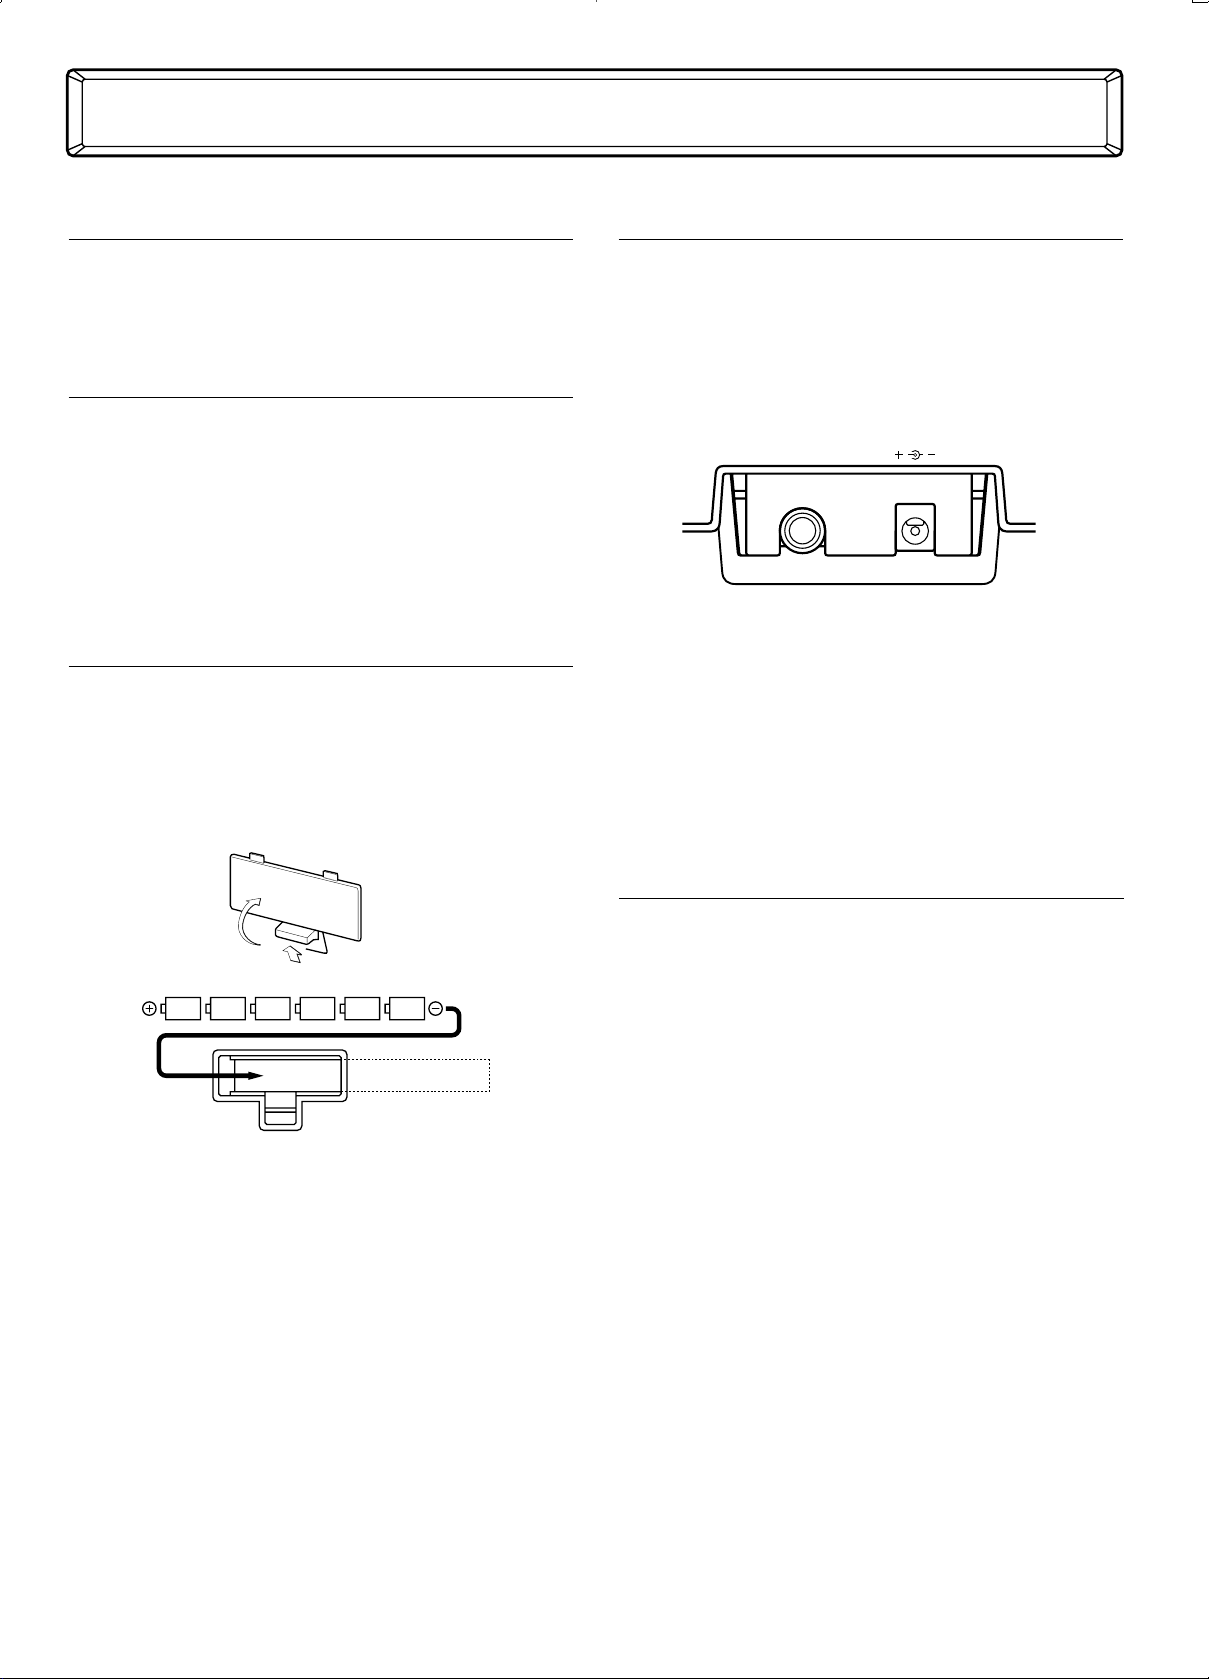
Using an AC Power Adaptor
To connect your PortaTone to a wall socket, you will
need the optionally available Yamaha PA-3/4/40 Power
Adaptor. Use of other AC adaptors could result in
damage to the instrument, so be sure to ask for the
right kind. Plug the adaptor into a convenient wall
outlet and its connector into the DC 10-12V IN jack on
the back of your PortaTone.
Using Batteries
Inserting Batteries
Turn the instrument upside-down and remove the
battery compartment lid. Insert six 1.5-volt size “D”
batteries as shown in the illustration, making sure that
the positive and negative terminals are properly aligned.
Replace the lid.
Accessory Jacks
Using Headphones
For private practicing and playing without disturbing
others, connect a set of stereo headphones to the rear
panel HEADPHONES/AUX OUT jack. Sound from the
built-in speaker system is automatically cut off when
you insert a headphone plug into this jack.
Getting Started
When the Batteries Run Down
When the batteries run low and the battery voltage
drops below a certain level, the PortaTone may not
sound or function properly. As soon as this happens,
replace them with a complete set of six new batteries.
Never mix old and new or different types of batteries
(e.g., alkaline and manganese).
Auto Power OFF
The PSR-73 features an Auto Power OFF function that
automatically turns the power OFF if the instrument is
not used for approximately 30 m inutes. This functions
whether batteries or the AC power adaptor is used.
2
HEADPHONES/
AUX OUT
DC IN 10-12V
Connecting a Keyboard Amplifier
or Stereo System
After making sure the PortaTone and any external
devices are turned off, connect one end of a stereo
audio cable to the LINE IN or AUX. IN jack(s) of the other
device and the other end to the HEADPHONES/AUX OUT
jack of the PortaTone.
The Music Stand
Insert the bottom edge of the music stand into the slot
located at the top rear of the PSR-73 control panel.
Page 4
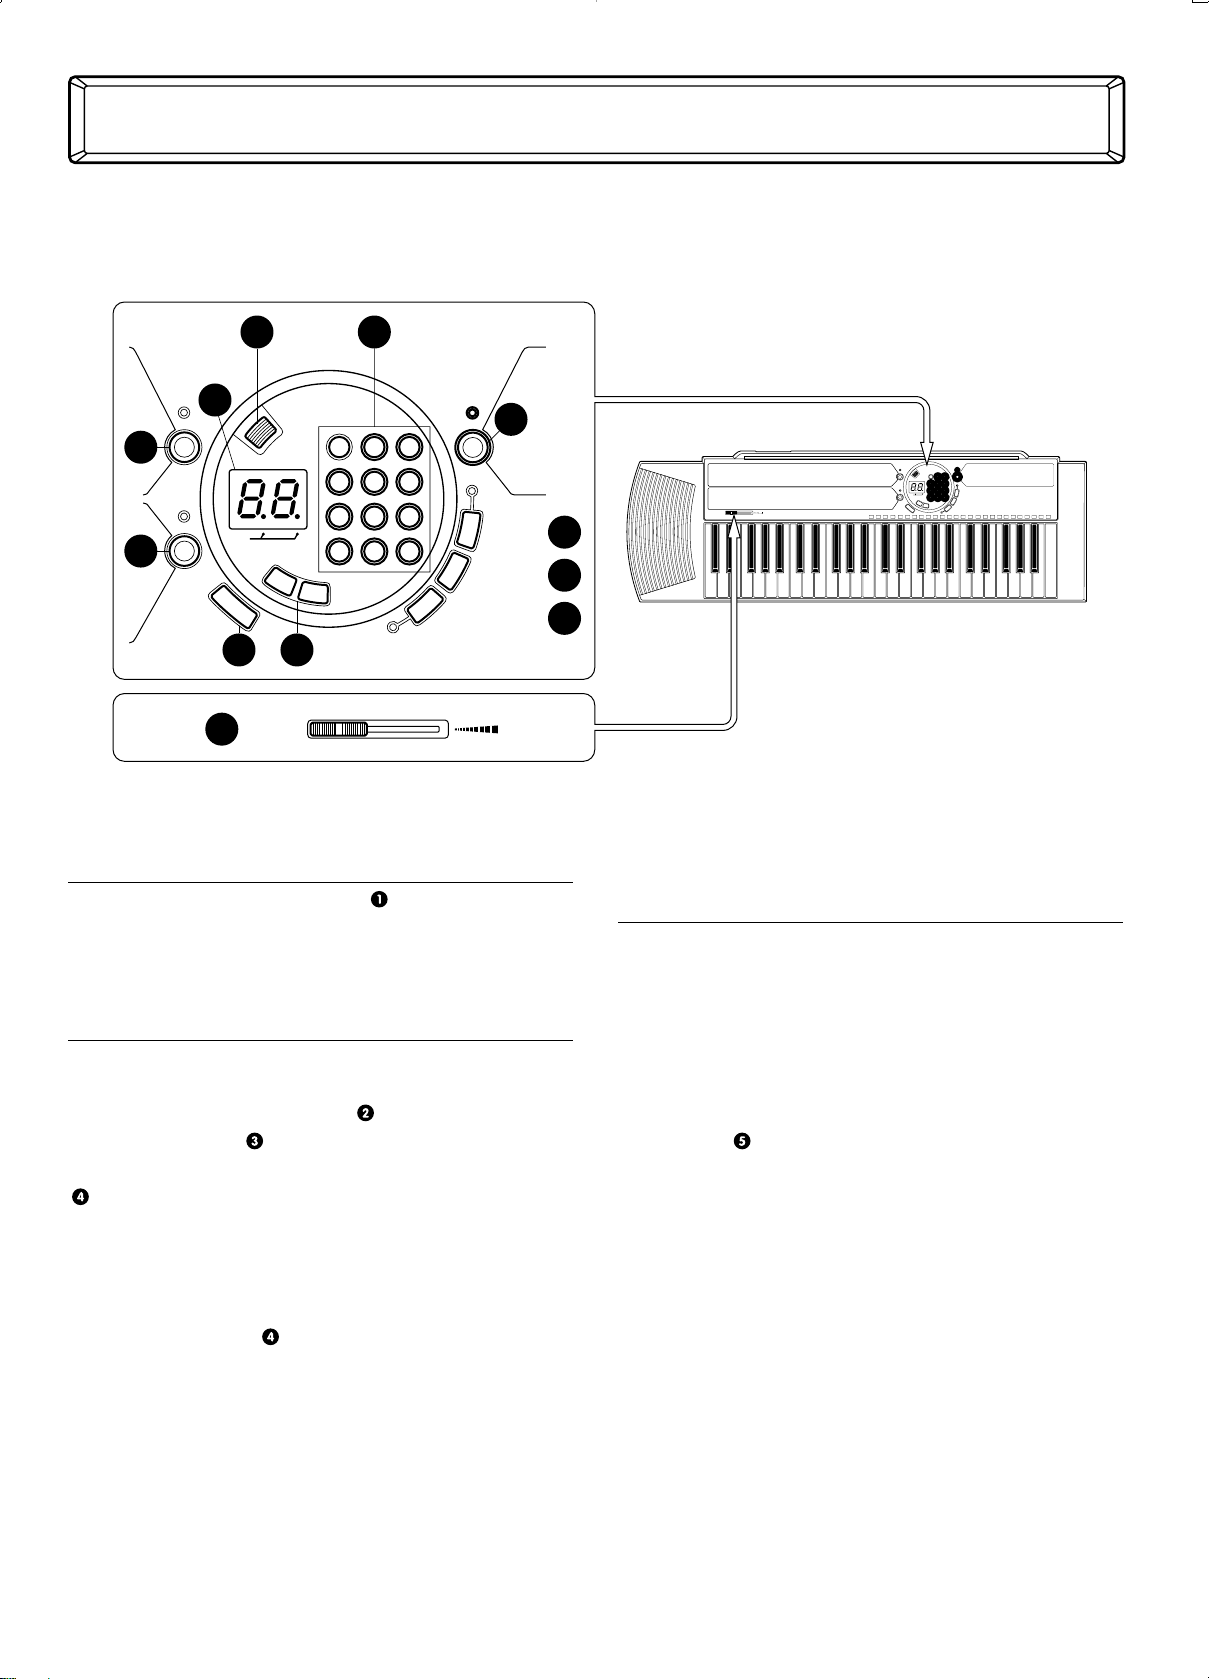
Playing Y our New PortaTone
Turning on the Power
Press the POWER ON/OFF button to turn on the
power of the PortaTone. Whenever the power is turned
on, Voice 01 (PIANO) is automatically selected.
Selecting a Mode
Your PortaTone has three different operating modes:
Voice, Style and Song — each selected from the corresponding panel buttons. VOICE
lets you select and
play a Voice. STYLE
lets you select and play a setting
that includes a rhythm/accompaniment pattern. SONG
lets you select and play either a Song or a Jam Track
pattern.
To select one of t he modes:
Press the button corresponding to the desired mode.
For now, press SONG
to select the Song mode.
Playing a Song
in the Song Mode
A variety of Songs and special Jam Tracks have been
recorded to your PortaTone to give you a taste of what
you can do with the instrument, and to provide music
and patterns for you to play along with.
To select and play one of the Songs:
1. With the Song mode selected, use the Numeric
Keypad
to enter the desired Song or Jam
Track number. Be sure to enter a two-digit
number, as is printed next to each song on the
panel. For example, to select Song 09, first
press “0” on the Numeric Keypad, then “9.”
You can also use the +/ – buttons on the Numeric
Keypad to step up or down through the preset
numbers; holding down the appropriate button
continuously changes the number. Note that the
+/ – buttons have a “wrap around” feature. For
example, pressing the + button from the last
number returns to Song 01. (Song 01 is also
automatically selected when you turn the power
on.)
This sect ion briefly shows you how t o use the various controls on the panel of the PortaTone.
3
1 2 3
4 5 6
7 8 9
–0+
+
–
ONE TOUCH SETTING
START/STOP
MINUS ONE
TEMPO
SONG
VOICE
POWER
ON/OFF
STYLE
SYNC-START/
FILL IN
MULTI DISPLAY
BEAT
VOLUME
12
VOLUME
1 2 3
4 5 6
7 8 9
–
0
+
+
–
ONE TOUCH SETTING
START/STOP
MINUS ONE
TEMPO
SONG
VOICE
POWER
ON/OFF
STYLE
SYNC-START
/FILL IN
MULTI DISPLAY
BEAT
DEMO
1
2
3
4
5
6
7
8
910
11
Page 5

2 .To play the selected Song, press the START/ STOP
button
.
Note that the dots in the MULTI DISPLAY
flash
in time with the music. The left dot flashes at the
first beat of every measure, and the right dot
flashes at the other beats. (For more information
on the MULTI DISPLAY, see box at right.)
3 . Adjust the volume of the Song by using the
VOLUME control
.
4 .Although the Song is automatically set to play at a
default tempo, you can change the speed of the
Song by using the TEMPO buttons
. Press TEMPO
+ to increase the speed and TEMPO – to decrease it;
holding down the appropriate button continuously
increases/decreases the speed. (Note that the
tempo value is briefly shown in the MULTI DISPLAY.)
If you want to set the tempo back to its original
default setting, press both TEMPO buttons simultaneously. (For more information on the Tempo
functions, see box at right.)
5 . To stop the Song, press the START/STOP button
again.
About the MULTI DISPLAY
As mentioned above, the dots in the MULTI DISPLAY
flash in time with the rhythm, and the indication is
used when a Song or Style plays back. This flashing
provides a visual indication of both the tempo and
the time signature of the rhythm.
About the Tempo Functions
Tempo V alues
As mentioned above, the tempo value is shown
briefly in the MULTI DISPLAY when one of the TEMPO
buttons is pressed. The displayed tempo range is
from 10 to 60; in actual tempo values, the range is
from 40 to 240 beats per minute. (Each step in the
tempo adjustment corresponds to 4 beats per
minute.)
Default Tempos
Each Song and Style has been given a default or
standard tempo. If you change the tempo, you can
set it back to the original default setting, by pressing
both TEMPO buttons simultaneously. Also, the
tempo of a Song or Style returns to the default
setting when selecting a different Song or Style. (The
set tempo remains, however, when switching Styles
during playback.) When you turn on the power of
the PortaTone, the tempo is automatically set to the
default setting of Style 01.
MULTI DISPLAY
BEAT
MULTI DISPLAY
BEAT
MULTI DISPLAY
BEAT
MULTI DISPLAY
BEAT
4th beat1st beat 2nd beat 3rd beat
NOTE
You should enter numbers on the Numeric Keypad relatively
quickly. If you do not enter the second digit of a number
within about ten seconds after entering the first digit, the first
digit will be cancelled. Entry of a first digit is also automatically
cancelled if any other button on the panel (except for those
on the Numeric Keypad) is pressed before entering the second
digit. Also, keep in mind that entry of numbers higher than 40
in the Song mode are ignored.
For Songs and Styles in 4/4 time, the dots flash like
this:
For Songs and Styles in 3/4 time, the dots flash like
this:
MULTI DISPLAY
BEAT
MULTI DISPLAY
BEAT
MULTI DISPLAY
BEAT
1st beat 2nd beat 3rd beat
4
Page 6

Voice Mode
The Voice mode feat ures 1 0 0 authentic Voices.
Many of these Voices have special preset charac-
teristics or embellishments. The Voices are divided
into various cat egories depending on their charac-
teristics or the effects used.
Dual Voices (#41 - # 5 6 ) feature tw o Voices mixed
together in a layer for rich ensemble sounds. Split
Voices (# 57 - #67) also have t w o V oices, but rather
than being layered, each is played from a different
range of the keyboard. Sustain Voices (#68 - # 7 2 )
extend t he sound by adding a natural, slow re-
lease. Harmony Voices (#73 - # 8 5 ) have an addi-
tional one-, tw o- or t hree- note harmony added to
the original monophonic Voice. Finally, Echo
Voices (# 86 - #00) have an echo effect t hat adds
delayed repeats to the original Voice.
Included in the Voices are special PERCUSSION
Voices (# 40 and # 0 0 ) that lets you play various
drum and percussion sounds from the keyboard.
(Refer to the Percussion Assign List page 1 0 .)
Selecting a Voice
1. Press the VOICE button to select the Voice mode.
2 .Use the Numeric Keypad to select the desired
Voice number.
Each Voice is automatically called up with the
most suitable octave range setting. Thus, playing
middle C with one Voice may sound higher or
lower than another Voice at the same key.
3 . Play the newly selected Voice. To change to
another Voice, repeat step 2 above.
You can also play rhythm Styles in the Voice mode
by simply pressing the START/STOP button. The
Style last selected from the Style mode will be
played.
1 2 3
4 5 6
7 8 9
–
0
+
VOICE
NOTE
The PortaTone is polyphonic up to a maximum of 12 notes.
(Depending on the Voice selected, fewer notes may be
available.) This includes not only the Voices played from the
keyboard, but also the notes in a Style pattern, and so on.
Thus, if you play too many notes at one time, some may not
sound and/or others may be cancelled.
About the Harmony Voices
Since Harmony Voices are designed to automatically
play two or more notes with the notes you play on
the keyboard, only one note can be played on the
keyboard at a time. If several notes are played
together, only the last note or highest note played
will be heard.
The type of harmony used depends on the Voice
that is selected. When a Style or Song/Jam Track is
not being played back, the basic key for the harmony
is always C. When a Style is played or the Stopped
Accompaniment function is active, the harmony
changes according to the chord played with the left
hand. When a Song is played back, the harmony
changes according to the chord progression of the
Song or Jam Track.
5
Page 7

Style Mode
4 . With the rhythm running, you’re ready to try out
the Auto Accompaniment feature. Try playing a
few single notes with your left hand, and notice
how the bass and chord accompaniment change
with each key you play. (Refer to the boxed
sections on pages 7 and 8 for more information on
how to use Auto Accompaniment.)
5 . Use the TEMPO buttons to change the tempo of the
Style as it’s playing. (For more information on
the Tempo functions, see page 4.)
6 .While the Style is playing, you can add variation
to the rhythm by playing special Fill In patterns.
To play a Fill In pattern, press the SYNC-START/
FILL IN button.
NOTE
The Fill In pattern may not play precisely when you press the
SYNC-START/FILL IN button, but instead starts on the beat
immediately following your press of the button. Also, depending on when you press the button, only a portion of the
Fill In might be played. Both of these situations are normal
and are done to ensure that the Fill In pattern complements
the basic rhythm, rather than disrupting it.
7 . To stop the rhythm, press the START/STOP
button again.
Pressing the START/STOP button while the
rhythm is playing produces a simple ending
phrase. This also applies to playing Jam Track
patterns in the Song mode.
The Style mode provides dynamic rhythm/
accompaniment pat terns — as w ell as V oice set-
tings appropriate for each pat t ern — for various
popular music styles, as listed on the panel. A total
of 100 different Styles are available, and are
divided into t en different categories. Each rhythm
patt ern also has a specially created companion Fill In
patt ern, w hich can be played by using t he SYNC-
START/ FI LL I N button.
Auto Accompaniment f eat ures built into the
rhythms add the ex citement of instrumental
backing to your performance, letting you control
the accompaniment by the chords you play. Auto
Accompaniment eff ectively splits t he keyboard
into t w o sections: The upper is used for playing a
melody line, and the lower (labeled “ AUTO ACCOMP.
SECTION” on the keyboard, including keys C1
through F2) is for t he Auto Accompaniment
function.
Selecting a Style
1. Press the STYLE button to select the Style mode.
2 .Use the Numeric Keypad to select the desired
Style number.
3 . You can start the selected rhythm by pressing the
START/STOP button.
The PortaTone also has a Synchro Start function
that allows you to start the rhythm by simply
pressing a key on the keyboard. To use Synchro
Start, first press the SYNC-START/FILL IN
button, then press one of the keys in the AUTO
ACCOMP. SECTION.
1 2 3
4 5 6
7 8 9
–
0
+
NOTE
Synchro Start is automatically set to stand-by when you select
the Style mode. (The dots in the MULTI DISPLAY flash to
indicate stand-by status.)
STYLE
6
Page 8

Single Finger Chords
Chords that can be produced in Single Finger operation are major, minor, seventh and minor seventh.
The illustration below shows how to produce the
four chord types. (The key of C is used here as an
example; other keys follow the same rules. For
example, B♭7 is played as B♭ and A.)
C
C7
Cm7
Cm
Press the root note of the chord.
Press the root note together with
any black key to the left of it.
Press the root note together with
any white and black key to the
left of it (three keys altogether).
Press the root note together with
any white key to the left of it.
NOTE
Chords played in the AUTO ACCOMP. SECTION of the keyboard
are also detected and played when the accompaniment is
stopped (Stopped Accompaniment function). In this
condition, the Voices used for the bass and chords are
automatically selected.
NOTE
To use the Minus One function with one of the Styles, press
the MINUS ONE button. (The LED next to the button lights.)
Minus One cancels all chord accompaniment, leaving only the
bass and basic rhythm of the Style.
7
Setting Auto Accompaniment to Single
Finger or Fingered
Though detection of the Single Finger and Fingered
methods is automatic, you can set Auto Accompaniment to function exclusively in either the Single
Finger or Fingered mode.
To set Auto Accompaniment to Single Finger, turn
the power off, then hold down the “–” button on the
Numeric Keypad and simultaneously turn the power
on. “SF” (Single Finger) briefly appears in the MULTI
DISPLAY.
NOTE
In Single Finger, the AUTO ACCOMP. SECTION is set between
the C1 key (the lowest key) and the C♯2 key.
To set Auto Accompaniment to Fingered, follow the
same steps, holding down the “+” button instead.
“F” (Fingered) briefly appears in the MULTI DISPLAY.
To switch back to Multi Fingering operation, simply
turn the power off and on again.
Using the Auto Accompaniment Function/Multi Fingering
The Auto Accompaniment function automatically generates bass and chord accompaniment for you to play along
with, by using Multi Fingering operation. You can change
the chords of the accompaniment by playing keys in the
AUTO ACCOMP. SECTION of the keyboard using either the
“Single Finger” or “Fingered” method. With Single Finger
you can simply play a one-, two- or three-finger chord
indication (see Single Finger Chords below). The Fingered
technique is that of conventionally playing all the notes of
the chord. Whichever method you use, the PortaTone
“understands” what chord you indicate and then automatically generates the accompaniment.
Page 9

Fingered Chords
Using the key of C as an example, the chart below shows the types of chords that can be recognized in the Fingered mode.
Fingered Chords in the Key of C
Notes enclosed in parentheses are optional; the chords will be recognized without them.
NOTE
• If the chord is inverted (i.e., C-E-G is played as G-C-E), the PortaTone will still recognize it as a C chord.
• Minor 6th chords are recognized only in root position, however; all other inversions are interpreted as minor 7th/flatted 5th.
• If augmented and diminished 7th chords are inverted, the lowest note will be recognized as the root.
• 7th flatted 5th chords may be played with the lowest note as the root or the 7th.
• 9th chords are recognized only in root position; all other inversions are interpreted as suspended 4th.
• Augmented 7th and diminished 7th chords are interpreted as simple augmented and diminished.
• The PortaTone also has a Chord Cancel function to stop the chord accompaniment but allow the rhythm pattern to continue playing.
To use Chord Cancel, simultaneously press any three consecutive notes in the AUTO ACCOMP. SECTION; for example, C, C♯ and D.
C C7sus
4
Cm Caug
(7)
C
7
Cdim
(7)
Cm
7
C
7
♭
5
CM
7
CmM
7
Cm
7
♭
5
Cm
6
Csus
4
C
9
One Touch Setting in the Style Mode
The One Touch Setting function automatically selects
an appropriate Voice for playing with the Style you
select. In other words, when One Touch Setting is
on, the Voice automatically changes when you
change the Style.
To turn on the One Touch Setting function, press the
ONE TOUCH SETTING button. (The LED next to the
button lights.)
To turn the function off, press the button again.
NOTE
When the One Touch Setting is on, selecting another Style will
automatically reset the tempo to the default of the selected
Style.
8
7 8 9
–
0
+
+
–
ONE TOUCH SETTING
START/STOP
MINUS ONE
TEMPO
STYLE
SYNC-START
/FILL IN
BEAT
Page 10

About the Minus One Function
Minus One, as its name implies, takes away the
melody part of the Song, allowing you to play that
part yourself. You can turn Minus One on before
starting a Song, or do it even while a Song is playing.
To help you play the “missing” melody, scores for
all Songs have been provided; see pages 13-22.
To use the Minus One function with the selected
Song, press the MINUS ONE button (either before
starting the Song or while it is playing). (The LED next
to the button lights.)
One Touch Setting in the Song Mode
The One Touch Setting function works with the
Minus One function and automatically selects an
appropriate Voice for playing the melody along with
the Song you select. Though the Minus One function
is not used with the Jam Track patterns, One Touch
Setting works the same way with Jam Track, automatically selecting an appropriate Voice.
To turn on the One Touch Setting function, press the
ONE TOUCH SETTING button. (The LED next to the
button lights.)
To turn the function off, press the button again.
If playback is not stopped, all Songs play back
repeatedly in succession, indefinitely. (However, if
Minus One is on, only the selected Song repeatedly
plays back.) If a Jam Track pattern is selected, only
the selected pattern repeats indefinitely.
The Song mode features special Songs and Jam
Track patterns that have been creat ed using t he
rich sounds and sophisticated accompaniment
functions of the PortaTone.
The Songs are generally for your listening
enjoyment; however, you can also play along with
them on the keyboard. Also, by using the M inus
One function, you can “ mut e” the original melody
and play it manually on the keyboard yourself.
The Jam Track patterns in this mode let you “ jam”
or play along with a variety of dynamic rhythm
styles and chord changes.
Selecting and Playing a Song
or Jam Track Pattern
1. Press the SONG button to select the Song mode.
2 .Use the Numeric Keypad to select the desired Song
or Jam Track number.
3 . Start the selected Song or Jam Track by pressing
the START/STOP button.
You can also start the selected Song or Jam Track
pattern with the Synchro Start function (as in the
Style mode) by simply pressing any key of the
keyboard.
4 . If you want to change to another Song or Jam
Track pattern, repeat step 2 above.
5 . To stop the Song or pattern, press the START/
STOP button again.
1 2 3
4 5 6
7 8 9
–
0
+
NOTE
Keep in mind that even with the One Touch Setting function on,
there are some Songs and Jam Track patterns which change the
selected Voice in the middle of the Song or pattern.
Song Mode
9
SONG
DEMO
7 8 9
–
0
+
+
–
ONE TOUCH SETTING
START/STOP
MINUS ONE
TEMPO
STYLE
SYNC-START
/FILL IN
BEAT
Page 11

10
Problem
When the PortaTone is turned on or off, a buzzing
sound is temporarily produced.
The sound of the voices or rhythms seems unusual or
strange.
Not all notes are heard when playing a number of
notes simultaneously.
The sound of the Voice changes from note to note.
The power cannot be turned on.
Possible Cause and Solution
This is normal and indicates that power is flowing into
the PortaTone.
The battery power is too low. Replace the batteries.
Too many keys are pressed at the same time. The
PortaTone is polyphonic up to a maximum of 12
notes. (See the note on page 5.)
The AWM tone generation method uses multiple
recordings (samples) of an instrument across the
range of the keyboard; thus, the actual sound of the
Voice may be slightly different from note to note.
Quick, successive pressing of the POWER ON/OFF
button may fail to turn the power on. When using the
POWER ON/OFF button, wait a short time between
successive presses.
Troubleshooting
Percussion Assign List (Voices 40 and 00)
Snare Drum 1
Rim Shot
Hi-hat Pedal
Hi-hat Close
Crash Cymbal
Synth Rim Shot
Crash Cymbal Mute
Synth Hi-hat Close
Synth Hi-hat Open
Bass Drum 1
Bass Drum 2
Snare Drum 2
Snare Drum 3
Tom Bass
Tom Low
Tom Mid
Tom High
Splash Cymbal
Synth Bass Drum
Synth Snare Drum
Synth Tom Bass
Synth Tom Low
Synth Tom Mid
Synth Tom High
Splash Cymbal Mute
Hi-hat Open
Page 12

11
Jam Track Chord Progression List
21 DANCE
Am7 Em7
Dm7 Am7
22 RAP
Am7
Am7
23 FUNK
C7 F7 F7C7
26 HEAVY METAL
C C
=120
=116
=92
=120
Dm7
24 SOUL BALLAD
C
Am
=104
G7 Gaug
G7 F7
28 ROCK'N'ROLL
C Am GF
29 R&B
C7 F7 C7
=144
=136
B
EAm
25 MINOR BLUES
Am
Dm Am
=144
GC
27 BOOGIE WOOGIE
C
F C
=136
GF
Am7 G7CF
30 SLOW ROCK =88
G7
32 JAZZ WALTZ
C7
C7
G 7 G7
33 FUSION
Dm7 G7
34 BOSSA NOVA
E 7Em7 Dm7 D 7
35 SAMBA
C F G
36 TANGO
E7 Am
38 COUNTRY
C C
CC
=192
=128
=160
=112
=124
=120
F7
31 JAZZ BLUES
C7 F7 C7
Dm7 C7G7 A7 Dm7 G7
C7 A7
=160
F7
C7
C7
37 SKA
Am Dm
=160
FG7
FCG7
39 MARCH
CG7C
=116
40 NEW AGE
CCC
=84
Page 13

12
One Touch Setting List
Turning on the One Touch Setting function, the following voice and tempo is automatically selected.
31 HARMONICA
22 TROMBONE
42 CHORUS E PNO
19 VIBRAPHONE
05 E ORGAN
05 E ORGAN
29 TENOR SAX
73 PIANO BLOCK
05 E ORGAN
44 12STR GUITAR
13 DIST GUITAR
52 FOLK GTR PAD
30 PANFLUTE
42 CHORUS E PNO
68 PIANO SUSTAIN
05 E ORGAN
29 TENOR SAX
41 HONKY-TONK
77 E ORGAN TRIO
24 BRASS ENS
22 TROMBONE
21 TRUMPET
19 VIBRAPHONE
54 BRASS ENS DUAL
22 TROMBONE
NO.
Style List
21
22
23
24
25
26
27
28
29
30
31
32
33
34
35
36
37
38
39
40
48 PIANO PAD
18 ORCHESTRA HIT
49 PIANO & VIBES
29 TENOR SAX
01 PIANO
13 DIST GUITAR
01 PIANO
05 E ORGAN
54 BRASS ENS
50 E PIANO PAD
66 PNO/VIBES
29 TENOR SAX
42 CHORUS E PNO
26 FLUTE
82 TRUMPET DUET
07 ACCORDION
22 TROMBONE
78 VIOLIN CNTRY
21 TRUMPET
50 E PIANO PAD
120
116
92
104
144
120
136
144
136
88
160
192
128
160
112
124
160
120
116
84
Jam Track List
01
02
03
04
05
06
07
08
09
10
11
12
13
14
15
16
17
18
19
20
21
22
23
24
25
26
27
28
29
30
31
32
33
34
35
36
37
38
39
40
41
42
43
44
45
46
47
48
49
50
51
52
53
54
55
56
57
58
59
60
61
62
63
64
65
66
67
68
69
70
71
72
73
74
75
76
77
78
79
80
81
82
83
84
85
86
87
88
89
90
91
92
93
94
95
96
97
98
99
100
32 SY BRASS
33 SY LEAD
42 CHORUS E PNO
56 FANTASY2
50 E PIANO PAD
52 FOLK GTR PAD
01 PIANO
26 FLUTE
19 VIBRAPHONE
05 E ORGAN
50 E PIANO PAD
53 JAZZ GUITAR PAD
55 FANTASY 1
51 E PNO & VIBES
52 FOLK GTR PAD
49 PIANO & VIBES
24 BRASS ENS
18 ORCHESTRA HIT
04 CLAVI
30 PANFLUTE
50 E PIANO PAD
32 SY BRASS
54 BRASS ENS DUAL
50 E PIANO PAD
82 TRUMPET DUET
09 JAZZ GTR
31 HARMONICA
19 VIBRAPHONE
22 TROMBONE
26 FLUTE
07 ACCORDION
82 TRUMPET DUET
22 TROMBONE
81 MARIMBA TRIO
22 TROMBONE
05 E ORGAN
24 BRASS ENS
20 MARIMBA
82 TRUMPET DUET
22 TROMBONE
81 MARIMBA TRIO
72 VIBRA PHONE SUSTAIN
26 FLUTE
72 VIBRA PHONE SUSTAIN
21 TRUMPET
29 TENOR SAX
80 VIBES BLOCK
26 FLUTE
33 SY LEAD
84 FLUTE DUET
33 SY LEAD
49 PIANO&VIBES
50 E PIANO PAD
31 HARMONICA
07 ACCORDION
74 PIANO CNTRY
05 E ORGAN
78 VIOLIN CNTRY
31 HARMONICA
80 VIBES BLOCK
09 J GUITAR
11 E GUITAR
27 CLARINET
14 VIOLIN
17 STRINGS
73 PIANO BLOCK
29 TENOR SAX
82 TRUMPET DUET
25 PICCOLO
07 ACCORDION
27 CLARINET
83 HORN DUET
55 FANTASY 1
17 STRINGS
48 PIANO PAD
152
188
104
200
120
92
92
92
80
68
112
116
112
112
112
96
104
116
112
108
140
120
120
128
120
96
120
88
84
104
104
92
152
144
140
120
116
128
120
120
88
176
136
156
136
88
148
108
152
176
160
140
120
148
128
124
104
88
68
160
124
136
112
200
116
152
84
96
152
104
208
140
140
128
112
120
100
192
120
112
120
132
120
76
88
204
176
116
132
200
144
120
112
124
120
128
72
180
148
84
VOICE TEMPO
NO.
VOICE TEMPO
NO.
VOICE TEMPO
Keep in mind that even with the One Touch
Setting function on, there are some Jam
Track patterns which change the selected
voice in the middle of the pattern.
Page 14

Song Scores
13
Not available
Page 15

Specifications
23
KEYBOARD
VOICE
STYLE
SONG/JAM TRACK
CONTROLS
OTHER TERMINALS, FITTINGS
AMPLIFIER(S)
SPEAKERS
POWER CONSUMPTION
RATED POWER SUPPLY
DIMENSIONS (W x D x H )
WEIGHT
CASING
OPTIONAL ACCESSORIES
using Power Adaptor: 3.8 W
POWER ON/OFF, VOICE, STYLE, SONG, Numeric Keypad, MINUS ONE, START/STOP,
ONE TOUCH SETTING, TEMPO, SYNC-START/FILL IN, MULTI DISPLAY, VOLUME
DC IN, HEADPHONES/AUX OUT, Music Stand
Polystyrene
Specifications are subject to change without notice.
HPE-3/150 Headphones, PA-3/4/40 Power Adaptors (PA-40 for use in U.S. only),
L-2C Keyboard Stand
DC 10-12 V: 6 "D" size/R-20/SUM-1 (1.5 V) batteries, or PA-3/4/40 Power Adaptor
Number of Keys
Key Size
Register
Tone Generation
Number of Voices
Polyphony (Maximum)
Number of Styles
Auto Accompaniment
Chord Detection
Songs
Jam Track Patterns
Minus One
One Touch Setting
PSR-73
49
Regular
C
1-C5
AWM
100
12 notes
100
Yes
Multi (Single Finger, Fingered)
20
20
Yes
Yes
964 × 287 × 113
mm
(38" × 11-1/4" × 4-1/2")
3.6 kg (7 lbs., 15 oz.)
10 cm, 4
8.0 w (using Power Adaptor PA-3)
using batteries: 3.8 W
Page 16

SPECIAL MESSAGE SECTION
approximately five years. When replacement becomes necessary, contact a
qualified service representative to perform the replacement.
This product may also use “household” type batteries. Some of these may be
rechargeable. Make sure that the battery being charged is a rechargeable type
and that the charger is intended for the battery being charged.
When installing batteries, do not mix batteries with new, or with batteries of a
different type. Batteries MUST be installed correctly. Mismatches or incorrect
installation may result in overheating and battery case rupture.
Warning:
Do not attempt to disassemble, or incinerate any battery. Keep all batteries
away from children. Dispose of used batteries promptly and as regulated by
the laws in your area. Note: Check with any retailer of household type batteries
in your area for battery disposal information.
Disposal Notice: Should this produc t become d ama ged beyon d repair, or for
some reason its useful life is considered to be at an end, please observe all
local, state, and federal regulations that relate to the disposal of products that
contain lead, batteries, plastics, etc. If your dealer is unable to assist you,
please contact Yamaha directly.
NAME PLATE LOCATION:
The name plate is located on the bottom of the product. The model number,
serial number, power requirements, etc., are located on this plate. You should
record the model number, serial number, and the date of purchase in the
spaces provided below and retain this manual as a permanent record of your
purchase.
Model
Serial No.
Purchase Date
PLEASE KEEP THIS MANUAL
IMPORTANT NOTICE: DO NOT MODIFY THIS UNIT!
This product, when insta lled as i nd icated in the i nstruc ti ons c on tained in this
manual, meets FCC requirem ents. Mod if ic ations not exp ressly a p p roved b y
Yamaha may void your authority, granted by the FCC, to use the product.
IMPORTANT:
When connecting this product to accessories and/or another product use only
high quality shielded cables. Cable/s supplied with this product MUST be
used. Follow all installation instructions. Failure to follow instructions could void
your FCC authorization to use this product in the USA.
NOTE:
This product has been tested and found to comply with the requirements listed in
FCC Regulations, Part 15 for Class “B” d i gital devices. Compl iance with th e s e
requirements p rovid es a reason ab le level of assu ranc e that your us e of this
product in a residential enviro nment w ill not re sult in ha rmful inte rference with
other electronic devices. This equipment generates/uses radio frequencies and,
if not installed and used according to the instructions found in the users manual,
may cause i nterferenc e ha rmful to the operation of oth er elec tronic d evic es.
Compliance with FCC reg ulati ons does not guarantee that in terfe rence will not
occur in all installations. If this product is found to be the source of interference,
which c an b e d eter mined b y turning the unit “O FF” and “ ON” , p lease try to
eliminate the problem by using one of the following measures:
• Relocate either this product or the device that is being affected by the
interference.
• Utilize power outlets that are on different branch(circuit breaker or fuse)
circuits or install AC line filter/s.
• In the case of radio or TV interference, relocate/reorient the antenna. If the
antenna lead-in is 300 ohm ribbon lead, change the lead-in to co-axial type
cable.
If these corrective measures do not produce satisfactory results, please contact
the local retailer authorized to distribute this type of product. If you can not locate
the app ropria te retailer, please contac t Yamaha Corporation of A merica,
Electronic Service Division, 6600 Orangethorpe Ave, Buena Park, CA90620
FCC INFORMATION (U.S.A.)
• This applies only to products distributed by Yamaha Corp or ation of Ame rica.
This product utilizes batteries or an external power supply (adapter). DO NOT
connect this product to any power supply or adapter other than one described
in the manual, on the name plate, or specifically recommended by Yamaha.
This product should be used only with the components supplied or; a cart,
rack, or stand that is recommended by Yamaha. If a cart, etc., is used, please
observe all safety markings and instructions that accompany the accessory
product.
SPECIFICATIONS SUBJECT TO CHANGE:
The information contained in this manual is believed to be correct at the time of
printing. However, Yamaha reserves the right to change or modify any of the
specifications without notice or obligation to update existing units.
This product, either alone or in combination with an amplifier and headphones
or speaker/s, may be capable of producing sound levels that could cause
permanent hearing loss. DO NOT operate for long periods of time at a high
volume level or at a level that is uncomfortable. If you experience any hearing
loss or ringing in the ears, you should consult an audiologist.
IMPORTANT: The louder the sound, the shorter the time period before damage
occurs.
NOTICE:
Service charges incurred due to a lack of knowledge relating to how a function
or effect works (when the unit is operating as designed) are not covered by the
manufacturer’s warranty, and are therefore the owners responsibility. Please
study this manual carefully and consult your dealer before requesting service.
ENVIRONMENTAL ISSUES:
Yamaha strives to produce products that are both user safe and environmentally friendly. We sincerely believe that our products and the production
methods used to produce them, meet these goals. In keeping with both the
letter and the spirit of the law, we want you to be aware of the following:
Battery Notice:
This product MAY contain a small non-rechargeable battery which (if
applicable) is soldered in place. The average life span of this type of battery is
24
Page 17

documentation manual, user maintenance, brochure, user reference, pdf manual
This file has been downloaded from:
User Manual and User Guide for many equipments like mobile phones, photo cameras, monther board, monitors, software, tv, dvd, and othes..
Manual users, user manuals, user guide manual, owners manual, instruction manual, manual owner, manual owner's, manual guide,
manual operation, operating manual, user's manual, operating instructions, manual operators, manual operator, manual product,
 Loading...