

Yamaha Audio PSR-350 User Manual

SPECIAL MESSAGE SECTION
This product utilizes batteries or an external power supply (adapter). DO NO T
connect this product to any power supply or adapter other than one described
in the manual, on the name plate, or specifically recommended by Yamaha.
This product should be used only with the components supplied or; a cart,
rack, or stand that is recommended by Yamaha. If a cart, etc., is used, please
observe all safety markings and instructions that accompany the accessory
product.
SPECIFICATIONS SUBJECT TO CHANGE:
The information contained in this manual is believed to be correct at the time
of printing. However, Yamaha reserves the right to change or modify any of
the specifications without notice or obligation to update existing units.
This product, either alone or in combination with an amplifier and headphones or speaker/s, may be capable of producing sound levels that could
cause permanent hearing loss. DO NOT operate for long periods of time at a
high volume level or at a level that is uncomfortable. If you experience any
hearing loss or ringing in the ears, you should consult an audiologist.
IMPORTANT: The louder the sound, the shorter the time period before damage occurs.
NOTICE:
Service charges incurred due to a lack of knowledge relating to how a function or effect works (when the unit is operating as designed) are not covered
by the manufacturer’s warranty, and are therefore the owners responsibility.
Please study this manual carefully and consult your dealer before requesting
service.
ENVIRONMENTAL ISSUES:
Yamaha strives to produce products that are both user safe and environmentally friendly. We sincerely believe that our products and the production methods used to produce them, meet these goals. In keeping with both the letter
and the spirit of the law, we want you to be aware of the following:
Battery Notice:
This product MAY contain a small non-rechargeable battery which (if applicable) is soldered in place. The average life span of this type of battery is
approximately five years. When replacement becomes necessary, contact a
qualified service representative to perform the replacement.
This product may also use “household” type batteries. Some of these ma y be
rechargeable. Make sure that the battery being charged is a rechargeable
type and that the charger is intended for the battery being charged.
When installing batteries, do not mix batteries with new, or with batteries of a
different type. Batteries MUST be installed correctly. Mismatches or incorrect
installation may result in overheating and battery case rupture.
Warning:
Do not attempt to disassemble, or incinerate any battery. Keep all batteries
away from children. Dispose of used batteries promptly and as regulated by
the laws in your area. Note: Check with any retailer of household type batteries in your area for battery disposal information.
Disposal Notice:
Should this product become damaged beyond repair, or for some reason its
useful life is considered to be at an end, please observe all local, state, and
federal regulations that relate to the disposal of products that contain lead,
batteries, plastics, etc. If your dealer is unable to assist you, please contact
Yamaha directly.
NAME PLATE LOCATION:
The name plate is located on the bottom of the product. The model number,
serial number, power requirements , etc., are located on this plate . You should
record the model number, serial number, and the date of purchase in the
spaces provided below and retain this manual as a permanent record of your
purchase.
Model
Serial No.
Purchase Date
92-BP (bottom)
PLEASE KEEP THIS MANUAL
FCC INFORMATION (U.S.A.)
1. IMPORTANT NOTICE: DO NOT MODIFY THIS UNIT!
This product, when installed as indicated in the instructions contained in
this manual, meets FCC requirements. Modifications not expressly
approved by Yamaha may void your authority, granted by the FCC, to use
the product.
2. IMPORTANT: When connecting this product to accessories and/or
another product use only high quality shielded cables. Cable/s supplied
with this product MUST be used. F ollow all installation instructions . Failure
to follow instructions could void your FCC authorization to use this product
in the USA.
3. NOTE: This product has been tested and found to comply with the
requirements listed in FCC Regulations, Part 15 for Class “B” digital
devices. Compliance with these requirements provides a reasonable lev el
of assurance that your use of this product in a residential environment will
not result in harmful interference with other electronic devices. This equipment generates/uses radio frequencies and, if not installed and used
according to the instructions found in the users manual, may cause interference harmful to the operation of other electronic devices. Compliance
* This applies only to products distributed by YAMAHA CORPORATION OF AMERICA.
OBSERVERA!
Apparaten kopplas inte ur växelströmskällan (nätet) sá länge som den ar
ansluten till vägguttaget, även om själva apparaten har stängts av.
ADVARSEL: Netspæendingen til dette apparat er IKKE afbrudt, sálæenge
netledningen siddr i en stikkontakt, som er t endt — ogsá selvom der or
slukket pá apparatets afbryder.
VAROITUS:
verkosta.
Laitteen toisiopiiriin kytketty käyttökytkin ei irroita koko laitetta
with FCC regulations does not guarantee that interference will not occur in
all installations. If this product is found to be the source of interference,
which can be determined by turning the unit “OFF” and “ON”, please try to
eliminate the problem by using one of the following measures:
Relocate either this product or the device that is being affected by the
interference.
Utilize power outlets that are on different branch (circuit breaker or fuse)
circuits or install AC line filter/s.
In the case of radio or TV interf erence, relocate/reorient the antenna. If the
antenna lead-in is 300 ohm ribbon lead, change the lead-in to co-axial
type cable.
If these corrective measures do not produce satisfactory results, please
contact the local retailer authorized to distribute this type of product. If you
can not locate the appropriate retailer, please contact Yamaha Corporation of America, Electronic Service Division, 6600 Orangethorpe Ave,
Buena Park, CA90620
The above statements apply ONLY to those products distributed by
Yamaha Corporation of America or its subsidiaries.
(class B)
Entsorgung leerer Batterien (nur innerhalb Deutschlands)
Leisten Sie einen Beitrag zum Umweltschutz. Verbrauchte Batterien oder
Akkumulatoren dürfen nicht in den Hausmüll. Sie können bei einer Sammelstelle für Altbatterien bzw. Sondermüll abgegeben werden. Informieren
Sie sich bei Ihrer Kommune.
(battery)
(standby)
2
Yamaha cannot be held responsible for damage caused by improper
use or modifications to the instrument, or data that is lost or destroyed.
* The illustrations and LCD screens as shown in this owner's manual
are for instructional purposes only, and may be different from the
ones on your instrument.
PRECAUTIONS
PLEASE READ CAREFULLY BEFORE PROCEEDING
* Please keep these precautions in a safe place for future reference.
WARNING
Always follow the basic precautions listed below to avoid the possibility of serious injury or even death from electrical shock,
short-circuiting, damages, fire or other hazards. These precautions include, but are not limited to, the following:
• Do not open the instrument or attempt to disassemble the internal parts or
modify them in any way. The instrument contains no user-serviceable
parts. If it should appear to be malfunctioning, discontinue use immediately and have it inspected by qualified Yamaha service personnel.
• Do not expose the instrument to rain, use it near water or in damp or wet
conditions, or place containers on it containing liquids which might spill
into any openings.
• If the AC adaptor cord or plug becomes frayed or damaged, or if there is a
sudden loss of sound during use of the instrument, or if any unusual
smells or smoke should appear to be caused by it, immediately turn off the
CAUTION
Always follow the basic precautions listed below to avoid the possibility of physical injury to you or others, or damage to the
instrument or other property. These precautions include, but are not limited to, the following:
• Do not place the AC adaptor cord near heat sources such as heaters or
radiators, and do not excessively bend or otherwise damage the cord,
place heavy objects on it, or place it in a position where anyone could walk
on, trip over, or roll anything over it.
• When removing the electric plug from the instrument or an outlet, always
hold the plug itself and not the cord.
• Do not connect the instrument to an electrical outlet using a multiple-connector. Doing so can result in lower sound quality, or possibly cause overheating in the outlet.
• Unplug the AC power adaptor when not using the instrument, or during
electrical storms.
• Always make sure all batteries are inserted in conformity with the +/polarity markings. Failure to do so might result in overheating, fire, or battery fluid leakage.
• Always replace all batteries at the same time. Do not use new batteries
together with old ones. Also, do not mix battery types, such as alkaline batteries with manganese batteries, or batteries from different makers, or different types of batteries from the same maker, since this can cause
overheating, fire, or battery fluid leakage.
• Do not dispose of batteries in fire.
• Do not attempt to recharge batteries that are not intended to be charged.
• When the batteries run out, or if the instrument is not to be used for a long
time, remove the batteries from the instrument to prevent possible leakage
of the battery fluid.
• Keep batteries away from children.
• If the batteries do leak, avoid contact with the leaked fluid. If the battery
fluid should come in contact with your eyes, mouth, or skin, wash immediately with water and consult a doctor. Battery fluid is corrosive and may
possibly cause loss of sight or chemical burns.
• Before connecting the instrument to other electronic components, turn off
the power for all components. Before turning the power on or off for all
components, set all volume levels to minimum. Also, be sure to set the
volumes of all components at their minimum levels and gradually raise the
volume controls while playing the instrument to set the desired listening
level.
• Do not expose the instrument to excessive dust or vibrations, or extreme
cold or heat (such as in direct sunlight, near a heater, or in a car during the
day) to prevent the possibility of panel disfiguration or damage to the internal components.
(4)-7
power switch, disconnect the adaptor plug from the outlet, and have the
instrument inspected by qualified Yamaha service personnel.
• Use the specified adaptor (PA-5C or an equivalent recommended by
Yamaha) only. Using the wrong adaptor can result in damage to the instrument or overheating.
• Before cleaning the instrument, always remove the electric plug from the
outlet. Never insert or remove an electric plug with wet hands.
• Check the electric plug periodically and remove any dirt or dust which may
have accumulated on it.
• Do not use the instrument near other electrical products such as televisions, radios, or speakers, since this might cause interference which can
affect proper operation of the other products.
• Do not place the instrument in an unstable position where it might accidentally fall over.
• Before moving the instrument, remove all connected adaptor and other
cables.
• When cleaning the instrument, use a soft, dry cloth. Do not use paint thinners, solvents, cleaning fluids, or chemical-impregnated wiping cloths.
Also, do not place vinyl, plastic or rubber objects on the instrument, since
this might discolor the panel or keyboard.
• Do not rest your weight on, or place heavy objects on the instrument, and
do not use excessive force on the buttons, switches or connectors.
• Use only the stand specified for the instrument. When attaching the stand
or rack, use the provided screws only. Failure to do so could cause damage
to the internal components or result in the instrument falling over.
• Do not operate the instrument for a long period of time at a high or uncomfortable volume level, since this can cause permanent hearing loss. If you
experience any hearing loss or ringing in the ears, consult a physician.
■
DATA BACK-UP AND STORAGE
• Yamaha recommends that you regularly save data using a floppy disk and
storing the floppy disks in a safe, cool, dry place. YAMAHA CANNOT BE
HELD RESPONSIBLE FOR THE ACCIDENTAL LOSS OF IMPORTANT
MUSIC DATA! Regarding the data you have created, as long as fresh batteries are inserted in (or an AC power adaptor is connected to) the instrument, the data will be retained, even when the power is turned off. It will
also be retained long enough to exchange an old set of batteries for a new
set. If you have important data in the instrument which you don’t want to
lose, please take care to keep fresh batteries inserted in (or keep an AC
power adaptor connected to) the instrument, and to regularly save data.
Always turn the power off when the instrument is not in use.
Make sure to discard used batteries according to local regulations.
3

■
■
■
Congratulations on your purchase of the Yamaha PSR-350 PortaTone!
You now own a portable keyboard that combines advanced functions, great sound
and exceptional ease-of-use in a highly compact package. Its outstanding features
also make it a remarkably expressive and versatile instrument.
Read this Owner’s Manual carefully while playing your new PSR-350 in order to
take full advantage of its various features.
Main Features
The PSR-350 is a sophisticated yet easy-to-use keyboard with the following features and functions:
MUSIC DATABASE ............................. page 49
The PSR-350 has an advanced, easy-to-use Music Database feature that automatically selects the style,
voice, and effect settings for playing in a specific type of music. This can be a big help if you know what
genre of music you want to play , but you don’t know what settings to make. Just select the genre, and the
PSR-350 takes care of the rest!
Disk Drive ............................. page 69
The PSR-350 also features a convenient floppy disk drive letting you load and save your own original
User Songs or load the Style Files. The PSR-350 is also compatible with a wide variety of disk formats,
allowing you to play back song data on commercially available GM, DOC, and Clavinova Disklavier
Piano Soft disks.
It also allows you to save and play back Standard MIDI File (SMF) format 0 data,making it possible to use
song data with your favorite sequencer or sequencingsoftware.
Powerful Speaker System
The built-in stereo amplifier/speaker system of the PSR-350 with a special Bass Boost feature — provides
exceptionally powerful, high-quality sound, letting you hear the full dynamic range of the PSR-350’s
authentic voices.
Other powerful features include:
• The advanced Yamaha Education Suite — a special set of
learning tools that make it easy and fun to master the keyboard.
These tools include
parts of a song just as a teacher would,
which evaluates your practice sessions and rates your performance, and
• Instant
• Exciting
•
• Special
• 10 different
• High-quality
Portable Grand
ing the PSR-350 for optimum piano play. Includes an authentic Stereo Sampled Piano voice and special pianoaccompaniment Pianist styles.
DJ
and rhythms at your fingertips.
618
exceptionally
tal recordings of actual instruments.
Split voices
separate sections of the keyboard.
cussion sounds on each key.
ing the sound of the voices — and your performance.
Lesson
, which guides you through the
Grade & Talking
Dictionary
feature, which puts a wealth of dance/DJ sounds
Drum Kit voices
Reverb, DSP, and Harmony effects
, which teaches you how to play chords.
function, for automatically configur-
realistic and dynamic voices
, with two different voices playable from
, with individual drum and per-
, utilizing digi-
,
for enhanc-
•
106 auto accompaniment styles
B, and Ending sections. An Auto Fill function adds dynamic
fills when switching sections.
• Powerful, easy-to-use
ing and playing back up to five of your original songs.
•
Registration Memory
panel settings to a single button for instant and automatic
recall.
One T ouch Setting
•
appropriate voice to match the style or song you select.
Touch Response
•
narily expressive control over the voices. They automatically
change both the volume and tone according to your playing
strength — just like a real musical instrument!
• Full MIDI and
you easily integrate the PSR-350 into a MIDI music system,
and use the built-in GM voices with all GM software.
song recording
presets for storing all of the PSR-350’s
function for automatically calling up an
and
Dynamic Filter
General MIDI (GM) compatibility
, each with Intro, Main A and
operations, for record-
that give you extraordi-
, letting
4

Contents
Panel Controls and Terminals........................6
Setting Up.........................................................8
• Power Requirements..........................................8
• Turning On the Power.........................................8
• Accessory Jacks.................................................9
Quick Guide 10
Step 1 Voices ........................................................... 10
Step 2 Songs............................................................ 12
Step 3 Music Database............................................. 14
Step 4 Lesson .......................................................... 16
Panel Display Indications .............................18
Portable Grand...............................................20
• Playing the Portable Grand...............................20
• Using the Metronome .......................................20
DJ ....................................................................22
• Playing the DJ...................................................22
Playing Voices ...............................................23
• Playing a Voice.................................................23
• Dual Voice ........................................................25
• One Touch Setting............................................27
• Transpose and Tuning......................................27
• Touch and Touch Sensitivity.............................29
Effects.............................................................30
• Reverb..............................................................30
• DSP ..................................................................31
• Harmony...........................................................32
Auto Accompaniment....................................35
• Selecting a Style...............................................35
• Playing the Accompaniment.............................36
• Sync Stop .........................................................40
• Changing the Tempo........................................41
• Accompaniment Sections
(Main A/B and Fill-ins)......................................41
• Adjusting the Accompaniment Volume.............42
• Using Auto Accompaniment
— Multi Fingering .............................................43
• Setting the Split Point .......................................45
• Dictionary..........................................................46
Using the Music Database ............................49
• Data stored by the Music Database..................50
Registration Memory.....................................51
• Registration Memory Presets ...........................51
• Recording a Registration Memory Preset.........51
• Recalling a Registration Memory Preset ..........52
Selecting and Playing Songs ....................... 53
• Selecting and Playing a Song...........................53
• A-B Repeat.......................................................54
• Melody Voice Change.......................................55
• Changing the Tempo........................................56
• Adjusting the Song Volume ..............................57
Song Recording............................................. 58
• Recording a User Song ....................................58
• Song Clear.......................................................61
• Track Clear.......................................................62
Song Lesson.................................................. 63
• Using the Lesson Feature.................................63
• Select the Lesson Track...................................65
• Lesson 1 — Timing...........................................65
• Lesson 2 — Waiting..........................................66
• Lesson 3 — Minus One....................................66
• Lesson 4 — Both Hands...................................67
• Grade/Talking...................................................68
Disk Operations............................................. 69
• Disk Song Playback..........................................71
• Save..................................................................72
Saving files in SMF Format 0.......................74
• Load..................................................................75
• Utility – Delete...................................................76
• Utility – Formatting an Unformatted Disk..........77
• Utility – Formatting a Previously
Formatted Disk .................................................78
MIDI Functions............................................... 79
• What Is MIDI?...................................................79
• Connecting to a Personal Computer.................81
• Local Control.....................................................82
• Using Initial Setup Send with a Sequencer.......83
• External Clock...................................................84
Troubleshooting............................................ 85
Data Backup & Initialization ......................... 86
Voice List ....................................................... 87
Style List ........................................................ 94
Music Database List...................................... 95
Drum Kit List.................................................. 96
MIDI Implementation Chart........................... 98
Effect map.................................................... 100
Specifications.............................................. 101
Index............................................................. 102
5
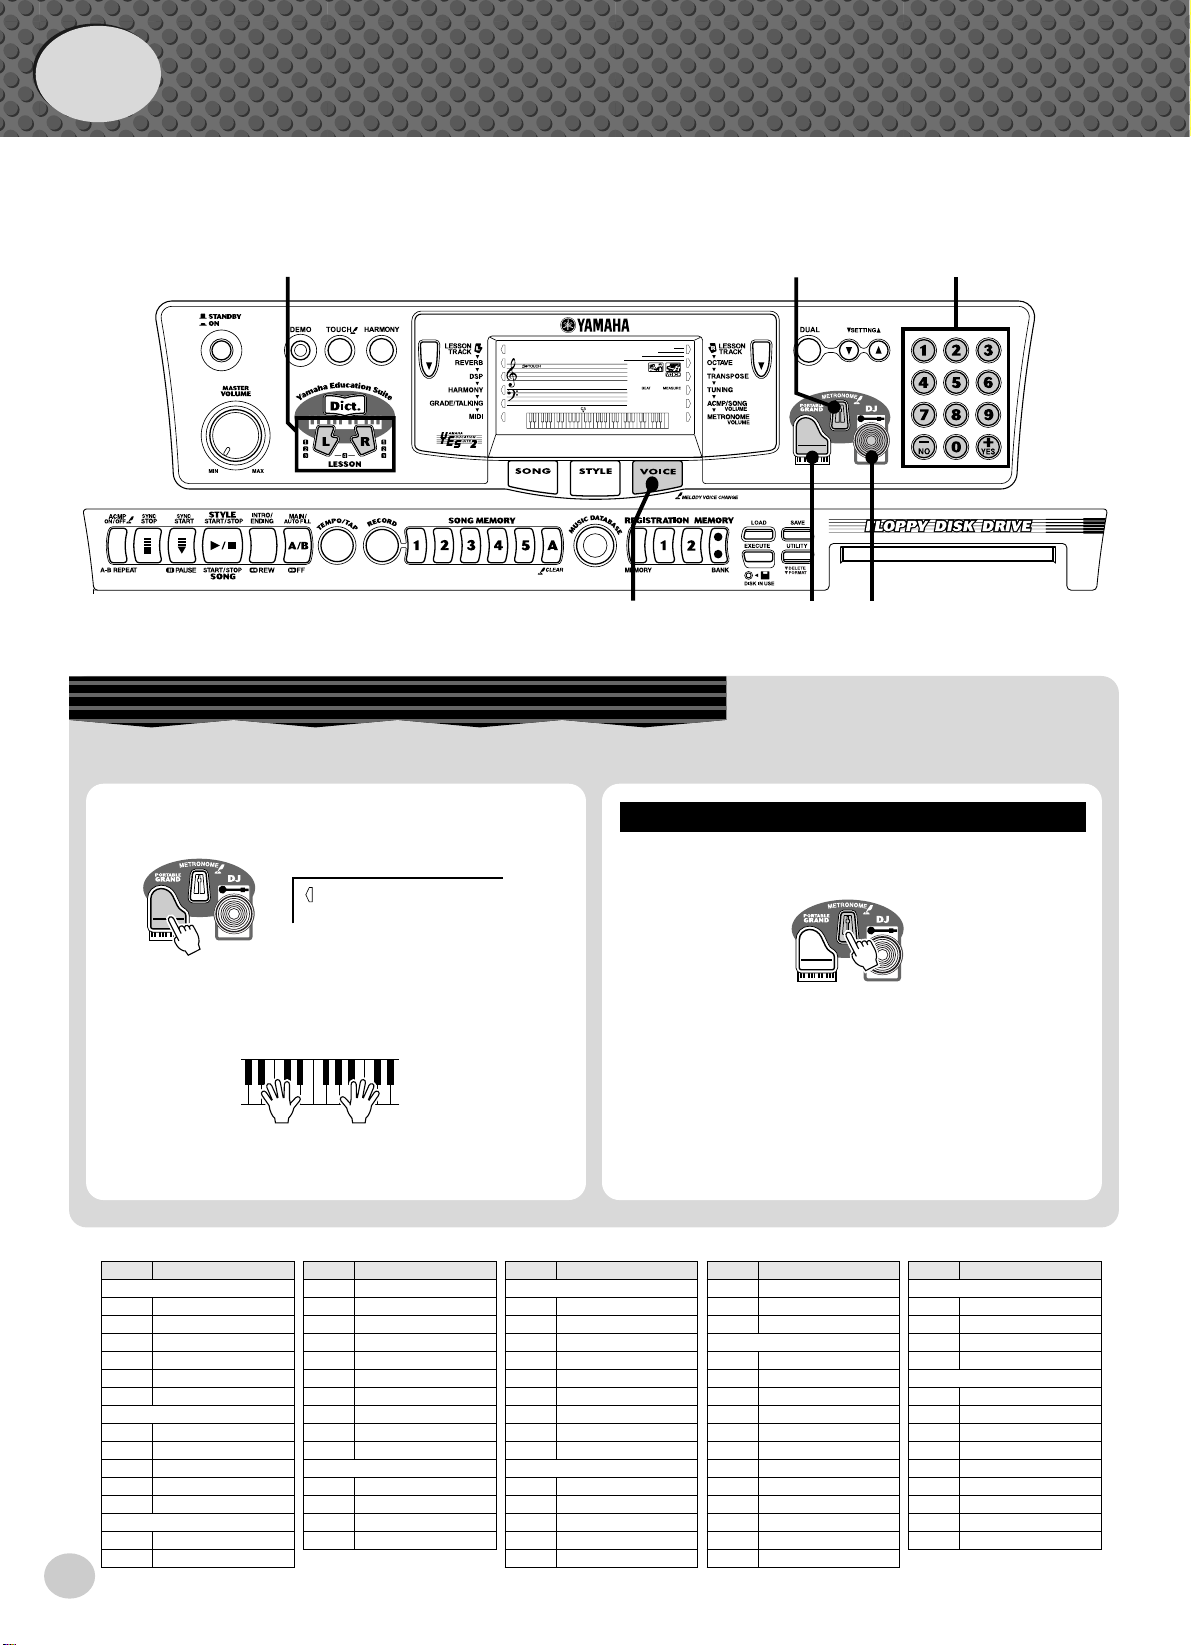
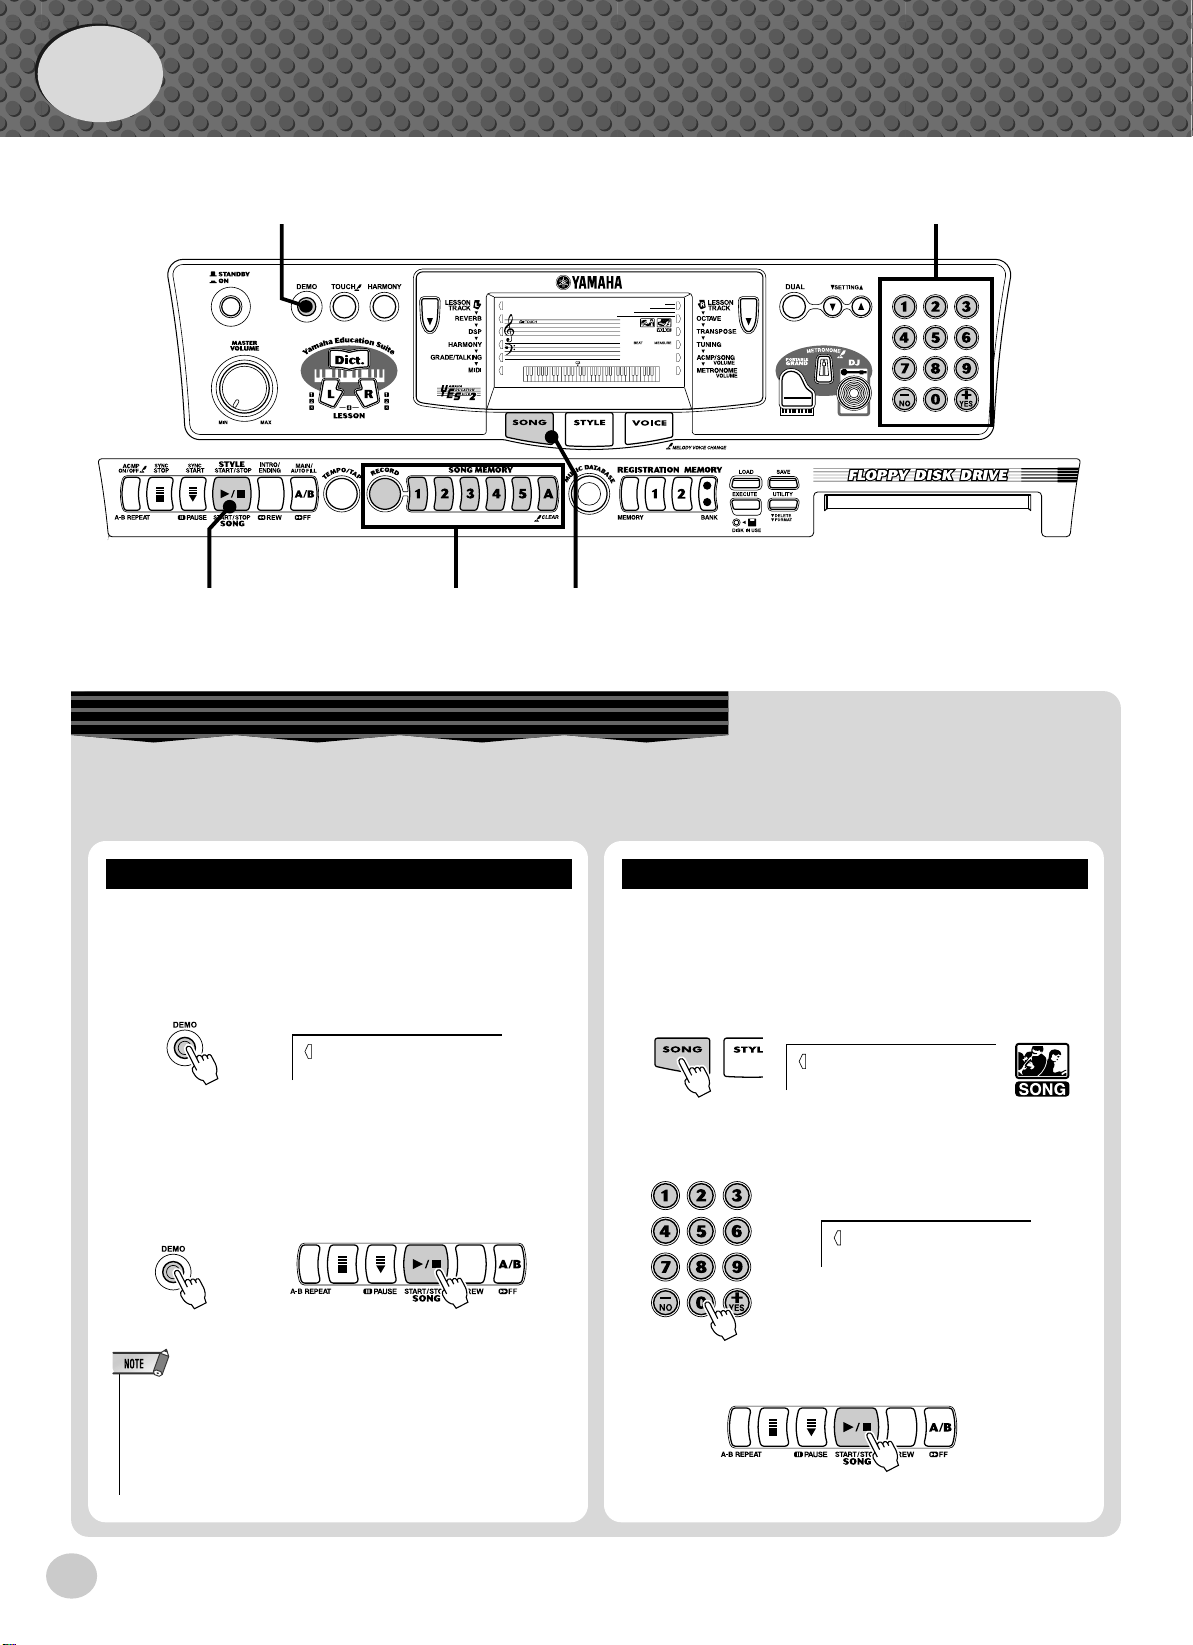
Panel Controls and Terminals
Front Panel
▲ / ▼
■
y y
i
@3
t
000
o
!0
@4 @6
e r
q
w
!7
!8
!9
@0
Power switch ([STANDBY/ON])
q
w
[MASTER VOLUME] dial
@1
@2
This determines the overall volume of the PSR-350.
e
[DEMO] button
This is used to play the Demo songs. (See page 12.)
[TOUCH] button
r
This turns the Touch function on and off. (See page
29.) Holding down this button allows you to adjust
the Touch Sensitivity setting. (See page 29.)
t
[HARMONY] button
This turns the Harmony effect on and off. (See page
32.)
Overall (left, right) buttons
y
These two buttons on either side of the LCD let you
call up various functions, settings, and operations of
the PSR-350, including effects, transpose, tuning, and
MIDI. (See page 18.)
GrandPno
!1
@5
o
u
001
!4
!3
!2
LESSON [L] (Left) and [R] (Right) buttons
!6
!5
@7
These call up the Lesson exercises for the corresponding hand (left or right) for the selected song. (See
page 64.)
!0
[SONG] button
This is for enabling song selection. (See page 53.)
!1
[STYLE] button
This is for enabling style selection. (See page 35.)
!2
[VOICE] button
This is for enabling voice selection. (See page 23.)
Holding down this button calls up the Melody Voice
Change function. (See page 55.)
!3
[PORTABLE GRAND] button
This instantly calls up the Grand Piano voice, plus a
special piano song and style. (See page 10.)
!4
[METRONOME] button
This turns the metronome on and off. (See page 20.)
u
[DUAL] and [SETTING ▲ / ▼ ] buttons
Use the [DUAL] button to turn the Dual voice on or
off. Use the [SETTING
] buttons to set the
parameters related to the Main and Dual voices.
i
[Dict.] (DICTIONARY) button
This calls up the Dictionary function (page 46).
6
!5
[DJ] button
This instantly calls up a special DJ voice, song and
style.
!6
Numeric keypad, [+/YES] and [-/NO] buttons
These are used for selecting songs, voices, and styles.
(See pages 24.) They are also used for adjusting certain settings and answering certain display prompts.
!7
[ACMP ON/OFF] / [A-B REPEAT] button
When the Style mode is selected, this turns the auto
accompaniment on and off. (See page 36.) In the
Song mode, this calls up the A-B Repeat function.
(See page 54.)
!8
[SYNC STOP] button
This turns the Sync Stop function on and off. (See
page 40.)
!9
[SYNC START] / [ PAUSE] button
This turns the Sync Start function on and off. (See
page 37.) In the Song mode, it is used to temporarily
pause song playback. (See page 55.)
@0
[START/STOP] button
When the Style mode is selected, this alternately starts
and stops the auto accompaniment. (See page 36.) In
the Song mode, this alternately starts and stops song
playback. (See page 54.)
@1
[INTRO/ENDING] / [ REW] button
When the Style mode is selected, this is used to control the Intro and Ending functions. (See page 36.)
When the Song mode is selected, this is used as a
“rewind” control, or move the song playback point
back toward the beginning.
@2
[MAIN/AUTO FILL] / [ FF] button
When the Style mode is selected, these are used to
change auto accompaniment sections and control the
Auto Fill function. (See page 41.) When the Song
Panel Controls and Terminals
mode is selected, this is used as a “fast forward” control, or move the song playback point toward the end.
@3 [TEMPO/TAP] button
This button is used to call up the Tempo setting, letting you set the Tempo with the numeric keypad or
[+]/[-] buttons. (See page 20.) It also allows you to
tap out the tempo and automatically start a selected
song or style at that tapped speed. (See page 37.)
@4 [SONG MEMORY] buttons
These buttons ([RECORD], [1] - [5], [A]) are used for
song recording, letting you record up to six different
tracks of a song (including a special Chord track).
(See page 59.) They are also used for clearing
recorded data of all or specific tracks of a User song.
(See pages 61, 62.)
@5 MUSIC DATABASE button
This calls up the optimum panel settings for selected
music genre. (See page 49.)
@6 REGISTRATION MEMORY buttons
These are used for selecting and recording the Registration Memory presets. (See page 51.)
@7 Disk Drive
This is for insertion of floppy disks, for loading and
saving of data. (See page 69.)
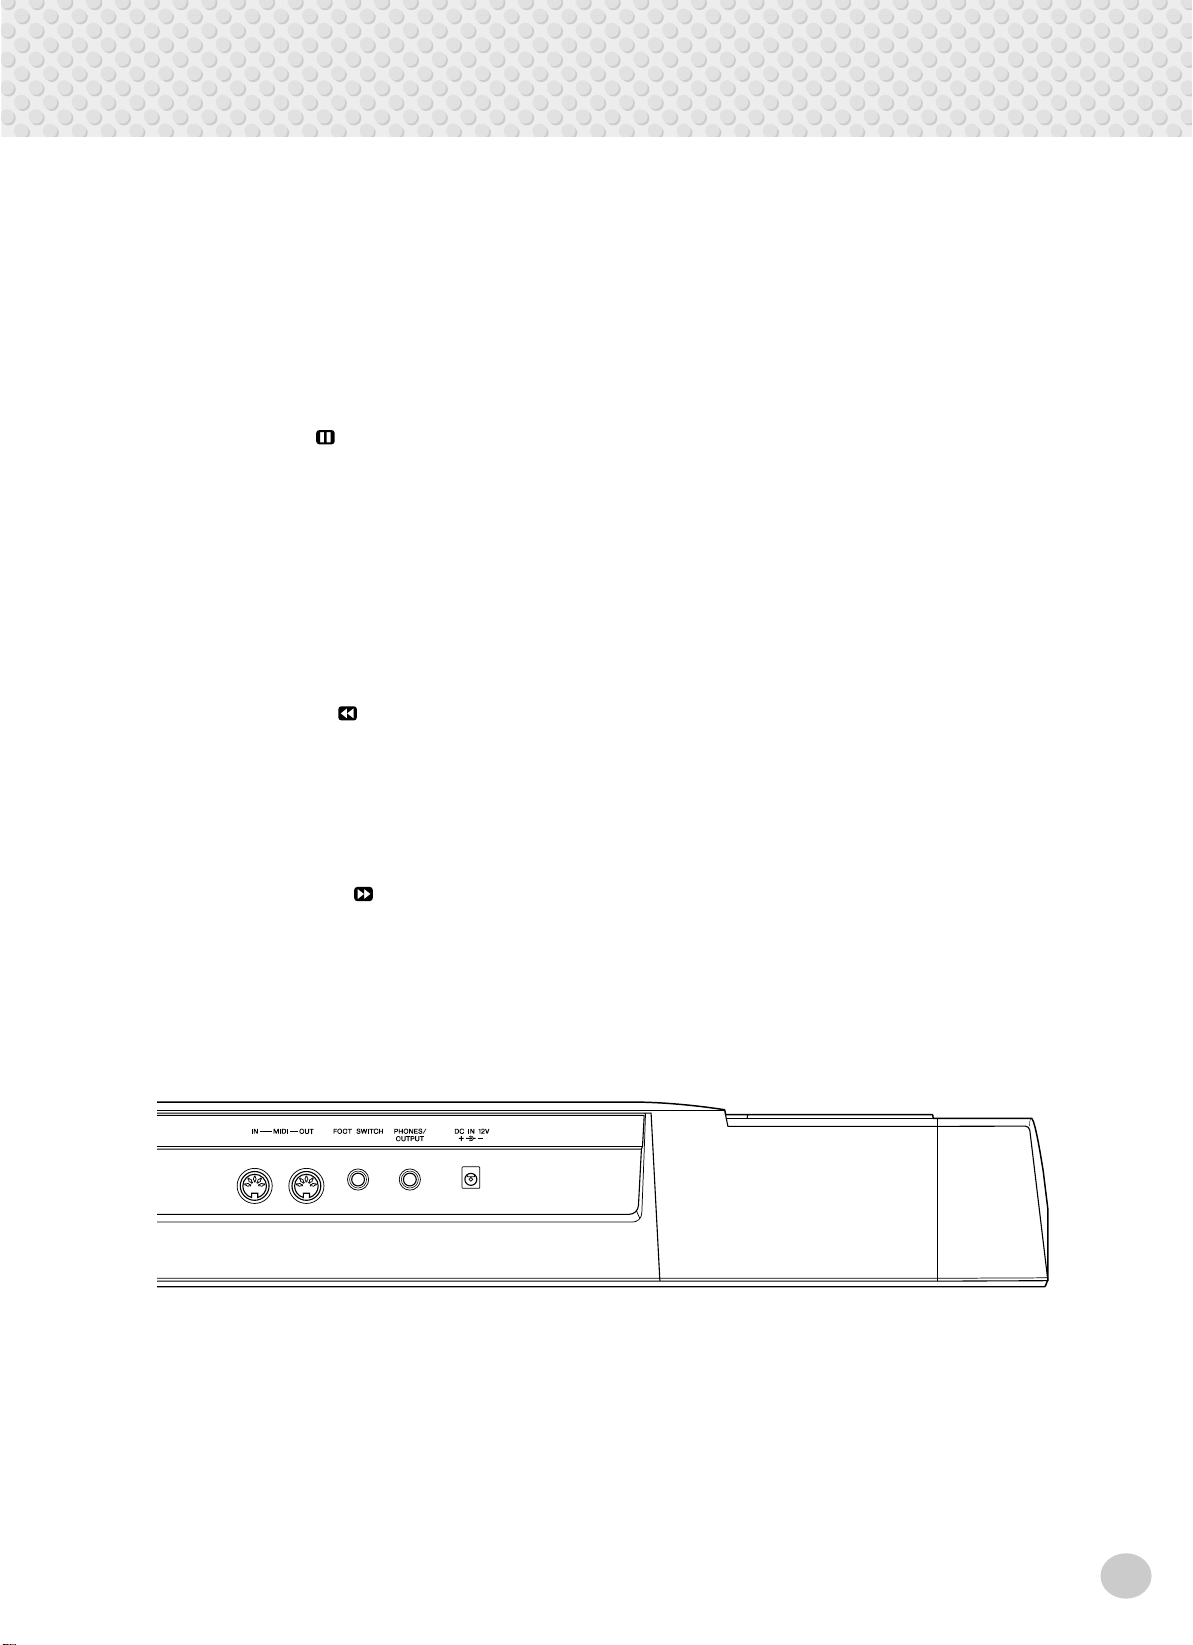
■ Rear Panel
@8
@9 #0
#1
@8 MIDI IN, OUT terminals
These are for connection to other MIDI instruments
and devices. (See page 80.)
@9
FOOTSWITCH jack
This is for connection to an optional FC4 or FC5
Footswitch for control over sustain, just like the
damper pedal on a piano. (See page 9.)
#0 PHONES/OUTPUT jack
This is for connection to a set of stereo headphones or
to an external amplifier/speaker system. (See page 9.)
#1
DC IN 12V jack
This is for connection to a PA-5C AC power adaptor.
(See page 8.)
7
Setting Up
This section contains information about setting up your PSR-350 for playing. Make sure to
read this section carefully before using the instrument.
Power Requirements
Although the PSR-350 will run either from an optional AC adaptor or batteries,
Yamaha recommends use of an AC adaptor whenever possible. An AC adaptor is
more environmentally friendly than batteries and does not deplete resources.
■ Using an AC Power Adaptor • • • • • • • • • • • • • • • • • • • • • • • • •
To connect your PSR-350 to a wall socket, you will need the optionally available
Yamaha PA-5C Power Adaptor. Use of other AC adaptors could result in damage
to the instrument, so be sure to ask for the right kind.
Make sure that the [STANDBY/ON] switch of the PSR-350 is set to STANDBY.
Connect one end of the adaptor to the DC IN 12V jack on the rear panel of your
PSR-350, and the other end to a suitable electrical outlet.
■ Using Batteries • • • • • • • • • • • • • • • • • • • • • • • • • • • • • • • • • •
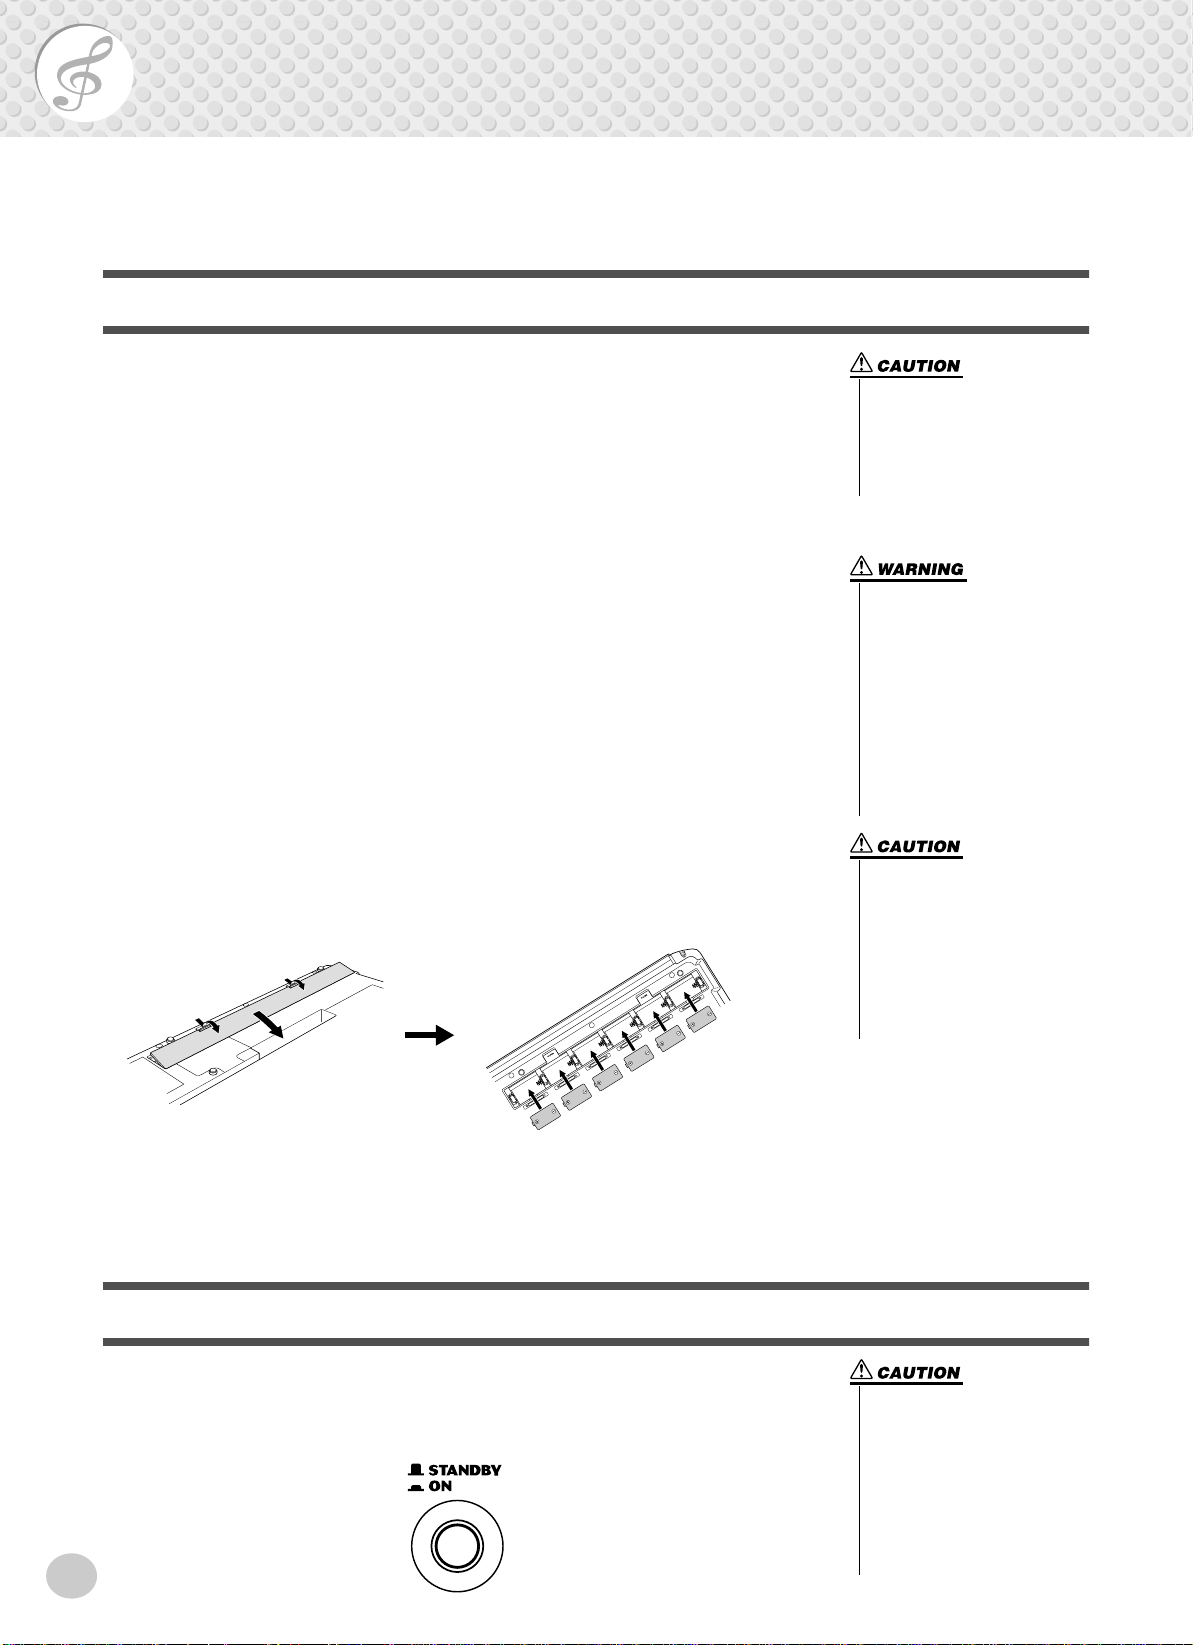
● Inserting Batteries
Turn the instrument upside-do wn and remove the battery compartment lid. Insert
six 1.5-volt “D” size, R20P (LR20) or equiv alent batteries as sho wn in the illustration, making sure that the positive and negative terminals are properly aligned,
and replace the lid.
• Never interrupt the power supply (e.g. remove the batteries
or unplug the AC adaptor) during any PSR-350 record operation! Doing so can result in a
loss of data.
• Use ONLY a Yamaha PA-5C AC
Power Adaptor (or other adaptor specifically recommended
by Yamaha) to power your
instrument from the AC mains.
The use of other adaptors may
result in irreparable damage to
both the adaptor and the PSR-
350.
• Unplug the AC Power Adaptor
when not using the PSR-350,
or during electrical storms.
• Never mix old and new batteries or different types of batteries (e.g., alkaline and
manganese).
• To prevent possible damage
from battery leakage, remove
the batteries from the instrument if it is not to be used for a
long time.
● When the Batteries Run Down
When the batteries run low and the battery voltage drops belo w a certain le vel, the
PSR-350 may not sound or function properly. As soon as this happens, replace
them with a complete set of six new batteries.
Turning On the Power
With the AC power adaptor connected or with batteries installed, simply press the
power switch until it locks in the ON position. When the instrument is not in use,
be sure to turn the power off. (Press the switch again so that it pops up.)
8
• Even when the switch is in the
“STANDBY” position, electricity is still flowing to the instrument at the minimum level.
When you are not using the
PSR-350 for a long time, make
sure you unplug the AC power
adaptor from the wall AC outlet, and/or remove the batteries
from the instrument.
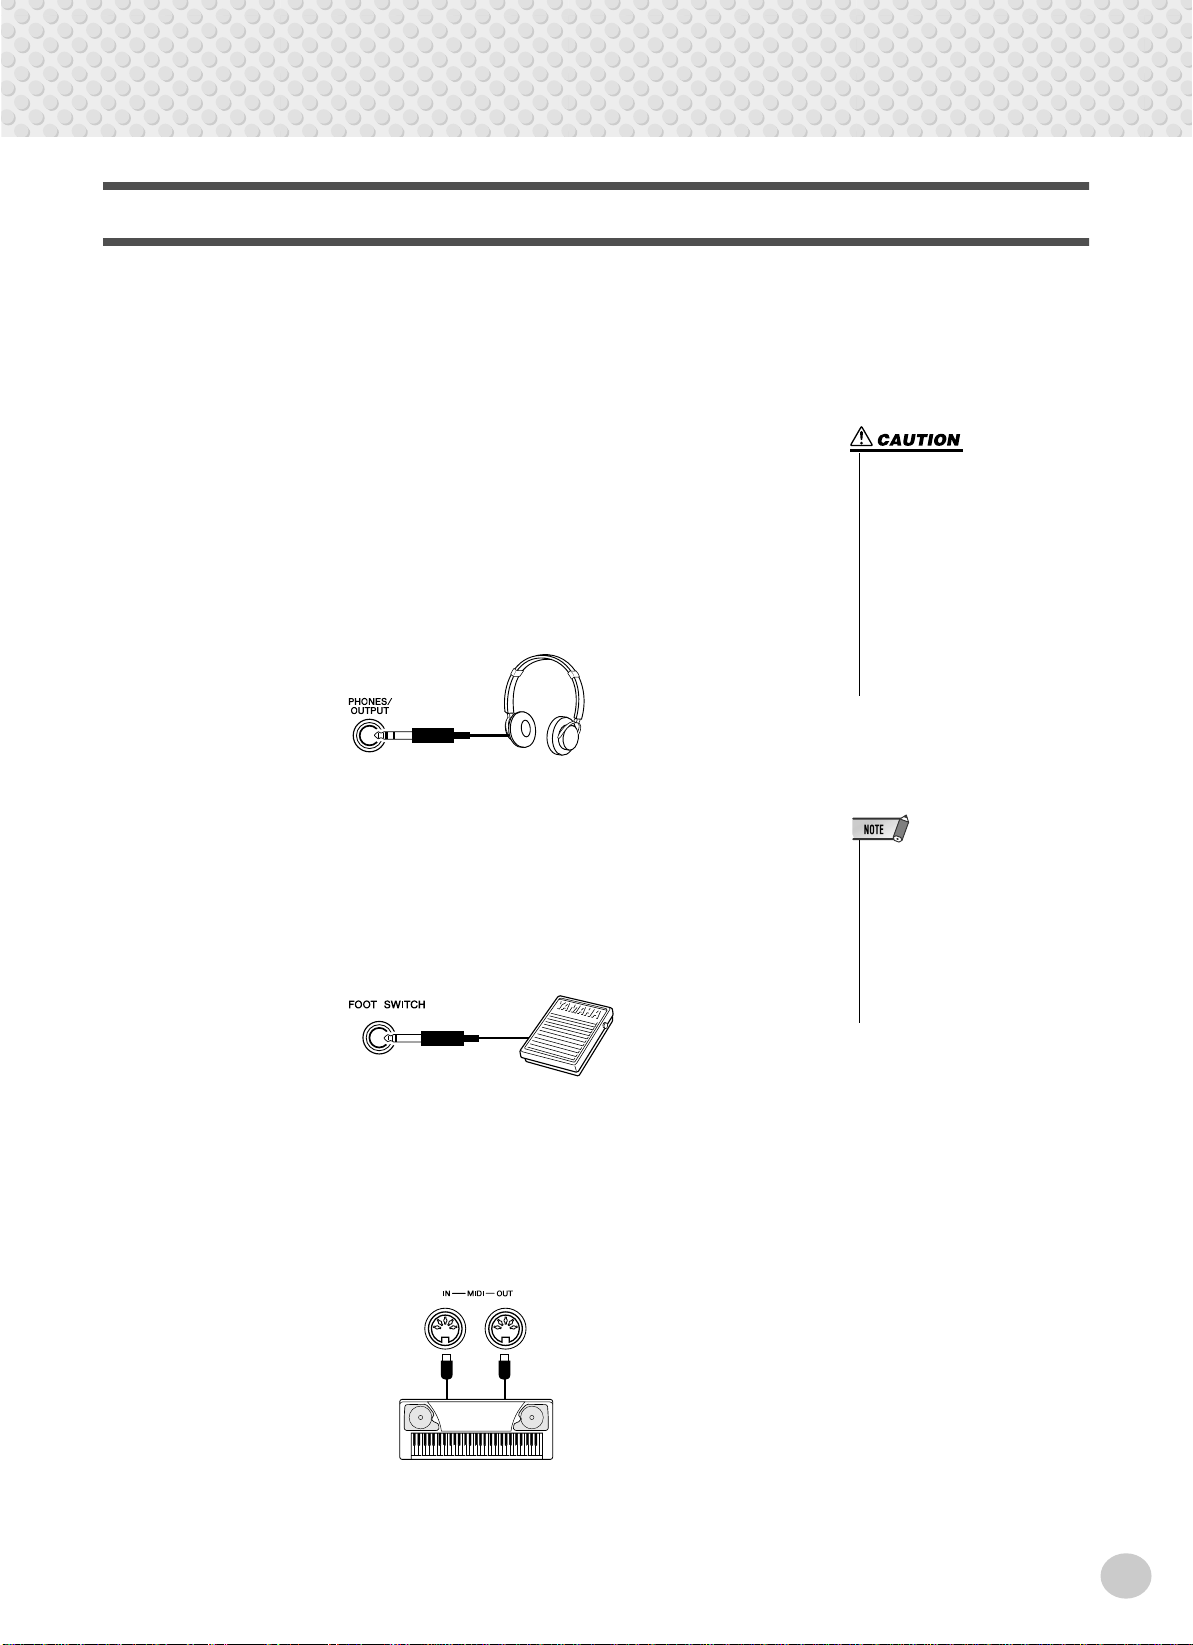
Accessory Jacks
-
■ Using Headphones• • • • • • • • • • • • • • • • • • • • • • • • • • • • • • • •
For private practicing and playing without disturbing others, connect a set of stereo headphones to the rear panel PHONES/OUTPUT jack. Sound from the builtin speaker system is automatically cut off when you insert a headphone plug into
this jack.
■ Connecting a Keyboard Amplifier or Stereo System • • • • • • •
Though the PSR-350 is equipped with a built-in speaker system, you can also play
it through an external amplifier/speaker system. First, make sure the PSR-350 and
any external devices are turned of f, then connect one end of a stereo audio cable to
the LINE IN or AUX IN jack(s) of the other device and the other end to the rear
panel PHONES/OUTPUT jack on the PSR-350.
Setting Up
• To prevent damage to the
speakers, set the volume of the
external devices at the minimum setting before connecting them. Failure to observe
these cautions may result in
electric shock or equipment
damage. Also, be sure to set
the volumes of all devices at
their minimum levels and grad
ually raise the volume controls
while playing the instrument to
set the desired listening level.
■ Using a Footswitch • • • • • • • • • • • • • • • • • • • • • • • • • • • • • • •
This feature lets you use an optional footswitch (Yamaha FC4 or FC5) to sustain
the sound of the voices. The footswitch functions the same way as a damper pedal
on an acoustic piano — press and hold down the footswitch as you play the keyboard to sustain the sound.
■ Using the MIDI Terminals • • • • • • • • • • • • • • • • • • • • • • • • • • •
The PSR-350 also features MIDI terminals, allowing you to interface the PSR350 with other MIDI instruments and devices. (For more information, see page
80.)
MIDI
instrument
• Make sure that the footswitch
plug is properly connected to the
FOOTSWITCH jack before turning on the power.
• Do not press the footswitch while
turning the power on. Doing this
changes the recognized polarity
of the footswitch, resulting in
reversed footswitch operation.
9
●
Quick
Guide
Step 1
Voices
w
000
GrandPno
001
z
z
qq
w
Playing the Piano
Simply by pressing the [PORTABLE GRAND] button, you can automatically reset the entire PSR-350 for piano play.
z
Press the [PORTABLE GRAND] button.
z
Playing along with the Metronome
Press the [METRONOME] button.
10
x
Play the keyboard.
Panel Voice List
No. Voice Name
PIANO
001 Grand Piano
002 Bright Piano
003 Honky-tonk Piano
004 MIDI Grand Piano
005 CP 80
006 Harpsichord
E.PIANO
007 Funky Electric Piano
008
DX Modern Elec. Piano
009 Hyper Tines
010 Venus Electric Piano
011 Clavi
ORGAN
012 Jazz Organ 1
013 Jazz Organ 2
000
GrandPno
Want to find out more? See page 20.
No. Voice Name
014 Click Organ
015 Bright Organ
016 Rock Organ
017 Purple Organ
018 16'+2' Organ
019 16'+4' Organ
020 Theater Organ
021 Church Organ
022 Chapel Organ
023 Reed Organ
ACCORDION
024
Traditional Accordion
025 Musette Accordion
026 Bandoneon
027 Harmonica
No. Voice Name
028 Classical Guitar
029 Folk Guitar
030 12Strings Guitar
031 Jazz Guitar
032 Octave Guitar
033 Clean Guitar
034 Muted Guitar
035 Overdriven Guitar
036 Distortion Guitar
037 Acoustic Bass
038 Finger Bass
039 Pick Bass
040 Fretless Bass
041 Slap Bass
GUITAR
BASS
Want to find out more? See page 20.
No. Voice Name
042 Synth Bass
043 Hi-Q Bass
044 Dance Bass
STRINGS
045 String Ensemble
046 Chamber Strings
047 Synth Strings
048 Slow Strings
049 Tremolo Strings
050 Pizzicato Strings
051 Orchestra Hit
052 Violin
053 Cello
054 Contrabass
055 Banjo
056 Harp
No. Voice Name
CHOIR
057 Choir
058 Vocal Ensemble
059 Vox Humana
060 Air Choir
SAXOPHONE
061 Soprano Sax
062 Alto Sax
063 Tenor Sax
064 Breathy Tenor
065 Baritone Sax
066 Oboe
067 English Horn
068 Bassoon
069 Clarinet
Step 1 Voices
Selecting and Playing Other Voices
The PSR-350 has a huge total of 618 dynamic and realistic instrument voices. Let’s try a few of them out now...
q
Press the [VOICE] button.
000
GrandPno
w
Select a voice.
e
Play the keyboard.
002
BritePno
Want to find out more? See page 23.
Playing with the DJ Feature
The exciting new DJ feature gives you a full variety of dance and DJ sounds — letting you create your own real-time mixes and
groove along with various contemporary rhythms.
q
Press the [DJ] button.
000
DJ Set1
w
Press the Lesson [L] or [R] button.
e
Play the DJ voice.
Want to find out more? See page 22.
No. Voice Name
TRUMPET
070 Trumpet
071 Muted Trumpet
072 Trombone
073 Trombone Section
074 French Horn
075 Tuba
BRASS
076 Brass Section
077 Big Band Brass
078 Mellow Horns
079 Synth Brass
080 Jump Brass
081 Techno Brass
FLUTE
082 Flute
No. Voice Name
083 Piccolo
084 Pan Flute
085 Recorder
086 Ocarina
SYNTH LEAD
087 Square Lead
088 Sawtooth Lead
089 Voice Lead
090 Star Dust
091 Brightness
092 Analogon
093 Fargo
SYNTH PAD
094 Fantasia
095 Bell Pad
096 Xenon Pad
No. Voice Name
097 Equinox
098 Dark Moon
PERCUSSION
099 Vibraphone
100 Marimba
101 Xylophone
102 Steel Drums
103 Celesta
104 Tubular Bells
105 Timpani
106 Music Box
107 Aco.Bass /
108 FngrBass /
SPLIT
GrandPno
GrandPno
No. Voice Name
109 Fretless / DXModern
110 Aco.Bass / Vibe
111 Fretless / Brass
112 Analogon /
Saw.Lead
113 SlapBass / Clavi
114 ClassGtr / Flute
115 Strings / GrandPno
116 V.Humana / Choir
DRUM KITS
117 Standard Kit 1
118 Standard Kit 2
119 Room Kit
120 Rock Kit
121 Electronic Kit
122 Analog Kit
No. Voice Name
123 Dance Kit
124 Jazz Kit
125 Brush Kit
126 Symphony Kit
127 SFX Kit 1
128 SFX Kit 2
11
Quick
Guide
Step 2 Songs
000
xqzx
GrandPno
001
zxcr w
Playing the Songs
The PSR-350 is packed with a total of 100 songs, including three Demo songs, plus seventeen songs that have been specially
created to showcase the rich and dynamic sounds of the instrument. There are also eighty additional songs, designed to be used
with the educational Lesson feature.
Playing
Let’s play the Demo songs now, Repeating with (001 -
003)
Start the Demo song.
z
001
Mission
You can also play back songs of other categories. Simply
select the appropriate number of the desired song during
playback.
x
Stop the Demo song.
or
Naturally, you can also individually select and play back
the PSR-350’s songs (001 - 205).
z
Press the [SONG] button.
x
Select a song.
Playing
001
002
Mission
Beauty&B
12
• The PSR-350 also has a Demo Cancel function that allows you to
disable Demo playback.
To enable Demo Cancel, simultaneously hold down the [DEMO] button and turn on the power.
To restore the Demo capabilities, simply turn the power off and on
again.
c
Start (and stop) the song.
Want to find out more? See page 53.
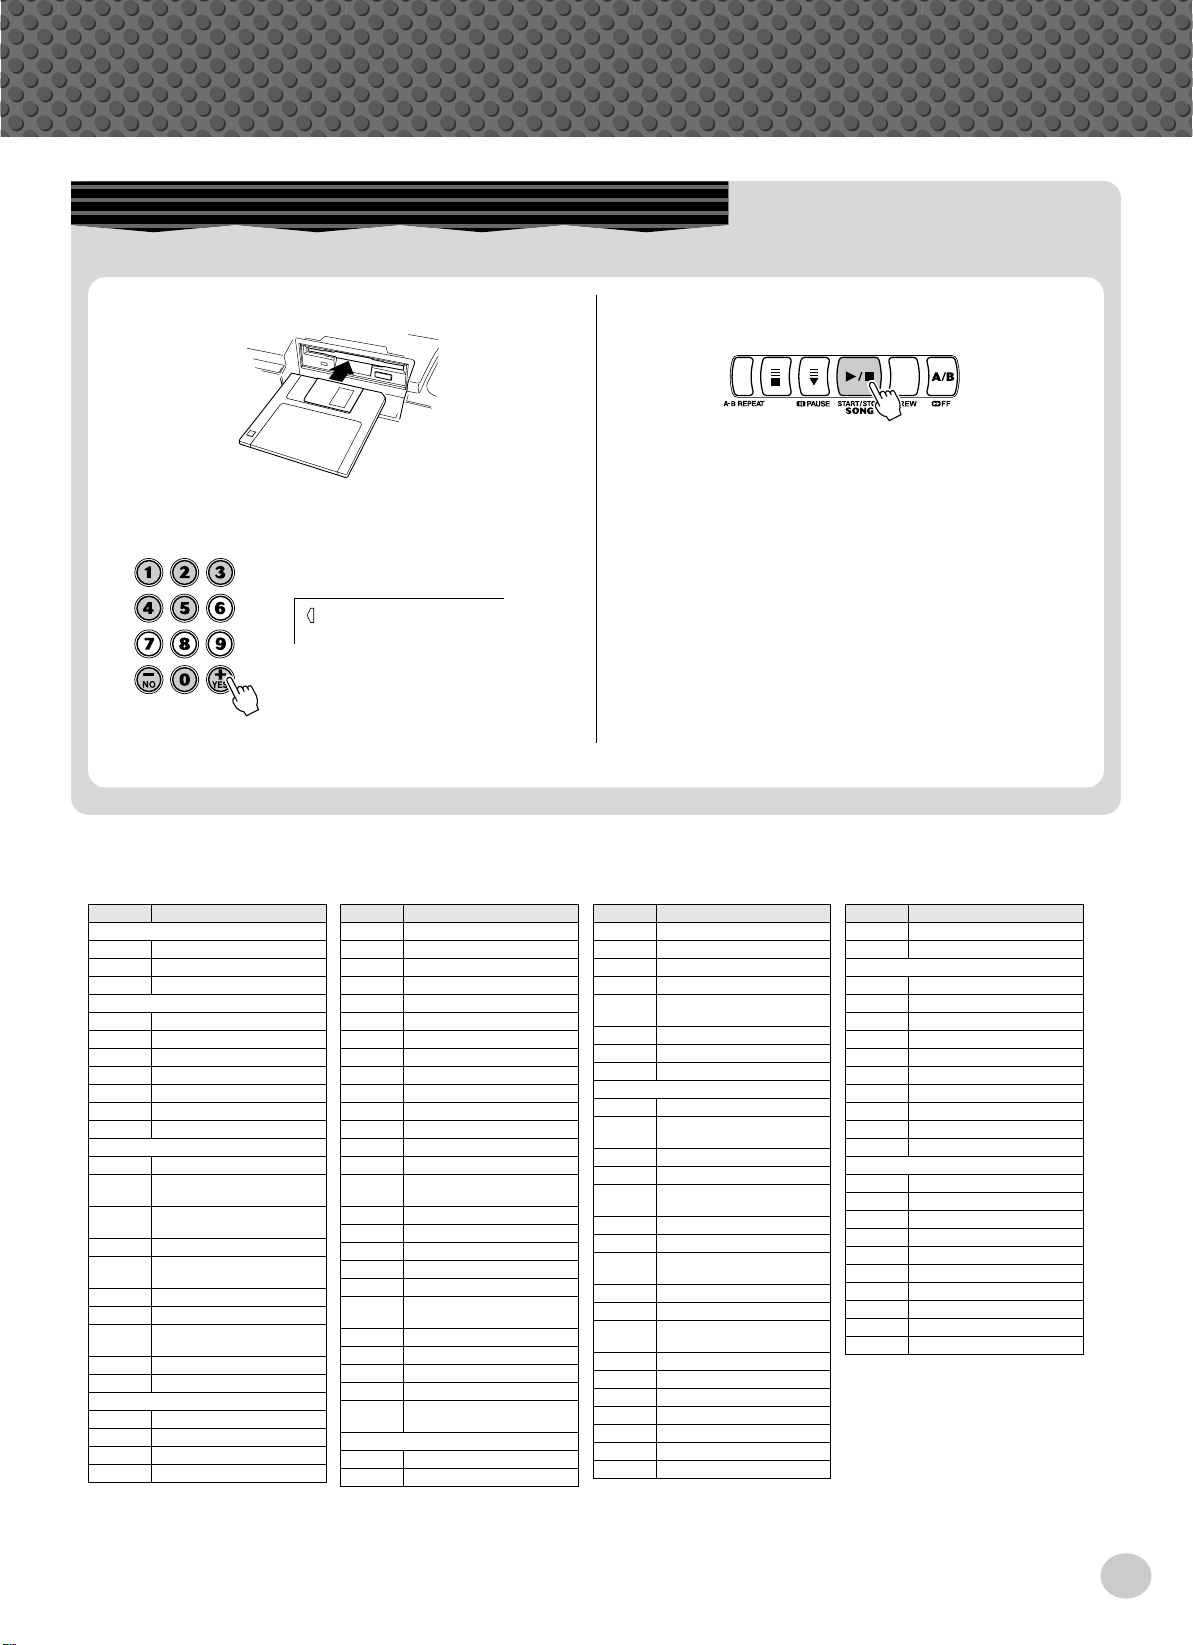
Playing the Disk Song
This function lets you play songs contained on the included disk or on other song data disks.
Step 2 Songs
Insert the disk.
q
w
Select a desired User song for recording.
101
Filename
● Song List
No. Song Name
001 Mission:Impossible
002 Beauty And The Beast
003 Linus And Lucy
004 Rock Chick
005 Love You
006 Electric Path
007 Twilight
008 Beach Party
009 Sometime
010 Slunky
011 Frühlingsstimmen
012 Danse Des Mirlitons From
013 "Orphée Aux Enfers" Ou014 Slavonic Dances No.10
015 La Primavera (From Le
016 Méditation De Thais
017 Guillaume Tell
018 Valse Des Fleurs
019 Frühlingslied
020 Ungarische Tänze Nr.5
021 Little Brown Jug
022 Loch Lomond
023 Oh! Susanna
024 Song Of The Pearl Fisher
Demo
Bandman
Orchestra
"The Nutcracker"
verture"
Quattro Stagioni)
(From"The Nutcracker")
Practice
No. Song Name
025
026 Die Lorelei
027 Funiculi-Funicula
028 Greensleeves
029 Aura Lee
030 Londonderry Air
031 Ring De Banjo
032 Turkey In The Straw
033 Old Folks At Home
034 Silent Night
035 Jingle Bells
036 Muss I Denn
037
038 Gavotte
039 String Quartet No.17 2nd
040 Menuett
041 Canon
042 The Danube Waves
043 From "The Magic Flute"
044 Symphonie Nr.9
045 Piano Sonate Op.27-2
046 Liebesträume Nr.3
047 "The Surprise"Symphony
048 To A Wild Rose
049 Air de Toréador"Carmen"
050 O Mio Babbino Caro
051 Ten Little Indians
052 Mary Had A Little Lamb
Wenn Ich Ein Vöglein War ?
Jesu, Joy Of Man's Desiring
Mov. "Serenade"
"Mondschein"
(From "Gianni Schicchi")
Duet
e
To start or stop playing, press the [START/
STOP] button.
Want to find out more? See page 71.
No. Song Name
053 O Du Lieber Augustin
054 Twinkle Twinkle Little Star
055 Pop Goes The Weasel
056 Im Mai
057 Close Your Hands, Open
Your Hands
058 The Cuckoo
059 London Bridge
060 O Christmas Tree
061 Für Elise
062 Dolly's Dreaming And
063 La Viollette
064 Menuett
065 Prelude (Wohltemperierte
066 Marcia Alla Turca
067 Turkish March
068 Moments Musicaux
069
070 Nocturne Op.9-2
071 Etude Op.10-3 "Chanson
072 La Candeur
073 Arabesque
074 Pastorale
075 Petite Réunion
076 Innocence
077 Progrès
078 Tarentelle
Pianist
Awakening
Klavier 1-1)
Op.94-3
Valse Op.64-1 "Peiti Chien"
De L'adieu"
No. Song Name
079 La Chevaleresque
080 The Entertainer
081 Amazing Grace
082 My Bonnie
083 Beautiful Dreamer
084 Yankee Doodle
085 Grandfather's Clock
086
087 Aloha Oe
088 My Darling Clementine
089 Auld Lang Syne
090 American Patrol
091 DJ Game
092 Ragga
093 Digital Rock
094 Hip House
095 All That
096 Pop Reggae
097 Acid House
098 SupaBad
099 Acid Techno
100 Flares
Accomp
Battle Hymn Of The Republic
DJ
*For the songs #021- #090, refer to the included Song Book.
13
Quick
Accompaniment
section
Left hand
Auto accompaniment
(for example,
bass + guitar + drums)
Right hand
Melody
+
Guide
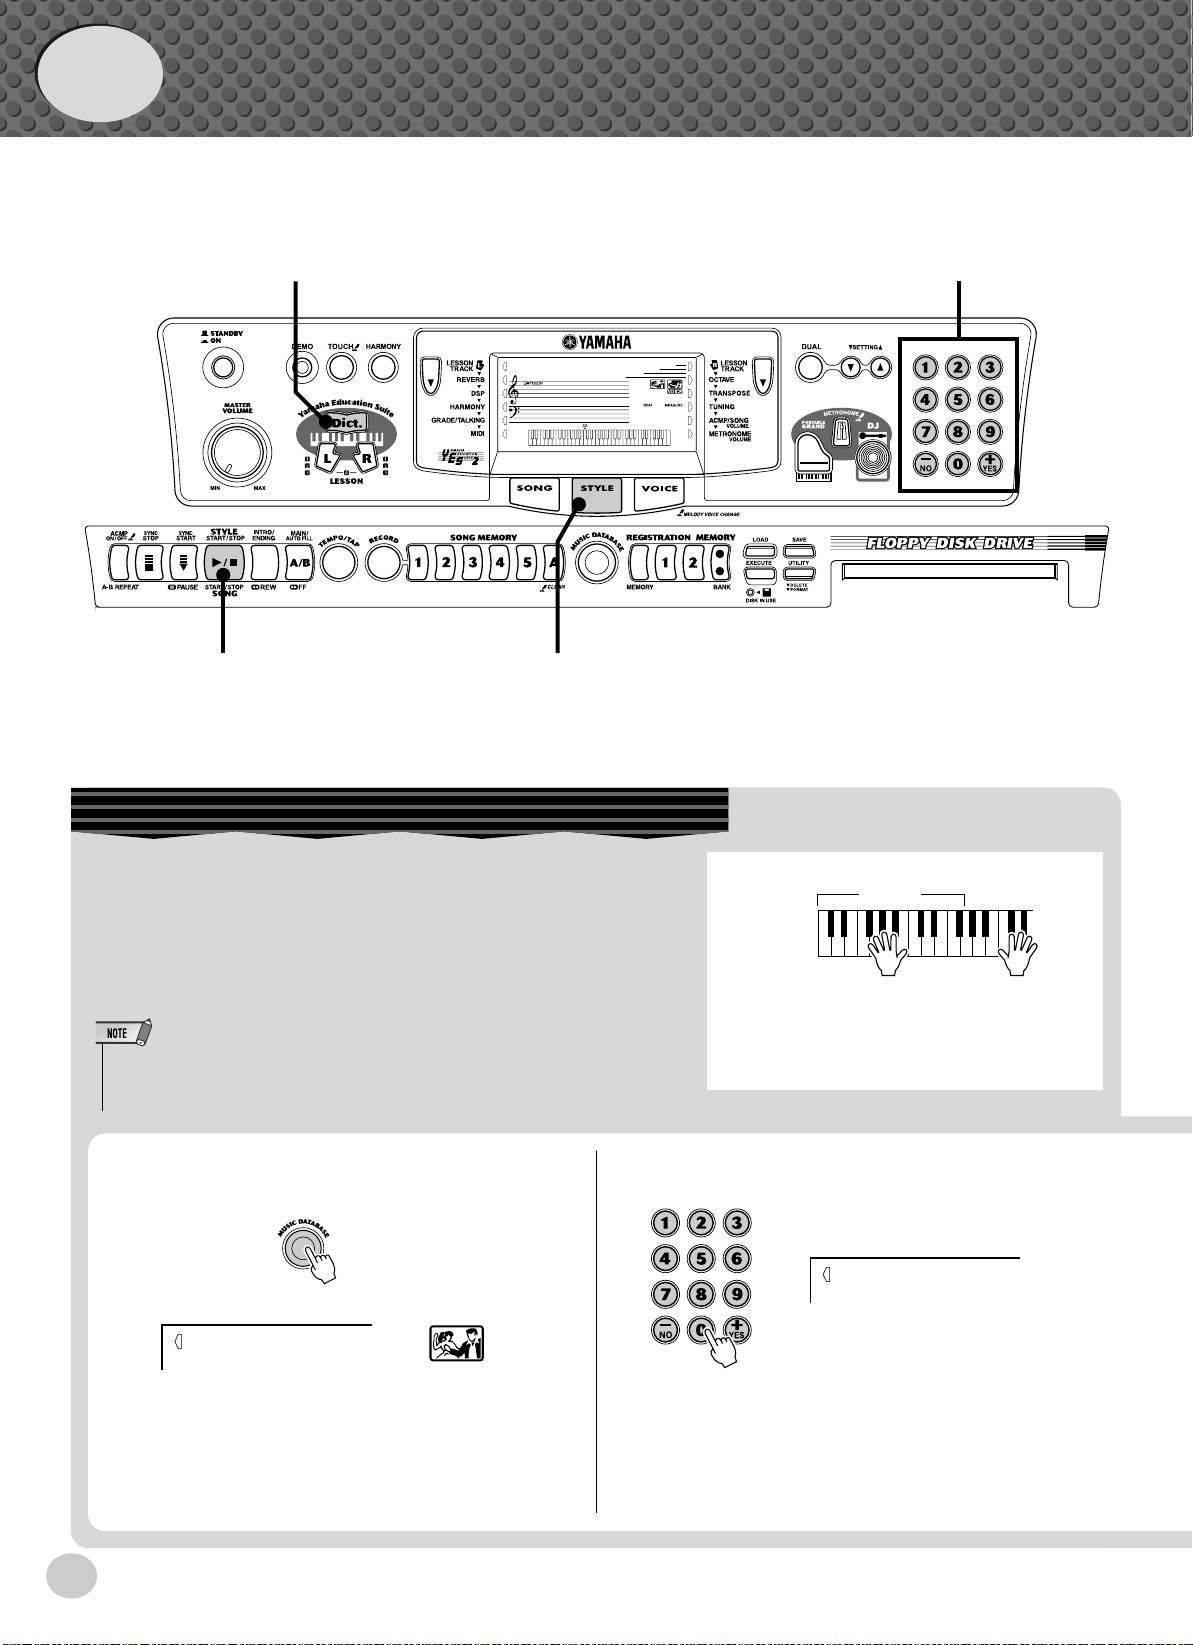
Step 3 Music Database
Music Database
zb
000
x
GrandPno
001
zv
Here's a convenient feature that lets you instantly reconfigure the
PSR-350 for playing in different music styles. If you want to perform in a certain genre but don't know what settings to make, simply
select the genre from the Music Database — and the PSR-350
makes all the right settings for you!
• For more infomation on playing proper chords for the auto accompaniment, see “Using Auto Accompaniment — Multi Fingering” on page
43 and “Looking up Chords in the Dictionary” on the next page.
z
Press the [MUSIC DATABASE] button.
001
AlvFevr
x
Select a Music Database.
Refer to the Music Database List on page 95.
002
Croco RK
14

Step 3 Music Database
Looking up Chords in the Dictionary
The convenient Dictionary function teaches you how to play chords by showing you the individual notes. In the example
below, we’ll learn how to play a GM7 chord...
c
Keys for entering
the chord type (C3 — B4)
Learning
Example:
GM7
Root note Chord type
Keys for entering
the chord root (C5 — B5)
Specify the chord type of the chord (in this
case, M7).
v
Play the notes of the chord as indicated in the
keyboard diagram in the display. The chord
name flashes when the chord is played properly.
z
Press the [Dict.] button.
Dict.
x
Specify the root note of the chord (in this case,
G).
c
Play a chord with your left hand.
The auto accompaniment
starts as soon as you play the
keyboard. For more on
chords, see “Looking up
Chords in the Dictionary”
above.
Accompaniment
section
Accompaniment
section
b
To leave the Dictionary function, press the
[Dict.] button again
Want to find out more? See page 46.
v
Stop the auto accompaniment.
Want to find out more? See page 49.
15

Quick
Guide
Step 4 Lesson
z zv
000
xx
GrandPno
001
Using the Lesson Feature
Songs 021 to 100 are specially designed for use with the educational Lesson feature. Lesson makes it fun and easy to master
these songs. You can practice the left- and right-hand parts of each song individually: simply press the appropriate button, [L]
(left) or [R] (right). The practice steps below apply to either hand.
Lesson 1 — Timing. . . . . . . . .This lesson step lets you practice just the timing of the notes.
Lesson 2 — Waiting . . . . . . . .In this lesson step, the PSR-350 waits for you to play the correct notes before continuing
playback of the song.
Lesson 3 — Minus One . . . . .This lesson step plays back the song with one part muted — letting you play and master the
missing part yourself.
Lesson 4 — Both Hands. . . . .This lesson step is the same as “Minus One,” except in that both the left- and right-hand
parts are muted — letting you play and master both hands.
z
Select one of the Lesson songs.
For instructions on selecting songs, see page 63.
Select the part you wish to work on (left or
x
right) and the Lesson step.
If you want to work on the right-hand part, press the
[R] button; to work on the left, press the [L] button.
c
Start the Lesson.
v
When you’re finished, stop the Lesson.
16
r1
Timing
• Each press of the corresponding button ([L] or [R]) alternately selects
Lessons 1 - 3. Pressing both buttons simultaneously calls up Lesson
4, Both Hands.
• You can also exit from the Lesson by pressing one the LESSON buttons ([L] or [R]) repeatedly until song name is shown in the display.
Lesson
This step lets you work on the timing of the notes. In Lesson 1, the particular note you play on the keyboard is
unimportant. The PSR-350 checks your timing and how
rhythmically “tight” your playing is.
Step 4 Lesson
The PSR-350 has a built-in evaluation function that monitors your practicing and — like a real teacher — tells you
how well you did each exercise. F our grades are assigned,
depending on your performance: “OK,” “Good,” “Very
Good,” and “Excellent.”
r1
Timing
Want to find out more? See page 65.
Lesson
In Lesson 2, you practice playing the notes correctly as
they appear in the display notation. The accompaniment
pauses and waits for you to play the notes correctly before
it continues.
r2
Waiting
Want to find out more? See page 66.
Lesson
In Lesson 3, one of the parts is muted, and you practice
the missing part in time with the rhythm.
Want to find out more? See page 68.
This feature “talks” to you through the speakers,
“announcing” the Grade comments as well as the titles of
the Lesson steps.
Want to find out more? See page 68.
Naturally, you can change the tempo (speed) of the song
to your liking, letting you slow down difficult passages
and bring up the tempo gradually until you master them at
normal speed.
Press the [TEMPO/TAP] button.
z
120
TEMPO
r3
MinusOne
Want to find out more? See page 66.
Lesson
Lesson 4 is just like Lesson 3, except that the parts for
both hands are muted, letting you practice the missing
parts in time with the rhythm.
Lr4
BothHand
Want to find out more? See page 67.
x
Use the numeric keypad to set the desired
tempo.
• The PSR-350 also has a convenient Tap Tempo function that allows
you to “tap” a new tempo in real time. (See page 37.)
17
Panel Display Indications
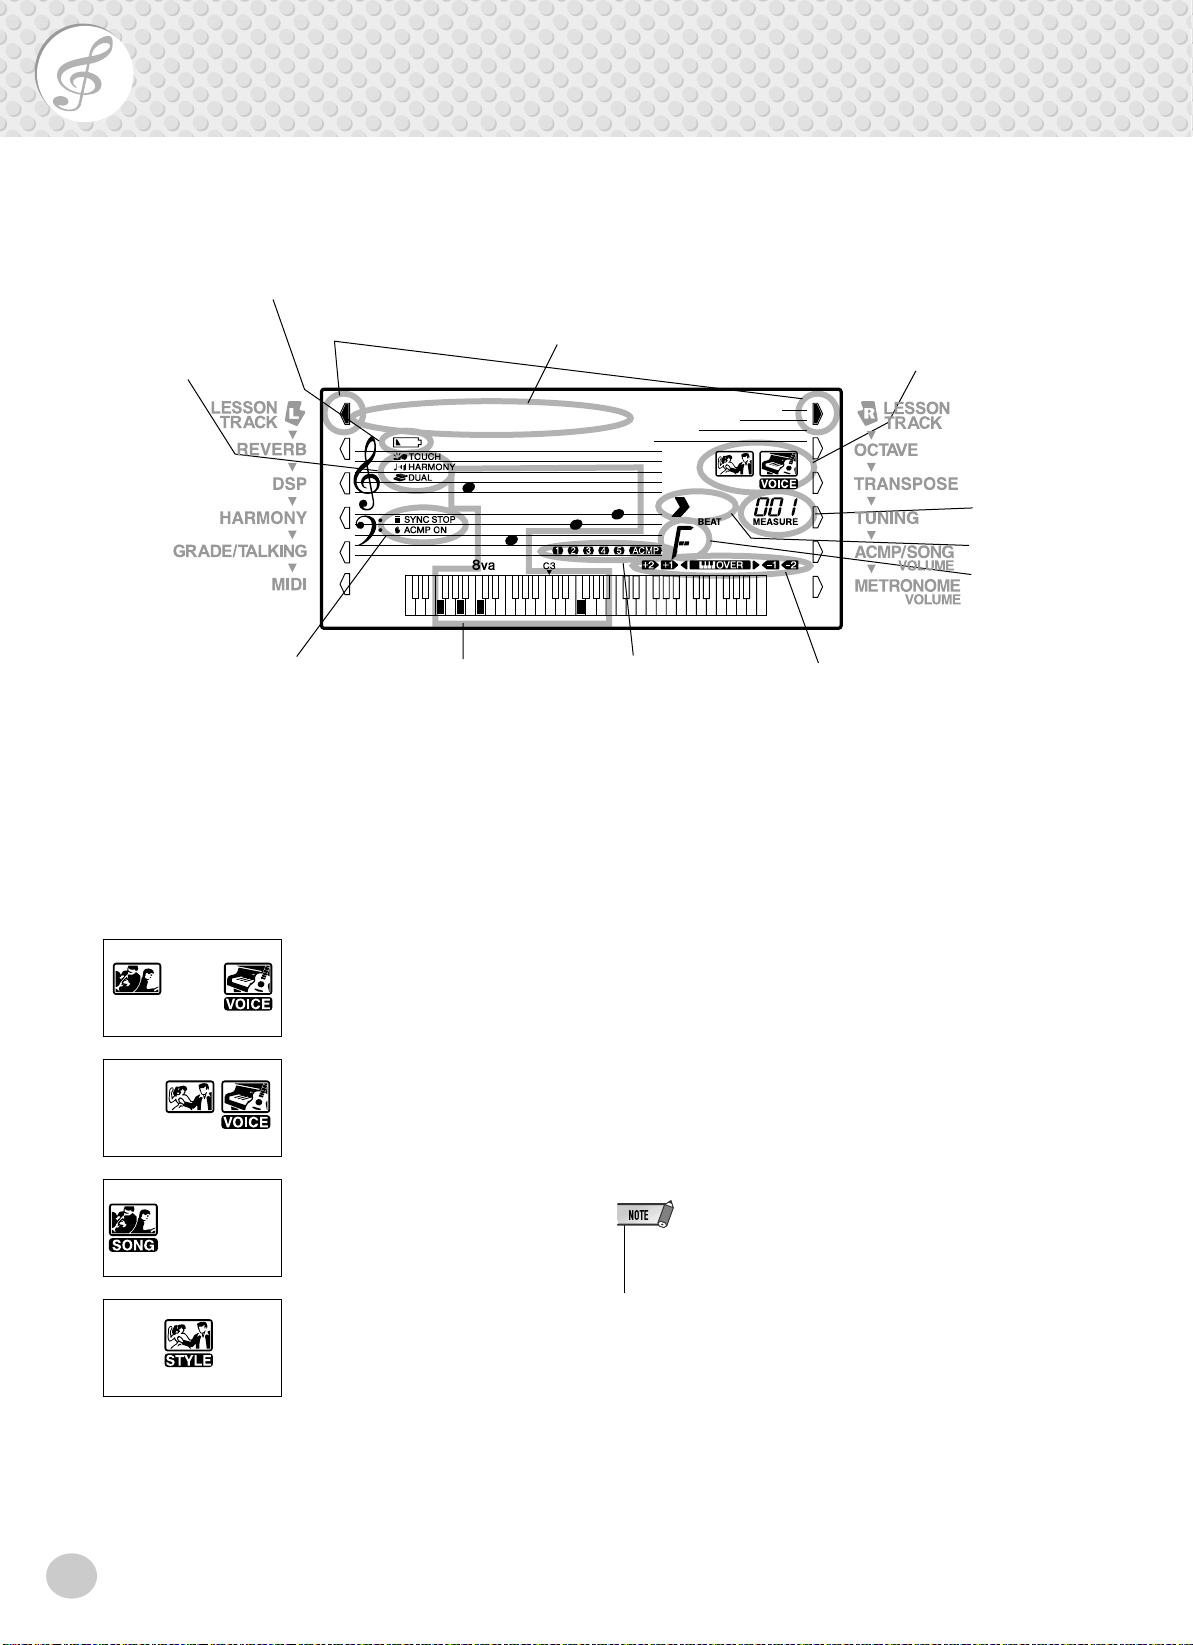
The PSR-350 features a large multi-function display that shows all important settings for the
instrument. The section below briefly explains the various icons and indications in the display.
!6 Battery Level indicator
!0 Touch indicator
!1 Harmony indicator
!2 Dual indicator
!3 Sync Stop indicator
!4 Accompaniment On
indicator
w Overall indicator
001
GrandPno
e Notation
r Keyboard
i Song/Voice/Style name and
number, Tempo
q Indicators
These indicate the operating condition of the PSR-350
as shown below:
Using the numeric keypad selects
voice numbers. Pressing the
[START/STOP] button starts song
playback.
Using the numeric keypad selects
voice numbers. Pressing the
[START/STOP] button starts style
playback.
Using the numeric keypad selects
song numbers. Pressing the
[START/STOP] button starts song
playback.
Using the numeric keypad selects
style numbers. Pressing the
[START/STOP] button starts style
playback.
q Indicators
t Measure
y Beat marks
u Chord
o Song track
indicators
!5 Octave indicator
w Overall indicator
The Overall buttons (on either side of the LCD) let
you access the Function operations and settings of the
PSR-350. The currently selected setting is indicated
by a dark bar that appears next to its name (printed on
the panel).
e Notation / r Keyboard
These two portions of the display conveniently indicate notes. When a song is being played back, they
show the melody or chord notes in succession. When
you play the keyboard yourself, the display shows the
notes you play.
• For a few specific chords, not all notes may be shown in the notation section of the display. This is due to space limitations in the
display.
t Measure
These show the current measure during playback of a
song or style.
18
y Beat marks
These marks (one large, three small) flash in sequence
and in time with the song or style. The large arrow
indicates the first beat of the measure.

Panel Display Indications
u Chord
When a song (with chords) is being played back, this
indicates the current chord root and type. It also indicates chords played in the ACMP section of the keyboard when the Style mode and auto accompaniment
are on.
i Song/Voice/Style name and number,
Tempo
This portion of the display indicates the name and
number of the currently selected song, voice, or style.
It also displays the name and current value or setting
of the Overall functions and the Function parameters,
as well as other important operation messages.
When the tempo setting is active, the value is shown.
o Song track indicators
In song recording and playback, these indicate the status of the tracks. (See page 59.)
!0 Touch indicator
This appears when the Touch function is turned on.
(See page 29.)
!2 Dual indicator
This appears when the Dual function is turned on.
(See page 25.)
!3 Sync Stop indicator
This appears when the Sync Stop function is turned
on. (See page 40.)
!4 Accompaniment On indicator
This appears when the auto accompaniment has been
turned on. (See page 36.)
!5 Octave indicator
When a disk song is playing and the note data exceeds
the range limit of C1 - C6, an "OVER" indication
Q
flashes and
When a disk song is playing and the octave setting is
raised or lowered, one of +2, +1, -1 and -2 indications
appears in the display.
or W appears in the display.
!6 Battery Level indicator
This appears when the battery power is too low to
ensure proper operation. (See page 8.)
!1 Harmony indicator
This appears when the Harmony effect is turned on.
(See page 32.)
Music Stand
Insert the bottom edge of the included music stand into
the slot located at the top rear of the PSR-350 control
panel.
19

Portable Grand
This convenient function lets you instantly call up the Grand Piano voice.
Playing the Portable Grand
Press the [PORTABLE GRAND] button.
Doing this automatically cancels any other mode or function, and resets the entire
instrument for playing the special “Stereo Sampled Piano” Grand Piano voice. It
automatically calls up song #061 (Für Elise) and style #097 (Stride).
• When the [PORTABLE GRAND]
button is pressed, One Touch
Setting (page 27) is automatically
turned on.
The Portable Grand setting is designed also for playing with the special Pianist
styles (#097 - #106). When auto accompaniment is turned on, these provide
piano-only accompaniment in a variety of music styles.
Using the Metronome
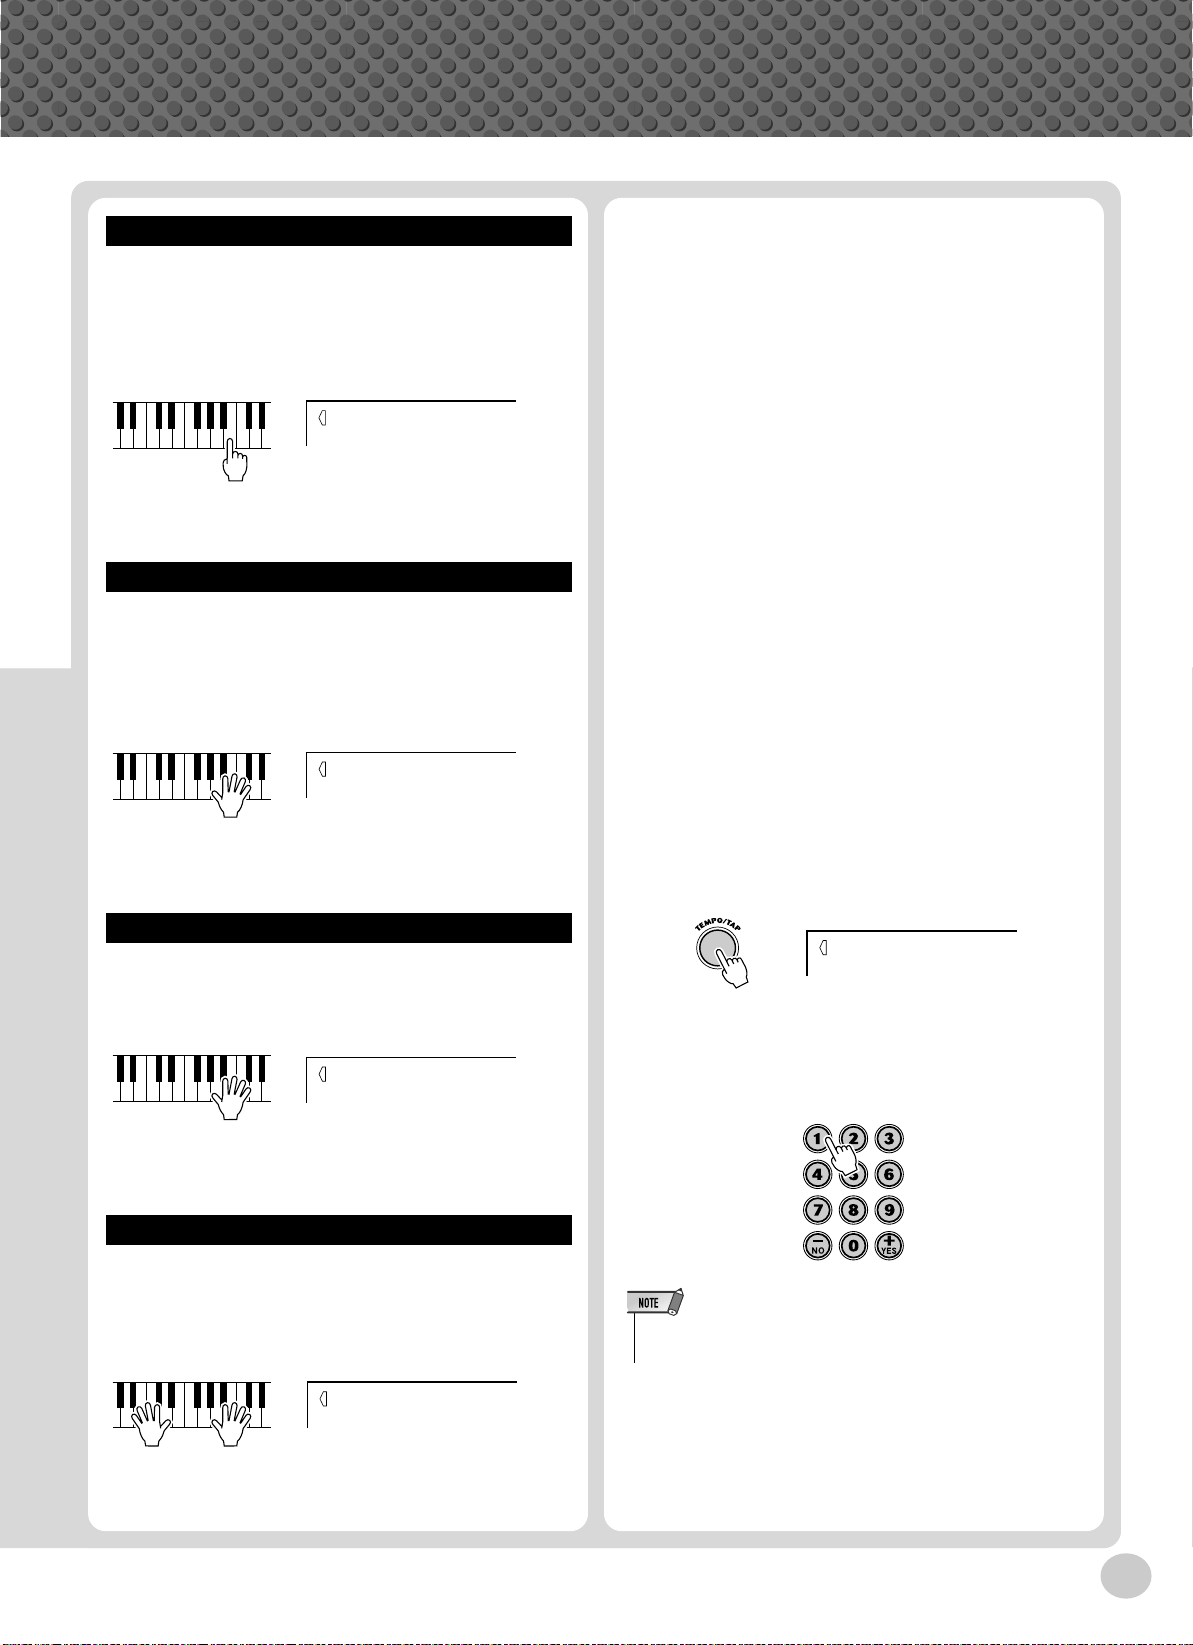
1 Call up the Tempo setting.
Press the [TEMPO/TAP] button.
Current T empo value
068
TEMPO
2 Change the value.
Use the numeric keypad to set the desired Tempo value, or use the [+]/[-]
buttons to increase or decrease the value.
20
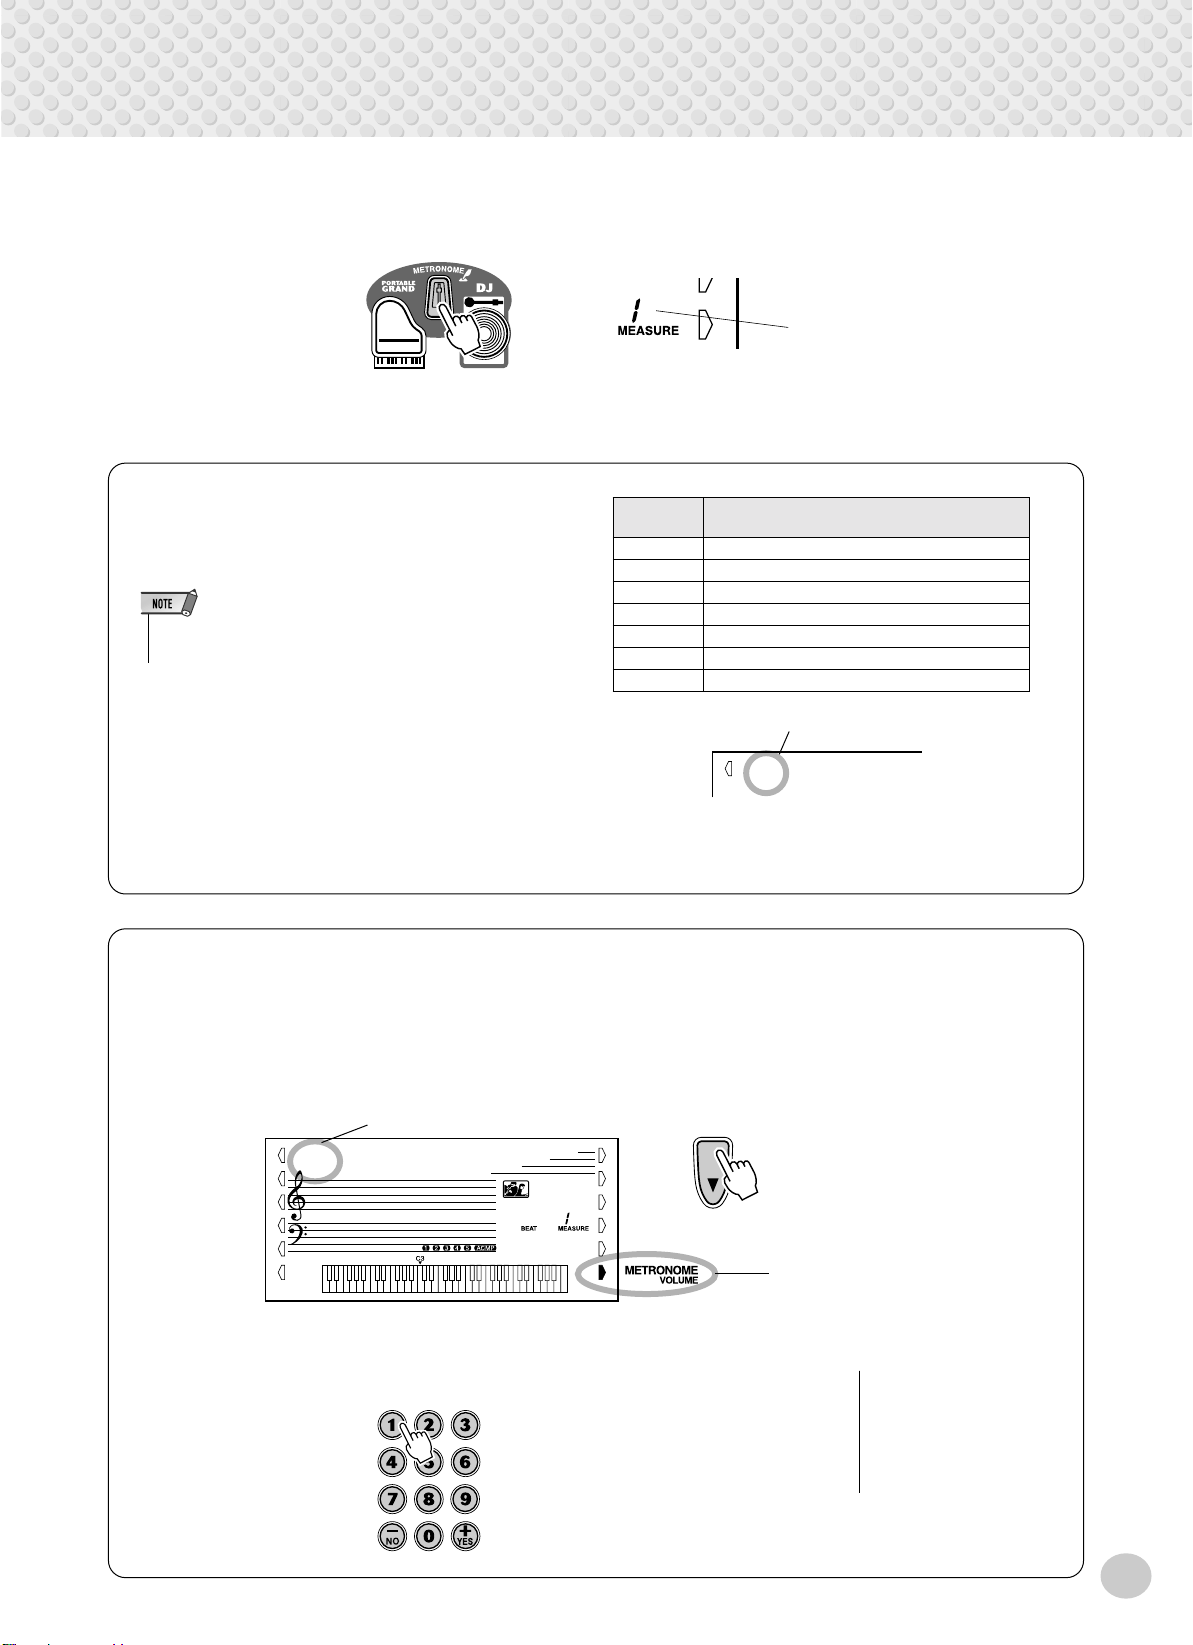
3
Turn on the Metronome.
Press the [METRONOME] button.
To turn the Metronome off, press the [METRONOME] button again.
Portable Grand
Indicates the beat number
in the measure.
Setting the Metronome Time Signature
The time signature of the Metronome can be set to various quarter-note based meters.
• The time signature changes automatically when a style or song is
selected.
Hold down the [METRONOME] button (until “TIME
SIG” appears in the display), then press the button on
Numeric
keypad
01 1/4 — Plays only “1” beats (all high clicks)
02 2/4
03 3/4
04 4/4
15 15/4
Time signature
: :
0 Plays no “1” beats (all low clicks)
Indicates current beat number
the numeric keypad that corresponds to the desired
04
time signature (see chart at right).
TIME SIG
Adjusting the Metronome Volume
You can adjust the volume of the Metronome sound independently of the other PSR-350 sounds. The v olume range
is 000 - 127.
1 Call up the Metronome Volume setting.
Press the right Overall button until “MTR VOL” appears in the display.
Current Metronome Volume value
100
MTR VOL
2 Change the value.
Use the numeric keypad to set the desired Metronome Volume value, or use the
[+]/[-] buttons to increase or decrease the value.
Indicates Metronome
Volume is selected
Restoring the Default Metronome V olume V alue
To restore the default Metronome Volume value (100),
press both [+]/[-] buttons
simultaneously (when Metronome Volume is selected in
the Overall menu).
21

DJ
This exciting feature lets you instantl y call up a dynamic DJ v oice and style f or pla ying contemporary dance music.
Playing the DJ
1 Press the [DJ] button.
000
DJ Set1
Doing this automatically resets the entire instrument for playing the specially programmed DJ song and voice.
2 Turn on the Lesson feature, and select a Lesson step.
Lesson steps 1 - 3 can be used with DJ play. Press either the [L] or [R] button, repeatedly if necessary, until the desired Lesson step is called up.
The DJ voice is divided into “blocks” (as shown below). Each block has a
different sound.
Block #1 Block #2 Block #3 Block #4
Once the song starts playing, play the appropriate block as indicated in the display. (When Grade/Talking is on, the blocks are also “announced” in Lesson 2.)
Block number
r1
132 33
When the DJ “teacher” is playing, the block numbers appear in the display
one after another according to the rhythm.
• If two sixteenth notes are to be
played, the appropriate block
numbers appear successively at
the same position. If the same
block is to be played twice as sixteenth notes, an equal sign
appears after the block number
(as shown below).
31
3=
• Since there are no left or right
parts in the DJ song, the [L] and
[R] buttons can be used interchangeably. Also for the same
reason, Lesson 3 and Lesson 4
are identical.
Indicates that the
third block and first
block are to be
played as succesive sixteenth notes.
Indicates that the
third block is to be
played as two sixteenth notes.
3 Press the [START/STOP] button to stop the song.
22
• Try playing one of the special DJ
voices (#609 - #618) or the DJ
GAME. (song #091 - #100)

Playing Voices
The PSR-350 features a total of 618 authentic voices — all of which have been created with
Yamaha’s sophisticated AWM (Advanced Wave Memory) tone generation system. These
include 480 Expanded voices, plus special Split voices, DJ voices and drum kits.
The PSR-350 also has a Dual Voice function that lets you combine two different voices in a
layer, and play the two together across the keyboard.
The voices are divided into various instrument categories, and the names are printed on the panel for convenience. For a complete list of available voices, see page 87.
Special Split voices (#107 - #116) feature two different voices that you can play from separate sections of the
keyboard — for example, playing a bass voice with your left hand and a piano voice with your right.
A special set of DJ voices (#609 - #618) provides dynamic, exciting voices for playing man y of today’s popular
music styles.
The Voice mode also features special effect sections that let you enhance the sound of the voice. These include
Reverb and Harmony, as well as a “DSP” section that provides miscellaneous effects, such as tremolo, echo,
delay, equalization, and wah. (See page 30.)
There’s also a Touch Sensitivity control (page 29), which determines how the voices respond to your playing
technique.
The PSR-350 also includes special Drum Kit voices — #117 - #128 — that let you play various drum and percussion sounds from the keyboard. (Refer to the Drum Kit Voice chart on page 96.)
When a voice is selected, the most suitable DSP Type (page 33) and Harmony Type (page 34) for the voice are
automatically called up.
Playing a Voice
1 Press the [VOICE] button.
Voice name and number
001
GrandPno
Indicates Voice mode
is selected
2 Select the desired voice number.
Use the numeric keypad. The voices and their numbers are shown on the
panel. A complete list of the available voices is given on page 87.
23
Playing Voices
There are two ways to select voices: 1) directly entering the voice number
with the numeric keypad, or 2) using the [+]/[-] buttons to step up and down
through the voice numbers.
■ Using the numeric keypad
Enter the digits of the voice number as indicated on the panel. For example,
to select voice #109, press “1” on the numeric keypad, then “0”, “9.” For
voice numbers beginning with zeroes (such as #042 or #006), the initial
zeroes may be omitted. In this case, there is a short pause before the indication appears.
109
DXEP/Hrm
■ Using the [+]/[-] buttons
Press the [+] button to select the next voice number, and press the [-] button
to select the previous voice. Holding down either button continuously
scrolls up or down through the numbers.
3 Play the selected voice.
Since either the Style or Song mode is active in the background (as indicated
by the illustration in the display), you can also play styles or songs, respectively, in the Voice mode by simply pressing the [START/STOP] button. The
last selected style or song will be played.
• Each voice is automatically
called up with the most suitable
octave range setting. Thus, playing middle C with one voice may
sound higher or lower than
another voice at the same key.
• You can also turn on One Touch
Setting by simultaneously pressing both the [+]/[-] buttons.
24
Playing Voices
Drum Kit Voice Chart (voices 117 - 128)
When one of the 12 Drum Kit voices are selected you
can play different drums and percussion instruments on
the keyboard.
117
Std.Kit1
No. Name LCD
117 Standard Kit 1 Std.Kit1
118 Standard Kit 2 Std.Kit2
119 Room Kit Room Kit
120 Rock Kit Rock Kit
121 Electronic Kit Elct.Kit
122 Analog Kit AnlogKit
123 Dance Kit DanceKit
124 Jazz Kit Jazz Kit
125 Brush Kit BrushKit
126 Symphony Kit SymphKit
127 SFX Kit 1 SFX Kit1
128 SFX Kit 2 SFX Kit2
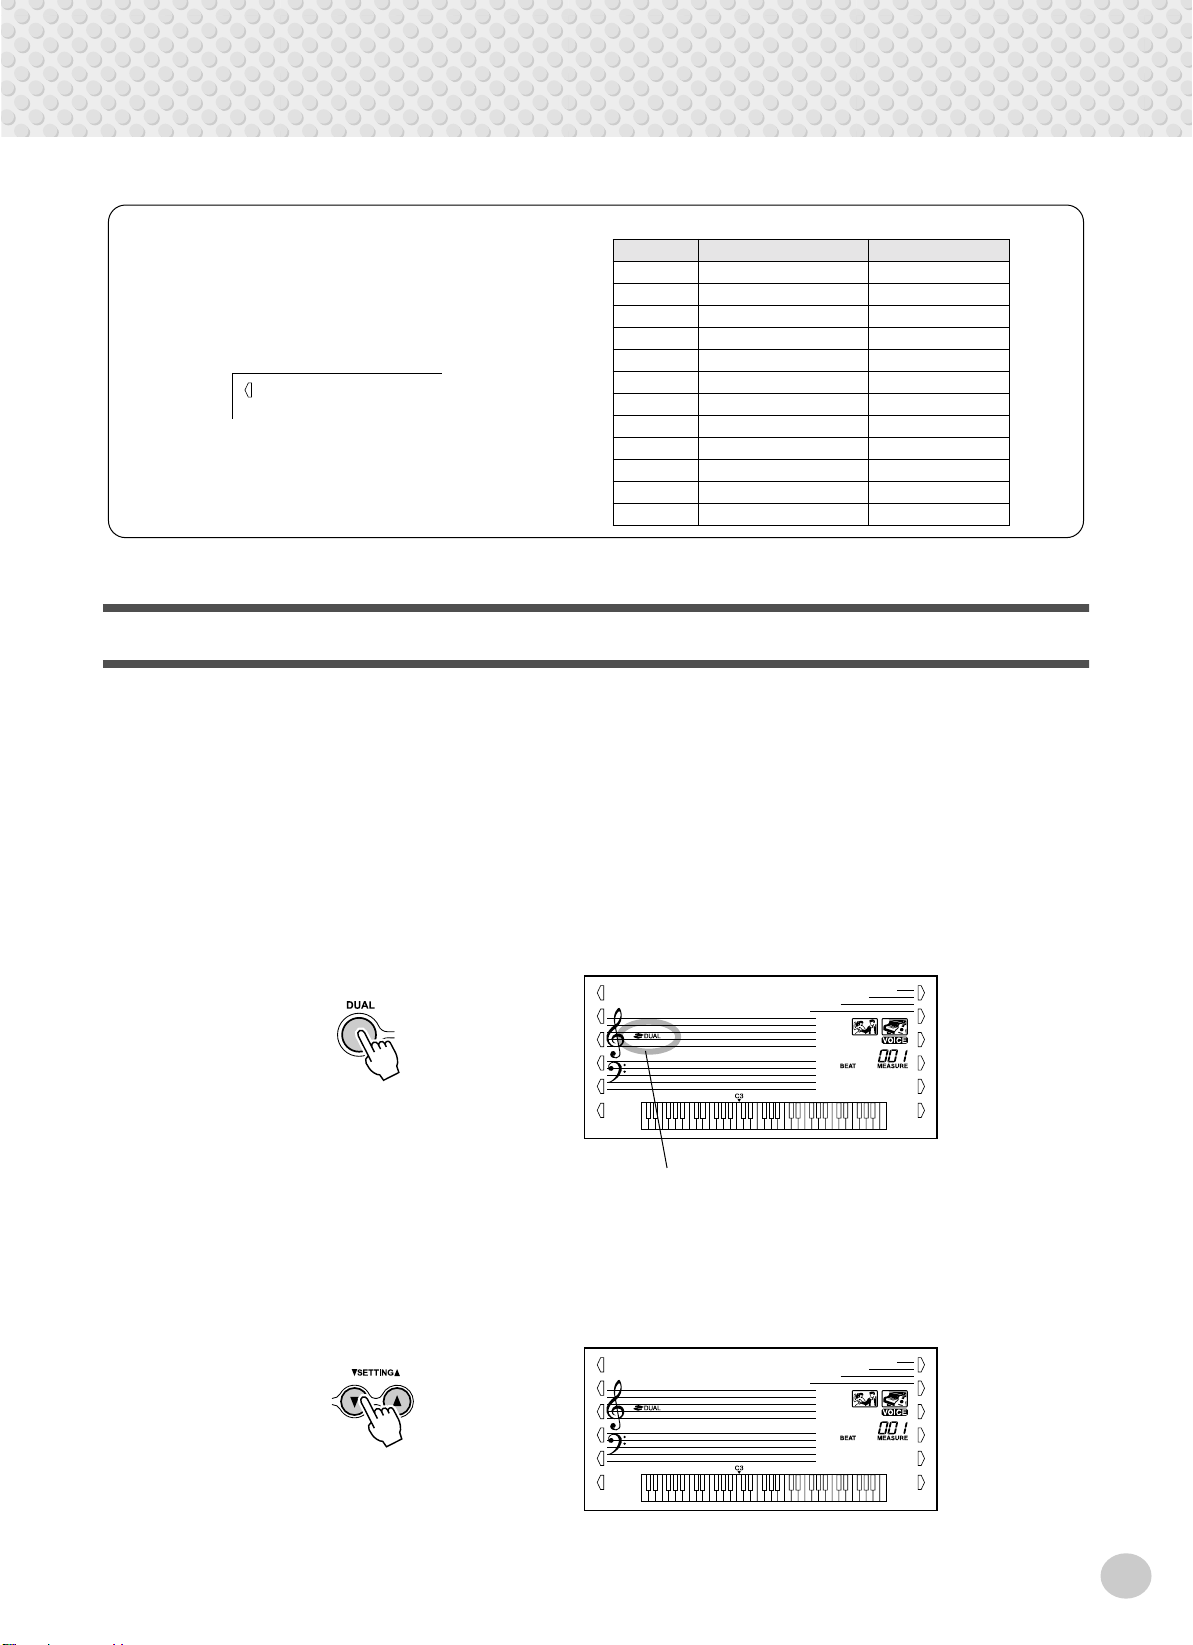
Dual Voice
The Dual Voice function lets you combine two different voices in a layer — one
the Main voice, which is selected normally, and the other the Dual voice, which is
selected here. You can also set various parameters independently for these voices,
such as giving them separate volume, octave, Reverb and DSP settings. This lets
you create an optimum mix for the voices, and enhance the way they blend
together.
1 Turn the Dual voice on or off.
Press the [DUAL] button.
001
GrandPno
Indicates Dual is turned on
2 Select one of the parameters for the Main and Dual voices.
Press the [SETTING ▲] or [SETTING ▼] button, repeatedly if necessary,
until the desired parameter's name appears in the display.
104
M.Volume
25
Playing Voices
3
Set the parameter's value.
Use the numeric keypad or the [+]/[-] buttons. (Refer to the parameter list
below.)
The parameters below provide all settings for both the Main Voice and Dual Voice — letting you change or enhance
the sound of these voices independently.
• Main Volume
• Dual Volume
• Dual Voice
• Dual Octave
• Main Reverb Level
• Dual Reverb Level
• Main DSP Level
• Dual DSP Level
• The Dual Voice function is not
available in the Lesson.
● Parameters
Parameter Name Display
Name
Main Voice Volume M.Volume 0-127 This determines the volume of the Main voice, letting you create an optimum mix
Dual Voice Volume D. Volume 0-127 This determines the volume of the Dual voice, letting you create an optimum mix
Dual Voice Select D. Voice
name
Dual Voice Octave D. Octave -2-2
Main Voice Reverb M. RevLvl 0-127 This determines how much of the Main voice’s signal is sent to the Reverb ef-
Dual Voice Reverb D. RevLvl 0-127 This determines how much of the Dual voice’s signal is sent to the Reverb ef-
Main Voice DSP M. DspLev 0-127 This determines how much of the Main voice’s signal is sent to the DSP effect.
Dual Voice DSP D. DspLev 0-127 This determines how much of the Dual voice’s signal is sent to the DSP effect.
Range /
Settings
with the Dual voice.
with the Main voice.
1-618 This selects the Dual voice.
This determines the octave of the Dual voice.
(Octaves)
fect. Higher values result in a louder Reverb effect for the Main voice.
fect. Higher values result in a louder Reverb effect for the Dual voice.
Higher values result in a louder DSP effect for the Main voice.
Higher values result in a louder DSP effect for the Dual voice.
26
One Touch Setting
This special “voice” is actually a conv enient feature which automatically selects a
suitable voice for you when you select a style. The voice is selected to best match
the style or song you’ve called up.
1 Select voice #000 (One Touch Setting).
One Touch Setting is selected
000
GrandPno
Playing Voices
You can also turn on One Touch Setting by simultaneously pressing both the
[+]/[-] buttons.
Transpose and Tuning
You can also adjust the tuning and change the transposition (key) of the entire
PSR-350 sound with the Transpose and Tuning functions.
■ Transpose • • • • • • • • • • • • • • • • • • • • • • • • • • • • • • • • • • • • • •
Transpose determines the key of both the main voice and the bass/chord accompaniment of the selected style. It also determines the pitch of the songs. This allows
you to easily match the pitch of the PSR-350 to other instruments or singers, or
play in a different key without changing your fingering. The Transpose settings
can be adjusted over a range of ± 12 semitones (± 1 octave).
1 Select the Transpose function.
Press the right Overall button, repeatedly if necessary, until “TRANSPOS”
appears in the display.
• The Transpose function has no
effect on the DJ voices (#609 #618) or the Drum Kits voices
(#117 - #128).
Current T ranspose value
00
TRANSPOS
Indicates T ranspose
is selected
27

Playing Voices
2
Change the value.
Use the numeric keypad to set the desired Transpose value (-12 - +12). To
transpose the pitch down, simultaneously press and hold the [-] button, and
use the numeric keypad to type in the (negative) value. You can also use the
[+]/[-] buttons to increase or decrease the value. Holding do wn either b utton
continuously increases or decreases the value.
■ T uning • • • • • • • • • • • • • • • • • • • • • • • • • • • • • • • • • • • • • • • • •
Tuning determines the fine pitch setting of both the main v oice and the bass/chord
accompaniment of the selected style. It also determines the pitch of the songs.
This allows you to accurately match the tuning with that of other instruments.
The T uning settings can be adjusted over a range of ± 100 (approx. ± 1 semitone).
Restoring the Default Transpose Value
If you’ve changed the Transpose
setting, you can instantly restore
the default setting of “00” by pressing both [+]/[-] buttons simultaneously (when Transpose is
selected).
1 Select the Tuning function.
Press the right Overall button, repeatedly if necessary, until “TUNING”
appears in the display.
Current T uning value
000
TUNING
2 Change the value.
Use the numeric keypad to set the desired Tuning value (-100 - +100). To
tune the pitch down, simultaneously press and hold the [-] button, and use
the numeric keypad to type in the (negative) value. You can also use the [+]/
[-] buttons to increase or decrease the value. Holding down either button
continuously increases or decreases the value.
• The Tuning settings have no
effect on the Drum Kit voices
(#117 - #128).
Indicates T uning
is selected
Restoring the Default Tuning
Value
If you’ve changed the Tuning setting, you can instantly restore the
default setting of “00” by pressing
both [+]/[-] buttons simultaneously
(when Tuning is selected).
28

Touch and Touch Sensitivity
-
The Touch function gives you dynamic, e xpressi v e control o v er the v oices, letting
you determine how loud or soft the sound is by your playing strength.
Turn the Touch function on or off as desired by pressing the [TOUCH] button.
000
TUNING
Indicates T ouch
function is on
T ouch Sensiti vity lets you set how the PSR-350 responds to your playing strength,
allowing you to customize this expressive function to suit your own playing style.
Playing Voices
1 Select the Touch Sensitivity control.
Press and hold the [TOUCH] button until the Touch Sensitivity setting and
name appears in the display.
Current Touch Sensitivity setting
2
Medium
2 Change the value.
Use the numeric keypad or [+]/[-] buttons to set the desired setting: 1, 2, or 3
(explained below).
● Settings:
1 (Soft) This results in limited touch response, and produces a relatively narrow
dynamic range, no matter how lightly or strongly you play the keys.
2 (Medium) This lets you play over a normal dynamic range (soft to loud).
3 (Hard) This is designed for playing very soft passages, giving you slightly more
detailed control in the soft volume range.
When Touch is turned off, a constant volume (corresponding to a velocity
value of 80) is produced.
Restoring the Default Touch
Sensitivity Value
The default Touch Sensitivity is 2
(Medium). To restore the default
value, press both [+]/[-] buttons
simultaneously (when Touch Sensi
tivity is selected).
29

Effects
/
The PSR-350 is equipped with a wide variety of effects that can be used to enhance the sound
of the voices. The PSR-350 has three separate effect systems — Reverb, DSP, and Harmon y —
and each has many different effect types to choose from.
Reverb
The Reverb effect reproduces the natural ambient “wash” of sound that occurs
when a instrument is played in a room or concert hall. A total of eight different
Reverb types simulating various different performance environments are available.
1 Select the Reverb function.
Current Reverb Type name and number.
1
Hall1
Indicates Reverb
is selected
2 Set the Reverb Type, if desired.
Use the numeric keypad or [+]/[-] buttons to set the desired Reverb Type.
(For a list of the available Reverb Types, see page 33.) To turn the Reverb
effect off, select Reverb Type #9.
• Twelve additional Reverb Types
are available when controlling the
PSR-350 from a MIDI device.
(For details, See page 100.)
• Each style of the PSR-350 has its
own independent Reverb setting.
• You can also determine the
Reverb level. (See page 25.)
Restoring the Default Reverb
Type
If you’ve changed the Rev erb Type,
you can instantly restore the
default setting by pressing both [+]
[-] buttons simultaneously (when
Reverb is selected).
30
 Loading...