

Page 1

Page 2

SPECIAL MESSAGE SECTION
This product utilizes batteries or an external power supply
(adapter). DO NOT connect this product to any power supply or adapter other than one described in the manual, on
the name plate, or specifically recommended by Yamaha.
This product should be used only with the components
supplied or; a cart, rack, or stand that is recommended by
Yamaha. If a cart, etc., is used, please observe all safety
markings and instructions that accompany the accessory
product.
SPECIFICATIONS SUBJECT TO CHANGE:
The information contained in this manual is believed to be
correct at the time of printing. However, Yamaha reserves
the right to change or modify any of the specifications without notice or obligation to update existing units.
This product, either alone or in combination with an amplifier and headphones or speaker/s, may be capable of producing sound levels that could cause permanent hearing
loss. DO NOT operate for long periods of time at a high
volume level or at a level that is uncomfortable. If you experience any hearing loss or ringing in the ears, you should
consult an audiologist.
IMPORTANT: The louder the sound, the shorter the time
period before damage occurs.
NOTICE:
Service charges incurred due to a lack of knowledge relating to how a function or effect works (when the unit is operating as designed) are not covered by the manufacturer’s
warranty, and are therefore the owners responsibility.
Please study this manual carefully and consult your dealer
before requesting service.
ENVIRONMENTAL ISSUES:
Yamaha strives to produce products that are both user safe
and environmentally friendly. We sincerely believe that our
products and the production methods used to produce
them, meet these goals. In keeping with both the letter and
the spirit of the law, we want you to be aware of the following:
This product may also use “household” type batteries.
Some of these may be rechargeable. Make sure that the
battery being charged is a rechargeable type and that the
charger is intended for the battery being charged.
When installing batteries, do not mix batteries with new, or
with batteries of a different type. Batteries MUST be installed correctly. Mismatches or incorrect installation may
result in overheating and battery case rupture.
Warning:
Do not attempt to disassemble, or incinerate any battery.
Keep all batteries away from children. Dispose of used
batteries promptly and as regulated by the laws in your
area. Note: Check with any retailer of household type batteries in your area for battery disposal information.
Disposal Notice:
Should this product become damaged beyond repair, or for
some reason its useful life is considered to be at an end,
please observe all local, state, and federal regulations that
relate to the disposal of products that contain lead, batteries, plastics, etc. If your dealer is unable to assist you,
please contact Yamaha directly.
NAME PLATE LOCATION:
The name plate is located on the bottom of the product.
The model number, serial number, power requirements,
etc., are located on this plate. You should record the model
number, serial number, and the date of purchase in the
spaces provided below and retain this manual as a permanent record of your purchase.
Model
Serial No.
Purchase Date
Battery Notice:
This product MAY contain a small non-rechargeable battery
which (if applicable) is soldered in place. The average life
span of this type of battery is approximately five years.
When replacement becomes necessary, contact a qualified
service representative to perform the replacement.
92-BP (bottom)
PLEASE KEEP THIS MANUAL
2
Page 3
PRECAUTIONS
PLEASE READ CAREFULLY BEFORE PROCEEDING
* Please keep these precautions in a safe place for future reference.
WARNING
Always follow the basic precautions listed below to avoid the possibility of serious injury or even death from electrical shock,
short-circuiting, damages, fire or other hazards. These precautions include, but are not limited to, the following:
• Do not open the instrument or attempt to disassemble the internal parts
or modify them in any way. The instrument contains no user-serviceable
parts. If it should appear to be malfunctioning, discontinue use immediately and have it inspected by qualified Yamaha service personnel.
• Do not expose the instrument to rain, use it near water or in damp or wet
conditions, or place containers on it containing liquids which might spill
into any openings.
• If the AC adaptor cord or plug becomes frayed or damaged, or if there is
a sudden loss of sound during use of the instrument, or if any unusual
smells or smoke should appear to be caused by it, immediately turn off
CAUTION
Always follow the basic precautions listed below to avoid the possibility of physical injury to you or others, or damage to the
instrument or other property. These precautions include, but are not limited to, the following:
the power switch, disconnect the adaptor plug from the outlet, and have
the instrument inspected by qualified Yamaha service personnel.
• Use the specified adaptor (PA-5B, PA-5C, PA-51 or an equivalent recommended by Yamaha) only. Using the wrong adaptor can result in damage to the instrument or overheating.
• Before cleaning the instrument, always remove the electric plug from the
outlet. Never insert or remove an electric plug with wet hands.
• Check the electric plug periodically and remove any dirt or dust which
may have accumulated on it.
• Do not place the AC adaptor cord near heat sources such as heaters or
radiators, and do not excessively bend or otherwise damage the cord,
place heavy objects on it, or place it in a position where anyone could
walk on, trip over, or roll anything over it.
• When removing the electric plug from the instrument or an outlet, always
hold the plug itself and not the cord.
• Do not connect the instrument to an electrical outlet using a multipleconnector. Doing so can result in lower sound quality, or possibly cause
overheating in the outlet.
• Unplug the AC power adaptor when not using the instrument, or during
electrical storms.
• Always make sure all batteries are inserted in conformity with the +/polarity markings. Failure to do so might result in overheating, fire, or
battery fluid leakage.
• Always replace all batteries at the same time. Do not use new batteries
together with old ones. Also, do not mix battery types, such as alkaline
batteries with manganese batteries, or batteries from different makers, or
different types of batteries from the same maker, since this can cause
overheating, fire, or battery fluid leakage.
• Do not dispose of batteries in fire.
• Do not attempt to recharge batteries that are not intended to be charged.
• If the instrument is not to be in use for a long time, remove the batteries
from it, in order to prevent possible fluid leakage from the battery.
• Keep batteries away from children.
• Before connecting the instrument to other electronic components, turn off
the power for all components. Before turning the power on or off for all
components, set all volume levels to minimum. Also, be sure to set the
volumes of all components at their minimum levels and gradually raise
the volume controls while playing the instrument to set the desired listening level.
• Do not expose the instrument to excessive dust or vibrations, or extreme
cold or heat (such as in direct sunlight, near a heater, or in a car during the
day) to prevent the possibility of panel disfiguration or damage to the
internal components.
(4)-4
• Do not use the instrument near other electrical products such as televisions, radios, or speakers, since this might cause interference which can
affect proper operation of the other products.
• Do not place the instrument in an unstable position where it might accidentally fall over.
• Before moving the instrument, remove all connected adaptor and other cables.
• When cleaning the instrument, use a soft, dry cloth. Do not use paint
thinners, solvents, cleaning fluids, or chemical-impregnated wiping cloths.
Also, do not place vinyl, plastic or rubber objects on the instrument, since
this might discolor the panel or keyboard.
• Do not rest your weight on, or place heavy objects on the instrument, and
do not use excessive force on the buttons, switches or connectors.
• Use only the stand/rack specified for the instrument. When attaching the
stand or rack, use the provided screws only. Failure to do so could cause
damage to the internal components or result in the instrument falling over.
• Do not operate the instrument for a long period of time at a high or uncomfortable volume level, since this can cause permanent hearing loss. If you
experience any hearing loss or ringing in the ears, consult a physician.
■SAVING USER DATA
• Always save data to a floppy disk frequently, in order to help prevent the
loss of important data due to a malfunction or user operating error.
Yamaha cannot be held responsible for damage caused by improper use or modifications to the instrument, or data that is lost or destroyed.
Always turn the power off when the instrument is not in use.
Make sure to discard used batteries according to local regulations.
* The illustrations and LCD screens as shown in this owner’s manual are for in-
structional purposes only, and may be different from the ones on your instrument.
3
1
Page 4

Congratulations on your purchase of the Yamaha
You now own a portable keyboard that combines advanced func-
tions, great sound and exceptional ease-of-use in a highly compact
package. Its outstanding features also make it a remarkably ex-
pressive and versatile instrument.
Read this Owner’s Manual carefully while playing your new
PortaTone in order to take full advantage of its various features.
The PSR-340 is a sophisticated yet easy-to-use keyboard
with the following features and functions:
Built-in Disk Drive
................................................ Pages 91-99
Built into the PortaTone is a convenient floppy disk
drive. By simply inserting a floppy disk, you’ve got
access to a wide variety of powerful functions, such as
recording and playback of your own original User
Songs, as well as saving and loading of User One Touch
Setting data and User EZ Chord data. The PortaTone is
compatible with a wide variety of disk formats, allowing
you to playback song data on commercially available
GM , DOC, and Clavinova Disklavier Piano Soft disks.
Yamaha Education Suite
................................................ Pages 60-71
The PortaTone features the new Yamaha Education
Suite — a set of learning tools that utilize the latest
technology to make studying and practicing music
more fun and fulfilling than ever before!
The Yamaha Education Suite includes:
Chord Guide functions in the Style mode —
Smart and Dictionary — that make it exceptionally
easy to learn chords and chord relationships.
There’s also a powerful EZ Chord function that lets
you easily record and play back chord progressions.
• Smart lets you easily play harmonically “correct”
chord progressions for whatever key you specify. It’s
great for learning — and performing!
• Dictionary is a built-in “chord encyclopedia” that
teaches you how to play specific chords. You type
in the chord name, and the PortaTone shows you
which notes to play!
• EZ Chord is a powerful and simple way to program and play chord progressions. Record all the
chord changes you need for a song, then play back
the chords one after another by simply playing a
single key!
4
4
PSR-340 PortaTone!
Main Features
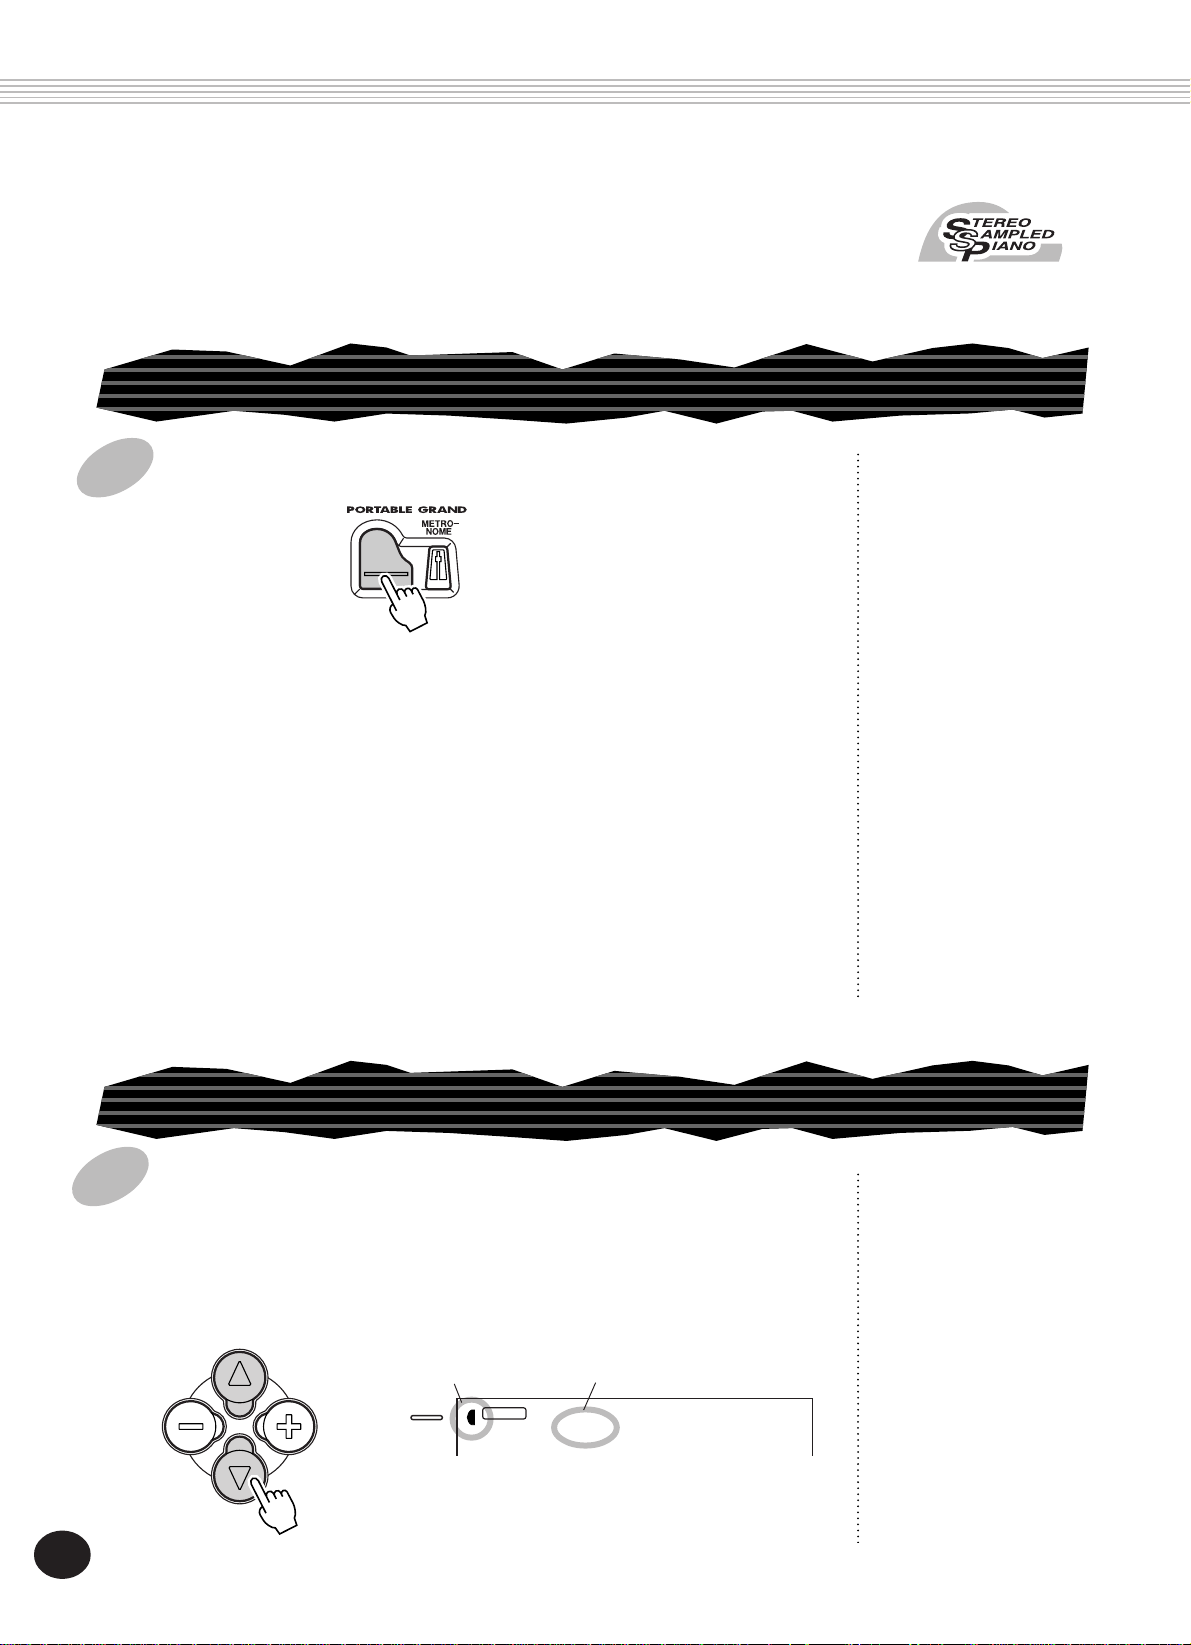
Portable Grand............................ Page 24
The PortaTone also has a Portable Grand function for
realistic piano performance. Pressing the PORTABLE
GRAND button instantly calls up the stunningly
authentic “Stereo Sampled Piano” voice and configures
the entire PortaTone for optimum piano play. Special
Pianist styles — with piano-only accompaniment — are
also provided.
Other powerful features include:
• Exceptionally realistic and dynamic sounds with 100 voices,
utilizing digital recordings of actual instruments.
• Dual voice and Split voice modes that let you layer two voices
together or assign two voices to separate sections of the keyboard
• Four high-quality effects — Reverb, Chorus, DSP, and Harmony —
each with a variety of different types.
• 100 auto accompaniment styles, each with different Intro, Main A
and B, and Ending sections. All styles (except for the Pianist styles)
also have their own four Fill-in patterns. The PortaTone also gives
you convenient control over accompaniment Styles — including
Tempo and independent Accompaniment Volume.
• Powerful song recording operations for recording and playing
back complete compositions (three User songs are available). Up to
six tracks can be recorded to a song, including a special chord track
for style accompaniment.
• One Touch Setting (OTS), for automatically calling up an
appropriate voice for playing with the selected style. Plus, there are
16 User OTS memory spaces that let you save your custom panel
settings for instant recall.
• Touch response (with front panel on/off switch) for maximum
expressive level control over the voices. This also works in
conjunction with the Dynamic Filter, which dynamically adjusts the
timbre or tone of a voice according to your playing strength — just
a like a real musical instrument!
• Convenient footswitch control over various functions — including
sustain, start/stop, and more.
• GM (General MIDI) compatibility and full GM voice set.
• Large custom LCD (backlit) gives you easy, at-a-glance confirma-
tion of all important settings, as well as chord and note indications.
• Comprehensive MIDI functions that let you integrate the
PortaTone into a MIDI music system, for sequence recording and
other advanced applications.
• Built-in, high-quality stereo amplifier/speaker system (2-way
speaker system).
2
Page 5
Contents
PANEL CONTROLS AND
TERMINALS 6
• Front Panel ............................... 6
• Rear Panel ................................ 7
SETTING UP 8
POWER REQUIREMENTS ................. 8
TURNING ON THE POWER ............. 8
ACCESSORY JACKS ......................... 9
Quick Guide —
How to Use Your New
PSR-340 PortaTone 10
Step 1 Using the Built-in Floppy
Disk Drive ....................... 10
Step 2 Songs ............................. 12
Step 3 Voices ............................. 14
Step 4 Auto Accompaniment .... 16
Step 5 Chord Guide .................. 18
Step 6 Function Parameters ...... 20
PANEL DISPLAY INDICATIONS
• Music Stand ........................... 23
22
PORTABLE GRAND 24
PLAYING THE PORTABLE GRAND .. 24
USING THE METRONOME .............. 24
• Setting the Metronome
Time Signature ....................... 25
• Adjusting the Metronome
Volume................................... 26
PLAYING VOICES —
THE VOICE MODE 27
PLAYING A VOICE — MAIN VOICE 27
• About Panel Voices and
GM Voices .............................. 29
• Drum Kit Voice Chart
(voices 101 - 110) .................. 30
Function Parameters — Main Voice
TRANSPOSE AND TUNING ............. 32
Transpose .................................... 32
Tuning ......................................... 33
PLAYING TWO VOICES —
DUAL VOICE ................................... 34
Function Parameters — Dual Voice
PLAYING TWO VOICES —
SPLIT VOICE .................................... 36
Function Parameters — Split Voice 37
ADDITIONAL VOICE
FUNCTIONS — VOICE SET AND
TOUCH SENSITIVITY ...................... 38
Function Parameters —
Voice Set and Touch Sensitivity ..... 39
30
35
EFFECTS 40
REVERB ............................................ 40
CHORUS .......................................... 41
DSP ................................................. 42
HARMONY ...................................... 43
Function Parameters — Effects ...... 44
• Effect Types ............................ 45
AUTO ACCOMPANIMENT —
THE STYLE MODE 47
SELECTING A STYLE AND
PLAYING THE ACCOMPANIMENT .. 47
ACCOMPANIMENT CONTROLS ..... 52
USING THE AUTO
ACCOMPANIMENT FEATURES ........ 52
CHANGING THE TEMPO ................ 53
ACCOMPANIMENT SECTIONS
(MAIN A, MAIN B AND FILL-INS) ... 54
ADJUSTING THE
ACCOMPANIMENT VOLUME ......... 55
USING AUTO ACCOMPANIMENT —
MULTI FINGERING .......................... 56
Single Finger Chords .................. 56
Fingered Chords ......................... 56
SETTING THE ACCOMPANIMENT
SPLIT POINT ................................... 58
Function Parameter —
Accompaniment Split Point .......... 59
WHAT IS A CHORD? ....................... 60
WRITING CHORD NAMES .............. 61
The Intervals of the Scale ........... 61
Other Chords .............................. 61
CHORD GUIDE ................................ 62
Dictionary ................................... 62
Smart ........................................... 64
• Smart Chord List .................... 65
EZ Chord ..................................... 66
EZ Chord — Playback ................... 66
• Bank Chain............................. 67
EZ Chord — Recording ................. 68
• Recording a Space.................. 69
• Playing the Accompaniment
During EZ Chord Recording ... 69
• HINT — Using Spaces............. 70
Clearing an EZ Chord Bank ........... 71
ONE TOUCH SETTING (OTS) 72
ONE TOUCH SETTING — USER ...... 72
Recording a User One Touch
Setting ......................................... 72
Recalling a User One Touch Setting
• Selecting a User Bank ............. 73
ONE TOUCH SETTING — PRESET ... 74
Selecting a Preset One Touch
Setting ......................................... 74
73
SELECTING AND PLAYING
SONGS — THE SONG MODE 75
SELECTING AND PLAYING A SONG
CHANGING THE TEMPO ................ 76
ABOUT THE BEAT DISPLAY ............. 77
75
ADJUSTING THE SONG VOLUME ... 78
SONG RECORDING 79
RECORDING A USER SONG —
REALTIME RECORDING .................. 80
• Using the Metronome ............ 81
• Additional Operations ............ 83
RECORDING A USER SONG —
STEP RECORDING ...........................84
Recording Notes ........................... 85
• Additional Operations ............ 87
Replacing a Note or Rest .............. 88
Entering Velocity Curves ............... 89
• Velocity Curve Chart ............... 89
CLEARING A SONG ......................... 90
DISK OPERATIONS 91
Using the Floppy Disk Drive
(FDD) and Floppy Disk ................. 92
DISK SONG PLAYBACK ................... 93
SAVE ................................................ 94
LOAD ............................................... 96
UTILITY — DELETE .......................... 97
UTILITY — FORMATTING AN
UNFORMATTED DISK ..................... 98
UTILITY — FORMATTING A PREVI-
OUSLY FORMATTED DISK .............. 99
FOOTSWITCH 100
• Footswitch Assign Functions . 101
MIDI FUNCTIONS 102
WHAT IS MIDI? ............................. 102
Channel Messages ...................... 103
System Messages ........................ 103
• MIDI Terminals ..................... 103
WHAT YOU CAN DO WITH MIDI . 104
CONNECTING TO A PERSONAL
COMPUTER ................................... 105
FUNCTION PARAMETERS — MIDI 106
USING INITIAL SETUP SEND
WITH A SEQUENCER .................... 108
Sending Initial Setup Data .......... 108
TROUBLESHOOTING .................... 110
DATA BACKUP & INITIALIZATION 111
SPECIFICATIONS ........................... 112
SONG SCORES
VOICE LIST .................................... 114
STYLE LIST .................................... 117
DRUM KIT LIST ............................. 118
MIDI IMPLEMENTATION CHART .. 120
INDEX ........................................... 123
(EZ Chord banks 1, 2)
. 113
5
3
Page 6
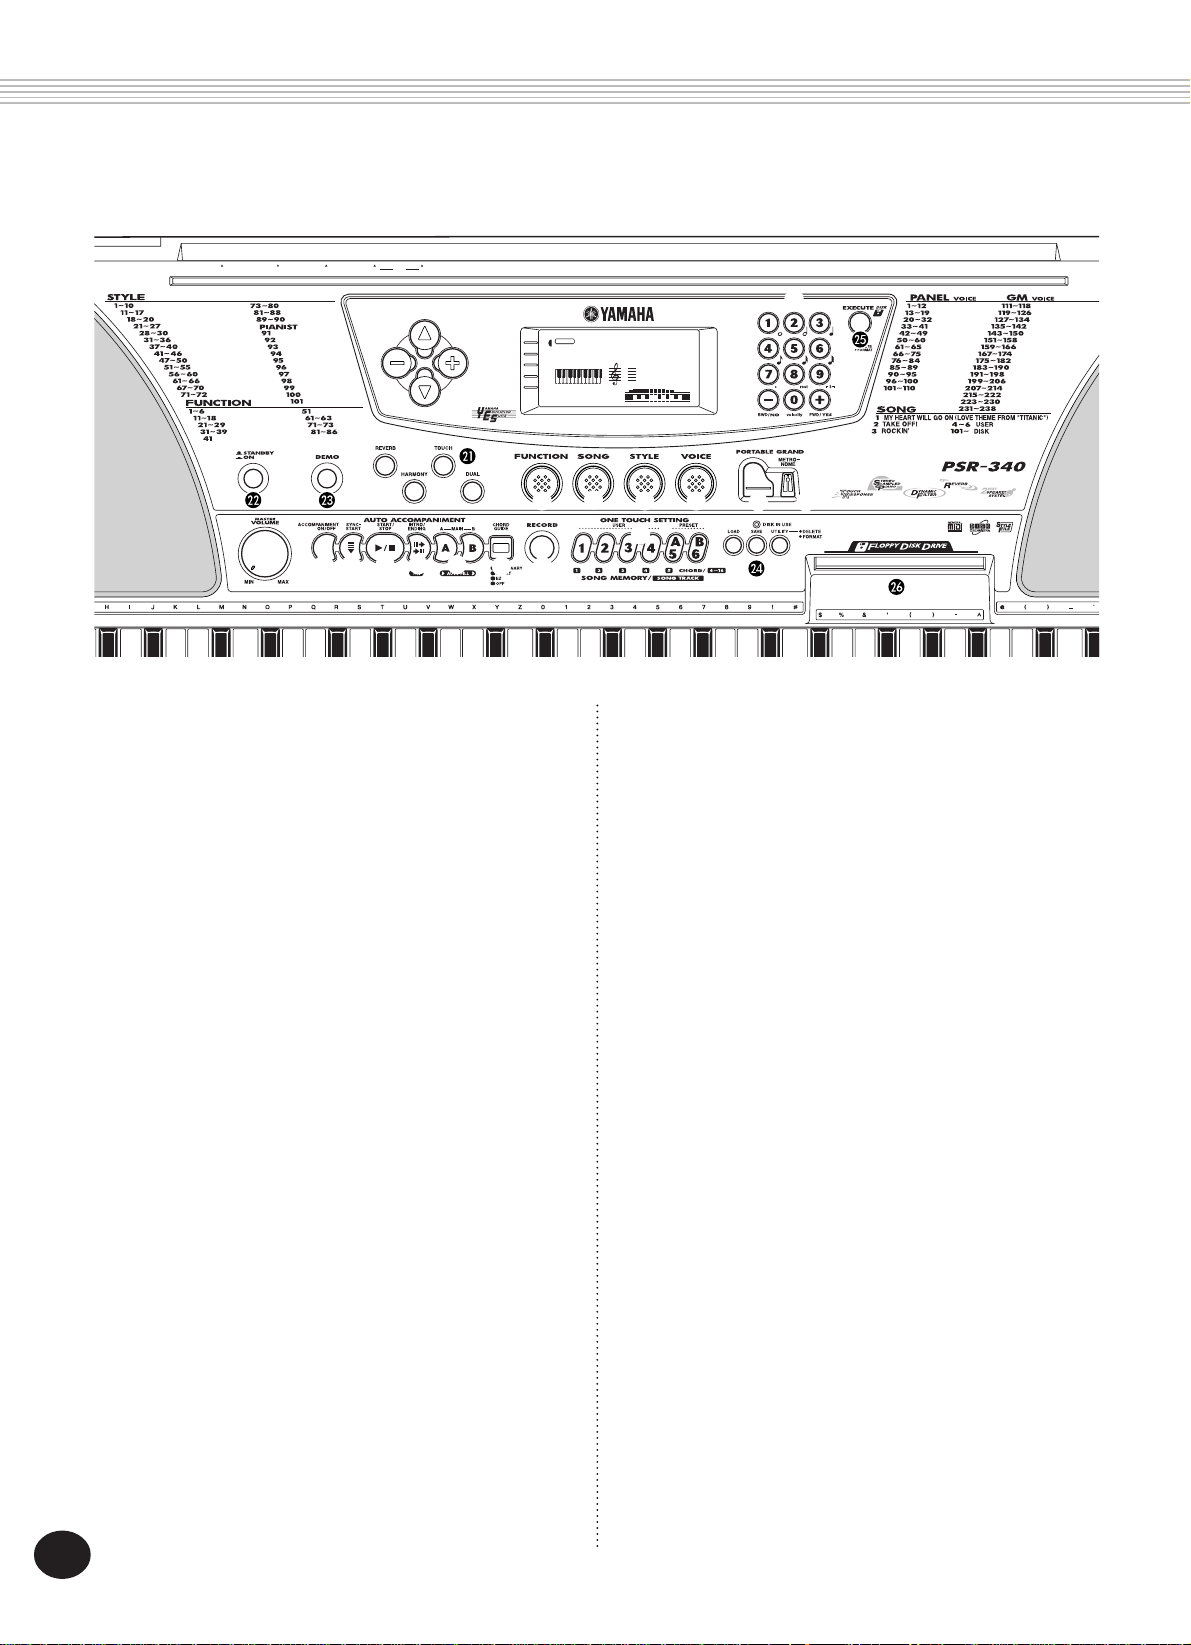
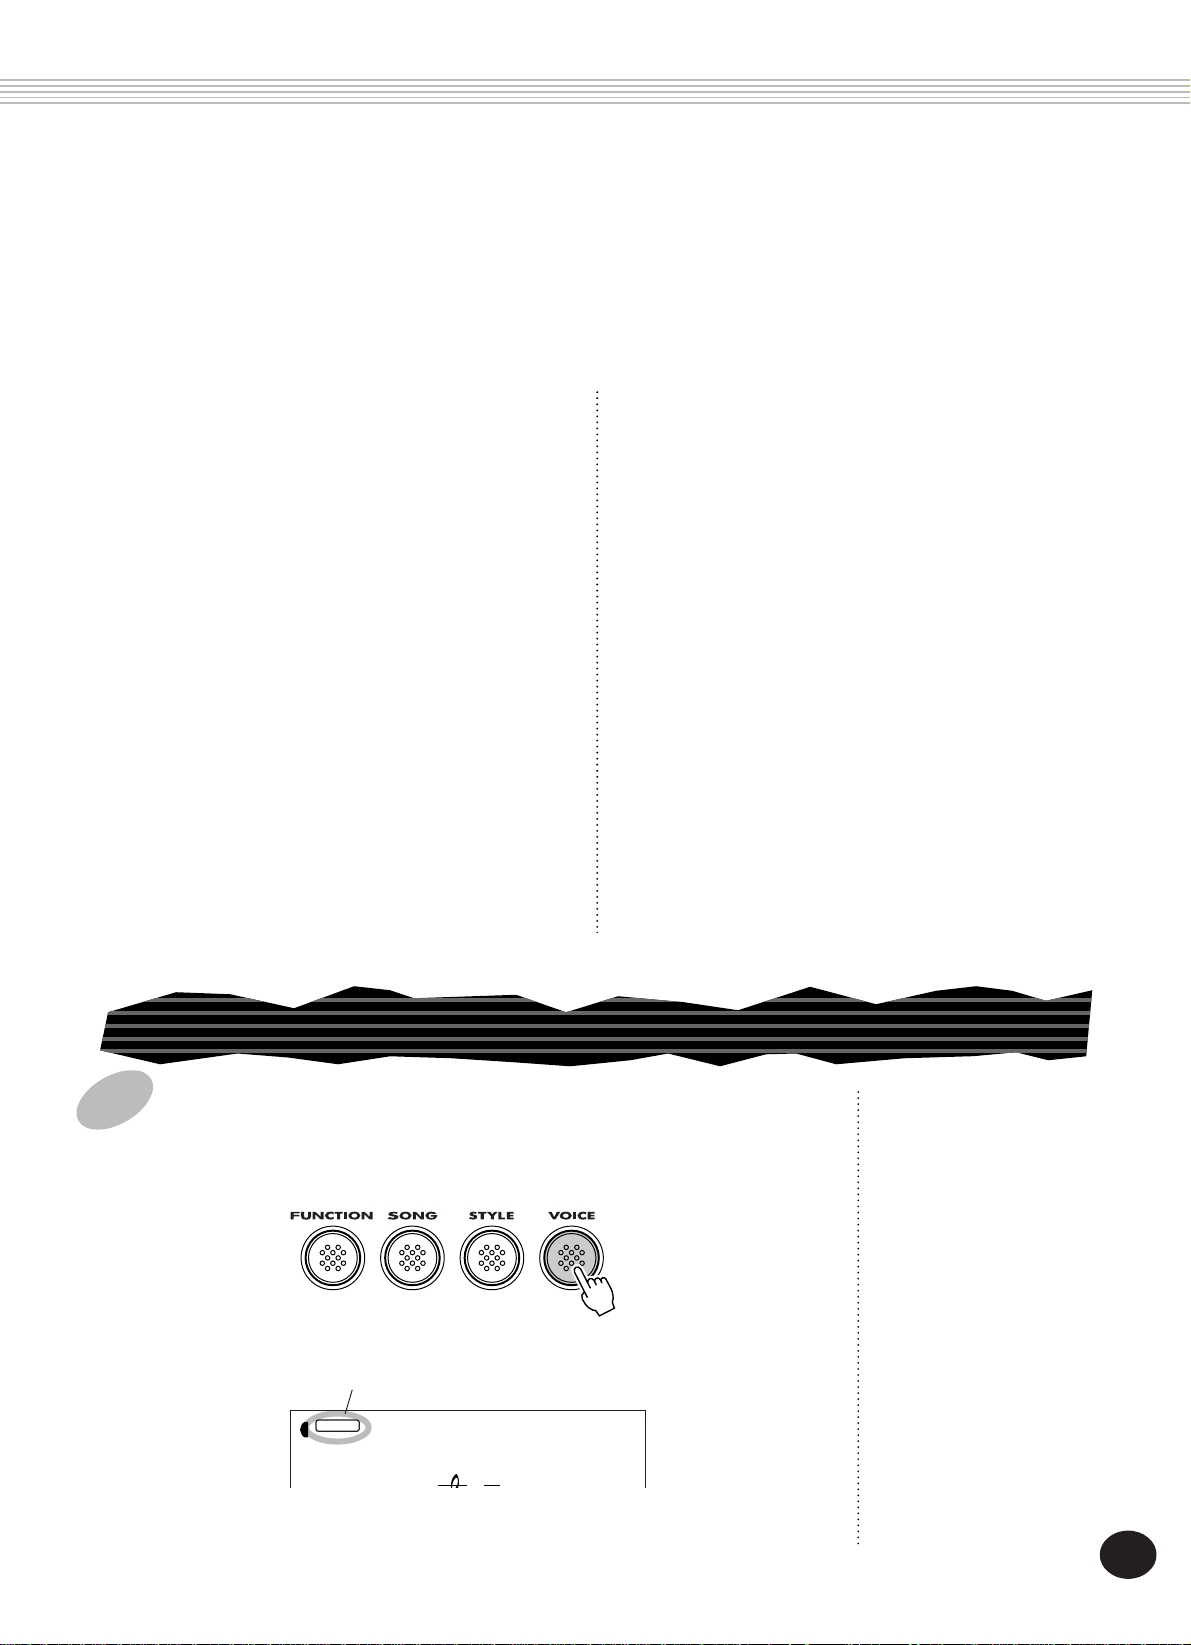
PANEL CONTROLS AND TERMINALS
Front Panel
DC IN 10-12V
PHONES/OUTPUT FOOT SWITCH OUT INMIDI
8BEAT
16BEAT
6/8 BALLAD
DANCE
DISCO
ROCK
ROCK&ROLL
RHYTHM&BLUES
CONTEMPORARY JAZZ
TRADITIONAL JAZZ
AMERICAS
COUNTRY&WESTERN
BALLROOM LATIN
BALLROOM STANDARD
MAIN VOICE
DUAL VOICE
SPLIT VOICE
EFFECT
ONE TOUCH SETTING
A
MARCH & WALTZ
LATIN
CARIBBEAN
ROCK-A-BALLAD
8BEAT
SWING
JAZZ BALLAD
2BEAT
BOOGIE
RAGTIME
ARPEGGIO
WALTZ
HAPPY
DISK
J
STYLE
SONG
UTILITY
MIDI
K
S
L
B
R
M
N
TEMPO
TRANSPOSE
TUNING
ACMP/SONG
VOLUME
METRONOME
VOLUME
T
O P
VOICE
STYLE
MEASURE
001 116
GrandPno
001
TEMPO
D
E FC
Q
G
H I
MALLET
ORGAN
GUITAR
BASS
ENSEMBLE
STRINGS
BRASS
REED
PIPE
SYNTH LEAD
SYNTH PAD
DRUM KITS
PIANO
ORGAN
GUITAR
BASS
STRINGS
ENSEMBLE
BRASS
REED
PIPE
SYNTH LEAD
SYNTH PAD
SYNTH EFFECTS
ETHNIC
PERCUSSIVE
SOUND EFFECTS
PIANO
CHROMATIC
A MASTER VOLUME dial
This determines the overall volume of the
PortaTone.
B OVERALL buttons (
▲, ▼
, +, -)
These are for selecting the various “overall”
functions and setting their values. (See pages
22, 24.)
C FUNCTION button
This selects the Function mode. (See page 20.)
D SONG button
This selects the Song mode. (See pages 12, 75.)
E STYLE button
This selects the Style mode. (See pages 16, 47.)
F VOICE button
This selects the Voice mode. (See pages 14, 27.)
G Numeric keypad, +/- buttons
These are for selecting songs, voices, and styles.
(See pages 28, 47, and 76.) They are also used
for making various settings, such as:
• Selecting and changing the Function
parameters (page 20)
• Setting note values and other settings for
the Step Record function (page 85)
• Setting the time signature for the Metronome (page 25)
• Setting the key signature for the Smart
Chord function (page 64)
H PORTABLE GRAND button
This instantly changes to the Voice mode and
calls up the Grand Piano voice. (See page 24.)
I METRONOME button
This turns the metronome on and off. (See page
24.)
J ACCOMPANIMENT ON/OFF button
When the Style mode is selected, this turns the
auto accompaniment on and off. (See page 52.)
This button has no function in the Song Play
mode.
K SYNC-START button
This turns the Sync-Start function on and off.
(See page 48.)
L START/STOP button
When the Style mode is selected, this alternately
starts and stops the auto accompaniment. (See
page 48.) In the Song mode, this alternately
starts and stops song playback. (See page 76.)
M INTRO/ENDING button
When the Style mode is selected, this is used to
control the Intro and Ending functions. (See
pages 49, 51.)
6
4
Page 7
PANEL CONTROLS AND TERMINALS
N MAIN A/B (AUTO FILL) buttons
When the Style mode is selected, these are used
to change auto accompaniment sections and
control the Auto Fill function. (See page 54.)
O CHORD GUIDE button
When the Style mode is selected, this is used to
control the Chord Guide functions. (See page
62.)
P RECORD button
This is used for selecting and enabling the
recording functions: Song (pages 80, 84), EZ
Chord (page 68), and One Touch Setting (page
72).
Q ONE TOUCH SETTING / SONG MEMORY
buttons
When the Style mode is selected, these are used
to select the One Touch Setting registrations
(page 73). When the Song mode is selected,
these are used to select specific tracks (pages 81,
85).
S REVERB button
This turns the Reverb effect on and off. (See
page 40.)
T DUAL button
This turns the Dual mode on and off. (See page
34.)
TOUCH button
This turns the Touch function on and off. (See
page 38.)
Power switch (STANDBY/ON)
DEMO button
This is used to play the Demo songs. (See page
12.)
LOAD, SAVE, UTILITY buttons
These are for using the corresponding disk
operations. (See pages 96, 94, 97.)
EXECUTE button
This is for executing disk operations. (See page
95.)
R HARMONY button
This turns the Harmony effect on and off. (See
page 43.)
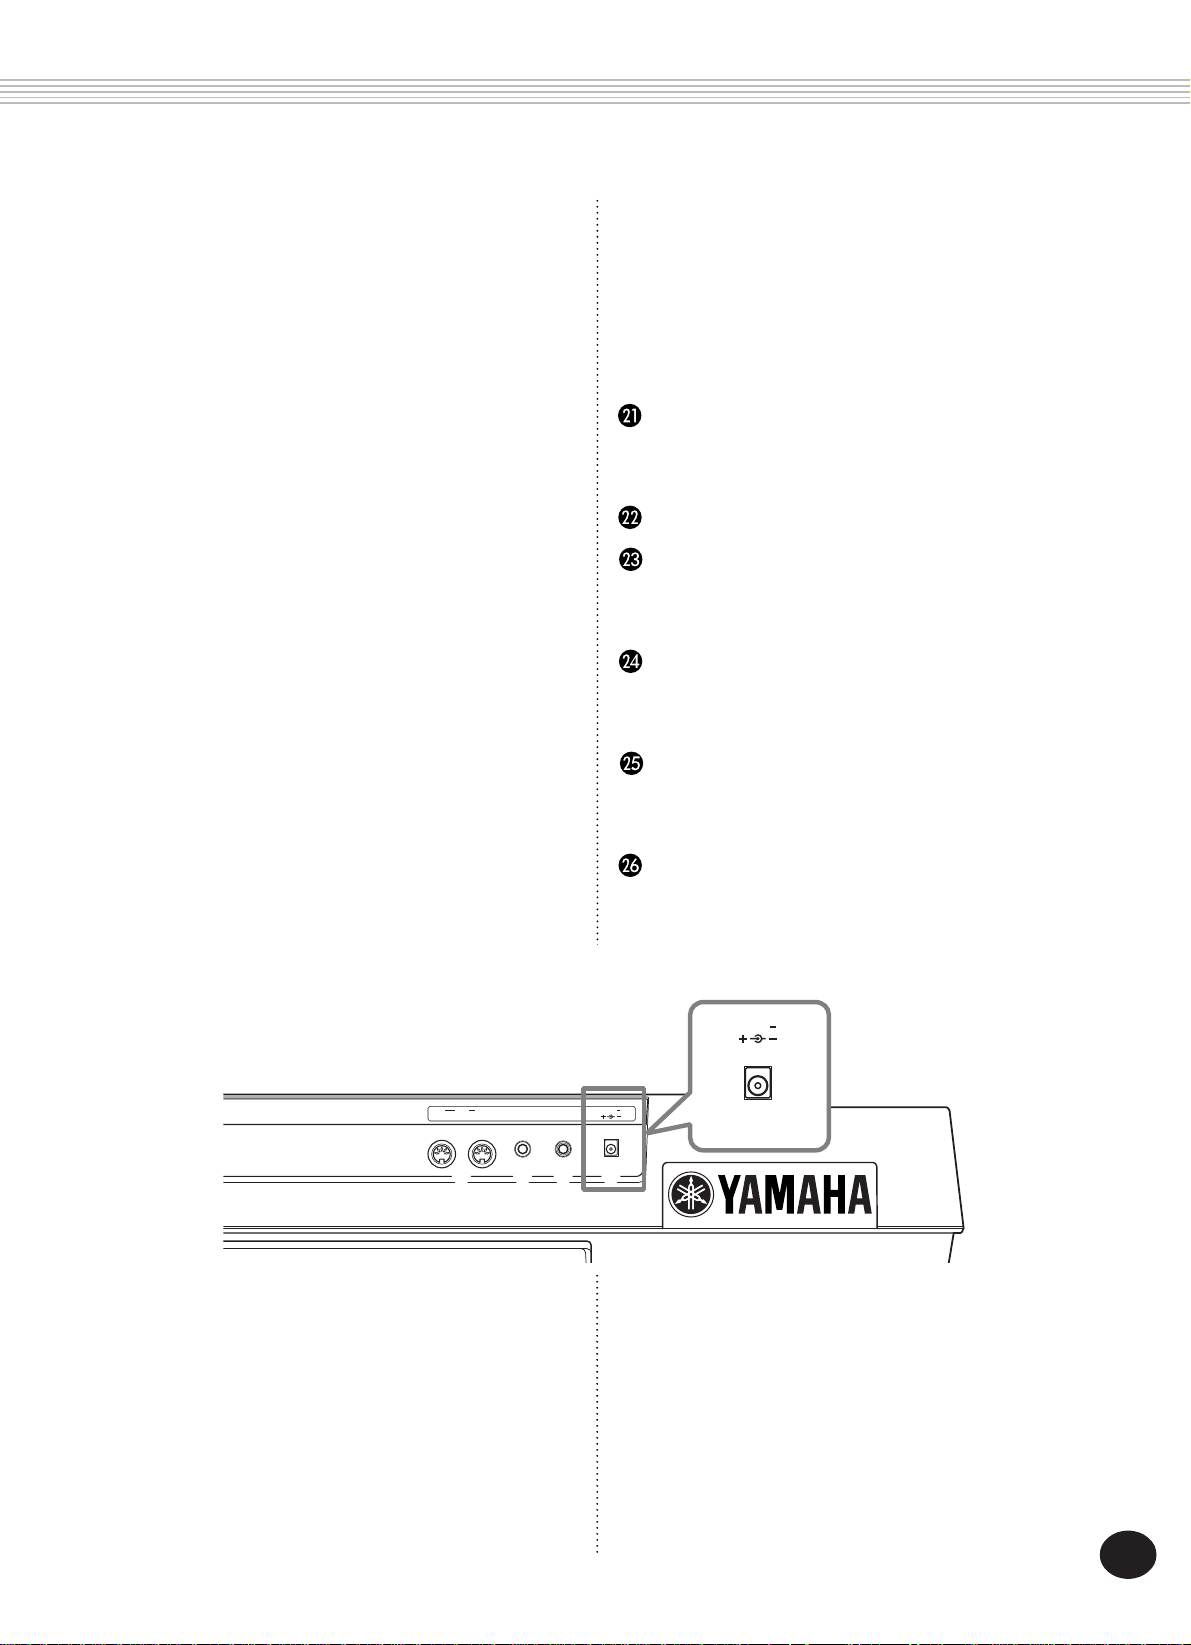
Rear Panel
IN MIDI OUT DC IN 10 12V
A DC IN 10-12V jack
This is for connection to a PA-5B, PA-5C or PA-51
AC power adaptor. (See page 8.)
B PHONES/OUTPUT jack
This is for connection to a set of stereo headphones or to an external amplifier/speaker
system. (See page 9.)
FOOT SWITCH PHONES/
OUTPUT
Disk Drive
This is for insertion of floppy disks, for loading
and saving data. (See page 92.)
DC IN 10 12V
AC POWER ADAPTOR
YAMAHA PA-5B/5C/51
AC POWER ADAPTOR
YAMAHA PA-5B/5C/51
ABD C
C FOOT SWITCH jack
This is for connection to an optional FC4 or FC5
Footswitch. The footswitch is generally used to
control sustain, but it can conveniently be set to
control one of a variety of functions instead.
(See pages 9, 100.)
D MIDI IN, OUT terminals
These are for connection to other MIDI instruments and devices. (See page 103.)
7
5
Page 8
SETTING UP
This section contains information about setting up your PortaTone for playing.
Make sure to read this section carefully before using the instrument.
POWER REQUIREMENTS
Although the PSR-340 will run either from an
optional AC adaptor or batteries, Yamaha recommends use of an AC adaptor whenever
possible. An AC adaptor is more environmentally friendly than batteries and does not deplete
resources.
CAUTION
Never interrupt the power supply (e.g. remove the batteries or
unplug the AC adaptor) during any PSR-340 record operation!
Doing so can result in a loss of data.
Using an AC Power Adaptor
To connect your PortaTone to a wall socket, you
will need the optionally available Yamaha PA-5B,
PA-5C or PA-51 Power Adaptor. Use of other AC
adaptors could result in damage to the instrument, so be sure to ask for the right kind. Connect one end of the adaptor to the DC IN 1012V jack on the rear panel of your PortaTone,
and the other end to a suitable electrical outlet.
WARNING
• Use ONLY a Yamaha PA-5B, PA-5C or PA-51 AC Power
Adaptor (or other adaptor specifically recommended by
Yamaha) to power your instrument from the AC mains. The
use of other adaptors may result in irreparable damage to
both the adaptor and the PSR-340.
• Unplug the AC Power Adaptor when not using the PSR-340,
or during electrical storms.
BATTERIES 1.5V x 6
■ When the Batteries Run Down
When the batteries run low and the battery
voltage drops below a certain level, the
PortaTone may not sound or function properly.
As soon as this happens, replace them with a
complete set of six new batteries.
CAUTION
• Never mix old and new batteries or different types of
batteries (e.g., alkaline and manganese).
• To prevent possible damage from battery leakage, remove
the batteries from the instrument if it is not to be used for a
long time.
TURNING ON THE POWER
With the AC power adaptor connected or with
batteries installed, simply press the power switch
until it locks in the ON position. When the
instrument is not in use, be sure to turn the
power off. (Press the switch again so that it
pops up.)
Using Batteries
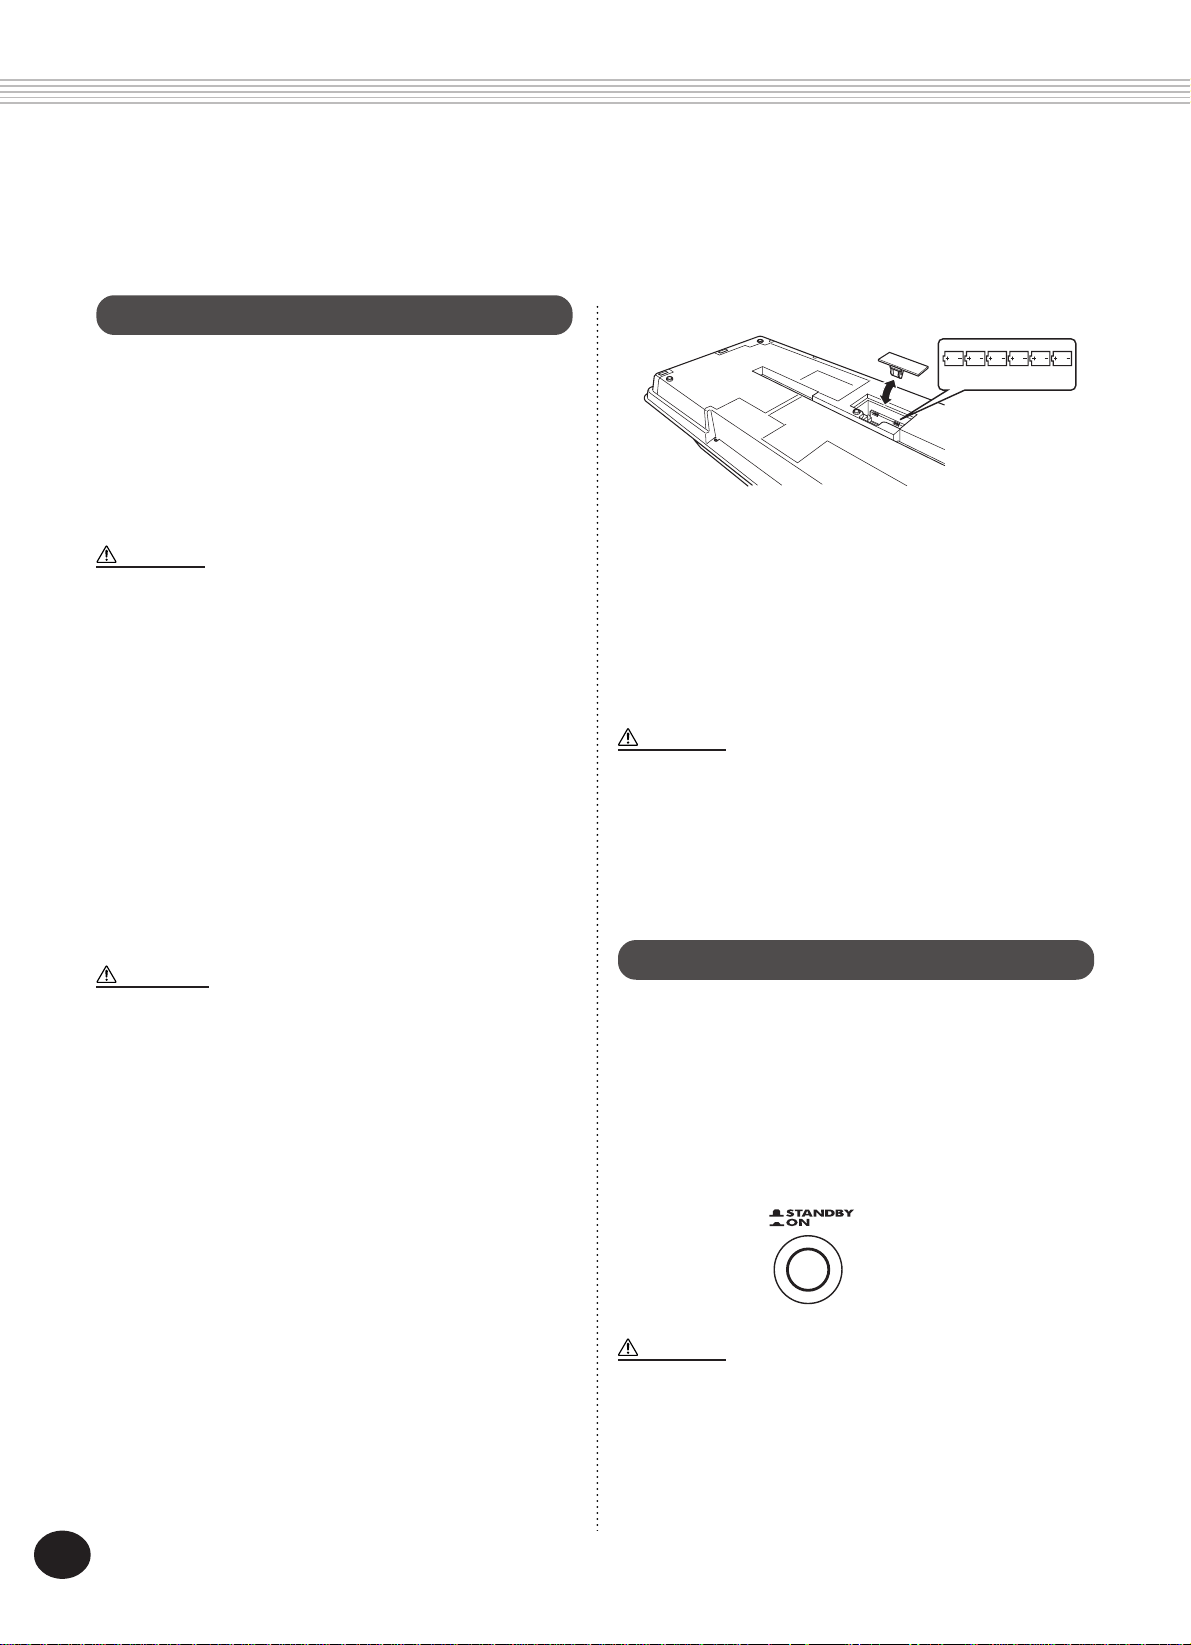
■ Inserting Batteries
Turn the instrument upside-down and remove
the battery compartment lid. Insert six 1.5-volt
size “D” (SUM-1, R-20 or equivalent) batteries as
shown in the illustration, making sure that the
positive and negative terminals are properly
aligned, and replace the lid.
8
CAUTION
Even when the switch is in the “STANDBY” position, electricity
is still flowing to the instrument at the minimum level. When
you are not using the PSR-340 for a long time, make sure you
unplug the AC power adaptor from the wall AC outlet, and/or
remove the batteries from the instrument.
6
Page 9
SETTING UP
ACCESSORY JACKS
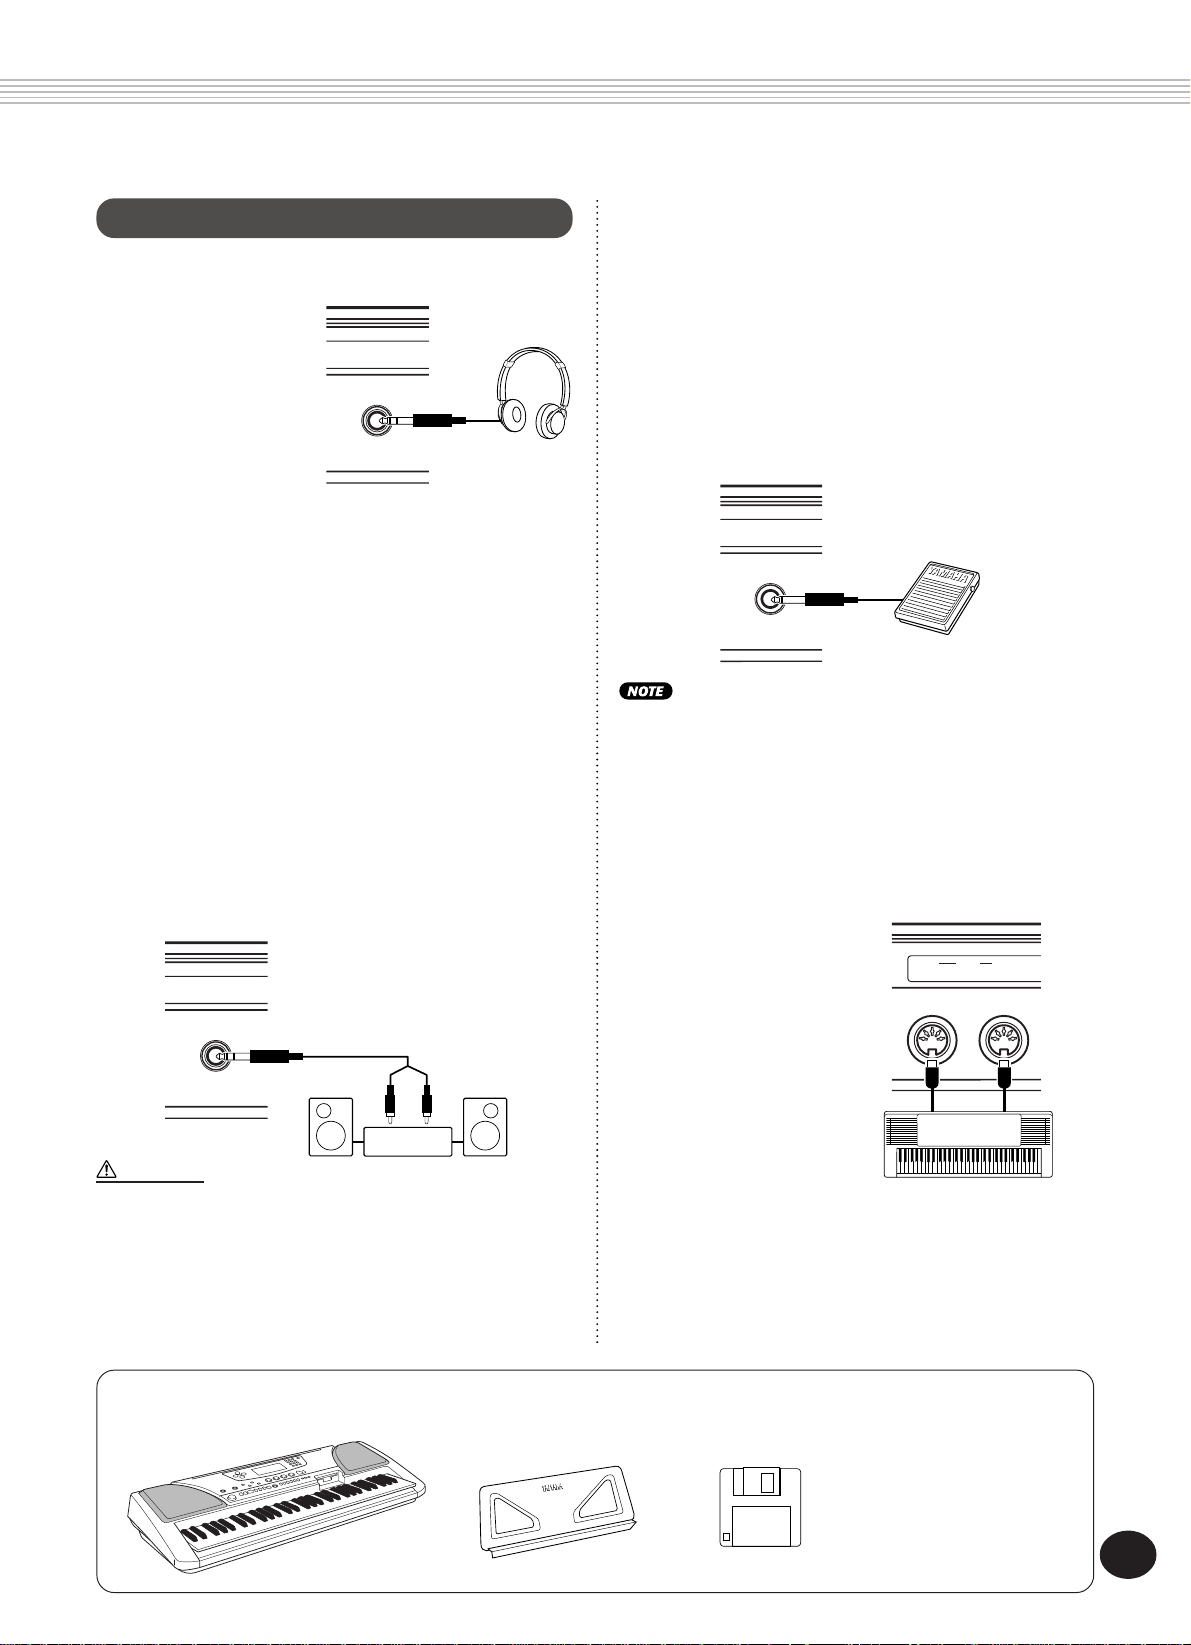
■ Using Headphones
For private practicing
and playing without
disturbing others,
connect a set of
stereo headphones to
the rear panel
PHONES/OUTPUT
jack. Sound from the
built-in speaker system is automatically cut off
when you insert a headphone plug into this jack.
■ Connecting a Keyboard Amplifier or Stereo
System
Though the PortaTone is equipped with a builtin speaker system, you can also play it through
an external amplifier/speaker system. First,
make sure the PortaTone and any external
devices are turned off, then connect one end of
a stereo audio cable to the LINE IN or AUX IN
jack(s) of the other device and the other end to
the rear panel PHONES/OUTPUT jack on the
PortaTone.
PHONES/
OUTPUT
CAUTION
To prevent damage to the speakers, set the volume of the
external devices at the minimum setting before connecting
them. Failure to observe these cautions may result in electric
shock or equipment damage. Also, be sure to set the volumes
of all devices at their minimum levels and gradually raise the
volume controls while playing the instrument to set the desired
listening level.
PHONES/
OUTPUT
Stereo system
■ Using a Footswitch
This feature lets you use an optional footswitch
(Yamaha FC4 or FC5) to sustain the sound of the
voices, or control a variety of other functions.
(See page 100.) When this is used for sustain,
the footswitch functions the same way as a
damper pedal on an acoustic piano — press and
hold down the footswitch as you play the keyboard to sustain the sound.
FOOT SWITCH
• Make sure that the footswitch plug is properly connected to
the FOOT SWITCH jack before turning on the power.
• Do not press the footswitch while turning the power on.
Doing this changes the recognized polarity of the footswitch,
resulting in reversed footswitch operation.
■ Using the MIDI Terminals
The PortaTone also
features MIDI termi-
IN MIDI OUT
nals, allowing you to
interface the
PortaTone with other
MIDI instruments and
devices. (For more
information, see page
MIDI instrument
102.)
Packing List
• PSR-340
7
• Music Stand • Sample Disk • Owner‘s manual
9
Page 10
Quick Guide —
Quick Guide —
How to Use Your New
How to Use Your New
CCCCCDDDDDDEEEEE
ГГГГГДДДДДДЕЕЕЕЕ
PSR-340 PortaTone
PSR-340 PortaTone
Step 1
Using
This brief, easy-to-follow section shows you how to use
the basic features and functions of your new PSR-340
PortaTone. If you’ve never touched an electronic keyboard before, reading and going through the steps in
this section will make you familiar with the PortaTone
in a very short time. It will also give you the tools you
need to explore the advanced capabilities of the instrument and use them effectively in your own music.
Good luck...and enjoy!
VOLUME
VOLUME
VOICE
STYLE
MEASURE
001
001 116
GrandPno
TEMPO
TEMPO
TRANSPOSE
TUNING
ACMP/SONG
METRONOME
The PSR-340 features a built-in disk drive.
It allows you to playback song data from
a wide variety of commercially available
disks, as well as create and save your own
PortaTone data. Included with the PSR340 is a sample disk containing 99
sample songs for playback.
Refer to page 92 for details on using the
floppy disk drive (FDD) and floppy disk.
v
x
c
b
cb
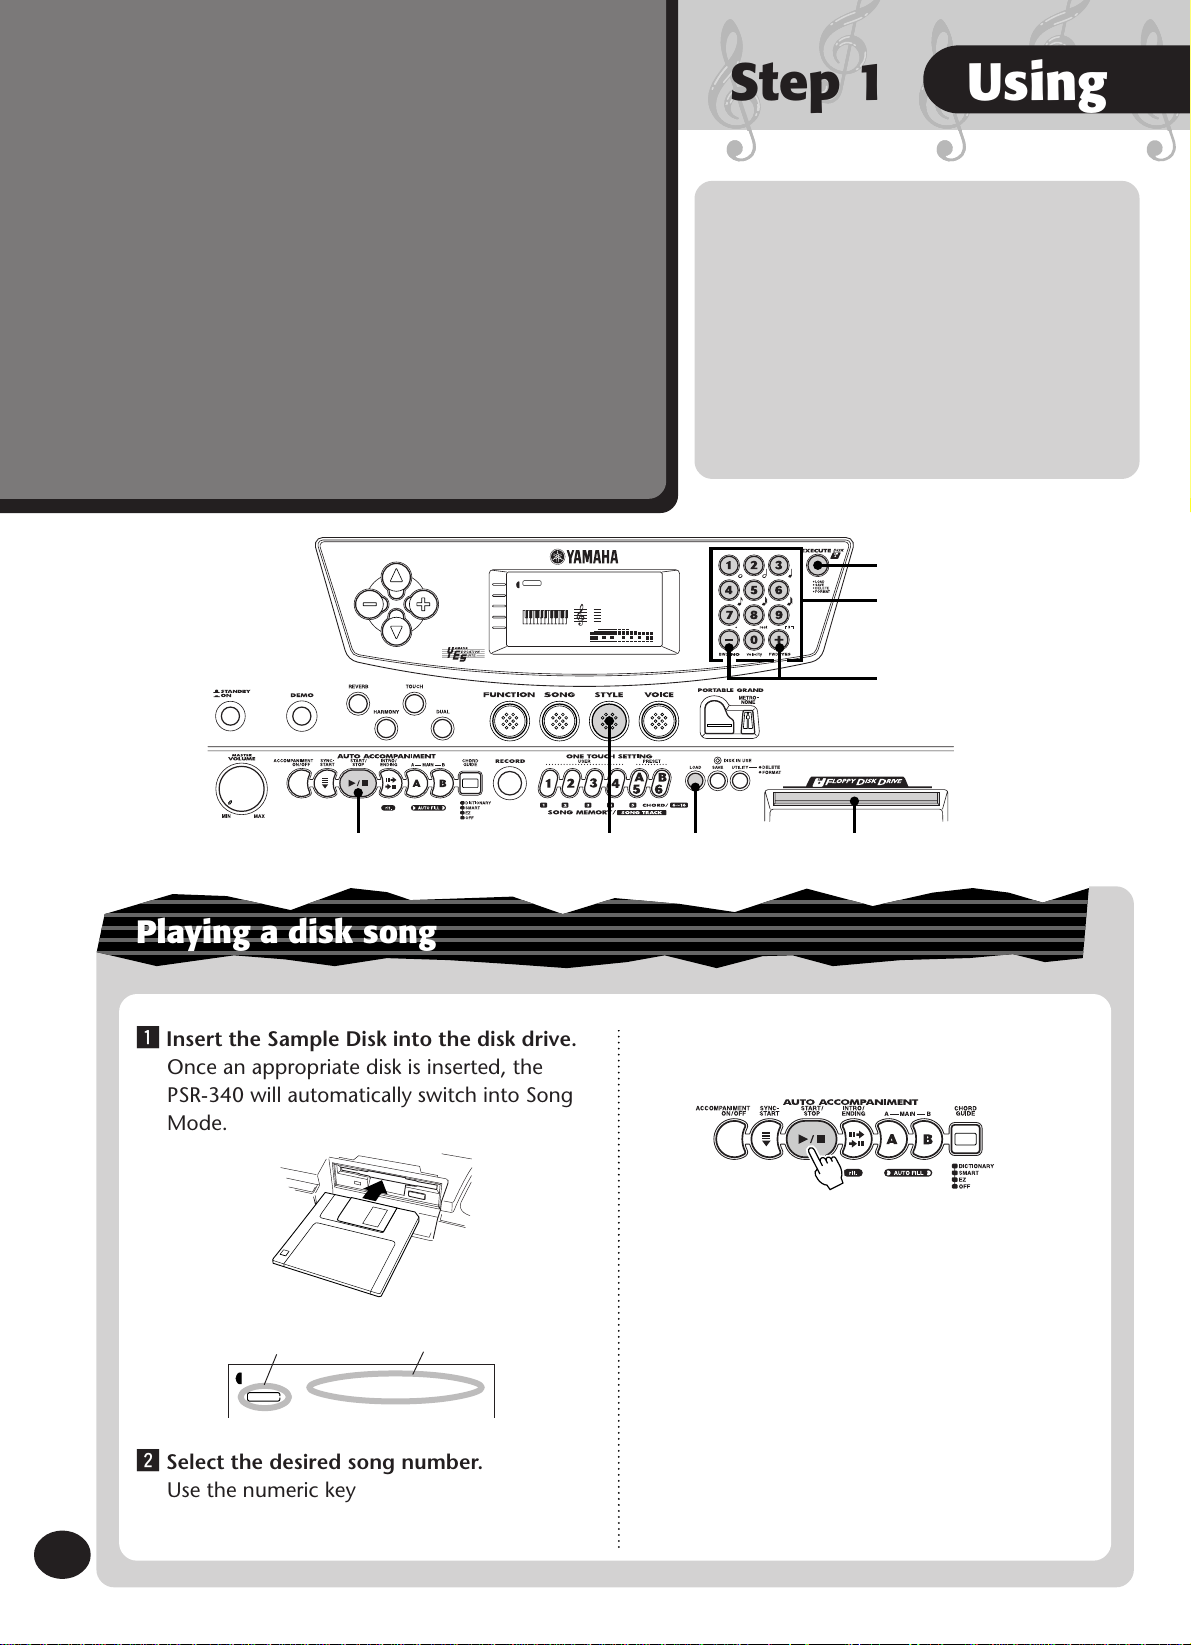
Playing a disk song
z Insert the Sample Disk into the disk drive.
Once an appropriate disk is inserted, the
PSR-340 will automatically switch into Song
Mode.
Indicates Song
mode is selected
101
SONG
Song name and
number
D-Song01
x zn z
c Start the selected song.
Press the START/STOP button.
In addition to playing a selected single song,
you can have all songs on the disk play back
in order. To do this, press the + button until
the last selection “ALL” is selected, then press
the START/STOP button to play back all
songs in order.
v If you want to change to another song,
repeat step 2 above.
x Select the desired song number.
Use the numeric keypad.
10
b Stop the song.
Press the START/STOP button.
Want to find out more? See page 93.
8
Page 11
the Built-in Floppy Disk Drive
CCCCCCDDDDD
EEEEE
ГГГГГГДДДДД
ЕЕЕЕЕ
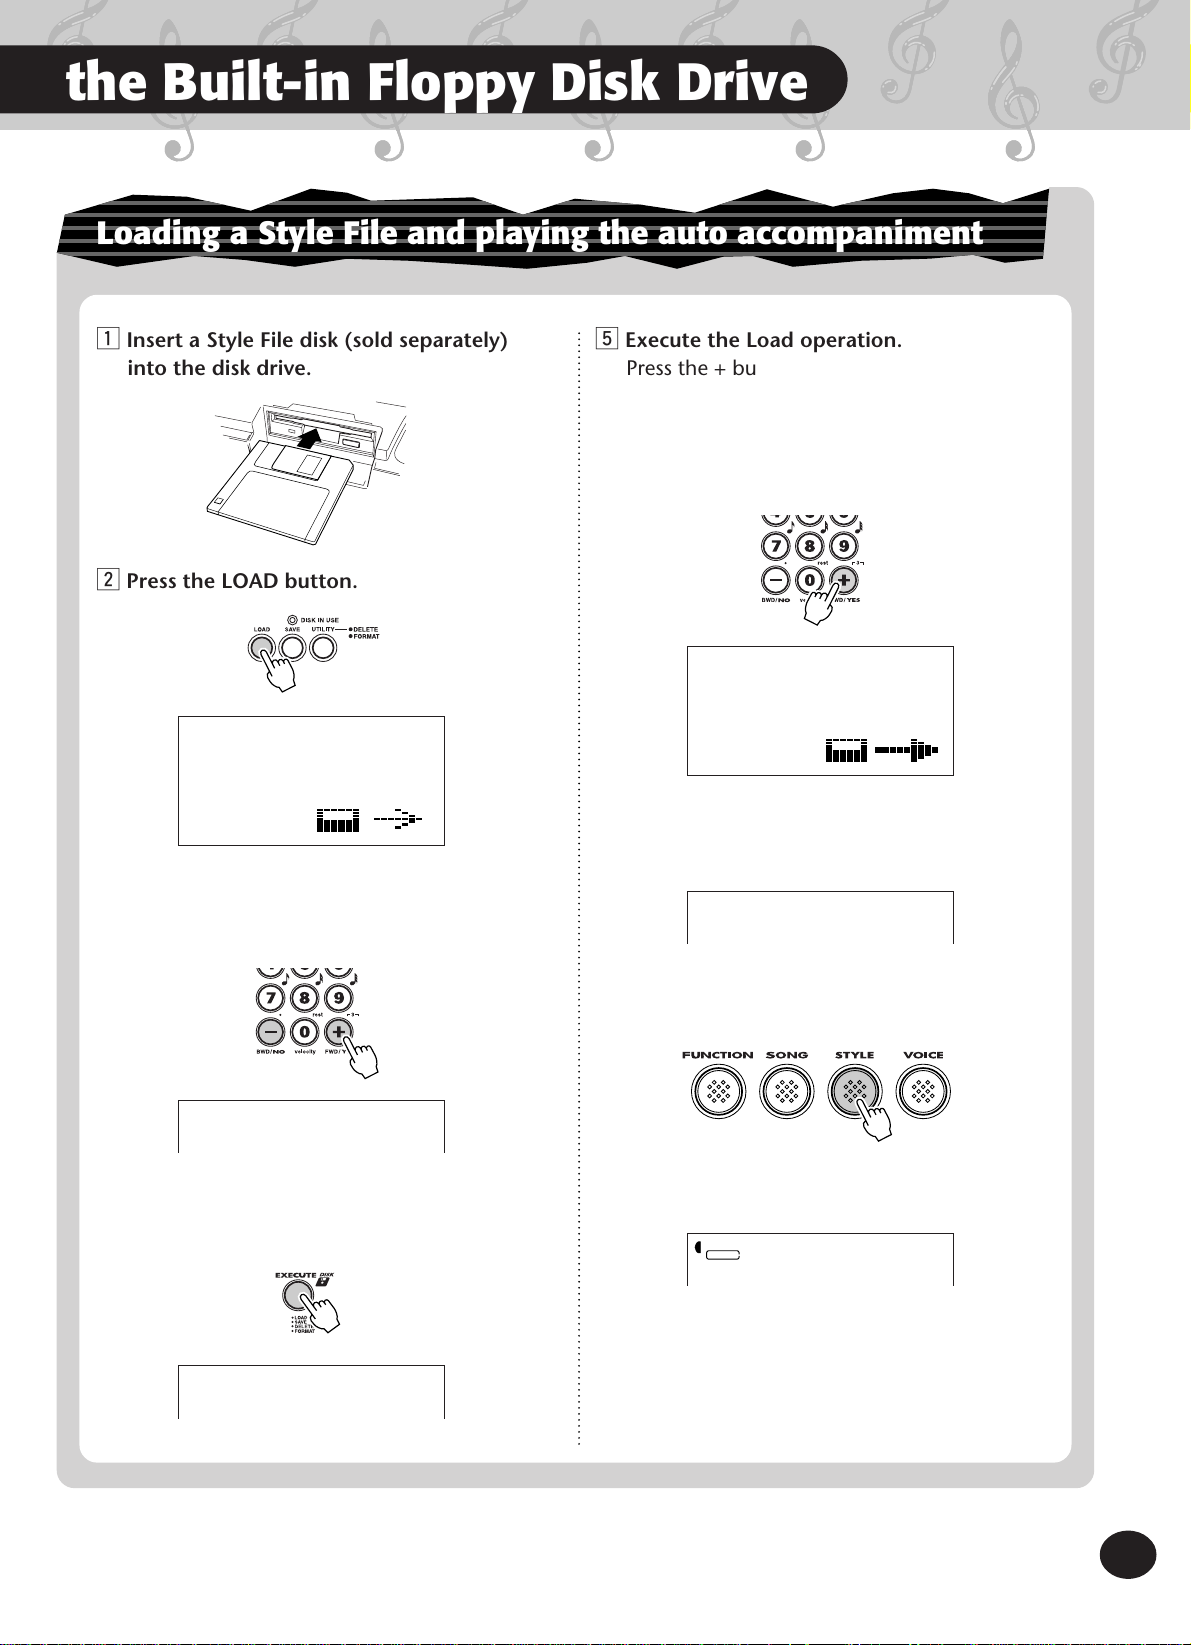
Loading a Style File and playing the auto accompaniment
z Insert a Style File disk (sold separately)
into the disk drive.
x Press the LOAD button.
BEBOP
stY
c Select the file to load.
Use the +/- buttons.
b Execute the Load operation.
Press the + button (“YES”), and the load
operation will start. Once started, the operation cannot be canceled.
As the file is loading, “Loading” will appear
on the top line of the display.
Loading
Sty
When the operation is completed, the following display briefly appears.
End
BEBOP
stY
v Press the EXECUTE button.
BEBOP
YES
n Enter the Style mode.
m Select the loaded style (101).
STYLE
101
BEBOP
, Play the auto accompaniment (page 47).
Want to find out more? See page 91.
11
9
Page 12
Step 2
ALL
001 052
MEASURE TEMPO
SONG
1 62 3 4 5
My heart
100
001 120
MEASURE TEMPO
SongVol
SONG
1 62 3 4 5
ACMP/SONG
VOLUME
CCCCCDDDDDDEEEEE
ГГГГГДДДДДДЕЕЕЕЕ
Playing a song
Songs
Playing back all three songs
The PSR-340 has three Demo songs that showcase the authentic voices and dynamic accompaniment of the instrument.
z Press the DEMO button.
My heart
ALL
SONG
MEASURE TEMPO
001 052
1 62 3 4 5
x Stop the song.
or
Playing back a single song
Naturally, you can also individually select and
play back any of the PortaTone’s songs.
z Enter the Song mode.
x Select a song.
TakeOff!
002
SONG
c Start (and stop) the song.
Want to find out more? See page 75.
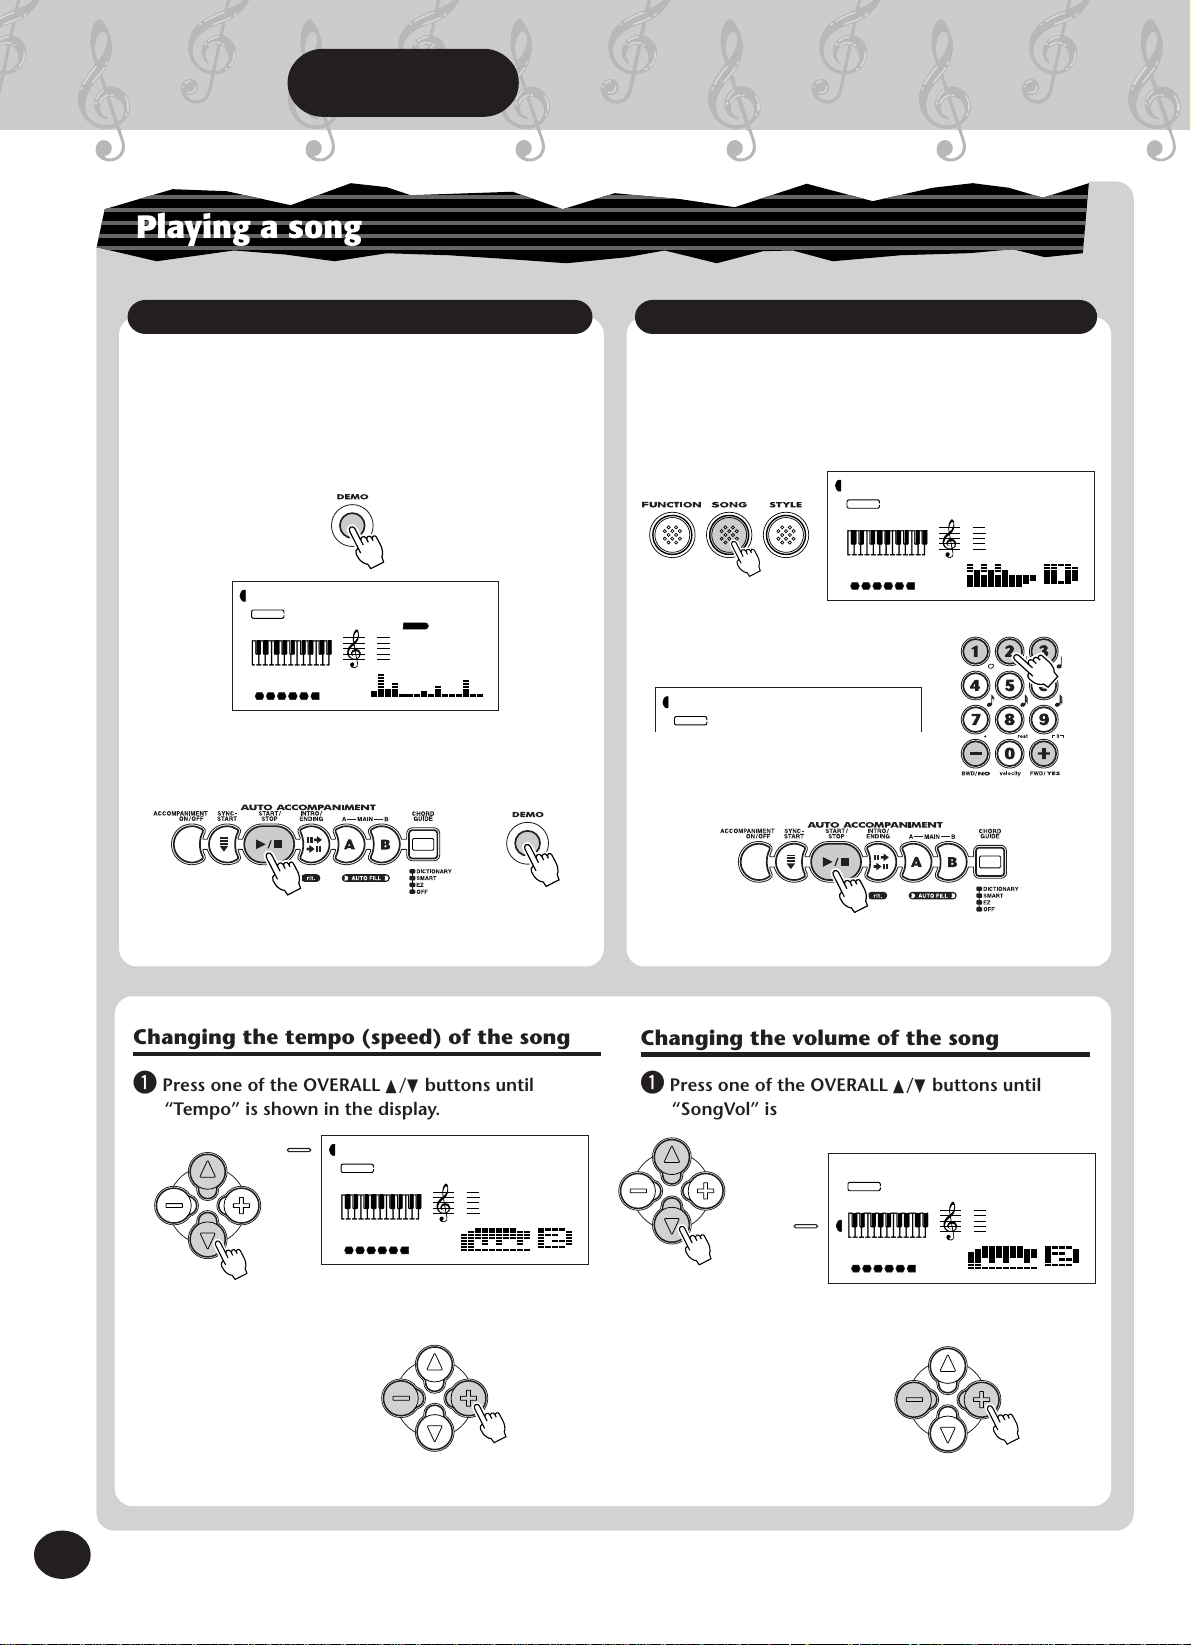
Changing the tempo (speed) of the song
q Press one of the OVERALL
“Tempo” is shown in the display.
TEMPO
▲/▼
buttons until
100
SONG
MEASURE TEMPO
001 100
1 62 3 4 5
Tempo
w Press the OVERALL + or - button to speed up or
slow down the tempo.
Want to find out more? See page 76.
Want to find out more? See page 75.
Changing the volume of the song
▲/▼
q Press one of the OVERALL
“SongVol” is shown in the display.
buttons until
w Press the OVERALL + or - button to raise or lower
the volume of the song.
Want to find out more? See page 78.
12
10
Page 13
Step 2
CCCCCCDDDDD
EEEEE
ГГГГГГДДДДД
ЕЕЕЕЕ
Songs
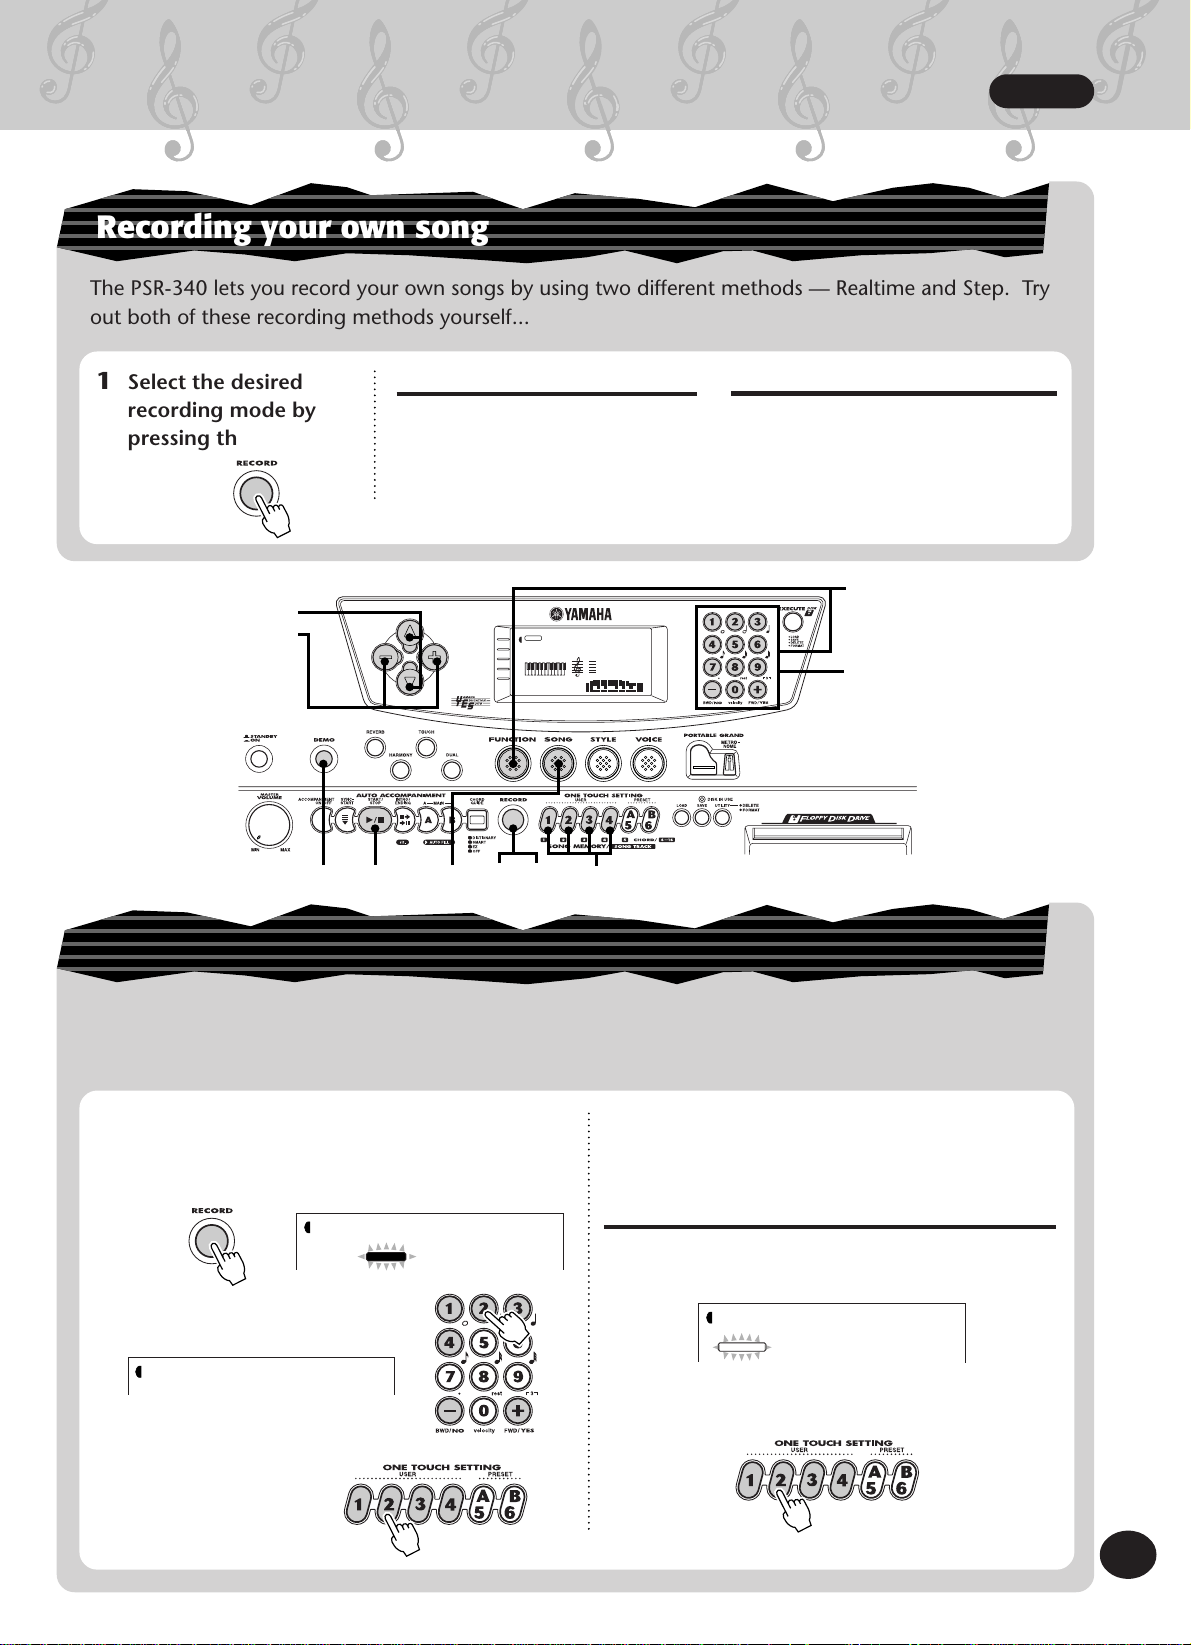
Recording your own song
The PSR-340 lets you record your own songs by using two different methods — Realtime and Step. Try
out both of these recording methods yourself...
1 Select the desired
recording mode by
pressing the RECORD
button.
Realtime recording
This method is much like using a
conventional tape recorder, letting
you play and record the parts of
the song in real time.
Step recording
This method is similar to using a
pencil and paper to write down each
note, entering the parts of the song
step by step.
Want to find out more? See pages 79-90.
q
VOICE
zz
TEMPO
TRANSPOSE
TUNING
ACMP/SONG
VOLUME
METRONOME
VOLUME
wt
STYLE
MEASURE
001 116
1
GrandPno
001
TEMPO
rxc
B
w
Creating your own custom One Touch Settings
A
x
e
You can also create your own One Touch Settings — letting you completely reconfigure virtually all
PortaTone settings at the touch of a button! Up to 16 settings can be saved (4 User banks x 4 User
buttons).
q Make all desired settings on the PortaTone.
w Select the User One Touch Setting
t Turn off the User One Touch Setting record
mode.
record mode.
Calling up a User One Touch Setting
STYLE
OTS User
1
RECORD
A Select Function #41, and select the desired bank
(1 - 4).
e Select the desired User
bank (1 - 4).
STYLE
UserBank
2
r Select the desired User
button (USER 1 - 4).
STYLE
FUNCTION
B Press the appropriate USER button (1 - 4) to
instantly call up your custom panel settings.
UserBank
F41
Want to find out more? See page 72.
13
11
Page 14
Step3 Voices
CCCCCDDDDDDEEEEE
ГГГГГДДДДДДЕЕЕЕЕ
Playing the Piano Voice
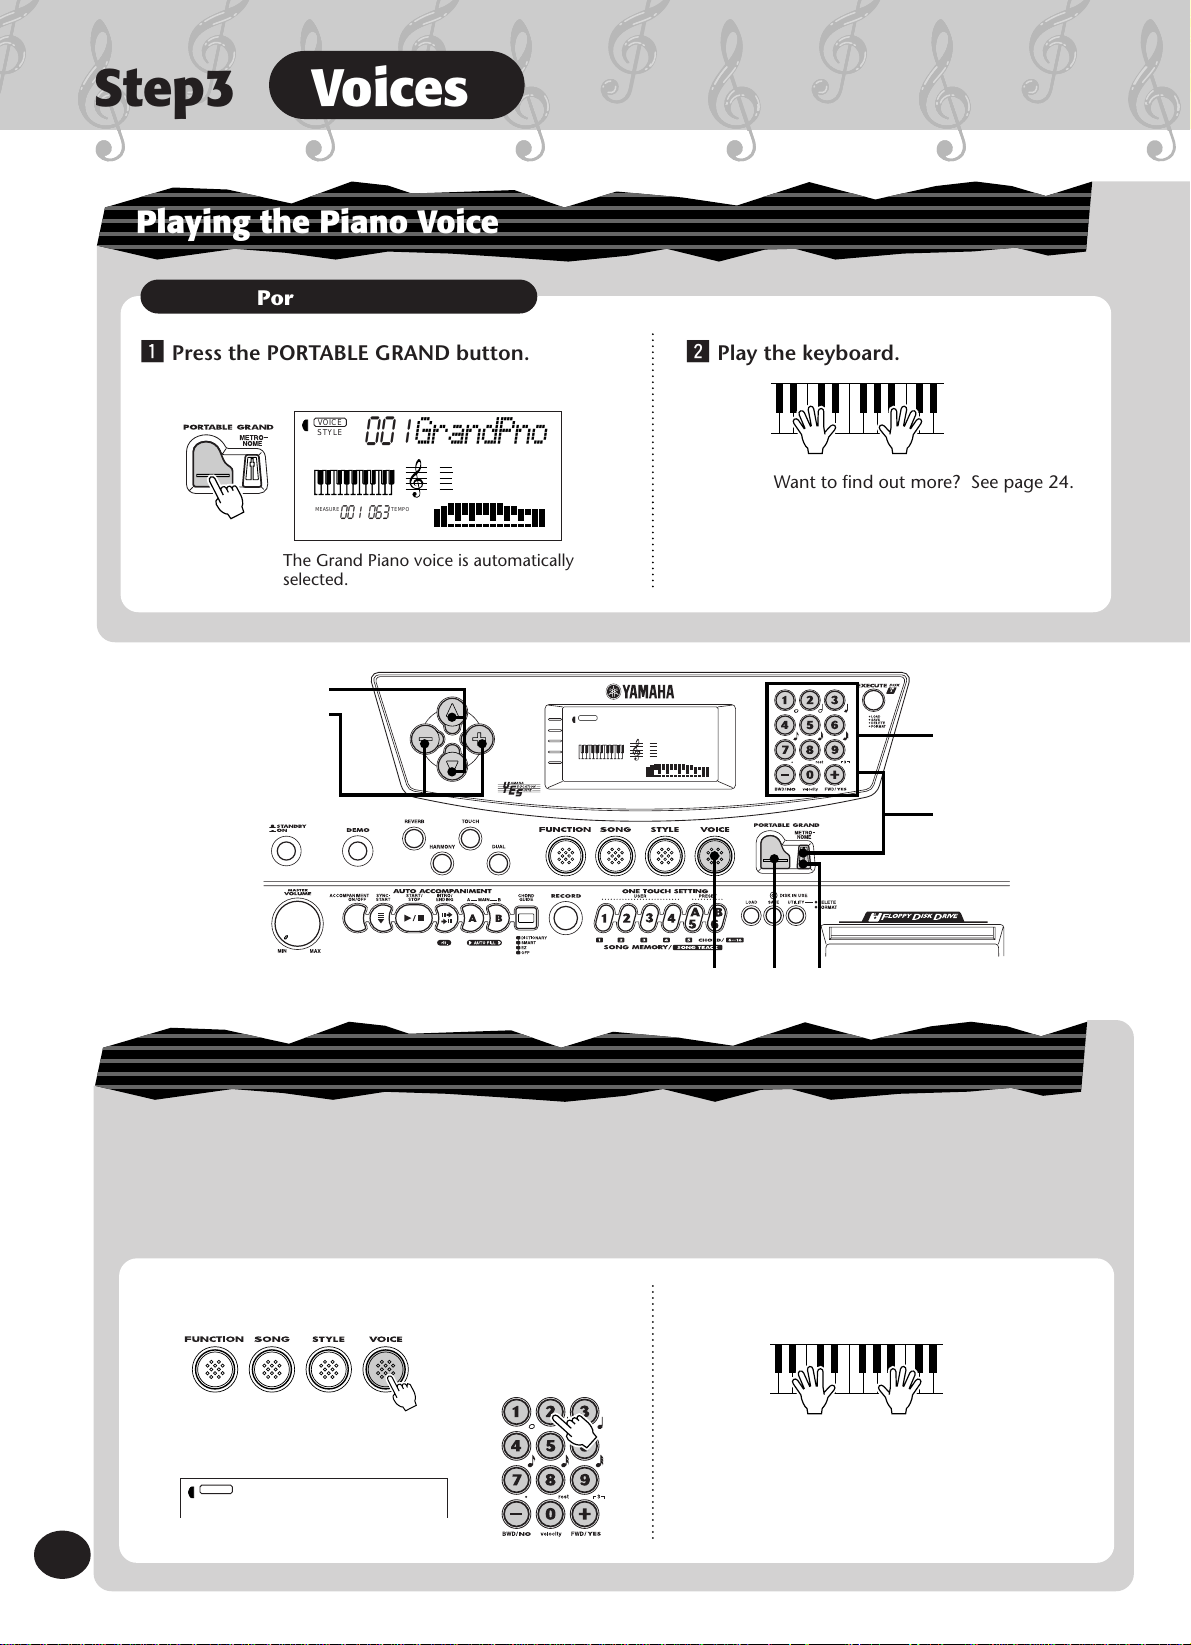
Portable Grand
z Press the PORTABLE GRAND button.
VOICE
STYLE
MEASURE TEMPO
001 063
The Grand Piano voice is automatically
selected.
GrandPno
001
1
2
TRANSPOSE
ACMP/SONG
METRONOME
TEMPO
TUNING
VOLUME
VOLUME
MEASURE
VOICE
STYLE
001 116
GrandPno
001
TEMPO
x Play the keyboard.
Want to find out more? See page 24.
x
q
14
z
zq
Selecting other voices
The PSR-340 features a total of 238 high-quality voices. Let’s try a few of them out...
Panel voices ........... 1 - 100 (100 voices)
101 - 110 (10 drum kit voices)
GM voices .............. 111 - 238 (128 voices)
z Enter the Voice mode.
x Select a voice.
VOICE
STYLE
BritePno
002
c Play the keyboard.
Want to find out more? See page 27.
12
Page 15

Step3
CCCCCCDDDDD
EEEEE
ГГГГГГДДДДД
ЕЕЕЕЕ
Voices
Playing along with the Metronome
q Press the METRONOME button.
Want to find out more? See page 24.
Changing the Metronome Volume
1 Press one of the OVERALL
“MtrVol” is shown in the display.
▲/▼
buttons until
Changing the time signature of the Metronome
q Simultaneously hold down the METRONOME button
and one of the number buttons (1 - 9) on the
numeric keypad.
+
Normally, the Metronome is set to play in 4/4
time. To change this to 2/4, press number button
“2.” To change it to 3/4 time, press number
button “3.”
Want to find out more? See page 25.
Panel Voice List
No. Voice Name
PIANO
1 Grand Piano
2 Bright Piano
3 Honky-tonk Piano
4 Funky Electric Piano
5 DX Electric Piano
6 MIDI Grand Piano
7 CP 80
8 Hyper Electric Piano
9 Bell Electric Piano
10 Harpsichord
11 Clavi
12 Celesta
MALLET
13 Vibraphone
14 Marimba
15 Xylophone
16 Tubular Bells
17 Timpani
18 Steel Drums
19 Music Box
ORGAN
20 Jazz Organ 1
21 Jazz Organ 2
22 Jazz Organ 3
No. Voice Name
23 Full Organ
24 Rock Organ 1
25 Rock Organ 2
26 16'+2' Organ
27 16'+4' Organ
28 Church Organ
29 Reed Organ
30 Musette Accordion
31 Traditional Accordion
32 Bandoneon
GUITAR
33 Classical Guitar
34 Folk Guitar
35 12Strings Guitar
36 Jazz Guitar
37 Octave Guitar
38 Clean Guitar
39 Muted Guitar
40 Overdriven Guitar
41 Distortion Guitar
BASS
42 Acoustic Bass
43 Finger Bass
44 Pick Bass
45 Fretless Bass
No. Voice Name
46 Slap Bass
47 Synth Bass
48 Techno Bass
49 Dance Bass
ENSEMBLE
50 Strings
51 Chamber Strings
52 Synth Strings
53 Slow Strings
54 Tremolo Strings
55 Pizzicato Strings
56 Choir
57 Choir Aahs
58 Choir Oohs
59 Synth Choir
60 Orchestra Hit
61 Violin
62 Cello
63 Contrabass
64 Banjo
65 Harp
66 Trumpet
67 Muted Trumpet
STRINGS
BRASS
VOICE
METRONOME
VOLUME
STYLE
MEASURE
001 063
MtrVol
100
TEMPO
2 Press the OVERALL + or - button to raise or lower
the value.
Want to find out more? See page 26.
No. Voice Name
68 Trombone
69 Trombone Section
70 French Horn
71 Tuba
72 Brass Section
73 Synth Brass
74 Jump Brass
75 Techno Brass
REED
76 Soprano Sax
77 Alto Sax
78 Tenor Sax
79 Baritone Sax
80 Oboe
81 English Horn
82 Bassoon
83 Clarinet
84 Harmonica
PIPE
85 Piccolo
86 Flute
87 Pan Flute
88 Recorder
89 Ocarina
No. Voice Name
SYNTH LEAD
90 Square Lead
91 Sawtooth Lead
92 Voice Lead
93 Crystal
94 Brightness
95 Analog Lead
SYNTH PAD
96 Fantasia
97 Bell Pad
98 Xenon Pad
99 Angels
100 Dark Moon
DRUM KITS
101 Standard Kit 1
102 Standard Kit 2
103 Room Kit
104 Rock Kit
105 Electronic Kit
106 Analog Kit
107 Dance Kit
108 Jazz Kit
109 Brush Kit
110 Symphony Kit
13
15
Page 16
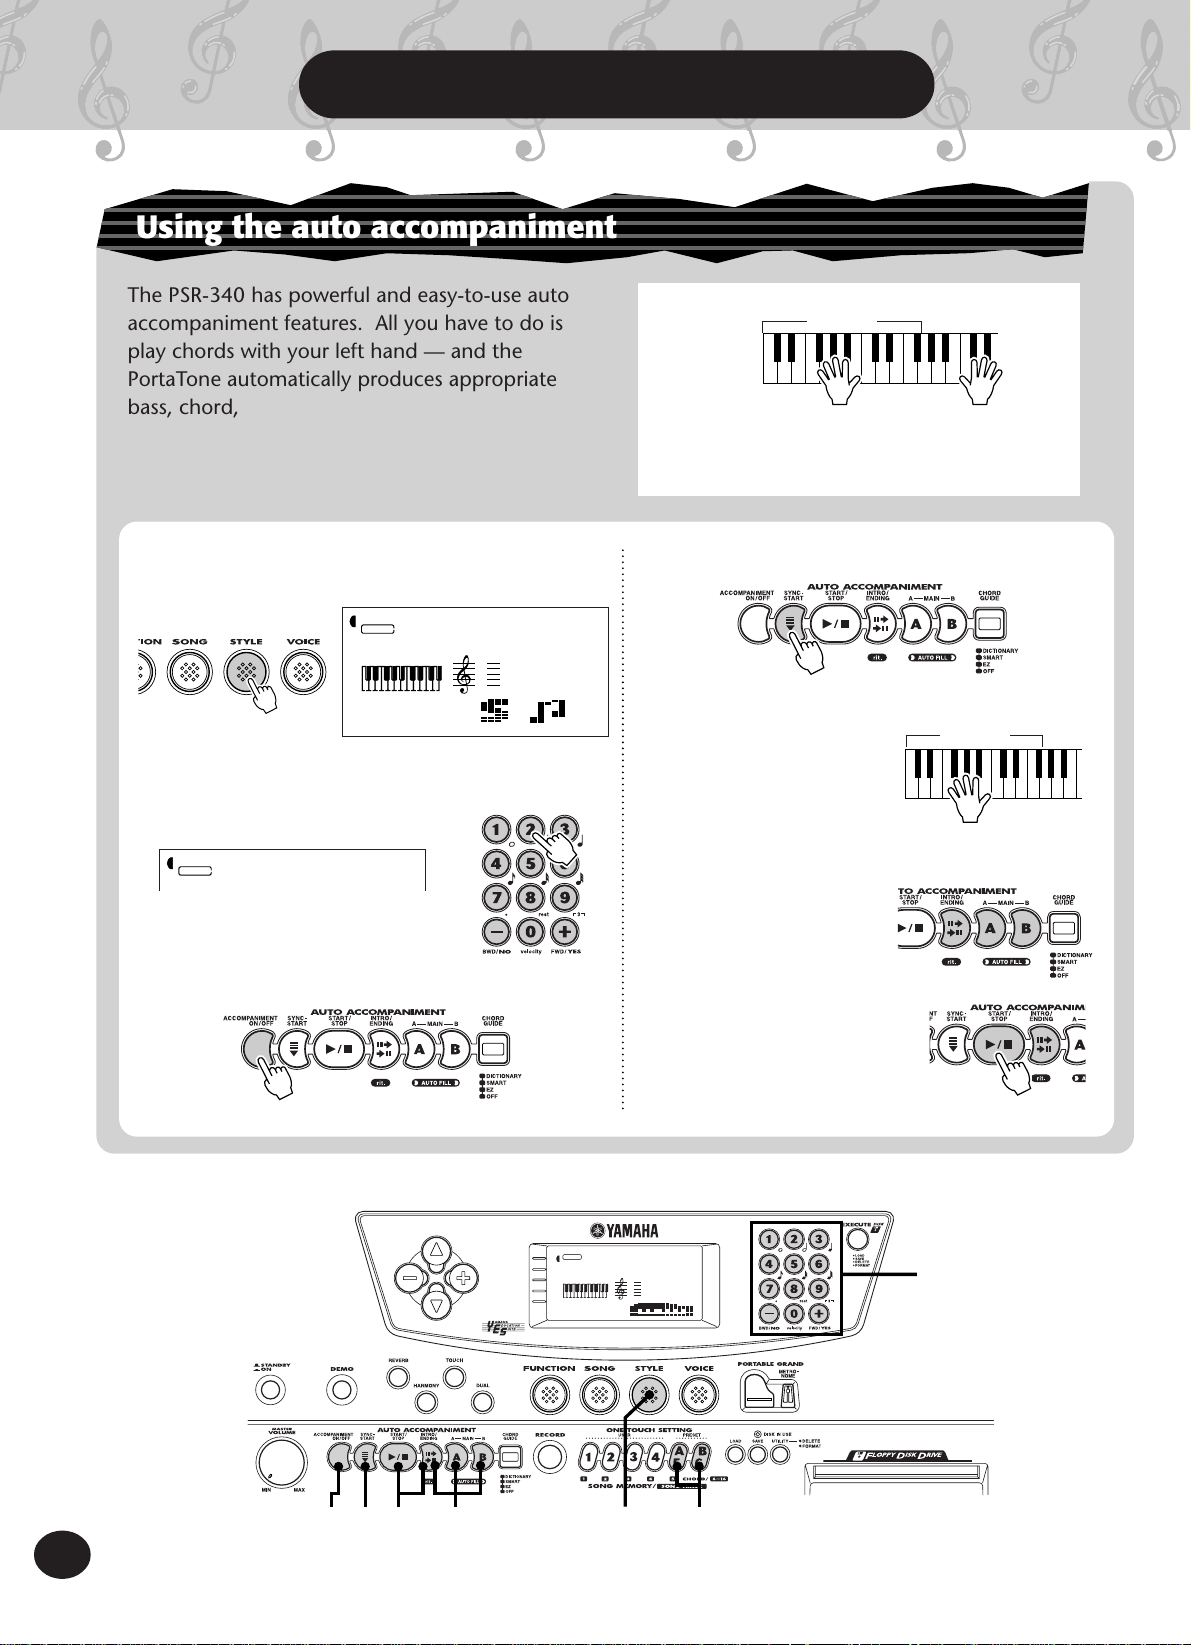
Step 4 Auto Accompaniment
CCCCCDDDDDDEEEEE
ГГГГГДДДДДДЕЕЕЕЕ
Using the auto accompaniment
The PSR-340 has powerful and easy-to-use auto
accompaniment features. All you have to do is
play chords with your left hand — and the
PortaTone automatically produces appropriate
bass, chord, and rhythm backing for your performance. Use your right hand to play melodies,
and you’ll sound like an entire band!
z Enter the Style mode.
STYLE
MEASURE TEMPO
001 116
8BtPop1
001
x Select a style.
For a list of styles, see page 17.
STYLE
8BtPop2
002
c Turn the auto accompaniment on.
Accompaniment
section
Left hand
Auto accompaniment
(for example, bass + guitar + drums)
+
Right hand
Melody
v Turn the Sync-Start function on.
b Play a chord with your left hand.
For help in learning
how to play chords,
refer to “Using the
Chord Guide function”
on page 18.
Accompaniment
section
n Select a section.
Try playing with the
Intro, Main A/B, and
Ending sections.
16
m Stop the auto accompa-
niment.
VOICE
TEMPO
STYLE
GrandPno
MEASURE
001
001 116
TEMPO
TRANSPOSE
TUNING
ACMP/SONG
VOLUME
METRONOME
VOLUME
cxvnm czz
Want to find out more? See pages 47-61.
x
14
Page 17
Step 4
CCCCCCDDDDD
EEEEE
ГГГГГГДДДДД
ЕЕЕЕЕ
Auto Accompaniment
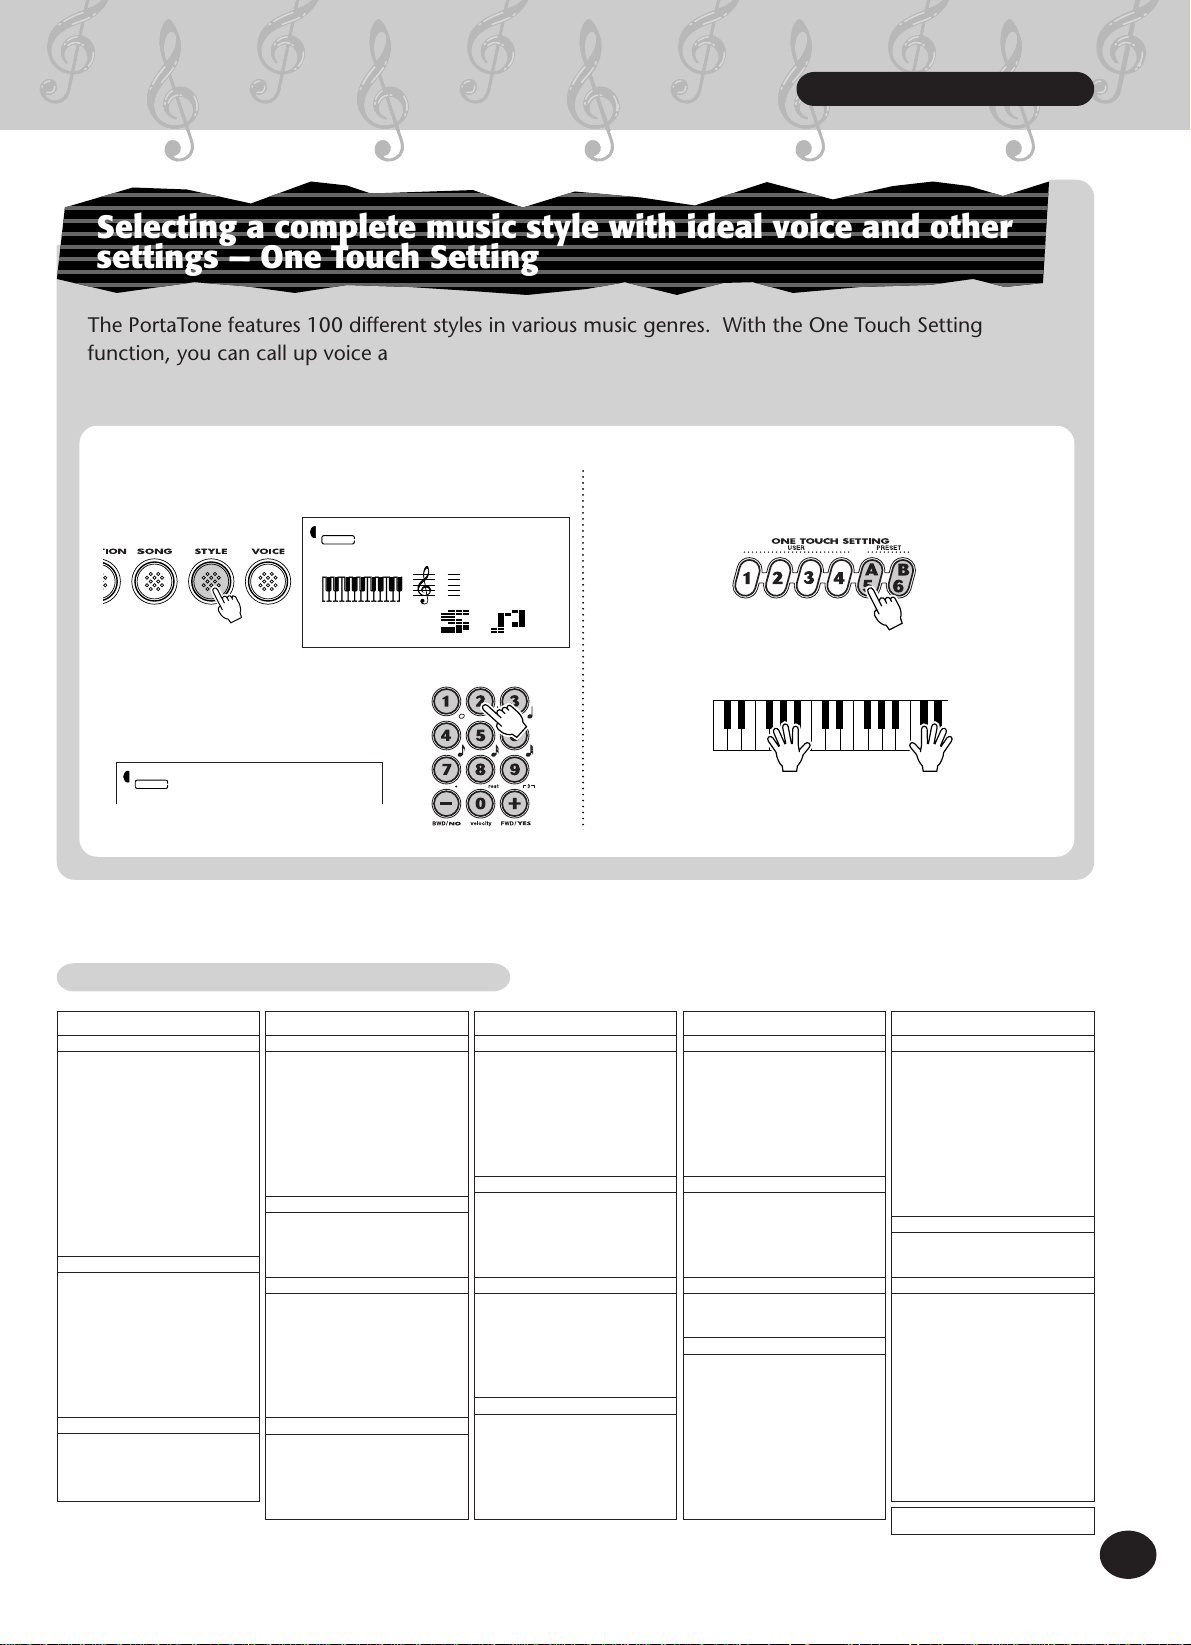
Selecting a complete music style with ideal voice and other
settings — One Touch Setting
The PortaTone features 100 different styles in various music genres. With the One Touch Setting
function, you can call up voice and other settings that best match the selected style. Each style has
been programmed with two Preset One Touch Settings.
z Enter the Style mode.
x Select a style.
For a list of styles, see below.
STYLE
Style List
No. Style Name
8BEAT
1 8Beat Pop 1
2 8Beat Pop 2
3 8Beat Uptempo
4 8Beat Standard
5 Folkrock
6 Pop Rock
7 8Beat Medium
8 8Beat Ballad
9 Epic Ballad
10 Piano Ballad
16BEAT
11 16Beat Shuffle 1
12 16Beat Shuffle 2
13 16Beat Pop
14 Funk 1
15 16Beat Ballad 1
16 16Beat Ballad 2
17 Soul Ballad
6/8 BALLAD
18 Slow Rock 1
19 Slow Rock 2
20 6/8 Ballad
8BtPop2
002
STYLE
MEASURE TEMPO
001 116
No. Style Name
DANCE
21 Dance Pop 1
22 Dance Pop 2
23 Techno
24 Eurobeat
25 Euro House
26 Hip Hop
27 Synth Boogie
28 70s Disco
29 Disco Tropical
30 Polka Pop
31 8Beat Rock Ballad
32 16Beat Rock Ballad
33 Hard Rock
34 Rock Shuffle
35 6/8 Heavy Rock
36 US Rock
37 Rock & Roll 1
38 Rock & Roll 2
39 Boogie
40 Twist
DISCO
ROCK
ROCK & ROLL
8BtPop1
001
c Press one of the One Touch Setting
buttons: Preset A or B.
v Play the keyboard.
No. Style Name
RHYTHM & BLUES
41 R&B
42 Funk 2
43 Soul
44 Gospel Shuffle
45 6/8 Gospel
46 4/4 Blues
CONTEMPORARY JAZZ
47 Cool Jazz
48 Jazz Ballad
49 Jazz Waltz
50 Fusion
TRADITIONAL JAZZ
51 Swing
52 Big Band Swing
53 Big Band Ballad
54 Jazz Quartet
55 Dixieland
AMERICAS
56 Cajun
57 Banda
58 Mariachi
59 Tejano
60 Cumbia
Want to find out more? See page 74.
No. Style Name
COUNTRY & WESTERN
61 Bluegrass
62 Country 2/4
63 Country Rock
64 Country Ballad
65 Country Shuffle
66 Country Waltz
BALLROOM LATIN
67 Cha Cha
68 Rhumba
69 Pasodoble
70 Tango Continental
BALLROOM STANDARD
71 Foxtrot
72 Jive
MARCH & WALTZ
73 March 1
74 March 2
75 6/8 March
76 Polka
77 Standard Waltz
78 German Waltz
79 Viennese Waltz
80 Musette Waltz
No. Style Name
LATIN
81 Bossa Nova 1
82 Bossa Nova 2
83 Salsa
84 Samba
85 Mambo
86 Beguine
87 Merengue
88 Bolero Lento
CARIBBEAN
89 Reggae 12
90 Pop Reggae
PIANIST
91 Rock-A-Ballad
92 8Beat
93 Swing
94 Jazz Ballad
95 2Beat
96 Boogie
97 Ragtime
98 Arpeggio
99 Waltz
100 Happy
101 Disk Style
15
17
Page 18

Step 5 Chord Guide
001 116
MEASURE TEMPO
ACMP ON
M
7
CCCCCDDDDDDEEEEE
ГГГГГДДДДДДЕЕЕЕЕ
Using the Chord Guide function
Learning how to play specific chords
Here, you’ll learn how to use the Chord Guide functions to show
the individual notes of chords.
z Enter the Style mode, then press the
c Specify the chord type of the chord.
Example:
GM
Root note Chord type
7
CHORD GUIDE button until “Dict.” is
shown in the display.
STYLE
ACMP ON
MEASURE TEMPO
001 116
Dict.
CHORD TYPE
v Play the notes of the chord as indicated
in the keyboard diagram in the display.
M7
x Specify the root note of the chord.
ROOT
STYLE
G
ACMP ON
Dict.
Playing appropriate chords with just one finger
The PortaTone also lets you easily create appropriate chords for a given scale by simply playing single
notes in the scale.
The notes in the keyboard diagram flash
when the chord is played properly.
Want to find out more? See page 62.
z Enter the Style mode, then press the
CHORD GUIDE button until “Smart” is
shown in the display.
STYLE
ACMP ON
MEASURE TEMPO
001 116
Smart
x Set the key to match that of the song you
wish to play.
Enter the number of sharps or flats of the
corresponding key.
STYLE
18
15
b=1
c Start the auto accompaniment.
v Play single note chords (root note) on the
keyboard.
To play these
chords....
.....press these
keys (root notes)
F Dm Gm Dm
Want to find out more? See page 64.
16
Page 19

Step 5
CCCCCCDDDDD
EEEEE
ГГГГГГДДДДД
ЕЕЕЕЕ
Chord Guide
Playing chord progressions (songs) with just one finger
The EZ Chord function gives you an exceptionally easy way to play the chords of a song. Simply press
single keys in succession, and the PortaTone automatically plays the proper chords for you!
q Enter the Style mode, then press the
CHORD GUIDE button until “EZ. is shown
in the display.
STYLE
ACMP ON
001 116
1
TEMPO
EZ
w Select an EZ Chord bank.
STYLE
EZ
2
e Start the auto accompaniment.
r Press and release a single note on the key-
board to play a chord.
Continue pressing
the same key each
Accompaniment
section
time you want a
new chord to be
played.
You can use the footswitch to select successive chords, letting you play the full keyboard
while still being able to use EZ Chord. (See
page 100.)
t Play the melody
with your right
hand as the auto
accompaniment
plays.
Want to find out more? See page 66.
Recording your own EZ Chord banks
You can also create your own custom chord
progressions, and play along with those if you
like.
Want to find out more? See page 68.
VOICE
TEMPO
STYLE
TRANSPOSE
TUNING
ACMP/SONG
VOLUME
METRONOME
VOLUME
Keys for playing the accompaniment
17
001
MEASURE
TEMPO
001 116
(C1 — F#2)
GrandPno
xwzzqce
Keys for entering the chord type
Use these keys for the Chord Guide Dictionary function.
(C3 — B4)
Keys for entering the chord root
(C5 — B5)
19
Page 20
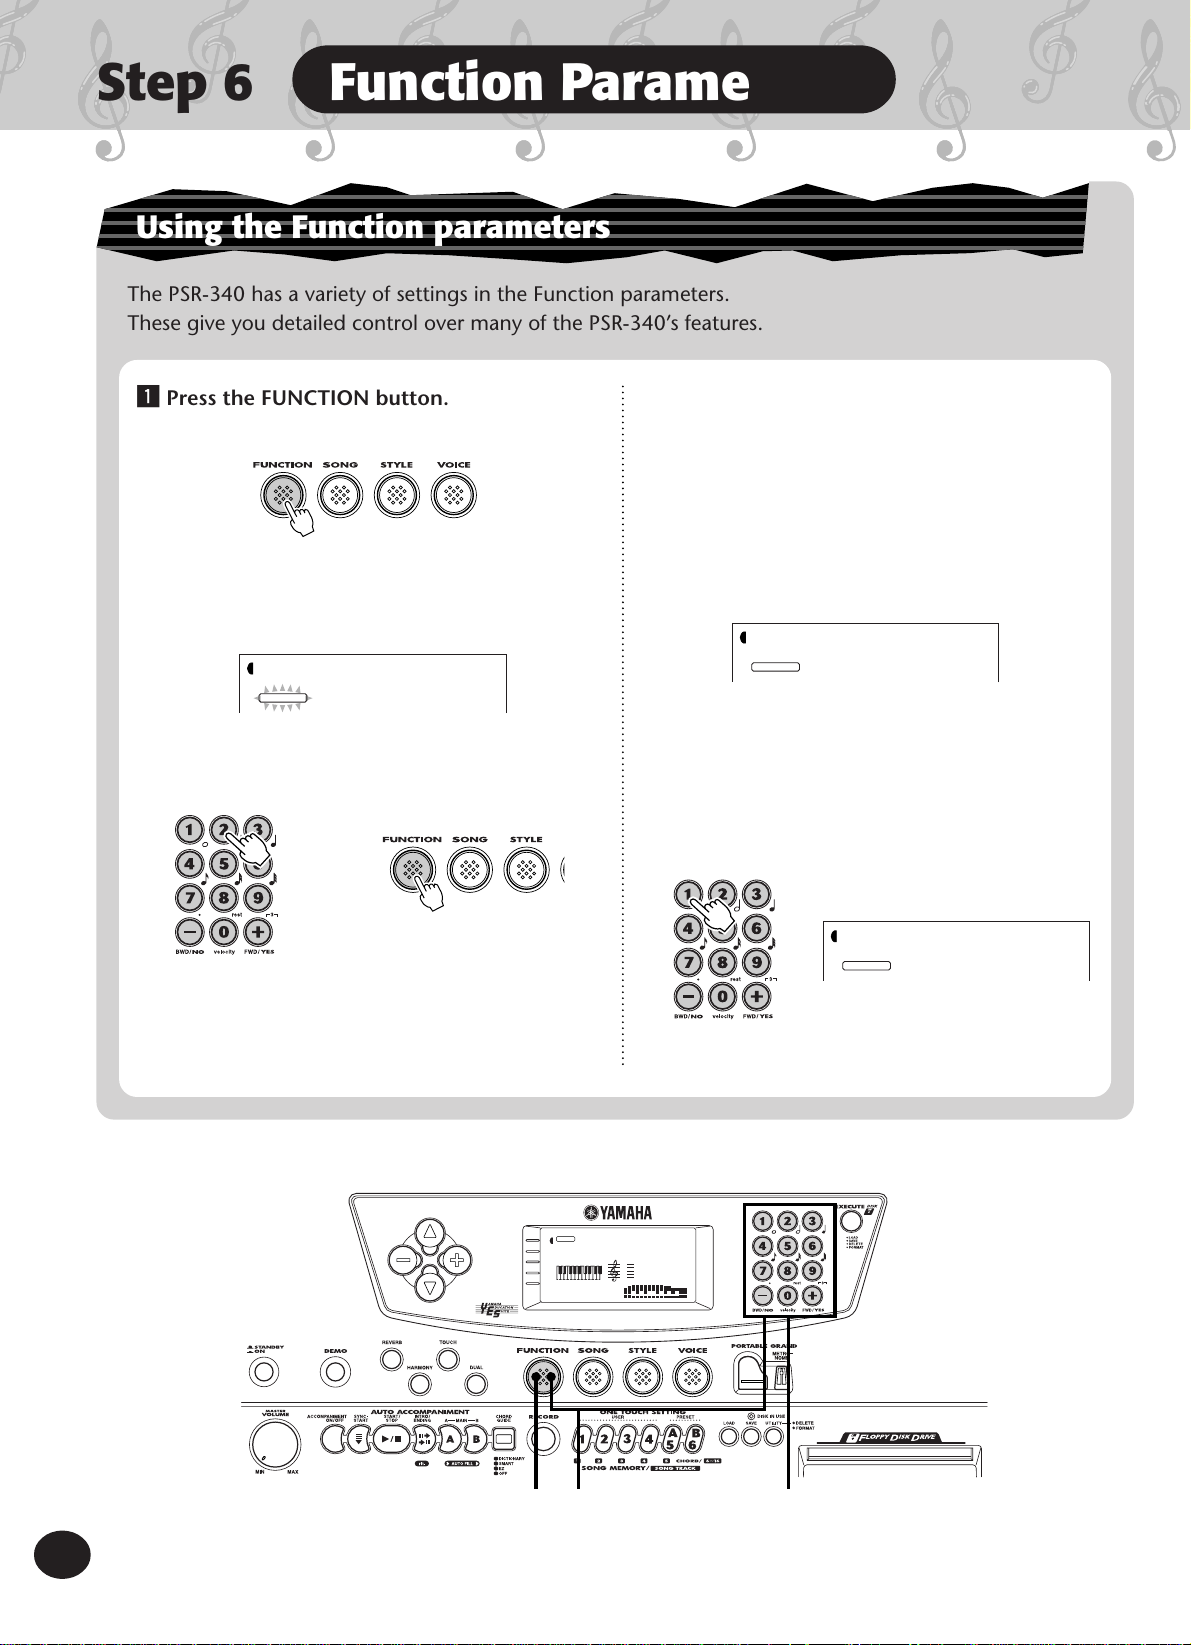
Step 6
1
M.Octave
STYLE
FUNCTION
CCCCCDDDDDDEEEEE
ГГГГГДДДДДДЕЕЕЕЕ
Function Parameters
Using the Function parameters
The PSR-340 has a variety of settings in the Function parameters.
These give you detailed control over many of the PSR-340’s features.
z Press the FUNCTION button.
x Select a Function number.
For a list of functions, see page 21.
STYLE
FUNCTION
The Function number can be selected
while the “FUNCTION” indication is
flashing.
Enter the Function
number on the
numeric keypad.
M.Octave
F02
Press the FUNCTION button;
each press advances through
the numbers. Hold down the
button to continuously
advance through the numbers.
c After “FUNCTION” in the display stops
flashing, change the value or setting.
After a couple of seconds, the “FUNCTION”
indication stops flashing and remains lit. At
the same time, the Function number (“F02”
in the example above) changes automatically
to the current value of the Function parameter.
STYLE
FUNCTION
Current value of the selected Function
parameter.
M.Octave
0
v Use the numeric keypad to change the
value or setting. For on/off settings, use
the +/- buttons.
20
TEMPO
TRANSPOSE
TUNING
ACMP/SONG
VOLUME
METRONOME
VOLUME
VOICE
STYLE
GrandPno
001
MEASURE
TEMPO
001 116
xvz
Want to find out more? See page 30.
18
Page 21
Step 6
CCCCCCDDDDD
EEEEE
ГГГГГГДДДДД
ЕЕЕЕЕ
Function Parameters
Function Parameters List
Function
page
F01 M.Volume Main Voice Volume 31
F02 M.Octave Main Voice Octave 31
F03 M.Pan Main Voice Pan 31
F04 M.RevLvl Main Voice Reverb Send Level 31
F05 M.ChoLvl Main Voice Chorus Send Level 31
F06 M.DspLvl Main Voice DSP Effect Send Level 31
F11 D.Volume Dual Voice Volume 35
F12 D.Octave Dual Voice Octave 35
F13 D.Pan Dual Voice Pan 35
F14 D.RevLvl Dual Voice Reverb Send Level 35
F15 D.ChoLvl Dual Voice Chorus Send Level 35
F16 D.DspLvl Dual Voice DSP Effect Send Level 35
F17 D.Voice Dual Voice 35
Function
page
F31 Reverb Reverb On/Off 44
F32 RevType Reverb Type 44
F33 Chorus Chorus On/Off 44
F34 ChoType Chorus Type 44
F35 Dsp DSP On/Off 44
F36 DspType DSP Type 44
F37 Harmony Harmony On/Off 44
F38 HarmType Harmony Type 44
F39 HarmVol Harmony Volume 44
F41 UserBank One Touch Setting User Bank 73
F51 AcmpSPnt Accompaniment Split Point 59
F61 USng1Clr User Song 1 Clear 90
F62 USng2Clr User Song 2 Clear 90
F18 Dual Dual On/Off 35
F21 S.Volume Split Voice Volume 37
F22 S.Octave Split Voice Octave 37
F23 S.Pan Split Voice Pan 37
F24 S.RevLvl Split Voice Reverb Send Level 37
F25 S.ChoLvl Split Voice Chorus Send Level 37
F26 S.DspLvl Split Voice DSP Effect Send Level 37
F27 S.Voice Split Voice 37
F28 Split Split On/Off 37
F29 SplitPnt Split Point 37
F63 USng3Clr User Song 3 Clear 90
F71 FootSw Footswitch 101
F72 VoiceSet Voice Set 39
F73 TouchSns Touch Sensitivity 39
F81 RemoteCh Remote Channel 107
F82 KbdOut Keyboard Out 107
F83 AcmpOut Accompaniment Out 107
F84 Local Local On/Off 107
F85 ExtClock External Clock 108
F86 InitSend Initial Data Send 108
19
21
Page 22
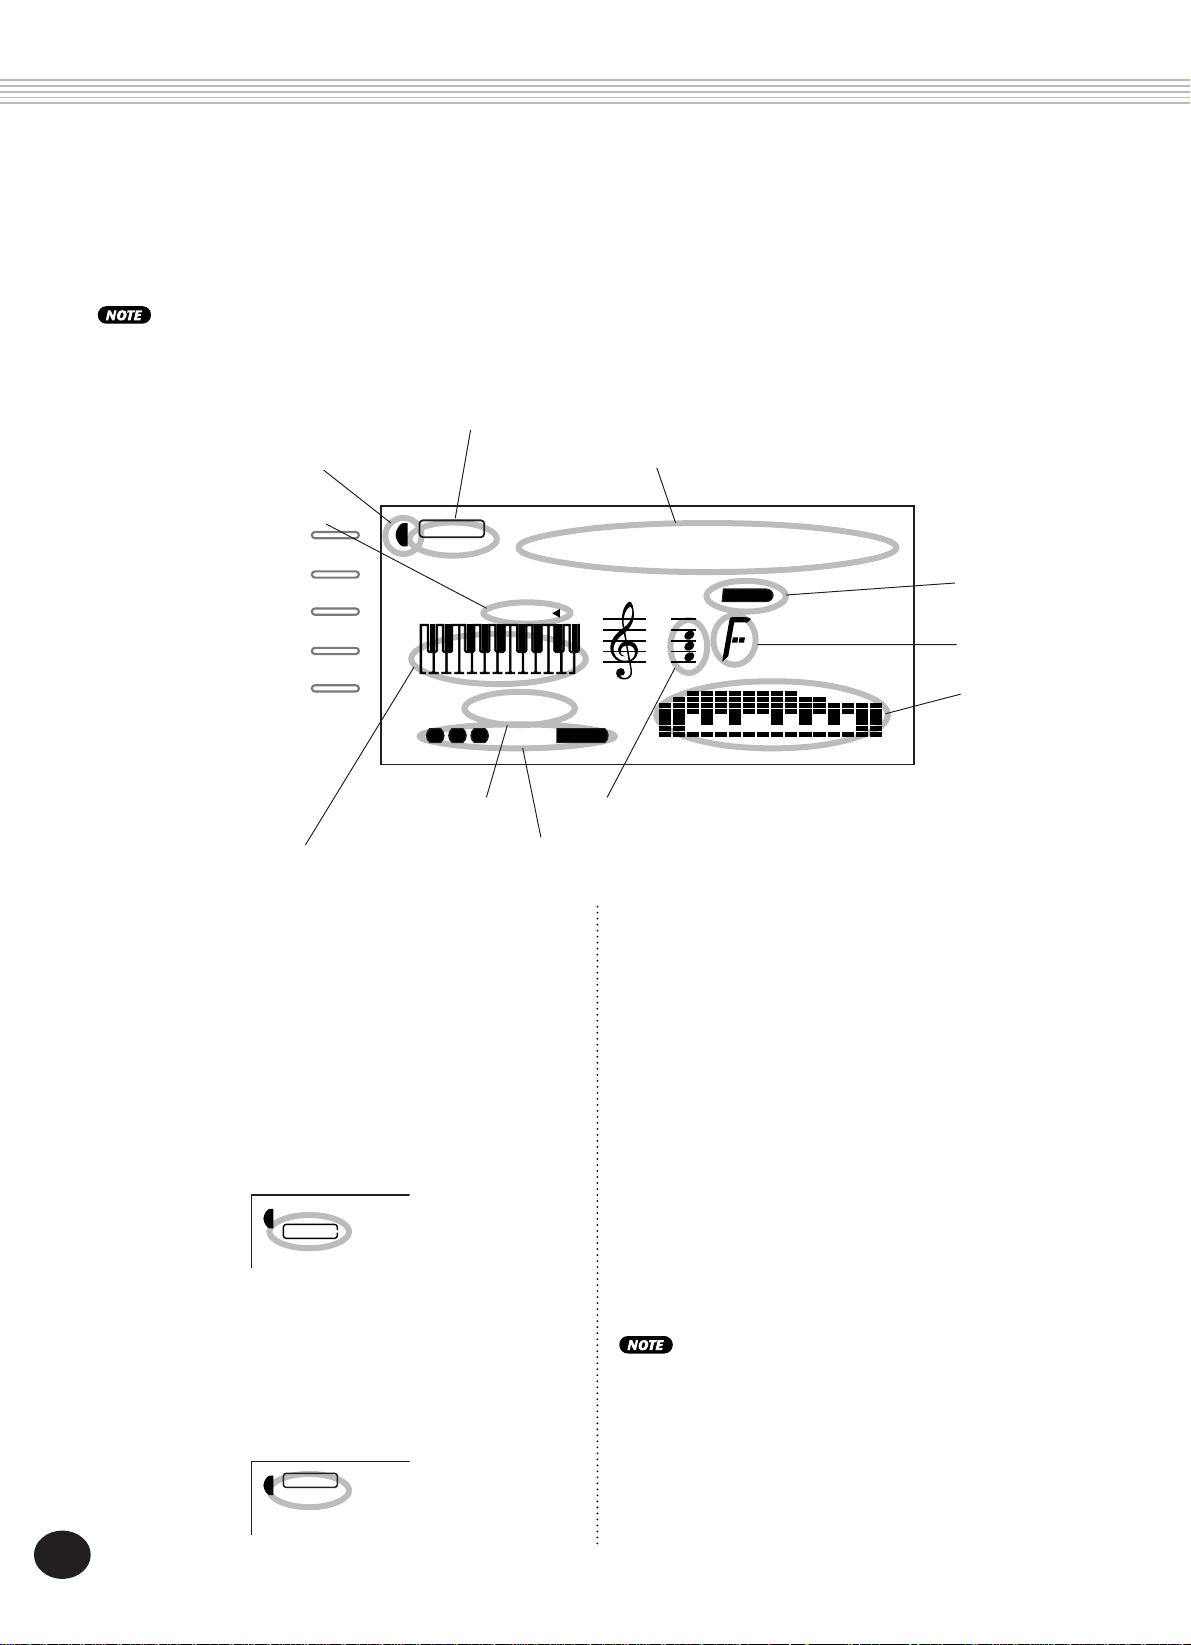
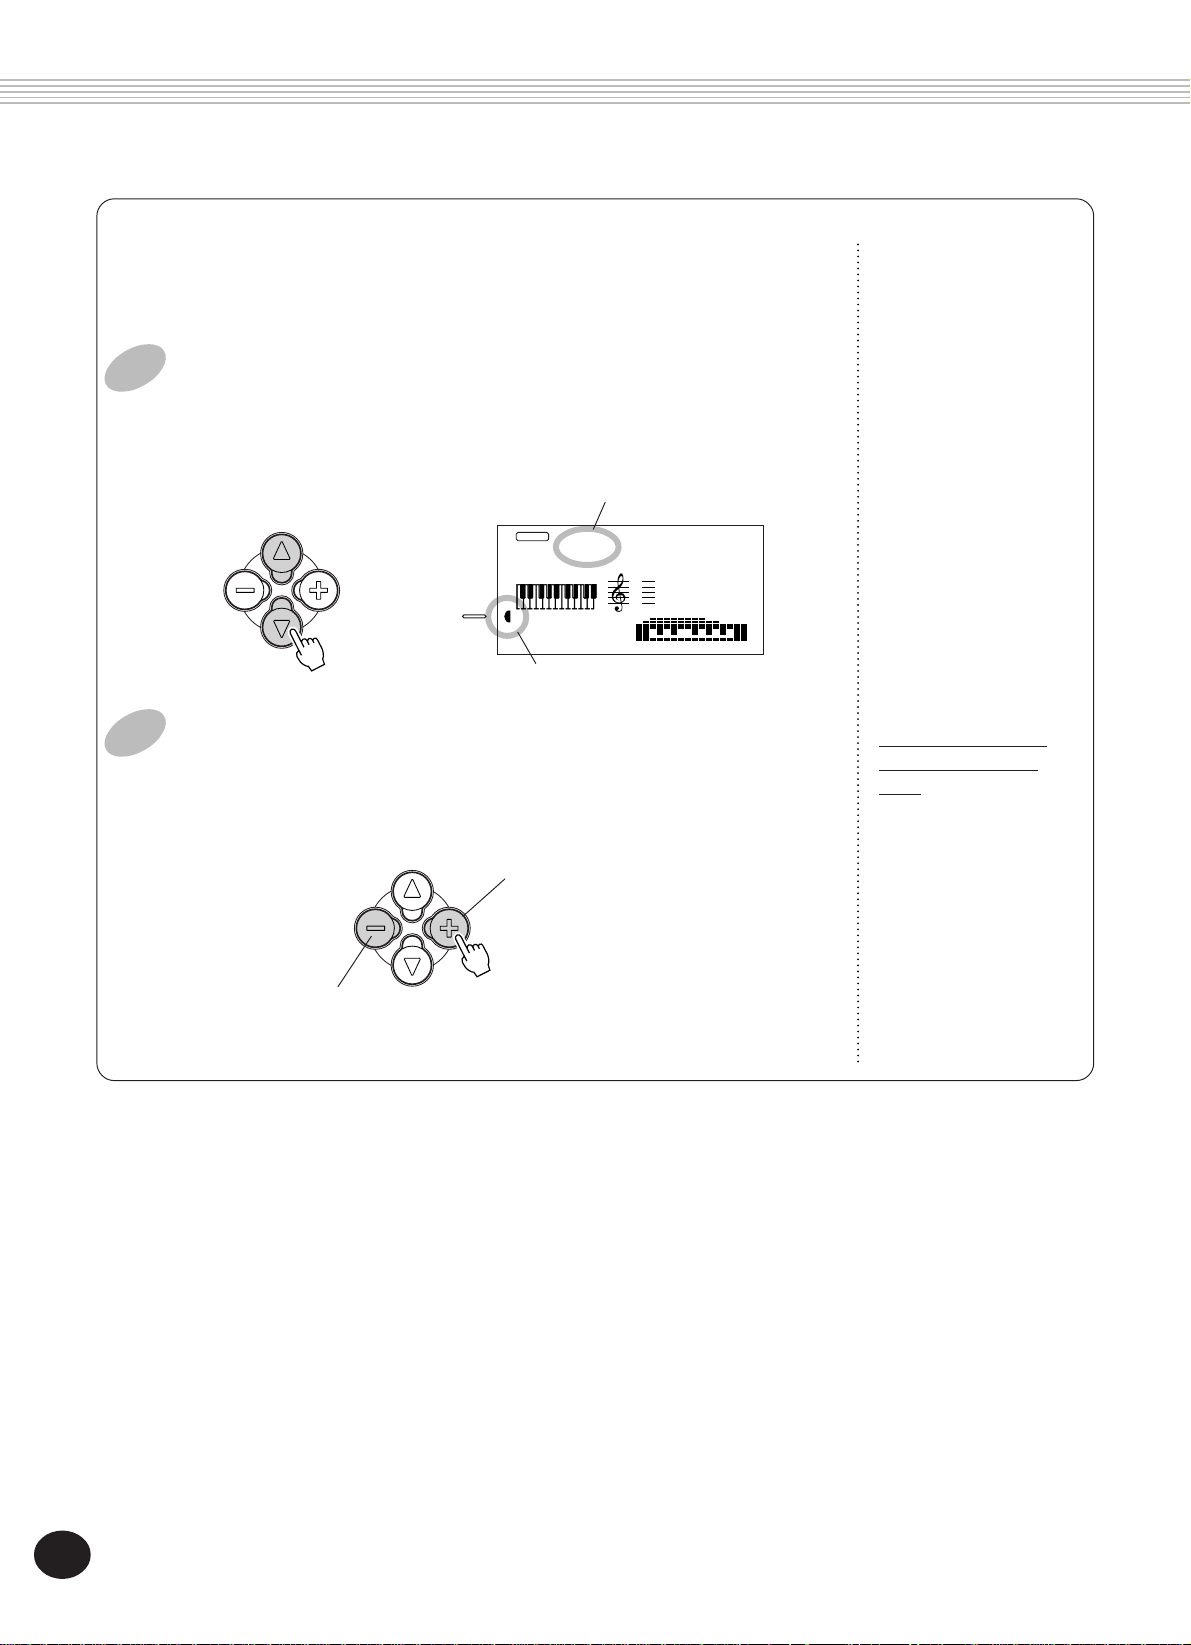
PANEL DISPLAY INDICATIONS
0
0
The PortaTone features a large multi-function display that shows all important
settings for the instrument. The section below briefly explains the various icons
and indications in the display.
The LCD’s backlight will gradually dim over a long period of use. When the display becomes dim or hard to read, contact the store
where you purchased the instrument or, Yamaha directly, to have the LCD replaced. A fee will be charged for replacement.
A Mode indicators
B Overall functions bar indicator
J Accompaniment On indicator
TEMPO
TRANSPOSE
TUNING
ACMP/SONG
METRONOME
VOLUME
VOLUME
VOICE
STYLE
001
ACMP ON
MEASURE TEMPO
001 116
1 CHORD2 3
E Measure and
Tempo
D Keyboard
A Mode indicators
These indicate the currently selected mode —
Voice, Style, Song, or Function — with the mode
name encircled in a rounded rectangle. When
“STYLE” or “SONG” appear without the rectangle, the corresponding mode is active in the
background.
In the first example, the Style mode is selected.
STYLE
K Song track indicators
0
In the second example, the Voice mode has
been selected, but the Style mode is still active
in the background. (This means that the style
controls are active and can be used to play the
currently selected style.)
H Song/Voice/Style name and number
GrandPno
C Notation
B Overall functions bar indicator
The PortaTone has five Overall functions or
controls. The currently selected function is
indicated by a dark bar that appears next to its
name (printed on the panel).
C Notation
D Keyboard
These two portions of the display conveniently
indicate notes. When a user song (with chords)
is being played back, they show the chord notes
in succession. When the Style mode and auto
accompaniment are active, the display also
shows the specific notes of the current chord.
For a few specific chords, not all notes may be shown in the
notation section of the display. This is due to space limitations
in the display.
F Beat indicators
G Chord
I Icon window
VOICE
STYLE
0
22
20
Page 23
PANEL DISPLAY INDICATIONS
E Measure and Tempo
These show the current measure during playback of a song or style, and the currently set
Tempo value for the song or style.
F Beat indicators
These dark bars (one large, three small) flash in
sequence and in time with the song or style.
The large bar indicates the first beat of the
measure. (See page 77.)
G Chord
When a user song (with chords) is being played
back, this indicates the current chord root and
type. It also indicates chords played in the
ACMP section of the keyboard when the Style
mode and auto accompaniment are on.
H Song/Voice/Style name and number
This portion of the display indicates the name
and number of the currently selected song,
voice, or style. It also displays the name and
current value or setting of the Overall functions
and the Function parameters, as well as other
important operation messages.
I Icon window
Depending on the mode or function selected,
this displays various symbols (icons) and other
messages to provide convenient, at-a-glance
information about the PortaTone operation. For
example, when a song or style accompaniment
is playing, this displays the level of each instrumental track.
J Accompaniment On indicator
This appears when the auto accompaniment has
been turned on. (See page 52.)
K Song track indicators
In song recording and playback, these indicate
the status of the tracks. (See pages 75, 83.)
Music Stand
Insert the bottom edge of the included music stand into
the slot located at the top rear of the PortaTone control
panel.
21
23
Page 24
PORTABLE GRAND
This convenient function lets you automatically exit from any
other mode or function and instantly call up the Grand Piano
voice.
PLAYING THE PORTABLE GRAND
Press the PORTABLE GRAND button.
Doing this automatically cancels any other mode or function, and resets
the entire instrument for playing the special “Stereo Sampled Piano” Grand
Piano voice (voice 001). It automatically selects the Voice mode (with the
Style mode active), and calls up style #91 (Rock-A-Ballad). It also resets the
footswitch to Sustain operation.
The Portable Grand setting is designed also for playing with the special
Pianist styles (#91 - #100). When auto accompaniment is turned on, these
provide piano-only accompaniment in a variety of music styles. (See page
52.)
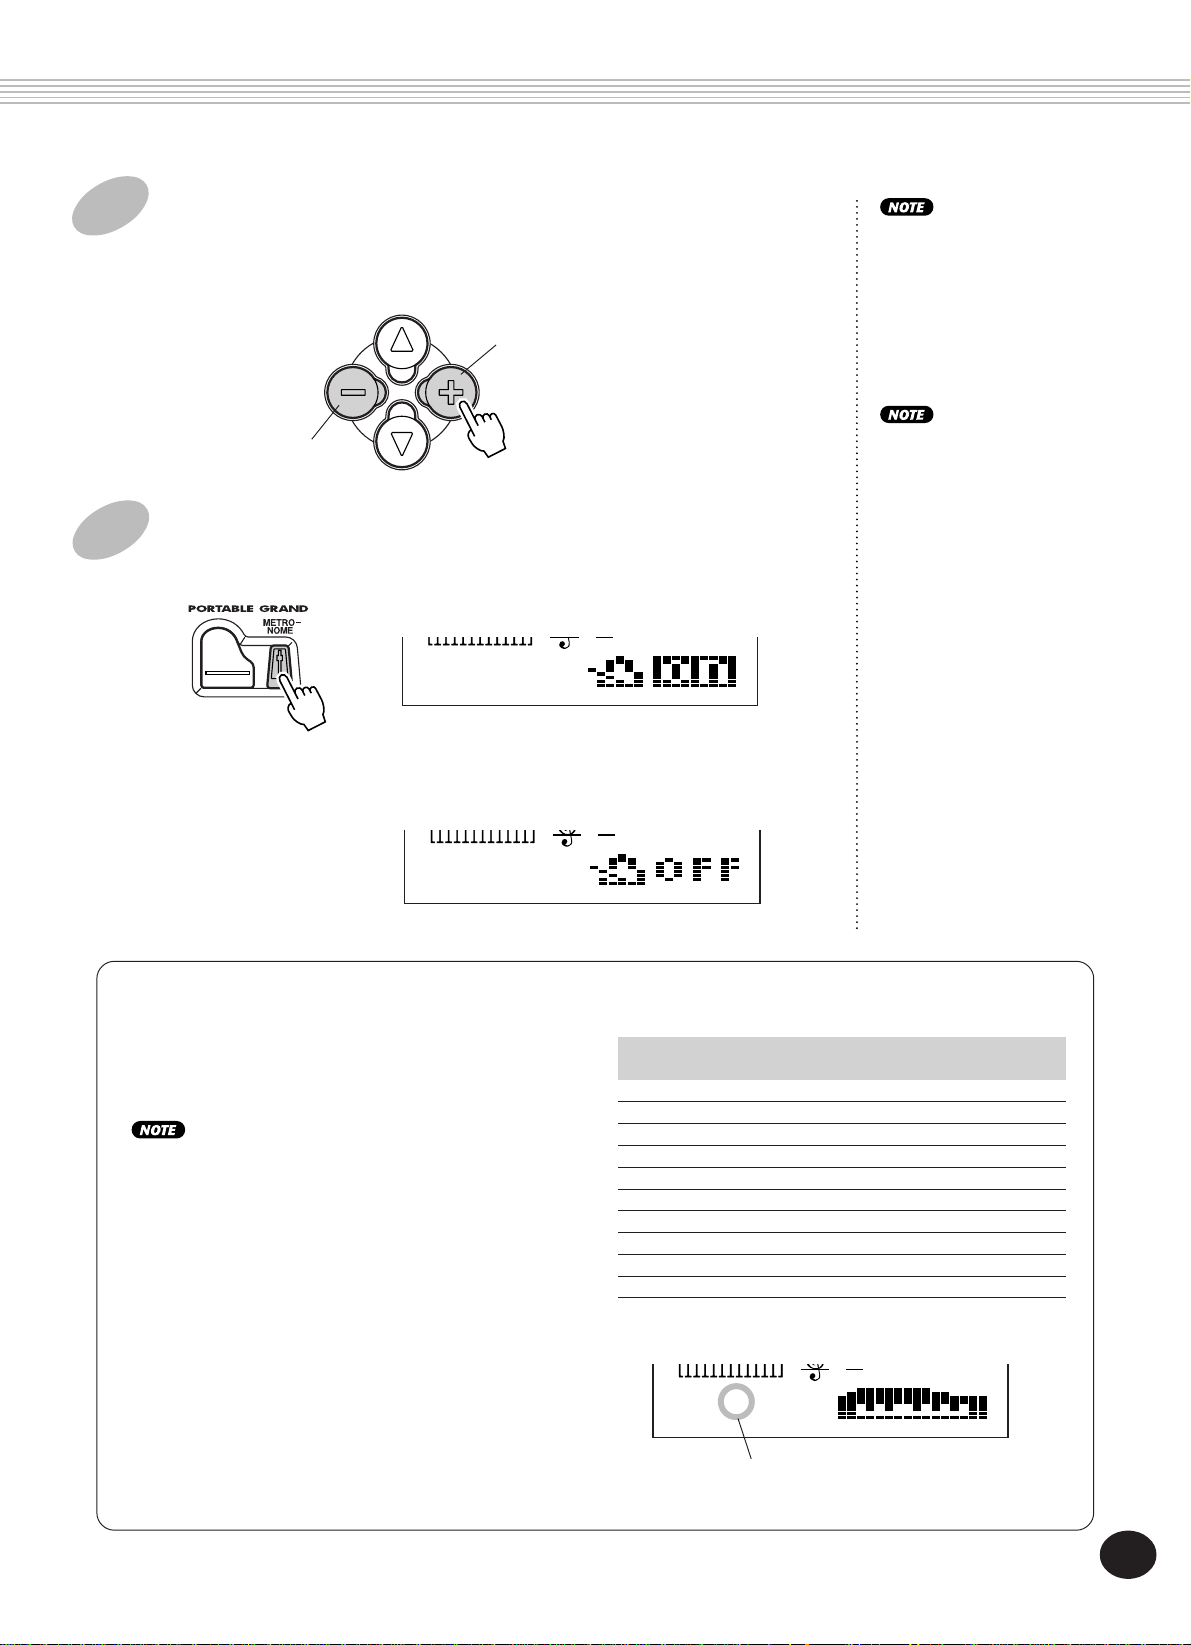
USING THE METRONOME
1 Set the desired tempo with the Tempo function in
the Overall menu.
▲/▼
Press one of the OVERALL
“Tempo” appears in the display.
buttons, repeatedly if necessary, until
Indicates Tempo is
selected
TEMPO
VOICE
STYLE
Current Tempo value
116
Tempo
24
22
Page 25
PORTABLE GRAN D
2 Change the value.
Use the OVERALL +/- buttons to increase or decrease the Tempo value.
Holding down either button continuously increases or decreases the value.
Increases Tempo
value
Decreases Tempo
value
3 Turn on the Metronome.
Press the METRONOME button.
TEMPO
3 063
To turn the Metronome off, press the METRONOME button again.
TEMPO
3 063
The numeric keypad cannot
be used to change values
for the Overall menu
settings.
The Metronome cannot be
turned on when free-tempo
song data is selected in the
Song mode.
The tempo setting of some
commercially available
songs is fixed. These songs
are called “free-tempo
software.” When playing
back free-tempo song data
on the PSR-340, the Tempo
display shows “---” and the
beat display does not flash.
Also, the measure number
in the display does not
match the actual measure
number of playback, and
only gives you an indication
of how much of the song
has played back.
Setting the Metronome Time Signature
The time signature of the Metronome can be set to
various quarter-note based meters.
The time signature changes automatically when a style or
song is selected.
Simultaneously hold down the METRONOME
button and press the button on the numeric
keypad that corresponds to the desired time
signature (see chart at right).
Number Time
button signature
1 1/4 — Plays only “1” beats (all high clicks)
2 2/4
3 3/4
4 4/4
5 5/4
6 6/4
7 7/4
8 8/4
9 9/4
0 Plays no “1” beats (all low clicks)
TEMPO
3 063
Indicates current beat
number
25
23
Page 26
PORTABLE GRAN D
Adjusting the Metronome Volume
You can adjust the volume of the Metronome sound independently of the other
PortaTone sounds. The volume range is 000 - 127.
1 Select the Metronome Volume function in the Overall menu.
Press one of the OVERALL
in the display.
▲/▼
buttons, repeatedly if necessary, until “MtrVol” appears
Current Metronome
Volume value
VOICE
METRONOME
VOLUME
STYLE
MEASURE
001 063
Indicates Metronome Volume
is selected
MtrVol
100
TEMPO
2 Change the value.
Use the OVERALL +/- buttons to increase or decrease the Metronome Volume value.
Holding down either button continuously increases or decreases the value.
Increases Metronome
Volume value
Decreases Metronome
Volume value
Restoring the Default
Metronome Volume
Value
To restore the default
Metronome Volume
value (100), press both
OVERALL +/- buttons
simultaneously (when
Metronome Volume is
selected in the Overall
menu).
26
24
Page 27
PLAYING VOICES — THE VOICE MODE
The Voice mode features 228 authentic voices (including 128 General MIDI
voices), plus 10 special drum kits — all of which have been created with
Yamaha’s sophisticated AWM (Advanced Wave Memory) tone generation system.
The Voice mode gives you many powerful and versatile tools for playing and
enhancing these Voices.
The voices are divided into various instrument
categories, all of which are printed on the panel
for convenience. For a complete list of the
available voices, see page 115.
The Voice mode is actually divided into three
separate modes: Main, Dual and Split. In the
Main Voice mode (see below), you can play a
single voice over the entire range of the keyboard. The Dual Voice mode (page 34) allows
you to “layer” two different voices together for
rich, complex sounds. The Split Voice mode
(page 36) lets you set up two different voices for
playing from separate sections of the keyboard.
Moreover, each mode features special effect
sections that let you enhance the sound of the
Voice or Voices. These include Reverb, Chorus,
and Harmony, as well as a “DSP” section that
provides miscellaneous effects such as tremolo,
echo, delay, distortion, equalization, and wah.
(See page 40.)
Other voice-related functions include Voice Set
(page 38), which lets you automatically call up
the ideal settings for each voice, and Touch
Sensitivity (page 38), which determines how the
voices respond to your playing technique.
The PortaTone includes special Drum Kit voices
— #101 - #110 — that let you play various drum
and percussion sounds from the keyboard.
(Refer to the Drum Kit Voice chart on page 30.)
Symbols are also printed above the keyboard,
conveniently indicating which sounds are played
from which keys.
PLAYING A VOICE — MAIN VOICE
1 Select the Voice mode.
Press the VOICE button.
Indicates Voice mode is selected
VOICE
STYLE
001
GrandPno
27
25
Page 28
PLAYING VOICES — TH E VOICE MODE
2 Select the desired voice number.
Use the numeric keypad. The basic categories of voices and their numbers
are shown at the right side of the panel. A complete list of the available
voices is given on page 115.
PIANO
MALLET
ORGAN
GUITAR
BASS
ENSEMBLE
STRINGS
BRASS
REED
PIPE
SYNTH LEAD
SYNTH PAD
DRUM KITS
PIPE
SYNTH LEAD
SYNTH PAD
SYNTH EFFECTS
ETHNIC
PERCUSSIVE
SOUND EFFECTS
ORGAN
GUITAR
BASS
STRINGS
ENSEMBLE
BRASS
REED
PIANO
CHROMATIC
There are three ways to select voices: 1) directly entering the voice number
with the numeric keypad, 2) using the +/- keys to step up and down
through the voices, or 3) pressing the VOICE button to advance through
the voice numbers.
Using the numeric keypad
Enter the digits of the voice number as indicated on the panel. For example, to select voice #42, press “4” on the numeric keypad, then “2.”
All two-digit voice numbers
can be selected without
entering an initial “0.”
However, when selecting
voice numbers 1 - 23, the
PortaTone pauses briefly
before actually calling up
the voice. (This pause
allows for entering threedigit voice numbers, such as
“235.” Entering the
numbers “2” then “4”
immediately calls up voice
#24, since there are no
voices #240 or higher.)
VOICE
STYLE
042
ACMP ON
Aco.Bass
28
If you want to immediately
call up voices #1 - #23,
enter one or two zeros
before the number; for
example, select voice #9 by
pressing “0,” “0,” then
“9.” Pressing only “0” does
not change the voice.
26
Page 29

PLAYING VOICES — TH E VOICE MODE
Using the +/- keys
Press the + key to select the next voice number, and press the - key to
select the previous voice. Holding down either key continuously scrolls up
or down through the numbers. The +/- keys have a “wrap around” feature. For example, pressing the + key from voice #238 returns to voice #1.
Using the VOICE button
Press the VOICE button to select the next voice number. (This functions
exactly the same as the + button.)
3 Play the selected voice.
To change to another voice, repeat step 2 above.
Since either the Style or Song mode is active in the background (as indicated by the mode name in the display, without the rectangle), you can
also play styles or songs, respectively, in the Voice mode by simply pressing
the START/STOP button. The last selected style or song will be played.
Each voice is automatically
called up with the most
suitable octave range
setting. Thus, playing
middle C with one voice
may sound higher or lower
than another voice at the
same key.
When you select a voice, the
PortaTone also automatically calls up various
settings that are appropriate for the voice. [This is
true when Voice Set
(Function #72, page 39) is
set to on — the default
setting.]
About Panel Voices and GM Voices
Keep in mind that the PortaTone has two separate sets of voices:
100 Panel voices and 128 GM (General MIDI) Voices. The GM
Voices can also be used for optimum playback of GM-compatible
song data. This means that any GM song data (played from a sequencer or other
MIDI device) will sound just as the composer or programmer intended.
When a GM voice is selected, the General MIDI icon appears at the top left of the
display.
27
29
Page 30
PLAYING VOICES — TH E VOICE MODE
Drum Kit Voice Chart (voices 101 - 110)
When one of the 10 panel Drum Kit voices are selected you can
play different drums and percussion instruments on the keyboard.
The drums and percussion instruments played by the various keys
are marked by symbols below the keys.
VOICE
STYLE
101
Std.Kit1
No. Name LCD
101 Standard Kit 1 Std.Kit1
102 Standard Kit 2 Std.Kit2
103 Room Kit Room Kit
104 Rock Kit Rock Kit
105 Electronic Kit Elct.Kit
106 Analog Kit AnlogKit
107 Dance Kit DanceKit
108 Jazz Kit Jazz Kit
109 Brush Kit BrushKit
110 Symphony Kit SymphKit
Function Parameters — Main Voice
The Function parameters provide additional settings for the Main
voice. These settings are especially useful when using a second voice
in the Dual or Split modes, since they let you change or enhance the
sound of the Main voice separate from the Dual or Split voice. These
settings include:
• Volume
• Octave
• Pan
• Reverb Send Level
• Chorus Send Level
• DSP Effect Send Level
1 Select the Function mode.
Press the FUNCTION button.
Flashes to indicate Function
parameter can be selected.
STYLE
FUNCTION
MEASURE TEMPO
F61
001 116
USng1Clr
2 Select the desired Function parameter number.
While the “FUNCTION” indication is flashing, use the numeric keypad to select the desired Main Voice Function parameter number (1 -
6). (See the “Parameters” list below for details.)
Function parameter numbers can be selected in the same way as with
the voices (see page 28). You can use the numeric keypad to directly
enter the number, use the +/- keys to step up and down through the
parameters, or press the FUNCTION button to advance through the
parameter numbers.
Since the “FUNCTION”
indication flashes for only a
couple of seconds, make
sure to select the parameter
quickly after step 1 above.
30
28
Page 31

PLAYING VOICES — TH E VOICE MODE
3 Change the parameter setting or value.
After the “FUNCTION” indication stops flashing, use the numeric
keypad or +/- buttons to change the value or setting. (The value/
setting is shown to the left of the parameter name.)
Parameter value or
STYLE
FUNCTION
setting
100
M.Volume
Parameter name
4 Set other parameters as needed.
To select and set other parameters, repeat steps 1 - 3 above.
5 Exit the Function mode.
Once you’ve made all desired settings, press one of the other mode
buttons (SONG, STYLE, or VOICE).
Restoring the Default
Value
If you’ve changed the
parameter setting, you can
instantly restore the
default setting by pressing
both +/- buttons simultaneously.
Negative values
To directly enter negative
values (for those parameters that have negative
values), simultaneously
hold down the - button
and press the desired
number button.
These settings are not saved
when you turn off the
power. If you wish to save
them, save them to a User
bank in the One Touch
Setting feature (page 72).
Function Parameters
No. Parameter Name Display Name Range/Settings
F01 Main Voice Volume M.Volume 0 — 127
F02 Main Voice Octave M.Octave -2 — 2 (octaves)
F03 Main Voice Pan M.Pan -7 (full left) —
0 (center) —
7 (full right)
F04 Main Voice Reverb M.RevLvl 0 — 127
Send Level
F05 Main Voice Chorus M.ChoLvl 0 — 127
Send Level
F06 Main Voice DSP M.DspLvl 0 — 127
Effect Send Level
Description
This determines the volume of the Main voice, letting
you create an optimum mix with the Dual or Split
voice.
This determines the octave range for the Main voice.
Use this to set the most suitable range for the Main
voice when using the Split mode, or use it to create an
octave layer in the Dual mode.
This determines the pan position of the Main voice in
the stereo image.
This determines how much of the Main voice’s signal is
sent to the Reverb effect. (See page 40.) Higher values
result in a louder Reverb effect.
This determines how much of the Main voice’s signal is
sent to the Chorus effect. (See page 41.) Higher
values result in a louder Chorus effect.
This determines how much of the Main voice’s signal is
sent to the DSP effect. (See page 42.) Higher values
result in a louder DSP effect.
29
31
Page 32

PLAYING VOICES — TH E VOICE MODE
TRANSPOSE AND TUNING
You can also adjust the tuning and change the transposition (key) of the
entire PortaTone sound with the Transpose and Tuning functions.
Transpose
Transpose determines the key of both the main voice and the bass/chord
accompaniment of the selected style. It also determines the pitch of the
songs. This allows you to easily match the pitch of the PortaTone to other
instruments or singers, or play in a different key without changing your
fingering. The Transpose settings can be adjusted over a range of ± 12
semitones (± 1 octave).
The Transpose and Tuning
settings have no effect on
the Drum Kit voices (#101 #110).
1 Select the Transpose function in the Overall menu.
Press one of the OVERALL
“Transpos” appears in the display.
▲/▼
TRANSPOSE
buttons, repeatedly if necessary, until
Indicates Transpose is
selected
VOICE
STYLE
Current Transpose value
Transpos
00
2 Change the value.
Use the OVERALL +/- buttons to increase or decrease the Transpose value.
Holding down either button continuously increases or decreases the value.
Increases Transpose
value
Decreases Transpose
value
Restoring the Default
Transpose Value
If you’ve changed the
Transpose setting, you can
instantly restore the
default setting of “00” by
pressing both OVERALL +/buttons simultaneously
(when Transpose is
selected in the Overall
menu).
32
30
Page 33

PLAYING VOICES — TH E VOICE MODE
Tuning
Tuning determines the fine pitch setting of both the main voice and the
bass/chord accompaniment of the selected style. It also determines the
pitch of the songs. This allows you to accurately match the tuning with
that of other instruments. The Tuning settings can be adjusted over a
range of ± 100 (approx. ± 1 semitone).
1 Select the Tuning function in the Overall menu.
Press one of the OVERALL
ing” appears in the display.
▲/▼
buttons, repeatedly if necessary, until “Tun-
TUNING
Indicates Tuning is
selected
VOICE
STYLE
Current Tuning value
000
Tuning
2 Change the value.
Use the OVERALL +/- buttons to increase or decrease the Tuning value.
Holding down either button continuously increases or decreases the value.
Increases Tuning
value
Decreases Tuning
value
Restoring the Default
Tuning Value
If you’ve changed the
Tuning setting, you can
instantly restore the
default setting of “00” by
pressing both OVERALL +/buttons simultaneously
(when Tuning is selected
in the Overall menu).
31
33
Page 34

PLAYING VOICES — TH E VOICE MODE
PLAYING TWO VOICES — DUAL VOICE
The Dual Voice mode lets you create richly textured sounds by “layering”
two different voices together — one voice being the Main voice selected in
the normal way (page 27), and the other a Dual voice selected as described
below.
1 Turn on the Dual Voice mode.
Press the DUAL button.
MEASURE TEMPO
001 116
When you play the keyboard, both the currently selected Main and Dual
voices will be heard.
To turn the Dual mode off, press the DUAL
button again.
2 Select the desired Dual voice and make other set-
tings for the voice (if desired) in the Function mode.
To do this, first call up the Function mode by pressing the FUNCTION
button.
The Dual Voice mode can
also be turned on and off
with a connected
footswitch. (See page 100.)
3 Select the desired Function parameter number.
While the “FUNCTION” indication is flashing, use the numeric keypad to
select the desired Dual Voice Function parameter number (11 - 18). Actual
selection of the Dual voice is made from parameter #17. (See the “Parameters” list below for details.)
STYLE
FUNCTION
Function parameter numbers can be selected in the same way as with the
voices (see page 28) — with the numeric keypad, +/- keys, or the FUNCTION button.
34
D.Voice
F17
• Since the “FUNCTION”
indication flashes for only a
couple of seconds, make
sure to select the parameter
quickly after step 2 above.
• For the Dual voice to be
heard properly, make sure
to:
* Select a different voice
(#17, Dual Voice).
* Set the volume to an
appropriate level (#11, Dual
Volume).
32
Page 35

PLAYING VOICES — TH E VOICE MODE
4 Change the parameter setting or value.
After the “FUNCTION” indication stops flashing, use the numeric keypad to
change the value or setting. For on/off settings, use the +/- buttons.
STYLE
Restoring the Default Value
If you’ve changed the parameter
setting, you can instantly restore
the default setting by pressing both
+/- buttons simultaneously.
Strings
050
Negative values
To directly enter negative values (for those
parameters that have negative values),
simultaneously hold down the - button and
press the desired number button.
These settings are not saved
when you turn off the
power. If you wish to save
them, save them to a User
bank in the One Touch
Setting feature (page 72).
5 Set other parameters as needed.
To select and set other parameters, repeat steps 2 - 4 above.
6 Exit the Function mode.
Once you’ve made all desired settings, press one of the other mode buttons (SONG, STYLE, or VOICE).
Function Parameters — Dual Voice
The Function parameters provide all settings for the Dual voice. Like the similar settings in the Main
Voice mode, these settings let you change or enhance the sound of the Dual voice separate from the
Main voice. These settings include:
• Volume
• Octave
• Pan
• Reverb Send Level
• Chorus Send Level
• DSP Effect Send Level
Function Parameters
No. Parameter Name Display Name Range/Settings
F11 Dual Voice Volume D.Volume 0 — 127
F12 Dual Voice Octave D.Octave -2 — 2 (octaves)
F13 Dual Voice Pan D.Pan -7 (full left) —
F14 Dual Voice Reverb D.RevLvl 0 — 127
Send Level
F15 Dual Voice Chorus D.ChoLvl 0 — 127
Send Level
F16 Dual Voice DSP D.DspLvl 0 — 127
Effect Send Level
0 (center) —
7 (full right)
• Dual Voice
• Dual On/Off
Description
This determines the volume of the Dual voice, letting
you create an optimum mix with the Main voice.
This determines the octave range for the Dual voice.
Use this to create an octave layer with the Main voice.
This determines the pan position of the Dual voice in
the stereo image. For a spacious sounding effect, set
this value at or near -7, and set the Main Voice Pan
(page 31) at the opposite positive value.
This determines how much of the Dual voice’s signal is
sent to the Reverb effect. (See page 40.) Higher values
result in a louder Reverb effect for the Dual voice.
This determines how much of the Dual voice’s signal is
sent to the Chorus effect. (See page 41.) Higher values
result in a louder Chorus effect for the Dual voice.
This determines how much of the Dual voice’s signal is
sent to the DSP effect. (See page 42.) Higher values
result in a louder DSP effect for the Dual voice.
F17 Dual Voice D.Voice 1 — 238
F18 Dual On/Off Dual on, off
33
This determines the Dual voice. (See list on page 115.)
This turns the Dual Voice mode on/off. (This is the
same function as that of the DUAL button. It can also
be controlled by a connected footswitch; see page 100.)
35
Page 36

PLAYING VOICES — TH E VOICE MODE
PLAYING TWO VOICES — SPLIT VOICE
In the Split Voice mode, you can assign two different Voices to opposite sections of the keyboard, and
play one Voice with your left hand while your right plays another. For example, you could play bass
with the left hand and play piano with the right. The right-hand (or upper) Voice is selected in the
Main Voice mode (page 27), and the left-hand (or lower) Voice is selected in the Split Voice mode, as
described below.
Split point
Split voice
Main voice
1 Call up the Function mode.
Press the FUNCTION button.
2 Select the Split On/Off parameter number.
While the “FUNCTION” indication is flashing, use the numeric keypad to
select parameter #28 (Split On/Off).
STYLE
FUNCTION
Split
F28
Function parameter numbers can be selected in the same way as with the
voices (see page 28) — with the numeric keypad, +/- keys, or the FUNCTION button.
3 Set Split to “on.”
After the “FUNCTION” indication stops flashing, press the + button to turn
the Split Voice mode on. (Pressing the - button turns the Split Voice mode
off.)
STYLE
FUNCTION
Split
on
4 Make other settings for the Split voice (if desired).
Do this in the normal way:
1) Press the FUNCTION button.
2) Select the desired parameter (with the numeric keypad).
3) After “FUNCTION” stops flashing, change the value/setting (with
the numeric keypad). For on/off settings, use the +/- buttons.
• Since the “FUNCTION”
indication flashes for only a
couple of seconds, make
sure to select the parameter
quickly after step 1 above.
• For the Split voice to be
heard properly, make sure
to:
* Set the volume to an
appropriate level (#21, Split
Volume).
* Set the octave to a
musically appropriate
setting (#22 Split Octave).
For example, a bass voice
might best be played with a
“-1” setting, while a strings
voice might sound best at
“1.”
* Set the desired Split Point
(#29). For most purposes,
however, the default Split
Point of “059” (Main voice
starts at middle C) is
suitable. (See the “Parameters” list below for details.)
Restoring the Default Value
If you’ve changed the parameter setting,
you can instantly restore the default
setting by pressing both +/- buttons
simultaneously.
36
Negative values
To directly enter negative values (for
those parameters that have negative
values), simultaneously hold down the button and press the desired number
button.
34
Page 37

PLAYING VOICES — TH E VOICE MODE
5 Exit the Function mode.
Once you’ve made all desired settings, press one of the other mode buttons (SONG, STYLE, or VOICE).
Function Parameters — Split Voice
The Function parameters provide all settings for the Split voice. Like the similar settings in the Main
Voice mode, these settings let you change or enhance the sound of the Split voice separate from the
Main voice. These settings include:
• Volume
• Octave
• Pan
• Reverb Send Level
• Chorus Send Level
• DSP Effect Send Level
Function Parameters
No. Parameter Name Display Name Range/Settings
F21 Split Voice Volume S.Volume 0 — 127
F22 Split Voice Octave S.Octave -2 —
F23 Split Voice Pan S.Pan -7 (full left) —
F24 Split Voice Reverb S.RevLvl 0 — 127
Send Level
F25 Split Voice Chorus S.ChoLvl 0 — 127
Send Level
2 (octaves)
0 (center) —
7 (full right)
• Split Voice
• Split On/Off
• Split Point
Description
This determines the volume of the Split voice, letting
you create an optimum mix with the Main voice.
This determines the octave range for the Split voice.
Use this to set the most suitable range for the Split
(lower) voice.
This determines the pan position of the Split voice in
the stereo image. For a spacious sounding effect, set
this value at or near -7, and set the Main Voice Pan
(page 31) at the opposite positive value.
This determines how much of the Split voice’s signal is
sent to the Reverb effect. (See page 40.) Higher values
result in a louder Reverb effect for the Split voice.
This determines how much of the Split voice’s signal is
sent to the Chorus effect. (See page 41.) Higher values
result in a louder Chorus effect for the Split voice.
F26 Split Voice DSP Effect S.DspLvl 0 — 127
Send Level
F27 Split Voice S.Voice 1 — 238
F28 Split On/Off Split on, off
F29 Split Point SplitPnt 000 — 127
35
This determines how much of the Split voice’s signal is
sent to the DSP effect. (See page 42.) Higher values
result in a louder DSP effect for the Split voice.
This determines the Split voice. (See list on page 115.)
This turns the Split Voice mode on/off. This can also be
controlled by a connected footswitch. (See page 100.)
This determines the highest key for the Split voice and
sets the Split “point” — in other words, the key that
separates the Split (lower) and Main (upper) voices.
(The Split voice sounds up to and including the Split
Point key.) The default Split Point is 059 (B2). The
value can also be set directly by pressing the desired
key while this parameter is selected. While this is being
set, the keyboard does not produce any sound. After
setting this, make sure to select a different parameter
or exit the Function mode before playing the keyboard.
The Split Point setting is related to and affected by the
Accompaniment Split Point setting. (See page 58.)
37
Page 38

PLAYING VOICES — TH E VOICE MODE
ADDITIONAL VOICE FUNCTIONS — VOICE SET AND TOUCH
SENSITIVITY
Voice Set and Touch Sensitivity are two important voice-related parameters,
and are found in the Utility section of the Function parameters.
When Voice Set (described in greater detail below) is set to on, you can
automatically call up a variety of voice-related settings that best suit the
selected voice.
Touch Sensitivity (also described below) gives you dynamic, expressive
control over the voices by letting you set how the volume of the PortaTone
responds to your playing strength.
Once the Touch Sensitivity parameter is set below, Touch response of the
keyboard can be turned on or off by pressing the TOUCH button.
Indicates Touch
Sensitivity is on.
Indicates Touch
Sensitivity is off.
1 Call up the Function mode.
Press the FUNCTION button.
2 Select the desired Function parameter number.
While the “FUNCTION” indication is flashing, use the numeric keypad to
select the Voice Set parameter (#72), or Touch Sensitivity (#73). (For
details on these parameters, see below.)
STYLE
FUNCTION
Function parameter numbers can be selected in the same way as with the
voices (see page 28) — with the numeric keypad, +/- keys, or the FUNCTION button.
VoiceSet
F72
STYLE
FUNCTION
TouchSns
F73
• Since the “FUNCTION”
indication flashes for only a
couple of seconds, make
sure to select the parameter
quickly after step 1 above.
3 Change the parameter setting or value.
After the “FUNCTION” indication stops flashing, use the numeric keypad to
change the value or setting.
STYLE
FUNCTION
38
VoiceSet
on
STYLE
FUNCTION
TouchSns
3
36
Page 39

Function Parameters — Voice Set and Touch Sensitivity
Function Parameters
PLAYING VOICES — TH E VOICE MODE
No. Parameter Name Display Name Range/Settings
F72 Voice Set VoiceSet oFF, on
F73 Touch Sensitivity TouchSns 1 — 3
Description
When this is set to on, selecting a voice also automatically calls up special voice-related parameters and
values that best suit the voice. The parameters
included in Voice Set are:
• Main Voice — Volume, Octave, Pan
• Dual Voice — Number, Volume, Octave, Pan,
Reverb Send Level, Chorus Send Level,
DSP Send Level
• Harmony — Type, On/Off, Volume
Use the panel HARMONY and DUAL buttons to turn
the respective functions on or off.
A setting of “1” results in limited touch response; this
setting produces a relatively narrow dynamic range, no
matter how lightly or strongly you play the keys. “2”
lets you play over a normal dynamic range (soft to
loud), while “3” is designed for playing very soft
passages, giving you slightly more detailed control in
the soft volume range. When Touch is turned off (page
38), a constant velocity value of 80 is produced (total
velocity range = 0 - 127).
37
39
Page 40

EFFECTS
The PortaTone is equipped with a wide variety of effects that can be used to
enhance the sound of the voices. Four general categories of effects are provided
— Reverb, Chorus, DSP, and Harmony — and each category has many effect types
to choose from.
Application of the effects is also exceptionally flexible. All four effects can be used simultaneously, and
the degree of the Reverb, Chorus, and DSP effects can be adjusted independently for each of the
voices: Main, Dual, and Split.
REVERB
The Reverb effect reproduces the natural ambient “wash” of sound that
occurs when a instrument is played in a room or concert hall. A total of
eight different Reverb types simulating various different performance
environments are available.
1 Turn on the Reverb effect.
Press the REVERB button.
MEASURE TEMPO
001 116
Indicates that Reverb is on
2 Set the desired Reverb Type in the Function mode.
Do this in the normal way:
1) Press the FUNCTION button.
2) Select the desired Function parameter number (#31, #32) with the
numeric keypad. (For a list of the Reverb Types, see page 45.)
STYLE
FUNCTION
Reverb
F31
3) After “FUNCTION” stops flashing, change the value (with the
numeric keypad). For on/off settings, use the +/- buttons.
Restoring the Default Value
If you’ve changed the parameter setting, you can instantly restore
the default setting by pressing both +/- buttons simultaneously.
STYLE
FUNCTION
RevType
F32
Reverb can also be turned
on and off with a connected
footswitch (page 100), or
from Function parameter
#31 (page 44).
• The panel REVERB on/off
button affects only the
keyboard played voices. If
you want to turn off the
Reverb effect for the overall
PortaTone sound (including
accompaniment and
songs), set the Reverb Type
(#9, page 45) to “off.”
• These settings are not
saved when you turn off the
power. If you wish to save
them, save them to a User
bank in the One Touch
Setting feature (page 72).
• Three additional Reverb
Types are available when
controlling the PortaTone
from a MIDI device. (For
details, see page 122.)
3 Set the Reverb Send Level for the desired voice(s).
The Main, Dual, and Split voices can each be set to have different amounts
of Reverb. Use the corresponding Reverb Send Level parameters in the
Function mode (Main: #04, Dual: #14, Split: #24) to control this. (See
pages 31, 35, 37.)
40
If the Reverb Send Level is
set to a value near or at
“000,” the Reverb effect
may not be heard.
38
Page 41

4 Exit the Function mode.
Once you’ve made all desired settings, press one of the other mode buttons (SONG, STYLE, or VOICE).
CHORUS
The Chorus effect lets you enhance the sound of a voice with through the
use of pitch modulation. Two basic types are provided: Chorus and
Flanger. Chorus produces a thicker, warmer, and more animated sound,
whereas Flanger creates a swirling, metallic effect. A total of four Chorus
types are available.
EFFECTS
The Chorus effect can also
be turned on and off with a
connected footswitch. (See
page 100.)
1 Turn on the Chorus effect and set the Chorus Type in
the Function mode.
Do this in the normal way:
1) Press the FUNCTION button.
2) Select the desired Function parameter number (#33, #34) with the
numeric keypad. (For a list of the Chorus Types, see page 45.)
STYLE
FUNCTION
Chorus
F33
3) After “FUNCTION” stops flashing, change the value/setting (with
the numeric keypad). For on/off settings, use the +/- buttons.
Restoring the Default Value
If you’ve changed the parameter setting, you can instantly restore
the default setting by pressing both +/- buttons simultaneously.
STYLE
FUNCTION
ChoType
F34
2 Set the Chorus Send Level for the desired voice(s).
The Main, Dual, and Split voices can each be set to have different amounts
of Chorus. Use the corresponding Chorus Send Level parameters in the
Function mode (Main: #05, Dual: #15, Split: #25) to control this. (See
pages 31, 35, 37.)
• The Chorus effect is
applied only to the keyboard-played voices.
• These settings are not
saved when you turn off the
power. If you wish to save
them, save them to a User
bank in the One Touch
Setting feature (page 72).
• Three additional Chorus
Types are available when
controlling the PortaTone
from a MIDI device. (For
details, see page 122.)
If the Chorus Send Level is
set to a value near or at
“000,” the Chorus effect
may not be heard.
3 Exit the Function mode.
Once you’ve made all desired settings, press one of the other mode buttons (SONG, STYLE, or VOICE).
39
41
Page 42

EFFECTS
DSP
The DSP effect section provides many reverb and chorus effects, plus a
wealth of other useful and dynamic effects for enhancing and changing the
sound of the voices. Included among these miscellaneous effects are
reverse gate reverb, phaser, rotary speaker, tremolo, echo, delay, distortion,
equalization, and wah. A total of thirty-three DSP types are available.
1 Turn on the DSP effect and set the DSP Type in the
Function mode.
Do this in the normal way:
1) Press the FUNCTION button.
2) Select the desired Function parameter number (#35, #36) with the
numeric keypad. (For a list of the DSP Types, see page 45.)
STYLE
FUNCTION
F35
Dsp
3) After “FUNCTION” stops flashing, change the value/setting (with
the numeric keypad). For on/off settings, use the +/- buttons.
Restoring the Default Value
If you’ve changed the parameter setting, you can instantly restore
the default setting by pressing both +/- buttons simultaneously.
STYLE
FUNCTION
DspType
F36
The DSP effect can also be
turned on and off with a
connected footswitch. (See
page 100.)
• The DSP effect is applied
only to the keyboard-played
voices.
• These settings are not
saved when you turn off the
power. If you wish to save
them, save them to a User
bank in the One Touch
Setting feature (page 72).
• Eighteen additional DSP
Types are available when
controlling the PortaTone
from a MIDI device. (For
details, see page 122.)
2 Set the DSP Send Level for the desired voice(s).
The Main, Dual, and Split voices can each be set to have different amounts
of DSP. Use the corresponding DSP Send Level parameters in the Function
mode (Main: #06, Dual: #16, Split: #26) to control this. (See pages 31, 35,
37.)
3 Exit the Function mode.
Once you’ve made all desired settings, press one of the other mode buttons (SONG, STYLE, or VOICE).
42
If the DSP Send Level is set
to a value near or at “000,”
the DSP effect may not be
heard.
40
Page 43

HARMONY
The Harmony section features a variety of performance effects that enhance
the melodies you play when using the accompaniment styles of the
PortaTone. A total of twenty-six Harmony types are available.
Tremolo, Trill and Echo effects can be used even if accompaniment is off.
There are five different Harmony Types that automatically create harmony
parts (for notes played in the upper section of the keyboard) to match the
accompaniment chords.
1 Turn on the Harmony effect.
Press the HARMONY button.
EFFECTS
The Harmony effect can
also be turned on and off
with a connected footswitch
(page 100), or from
Function parameter #37
(page 44).
ACMP ON
MEASURE TEMPO
001 116
Indicates that Harmony is on
2 Set the Harmony Type and desired Harmony Volume
in the Function mode.
Do this in the normal way:
1) Press the FUNCTION button.
2) Select the desired Function parameter number (#37, #38, #39)
with the numeric keypad. (For a list of the Harmony Types, see page
46.)
STYLE
FUNCTION
STYLE
FUNCTION
Harmony
F37
HarmVol
F39
STYLE
FUNCTION
HarmType
F38
• For the first five Harmony
Types (Duet, Trio, Block,
Country, and Octave),
chords must be played in
the Accompaniment section
of the keyboard.
• The speed of the Trill,
Tremolo, and Echo effects
depends on the Tempo
setting (page 76).
If the Harmony Volume is
set to a value near or at
“000,” the Harmony effect
may not be heard.
3) After “FUNCTION” stops flashing, change the value (with the
numeric keypad). For on/off settings, use the +/- buttons.
Restoring the Default Value
If you’ve changed the parameter setting, you can instantly restore the
default setting by pressing both +/- buttons simultaneously.
41
These settings are not saved
when you turn off the
power. If you wish to save
them, save them to a User
bank in the One Touch
Setting feature (page 72).
43
Page 44

EFFECTS
3 Exit the Function mode.
Once you’ve made all desired settings, press one of the other mode buttons (SONG, STYLE, or VOICE).
Function Parameters — Effects
The Effect Function parameters provide all effect-related settings (with the exception of the Send
parameters in the Main, Dual, and Split sections). These settings include:
• Reverb On/Off
• Reverb Type
• Chorus On/Off
• Chorus Type
• DSP On/Off
• DSP Type
• Harmony On/Off
• Harmony Type
• Harmony Volume
Function Parameters
No. Parameter Name Display Name Range/Settings
F31 Reverb On/Off Reverb on, off
F32 Reverb Type RevType (See “Reverb Type”
F33 Chorus On/Off Chorus on, off
F34 Chorus Type ChoType (See “Chorus Type”
F35 DSP On/Off Dsp on, off
F36 DSP Type DspType (See “DSP Type” list
list below.)
list below.)
below.)
Description
This turns the Reverb effect on/off. (This is the same
function as that of the REVERB button. It can also be
controlled by a connected footswitch; see page 100.)
(See “Reverb Type” list below.)
This turns the Chorus effect on/off. This can also be
controlled by a connected footswitch. (See page
100.)
(See “Chorus Type” list below.)
This turns the DSP effect on/off. This can also be
controlled by a connected footswitch. (See page
100.)
(See “DSP Type” list below.)
F37 Harmony On/Off Harmony on, off
F38 Harmony Type HarmType (See “Harmony Type”
F39 Harmony Volume HarmVol 000 — 127
44
This turns the Harmony effect on/off. (This is the
same function as that of the HARMONY button. It
can also be controlled by a connected footswitch;
see page 100.)
(See “Harmony Type” list below.)
list below.)
This determines the level of the Harmony effect,
letting you create the optimum mix with the original
melody note.
42
Page 45

■ Effect Types
EFFECTS
Reverb Types
No. Reverb Display
Type Name
1 Hall 1 Hall1
2 Hall 2 Hall2
3 Room 1 Room1
4 Room 2 Room2
5 Stage 1 Stage1
6 Stage 2 Stage2
7 Plate 1 Plate1
8 Plate 2 Plate2
9 Off Off
Description
Concert hall reverb.
Small room reverb.
Reverb for solo instruments.
Simulated steel plate reverb.
No effect.
DSP Types
No. DSP Display
Type Name
1 Hall 1 Hall1
2 Hall 2 Hall2
3 Room 1 Room1
4 Room 2 Room2
5 Stage 1 Stage1
6 Stage 2 Stage2
7 Plate 1 Plate1
8 Plate 2 Plate2
9 Early Reflection 1 ER1
10 Early Reflection 2 ER2
11 Gate Reverb Gate1
12 Reverse Gate Gate2
13 Chorus 1 Chorus1
14 Chorus 2 Chorus2
15 Flanger 1 Flanger1
16 Flanger 2 Flanger2
17 Symphonic Symphony
18 Phaser Phaser
19 Rotary Speaker 1 Rotary1
20 Rotary Speaker 2 Rotary2
21 Tremolo 1 Tremolo1
22 Tremolo 2 Tremolo2
23 Guitar Tremolo Tremolo3
24 Auto Pan AutoPan
25 Auto Wah AutoWah
26 Delay Left - DelayLCR
Center - Right
27 Delay Left - Right DelayLR
28 Echo Echo
29 Cross Delay CrossDly
30 Distortion Hard D Hard
31 Distortion Soft D Soft
32 EQ Disco EQ Disco
33 EQ Telephone EQ Tel
34 Off Off
Chorus Types
No. Chorus Display
Type Name
1 Chorus 1 Chorus1
2 Chorus 2 Chorus2
3 Flanger 1 Flanger1
4 Flanger 2 Flanger2
5 Off Off
Description
Concert hall reverb.
Small room reverb.
Reverb for solo instruments.
Simulated steel plate reverb.
Early reflections only.
Gated reverb effect, in which the reverberation is quickly cut off for special effects.
Similar to Gate Reverb, but with a reverse increase in reverb.
Conventional chorus effect with rich, warm chorusing.
Pronounced three-phase modulation with slight metallic sound.
Exceptionally rich & deep chorusing.
Pronounced, metallic modulation with periodic phase change.
Rotary speaker simulation.
Rich Tremolo effect with both volume and pitch modulation.
Simulated electric guitar tremolo.
Several panning effects that automatically shift the sound position (left, right, front,
back).
Repeating filter sweep “wah” effect.
Three independent delays, for the left, right and center stereo positions.
Initial delay for each stereo channel, and two separate feedback delays.
Stereo delay, with independent feedback level settings for each channel.
Complex effect that sends the delayed repeats “bouncing” between the left and right
channels.
Hard-edge distortion.
Soft, warm distortion.
Equalizer effect that boosts both high and low frequencies, as is typical in most disco
music.
Equalizer effect that cuts both high and low frequencies, to simulate the sound heard
through a telephone receiver.
No effect.
Description
Conventional chorus program
with rich, warm chorusing.
Pronounced three-phase
modulation with a slight metallic
sound.
No effect.
45
43
Page 46

EFFECTS
Harmony Types
No. Harmony Type Display Name
1 Duet Duet
2 Trio Trio
3 Block Block
4 Country Country
5 Octave Octave
6 Trill 1/4 note Tril1/4
7 Trill 1/6 note Tril1/6
8 Trill 1/8 note Tril1/8
9 Trill 1/12 note Tril1/12
10 Trill 1/16 note Tril1/16
11 Trill 1/24 note Tril1/24
12 Trill 1/32 note Tril1/32
13 Tremolo 1/4 note Trem1/4
14 Tremolo 1/6 note Trem1/6
15 Tremolo 1/8 note Trem1/8
16 Tremolo 1/12 note Trem1/12
17 Tremolo 1/16 note Trem1/16
18 Tremolo 1/24 note Trem1/24
19 Tremolo 1/32 note Trem1/32
Description
Harmony types 1 - 5 are pitch-based and add one-, two- or
three-note harmonies to the single-note melody played in the
right hand. These types only sound when chords are played in
the auto accompaniment section of the keyboard.
Types 6 - 26 are rhythm-based effects and add embellishments
3
or delayed repeats in time with the auto accompaniment.
These types sound whether the auto accompaniment is on or
3
not; however, the actual speed of the effect depends on the
Tempo setting (page 76). The individual note values in each
type let you synchronize the effect precisely to the rhythm.
3
Triplet settings are also available: 1/6 = quarter-note triplets, 1/
12 = eighth-note triplets, 1/24 = sixteenth-note triplets.
• The Trill effect Types (6 - 12) create two-note trills (alternating
notes) when two notes are held.
3
• The Tremolo effect Types (13 - 19) repeat all held notes (up to
four).
3
• The Echo effect Types (20 - 26) create delayed repeats of each
note played.
3
20 Echo 1/4 note Echo1/4
21 Echo 1/6 note Echo1/6
22 Echo 1/8 note Echo1/8
23 Echo 1/12 note Echo1/12
24 Echo 1/16 note Echo1/16
25 Echo 1/24 note Echo1/24
26 Echo 1/32 note Echo1/32
3
3
3
46
44
Page 47

AUTO ACCOMPANIMENT —
THE STYLE MODE
The Style mode provides dynamic rhythm/accompaniment patterns — as well as
voice settings appropriate for each pattern — for various popular music styles.
A total of 100 different styles are available, in several different categories. Each style is made up of
separate “sections” — Intro, Main A and B (with 4 Fill-ins), and Ending — letting you call up different
accompaniment sections as you perform.
The auto accompaniment features that are built into the rhythms add the excitement of instrumental
backing to your performance, letting you control the accompaniment by the chords you play. Auto
accompaniment effectively splits the keyboard into two sections: The upper is used for playing a
melody line, and the lower (set by default to keys F#2 and lower) is for the auto accompaniment
function.
The Style mode also has the powerful Chord Guide features, which include three sophisticated learning and performance tools: Dictionary, Smart, and EZ Chord. The Dictionary and Smart functions
(pages 62, 64) provide powerful, easy-to-use tools for learning chords and chord relationships. EZ
Chord (page 66) lets you record chord progressions for an entire song, and then step through the
chords by simply pressing a single key in the auto accompaniment section of the keyboard.
SELECTING A STYLE AND PLAYING THE ACCOMPANIMENT
1 Select the Style mode.
Press the STYLE button.
Indicates Style
mode is selected
STYLE
MEASURE TEMPO
001
001 116
Style name and number
8BtPop1
The PortaTone can also be
used with commercially
available Style File data,
allowing you to load
additional styles (auto
accompaniment patterns)
to the instrument. Style File
data is loaded individually
as style number 101, and
can be played just like the
preset styles.
2 Select the desired style number.
Use the numeric keypad. The basic categories of styles and their numbers
are shown at the left of the panel. A complete list of the available styles is
given on page 117.
45
47
Page 48

AUTO ACCOMPANIMENT — THE STYLE MODE
Style numbers can be selected in the same way as with the voices (see page
28). You can use the numeric keypad to directly enter the style number,
use the +/- keys to step up and down through the styles, or press the STYLE
button to advance through the style numbers.
3 Start the accompaniment.
You can do this in one of the following ways:
Pressing the START/STOP button
The rhythm starts playing immediately without bass and chord
accompaniment. The currently selected Main A or B section will play.
This function can also be
controlled by using a
connected footswitch. (See
page 100.)
You can select the Main A or B section by pressing the appropriate
button — MAIN A or MAIN B — before pressing the START/STOP
button. (The icon section of the display briefly shows the letter of the
selected section: “A” or “B.”)
MEASURE TEMPO
001 116
Indicates
selected section
(Main A or B).
Using Sync-Start
The PortaTone also has a Sync-Start function that allows you to start
the rhythm/accompaniment by simply pressing a key on the key-
board. To use Sync-Start, first press the SYNC-START button (the
beat bars below the style name all flash to indicate Sync-Start stand-
by), then press any key on the keyboard. (When auto accompani-
ment is on, play a key or chord in the auto accompaniment section of
the keyboard.)
Auto accompaniment
section
48
46
Page 49

AUTO ACCOMPANIMENT — THE STYLE MODE
Starting with an Intro section
Each style has its own two- or four-measure Intro section. When used
with the auto accompaniment, many of the Intro sections also in-
clude special chord changes and embellishments to enhance your
performance.
To start with an Intro section:
1) Press the MAIN A or MAIN B button — to select which
section (A or B) is to follow the Intro.
MEASURE TEMPO
001 116
Indicates selected
section (Main A
or B).
2) Press the INTRO button.
MEASURE TEMPO
001 116
Indicates Intro
standby.
To actually start the Intro section and accompaniment,
press the START/STOP button.
Once the Intro section is finished, the icon section of the display
briefly shows the letter “A” or “B” to indicate that the selected
Main section is currently playing.
Using Sync-Start with an Intro section
You can also use the Sync-Start function with the special Intro section
of the selected style.
This function can also be
controlled by using a
connected footswitch. (See
page 100.)
To use Sync-Start with an Intro section:
1) Press the MAIN A or MAIN B button — to select which
section (A or B) is to follow the Intro.
MEASURE TEMPO
001 116
47
Indicates
selected section
(Main A or B).
49
Page 50

AUTO ACCOMPANIMENT — THE STYLE MODE
2) Press the INTRO button.
MEASURE TEMPO
001 116
Indicates Intro
standby.
3) Press the SYNC-START button to enable Sync-Start, and start
the Intro section and accompaniment by playing any key on
the keyboard. (When auto accompaniment is on, play a key or
chord in the auto accompaniment section of the keyboard.)
Auto accompaniment
section
Once the Intro section is finished, the icon section of the display
briefly shows the letter “A” or “B” to indicate that the selected Main
section is currently playing.
About Auto Accompaniment
Auto accompaniment can be used with any of the above methods. Simply press the ACCOMPANIMENT ON/
OFF button to turn on the auto accompaniment. (This can be done at any point in the operation.)
Indicates that
auto accompaniment is on.
When using Sync-Start with the auto accompaniment, only keys in the auto accompaniment section can be
used to start the accompaniment. (For more information on auto accompaniment, see page 52.)
50
ACMP ON
48
Page 51

About the Beat Display
The dark bars underneath the style name in the display flash in time with the current tempo during playback
(or Sync-Start standby) of the accompaniment. The flashing bars provide a visual indication of both the tempo
and time signature of the accompaniment. (For more information, see page 77.)
4 Stop the accompaniment.
You can do this in one of three ways:
AUTO ACCOMPANIMENT — THE STYLE MODE
Pressing the START/STOP button
The rhythm/accompaniment stops playing immediately.
Using an Ending section
Press the INTRO/ENDING button. The accompaniment stops after
the Ending section is finished.
Pressing the SYNC-START button
This immediately stops the accompaniment and automatically en-
ables Sync-Start, letting you re-start the accompaniment by simply
playing a chord or key in the auto accompaniment section of the
keyboard.
• This function can also be
controlled by using a
connected footswitch. (See
page 100.)
• To have the Ending
section gradually slow down
as it is playing, press the
INTRO/ENDING button
twice quickly.
49
51
Page 52

AUTO ACCOMPANIMENT — THE STYLE MODE
ACCOMPANIMENT CONTROLS
When the Style mode is active, the panel buttons below the display function as accompaniment
controls.
Pressing this button
alternately enables
and cancels the bass
and chord accompaniment. (See below.)
Pressing this
button alternately
starts and stops
accompaniment
playback.
Pressing this
button alternately
enables and
cancels the SyncStart function.
(See page 48.)
This controls
the Intro and
Ending
sections.
(See pages
49, 51.)
Pressing this
button selects the
Main A section, or
adds a Fill-in A
section. (See
page 54.)
Pressing this button
selects the Main B
section, or adds a
Fill-in B section.
(See page 54.)
USING THE AUTO ACCOMPANIMENT FEATURES
This controls the
Chord Guide
functions. (See
page 62.)
1 Turn on the auto accompaniment.
Press the ACCOMPANIMENT ON/OFF button to turn on (enable) the auto
accompaniment.
Indicates that
auto accompa-
niment is on.
ACMP ON
2 Select a style and play the accompaniment.
Select one of the styles and start playback, as described in steps 1 - 3 on
page 47.
52
50
Page 53

AUTO ACCOMPANIMENT — THE STYLE MODE
3 Change chords using the auto ac-
companiment feature.
Try playing a few successive single notes with your
left hand, and notice how the bass and chord
accompaniment change with each key you play.
You can also play full chords to control the auto
accompaniment. (Refer to page 56 for more information on how to use auto accompaniment.)
• The ACCOMPANIMENT ON/OFF button can also be
used to turn off and on the bass/chord accompaniment
while playing — allowing you to create dynamic rhythmic
breaks in your performance.
• You can use the Sync-Start function to create a similar,
yet even more dramatic break. While the accompaniment
is playing, pressing the SYNC-START button immediately
stops the accompaniment and enables Sync-Start. This
lets you play unaccompanied until you press a key in the
auto accompaniment section to start the accompaniment
again. This is especially effective when you press the
SYNC-START button at the end of a musical phrase.
Chords played in the auto accompaniment section of the
keyboard are also detected and played when the accompaniment is stopped. In effect, this gives you a “split
keyboard,” with bass and chords in the left hand and the
normally selected voice in the right.
CHANGING THE TEMPO
The Tempo of song (and accompaniment) playback
can be adjusted over a range of 32 - 280 bpm
(beats per minute). For instructions on changing
the Tempo, see page 76.
Each style has been given a default or standard tempo.
(For instructions on restoring the default tempo, see page
77.) When accompaniment playback is stopped and a
different style is selected, the tempo returns to the default
setting of the new style.
51
53
Page 54

AUTO ACCOMPANIMENT — THE STYLE MODE
ACCOMPANIMENT SECTIONS (MAIN A, MAIN B AND FILL-INS)
While the accompaniment is playing, you can add variation in the rhythm/
accompaniment by pressing the MAIN/AUTO FILL A or B button. This
automatically plays one of four Fill-in sections, and smoothly leads into the
next section — even if it is the same section.
MEASURE TEMPO
001 116
Each style has four different Fill-in sections that play in the following conditions:
• Main A → Main A (Fill-in “AA”)
• Main A → Main B (Fill-in “AB”)
• Main B → Main A (Fill-in “BA”)
• Main B → Main B (Fill-in “BB”)
This appears while
the Fill-in section is
playing.
• This function can also be
controlled by using a
connected footswitch. (See
page 100.)
• If you press the MAIN A or
B button, the Fill-in will
begin immediately, and the
newly selected section (A or
B) will actually begin
playing from the top of the
next measure, unless the
MAIN A or B button is
pressed during the last beat
of the measure — in which
case the Fill-in will begin
from the first beat of the
next measure.
• Rhythm sounds and Fill-in
sections are not available
when one of the Pianist
styles (#91 - #100) are
selected.
54
52
Page 55

AUTO ACCOMPANIMENT — THE STYLE MODE
ADJUSTING THE ACCOMPANIMENT VOLUME
The playback volume of the accompaniment can be adjusted. This volume
control affects only the accompaniment volume. The volume range is 000
- 127.
1 Select the Accompaniment Volume function in the
Overall menu.
Press one of the OVERALL ▲/▼ buttons, repeatedly if necessary, until
“AcmpVol” appears in the display.
Current Accompaniment Volume value
ACMP/SONG
VOLUME
STYLE
Indicates Accompaniment
Volume is selected
100
AcmpVol
2 Change the value.
Use the OVERALL +/- buttons to increase or decrease the Accompaniment
Volume value. Holding down either button continuously increases or
decreases the value.
Increases Accompaniment
Volume value
Decreases Accompaniment
Volume value
Restoring the Default
Value
To restore the default
Accompaniment Volume
value (100), press both
OVERALL +/- buttons
simultaneously (when
Accompaniment Volume is
selected in the Overall
menu).
Accompaniment Volume
cannot be changed unless
the Style mode is active.
53
55
Page 56

C
Cm
C
Cm
7
7
AUTO ACCOMPANIMENT — THE STYLE MODE
USING AUTO ACCOMPANIMENT — MULTI FINGERING
When it is set to on (page 52), the auto accompaniment function automatically generates bass and chord accompaniment for you to play along with,
by using Multi Fingering operation. You can change the chords of the
accompaniment by playing keys in the auto accompaniment section of the
keyboard using either the “Single Finger” or “Fingered” method. With
Single Finger you can simply play a one-, two- or three-finger chord indication (see Single Finger Chords below). The Fingered technique is that of
conventionally playing all the notes of the chord. Whichever method you
use, the PortaTone “understands” what chord you indicate and then
automatically generates the accompaniment.
Single Finger Chords
Chords that can be produced in Single Finger
To play a major chord: Press the root
note of the chord.
operation are major, minor, seventh and
minor seventh. The illustration shows how to
produce the four chord types. (The key of C
is used here as an example; other keys follow
the same rules. For example, Bb7 is played as
Bb and A.)
To play a minor chord: Press the root
note together with the nearest black
key to the left of it.
To play a seventh chord: Press the root
note together with the nearest white
key to the left of it.
To play a minor seventh chord: Press
the root note together with the nearest
white and black keys to the left of it
(three keys altogether).
Fingered Chords
Using the key of C as an example, the chart below shows the types of
chords that can be recognized in the Fingered mode.
Example for “C” chords
(9)
C
Csus
4
C
Caug
CmM
7
CmM
7
(9)
C
6
( )
CM aug
7
( )
b5
Cm
7
(9)
C
6
Cm
CmM
CM
7
Cm
Cdim
( )
(9)
( )
b5
7
CM
Cm
Cdim
(9)
7
( )
6
7
CM
Cm
C
(#11)
7
( )
7
( )
7
C
Cm
C
(b5)
7
7
(b9)
(9)
( )
CM
Cm
C
7
7
7
( )
(b13)
b5
(11)
( )
( )
(9)
C
7
( )
( )
#11)
(
C
7
( )
(13)
C
7
C
7
( )
* Notes enclosed in parentheses are optional; the chords will be recognized without them.
56
(#9)
C
( )
1+2+5
54
( )
b5
C
7
( )
C aug
7
C sus
7
4
( )
Page 57

AUTO ACCOMPANIMENT — THE STYLE MODE
Chord Name/[Abbreviation] Normal Voicing
Major [M] 1 - 3 - 5
Add ninth [(9)] 1 - 2 - 3 - 5
Sixth [6] 1 - (3) - 5 - 6
Sixth ninth [6(9)] 1 - 2 - 3 - (5) - 6
Major seventh [M7] 1 - 3 - (5) - 7 or
Major seventh ninth [M7(9)] 1 - 2 - 3 - (5) - 7
Major seventh add sharp eleventh [M7(#11)] 1 - (2) - 3 - #4 - 5 - 7 or
Flatted fifth [(b5)] 1 - 3 - b5
Major seventh flatted fifth [M7b5] 1 - 3 - b5 - 7
Suspended fourth [sus4] 1 - 4 - 5
Augmented [aug] 1 - 3 - #5
Major seventh augmented [M7aug] 1 - (3) - #5 - 7
Minor [m] 1 - b3 - 5
Minor add ninth [m(9)] 1 - 2 - b3 - 5
Minor sixth [m6] 1 - b3 - 5 - 6
Minor seventh [m7] 1 - b3 - (5) - b7
Minor seventh ninth [m7(9)] 1 - 2 - b3 - (5) - b7
Minor seventh add eleventh [m7(11)] 1 - (2) - b3 - 4 - 5 - (b7)
Minor major seventh [mM7] 1 - b3 - (5) - 7
Minor major seventh ninth [mM7(9)] 1 - 2 - b3 - (5) - 7
Minor seventh flatted fifth [m7b5] 1 - b3 - b5 - b7
Minor major seventh flatted fifth [mM7b5] 1 - b3 - b5 - 7
Diminished [dim] 1 - b3 - b5
Diminished seventh [dim7] 1 - b3 - b5 - 6
Seventh [7] 1 - 3 - (5) - b7 or
Seventh flatted ninth [7(b9)] 1 - b2 - 3 - (5) - b7
Seventh add flatted thirteenth [7(b13)] 1 - 3 - 5 - b6 - b7
Seventh ninth [7(9)] 1 - 2 - 3 - (5) - b7
Seventh add sharp eleventh [7(#11)] 1 - (2) - 3 - #4 - 5 - b7 or
Seventh add thirteenth [7(13)] 1 - 3 - (5) - 6 - b7
Seventh sharp ninth [7(#9)] 1 - #2 - 3 - (5) - b7
Seventh flatted fifth [7b5] 1 - 3 - b5 - b7
Seventh augmented [7aug] 1 - 3 - #5 - b7
Seventh suspended fourth [7sus4] 1 - 4 - (5) - b7
One plus two plus five [1+2+5] 1 - 2 - 5
1 - (3) - 5 - 7
1 - 2 - 3 - #4 - (5) - 7
1 - (3) - 5 - b7
1 - 2 - 3 - #4 - (5) - b7
Chord (C) Display
CC
C(9) C(9)
C6 C6
C6(9) C6(9)
CM7 CM7
CM7(9) CM7(9)
CM7(#11) CM7(#11)
C(b5) Cb5
CM7b5 CM7b5
Csus4 Csus4
Caug Caug
CM7aug CM7aug
Cm Cm
Cm(9) Cm(9)
Cm6 Cm6
Cm7 Cm7
Cm7(9) Cm7(9)
Cm7(11) Cm7(11)
CmM7 CmM7
CmM7(9) CmM7(9)
Cm7b5 Cm7b5
CmM7b5 CmM7b5
Cdim Cdim
Cdim7 Cdim7
C7 C7
C7(b9) C7(b9)
C7(b13) C7(b13)
C7(9) C7(9)
C7(#11) C7(#11)
C7(13) C7(13)
C7(#9) C7(#9)
C7b5C7b5
C7aug C7aug
C7sus4 C7sus4
C1+2+5 C
• Notes in parentheses can
be omitted.
• Playing two same root
keys in the adjacent octaves
produces accompaniment
based only on the root.
• A perfect fifth (1 + 5)
produces accompaniment
based only on the root and
fifth which can be used with
both major and minor
chords.
• The chord fingerings listed
are all in “root” position,
but other inversions can be
used — with the following
exceptions:
m7, m7
aug, dim7, 7
b
5, 6, m6, sus4,
b
5, 6(9),
1+2+5.
• Inversion of the 7sus4 and
m7(11) chords are not
recognized if the notes
shown in parentheses are
omitted.
• The AUTO ACCOMPANIMENT will sometimes not
change when related chords
are played in sequence (e.g.
some minor chords followed
by the minor seventh).
• Two-note fingerings will
produce a chord based on
the previously played chord.
55
57
Page 58

AUTO ACCOMPANIMENT — THE STYLE MODE
SETTING THE ACCOMPANIMENT SPLIT POINT
The Accompaniment Split Point determines the highest key for the accompaniment section. The accompaniment can be played with the keys up to
and including the Accompaniment Split Point key.
This parameter can be set lower (but not higher) than the Split Point in the
Split mode. When set to different values, the two settings affect one
another in the following way:
• When the Voice Split Point is set higher than the Accompaniment Split Point:
Accompaniment
• When the Voice Split Point is set to the same key as the Accompaniment Split
Point:
Split voice +
Accompaniment section
Split
Main
Main
1 Call up the Function mode.
Press the FUNCTION button.
2 Select the Accompaniment Split Point parameter.
While the “FUNCTION” indication is flashing, use the numeric keypad to
select the Accompaniment Split Point parameter (#51). (For details on the
parameter, see below.)
The Function parameter number can be selected in the same way as with
the voices (see page 28) — with the numeric keypad, +/- keys, or the
FUNCTION button.
• Since the “FUNCTION”
indication flashes for only a
couple of seconds, make
sure to select the parameter
quickly after step 1 above.
STYLE
FUNCTION
58
F51
AcmpSPnt
56
Page 59

AUTO ACCOMPANIMENT — THE STYLE MODE
3 Change the parameter setting or value.
After the “FUNCTION” indication stops flashing, use the numeric keypad to
change the value or setting.
STYLE
FUNCTION
054
AcmpSPnt
The value can also be set directly by pressing the desired key while this
parameter is selected. After setting this, make sure to select a different
parameter or exit the Function mode before playing the keyboard.
Function Parameter — Accompaniment Split Point
Function Parameters
No. Parameter Name Display Name Range/Settings
F51 Accompaniment AcmpSPnt 000 — 127
Split Point
Description
This determines the highest key for the accompaniment section and sets the accompaniment split
“point” — in other words, the key that separates the
accompaniment section and the Main voice. (When
accompaniment is turned on, the accompaniment
section sounds up to and including the Accompaniment Split Point key.) This cannot be set higher
than the Split Point in the Split mode (page 37).
While this is being set, the keyboard does not
produce any sound. After setting this, make sure to
select a different parameter or exit the Function
mode before playing the keyboard.
57
59
Page 60

AUTO ACCOMPANIMENT — THE STYLE MODE
WHAT IS A CHORD?
The simple answer: Three or more notes played simultaneously is a chord. (Two notes played
together is an “interval” — an interval being the distance between two different notes. This is
also referred to as a “harmony.”) Depending on the intervals between the three or more notes,
a chord can sound beautiful or muddy and dissonant.
The organization of notes in the example at left — a triad chord —
produces a pleasant, harmonious sound. Triads are made up of
three notes and are the most basic and common chords in most
music.
In this triad, the lowest note is the “root.” The root (also called the “tonic”) is the most impor-
tant note in the chord, because it anchors the sound harmonically by determining its “key” and
forms the basis for how we hear the other notes of the chord.
The second note of this chord is four semitones higher than the first, and the third is three
semitones higher than the second. Keeping our root note fixed and changing these notes by a
semitone up or down (sharp or flat), we can create four different chords.
Major chord
(ex. C)
Minor
3rd
Major
3rd
Minor chord
(ex. C
Major
3rd
m)
Minor
3rd
Augmented chord
Major
3rd
(ex. C
aug)
Major
3rd
Diminished chord
Minor
3rd
(ex. C
dim)
Minor
3rd
Keep in mind that we can also change the “voicing” of a chord — for example, change the
order of the notes (called “inversions”), or play the same notes in different octaves — without
changing the basic nature of the chord itself.
Inversion examples for the key of C
G
E
C
C
G
E
E
C
G
Beautiful sounding harmonies can be built in this manner. The use of intervals and chords is one
of the most important elements in music. A wide variety of emotions and feelings can be created depending on the types of chords used and the order in which they are arranged.
60
58
Page 61

AUTO ACCOMPANIMENT — THE STYLE MODE
WRITING CHORD NAMES
Knowing how to read and write chord names is an easy yet invaluable skill. Chords are often
written in a kind of shorthand that makes them instantly recognizable (and gives you the freedom to play them with the voicing or inversion that you prefer). Once you understand the
basic principles of harmony and chords, it’s very simple to use this shorthand to write out the
chords of a song.
First, write the root note of the chord in an uppercase letter. If you need to specify sharp or flat,
indicate that to the right of the root. The chord type should be indicated to the right as well.
Examples for the key of C are shown below.
Major chord Minor chord Augmented chord Diminished chord
C
For simple major chords, the type is omitted.
Cm Caug Cdim
One important point: Chords are made up of notes “stacked” on top of each other, and the
stacked notes are indicated in the chord name of the chord type as a number — the number
being the distance of the note from the root. (See the keyboard diagram below.) For example,
the minor 6th chord includes the 6th note of the scale, the major 7th chord has the 7th note of
the scale, etc.
Dominant 7th
(flatted 7th)
The Intervals of the Scale
To better understand the intervals and the numbers
used to represent them in the chord name, study
Octave
F
11th
9th
this diagram of the C major scale:
CDEFGABCDE
Root
2nd
4th
3rd
5th
7th
6th
Other Chords
Csus4
C7
Cm7
CM7
5th 4th
Cm7b5
Dominant
7th
59
Diminished
chord
Dominant
7th
Cm6
Minor
chord
Major
chord
6th
Dominant
7th
C(9)
9th
Minor
chord
7th Major
Cdim7
Diminished
7th
(double
flatted 7th)
chord
* Bbb = A
Diminished
chord
61
Page 62

AUTO ACCOMPANIMENT — THE STYLE MODE
CHORD GUIDE
The Chord Guide functions of the PortaTone provide powerful, easy-to-use
tools for learning chords and chord relationships. Chord Guide features
three different types of operation: Dictionary, Smart, and EZ Chord.
• Pressing the CHORD GUIDE button automatically turns on the auto accompaniment.
• When you wish to use the Style mode normally without the Chord Guide functions,
make sure that OFF is selected. To do this:
1) Press the STYLE button to select the Style mode.
2) Press the CHORD GUIDE button so that a style name is shown in the display
(instead of “Dict.,” “Smart,” or “EZ”).
Dictionary
The Dictionary type is essentially a built-in “chord book” that shows you
the individual notes of chords. It is ideal when you know the name of a
certain chord and want to quickly learn how to play it.
1 With the Style mode active, select the Dictio-
nary Chord Guide.
Press the CHORD GUIDE button so that “Dict.” appears in the display.
STYLE
Dict.
2 Specify the root of the chord.
Press the key on the keyboard that corresponds to the desired chord
root (as printed on the panel).
ROOT
ACMP ON
62
Pressing this key
selects the root G.
G
60
Page 63

AUTO ACCOMPANIMENT — THE STYLE MODE
3 Specify the type of the chord (major, minor,
seventh, etc.).
Press the key on the keyboard that corresponds to the desired chord
type (as printed below the keyboard).
CHORD TYPE
Pressing this key selects the major seventh chord type (M7).
The display shows the name of the chord, and the individual
notes — both in notation and on the keyboard diagram.
STYLE
ACMP ON
MEASURE TEMPO
001 116
Individual notes of
chord (keyboard)
M7
Dict.
M
Notation of chord
Chord name
7
(root and type)
4 Play the chord.
Play the chord (as indicated in the display) in the auto accompaniment section of the keyboard. The chord name flashes when the
correct notes are held down. (Inversions for many of the chords are
also recognized.)
For a few specific chords,
not all notes may be shown
in the notation section of
the display. This is due to
space limitations in the
display.
STYLE
ACMP ON
MEASURE TEMPO
001 116
61
Dict.
Indicates notes to be played.
Flashes when correct notes are held.
M
7
63
Page 64

AUTO ACCOMPANIMENT — THE STYLE MODE
Smart
The Smart type allows you to set the basic key for the chord accompaniment. Once this is set, you can simply press single keys in the scale and
have harmonically appropriate chords played automatically. For example,
with the key set to C, playing an D will result in an D minor chord (rather
than a harmonically inappropriate D major).
The Smart type is not only a convenient feature for easily playing various
chord progressions in a specified key, it’s also an excellent learning tool to
find out how chords relate to each other harmonically in a given key.
1 Select a style.
Select one of the styles, as described in steps 1 - 2 on page 47.
2 Select the Smart Chord Guide.
Press the CHORD GUIDE button so that “Smart” appears briefly in
the display.
STYLE
Smart
3 Set the desired key.
Use the +/- buttons on the numeric keypad to step through the
available keys, or use the numeric keypad to directly enter the number corresponding to the desired key (see chart below).
Indicates selected key signature (shows
number of sharps or flats in key).
STYLE
Number Key (display indication, actual key)
01 #/b=0 (C, or Am)
02 #=1 (G, or Em)
03 #=2 (D, or Bm)
04 #=3 (A, or F#m)
05 #=4 (E, or C#m)
06 #=5 (B, or G#m)
07 #=6 (F#, or D#m)
08 #=7 (C#, or A#m)
#/b=0
01
Number Key (display indication, actual key)
09 b=7 (Cb, or Abm)
10 b=6 (Gb, or Ebm)
11 b=5 (Db, or Bbm)
12 b=4 (Ab, or Fm)
13 b=3 (Eb, or Cm)
14 b=2 (Bb, or Gm)
15 b=1 (F, or Dm)
64
62
Page 65

AUTO ACCOMPANIMENT — THE STYLE MODE
For example, to play the following music score, select number 15 so
that the key is set to b=1 (F, or Dm).
Key of F
STYLE
15
b=1
4 Play the accompaniment, and play single note
chords (root notes) in the auto accompaniment
section.
Start accompaniment playback in the desired way. (For specific
instructions on starting the accompaniment, see page 48.)
For example, when the key has been set to F major, you can play the
following chords by pressing the single root notes indicated below:
To play these chords...
F Dm Gm Dm
...press these root notes.
Notice that the minor chords appropriate to the key of F major are
automatically converted.
Smart Chord List
No. Display Root note
indication C C# (Db) D Eb (D#)E F F# (Gb) G Ab (G#) A Bb (A#)B
01 #/b=0 C C#dim Dm Eb Em F F#dim G Ab Am Bb Bm
02 #=1 C C#dim D Eb Em F F#mG Abdim Am Bb Bm
03 #=2 C C#mD Ebdim Em F F#mG Abdim A Bb Bm
04 #=3 C C#mD Ebdim E F F#mG AbmA Bbdim Bm
05 #=4 C C#mD Ebm E Fdim F#mG AbmA Bbdim B
06 #=5 Cdim C#mD Ebm E Fdim F# GAbmA BbmB
07 #=6 Cdim C# DEbmE Fm F# Gdim AbmA BbmB
08 #=7 Cm C# Ddim EbmE Fm F# Gdim Ab ABbmB
09 b=7 Cdim C#mD Ebm E Fdim F# GAbmA BbmB
10 b=6 Cdim C# DEbmE Fm F# Gdim AbmA BbmB
11 b=5 Cm C# Ddim EbmE Fm F# Gdim Ab ABbmB
12 b=4 Cm C# Ddim Eb EFmF#Gm Ab Adim BbmB
13 b=3 Cm C# Dm Eb Edim Fm F# Gm Ab Adim Bb B
14 b=2 Cm C# Dm Eb Edim F F# Gm Ab Am Bb Bdim
15 b=1 C C# Dm Eb Em F F#dim Gm Ab Am Bb Bdim
63
65
Page 66

AUTO ACCOMPANIMENT — THE STYLE MODE
EZ Chord
The EZ Chord function is an exceptionally flexible and easy way to program
semi-automatic backing for your performances. It lets you record all
necessary chord changes for an entire song, and then allows you to “play”
each chord in the sequence you programmed by simply pressing a single
key in the auto accompaniment section of the keyboard.
Besides being a convenient performance tool, EZ Chord is also ideal for
practicing right hand melodies and soloing techniques, since it lets you
easily produce the chord accompaniment with your left hand — allowing
you to concentrate on your right hand.
EZ Chord gives you eight separate banks (each of which contains up to 128
chord spaces) to which you can record chords. A special bank chain
function allows you to connect all banks, letting you switch automatically
from one bank to the next, without breaking up your chord progression.
EZ Chord — Playback
Once you’ve recorded your own EZ Chord bank (page 68), you can
play it back using the operation steps below.
However, you can try out EZ Chord on your own right now, without
having to record your own EZ Chord bank. Several chord progressions have already been recorded to EZ Chord banks 1 and 2, letting
you try out this convenient feature and get some ideas on how to
best use EZ Chord in your own performances. (For your convenience, the scores for factory-programmed banks 1 and 2 are given
on page 113.)
1 Call up the Style mode and select a style. Also
select an OTS setting, if desired.
Press the STYLE button and select the desired style with the numeric
keypad. (For more information on OTS, see page 72.)
2 Select the EZ Chord function.
Press the CHORD GUIDE button, repeatedly if necessary, until “EZ”
appears. The auto accompaniment is automatically turned on when
EZ Chord is selected.
STYLE
3 Select the desired EZ Chord bank.
Use the numeric keypad. Buttons 1 - 8 select EZ Chord banks #1 -
66
#8, respectively. Button 9 selects the bank chain “A-1” bank (see box
on page 67).
EZ
1
64
Page 67

AUTO ACCOMPANIMENT — THE STYLE MODE
EZ
A-1
STYLE
4 Start the accompaniment.
Use any one of the methods described on page 48 to start the accompaniment.
The EZ Chord chords can also be played back without the full (bass
and rhythm) accompaniment. To do this, simply skip step #4.
5 Play the chords.
To play a chord, press any one key in the auto accompaniment
section of the keyboard.
Auto accompaniment
section
ACMP ON
Chord name
006 116
Indicates the chord position
(128 are available in a bank).
TEMPO
Each dark “block” indicates
a recorded chord. Currently
selected block flashes.
Each time you press a single key in the accompaniment section of the
keyboard, EZ Chord plays the recorded chord and automatically
advances to the next one. (Unrecorded “empty” blocks are skipped.)
In this way, you can control the timing of chords with just a single
finger of your left hand, and still use the powerful auto accompaniment features to create full backing — while you play melodies or
solo with your right hand.
You can use the footswitch to
FOOT SWITCH
select successive chords, letting
you play the full keyboard while
still being able to use EZ Chord.
(See page 100.)
• To reset the position to
the first chord in the bank,
simply select the same bank
again by pressing the
corresponding number
button of the numeric
keypad.
• The accompaniment Split
Point can be freely set,
letting you determine what
keys comprise the auto
accompaniment section of
the keyboard. (See page
59.)
Bank Chain
A special bank chain function allows you to connect all banks, letting you go automatically from one bank to
the next, without breaking up your chord progression. This, for example, lets you program chord changes for
an entire set of songs, and not have to interrupt your performance by changing banks.
To use this, go to step #3 above (in “EZ Chord
Playback”) and press the “9” button of the
numeric keypad.
65
Indicates that bank chain is selected.
67
Page 68

RECORD
RECORD
AUTO ACCOMPANIMENT — THE STYLE MODE
EZ Chord — Recording
1 Enable recording.
Press the RECORD button, repeatedly if necessary, until EZ Chord
recording is selected. (“EZ” appears in the display and the
“RECORD” indication flashes for a couple of seconds.)
RECORD indication flashes
briefly.
STYLE
ACMP ON
RECORD
EZ
3
2 Select the desired EZ Chord bank.
Use the numeric keypad. Buttons 1 - 8 select EZ Chord banks #1 #8, respectively.
3 Start recording.
When the “RECORD” indication stops flashing (and is lit continuously), you can start recording. Recording chords in EZ Chord is
essentially a three-step operation:
— Clearing
the Bank
Before recording, you may
want to erase (clear) all
recorded chords for the
selected EZ Chord bank. For
instructions on doing this,
see “Clearing an EZ Chord
Bank” on page 71.
Even if you’ve recorded over
(erased) the factory set EZ
Chord banks, you can
restore the original banks.
(See page 111.)
1) Select the desired block with the +/- buttons.
ACMP ON
3 025
-
Indicates the
chord position.
Currently selected
block flashes.
2) At the selected block, record the desired chord.
You can do this in one of two ways:
• Play Multi Fingering chords in the auto accompaniment
section. (See page 56.)
• Enter the chord root and name manually from the
ROOT and CHORD TYPE section of the keyboard.
ACMP ON
3 025
-
M
7
Indicates the
recorded chord.
1 — 16 Block
17 — 32 Block
33 — 48 Block
49 — 64 Block
65 — 80 Block
81 — 96 Block
97 — 112 Block
113 — 128 Block
Bank number
Block number (128 are available in a bank)
68
66
Page 69

AUTO ACCOMPANIMENT — THE STYLE MODE
3) Press the + button in the numeric keypad.
This actually records the chord to the selected block and automatically moves to the next block.
This step is necessary; the chord is not actually recorded until you
press the + button. (Pressing the - button will select the previous
block without recording the chord.)
To record a sequence of chords, repeat steps 2) and 3) above (play a
chord, select the next step, play a different chord, select the next
step, etc.).
4 Stop recording and exit from the record mode.
When finished recording the chords, press the RECORD button. This
exits from the record mode and lets you playback your newly recorded chords. (See page 66.)
Recording a Space
To leave a block empty (creating a space between blocks), simply select the next block without entering a
chord. To leave the rest of a row empty and start at the next row, use the + button to move to the first block
in the next row and start recording from that position. (For more infomation, see the hint “Using Spaces” on
page 70.)
Playing the Accompaniment During EZ Chord Recording
It may be helpful for you to hear the style and auto accompaniment as you are
recording chords in the EZ Chord function. To do this:
1) Press the STYLE button.
This briefly calls up the Style mode, while keeping EZ Chord recording
active.
2) Select the desired style.
Before the display reverts back to EZ Chord (a couple of seconds after
pressing the STYLE button), use the numeric keypad to select a style.
3) Start accompaniment playback.
Press the START/STOP button.
4) Record the chord.
Play the desired chord in the auto accompaniment section of the keyboard. Remember that the chord is not actually recorded until you press
the + button to move to the next block.
If you manually enter
the chord root and type
(as described on page
68), the chord and bass
accompaniment will not
sound.
67
69
Page 70

AUTO ACCOMPANIMENT — THE STYLE MODE
HINT — Using Spaces
If your chord progressions are not long and the maximum memory space for chords isn’t very important to
you, you can use the spaces between recorded blocks to good advantage. (Keep in mind that spaces have no
effect during playback; the EZ Chord function automatically skips the space or spaces and plays the next
chord.)
To record a space:
Press the + button without recording a chord.
Some advantages to using spaces:
• Put one or two spaces between recorded chord blocks — for example, between the different sections (verse,
chorus, bridge, etc.) of your song. This gives you a clear visual indication of where you are in a song, and
makes it easier to perform the chord changes.
• Regardless of the musical genre — rock, pop, country, jazz, and even much contemporary music — the
structure of most songs and music, in terms of length in measures, is based on the number four and its
multiples. Examples of this include four- and eight-measure melodic phrases, the popular “twelve-bar” blues,
and the sixteen-measure length of verses and choruses in many pop songs and jazz standards.
What does this have to do with “spaces”? If your chord progression follows this kind of structure closely, you
may want to group the chord changes for each section in four-, eight, twelve- or sixteen-block groups. For
example, the first song in the illustration below shows a sixteen-block group, followed by a group of twelve,
then one of eight.
3 040-
8 Blocks
12 Blocks
16 Blocks
70
68
Page 71

AUTO ACCOMPANIMENT — THE STYLE MODE
Clearing an EZ Chord Bank
This operation lets you erase (clear) all recorded chords for the selected EZ Chord bank.
1 Enable the EZ Chord Record mode.
Press the RECORD button, repeatedly if necessary, until EZ Chord
recording is selected. (“EZ” appears in the display and the
“RECORD” indication flashes for a couple of seconds.)
2 Select the desired point from which chords will
be cleared.
Use the +/- buttons. All chords following the selected point will be
erased.
3 Call up the EZ Chord Clear function.
Wait for a couple of seconds until the “RECORD” indication stops
flashing and “EZ” appears in the display. Then, hold down the “0”
button until the “Clear?” prompt appears.
STYLE
YES
RECORD
ACMP ON
Clear?
4 Execute the Clear function.
At the “Clear?” prompt, press the + button (“YES”) to actually clear
the bank, or press the - button to cancel.
5 Continue recording, or exit the Record mode.
Operation returns to EZ Chord Record, letting you record a new bank
of chords. To exit, simply press the RECORD button.
Erasing a Single Chord
To erase (clear) a single recorded chord in an EZ Chord bank:
1) Enable the EZ Chord Record mode.
Press the RECORD button, repeatedly if necessary, until EZ Chord recording is selected.
2) Select the desired point at which the chord will be cleared.
Use the FWD/BWD buttons.
3) Call up the Clear function.
Press the C6 key (highest key on the keyboard).
4) To actually clear the chord data press the FWD button.
69
71
Page 72

ONE TOUCH SETTING (OTS)
One Touch Setting is a powerful and convenient Style mode function that lets you
instantly reconfigure virtually all settings of the PortaTone — with the touch of a
single button. Two types of One Touch Settings are available: User and Preset.
ONE TOUCH SETTING — USER
Four User banks each with four different settings — a total of sixteen — are available for your custom
settings. Each of the sixteen User One Touch Settings can have different settings for the following
parameters:
• Main voice number
• All Main voice settings (Volume, Octave, Pan, Reverb Level, Chorus Level, and DSP
Level)
• Dual voice number
• All Dual voice settings (On/Off, Volume, Octave, Pan, Reverb Level, Chorus Level, and
DSP Level)
• Split voice number
• All Split voice settings (On/Off, Split Point, Volume, Octave, Pan, Reverb Level, Chorus
Level, and DSP Level)
• Reverb Type and On/Off
• Chorus Type and On/Off
• DSP Type and On/Off
• Harmony Type, On/Off, and Volume
• Style number, and style-related settings: Accompaniment On/Off, Section (Main A or
B), and Accompaniment Split Point
• Overall menu settings: Tempo, Transpose, Tuning, and Accompaniment Volume
• Footswitch assignment
• Touch Sensitivity setting
When using User One Touch
Settings to which a disk
style (number 101) has
been recorded, you will need
to load that same style data
from the appropriate disk.
If a different style disk is
used, the style on that disk
will be used for the User
One Touch Settings, and
not the one you originally
selected.
72
Recording a User One Touch Setting
1 Make all desired settings for the PortaTone.
Virtually all PortaTone settings can be saved to a User button. Refer
to the list above for details.
2 Select the OTS Record mode.
Press the RECORD button, repeatedly if necessary, until “OTS User”
appears at the top of the display.
RECORD indication flashes briefly.
STYLE
RECORD
ACMP ON
OTS User
1
3 Select the desired bank.
Use the +/- buttons or the numeric keypad to select the desired User
bank number (1 - 4).
STYLE
RECORD
OTS User
1
70
Page 73

4 Select the desired User number.
Press the corresponding USER ONE TOUCH SETTING button (1 - 4).
Doing this records the settings to the selected button.
Briefly appears to
MEASURE
001
116
TEMPO
indicate that
settings have been
saved to OTS User
button 1.
5 Exit from the Record mode.
Press the RECORD button.
ONE TOUCH SETTING (OTS)
Recalling a User One Touch Setting
Once you’ve recorded your settings to a User button, you can instantly recall those settings any time you want.
1 Call up the Style mode.
Press the STYLE button.
2 Press the appropriate ONE TOUCH SETTING
USER button.
Press the USER button (1 - 4) corresponding to the desired settings.
MEASURE
001
116
TEMPO
Briefly appears to
indicate that OTS
User 1 is active.
Selecting a User Bank
Before selecting a User One Touch Setting (in step #2), you may want to select a different bank. To do this:
1) Select Function #41. (Press the FUNCTION button, then use the +/- buttons or the numeric keypad
to select #41.)
2) After the “FUNCTION“ indication stops flashing, select the desired bank number with the +/buttons or the numeric keypad.
71
73
Page 74

ONE TOUCH SETTING (OTS)
ONE TOUCH SETTING — PRESET
Preset One Touch Settings are used in a slightly different way than the User settings. First, select a
style, then select a Preset OTS. The Preset A and B settings have been specially programmed at the
factory to match the selected style. This means that you can select the style you want, then choose a
Preset that has the best suited voice, effect, and other settings for that style.
• Main voice number
• All Main voice settings (Volume, Octave, Pan, Reverb Level, Chorus Level, and DSP
Level)
• Dual voice number
• All Dual voice settings (On/Off, Volume, Octave, Pan, Reverb Level, Chorus Level, and
DSP Level)
• Split voice number
• All Split voice settings (Volume, Octave, Pan, Reverb Level, Chorus Level, and DSP
Level)
• Reverb Type and On/Off
• Chorus Type and On/Off
• DSP Type and On/Off
• Harmony Type, On/Off, and Volume
• Style-related settings: Accompaniment On/Off, Section (Main A or B), and Accompaniment Split Point
When a disk style (number
101) is selected, the preset
One Touch Settings cannot
be used.
74
Selecting a Preset One Touch Setting
1 Select a style.
Select one of the styles, as described in steps 1 - 2 on page 47.
2 Press the appropriate ONE TOUCH SETTING
PRESET button.
Press the PRESET button (A, B) corresponding to the desired settings.
MEASURE
001
116
TEMPO
Briefly appears to
indicate that OTS
Preset A is active.
3 Play the accompaniment.
Since both Sync-Start and auto accompaniment are automatically set
to On when One Touch Setting is on, playing a key or chord in the
auto accompaniment section of the keyboard starts the accompaniment.
72
Page 75

SELECTING AND PLAYING SONGS —
THE SONG MODE
The Song mode features six songs — three demo songs that have been created
using the rich and dynamic sounds of the PortaTone, and three User songs to
which you can record your own performance.
The demo songs are generally for your listening enjoyment; however, you can also play along with
them on the keyboard.
The User songs are “empty” and cannot be played until something has been recorded to them. (For
instructions on recording your own songs, see page 79.)
Song Playback Display
When playing User songs using
accompaniment, these display
the notes and name of the
current chord.
Current measure
number
SONG
001
My heart
MEASURE TEMPO
008 052
1 62 3 4 5
Indicates the tracks currently playing back. (These can be alternately muted and
sounded during playback by pressing the corresponding SONG MEMORY buttons.)
My Heart Will Go On (Love Theme From ‘Titanic’)
from the Paramount and Twentieth Century Fox Motion Picture TITANIC
Music by James Horner
Lyrics by Will Jennings
Copyright © 1997 by Famous Music Corporation, Ensign Music Corporation, TCF
Music Publishing, Inc., Fox Film Music Corporation and Blue Sky Rider Songs
All Rights for Blue Sky Rider Songs Administered by Irving Music, Inc.
International Copyright Secured All Rights Reserved
SELECTING AND PLAYING A SONG
1 Select the Song mode.
Press the SONG button.
“Level meters” show performance
data recorded to each track.
Indicates Song mode
is selected
SONG
73
003
Rockin'
Song name and number
75
Page 76

SELECTING AN D PLAYING SONGS — TH E SONG MODE
2 Select the desired song number.
Use the numeric keypad.
Song numbers can be selected in the same way as
with the voices (see page 28). You can use the
numeric keypad to directly enter the song number,
use the +/- keys to step up and down through the
songs, or press the SONG button to advance
through the song numbers.
3 Start the selected song.
Press the START/STOP button. As the song plays back, the measure number and chords are shown in the display.
4 If you want to change to another song, repeat step
2 above.
5 Stop the song.
Press the START/STOP button. If playback was started by pressing the
START/STOP button, the selected song stops automatically.
CHANGING THE TEMPO
• You can play along with
the song using the currently
selected voice, or even select
a different voice for playing
along. Simply call up the
Voice mode while the song
is playing back and select
the desired voice.
• This function can also be
controlled by using a
connected footswitch. (See
page 100.)
The tempo of song (and style) playback can be adjusted over a range of 32
- 280 bpm (beats per minute).
1 Select the Tempo function in the Overall menu.
Press one of the OVERALL ▲/▼ buttons, repeatedly if necessary, until
“Tempo” appears in the display.
Indicates Tempo is
selected
TEMPO
76
SONG
Current Tempo value
205
Tempo
74
Page 77

SELECTING AN D PLAYING SONGS — TH E SONG MODE
2 Change the value.
Use the OVERALL +/- buttons to increase or decrease the Tempo value.
Holding down either button continuously increases or decreases the value.
Increases Tempo
value
Decreases Tempo
value
Restoring the Default Tempo Value
Each song and style has been given a default or standard tempo. If you’ve
changed the tempo, you can restore the original default setting by pressing
both OVERALL +/- buttons simultaneously (when Tempo is selected in the
Overall menu).
Also, the tempo of a song or style returns to the default setting when
selecting a different song or style. (The set tempo remains, however, when
switching styles during playback.) When you turn on the power of the
PortaTone, the tempo is automatically set to 116 bpm.
ABOUT THE BEAT DISPLAY
This section of the display provides a convenient, easy-to-understand
indication of the rhythm for song and style playback. The dark bars below
the name section in the display flash in time with the beat. The first dark
bar indicates the first beat of the measure, and the other bars flash in
sequence to indicate subsequent beats.
SONG
003
Rockin'
75
Fourth beat
Third beat
Second beat
First beat of measure
77
Page 78

SELECTING AN D PLAYING SONGS — TH E SONG MODE
ADJUSTING THE SONG VOLUME
The playback volume of the song can be adjusted. This volume control
affects only the song volume. The volume range is 000 - 127.
1 Select the Song Volume function in the Overall
menu.
Press one of the OVERALL ▲/▼ buttons, repeatedly if necessary, until
“SongVol” appears in the display.
Current Song Volume
value
100
SongVol
ACMP/SONG
VOLUME
Indicates Song
Volume is selected
SONG
MEASURE TEMPO
001 205
1 62 3 4 5
2 Change the value.
Use the OVERALL +/- buttons to increase or decrease the Song Volume
value. Holding down either button continuously increases or decreases the
value.
Increases Song
Volume value
Decreases Song
Volume value
Song Volume cannot be
changed unless the Song
mode is active. (This
function becomes Accompaniment Volume when the
Style mode is active.)
Restoring the Default Value
To restore the default Song Volume value (100), press both OVERALL +/buttons simultaneously (when Song Volume is selected in the Overall
menu).
78
76
Page 79

SONG RECORDING
The PortaTone features powerful and easy-to-use song recording features that
let you record your keyboard performances — using up to six separate tracks —
and create your own complete, fully orchestrated compositions. Up to three
User songs can be recorded and saved. There are two record modes: Realtime
and Step.
STYLE
RECORD
001 116
1
TEMPO
STYLE
MEASURE TEMPO
EZ
STYLE
RealTime
004
RECORD
001 116
OTS User
1
RECORD
TEMPO
001 116
STYLE
004
RECORD
MEASURE TEMPO
001 116
Realtime recording is similar to using a tape
recorder; whatever you play on the keyboard is
recorded in real time as you play it. Also, when
you record subsequent parts to other tracks, you
can hear the previously recorded parts as you
record new ones.
Step recording allows you to enter notes individually. As such, it is very similar to writing
down the notes on a sheet of music paper; each
note is entered one at a time.
Each method has its own advantages and uses.
Step recording is excellent for precision and for
entering notes whose placement, rhythmic
value, and velocity are fixed or consistent —
such as individual drum parts in a rhythm pattern, or single notes in a syncopated bass part.
It also gives you precise control in recording fast
or complex passages that would be difficult or
impossible to record in real time. Realtime
Each press of the RECORD button cycles
through the four Record modes — Realtime,
Step, OTS, and EZ Chord — before exiting
Step
back to normal operation. (The OTS and EZ
Chord modes are unrelated to Song recording; they are described on pages 72 and 68,
respectively.)
— Song Memory Capacity
• Maximum number of notes : approximately 10,000
(when only “melody” tracks are recorded)
• Maximum number of chords : approximately 5,500
(when only the chord track is recorded)
recording on the other hand, is best for capturing the natural “feel” of a performance, since it
allows you to record as you are playing and
simultaneously hear what you are recording.
Which method you use depends partly on the
type of music you wish to create and partly on
your own personal preference. You can even
use both methods in tandem. For example, you
could record a basic song guide to track 1 with
Realtime, then use Step to record your “precision” parts to other tracks (and perhaps even rerecord track 1, once all the other parts are in
place). Or you could program basic riffs and
patterns with Step first, then use Realtime to add
melodies and embellishments.
Keep in mind that all recording operations “replace” the data.
In other words, if you record to a track that already has
recorded data, all previous data in the track will be erased and
replaced by the newly recorded data.
77
79
Page 80

SONG RECORDING
RECORDING A USER SONG — REALTIME RECORDING
In brief, the basic operation for recording is:
1) Make all desired PortaTone settings.
2) Select the Realtime Record mode.
3) Select a User song for recording.
4) Select a track number.
5) Start recording.
6) Stop recording.
7) Listen to your new recording.
8) Record to other tracks as desired.
9) Exit from the Record mode.
When playing back song
data that uses a disk style
(number 101), you will
need to load that same style
data from the appropriate
disk. If a different style disk
is used, the style on that
disk will be used for the
song, and not the one you
originally selected.
Data that can be recorded to the normal (melody)
tracks:
• Note on/off
• Velocity
• Main voice settings (Voice Number*, Volume*,
Octave, Pan*, Reverb Send Level, Chorus Send
Level, DSP Send Level)
• Dual voice settings (Dual on/off, Voice Number*,
Volume*, Octave, Pan*, Reverb Send Level, Chorus
Send Level, DSP Send Level)
• Reverb on/off, Reverb Type*
• Chorus on/off, Chorus Type*
• DSP on/off, DSP Type*
• Harmony on/off, Harmony Type
• Sustain on/off
• Tempo*, Time Signature* (if there is no such data
in the Chord track)
Data that can be recorded to the Chord track:
• Style number*
• Chord changes and timing
• Changing sections (Intro, Main A/B, etc.)
• Accompaniment Volume*
• Tempo, Time Signature*
* These settings can only be recorded once at the beginning
of a song; other settings can be changed in the middle of a
song.
1 Make all desired PortaTone settings.
Before you actually start recording, you’ll need to make various settings for
the song — such as selecting a style, setting the Tempo, and selecting a
voice. (See pages 47, 76, and 27.)
Selecting a style lets you use the sophisticated auto accompaniment features as part of your song. In this way, you can simply play the chords, and
the PortaTone automatically creates the appropriate bass and chord backing. (For more information on auto accompaniment, see page 52.)
If desired, also make other settings. Refer to the list above for settings that
can be recorded to a song.
80
78
Page 81

Using the Metronome
You can use the Metronome instead of a style if desired. This allows you to keep
your performance “in time,” even when recording without rhythmic accompaniment. To do this, press the METRONOME button before recording in step #5 below.
After the song is completely recorded, simply play back the song with the Metronome turned off.
SONG RECORDING
2 Select the Realtime Record mode.
Press the RECORD button, repeatedly if necessary, until “RealTime” appears
at the top of the display.
RECORD indication flashes briefly,
then stays lit to indicate record
standby.
STYLE
MEASURE TEMPO
004
RECORD
001 116
RealTime
3 Select a User song for recording.
Use the numeric keypad to select the desired song:
User 1 (004), User 2 (005), or User 3 (006).
User song numbers can be selected in the same way
as with the voices (see page 28). You can use the
numeric keypad to directly enter the song number,
use the +/- keys to step up and down through the
songs, or press the SONG button to advance
through the song numbers.
Realtime and Step recording
methods can be mixed in
the same song, but not the
same track.
4 Select a track number.
Press the SONG MEMORY button corresponding to the desired track. (This
step is optional; the PortaTone automatically selects the first available track.
When there is no song data, track 1 is automatically selected.)
79
81
Page 82

SONG RECORDING
RECORD
00
SONG
Recording to the Chord Track
A special Chord track is provided for recording accompaniment data.
This is automatically recorded to the Chord track (track 6). To select
the Chord track and turn on the accompaniment, press the ACCOMPANIMENT ON/OFF button.
ACMP ON
MEASURE TEMPO
001 116
1
CHORD
You can also simultaneously record one of the melody tracks (1 - 5)
and the Chord track (6).
5 Start recording.
When the “RECORD“ indication stops flashing and the beat bars and track
number start flashing, you can start recording simply by playing the keyboard (or by pressing the START/STOP button).
If accompaniment has
already been turned on
before entering the Record
mode, the Chord track is
automatically selected.
This function can also be
controlled by using a
connected footswitch. (See
page 100.)
RECORD
ACMP ON
MEASURE TEMPO
001 116
1
CHORD
Indicates Record
standby.
Flashing beat bars
indicate Sync-Start is on.
If you want to rehearse your part before recording, press the SYNC-START
button to turn Sync-Start off. After rehearsing, press SYNC-START again to
return to the above condition.
When recording the Chord track
With Sync-Start on, play the first chord of the song in the auto accompaniment section of the keyboard. The accompaniment starts
automatically and you can continue recording, playing other chords
in time with the accompaniment.
If you wish to cancel recording at this point, press the RECORD button
again.
6 Stop recording.
After you’ve finished playing the part, press the START/STOP button.
82
80
Page 83

7 Listen to your new recording.
To play back the song from the beginning, simply press the START/STOP
button again. Playback stops automatically at the end of the song, or
when the START/STOP button is pressed again.
8 Record to other tracks as desired.
To do this, simply repeat steps #4 - #7 above. Make sure that when you
press the SONG MEMORY button corresponding to the desired track, the
track number in the display flashes.
9 Exit from the Record mode.
Press the RECORD button.
SONG RECORDING
■ Additional Operations
Muting Tracks During Playback
While recording is enabled, you can selectively mute different tracks. This is useful for when you want to clearly
hear certain tracks, and not others, during recording. Muting can also be done “on the fly” during playback. To
use muting, press the corresponding SONG MEMORY button, repeatedly if necessary, until the desired track
number in the display is off.
Each press of a SONG MEMORY button (when playback is stopped) cycles through the following settings:
MEASURE TEMPO
001 116
1 CHORD
Track number off — Track is muted.
Track number on — Track will play back.
Re-recording a Track
If you’ve made a mistake and wish to record a track over again:
Press the corresponding SONG MEMORY button, repeatedly if necessary, until the desired track number in
the display flashes (indicating record standby for that track). Since doing this turns Sync-Start off, press the
SYNC-START button to turn Sync-Start on again, then start recording (as explained in step #5 above).
Alternately, simply press the START/STOP button to start recording.
Clearing a Single Track
If you wish to erase a single track without clearing the entire song (in the Song Clear operation, page 90):
1) Press the RECORD button.
2) Select the desired track (with the corresponding SONG MEMORY button).
3) Press the START/STOP button once to start recording, and once again to stop (without playing any keys).
This erases previous data, and creates a blank track.
Track number flashes — Track will record.*
* Cannot be selected during playback.
81
83
Page 84

SONG RECORDING
RECORDING A USER SONG — STEP RECORDING
The basic steps for Step recording are similar to those for Realtime recording. In brief, the basic
operation is:
1) Make all desired PortaTone settings.
2) Select the Step Record mode.
3) Select a User song for recording.
4) Select a track number.
5) Start recording. Enter notes and rests individually, playing back
the song occasionally to hear the results.
6) Listen to your new recording.
7) Record to other tracks as desired.
8) Exit from the Record mode.
When playing back song
data that uses a disk style
(number 101), you will
need to load that same style
data from the appropriate
disk. If a different style disk
is used, the style on that
disk will be used for the
song, and not the one you
originally selected.
Data that can be recorded to the normal (melody)
tracks:
• Note on/off
• Velocity**
• Main voice settings (Voice Number*, Volume*,
Octave, Pan*, Reverb Send Level*, Chorus Send
Level*, DSP Send Level*)
• Dual voice settings (Dual on/off, Voice Number*,
Volume*, Octave, Pan*, Reverb Send Level*, Chorus
Send Level*, DSP Send Level*)
• Reverb on/off, Reverb Type*
• Chorus on/off, Chorus Type*
• DSP on/off, DSP Type*
• Tempo*, Time Signature* (if there is no such data
in the Chord track)
Data that can be recorded to the Chord track:
• Style number*
• Chord changes and timing
• Changing sections (Intro, Main A/B, etc.)
• Accompaniment Volume*
• Tempo*, Time Signature*
* These settings can only be recorded once at the beginning
of a song; other settings can be changed in the middle of a
song.
** All notes are entered at the same velocity; however, this
can be changed in various ways with the Velocity Curve
function (page 89).
1 Make all desired PortaTone settings.
This operation is the same as that of Realtime recording (page 80).
2 Select the Step Record mode.
Press the RECORD button, repeatedly if necessary, until “Step” appears at
the top of the display.
STYLE
004
RECORD
Step
RECORD indication
flashes briefly, then
stays lit to indicate
record standby.
Realtime and Step recording
methods can be mixed in
the same song, but not the
same track.
MEASURE
001
116
TEMPO
84
82
Page 85

3 Select a User song for recording.
RECORD
This operation is the same as that of Realtime recording (page 81).
4 Select a track number.
Press the SONG MEMORY button corresponding to the desired track.
Recording to the Chord Track
A special Chord track is provided for recording accompaniment data.
This is automatically recorded to the Chord track (track 6). To select
the Chord track and turn on the accompaniment, press the ACCOMPANIMENT ON/OFF button.
ACMP ON
SONG RECORDING
Unlike Realtime Recording,
Step Recording only allows
you to record one track at a
time; the Chord track
cannot be recorded
simultaneously with another
track.
MEASURE TEMPO
001 116
1
CHORD
5 Start recording.
When the RECORD indication stops flashing and the track number starts
flashing, you can start recording. Record each note (or chord) and rest
individually, as described below:
Recording Notes
1) Select the desired position in the song (measure/beat) with
the +/- buttons. (Each press of the button moves one beat
forward or backward.)
2) Play the desired key or keys. (The note name is shown at the
top of display.)
When recording chords to the Chord track, make sure the
accompaniment is on, then play the desired chord in the
accompaniment section of the keyboard.
More than one note can be
recorded at a time;
however, only the last
pressed note appears in the
display.
83
85
Page 86

SONG RECORDING
3) Select the note (time) value with the numeric keypad. (The
note value is shown as an icon in the display.)
For example, play middle C (C3), then press the “4” button (1/8
note).
Note name
To record a tie (extended
note value), select the
desired note value to be tied
on the numeric keypad,
immediately after you’ve
specified the first note in
step 3 above.
SONG
MEASURE
1
Measure number Clicks
004
RECORD
001 201
-
Beat number
C3
Note value
Beat bars
q(96 Clicks) q(96 Clicks) q(96 Clicks) q(96 Clicks)
Beat Beat Beat Beat
Measure (384 Clicks)
The beat bars also indicate the current recording position (as the beat
of the measure).
The note is automatically entered and Step recording moves to the
next available position. For example, if a whole note is entered at the
beginning of measure 1, the next position is the beginning of measure 2.
As mentioned above, you can use the +/- keys to move backward and
forward in the track. When material has been recorded, this steps
through and sounds each note in succession.
86
84
Page 87

■ Additional Operations
RECORD
Recording Chords and Sections to the Chord Track:
1) Play a chord in the accompaniment section of the keyboard. (“Chord“
and the chord name appears in the display.)
SONG RECORDING
• The Intro section can
only be recorded at the
beginning of a song.
ACMP ON
M
7
Chords can be entered manually (with the Dictionary function), or played
with Multi Fingering. (See page 62, 56.)
2) Select a section by pressing the corresponding button.
When selecting an Intro or Ending section, the length is fixed, and need
not be entered in step 3 below.
3) Select the note (time) value with the numeric keypad.
Recording Triplets and Dotted Notes:
1) At the desired position, press the corresponding numeric keypad
button (“7” for dotted or “9” for triplets).
2) Press the numeric keypad button for the desired note value.
+
+
Dotted note
Triplet
• When an Ending
section is selected, no
further notes can be
recorded.
Triplets are three notes
within a single beat —
in other words, one beat
is divided up into three
equal units. Each note
(or rest) of a triplet must
be entered separately.
Two eighth notes (within a
quarter-note beat).
Three eighth-note triplets
(within a quarter-note beat).
Dotted notes extend the
length of a note by half
— in other words, the
length of a dotted
eighth note is an eighth
note plus a sixteenth
note.
Recording Rests:
1) Select the desired position in the song with the +/- buttons.
2) Press the “8” (rest) button in the numeric keypad.
3) If you want to record a dotted rest or triplet rest, press the appropriate
numeric keypad button (“7” for dotted or “9” for triplets).
4) Press the numeric keypad button (1 - 6) corresponding to the desired
rest value. (The specified rest value appears as an icon in the display.)
+
5) After recording the desired rest value(s), record the next note.
85
MEASURE
1
001 201
-
Rest value icon (eighth-note rest)
=+
If you want to enter two
or more consecutive
beats of rest, you can
simply use the + button
to move forward in the
track (for as many beats
rest as desired). This
saves you the trouble of
repeatedly entering rests
when there are several
beats or measures of
silence between notes.
87
Page 88

SONG RECORDING
6 Listen to your new recording.
You can listen to the entire step recorded track at any time by pressing the
START/STOP button. The track you are working on plays back (until
stopped), and returns to Step recording at the next position.
Keep in mind that this only plays the selected track. To hear all tracks of
the song, exit from Step Rec (press the RECORD button), then press the
START/STOP button to start song playback.
7 Record to other tracks as desired.
To do this, simply repeat steps #4 - #6 above. Make sure that when you
press the SONG MEMORY button corresponding to the desired track, the
track number in the display flashes.
8 Exit from the Record mode.
Press the RECORD button.
Replacing a Note or Rest
If you want to change a note or rest you’ve just recorded, you can easily
replace it with a new one. To do this:
1) Select the desired position in the song with the +/- buttons.
2) Press the new note on the keyboard (or the appropriate rest value
button on the numeric keypad).
3) Enter the new note value on the numeric keypad. (Enter dotted
note or triplet first, if desired.)
4) At the “Delete?” prompt press the + button. To cancel, press the button.
CAUTION
This operation deletes
all previously recorded
notes that follow the
note to be replaced.
Make sure you wish to
delete any subsequent
notes before actually
replacing the selected
note or rest.
88
86
Page 89

SONG RECORDING
Entering Velocity Curves
In Step recording, all notes are recorded at the same velocity or volume. To make a Step-recorded
track sound more natural or to create some dynamic changes in the track, use the Velocity Curve
function.
1) Select the first note to be affected by the Velocity Curve (by using the +/- buttons of the
numeric keypad). All subsequent notes will be velocity-transformed.
2) Simultaneously hold down the VELOCITY button (“0” in the numeric keypad) and press + or to select the desired Velocity Curve.
MEASURE
001 201
-
1
Selected Velocity Curve appears as
icon in the display.
3) At the “Change?” prompt,
press the + button (“YES”) to
actually enter the selected Velocity Curve, or press the - button
to cancel the operation.
Velocity Curve Chart
Display Type/Description
Mezzoforte
This sets all subsequent notes to a velocity
value of 80.
Forte
This sets all subsequent notes to a velocity
value of 100.
Fortissimo
This sets all subsequent notes to a velocity
value of 120.
Mezzopiano
This sets all subsequent notes to a velocity
value of 60.
Piano
This sets all subsequent notes to a velocity
value of 40.
Pianissimo
This sets all subsequent notes to a velocity
value of 20.
Crescendo 1
This creates a two-measure crescendo, starting
with the current velocity at the selected note
and ending with a velocity increase of 40.
Crescendo 2
This creates a two-measure crescendo, starting
with the current velocity at the selected note
and ending with a velocity increase of 20.
Crescendo 3
This creates a two-measure crescendo, starting
with the current velocity at the selected note
and ending with a velocity increase of 10.
You can specify a Velocity Curve in the middle of a
track BEFORE recording the notes that the curve will
affect. To do this, select the last note of the track
(by using the +/- buttons), then enter the desired
Velocity Curve. In this case, the Velocity Curve is
NOT applied to that last note, but affects all
subsequently entered notes.
Display Type/Description
Diminuendo 1
This creates a two-measure diminuendo,
starting with the current velocity at the selected
note and ending with a velocity decrease of 40.
Diminuendo 2
This creates a two-measure diminuendo,
starting with the current velocity at the selected
note and ending with a velocity decrease of 20.
Diminuendo 3
This creates a two-measure diminuendo,
starting with the current velocity at the selected
note and ending with a velocity decrease of 10.
Accent 1
This increases the velocity of notes at the top
(1st beat) of all measures by 30. (Display icon
represents two measures.)
Accent 2
This increases the velocity of notes at the top
and halfway points of all measures by 30.
(Display icon represents two measures.)
Triangle wave
This alternately and gradually increases and
decreases the velocity by 30 in the pattern of a
triangle wave. The wave repeats every two
measures throughout the track. (Display icon
represents two measures.)
Square wave
This alternately and abruptly increases and
decreases the velocity by 30 in the pattern of a
square wave. The wave repeats every two
measures throughout the track. (Display icon
represents two measures.)
89
87
Page 90

SONG RECORDING
CLEARING A SONG
The Song Clear operation (of the Function parameters) completely erases
all recorded data on all tracks of a selected User song. Use this operation
only when you’re sure you want to erase a song and record a new one.
1 Select the Function mode.
Press the FUNCTION button.
STYLE
FUNCTION
Flashes to indicate Function
parameter can be selected.
F61
USng1Clr
2 Select the Function parameter (61 - 63) correspond-
ing to the song you wish to clear.
While the “FUNCTION” indication is flashing, use the numeric keypad to
select the desired Function parameter number:
• 61 — Clear song #1 (“F61 USng1Clr”)
• 62 — Clear song #2 (“F62 USng2Clr”)
• 63 — Clear song #3 (“F63 USng3Clr”)
3 Start the Song Clear operation.
After the “FUNCTION” indication stops flashing and the “Clr?” prompt
appears, press the + button to start the Song Clear operation.
STYLE
FUNCTION
YES
#1 Clr?
These parameter numbers
can be selected in the same
way as with the voices (see
page 28). You can use the
numeric keypad to directly
enter the number, use the
+/- keys to step up and
down through the parameters, or press the FUNCTION button to advance
through the parameter
numbers.
Since the “FUNCTION”
indication flashes for only a
couple of seconds, make
sure to select the parameter
quickly after step 1 above.
4 At the “Sure?” prompt, clear the selected song.
Press + to actually clear the corresponding song, or press - to cancel the
operation and return to step 3.
STYLE
FUNCTION
To exit from the Song Clear operation, press one of the other mode buttons: SONG, STYLE, or VOICE.
90
YES
Sure?
88
Page 91

DISK OPERATIONS
The PortaTone features a convenient floppy disk drive — built right into the
instrument. Not only does the disk drive let you record and play back your own
original User Songs, it allows you to save and load important PortaTone data,
including User One Touch Setting data and User EZ Chord.
Moreover, since the PortaTone is compatible with a wide
variety of disk formats, you can play back song data on commercially available GM (General MIDI), DOC (Disk Orchestra
Collection), and Clavinova Disklavier Piano Soft disks.
The PortaTone can also be used with commercially available
Style File data, allowing you to load additional styles (auto accompaniment patterns) to the instrument. Style File data is loaded individually as style number 101, and can
be played just like the preset styles. Once loaded, the Style File data can then be saved in combination with User songs, One Touch Settings, and EZ Chord. This means you can record a User song
using the desired Style File data, then save the song and Style File data together for future recall.
Included with your PSR-340 is a special sample disk containing 99 sample songs for playback.
● Data that Can be Saved or Loaded with the PSR-340
While any of the disk-
Data Type Extension Save Load
User Songs, One Touch Settings,
EZ Chord and Disk Style .340 OO
(style number 101)
Style File .STY — O
● Using Commercially Available Music Data (sold separately)
The PSR-340 is compatible with music disks (floppy disks) that bear the
following marks:
You can playback song files collected on these disks using the voices defined in
the GM standard. (See page 93)
“GM System Level 1” is an addition to the MIDI standard which ensures that
any GM-compatible music data can be accurately played by any GM-compatible
tone generator, regardless of manufacturer. The GM mark is affixed to all
software and hardware products that support GM System Level 1. The PSR-340
supports GM System Level 1.
You can playback song files collected on these disks using the voices defined in
Yamaha’s DOC format. (See page 93)
The DOC voice allocation format provides data playback compatibility with a
wide range of Yamaha instruments and MIDI devices, including the Clavinova
series.
You can load and play with the style files collected on these disks. (See page 96)
The Style File Format — SFF — is Yamaha’s original style file format which uses a
unique conversion system to provide high-quality automatic accompaniment
based on a wide range of chord types. The PSR-340 uses the SFF data internally,
reading from optional SFF style disks.
related displays are shown
(called up by pressing the
LOAD, SAVE, or UTILITY
buttons), no panel operations can be executed
(except for disk operations),
and playing the keyboard
does not produce any
sound.
• User Songs, One Touch
Settings, EZ Chord data,
and Disk Style data (style
number 101) are saved and
loaded as a single file on the
PSR-340.
• To ensure proper data
storage, use only disks that
have been formatted on the
PSR-340 (page 98).
• The three letters following
the file name (after the
period) are referred to as a
file “extension.” The
extension indicates the type
of file.
91
89
Page 92

DISK OPERATIONS
Using the Floppy Disk Drive (FDD) and Floppy Disk
Be sure to handle floppy disks and treat the disk drive
with care. Follow the important precautions below.
■ Compatible Disk Type
3.5" 2DD and 2HD type floppy disks can be used.
■ Inserting/Ejecting Floppy Disks
● To insert a floppy disk into the disk drive:
• Hold the disk so that the label of the disk is facing
upward and the sliding shutter is facing forward,
towards the disk slot.
Carefully insert the disk
into the slot, slowly
pushing it all the way in
until it clicks into place
and the eject button
pops out.
When the PSR-340 is
turned on, the LED below the floppy disk slot will be lit
indicating that the Disk Drive is ready to use.
● To eject a floppy disk:
• Before ejecting the disk, be sure to confirm that
the FDD is stopped (check if the DISK IN USE lamp
is off). Press the eject button slowly as far as it will
go; the disk will automatically pop out. When the
disk is fully ejected, carefully remove it by hand.
This lamp lights during disk read/write operations, such as when a disk has been inserted,
during recording, playback, formatting, etc.
This lamp is
always on when the
power is on, regardless
of Disk operation.
• If the eject button is pressed too quickly, or if it is
not pressed in as far as it will go, the disk may not
eject properly. The eject button may become stuck
in a half-pressed position with the disk extending
from the drive slot by only a few millimeters. If this
happens, do not attempt to pull out the partially
ejected disk, since using force in this situation can
damage the disk drive mechanism or the floppy
disk. To remove a partially ejected disk, try pressing
the eject button once again, or push the disk back
into the slot and then repeat the eject procedure.
● Be sure to remove the floppy disk from the disk drive
before turning off the power. A floppy disk left in the
drive for extended periods can easily pick up dust and
dirt that can cause data read and write errors.
■ Cleaning the Disk Drive Read/Write
Head
● Clean the read/write head regularly. This instrument
employs a precision magnetic read/write head which,
after an extended period of use, will pick up a layer of
magnetic particles from the disks used that will eventually cause read and write errors.
● To maintain the disk drive in optimum working order
Yamaha recommends that you use a commerciallyavailable dry-type head cleaning disk to clean the head
about once a month. Ask your Yamaha dealer about the
availability of proper head-cleaning disks.
● Never insert anything but floppy disks into the disk
drive. Other objects may cause damage to the disk
drive or floppy disks.
■ About the Floppy Disks
● To handle floppy disks with care:
• Do not place heavy objects on a disk or bend or
apply pressure to the disk in any way. Always keep
floppy disks in their protective cases when they are
not in use.
• Do not expose the disk to direct sunlight, extremely high or low temperatures, or excessive
humidity, dust or liquids.
• Do not open the sliding shutter and touch the
exposed surface of the floppy disk inside.
• Do not expose the disk to magnetic fields, such as
those produced by televisions, speakers, motors,
etc., since magnetic fields can partially or completely erase data on the disk, rendering it unreadable.
• Never use a floppy disk with a deformed shutter or
housing.
• Do not attach anything other than the provided
labels to a floppy disk. Also make sure that labels are
attached in the proper location.
● To protect your data (write-protect tab):
• To prevent accidental erasure of important data,
slide the disk’s write-protect tab to the “protect”
position (tab open).
● Never attempt to remove the disk or turn the power
off during recording, reading and playing back (when
the DISK IN USE lamp is lit). Doing so can damage the
disk and possibly the disk drive.
92
Write protect tab
ON (locked or
write protected)
Write protect tab
OFF (unlocked or
write enabled)
90
Page 93

DISK SONG PLAYBACK
This function allows you to play back song data on commercially available
GM (General MIDI), Yamaha DOC (Disk Orchestra Collection), or
Clavinova Disklavier Piano Soft disks.
1 Insert the disk into the disk drive.
Once the disk is inserted, the PSR-340 will automatically switch to the Song
mode.
Indicates Song mode
is selected
Song name and number
DISK OPERATIONS
SONG
101
D-Song01
2 Select the desired song number.
Use the numeric keypad.
3 Start the selected song.
Press the START/STOP button.
Playing All Songs
In addition to playing a selected single song, you can have all songs
on the disk play back in order. To do this, press the + button until the
last selection “ALL” is selected, then press the START/STOP button to
play back all songs in order.
The tempo setting of some
commercially available disk
songs is fixed. These songs
are called “free-tempo
software.” When playing
back free-tempo song data
on the PSR-340, the Tempo
display shows “---” and the
beat display does not flash.
Also, the measure number
in the display does not
match the actual measure
number of playback, and
only gives you an indication
of how much of the song
has played back.
The song files on the
included sample disk are
also free-tempo software.
SONG
ALL
D-Song01
4 If you want to change to another song, repeat step
2 above.
5 Stop the song.
Press the START/STOP button.
For details, see “Selecting and Playing a Song,” page 75.
91
93
Page 94

DISK OPERATIONS
SAVE
You can save User songs (page 79), User One Touch Settings (page 72),
User EZ Chord data (page 66) and Disk Style data (page 91) to floppy
disks.
1 Insert a formatted floppy disk.
2 Press the SAVE button.
Press the SAVE button again to exit from the SAVE screen.
---
UF_00nnn
• If the SAVE button is
pressed when there is no
floppy disk inserted into the
disk drive, a “No Disk”
message appears at the top
of the display, and all disk
operations will be disabled.
Select the file to save, if necessary.
Use the +/- buttons.
USr
To overwrite the data already saved to an existing file, use the +/- buttons
to select the file you want to overwrite.
Filename
3 If necessary change the file name.
The PSR-340 automatically creates a file name ( for example “UF_00nnn” )
for the file you are about to save. If you want to enter a more descriptive
name for easier file identification (and this is recommended), this can be
done directly from the keyboard.
• When the floppy disk’s
write-protect tab is set to
ON ( page 92) or the disk is
a purposely “copy-protected” disk, a “Protect”
message appears, indicating
that the Save function is not
possible.
Even if you chose a file
where data is already saved
because you want to
overwrite the data,
renaming the file will cause
the new data to be saved in
a different file, and the old
data won’t be overwritten.
A file name can consist of up to 8 characters. Each key on the keyboard
enters a different character, printed directly above the key (you cannot
write over the file extension following the period at the end of the file
name). The A#5 and B5 keys move the cursor backward and forward within
the file name. Use these keys to place the cursor where you want to enter
or change a character. The DELETE key (C6) deletes the character at the
cursor position.
94
92
Page 95

DISK OPERATIONS
4 Press the EXECUTE button.
YES
Filename
5 Execute the Save operation.
Press the + button (“YES”), and the Save operation will start. Once started,
the operation cannot be canceled.
As the file is saving, “Saving” will appear on the top line of the display.
USr
When the operation is completed, the following display briefly appears.
Saving
End
If you do not intend to save the file, press the - button (“NO”) instead of
the + button (“YES”).
If you have selected a file to
which data has already
been saved, “yES Rewrite?”
will appear on the top line
of the display.
• If there isn’t enough space
on the disk, a “DiskFull”
message appears, and you
will not be able to save any
data. You can delete
unneeded files on the disk
(page 97), or replace the
disk with a new one and
repeat the save operation.
• If a write error occurs
during a save operation, an
“Error” message appears. If
the error reoccurs after
repeating the save operation, there could be
something wrong with the
disk. Insert a different disk
in the drive and retry the
save operation.
CAUTION
While the file is being saved
(the DISK IN USE lamp is
lit), never eject the floppy
disk or turn the power off.
93
95
Page 96

DISK OPERATIONS
LOAD
Once you’ve saved your User data onto a floppy disk, you can reload that
data back to the PortaTone. You can also load style data from commercially available Yamaha Style File disks.
1 Insert the floppy disk into the disk drive.
2 Press the LOAD button.
Press the LOAD button again to exit from the LOAD screen.
USr
Filename
3 Select the file to load.
Use the +/- buttons.
USr
Filename
4 Press the EXECUTE button.
YES
Filename
5 Execute the Load operation.
Press the + button (“YES”), and the Load operation will start. Once started,
the operation cannot be canceled.
As the file is loading, “Loading” will appear on the top line of the display.
USr
Loading
If the LOAD button is
pressed when there is no
floppy disk inserted into the
disk drive, a “No Disk”
message appears at the top
of the display, and all disk
operations will be disabled.
If the disk contains no file,
the display shows “No File”
indicating that the Load
function is not possible.
User files are indicated by
“USr” in the display; disk
styles are indicated by
“Sty.” (For more on disk
styles, see page 11.)
When data is loaded from a
floppy disk to the PSR-340,
the data already in the
memory of the PSR-340 will
be replaced by the data on
the disk. Save important
data into a disk file before
doing the operation.
When the operation is completed, the following display briefly appears.
If you do not intend to load the file, press the - button (“NO”) instead of
the + button (“YES”).
96
CAUTION
While the file is loading (the
DISK IN USE lamp is lit),
never eject the floppy disk or
turn the power off.
End
94
Page 97

UTILITY — DELETE
This function allows you to delete individual files of User data you’ve saved
to floppy disk.
1 Insert the floppy disk into the disk drive.
2 Press the UTILITY button.
The filename will appear at the top of the display.
To exit from the UTILITY screen, press the UTILITY button twice.
USr
Filename
3 Select the file to be deleted.
Use the +/- buttons.
USr
Filename
4 Press the EXECUTE button.
YES
Filename
DISK OPERATIONS
• If the UTILITY button is
pressed when there is no
floppy disk inserted into the
disk drive, a “No Disk”
message appears at the top
of the display, and all disk
operations will be disabled.
• When the floppy disk’s
write-protect tab is set to
ON (see page 92) or the
disk is a purposely “copyprotected” disk, a “Protect”
message appears, indicating
that the Utility function is
not possible.
Only files that were created
on the PSR-340 and were
saved as files (User song,
etc.) can be deleted. When
there are no files on disk
that the PSR-340 can
delete, the FORMAT display
appears instead of DELETE,
when the UTILITY button is
pressed.
5 Execute the Delete operation.
Press the + button (“YES”), and the Delete operation will start. Once
started, the operation cannot be canceled.
As the file is deleting, “Deleting” will appear on the top line of the display.
When the operation is completed, the following display briefly appears.
If you do not intend to delete the file, press the - button (“NO”) instead of
the + button (“YES”).
95
USr
Deleting
End
CAUTION
While the file is being
deleted (the DISK IN USE
lamp is lit), never eject the
floppy disk or turn the
power off.
97
Page 98

DISK OPERATIONS
UTILITY — FORMATTING AN UNFORMATTED DISK
1 Insert the unformatted floppy disk into the disk
drive.
A “Format?” message will appear at the top of the display.
Press the UTILITY button to exit from the FORMAT screen.
CUE
Format?
2 Press the EXECUTE button.
YES
Sure?
3 Execute the Format operation.
Press the + button (“YES”), and the Format operation will start. Once
started, the operation cannot be canceled.
During formatting, “Formting” will appear at the top of the display.
• If you insert an
unformatted disk with the
write protect tab in the ON
position into the drive, a
“Protect” message appears.
Eject the disk, move the
protect tab to the OFF
position, and reinsert it in
the drive.
• If a disk that cannot be
read by the PSR-340 is
inserted into the disk drive,
it will be treated the same
as an unformatted floppy
disk. Take care not to erase
important data by accidentally formatting a disk.
When the operation is completed, the following display briefly appears.
If you do not intend to format the disk, press the - button (“NO”) instead
of the + button (“YES”).
98
072
Formting
End
96
Page 99

UTILITY — FORMATTING A PREVIOUSLY FORMATTED DISK
This function is useful for quickly deleting unnecessary files from an already
formatted disk. Be careful when using this operation, since it automatically
deletes all data on the disk.
1 Insert the floppy disk into the disk drive.
DISK OPERATIONS
2 Press the UTILITY button.
This calls up the Delete operation (page 97).
The filename will appear at the top of the display.
When there are no files on disk that the PSR-340 can delete, the FORMAT
display appears instead of DELETE, when the UTILITY button is pressed. In
this situation, step #2 is unnecessary.
Filename
USr
3 Press the UTILITY button again.
This calls up the Format operation.
“Format?” will appear at the top of the display.
Format?
CUE
4 Press the EXECUTE button.
Sure?
YES
If the UTILITY button is
pressed when there is no
floppy disk inserted into the
disk drive, a “No Disk”
message appears at the top
of the display, and all disk
operations will be disabled.
When the floppy disk’s
write-protect tab is set to
ON (see page 92) or the
disk is a purposely “copyprotected” disk, a “Protect”
message appears, indicating
that the Utility function is
not possible.
5 Execute the Format operation.
Press the + button (“YES”), and the Format operation will start. Once
started, the operation cannot be canceled.
During formatting, “Formting” will appear at the top of the display.
When the operation is completed, the following display briefly appears.
If you do not intend to format the disk, press the - button (“NO”) instead
of the + button (“YES”). To exit from the operation, press the UTILITY
button.
97
Formting
072
End
CAUTION
• While formatting is in
progress (the DISK IN USE
lamp is lit) , never eject the
disk or turn the power off.
• If data is already saved on
the disk, be careful not to
format it. If you format the
disk, all the previously
recorded data will be
deleted.
99
Page 100

FOOTSWITCH
The PortaTone has a footswitch feature that can be used to control a variety of
functions and operations. By using your foot to conveniently control these functions, you free your hands to concentrate on your performance.
Normally, this is used as a damper pedal, producing pedal-controlled sustain for piano and other
instrument sounds that have a natural decay. It can also be assigned to any of these eleven other
functions:
• EZ Chord increment
• START/STOP
• INTRO/ENDING
• MAIN A
• MAIN B
• Harmony On/Off
• Dual On/Off
• Split On/Off
• Reverb On/Off
• Chorus On/Off
• DSP On/Off
1 Call up the Function mode.
Press the FUNCTION button.
2 Select the Footswitch Assign parameter.
While the “FUNCTION” indication is flashing, use the numeric keypad to
select Footswitch Assign (#71).
Function parameter numbers can be selected in the same way as with the
voices (see page 28) — with the numeric keypad, +/- keys, or the FUNCTION button.
Since the “FUNCTION”
indication flashes for only a
couple of seconds, make
sure to select the parameter
quickly after step 1 above.
STYLE
FUNCTION
F71
FootSw
3 Select the desired footswitch function.
After the “FUNCTION” indication stops flashing, use the numeric keypad to
change the setting. (See the “Footswitch Assign Functions” list below for
details.)
STYLE
FUNCTION
100
Sustain
01
Restoring the Default
Value
If you’ve changed the
parameter setting, you can
instantly restore the
default setting (Sustain) by
pressing both +/- buttons
simultaneously.
98
 Loading...