

Yamaha YT-220 User Manual
Ukulele/Guitalele AUTO TUNER
YT-220
YT-220
取扱説明書
このたびはヤマハ・ウクレレ / ギタレレ オートチューナーYT-220をお買い求め
いただき、まことに ありがとうござい ます 。
お使いになる前に、この取扱説明書をよくお読みになり、正しくご 使 用くださ い 。
また、お読みになった後は、保証書と共に大切に保管してください。
安全へのこころがけ
火災・感電・人身傷害の危険を防止するには
〜以下の指示を必ず守ってください〜
絵表示に
ついて
この「安全へのこころがけ」は製品を安全に正しくお使いいただき、お客
様や他の人々への危害や財産への損害を未然に防止するために、いろ
いろな絵表示を使って説明しています。
絵表示の意味をよく理解してから、本文をお読みください。
注意(危険・警告を含む)を促す内容があることを告げるものです。
禁止の行為を告げるものです。
この表示を無視して誤った取
警告
この機器を使用する前に、以下の指示と取扱説
明書をよく読んでください。
この機器を分解したり、改造したりしないでく
ださい。火災、感電の原因となります。
修理/部品の交換などで、取扱説明書に書かれ
ている以外のことは、絶対にしないでください。
必ずサービスセンターに相談してください。
次のような場所での使用や保存はしないでくだ
さい。火災、感電の原因となります。
・ 温度が極端に高い場所(直射日光の当たる場
所、暖房機器の近く、発熱する機器の上など)
・ 水気の近く(風呂場、洗面台、濡れた床など)
や湿度の高い場所
・ ホコリの多い場所
・ 振動の多い場所
※ 特に自動車内は直射日光などにより非常に
高温となります。この機器を車内に放置しな
いでください。
この機器に、異物(燃えやすいもの、硬貨、針金な
ど)や液体(水やジュースなど)を絶対に入れな
いでください。火災、感電の原因となります。
ぐらついた台の上や傾いた所など、不安定な場
所に置かないでください。また、過度に積み重ね
ての使用はしないでください。落ちたり倒れた
りして、けがの原因となります。
扱いをすると、人が死亡又は
重傷を負う危険の恐れがある
内容を示しています。
例: → 分解禁止
注意
この表示を無視して誤った取扱い
をすると、人が障害を負ったり、財産
が損害を受ける危険の恐れがある
内容を示しています。
この機器は、正常な通気が妨
げられることのない所に設
定して、使用してください。
使用後の電池は火中に捨
てないでください。発熱、
破裂、発火の原因となりま
す。一般のゴミとは分け
て、決められた場所に捨て
ましょう。
電池は表示された極性
(+、−)を間違えないよう
にしてください。間違えま
すと電池の破裂や液もれ
によって、けがや周囲を汚
損する原因となることが
あります。
本体を、故意に投げたり落
としたりしないでくださ
い。本体の故障だけでなく、
思わぬけがの原因となるこ
とがあります。
電池は幼児の手の届かない
場所に保管してください。
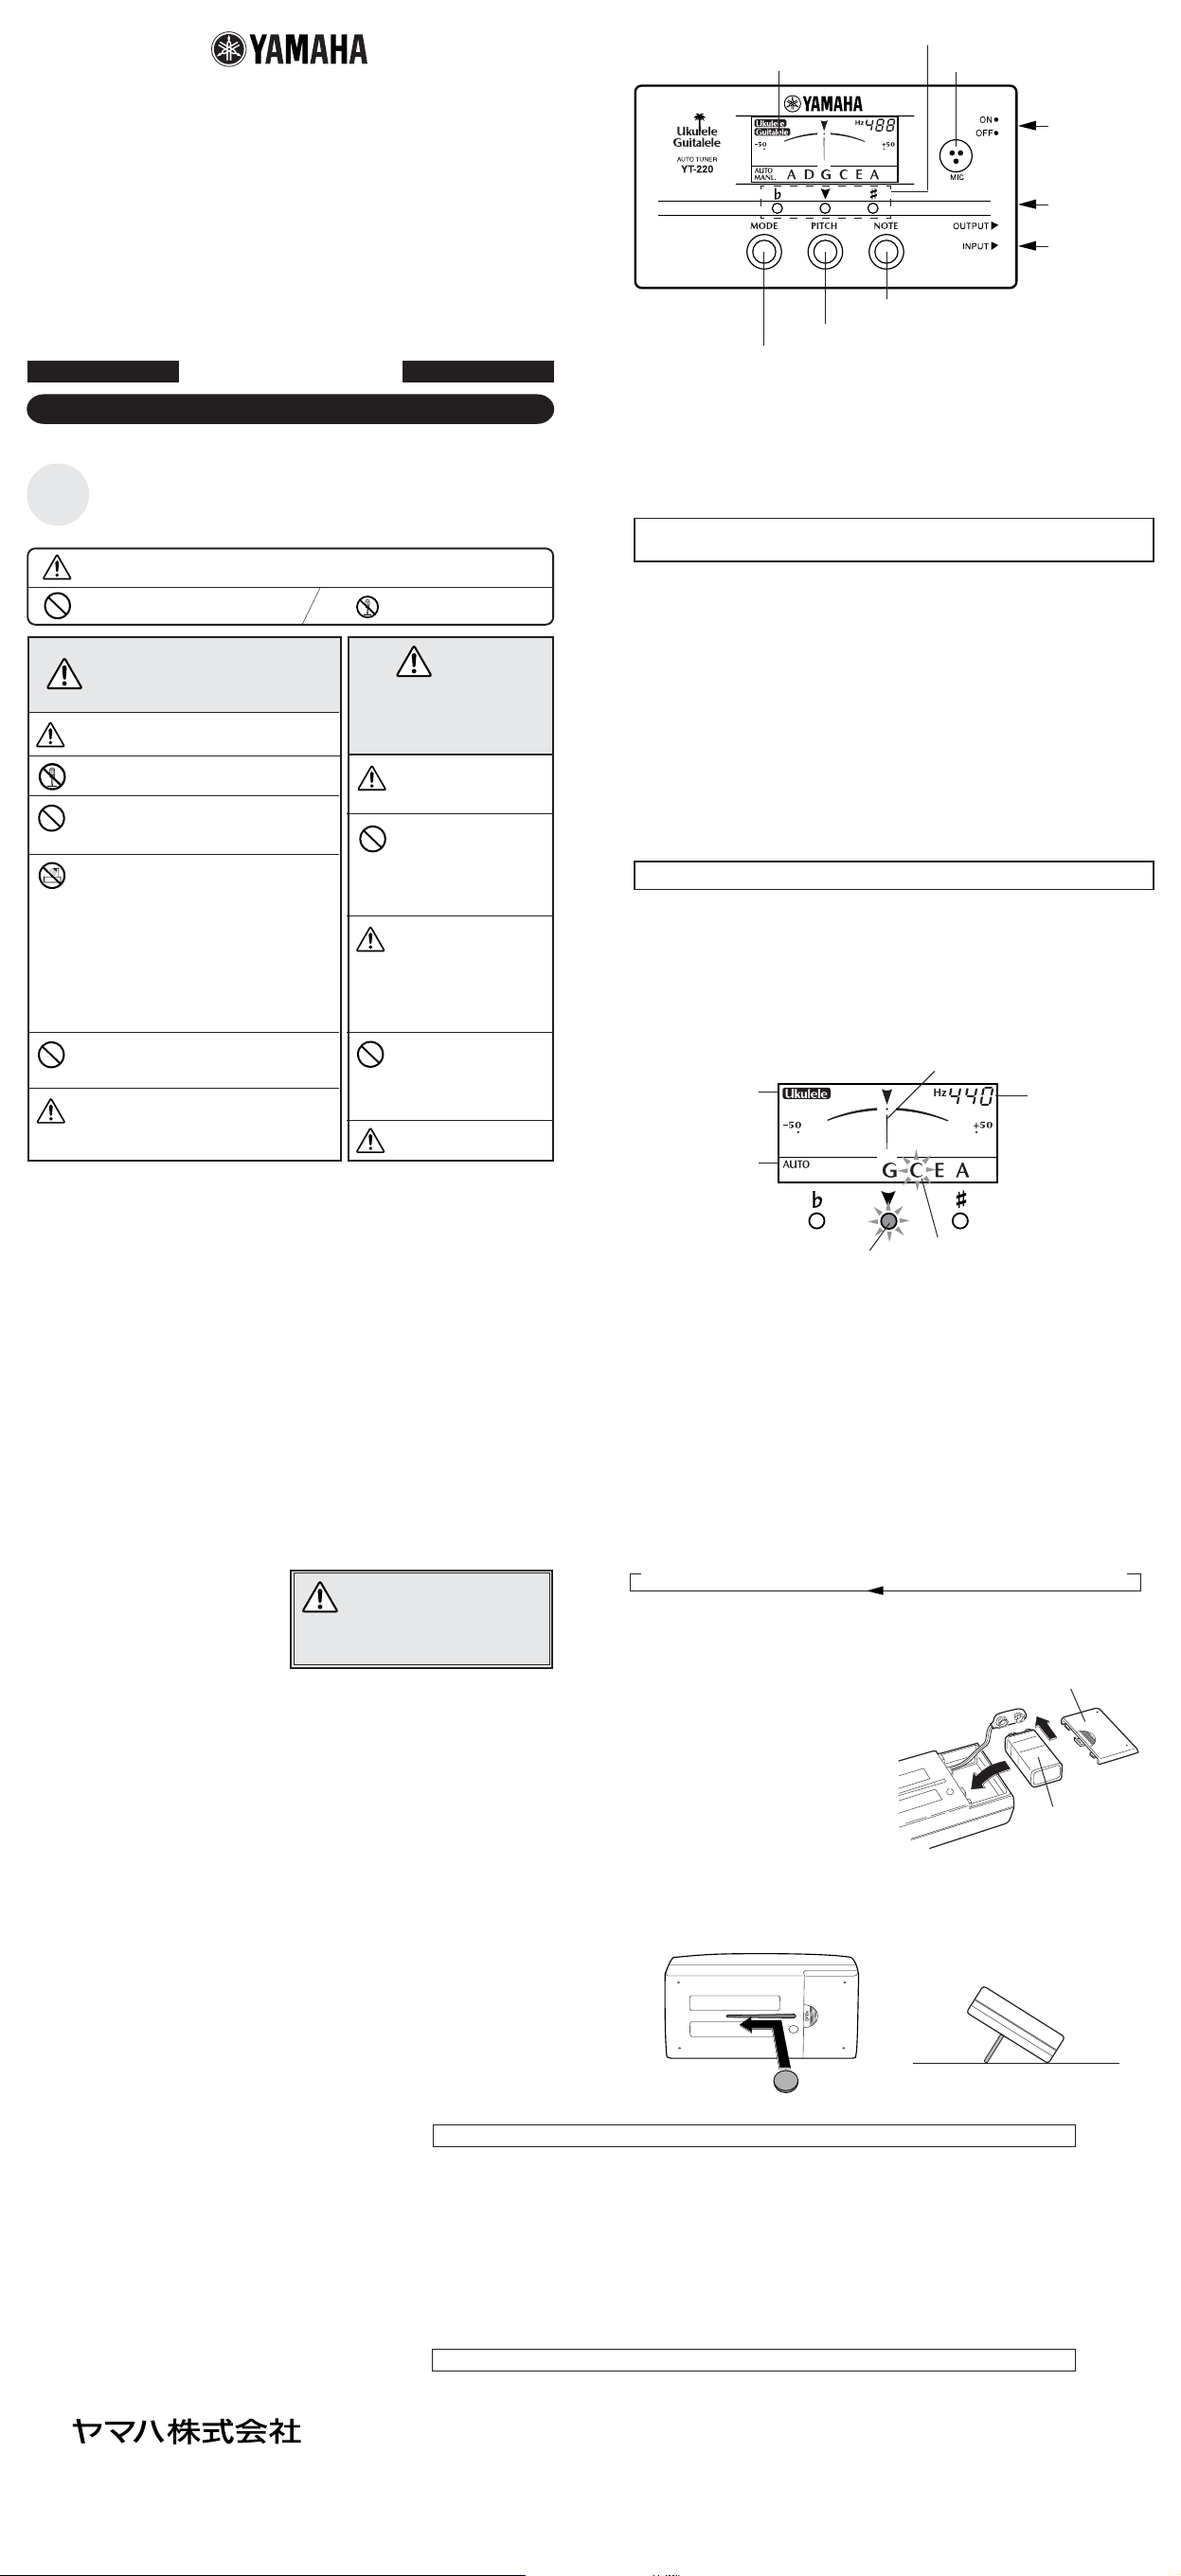
■ 各部の名称
q液晶インジケーター
wチュー ニングガ イド
y内蔵マイクロホン
u POWER
スイッチ
i OUTPUT
ジャック
o INPUT
ジャック
tNOTEスイッチ
rPITCHスイッチ
eMODEスイッチ
■ チューニングの方法
チューニングの方法には、入力した音に一番近い音名とその音名の音より高いか低いか
を自動的に表示するオート(AUTO)モードと、合わせたい音名を指定してチューニング
するマニュアル(MANL.)モードがあります。モードの切り替えはMODEスイッチ
押して行います。どちらのモードになっているかは、液晶ディスプレイ
AUTOまたはMANL.が表示されます。
※オートモードではNOTEスイッチtを押してもマニュアルモードになります。
弦を交換した時や、音が大きく外れている状態からチューニングをする場合は、
マニュアルモードで行うことをおすすめします。
●オートチューニング:AUTO
1. ピックアップ付モデルやマイクを使用している場合は、INPUTジャックoに楽器・
マイクからのコードを接続します。(OUTPUTジャック
ば、本機の電源のON/OFFに関わらず楽器からの信号はアンプに送られます。ただし
ノイズの原因となりますので、演奏中は本機の電源を切っておいてください。)
※ INPUTジャック
動しません。
ピックアップやマイクを使用せずに楽器をチューニングする場合は、手順5の際、楽
器に内蔵マイクロホン
2. POWERスイッチ
液晶インジケーターqに基準ピッチ(初期設定はA4=440Hz)が約2秒間点滅表示さ
れ、その後自動的にオートモードになります。(液晶インジケーター
3. 基準ピッチを変更する場合は、PITCHスイッチrにより設定します。(基準ピッチ
の設定の項参照)
4. チューニングする楽器に合わせて、MODEスイッチ
oにプラグが接続されている状態では、内蔵マイクロホンyは作
yをできるだけ近付けます。
uをONにします。
iとアンプを接続しておけ
eを押して液晶インジケーター
qに楽器名(UkuleleまたはGuitalele)を表示させます。
音名表示部には、選択した楽器の弦の並び通り(低音弦→高音弦)に音名が表示されます。
5. チューニングしたい弦を弾きます(単音で鳴らします)。
液晶インジケーター
チューニングします。
5-1. まず、合わせたい音名表示が点滅するように、おおまかに楽器をチューニングし
ます。
5-2. 次に、針表示が中央を指し、チューニングガイド
細かくチューニングしたら完了です。
qの音名、針表示およびチューニングガイドwを見ながら楽器を
wの緑のLEDが点灯するように
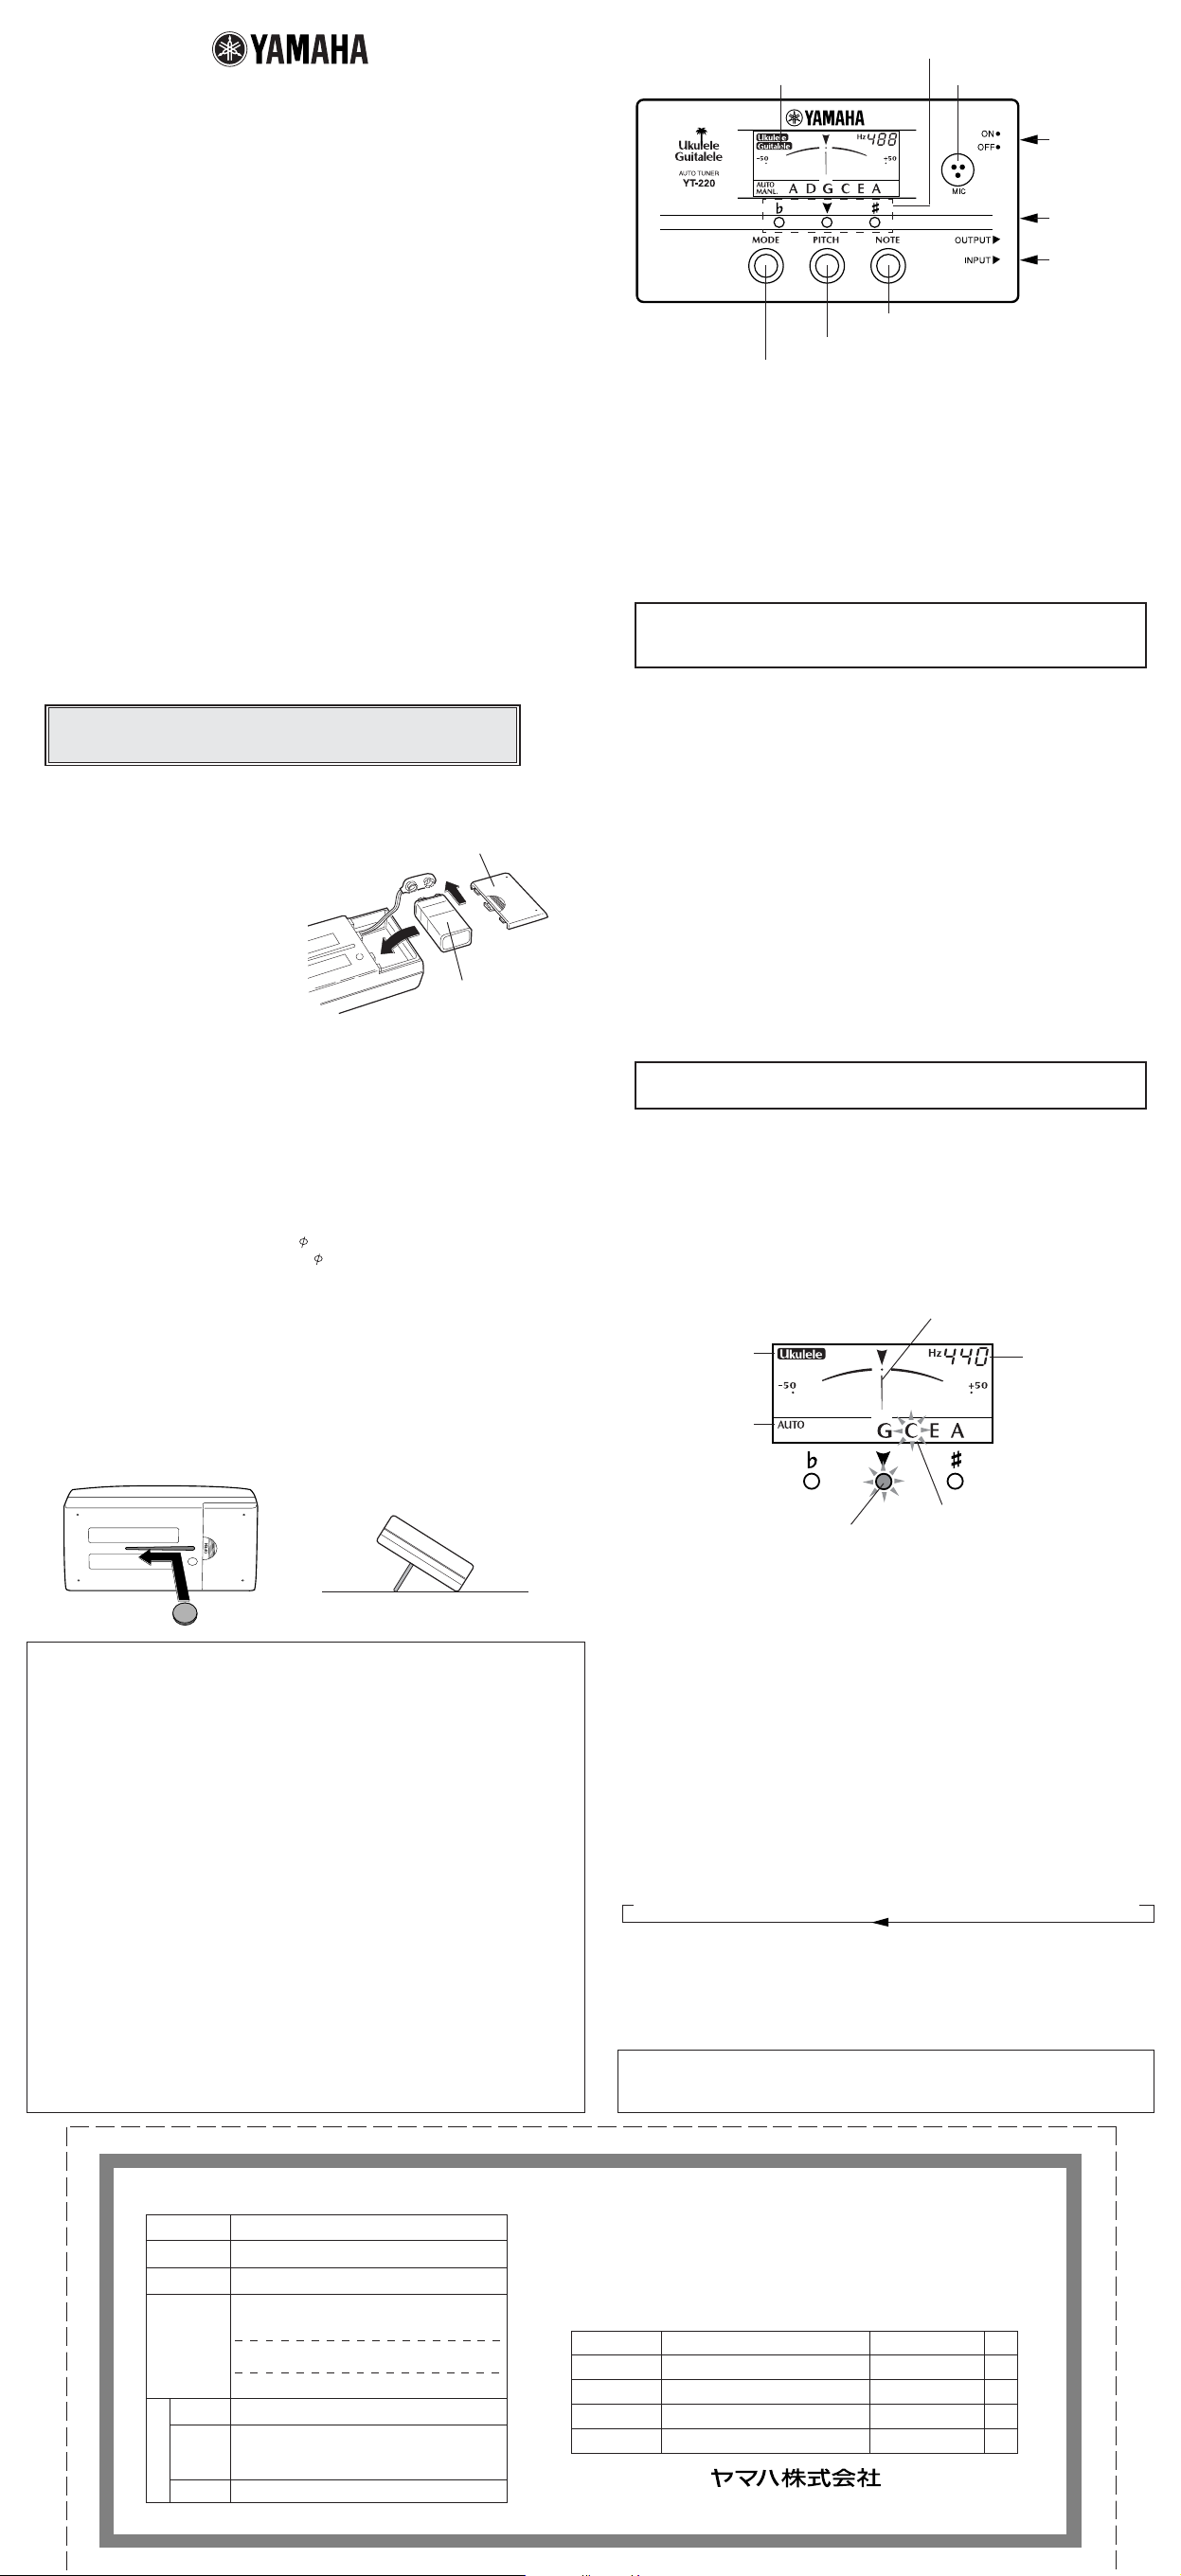
例)オートモードでウクレレのE弦をチューニングする場合
針表示が中央を指すように
Ukuleleを表示させる
AUTOを表示させる
qの左下部に
q
にAUTOが点灯)
基準ピッチを表 示
eを
■ ご使用になる前に
◆使用する場所
故障の原因となりますので、次 のような場 所
でご使用にならないでください。
・ 直射日光の当たる場所
・ 温度や湿度が非常に高い場所や低い場所
・ 砂やホコリの多い場所
◆電池について
・ YT-220は、6F22(006P)乾電池で作
動します 。
・ ご 使用にならな い時は、必ず電源スイッチ
をOFFにしておいてください。また、電池
の液漏れを防ぐため、長時間ご使用にな
らない場合は、電池を取り出しておいてく
ださい。
・ 電池が切れたままで長時間放置しますと、
電池の液漏れなど、故障の原因となりま
す。お早めに電池交換してください。
◆取り扱いはやさしく
スイッチや本体に無理に力を加えたり、本体
を落としたりしますと、故障の原因となります。
ご注意ください。
◆お手入れ
外装のお手入れの際は、必ず柔らかい布で
乾拭きしてください。ベンジンやシンナー系の
液体、強燃性のポリッシャーなどは絶対にご
使用にならないでください 。
◆保証書の手続き
製品をお買上げいただいた日より1年間は
保証期間となり、修理料金は無償とさせてい
ただきます。ただし、保証書に販売店印、購入
年月日の記入がない場合は、保証期間中で
もサービスが有償となることがあります。必
ずお求めになった販売店で保証書の手続き
を行なった後、大切に保管してください。
◆取扱説明書は大切に
この取扱説 明書をお読みになった後は、大
切に保管してください。
ご使用済みの電池は、火の中
に入れな いでください 。
また、電池は幼児の手の届か
ない所に保管してください。
■仕様
表示 :液晶インジケーター、チューニングガイド(3点LED)
音名 : ウクレレ G,C,E,A
調律範囲 : A0(27Hz)〜C8(4186Hz)
調律精度 :±1セント
ジャストチューン 範囲 :±3セント
基準ピッチ範囲 : A4=435〜446Hz(1Hzステップ)
入力 : INPUT端子(6φモノラル)、内蔵マイクロホン
出力 : OUTPUT端子(6φモノラル)
電源 : 6F22(006P)9V乾電池×1個
電池寿命 :約50時間(AUTOモード時)
外形寸法 : 118(W)×63(H)×24.5(D)mm
重量(本体) : 130g(乾電池含む)
付属品 : 6F229V乾電池×1個
ギタレレ A,D,G,C,E,A
このL EDが点灯したら
チューニングOK
合わせたい音名表示
が点滅するように
●マニュアルチューニング:MANL.
1. オートチューニングの手順1〜4と同様の設定をします。
2. 合わせたい音名表示が点滅するまで、NOTEスイッチ
ルモードになります。(液晶インジケーター
3. オートチューニングの手順5と同様に、楽器の音を出しチューニングします。
4. 別の音にチューニングする場合は、上記手順2,3を繰り返します。
qにMANL.が点灯)
tを数回押します。マニュア
■ 基準ピッチの設定
1. POWERスイッチuをONにします。ピッチは440Hzにセットされます。(点滅表示)
2. PITCHスイッチ
ます。
3. PITCHスイッチ
ります。
rを繰り返し押して、希望する基準ピッチ(435〜446Hz)に設定し
rを押す操作を止めた後、約2秒後に自動的にチューニングモードへ戻
435→436→437→438→439→440→441→442→443→444→445→446
※ POWERスイッチ
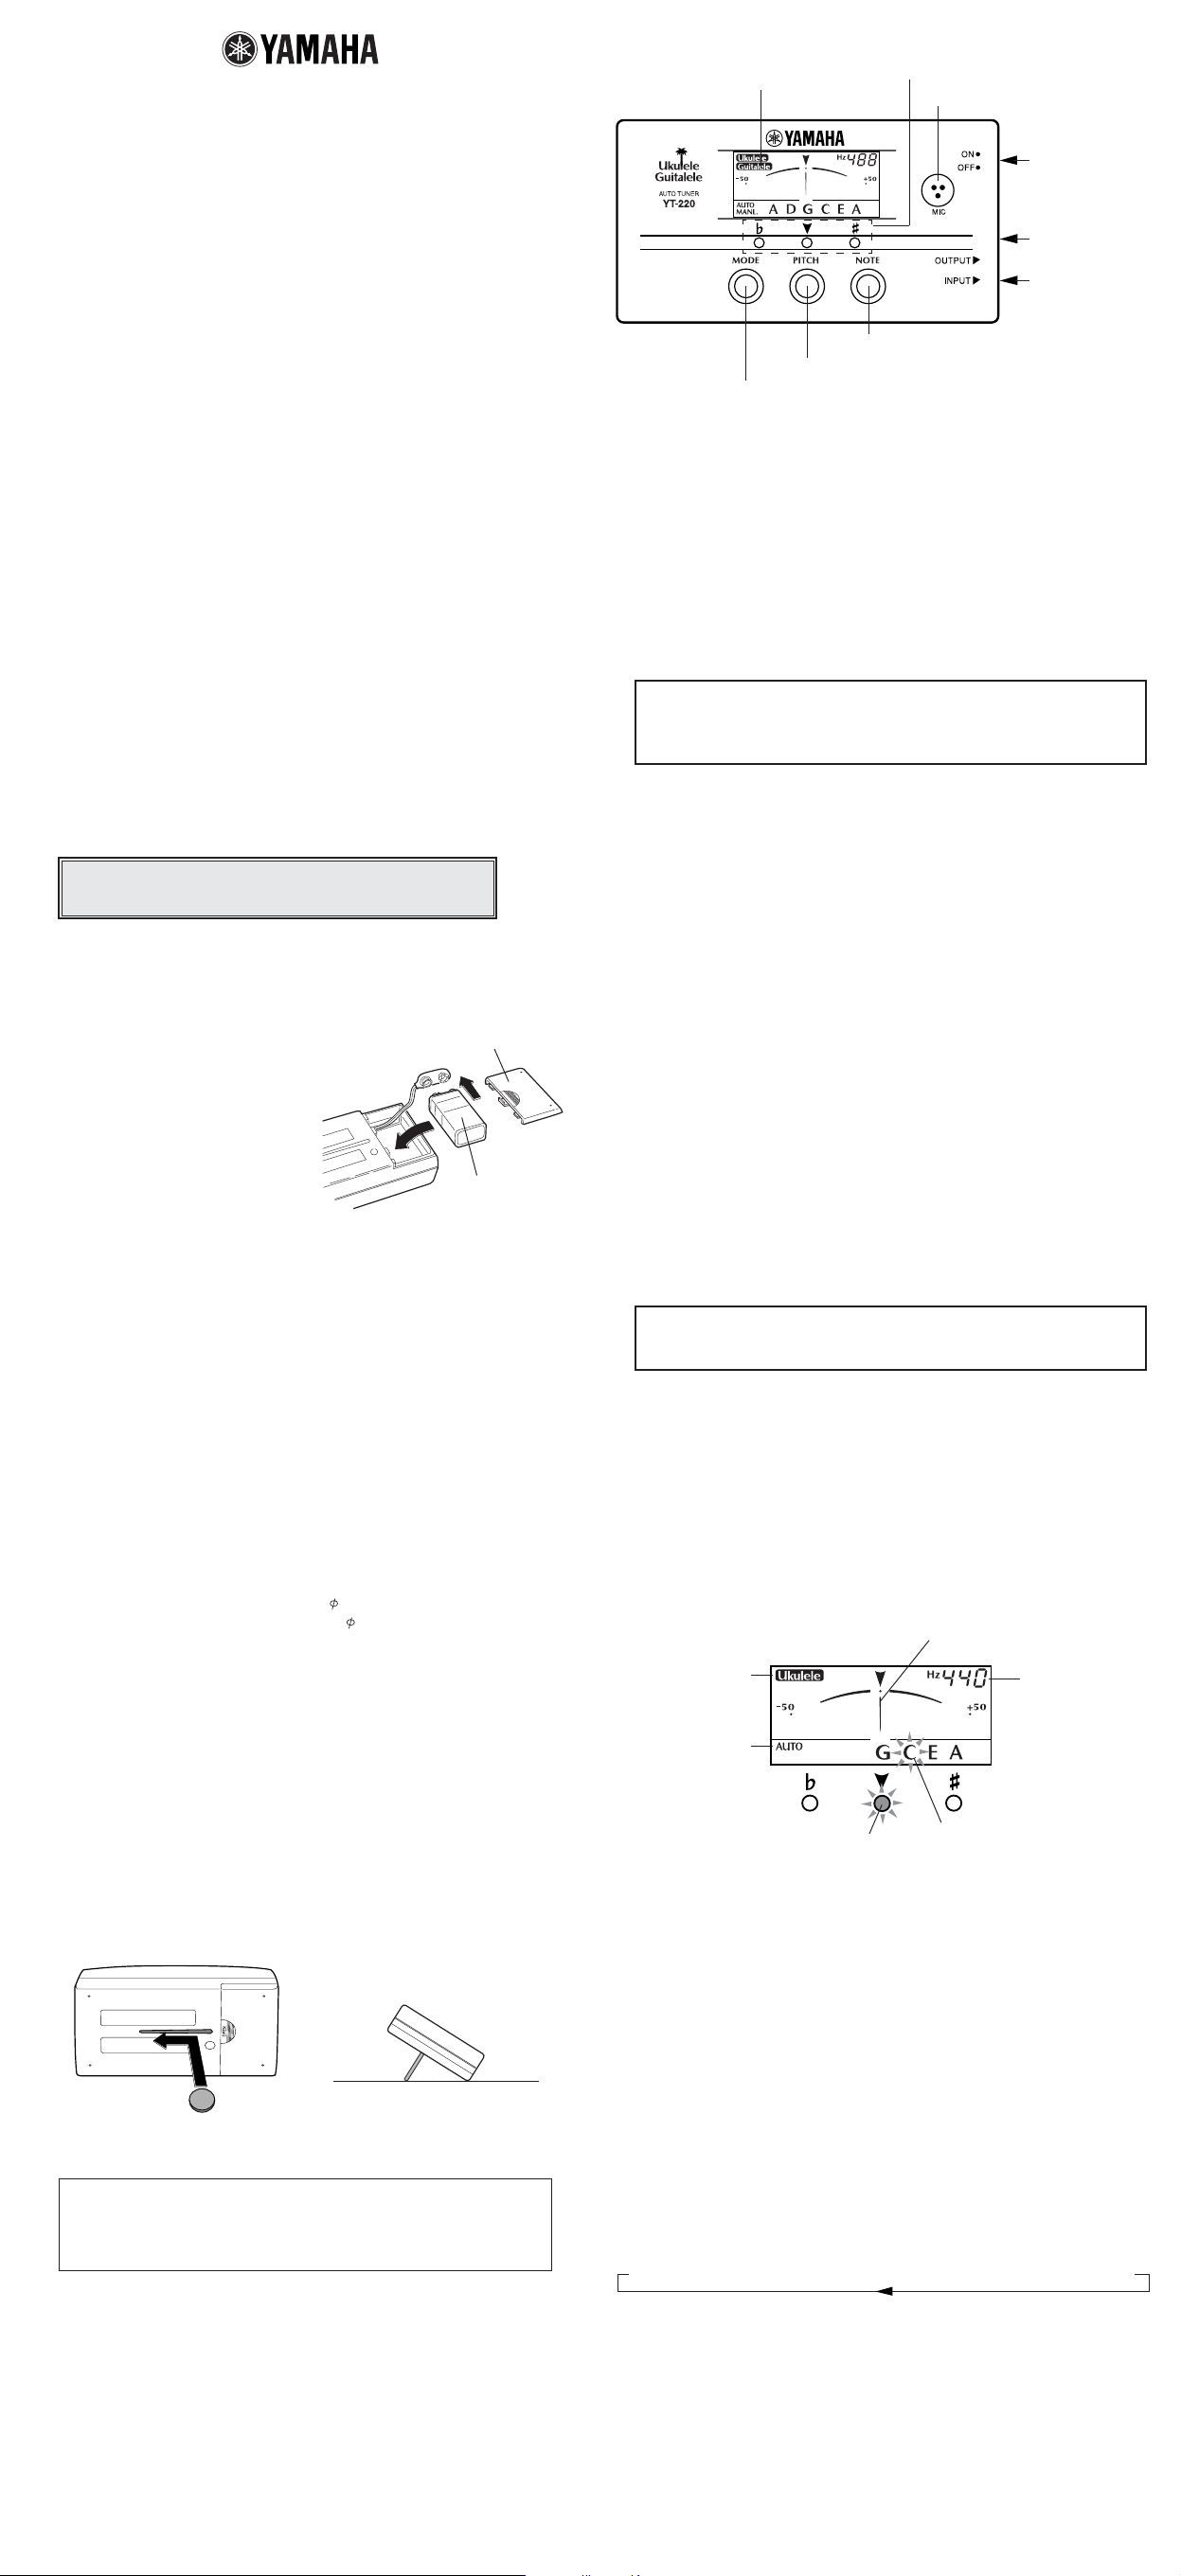
■ 電池交換
電池が消耗してくると、液晶インジケーター
が暗くなってきます。電池が消耗したままだ
と、誤動作する場合があります。お早めに新
しい電池(6F22,006P9V乾電池)と交換し
てください。
※ 電池の交換は、必ずPOWERスイッチ
OFFにしてから行ってください。
※ 電池の極性(+,−)を間違えないように注
意してください。
uをOFFにすると、ピッチ設定は440Hzにリセットさ れます 。
電池カバー
裏面
uを
6F22,006P
9V乾電池
■チルトスリットの使い方
本体裏側のスリットは、チューナーを傾けて使うためのものです。下図のようにスリット
にコインなどをセットしてお使いください。
※仕様および外観は、改良のため予告なく変更することがあります。
■保証とアフターサービス
● 保証書
保証書は、販売店にて「販売店印、お買い上げ年月
日」の押印、記入をしてお渡し致しますので、お買
い上げの際にご確認の上、大切に保管ください。
● 保証期間
お買い上げ日から1年間です。
● 保証期間中の修理
保証書記載内容に基づいて修理いたします。詳しく
は保証書をご覧ください。
● 保証期間経過後の修理について
修理可能な部分は、ご要望により有料にて修理させ
て頂きます。但し、修理料金の金額や補修部品の保
有期間の都合により、相当品の代替購入をおすすめ
する場合もございます。
弦打楽器営業部営業課
〒430-8650 静岡県浜松市中沢町10番1号
TEL053-460-2433
ヤマハ電気音響製品サービス拠点(修理、サービス問い合せ先)
北海道サービスセンター 〒064-8543 札幌市中央区南10条西1丁目1-50ヤマハセンター内 TEL. 011-512-6108
仙台サービスセンター 〒984-0015 仙台市若林区卸町5-7仙台卸商共同配送センター3F TEL. 022-236-0249
首都圏サービスセンター 〒211-0025 川崎市中原区木月1184 TEL. 044-434-3100
東京サービスステーション 〒108-8568 東京都港区高輪2-17-11 TEL. 03-5488-6625
(お持込み修理のみお取扱い)
浜松サービスセンター 〒435-0048 浜松市上西町911ヤマハ(株)宮竹工場内 TEL. 053-465-6711
名古屋サービスセンター 〒454-0058 名古屋市中川区玉川町2-1-2ヤマハ(株)
大阪サービスセンター 〒565-0803 吹田市新芦屋下1-16ヤマハ(株)千里丘センター内 TEL. 06-877-5262
四国サービスステーション 〒760-0029 高松市丸亀町8-7ヤマハミュージック高松店内 TEL. 087-822-3045
広島サービスセンター 〒731-0113 広島市安佐南区西原6-14-14 TEL. 082-874-3787
九州サービスセンター 〒812-8508 福岡市博多区博多駅前2-11-4 TEL. 092-472-2134
[本社]カスタマーサービス部 〒435-0048 浜松市上西町911ヤマハ(株)宮竹工場内 TEL. 053-465-1158
ヤマハ株式会社各支店(商品に関する問い合せ先)
弦打楽器営業部 〒 430-8650 浜松市中沢町10 番 1 号 TEL. 053-460-2433
EM 北海道営業所 〒 064-8543 札幌市中央区南10 条西1 丁目1-50(ヤマハセンター) TEL. 011-512-6113
EM 仙台営業所 〒 980-0804 仙台市青葉区大町2-2-10 TEL. 022-222-6147
EM 東京事業所 〒 108-8568 東京都港区高輪2-17-11 TEL. 03-5488-5471
EM 関東営業所 〒 108-8568 東京都港区高輪2-17-11 TEL. 03-5488-5447
EM 名古屋営業所 〒 460-8588 名古屋市中区錦1-18-28 TEL. 052-201-5199
EM 大阪事業所 〒 542-0081 大阪市中央区南船場3-12-9心斎橋プラザビル東館 TEL. 06-252-5231
EM 広島営業所 〒 730-8628 広島市中区紙屋町1-1-18 TEL. 082-244-3749
EM 九州営業所 〒 812-8508 福岡市博多区博多駅前2-11-4 TEL. 092-472-2130
※住所及び電話番号は変更になる場合があります。
名古屋流通センター3F
TEL. 052-652-2230
Ukulele/Guitalele AUTO TUNER
YT-220
YT-220
■ COMPONENTS
q LCD indicator
w Tuning guide
y Built-in microphone
u POWER
switch
OWNER’S MANUAL
Thank you for purchasing the YAMAHA YT-220 Ukulele/
Guitalele AUTO TUNER.
Please read this manual thoroughly and keep it in a safe place for
future reference.
■ PRECAUTIONS
◆ To prevent damage, do not use the tuner in the following locations:
• places where the unit will be in direct sunlight;
• places subject to temperature and humidity extremes;
• places that are sandy or dusty.
◆ To power the tuner, use only a 6F22 or 006P 9V dry cell battery.
◆ For maximum battery life, always be sure the tuner is turned OFF when not in
use.
◆ If an exhausted battery is left in the unit for an extended period of time, it may
leak and cause malfunctioning of the unit. When the battery becomes
exhausted, always remove it and replace it as soon as possible.
◆ Do not subject the tuner to strong physical shock or vibration. Do not use
excessive force on any of the controls.
◆ Never use solvents such as benzene or thinner to clean the tuner. Wipe clean
with a soft, dry cloth.
◆ After reading the owner's manual, keep it in a safe place for future reference.
Never dispose of used batteries by burning them.
Also make sure to keep batteries away from children.
■ BATTERY REPLACEMENT
When battery power runs down, the
LCD indicator will grow dim.
Continued use of the tuner may result in
inaccurate operation. Replace the
battery with a new one (6F22 or 006P
9V dry cell battery) as soon as possible.
The battery compartment is in the rear
of the tuner. Remove the old battery
and replace it with a new one of the
same type. Be careful to connect the
battery in the correct polarity.
* Always turn the POWER switch u to “OFF” before changing the battery.
Bottom side
Battery cover
6F22 or 006P
9V dry cell battery
■ SPECIFICATIONS
Indicators : Liquid crystal display, Tuning guides
Tuning Notes : Ukulele G, C, E, A
Note Setting Range : A0 (27Hz) – C8 (4186Hz)
Accuracy : ±1 cent
In Pitch Accuracy : ±3 cent
Standard Pitch Setting Range : A4=435 – 446Hz (1Hz steps)
Input : INPUT (6
Output : OUTPUT (6
Power Source : 9V dry cell battery (006P or 6F22)
Battery Life : Approximately 50 hrs. (AUTO mode)
Dimensions (W x H x D) : 118 x 63 x 24.5 mm (4.6" x 2.5" x 1.0")
Weight (including battery) : 130 g (4.6 oz)
Accessory : 9V dry cell battery (6F22) x 1
* Specifications and external appearance are subject to change without notice.
Guitalele A, D, G, C, E, A
monaural), microphone
monaural)
i OUTPUT
jack
o INPUT
jack
t NOTE switch
r PITCH switch
e MODE switch
■ TUNING PROCEDURES
Two tuning modes are available for tuning. The Auto (AUTO) mode
automatically selects the closest note name to the pitch received by the tuner
and indicates whether the pitch is high or low. The Manual (MANL.) mode allows
the user to manually select the note to be tuned. Press the MODE e switch to
select the desired tuning mode. The selected mode, AUTO or MANL., is
displayed on the lower left hand corner of the LCD display q.
* Pressing the NOTE t switch while in the Auto mode also switches the tuner to the
Manual mode.
We recommend the use of the Manual mode for tuning the
instrument after the installation of new strings or when string’s
pitch is extremely out of tune.
● Auto Tuning: AUTO
1. For instruments equipped with a pickup or mic, connect the instrument or
mic cable directly to the tuner’s INPUT o jack. (Connecting the OUTPUT
i jack to an amp allows the amp to receive the instrument’s signal whether
the tuner’s power is on or off. However, it might result in added noise to the
line so you should switch the tuner’s power off during performance.)
* The built-in microphone y will not operate when a cable is connected to the
tuner’s INPUT o jack.
To tune instrument’s not equipped with a pickup or mic, use the tuner’s
built-in microphone and play the note as close to the tuner as possible
during step 5.
2. Turn the POWER u switch ON.
The standard pitch (factory preset A4=440Hz) will flash on the LCD display
q for about 2 seconds. After that, the tuner will automatically enter the
Auto tuning mode (AUTO will appear on the display q).
3. Use the PITCH r switch to change the standard pitch (see to the “Setting
the Standard Pitch” section below).
4.
Press the MODE e switch to select the instrument to be tuned. The selected
instrument (Ukulele or Guitalele) will be indicated on the display q.
At this time, the note names are displayed in the string order (low
string m high string) of the instrument selected in the note display.
5. Pluck the string to be tuned (do not pluck more than 1 string at a time).
Use the note name, indicated on the display q, the needle and tuning
guide w as a reference while tuning the instrument.
5-1. First, approximately adjust the string so that the indicator for the
appropriate string name flashes.
5-2. Next, tune the string until the needle rests in the center and the green
LED of the tuning guide w lights.
Example) Using the AUTO mode to tune a Ukulele’s “C” string.
Tune until needle comes to
rest in the center.
Select Ukulele on
the LCD indicator.
Standard Pitch is
displayed.
■ TILT SLIT
The tuner can be tilted back by using the slit in the rear panel. Insert a coin or
similar flat object into the slit and tilt back as shown in the diagram below.
FCC INFORMATION (U.S.A.)
1.IMPORTANT NOTICE: DO NOT MODIFY THIS UNIT!
This product, when installed as indicated in the instructions contained in this manual,
meets FCC requirements. Modifications not expressly approved by Yamaha may void
your authority, granted by the FCC, to use the product.
2.IMPORTANT: When connecting this product to accessories and/or another product
use only high quality shielded cables. Cable/s supplied with this product MUST be used.
Follow all installation instructions. Failure to follow instructions could void your FCC
authorization to use this product in the USA.
3.NOTE: This product has been tested and found to comply with the requirements listed
in FCC Regulations, Part 15 for Class ”B” digital devices. Compliance with these requirements provides a reasonable level of assurance that your use of this product in a
residential environment will not result in harmful interference with other electronic devices. This equipment generates/uses radio frequencies and, if not installed and used
according to the instructions found in the users manual, may cause interference harmful
to the operation of other electronic devices. Compliance with FCC regulations does not
guarantee that interference will not occur in all installations. If this product is found to
be the source of interference, which can be determined by turning the unit ”OFF” and
”ON”, please try to eliminate the problem by using one of the following measures:
Relocate either this product or the device that is being affected by the interference.
Utilize power outlets that are on different branch (circuit breaker or fuse) circuits or
install AC line filter/s.
In the case of radio or TV interference, relocate/reorient the antenna. If the antenna
lead-in is 300 ohm ribbon lead, change the lead-in to co-axial type cable.
If these corrective measures do not produce satisfactory results, please contact the
local retailer authorized to distribute this type of product. If you can not locate the
appropriate, please contact Yamaha Corporation of America, Electronic Service Division, 6600 Orangethorpe Ave, Buena Park, CA 90620
The above statements apply ONLY to those products distributed by Yamaha
Corporations of America or its subsidiaries.
Select the AUTO
mode.
When this LED lights,
the string is tuned.
The note name of the string
to be tuned flashes.
● Manual Tuning : MANL.
1. Carry out the same settings as described in steps 1-4 in the AUTO tuning
section.
2. Continue to press the NOTE t switch until the desired note name
flashes. The tuner is now in the manual mode and “MANL.” appears on
the display q.
3. As in step 5 of the AUTO tuning section, pluck the string to be tuned.
Proceed to tune the string.
4. Repeat steps 2 and 3 to tune the other strings.
■ SETTING THE STANDARD PITCH
1. Turn the POWER switch u ON. The pitch is set to 440 Hz (flashing
display).
2. Continuously press the PITCH switch r until the desired standard pitch
(435 – 446Hz) is selected.
435→436→ 437→438→439→440→ 441→442→443→ 444→445→446
3. When the PITCH switch r has not been pressed for about 2 seconds, the
tuner will automatically return to the tuning mode.
* When the POWER switch u is turned OFF, the standard pitch setting will be
reset to A=440Hz.
THIS DIGITAL APPARATUS DOES NOT EXCEED THE “CLASS B” LIMITS FOR RADIO
NOISE EMISSIONS FROM DIGITAL APPARATUS SET OUT IN THE RADIO INTERFERENCE REGULATION OF THE CANADIAN DEPARTMENT OF COMMUNICATIONS.
持込修理
品名/品番
保証期間
※お買上げ日
お客様
店名
※
販
住所
売
店
電話
ウクレレ/ギタレレオートチューナー/YT-220
本体:お買上げの日から1ヶ年間
年 月 日
ご住所 〒
お名前 様
電 話 ( )
印
()
ご販売店様へ ※印欄は必ずご記入してお渡しください。
保証書
この度はヤマハ・ウクレレ/ ギ タレレオ ートチューナーをお買上げ戴きましてあ
りがとうございました。
本書は、本書記載内容で修理を行なう事をお約束するものです。お買上げの
日から左記期間中に故障が発生した場合は、本書をご提示の上お買上げの販
売店に修理をご依頼ください。(詳細は裏面をご覧ください)
修理(サービス)メモ
内 容年 月 日 印
〒430-8650 静岡県浜松市中沢町10番1号
担 当 者
弦打楽器営業部営業課
TEL053-460-2433
ACCORDEUR AUTOMATIQUE pour guitare
Hawaïenne ou Guitalele
YT-220
YT-220
■ ORGANES
q Afficheur à cristaux
liquides
w Guide d’accord
y Microphone incorporé
u Interrupteur
d’alimentation
POWER
MODE D’EMPLOI
Nous vous remercions d’avoir porté votre choix sur
L’ACCORDEUR AUTOMATIQUE YAMAHA YT-220 pour guitare
Hawaïenne ou Guitalele.
Nous vous prions de lire attentivement ce mode d’emploi et de le
conserver en lieu sûr pour vous y reporter ultérieurement.
■ PRECAUTIONS
◆ Afin de ne pas endommager l’accordeur, évitez de l’utiliser dans des endroits
répondant aux conditions suivantes :
• plein soleil
• humidité ou températures excessives.
• sable ou poussière
◆ Pour alimenter l’accordeur, utilisez exclusivement une pile sèche 6F22 ou
006P de 9 Volts.
◆ Pour garantir une longévité maximale des piles, mettez toujours l’accordeur
hors tension lorsque vous ne l’utilisez pas.
◆ Les piles épuisées qui restent dans l’accordeur pendant une longue période,
peuvent fuir et provoquer des anomalies de fonctionnement. Lorsque les
piles présentent des signes de décharge, remplacez-les dans le délai le plus
bref.
◆ L’accordeur ne doit pas subir de chocs ni de vibrations importants. Ne le
manipulez jamais avec une force excessive.
◆ N’utilisez jamais de solvants tels que de la benzine ou du diluant pour
nettoyer l’accordeur. Essuyez-le avec un chiffon doux et sec.
◆ Après avoir lu ce mode d’emploi, conservez-le en lieu sûr pour vous y reporter
ultérieurement.
Ne jetez jamais les piles au feu et conservez-les
toujours hors de portée des enfants.
■ REMPLACEMENT DE LA PILE
Lorsque la puissance de la pile devient
insuffisante, l’afficheur à cristaux
liquides s’assombrit.
Le fait de continuer à utiliser l’accordeur
dans ces conditions risque de ne pas
permettre de fournir une indication
précise. Remplacer la pile par une pile
sèche neuve (6F22 ou 006P 9 V) dans
les meilleurs délais.
Le logement de la pile est situé au dos
de l’accordeur. Retirer la pile usée et
la remplacer par une pile neuve du
même type. Faire très attention de placer la pile en respectant les polarités.
* Toujours mettre l’interrupteur POWER u sur la position “OFF” avant de
remplacer la pile.
Dos de
l’accordeur
Couvercle du
logement des piles
Pile 6F22 ou 006P
de 9 Volts
i Mini-prise de
sortie OUTPUT
o Mini-prise
d’entrée INPUT
t Commutateur de note NOTE
r Commutateur de hauteur PITCH
e Commutateur de mode MODE
■ MÉTHODES D’ACCORD
L’accord peut être fait suivant deux modes différents. Le mode de réglage
automatique (AUTO) sélectionne automatiquement la note la plus proche de la
hauteur du son qui est reçue par l’accordeur et indique si la hauteur est haute ou
basse. Le mode de réglage manuel (MANL) permet à l’utilisateur de choisir
manuellement la note à accorder. Appuyez sur le commutateur MODE e pour
choisir le mode d’accord désiré. Le mode d’accord ainsi sélectionné; AUTO ou
MANL., est affiché dans le coin inférieur gauche de l’écran afficheur à cristaux
liquides q.
* Le fait d’appuyer sur le commutateur NOTE t lorsque l’accordeur est réglé en
mode AUTO permet également de commuter l’accordeur en mode manuel.
Nous recommandons d’utiliser le mode de réglage manuel pour
accorder l’instrument après avoir monté des cordes neuves ou
lorsque l’écart de hauteur du son d’une corde est particulièrement
important.
● Accord automatique : AUTO
1. Avec les instruments qui sont équipés d’un phonocapteur ou d’un
microphone, branchez l’instrument ou le câble de raccordement du
microphone directement à la prise INPUT o de l’accordeur. (En raccordant
la prise de sortie OUTPUT i à un amplificateur, ceci permet à
l’amplificateur de recevoir les signaux de l’instrument, que l’accordeur soit
sous tension ou non. Cependant, il faut savoir que cela peut rajouter du
bruit à la ligne de sorte qu’il est préférable de couper l’alimentation de
l’accordeur pendant une interprétation.)
* Le microphone incorporé y ne fonctionnera pas si un câble est raccordé à la
prise INPUT o de l’accordeur.
Pour accorder un instrument qui n’est pas équipé d’un phonocapteur ou
d’un microphone, utilisez le microphone incorporé de l’accordeur et jouez
la note le plus près possible de l’accordeur au cours de l’étape 5.
2. Mettez l’accordeur sous tension avec l’interrupteur d’alimentation POWER
u
.
La hauteur standard du son (dont le préréglage a été fait sur A = 440 Hz en
usine) apparaîtra en clignotant dans l’afficheur à cristaux liquides q
pendant 2 secondes environ. Ensuite, l’accordeur se commutera
automatiquement en mode d’accord automatique (AUTO apparaîtra dans
l’afficheur à cristaux liquides q).
3. Utilisez le commutateur PITCH r pour changer la hauteur standard
(reportez-vous à la description intitulée “Réglage de la hauteur standard”
ci-après.)
4. Appuyer sur le commutateur MODE e pour choisir l’instrument à accorder.
L’instrument sélectionné (guitare Hawaïenne ou Guitalele) apparaîtra dans
l’afficheur à cristaux liquides q.
Dès que ceci est effectué, le nom des notes apparaît dans l’ordre des
cordes (corde de grave → corde d’aigu) de l’instrument sélectionné
dans l’afficheur de note.
■ FICHE TECHNIQUE
Indicateurs et témoins : Afficheur à cristaux liquides, guide d’accord
(à 3 diodes électroluminescentes)
Notes d’accord : Guitare Hawaïenne G, C, E, A
Guitalele A, D, G, C, E, A
Plage de réglage de note : A0 (27Hz) - C8 (4186Hz)
Précision : ± 1 centième
Précision de hauteur : ± 3 centièmes
Plage de réglage de hauteur standard
: A4=435 - 446Hz (par incréments d’1 Hz)
Entrée : INPUT (6 monaurale), microphone
Sortie : OUTPUT (6 monaurale)
Source d’alimentation : Pile sèche de 9V (006P ou 6F22)
Autonomie des piles : 50 heures environ. (Mode AUTO)
Dimensions (L x H x P) : 118 x 63 x 24,5 mm
Poids (piles incluses) : 130 g
Accessoires : Pile sèche de 9V (6F22) x 1
* Les spécifications et l’aspect externe peuvent être modifiés sans aucun avis.
■ FENTE D’INCLINAISON
L’accordeur peut être maintenu incliné en utilisant la fente du panneau arrière.
Introduire une pièce de monnaie, ou autre objet plat similaire, dans la fente et
incliner l’accordeur de la manière illustrée.
5. Pincez la corde qui doit être accordée (ne pincez pas plus d’une corde à la
fois.) Utilisez en même temps le nom de la note qui est indiqué dans
l’afficheur q, la position de l’aiguille et le guide d’accord w comme moyen
de référence tout en accordant l’instrument.
5-1. Réglez tout d’abord la corde et faites en sorte que l’indicateur du nom de
la corde approprié clignote.
5-2. Ensuite, accordez la corde jusqu’à ce que l’aiguille se stabilise en position
centrale et que la diode électroluminescente verte du guide d’accord w
s’allume.
Exemple) Comment accorder la corde “C” d’une guitare Hawaïenne
en mode AUTO.
Accorder jusqu’à ce que l’aiguille se
Choisissez
l’indication Ukulele
dans l’afficheur à
cristaux liquides.
Choisir le mode
AUTO.
La corde est accordée dès que la
diode électroluminescente s’allume.
stabilise en position centrale.
La hauteur
standard est
affichée.
Le nom de la note de la corde à
accorder clignote.
● Accord manuel : MANL.
1. Effectuez les mêmes réglages que ceux qui sont décrits aux étapes 1 à 4
ci-dessus du passage consacré à l’accord réalisé en mode AUTO.
2. Maintenir le commutateur NOTE t enfoncé jusqu’à ce que le nom de la note
que vous voulez obtenir clignote. L’accordeur se trouve maintenant en mode
d’accord manuel et l’indication “MANL.” apparaît dans l’afficheur à cristaux
liquides q.
3. Comme au cours de l’étape 5 du passage consacré au procédé d’accord en
mode AUTO, pincez la corde qui doit être accordée. Faites en sorte que la
corde soit accordée.
4. Refaites les étapes 2 et 3 pour accorder les autres cordes.
LE PRESENT APPAREIL NUMERIQUE N'EMET PAS DE BRUITS
RADIOELECTRIQUES DEPASSANT LES LIMITES APPLICABLES AUX
APPAREILS NUMERIQUES DE LA "CLASSE B" PRESCRITES DANS LE
REGLEMENT SUR LE BROUILLAGE RADIOELECTRIQUE EDICTE PAR LE
MINISTERE DES COMMUNICATIONS DU CANADA.
■ RÉGLAGE DE LA HAUTEUR STANDARD
1. Mettre l’accordeur sous tension avec l’interrupteur d’alimentation POWER
u. La hauteur est calée sur 440 Hz (l’afficheur clignote).
2. Maintenir le commutateur PITCH r enfoncé jusqu’à ce que la hauteur
standard désirée soit otenue (435 – 446 Hz).
435→436→ 437→438→439→ 440→441→442→443→ 444→445→446
3. Si le commutateur PITCH r est laissé ainsi sans être enfoncé pendant 2
secondes environ, l’accordeur reviendra automatiquement en mode
d’accord.
* Lorsque l’alimentation de l’accordeur est coupée avec l’interrupteur
d’alimentation POWER u, la hauteur standard est ramenée sur A = 440 Hz.
 Loading...