

Yamaha YT-2100 User Manual 2
GUITAR/BASS AUTO TUNER
YT-2100
OWNER’S MANUAL / MODE D’EMPLOI
BEDIENUNGSANLEITUNG / 取扱説明書
このたびはヤマハ・ギ ター/ベースオートチューナー YT-2100をお買い求め
いただき、ありがとうござ います 。
お使いになる前に、この取 扱説明書をよくお読みのうえ、正しくご 使 用ください。また、
お読みになった後は、保証書と共に大切に保管してください。
安全へのこころがけ
火災・感電・人身傷害の危険を防止するには
〜以下の指示を必ず守ってください〜
この「安全へのこころがけ」は製品を安全に正しくお使いいただき、お
絵表示に
ついて
この機 器を使 用 する前に、以下の指示と取扱説明書
をよく読 んでください。
この機 器を分 解したり、改造したりしな い でください。
火災、感電の原因となります。
修理/部品の交換などで、取扱説明書に書かれてい
る以外 のことは、絶対にしないでください 。必ずサー
ビスセンターに相談してください。
次のような場所での使用や保存はしないでくださ
い。火災、感電の原因となります。
●
● 水気の近く(風呂場、洗面台、濡れた床など)や
●ホコリの多い場所
● 振動の多い場所
※特に自動車内は直射日光などにより非常に高温
となります。この機器を車内に放置しないでくださ
い。
ACアダプター使用時、ACアダプターの電源プラグ
は、必ずAC100Vの電源コンセントに 差し込 ん でく
ださい。100V以外では火災、感電の原因となりま
す。
ACアダプター使用時、ACアダプターの電源コード
を無理に曲げたり、上に重いものを乗せたりしない
でください。電源コードに傷がつきます。火災、感電の
原因となります。
この機 器に、異物(燃えやすいもの、硬貨、針金など)
や液体(水やジュースなど)を絶対に入れないでくだ
さい。火災、感電の原因となります。
次のような場合は、直ちに電 源を切って、サービスセ
ンターに修 理を依 頼してください。
●ACアダプターの電源コードやプラグが破損し
●
● 機器が(雨などで)濡れたとき
●機器に異常や故障が生じたとき
■ご使用になる前に
◆使用する場所
次のような場所でご使用になりますと、故障の原因
となります の でご 注 意ください。
・直射日光の当たる場所
・温度や湿度が非常に高い場所や低い場所
・砂やホコリの 多い場所
◆電源について
・ YT-2100は、6F22(006P)乾電池または別売
のYAMAHAACアダプターAC-05、AC-320
で作動します。他のACアダプターを使用された
場合、故障の原因となることがあります。
必ず極性の正しいもの(−
ださい。
・ご使用にならな い 時は、必ずパワースイッチを
OFFにしておいてください。また、電池の液漏れを
防ぐため、長時間ご使用にならない時は、電池を
取り出しておいてください。
◆取り扱いはやさしく
客様や他の人々への危害や財産への損害を未然に防止するために、
いろいろな絵表示を使って説明しています。
絵表示の意味をよく理解してから、本文をお読みください。
注意(危険・警告を含む)を促す内容があることを告げるものです。
禁止の行為を告げるものです。
行為を強制したり指示する内容
を告げるものです。
この表示を無 視して誤った取扱いをする
と、人が死亡又は重傷を負う危険の恐れ
がある内容を示しています。
温度が極端に高い場所(直射日光の当たる場
所、暖房機器の近く、発熱する機器の上など)
湿度の高い場所
たとき
異物が内部に入ったり、液体がこぼれたとき
スイッチなどに無理に力を加えたり、本体を落としま
すと故障の原因となりますのでご注意ください。
例: → 分解禁止
例: → 電源プラグをコン
セントから抜く
注意警告
この機 器は、正常な通気が妨げられ
ることの ない 所に設定して、使用して
くだ さい 。
ACアダプターの電源コードをコン
セントに 抜き差しするときは、必ず電
源プラグを持ってくだ さ い 。
長時間使用しない場合は、ACアダ
プターの電源プラグをコンセントか
ら抜いてください。
使用後の乾電池は火中に捨てない
でください。一般のゴミとは分けて、
決められた場所に捨てましょう。
乾電池は表示された極性(+、−)を
間違えないようにしてください。間違
えますと乾電池の破れつや液もれに
よって、けがや周 囲を汚損する原因
となることがあります。
ACアダプターは、指定のACアダプ
ターを使用してください。
本体を、故意に投げたり落としたりし
ないでください。本体の故障だけで
なく、思わぬけがの原因となることが
あります 。
乾電池は幼児の手の届かない場所
に保管してください。
◆お手入れ
外装のお手入れの際は、必ず柔らかい布で乾拭きし
てください。ベンジンやシンナー系の液体、強燃性の
ポリッシャーなど は 絶 対 にご使 用に ならな い でくださ
い。
◆保証書の手続き
製品をお買上げいただいた日より1年間は保証期間
となり、修理料金は無償とさせ ていただきます。ただ
+)をお使いく
し、保証書に販売店印、購入年月日の記入がありませ
んと、保証期間中でもサービスが有償となることが
あります 。必ずお求めになった販売店で保証書の手
続きを行なった後、大切に保管してください。
Printed in Hong Kong
この表 示を無 視して 誤った
取扱いをすると、人が障害を
負ったり、財産が損害を受け
る危険 の恐 れがある内 容を
示しています。
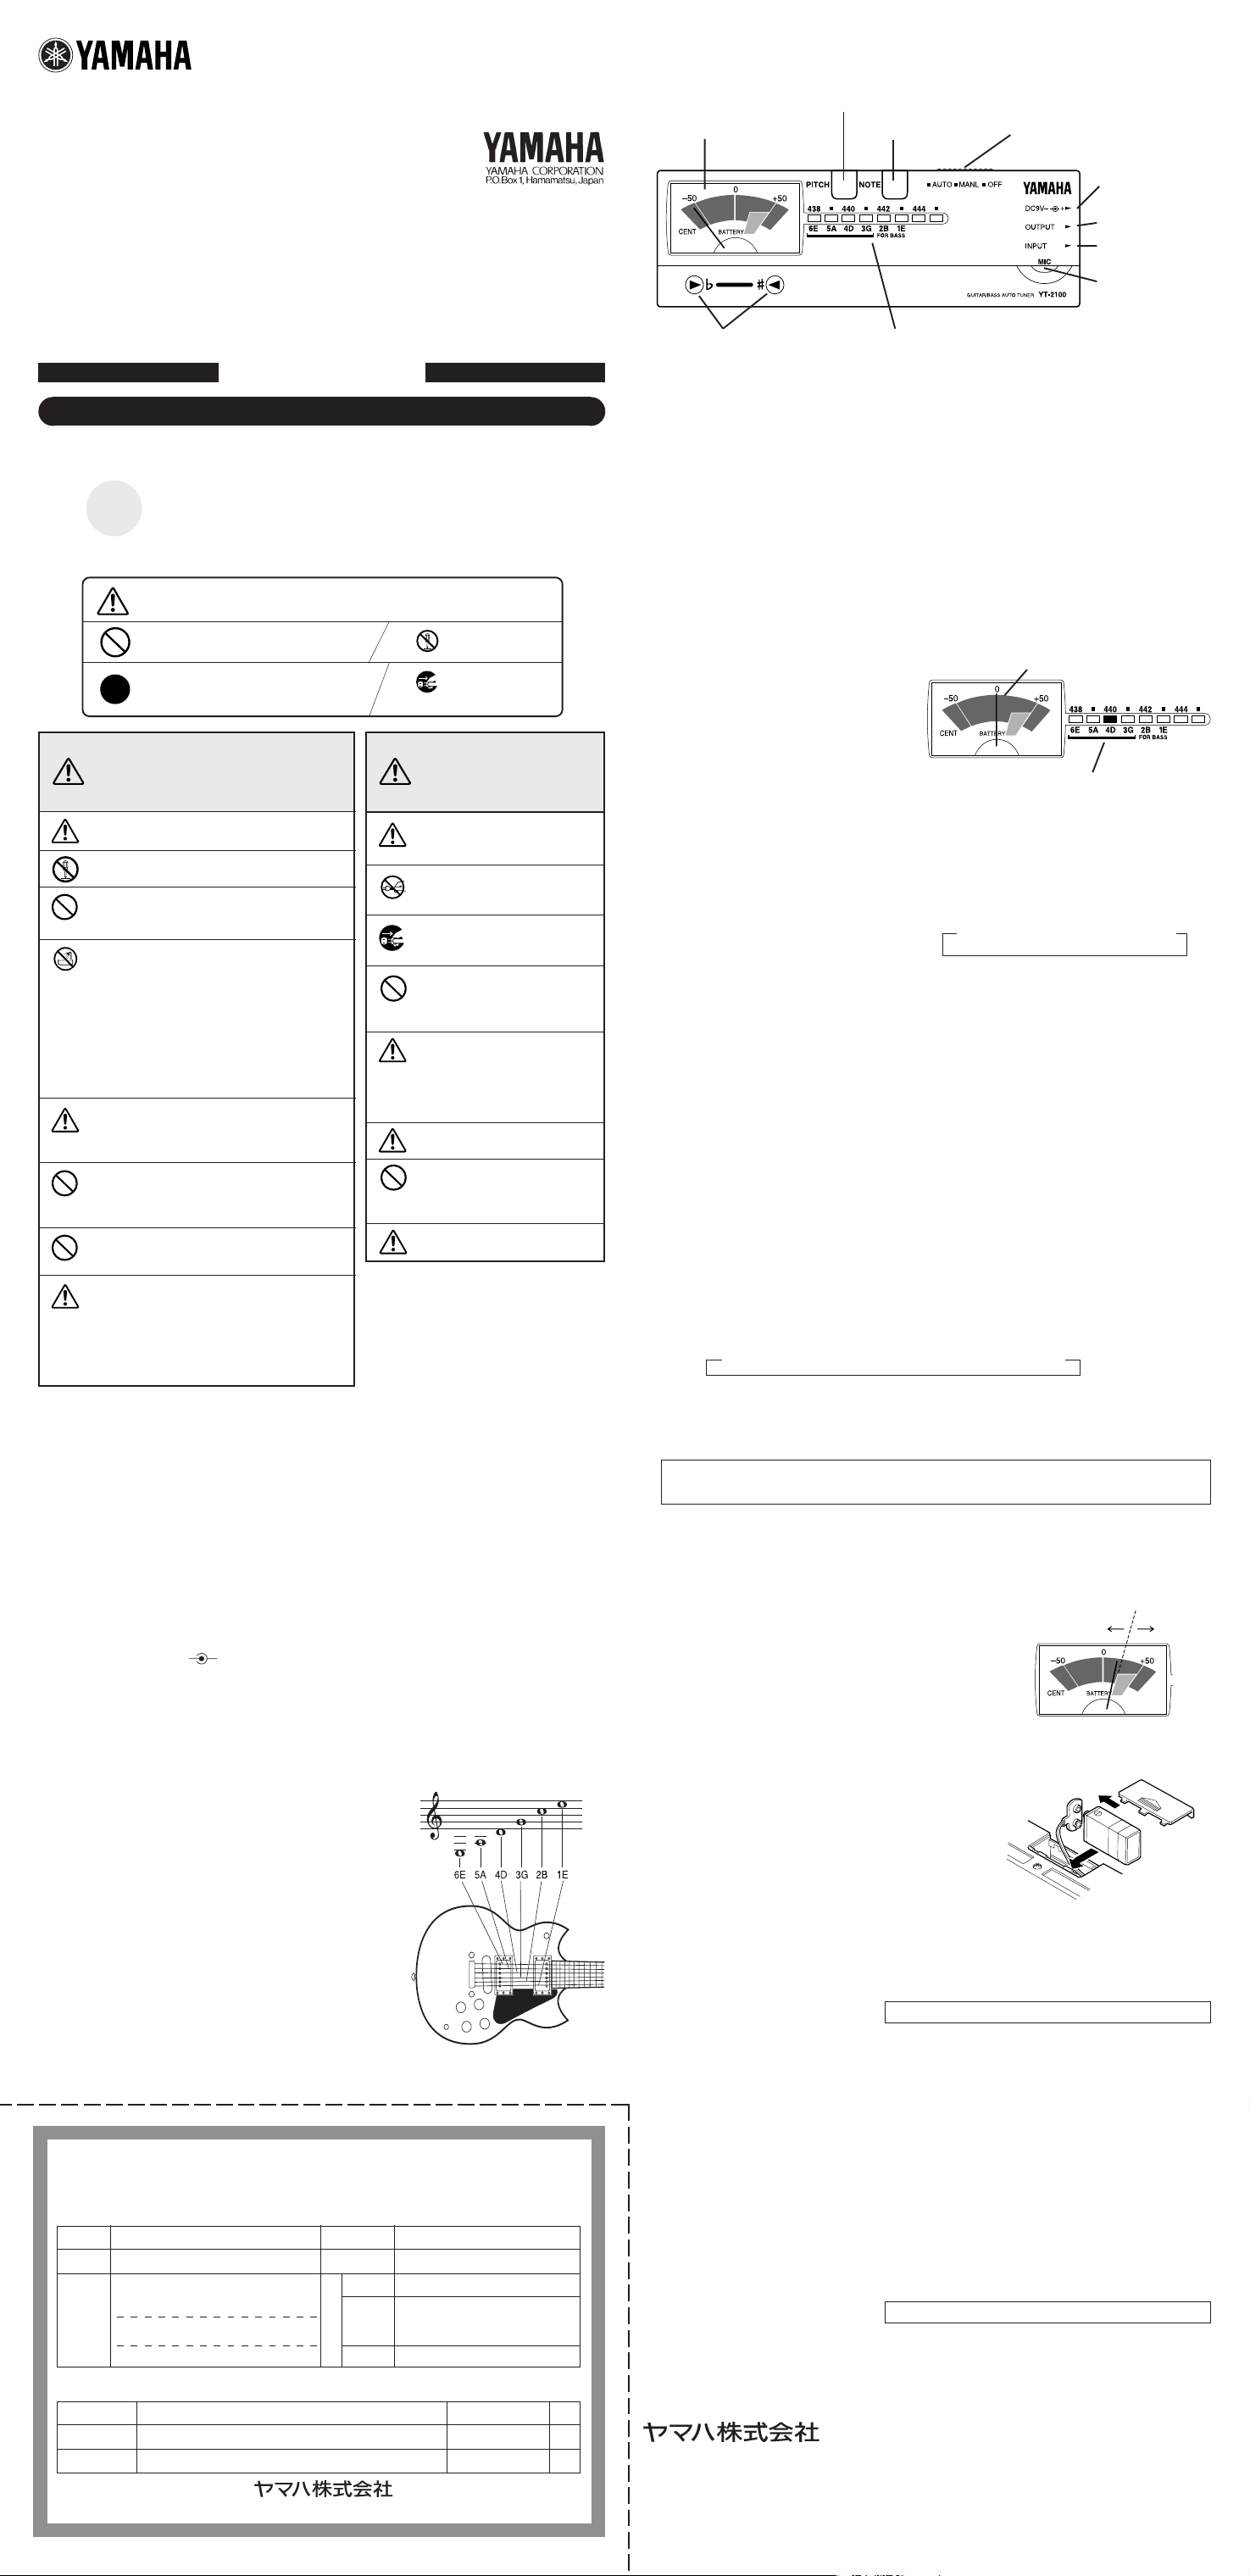
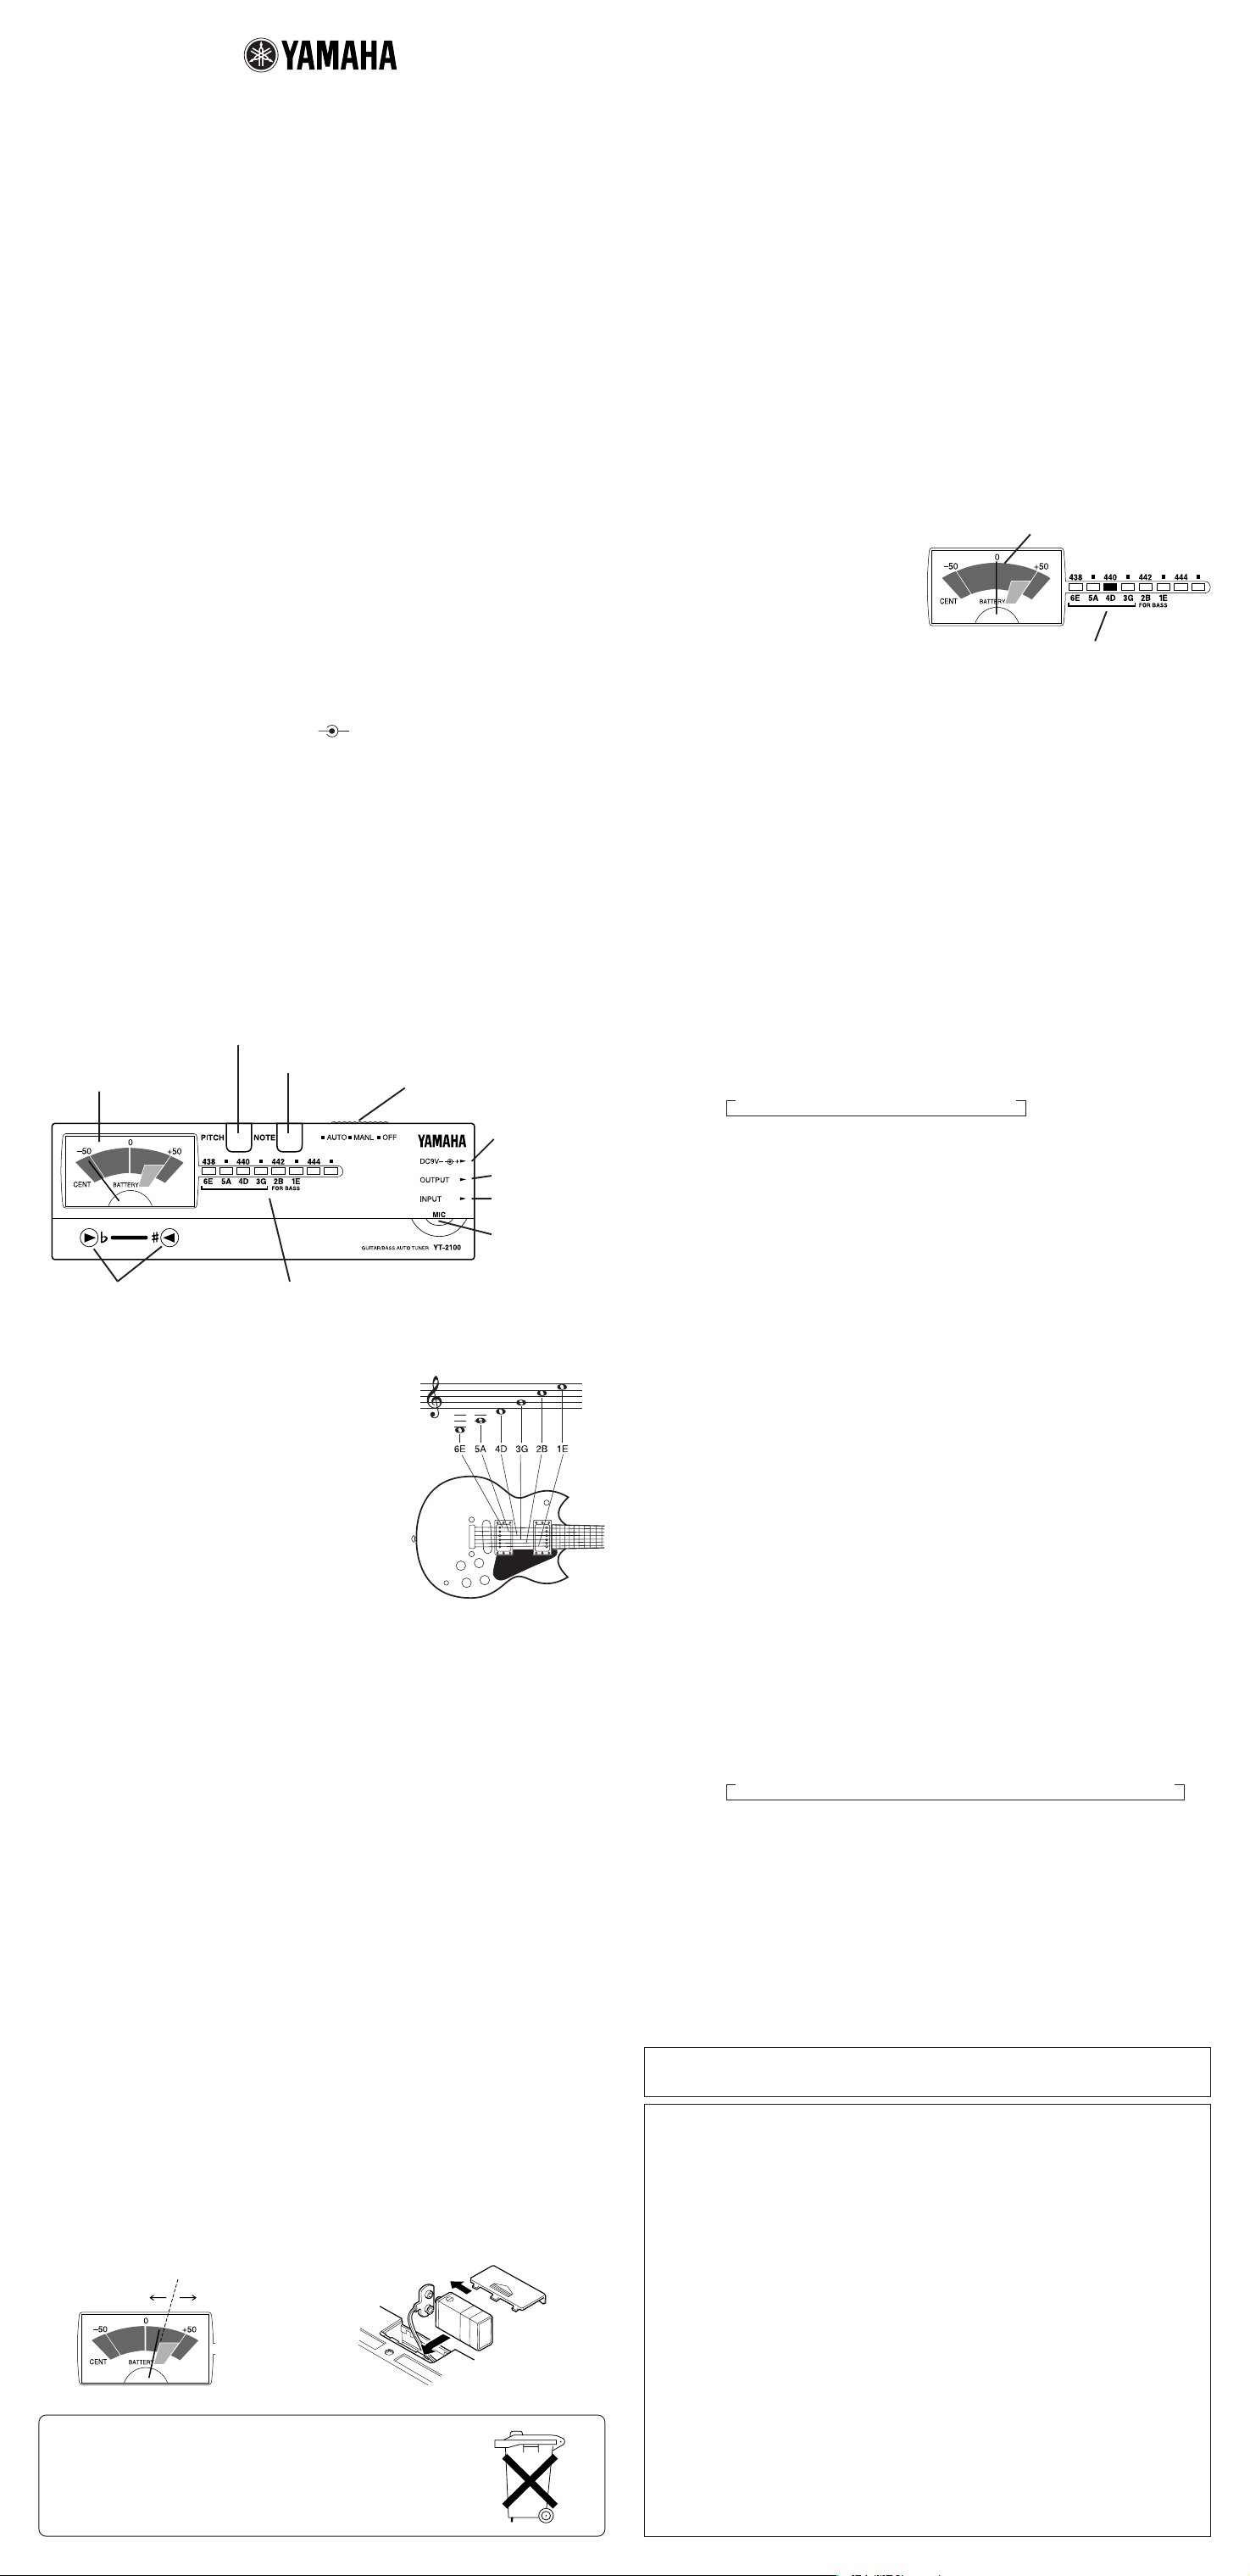
■ 各部の名称
e ピッチスイッチ
w ノートス イッチr メーター
q パワースイッチ
!0 DC9Vジャック
(入力用)
o OUTPUTジャック
i INPUTジャック
u マイクロホン
t チューニング ガイド y イン ジ ケ ーター
■ チューニングの方法
●オートチューニング:(AUTO)
自動的にチューニングするモードです。音を入力すると、その音にいちばん近い基準音の音名と、基準になる音よ
り高いか低いかを表示します。
1. エレキギター/ベースの場合はINPUTジャック
ジャック
oとアンプを接続しておけば、演奏中でもチューニングができます。)
アコースティックギ ターの場合は、内蔵マイクロホン
す。
※INPUTジャック
2. パワースイッチ
3.ピッチスイッチ
照)
4. チュー ニングしたい 弦を 弾くと、その弦の音名のインジケーター
かないでください。)
5. その弦と違う音名 のインジ ケーターが 点灯した
場合は、ギターのペグ(糸巻)を回してその弦の
音名が点灯するようにします。
6. ギターのペグ(糸巻)を調節して、メータ ー
中央(0)に針がくるようにします。チューニングガ
イド
tのWだけが点 灯した時はチューニングを
上げ、
Qだけが点灯した時は下げます。正しく
チューニングされた時には、
します。
7. 他の弦も同様に4〜 6の操 作を繰り返してチュー
ニングをします。
iにプラグが接続されている時には、内蔵マイクロホンuは作動しません。
qをAUTOにセットし ま す 。
eを押して、標準となるA 4 のピッチ(438〜445Hz)を選択します。(ピッチ設 定の項参
WとQの両方が点灯
iにギターからのコードを接 続します。(この時OUTPUT
uにギターのサウンドホールをできるだけ近づけま
yが点灯します。(2本以上の弦を同時に弾
針が中央(0)にくるように
rの
弾いた弦(音名)のインジケー
ターが点灯するように
●マニュアルチューニング:(MANL)
あらかじめ チ ュー ニング する弦(音名)をセットし ておいてからチューニングするモードです。
1. オートチューニン グ の場合と同様に、ギターを接続または内蔵マイクロホンに近づけます。
2. パワースイッチ
3.ピッチスイッチ
照)
4. ノートスイッチ
弦(音名)を選びます。
ノートスイッチ
弦名が変わります。
5. チュー ニングしたい 弦を弾き、メーター
正しくチューニ ングされた時には、チューニング ガイド
6. 他の弦も同様に4, 5の操作を繰り返してチューニングをします。
qをMANLにセットし ま す 。
eを押して、標準となるA 4 のピッチ(438〜445Hz)を選択します。(ピッチ設 定の項参
wによりチューニングしたい
6E→5A→4D→3G→2B→1E
wを押すごとに、右図の順で
rの中央(0)に針がくるように、ギターの ペグ(糸巻)を調節します。
tのWとQの両方が点灯します。
■ ピッチ設定
標準となるピッチを設定します。各楽器のチューニングを合わせるために、ピアノの中央のラの音(A4=440Hz)
が標準ピッチとして用 いられます 。この標 準ピッチは 地 域 や 時 代に よって多少の誤 差 があり、近年ではやや高めの
ピッチでチューニン グされる事 が多くなっています。
■ ピッチ設定の方法
1. パワースイッチqをAUTOまたはMANLにセットしま す 。
2.ピッチスイッチ
ター
yが点滅します。
3. インジケーター
1回押すごとにインジケーター
4.ピッチスイッチ
※パワースイッチ
有効です。パワースイッチ
セットされます 。
標準ピッチ(A4)を一度セットした ら 、あとは各弦(音名)とも、メー タ ー
ニングす ればOKです。
■ 電池交換
●バッテリーチェック
パワースイッチをOFFからAUTOまた はMANLにし た時、約
2秒間メーターにより電池の残量を表示します。この時、メーターの
指針が図1のようにBATTERYのバーより左側にある場合は電池が
消耗していますので、ただちに新しい電池と交換するか、当社指定の
ACアダプター(AC-05またはAC-320)をDC9Vジャック
続して ご 使 用ください 。
また、ご使用中にチューニングガイドの両方(
したら、電池が消耗していますので、新しい電 池と 交換するか、当社
指定のACアダプター(上記)をご使 用ください。
eを1回押すと、現在設定されている標準ピッチ(A4:438〜445Hz)を示すインジケー
yの点滅中にピッチスイッチeを押して、希望する標準ピッチを設定します。
yの点滅位置が1ステップ(1Hz)ずつ移動します。
438→439→440→441→442→443→444→445
eを押す操作を止めた後、約2秒後に自動的にチューニングモードへ戻ります。
qをOFFにするまで、設定された標準ピッチはAUTO、MANLいずれのモードでも
qをOFFからAUTOまたはMANLにすると、標準ピッチは4 4 0 H zにリ
rの中央(0)に針がくるようにチュー
電池
残量不足電池残量OK
!0に接
W,Q)が点滅を始めま
図1
■仕様
表示 :メーター、イン ジ ケ ーター、チューニング ガイド
音名 : 6E,5A,4D,3G,2B,1E
精度 :±1セント
標準ピッチ 範囲
付加機能 :バッテリーチェック機能
端子 : INPUTジャック、OUTPUTジャック、DC9Vジャック
電源 : 6F22(006P)9V乾電池
電池寿命 : 連続約9時間(AUTOモード時)
外形寸法 : 155(W)×48.5(H)×32.5(D)mm
重量 : 159g(乾電池含む)
付属品 : 6F229V乾電池×1
※仕様および外観は、改良のため予告なく変更することがあります。
持込修理
この度はヤマハ・ギター/ベースオートチューナーをお買上げ戴きましてありがとうございました。
本書は、本書記載内容で修理を行なう事をお約束するものです。お買上げの日から下記期間中に故障が発生した
場合は、本書をご提示の上お買上げの販売店に修理をご依頼ください。(詳細は裏面をご覧ください)
品名
保証期間
お客様
修理(サービス)メモ
: A4=438〜445Hz(1Hzステップ)
別売ACアダプター(AC-05またはAC-320)
ギター/ベースオートチューナー
本体:お買上げの日から1ヶ年間
ご住所 〒
お名前 様
電 話 ( )
年 月 日
保証書
品番
※お買上げ日
店名
※
販
住所
売
店
電話
ご販売店様へ ※印欄は必ずご記入してお渡しください。
内 容
〒430静岡県浜松市中沢町10番1号053-460-2431
YT-2100
年 月 日
印
( )
弦打楽器営業部 営業課
担 当 者
●電池交換の方法
図2のようにし て 電 池 を 交 換しま す 。電池の+、−を間違えないよう
にしてください 。
※電池を交換する時、またはAC アダプターを接続する時には、必ず
パワースイッチ
■サービスについて
1. 保証期間
本機の保証期間は、ご購入(保証書による)
より満1ヶ年(現金・クレ ジット・月賦等による
区別はございません。また保証 は日本国内
でのみ有効)と致します。
2. 保証期間中のサービス
保証期間中に万一故障が発生した場合、お
買い上げ店にご連絡頂きますと、技術者が
修理・調整致します。この際必ず保証書をご
提示ください。保証書なき場合にはサービス
料金を頂く場合もあります。
また、お買い上げ店より遠方に移転される場
合は、事前にお買い上げ店あるいは右記の
ヤマハ電気音響製品アフターサービス拠点
にご連絡ください。移転先におけるサービス
担当店をご紹介申し上げますと同時に、引
続き保証期間中のサービスを責任をもって
行なうよう手続き致します。
3. アフターサービス
満1ヶ年の保証期間を過ぎますとサービスは
有料となりますが、引き続き責任をもって
サービスをさせていただきます。そのほかご
不明の点などございましたら、お買い上げ店
あるいは右記のヤマハ電気音響製品アフ
ターサービス拠点までお問い合わせくださ
い。
印
弦打楽器営業部 営業課
〒430 静岡県浜松市中沢町10番1号
qをOFFにしてから行なってください。
053-460-2433
図2
ヤマハ電気音響製品アフターサービス拠点
〔修理受付および修理品お持込み窓口〕
北海道サービスセンター 〒064 札幌市中央区南十条西 1丁目1-50ヤマハセンター内
仙台サービスセンター 〒983 仙台市若林区卸町5- 7仙台卸商共同配送センター3F
首都圏サービスセンター 〒211 川崎市中原区木月1184 TEL(044)434-3100
東京サービスステーション* 〒108 東京都港区高輪2-17-11 TEL(03)5488-6625
(*お持込み修理窓口)
浜松サービスセンター 〒435 浜松市上西町911ヤマハ(株)宮竹工場内
名古屋サービスセンター 〒454
大阪サービスセンター 〒565 吹田市新芦屋下 1-16ヤマハ(株)千里丘センター内
四国サービスステーション 〒760 高松市丸亀町8-7 ヤマハ(株)高松店内
広島サービスセンター 〒731-01広島市安佐南区西原6-14-14 TEL(082)874-3787
九州サービスセンター 〒812 福岡市博多区博多駅前 2-11-4 TEL(092)472-2134
[本社]
カスタマーサービス部 〒435 浜松市上西町911ヤマハ(株)宮竹工場内
名古屋市中川区玉川町2-1-2ヤマハ(株)名古屋流通センター3F
TEL(011)513-5036
TEL(022)236-0249
TEL(053)465-6711
TEL(052)652-2230
TEL(06)877-5262
TEL(0878)22-3045
TEL(053)465-1158
ヤマハ株式会社国内楽器営業本部
弦打楽器営業部
東京支店第2営業部
関東支店第2営業課
大阪支店第2営業1課
名古屋支店第2営業課
九州支店第2営業課
北海道支店第2営業課
仙台支店第2営業課
広島支店第2営業課
〒430 浜松市中沢町10番1号 TEL(053)460-2433
〒108 東京都港区高輪2-17-11 TEL(03)5488-5476
〒108 東京都港区高輪2-17-11 TEL(03)5488-1688
〒542 大阪市中央区南船場3-12-9(心斎橋プラザビル東館)
〒460 名古屋市中区錦1-18-28 TEL(052)201-5199
〒812 福岡市博多区博多駅前2-11-4 TEL(092)472-2130
〒064 札幌市中央区南十条西1丁目1-50(ヤマハセンター)
〒980 仙台市青葉区大町2-2-10 TEL(022)222-6147
〒730 広島市中区紙屋町1-1-18(ヤマハビル)
※住所及び電話番号は変更になる場合があります。
TEL(06)252-5231
TEL(011)512-6113
TEL(082)244-3749
GUITAR/BASS AUTO TUNER
YT-2100
OWNER’S MANUAL
Thank you for purchasing the YAMAHA YT-2100 Guitar/
Bass Auto Tuner.
Please read this manual thoroughly and keep it in a
safe place for future reference.
■ PRECAUTIONS
◆ To prevent damage, do not use the tuner in the following locations:
• places where the unit will be in direct sunlight;
• places subject to temperature and humidity extremes;
• places that are sandy or dusty.
◆ To power the tuner, use only a 6F22 or 006P 9V dry cell battery or
an optional YAMAHA AC-05UC or AC-320UC AC Adaptor. Other
power sources may damage the device.
* Before connecting the AC adaptor, make sure that the polarities of
the plug and the jack match ( –
◆ For maximum battery life, always be sure the tuner is turned OFF
when not in use.
◆ To prevent possible damage due to leakage of battery fluid, remove
the battery from the tuner if it is not to be used for an extended
period of time.
◆ Do not subject the tuner to strong physical shock or vibration. Do not
use excessive force on any of the parts.
◆ Never use solvents such as benzine or thinner to clean the tuner.
Wipe clean with a soft, dry cloth.
■ COMPONENTS
e PITCH SWITCH
w NOTE SWITCH
r VU METER
+ ).
q POWER SWITCH
■ TUNING PROCEDURES
● Auto Tuning (AUTO)
In AUTO mode, the tuner will automatically select the note closest to
the tone input for tuning. This is convenient for tuning during musical
performances.
1. For electric guitars and basses, connect the guitar cord to the INPUT
jack
i. (At this time, the OUTPUT jack o can be connected to an
amplifier in preparation for tuning during a performance.) For acoustic
guitars, place the guitar sound hole near the built-in microphone u.
* The built-in microphone u cannot be used when there is a plug in the
INPUT jack
2. Turn the power switch q to the “AUTO” position.
3. If desired, press the pitch switch e to select the standard A4 pitch.
(Refer to the Pitch Selection section for details.)
4. Pluck the string to be tuned. The appropriate indicator
up for the tuning note. (Do not pluck two or more strings at the time.)
5. If the wrong indicator light is on, adjust the guitar tuning peg until the
correct light comes on.
6. Continue to adjust the tuning
peg until the VU meter
needle rests in the middle (“0
cent”). If the note is flat, the
left tuning guide (W) will light.
If the note is raised, the right
tuning guide (Q ) will light.
Adjust accordingly until both
tuning guides (W ,Q ) are lit.
At this point, the string is
correctly tuned.
7. Repeat steps 4 through 6 to tune the other strings.
● Manual Tuning (MANL)
In MANL mode, each note must be individually selected as needed.
This mode is most commonly used to tune instruments before musical
performances.
1. Similar to AUTO mode, connect the electric guitar or bass cord to
the INPUT jack i. For acoustic guitars, place the guitar sound hole
near the built-in microphone u.
2. Turn the power switch q to the “MANL” position.
3. If desired, press the pitch switch e to select the standard A4 pitch.
(Refer to the Pitch Selection section for details.)
4. Press the note switch w to select the desired tuning note. The
indicators y for the tuning notes will light in sequence (as shown in
the pattern below) each time the note switch is pressed.
i.
r
6E → 5A → 4D → 3G → 2B → 1E
Adjust the tuning peg until the VU meter
needle rests in the middle (“0 cent”).
The appropriate indicator for the
plucked tuning note should lights up.
y will light
!0 DC 9V JACK
o OUTPUT JACK
i INPUT JACK
u MICROPHONE
t TUNING GUIDES y INDICATORS
■ SPECIFICATIONS
Indicators : VU Meter, Indicator
LEDs,Tuning Guides
Tuning Notes : 6E, 5A, 4D, 3G, 2B, 1E
VU Meter Precision : ± 1 cent
Standard Pitch Range
Added Function : Battery Check
Jacks : INPUT, OUTPUT, DC 9V
Power Source : 9V dry cell battery
Battery Life : Approx. 9 hours
Dimensions : 155 x 48.5 x 32.5 mm
(WxHxD) (6-1/8" x 1-15/16" x 1-1/4")
Weight : 159 g (5.6 oz) with battery
Accessory : 9V dry cell battery (6F22) x 1
: A4 = 438 Hz — 445 Hz
(1 Hz steps)
(006P or 6F22) or YAMAHA
AC adaptor (AC-05UC or AC320UC)
* Specifications and external appearance are subject to change without
notice.
■ BATTERY CHECK
For about 2 seconds after switching the power from “OFF” to “AUTO”
or “MANL”, the VU meter needle will indicate the charge remaining in
the battery. If the needle rests to the left of the battery check bar (refer
to Figure 1 below), the battery needs to be replaced.
As an additional check, if the battery runs low while the tuner is in use,
both tuning guide indicators (W,Q ) will flash indicating that the battery
must be replaced.
For convenience, the tuner has a DC 9V jack; please use an optional
YAMAHA AC adaptor (AC-05UC or AC-320UC) wherever possible.
5. Adjust the tuning peg until the VU meter r needle rests in the
middle (“0 cent”). If the note is flat, the left tuning guide (W ) will
light. If the note is raised, the right tuning guide (Q) will light. Adjust
accordingly until both tuning guides (W ,Q ) are lit. At this point, the
string is correctly tuned.
6. Repeat steps 4 and 5 to tune the other strings.
■ PITCH SELECTION
Recently, it has become common to slightly raise the standard pitch
when tuning musical instruments. The standard pitch also depends on
the region and the era. To conform to the current standard and to
harmonize with other instruments, the standard pitch must be changed
from time to time.
■ PITCH SELECTION METHOD
1. Turn the power switch q to the “MANL” or “AUTO” position.
2. Press the pitch switch e once to enter pitch selection mode. An
indicator y will flash at one of the standard pitch settings (A4: 438
— 445 Hz).
3. While the indicator
indicators y will flash in sequence (as shown in the pattern below)
each time the pitch switch is pressed. Each indicator y step represents
a 1 Hz change in standard pitch.
438 → 439 → 440 → 441 → 442 → 443 → 444 → 445
4. Select the desired standard pitch. When the pitch switch
been pressed for about 2 seconds, the tuner will automatically
return to tuning mode.
* Turning OFF the power switch
When the power switch
position, the standard pitch automatically resets to A4: 440 Hz.
THIS DIGITAL APPARATUS DOES NOT EXCEED THE “CLASS B” LIMITS FOR RADIO NOISE EMISSIONS FROM
DIGITAL APPARATUS SET OUT IN THE RADIO INTERFERENCE REGULATION OF THE CANADIAN DEPARTMENT
OF COMMUNICATIONS.
y is flashing, press the pitch switch e. The
e has not
q cancels the selected standard pitch.
q is turned back on to the “AUTO” or “MANL”
● Battery Change
The battery compartment is in the rear of the tuner. Remove the old
battery and replace it with a new one of the same type. Be careful to
connect the battery in the correct polarity.
* Always turn the power switch q to “OFF” before changing the battery
or connecting an AC adaptor.
OKLOW
(Figuare 2)(Figuare 1)
Bij dit produkt zijn batterijen geleverd. Wanneer
deze leeg zijn, moet u ze niet weggooien maar
inleveren als KCA.
FCC INFORMATION (U.S.A.)
1. IMPORTANT NOTICE: DO NOT MODIFY THIS UNIT!
This product, when installed as indicated in the instructions contained in this manual, meets FCC
requirements. Modifications not expressly approved by Yamaha may void your authority, granted by
the FCC, to use the product.
2. IMPORTANT:
shielded cables. Cable/s supplied with this product MUST be used. Follow all installation instructions.
Failure to follow instructions could void your FCC authorization to use this product in the USA.
3. NOTE:
tions, Part 15 for Class ”B” digital devices. Compliance with these requirements provides a reasonable
level of assurance that your use of this product in a residential environment will not result in harmful
interference with other electronic devices. This equipment generates/uses radio frequencies and, if not
installed and used according to the instructions found in the users manual, may cause interference
harmful to the operation of other electronic devices. Compliance with FCC regulations does not guarantee that interference will not occur in all installations. If this product is found to be the source of
interference, which can be determined by turning the unit ”OFF” and ”ON”, please try to eliminate the
problem by using one of the following measures:
Relocate either this product or the device that is being affected by the interference.
Utilize power outlets that are on different branch (circuit breaker or fuse) circuits or install AC line filter/s.
In the case of radio or TV interference, relocate/reorient the antenna. If the antenna lead-in is 300 ohm
ribbon lead, change the lead-in to co-axial type cable.
If these corrective measures do not produce satisfactory results, please contact the local retailer
authorized to distribute this type of product. If you can not locate the appropriate, please contact
Yamaha Corporation of America, Electronic Service Division, 6600 Orangethorpe Ave, Buena Park, CA
90620
The above statements apply ONLY to those products distributed by Yamaha Corporations of America or
its subsidiaries.
When connecting this product to accessories and/or another product use only high quality
This product has been tested and found to comply with the requirements listed in FCC Regula-
 Loading...