

Page 1
GUITAR/BASS TUNER
wtn cx m u^ [yZ < nts i\.
ik(ni Т 4-iJiSrt-r') i11. iÄWcolSW b')
YAMAHA
YT-1000
OW NER 'S M AN UA L
MOD E D ’E MP LO l
BED IEN U NG SA NL EIT UN G
Xi',&t£b.i}il]altz>). miiiiblt-t-b
Ш«^й?ЛЧt *i*) tt</)t-ritÄUi%\
YAMAHA
YAAAAHA CORPORATOM
RO.Box 1. Hamamatsu. Japan
Printed in Hong Kong
L <
■5= -z l-- >^ (Z) 7d .^
• Т’З -Д -г- Г •у^=¥^-<Т)^л.-->'7
1. --'“У-хЛ-/tOi- “ON* IC Li to
2. /-ЬХ^ ••/tOlcj:'К ti-->/L4i'i£ (#iS) i-iit/it,
3. f i t, (2tU
1:<7 )Й ^И В# (с ^|Л '4 пТ '< 4 '? i'o )
4. Х-;?-©Х)||й''Ф:^Х)440Н2 (0) IC44J:t1C. (#:#) ^iSHTiLit,
')^'^М'-'4РЯЛв-Л‘'й< 4')t?’Ti'it, i-->/L4iiLT<4'?i',
5. fÜ^Si)|nl<i-lcLTt^.-->/Lit,
#X X(7) -t ^ .-- >^ 7'
1. (irifiiX)INPUT-»-/i'©lc. i^^-/^-XÄ‘bC03-b-^i$i^Lito (^iOB^UTPUTv^ y^OLr^t^jg
t-ltit ШФТ'УЬ^Х'Ь ito)
2. 7 3-Xr-f y^^^-fiOißfi-60 (1-5) ¿[riJLT'to 4K INPUTi-'^ •/;7©(:7’7
H^ilTi'^iMFicii, ЙШ ^'! ^o tr yQ lii ¥§ })lt tA .o
■Ь* ':у^ Ф ^М
^i^=f-yt(iA4=440HzT-t*L 41¿(iA4=444HzlC<ib-ti:/.:i>iß<t[i
T IC. x-i'-©50|j-M44Hzi^iSt<i; 7 lcti--> / LT < 4
?l'o
Hz 430
CENT -50 0/
440
450
• • • • •
[• • •
• •
♦50
ВАТТ»
• /< .y-jr IJ —-^ X .у ^
/x”7_X^ yfOi- “BAT.“ iü;ü?lcL/c»i. X-i'-iOit4BATTERY/)feiif'/->Ä‘^51-aTi'4iß<i- (MD II. tifi
mnn L TI' i tiOT'. 4445 icff LI L L T < 4? I',
L *'4
M2(7)j:7(cLT-4iiÜ^5:4^Lit, •^¡ÜiO+. -il!iJüx4i'j: 7 IcLT < 4$i‘,
‘ä‘f'<n-X^-y^Oi: “OFF" IC L Тй'ь4т4‘оТ < 4? L',
• fK»*3 UiO^i'ißpfr
♦IC iS iCO L'T
• YT-l OOOii. 6F22 (006P) (¿Ш ПШ Lit,
• crfifülz^-ь^г1^ЛШ-е:‘Т''''7-х 'f -/ i-^OFFlz L
i <• / ¿r t. Ш 1Я !Г b
i Ч fi*. L T iiI»T < A; $ I
IS8B 0 Sff ii
Q>-9-
©V- fi7 D,7 >
EO 450
\ BATTERY
t7 ► -4^ БЕ 5A403G 2B 1E <düUJJ
ODQ 1,4 t ° t= 3|
MIC
Hz 430 4
. cent\so 0 «SO
ГЯЗЗ BAT.ON
$i‘. '/УЛ *
-tc L'iiigii U r i, 4-1 'T- < ti%\
'), Ш1 Ш ШШ Ь i to ^z fz'L . Ш
.•МсК'ЛЙЙК ffiл^-ИПc7)ä!лÄ^Í)'^í-li:^¿.
Л U 4 o t-№ä .‘Fi;pii<7)T-ix $ 4 if 4 о fz'iL
A-WU№ifLT</i$i‘.
YAMAHA
YT-1000
GUTAR/BASS
TUNER
• • • •
4E ЗА 20 IG С!Ш
©y-hx-f-vt ©INPUTv-t"y/
LT < ti
it, ^'tati
©OUTPUT V -f -y X
SIO K
(m)
■5^ M^ hX 'J ':7S 0f fiL \75
t№Kffl^X'j'/ Mi. /-7-*fi(tT№74rti0i)C7)Tt, M<7)i 7 IC3 ^ b LTDiit‘< 4§i’
mitm
Ш&
flut f-y -t
«t
Ш
mtii
ЖЖ
«ttii b-J t/ Jftt li.
x-7-
6E(4E),5A(3A),4D(2D), 3G(lG),2B, IE
±l-tr> 1-
A4=440Hz
y\'-y X') —11 V X®HE
INPUT V -f 7 i'. OUTPUTV -f 7 X
6F22(006P)9V?zlitfe
140(W)X56(D)X3l(H)mm
i70g(iz®i-aat;)
6F22 9V^®vtfeXl .
< Si r 4 C t *<* 'j 4 T.
______
О
— -©- I
^ I
6Е 5А 4D 3G 2В 1Е
äS
»K
4#i Xi5 TI
»г
М
ky;
4>;,‘Я1. |v5riii:j4ii-2> {,cor-7o iJli l-.tr« u й'*> KJCWBI'W-ttWA'it'l-; L/.ii}
ft(i. 4;г*Г4:Г4й7<л l-.iiHi' hlf«7)lic-/'Eyii;*ieJ4'.i-rtfi«< yc?i*. (¿TWliÄiftii riZ< 4'?i*)
йуТ?.
ЛА
AS
ш
attimn
ш
т
АЙ
й*Т<
AS
b- * «
W
АЙ
м
«Я (-9-—fX) Xi
ж
ш
щ
лЯ
т
гл
Щ
м
т
У!Л
&■*<
АЙ
ЙХ.
AS
йТйй^Г^й'Хй';
:tr ^ я f-i-:#--
: bUJitYOB *'i>1 x %f4
-шт
Ь«_Й,
'«’ й “
% fl e
l.trÄ3^ JL L-CJ>7*‘t ■> r?i> JL L/-.
YT-1000
«bU Jiif a
£
tt Ä
« u
*sa* »^
«EPWlJÜ'rz-ieXLTiiitK tZ$ \.'.
rt S И а «
=f-130 A>WmiRi&ili‘l'!ViBn08fHJ- 053--160-243I
EP
Ш
Kg
ЛЙ
>Уо
AS
AS
>T<
AS
>%
АЙ
йс»;
AS
sx
AS
SV
АЙ
>v
AS
Ж
AS
ÄX,
AS
Й^Х,
AS
Щ
АЙ
ftX,
AS
ÄX
AS
Ж
ж
■tt— t r:x e'o i\ i:
1. (^liE^Fe^
riSAU (1Ш,TIC ill)
J;') ill у t- (Щ^ • X w 7 b • H 5Ä?i ic I
■bKU'llir 14№1£1ЛМЛУ)А
{m b&Ltto
2. «liE)(flPit(7)t-t'X
№МИ1Я1'|'iz)}-mu<m L4ißit. t-n
1'±1ГЙ1СГ1$#Щ$ it L.
• L i t. C iOfS-2-tГШ'<
< 4$i', №äA4-$ißiMc(it-txnt
4iri<ißft{>i>')it,
i4. iini‘J:lf)Ai *)läAlcfite$lUiß
frli. Iv fPj (c fi П V'J:lfЙ i) ■5.1' li *älcot
v/N-.l£il^SI?.¥.T7X-t-h'xföA|cr
< 4 § I 'о f^teytic Й It 1.1 - h'xtt'‘i
¿£fflil3'l'X>t-h'xtfiitt {.оТГг4-5 i
T-TiiJÄLit,
3. 77X—t-tfX
11 У t-iO iSM Ш t Й i t L t -1X li
fiftL 4') it*L -Л«5 rtfCt (> oTt-
tx4$tTi'44§it,
¡7).*4 f r ‘ i L 4 7. iiПI'J-.lflAi) S
l'li*ldX)-Yvy^,eiлlf^53йr7X-t-
t ХЙ.* i T-fPlii < 4 $ V
LM^ -^ ai
=г430 Й?1й]WiRfö гЬ''Вii^Pf 1 о# 14>
L hlf it LMBilc.
053 460-2431
1 T’T?/\®m§»ssp75'—t-ьгяг&.'З i
(вВ*«Х?:ОЯЯахЯЧЖа)
«JE - К Д 0 Ж -TlOl
nF Ttso
нав?-ед^>ж-
am v- ti д с > f-
кт ^ - ti x ^ > f ~
(»«)
n m ж Ш »
^9Z ot iK ^'^ 9-
•iflia‘?‘ÄSÄ+*Sf*i*so
TOM
TEL(0tl)St3S034
i4Xmr.»»EB*i&-7 ttXKcnHie;se>y-3F
xM3
TEL (022)236-0219
Tfb OMi535ftI-4 8 ✓ A/i-T-ittiÄrff
T£L {025)243-4321
K:^ mX ^ 2-S -2 ФЩе'Д.У
тЛО
TEL(02e3)32‘S930
*.^е-|-паг?*ши.я&з-4
та(озхэл5*П41
Г:к»«4>9г:?.ЛиМ
Till
TCL(04«)434-]tOO
TtlbД%2в±В>:}П rv/»4*nXB;«j
Та(05Э)4» «711
T<M
€25««+г1а1Я1Г2-1-г гт/»Авг*хде>>-зг
Ta(0S2)«S2*2230
Xi*s»tffl^RB*Ti-ib VTi\n .^ 9& x: >9 -m
TCL(06)I77&2«2
wi*a^ÄKi*J2-7-3 r?/'i^Fai*i7f
T£L(07t)»l-tl9S
t7«шкт к% п -7
T£i. (0878)22 3045
01 !r.*mSii«KS.qi?-?7-31
X?3I-
TEL (082)874-3787
Tli? я=яг-11-4
m(092)472*2134
д^^а^яв:»п rv/44*nx«?j
T13S
TCL(053)4«5*Sm
1 T’T'/WJCSilLM^^gB I
о--к9У.11«|1 т»м д««<1>я»110-1 ти.(Ю)1<ео-г<]1
■ в ■ X ■ я =г1м TEL(o])3S7< ess?
к X X ■ я XIM К-ХвФ^СЯХТ-П-ЗСЗ^Аел-) TEL(03)357«-859?
X Н X Я Я тИ? *KÄf*E*»;B3-l?-5(-OA«77’fte.*B)IEL(06)?S?S?3i
S S я X ■ я т<ео ггая>1>Ей1-18-?8 TEL(a52)2oi-si99
7г П X • я т81? >Sam»»ETi»»Rfi?-ll-8 TEL(09?)47? ?130
d « X ■ я Т064 *L«S4>ÄE«-E«SI-l(XV/xfe>y-) TEL(0II)SI?-*II3
tt X X ■ Я X98C <ЛйтХ*ЕУ:Ч2 г сО IEL{022>22?-6I<6
с: X X ■ Я т7зо 1:*ш"?Е1£*»т1-1-1|1Х7/*е».) тее(0(?)?«-з7(з
• 9Я1'.’«ами;сс'. i«tf»4iT
Page 2
YAMAHA
GUITAR/BASS TUNER
YT-1000
OWNER'S MANUAL
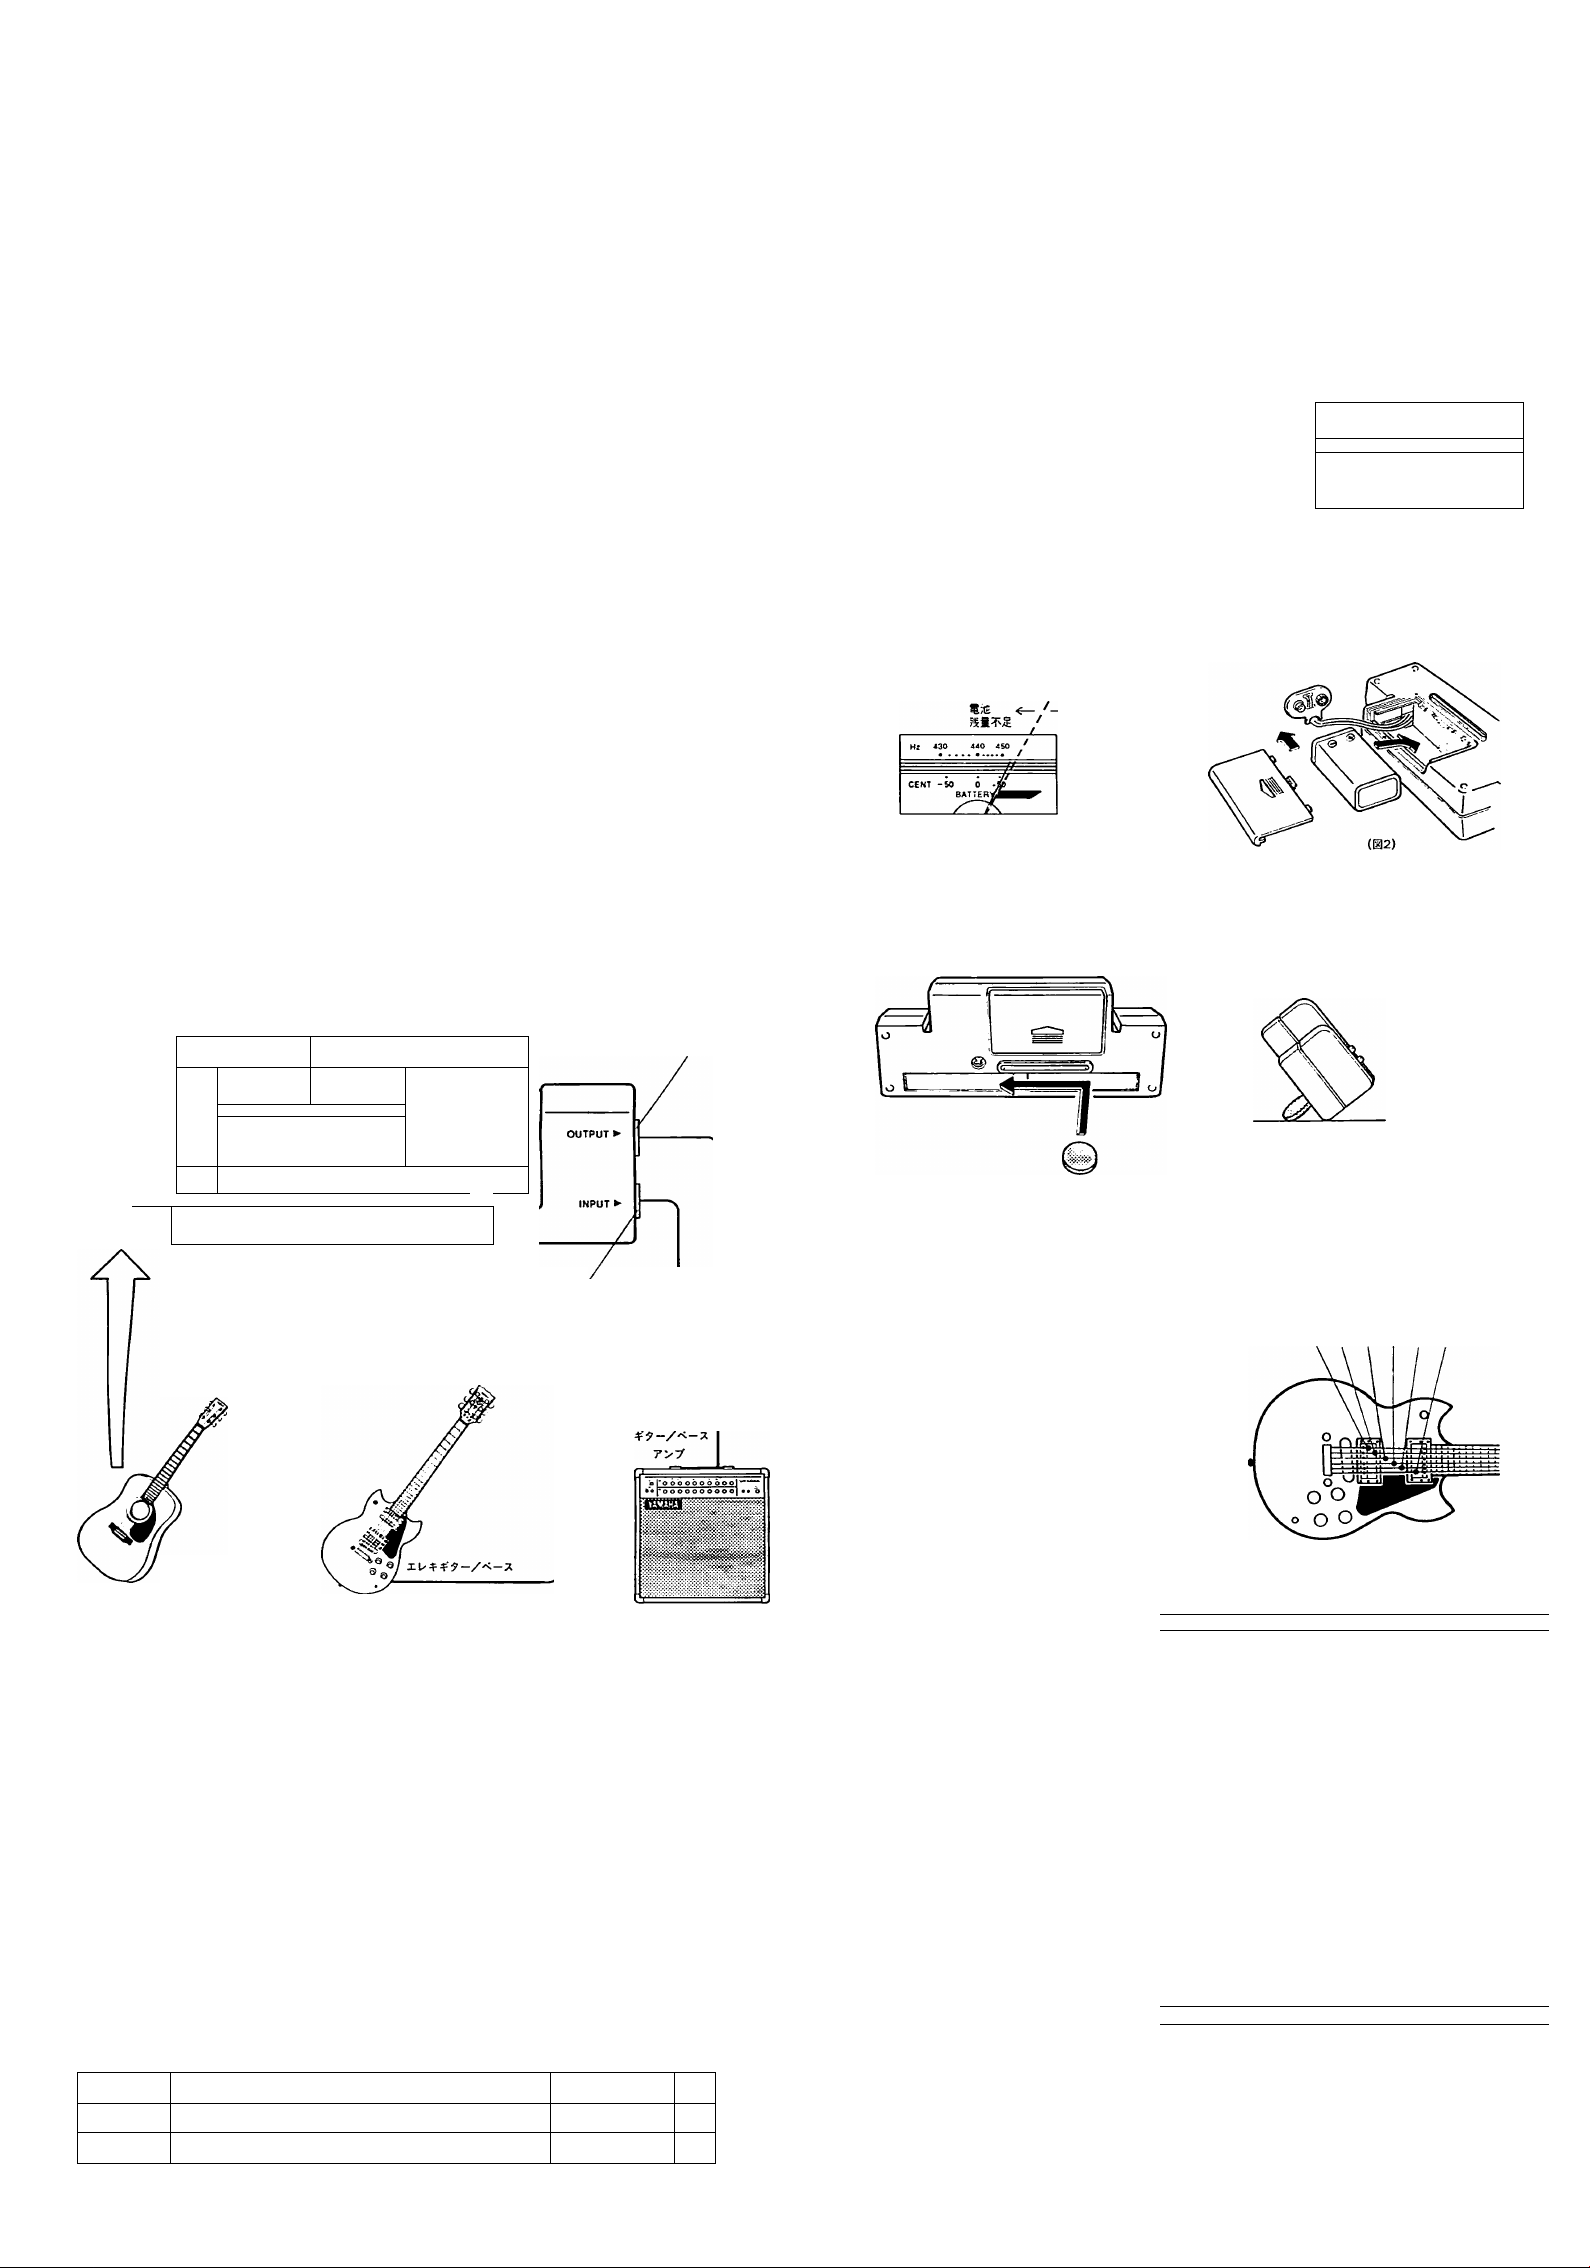
■ TUNING PROCEDURES
• Acoustic Guitar Tuning
1. Move the power switch O to the “ON” position.
2. Move the note switch @ to the desired tuning note.
3. Place the guitar sound hole near the built-in microphone @.
* The built-in microphone © cannot be used when there is a plug in the input jack ©.
4. Pluck the string to be tuned. (Do not pluck more than one string at a time.)
5. Adjust the tuning peg until the meter needle 0 rests in the middle of the meter at 440
Hz (0 Cent). If the note is flat, the needle will lean to the left; if the note is raised, the
needle will lean to the right.
6. Repeat steps 4 and 5 to tune the other strings.
Thank you for purchasing the YAMAHA YT-1000 Guitar/Bass Tuner.
Please read this manual thoroughly and keep it in a safe place for
future reference.
■ PRECAUTIONS
♦ To prevent damage, do not use the tuner in the following locations;
• places where the unit will be in direct sunlight;
• places subject to temperature and humidity extremes;
• places that are sandy or dusty.
♦ To power the tuner, use only a 6F22 or 006P 9V dry cell battery.
Other power sources may damage the device.
♦ For maximum battery life, always be sure the tuner is turned OFF when not in use.
♦ To prevent possible damage due to leakage of battery fluid, remove the battery from
the tuner if it is not to be used for an extended period of time.
• Electric Guitar/Bass Tuning
1. Connect the guitar cord to the INPUT jack @. (At this time, the OUTPUT jack O can
be connected to an amplifier in preparation for tuning during a performance.)
2. Follow the same acoustic guitar procedures as those outlined above.
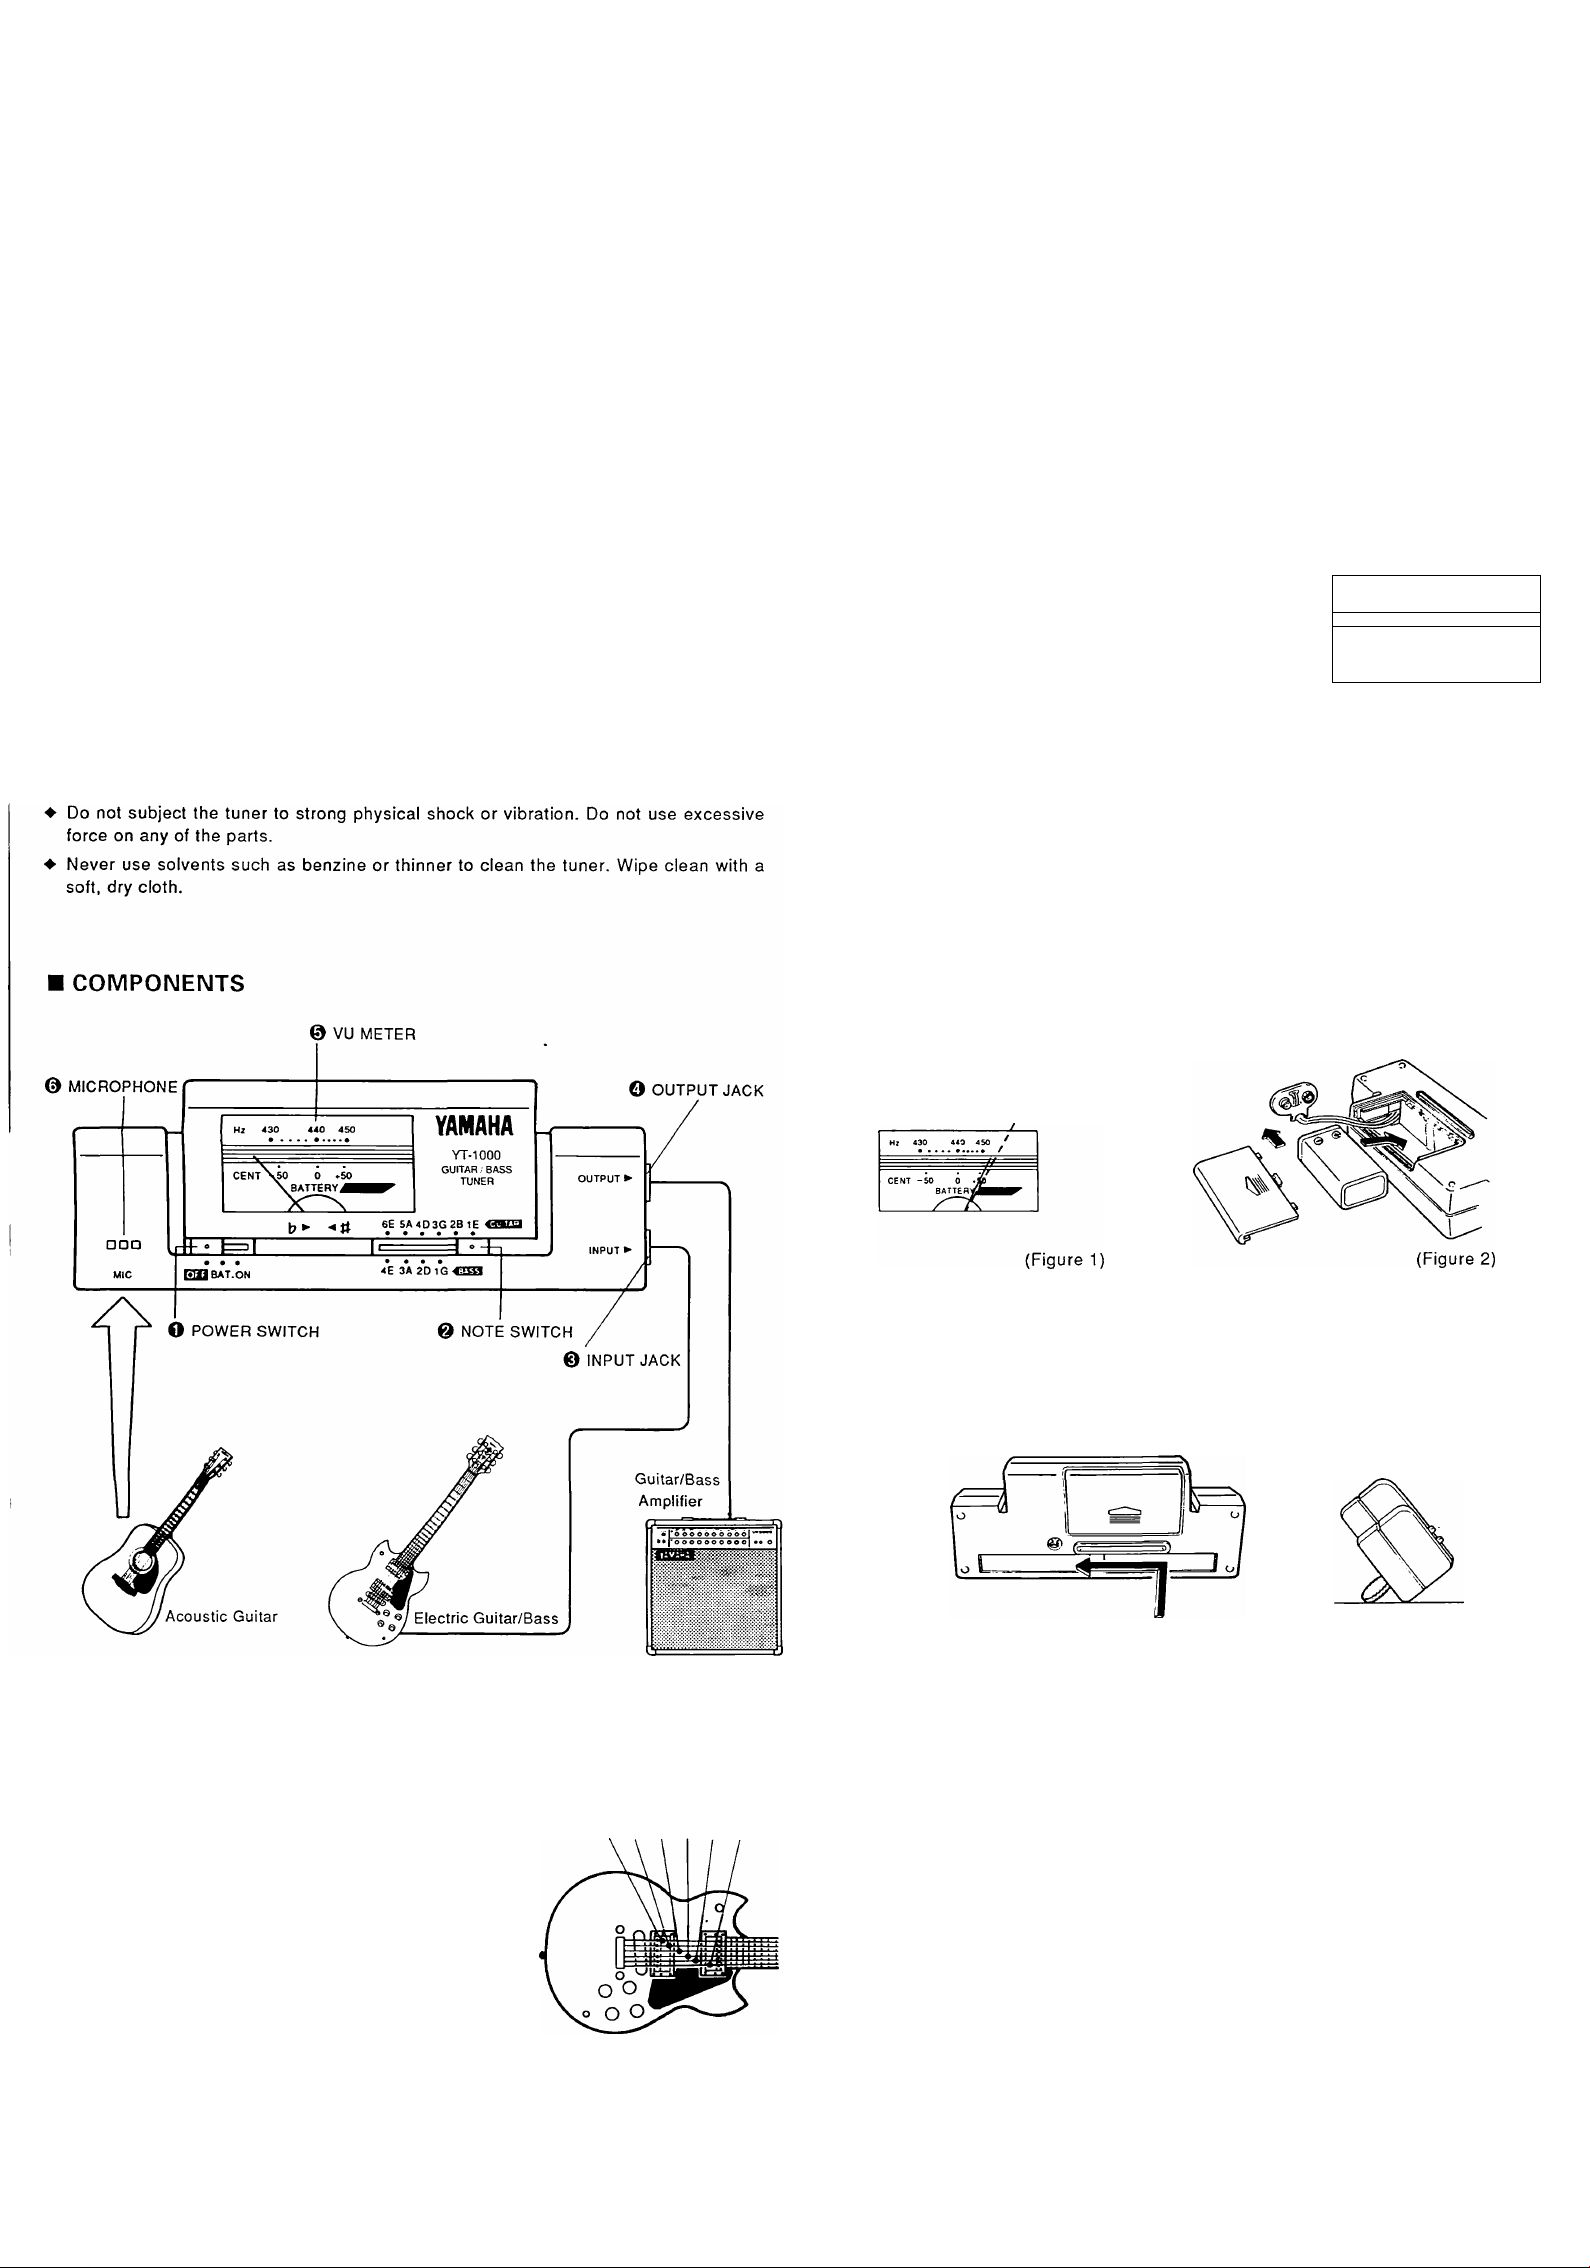
■ PITCH SELECTION
The A4 standard pitch can be changed from 440 Hz to
some other pitch. For example, if an A4 = 444 Hz
standard pitch is desired, tune the strings so that the
meter needle @ rests at 444 Hz instead of 440 Hz
when tuning.
Hz 430
CENT -50
440 450
. • . • •
• -
[• • •
ol *5 0
BATTJ
■ BATTERY CHECK
Move the power switch O to the “BAT.” position. The meter needle © now indicates the
charge remaining in the battery. If the needle rests to the left of the battery check bar
(refer to Figure 1), the battery needs to be replaced immediately.
• Battery Change
The battery compartment is in the rear of the tuner. Remove the old battery and replace
it with a new one of the same type. Be careful to connect the battery in the correct
polarity.
* Always turn the power switch O to '’OFF" before changing the battery .
LOW OK
■ TILT SLIT
The tuner can be tilted back by using the slit in the rear panel. Insert a coin or similar flat
object into the slit and tilt back as shown in the diagram below.
■ SPECIFICATIONS
Indicators : VU Meter
Tuning Notes : 6E(4E), 5A(3A), 4D(2D), 3G(1G), 2B, 1E
VU Meter Precision ; ± 1 cent
Standard Pitch : A4 = 440 Hz
Added Function : Battery Check
Jacks : INPUT, OUTPUT
Power Source : 9V dry cell battery (006P or 6F22)
Dimensions (WxHxD) ; 140 x 56 x 31 mm
(5-1/2" X 2-3/16" X 1-1/4")
Weight ; 170 g (6 oz) with battery
Accessory ; 9V dry cell battery (6F22) x 1
Specifications and external appearance are subject to change without notice.
____
I
— I
6E 5A 4D 3G 2B 1E
I I
_
~0'
THIS DIGITAL APPARATUS DOES NOT EXCEED THE ‘CLASS B" LIMITS FOR RADIO NOISE EMISSIONS FROM DIGITAL APPARA
TUS SET OUT IN THE RADIO INTERFERENCE REGULATION OF THE CANADIAN DEPARTMENT OF COMMUNICATIONS.
FCC INFORMATION (U.S.A.)
1. IMPORTANT NOTICE: DO NOT MODIFY THIS UNIT!
This product, when installed as indicated in the instructions contained in this manual, meets FCC requirements. Modifications
not expressly approved by Yamaha may void your authority, granted by the FCC, to use the product.
2. IMPORTANT: When connecting this product to accessories and/or another product use only high quality shielded cables. Cable/
s supplied with this product MUST be used. Follow all installation instructions. Failure to follow instructions could void your FCC
authorization to use this product in the USA
3. NOTE: This product has been tested and found to comply with the requirements listed in FCC Regulations. Part 15 for Class ”B‘
digital devices. Compliance with these requirements provides a reasonable level of assurance that your use of this product in a
residential environment will not result in harmful interference with other electronic devices. This equipment generates/uses radio
frequencies and, if not installed and used according to the instructions found in the users manual, may cause interference
harmful to the operation of other electronic devices. Compliance with FCC regulations does not guarantee that interference will
not occur in all installations. If this product is found to be the source of interference, which can be determined by turning the unit
’OFF" and ’ON’, please try to eliminate the problem by using one of the following measures:
Relocate either this product or the device that is being affected by the interference.
Utilize power outlets that are on different branch (circuit breaker or fuse) circuits or install AC line filter/s.
In the case of radio or TV interference, relocate/reorient the antenna. If the antenna lead-in is 300 ohm ribbon lead, change the
lead-in to co-axial type cable.
If these corrective measures do not produce satisfactory results, please contact the local retailer authorized to distribute this
type of product If you can not locate the appropriate, please contact Yamaha Corporation of America. Electronic Service
Division, 6600 Orangethorpe Ave, Buena Park, CA 90620
The above statements apply ONLY to those products distributed by Yamaha Corporations of America or its subsidiaries.
Page 3

YAMAHA
ACCORDEUR DE GUITARE/BASSE
YT-1000
MODE D'EMPLOI
Nous vous remercions d’avoir porté votre choix sur l’accordeur de
guitare!basse YAMAHA YT-1000.
Nous vous prions de lire attentivement ce mode d’emploi et de le
conserver en lieu sûr pour toute référence future.
■ PRECAUTIONS
♦ Afin de ne pas endommager l’accordeur ne pas l’utiliser dans des endroits soumis aux
conditions suivantes:
• plein soleil;
• humidité ou températures excessives;
• sable ou poussière.
♦ Pour alimenter l’accordeur, utiliser une pile sèche 6F22 ou 006P de 9 volts.
Tout autre source d’àlimentation pourrait endommager l’appareil.
♦ Pour prolonger au maximum la durée de vie de la pile, toujours mettre l’accordeur
hors tension lorsqu’il n’est pas utilisé.
♦ Pour prévenir tout endommagement éventuel de l’accordeur dû à une fuite du liquide
de la pile, enlever la pile lorsque l’accordeur ne doit pas être utilisé pendant une
période prolongée.
♦ Ne pas soumettre l’accordeur à des chocs ou à des vibrations importantes. Ne jamais
le manipuler avec une force excessive.
♦ Ne jamais utiliser de solvants, tels que de la benzine ou un diluant, pour nettoyer
l’accordeur. L’essuyer avec un chiffon propre et sec.
m MARCHE A SUIVRE
• Accord d’une guitare acoustique
1. Mettre l’interrupteur d’alimentation O sur la position "ON”.
2. Mettre la touche de note @ sur la note d’accord souhaitée.
3. Approcher l’ouïe de la guitare du micro intégré ©.
* Le micro intégré © ne peut pas être utilisé lorsqu’un instrument est branché à la prise
d’entrée ©.
4. Pincer la corde à accorder (ne pas pincer plus d’une corde à la fois.
5. Régler les chevilles d’accord jusqu’à ce que l’aiguille du VU-mètre © s’arrête au mi
lieu de la plage d’indication à 440 Hz (0 cent). Si la note est trop basse l’aiguille se
déplace vers la gauche, alors que si elle est trop haute elle se déplace vers la droite.
6. Répéter les étapes 4 et 5 pour accorder les autres cordes.
• Accord d’une guitare/basse électrique
1. Connecter le câble de la guitare à la prise INPUT ©. (La prise OUTPUT O peut alors
être connectée à un amplificateur, ce qui permet d’accorder l’instrument en cours
d’exécution.)
2. Procéder de la même manière que pour une guitare acoustique en suivant les instruc
tions données ci-dessus.
■ SELECTION DE LA HAUTEUR
La hauteur standard de A4, qui est de 440 Hz, peut
être élevée ou abaissée. Si une hauteur standard A4 =
444Hz est souhaitée, par exemple, accorder les cordes
de sorte que l’aiguille du VU-mètre © s’arrête sur 444
au lieu de 440 Hz.
■ CONTROLE DE LA PILE
Mettre l’interrupteur d’alimentation O sur la position “BAT”. L’aiguille du VU-mètre ©
indique alors la charge restante de la pile. Si l’aiguille s’arrête à gauche de la barre de
contrôle de la pile (voir la figure 1), la pile doit être immédiatement remplacée.
ORGANES
0 VU-METRE
• Remplacement de la pile
Le logement de la pile est situé au dos de l’accordeur. Retirer la pile usée et la
remplacer par une pile neuve du même type. Faire très attention de placer la pile en
respectant les polarités.
* Toujours mettre T interrupteur POWER O sur la position “OFF” avant de remplacer la
pile.
BAS CORRECT
(Figure 1)
■ FENTE D'INCLINAISON
L’accordeur peut être maintenu incliné en utilisant la fente du panneau arrière. Introduire
une pièce de monnaie, ou autre objet plat similaire, dans la fente et incliner l’accordeur de la
manière illustrée.
■ FICHE TECHNIQUE
Indicateurs : VU-mètre
Notes d’accord : 6E(4E), 5A(3A), 4D(2D), 3G(1G), 2B, 1E
Précision du VU-mètre ; ± 1 centième
Hauteur standard ; A4 = 440 Hz
Fonction supplémentaire : Contrôle de la pile
Prises : INPUT, OUTPUT
Alimentation : Pile sèche de 9V (006P ou 6F22)
Dimensions (L x H x P) : 140 x 56 x 31 mm
Poids : 170 g avec pile
Accessoires : Pile sèche de 9 V (6F22) x 1
* Les spécifications et l’aspect externe peuvent être modifiés sans aucun avis.
*
LE PRESENT APPAREIL NUMERIQUE N'EMET PAS DE BRUITS RADIOELECTRIQUES DEPASSANT LES LIMITES APPLICABLES
AUX APPAREILS NUMERIQUES DE LA 'CLASSE B‘ PRESCRITES DANS LE REGLEMENT SUR LE BROUILLAGE RADIOELECTRIQUE
EDICTE PAR LE MINISTERE DES COMMUNICATIONS DU CANADA.
Page 4

YAMAHA
GITARREN/BASS-STIMMGERÄT
YT-1000
BEDIENUNGSANLEITUNG
■ STIMMVERFAHREN
• Stimmen einer akustischen Gitarre
1. Den Betriebsschalter O auf “ON” stellen.
2. Den Notenschalter 0 auf die gewünschte Stimmnote stellen.
3. Das Schalloch der Gitarre direkt vor dem eingebauten Mikroforl 0 plazieren.
* Bei belegter INPUT-Buchse © ist das eingebaute Mikrofon © funktionslos.
4. Die zu stimmende Saite anzupfen. (Stets nur eine einzige Saite anzupfen.)
5. Am Stimmwirbel drehen, bis der Zeiger 0 des VU-Meters fest auf 440 Hz (0 Cent) in
Skalenmitte weist. Bei zu niedrigem Ton ist der Zeiger nach links und bei zu hohem
Ton nach rechts geneigt.
6. Zum Stimmen der übrigen Saiten die Schritte 4 und 5 wiederholen.
Vielen Dank für den Kauf des Gitarren!Baß-Slimmgeräts YT-1000 von Yamaha.
Bitte lesen Sie sich diese Anleitung vor Gebrauch durch und bewahren Sie
sie dann zur späteren Bezugnahme an einem sicheren Ort auf.
VORSICHTSMASSNAHMEN
Das Gerät vor den nachfolgenden Einflüssen schützen, um Schäden zu verhindern;
• Direkte Sonneneinstrahlung
• Extreme Temperaturen oder Feuchtigkeit
• Übermäßiger Staub.
Zum Betrieb des YT-1000 nur eine 9 V Batterie der Kennung 6F22 oder 006P.
Andere Stromquellen können zu Schäden führen.
Das Gerät nach Gebrauch stets ausschalten, um die Batterie zu schonen.
Vor längerem Nichtgebrauch die Batterie entfernen, um Schäden durch womöglich
lecke Batterien zu verhindern.
Vor Stoß und Schlag schützen. Keinesfalls mit Gewalt handhaben.
Zum Reinigen keinesfalls Benzin oder Verdünner verwenden. Mit einem trockenen,
sauberen Tuch abwischen.
BAUTEILE
© VU-Meter
• Stimmen einer E- bzw. Baßgitarre
1. Das Gitarrenkabel mit der INPUT-Buchse © verbinden. (Hierbei kann an die OUTPUT-Buchse O ein Verstärker zum Stimmen während der Darbietung angeschlossen
sein.)
2. Das Stimmen des Instruments erfolgt in der gleichen Weise wie bei der akustischen
Gitarre.
■ WAHL DER STANDARDTONHOHE
(KAMMERTON A)
Die Standardtonhöhe A4 (440 Hz) läßt sich auf eine
andere Frequenz einstellen. Falls beispielsweise eine
Standardtonhöhe A4 = 444 Hz gewünscht wird, müssen
die Saiten so gestimmt werden, daß der Zeiger 0 auf
444 Hz statt auf 440 Hz weist.
Hz 430 440 450
■ KIPPSCHLITZ
Das YT-1000 weist einen Schlitz auf der Rückseite auf, wodurch es nach hinten gekippt
werden kann. Eine Münze o.ä. in den Schlitz einführen und das Gerät nach hinten
kippen, wie gezeigt.
0 Mikrofon (MIC.) f
□ □□
MIC
Hz 430 4
centXso ó ♦«)
'
Ш1
ЕШ BAT.ON
О Betriebsschalter
(OFF/BAT./ON)
Akustische Gitarre
40 450
• •••••
\ BATTERY^^^V'
<И 6Е 5A4D3G 2В 1Е <<ШкШ
••••••
4E ЗА 2D 1G 43Ш
YAMAHA
YT-1000
GUITAR ' BASS
TUNER
0 Notenschalter
о Ausgangsbuchse
© Eingangsbuchse
(INPUT)
Verstärker für
E-Gitarre/Baß
(OUTPUT)
Niedrig OK
/
(Abb. 1)
■ BATTERIEPRUFUNG
Den Betriebsschalter O in Stellung "BAT." schieben, worauf der Zeiger © den Ladezu
stand der Batterie anzeigt. Weist der Zeiger auf das linke Ende des Batterieprüfbalkens
(siehe Abb. 1), so ist die Batterie sofort auszutauschen.
• Batteriewechsel
Das Batteriefach befindet sich auf der Rückseite. Die alte Batterie durch eine neue des
gleichen Typs austauschen. Beim Anschließen der Batterie auf korrekte Polung achten.
* Vor dem Wechseln der Batterie den Betriebsschalter O unbedingt auf OFF stellen.
■ TECHNISCHE DATEN
Anzeigen : VU-Meter
Stimmnoten ; 6E(4E), 5A(3A), 4D(2D), 3G(1G), 2B, 1E
VU-Meterpräzision :± 1 Cent
Standardtonhöhe : A4 = 440 Hz
Zusatzfunktion : Batterieprüfung
Buchsen : INPUT, OUTPUT
Stromversorgung : 9V Trockenzelle (006P oder 6F22)
Abmessungen (WxHxD) : 140 x 56 x 31 mm
Gewicht : 170 g mit Batterie
Zubehör ; 9V Batterie (6F22) x 1
* Änderungen an Daten und Design Vorbehalten.
Bescheinigung des Importeurs
Hiermit wird bescheinigt, daß der / die / das
GUITAR/BASS TUNER Typ : YT-1000
(Gerät, Typ, Bezeichnung)
in Übereinstimmung mit den Bestimmungen der
VERFÜGUNG 1046/84
(Amtsblattverfügung)
funkentstört ist.
Der Deutschen Bundespost wurde das Inverkehrbringen dieses Gerätes angezeigt und die Bere
chtigung zur Überprüfung der Serie auf Einhaltung der Bestimmungen eingeräumt.
YAMAHA Europa GmbH
Name des Importeurs
_____________________________________________________
__________
________________________________________
_
____
I
— -ö- I
■ö" I
6E 5A 40 3G 2ß IE
О
Ш
ñ X. rfíefíi <
гйй^.й. ^r izcr um v è '-»Drî-ica. чс о-х
Ш
IXáE»fFHÍ WT- ¿ t á -r,
(1) 4= .'F<7) ^
(2) 4=,«F(-Íií3.htfí0íp;j IK Ji'ffm.
Ш
ж
Ш
í- -SiftiVfi. ÜH J-JfcOBU'/dVí I-IÍH.V. t Г
m.ó: (z ^ и i ^ < rj ? i
sr»:
ÄS
Ш
Ш
SX
SX
гл
SX
íiim.
_
Ш
Ш
m
This warranty is valid only in Japan.
Ш
6.
.1 ÍSH ?F(4 fÇîêifSÎ: Lâ■^t^co Z-±VJ (zL T < Л: ? i
¿ik
Ш
Ш
й«
Л».
K«;
ЛЛ
,'Fíi4=,‘F«->T4L/.:»ní!K ^№¿0 6 > (jí^ X -T o Lfz A ‘
oTCíO№t¡F.7F(;¡:со т ^Ч ^М Ш -Г Ъ ¿cOT'íií) О №йЕ»И«)
1 jiHHi < /»'г i'o
í o íT^- -7
äX
SX
м
ш
т
ш
ш
ш
ш
 Loading...