

Page 1

YAMAHA
5#
iî/iïS&
tí
II
ìimm
A
. 0.<'
cT A
IMPORTANT WICHTIG
IMPORTANT
'iiiiB*'' ..tiiiiim
...FliiiiiiiillP''"
tliííiliiliiiiílií"''
.:.i®ММММММММBF^'^'
,йКККlККККККIК№-^"
IMPORTANTE
.
.
Check your power supply
Make sure that your local AC mains
voltage matches the voltage specified
on the name plate on the bottom
panel. In some areas a voltage selec
tor may be provided on the rear
panel of the main keyboard unit.
Make sure that the voltage selector
is set for the voltage in your area.
Überprüfung der
Stromversorgung
Sicherstellen, daß die örtliche Netz
spannung den Betriebsspannungs
werten entspricht, die in die Plakette
auf der Unterseite des Keyboards
eingetragen sind. Für manche Be
stimmungsländer ist das Keyboard
mit einem Spannungswähler auf
der Rückseite ausgerüstet. Darauf
achten, daß der Spannungswähler
auf die örtliche Netzspannung ein
gestellt ist.
Contrôler la source
d’alimentation
S’assurer que la tension secteur
locale correspond à la tension indi
quée sur la plaque d’identification
située sur le panneau inférieur. Les
modèles destinés à certaines régions
peuvent être équipés d’un sélecteur
de tension situé sur la plaque d’iden
tification, sur le parmeau arrière du
clavier. Vérifier que le sélecteur est
bien réglé pour la tension secteur
utilisée.
Verifique la alimentación
de corriente
Asegúrese de que el voltaje local de
CA concuerde con el especificado en
la placa de identificación del panel
inferior. En algunas áreas, la unidad
viene provista de un selector de
voltaje en el panel posterior de la
unidad de teclado principal. Asegú
rese de que este selector esté en la
posición correspondiente al voltaje
de su área.
Page 2
CAUTION
RISK OF ELECTRIC SHOCK
DO NOT OPEN
The lightning flash with arrowhead symbol,
within an equilateral triangle, is intended to alert
the user to the presence of uninsulated “danger
ous voltage” within the product’s enclosure that
may be of sufficient magnitude to constitute a
risk of electric shock to persons.
CAUTION: TO REDUCE THE RISK OF ELECTRIC SHOCK.
DO NOT REMOVE COVER (OR BACK).
NO USER-SERVICEABLE PARTS INSIDE.
REFER SERVICING TO OUALIFIED SERVICE PERSONNEL.
See bottom of keyboard enclosure for graphic symbol markings
The exclamation point within an equilateral tri
angle is intended to alert the user to the presence
of important operating and maintenance (servic
ing) instructions in the literature accompanying
the product.
IMPORTANT SAFETY AND INSTALLATION INSTRUCTIONS
INFORMATION RELATING TO POSSIBLE PERSONAL INJURY, ELECTRIC SHOCK, AND FIRE HAZARD
POSSIBILITIES HAS BEEN INCLUDED IN THIS LIST.
VU —When using electronic products, basic pre-
TT X VJ cautions should always be followed, including
the following:
Read all Safety and Installation Instructions, Explanation of
I
• Graphical Symbols, and assembly instructions (where applicable)
BEFORE using your Yamaha electronic product. Check unit weight
specifications before you attempt to move this instrument!
Main Power Supply Verification: Your Yamaha electronic prod-
2
• uct has been manufactured specifically for the main supply
voltage used in your area. If you should move, or if any doubt exists,
please contact your dealer for instructions. The main supply voltage
required by your electronic product is printed on the name plate. For
name plate location, see “TAKING CARE OF YOUR PERSONAL
ELECTRONIC PIANO” item.
This product may be equipped with a polarized line plug (one
3
• blade wider than the other). If you are unable to insert the
plug into the outlet, contact an electrician to have your obsolete
outlet replaced. Do NOT defeat the safety purpose of the plug.
Yamaha products not having polarized plugs incorporate construc
tion methods and designs that do not require line plug polarization.
WARNING—Do NOT place objects on your electronic product’s
4
• power cord or place the unit in a position where anyone could
trip over, walk over, or roll anything over cords of any kind. Do NOT
allow your electronic product or its bench to rest on or be installed
over cords of any type. Improper installations of this type create the
possibility of a fire hazard and/or personal injury.
Environment: Your electronic product should be installed away
5
• from heat sources such as a radiator, heat registers and/or
other products that produce heat. Additionally, the unit should not
be located in a position that exposes the cabinet to direct sunlight, or
air currents having high humidity or heat levels.
Your Yamaha electronic product should be placed so that its
6
• location or position does not interfere with its proper ventilation.
_ Some Yamaha electronic products may have benches that are
/ • either a part of the product or supplied as an optional accessory.
Some of these benches are designed to be dealer assembled. Please
make sure that the bench is stable before using it. The bench
supplied by Yamaha was designed for seating only. No other uses are
recommended.
Some Yamaha electronic products can be made to operate with
8
• or without the side panels or other components that constitute
a stand.These products should be used only with the components
supplied or a cart or stand that is recommended by the manufacturer.
Do not operate for a long period of time at a high volume level
9
• or at a level that in uncomfortable. If you experience any
hearing loss or ringing in the ears, you should consult an audiologist.
"I A Yamaha electronic product near water or in
J.U* wet environments. For example, near a swimming pool, spa,
or in a wet basement.
Care should be taken so that objects do not fall, and liquids
n
• are not spilled, into the enclosure through openings.
-j Your Yamaha electronic product should be serviced by a
J.X* qualified service person when:
a. The power-supply cord or plug has been damaged: or
b. Objects have fallen, or liquid has been spilled into the product: or
c. The product has been exposed to rain; or
d. The product does not operate, exhibits a marked change in
performance: or
e. The product has been dropped, or the enclosure of the product
has been deunaged.
^ /y When not in use, always turn your Yamaha electronic product
unplugged from the outlet when it is to be left unused for a long period
of time. Notes: In this case, some units may lose some user pro
grammed data. Factory programmed memories will not be affected.
-j j Do not attempt to service the product beyond that described
should be referred to qualified service personnel.
_ Electromagnetic Interference (RFI). This series of Yamaha
J-J* electronic products utilizes digital (high frequency pulse)
technology that may adversely affect Radio/TV reception or the
operation of other devices that utilize digital technology. Please read
FCC Information (Page 40) for additional information.
“OFF”, The power-supply cord of the product should be
in the user-maintenance instructions. All other servicing
PLEASE KEEP THIS MANUAL
FOR FUTURE REFERENCE!
Page 3

Introduction
Thank you for choosing a Yamaha YPP-50 Personal Electronic Piano. Your
Personal Electronic Piano is a fine musical instrument that employs advanced
Yamaha music technology. With the proper care, it will give you many years
of musical pleasure.
• Yamaha's sophisticated AWM (Advanced Wave Memory) tone generator
system offers rich, realistic reproductions of digitally sanrpled keyboard
sounds.
• 8-note polyphony permits use of most standard playing techniques.
• Piano-like touch response provides extensive expressive control and out
standing playability.
• Performance Memory function records and plays back your keyboard
performances—and you can play along on the keyboard as the recorded
performance plays back!
• Built-in metronome facilitates practice and helps to develop an accurate
sense of timing.
• MIDI compatibility and a range of MIDI functions make the Personal Elec
tronic Piano useful in a range of advanced MIDI music systems.
In order to make the most of your Personal Electronic Piano's performance
potential and features, we urge you to read this Owner's Manual thoroughly,
and keep it in a safe place for later reference.
Contents ___________
KEYBOARD STAND
ASSEMBLY
TAKING CARE OF YOUR
PERSONAL ELECTRONIC
PIANO
THE CONTROLS AND
CONNECTORS: BASIC
OPERATION..................................... 6
ENJOY THE DEMONSTRATION. 8
PLAYING THE PERSONAL
ELECTRONIC PIANO
TRANSPOSITION
PITCH CONTROL
THE PERFORMANCE MEMORY 9
MIDI FUNCTIONS
A Brief Introduction to MIDI . 10
MIDI "Messages" Transmitted
& Received by the Personal
Electronic Piano
......................................
...............................................
......................
...........................
............................
..........................
.......................
10
10
2
6
8
8
9
MIDI Transmit & Receive
Channel Selection
Local Control ON/OFF
Program Change ON/OFF..., 11
Control Change ON/OFF
The Multi-Timbre Mode
The Split & Left Local OFF
Mode
..........................................
The Split & Right Local OFF
Mode
..........................................
Transmitting the Panel
Settings...................................... 12
TROUBLESHOOTING
OPTIONS & EXPANDER
MODULES ..................................... 13
MIDI DATA FORMAT
SPECIFICATIONS
....................
..............
..........
............
..................
....................
........................
10
11
11
12
12
12
13
13
38
Vorwort
Herzlichen Dank für den Kauf des Yamaha Personal Electronic Pianos YPP-50.
Ihr Personal Electronic Piano ist ein vielseitiges Keyboard, das mit modernster
Yamaha Musiktechnologie arbeitet. Bei umsichtiger Handhabung bietet Ihnen
das Personal Electronic Piano viele Jahre höchsten Spielgenuß.
• Das integrierte Yamaha AWM-Tonerzeugungsystem produziert klangvolle,
natürlich klingende Stimmen auf der Basis von digital aufgezeichneten
Intrumentenklängen.
• Die 8-Noten Polyphonie erlaubt praktisch alle Standard-Spieltechniken.
• Die pianoähnliche Anschlagsansprache ermöglicht eine nuancenreiche
Akzentuierung und sorgt für ein natürliches Spielgefühl,
• Eine Sequenzerfunktion, PERFORMANCE MEMORY genannt, dient zum
Auf zeichnen und zur Wiedergabe des eigenen Spiels—die Wiedergabe kann
sogar live auf dem Keyboard begleitet werden.
• Eine eingebaute Metronomfunktion bietet eine Übungshilfe und schärft
das Gefühl für Timing.
• Aufgrund der MIDI-Kompatibilität und der integrierten MIDI-Funktionen
kann das Personal Electronic Piano problemlos in komplexe MIDI-Systeme
integriert werden.
Um das großartige Potential Ihres Personal Electronic Pianos voll ausschöpfen
zu können, sollten Sie sich diese Bedienungsanleitung sorgfältig durchlesen
und zur späteren Bezugnahme an einem sicheren Ort aufzubewahren.
Introduction
Nous vous remercions d'avoir porté votre choix sur le Piano Electronique
Personnel Yamaha YPP-50. Ce Piano Electronique Personnel est un instrument
de musique pwfectionné faisant appel aux innovations les plus récentes de
la technologie musicale mise au point par Yamaha. Si vous l'utilisez avec
le soin qui convient, il vous donnera de grandes satisfactions musicales
pendant de longues années.
• Le système générateur de son AWM (de l'artgtais Advanced Wave Memory
ou Mémoire d'onde perfectionnée) offre une reproduction à la fois riche
et réaliste de sonorités de clavier échantillonnées numériquement.
• Une polyphonie à 8 notes permet d'utiliser les techniques de jeu les plus
classiques.
• Une réponse au toucher similaire à celle d'un piano vous permet un plus
grand contrôle de l'expression et vous offre de remarquables possibilités
d'exécution.
• La fonction de mémoire de performance vous permet d'enregistrer et de
reproduire vos propres exécutions, et de jouer pendant la reproduction
de votre enregistrement. ^
• Un métronome incorporé facilite les exercices au piano et vous permet
de développer un sens précis du rythme.
• La compatibilité MIDI et une gamme étendue de fonctions MIDI permettent
d'utiliser le Piano Electronique Personnel dans une grande variété de systè
mes musicaux MIDI.
Afin d'obtenir le maximum des fonctions et du potentiel d'exécution offerts
par le Piano Electronique Personnel, nous vous conseillons de lire attentive
ment ce manuel et de le conserver en lieu sûr pour toute référence future.
_________________________________
______________________________
Inhalt
ZUSAMMENBAU DES
KEYBOARDSTÄNDERS
VORSICHTSMASSNAHMEN... 14
BEDIENELEMENTE UND
ANSCHLÜSSE; GRUNDLEGENDE
BEDIENUNG................................... 14
WIEDERGABE DES
DEMOSTÜCKS
SPIELEN AUF DEM PERSONAL
ELECTRONIC PIANO
TRANSPOSITION
STIMMFUNKTION.......................... 17
PERFORMANCE MEMORYFUNKTION
MIDI-FUNKTIONEN
_____________
..............
..............................
....................
.........................
.....................................
Eine kurze Einführung in
MIDI
............................................
Vom Personal Electronic
Piano übertragene und
empfangene MIDI-Meldungen
....................................................
.......................
2
16
16
16
17
18
18
Tables des matières
ASSEMBLAGE DU SUPPORT
DU PIANO
ENTRETIEN DU PIANO
ELECTRONIQUE PERSONNEL
COMMANDES ET CONNEC
TEURS: FONCTIONNEMENT
DE BASE
ECOUTE DE LA SEQUENCE
DE DEMQNSTRATION
EXECUTION AU PIANO
REGLAGE DE LA HAUTEUR
......................................
.......................................
................
Quelques mots sur
l'interface MIDI...........................
"Messages" MIDI transmis
et reçus par le Piano Electro
nique Personnel
Sélection des canaux MIDI
de transmission et de
réception....................................
Commande locale ON/OFF.. 27
........................
Wahl des MIDI-Sende/
Empfangskanals
Lokalsteuerung EIN/AUS
Programm Wechsel EIN/AUS. 19
Steuerelement EIN/AUS............ 19
Die Multi-Timbre-Betriebsart 20
Splitfunktion & Lokalsteuerung
für linke Seite aus
Splitfunktion & Lokalsteuerung
für rechte Seite aus
Übertragen der Einstelldaten 20
STÖRUNGSSUCHE
SONDERZUBEHÖR UND
EXPANDERMODULE
MIDI-DATENFORMAT
TECHNISCHE DATEN
18
Changement de programme
ON/OFF....................................... 27
3
22
22
24
24 DEPISTAGE DES PANNES
24
25 FORMAT DES DONNEES
25
26 SPECIFICATIONS
26
26
26
Changement de commande
ON/OFF....................................... 27
Mode multitimbral.....................
Mode split, local gauche
OFF
.............................................
Mode split, local droit OFF.. 28
Transmission des réglages
de panneau
OPTIONS ET MODULES
EXPANDEURS
MIDI................................................. 29
.......................
.....................
......................
...................
..................
...................
................................
..............................
..........................
.........
..................
..........
18
19
20
20
21
21
21
38
28
28
28
29
29
38
Introducción ______________________________
Muchas gracias por comprar un Piano Electrónico Personal YPP-50 de Yamaha.
Su Piano Electrónico Personal es un buen instrumento musical que emplea
la avanzada tecnología musical de Yamaha. Con un cuidado apropiado, le
dará muchos años de placer musical.
• El sistema del generador de tonos AWM (Memoria de Ondas Avanzada)
sofisticado de Yamaha ofrece unas reproducciones ricas y reales de los
sonidos de teclado muestreados digitalmente.
• Polifonía de 8 notas que permiten el uso de las técnicas de interpretación
más estándar.
• Respuesta de pulsación como un piano acústico que proporciona un gran
control expresivo y una excelente capacidad de interpretación.
• Realiza grabaciones con la función de memoria de interpretaciones y repro
duce sus interpretaciones en el teclado—¡y usted puede tocar en el teclado
a la vez que se reproducen sus interpretaciones grabadas!
• Metrónomo incorporado que facilita la práctica y ayuda a desarrollar un
sentido preciso de la sincronización.
• Compatibilidad MIDI y un margen de funciones MIDI que hacen al Piano
Electrónico Personal útil en un margen de sistemas musicales MIDI avan
zados.
Para poder aprovechar al máximo el potencial de interpretación y caracterís
ticas del Piano Electrónico Personal, le aconsejamos leer este manual del
propietario completamente, y guárdelo en un lugar seguro para futuras
referencias.
Indice
MONTAJE DEL SOPORTE
DEL TECLADO
CUIDADOS DE SU PIANO
ELECTRONICO PERSONAL
CONTROLES Y CONECTORES:
OPERACION BASICA
DISFRUTE DE LA
DEMOSTRACION
TOCANDO EL PIANO
ELECTRONICO PERSONAL......... 32
TRANSPOSICION
CONTROL DEL TONO
MEMORIA DE
INTERPRETACIONES
FUNCIONES MIDI
_____________
..............................
...................
..........................
..........................
..................
...................
Una breve introducción a
MIDI............................................. 34
"Mensajes" MIDI transmitidos
y recibidos por el Piano
Electrónico Personal................ 34
Selección del canal de
transmisión y recepción
MIDI..............................................34
..........................
........
3
30
30
32
32
33
33
34
Activación/desactivación de
control local
Activación/desactivación de
cambio de programa
Activación/desactivación de
cambio de control......................35
Modo de timbres múltiples.. 36
Modo de división y desactiva
ción local izquierda
Modo de división y desactiva
ción local derecha
Transmisión de los ajustes
del panel
LOCALIZACION Y
REPARACION DE AVERIAS.... 37
OPCIONES Y MODULOS
EXPANSORES............................... 37
FORMATO DE DATOS MIDI .. 37
ESPECIFICACIONES
...............................
................
...................
....................
....................................
....................
35
35
36
36
36
38
Page 4
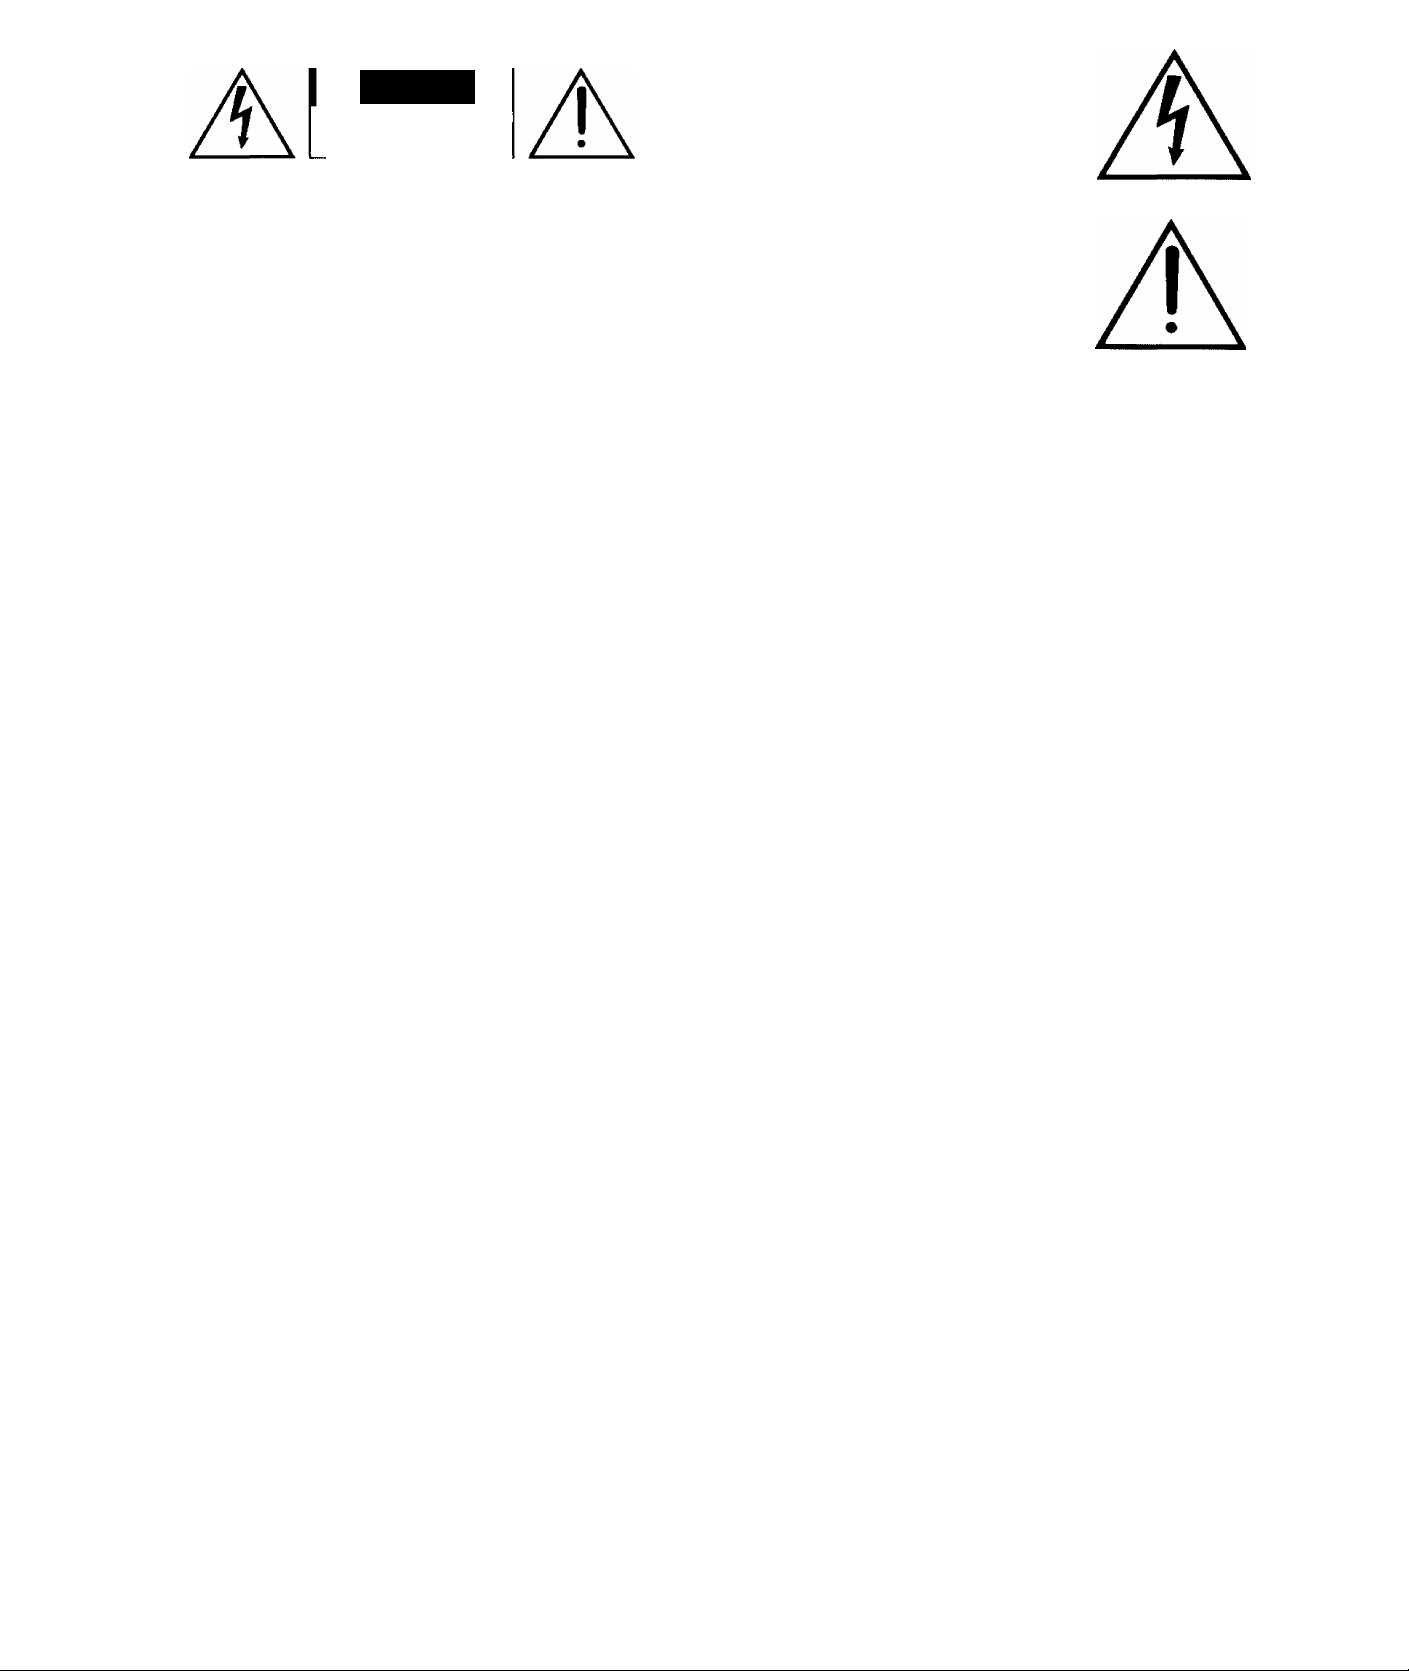
•Long bolts X 8
•Lange Schrauben x 8
•Vis longues x 8
•Pernos largos x 8
• Short bolts X 6
•Kurze Schrauben x 6
•Vis courtes X 6
•Pernos cortos X 6
•Joint connectors x 8
•Verbindungsstücke x 8
• Dispositifs d'assemblage x 8
•Conectores de unión x 8
KEYBOARD STAND ASSEMBLY
NOTE: Although the YPP-50 keyboard stand can be assembled
by a single person, the job is much easier with two people.
Open the box and remove all the parts.
On opening the box you should find the parts shown in the
illustration. Check to make sure that all the required parts are
provided.
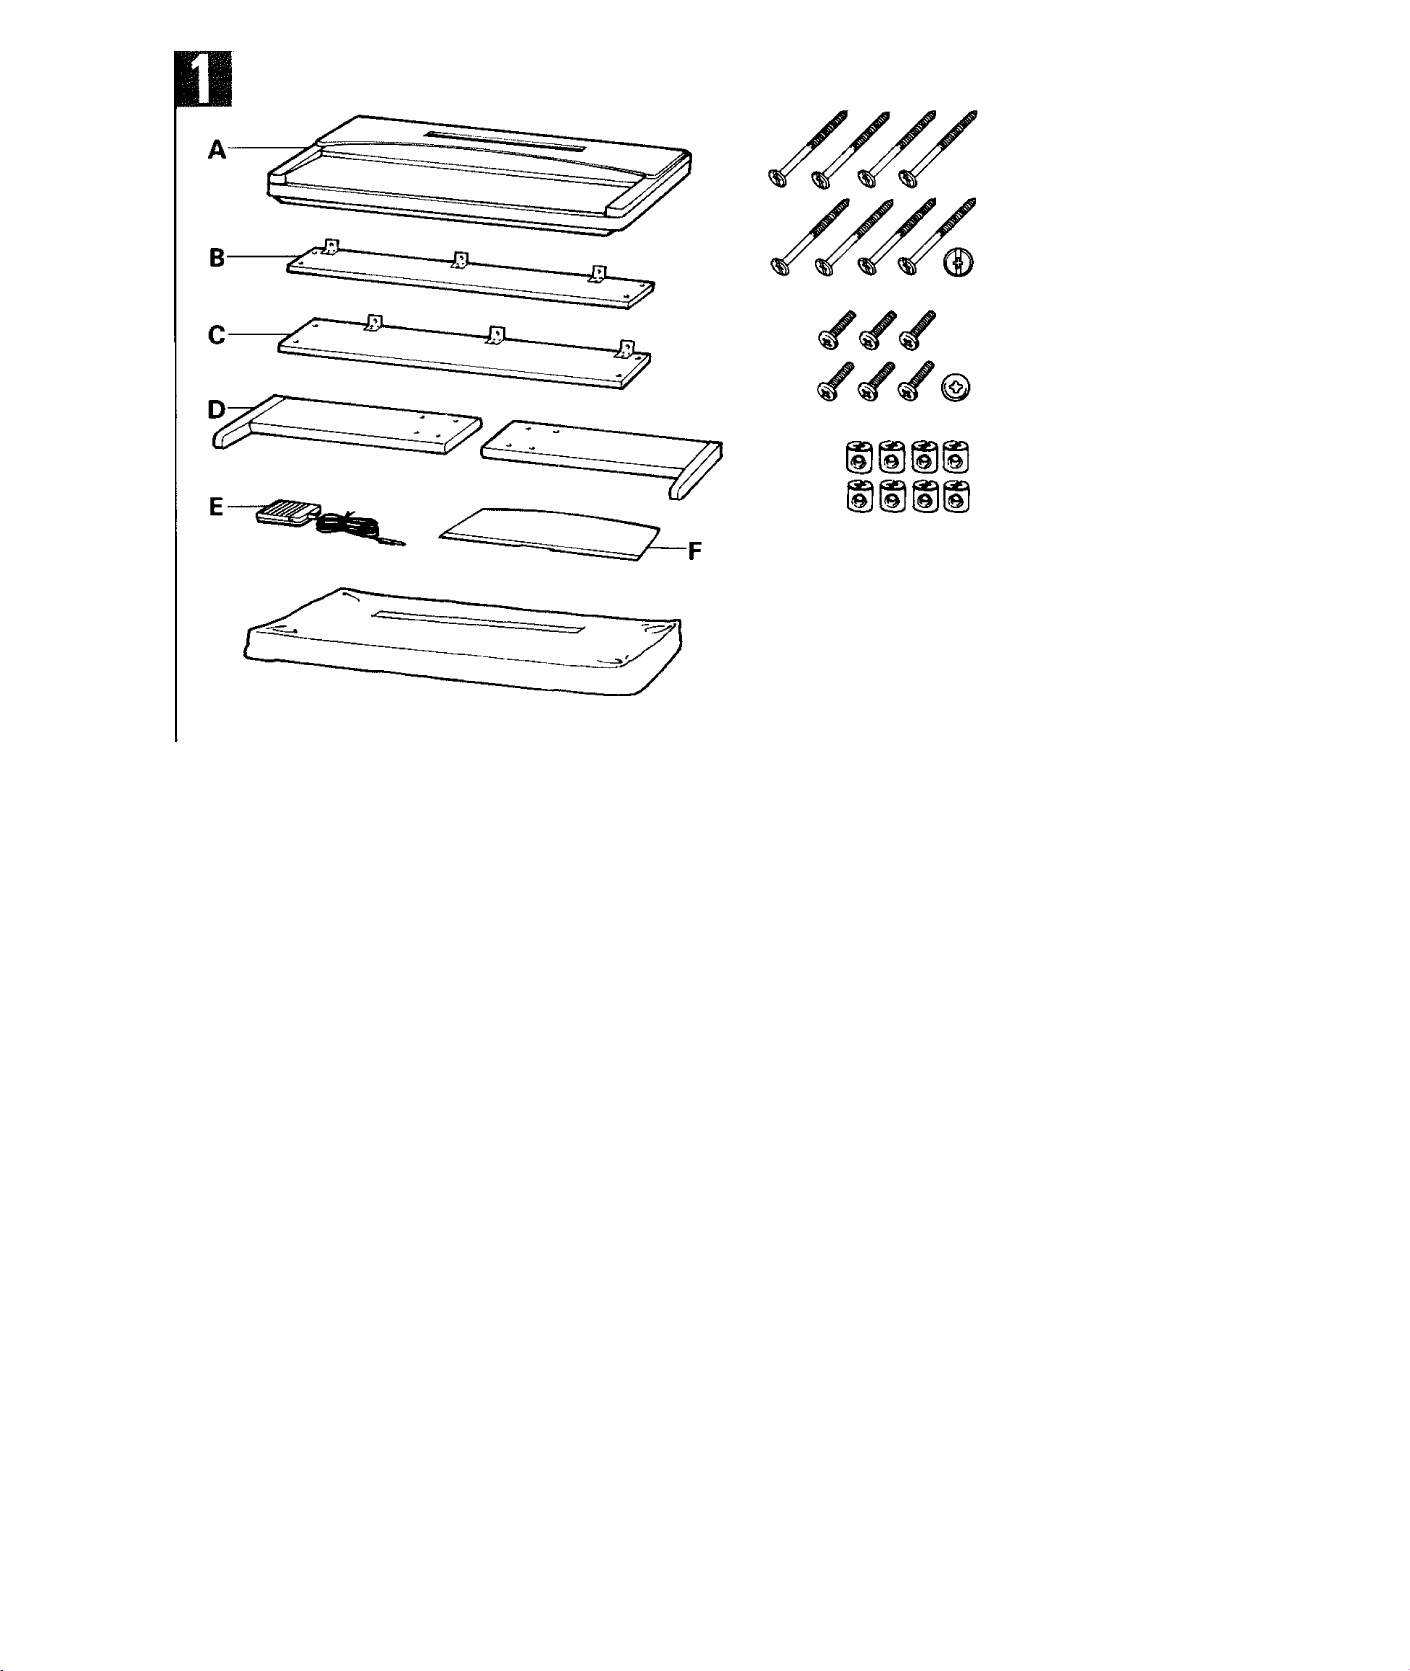
___ Invert the main unit (A).
When main unit (A) is removed from the box, place it upsidedown on a soft, non-abrasive surface such as a clean rug or
blanket to prevent scratches to the finish. This inverted posi
tion makes it easier to attach the assembled keyboard stand
later on.
CZ2> C2» CZ5i
C3C3» CIS
•Dust cover
•Abdeckung
•Housse
• Cubierta contra el polvo
•Boit covers X 8
•Schraubenkappen x 8
• Cache-vis x 8
•Cubiertas de perno x 8
ZUSAMMENBAU DES
KEYBDARDSTÄNDERS
HINWEIS: Obwohl der Keyboardständer des YPP-50 durchaus von
Der Versandkarton sollte alle abgebildeten Teile enthalten.
Sicher st eilen, daß alle benötigten Teile vorhanden sind.
Das Keyboard (A) aus dem Versandkarton heben und umgedreht
auf eine weiche, nicht kratzende Unterlage wie z. B. auf einen
sauberen Teppich oder eine Decke ablegen. In der umgedrehten
Stellung läßt sich der Keyboardständer leichter anbringen.
einer Person alleine montiert werden kann, empfiehlt
es sich, den Zusammenbau zu zweit vorzunehmen.
Den Versandkarton öffnen und alle Teile
auspacken.
Das Keyboard (A) umdrehen.
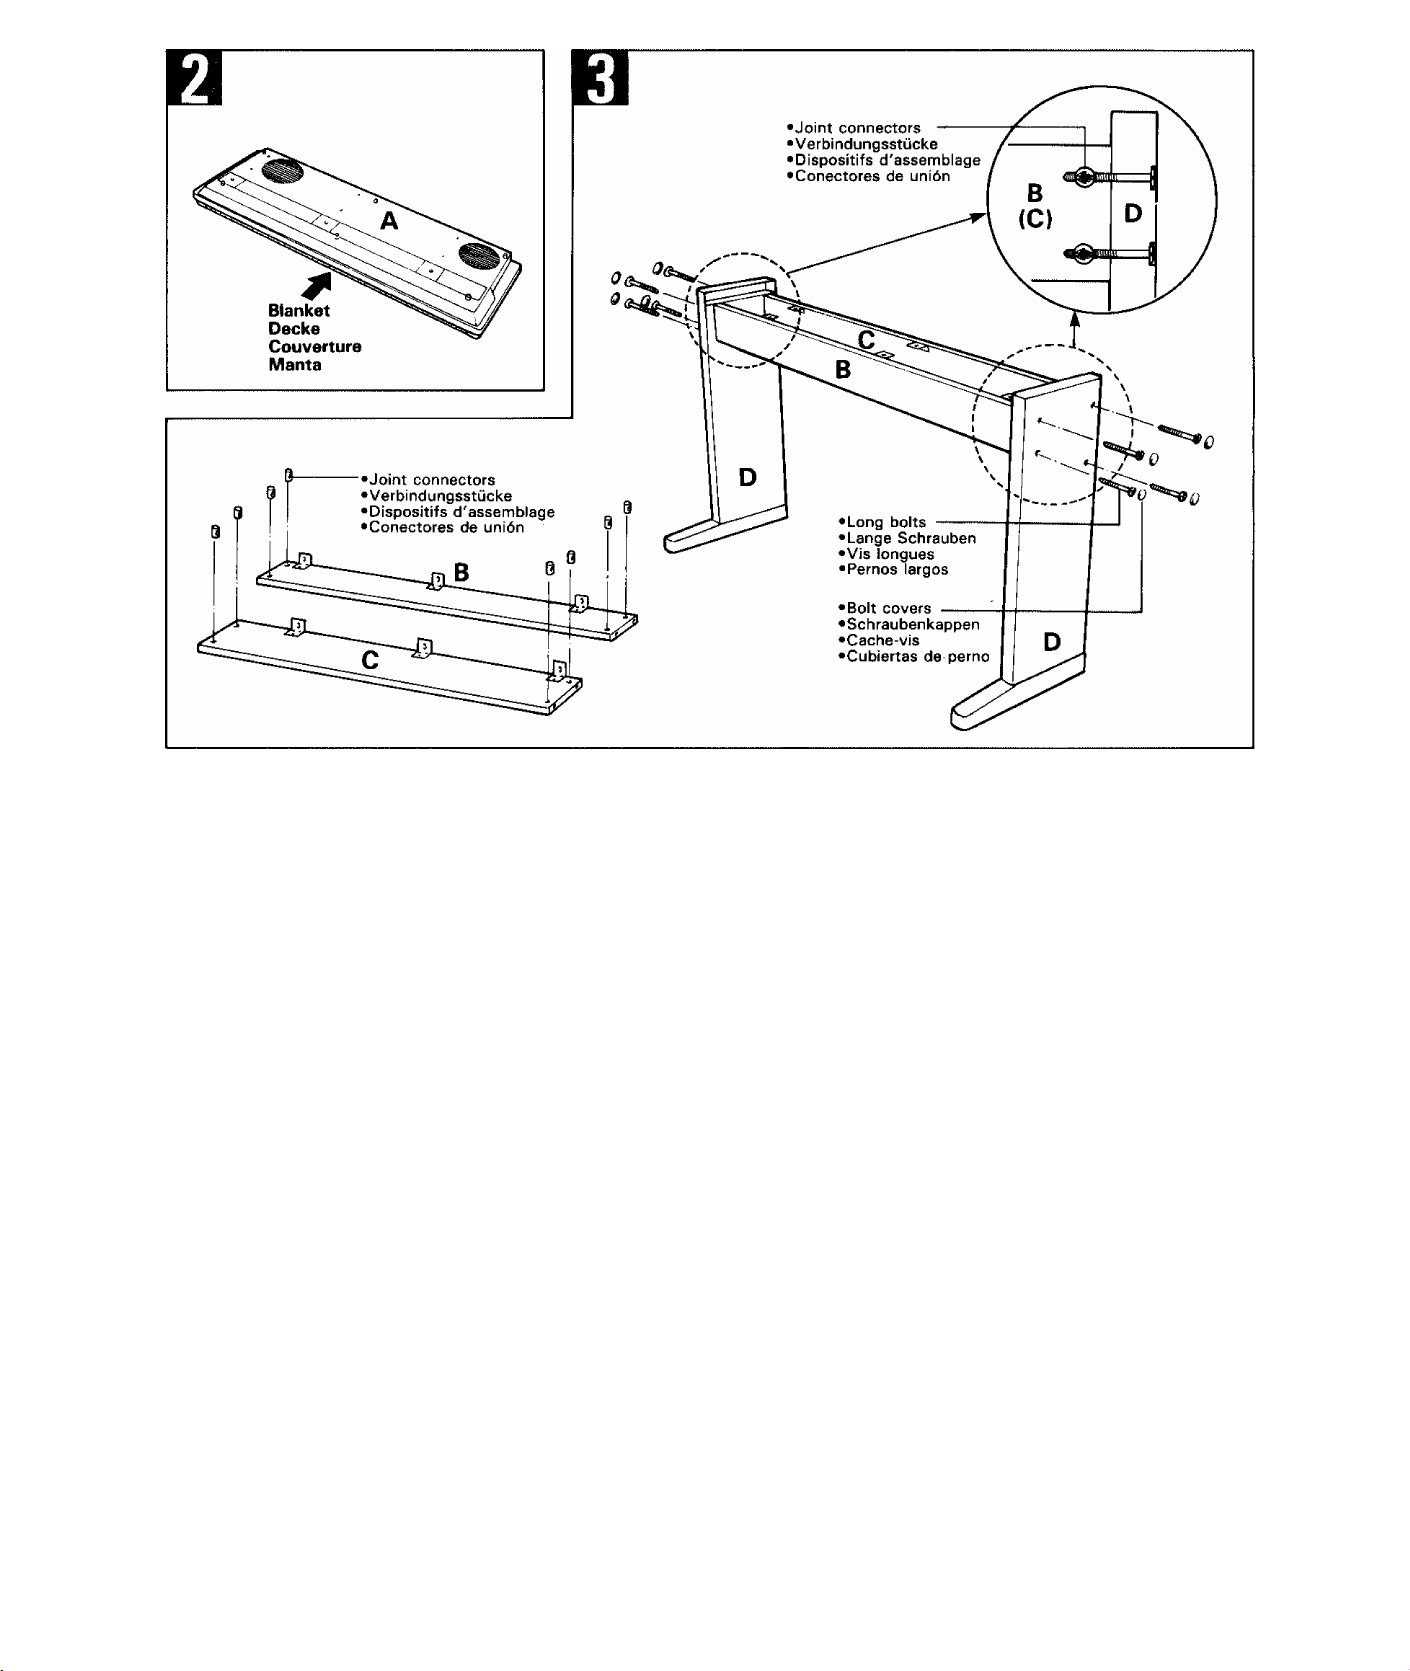
Attach the side panels (D) to the front (B) and
rear (C) panels.
Begin by installing the joint connectors in the front (B) and rear
(C) panels as shown in the illustration.The front and rear panels
(the rear panel is the wider one) are attached between the side
panels (D) using two long bolts at each end. The sides of the
side panels (D) with the recesses at the top face inwards; the
direction in which the feet extend from the side panels is the
“front” (the direction the keyboard faces). The metal brackets
on the front (B) and rear (C) panels face upwards and inwards.
Attach the first panel loosely so that the second panel slides
into position easily, then attach the second panel and finally
tighten all eight bolts. When the assembly is complete and the
bolts are securely tightened, snap the eight plastic bolt covers
into place over the bolt heads.
• When installing the joint connectors in the holes in the panels,
make sure that the arrows printed on their upper surface face
in the direction shown in the illustration.
Die Standbeine (D) mit der vorderen (B) und
hinteren Verbindungsstrebe (C) verschrauben.
Zunächst die Verbindungsstücke entsprechend der Abbildung
in die vordere (B) und hintere Verbindungsstrebe (Q einsetzen.
Die zwei Verbindungsstreben (die hintere ist breiter) werden
an beiden Seiten jeweils mit zwei langen Schrauben an die Stand
beine (D) angeschraubt. Die Aussparungen oben an den Stand
beinen (D) müssen nach innen weisen; die Seite mit den Füssen,
ist die Seite für die Klaviatur, Die Metallhalterungen an der
vorderen (B) und hinteren Verbindungsstrebe (C) liegen auf der
Innenseite und zeigen nach oben. Die erste Verbindungsstrebe
zunächst nur locker verschrauben, damit die zweite Verbindungs
strebe leichter eingepaßt und montiert werden kann. Danach
alle acht Schrauben festziehen und zum Abschluß die acht
Plastikkappen auf die Schraubenköpfe aufsetzen.
• Beim Einsetzen der Verbindungsstücke in die Löcher der Verbin
dungsstreben sichetstellen, daß die Pfeilmarkierungen auf der
Oberfläche in die gleiche Richtung wie in der Abbildung weisen.
Page 5
ASSEMBLAGE DU SUPPORT DU
MONTAJE DEL SOPORTE
PIANO
REMARQUE: Bien qu 'une personne seule puisse assembler le support
Les pièces indiquées sur rillustration devraient toutes se trouver
dans le carton. Vérifier qu’il n’en manque aucune.
Lorsque le piano (A) est sorti du carton, le placer à l’envers
sur une surface douce, non rugueuse, comme par exemple un
tapis ou une couverture, afin de ne pas abîmer le fini. De plus,
avec le piano dans cette position, il sera plus facile par la suite
d’y fixer le support assemblé.
Commencer par poser les dispositifs d’assemblage sur le panneau
avant (B) et sur le panneau arrière (C) de la manière illustrée.
Le panneau avant et le panneau arrière (le panneau arrière est
le plus large), sont fixés entre les panneaux latéraux (D) à l’aide
de deux vis longues à chacune des extrémités. Le côté des pan
neaux latéraux (D) ayant une partie en creux au sommet doit
être dirigé vers l’intérieur; le côté où se trouve les pieds est le
devant (le côté du clavier). Les ferrures métalliques sur le pan
neau avant (B) et sur le panneau arrière (C) doivent être dirigées
vers le haut et vers l’intérieur. Fixer le premier panneau sans
le serrer, afin que le second puisse glisser facilement en place,
puis fixer le second panneau et serrer ensuite les huit vis. Lors
que l’assemblage est terminé et que les vis sont serrées à fond,
poser les huis caches en plastique sur la tête des vis.
• Lors de la pose des dispositifs d'assemblage dans les trous des
panneaux, veiller à diriger ta flèche peinte sur leur surface supé
rieure dans le sens indiqué sur l'illustration.
du Piano Electronique Personnel, nous vous conseillons
de te faire à deux car le travail en est d'autant facilité.
Ouvrir le carton et retirer toutes les pièces
Mettre le piano (A) à l'envers
Fixer les panneaux latéraux (D) aux panneaux
avant (B) et arrière (C)
DEL TECLADO
NOTA: Aunque el soporte del teclado YPP-50 puede montarlo sólo
una persona, el trabajo es muchos más fácil entre dos
personas.
Abra la caja y extraiga todas las partes.
Al abrir la caja debe buscar las partes mostradas en la ilustra
ción. Compruebe para asegurarse de que todas las partes re
queridas se han suministrado.
Dele la vuelta a la unidad principal (A)
Cuando se extraiga de la caja la unidad principal (A), colóquela
al revés en una superficie blanda y no abrasiva, tal como una
manta para evitar que se raye el acabado. Esta posición al
revés hace más fácil la unión del soporte del teclado montado
más tarde.
Una los paneles laterales (D) a los paneles frontal
(B) Y posterior (C)
Empiece instalando los conectores de unión de los paneles
frontal (B) y posterior (C) como se muestra en la ilustración.
Los paneles frontal y posterior (el panel posterior es el ancho)
se unen entre los paneles laterales (D) usando dos pernos largos
en cada extremo. Los lados de los paneles laterales (D) con
las partes adentradas de la parte superior se encaran hacia
dentro; la dirección en la cual las patas se extienden desde de
los paneles laterales es la parte “frontal” (la dirección en la
que se encara el teclado). Las ménsulas de metal de los paneles
frontal (B) y posterior (C) se encaran hada arriba y hacia
dentro. Una el primer panel un poco flojo de forma que el
segundo panel se deslice fácilmente a su posición, luego una
el segundo panel y finalmente apriete los ocho pernos. Cuando
el montaje esté completo y los pernos estén bien apretados,
fíje las ocho cubiertas del perno de plástico en su lugar sobre
las cabezas de los pernos.
• Cuando instale los conectores de unión en los orificios de tos
paneles, asegúrese de que las flechas impresas en sus superfi
cies superiores están encaradas en la dirección mostrada en
la ilustración.
Page 6

Manta
If the holes in the metal brackets on the front (B)
and rear (C) panels do not line up properly with
the screw holes in the main unit (A), loosen the
long bolts connecting the side panels (D) to the
front and rear panels, align the holes, screw in the
short bolts firmly, then re-tighten the side-panel
long bolts.
Falls die Löcher in den Metallhalterungen der vor
deren (B) und hinteren (C) Verbindungsstrebe nicht
mit den Schraubenlöchern im Keyboard (A) fluch
ten, die langen Schrauben, die die Standbeine (D)
an den Verbindungsstreben halten, etwas lösen
und die Löcher fluchten. Dann die kurzen Schrau
ben fest hineindrehen und anschließend die langen
Schrauben wieder festziehen.
Si les orifices des ferrures de montage du panneau
avant et du panneau arrière (C) ne sont pas
alignés correctement sur les orifices de vis du piano
(A), desserrer les vis longues fixant les panneaux
latéraux (D) aux panneaux avant et arrière, aligner
les orifices, serrer à fond les vis courtes et resser
rer les vis longues des panneaux latéruax.
Si los orificios de las ménsulsa metálicas de los
paneles frontal y posterior (C) no se alinean
correctamente con los orificios para los tornillos de
la unidad principal (A), afloje los pernos largos que
conectan los paneles laterales (D) a los paneles
frontal y posterior, alinee los orificios, enrosque
bien los pernos cortes y vuelva a apretar los
pernos largos de los paneles laterales.
Attach the stand assembly to the main unit (A).
Turn the assembled stand upside down and place it on top of
the main unit (which should also be upside-down) with the feet
extending toward the keyboard side of the main unit. The tops
of the side panels fit into the recessed areas at the ends of the
main unit. Align the holes in the front and rear panel brackets
with the holes in the bottom of the main unit, and firmly screw
in the six short bolts through the brackets. Finally, turn the
entire assembly rightside-up and stand it on its feet.
* Check to make sure that all screws have been securely tightened.
Plug in the damper pedal (E).
Plug the supplied FC5 damper pedal cable into the DAMPER
jack on the rear panel of the main unit, and place the pedal
in a convenient position on the floor below the keyboard.
Install the music stand (F).
Insert the bottom (flat) edge of the music stand (F) into the
slot on the top of the main unit (A) so that the music stand
leans backwards away from the keyboard.
Keyboardständer am Keyboard (A) anbringen.
Den zusammengebauten Ständer umdrehen und auf das Key
board (das ebenso umgedreht ist) plazieren. Die Füsse des Stän
ders müssen sich auf der Seite mit der Klaviatur befinden. Die
Oberseiten der Standbeine in die Aussparungen an den Keyboardseiten einpassen. Die Löcher in den Metallhalterungen der
vorderen und hinteren Verbindungsstrebe mit den Bohrungen
auf der Unterseite des Keyboards ausrichten und die sechs
kurzen Schrauben in die Halterungen hineindrehen und festzie
hen. Zum Abschluß das zusammengebaute Keyboard auf die
Füsse stellen.
* SichersteHen, daß alle Schrauben gut festgezogen sind.
Das Dämpferpedal (E) anschließen.
Das beiliegende Dämpferpedal FC5 über das an die DAMPERBuchse anschließen und das Pedal an eine geeignete Stelle unter
dem Keyboard plazieren.
£J[ Den Notenständer (F) anbringen.
Die Unterkante (flach) des Notenständers (F) in den Schlitz
oben am Keyboard (A) so einführen, daß der Ständer nach
hinten geneigt ist.
Page 7

Poser l'ensemble sur le piano (A)
Retourner l’ensemble de support et le poser sur le piano (qui
doit être lui aussi à l’envers) avec les pieds placés du côté clavier,
La partie supérieure des panneaux vient se placer dans les rai
nures situées aux deux extrémités du piano. Aligner les trous
des ferrures avant et arrière sur les orifices du piano et fixer
à l’aide de six vis courtes; serrer les vis à fond. Retourner l’en
semble afin qu’il repose sur les pieds.
* Vérifier que toutes les vis sont serrées à fond
Connecter la pédale (E)
Connecter le câble de la pédale d’assourdissement FC5 fournie
à la prise DAMPER située sur le panneau arrière et placer la
pédale sur le sol à un endroit commode.
Ül Poser le pupitre (F)
Introduire le bord inférieur (plat) du pupitre (F) dans la rainure
située sur le dessus du piano (A) de manière que le pupitre
soit incliné vers l’arrière.
Una el conjunto del soporte en la unidad principal
ÍA)
Gire el soporte montado al revés y colóquelo en la parte supe
rior de la unidad principal (la que también ha de estar al revés)
con las patas extendidas hacia adelante desde el lado del teclado
de la unidad principal. Las partes superiores de los paneles
laterales se acoplan a las partes entrantes de los extremos de
la unidad principal. Alinee los orificios de las ménsulas del
panel frontal y posterior con los orificios de la parte inferior
de la unidad principal, y enrosque firmemente tos seis pernos
cortos a través de las ménsulas. Finalmente, vuelva a colocar
derecho el conjunto entero y sopórtelo sobre sus patas.
* Compruebe para asegurarse de que todos ios tornillos se han
apretado bien.
Conecte el pedal apagador (E)
Conecte el cable del pedal apagador FC5 suministrado en la
toma DAMPER del panel posterior de la unidad principal, y
coloque el pedal en una posición conveniente en el suelo debajo
del teclado.
mi‘ "iMl
Instale el atril (F)
13
Inserte el borde de la parte inferior (plano) del atril (F) en la
ranura de la parte superior de la unidad principal (A) de forma
que el atril se incline hacia atrás mirando desde el teclado.
Page 8

VORSICHTSMASSNAHMEN
Ihr Personal Electronic Piano ist ein hochwertiges Musikinstru
ment und verdient deshalb eine umsichtige Handhabung. Wenn
Sie folgende Anweisungen befolgen, bleiben Klang und'Ausse
hen des Personal Electronic Pianos über viele Jahre erhalten.
1. Niemals das Gehäuse öffnen und interne Schaltkreise berüh
ren oder verändern.
2. Nach dem Gebrauch das Instrument ausschalten (Netzschal
ter auf OFF) und mit der beiliegenden Hülle abdecken.
3. Gehäuse und Tastatur des Personal Electronic Pianos nur
mit einem sauberen, leicht angefeuchteten Tuch abwischen.
Ein neutrales, mildes Reinigungsmittel kann verwendet
werden. Niemals Scheuermittel, Wachs, Lösungsmittel oder
chemisch behandelte Staubtücher zur Reinigung verwenden,
da diese die Oberfläche angreifen.
4. Niemals Gegenstände aus Vinyl auf das Personal Electronic
Piano legen. Kontakt mit Vinyl kann irreparable Schäden
an der Gehäuseoberfläche verursachen.
5. Das Personal Electronic Piano vor direkter Sonneneinstrah
lung, übermäßiger Feuchtigkeit oder Hitze schützen.
6. Die Bedienelemente, Anschlüsse und Teile des Personal
Electronic Pianos niemals mit Gewalt behandeln. Vor Krat
zern und Stoß schützen.
7. Keine schweren Gegenstände längere Zeit auf die Tastatur
legen.
8. Die Tastatur und die anderen Teile unbedingt vor Eindrin
gen von Wasser, Getränken oder andere Flüssigkeiten schüt
zen.
9. Das YPP-50 enthält Digitalschaltkreise, die Empfangsstö
rungen hervorrufen können, wenn das YPP-50 zu nahe bei
Radios, Fernsehgeräten und anderen Empfangsgeräten auf
gestellt wird. Bei Störungen das YPP-50 vom gestörten
Gerät weiter weg plazieren.
10. WICHTIG!: Die Stromversorgung überprüfen.
Sicherstellen, daß die örtliche Netzspannung der Betriebs
spannung entspricht, die in der Herstellerplakette auf der
Unterseite des Keyboards aufgeführt ist. Für manche Bestim
mungsländer ist das Instrument mit einem Spannungswähler
versehen. Sicherstellen, daß der Spannungswähler korrekt
auf die örtliche Netzspannung eingestellt ist.
• Herstellerplakette
Die Herstellerplakette des YPP-50 befindet sich auf der
Unterseite.
BEDIENELEMENTE UND ANSCHLÜS-
SE: GRUNDLEGENDE BEDIENUNG
©Netzschalter (POWER)
Dient zum Ein- und Ausschalten des Keyboards. Beim Ein
schalten leuchtet die Leuchtdiode der Stimmenwahltaste
PIANO auf.
(g) Lautstärkeregler (MASTER VOLUME)
Der MASTER VOLUME-Regler steuert die Lautstärke des
YPP-50. Bei Anschluß eines Kopfhörers an die Buchse
HEADPHONE (D dient der MASTER VOLUME-Regler
außerdem zur Einstellung der Kopfhörerlautstärke.
(3) MIDI/Transponier-Taste (MIDI/TRANSPOSE)
Die Taste MIDI/TRANSPOSE gewährt Zugriff auf die
Transponierfunktion (zum Verändern der Tonlage der gesam
ten Klaviatur nach oben oder unten) und die MIDI-Funktionen. Einzelheiten hierzu sind unter “TRANSPOSITION”
und “MIDI-FUNKTIONEN” auf Seite 16 bzw. 18 aufge
führt.
r
©Metronomtaste (METRONOME)
Die METRONOME-Taste startet und stoppt das eingebaute
Metronom des YPP-50. Das Metronom erklingt anfänglich
mit 120 Schlägen pro Minute. Das Tempo kann mit den
TEMPO-Tasten A und ▼ verändert werden, wie nachstehend
erklärt. Die LED-Anzeige der METRONOME-Taste leuchtet
jeweils am ersten Taktschlag jedes Takts auf.
• Metronomlautstärke: Die Lautstärke des Metronomklangs
kann über fünf Stufen verändert werden (Normallautstärke
plus zwei Senkungsstufen und zwei Anhebungsstufen).
Dazu wird die METRONOME-Taste gedrückgehalten
und die TEMPO-Taste
A bzw. ▼ gleichzeitig angetippt.
Die TEMPO-Taste A erhöht die Metronomlautstärke
während ▼ sie senkt. Zum Rückstellen auf Normallaut
stärke hält man die METRONOME-Taste gedrückt und
betätigt gleichzeitig die TEMPO-Tasten
Hinweis: Das Metronom arbeitet auch beim Aufzeichnen mit
der PERFORMANCE MEMORY-Funktion des YPP-SO.
Die Einzelheiten hierzu sind unter PERFORMANCE
MEMORY-Funktion auf Seite 17 erläutert.
A und ▼.
©Tempotasten (TEMPO A und ▼)
Die TEMPO A und ▼ dienen in erster Linie zur Einstellung
des Metronomtempos. Das Tempo kann in folgenden Schrit
ten zwischen 32 und 280 Taktschlägen pro Minute eingestellt
werden;
32 36 40
72 74
70
92 94
114
140 144 148
208 216 224
96 98
116 118
44 48 52 56 60 64
76
120
152 156 160 168 176
232 240 248 256 264 272
80 82 84
78
102 104
100
122 124
106 108
126 128 130
86
184
66 68
88 90
110 112
132
136
192
200
280
Beim anfänglichen Einschalten des YPP-50 ist ein Tempo
von 120 Taktschlägen pro Minute vorgewählt. Mit jedem
Druck auf die TEMPO-Taste A oder ▼ erhöht bzw. senkt
sich das Tempo um einen Schritt. Wird die Taste A oder ▼
stetig gedrückt, ändert sich das Tempo kontinuierlich. Zum
Rückstellen auf das anfängliche Tempo von 120 Taktschlägen
pro Minute muß man nur beide TEMPO-Tasten ( A und ▼)
gleichzeitig drücken.
Hinweis: Die TEMPO-Tasten A und T werden auch für die Trans
postion und die Einstellung der Metronomlautstärke
verwendet. Siehe hierzu unter (4) Metronomtaste, oben
und "TRANSPOSITION" auf Seite 16.
14
Page 9

F
-------------
J
--------------------------------------------------------
TI
_
..........................
'VJLJ —=—
....
1 T
YAMAHA
9
) Lg gj/
■"^1 1/
VJ LJ*
(6) Stirn men wahltasten
Das YPP-50 verfügt über acht Stimmenwahltasten. Einfach
eine Stimmenwahltaste drücken, um die entsprechende Stimme
aufzurufen. Die LED-Anzeige über der Stimmenwahltaste
leuchtet auf, um anzugeben, welche Stimme gegenwärtig
gewählt ist.
• Die BASS-Splitfunktion: Die BASS-Splitfunktion des
YPP-50 teilt die Klaviatur des YPP-50 in zwei Bereiche
auf: Der linke Bereich einschließlich der Taste FH2 wird
für die Baßstimme reserviert, während auf der rechten
Klaviaturhälfte gleichzeitig eine andere Klangfarbe gespielt
werden kann. Zum Aktivieren der BASS-Splitfunktion
und zum Wählen einer Stimme für die rechte Klaviatur
hälfte die BASS-Stimmenwahltaste ged rückth alten und
gleichzeitig die Stimmenwahltaste betätigen, die der Melo
diestimme für die rechte Hälfte entspricht. Danach die
beiden Stimmenwahltasten loslassen. Nun leuchtet die
LED-Anzeige der BASS-Stimmenwahltaste und der Stim
menwahltaste, die zur Wahl der Melodiestimme gedrückt
wurde. Dabei ist zu beachten , daß das Dämpferpedal bei
aktivierter BASS-Splitfunktion nicht auf die Baßstimme
wirkt. Durch Drücken einer anderen Stimmenwahltaste
wird die BASS-Splitfunktion ausgeschaltet und das YPP-50
auf normalen Spielbetrieb rückgestellt.
Hinweis: Beim Einschalten wird die Stimme PIANO automatisch
vorgewählt.
©Aufnahme- und Wiedergabetaste (PERFORMANCE
MEMORY REC und PLAY)
Diese Tasten aktivieren die Aufnahme- und Wiedergabefunk
tion des PERFORMANCE MEMORY des YPP-50. Einzel
heiten zum PERFORMANCE MEMORY sind auf Seite 17
erläutert.
(D Demotaste (DEMO)
Die DEMO-Taste dient zum Abspielen des vorprogrammier
ten Demostücks des YPP-50. Die Einzelheiten dazu sind auf
Seite 16 aufgeführt.
(9) Kopfhörerbuchse (HEADPHONE)
An diese Buchse kann ein herkömmlicher Stereo-Kopfhörer
angeschlossen werden, um bei mitternächtlichen Etüden den
Nachbarn nicht aus dem Schlaf zu reißen. Bei Anschluß eines
Kopfhörers an die HEADPHONE-Buchse wird das interne
Lautsprechersystem automatisch stummgeschaltet.
© Zusatzgeräteein- und -ausgänge (OPTIONAL IN L/R
und OUT L/R)
Diese Buchsen sind in erster Linie für Yamaha Expandermodule der EM-Serie gedacht, wie z. B. EME-1 Digitalhall,
EMT-1 FM Tongenerator, EMT-10 AWM WellenspeicherTongenerator und EMR-1 Rhythmusgerät. Im Fall des EME-1
Digitalhalls werden die Buchsen OPTIONAL OUT mit den
LINE IN-Buchsen des EME-1 verbunden und die LINE OUTBuchsen des EME-1 an den OPTIONAL IN-Buchsen des
YPP-50 angeschlossen. Damit können Sie den Stimmen des
Personal Electronic Pianos hochwertige Digitaleffekte wie
Reverb (Hall) und Echo hinzufügen. Die Einzelheiten zum
Anschluß sind in den einschlägigen Bedienungsanleitungen
für die EM-Serie aufgeführt.
©Dämpferpedalbuchse (DAMPER)
Das beiliegende Dämpferpedal (Yamaha FC-5) wird an diese
Buchse angeschlossen. Dieses Pedal funktioniert wie das
Dämpferpedal eines akustischen Klaviers. Bei gedrücktem
Pedal werden angeschlagene Noten länger angehalten. Durch
Freigeben des Pedals stoppen angehaltene Noten sofort.
© MIDI-EIN/AUSGANG (MIDI IN und OUT)
Der MIDI IN-Eingang empfängt MIDI-Daten von externen
Geräten (wie z. B. dem EMQ-I Sequenzer), die zum Steuern
des YPP-50 verwendet werden können. Der MIDI OUTAusgang dient zur Weitergabe der vom YPP-50 erzeugten
MIDI-Daten (z. B. Noten- und Anschlagsdynamikdaten, die
durch Spielen auf dem YPP-50 erzeugt werden). Einzelheiten
zu MIDI sind unter “MIDI-FUNKTIONEN” auf Seite 18
aufgeführt.
1!
Page 10

WIEDERGABE DES DEMOSTÜCKS
In das YPP-50 ist ein Demostück einprogrammiert, um Ihnen
eine Vorstellung vom großen Potential des YPP-50 zu geben.
Dieses automatisch abgespielte Demo demonstriert verschiedene
Stimmen des YPP-50 und besteht aus einer Reihe von Passagen
der folgenden Stücke;
• 24 Präludium Nr. 15 in Di>-Dur, “Regentropfen” Op. 28-15
von Chopin (PIANO-Stimme).
• Grobschmiedvariationen von Händel (HARPSI-Stimme).
• Arabeske von Debussy (PIANO-Stimme).
• Fuge in Gm von Bach (P.ORGAN-Stimme).
1. Das Gerät einschalten. Dadurch leuchtet die LED-Anzeige
der Stimmenwahltaste PIANO auf.
POWER
-
-------
-
2. Den MASTER VOLUME-Regler ungefähr 3/4 bis zur MAXStellung schieben. Die Lautstärke kann dann während der
Wiedergabe korrigiert werden.
MASTER VOLüM£
....
II
3. Durch Drücken der DEMO-Taste wird die Demowiedergabe
ausgelöst. Das Demostück spielt kontinuierlich und demon
striert die verschiedenen Stimmen, bis die DEMO-Taste erneut
gedrückt wird.
2. Anfänglich den MASTER VOLUME-Regler ungefähr 3/4
bis zur “MAX’’-Stellung schieben. Dann beim Spielen die
Lautstärke auf den gewünschten Pegel einstellen.
MASTER VOLUME
3. Zum Wählen von Stimmen die entsprechenden Stimmenwahl
tasten drücken.
PIANO E PIANO KARPSI VIBES SIPiNGS BRASS P ORGAN BASS
::ä o o o o o o o
00000000
4. Spielen
Hinweis: Das Persona! Electronic Piano bietet Snotige Polyphonie,
d. h. daß bis zu 8 Noten auf einmal erklingen können.
Bei aktivierter BASS-SpHtfunktion können im Unken
(Baßstimme) Klaviaturbereich zwei und im rechten Kla
viaturbereich 6 Noten zugleich gespielt werden (siehe
@ Stimmenwahltasten—Die BASS-SpUtfunktion auf
Seite 15). Die Metronomfunktion beiegt ebenso eine
Note, d. h., daß bei zugeschaltetem Metronom nur
sieben Noten gleichzeitig auf der Tastatur angeschlagen
werden können (bei aktivierter BASS-SpHtfunktion ver
wendet die Metronomfunktion eine Note im Unken, d.
h. im Baßstimmenbereich).
Außerdem reagiert das YPP-50 auf die Anschlagsdyna
mik. Daher können Lautstärke und Timbre von Stimmen
über die Anschlagshärte beeinflußt werden. Das Ausmaß
der Modulation hängt jedoch von den einzelnen Stimmen
ab.
0
• Während der Demowiedergabe können Sie andere Stimmen
wählen oder das Tempo verändern (die Einzelheiten dazu sind
in den entsprechenden Abschnitten dieser Anleitung zu finden).
Die von Ihnen abgerufenen Stimmen spielen jedoch nur bis zum
nächsten automatischen Stimmen Wechsel.
SPIELEN AUF DEM PERSONAL
ELECTRONIC PIANO
Zuerst sollten Sie sicherstellen, daß das YPP-50 korrekt mit
einer Steckdose verbunden ist und etwaige Anschlüsse ordnungs
gemäß ausgeführt worden sind.
I. Die POWER-Taste links am Keyboard drücken, um das
Instrument einzuschalten. Nach dem Einschalten leuchtet
die LED-Anzeige der Stimmenwahltaste PIANO (PIANO
wird beim Einschalten automatisch aufgerufen).
C POWER 1
TRANSPOSITION
Die TRANSPOSE-Funktion (Transponierfunktion) ermöglicht
ein Absenken oder Erhöhen der Tonlage über das gesamte
Manual in Halbtonschritten. Es kann maximal um sechs Halb
töne nach oben oder unten transponiert werden. Das “Transpo
nieren” der Tonlage erleichtert das Spielen mit schwierigen
Tonarten und erlaubt außerdem das Einstimmen des YPP-50
auf die Tonlage eines Sängers oder anderen Instruments.
Zum Transponieren werden die MIDI/TRANSPOSE-Taste
und die TEI^O-Tasten A und ▼ verwendet.
1. Die MIDI/TRANSPOSE-Taste gedrückthalten.
2. Gleichzeitig die TEMPO-Taste A oder ▼ entsprechend oft
antippen, um die Verschiebung der Tonlage einzugeben. Mit
jedem Drücken der TEMPO-Taste A oder ▼ erhöht bzw.
senkt sich die Tonlage der Klaviatur um einen Halbton. Die
Tonlage kann maximal um sechs Halbtöne nach oben oder
unten transponiert werden.
3. Die MIDI/TRANSPOSE-Taste loslassen.
0/ 0 0
Wenn die TEMPO-Tasten A und ▼ bei gedrückter MiDi/TRANSPOSE -Taste gleichzeitig betätigt werden, schaltet das YPP-50
auf die Standardtonlage zurück.
Page 11

STIMMFUNKTION
Dank der Einstimmfunktion kann das Personal Electronic Piano
in Schritten von 3 Cents in einem Bereich von ± 50 Cent feingestimmi werden. 100 Cents entsprechen einem Halbton, weshalb
der Feinstimm bereich ungefähr einen Halbton beträgt. Mit der
Einstimmfunktion kann das YPP-50 anderen Instrumenten oder
Musikaufzeichnungen angeglichen werden.
Tonerhöhung
1. Zum Erhöhen der Tonlage die Manualtasten Eo und Fo zu
gleich drücken und gedrückthalten.
2. Eine beliebige Taste zwischen C3 und H3 drücken. Mit jedem
Anschlägen einer Taste dieses Bereichs wird die Tonhöhe
um ca. 3 Cents erhöht, bis die maximale Verstimmung von
50 Cents erreicht ist.
3. Die Tasten Eo und Fo loslassen.
Tonsenkung
1. Zum Absenken der Tonlage die Manualtasten Eo und Fito
zugleich drücken und gedrückthalten.
2. Eine beliebige Taste zwischen C.t und H3 drücken. Mit jedem
Anschlägen einer Taste dieses Bereichs senkt sich die Tonhöhe
um ca. 3 Cents, bis die maximale Verminderung von 50 Cents
erreicht ist.
3. Die Tasten Eo und Fl* *o loslassen.
Rückstellung auf Standardtonhöhe*
1, Zum Rückstellen auf Normaltonhöhe {A3 = 440 Hz) die Tasten
Eo, Fo und pilo gleichzeitig drücken und gedrückthalten.
2, Eine Taste zwischen C3 und H3 anschlagen.
3, Die Tasten Eo, Fo und F)*o loslassen.
Beim Einschalten des Geräts wird es automatisch auf Standardton
höhe (Аз = 440 Hz) eingestellt.
Aufnahme
1. Auf Aufnahmebereitschaft schalten.
Die Taste PERFORMANCE MEMORY REC drücken, wo
durch das YPP-50 auf Aufnahmebereitschaft schaltet; Die
LED-Anzeige der REC-Taste leuchtet auf und das Metronom
erklingt im eingestellten Tempo.
REC PLAY
О
ж
о о
2. Das Tempo einstellen
Vor der eigentlichen Aufnahme sollte ein leicht zu spielendes
Tempo mit den TEMPO-Tasten A und ▼ eingestellt werden.
Falls das Metronom während der Aufnahme nicht erklingen
soll, einfach die METRONOME-Taste antippen. Damit ver
stummt das Metronom, die METRONOME-Anzeige blinkt
jedoch im gewählten Tempo.
3. Aufnahme starten
Die Aufnahme beginnt automatisch mit dem Anschlägen
der ersten Note.
4. Aufnahme stoppen
Die REC-Taste erneut drücken, um die Aufnahme zu stop
pen, Die Aufnahme kann auch durch Drücken der PLAYTaste gestoppt werden. Wenn die Speicherkapazität des
YPP-50 überschritten wird, stoppt die Aufnahme automatisch.
Bei Aufnahme mit der PERFORMANCE MEMORY-Funktion wird
zuvor eingespieltes Material gelöscht.
• Der Inhalt des PERFORMANCE MEMORY kann auf folgende
Weise gelöscht werden: Die PERFORMANCE MEMORY RECTaste antippen, während Eo und Fo (die beiden tiefsten weißen
Tasten auf der Klaviatur) gedrückt werden. Dann die Tasten los-
iassen und PERFORMANCE MEMORY REC erneut drücken, um
die Aufnahmebetriebsart zu verlassen.
Mllll Mlllllllllllllllll
Zur Tonlagenregelung (E0 + F0/E0 + FÍ0Í
Zur Toniagenregeiung (Сз —Нз)
PERFORMANCE MEMORYFUNKTION
Die PERFORMANCE MEMORY-Funktion des YPP-50 stellt
einen Digitalrekorder dar, mit dem Sie Ihr Spiel in allen Einzel
heiten aufzeichnen und wiedergeben können. Sie können die
Wiedergabe Ihrer Darbietung zum Analysieren des Spiels benut
zen und Sie sogar begleiten. Dazu können Sie mit einer
Stimme oder aber bei aktivierter BASS-Splitfunktion die Kom
bination aus Baß- und Melodiestimme aufnehmen.
Die PERFORMANCE MEMORY-Funktion erfaßt folgende Daten:
Gespielte Noten, Dämpferpedalstellung, gewählte Stimme, BASSSpUtmodus, anfängliches Tempo und Tempowechsel während
der Aufnahme.
• Die Speicherkapazität reicht für ca. 1300 Noten aus. Die genaue
Anzahl hängt jedoch von der Betätigung des Dämpferpedals
und anderen Funktionszuschaltungen ab.
Aufgezeichnetes Material wird nach dem Ausschalten vom YPP-50
Speicher ca. eine Woche lang festgehalten. Falls die Auf Zeichnung
länger festgehatten werden soll, das YPP-50 mindestens einmal
pro Woche kurz einschalten.
Hinweis: Im Multi-Timbremodus des YPP-50 kann die Aufnahme
funktion nicht ausgelöst werden (siehe Multi-Timhrebetriebsart im A bschnitt ' ‘MIDI-FUNK TIONEN” auf Seite
18).
j
Wiedergabe
1. Die PLAY-Taste drücken.
Mit dem Drücken der PERFORMANCE MEMORY PLAYTaste beginnt die Wiedergabe der Aufzeichnung (die LEDAnzeige der PLAY-Taste leuchtet auf).
l'.FF(HiV!AMCL'
RCC PLAY
° w
0 0
2. Die Wiedergabe auf Wunsch begleiten
Die Wiedergabe kann auf dem YPP-50 begleitet werden.
Dabei ist jedoch zu beachten, daß die Beschränkung durch
die 8-Noten Polyphonie des YPP-50 gilt. Anders ausgedrückt,
die Gesamtzahl der Noten der Aufzeichnung und der gleich
zeitig auf dem Keyboard gespielten Noten kann niemals 8
Noten überschreiten.
.3. Wiedergabe stoppen
Am Ende der Aufnahme stoppt die Wiedergabe automatisch.
Die Wiedergabe kann jedoch jederzeit durch Antippen von
REC oder PLAY abgebrochen werden. Die Wiedergabe stoppt
ebenso, wenn die DEMO-Taste betätigt wird.
Page 12

MIDI-FUNKTIONEN
Eine kurze Einführung in MIDI
MIDI steht für “Musical Instrument Digital Interface” und
stellt einen weltweiten Kommunikationsstandard für elektronische
Musikinstrumente dar. Dank dieses Systems können MIDlInstrumente Daten miteinander austauschen und sich gegenseitig
steuern. Dadurch können umfassende Musiksysteme aus MIDI-
Instrumenten zusammengestellt werden, die wesentlich mehr
schöpferisches Potential als einzelne Instrumente bieten. Die
meisten Keyboards (natürlich auch Ihr YPP-50) senden Notenund Dynamikinformation (Anschlagshärte) über den MIDI OUTAusgang, wenn eine Note angeschlagen wird. Falls der MIDI
OUT-Anschluß mit dem MIDI IN-Eingang eines zweiten Keybo
ards (Synthesizer) oder Tongenerators wie z. B. dem Yamaha
EMT-1 FM Tongenerator (im Grunde genommen ein Synthe
sizer ohne Manual) verbunden wird, spricht das Keyboard
oder der Tongenerator präzise auf die am sendenden Keyboard
angeschlagenen Noten an. Deshalb können Sie durch Anschlägen
einer Note mehrere Instrumente gleichzeitig spielen und sich
ein Orchester erstellen.
MIDI Kabel
EMT-1 FM Tongenerator
Für MIDI-Sequenzaufzeichnungen wird die gleiche Form von
Datenübertragung verwendet. Ein Sequenzer, wie z. B. der
Yamaha EMQ-1 kann zum Aufzeichnen der vom YPP-50 emp
fangenen MIDI-Daten eingesetzt werden. Wenn die aufgenom
mene Sequenz dann wiedergegeben wird, “spielt” das YPP-50
die aufgezeichnete Sequenz mit allen Einzelheiten automatisch
nach.
Aufgezeichnete Daten
Die oben gegebenen Beispiele stellen dabei nur die Spitze des
Eisbergs dar. MIDI kann viel, viel mehr. Das YPP-50 bietet
eine Reihe von Ml DI-Funktionen, die die Integration in relativ
komplexe MIDI-Systeme erlauben.
Hinweis: Zum Verbinden des M/Di OUT-Ausgangs mit dem MIDI
IN-Eingang stets hochwertige MIDl-Kabel verwenden. Das
MIDI-Kabel sollte nicht länger als 15 m sein, da tangere
Kabel Rauscheinstreuungen induzieren können.
Programm wechselnummern
Das YPP-50 überträgt eine MIDI-Programmwechselnummer
zwischen 0 und 14 wenn eine seiner Stimmenwahltasten gedrückt
wird. Die resultierende Meldung ruft normalerweise im empfan
genden Gerät die Stimme oder das Programm mit der gleichen
Nummer ab. Das YPP-50 reagiert bei Empfang einer Programmwechselnummer auf die gleiche Weise und ruft automatisch die
entsprechende Stimme auf. Siehe “ProgrammWechsel EIN/AUS”
auf Seite 19 bezüglich Einzelheiten zum Aktivieren (EIN) oder
Unterbinden (AUS) des Empfangs bzw. der Übertragung von
Programmwechselnummern.
NR. STIMME
NR. STIMME
0 PIANO 8 PIANO-1-BASS
1 E.PIANO 9 E. PIANO-h BASS
2 HARPSI 10 HARPSI + BASS
3 VIBES
4
BRASS
11 VIBES -1- BASS
12 BRASS -H BASS
5 STRINGS 13 STRINGS-H BASS
6
7
P. ORGAN 14
BASS
P.ORGAN-tBASS
— —
Steuerelementnummern
Die Steuerelementnummern repräsentieren die Regeldaten, die
beim Betätigen des Pedals des Personal Electronic Pianos gesen
det werden. Falls es sich beim empfangenden Gerät um einen
Tongenerator oder zweites Keyboard handelt, reagiert es auf
Pedalbewegungen auf die gleiche Weise wie der interne Ton
generator des YPP-50S. Gleichermaßen spricht das YPP-50 auf
entsprechende Pedal- und einige andere Steuerelementdaten an,
wenn diese empfangen werden. Siehe “Steuerelement EIN/AUS”
auf Seite 19 bezüglich Einzelheiten zum Aktivieren (EIN) oder
Unterbinden (AUS) des Empfangs bzw. der Übertragung von
Steuerelementnummer n.
Hinweis: Die MIDI-Funktionen des YPP-50 können bei zugeschalte
tem Metronom nicht aktiviert werden.
Wahl des MIDI-Sende/Empfangskanals _
Das MIDI-System erlaubt das Senden und Empfangen von
MIDI-Daten auf 16 verschiedenen Kanälen. Es wurden mehrere
Kanäle geschaffen, um eine individuelle Steuerung von Geräten
zu ermöglichen, die in Reihe geschaltet sind. Damit kann ein
einzelner MIDI-Sequenzer auf zwei verschiedenen- Instrumenten
oder Tongeneratoren “spielen”. Dazu müssen die beiden Instru
mente auf verschiedenen MIDI-Kanälen empfangen, z. B. Instru
ment 1 auf MIDI-Kanal 1 und Instrument 2 auf MIDI-Kanal 2.
In diesem Fall spricht Instrument 1 nur auf die über Kanal 1
übertragene Information an, während Instrument 2 nur die
über Kanal 2 empfangenen Daten verarbeitet. Auf diese Weise
kann ein Sequenzer zwei vollkommen verschiedene Stimmen in
zwei empfangenden Instrumenten oder Tongeneratoren steuern.
MIDI OUT MIDI IN ^
EMQ-1 Sequenzer
MIDI THRU^
EMT-1 FM Tongenerator
(empfängt auf MIDIKanal 2)
Vom Persona! Electronic Piano übertragene
und empfangene MIDI-Meldungen
Die vom YPP-50 gesendeten und empfangenen MIDI-Informationen (Meldungen) sind, wie folgt:
Noten- und Dynamikdaten
Diese Information weist das empfangende Keyboard oder Ton
generatormodul an, eine bestimmte Note (wird durch MIDI-
Notennummer spezifiziert) mit einer bestimmten Dynamik (wird
durch den MI DI-Anschlagsdynamik wert festgelegt) zu spielen.
Das YPP-50 sendet jedesmal Noten- und Dynamikdaten, wenn
eine Taste angeschlagen wird, während der interne AWM-Tongenerator des YPP-50 die entsprechende(n) Note(n) “spielt”,
sobald Noten- und Dynamikdaten von einem externen MIDIGerät empfangen werden.
18
__________
YPP-50 (empfängt auf MIDI-Kanal 1)
Page 13

Um ein MIDI-System zusammenzustellen, müssen die MIDI-
Kanäle von sendenden und empfangenden Geräten aufeinander
abgestimmt werden. Außerdem gibt es eine OMNI-Funktion,
die den Empfang auf allen 16 MIDI-Kanälen ermöglicht. In
der OMNI-Betriebsart muß der Empfangskanal des empfangen
den Geräts nicht auf den Sendekanal (außer für Empfang von
Modusmeldungen) des steuernden Geräts eingestellt werden.
Einstellung der MIDI-Kanäle des YPP-50s
1. Die MIDI/TRANSPOSE-Taste gedrückthalten.
2. Die Taste auf dem Manual drücken, die dem gewünschten
MIDI-Empfangs- oder Sendekanal entspricht*.
3. Die MIDI/TRANSPOSE-Taste freigeben.
* Die Tasfen Ci bis auf dem Manual werden гит Wählen des
MlDl-Sendekanals benutzt, während die Tasten Сз bis 0^4 zum
Ein/Ausscha/ten der OMNI-Funktion sowie zum EinsteUen des
MIDI-Empfangskanal dienen. Siehe Abbildung unten. Die £4-
Taste schaltet auf OMNI-Empfang und wählt Kanal 1 als Basisemp
fangskanal.
В
YPP-50
(Lokalsteuerung AUS, wird über den
EMQ-1 Sequenzer gesteuert)
Ein/Ausschalten der Lokalsteuerung
1. Die MIDI/TRANSPOSE-Taste gedrückthalten.
2. Die Stimmenwahltaste PIANO drücken. Wenn dadurch die
LED-Anzeige der Stimmenwahltaste PIANO aufleuchtet, ist
jetzt die Lokalsteuerung ausgeschaltet. Wenn die LED-Anzeige
nach Drücken der Stimmen wahltaste PIANO erlischt, ist die
l/
Lokalsteuerung aktiviert.
3. Die MIDI/TRANSPOSE-Taste loslassen.
\
L...................
Zum Einstellen des
Sendekanals. (Ci~D#2)
Hinweis: Beim Einschalten wird die OMNI-Funktion für Empfang
aktiviert und Kanal 1 als Sendekanal eingestellt.
MIDI FUNKTIONEN
Funktion
Lokalsteuerung Ein/Aus
Programm Wechsel Ein/Aus
Steuerelement Ein/Aus
J
Zum Einstellen des
Empfangskanals. (Сэ-0)(4)
______________________
Stimmenwafaltaste*
PIANO
E.PIANO
HARPSI
Multi-Ti mbre-Betriebsart VIBES
Splitfunktion & Lokalsteuerung
STRINGS
für linke Tastaturhälfte aus
Splitfunktion & Lokalsteuerung
BRASS
für rechte Tastatur hälfte aus
Einstelldatenübertragung
Die hier aufgelisteten MIDI-Funktionen werden durch gleichzeitiges
Drücken der MIDI/TRANSPOSE-Taste und der entsprechenden
Stimmenwahltaste angesteuert. Einzelheiten sind in den nachfol
genden Seiten aufgeführt.
P.ORGAN
Lokalsteuerung EIN/AUS _________________
“Lokalsteuerung” bedeutet, daß das YPP-50 den eigenen inter
nen Tongenerator steuert, wodurch die internen Stimmen über
die Tastatur gespielt werden können. In diesem Fall ist die
Lokalsteuerung aktiviert, da ja der interne Tongenerator von
der Tastatur des YPP-50 gesteuert wird.
Die Lokalsteuerung läßt sich ausschalten, wodurch das Key
board nicht mehr mit dem internen Tongenerator spielt. Allerdings
werden beim Anschlägen von Noten auf der Tastatur weiterhin
MIDI-Daten über den MIDI OUT-Ausgang gesendet. Gleich
zeitig reagiert der interne Tongenerator auf MIDI-Meldungen
die am MIDI IN-Eingang eintreffen. Damit kann zum Beispiel
ein Sequenzer wie der Yamaha EMQ-1 den internen Tongene
rator steuern, während das YPP-50 wiederum auf einem externen
Tongenerator wie dem EMT-1 spielt.
Programmwechsel EIN/AUS
Normalerweise spricht das YPP-50 auf MIDI-Programmwechselnummern an, die von einem externen MIDI-Gerät empfangen
werden, wodurch die entsprechend numerierte Stimme des
YPP-50S abgerufen wird. Mit jedem Drücken einer seiner Stim
menwahltasten sendet das YPP-50 ebenso eine MIDI-Programmwechselnummer, die wiederum im empfangenden Gerät das
Programm oder die Stimme mit der entsprechenden Nummer
abruft. Natürlich muß dafür der Empfang und die Verarbeitung
von Programmwechselmeldungen für das empfangende Gerät
eingeschaltet sein.
Mit Hilfe dieser Funktion kann der Empfang und die Übertra
gung von Programmwechselnummern unterbunden werden,
wodurch Stimmen im YPP-50 abgerufen werden können, ohne
daß das externe MIDI-Gerät davon beeinflußt wird.
1. Die MIDI/TRANSPOSE-Taste gedrückthalten.
2. Die Stimmen wahltaste E.PIANO drücken. Wenn dadurch
die LED-Anzeige der Stimmen wahltaste E. PIANO aufleuchtet,
ist jetzt der Empfang bzw. die Übertragung von Programm
wechselmeldungen ausgeschaltet. Wenn die LED-Anzeige
nach Drücken der Stimmenwahltaste E.PIANO erlischt, ist
der Empfang und die Übertragung von Programmwechselnum
mern aktiviert.
3. Die MIDI/TRANSPOSE-Taste loslassen.
Steuerelement EIN/AUS
Normalerweise spricht das YPP-50 auf MIDI-Steuerelementmeldungen von einem externen MIDI-Gerät oder Keyboard an,
wodurch die gewählte Stimme des YPP-50s von diesen empfan
genen Pedal- oder Reglerdaten beeinflußt wird. Darüber hinaus
sendet das YPP-50 MIDI-Steuerelementdaten wenn das Pedal
betätigt wird.
Mit dieser Funktion können Empfang und Übertragung von
Steuerelementmeldungen unterbunden werden, falls die Stimmen
nicht von den Reglern externer Geräte gesteuert werden sollen
oder umgekehrt.
1. Die MIDI/TRANSPOSE-Taste gedrückthalten.
2. Die Stimmenwahltaste HARPSI drücken. Wenn dadurch die
LED-Anzeige der Stimmen wahltaste HARPSI aufleuchtet,
ist jetzt der Empfang bzw. die Übertragung von Steuerelement
meldungen ausgeschaltet. Wenn die LED-Anzeige nach
Drücken der Stimmen wahltaste HARPSI erlischt, sind Emp
fang und Übertragung von Steuerelementmeldungen aktiviert.
3. Die MIDI/TRANSPOSE-Taste loslassen.
19
Page 14

Die Multi-Timbre-Betriebsart
Die Multi-Timbre-Betriebsart ist ein spezieller Modus, bei dem
verschiedene Stimmen von einem MIDI-Sequenzer wie dem
EMQ-1
gesteuert
KANAL
über verschiedene
werden können.
STIMME
1
PIANO
2 E.PIANO
3 HARPSI
4
VIBES
5 BRASS
Die Multi-Timbre-Funktion wird folgendermaßen aktiviert:
1. Die MIDI/TRANSPOSE-Taste gedrückthalten.
2. Die Stimmenwahltaste VIBES drücken. Wenn dadurch die
LED-Anzeige der Stimmenwahltaste VIBES aufleuchtet, ist
die Multi-Timbre-Betriebsart eingeschaltet. Wenn die LEDAnzeige nach Drücken der Stimmenwahltaste VIBES erlischt,
ist die Multi-Timbre-Betriebsart ausgeschaltet.
3. Die MIDI/TRANSPOSE-Taste loslassen.
Und hier ein Beispiel, wie die Multi-Timbre-Betriebsart zum
Aufzeichnen von drei verschiedenen Stimmenspuren im EMQ-1
Sequenzer verwendet wird, um später die drei Stimmen des
YPP-50 durch die aufgezeichnete Sequenz simultan wieder
zugeben.
1. Den EMQ-1 entsprechend der Abbildung unten anschließen.
YPP-50
2. Die erste Stimme und den ersten MIDI-Sendekanal wählen,
dann die erste Stimmenspur mit dem EMQ-1 aufnehmen.
3. Die YPP-50 Multi-Timbre-Betriebsart aktivieren, eine neue
Stimme und einen neuen MIDl-Kanal wählen. Dann die
zweite Stimmenspur mit der Overdubbing-Funktion des EMQ-1
aufnehmen.
4. In der Multi-Timbre-Betriebsart dann den dritten MIDISendekanal und die dritte Stimme wählen. Danach die dritte
Stimmenspur mit dem EMQ-1 aufzeichnen und mit den ande
ren Spuren kombinieren.
5. Weiterhin in der Multi-Timbre-Betriebsart die aufgezeichnete
Sequenz mit dem EMQ-1 wiedergeben. Die aufgezeichneten
Stimmenspuren werden mit den bei der Aufnahme gewählten
Stimmen wiedergegeben, wodurch ein dreistimmiges Orchester
erklingt.
MIDI-Kanäle
KANAL
6 STRINGS
7
8
9
10
(1 bis 10), separai
STIMME
P. ORGAN
BASS
PIANO
PIANO
EMQ-1 Sequenzer
nen Noten werden auf dem Basiskanal gesendet (d. h. den Kanal,
der mit der zuvor beschriebenen MIDl-Kanalwahlfunktion ein
gestellt wurde). Die Regeldaten vom Dämpferpedal werden auf
beiden Kanälen gleichzeitig übertragen.
OPTIONAL IN
MIDI OUT
YPP-50
LV
^ Teilungspunkt auf F02 eingestellt.
LINE OUT R
EMT-1 FM Tongenerator
(empfängt auf MIDlKanal 2)
L ' f|N
nimm
C3
Linke Manuafhälfte spielt
eine Baßstimme des EMT-1. Rechte Manualhälfte steuert
Aktivieren der Splitfunktion & Ausschatten der Lokal
steuerung für die linke Klaviaturhälfte
1. Die MIDI/TRANSPOSE-Taste gedrückthalten,
2. Die Stimmenwahltaste STRINGS drücken. Falls die LEDAnzeige der Taste STRINGS nun leuchtet, ist die Splitfunktion aktiviert und die Lokalsteuerung für die linke Tastatur
hälfte ausgeschaltet. Ist die STRINGS-Anzeige erloschen, ist
die Splitfunktion ausgeschaltet.
3. Die MIDI/TRANSPOSE-Taste und die STRINGS-Stimmenwahltaste freigeben.
Spiitfunktion & Lokaisteuerung für rechte
Seite aus______________________________
Beim YPP-50 kann entweder die rechte oder linke Tastalurhälfte
zum Steuern eines externen Keyboards oder Tongenerators
verwendet werden. Die Zuweisung der linken Tastaturhälfte
zur Steuerung eines externen Geräts wurde im vorangehenden
Abschnitt beschrieben. Um die rechte Tastaturhälfte einem ex
ternen Tongenerator zuzuordnen, während die linke Hälfte zur
Steuerung der internen Stimmen des YPP-50s verwendet wird,
die BRASS-Taste statt STRINGS zum Aktivieren der MlDlSplitfunktion drücken (siehe “Aktivieren der Spiitfunktion &
Ausschalten der Lokalsteuerung für die linke Klaviator” im
vorangehenden Abschnitt). Die anderen Bedienschritte sind mit
denen im vorherigen Abschnitt identisch.
YPP-50-Stimme.
^MIOI
CO
Spiitfunktion & Lokalsteuerung für Unke
Seite aus______________________________
Bei der MIDI-Splitfunktion (Manualteilung) wird eine Hälfte der
Tastatur zum Spielen einer YPP-50-Stimme reserviert, während
die andere Tastaturhälfte ein zweites MIDI-Keyboard oder einen
Tongenerator wie den Yamaha EMT-1 oder EMT-10 steuert.
Bei dieser Funktion steuert die rechte Tastaturhälfte eine interne
YPP-50-Stimme, während die linke Tastaturhälfte zum “Spielen”
auf einem externen Keyboard oder Tongenerator wie dem Yamaha
EMT-1 FM Tongenerator oder dem EMT-10 AWM-Tongenerator
dient. Wird nun eine Taste auf der linken Hälfte angeschlagen,
bleibt das YPP-50 stumm. Der Teilungspunkt, d. h. die Taste,
die die Klaviatur in zwei Hälften unterteilt, ist automatisch
auf Fl^2 festgelegt.
Die Splitfunktion ist äußerst praktisch, wenn Sie mit der rechten
Hand eine Pianostimme (YPP-50) und mit der linken eine Baßli
nie oder Streicherpassage auf einem Synthesizer spielen wollen.
Bei aktivierter Splitfunktion werden die mit der linken Hand
gespielten Noten über den MIDI OUT-Ausgang des YPP-50 auf
MIDI-Kanal 2 gesendet. Die mit der rechten Hand angeschlage-
20
Übertragen der Einsteildaten ______________
Mit dieser Funktion werden alle Einstellungen des YPP-50
(abgerufene Stimme usw.) über den MIDI OUT-Anschluß gesen
det. Dies ist besonders praktisch für die Aufzeichnung mit einem
MIDI-Sequenzer*, dessen Wiedergabe dann das YPP-50 steuern
soll. Durch das Übertragen und Aufzeichnen der Einstelldaten,
bevor die eigentlichen Spieldaten mit dem Sequenzer aufgenom
men werden, wird das YPP-50 vor der Wiedergabe automatisch
auf diese aufgezeichneten Einstellungen gebracht.
* Da der Yamaha Sequenzer EMQ-1 zu Beginn einer Aufnahme die
YPP-50-Einstelldaten automatisch empfängt und aufzeichnet,
ist diese Funktion nur für andere Sequenzer als den EMQ-1 not
wendig.
1. Die MIDI/TRANSPOSE-Taste gedrückthalten.
2. Die P.ORGAN-Stimmenwahltaste antippen.
3. Die MIDI/TRANSPOSE-Taste loslassen.
Page 15

STÖRUNGSSUCHE
MIDI-DATENFDRMAT
Falls eine Betriebsstörung auftritt, zunächst folgende Punkte
überprüfen, um festzustellen, ob es sich um einen echten Defekt
handelt.
1. Keine Tonerzeugung nach dem Einschalten
Ist der Netzstecker richtig an einer Steckdose angeschlossen?
Die Netzverbindung sorgfältig überprüfen. Ist der MASTER
VOLUME-Regler auf ein hörbaren Pegel eingestellt?
2. Das YPP-50 reproduziert Radio- oder Fernsehsendungen
Dies kann in der Nähe von starken Sendern verkommen.
Den Yamaha-Händler kontaktieren.
3. Zeitweises Statikrauschen
Dies wird gewöhnlich durch das Ein/Ausschalten eines Haus
haltsgeräts oder Elektrogeräts verursacht, das am gleichen
Netzzweig wie das YPP-50 angeschlossen ist.
Radio- oder Fernsehempfang in der Nähe des YPP-50s gestört
Das YPP-50 enthält Digitalschaltkreise, die im Hochfrequenz
bereich Rauschen induzieren können. Zur Abhilfe das YPP-50
vom betroffenen Gerät weiter entfernt aufstellen oder umge
kehrt.
5. Verzerrter Klang bei Anschluß des YPP-50s an ein externes
Verstärker/Lautsprechersystem
Falls bei Anschluß des YPP-50s an eine Stereo-Anlage oder
einen Instrumentverstärker ein verzerrter Klang entsteht, den
MASTER VOLUME-Regler des YPP-50s so weit absenken,
bis die Verzerrungen verschwinden.
SONDERZUBEHÖR UND
EXPANDERMODULE
SONDERZUBEHÖR
Sitzbank BC-7
Diese stabile komfortable Bank ist ganz auf das YPP-50 zuge
schnitten.
Stereo-Kopfhörer HPE-5
Diese hochwertigen, leichten Kopfhörer bieten aufgrund der
weichen Ohrmuscheln höchsten Tragekomfort.
Anschlußkabei PCS-3
Dient zum Anschluß des YPP-50s an eine Stereoanlage oder ein
Audiogerät.
EXPANDERMODULE
Sound Box EMT-10
Sound Box EMT-1
Memory Box EMQ-1............................Diskettensequenzer
Drum Box EMR-1
Reverb Box EME-1
Mit diesen hochwertigen Expandermodulen können Sie das
Potential Ihres YPP-50s ungemein erhöhen.
HfNWElS: Einige dieser Artikel sind in manchen Ländern nicht lie
ferbar.
................................
................................
................................
..............................
AWM-Tongenerator
FM Tongenerator
Digital-Rhythmusgerät
Digitalhall
Falls Sie bereits mit MIDI vertraut sind oder einen Computer
zur Erzeugung von MIDl-Steuermeldungen für die Instrumente
verwenden, sind die hier dargestellten Daten wahrscheinlich
bei der Steuerung des YPP-50s hilfreich.
1. NOTE EIN/AUS
Datenformat; [9nH]
9nH = Note EIN/AUS-Ereignis (n = Kanalnummer)
kk = Notennummer (28 - 103 = Eo - Gö)
vv = Anschlagsdynamik (Taste EIN = 1 -127; Taste AUS = 0)
Das Note-AUS-Ereignisformat fSnHJbeitet (nur bei Empfang).
2. STEUERELEMENT- & MODUSMELDUNGEN
[kk]-[vv]
'{kk] wird ebenso verar-
Datenformat: [BnHj ^ [cc][dd]
BnH = Steuerelementereignis (n = Kanalnummer)
cc = Steuerelementnummer (oder Modusmeldungsnummer)
dd = Einstellwert
cc
07H
OBH
40H
43H
79H
7AH
7BH
7CH
7DH
3. PROGRAMMWECHSEL
PARAMETER
Lautstärke
Ausdmck
Dämpferpedal
Soft-Pedal
Rückstellung aller
Bedienelemente
Lokalsteuerung
EIN/AUS
Alle Noten AUS
OMNI AUS/Alle
Noten AUS
OMNI EIN/Alle
Noten AUS
43H, 79H, 7AH, 7BH, 7CH und 7DH beziehen sich nur auf
Empfang
dd
0 = OEF; 6FH= -3dB; 7EH = 0dB
0 = OFF; 6FH= -3dB; 7FH = 0dB
0 ~ 3FH = OFF; 40H - 7FH = ON
0 - 3FH = OFF; 40H - 7FH = ON
0
0=OFF; 7FH = ON
Datenformat: [CnH] ^ [dd]
CnH = Programmwechselereignis (n = Kanalnummer)
dd = Programmnummer
dd
ООН
OIH
02H
03 H
04H
05 H
06H
07H
4. SYSTEM-ECHTZEITMELDUNGEN
STiMME
PIANO
E. PIANO
HARPSI
VIBES
BRASS
STRINGS
P. ORGAN
BASS
Wenn dd über OEH Hegt, wird kein Stimmenwechsel durch
geführt.
dd
08H
09H
OAH
OBH
OCH
ODH
OEH
STIMM
PIANO + BASS
E. PIANO BASS
HARPSI + BASS
VIBES + BASS
BRASS-I-BASS
STRINGS H-BASS
P.ORGAN + BASS
Aktivansprechung (FEH)
Wird alle 200 Millisekunden übertragen, Falls diese Meldung 400
Millisekunden ausbleibt, wird dies als NOTE AUS-Ereignis verstanden.
5. SYSTEMEXKLUSIVE MELDUNGEN
Datenformat ; [FOH] -> [43 H] -» [xn] -► [ f f]... [F7 H]
X = 0, ff = 7CH: Einstelldatenempfang, Die Einstelldaten folgen 7CH
X = 2,ff = 7CH: Bei Empfang dieser Daten werden die Einstelldaten
gesendet.
Datenformat; [FOH] ^ [43H] ^ [73H] ^ [20H] ^ [nn] ^ [F7H]
43H = YAMAHA ID
73H = EINZELKEYBAORD ID
20H = YPP-50 ID
nn = 40H: Aufnatimewiedergabe EIN (nur Empfang)
nn = 41H; Aufnahmewiedergabe AUS (nur Empfang)
nn = 50H; Tempoerhöhung
nn = 51H: Temposenkung
nn = 52H; Tempo 120
6. MULTI-TIMBRE-BETRIEBSART
Datenformat: [FOH] [43H] [73H] [id] [nn] ^ [F7H]
43H = YAMAHA ID-NR.
73H = ID-NR. FÜR EINZELNES KEYBOARD
id = OIH (Standard), IBH (Clavinova), oder 20H (YPP-50)
nn = 15H: MULTI-TI MBRE-Betriebsart EIN; nn=13H: MULTITIM BRE-Betriebsart AUS, nn = 7nH: Empfangskanalwechsel (n =
Kanalnummer, nur für Empfang)
Alle für den allgemeinen Betrieb notwendigen MIDI-Daten sind
hier oben gegeben.
21
Page 16

SPECIFICATIONS
TECHNISCHE DATEN
SPÉCIFICATIONS
ESPECIFICACIONES
* Specifications subject to change without notice.
* Änderungen ohne Vorankündigung Vorbehalten.
* Sous toute réserve de modification des caractéristiques sans préavis.
* Especificaciones sujetas a cambios sin previo aviso.
YPP-50
KEYBOARD
VOICE SELECTORS
76 KEYS (Eo~G6)
PIANO, E.PIANO, HARPSICHORD, VIBES, STRINGS, BRASS, P.ORGAN, BASS
OTHER CONTROLS MASTER VOLUME, MIDI/TRANSPOSE, METRONOME, TEMPO A/V,
PERFORMANCE MEMORY REC/PLAY, DEMO
JACKS/CONNECTORS
INPUT & OUTPUT
LEVEL/IMPEDANCE
MAIN AMPLIFIER
SPEAKERS
DIMENSIONS (W X H X D)
WEIGHT
HEADPHONES, OPTIONAL IN L/R, OPTIONAL OUT L/R, MIDI IN/OUT, DAMPER
OPTIONAL OUT; 600 il/I ~4 Vpp
OPTIONAL IN: 22 kii/- 10 dBm (for nominal output level)
10 Watts
16 cm (6-2/7”) X 2
1157 X 396 X 759 mm (45-6/9” x 15-3/5” x 28-8/9”)
23 kg (50-5/7 lbs.)
NAME PLATE LOCATION; The nameplate is located on
the bottom panel. The Model, Serial Number, Power
requirements, etc., are indicated on this plate. You should
note the model, serial number and the date of purchase
in the spaces provided below and retain this manual as a
permanent record of your purchase.
Model
Serial No.
Purchase Date
LAGE DES TYPENSCHILDS: Das Typenschild befindet sich
auf der Unterseite. Modeitbezeichnung, Seriennummer,
Betriebsstrom etc, sind auf dem Typenschild angegeben.
Tragen Sie Modellbezeichnung, Seriennummer und
Kaufdatum in die unten vorhandenen Felder ein und
bewahren Sie dieses Handbuch ais permanenten Kaufbeleg
auf.
Modell
Seriennummer
Kaufdatum
EMPLACEMENT DE LA PLAQUE SIGNALETIQUE: La plaque
signalétique se trouve sur le panneau inférieur. Le modèle,
le numéro de série, l’alimentation requise et autres
paramètres sont indiqués sur cette plaque. Inscrire ie
modèie, le numéro de série et la date de l’achat dans
l’espace prévu cidessous et conserver le mode d’emploi à
titre d’enregistrement permanent de i’achat.
Modèle________________________________________________
N® de série
Date de l’achat
UBICACION DE LA PLACA DE CARACTERISTICAS: La placa
de características está situada en el panel inferior. En
esta placa se indican ei modelo, el número de serie, la
tensión de alimentación, etc. Anote ei modelo, el número de
serie, y la fecha de adquisición en ios espacios ofrecidos a
continuación, y guwarde este manuai como registro
permanente de su adquisición.
Modelo
N.° de serie
Fecha de adquisición
38
Page 17

YAMAHA f Personal Electronic Piano ]
Model YPP50 MIDI Implementation Chart
Date : 7/28, 1989
Version : 1.0
Transmitted
Recognized
Fune tIon
Basic
Channel
De fault
Changed
Default
Mode
------------------------------------------------------------------------1--------------
Messages
1
1-16
3
X
*««****«««*««*
1
1-16
OMNIon.OMNIoff
X
Note : 28-103 : 28-103
Number : True voice: ************** : 28-103
------------------------------------+--------------------------------+
Velocity Note on
Note off
After
Touch
Key's
cir s
Pitch Bender
Control
07
11 X
64
: 0 9nH,v=l-127
: X 9nH,v=0
+-----------------------------------------------
: X
: X
: X
+ —
X
0
------------
0 v=1-127
X
X
X
: X
4. —
0
0
0 Damper
Change
Remarks
Volume
Expression
121 X
Program
Change
: True #
System Exclusive
System : Song Pos :
: Song Sel ;
Common : 'Pune
System : Clock :
Real Time : Commands :
Aux : Local ON/OFF :
:A11 Notes OFF:
Mes- : Active Sense :
sages :Rese t :
67
X
: 0 0-14
*************
. +
--------------------------------------------
: 0
+
---------------------------
X
X
X
X
X
X
X
0
X
0 Soft Pedal
0
0 0-14
0-14
+
----
: 0
+ —
X
X
X
X :
X :
0
0 (123-125) *1
0
X
Notes : *1 = receive (123) if omni off or multi-timbre on
Reset All
Controllers
Mode 1 : OMNI ON, POLY Mode 2
Mode 3 : OMNI OFF. POLY Mode 4
OMNI ON, MONO
OMNI OFF. MONO
0
Yes
X
No
Page 18

FCC INFORMATION (U.S.A.)
1. IMPORTANT NOTICE: DO NOT MODIFY THIS UNIT!
This product, when installed as indicated in the instructions contained in this manual, meets FCC requirements. Modifications not
expressly approved by Yamaha may void your authority, granted by the FCC, to use the product.
2. IMPORTANT: When connecting this product to accessories and/or another product use only high quality shielded cables. Cable/s
supplied with this product MUST be used. Follow all installation instructions. Failure to follow instructions could void your FCC
authorization to use this product in the USA.
3. NOTE: This product has been tested and found to comply with the requirements listed in FCC Regulations, Part 15 for Class "B”
digital devices. Compliance with these requirements provides a reasonable level of assurance that your use of this product in a
residential environment will not result in harmful interference with other electronic devices. This equipment generates/uses radio
frequencies and, if not installed and used according to the instructions found in the users manual, may cause interference harmful
to the operation of other electronic devices. Compliance with FCC regulations does not guarantee that interference will not occur in
all installations. If this product is found to be the source of interference, which can be determined by turning the unit "OFF” and "ON”,
please try to eliminate the problem by using one of the following measures:
Relocate either this product or the device that is being affected by the interference.
Utilize power outlets that are on different branch (circuit breaker or fuse) circuits or install AC line filter/s.
In the case of radio or TV interference, re locate/reorient the antenna. If the antenna lead-in is 300 ohm ribbon lead, change the lead-in
to co-axial type cable.
If these corrective measures do not produce satisfactory results, please contact the local retailer authorized to distribute this type of
product. If you can not locate the appropriate retailer, please contact Yamaha Corporation of America, Electronic Service Division,
6600 Orangethorpe Ave, Buena Park, CA90620
The above statements apply ONLY to those products distributed by Yamaha Corporation of America or its subsidiaries.
* This applies only to products distributed by YAMAHA CORPORATION OF AMERICA.
Wichtiger Hinweis für die Benutzung in der Bundesrepublik
Deutschland.
Bescheinigung des Importeurs
Hiermit wird bescheinigt, daß der/die/das
Electronic Piano Typ: YPP-SO
(Gerät, Typ, Bezeichnung)
in Übereinstimmung mit den Bestimmungen der
VERFÜGUNG 1046/84
(Amtsblattverfügung)
funk-entstört ist.
Der Deutschen Bundespost wurde das Inverkehrbringen
dieses Gerätes angezeigt und die Berechtigung zur Überprüfung
der Serie auf Einhaltung der Bestimmungen eingeräumt.
Yamaha Europa GmbH
Name des Importeurs
• Dies bezieht sich nur auf die von der Yamaha Europa GmbH vertriebenen
Produkte.
IMPORTANT NOTICE FOR THE UNITED KINGDOM
Connecting the Plug and Cord
IMPORTANT. The wires in this mains lead are coloured in accordance
with the following code:
BLUE : NEUTRAL
BROWN : LIVE
As the colours of the wires in the mains lead of this apparatus may
not correspond with the coloured makings identifying the terminals in
your plug proceed as follows:
The wire which is coloured BLUE must be connected to the terminal
which is marked with the letter N or coloured BLACK.
The wire which is coloured BROWN must be connected to the terminal
which is marked with the letter L or coloured RED.
Making sure that neither core is connected to the earth terminal of the
three pin plug.
This applies only to products distributed by Yamaha-Kemble Music (U.K.)
Ltd.
CANADA
THIS DIGITAL APPARATUS DOES NOT EXCEED THE
“CLASS B” LIMITS FOR RADIO NOISE EMISSIONS FROM
DIGITAL APPARATUS SET OUT IN THE RADIO
INTERFERENCE REGULATION OF THE CANADIAN
DEPARTMENT OF COMMUNICATIONS.
LE PRESENT APPAREIL NUMERIQUE N’EMET PAS DE
BRUITS RADIOELECTRIQUES DEPASSANT LES LIMITES
APPLICABLES AUX APPAREILS NUMERIQUES DE LA
“CLASSE B” PRESCRITES DANS LE REGLEMENT SUR LE
BROUILLAGE RADIOELECTRIQUE EDICTE PAR LE
MINISTERE DES COMMUNICATIONS DU CANADA.
This applies only to products distributed by Yamaha Canada Music Ltd.
Ceci ne s’applique qu’aux produits distribués par Yamaba Canada Musique Ltée.
Dette apparai overholder det gaeldende EF-direktiv vedrorende
radiostoj.
Cet appareil est conforme aux prescriptions de la directive
communautaire 87/308/CEE.
Diese Geräte entsprechen der EG-Richtlinie 82/499/EWG und/
oder 87/308/EWG.
This product complies with the radio frequency interference
requirements of the Council Directive 82/499/EEC and/or 87/308/
EEC.
Questo apparecchio è conforme al D.M.13 aprile 1989 (Direttiva
CEE/87/308) sulla soppressione dei radiodisturbi.
Este producto está de acuerdo con los requisitos sobre
interferencias de radio frequencia fijados por el Consejo
Directivo 87/308/CEE,
YAMAHA CORPORATION
40
Page 19

For details of products, please contact your nearest Yamaha/
or the authorized distributor listed below.
Die Einzelheiten zu Produkten sind bei Ihrer unten aufgeführ
ten Niederlassung und bei Yamaha-Vertragshändlem in den
jeweiligen Bestimmungsländern erhältlich.
Pour plus de détails sur les produits, veuillez-vous adresser à
Yamaha ou au distributeur le plus proche de vous figurant
dans la liste suivante.
NORTH AMERICA
CANADA
Yamaha Canada Music Ltd.
135 Milner Avenue, Scarborough, Ontario,
MIS 3R1, Canada
Tel: 416-298-1311
U,S.A.
Yamaha Corporation of America,
Keyboard Division
6600 Orangethorpe Ave., Buena Park, Calif. 90620,
U.S.A.
Tel: 714-522-9011
MIDDLE & SOUTH AMERICA
MEXICO
Yamaha De Mexico S.A. De C.V.,
Departamento de ventas
Javier Rojo Gomez No.l 149, Col. Gpe Del
Moral. Dcleg. Iztapalapa. 09300 Mexico, D.F.
Tel: 686-00-33
BRASIL
Yamaha Musical Do Brasil LTDA.
Ave. Reboucas 2636, Sao Paulo, Brasil
Tel: 55-11 853-1377
PANAMA
Yamaha De Panama S.A.
Edificio Interseco, Calle Elvira Mendez no. 10, Piso
3, Oficina #105, Ciudad de Panama, Panama
Tel: 507-69-5311
OTHER LATIN AMERICAN COUNTRIES
AND CARIBBEAN COUNTRIES
Yamaha Music Latin America Corp.
6101 Blue Lagoon Drive, Miami, Florida 33126,
U.S.A.
Tel: 305-261-4111
EUROPE
THE UNITED KINGDOM
Yamaha-Kemble Music(U.K.) Ltd.
Sherboume Drive, Tilbrook, Milton Keynes,
MK7 8BL England
Tel: 0908-366700
IRELAND
Danfay Ltd,
61D, Sallynoggin Road, Dun Laoghaire, Co. Dublin
Tel: 01-2859177
GERMANY/SWITZERLAND
Yamaha Europa GmbH.
SiemensslraBe 22-34, D-2084 Rellingen, F.R. of
Germany
Tel: 04101-3030
AUSTRIA/HUNGARY/SLOVENIA/
ROMANIA/BULGARIA
Yamaha Music Austria Gesm b H.
Schleiergasse 20, A-1100 Wien Austria
Tel: 0222-60203900
THE NETHERLANDS
Yamaha Music Benelux B.V.,
Verkoop Administratie
Kanaalweg 18G, 3526 KL Utrecht, The Netherlands
Tel: 030-828411
BELGIUMALUXEMBOURG
Yamaha Music Benelux B.V.,
Brussels-ofnce
Keiberg Imperiastraat 8, 1930 Zavenlem, Belgium
Tel: 02-7258220
FRANCE
Yamaha Musique France, Division
Instruments Electroniques et de Scène
BP 70-77312 Marne*la-Valée Cedex 2, France
Tel: 01-64-61-4000
ITALY
Yamaha Musica Italia S.P.A.,
Home Keyboard Division
Viale Italia 88, 20020 Lainate(Milano), Italy
Tel: 02-935-771
SPAIN
Yamaha-Hazen Electronîca Musical, S.A.
Jorge Juan 30, 28001, Madrid, Spain
Tel: 91-577-7270
PORTUGAL
Valentim de Carvalho CI SA
Estrada de Porto Salvo, Paço de Arcos 2780 Oeiras,
Portugal
Tel: 01*443-3398/4030/1823
GREECE
Philippe Nakas S.A.
Navarinou Street 13, P.Code 10680, Athens, Greece
Tel: 01-364-7111
SWEDEN
Yamaha Scandinavia AB
J. A. Wettergrens gata 1, Box 30053, 400 43
Göteborg, Sweden
Tel: 031-496090
DENMARK
YS Copenhagen Liaison Office
FinsensvcJ 86, DK*2000 Frederiksberg, Denmark
Tel: 31-87 30 88
FINLAND
Fazer Music Inc.
Aleksantcrinkatu 11. SF 00100 Helsinki, Finland
Tel: 0435 0!)
NORWAY
Narud Yamaha AS
0stemdalen 29, 1345 0sterâs
Tel: 02-24 47 90
ICELAND
Pâli H. Pâlsson
P.O. Box 85, 121 Reykjavik, Iceland
Tel: 01-19440
OTHER EUROPEAN COUNTRIES
Yamaha Europa GmbH.
Siemensstraße 22-34, D-2084 Rellingen, F.R, of
Germany
Tel: 04101-3030
Yamaha Corporation,
International Marketing Division
Nakazawa-cho 10-1, Hamamatsu, Japan 430
Tel: 053-460-2311
MIDDLE EAST
TURKEY/CYPRUS
Yamaha Musique France, Division Export
BP70-77312 Mame-la-Valée Cedex 2, France
Tel: 01-64-61-4000
OTHER COUNTRIES
Yamaha Corporation,
International Marketing Division
Nakazawa-cho 10-1, Hamamatsu, Japan 430
Tel: 053-460-2311
Para detalles sobre productos, contacte su tienda Yamaha más
cercana o el distribuidor autorizado que se lista debajo.
ASIA
HONG KONG
Tom Lee Music Co., Ltd.
1 l/F., Silvercord Tower 1, 30 Canton Road,
Tsimshatsui, Kowloon, Hong Kong
Tel: 730-1098
INDONESIA
PT. Yamaha Music Indonesia (Distributor)
PT. Nusantik
Gedung Yamaha Music Center, Jalan Jend. Gatot
Subroto Kav, 4, Jakarta 12930, Indonesia
Tel: 21-520-2577
MALAYSIA
Yamaha Music Malaysia Sdn., Bhd.
16-28, Jalan SS 2/72. Petaling Jaya, Selangor,
Malaysia
Tel: 3-717-8977
PHII>IPPINES
Yupangco Music Corporation
339 Gil J. Puyat Avenue, P.O. Box 885 MCPO,
Makati, Metro Manila, Philippines
Tel: 819-7551
SINGAPORE
Yamaha Music Asia Pte., Ltd.
Blk 17A Toa Payoh #01-190 Lorong 7
Singapore 1231
Tel: 354-0133
TAIWAN
Kung Hsue She Trading Co., Ltd.
No. 322, Section 1, Fu Hsing S. Road,
Taipei 106, Taiwan, R.O.C.
Tel: 02-709-1266
THAILAND
Siam Music Yamaha Co., Ltd.
865 Phornprapha Building, Rama 1 Road,
Patumwan, Bangkok 10330, Thailand
Tel: 2-215-3443
THE PEOPLE’S REPUBLIC OF CHINA
AND OTHER ASIAN COUNTRIES
Yamaha Corporation,
International Marketing Division
Nakazawa-cho 10-1, Hamamatsu, Japan 430
Tel: 053-460-2311
OCEANIA
AUSTRALIA
Yamaha Music Australia Pty. Ltd.
17-33 Market Street, South Melbourne, Vic. 3205,
Australia
Tel: 3-699-2388
AFRICA
NEW ZEALAND
Music Houses of N.Z. Ltd.
146/148 Captain Springs Road, Te Papapa,
Auckland, New Zealand
Tel: 9-634-0099
COUNTRIES AND TRUST
TERRITORIES IN PACIFIC OCEAN
Yamaha Corporation,
International Marketing Division
Nakazawa-cho 10-1, Hamamatsu, Japan 430
Tel: 053-460-2311
[CD 2
HEAD OFFICE Yamaha Corporation, Electronic Musical Instrument Division
Nakazawa-cho 10-1, Hamamatsu, Japan 430
Tel: 053-460-3255
Page 20

VI27370 JDßCR13P02.3CP Printed in Japan
 Loading...