

Page 1

Starter Motor & Disc Brake
ROKE MOTOR OIL
0
Starter Motor & Disc Brake
OWNER'S MANUAL
W40
4
er Engine Life
r Maintenance Cost
r Exhaust Smoke
ces Wear and Tear
5P4-F8199-E1
PRINTED IN INDIA
2Y16(OM-01)-271-08-06-E
(Starter Motor & Disc Brake)
5P42
5P4-F8199-E1
Page 2
WARNING
PLEASE READ THIS MANUAL CAREFULLY AND COMPLETELY BEFORE OPERATING THISMOTORCYCLE.
OWNER'S MANUAL
YAMAHA MOTOR INDIA PVT. LIMITED
All rights reserved. Any reprinting or
unauthorised use without the written
permission of
YAMAHA MOTOR LIMITED is
expressly prohibited.
INDIA PVT.
TAKE NECESSARY PRECAUTIONS DURING RUNNING-IN PERIOD.
Page 3
INTRODUCTION
Congratulations on yourpurchase of the . This motorcycle hasbeen produced using the latest
technology in our modern plant, to provide you a happy, enjoyable and safe riding for many thousand
kilometers and years. It represents the high degree of craftsmanship and reliability that have made
YAMAHA
This Owner's Manual will give you an understanding of the operation, inspection and basic maintenance of
this Motorcycle. To ensure a long trouble free performance, please take due care and ensure proper
maintenance of your Motorcycle as recommended in this Owner's Manual.Always demand only
Genuine Spare Parts and Yamalube oil. If you have any queries regarding the operation or maintenance of
your Motorcycle, please consult your DEALER who will be toohappyto help you.
This Owner's Manual also includes the GREEN BOOK containing Guidelines, DO's and DON'Ts to be
followed by the Owner/ User of the Motorcycle for keeping Environment Clean and Green. You are
requested to please read theGREENBOOK carefully.
We Provide
At Your CaringService,
a leader in these fields.
GLADIATOR
YAMAHA
YAMAHA
YAMAHA MOTOR INDIA PVT.LTD.
A-3, Industrial Area, Noida Dadri Road
Surajpur - 201 306 UP (India)
Page 4

IMPORTANT MANUAL INFORMATION
Particularly important information is distinguished in this manual by the following notations:
The SafetyAlert Symbol meansATTENTION ! BECOME ALERT ! YOUR SAFETY
IS INVOLVED !
WARNING
CAUTION :
NOTE :
Failure to follow WARNING instructions to the
Motorcycle operator, a bystander or a person inspecting orrepairingthe Motorcycle.
A CAUTION indicates specialprecautions that must be taken to avoid damage to the
Motorcycle.
ANOTE provides key information to make procedures easierorclearer.
could result in severe injury
NOTE :
•
This manual should be considered a permanent part of this Motorcycle and should
remain with it even iftheMotorcycle is subsequently sold.
•
YAMAHA
while this manual contains the most current product information available at the time of
printing, there may be minor discrepancies between your Motorcycle and this manual. If
there is any question concerningthismanual, please consult your dealer.
continually seeks advancements in product design and quality. Therefore,
YAMAHA
Page 5
1
ROAD SAFETY TIPS ....................................... 1-1
2
DESCRIPTION ................................................ 2-1
Left view ........................................................ 2-1
Right view ...................................................... 2-2
Controls/Instruments ................................... 2-3
3
INSTRUMENT AND CONTROL
FUNCTIONS.................................................... 3-1
Main switch cum steering lock ..................... 3-1
Speedometer ................................................ 3-2
Fuel Meter ..................................................... 3-2
Indicator lights .............................................. 3-2
Handlebar switches/Kill Switch ................... 3-3
Starter Switch
Clutch lever ................................................... 3- 4
Shift pedal ..................................................... 3-4
Front brake lever ........................................... 3 -4
Rear brake pedal .......................................... 3-5
Fuel tank cap ................................................ 3-5
Fuel ............................................................... 3-5
Fuel cock ....................................................... 3 -6
Starter Lever.................................................. 3 - 7
Kick starter .................................................... 3-8
T ABLE OF CONTENTS
Seat ............................................................... 3-8
Storage compartment................................... 3-9
Rear shock absorber adjustment ............... 3-9
Handle Seat, Stay Lock................................. 3-10
4
PRE-OPERATION CHECKS ........................... 4 - 1
Pre-operation check list ............................... 4-1
5
OPERATION AND IMPORT ANT RIDING
POINTS............................................................ 5-1
Starting and warming up a
cold engine ................................................... 5-1
Starting a warm engine ................................ 5-2
Shifting .......................................................... 5-2
Tips for reducing fuel consumption ............. 5-3
Running-in .................................................... 5-3
6
Parking.......................................................... 5-4
PERIODIC MAINTENANCE AND MINOR
REPAIR ............................................................ 6-1
Tool kit ........................................................... 6- 1
Preventive maintenance schedule .............. 6-3
Panel removal and installation .................... 6-5
Spark plug inspection .................................. 6-7
Engine Oil ..................................................... 6-8
fazer5yy8.pmd 8/28/2006, 11:51 AM1
Page 6
TABLE OF CONTENTS
Air filter........................................................... 6-10
Carburetor adjustment ................................. 6-11
Idle speed adjustment ................................. 6-12
Throttle cable free play adjustment ............. 6-12
Valve clearance adjustment ......................... 6-13
Tyres.............................................................. 6-13
Wheels.......................................................... 6-15
Clutch lever free play adjustment ................ 6-16
Rear brake adjustment ................................ 6-17
Brake light switch adjustment ..................... 6-17
Checking front Brake Pads &
rear brake shoes .......................................... 6-18
Checking brake fluid level ............................ 6-18
Drive chain slack check ................................ 6-19
Drive chain slack adjustment ...................... 6-20
Drive chain lubrication .................................. 6-22
Cable inspection and lubrication................. 6-22
Throttle cable and grip lubrication ............... 6-22
Brake and shift pedal lubrication ................. 6-23
Brake and clutch lever lubrication................ 6-23
Center and sidestand lubrication ................ 6-23
Front fork inspection ..................................... 6-24
Steering inspection....................................... 6-24
Wheel bearings ............................................ 6-25
Battery ........................................................... 6-25
Fuse replacement ........................................ 6-27
Headlight bulb replacement ........................ 6-28
Turn signal and taillight bulb
replacement.................................................. 6-29
Front wheel removal ..................................... 6-29
Front wheel installation ................................ 6-30
Rear wheel removal ..................................... 6-31
Rear wheel installation ................................ 6-33
Troubleshooting ........................................... 6-33
Troubleshooting chart .................................. 6-34
7
CLEANING & STORAGE................................. 7-1
A. Cleaning ................................................... 7-1
B. S torage ...................................................... 7-2
8
SPECIFICATIONS ........................................... 8-1
CUSTOMER INFORMATION........................... 9-1
9
Key identification number ............................. 9-1
Frame serial number ................................... 9-1
Engine serial number .................................. 9-1
10
DETATCHMENTS
Pre-Delivey Inspection.................................... 10-1
Installation....................................................... 10-5
fazer5yy8.pmd 8/28/2006, 11:51 AM2
Page 7
ROAD SAFETY TIPS
SAFE RIDING
1. Before riding, you should learn to ride your motorcycle properly and all the control functions should be known
to you.
2. Remember that there are no legal “rights” when it comes to survival as far as Motorcyclists are
concerned. The fact that you may be well within your rights is no guarantee that you will avoid a collision with
a bigger vehicle whose driver fails to see you. Always ride defensively and take nothing on road for granted.
3. Develop the ability to react swiftly to any unexpected road hazards or emergencies giving yourself time to
spare for appropriate response.
4. Develop the ability to get the most out of your Motorcycle, But at the same time get to know its capabili-
ties and limitations.
5. Right thoughtfully, planning your route well in advance.
6. Give proper Signals and use Horn and Headlights judiciously.
7. Don’t ride in another motorist’s blind spot.
8. Always make pre-ride safety checks before you start the Engine.
SAFE BRAKING
Use the basic methods of braking effectively.
1. Engine Brake : When the Throttle is released, compression backs up and acts as the Engine Brake.
If the riding condition allows, reduce speed by shifting the Gear down.
2. Front and Rear Brakes : It is important to apply equal force to the Front and Rear Brakes simultaneously.
CAUTION :
• Use Front and Rear Brakes simultaneously.
• Be sure not to disengage the clutch while braking.
• While riding downhill always use Engine as a Brake and never ride in Neutral Gear.
• While riding down hill do not switch off ignition while Engine is in gear.
fazer5yy8.pmd 8/28/2006, 11:51 AM3
1-1
Page 8
DESCRIPTION
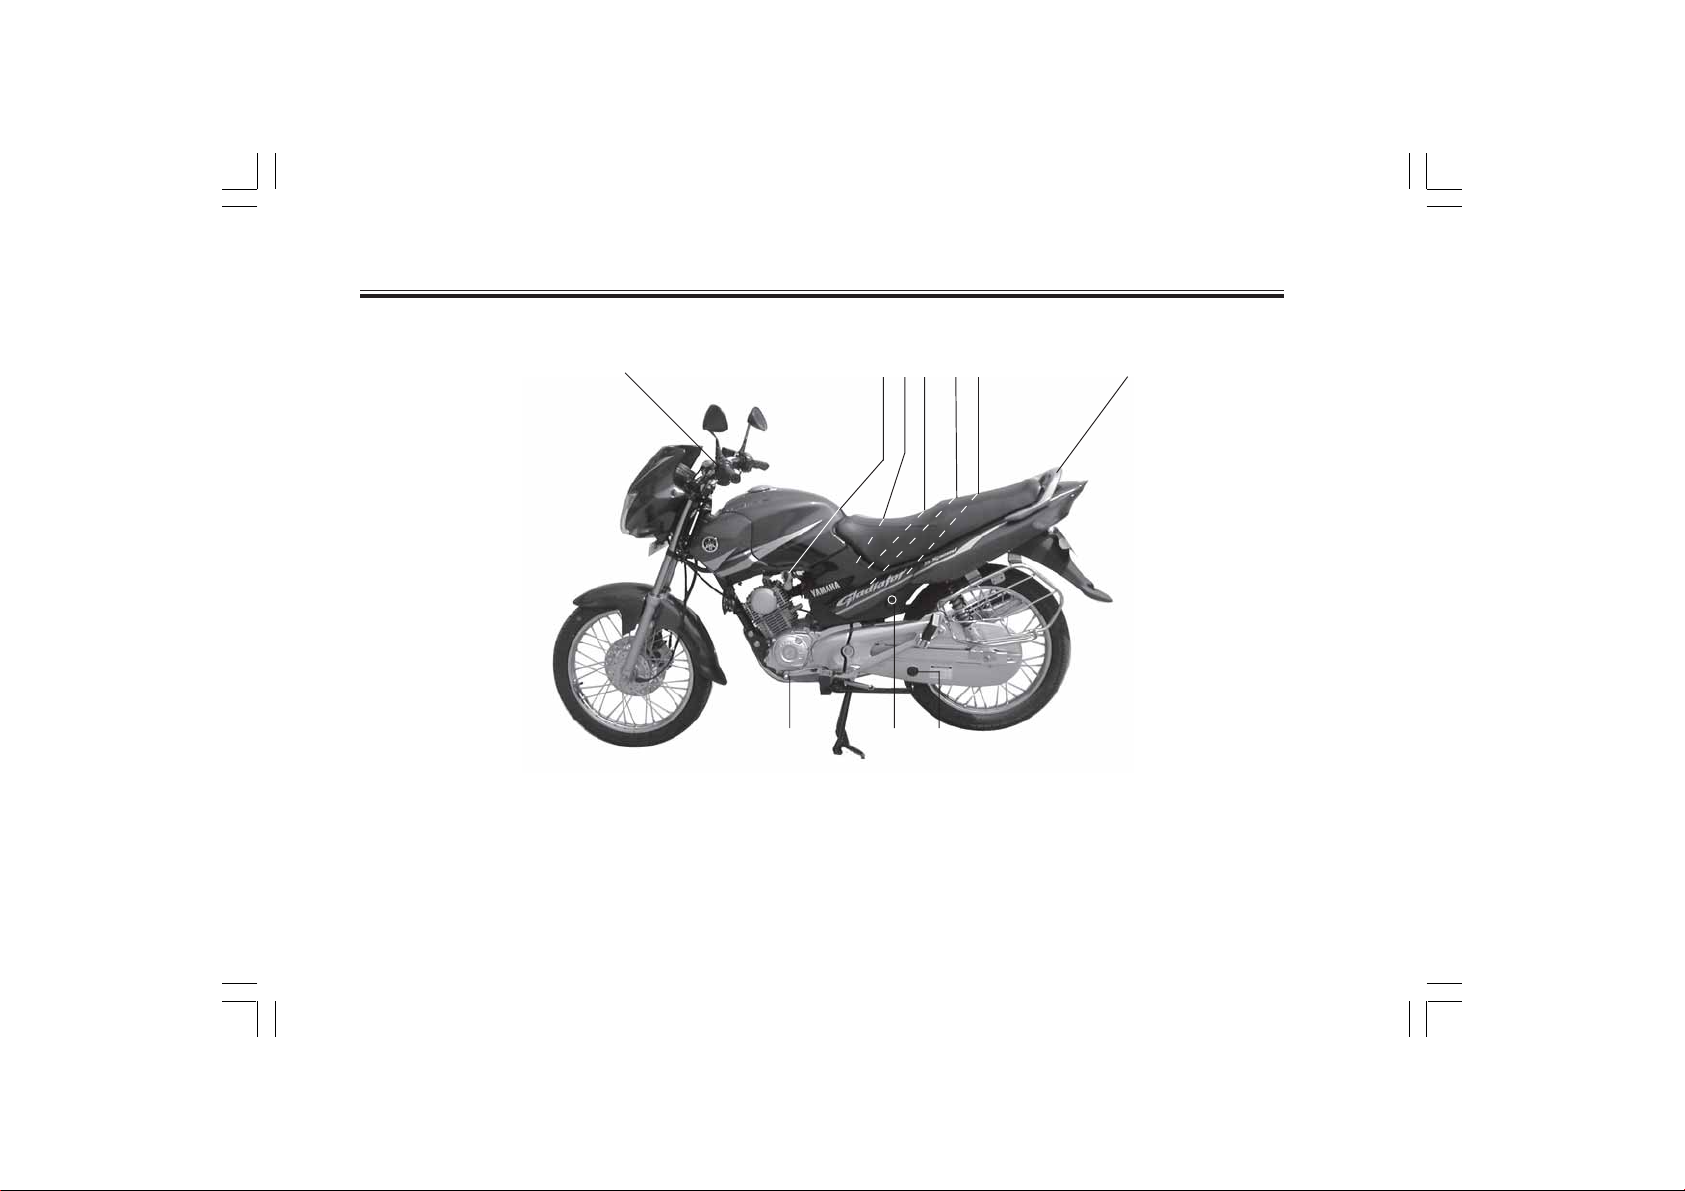
Left view
2
STANDARD VEHICLE
1. Fuel cock (page 3-6)
2. Starter Lever (page 3-7)
3. Fuse (page 6-26)
4. Battery (page 6-24)
5. Storage Compartment (page 3-9)
10
6543 7
1
89
6. Toolkit (page 6-1)
7. Handle Seat (page 3-10)
8. Drive chain free play check window (page 6-19)
9. Side panel (L.H.) lock (page 6-5)
10. Shift pedal (page 3-4)
fazer5yy8.pmd 8/28/2006, 11:51 AM4
2-1
Page 9
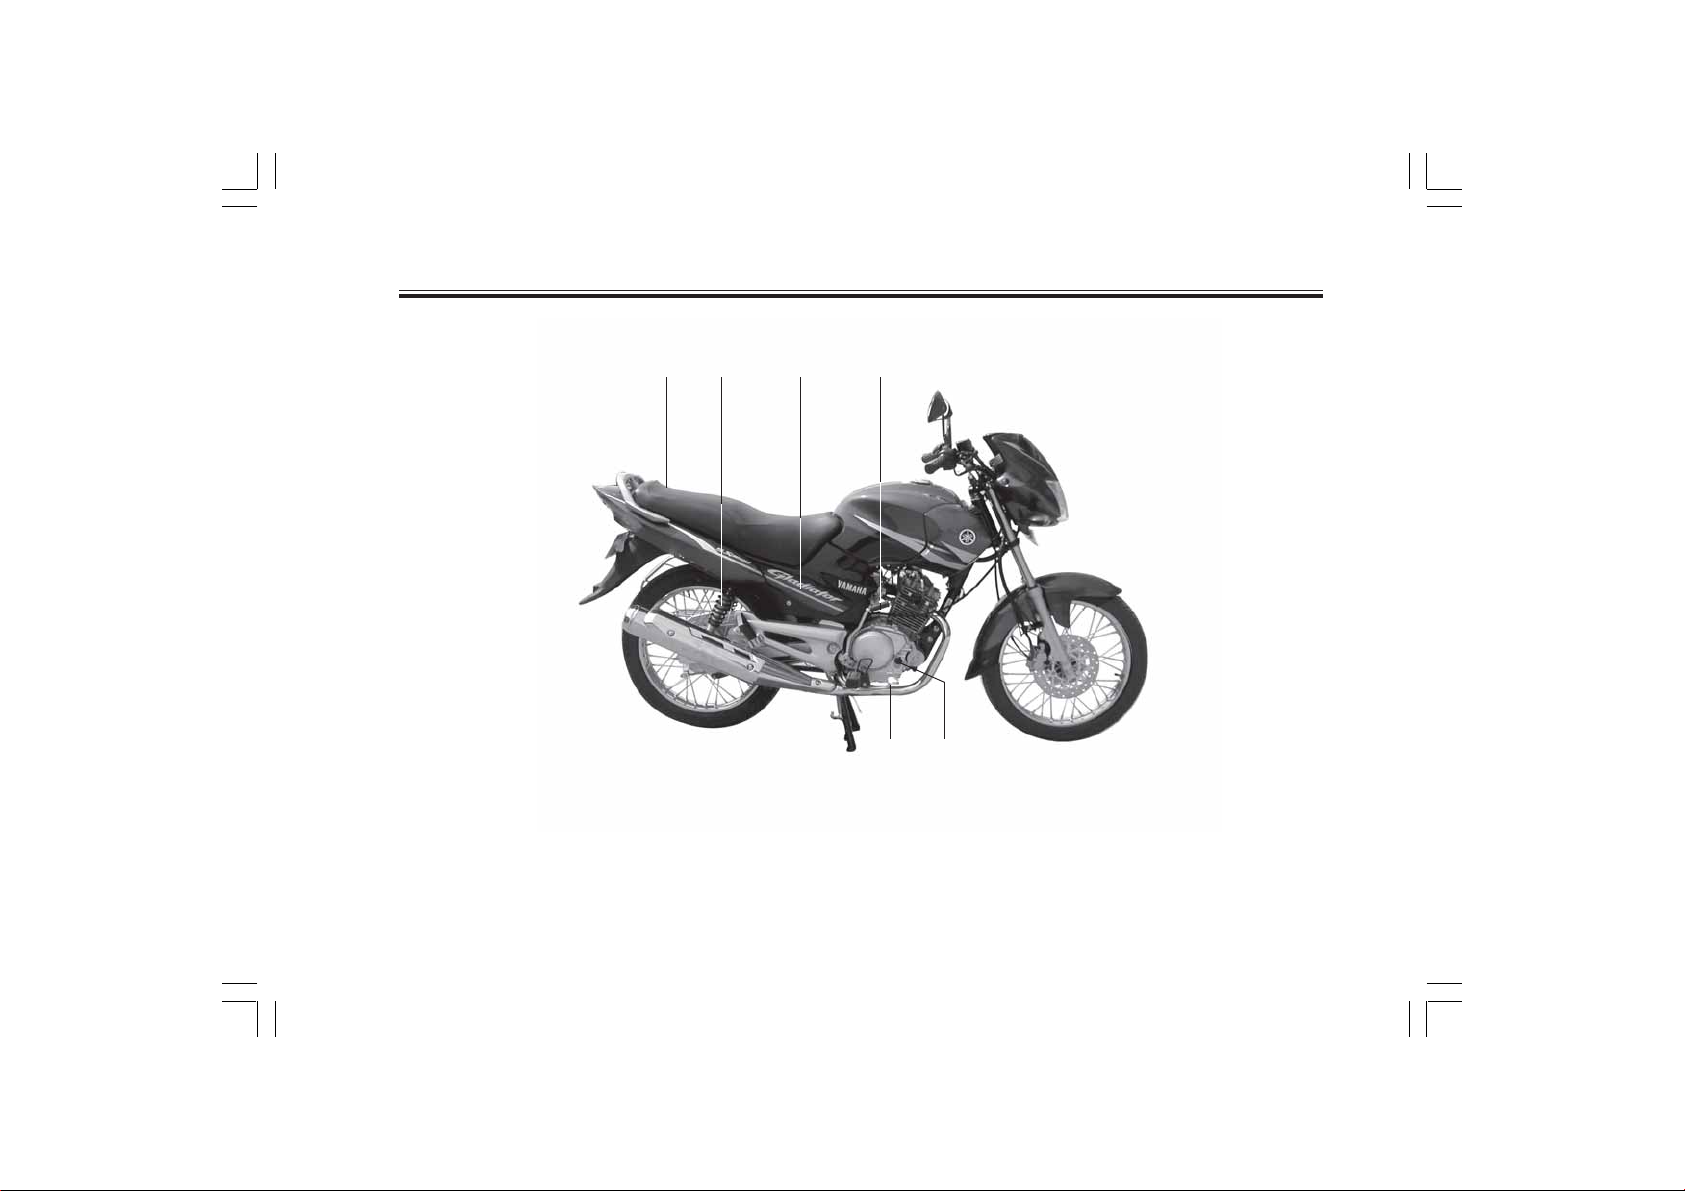
Right view
STANDARD VEHICLE
11
DESCRIPTION
12 1314
16
15
11. Rear shock absorber (page 3-9)
12. Air filter (page 6-10)
13. Kick starter (page 3-7)
fazer5yy8.pmd 8/28/2006, 11:51 AM5
14. Seat (page 3-8)
15. Engine oil filler cap (page 6-8)
16. Rear brake pedal (page 3-4,6-17)
2-2
Page 10

DESCRIPTION
Controls / Instruments
18
19 20 21
17
25
STANDARD VEHICLE
17. Clutch Lever (page 3-3, 6-16)
18. Left Hand Switch (page 3-3)
19. Speedometer (page 3-2)
20. Main switch Cum Steering Lock (Page 3-1)
21. Fuel Gauge (page 3-2)
fazer5yy8.pmd 8/28/2006, 11:51 AM6
22
23
26
24
22. Front Brake Lever (page 3-4, 6-16)
23. Throttle Grip (page6-12)
24. Fuel Tank Cap (page 3-5)
25. Turn Indicator Switch (page 3-2)
26. Starter/Kill Switch (page 3-3)
2-3
Page 11
INSTRUMENT AND CONTROL FUNCTIONS
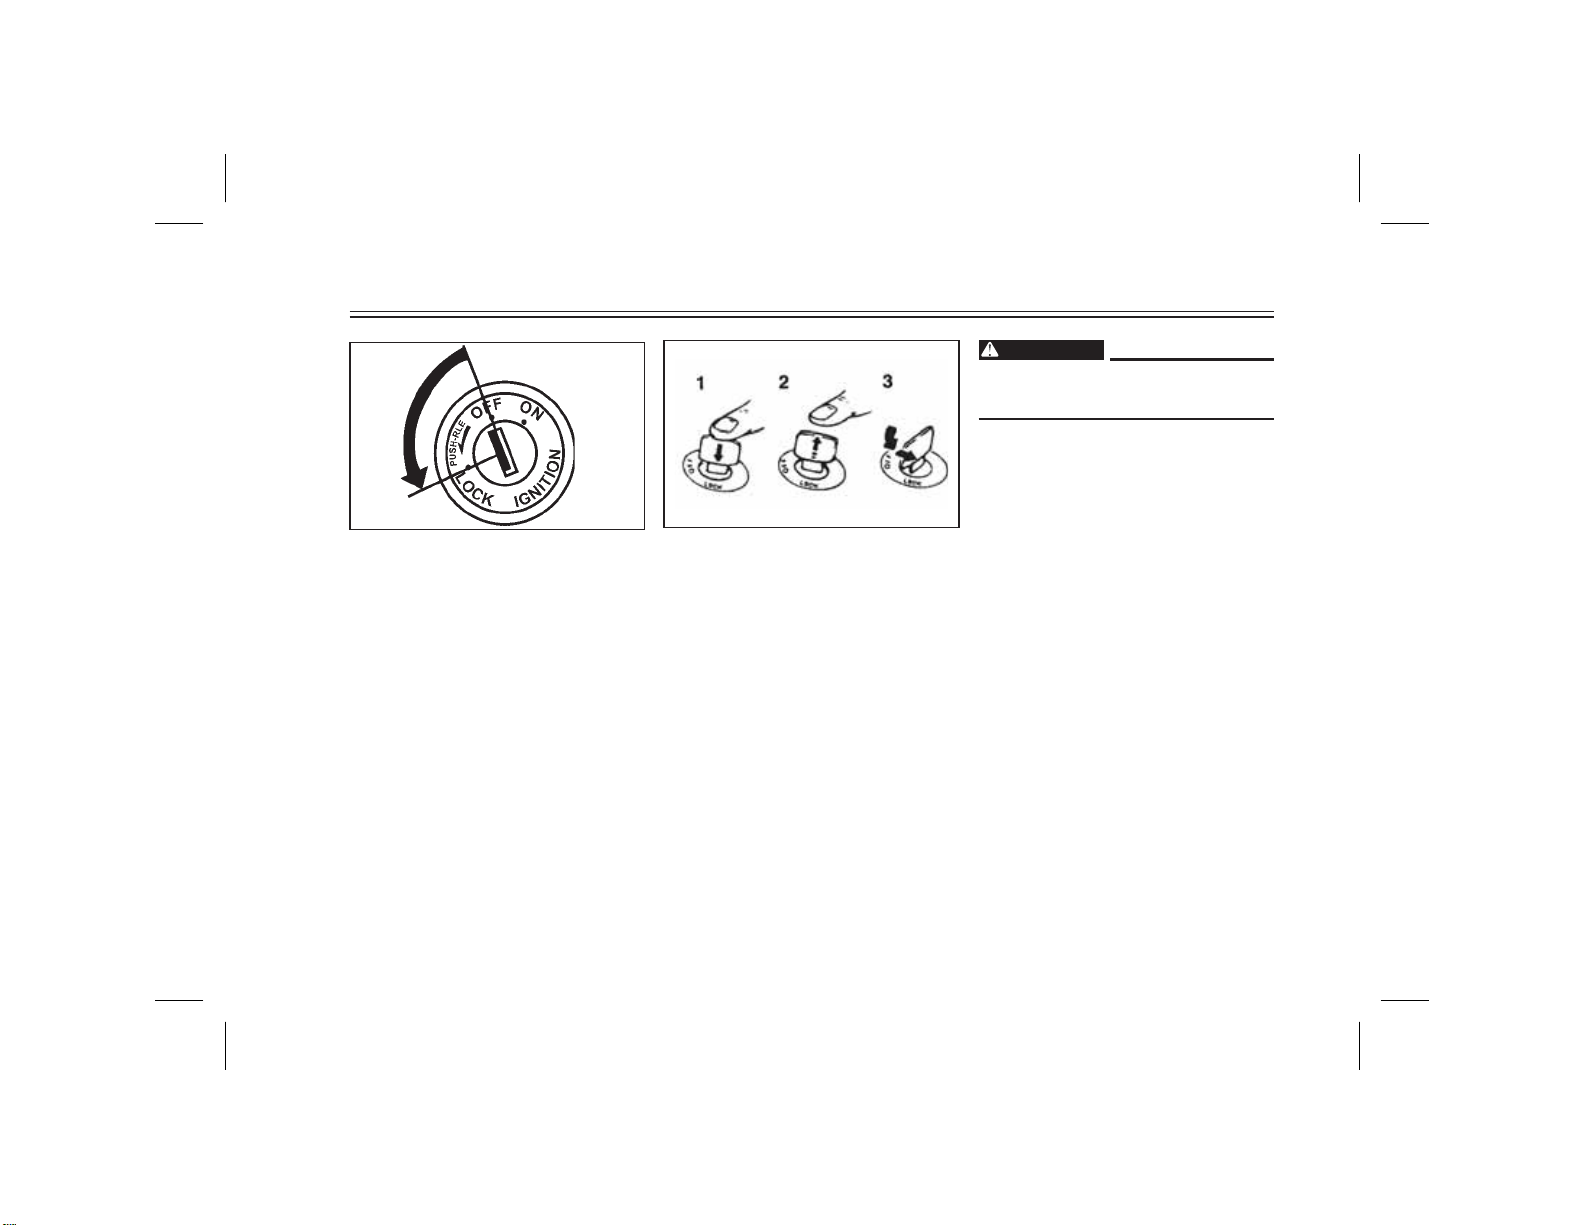
WARNING
Never turn the key to "LOCK" when
the Motorcycle is moving.
Main switch cum steering
lock
The main switch controls the ignition
and lighting systems. Its operation is
described below.
ON:
Electrical circuits are switched on.
The engine can be started. The key
cannot be removed in thisposition.
OFF:
Engine will be shut off. All electrical
circuits are switched off. The key can
be removed in this position.
1. Push
2. Release
3. Turn
LOCK:
The steering is locked in this position
and all electrical circuits are switched
off.
The key can be removed in this
position.
To lock the steering, turn the handlebars all the way to the left or right. With
the key at "OFF", push it into the main
switch and release it, turn it counterclockwise to "LOCK" and removeit. To
release the lock, turn the key to
"OFF".
3-1
Page 12
INSTRUMENT AND CONTROL FUNCTIONS
1
2
1
2
3
1
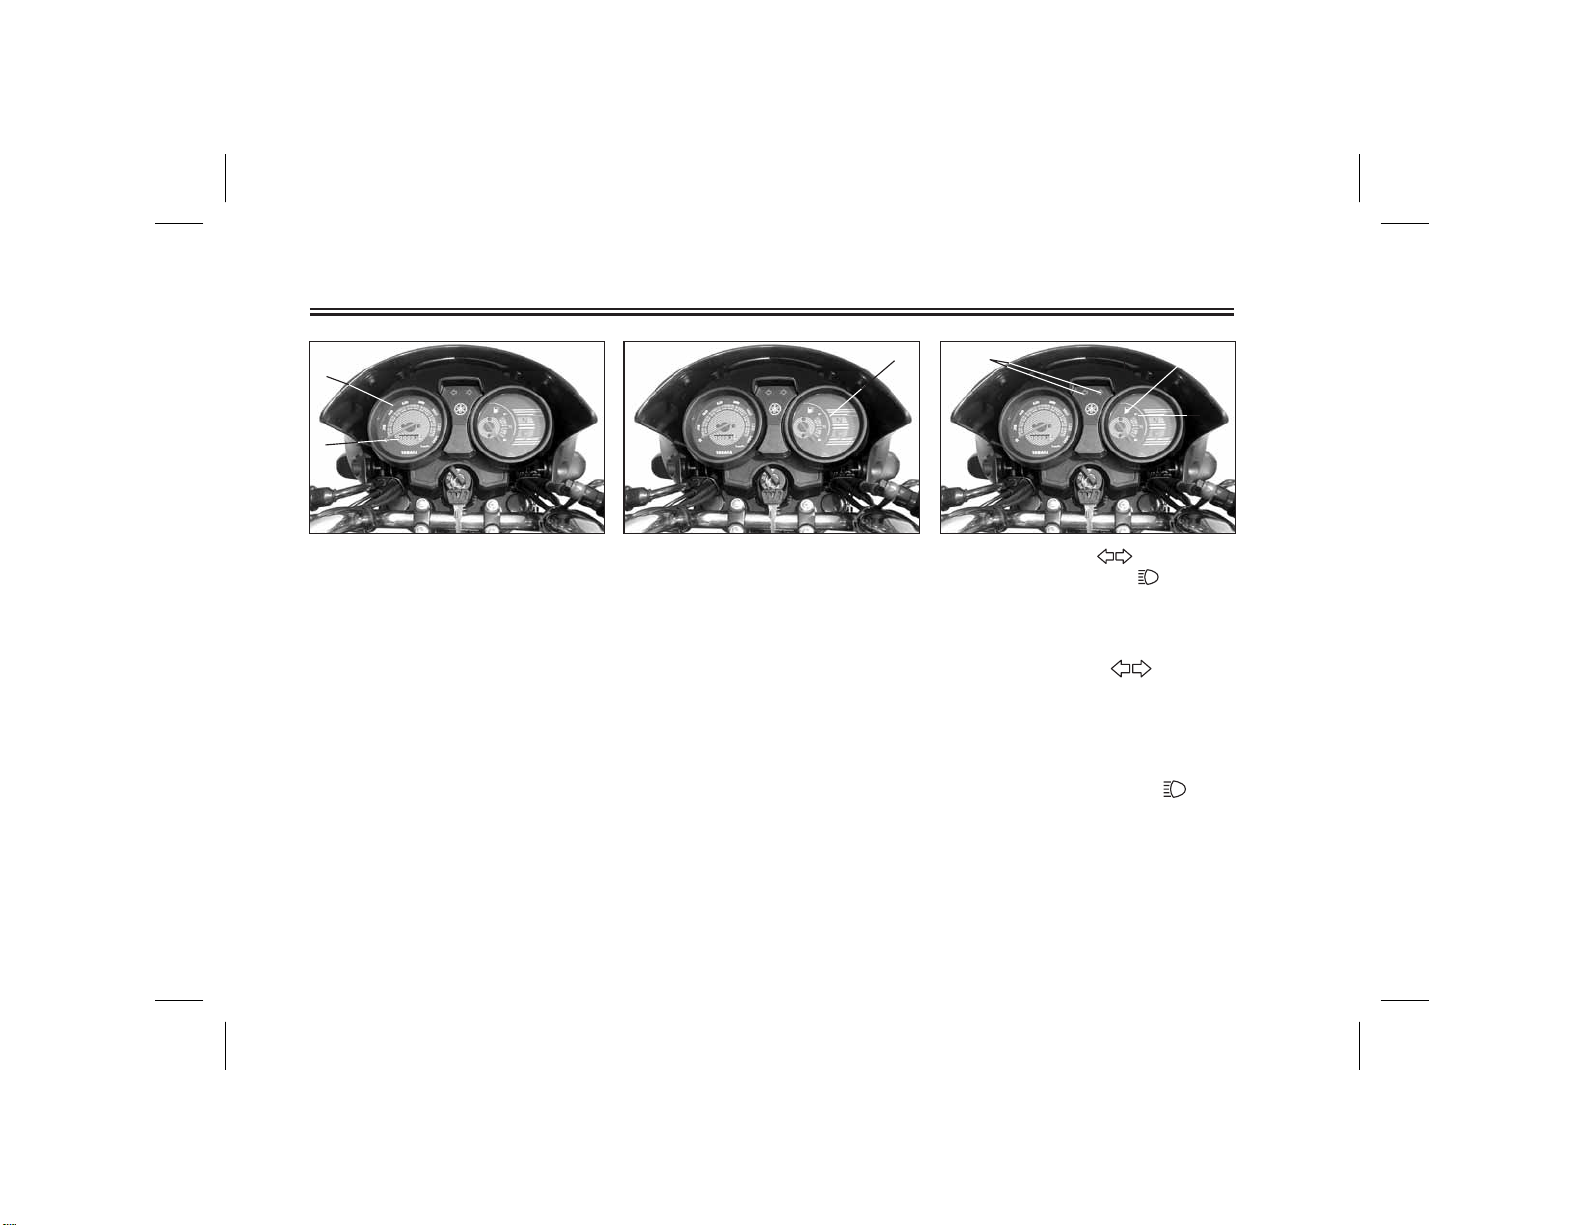
1. Speedometer
2. Odometer
Speedometer
The speedometer shows riding
speed.
This speedometer is equipped with
an odometer.
1. Fuel Meter
Fuel Meter
The fuel meter indicates the quantity
of the remaining petrol inthe fuel tank.
The gauge needle moves from “F”
(Full) to"E”(Empty) as the fuel level
decreases.
When the needle comes below “E”
please refill the fuel tank at the
earliest.
1. Turn indicator light “ ”
2. High beam indicator light “ ”
3. Neutral indicator light “N”
Indicator lights
Turn indicatorlight " "
The indicator flashes when the turn
switch is moved to theleft or right. .
Neutral indicator light "N"
This indicator comes on when the
transmission is in neutral.
High beam indicator light " "
This indicator comes on when the
headlight high beam is used.
3-2
Page 13
INSTRUMENT AND CONTROL FUNCTIONS
1
2
1
2
4
5
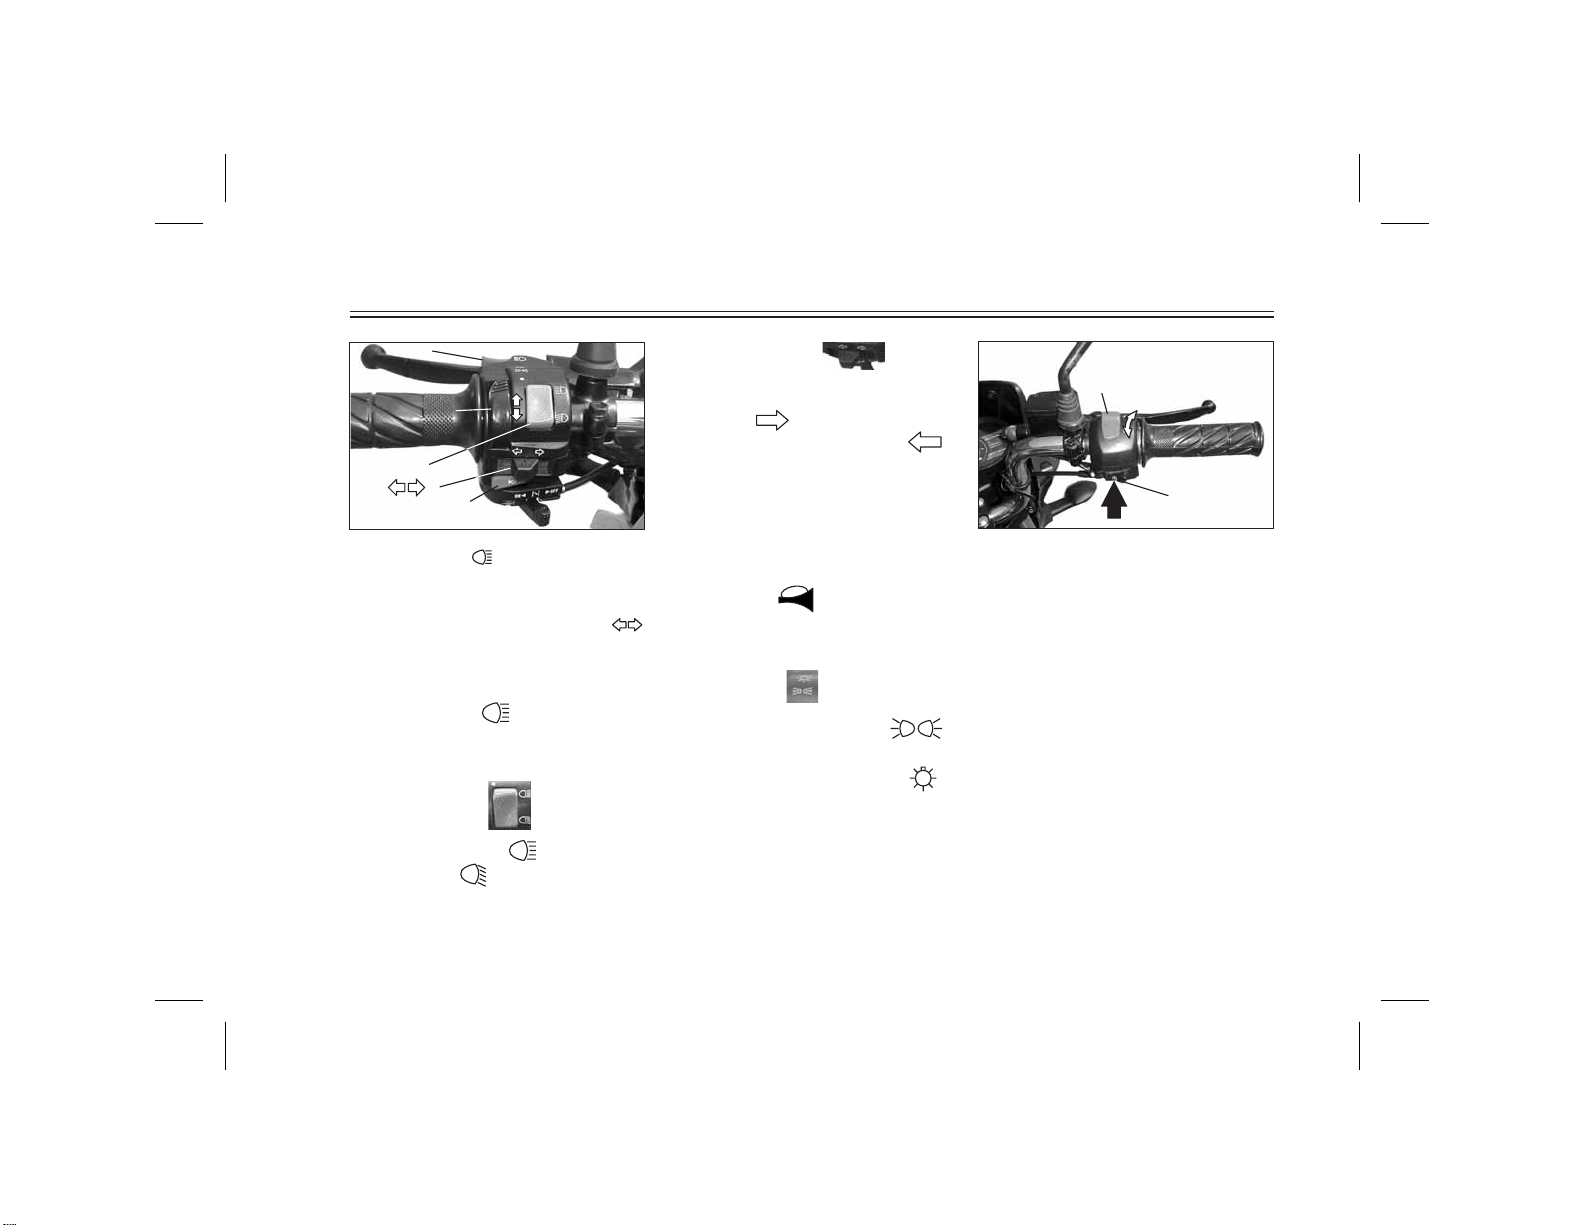
Turn signalswitch
3
To signal a right-hand turn, push the
switch to " ". To signal a lefthand turn, push the switch to " ".
OFF
ON
Once the switch is released it will
return to the center position. To
cancel the signal, push the switch in
1. PassSwitch " "
2. Dimmer Switch
3. Light switch
4. Turn signal cum cancellation switch“ “
5. Horn switch
Handlebar switches
Pass switch ""
Press the switch to operate the
Passing Light.
Dimmer switch
after it has returned to the center
position.
Horn switch " "
Press the switch to sound the horn.
Lights switch
Turning the light switch to " ",
turns on the meter light and tail-light.
Turning the light switch to “ ",
turns the headlight on also.
1. Starter Switch
2. Kill Switch
Starter Switch
Press the button to start the bike.
Vehicle should be in
1) Neutral Position
2) If in Gear clutch lever to be
pressed
Kill Switch
Kill switch is an emergency switch to
Press
cut "OFF" engine & should always
Turn the switch to" " for the high
beam and to " " for thelow beam.
3-3
be in "ON" positon at the time of
starting the vehicle.
Page 14
INSTRUMENT AND CONTROL FUNCTIONS
1
1
1
1
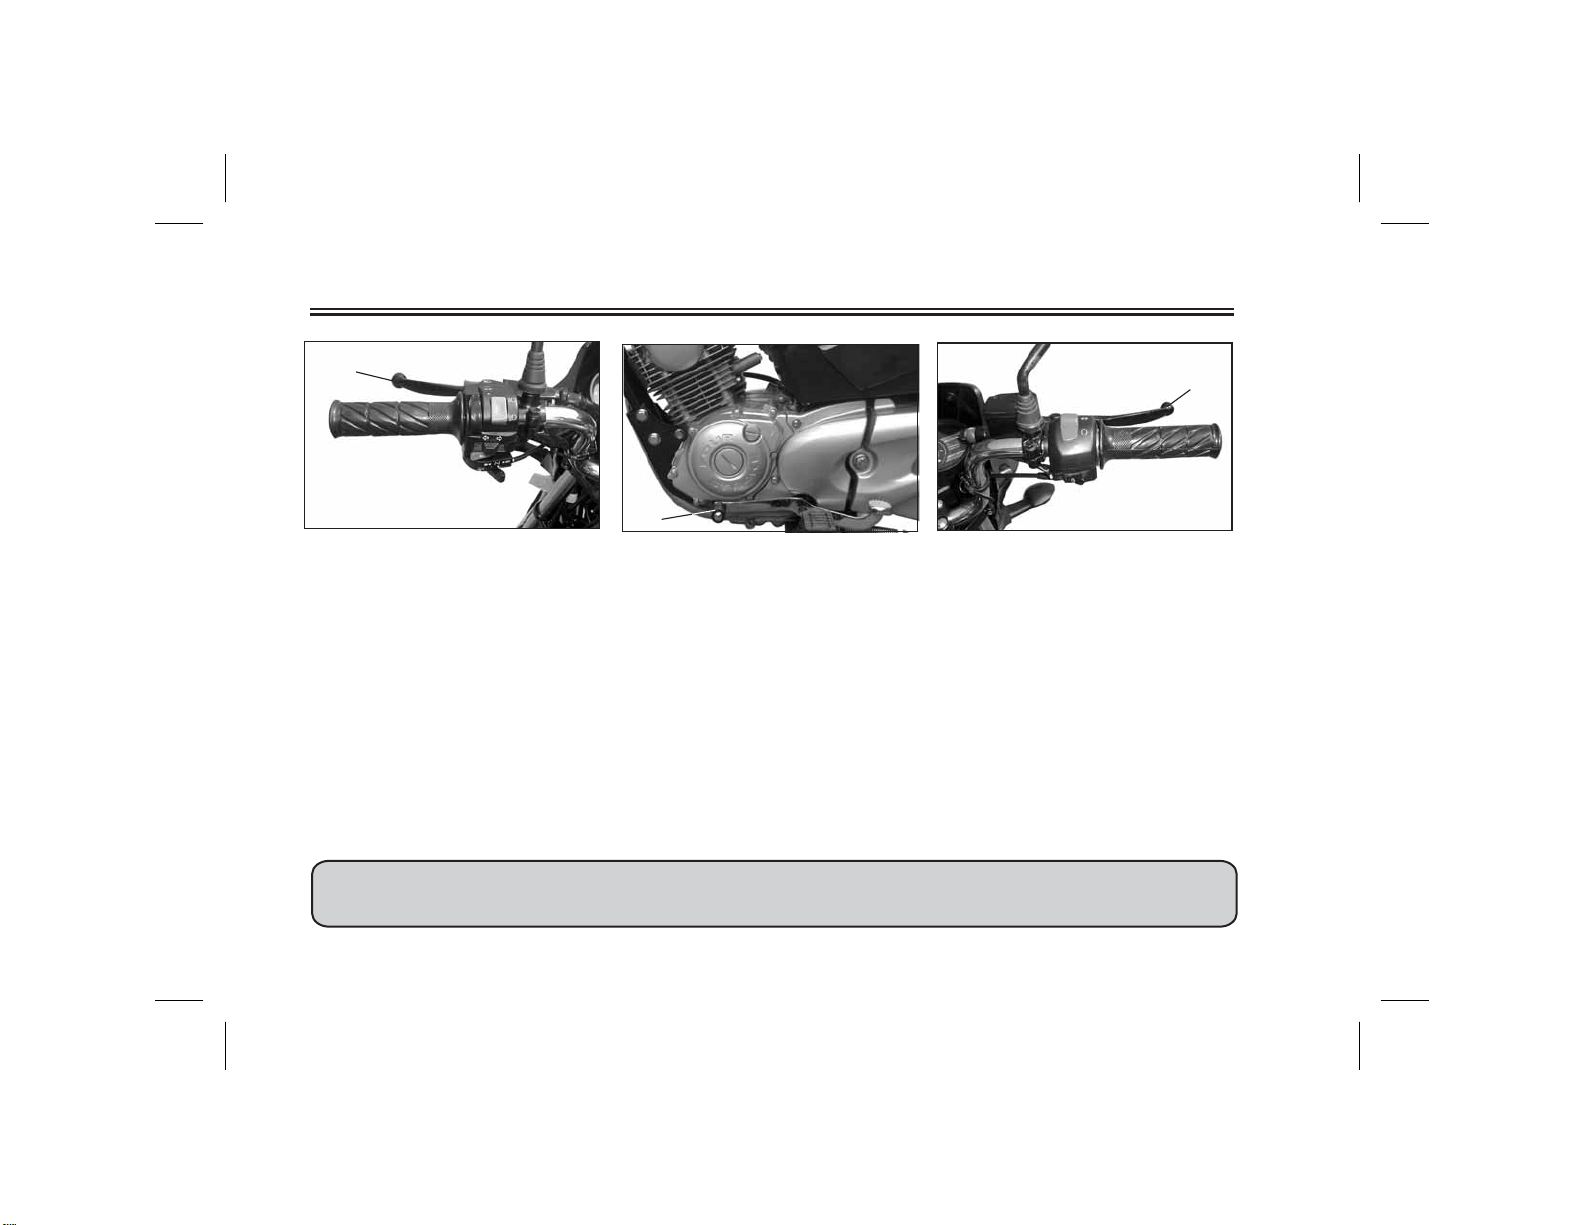
1. Clutch lever
Clutch lever
The clutch lever is located on the left
handlebar. Pull the clutch lever to
the handlebar to disengage the
clutch, and release the lever to
engage the clutch. The lever should
be pulled rapidly and released slowly
for smooth clutch operation.
1. Shift pedal
Shift pedal
The shift pedal is located on the left
side of the engine and is used in
combination with the clutch when
shifting.
Use your toe or heel to shift up and
your toe to shift down.
1. Front brake lever
Front brake lever
The front brake lever is located on
the right handlebar. Pull it toward the
handlebar to apply the front brake.
USE BOTH BRAKES SIMULTANEOUSLY
3-4
Page 15

1 Rear brake pedal
1
1
1
Rear brake pedal
The rear brake pedal is on the right
side of the Motorcycle. Press down on
the brake pedal to apply the rear
brake.
INSTRUMENT AND CONTROL FUNCTIONS
WARN
ING
B
e
f
o
r
e
y
o
u
o
p
e
r
a
t
e
t
h
i
s
v
e
h
i
l
e
r
e
a
d
t
h
e
O
w
n
e
r
'
s
M
a
n
u
a
l
.
1. Open
Fuel tank cap
TO OPEN:
Insert the key and turn it 1/4 turn
clockwise. The lock will be released
and the cap can be opened.
TO CLOSE:
Push the tank cap into position with
the key inserted. To remove the key,
turn it counterclockwise to the
original position.
Ensure the arrow on fuel tank is
towards the Front of the bike when
inserting Fuel Tank Cap in Fuel
Tank.
NOTE :
This tank cap cannot be closed
unless the key is in the lock. The key
cannot be removed if the cap is not
locked properly.
WARNING
WARNING
Be sure the cap is properly
installed and locked in place
before riding the Motorcycle.
1
WARNING
Before you operate this vehile
read the Owner's Manual.
1. Arrow
3-5
Page 16
INSTRUMENT AND CONTROL FUNCTIONS
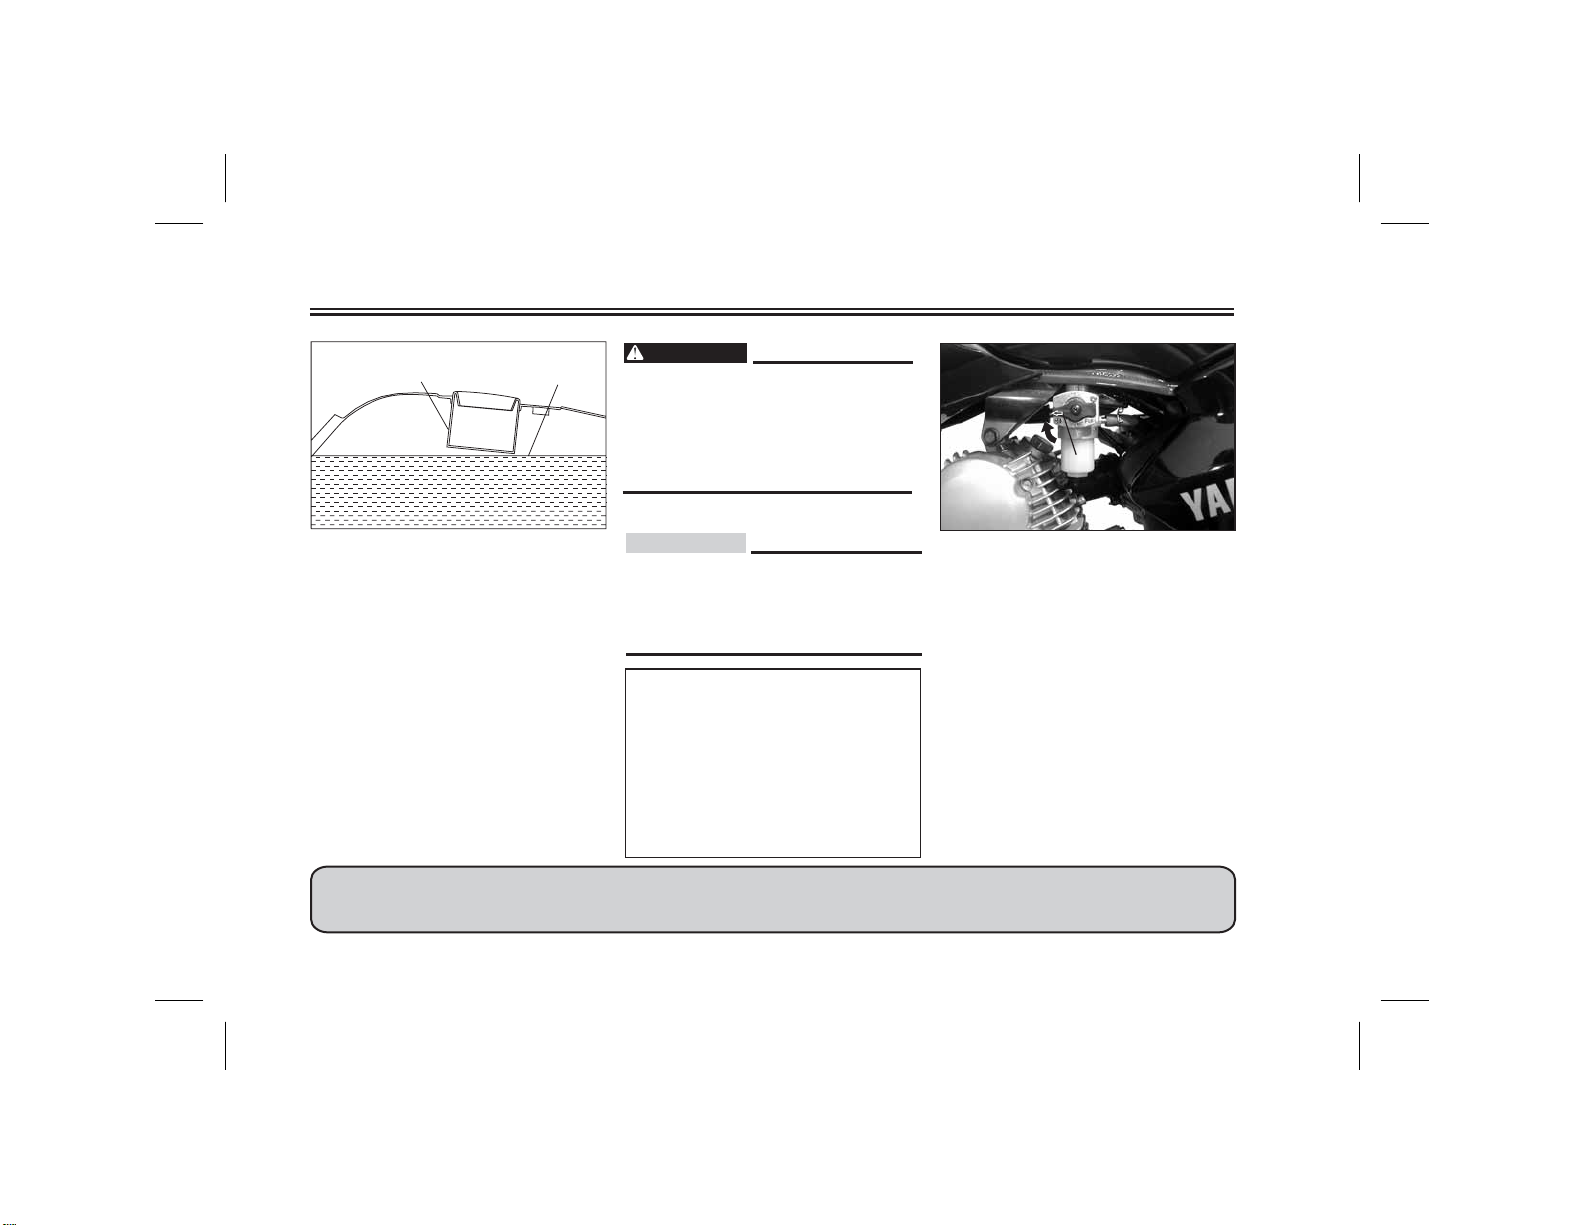
1
1. Filler tube
2. Fuel level
2
Fuel
Make sure there is sufficient fuel in the
tank. Fill the fuel tank to the bottom of
the filler tube as shown in the
illustration.
IT IS A GOOD PRACTICE TO RETURN THE FUEL COCK LEVER TO
"Off" POSITION WHEN ENGINE IS NOT RUNNING
WARNING
Do not overfill the fuel tank. Avoid
spilling fuel on the hot engine. Do
not fill the fuel tank above the
bottom of the filler tube to avoid
Spillage
CAUTION :
Always wipe off spilled fuel
immediately with a dry and clean
soft cloth. Fuel may deteriorate
painted surfaces or plastic parts.
Recommended Fuel :
Regular gasoline (Petrol)
Fuel tank capacity :
Total :
13.0 L
Reserve :
1.2 L
OFF
1
1. Arrow mark
Fuel cock
The fuel cock supplies fuel from the
tank to the carburetor while filtering it
also.
The fuel cock has three positions,
which should be set as shown in the
illustrations.
OFF: With the fuel cock in this
position, fuel will not flow.
Always set the fuel cock to this
position when the engine is not
running.
3-6
Page 17
INSTRUMENT AND CONTROL FUNCTIONS
1
ON
1
1. Arrow mark
ON: With the fuel cock in this
position, fuel flows to the
carburettor. Set the fuel cock to
this position when starting the
engine and while riding.
RES
1. Arrow mark
RES: This indicates reserve. If you
run out of fuel while riding, set
the fuel cock to this position.
Fill the tank at the first
opportunity. Be sure to set the
fuel cock back to "ON" after
refueling
NEVER MIX OIL IN PETROL
3-7
a
1. Starter lever
b
Starter lever
Starting a cold engine requires a
richer air-fuel mixture. A separate
starter circuit supplies this mixture.
Move the Starter Lever in
Direction a to Turn on theStarter
Move the Starter Lever in
Direction b to Turn Off the Starter
Page 18
INSTRUMENT AND CONTROL FUNCTIONS
1
1
2
1. Kick starter
Kick-starter
Raise the right Pillion footrest, and
rotate the kick starter away from the
engine. Push the starter down
lightly with your foot Kick until the
gears engage, then kick smoothly and
forcefully to start the engine. This
model has a primary-coupled kick
starter so the engine can be started in
any gear if the clutch is disengaged.
However, shifting to neutral before
starting is recommended.
kick
1. Open (Bolt - 1 No.)
2. Open (Bolt - 1 No.)
Opening of Seat
To remove
Open side panels as per instructions
on page 6-5.
Remove the two bolts 1 and 2 as
shown in figure. Lift the front of the
seat and slide forward to remove.
1. Seat Holder
2. Projection
To install
Insert the projection on the rear of
seat in to seat holder. Then push
down on front of the seat and tighten
the bolts on the left and right hand
side of the seat.
ALWAYS USE A HELMET WHILE RIDING FOR YOUR SAFETY
3-8
Page 19
INSTRUMENT AND CONTROL FUNCTIONS
1
1
2
Stan-
Soft
Adjusting
Position
b
a
(Depends upon rider's requirement)
12345
WARNING
Always adjust each shock
1. Storage compartment
Storage compartment
The storage compartment is located
inside the L.H. Side Cover
1. Spring preload adjusting ring
2. Position indicator
Rear shock absorber
adjustment
Each shock absorber is equipped
with a spring preload adjusting ring.
Adjust spring preload as follows.
Turn the adjusting ring in direction a
to increase spring preload and in
direction b to decrease spring
preload. Make sure that the
appropriate notch in the adjusting
ring is aligned with the position
indicator on the rear shock absorber.
absorber to the same setting.
Uneven adjustment cancause poor
handling and loss of stability.
dard
Hard
3-9
Page 20
INSTRUMENT AND CONTROL FUNCTIONS
1
1
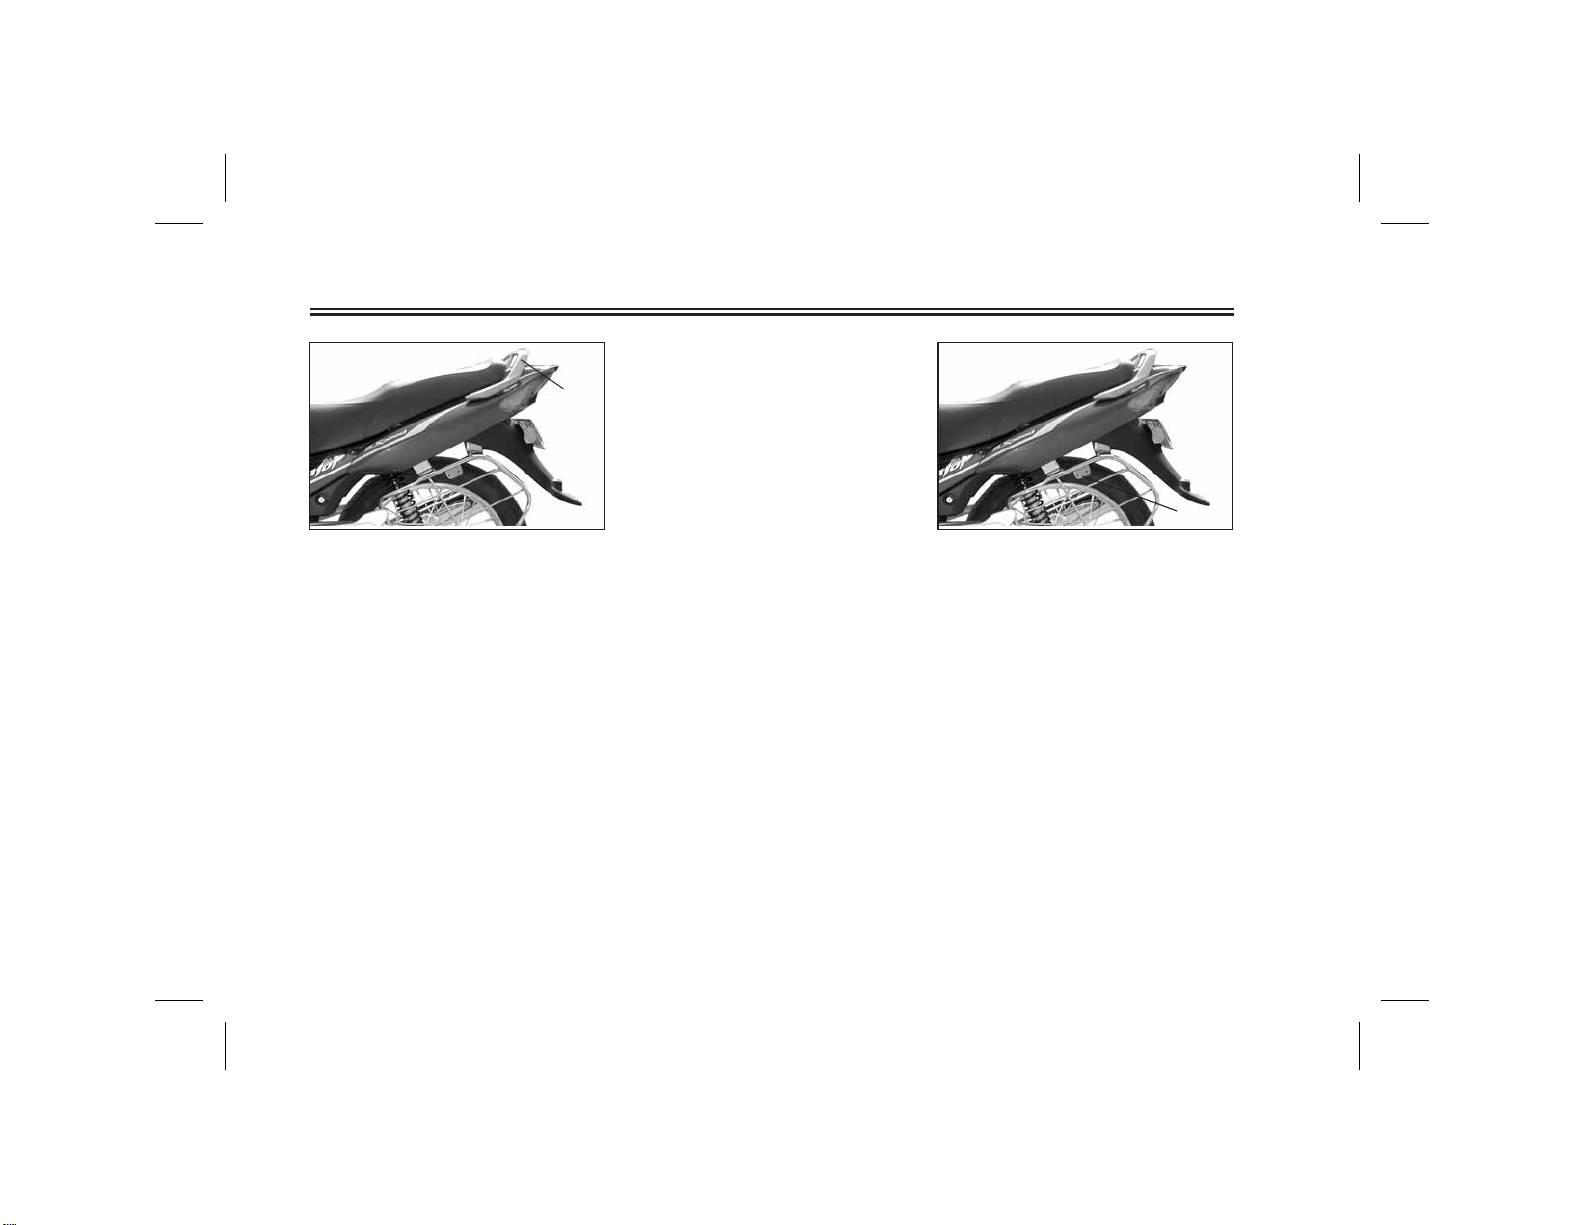
1. HandleSeat
1. Stay Lock on Saree Guard
Stay Lock
For mounting Helmet Lock
3-10
Page 21

PRE-OPERATION CHECKS
Owners are personally responsible for their vehicle's condition. Your Motorcycle's vital functions can start to
deteriorate quickly and unexpectedly- even if it remains unused (for instance, if it is exposed to the elements). Any
damage. fluid leak or loss of tyre pressure could have serious consequence Therefore' it is very important that, in
addition to a thorough visual inspection, you check the following points before each ride.
PRE - OPERATION CHECK LIST
ITEM CHECKS
Front brake
Rear brake
Clutch
Throttle grip and housing
Engine oil
Drive chain
Wheels and tyres
• Check operation, condition and free play.
• Adjust if necessary.
• If necessry, add recommended brake fluid to specified level.
• If soft or spongy, have YAMAHA dealer bleed hydraulic system.
• Check fluid level in reservoir.
• Check hydraulic system for leakage.
• Check operation, condition and free play.
• Adjust if necessary.
• Check operation, condition and free play.
• Adjust if necessary.
• Check for smooth operation.
• Lubricate if necessary.
• Check oil level.
• Fill with oil if necessary.
• Check chain slack and condition.
• Lubricate if necessary.
• Adjust if necessary.
• Check tyre pressure, wear, damage and spoke tightness.
• Tighten spokes if necessary.
4-1
PAGE
3-4, 6-18
3-5, 6-17
3-4, 6-16
6-12, 6-22
6-8 ~ 6-9
6-19 ~ 6-20
6-13 ~ 6-15
Page 22

PRE-OPERATION CHECKS
ITEM CHECKS
Control and meter cable
Brake and shift pedal shafts
Brake and clutch lever pivots
Center and sidestand pivot
Chassis fasteners
Fuel Tank
Lights, signals and switches
Battery
• Check for smooth operation.
• Lubricate if necessary.
• Check for smooth operation.
• Lubricate if necessary.
• Check for smooth operation.
• Lubricate if necessary.
• Check for smooth operation.
• Lubricate if necessary.
• Make sure that all nuts, bolts, and screws are properly tightened.
• Tighten if necessary.
• Check fuel level.
• Fill with fuel if necessary.
• Check for proper operation.
• Check fluid level.
• Fill with distilled water if necessary.
PAG E
6-22
6-23
6-23
6-23
-
3-5 ~ 3-6
3-3, 6-28 ~ 6-29
6-25 ~ 6-26
WARNING
If any item in the Pre-Operation Check is not working properly, have it inspected and repaired before operating
the Motorcycle.
IF WAITING AT TRAFFIC SIGNAL IS FOR LONG, SWITCH OFF THE ENGINE
TO PROTECT THE ENVIRONMENT AND TO LOWER FUEL CONSUMPTION
4-2
Page 23
OPERATION AND IMPORTANT RIDING POINTS
WARNING
1. Before riding this Motorcycle,
become thoroughly familiar
with all operating controls and
their functions. Consult a
YAMAHA dealer regarding any
control or function that you do
not thoroughly understand.
2. Never start your engine or let it
run for any length of time in a
closed area. The exhaust fumes
are poisonous and can cause
loss of consciousness.
Always operate your
Motorcycle in an area with
adequate ventilation.
3. Before starting out, always be
sure the side stand is up.
Failure to retract the side stand
completely can result in a
serious accident when you try
to turn a corner.
Starting and warming up a
cold engine
1. Turn the fuelcock to "ON"
2. Turn the mainswitch to "ON."
3. Shift the transmission into
neutral.
NOTE :
When the transmission is in neutral,
the neutral indicatorlight shouldbe on.
If the light does not come on, ask a
YAMAHA dealer toinspect it.
4 Fully open the Starter Lever and
completely close the throttle grip.
5. Kick the kick starter to start the
engine.
6. After starting the Engine, turn back
the Starter Lever to the Warmingup Position (About Half way)
7. After Warming-up the Engine,
turn off the Starter Lever
completely.
NOTE :
For better engine performance
always warm up the engine. before
take off. Never open throttle fully
when engine is cold, otherwise
engine tends to stop.
NOTE :
The engine is warm when it
responds normally to the throttle
with the Starter Lever in “OFF”
direction.
5-1
Page 24
OPERATION AND IMPORTANT RIDING POINTS
N
1
2
3
4
a
5
Starting a warm engine.
The Starter Lever may not be required
when the engine is warm.
CAUTION :
See the "Running-in" section prior
to operating the Motorcycle for the
first time.
NEVER RIDE MOTORCYCLE WITH CLUTCH PARTIALLY ENGAGED.
a. Shift pedal
N. Neutral, 1,2,3,4,5 Gear Shift Patterns
Shifting
The transmission lets you control the
amount of power you have available
at a given speed for starting,
accelerating, climbing hills, etc. The
use of the shift pedal is shown in the
illustration.
To shift into neutral, depress the shift
pedal repeatedly until it reach- es
the end of its travel, then raise the
pedal slightly.
CAUTION :
• Do not ride downhill with
Ignition Switch in “OFF”
Position & in Neutral Gear.
• Always ride motor cycle with
Ignition Switch in “ON”
Position & in Neutral Gear.
• Always use the clutch when
changing gears. The engine,
transmission, and driveline are
not designed to withstand the
shock of forced shifting and
can be damaged by shifting
without using the clutch.
5-2
Page 25

OPERATION AND IMPORTANT RIDING POINTS
Tips for reducing fuel
consumption
Your Motorcycle's fuel consumption
depends to a large extent on your
riding style. The following tips can
help reduce fuel consumption:
1. Warm up theengine before riding.
2. Move the starter Lever to “Off” as
soon as possible.
3. Shift up swiftly and avoid high
engine speeds during
acceleration.
4. Do not double-clutch or rev the
engine while shifting down and
avoid high engine speeds with no
load on the engine.
5. Turn off the engine instead of
letting it idle for an extended
length of time, i.e. in traffic jams, at
traffic lights or rail- roadcrossings.
6. Do not drive with excessive load
on the Motorcycle.
7. Plan your route in advance.
8. Avoid frequent braking.
9. Always maintain your tyre
pressure as per recommendation
10. Get your motorcycle serviced
periodically after every 2000 kms.
Running-in
There is never a more important
period in the life of your Motorcycle
than the period between zero and
1,000 km. For this reason we ask that
you carefully read the following
material. Because the engine is brand
new, you must not put an excessive
load on it for the first 1,000 km. The
various parts in the engine wear and
polish themselves to the correct
operating clearances. During this
period, prolonged full throttle
operation, or any condition which
might result in excessive heating of
the engine, must be avoided.
CAUTION :
Be sure to replace the engine oil as
per recommended schedule.
1,000 km and below :
Avoid prolonged full-throttle
operation. Vary speed occasionally.
CAUTION :
If any engine trouble should occur
during the "Running-in" period,
consult YAMAHA dealer
5-3
Page 26

OPERATION AND IMPORTANT RIDING POINTS
Parking
When parking the Motorcycle, stop
the engine and remove the ignition
key. Turn the fuel cock to "OFF"
whenever stopping the engine.
WARNING
The exhaust system is hot. Park
the Motorcycle in a place where
pedestrians or children are not
likely to touch the Motorcycle. Do
not park the Motorcycle on a slope
or soft ground; the Motorcycle
may overturn.
IT IS NOT RECOMMENDED TO RIDE THE MOTORCYCLE WITH
CONSTANT THROTTLE OPENING FOR VERY LONG DISTANCE
5-4
Page 27

PERIODIC MAINTENANCE AND MINOR REPAIR
1
Periodic inspection, adjustment and
lubrication will keep your Motorcycle
in the safest and most efficient
condition possible. Safety is an
obligation of the Motorcycle owner.
The maintenance and lubrication
schedule chart should be considered
strictly as a guide to general
maintenance and lubrication
intervals. YOU MUST TAKE INTO
CONSIDERATION THAT
WEATHER, TERRAIN,
GEOGRAPHICAL LOCATIONS,
AND A VARIETY OF INDIVIDUAL
USES ALL TEND TO DEMAND
THAT EACH OWNER ALTER THIS
TIME SCHEDULE TO SHORTER
INTERVALS TO MATCH THE
ENVIRONMENT. The most important points of Motorcycle inspection,
adjustment, and lubrication are
explained in the following pages.
WARNING
If you are not familiar with
Motorcycle service, this work
should be done by a YAMAHA
dealer.
1. Tool kit
Tool kit
The service information included in
this manual is intended to provide
you, the owner, with the necessary
information for completing some of
your own preventive maintenance
and minor repairs. The tools
provided in the owner's tool kit are to
assist you in the performance of
periodic maintenance. However,
some other tools such as a torque
wrench are also necessary to
perform the maintenance correctly.
6-1
Page 28

PERIODIC MAINTENANCE AND MINOR REPAIR
NOTE :
If you do not have necessary tools
required during a service operation,
take your Motorcycle to a YAMAHA
dealer for service.
WARNING
Modifications to this Motorcycle
not approved by YAMAHA may
cause loss of performance, and
render it unsafe for use. Consult
a YAMAHA dealer before
attempting any changes.
KEEP YOUR MOTORCYCLE TUNED IN PERFECT CONDITION
6-2
Page 29

PERIODIC MAINTENANCE AND MINOR REPAIR
ITEM OPERATIONSNO
VALVES
1
2
SPARK PLUG
3
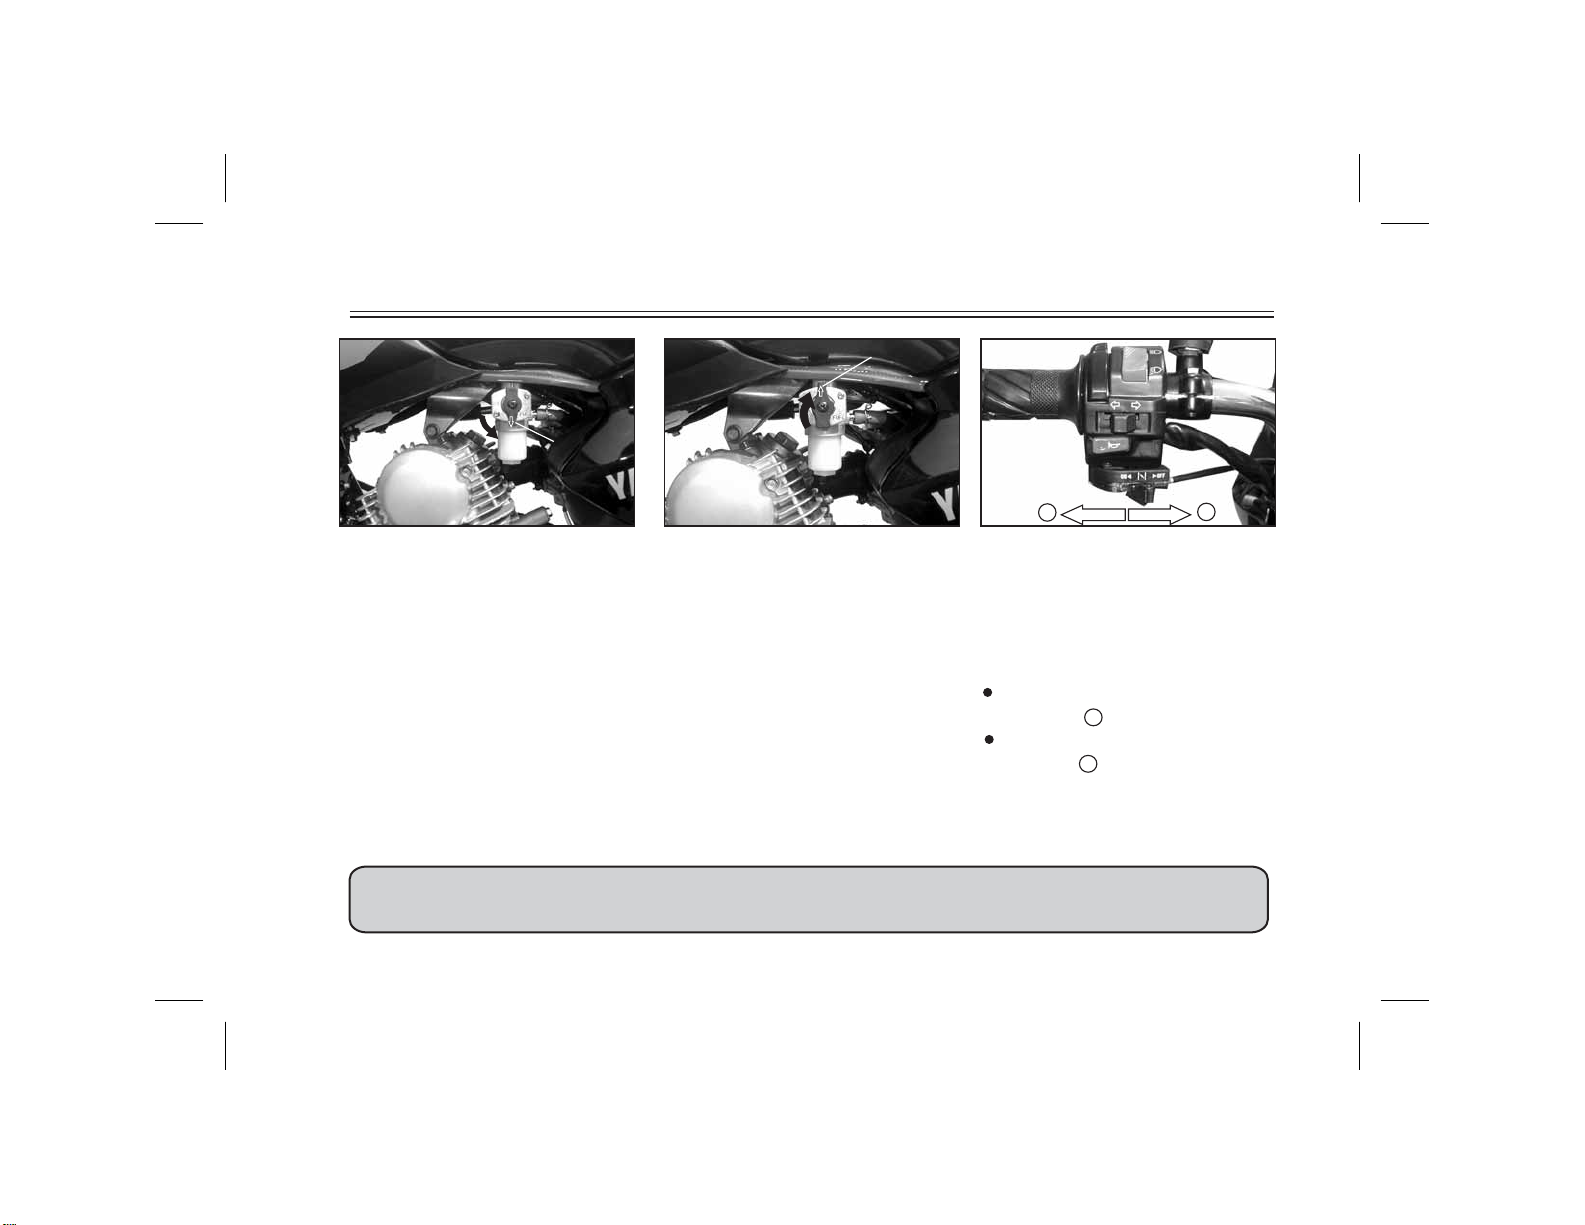
CARBURETOR
1. TPS (Throttle Position Sensor)
AIR FILTER
4
*
5
FUEL LINE
FUEL FILTER
6
7
ENGINE OIL
ENGLINE OIL FILTER SCREEN
8
9
BRAKE REAR
10
BRAKE SHOES-REAR
BRAKE FLUID LEVEL
11
BRAKE DISC
12
13
BRAKE PADS
MASTER CYLINDER & CALIPER
14
15
FRONT BRAKE
PREVENTIVE MAINTENANCE SCHEDULE
Check valve clearances, adjust if necessary.
Check condition, gap;
Clean and reset if necessary.
Check idle speed, Starter lever operation.
2. BS (Butterfly Slide) Valve Screws
CAUTION :
1. Do not Tamper/Adjust withTPS (fig-1)
2. Do not OpenBS (Butterflyslide) ValveScrews (fig-2)
Clean, inspect & lubricate. (replace if necessary)
Check fuel hose, for cracks or damage.
Replace if necessary.
Check for free flow of petrol, cleanliness of filter bowl,
replace if necessary.
Replace with recommended oil - Yamalube SG Grade
(Warm engine before draining)
Wash with petrol
Check operation./ Adjust if necessary.
Grease the brake cam.
Check for wear, replace if necessary.
Check Level Refill if necessary
Check for scoring marks on disc Face and Run out
Check for wear
Check for leakage
Check operation, fluid level and vehicle fluid leakage
Replace Brake Pads
DURING SERVICE DAYS OR KMS
WHICHEVE OCCURS FIRST
30 DAYS OR
500~700 KMS
90 DAYS OR
2500~2700 KMS
180 DAYS OR
4500~5000 KMS
REPLACE EVERY 10,000 km
WHENEVER WORN TO THE LIMIT
AFTER
2000 KMS
6-3
Page 30

PERIODIC MAINTENANCE AND MINOR REPAIR
S.NO
16
CLUTCH
17
REAR ARM PIVOT
18
WHEELS
19
WHEEL BEARING
20
STEERING BEARING
21
FRONT FORKS
REAR SHOCK
22
ABSORBER
23
DRIVE CHAIN
NUTS, BOLTS AND
24
FASTENERS
CENTERSTAND AND
25
SIDE STAND
26
BATTERY
CONTROL CABLES
-THROTTLE
27
-CLUTCH
-FRONT BRAKE
ITEM
PREVENTIVE MAINTENANCE SCHEDULE
OPERATION
Check alignment marks on Push Lever and
Crankcase L.H. Adjust if necessary
Check Rear Arm assembly for looseness.
Tighten with specified Torque if necessary
Check runout, spoke tightness, damage;
Correct it, if necessary.
Check Bearing assembly for looseness, damage;
Replace if necessary.
Check Bearing assembly for looseness;
Correct if necessary.
Check operation/oil leakage. Repair if necessary.
Check operation/oil leakage.
Replace if necessary.
Check Chain slack, alignment. Adjust if necessary.
Clean periodically.
Check all Chassis fittings and fasteners for looseness.
Tighten as per specification.
Check operation and lubricate if necessary.
Check electrolyte level and top it up if necessary.
Check specific gravity and charge if required.
Check breather pipe for blockage and routing.
Check operation, free play, cable damage
Readjust or replace as required.
Repack grease
Repack grease
Relace oil
30 DAYS OR
500~700 KMS
DURING SERVICE DAYS OR KMS
WHICHEVE OCCURS FIRST
90 DAYS OR
2500~2700 KMS
180 DAYS OR
4500~5000 KMS
EVERY 10,000 KMS
EVERY 10,000 KM
EVERY 10,000 KM
EVERY MONTH
AFTER
2000 KMS
IT IS RECOMMENDED THAT THE ABOVE BE SERVICED BY AUTHORIZED YMI DEALER.
*
SERVICE MORE FREQUENTLY WHEN THE VEHICLE IS DRIVEN IN DUSTY AREAS.
Page 31

PERIODIC MAINTENANCE AND MINOR REPAIR
1
1. Panel A
Panel removal and installation
The panels illustrated need to be
removed to perform some of the
maintenance described in this
manual. Refer to this section each
time a panel has to be removed or
reinstalled.
2. Panel B
2
1
2
3
1. Lug
2. Panel A
3. Lug
Removal of Panel A
Unlock the panel.
Pull the lug 1 towards you to remove
it from the fuel tank.
Slide the panel A 2 towards the
Front of the motorcycle for removing
the lug 3 to free the panel.
6-5
Page 32

PERIODIC MAINTENANCE AND MINOR REPAIR
3
1
2
1. Lug
2. Lug
3. Lug
Removal of Panel B
Loosen screw completely and follow
the same procedure as for
removing panel A.
2
2
1
1. Lug
2. Lug
1
Installation of Panel A
Slide the panel towards the Rear of
the motorcycle for inserting the lug
"2" in the slot given in the frame.
Insert and push the lug "1" in the
fuel tank ensuring proper seating.
After proper seating of the panel A,
lock it.
3
1
3
2
2
1. Lug.
2. Lug
3. Lug
1
Installation of Panel B
Follow the same procedure as given
for installation of panel A and tighten
the screw for locking.
6-6
Page 33

A
A. Spark plug gap
Spark plug inspection
The spark plug is an important engine
component and is easy to inspect.
The condition of the spark plug can
indicate the condition of the engine.
The ideal color on the white insulator
around the center electrode is a
medium-to-light tan color for a
Motorcycle that is being ridden
PERIODIC MAINTENANCE AND MINOR REPAIR
normally. Do not attempt to diagnose
any problems yourself. Instead, take
the Motorcycle to a YAMAHA dealer.
You should periodically remove and
inspect the spark plug because heat
and deposits will cause the spark plug
to slowly break down and erode. If
electrode erosion becomes excessive, or if carbon and other deposits
are excessive, you should replace the
spark plug with the specifiedplug.
Specified spark plug:
CR7HSA (NGK)
Before installing the spark plug,
measure the electrode gap with a wire
thickness gauge; adjust the gap to
specification as necessary.
A.- Spark plug gap: 0.6-0.7 mm
When installing the plug, always
clean the gasket surface and use a
new gasket. Wipe off any grime from
the threads and tighten the spark plug
to the specified torque.
Tightening torque:
Spark plug:
12 ft-lb (1.75 m-kg)
NOTE :
If a torque wrench is not available
when you are installing a spark plug,
a good estimate of the correct
torque is 1/4 to 1/2 turn past finger
using a box spanner.
ALWAYS USE ONLY THE STANDARD RECOMMENDED MAKE AND TYPE OF
SPARK PLUG
6-7
Page 34

PERIODIC MAINTENANCE AND MINOR REPAIR
112
1
1. Engine oil filler cap
Engine oil
1. Oil level measurement
a. Place the Motorcycle on the
centerstand. Warm up the engine
for several minutes.
NOTE :
Be sure the Motorcycle is positioned
straight up when checking the oil
level with the rear wheel off the
ground. A slight tilt toward the side
can result in false readings.
ALWAYS CHANGE ENGINE OIL AT RECOMMENDED INTERVALS
FOR OPTIMUM ENGINE PERFORMANCE AND ENGINE LIFE
1. Maximum level
2. Minimum level
NOTE :
Wait a few minutes until the oil level
settles before checking.
B. Unscrew the dipstick and rest it
on the threads of the oil filler hole.
The oil level should be between
the minimum and maximum mark
on the dip- stick. If the level is low,
add oil to raise it to the specified
level.
6-8
1. Dipstick
2. Engine oil replacement
a. Warm up the engine for a few
minutes.
b. Stop the engine. Place an oil pan
under the engine and remove the
dipstick.
Page 35

PERIODIC MAINTENANCE AND MINOR REPAIR
1
Tightening torque:
Drain plug:
14.5 It-lb (2.0 m-kg)
e. Fill engine with oil and install
the dipstick.
1 . Engine oil drain plug
c. Remove the drain plug and drain
the oil.
d. Reinstall the drain plug and
tighten it to the specified
torque.
Recommended oil:
YAMALUBE 4-stroke motor oil
(20W40 type SG).
Oil quantity:
Total amount:
1.2 L
Periodic oil change:
1.0 L
f. Start the engine and warm up
for a few minutes. While
warming up, check for oil leakage. If oil leakage is found, stop
the engine immediately and
check for the cause.
ALWAYS USE ONLY THE RECOMMENDED GRADE OF ENGINE OIL
6-9
Page 36

PERIODIC MAINTENANCE AND MINOR REPAIR
2
1
2
1
1
1. Air filter case cover
2. Screw(4 Nos)
Air filter
The air filter should be cleaned at
the specified intervals. It should be
cleaned more frequently when riding
in unusually wet or dusty areas.
1. Air filter element
2. Lockable SpringWire
3. Remove the air filter from the
case.
4. Unlock the spring wire.
1. Remove panel B. (See page 6-6
1. Air filter element
2. Frame
6. Dip the Air Filter Elements in
recommended oil squeeze out the
excess oil.They should be wet but
not dripping.
Recommended oil:
YAMALUBE 20W40Type SG
2
for removal and installation
procedures.)
2. Remove the air filter case fitting
screws and the air filter case
cover.
6-10
Page 37

PERIODIC MAINTENANCE AND MINOR REPAIR`
7. Pull the air filter elements over
the frame and install the air filter
in the case.
8. Install the Spring Wire
9. Install the air filter case cover
and panel
CAUTION :CAUTION :
Do not twist Element Air
Cleaner.
NOTE :
Ensure no distoration/proper
positioning of felt Seal 1 , if
damaged contact YAMAHA Dealer.
1
CAUTION :
• Make sure the air filter is
properly seated in the air filter
case.
• The engine should never be run
without the air filter installed.
Excessive piston and/or
cylinder wear may result.
• Dirty Element Air Cleaner
causes excessive fuel
consumption and loss of
power.
Clean Element Air Cleaner after
•
every 2000 Kms.
• The Element Air Cleaner should
be cleaned and lubricated more
frequently (every 1000 kms), if
Motorcycle is operated in very
dusty (e.g. unpaved, dust laden
roads) conditions.
Carburetor adjustment
The carburetor is a vital part of the
engine and requires very sophisticated adjustments. Most adjustments should be left to a YAMAHA
dealer who has the professional
knowledge and experience to do so.
However, the following may be
serviced by the owner as part of
routine maintenance.
CAUTION :
CAUTION :
The carburetor was set at the
YAMAHA factory after many
tests. If the settings are changed,
poor engine performance and
damage may result.
6-11
Page 38

PERIODIC MAINTENANCE AND MINOR REPAIR
Idle speed adjustment
NOTE :
A diagnostic tachometer must be
used for this procedure.
1. Attach the tachometer. Start the
engine and warm it up for a few
minutes at approximately 1,300
to 1,500 r/min. Occasionally rev
the engine to 4,000 to 5,000
r/min. The engine is warm when it
quickly responds to the throttle.
1
a
b
1. Throttle stop screw
2. Set the idle to the specified
engine speed by adjusting the
throttle stop screw. Turn the
screw in direction a to increase
engine speed and in direction b
to decrease engine speed.
Standard idle speed:
1,300 ~ 1,500 r/min
NOTE :
If the specified idle speed cannot be
obtained by performing the above
adjustment, consult a
dealer.
YAMAHA
Throttle cable free play
adjustment
NOTE :
Before checking the throttle cable
free play, the engine idling speed
should be adjusted.
Adjust the throttle cable by turning
the adjusting nut so that specified
free play at the throttle grip is
obtained.
Free play:
3 ~ 7mm
CAUTION :
1. Do not Tamper/Adjust with TPS
(Throttle Position Sensor)
2. Do not OpenBS (Butterfly Slide)
ValveScrews.
Please refer Page 6.3
6-12
Page 39

1
b
2
a
1. Free play
2. Locknut
3. Adjusting nut
1. Loosen the locknut.
2. Turn the adjusting nut in direction
b to increase free play and in
direction a to decrease free play.
3. Tighten the locknut.
3
PERIODIC MAINTENANCE AND MINOR REPAIR
Valve clearance adjustment
The correct valve clearance
changes with use, resulting in
improper fuel/air supply or engine
noise. To prevent this, the valve
clearance must be adjusted
regularly. This adjustment however,
should be left to a YAMAHA dealer.
1. Tread depth
2. Side wall
Tyres
To ensure maximum performance,
long service and safe operation,
note the following:
1. Tyre air pressure
Always check and adjust the tyre
pressure before operating the
Motorcycle.
KEEP RECOMMENDED TYRE PRESSURE IN BOTH THE TYRES
6-13
Page 40

PERIODIC MAINTENANCE AND MINOR REPAIR
WARNING
Tyre inflation pressure should be
checked and adjusted when the
temperature of the tyre equals the
ambient air temperature. Tyre
inflation pressure must be adjusted according to total weight of
cargo, rider, passenger, and
accessories (fairing, saddlebags,
etc. approved for this model), and
vehicle speed.
Maximum load* 153 kg
Front RearCold tyre pressure:
Single Rider
With Pillion Rider
25 psi
(1.75kg/cm )
25 psi
(1.75kg/cm )
32 psi
2
(2.25kg/cm )
36 psi
2
(2.25kg/cm )
WARNING
Proper loading of your Motorcycle
is important for several characteristics of your Motorcycle, such as
handling, braking, performance
and safety. Do not carry loosely
packed items that can shift.
Securely pack your heaviest items
close to the center of the Motorcycle, and distribute the weight
evenly from side to side. Properly
adjust the suspension for your
load, and check the condition and
pressure of your tyres. NEVER
OVERLOAD YOUR
MOTORCYCLE. Make sure the
total weight of the cargo, rider,
passenger, and accessories
2
(fairing, saddlebags, etc.
2
approved for this model) does not
exceed the maximum load of the
Motorcycle. Operation of an overloaded Motorcycle could cause
tyre damage, an accident, or even
injury.
2. Tyreinspection
Always check the tyres before
operating the Motorcycle. If a tyre
tread shows crosswise lines
(minimum tread depth), if the tyre
has a nail or glass fragments in it,
or if the side wall is cracked,
contact a dealer
YAMA H A
immediately and have the tyre
Front tyre size:
2.75-18” 4PR
Rear tyre size:
3.00-18” 6PR
Minimum tyre
tread depth :
1.0 mm
(front and rear)
6-14
Page 41

PERIODIC MAINTENANCE AND MINOR REPAIR
WARNING
1. It is dangerous to ride with a
worn-out tyre. When a tyre
tread begins to show lines,
have a YAMAHA dealer replace
the tyre immediately.
Wheels
To ensure maximum performance,
long service, and safe operation,
note the following:
1. Always inspect the wheels before
a ride. Check for cracks, bends or
warpage of the wheel. Be sure the
spokes are tight and undamaged.
If any abnormal condition exists in
a wheel, consult a YAMAHA
dealer. Do not attempt even small
repairs to the wheel. If a wheel is
deformed or cracked, it must be
replaced.
2. Tyres and wheels should be
balanced whenever either one is
changed or replaced. Failure to
have a wheel balanced can result
in poor performance, adverse
handling characteristics, and
shortened tyre life.
3. Ride at moderate speeds after
changing a tyre since the tyre
surface must first be broken in for
it to develop its optimal
characteristics.
6-15
Page 42

PERIODIC MAINTENANCE AND MINOR REPAIR
NOTE :
If proper adjustment cannot be
2
a
b
1
1. Locknut
2. Adjusting Bolt
3. Free play (10~15 mm)
Clutch lever free play
adjustment
The clutch lever free play should be
adjusted to 10 ~ 15 mm. If the free
play is incorrect, adjust as follows.
1 . Loosen the locknut.
2. Turn the adjusting bolt at the
clutch lever in direction b to
increase free play or in direction a
to decrease free play.
3. Tighten the locknut.
obtained or the clutch does not work
correctly, ask a dealer to
inspect the internal clutch
mechanism.
3
YAMAHA
6-16
Page 43

PERIODIC MAINTENANCE AND MINOR REPAIR
a
b
INSTRUCTION 1
1. Adjusting Nut
Rear brake adjustment
The rear brake pedal free play
should be adjusted to 20 ~ 30 mm
(Instruction 2, a ) at the brake pedal
end. Turn the adjusting nut in
direction a to increase free play and
in direction b to decrease free play.
INSTRUCTION 2
a. Freeplay
WARNING
• When it is impossible to make
the proper adjustment, ask a
YAMAHA dealer.
• Check the operation of the
brake light after adjusting the
rear brake.
6-17
2
1
1. Brake light switch
2. Adjusting nut
Brake light switch adjustment
The rear brake light switch is activated by the brake pedal and is
properly adjusted when the brake
light comes on just before braking
takes effect. To adjust the rear
brake light switch, hold the switch
body so it does not rotate while
turning the adjusting nut.
Turn the adjusting nut in direction a
to make the brake light come on
earlier.
Turn the adjusting nut in direction b
to make the brake light come on
later.
Page 44

PERIODIC MAINTENANCE AND MINOR REPAIR
1
1. Brake pad wear indicator groove (x3)
1
Checking the front brake
pads
Each front brake pad is provided
with wear indicator grooves, which
allow you to check the brake pad
wear without having to disassemble
the brake. to check the brake pad
wear, check the wea indicator
grooves. Ifa brake pad has worn to
the point tha the wear indicator
grooves have almost disappeared,
have a YAMAHA dealer replace the
brake pads as a set.
2
1
1. Wear limit line
2. Wear indicator
Checking the rear brake
shoes
The rear brake is provided with a
wear indicator; which allows you to
check the brake shoe wear without
having to disassemble the brake.
To check the brake shoe wear,
check the position of the wear
indicator while applying the brake. If
a brake shoe has worn to thepoint
that the wear indicator reaches the
wear limit line, have a YAMAHA
dealer replace the brake shoes as a
1
1. Minimum Level Mark
Checking the brake fluid
level
Insufficient brake fluid may allow air
to enter th brake system, possibly
causing it to become ineffective.
Before riding, check that the brake
fluid is above the minimum level mark
and replenish if necessary. A low
brake fluid level may indicate worn
brake pads and/or brake system
leakage. If thebrake fluidlevel islow,
be sure to check the brake pads for
wear and the brake system for
leakage
6-18
Page 45

PERIODIC MAINTENANCE AND MINOR REPAIR
Observe these precautions :
• When checking the fluid level,
make sure that the top of the brake
fluid reservoir is level.
• Use only the recommended quality
brake fluid, otherwise the rubber
seals may deteriorate, causing
leakage and poor braking
performance
Recommended brake fluid :
DOT 3 Brake Fluid
• Refill with the same type of brake
fluid. Mixing fluids may result in
a harmful chemical reaction and
lead to poor braking
performance.
• Be careful that water does not enter
the brake fluid reservoir when
refilling. Water will significantly
lower the boiling point of the fluid
and may result in vapourlock.
• Brake fluid may deteriorate painted
surfaces or plastic parts. Always
clean up spilled fluid immediately.
• As the brake pads wear, it is normal
or the brake fluid level to gradually
go down, However, if the brake fluid
level goes down suddenly, have
YAMAHA dealer check the cause.
Changing the brake fluid
Have a YAMAHA dealer check the
brake fluid at the intervals specified in
the periodic maintenance. In
addition, have the oil seals of the
brake master cylinder and caliper as
well as the brake hose replaced at the
intervals listed below or
they are damaged or leaking.
• Oil Seals : Replace every two
years.
• Brake Hose : Replace every four
years.
• Brake Fluid : Replace every two
years or in case of severe operating
conditions replace every year.
whenever
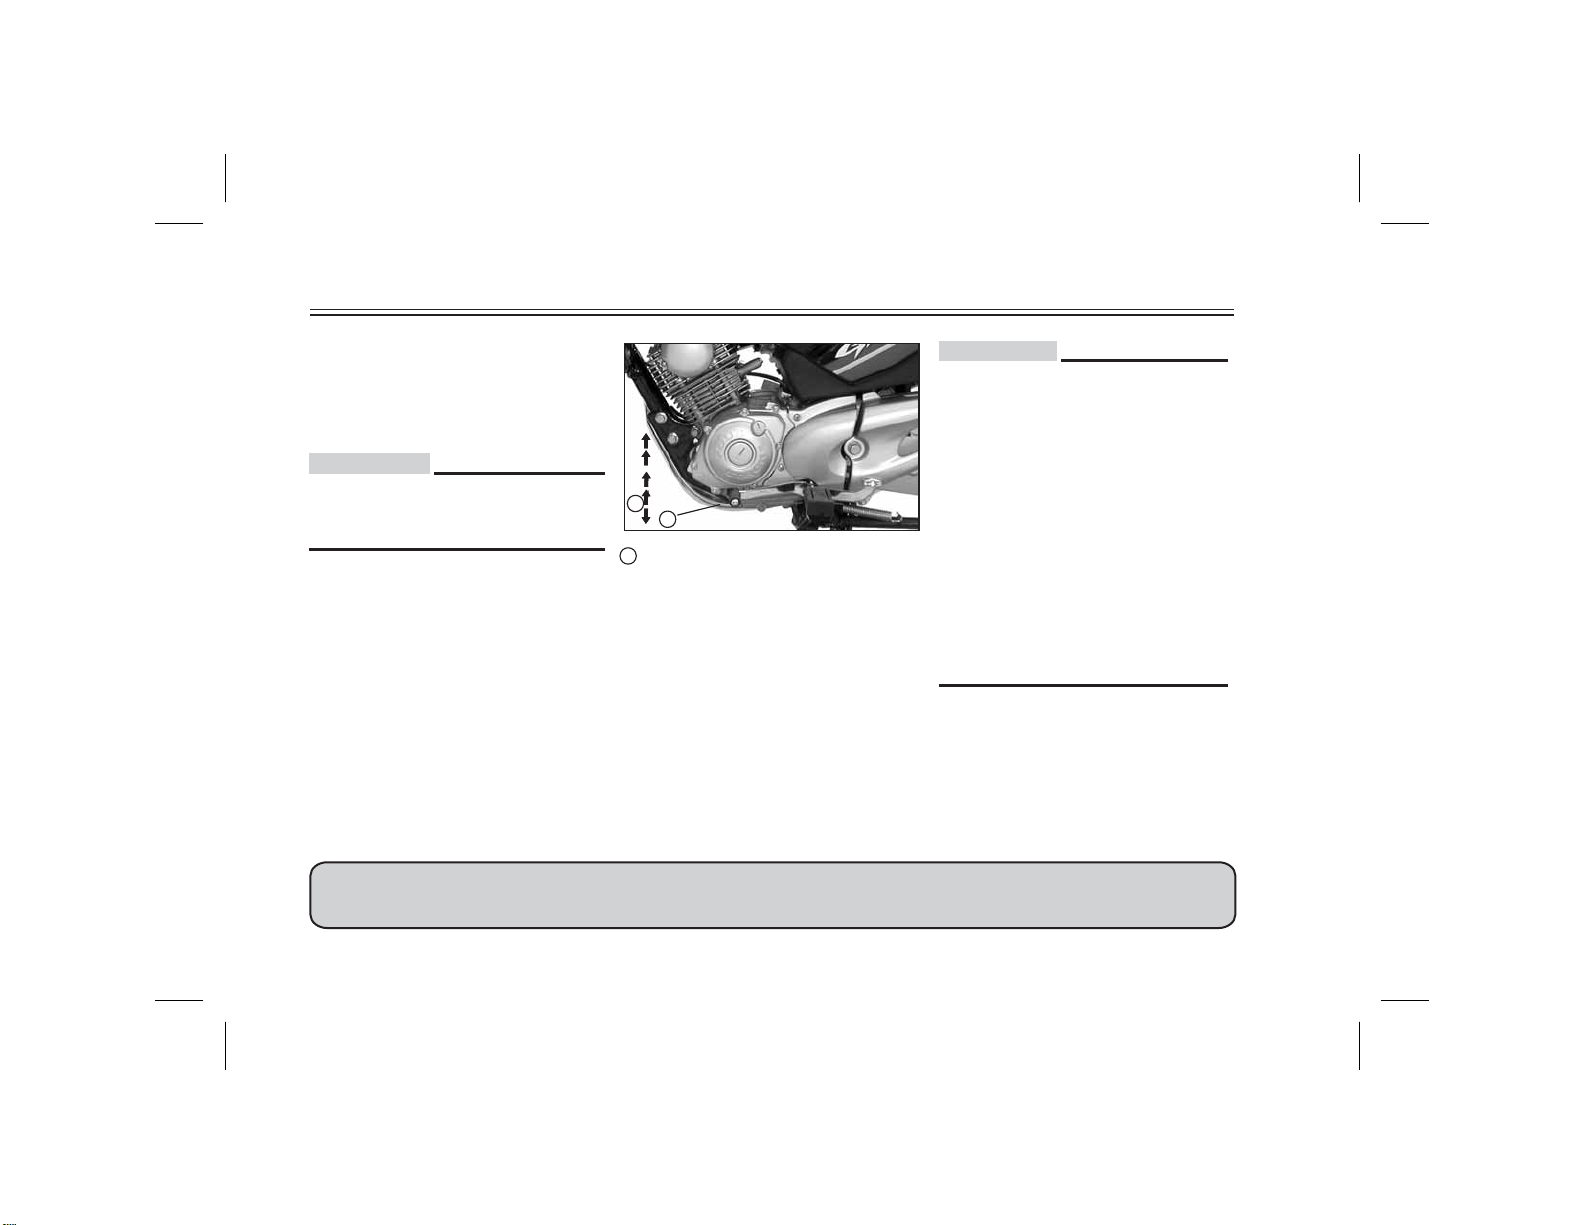
20~30
mm
Drive chain slack check
Spin the wheel several times and
find the tightest position of the chain.
Check and/or adjust the chain slack
while it's in this tightest position.
Inspect the drive chain when the
Motorcycle is on the centerstand.
Check the slack at the position
shown in the illustration. Normal
slack is approximately 20 ~ 30 mm.
If the slack exceeds 30 mm, adjust.
6-19
Page 46

PERIODIC MAINTENANCE AND MINOR REPAIR
a
b
1. Chain joint
If the chain is disassembled, be sure
the chain lock is placed in the
correct direction when installing.
3
2
1
1. Adjusting nut
2. Cotter pin
3. Axle nut
Drive chain slack adjustment
1. Loosen the rear brake pedal
free play adjusting nut.
2. Remove the cotter pin from
the axle nut.
3. Loosen the axle nut.
1
2
1. Locknut
2. Adjusting hex screw
4. Loosen the chain adjusting
locknuts on each chain puller. To
tighten the chain, turn the chain
adjusting hex screw in direction b
to loosen the chain, turn the chain
adjusting hex screw in direction a
and push the wheel forward. Turn
each chain adjusting hex screw
exactly the same amount to
maintain correct axle alignment.
There are marks on each chain
puller. Use these marks to align
the rear wheel.
6.20
Page 47

PERIODIC MAINTENANCE AND MINOR REPAIR
CAUTION :
•
Maintain chain slackness
within specified limits as per
specifications.
• To maintain correct axle
alignment, Ensure the notch
on the adjuster is on the same
Mark on Left and RightSide.
5. After adjusting, be sure to tighten
each chain adjusting locknut.
Then tighten the axle nut to the
specified torque.
Tightening torque:
Axle nut:
65 ft-lb (9.05 m-kg)
7 Adjust the free play in the
brake pedal.
WARNING
Check the operation of the brake
light after adjusting the rear
brake.
1. Cotter pin
6. Insert a new cotter pin into the
axle nut and bend the end of the
cotter pin asshown. Ifthe notch in
the axle nut and the cotter pin
hole do not match, tighten the nut
slightly to align them.
WARNING
Always use a new cotter pin on
the axle nut.
6-21
Page 48

PERIODIC MAINTENANCE AND MINOR REPAIR
Drive chain lubrication
The chain consists of many parts
which work with each other. If the
chain is not maintained properly, it
will wear out quickly. Therefore, the
chain must be serviced regularly.
This service is especially necessary
when riding in dusty areas.
1. The drive chain should be
lubricated every 5,000 km.
2. To clean the chain thoroughly,
remove it from the Motorcycle,
dip it in solvent, and clean out as
much dirt as possible. Then, take
the chain out of the solvent to dry
it, and then dip the chain in oil of
20W40. Remove the chain and
hang it on a peg for a while till the
excess oil drips down completely.
Then using a clean cloth wipe the
chain.
Cable inspection and
lubrication
WARNING
Damage to the outer housing of
cables may lead to internal rusting
and interfere with the cable
movement. Replace damaged
cables as soon as possible to
prevent unsafe conditions.
Lubricate the cables with anticorrosive oil and cable ends. If a
cable does not operate smoothly,
ask a YAMAHA dealer to replace it.
Recommended lubricant:
YAMALUBE 20W40Type SG
Throttle cable and grip
lubrication
The throttle twist grip assembly
should be greased at the time that
the cable is lubricated, since the
grip must be removed to get at the
end of the throttle cable. After
removing the screws, hold the end
of the cable up in the air and put in
several drops of lubricant. With the
throttle grip disassembled, coat the
metal surface of the grip assembly
with a suitable all purpose grease.
6-22
Page 49

PERIODIC MAINTENANCE AND MINOR REPAIR
Brake and shift pedal
lubrication
Lubricate the pivoting parts.
Brake and Clutch Lever
Greasing
Grease the pivoting parts.
Recommended Grease :
MULTIPURPOSE
6-23
Center and sidestand
lubrication
Lubricate the pivoting and mating
joints.
Check to see that the center and
sidestand move up and down
smoothly.
WARNING
If the centerand/or sidestanddoes
not move smoothly, consult a
YAMAHA dealer.
Page 50

PERIODIC MAINTENANCE AND MINOR REPAIR
2. Operation check
Place the Motorcycle on a level
place.
a. Hold the Motorcycle in an
upright position and apply the
front brake.
b. Push down hard on the
handlebars several times and
Front fork inspection
WARNING
Securely support the Motorcycle
so there is no danger of it falling
over.
1. Visual check
Check for scratches or damage
on the inner tube and excessive
oil leakage from the frontfork.
check if the fork rebounds
smoothly.
CAUTION :
If any damage or unsmooth
movement is found with the front
fork, consult a YAMAHAdealer.
Steering inspection
Periodically inspect the condition of
the steering. Worn out or loose
steering bearings may be dangerous. Place a stand under the engine
to raise the front wheel off the
ground. Hold the lower end of the
front forks and try to move them
forward and backward. If any free
play can be felt, ask a YAMAHA
dealer to inspect and adjust the
steering. Inspection is easier if the
front wheel is removed.
6-24
Page 51

PERIODIC MAINTENANCE AND MINOR REPAIR
1
2
MAX
MIN
WARNING
Securely support the Motorcycle
so there is no danger of it falling
over.
Wheel bearings
If there is play in the front or rear
wheel hub or if the wheel does not
turn smoothly, have a YAMAHA
dealer inspect the wheel bearings.
1. Maximum level mark
2. Minimum level mark
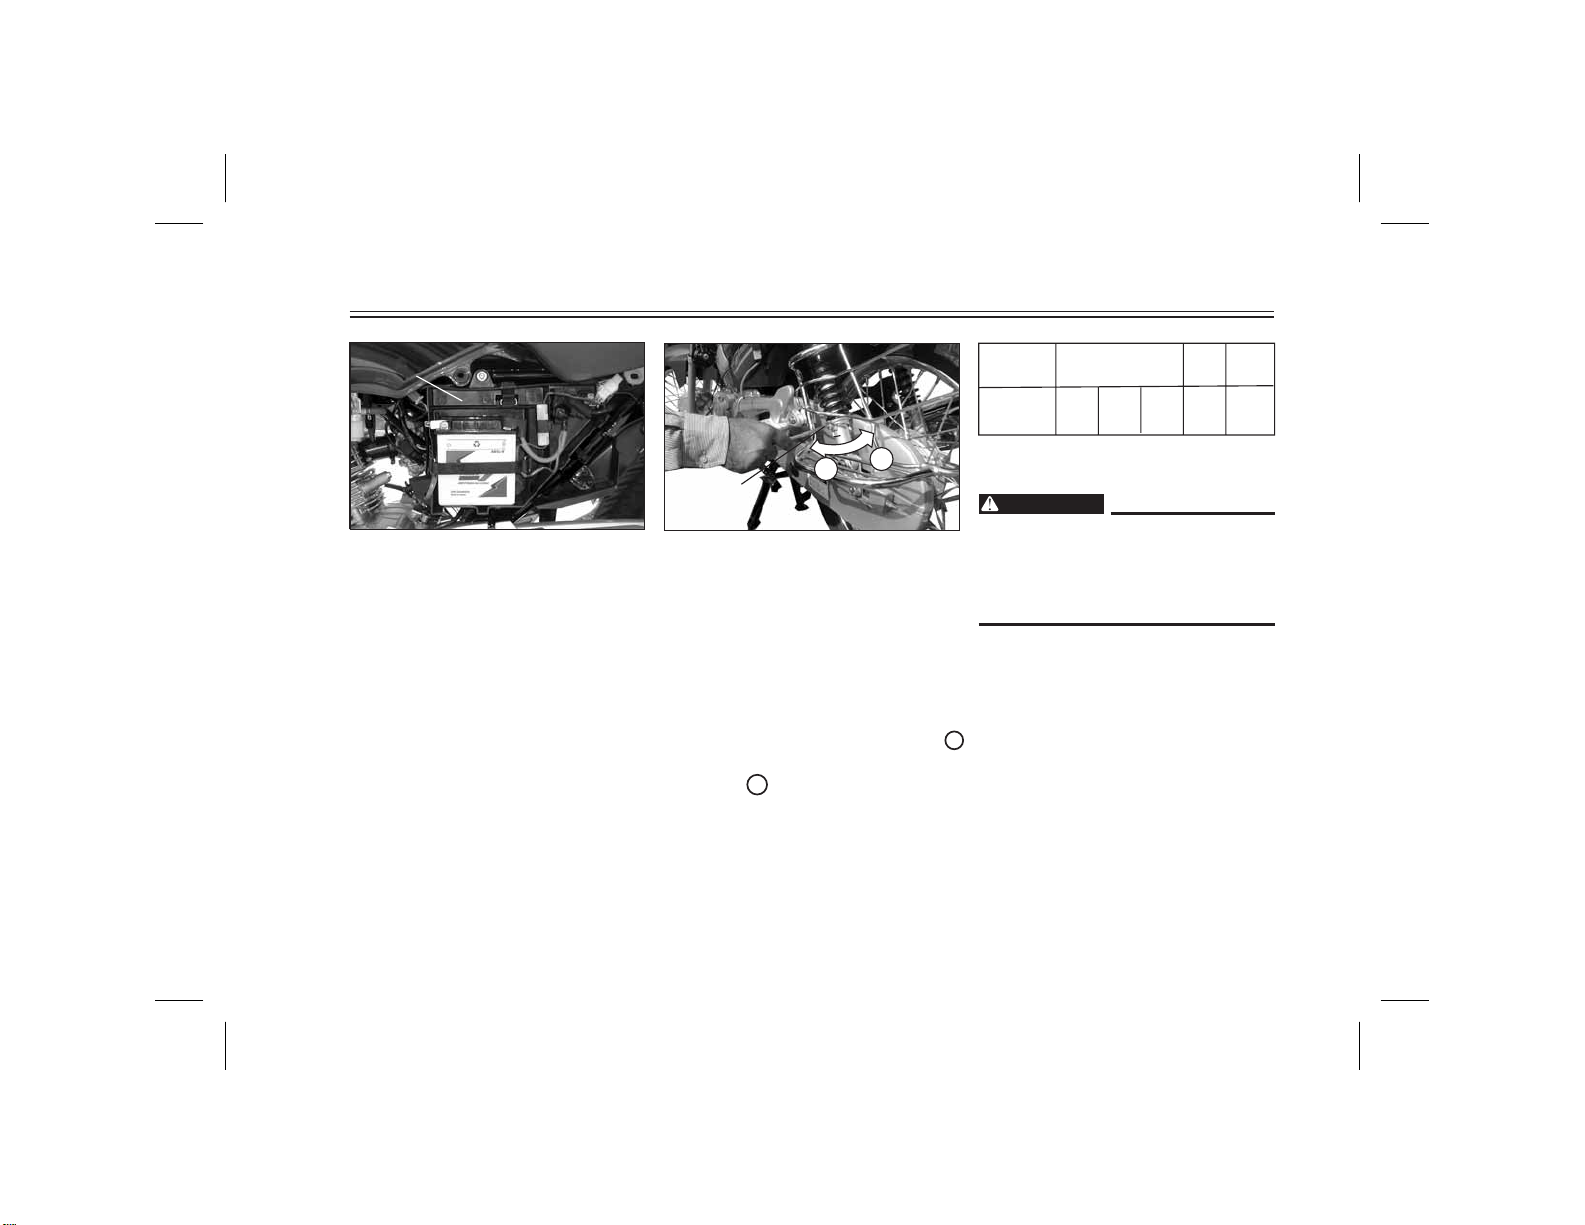
Battery
1. Battery is located inside the
L.H. side panel (for removal &
installation of L.H. side panel
please refer page 6-5)
2. Open the lid.
3. Check the level of the battery
electrolyte and make sure that
the terminals are tight.
Top up with distilled water if the
electrolyte level is low.
6-25
Page 52

PERIODIC MAINTENANCE AND MINOR REPAIR
CAUTION :
When inspecting the battery, be
sure the breather hose is routed
correctly. If the breather hose is
positioned in such a way as to
cause battery electrolyte or gas to
exit onto the frame, structural and
cosmetic damage to the
Motorcycle can occur.
Battery electrolyte is poisonous
and dangerous, causing severe
burns, etc. It contains sulfuric
acid. Avoid contact with skin, eyes
or clothing.
ENSURE THAT BATTERY ELECTROLYTE LEVEL IS MAINTAINED BETWEEN
MAX . AND MIN. MARKS. IF REQUIRED, ADD DISTILLED WATER ONLY
Antidote:
EXTERNAL: Flush with water.
INTERNAL: Drink large quantities
of water or milk. Follow with milk of
magnesia, beaten egg, or
vegetable oil. Call a physician
immediately. EYES: Flush with
water for 15 minutes and get
prompt medical attention.
Batteries produce explosive
gases. Keep sparks, flame,
cigarettes etc., away. Ventilate
when charging or using in an
enclosed space. Always shield
your eyes when working near
batteries. KEEP OUT OF REACH
OF CHILDREN.
Replenishing the battery fluid
A poorly maintained battery will
corrode and discharge quickly. The
battery fluid should be checked at
least once a month. The level should
be between the minimum level and
maximum level marks. Use only
distilled water if refilling is necessary.
CAUTION :
Normal tap water contains
minerals which are harmful to a
battery; therefore, refill only with
distilled water.
WARNING
Take care not to spill battery fluid
on the chain. Battery fluid may
weaken the chain causing shorter
chain life and possibly result in an
accident
6-26
Page 53

PERIODIC MAINTENANCE AND MINOR REPAIR
1
Battery storage
1. When the Motorcycle will not be
used for a month or longer,
remove the battery, fully charge it
and store it in a cool, dry place.
Completely recharge the battery
before reinstallation.
2. If the battery will be stored for
longer than two months, check
the specific gravity of the fluid at
least once a month and fully
recharge the batterywhen it is too
low.
3.Always make sure the
connections are correct when
putting the battery back in the
motorcycle. Make sure the
breather hose is properly
connected and is not damaged or
obstructed.
1. Main fuse
Fuse replacement
The fuse is located behind panel A.
(See page 6-6 for panel removal and
installation procedures.)
If the fuse is blown, turn off the main
switch and the switch of the circuit in
question. Install a new fuse of proper
amperage. Turn on the switches and
see if the electrical device operates.
If the fuse immediately blows again,
consult a YAMAHA dealer.
CAUTION :
Do not use fuse of higher
amperage rating than those
recommended. Substitution of a
fuse of improper rating can cause
extensive electrical system
damage and possibly a fire.
Specified fuse: 10A
6-27
Page 54

PERIODIC MAINTENANCE AND MINOR REPAIR
1
1
1
1
2
1. Screw - 2 Nos.
2. Bolt - 1
No.
(LH & RH)
Headlight/Parking bulb
replacement
If the head/parking light bulb burns
out, replace the bulb as follows:
1. Remove the two screws from the
Head light Cowling "1".
2. Loosen the Bolt "2" below the
Headlight Cowling.
3. Slide head light forward.
1. Bulb holder - 1 Nos.
1.Head Light Bulb-1No.
4. Remove the defective head light
bulb from the bulb holder, if
fused.
5. Remove the parking bulb iffused.
6-28
1. Parking Bulb 1 No.
WARNING
Keep flammable products and
your hands away from the bulb
while it is on, as it is hot. Do not
touch the bulb until itcools down.
5. Put a new bulb into position and
secure it in place with the bulb
holder as the case maybe.
6. Install the head light assy.
7. If the headlight beam adjustment
is necessary, ask a YAMAHA
dealer to make adjustment.
Page 55

1
1. Indicator Screws (1 No.)
Turn signal and taillight
bulb replacement
1. Remove the screws and the
lense.
2. Push the bulb inward and turn it
counterclockwise.
3. Place a new bulb in the socket.
Push the bulb inward and turn it
clockwise until it engages into the
socket.
4. Install the lense and the
screws.
PERIODIC MAINTENANCE AND MINOR REPAIR
Front wheel removal
WARNING
• It is advisable to have a
YAMAHA dealer service the
wheel.
1
1. Integral Tail lamp
with Indicators
Screws Nos)
(2
CAUTION :
Do not over-tighten the screws as
the lense may break.
• Securely support the
Motorcycle so there is no
danger of it falling over.
6-29
Page 56

PERIODIC MAINTENANCE AND MINOR REPAIR
1
1
2
2
1
1. Nut
2. Speedometer Cable
1. Place the Motorcycle on the
centerstand.
2. Loosen the Speedometer cable
Nut '1', & pullthe cable'2' out from
the Front Wheel
1. Cotter Pin
2. Axle Nut
3. Remove the cotter pin '1' and axle
nut '2'.
4. Remove the wheel, make sure
the Motorcycle is properly
supported.
5. Remove the Front Wheel
6-30
Page 57

PERIODIC MAINTENANCE AND MINOR REPAIR
1
1. Stopper
Front wheel installation
When installing the front wheel,
reverse the removal procedure.
Pay attention to the following points:
1. Make sure the slot in the gear
meter assembly fits over the
stopper on the front fork outer
tube.
2. Make sure the axle nut is properly
torqued and a new cotter pin is
installed.
WARNING
Always use a new cotterpin.
Axle nut torque:
33 ft-lb (4.55 m-kg)
Rear wheel removal
WARNING
• It is advisable to have a
YAMAHA dealer service the
wheel.
• Securely support the
Motorcycle so there is no
danger of it falling over.
6-31
Page 58

PERIODIC MAINTENANCE AND MINOR REPAIR
1
2
3
4
1. Nut
2. Cotter pin
3. Tension bar
1. Place the Motorcycle on the
centerstand.
2. Remove the cotter pin and nut.
Then remove the tension bar
from the brake shoe plate.
ALWAYS USE YAMAHA GENUINE SPARE PARTS
1. Axle nut
2. Cotter pin
3. Brake rod
4. Brake adjusting nut
3. Remove the brake adjusting nut
and brake rod from the brake cam
lever.
4. Remove the axle nut cotter pin
and the axle nut.
6-32
1. Rear axle
5. Pull out the rear axle.
6. Remove the wheel assembly.
Page 59

PERIODIC MAINTENANCE AND MINOR REPAIR
Rear wheel installation
1. Install the rear wheel and the
axle.
2. Install the axle nut.
3. Insert the brake rod into the
brake cam lever and install the
brake free play adjusting nut.
4. Install the tension bar onto the
brake shoe plate and tighten the
tension bar nut to the specified
tightening torque.
5. Take the Motorcycle off the
centerstand.
6. Tighten the axle nut to the
specified tightening torque.
Then install a new cotterpin.
Specified torque:
Tension bar nut:
14 ft-lb (1.9 m kg)
Axle nut:
65 ft-lb (9.05 m kg)
WARNING
Always use a new cotterpin.
7. Adjust the rear brake pedal free
play.(See page 6-17.)
WARNING
Check the operation of thebrake
light after adjusting the rearbrake.
Troubleshooting
Although YAMAHA Motorcycles
receive a rigid inspection before
shipment from the factory, trouble
may occur during operation. Any
problem in the fuel, compression, or
ignition systems can cause poor
starting and loss of power. The
troubleshooting chart describes a
quick, easy procedure for making
checks. If your Motorcycle requires
any repair, bring it to a YAMAHA
dealer. The skilled technicians at a
YAMAHA dealership have the tools,
experience, and know-how to
properly service your Motorcycle.
Use only genuine YAMAHA parts
on your Motorcycle. Imitation
parts may look like YAMAHA
parts, but they are often inferior.
Consequently, they have a shorter
service life and can lead to
expensive repair bills.
6-33
Page 60

PERIODIC MAINTENANCE AND MINOR REPAIR
Troubleshooting chart - For Starting
WARNING
Never Check the fuel systemwhile smoking or inthe vicinity ofan open flame.
1. Fuel
Check if there is fuel
in the fuel tank
2. Compression
Use kick starter.
3. Ignition
Remove spark
plug and check
electrode.
Enough fuel
No fuel
There is compression
No compression.
Wet
Dry with
Black Soot
Go to compression check
Supply fuel.
Wipe clean with dry cloth
and correct spark plug
or replace spark plug.
Ask YAMAHA
dealer to inspect.
6-34
Engine doesn't start, go to
compression check.
Go to Ignition check.
Ask YAMAHA dealer to inspect.
Open the throttle half-way
and start the engine.
If Engine does not start
Contact YAMAHA dealer.
Page 61

CLEANING AND STORAGE
A. CLEANING
Frequent, thorough cleaning of your
Motorcycle will not only enhance its
appearance but will improve its
general performance and extend
the useful life of many components.
CAUTION :
• Improper cleaning can damage
the cowlings, panels and other
plastic parts. Use only a soft,
clean cloth or sponge with mild
detergent and water to clean
plastic.
Do not use any harsh chemical
•
products on plastic parts.
Alaways use clean cloth or
sponge for cleaning the
Motorcycle.
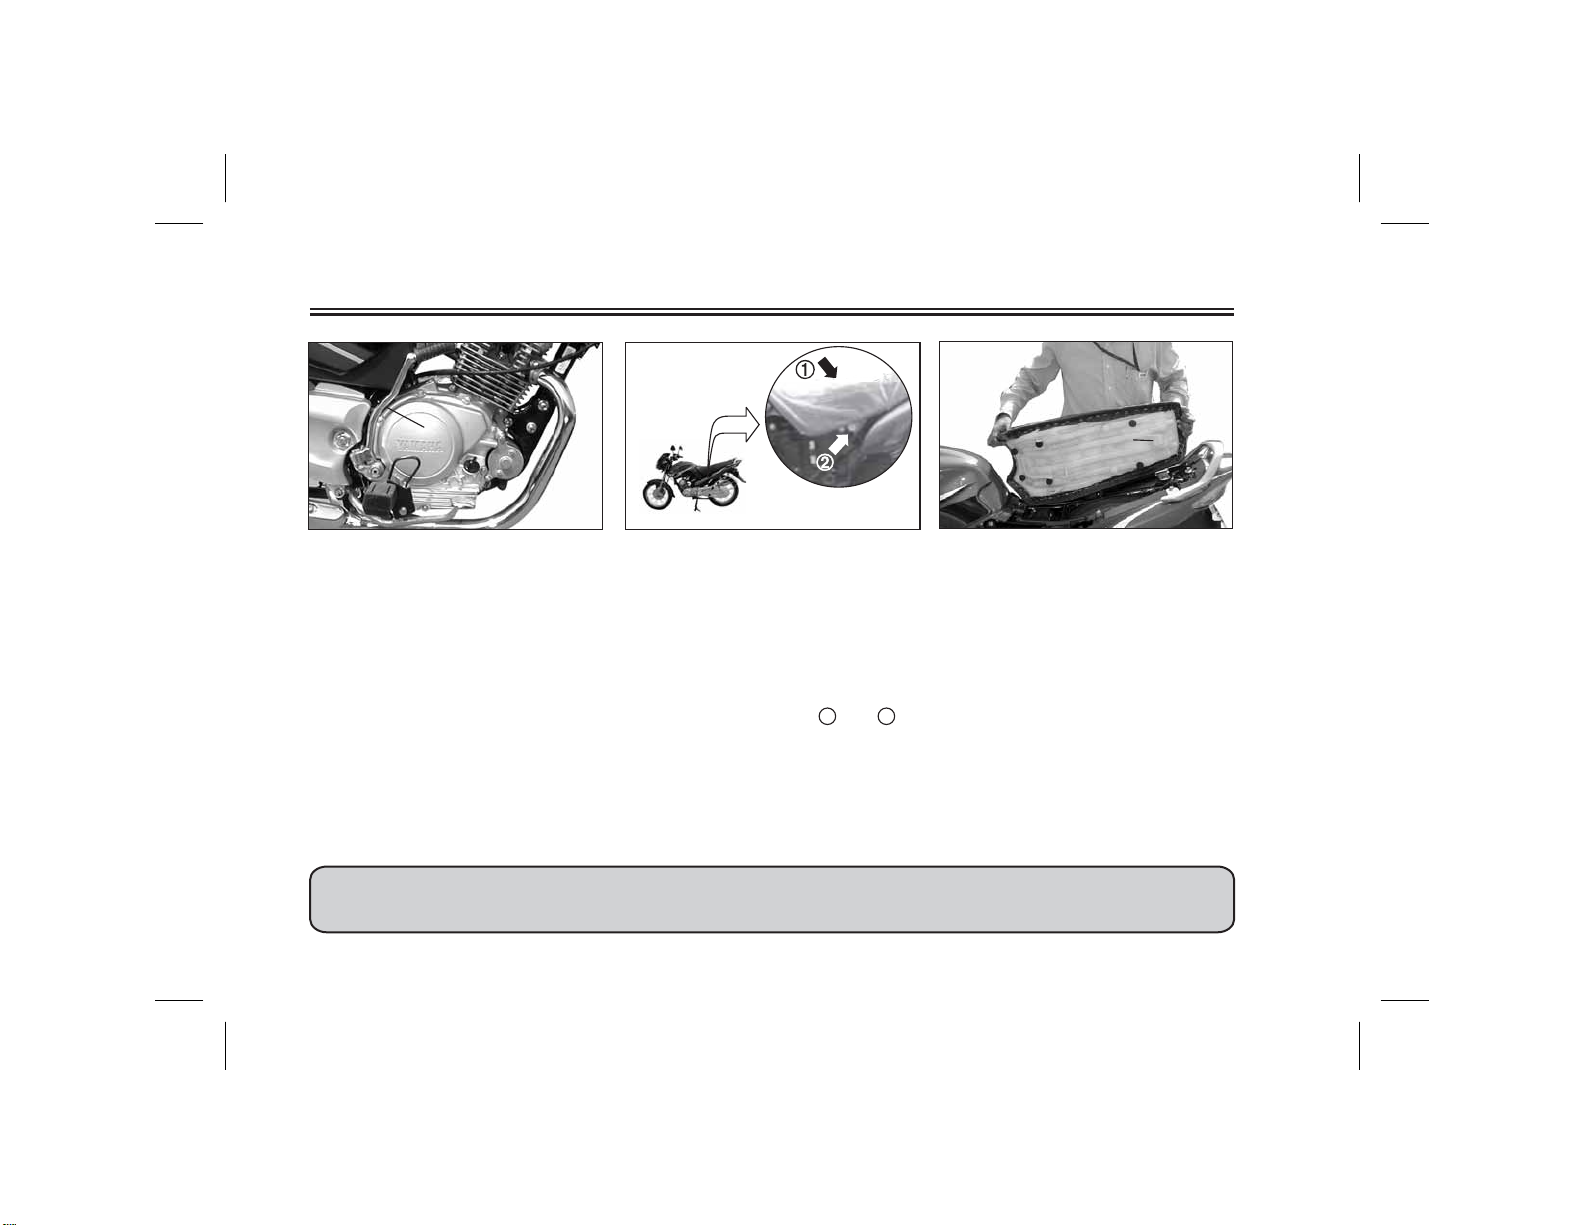
1. Before cleaning the Motorcycle:
a. Block off the end of the exhaust
pipe to prevent water entry; a
plastic bag and strong rubber
band may be used.
b. Make sure the spark plug and all
filler caps are properly installed.
2. If the engine case is excessively
greasy, apply degreaser with a
paint brush. Do not apply
degreaser to the chain, sprockets,
or wheel axles.
3. Rinse the dirt and degreaser off
with a garden hose. Use only
enough pressure to do thejob.
7-1
CAUTION :
Direct excessive Hose Pressure
may cause water Entry Into Wheel
Bearing, Front Fork Brakes,
Transmission Seals & Electrical
Parts, there-by leading to its
Detorioration.
4. After riding on salted roads, wash
the Motorcycle with cold water
immediately. Do not use warm
water as it increases the chemical
reaction of the salt.
5. Once the majority of the dirt has
been hosed off, wash all surfaces
with warm water and mild,
detergent-type soap. An old
toothbrush or bottle brush is
handy for hard-to-get-at places.
6. Rinse the Motorcycle off
immediately with clean water and
dry all surfaces with a chamois,
clean towel, or soft absorbent
cloth.
7. Dry the chain and lubricate it to
prevent rust.
Page 62

CLEANING AND STORAGE
8. Clean the seat with a vinyl
upholstery cleaner to keep the
cover pliable and glossy.
9. Automotive-type wax may be
applied to all painted and chromeplated surfaces. Avoid
combination cleaner waxes. Many
contain abrasive which may mar
the paint or protective finish.When
finished, start the engine and let it
idle for several minutes.
B. STORAGE
Long term storage (60 days or more)
of your Motorcycle will require some
preventive procedures to guard
against deterioration. After thoroughly cleaning the Motorcycle,
prepare for storage as follows:
1. Drain the fuel tank, fuel lines, and
carburetor float bowl.
2. Remove the empty fuel tank, pour
a cup of SAE 10W30 or 20W40
motor oil in the tank, shake the
tank to coat the inner surfaces
thoroughly and drain off the
excess oil. Reinstall the tank.
3. Remove the spark plug, pour
about one tablespoon of SAE
10W30 or 20W40 motor oil in the
spark plug hole and reinstall the
spark plug. Kick the engine over
several times (with the ignition off)
to coat the cylinder wallwith oil.
4. Remove the drive chain.
Thoroughly clean the chain with
solvent and lubricate it. Reinstall
the chain or store it in a plastic bag
(tied to frame for safe-keeping).
5. Lubricate all control cables.
6. Block up the frame to raise both
wheels off the ground.
7. Tie a plastic bag over the
exhaust pipe outlet to prevent
moisture from entering.
8. If storing in a humid or salt-air
atmosphere, coat all exposed
metal surfaces with a light film of
oil. Do not apply oil to any rubber
parts or the seat cover.
9. Remove the battery and charge it.
Store it in a dry place and
recharge it once a month. Do not
store the battery in an excessively
warm or cold place (less than 0ºC
or more than Ambient).
NOTE :
Make any necessary repairs before
storing the Motorcycle.
7-2
Page 63

SPECIFICATIONS
Specifications
Model GLADIATOR
Dimensions
Overall length 2065 mm
Overall width 730 mm
Overall height 1100 mm
Seat height (Upto Rider) 800 mm
Wheelbase 1300 mm
Ground clearance 160 mm
Minimum turning radius 2065 mm
Kerb weight :(With Engine Oil &
90% Fuel in Tank)- 127 Kg.
Engine :
Engine type
Cylinder arrangement
Displacement
Bore x Stroke 54X54
Compression ratio 10 : 1(Geometric)
Starting system
Lubrication system
Maximum power
Maximum torque
:
(Upto Pillion Rider) 870 mm
Air cooled 4-stroke,SOHC
Forward inclined single
cylinder
123.7 cm
mm
Kick / Self starter
Wet sump
8.0 KW
(10.8 BHP) @ 7500 RPM
10.4 Nm
(1.06 Kgfm) @ 6500 RPM
3
EngineOil:
Type:
YAMALUBE 4-Stroke motor
oil (20W40 type SG)
CAUTION :
Be sure to use motor oils that do not contain
antifriction modifiers. Passenger car motor oils (often
labelled Energy conserving) contain anti-friction
additives which will cause clutch and/or starter clutch
slippage, resulting in reduced component life and
poor engine performance.
Capacity
Air filter:
Fuel :
Carburettor:
:
Periodic oil change 1.0
Total amount 1.2
Type Regular Gasoline ( Petrol)
Fuel tank capacity 13.0
Reserve amount
Type BS25
Manufacturer M/S UCAL Fuel System
L
L (First fill/Overhaul)
Wet type element
Litres
1.2 Litres
Limited, India.
8-1
Page 64

SPECIFICATIONS
Spark plug :
Type/Manufacturer CR7HSA (NGK)
Spark plug gap 0.6-0.7 mm
Clutch type :
Transmission :
Primary reduction system Helical gear
Primary reduction ratio 3.4 (68/20)
Secondary reduction system Chain drive
Secondary reduction ratio 3.214 (45/14)
Transmission type Constant mesh 5 speed
Operation
Gear ratio 1st 33/11 - 3.0 : 1
Chassis:
Frame type Diamond Type
Caster angle 26.4
Wet, multiple-disc
Left foot operation
2nd 32/18 - 1.77 : 1
3rd 25/19 - 1.31 : 1
4th 23/12 - 1.04 : 1
5th 21/24 - 0.875 : 1
0
Tyre with Tube
Size
Front
Rear 3.00
Air pressure (cold tyre ):
Single Rider
Front
Rear 32
With Pillion and rider
Front
Rear
2.75 x18” 4PR (RIBBED)
X18” 6PR (UNIVERSAL)
25 psi (1.75 Kgf/cm )
psi (2.25Kgf/cm )
25 psi (1.75Kgf/cm )
36 psi (2.5 Kgf/cm )
2
2
2
2
8-2
Page 65

SPECIFICATIONS
Wheels:
Type:
Front Spoke wheel
Rear Spoke wheel
Size:
Front 1.60 X 18
Rear 1.60 X 18
Brakes:
Front :
Type Single Disc Brake
Operation Right Hand lever
Fluid DOT3
Rear :
Type Drum brake
Operation Right foot operation
Suspension :
Front Telescopic fork
Rear
Shock absorber
Front Coil spring/ oil damper
Rear
:
Swing arm
Coil spring/ oil damper
Wheel travel:
Front 120 mm
Rear: 90 mm
Electrical:
Ignition system: DC-CDI (Digitally Timing
Generator system:
Type
Standard output 12V
Battery:
Type
Voltage, capacity
Bulb voltage ,Wattage x Quantity:
Headlight
Parking Bulb 12V - 5W x 1
Tail / Brake light
Front flasher light
Rear flasher light
Meter light
Neutral indicator light
High beam indicator light
Turn indicator light
Fuse:
Main
8-3
Advanced)
Flywheel magneto
Lead acid
12V 5.0 AH
12V 35W/ 35W x 1
12V 21W/5W x 1
12V10Wx2
12V10Wx2
(In Built in T/Light)
12V3.4Wx2
12V3.4Wx1
12V3.4Wx1
12V3.0Wx2
1OA
Page 66

CUSTOMER INFORMATION
1. Key identification number
Key identification number
The key identification number is
stamped on the key.
Record this number in the space
provided and use it for reference
when obtaining a new key.
1. Frame serial number
Frame serial number
The frame serial number is stamped
into the steering head pipe on right
hand side.
9-1
1. Engine serial number
Engine serial number
The engine serial number is
stamped into the right hand
crankcase.
Page 67

PRE-DELIVERY INSPECTION REPORT
(To be filled in by the Dealer on receipt of the Motorcycle from YAMAHA)
Frame
No.
Engine
No.
Odo-Meter
Reading
Inspection
No.
Date of
1. Check for any missing item(s), scratches in painted/plated part(s), saddle or other external
visual damages and take corrective action.
Check each of the following items individually and mention the corrective action (as per the
recommended specifications) in the boxes provided.
Found OK
Set Right Replaced Cleaned Lubricated
RCLS
2. Check for missing part(s), if any.
A. FRAME
a. Brakes
Rear : Free Play at Rear Brake (20 ~ 30 mm)
b. Clutch : Free Play at Lever End (10 ~ 15 mm)
c. Throttle : Free Play at Throttle Grip (3 ~7 mm)
d. Steering : Check for Free Movement
e. Suspension
Front Fork : Check for any sticky movement
Rear Shock Abs : For Free Stroking & Setting on both
Date of
Sale
SERVICE2.PMD 8/28/2006, 2:23 PM1
10-1
Page 68

PRE-DELIVERY INSPECTION REPORT
f. Wheels
Tyre : Tyre pressure Solo Double
(PSI)
Front 25 25
Rear 32 36
Rim : Runout - Radial - 1.5 mm (Max)
- Lateral - 1.5 mm (Max)
Spokes : No loosenes
g. Locks Operation : • Ignition
• Steering
• Fuel Tank Cap
• Side Cover (L.H.)
h. Fasteners Specified Torque
1. Front Wheel Axle Nuts 25-40
2. Front Fork (Crown Handle & Inner Tube) 13-20
2. Front Fork under Bracket Stem Nut 18-22
3. Handle Bar Mounting Bolts 13-20
4. Rear Shock Absorber Mounting Bolts 22-35
5. Rear Swing Arm Pivot Shaft Nut 32-52
6. Rear Wheel Axle/Sprocket. Shaft Nuts 60-70
B. ENGINE
a. Engine Oil : • Oil Level (For checking - Refer Pg. 6-8)
• Check for any Leakages
(Ft-Lb)
10-2
SERVICE2.PMD 8/28/2006, 2:23 PM2
Page 69

PRE-DELIVERY INSPECTION REPORT
b. Spark Plug : Recommended No. (CR7HSA-NGK)
Gap 0.6-0.7 mm
c. Valve Clearance : (Cold condition)
(If required) Inlet 0.08 ~ 0.12 mm
Exhaust 0.10 ~ 0.14 mm
(After matching of the mark on sprocket cam chain with mark on Cylinder
Head Casting and ensuring the Piston at TDC of compression stroke.)
d. Kick Operation : For free Movement
e. Carburetor : • Idle RPM In warmed up condition(1300~1500 RPM)
• Check for Overflow
f. Drive Chain : • Alignment
• Slackness (20 ~ 30 mm)
g. Brake Fluid : • Fluid Level (Refer Page 6-18)
h. Fasteners Specified Torque
(Ft-Lb)
1. Cylinder Head Bolts 14-17
2. Engine Mounting
a) Engine Mounting Front and Stay Front 25-29
b) Stay Engine Front and Frame 25-29
c) Engine Mounting Rear and Frame 25-29
d) Engine Mounting Upper &
Stay Engine Upper 25-29
e) Stay Engine Upper and Frame 25-29
3. Front and Rear Silencer Mounting Nut 9-12
4. Crown Handle Centre Bolt 8-14
5.Starter Motor Mounting Bolts 6-7
10-3
SERVICE2.PMD 8/28/2006, 2:23 PM3
Page 70

PRE-DELIVERY INSPECTION REPORT
C. ELECTRICAL
a. Ignition Switch Operation
b. Left Hand Switch Operation & Pass Beam
• Horn
• Indicator
• Head Light
c. All Bulbs - Functioning
d. Battery
• Electrolyte Level
• Specific Gravity
• Routing of Breather Pipe
• Fuse
• Routing of Positive Wire (Red) Below Breather Pipe
e. Starter Switch/Kill Switch
D . ROAD TEST
a. Starting
b. Gear Shifting Operation
c. Clutch Operation
d. Application of Brakes (Front and Rear)
e. Speedo/ Odo Meter Operation
f. Fuel Meter Operation
EXPLAINED BY
SIGNATURE : NAME :
MAIN SELLING DLR'S STAMP, SIGN & CODE
CUSTOMER’S SIGN.
10-4
SERVICE2.PMD 8/28/2006, 2:23 PM4
Page 71

INST ALLA TION
Procedures to be explained to the customer on delivery of the Motorcycle by the Dealer's
Representative.
1. Operation of all the locks (Ignition, Steering, Fuel Tank Cap, Side Cover L.H.).
2. Fuel Cock Lever Operation and its reserve position; Fuel Tank Capacity including reserve.
3. Operation and function of Starter Lever.
4. Operation of Kick Lever.
5. Operation of Throttle.
6. Operation of Handle Bar Switches, their Functions and Pass Beam.
7. Operation of Starter/Kill Switch & Its functioning.
8. Disadvantages of riding on half Clutch (Never ride with clutch pressed).
9. Gear shifting pattern.
10. Tyre inflation pressure : Front - 25 Psi Rear - 32 Psi (Solo), 36 Psi (Double)
11. Never give sudden acceleration; always accelerate gradually
12. Simultaneous use of Front and Rear Brakes.
13. Checking of Brake Fluid at regular intervals
14. Never ride with your foot on Rear brake Pedal.
15. Whenever parking the Motorcycle on the Side Stand, ensure that the Fuel Cock Lever is in closed
position.
16. Always adjust both the right and left Shock Absorbers to the same position.
SERVICE2.PMD 8/28/2006, 2:23 PM5
10-5
Page 72

INST ALLATION
17. Location of Storage and T ool Kit comp artments and their use.
18. Procedure of opening and closing of L. H. Side Panel.
19. Battery Maintenance : Checking of electrolyte level ( To add only distilled water if required &
to maintain its Specified Level)
20. Correct Drive Chain Slackness (20 ~30 mm).
21. Correct type of S park Plug and Spark Plug gap.
22. Engine Oil (in Gear Box), level checking and explaining the importance of replacing the Engine
Oil after every 2000 KMS Always use YAMALUBE 4T OIL SG Grade.
23. TFF oil to be replaced after every 10000 Kms.
24. Running- In Period/ Preventive Maintenance Schedule Instructions
IMPORTANT CAUTION
EXPLAINED BY
SIGNATURE : NAME :
MAIN SELLING DLR'S STAMP, SIGN & CODE
SERVICE2.PMD 8/28/2006, 2:23 PM6
CUSTOMER’S SIGN.
10-6
Page 73

• DO’S & DON’TS for the Motorcycle 1
• Procedure for measurement of ‘CO’ Emission Level. 3
• List of Components impacting Emission 3
CONTENTS
greenbook.PMD 8/28/2006, 2:24 PM1
Page 74

DO’S AND DON’TS FOR THE MOTORCYCLE
1 KEEP OUR ENVIRONMENT CLEAN.
Please follow simple steps
DO’S ()
1 Always use genuine ‘spare parts’ purchased from YAMAHA Authorised Dealers.
2 Always use only genuine oils
• 4T - 20W/40 SG grade - YAMALUBE 4T
3 Always keep your engine well tuned. Save environment and also improve Fuel Efficiency
4 • AL WAYS GET YOUR MOTORCYCLE REPAIRED AND MAINTAINED ONL Y A T Y AMAHA AUTHORISED
DEALER.
• YAMAHA serves you through a wide network of Authorised Dealers.
5. Check the Following at every scheduled service:-
a) Spark Plug : Check/Reset Gap/Replace as per the recommendations
in this Owner’s Manual (page no 6-7)
b) Carburetor : Cleaning/Adjustment Every 4500 kms
c) Air Filter : Clean every 2000 kms as per the environment conditions.
d) Piston/Rings/Cylinder : Check / Clean / Replace if necessary
e) Exhaust System : Check / Replace if necessary
f) Valve Timing : Check / Adjust every 4500 kms
g) Compression pressure : Check / Diagnose.
greenbook.PMD 8/28/2006, 2:24 PM2
1
Page 75

DO’S AND DON’TS FOR THE MOTORCYCLE
6 Always drive with Starter Lever in OFF position.
7 Use Starter Lever for minimum possible period (1 to 2 minutes) only to start and warm up Engine
(may be required only in winter)
8 If misfiring, get your Motorcycle diagnosed & attended immediately without running even for a KM.
9 Get Motorcycle maintained regularly as per details and schedule given in Owner’s Manual.
10 Get emission of your Motorcycle inspected at least once every 3 months.
11 Please follow good driven habits in varying traffic conditions.
12 Switch “OFF” the engine while waiting at signal point.
DON’TS ()
1. Don’t overload/overspeed your Motorcycle.
2. Don’t alter or modify your Motorcycle.
3. Never drive with Ignition “OFF” while moving down a slope.
4. Don’t turn off the Engine or interrupt the Ignition when the Transmission is in Gear & the Motor
cycle is in motion.
5. Don’t idle the Engine for a prolonged period.
6. Don’t use Non-Genuine Parts.
7. Don’t buy adulterated Petrol/Oil.
greenbook.PMD 8/28/2006, 2:24 PM3
2
Page 76

‘CO’ EMISSION LEVEL MEASUREMENT
2. PROCEDURE FOR MEASUREMENT OF “CO” EMISSION LEVEL
2.1 IMPORTANT : “CO” Measurement Equipment must be duty calibrated.
2.2 Check for “NO LEAKAGE” from Exhaust System.
2.3 Starter Lever should be in OFF position.
2.4 All Electricals should be in OFF position.
2.5 Set the Idle speed of the Engine in warmed up condition of Motorcycle as specified.
MODEL IDLE R.P.M.
GLADIA TOR
2.6 Insert the Sampling probe of the Exhaust Gas Analyser inside the Exhaust Muffler of the
Motorcycle.
2.7 • If the reading is within specified limits then it is acceptable.
• If the reading exceeds the norm of 3.5% (by volume) have it adjusted by YAMAHA
Authorised Dealer.
3. LIST OF COMPONENTS IMP ACTING “EMISSION”
a. Air Filter e. Cylinder Head i. Valve Seals m. Spark Plug
1300 - 1500 RPM
b. Carburetor f. Rocker Arm j. Timing Chain n. Exhaust System
c. Cylinder g. Valves k. Air Intake System
d. Piston Ring & Piston h. Cam Shaft l. Ignition Coil, CDI, Magneto
greenbook.PMD 8/28/2006, 2:24 PM4
3
Page 77

SG
Always use
Parts & Accessories
4 STROKE MOTOR OIL
20W40
4
• Longer Engine Life
• Lower Maintenance Cost
• Lower Exhaust Smoke
• Reduces Wear and Tear
(Starter Motor & Disc Brake)
5P42
YAMAHA MOTOR INDIA PRIVATE LIMITED
A-3, SURAJPUR INDUSTRIAL AREA, NOIDA DADRI ROAD
SURAJPUR - 201 306 (UP) INDIA
5P4-F8199-E1
PRINTED IN INDIA
2Y16(OM-01)-271-08-06-E
 Loading...