

Yamaha XS850G Owner's Manual


XS850G
OWNER’S MANUAL
1ST
PRINTING, JULY 1979
ALL RIGHTS RESERVED,
BY YAMAHA MOTOR COMPANY
LIMITED, JAPAN
PRINTED IN JAPAN
P/N LIT-l 1626-01-79
PLEASE READ THIS MANUAL CAREFULLY AND COMPLETELY
BEFORE OPERATING THIS MOTORCYCLE.
DO NOT ATTEMPT TO OPERATE THIS MOTORCYCLE UNTIL
YOU HAVE ATTAINED A SATISFACTORY KNOWLEDGE OF ITS
CONTROLS AND OPERATING FEATURES AND HAVE BEEN
TRAINED IN SAFE AND PROPER RIDING TECHNIQUES.
REGULAR INSPECTIONS AND CAREFUL MAINTENANCE ARE
REQUIRED IN ADDITION TO RIDING SKILL IN ORDER TO
ENJOY THE CAPABILITIES AND RELIABILITY OF THIS MOTOR-
CYCLE SAFELY.
Particularly important information is distinguished in this manual by the following notations:
NOTE:
CAUTION:
WARNING:
A NOTE provides key information to make procedures
easier or clearer.
A CAUTION indicates special procedures that must be fol-
lowed to avoid damage to the motorcycle.
A WARNING indicates special procedures that must be fol-
lowed to avoid injury to a motorcycle operator or person in-
specting or repairing the motorcycle.

NOTE:
This manual should be considered a permanent part of this motorcycle and
should remain with it even if the motorcycle is subsequently sold.
-SAFETY WARNINGS:
1,
Traffic regulations vary from state to state. Study the regulations
in your state before riding this motorcycle.
2.
This motorcycle is designed for on-road use only. It is not suita-
ble for off-road use.
3. GASOLINE IS HIGHLY FLAMMABLE:
*
Always turn off the engine when refuelling.
*
Take care not to spill any gasoline on the engine or exhaust
pipe(s)/muffler(s)
when refuelling.
*
Never refuel while smoking or in the vicinity of an open flame.
4.
If you should swallow some gasoline, or inhale a lot of gasoline
vapor, or allow some gasoline to get in your
eye(s), see your
doctor immediately. If any gasoline spills on your skin or clothing, immediately wash it with soap and water and change your
clothes.

5.
*
*
6.
7.
6.
Always turn off the engine before leaving the motorcycle unattended and do not forget to remove the ignition key. When parking the motorcycle, note the following:
The engine and exhaust
pipe(s)/muffler(s)
may be hot. Park the
motorcycle in a place where pedestrians or children are not likely to touch the motorcycle.
Do not park the motorcycle on a slope or soft ground; the motorcycle may overturn.
When transporting the motorcycle in another vehicle, be sure it
is kept upright and that the fuel petcock(s) is turned to the “ON”
or “RES” position (for vacuum
type)/“OFF”
position (for manual
type). If it should lean over, gasoline may leak out of the carbretor or fuel tank.
Never start your engine or let it run for any length of time in a
closed area. The exhaust fumes are poisonous and may cause
loss of consciousness and death within a short time. Always
operate your motorcycle in en area with adequate ventilation.
Always wear a helmet, gloves, trousers (tapered around the cuff
and ankle so they do not flap), and a brightly colored jacket.

INTRODUCTION
Congratulations on your purchase of the
Yamaha
XS850G.
This model represents the
product of many years of Yamaha experience
in the production of fine sporting. touring,
and pacesetting racing machines. You can
now appreciate the high degree of craftsmanship and reliability that have made
Yamaha a leader in these fields.
This manual will provide the owner with a
good basic understanding of the operation
and basic maintenance of this vehicle. If you
have any questions regarding the operation
or maintenance of your motorcycle. please
consult
your Yamaha dealer.
-NOTICE:
Some data in this manual may become
outdated due to improvements made to
this model in the future. If there is any
question concerning this manual, consult your nearby Yamaha dealer.
This Yamaha Motorcycle in its design and
manufacture fully complies with the emissions standards for clean air applicable at
the date of manufacture. Yamaha has met
these standards without
reducing the
motorcycle’s performance or economy of
operation. To maintain these high standards.
it is important that you and your dealer pay
close
attention to
the
recommended
maintenance schedules and operating instructions contained within this manual.
SERVICE DEPT.
INTERNATIONAL DIVISION
YAMAHA MOTOR CO., LTD.

CONTENTS
LOCATION OF THE “CAUTION AND
SPECIFICATION LABELS”
,.,.,.......................
1
DESCRIPTION
..,,,...........................................~
2
MACHINE IDENTIFICATION
3
CONTROL FUNCTIONS4
PRE-OPERATION CHECKS
..,,......................
15
OPERATION AND IMPORTANT
RIDING POINTS 24
PERIODIC MAINTENANCE AND
MINOR REPAIR
.,.......,,,,,,.,..,.,.,......................
30
CLEANING AND STORAGE
.,.......................
72
MISCELLANEOUS 75
SPECIFICATIONS 77
WARRANTY INFORMATION 80
MAINTENANCE RECORD 81
WIRING DIAGRAM 83

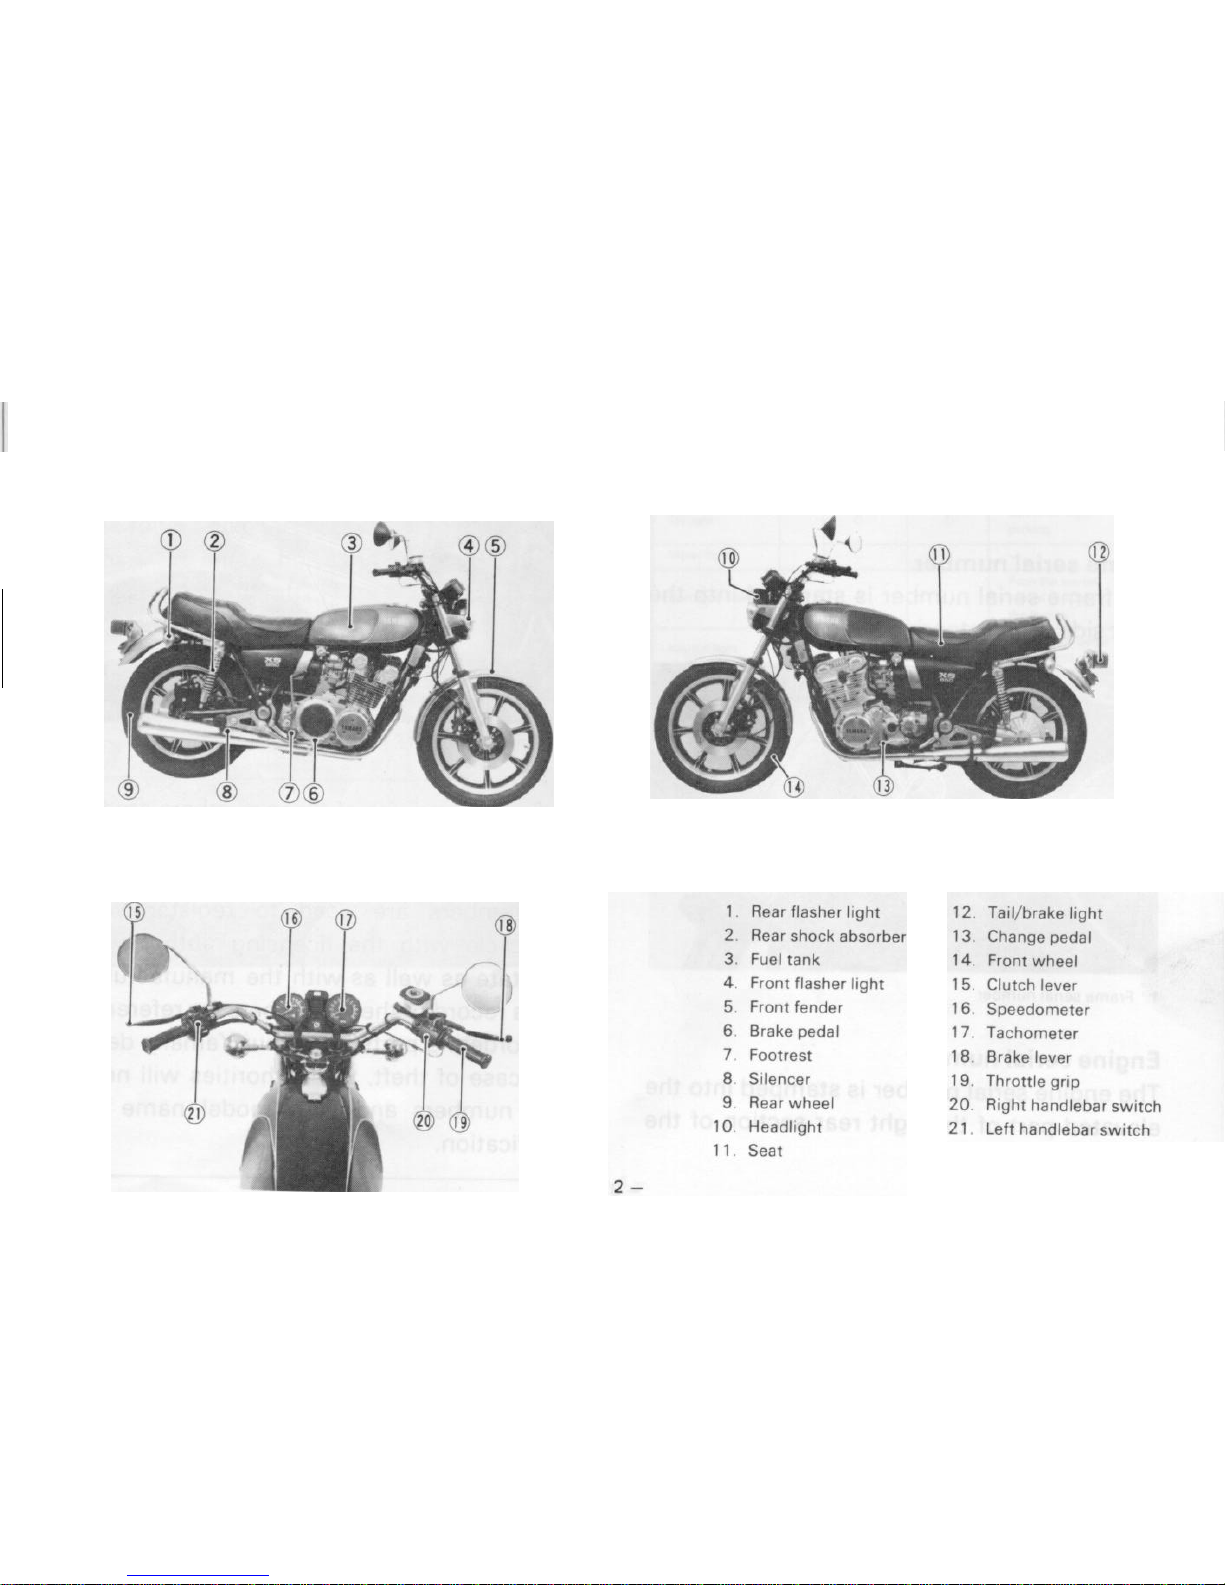
RIGHT SIDE
DESCRIPTION
INSTRUMENTS
LEFT SIDE
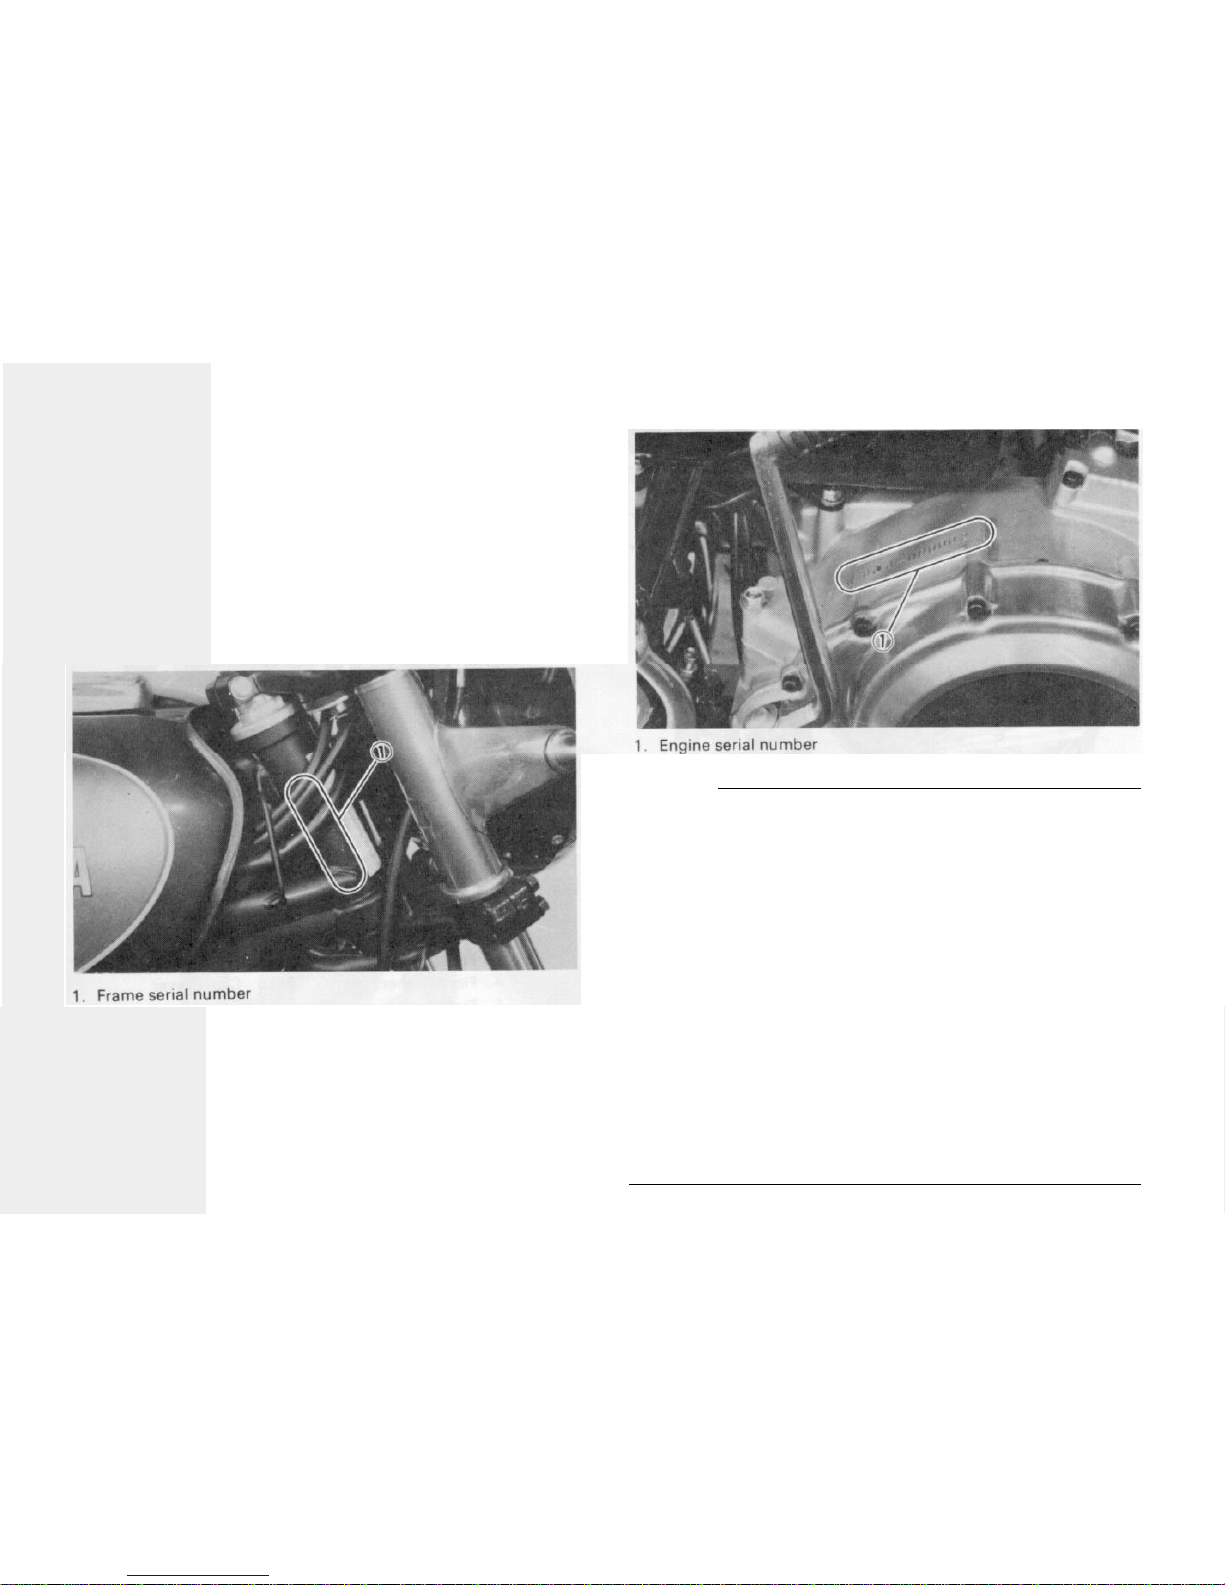
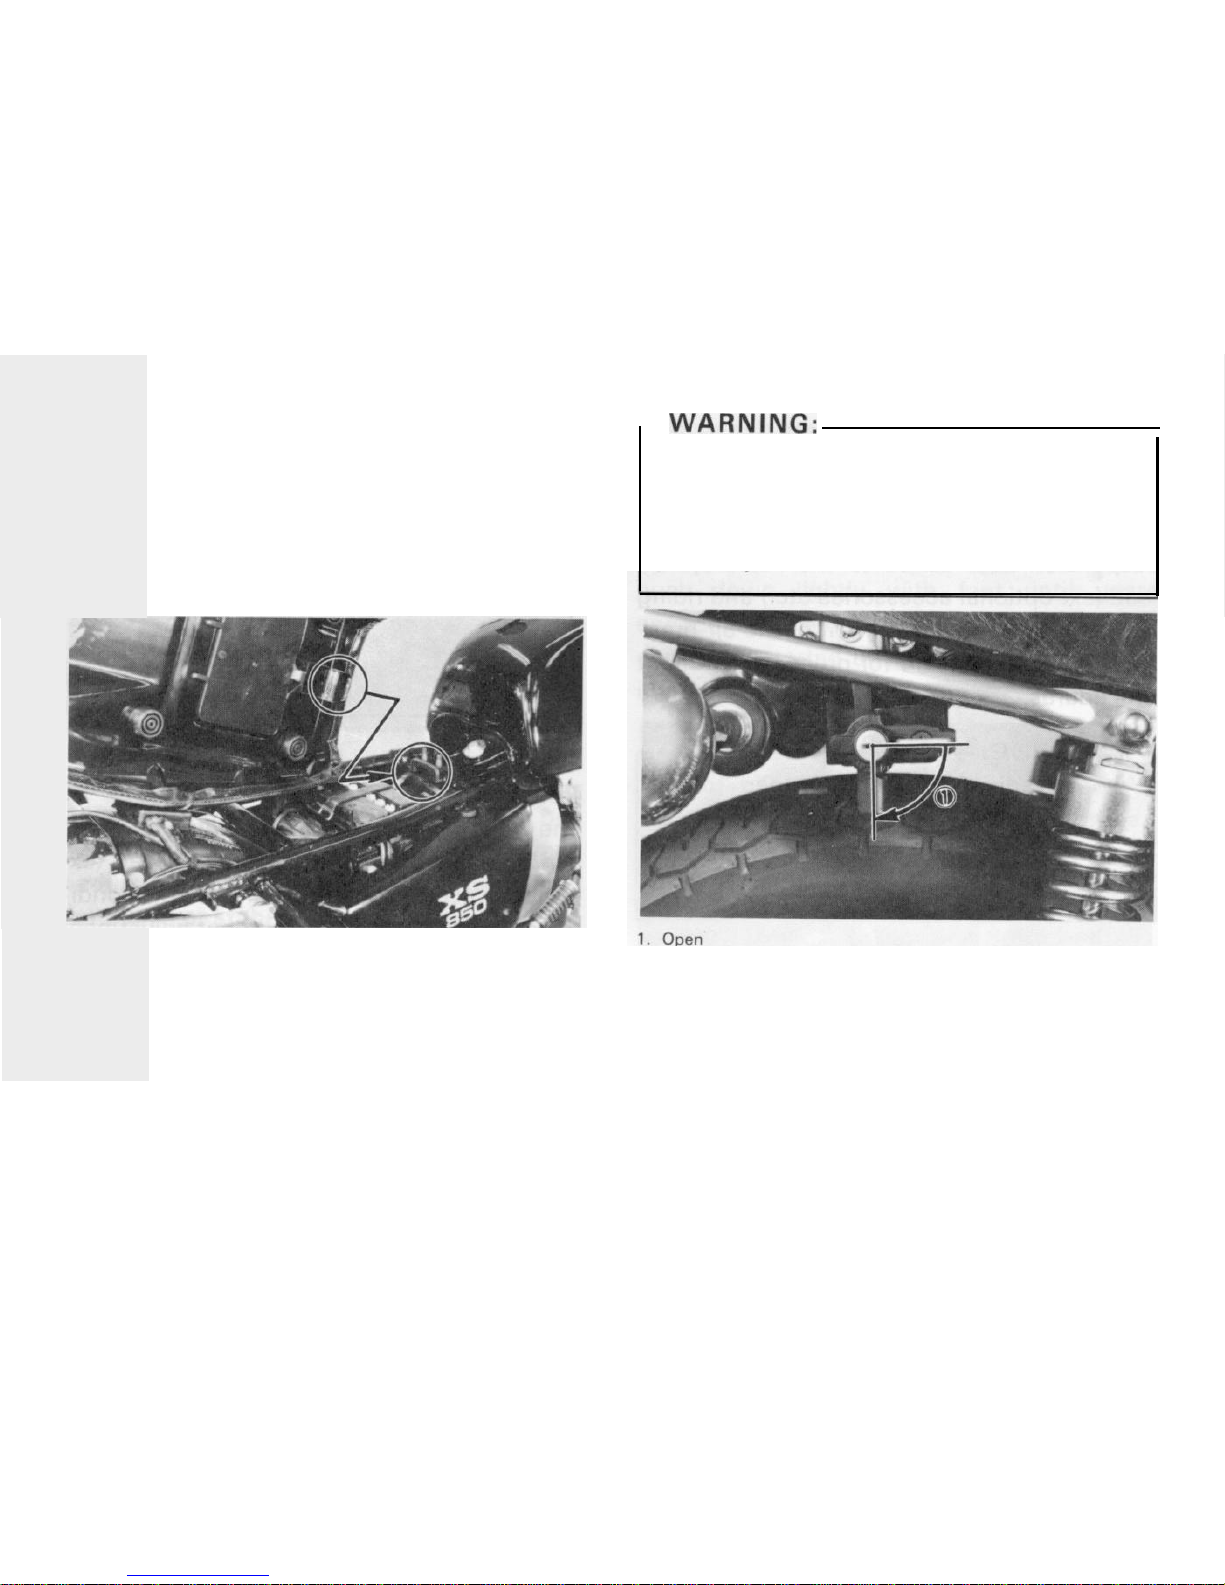
MACHINE
IDENTIFICATION
Frame serial number
The frame serial number is stamped into the
right side of the steering head pipe.
Engine serial number
The engine serial number is stamped into the
elevated part of the right rear section of the
engine.
NOTE:
The first three digits of these numbers are for
model identification; the remaining digits are
the unit production number. These identification numbers are used to register Your
motorcycle with the licensing authority in
your state as well as with the manufacturer.
Keep a record of these numbers for reference
when ordering parts from Your Yamaha dealer. In case of theft, the authorities will need
these numbers and Your model name for
identification.
ON:
RES:
With the lever in this position fuel
flows if the engine is running but stops
if the engine is not running.
This indicates “RESERVE”. If you run
out of fuel while riding, move the lever
to
“PRI”
and switch to “RES” position after starting the engine. Then, fill
the tank at the first opportunity.
NOTE:
In the “ON” and
“RES”
positions the petcock
works on pressure from the engine turning
over. If the line connecting the petcock to the
carburetor intake manifold is not connected
or has a leak the petcock will not function
properly.
PRI: This indicates “PRIME”. With the fuel
petcock in this position fuel flows
whether the engine is running or not. If
the fuel tank is completely empty, refill
the tank, prime the carburetor in this
position, and then switch to the “ON”
position after starting the engine.
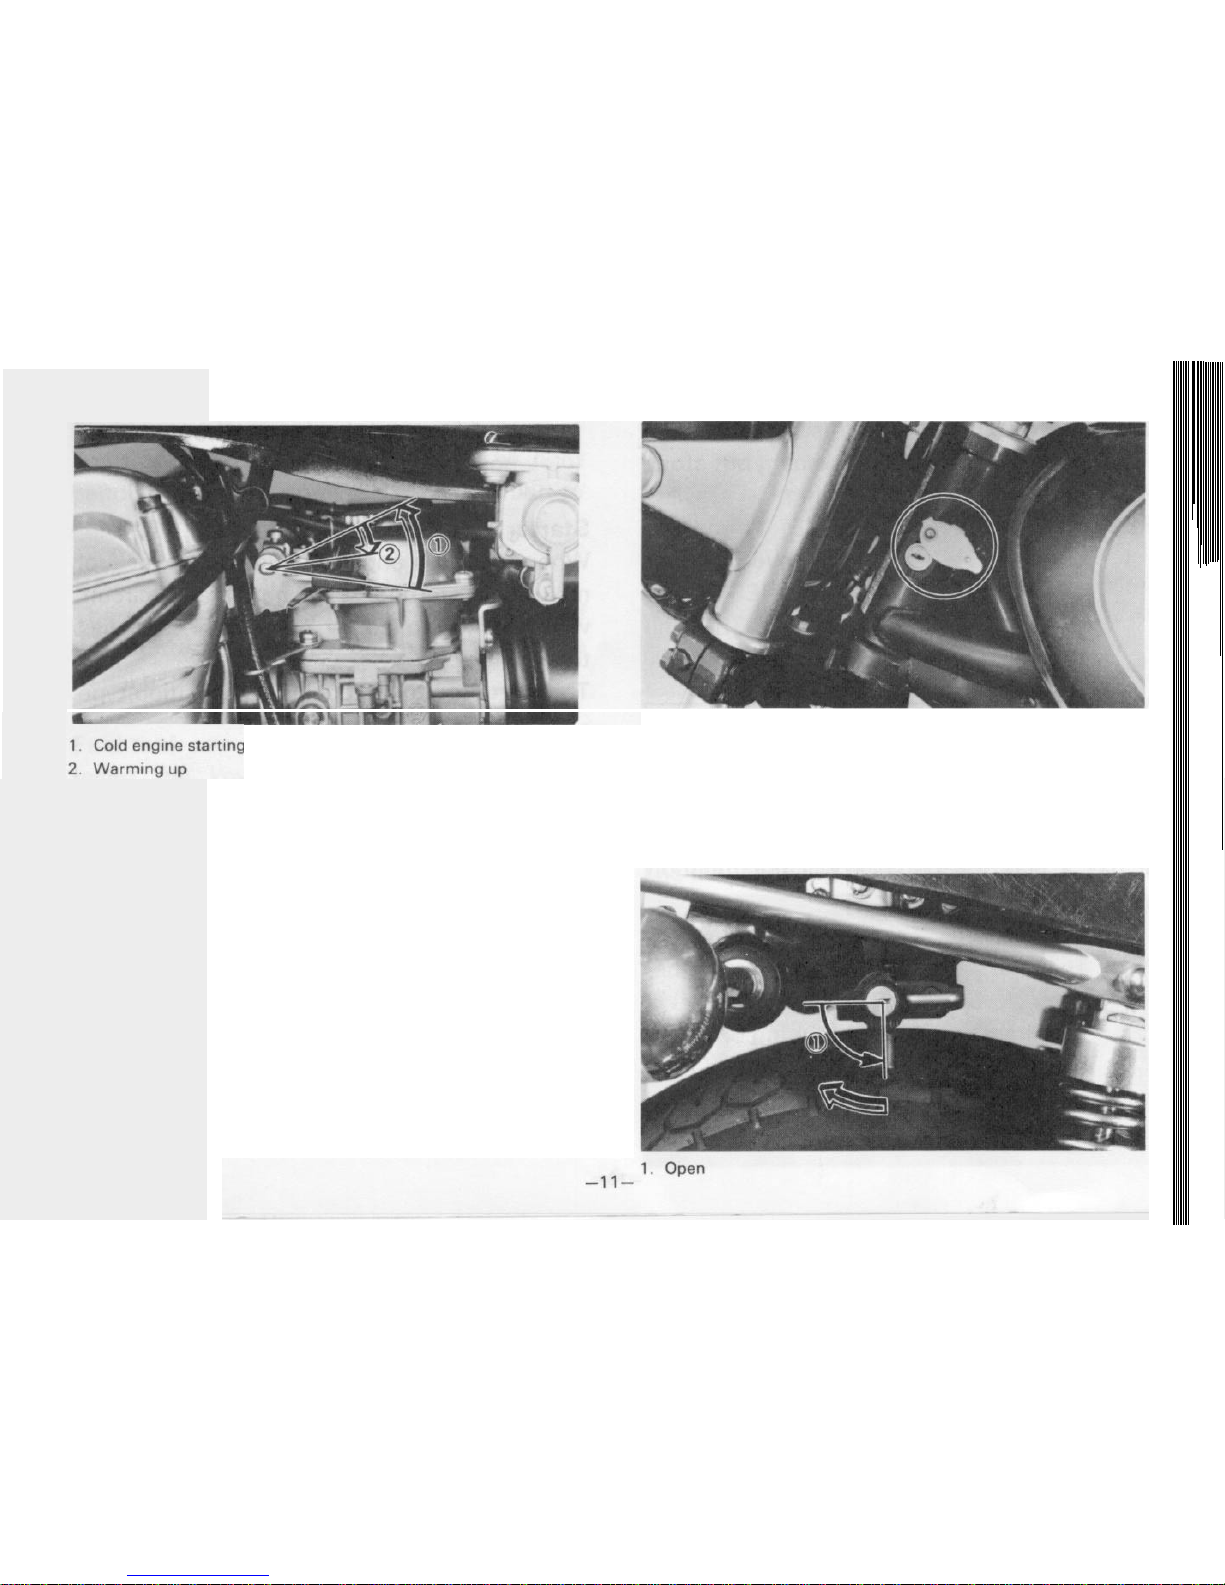
Starter (CHOKE)
When cold, the engine requires a richer fuel
mixture for starting. A separate starter circuit,
which is controlled by the starter, supplies
this mixture.
The starter on this model is a
2-position
type
as follows:
1.
Pull the starter fully up.
-When starting a cold engine.
2.
Push back the starter half-way.
-When warming up the engine.
NOTE:
Refer to “Starting and warming up a cold
engine” for proper operation.
Steering lock
To lock the steering, turn the handlebars fully
to the right, insert the key into the steering
lock and turn the key about
l/8
turn coun-
terclockwise. Then push the key in and turn it
about
l/8
turn clockwise. After checking if
the lock is engaged, remove the key from the
lock. To release the lock. reverse the above
steps.
Seat lock
To open the seat lock insert the key in the
lock and turn it counterclockwise and pull the
lever backwards.
In reinstalling the seat. insert the lobes on
the seat front into the receptacles on the
frame, then push down the seat at the end.
After making sure the seat is securely fitted,
turn the key clockwise to the center position
to lock.
Helmet holder
To open the helmet holder. insert the key in
the lock and turn it clockwise.
To lock the helmet holder, replace the holder
in the original position.
Never ride with a helmet in the helmet
holder. It could interfere with rear wheel
movement, causing loss of control and
possibly an accident.
Side cover (Left and Right)
To remove the right side cover, pull out the
bottom of the cover. To reinstall the cover.
make sure the top of the cover is securely
seated on the hinge hooks, then push the
bottom of the cover into its snap fitting.
-12-
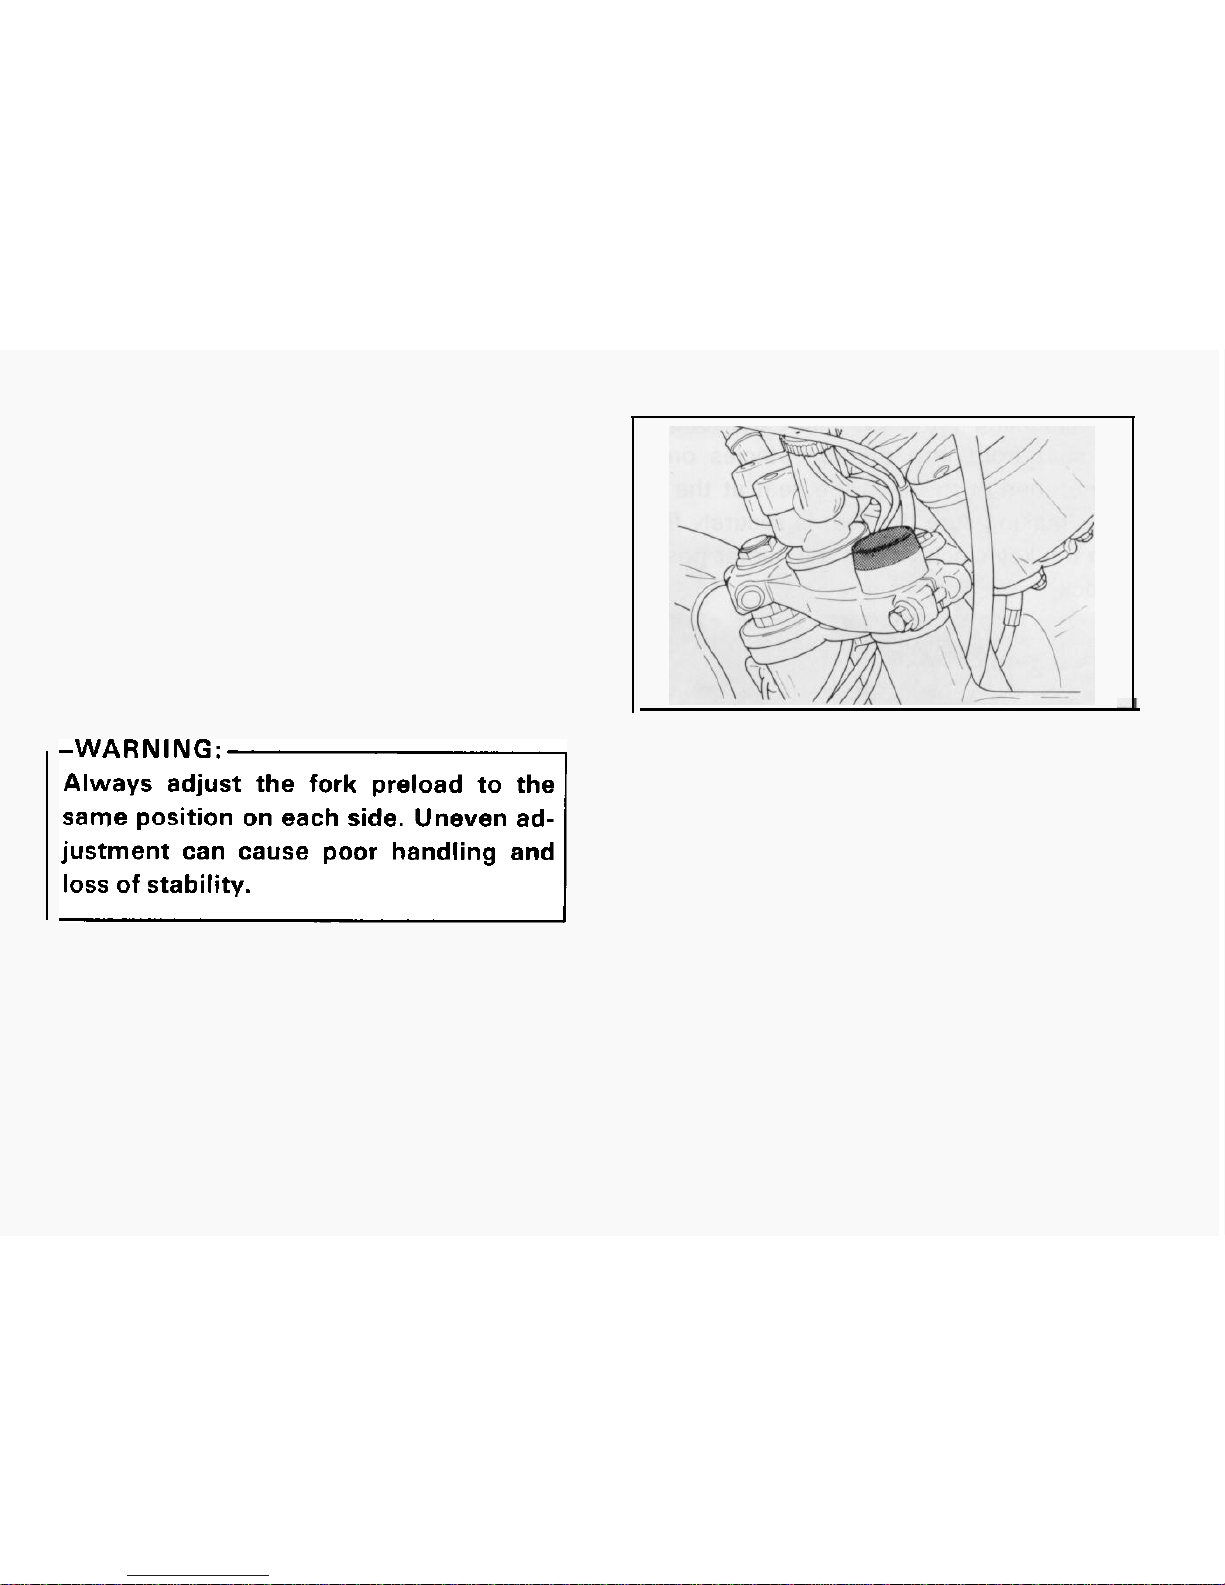
Front forks
The front forks of this model are
pneumomechanical; namely, a combination air and mechanical coil spring in the inner tube provides
suspension best suited to the motorcycle’s
load
(ex:
optional accessories etc.) and riding
conditions by the adjustment of the air pressure. Refer to page 54 for proper adjustment
procedures.
Always adjust the fork preload to the
same position on each side. Uneven ad-
::::::b::
justment can cause poor handling and
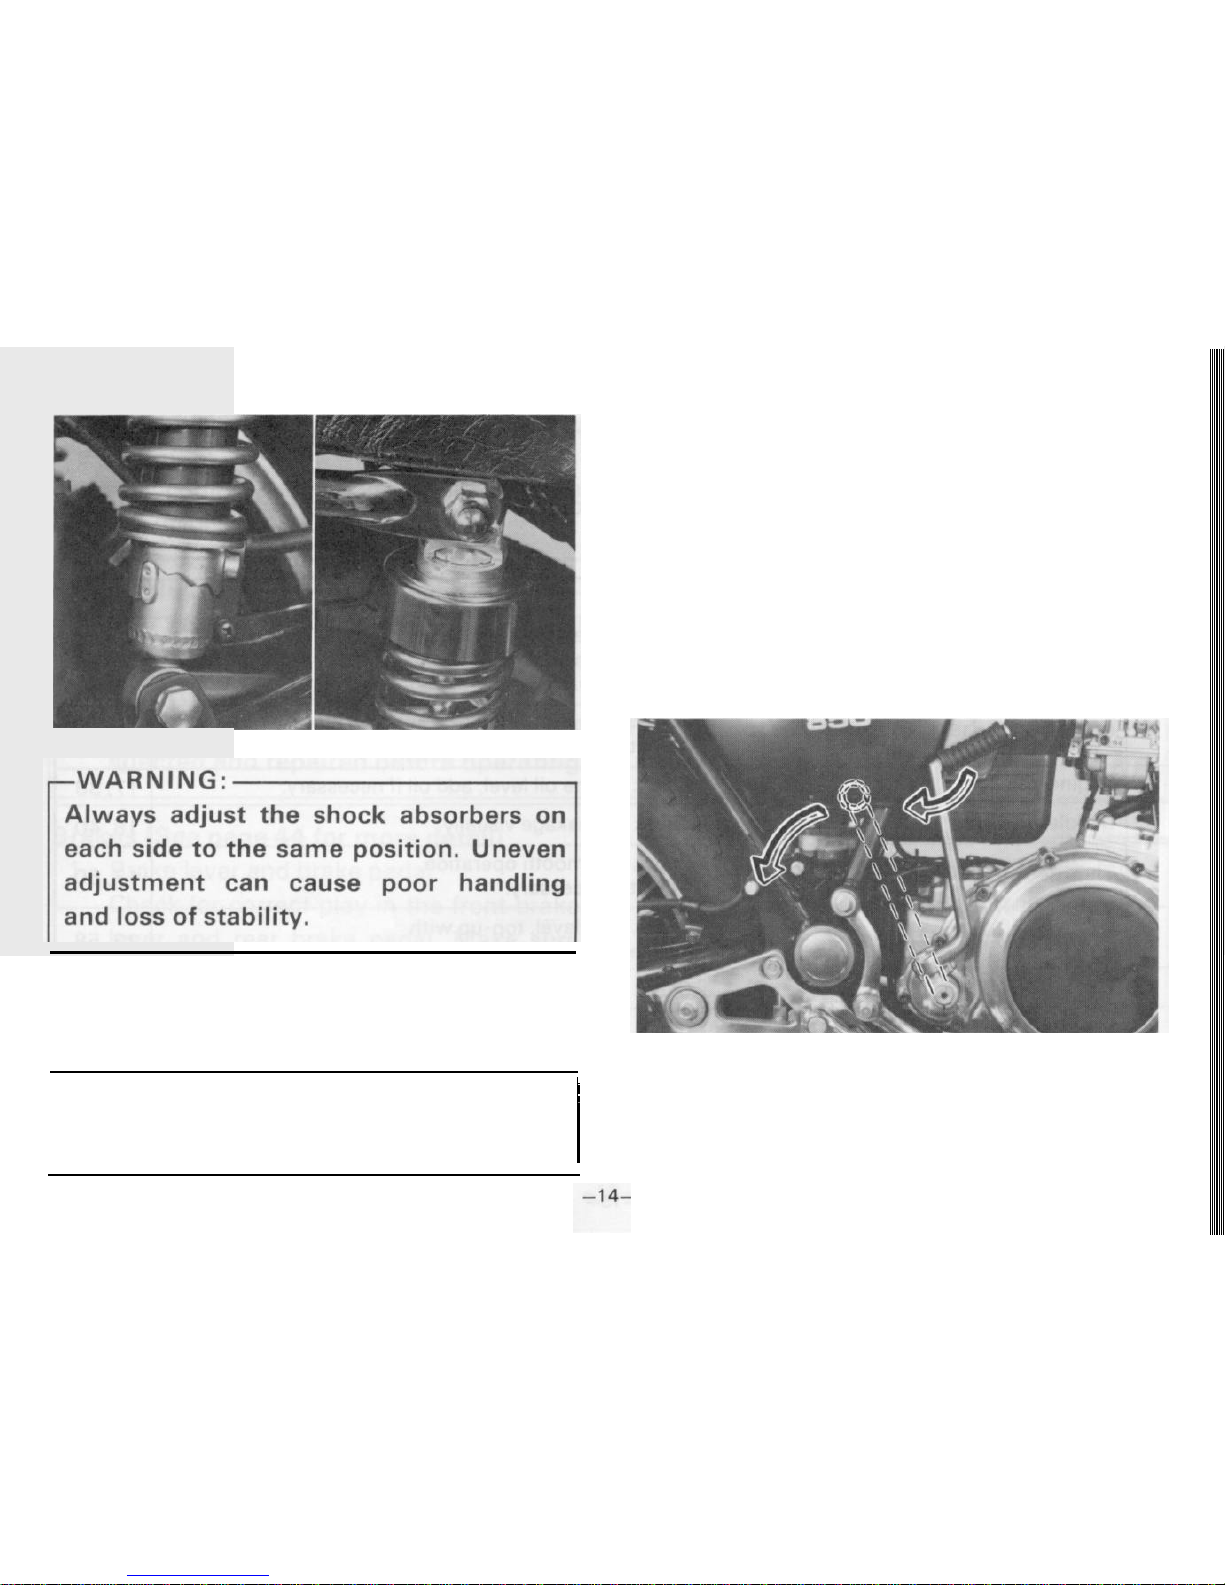
Rear shock absorber
The spring preload and the damping force
can be adjusted to suit motorcycle load (ex:
optional accessories etc.) and riding conditions. Refer to page 54 for proper adjustment
procedures.
-I3-
An optional heavy duty rear shock absorber spring is available for this model.
Please ask your nearby Yamaha dealer for
further details.
Kick starter
To start the engine. rotate the kick crank.
push down lightly with foot until gears
engage, and then kick forcefully. This model
cannot be started unless the transmission is
in neutral.
* Heavy duty rear shock absorber
spring: P/No.
3J2-22212-A0
i

PRE-OPERATION CHECKS (DAILY)
Before using this motorcycle check the following points:
No.
Item
Routine
Page
Check operation, free play and fluid.
1.
Brakes (Front and Rear)
Top-up with DOT.
#3
brake fluid 16.44
if necessary.
2. Clutch
3. Engine oil
4 Middle/final Gear Oil
5. Throttle
6. Battery
7. Lights/Signals
8. Wheels/Tires
9. Fittings/Fasteners
Check operation. condition and free play.
Adjust if necessary.
Check engine oil
level.
add oil if necessary.
Check for leakage visually.
Check for smooth operation.
Adjust if necessary.
Check
fluid level. top-up with
distilled water if necessary.
Check operation.
Check tire pressure. wear damage.
Check all chassis fittings and fasteners.
Adjust. if necessary.
17.49
17.38
18.40
17.50
23.58
22
18
37
-15-
Pre-operation checks should be made each time the motorcycle is used. Such an inspection
can be accomplished in a very short time, and the added safety it assures is more than worth
the time involved.
. . . . .._.._ -.
1. The engine, exhaust pipe(s), and muffler(s) will be vary hot after the engine has
been run. Be careful not to touch them or to allow any clothing item to contact
them during inspection
or
repair.
2. If any item in the PRE-OPERATION CHECK is not working properly, have it inspected and repaired before operating the motorcycle.
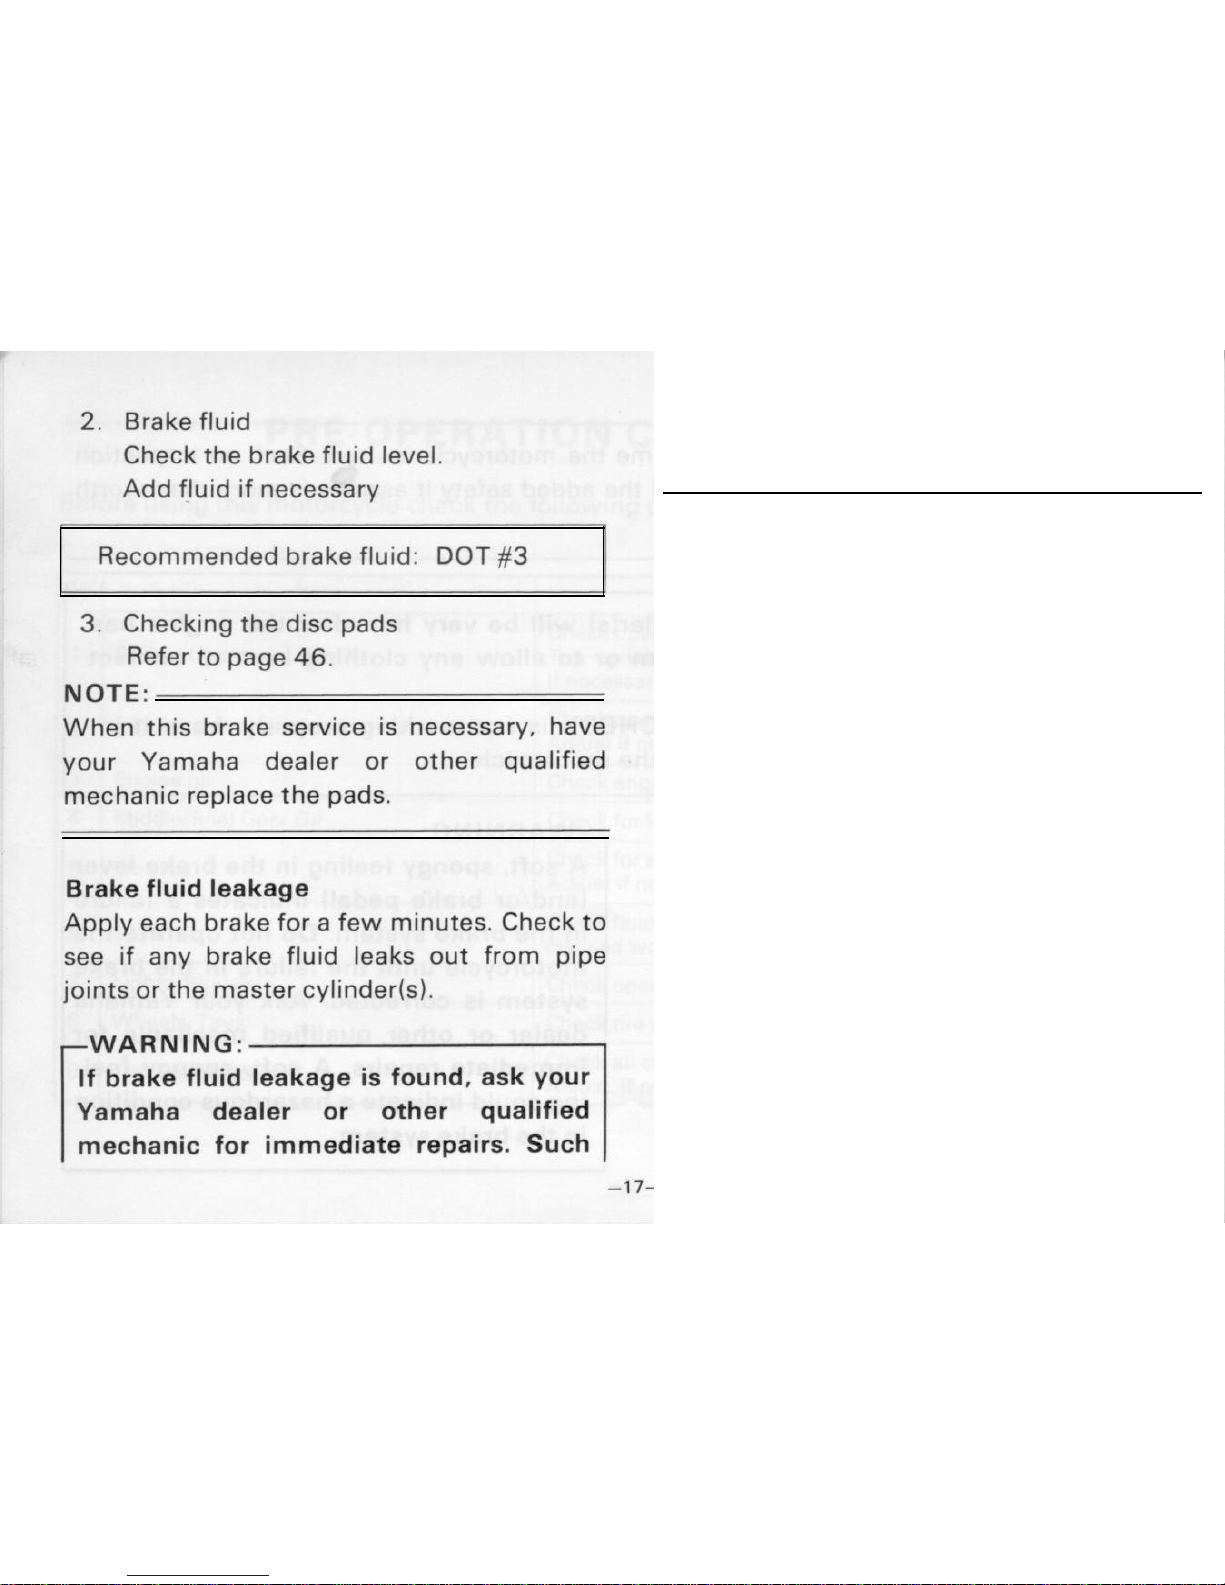
Brakes (See page 44 for more detail)
1.
Brake lever and brake pedal
Check for correct play in the front brake
lever and rear brake pedal. Make sure
they are working properly. Check the
brakes at low speed shortly after starting out.
-16-
-WARNING:
A soft, spongy feeling in the brake lever
(and/or brake pedal) indicates a failure
in the brake system. Do not operate the
motorcycle until the failure in the brake
system is corrected. Ask your Yamaha
dealer or other qualified mechanic for
immediate repairs. A soft, spongy feel-
ing could indicate a hazardous condition
in the brake system.
leakage could indicate a hazardous condition in the brake system.
Clutch (See page
49
for more detail)
Check for correct play in the clutch lever and
make sure the lever operates properly.
If the play is incorrect, make an adjustment,
Throttle grip (See page 50 for more detail)
Turn the throttle grip to see if it operates
properly and if the play is normal. Make
certain the throttle springs closed when released.
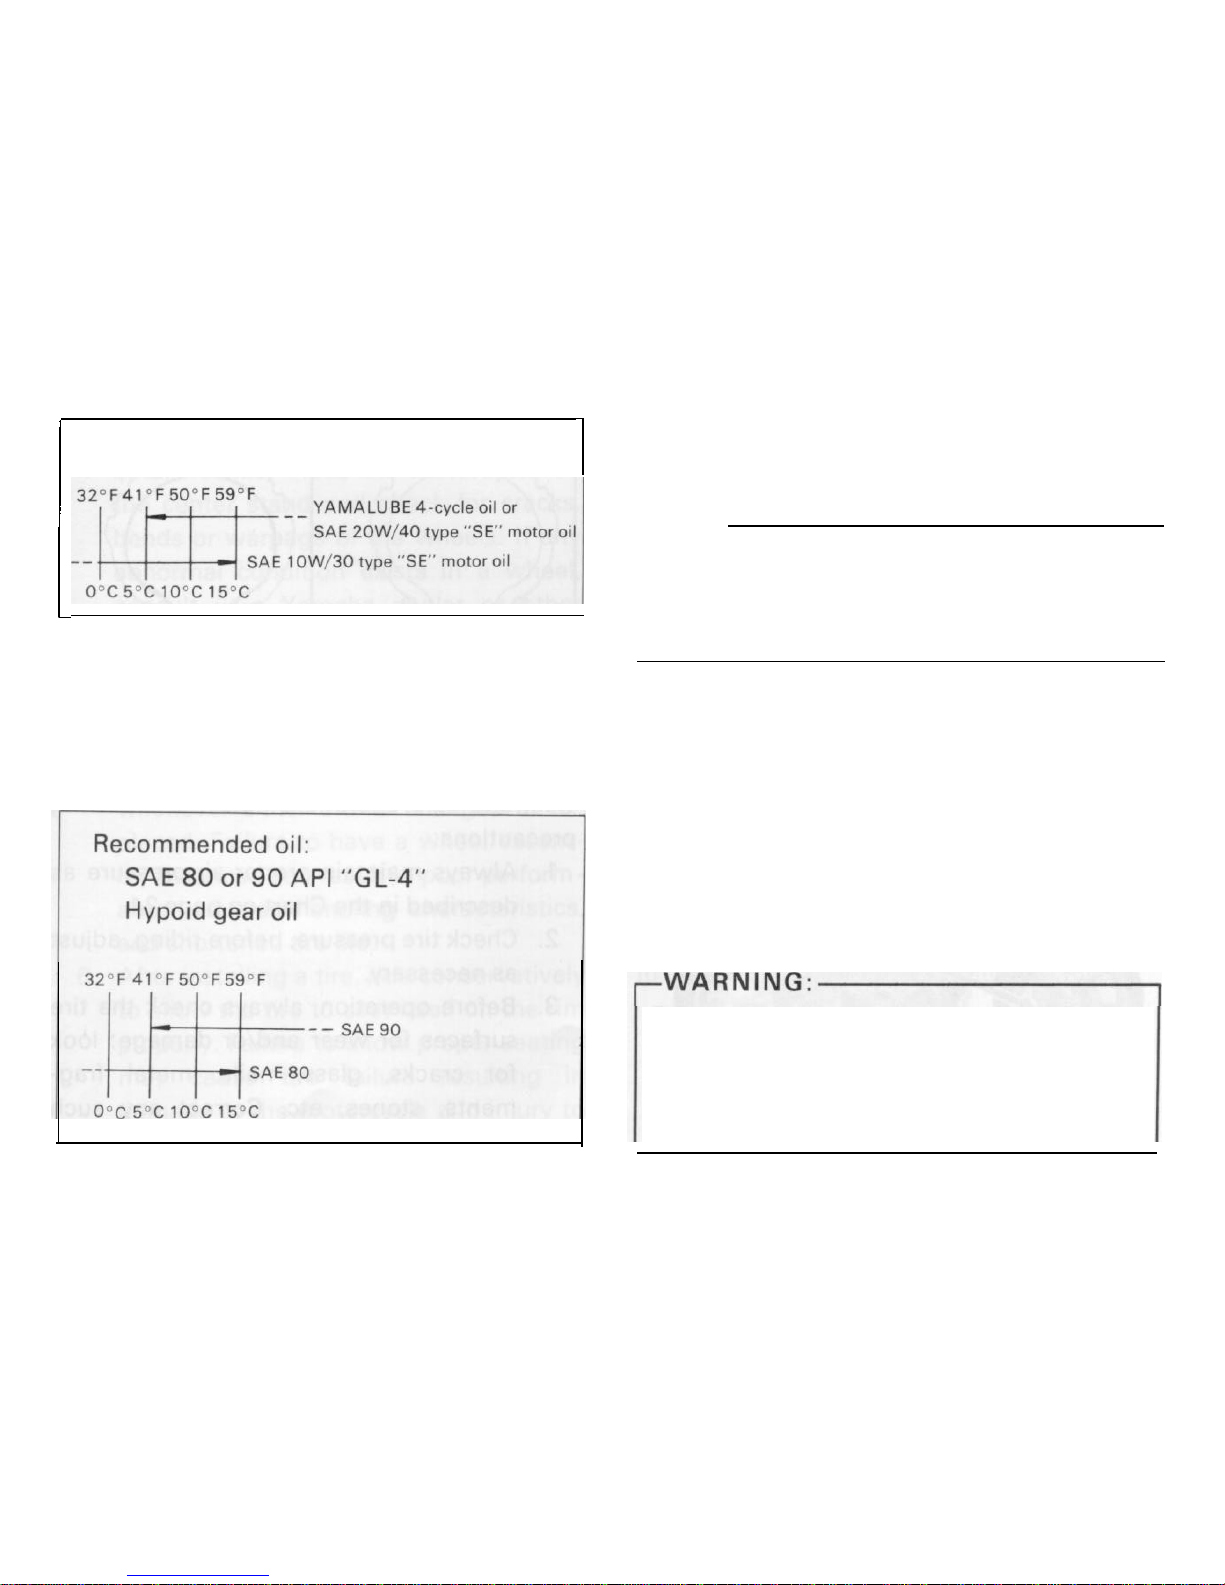
Engine oil (See page 38 for more detail)
Make sure the engine oil is at the specified
level. Add oil as necessary.
I
1
Recommended oil:
I
Middle gear/Final gear oil (See page 40 for
more detail)
Make sure the middle gear/final gear oil is at
the specified level. Add oil as necessary.
If desired, an SAE
80W/90
hypoid gear oil
may be used for all conditions.
NOTE:
“GL-4” is a quality and additive rating. “GL-
5” or “GL-6” rated hypoid gear oils may also
be used.
TUBELESS TIRES AND ALUMINUM
WHEELS
This motorcycle is equipped with aluminum
wheels designed to be compatible with
either tube or tubeless tires.
Tubeless tires are installed as standard
equipment.
Do not attempt to use tubeless tires on
a wheel designed for use only with tube-
type tires. Tire failure and personal in-
jury may results from sudden deflation.

Tubeless-type Wheel
--t
Tube-type
rWARNING:-
When using tube-type tires be sure to
install the proper tube also.
To insure maximum performance, long service, and safe operation, note the following
precautions:
1.
2.
3.
Always maintain proper air pressure as
described in the Chart on page 21.
Check tire pressure. before riding. adjust
as necessary.
Before operation, always check the tire
surfaces for wear and/or damage: look
for cracks, glass, nails, metal frag-
ments, stones, etc. Correct any such
hazard before riding.
-19-

4. Always inspect the aluminum wheels
before a ride. Place the motorcycle on
the center stand and check for cracks,
bends or
warpage
of the wheels. If any
abnormal condition exists in a wheel,
consult your Yamaha dealer or other
qualified mechanic. Do not attempt
even small repairs to the wheel. If a
wheel is deformed or cracked, it must
be replaced.
5. Tires and wheels should be balanced
whenever either one is changed or replaced. Failure to have a wheel assembly balanced can result in poor performance, adverse handling characteristics,
and shortened tire life.
6. After installing a tire, ride conservatively
to allow the tire to seat itself on the rim
properly. Failure to allow proper seating
may cause tire failure resulting in
damage to the motorcycle and injury to
the rider.
7. After repairing or replacing a tire, check
to be sure the valve stem lock nut is
securely fastened. If not, torque it as
specified.
Tightening torque: 0.15 m-kg (1
.1
ft-lb)
The standard equipment tires originally fitted
to the
XS850G
are suited to normal riding
and touring. They are not suited for sustained
high speed running or racing and must not be
used for such purposes. Consider your riding
skill, road and weather conditions, and correct weight distribution when loading your
motorcycle. Securely pack your heaviest
items close to the center of the motorcycle.

-WARNING:
1. This motorcycle is not designed to
pull a trailer or to be attached to a
sidecar. The accessories you choose
for your motorcycle should be designed specifically for it and should
be securely mounted in such a
fashion as to maintain the inherent
stability of the original design as
much as possible. Yamaha has a full
line of sport and touring accessories
designed specifically for this motorcycle. Please consider them before
making a purchase. Use of non-ap-
proved accessories may cause loss
of handling stability and riding safety. Consult your Yamaha dealer or
other qualified mechanic regarding
the consequences of using such
items.
2. Proper loading of your motorcycle is
important for the handling, braking,
I
and other performance and safety
characteristics of your motorcycle.
NEVER OVERLOAD YOUR MOTORCYCLE. Make sure the total
weight of the accessories, and etc.,
does not exceed the maximum load
limites. Operation of an overloaded
motorcycle could cause tire damage,
an accident, and injury.
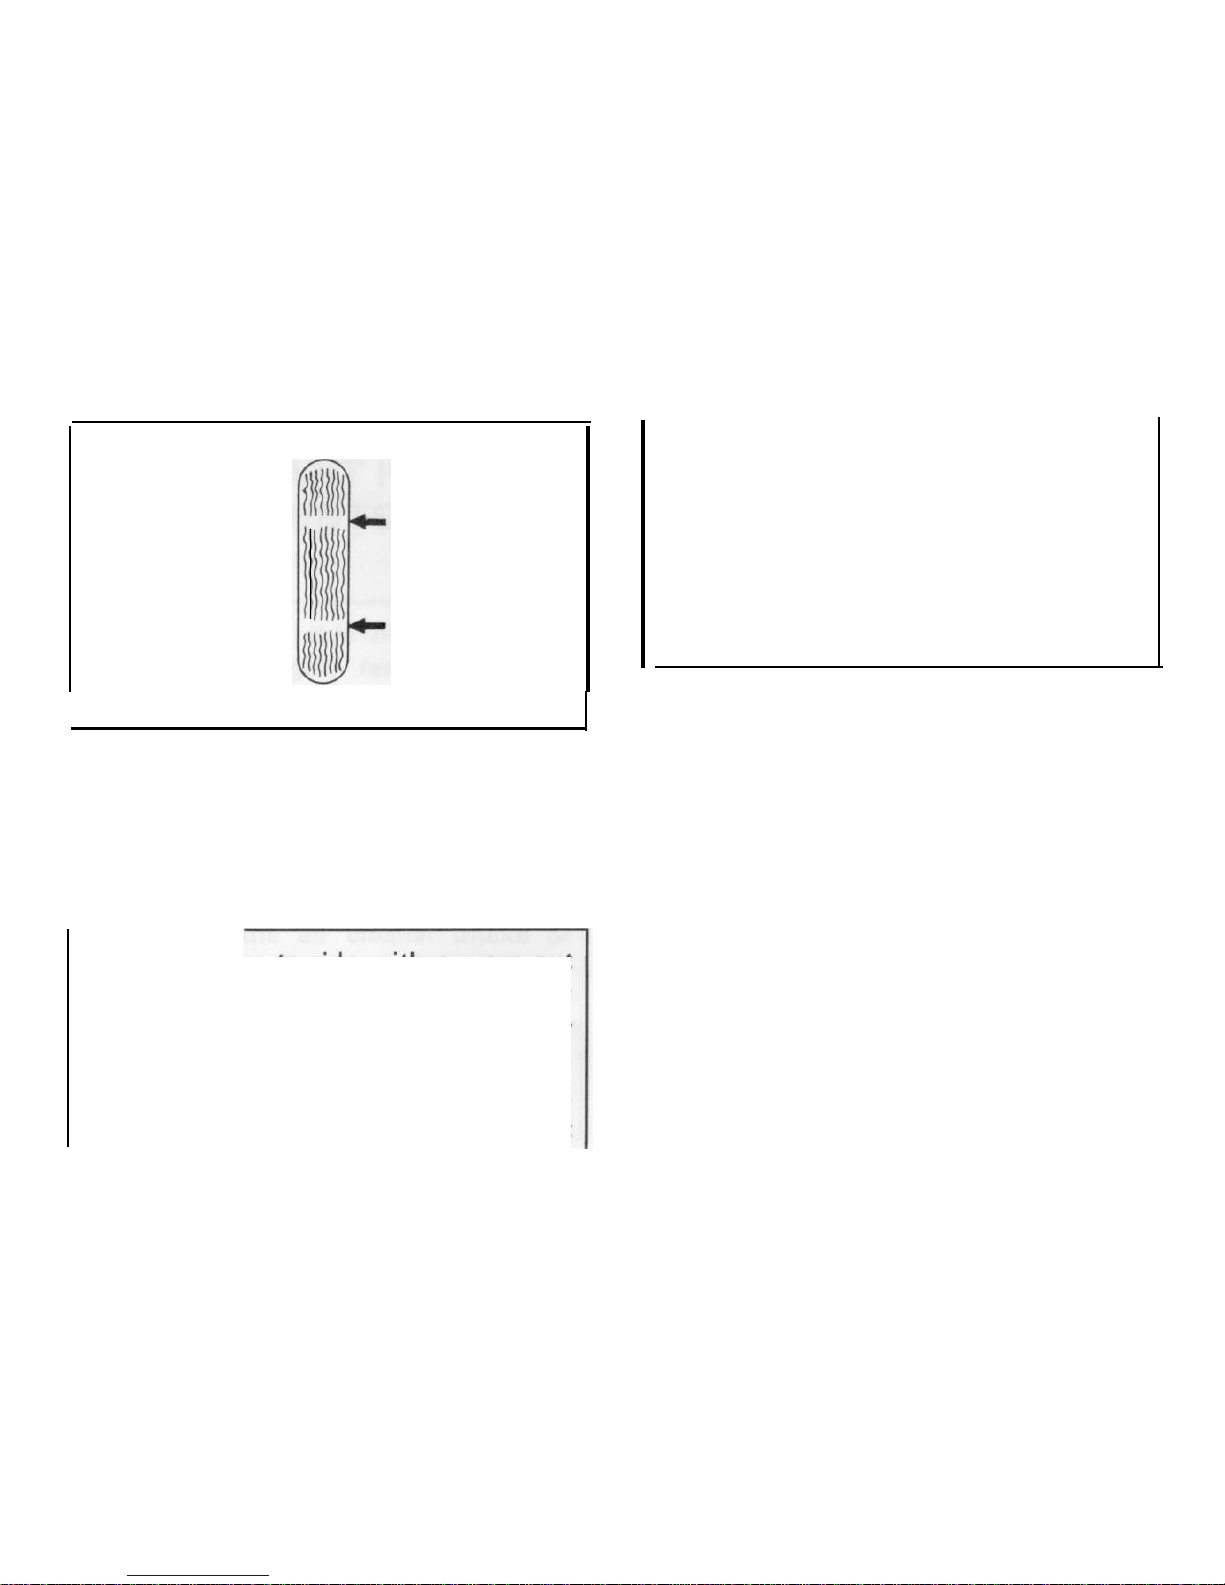
If a tire tread shows crosswise lines, it means
that the tire is worn to its limit. Replace the
tire.
-WARNING:
It is dangerous to ride with a worn-out
tire. When a tire tread begins to show
lines. Have Your Yamaha dealer or other
qualified mechanic replace the tire immediately. Brake pad replacement, tire,
and related wheel parts replacement
should be left to a Yamaha Service
Technician or other qualified mechanic.
If you must change your own tire, be
sure to use proper tools and procedures
as described in the Tubeless Tire and
Wheel Manual available from Your
Yamaha dealer.
Fittings/Fasteners
Always check the tightness of chassis fittings
and fasteners before a ride. Use the chart on
page 37 to find the correct torque.
Lights and signals
Check the headlight, flasher lights, taillight,
brake light, meter lights and all the indicator
lights to make sure they are in working con-
dition.
-22-
Switches
Check the operation of the headlight switch,
turn switch, brake light switch, horn button,
main switch, etc.
Battery (See page 58 for more detail)
Check fluid level and top-up if necessary.
Use only
distilled
water if refilling is neces-
sary.
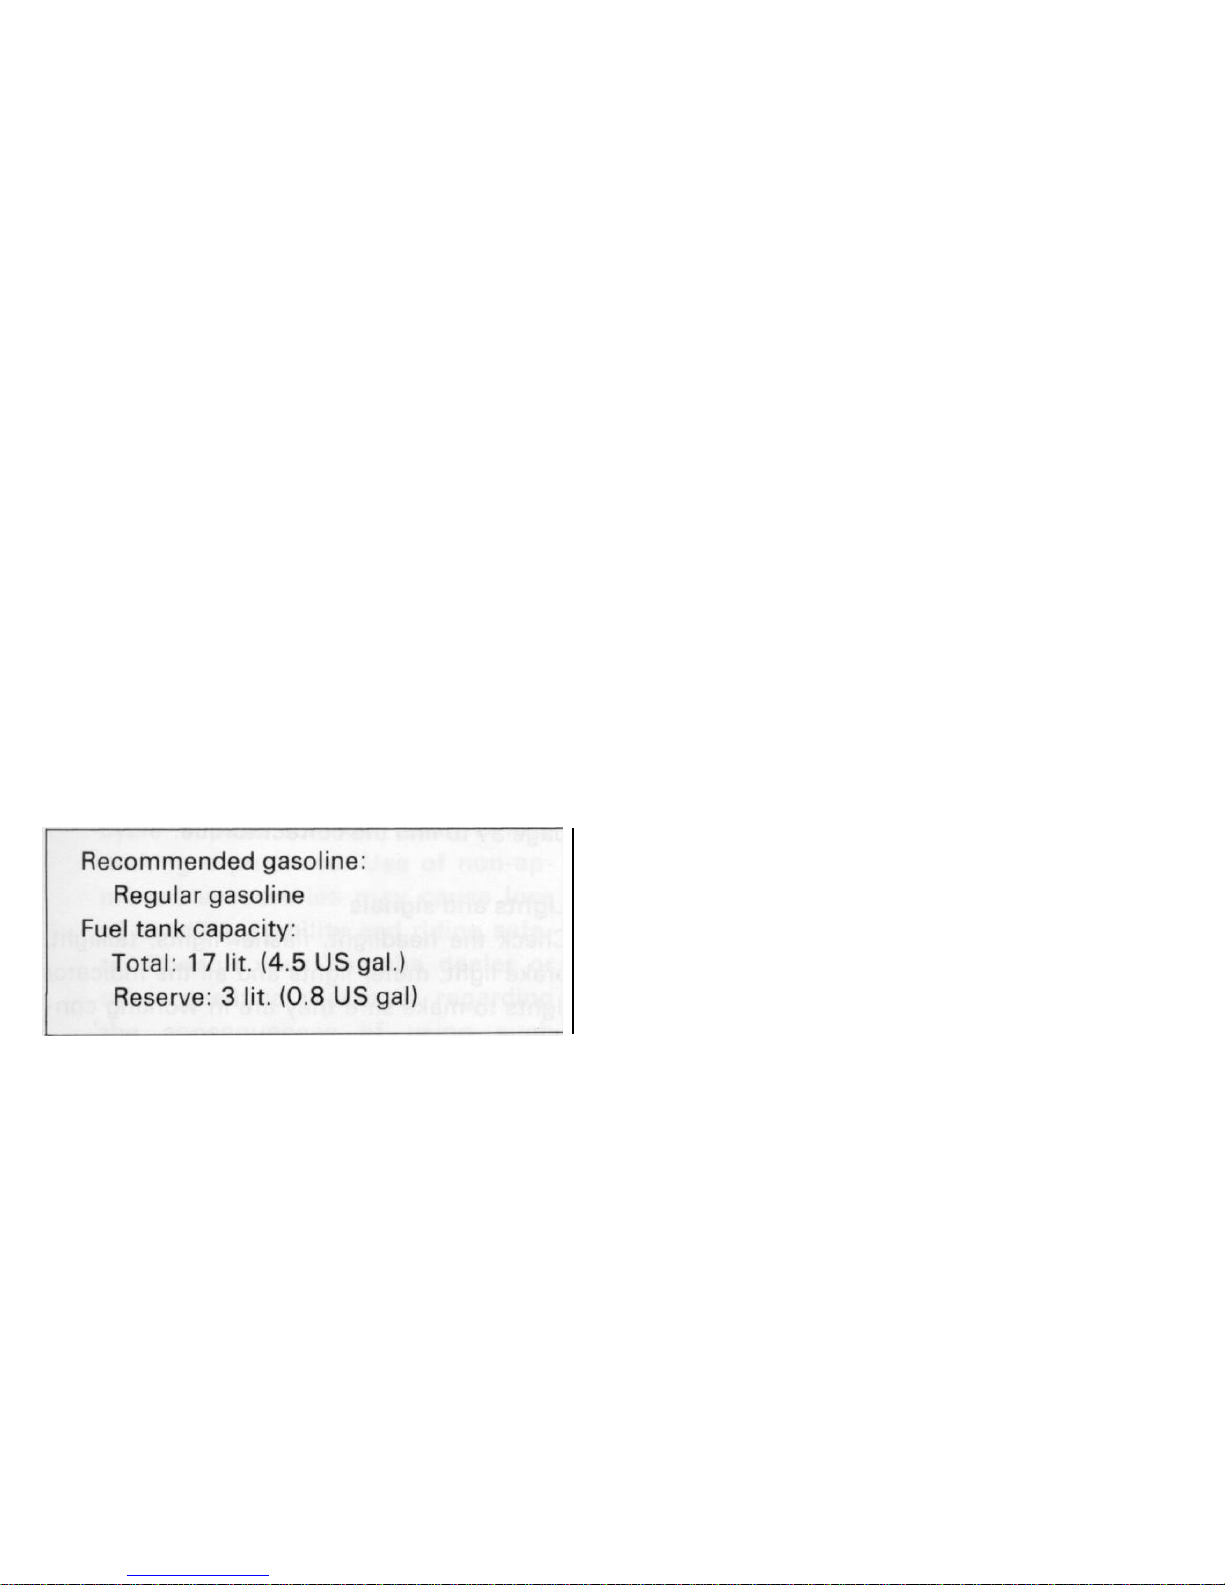
Fuel
Make sure there is sufficient fuel in the tank.
-23-
 Loading...