

YAMAHA TX81Z User Manual

®
YAMAHA
AUTHORIZED
PRODUCT MANUAL
FM TONE GENERATOR

YAMAHA
FM TONE GENERATOR
OWNER’S MANUAL

INTRODUCTION
Thank you for purchasing the Yamaha TX81Z FM Tone Generator. The TX81Z
is an 8-note polyphonic FM tone generator that can act as up to 8 independent
instruments. It can be used in many ways, both simple and complex. First, you will
probably want to try out the preset voices. The simple instructions on the next page
tell you how. Then, to get an idea of the full range of possibilities, read “How Does
the TX81Z Work?”. Detailed explanations of each mode follow. The chapter entitled “Ideas and Suggestions” has some interesting ways to use the TX81Z. Various
supplementary reference materials are also included.
CONTENTS
INTRODUCTION
CONTENTS
FEATURES
SIMPLE PLAYING INSTRUCTIONS
CONNECTIONS
ADJUST VOLUME
SELECT VOICES 4
TX81Z PRESET VOICENAMES
HOW DOES THE TX81Z WORK?
FRONT/REAR PANEL
PLAY SINGLE
STORE VOICE
SINGLE EDIT
EDITING PROCEDURE
COMPARE 13
SINGLE UTILITY
PLAY PERFORMANCE
STORE PERFORMANCE 36
PERFORMANCE EDIT
EDIT PROCEDURE
THE PERFORMANCE EDIT BUFFER
PERFORMANCE UTILITY
11
11
12
12
24
35
37
37
42
37
1
1
2
3
3
3
4
5
7
OTHER FUNCTIONS
IDEAS AND SUGGESTIONS
DX21/DX27/DX100 COMPATIBILITY
MICRO TUNING DATA TABLE
WAVEFORM HARMONIC CONTENT
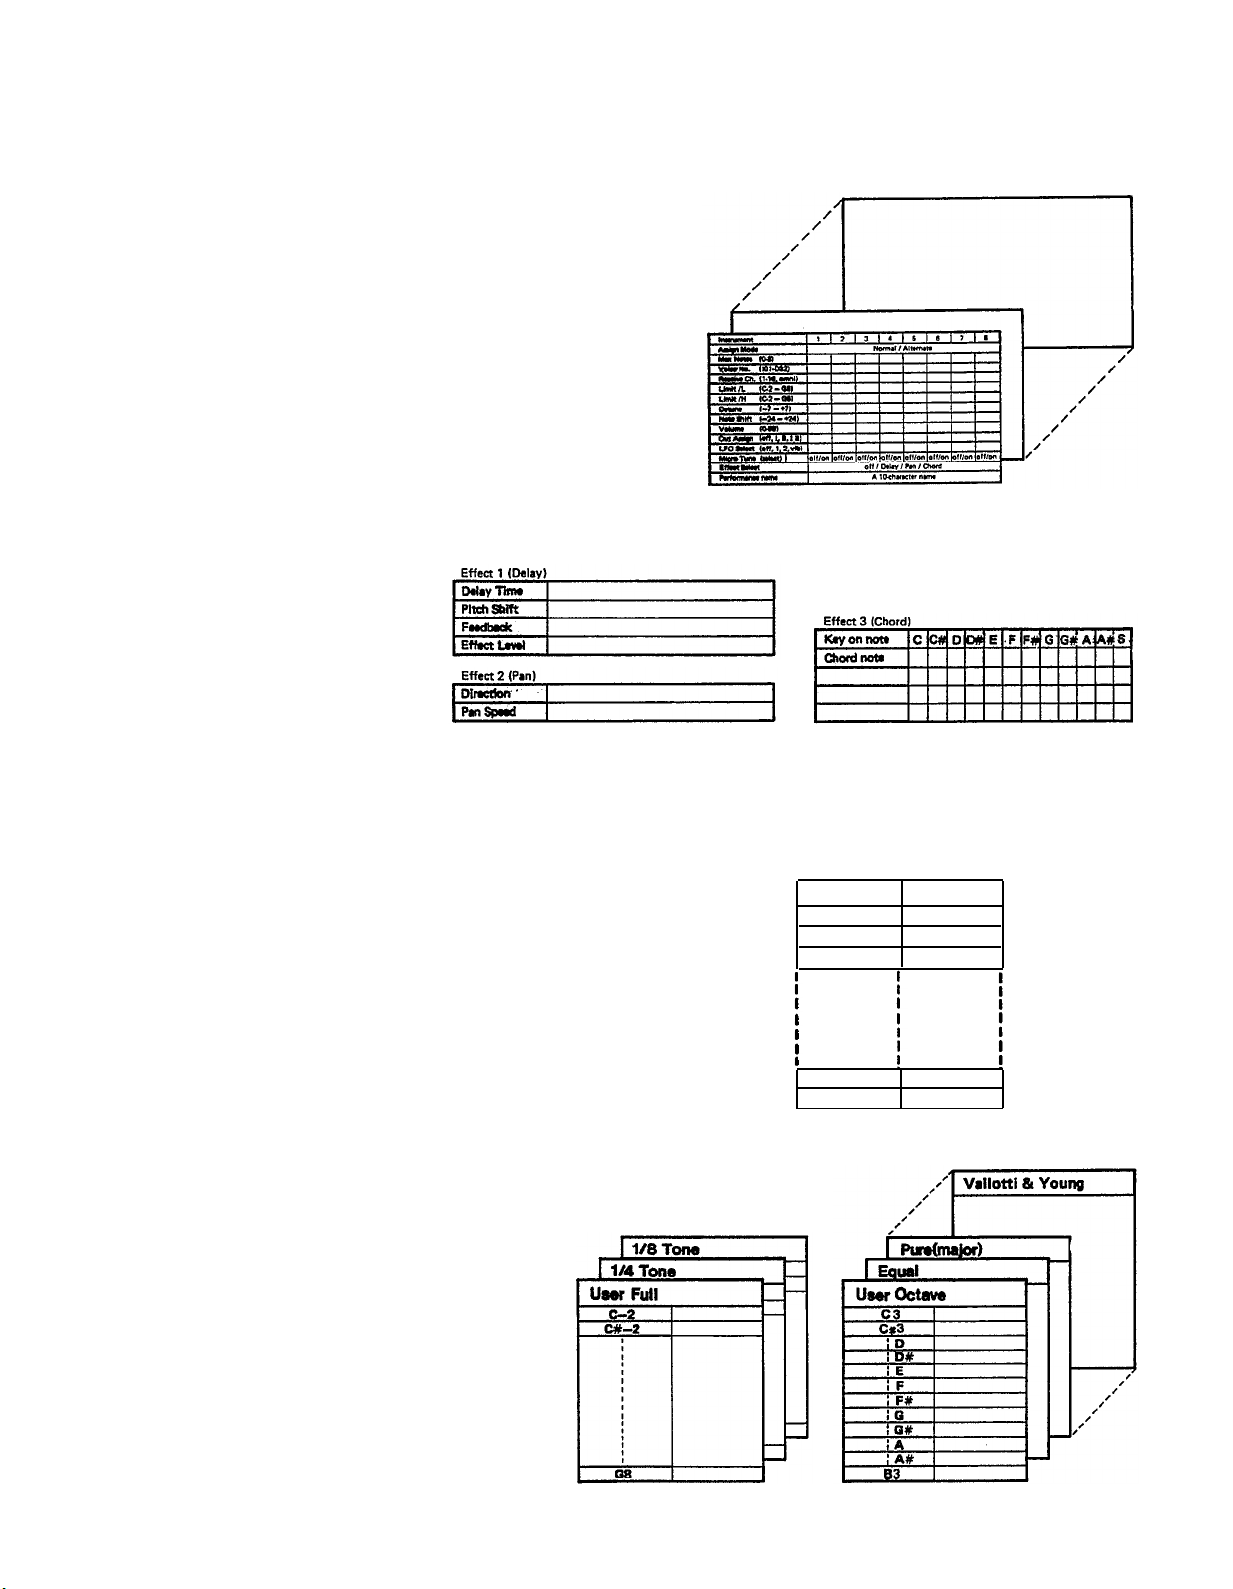
PERFORMANCE DATA
PERFORMANCE MEMO CHART
VOICE DATA LIST
MIDI RECEPTION/TRANSMISSION
SYSTEM EXCLUSIVE DATA FORMAT
PARAMETER CHANGE MESSAGES
BULK DATA MESSAGES
DUMP REQUEST MESSAGES
SPECIFICATIONS
MIDI IMPLEMENTION CHART
WHAT’S MIDI?
MIDI MESSAGES
WHAT’S FM?
INDEX
46
47
48
49
50
51
63
64
65
67
67
68
70
78
79
80
82
83
86

FEATURES
*Produces up to 8 different voices simultaneously, making it ideal for use with a MIDI sequence recorder.
*Voices and all memory parameters can be edited from the front panel. No separate programming device or
computer is necessary.
*New LSI tone generator chip can perform FM synthesis using a total of 8 different waveforms.
*“Pseudo-reverb” effect programmable for each voice.
*Either Fixed or Ratio frequencies are selectable for each operator.
*Two independent LFOs and a Vibrato Generator.
*While voice and function data is compatible with DX21/27/27S/100 voice data, the sound quality has been
upgraded, and the resolution of the EGs has been improved.
*128 ROM factory preset voices.
*32 user-programmable voice memories.
*24 user-programmable performance memories.
*13 Microtonal Scales (2 user-programmable and 11 preset).
*Pan, Single Note Chord, and Transposed Delay effects.
*Save and load TX81Z memory data to and from a cassette.
*Transmit and receive TX81Z memory data via MIDI.
*Program Change Table for re-directing program change messages.
*Alternate Voice Assign lets you play a different voice with each successive note.
–2–
SIMPLE PLAYING INSTRUCTIONS
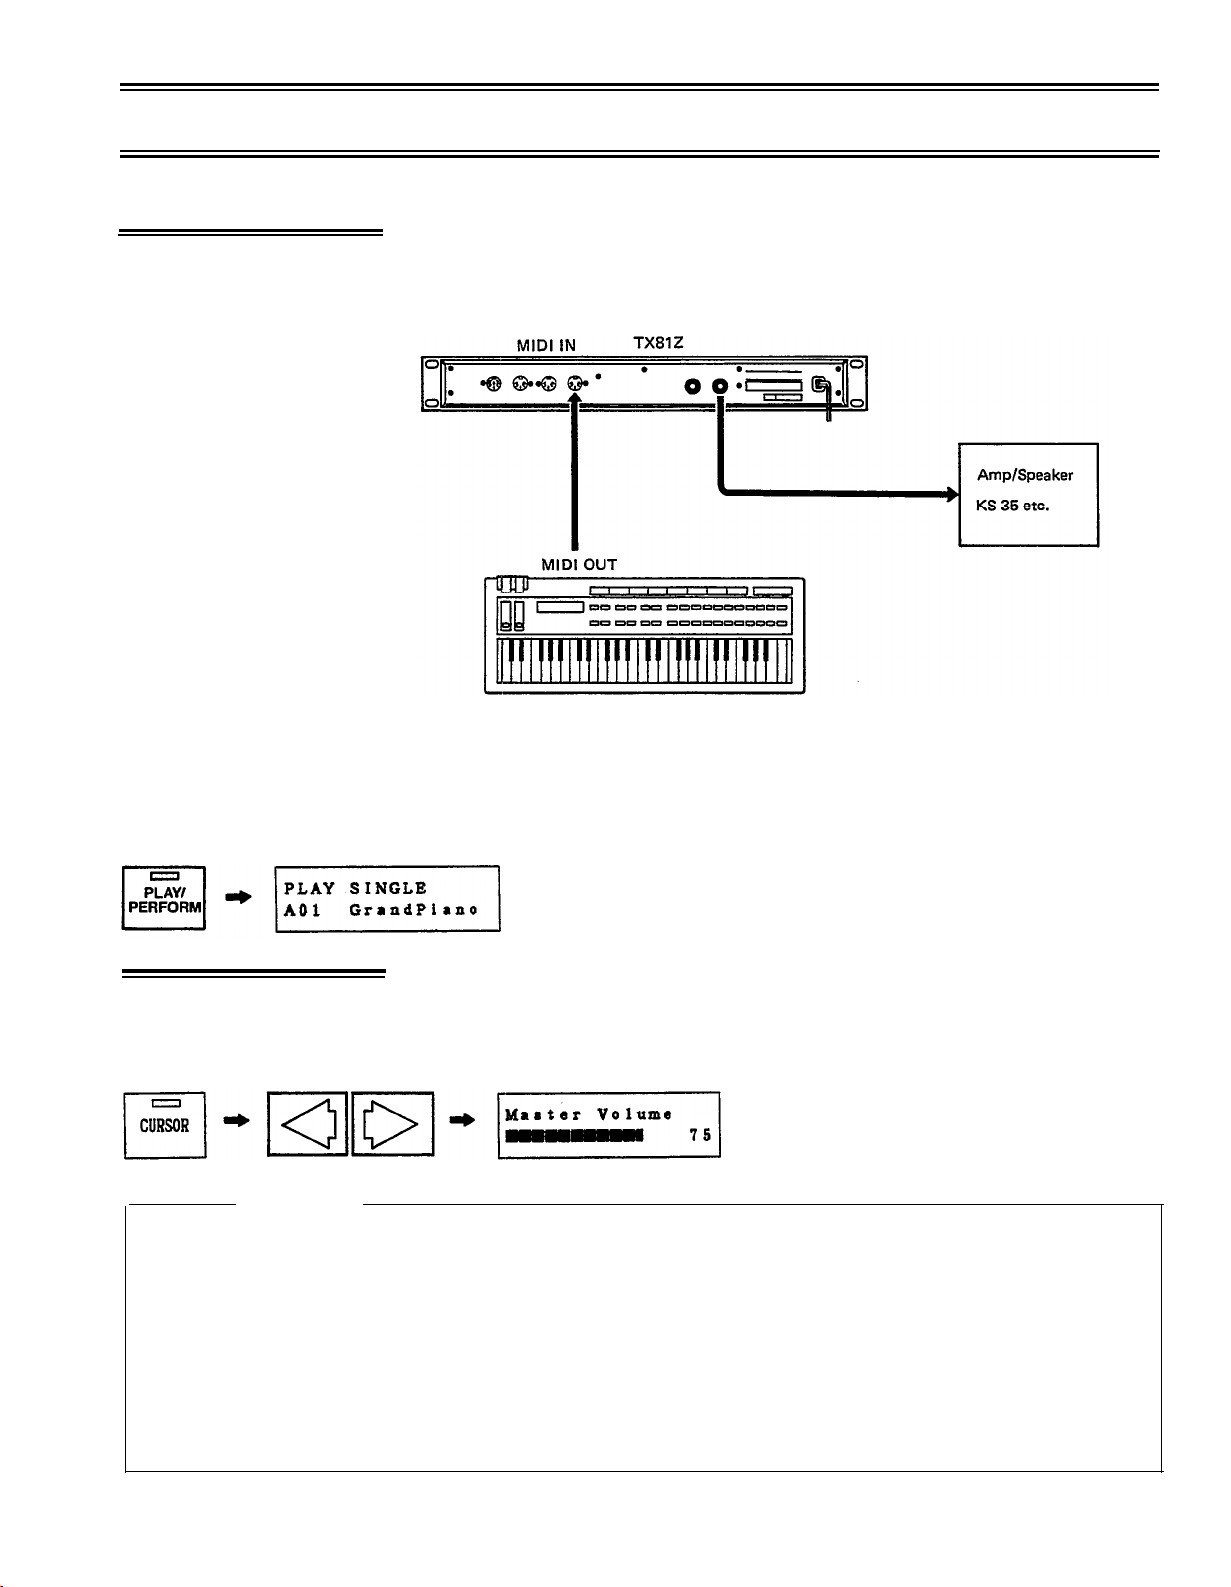
CONNECTIONS
Connect the MIDI OUT of your keyboard to the TX MIDI IN, and connect
the audio output of the TX to an amp/speaker system as shown. Set the
transmission channel of your keyboard to channel 1 (see the owner’s manual
for your keyboard).
When you turn the TX81Z power on, it will flash each LED, display “*YAMAHA TX81Z* <Good morn-
ing!!>” for a few seconds (this greeting can be changed, see p.46), and then display whatever function was
selected when the power was turned off. Press SINGLE/PERFORMANCE to make the display read “PLAY
SINGLE”. (You may have to press it twice,)
Press once or twice
Playing the keyboard should produce sound. Adjust the TX81Z output volume
ADJUST VOLUME
LED is off
*Perhaps the TX81Z MIDI Receive Channel does not match the Transmit Channel of your keyboard.
Press UTILITY to get the “UTILITY MODE” display. Use the PARAMETER keys to get the “Midi
Control?” display and press “YES” to get “Basic Rcv.Ch=xx”.
channel to match the MIDI output channel of your keyboard (or set it to “omni” so it will receive all
channels).
MASTER VOLUME
If no sound
by pressing the MASTER VOLUME keys. The LCD will show a bar graph
indicating the volume. (To adjust volume, the CURSOR LED must be off.)
Use the DATA ENTRY keys to set the
*It is possible that the voice is set so that its volume is regulated by a controller such as Foot Controller
or Breath Controller. If your keyboard has a volume control slider or a Foot Controller, try moving them
up to max position.
–3–

SELECT VOICES
TX81Z PRESET
VOICENAMES
The TX81Z has 5 banks of 32 voices. Banks A-D contain factory preset voices.
(When the unit is shipped, bank “I” contains selected voices from bank A-D.)
Use the PARAMETER keys to select banks I, A, B, C, D. Use the DATA
ENTRY keys to select voices 1-32 in each bank.
10
11
12
13
14
15
16
17
18
19
20
21
22
23
24
25
26
27
28
29
30
31
32
1
2
3
4
5
6
7
8
9
BANK A
GrandPiano
Uprt Piano
Deep Grd
HonkeyTonk
Elec Grand
Fuzz Piano
SkoolPiano
Thump Pno
LoTine81Z
HiTine81Z
ElectroPno
NewElectro
DynomiteEP
DynoWurlie
Wood Piano
Reed Piano
PercOrgan
16842F
PumpOrgan
<6 Tease>
Farcheeza
Small Pipe
Big Church
AnalogOrgn
Thin Clav
EZ Clav
Fuzz Clavi
LiteHarpsi
Rich Harpsi
Celeste
BriteCelst
Squeezebox
10
11
12
13
14
15
16
17
18
19
20
21
22
23
24
25
26
27
28
29
30
31
32
1
2
3
4
5
6
7
8
9
BANK B
Trumpet81Z
Full Brass
FlugelHorn
ChorusBras
French Horn
AtackBrass
SpitBoneBC
Horns BC
MelloTenor
RaspAlto
Flute
Pan Floot
Basson
Oboe
Clarinet
Harmonica
DoubleBass
BowCello
BoxCello
SoloViolin
HiString 1
LowString
Pizzicato
Harp
ReverbStrg
SynString
Voices
HarmoPad
FanfarTpts
HiString 2
PercFlute
BreathOrgn
10
11
12
13
14
15
16
17
18
19
20
21
22
23
24
25
26
27
28
29
30
31
32
BANK C
1
NylonGuit
2
Guitar # 1
3
TwelveStrg
4
Funky Pick
AllThatJaz
5
6
HeavyMetal
7
Old Banjo
8
Zither
9
ElecBass 1
SqncrBass
SynFunkBas
ElecBass 2
AnalogBass
Jaco Bass
LatelyBass
Monoph Bass
StadiumSol
TrumptSoIo
BCSexyPhon
Lyrisyn
WarmSquare
Sync Lead
MellowSqar
Jazz Flute
Heavy Lead
Java Jive
Xylophone
GreatVibes
Sitar
Bell Pad
PlasticHit
DigiAnnie
10
11
12
13
14
15
16
17
18
19
20
21
22
23
24
25
26
27
28
29
30
31
32
1
2
VocalNuts
3
KrstlChoir
4
Metalimba
5
WaterGlass
BowedBell
6
7
> >WOW< <
8
9
Spc Midiot
Gurgle
Hole in 1
Birds
MalibuNite
Storm Wind
Alarm Call
Whistling
Space Talk
Space Vibe
Timpani
Tube Bells
Noise Shot
Snare 1
Snare 2
Synballs
Efem Toms
BANK D
BaadBreath
Fuzzy Koto
Helicopter
Flight Sim
Brthbells
Racing Car
FM Hi-Hats
Bass Drum
Hand Drum
–4–
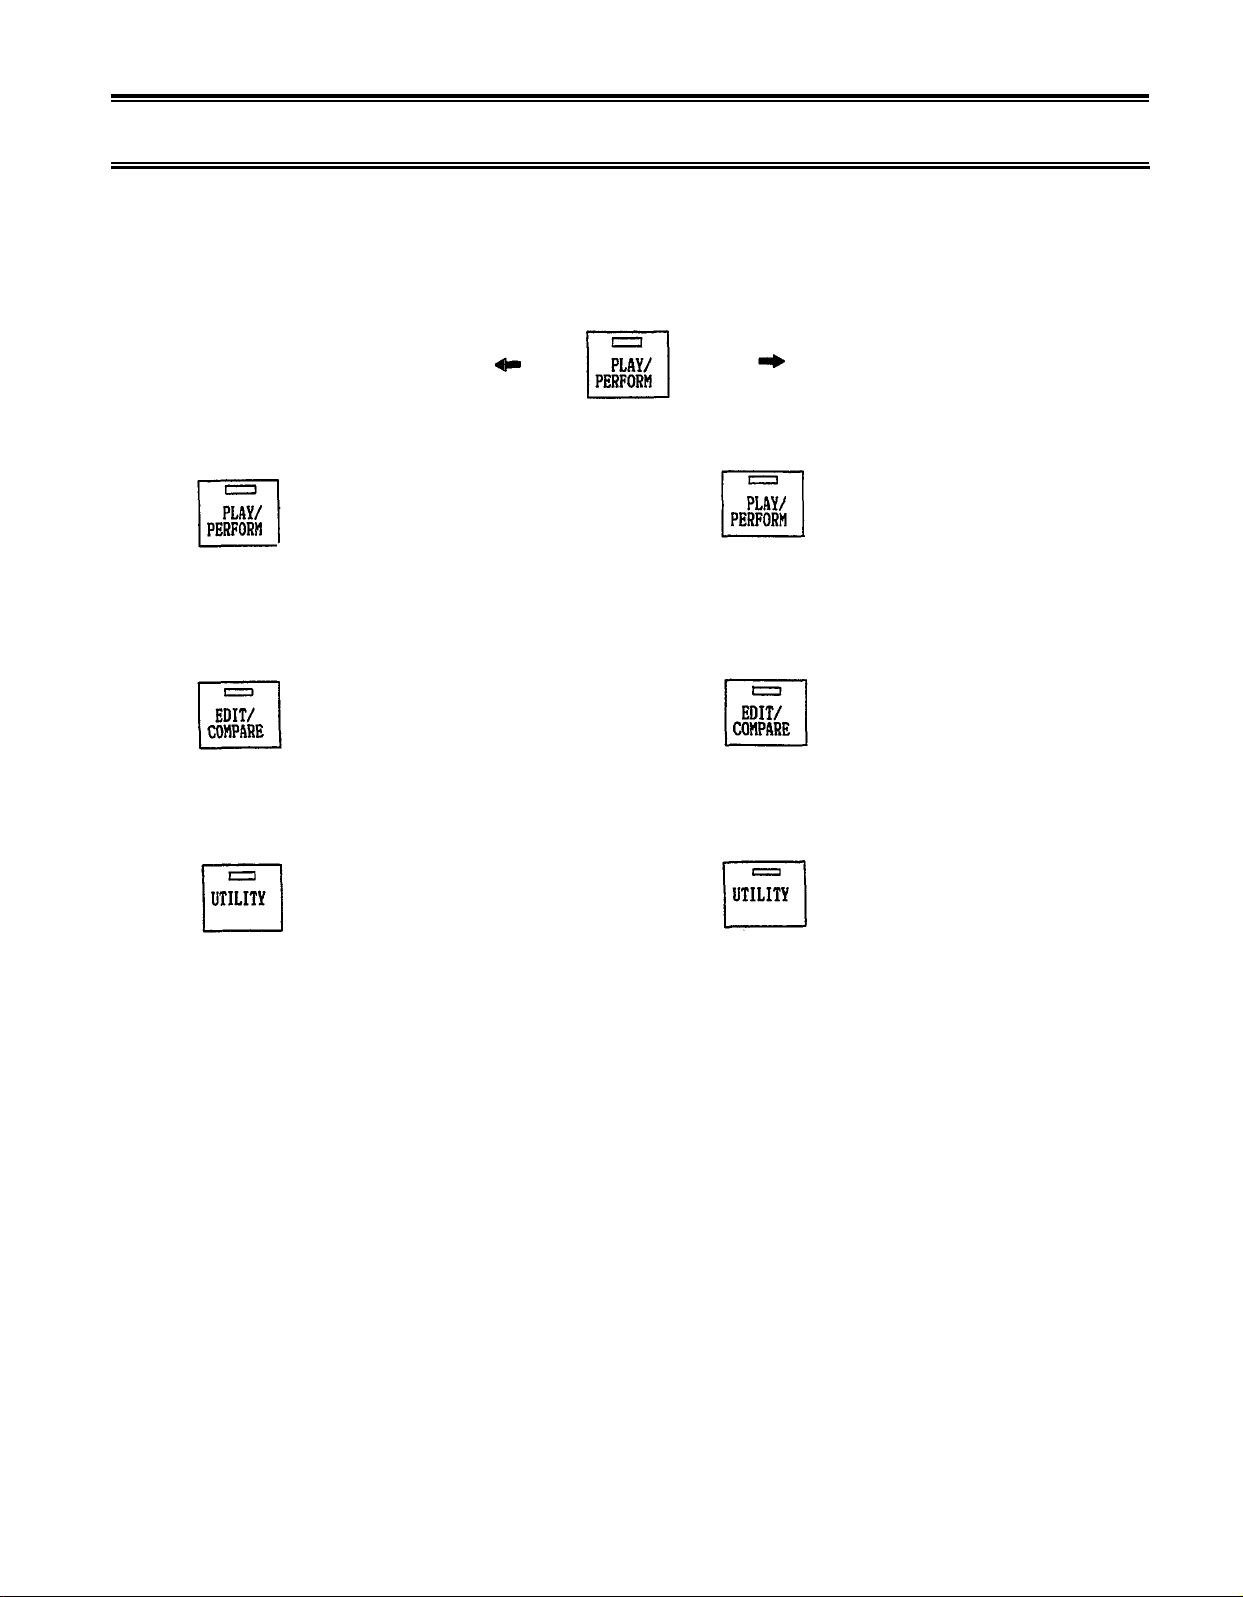
HOW DOES THE TX81Z WORK?
The TX81Z has two main modes. Each main mode has three “sub-modes”.
Press twice, remains lit.
SINGLE
PLAY (Single)
Select and play any
voice using chords of
up to 8 notes (p.11).
EDIT (Single)
Create your own voices
or modify an existing
voice (p.12).
UTILITY (Single)
*Save and load data (p.28).
*Set microtone tables (p.31).
*Set program change table (p.26).
*Set pan, delay and chord
effects (p.29).
*And other useful functions.
PERFORMANCE
PLAY (Performance)
The TX81Z acts as up to
8 independent instruments
as specified in the Performance
Memory that you select (p.35).
EDIT (Performance)
Change the settings of a
Performance Memory (p.37).
UTILITY (Performance)
*Set a Performance to a
basic setting (p.42).
*And other useful functions.
Here are the main memory areas inside the TX81Z.
Voice Memory (p.11)
There are 5 voice memory banks, each with 32 voices.
Banks A-D are preset, and cannot be changed. Bank
I is for you to store your own voices in.
–5–
Performance Memory (p.35)
Each performance memory can set the TX81Z to act
as up to 8 independent instruments, each controlled
on a different channel.
Effect Memory (p.29)
Each performance can use one of the three effects.
Program Change Table (p.26)
Incoming program change messages can select anything you want; voices or performance memories.
Microtune Tables (p.31)
You can use non-standard scales. 11 scales are preset.
The Octave and Full Settings are user programmable.
Program Change Table
Incoming
1
2 PF24
3
127
128
Selected
B19
A32
C14
I07
–6–
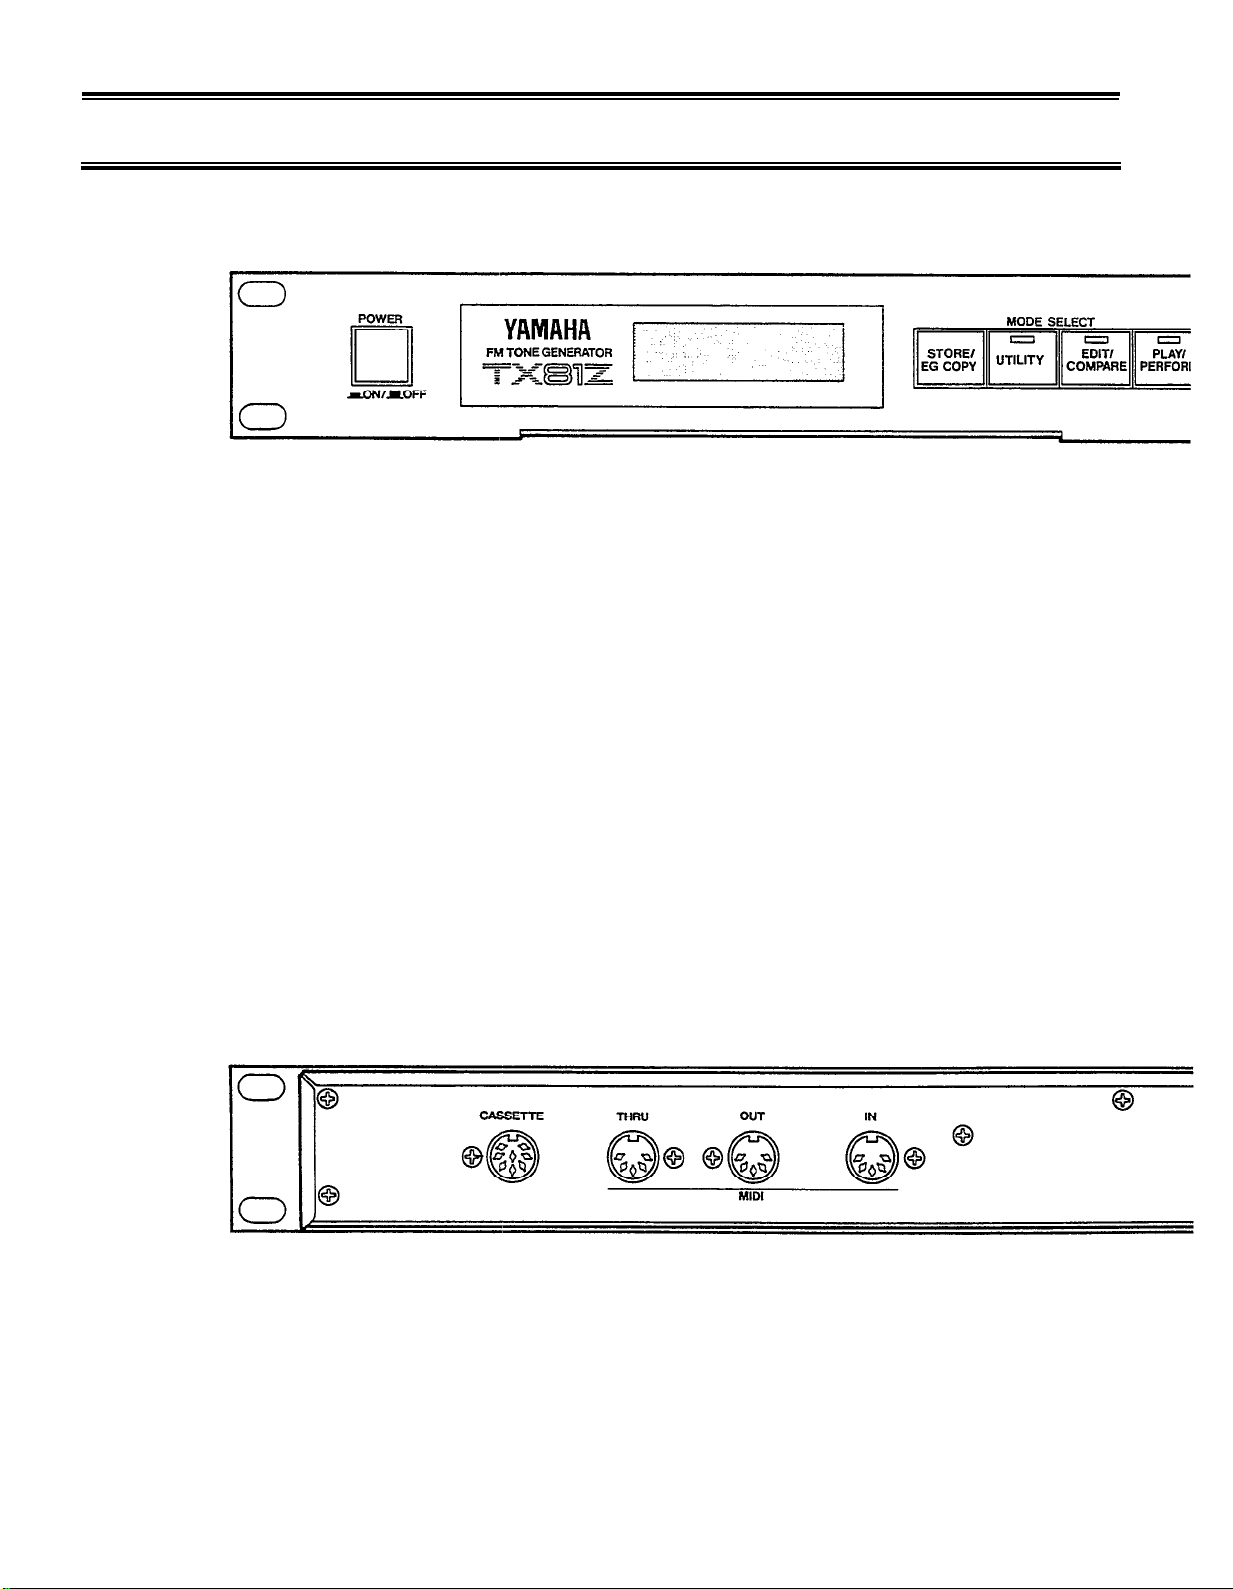
FRONT/REAR PANEL
FRONT PANEL
LCD
A two-row 16-character Liquid Crystal Display, back-lit for high visibility.
OPERATION GUIDE
A pull-out card lists the main operations of the TX81Z.
STORE/EG COPY
In PLAY/PERFORM mode, this is used to store voices or performances.
In SINGLE EDIT mode, it copies an Envelope setting from one operator to another.
UTILITY
This enters UTILITY mode, where you can save and load data, set up effects and microtonal scales, and
perform various other useful functions.
EDIT/COMPARE
In SINGLE mode, this enters SINGLE EDIT mode, and selects the edited voice or the original voice. The
blinking EDIT/COMPARE LED indicates that the original voice is selected. In PERFORMANCE mode, this
enters PERFORMANCE EDIT mode.
PLAY/PERFORM
When already in PLAY mode, this selects SINGLE or PERFORMANCE mode. If you have been in UTILITY
or EDIT, this will returns you to PLAY mode. The LED blinks to indicate an incoming note.
REAR PANEL
CASSETTE
Use the included cassette cable to connect this to a data cassette recorder for saving and loading TX81Z data.
MIDI THRU
All messages received at MIDI IN are re-transmitted unchanged from this terminal.
MIDI OUT
TX81Z bulk data can be sent from this terminal.
–7–
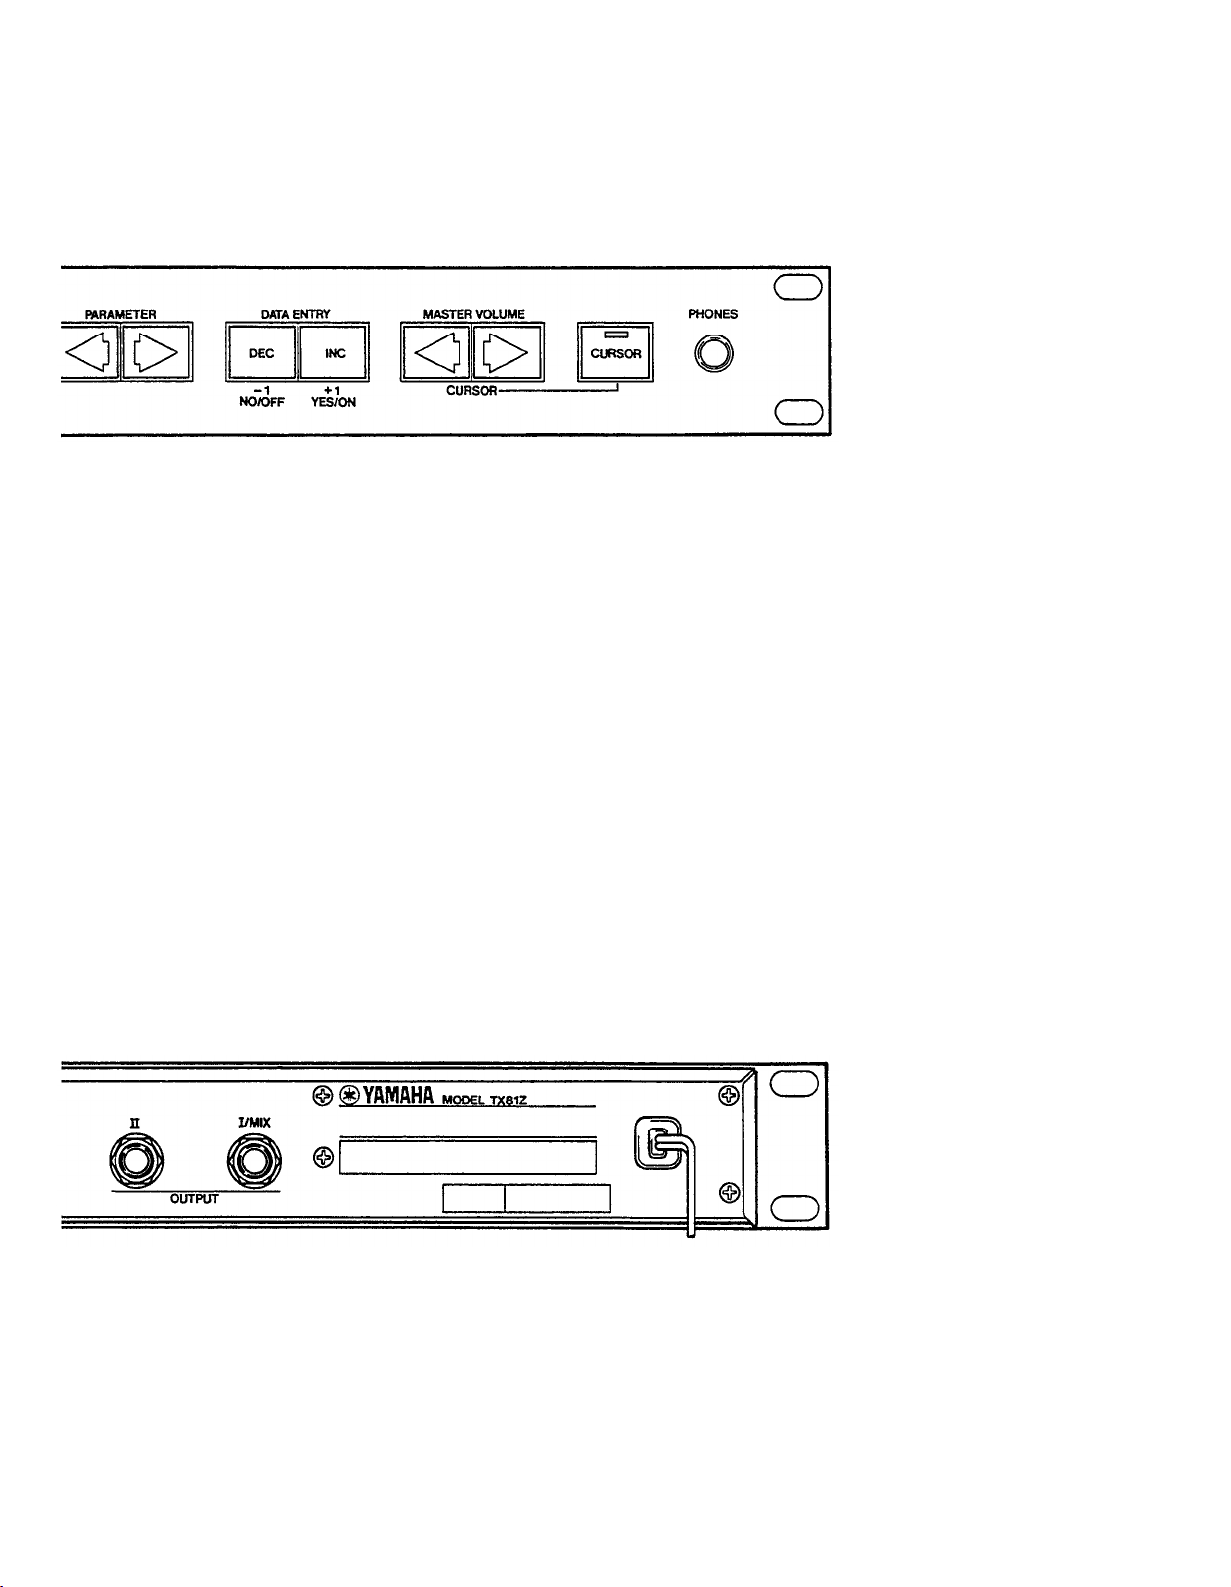
PARAMETER
In PLAY SINGLE mode, these select voice memory banks I, A, B, C, D.
In EDIT and UTILITY modes, they step through the parameters or jobs.
DATA ENTRY
In PLAY SINGLE mode, these select voices 1-32.
In PLAY PERFORMANCE mode, these select performances 1-24.
In EDIT and UTILITY modes, they are used to change settings or answer “No/Yes”.
MASTER VOLUME/CURSOR
When the CURSOR LED is off, these keys control the master volume of the entire unit. When the CURSOR
LED is on, these keys move the blinking cursor.
CURSOR
This selects the function of the MASTER VOLUME/CURSOR keys.
PHONES
A jack for standard stereo headphones. (The volume is controlled by MASTER VOLUME. See above.) Using
this jack will not affect the rear panel outputs. If output II is not plugged in, the phones will have a mono sig-
nal of both outputs mixed.
MIDI IN
MIDI messages coming into this terminal will make the TX81Z produce sound, and TX81Z bulk data can also
be received here.
OUTPUT I, II
Sound produced by the TX81Z is sent from here to an external mixer or amp. If only output I is used, it
will transmit the combined signal from both outputs.
–8–

SINGLE MODE
In this mode, the TX81Z will act as a single, 8-note
polyphonic instrument. Single mode also allows you
to create or edit voices.
SINGLE: Play
PLAY SINGLE
Use the PARAMETER keys to select voice banks I, A, B, C, D, and use the DATA ENTRY keys to select
voices 1-32.
Bank I, A-D Voice number and name
The 128 factory preset voices are listed on p.4. If the Program Change Conversion table (p.26) is initialized,
incoming MIDI Program Changes 1-32 will select bank I 1-32 (internal user memories), 33-64 will select from
bank A, and so on.
When the TX81Z is shipped, the internal user memories I01-132 contain selected voices from banks A-D.
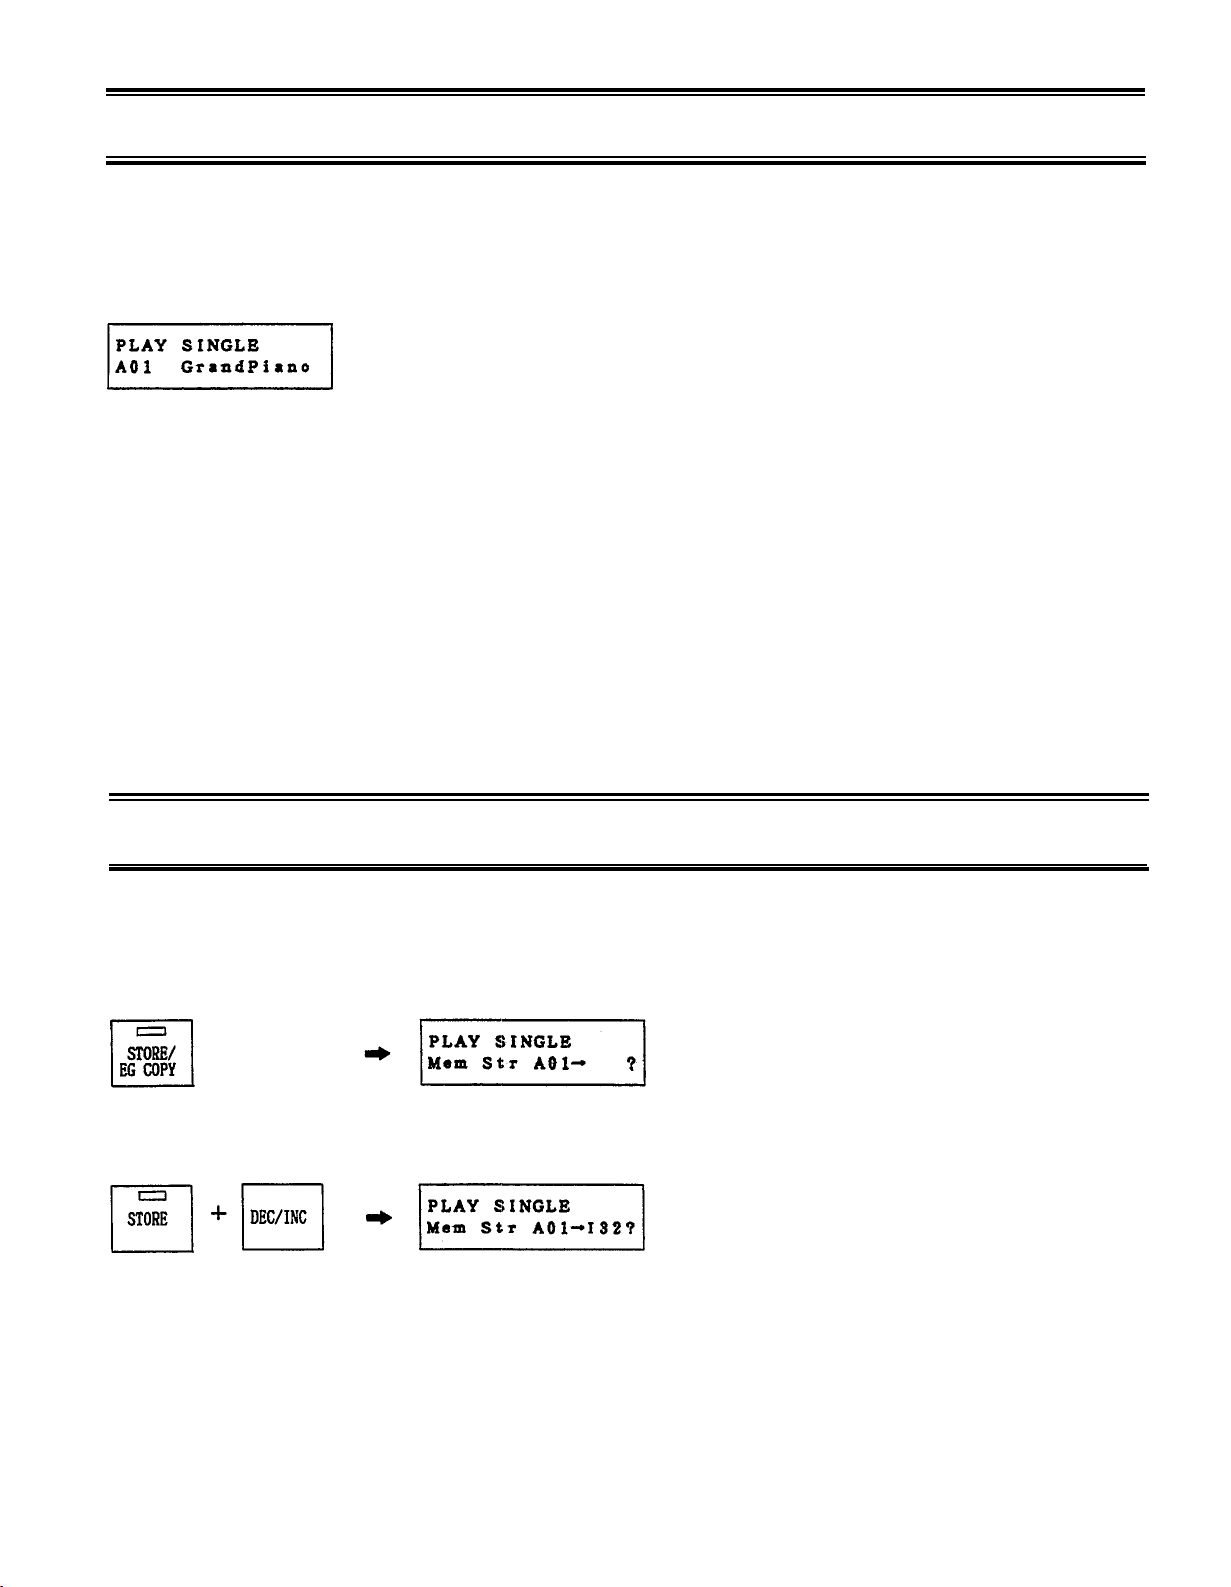
STORE VOICE
You can store the currently selected voice (edited or not) in the Internal user memory (Bank I). While in
PLAY SINGLE mode, press and hold the STORE key. The LCD will ask
so continue holding STORE and use the DATA ENTRY keys to select the store destination (I01-I32).
Select destination
When the LCD shows the destination you want, release STORE and press YES. The voice will be stored into
the selected memory. (You can quit without storing by pressing NO.)
–11–
SINGLE: Edit
SINGLE EDIT
This is where you create your own voices, or edit the preset voices. In this section we assume you already
know something about FM synthesis. If you are new to FM, please turn to p.83 and read “What’s FM?”
before continuing.
In SINGLE mode, press EDIT/COMPARE. The EDIT LED will light, and the
EDITING
PROCEDURE
LCD will show the previously edited parameter. Use the PARAMETER keys to
move through the parameters, Use the DATA ENTRY keys to change the data
value. When the LCD shows several parameters at once, use the CURSOR keys
to move the blinking cursor to the parameter you want to set. (The CURSOR
LED will automatically come on when you enter EDIT mode.) Some parameters are in groups, and when the LCD shows “xxxxxx ?” you can press YES
to edit the parameters inside the group.
–12–
SINGLE: Edit
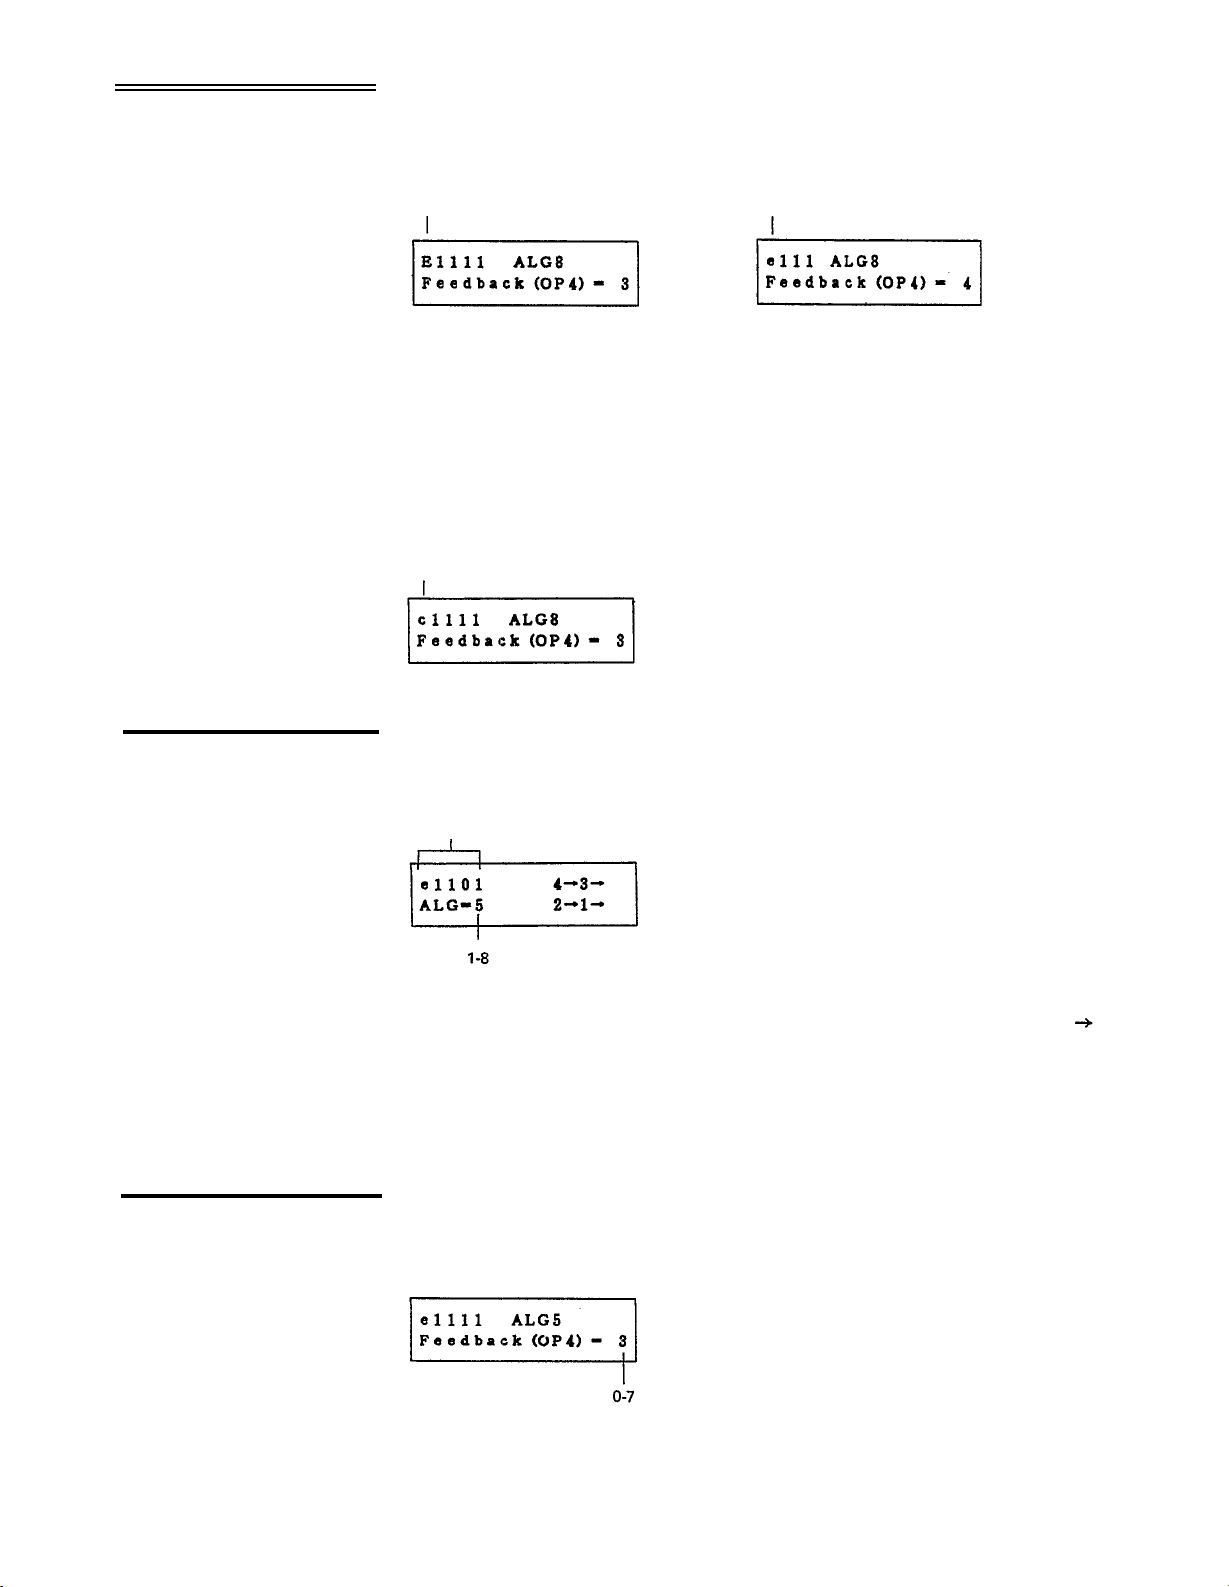
COMPARE
When you first enter SINGLE EDIT mode, the LCD will show an “E” in the
upper left corner, indicating “Edit”. As soon as you modify the data, this
will change to “e”.
Algorithm
Original data unchanged
Modifications have been made
While editing a voice, you can compare it with the original voice. Press EDIT/
COMPARE. The LED will begin blinking, and the LCD will show a “c” in the
upper left corner, indicating “Compare”. Use the PARAMETER keys to look
through the parameters. When the Compare LED is flashing, you will not be
able to modify the data. To return to edit mode, press EDIT/COMPARE
once more.
Compare original voice
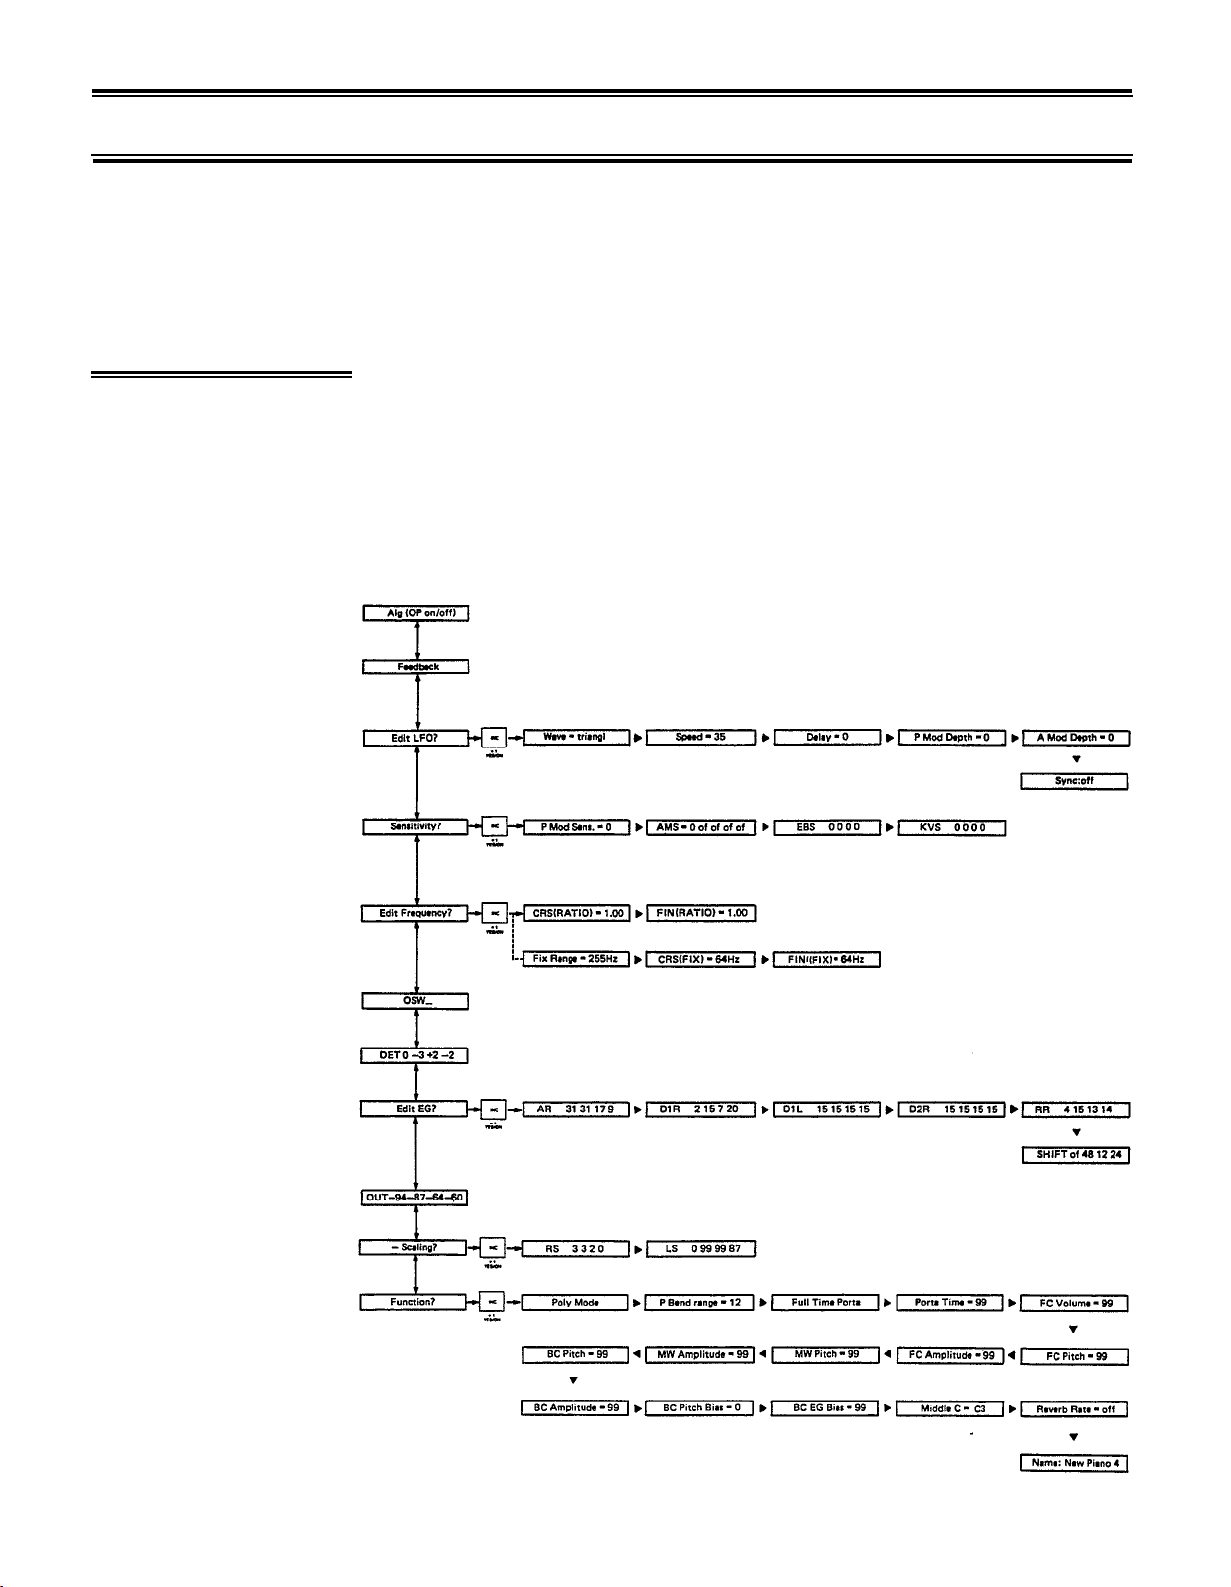
This is where you select the Algorithm, or “arrangement” of operators.
Feedback
Operator 1-4 on/off
In addition to the algorithm number, the LCD shows a graphic representation
of the actual algorithm structure. The arrows indicate the modulator
carrier
connection. (See also the pull-out reference card under the LCD.)
By moving the cursor to the “1111” area and pressing DEC/INC, you can turn
each operator on (1) or off (0). When editing, it is often useful to hear only a
certain combination of operators at once. Obviously, if all carriers are turned
off, there will be no sound.
In any algorithm, operator 4 can be set to modulate itself on a scale of 0
(no feedback) to 7.
–13–
Edit LFO?
SINGLE: Edit
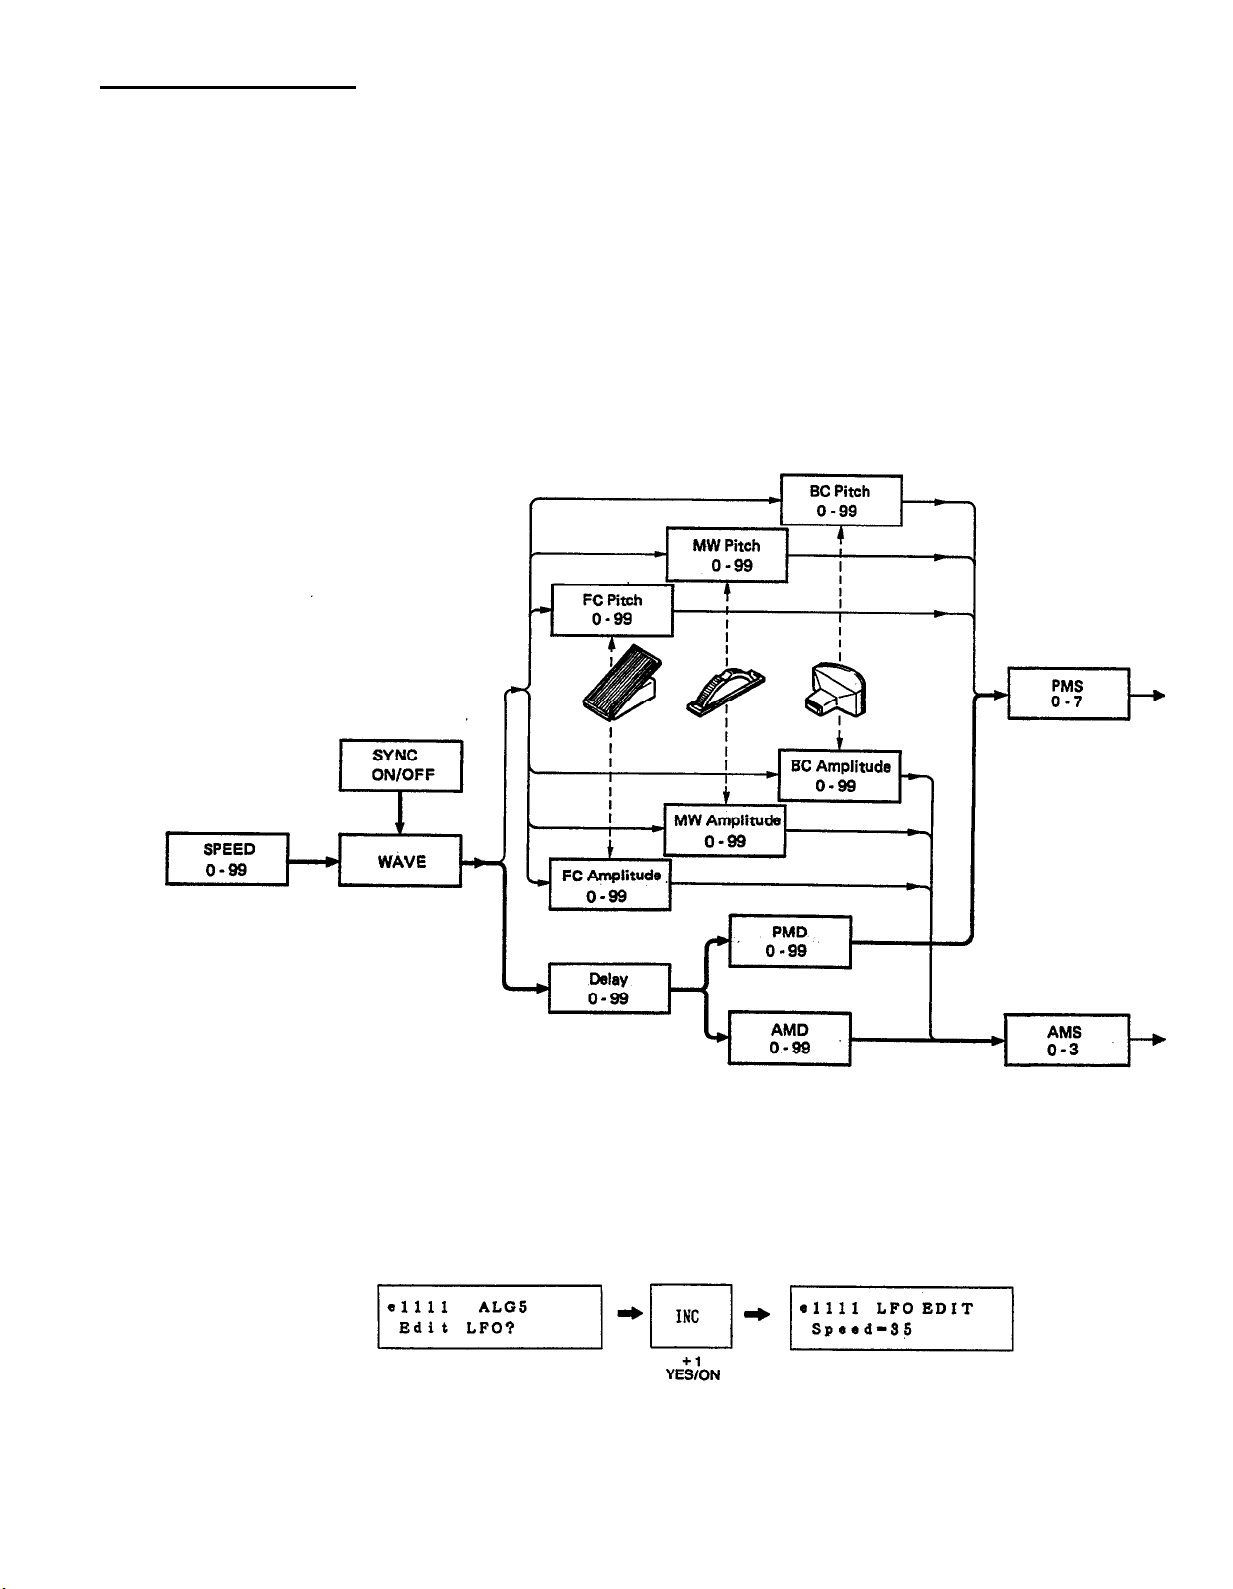
The LFO is a Low Frequency Oscillator that sends a continuously changing
control signal. Its effect depends on the Sensitivity (p.16) and Voice Function
(p.21) settings, and can affect the output level of the operators or the overall
pitch of the voice. As you can see from the diagram below, the Voice Function
settings determine how the MIDI Controllers (Modulation Wheel, Foot Controller, Breath Controller) will regulate the LFO signal going to the operators,
and the Sensitivity settings determine how the operators will react to the LFO
signal.
As you can see, the modulation you set in the LFO does NOT go DIRECTLY
to the operators. The final effect will depend on the LFO Settings, the Voice
Function settings, the Sensitivity settings, AND the position of the MIDI
controllers (Modulation Wheel, Foot Controller, Breath Controller) on your
keyboard.
This “modulation matrix” may seem complex, but it gives you total expressive control over your instrument. Answer YES to this display and use the
PARAMETER keys to select the six LFO parameters.
–14–

SINGLE: Edit
Wave (saw up, square, triangle, S/Hold)
The first three waveshapes are probably familiar to you. S/Hold stands for
Sample And Hold. At periodic intervals determined by the LFO Speed, a
random number is sampled, and the LFO is held at that random value until the
next sample. This is especially useful in creating sound effects.
saw up
(saw tooth wave)
square
(square wave)
triangle
(triangle wave)
S/Hold
(sample & hold)
Speed (0-99)
Delay (0-99)
Pitch Modulation Depth
(0-99)
Amplitude Modulation
Depth (0-99)
Sync (on/off)
At a setting of 1, the LFO will take about 150 seconds to complete one cycle
(0.007Hz), and at a setting of 99 the LFO will make about 50 cycles every
second (50Hz).
In many acoustic instruments, the vibrato begins a short time after the note
begins sounding. This can be simulated using the LFO Delay, which is adjustable from 0 (no delay) to 99 (about 15 seconds delay).
This controls the amount of Pitch Modulation that will be present regardless of
the Function Settings. When this value is above 0, the LFO will always produce
some Pitch Modulation, regardless of the position of the Foot Controller, Mod
Wheel or Breath Controller, provided that P. Mod Sens is not zero.
This controls the amount of Amplitude Modulation that will be present regardless of the Function settings. When this value is above 0, the LFO will always
send some Amplitude Modulation to the operators, regardless of the position of
the Foot Controller, Modulation Wheel or Breath Controller, provided that at
least one operators has an AMS value greater than zero.
When Sync is on, each note will reset the LFO wave to its beginning. For
example, the Saw Up wave would begin again from the lowest position at the
beginning of the note. When sync is off, the LFO wave will keep repeating
regularly, regardless of notes being played.
–15–
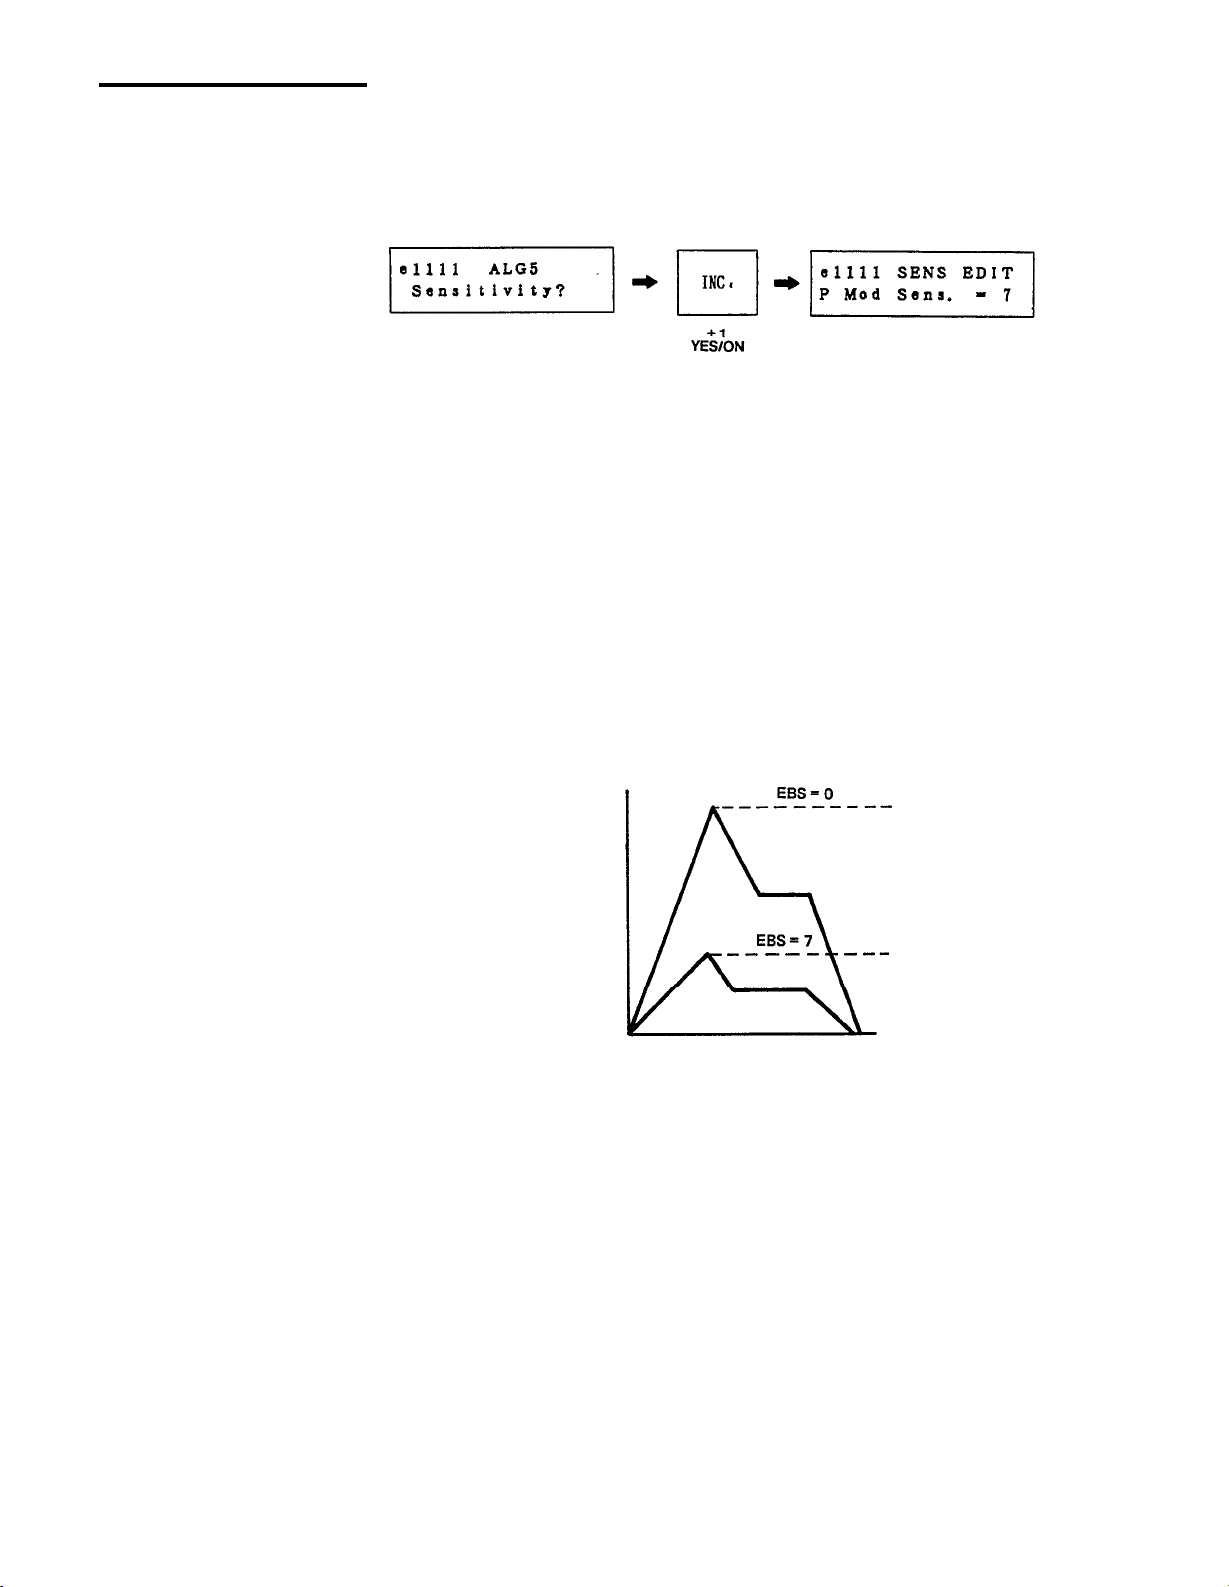
Sensitivity?
SINGLE: Edit
This is where you set the sensitivity of the voice to LFO Pitch Modulation, and
set the sensitivity of each operator to incoming LFO and other control signals.
Answer YES and use the PARAMETER keys to select the four Sensitivity
parameters.
P Mod Sens. (0-7)
AMS (0-3, on/off for
each operator)
EBS (0-7 for each operator)
This determines the Pitch Modulation Sensitivity of the entire voice. If it is 0,
there will be no pitch modulation.
The overall Amplitude Modulation Sensitivity of the operators is adjustable
from 0-3, and each operator can be set to react to LFO Amplitude Modulation
(on) or not (off). For example, if the carrier operators were sensitive to LFO
amplitude modulation, the LFO would affect the volume of the voice (tremolo).
If the modulator operators were sensitive to LFO amplitude modulation, the
LFO would affect the tone of the voice (wah-wah).
This sets the EG (envelope generator) Bias Sensitivity of each operator. EG Bias
is a control signal that directly affects the output level of an operator. (It has
nothing to do with the LFO.) There is a Voice Function parameter (p.22) that
lets a Breath Controller control EG Bias.
KVS (0-7 for each operator)
If a carrier has EBS, the EG Bias signal will affect the volume of the voice. If a
modulator has EBS, the EG Bias signal will affect the tone of the voice. When
programming wind instruments, it is effective to set the carriers to an EBS of 7,
so that the volume will depend totally on how hard you blow into the Breath
Controller. Set the modulators to a lower value of sensitivity, so that the tone
will become somewhat sharper as you blow harder.
This sets the Key Velocity Sensitivity of each operator. Each MIDI Note On
message has a Velocity byte that tells how hard the keyboard was struck. If an
operator has KVS, it will adjust its output level according to the velocity of the
note. If a carrier has KVS, strongly played notes will be louder. If a modulator
has KVS, strongly played notes will have a sharper tone. Extremely high KVS
settings will make the voice difficult to control, and you will need to play quite
strongly to get any sound at all.
–16–
SINGLE: Edit
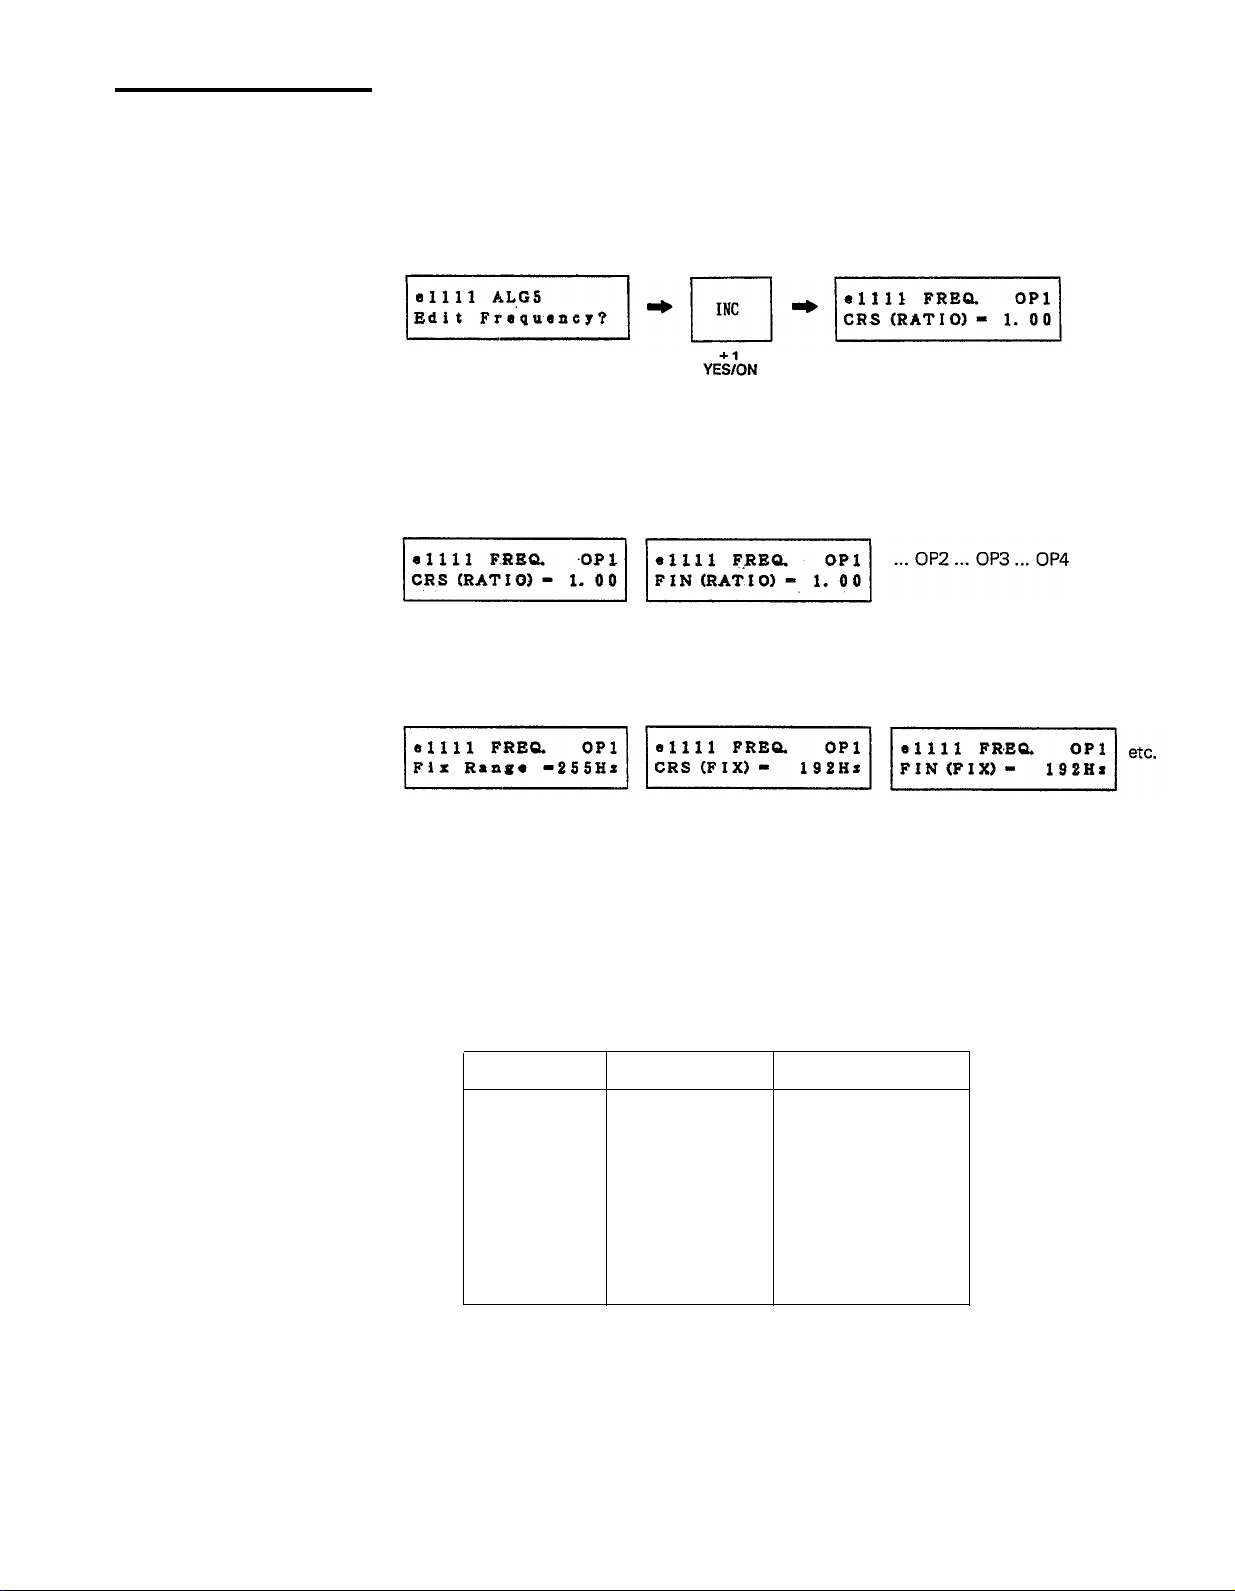
Edit Frequency?
This is where you set the frequency of each operator. Each operator can be set
to Ratio or Fixed mode. In Ratio mode, the frequency will depend on the key
you play. In Fixed mode, the frequency will be the same no matter which key
you play. This can be useful for special effects, or for creating “formants”
(fixed characteristics of spectral emphasis found in human voices and some
instruments).
Answer YES to this display, and use the PARAMETER keys to select the
coarse (CRS) and fine (FIN) frequency adjustment for each operator 1-4.
By moving the cursor to (xxx), you can set the oscillator mode to RATIO
or FIX.
Ratio (0.50-27.57)
Fix Frequency
(8Hz-32,640Hz)
If Fixed Mode is selected, you can set the Fixed Frequency Range (see below).
The “standard” ratio is 1.00. le. when a operator is set to 1.00 frequency ratio,
it will produce a 440Hz tone for an A3 note (standard pitch). A ratio of 2.00
would be an octave higher, and 4.00 would be two octaves higher.
The fixed frequency is variable over a wide range. (However, due to hardware
limitations, the very highest frequencies will not actually be output.) Fixed
Frequency is divided into the ranges shown below.
Select (Hz)
255
510
1K
2K
4K
8K
16K
32K
Fix Range (Hz)
8-255
16-510
32-1020
64-2040
128-4080
256-8160
512-16320
1024-32640
One Fine Step (Hz)
1
2
4
8
16
32
64
128
–17–

Oscillator Wave
SINGLE: Edit
The TX81Z is the first Yamaha synthesizer to offer FM synthesis with 7 new
waveforms in addition to sine waves.
Each operator can be independently set to one of the following 8 waveforms.
The selected waveform will be graphically indicated in the LCD.
These new waveforms can be used as both carriers and modulators. Sine waves
are pure tones. The seven additional waveforms have additional harmonics
already in them. This allows for complex waveforms to be created from fewer
operators. For ideas on how to use the new waveforms, examine the preset
voices. The harmonic content of each waveform is described on p.50.
Detune
Edit EG?
The frequency of each operator can be moved slightly higher or lower. By
detuning two carriers in opposite directions, you can create a detune-chorus
effect. By detuning a modulator and carrier, you can create slightly irregular,
“natural-sounding”
harmonic structures. The exact amount of detune will
differ by the note number. At C3 the range is ± 2.6 cents.
Answer YES to this display and use the PARAMETER keys to select the six
EG parameters. Each display shows the settings for operators 1-4.
The Envelope Generator (EG) determines how the operator output level
changes over time. TX81Z EGs have 4 rate (speed) parameters and 1 level
parameter. In addition, you can “shift” the range of the entire envelope by a
specified amount, so that there will be some operator output even when a note
is not being pressed.
–18–
SINGLE: Edit
AR (0-31)
D1R (0-31)
D1L (0-15)
D2R (Q-31)
RR (1-15)
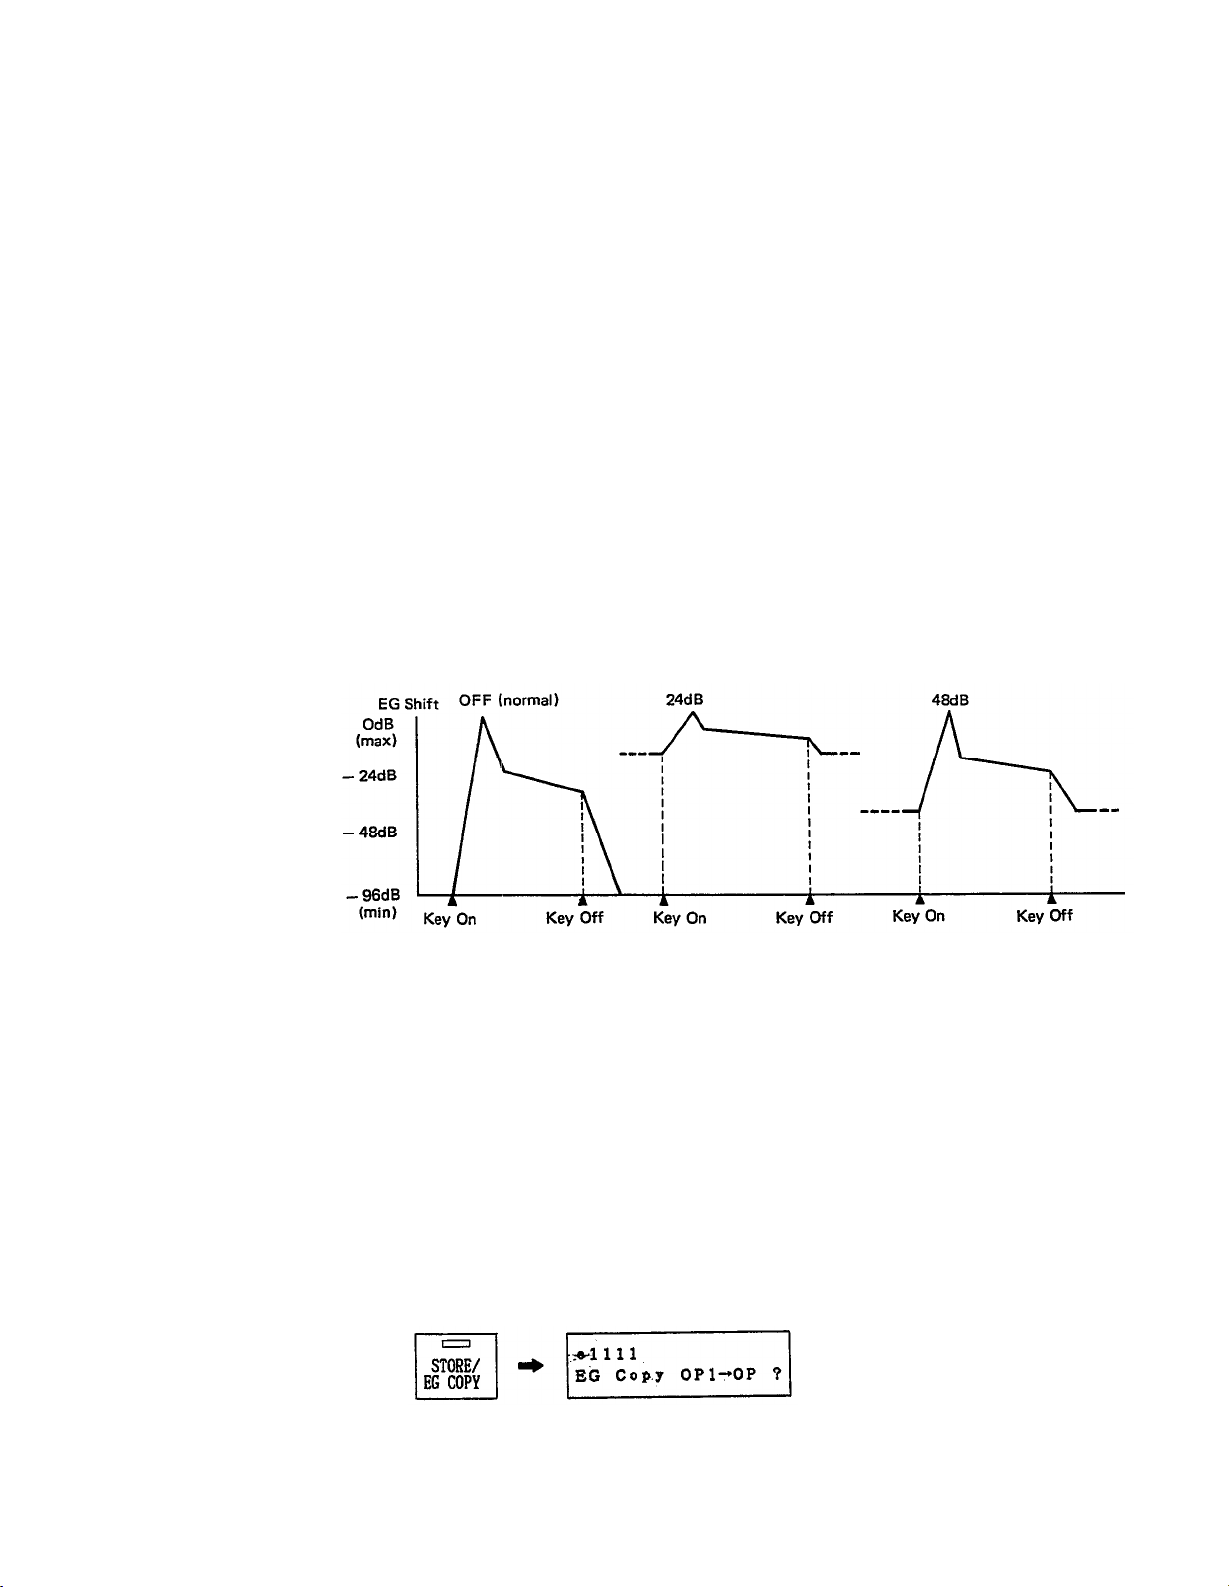
SHFT (off, 48, 24, 12)
Attack Rate determines how quickly the level will rise up to maximum level.
When AR is 0, the rate is slowest and when AR is 31, the attack is fastest,
1st Decay Rate determines how quickly the level will decay from maximum to
the 1st Decay Level. Obviously, if the 1st Decay Level is 15 (max), the 1st
Decay Rate will have no effect.
1st Decay Level is the point where the 2nd Decay Rate begins.
2nd Decay Rate determines how quickly the level will decay from the 1st
Decay Level down to 0. If the 2nd Decay Rate is set to 0, the sound will
continue as long as the note is held.
Release Rate determines how quickly the level will decay from the level at the
time the note is released down to 0.
EG Shift sets the range of the envelope. When “off” is selected, the EG will
change the operator output level over a range of 0 to -96dB (the full range).
However, when 12, 24 or 48 is selected, the EG range is “compressed” to the
specified range. For example if EG Shift is 24, the EG will change the operator
output level over a range of 0 to -24dB, and the operator output level will be
at -24dB even before the note is pressed. (EG shift of operator 1 is fixed at “off".)
EG Copy
This can be used to limit the EG range of a modulator for very subtle changes
in tone, or to create an instantaneous attack. You can use it on a carrier for ef-
fects that will sound even when a key is not being pressed. The EGS setting will
not affect the time the envelope takes, even though the “distance” of the level
change may be different (ie.
“rates” are automatically compensated).
When trying to imitate an acoustic instrument sound, it is usually a good idea
to first program the carrier envelope (volume envelope) and copy it to the
modulating operators. (Of course you will need to make fine adjustments later
by ear.) Usually, as the volume of a sound increases (or decreases), the tone
also gets brighter (or softer).
Copying envelopes is easily done. Anytime you are in SINGLE EDIT mode,
press and hold STORE/EG COPY. The LCD will ask which operator you want
to copy the envelope from.
–19–

Operator Output Level
Scaling?
SINGLE: Edit
Continue holding STORE/EG COPY and use the DATA ENTRY keys to select
the source operator. Use the CURSOR keys to move the blinking cursor and
use the DATA ENTRY keys to select the destination operator. Release STORE/
EG COPY and answer YES. The envelope (AR, D1R, D1L, D2R, RR) will be
copied. (If you change your mind, answer NO.)
This sets the output level of each operator.
The output level of a carrier will affect the volume, and the output level of a
modulator will affect the tone. Setting modulator output levels too high may
lead to distortion. Sometimes this may be desirable when creating sound.
What the human ear interprets as loudness is closely related to timbral complexity (tone), and raising the level of a modulator will often increase the
“loudness” as well.
Answer YES to this display and use the PARAMETER keys to select the two
scaling parameters.
Rate Scaling (0-3)
Level Scaling (0-99)
Low Notes
On an acoustic instrument, high notes usually have a faster attack and decay
than low notes. Rate Scaling simulates this. When RS is 0, the envelope will be
the same time length for all notes. When RS is 3, high notes will have a shorter
envelope.
High Notes
High notes on an acoustic instrument tend to have a less complex tone than
low notes. You can use Level Scaling to simulate this by decreasing the output
level of a modulator as you play up the keyboard. (Level Scaling operates on a
curve starting from about C1.) When LS is 0, the operator output level will be
the same for all notes. When LS is 99, the output level will have dropped to 0
by the time you get to G6.
Low notes
High notes
–20–
SINGLE: Edit
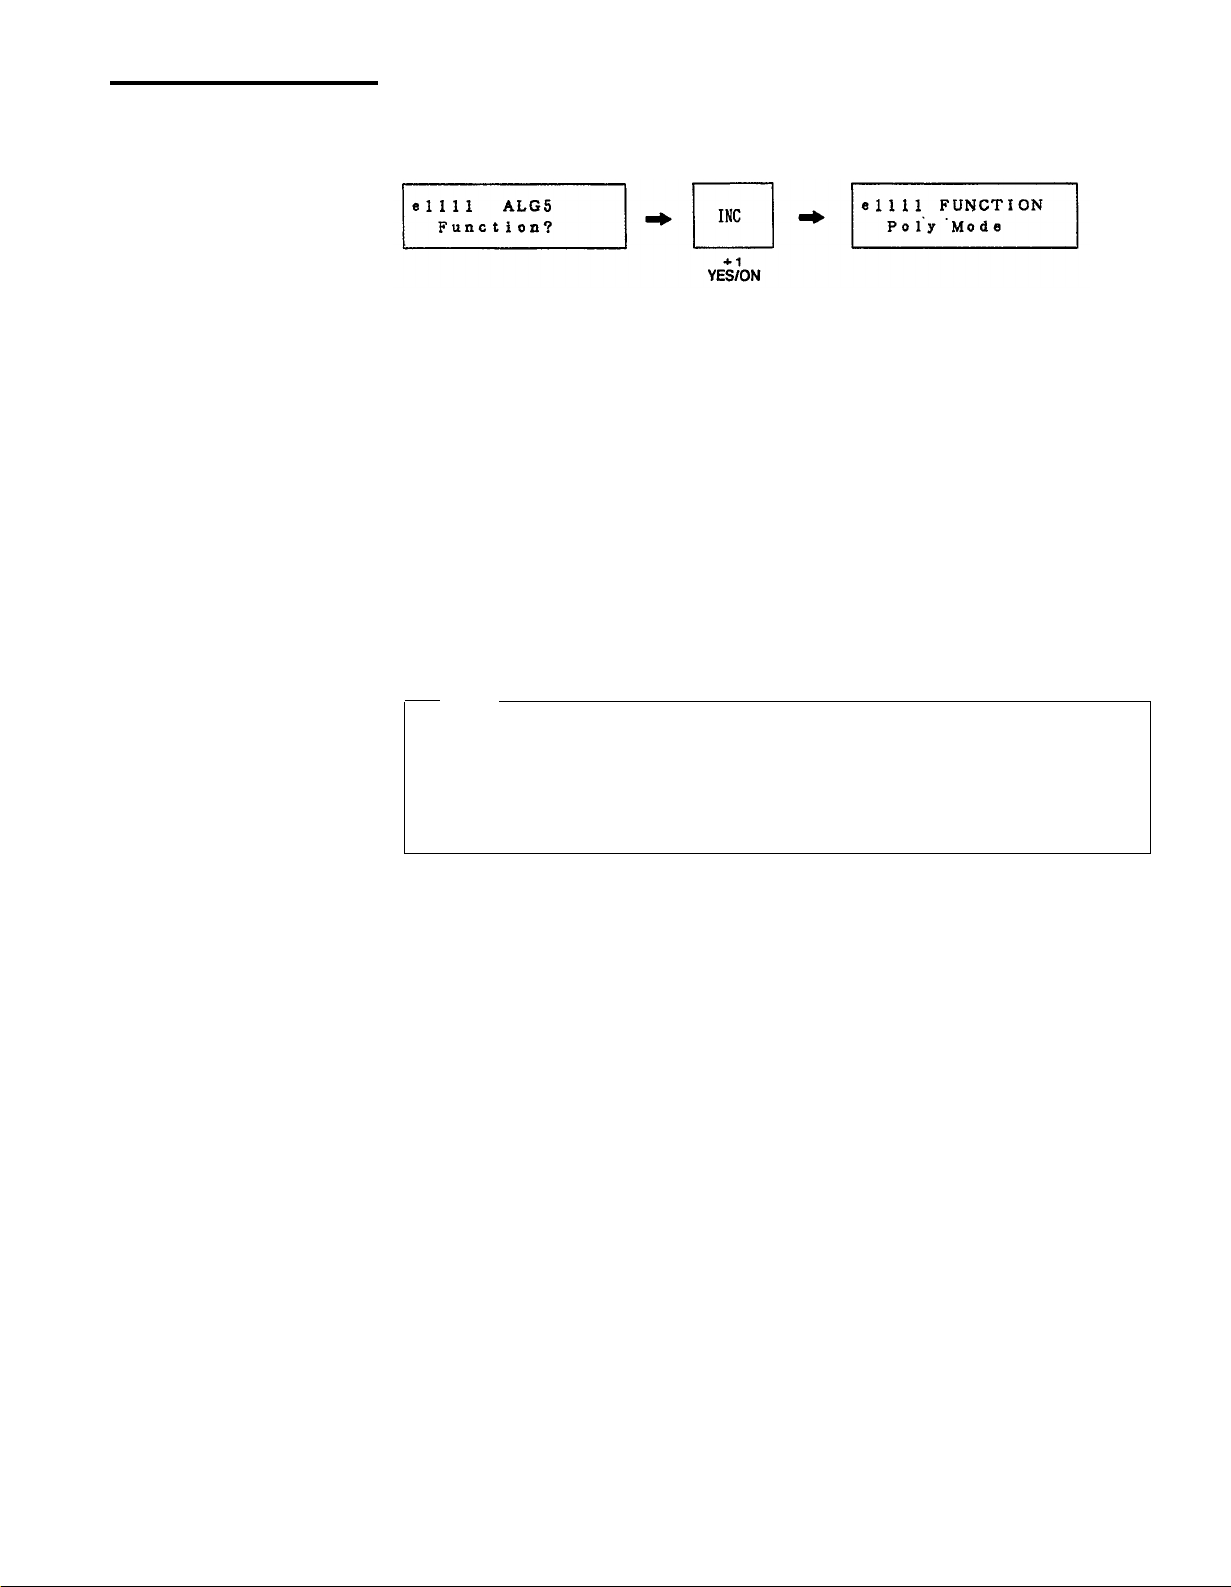
Function?
This is where you set how the TX81Z will be controlled by incoming MIDI
messages. Answer YES to the “?” display and use the PARAMETER keys to
select the sixteen Function parameters.
Poly Mode (Poly/Mono)
P Bend Range (0-12)
Poly Mode: In SINGLE mode, the TX81Z will play up to 8 notes simultane-
ously, and in PERFORMANCE mode, each instrument will play as many
notes as permitted in the “Max Notes” setting for that instrument (p.38).
Mono Mode: Only the most recent note you press will be sounded. This can be
desirable when playing solos. Also, Mono Mode gives you a choice of portamento (see below). A Max Notes (p.38) setting of 1 is not quite the same as
Mono mode. In Mono, a note played before the previous one is released will
not re-trigger the envelope. ie. the decay will continue from the previous
note. However in Poly mode, each note starts its envelope from the beginning even if the previous note has not been released. Thus, if you want to
have only one note sounding at a time, but want each note to re-trigger the
envelope, use Poly mode and set Max Notes (p.38) to 1.
Note
If you play a note in Mono Mode without releasing the previous note, and
then release the second note, the sound will “jump back” to the previous
note. In SINGLE mode, up to 8 of these previous notes will be remembered
(as long as you continue pressing them), and in PERFORMANCE mode, up
to 5 notes will be remembered.
This determines the range (in semitones) of the pitch bend effect. When set to
12, the pitch bend wheel on your keyboard will have a maximum effect of one
octave up or down. When set to 0, the pitch bender will have no effect.
Full Time Portamento/
Fingered Portamento
Portamento Time (0-99)
There are two modes of Portamento (the “glide” between notes), but you have
a choice only in Mono Mode. If Poly Mode is selected, this will always be “Full
Time Portamento”. With Fingered Portamento, portamento is applied only if
you press a note before releasing the previous one. With Full Time Portamento,
portamento is applied between all notes. Full Time Portamento can be turned
on or off by a portamento footswitch connected to your keyboard, but Fingered
Portamento cannot be switched off. If you don’t want to have Portamento,
set the Portamento Time to 0 (see below). When power is turned on, porta-
mento will be on. (And when a Performance is selected, portamento will be on
for each instrument in the performance.) To turn portamento off, you will
need to send a Portamento Off message (Bn.41.00)
This sets the speed of the “glide” effect between notes. When Portamento Time
is at 99, a three-octave glide will take about 30 seconds. When Portamento
Time is at 0, there will be no glide. If you don’t want a voice to have portamento, set the Portamento Time to 0.
–21–
SINGLE: Edit
FC Volume (0-99)
FC Pitch
FC Amplitude
MW Pitch
MW Amplitude
BC Pitch
BC Amplitude
(0-99)
(0-99)
(0-99)
(0-99)
(0-99)
(0-99)
This allows you to use the Foot Controller connected to your keyboard to control the volume of the TX81Z voice. When FC Volume is at 99, the volume of
the TX voice is regulated completely by the Foot Controller, ie. when the Foot
Controller pedal is at minimum position, there will be no sound. When FC
Volume is at some middle value such as 50, there will be some sound even
when the Foot Controller pedal is at minimum.
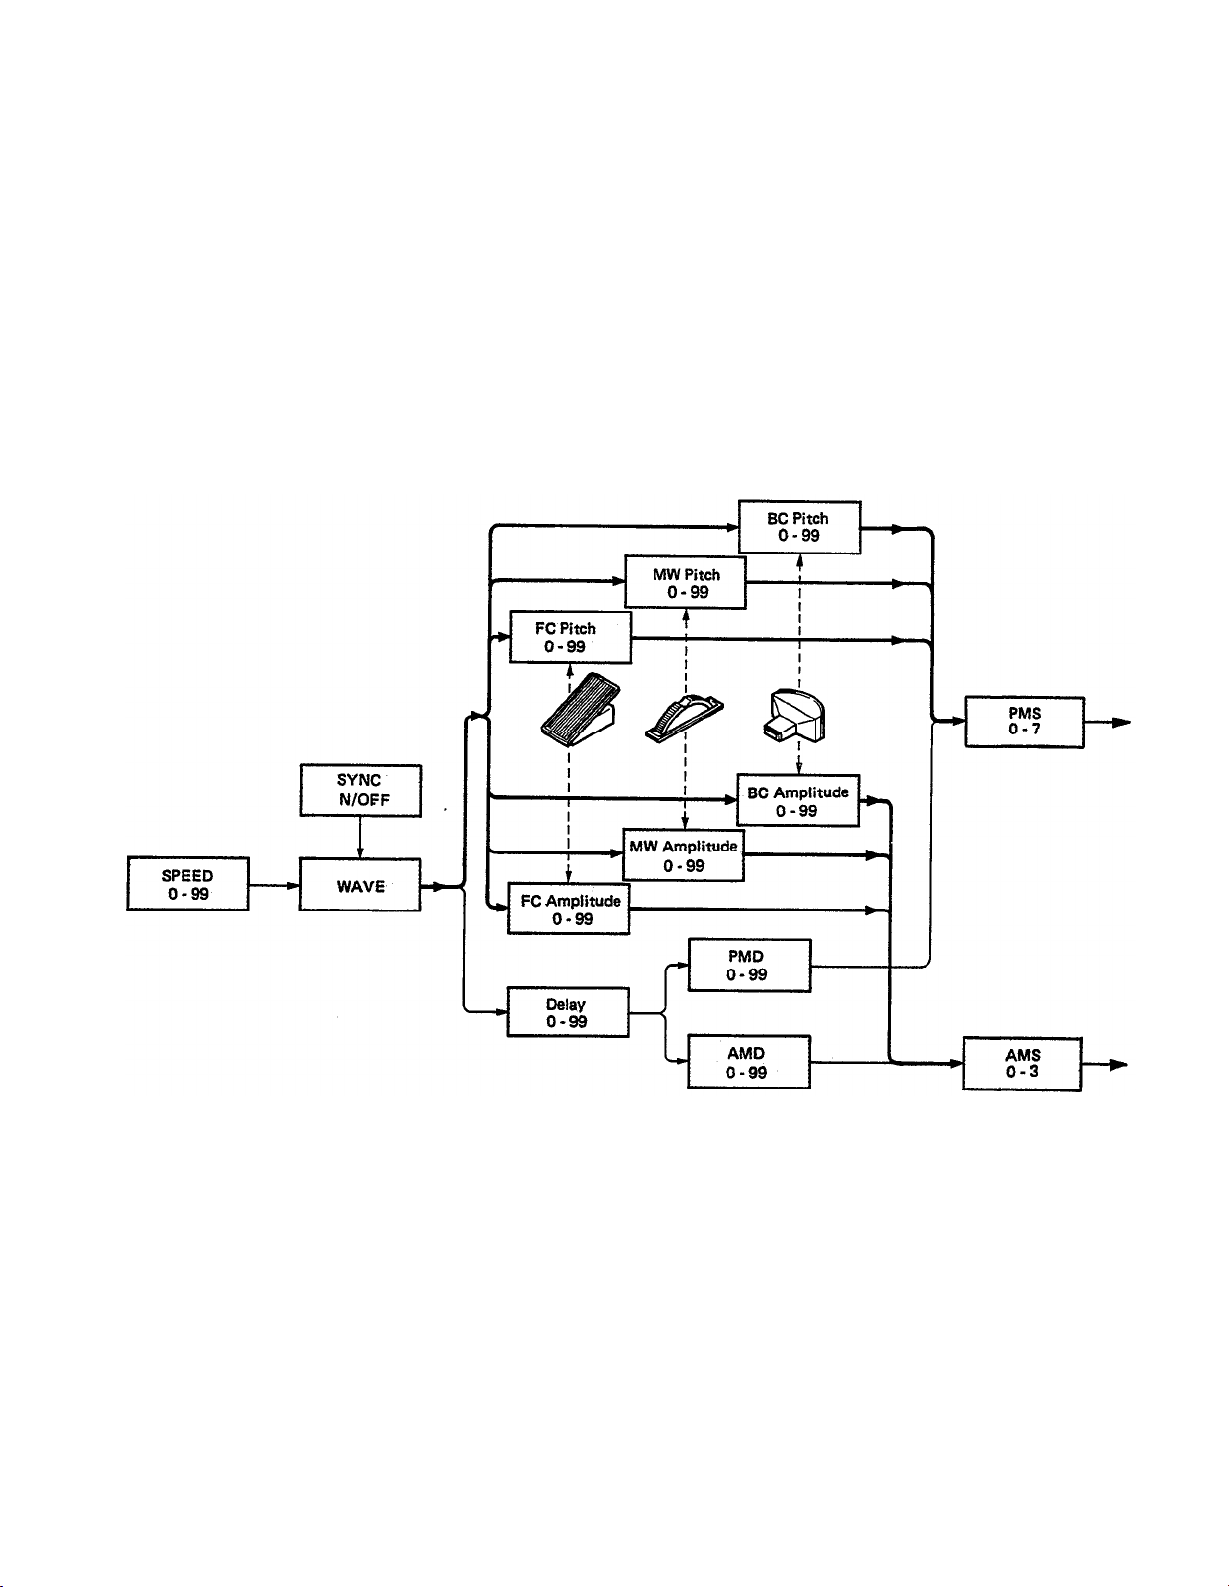
These six parameters allow you to regulate the amount of LFO modulation
using an external controller connected (or built in) to your keyboard. The
diagram below explains how LFO modulation is controlled. Each parameter
can be set between 0 and 99. When it is set to 0, the position of the controller
will have no effect on the amount of LFO modulation,
BC Pitch Bias (–50- +50)
BC EG Bias (0-99)
Middle C (C1-C5)
This allows you to directly control the pitch using a Breath Controller. (This is
a “pitch-bending” effect, and has nothing to do with the LFO.) When BC Pitch
Bias is set at 0 (the normal value), blowing into the Breath Controller will not
affect the pitch. Settings of above 0 will result in the pitch rising when you
blow, and settings of below 0 will result in the pitch falling. The further away
from 0, the greater the effect.
This allows you to directly control the output level of the operators using a
Breath Controller. The amount of control will depend on the EG Bias Sensitivity for each operator (see p.16) as well as the BC EG Bias setting.
The voice can be transposed up or down 2 octaves in steps of a semitone. The
display indicates the note actually sounded when the middle C key (MIDI Note
Number 3C) is pressed.
–22–
SINGLE: Edit
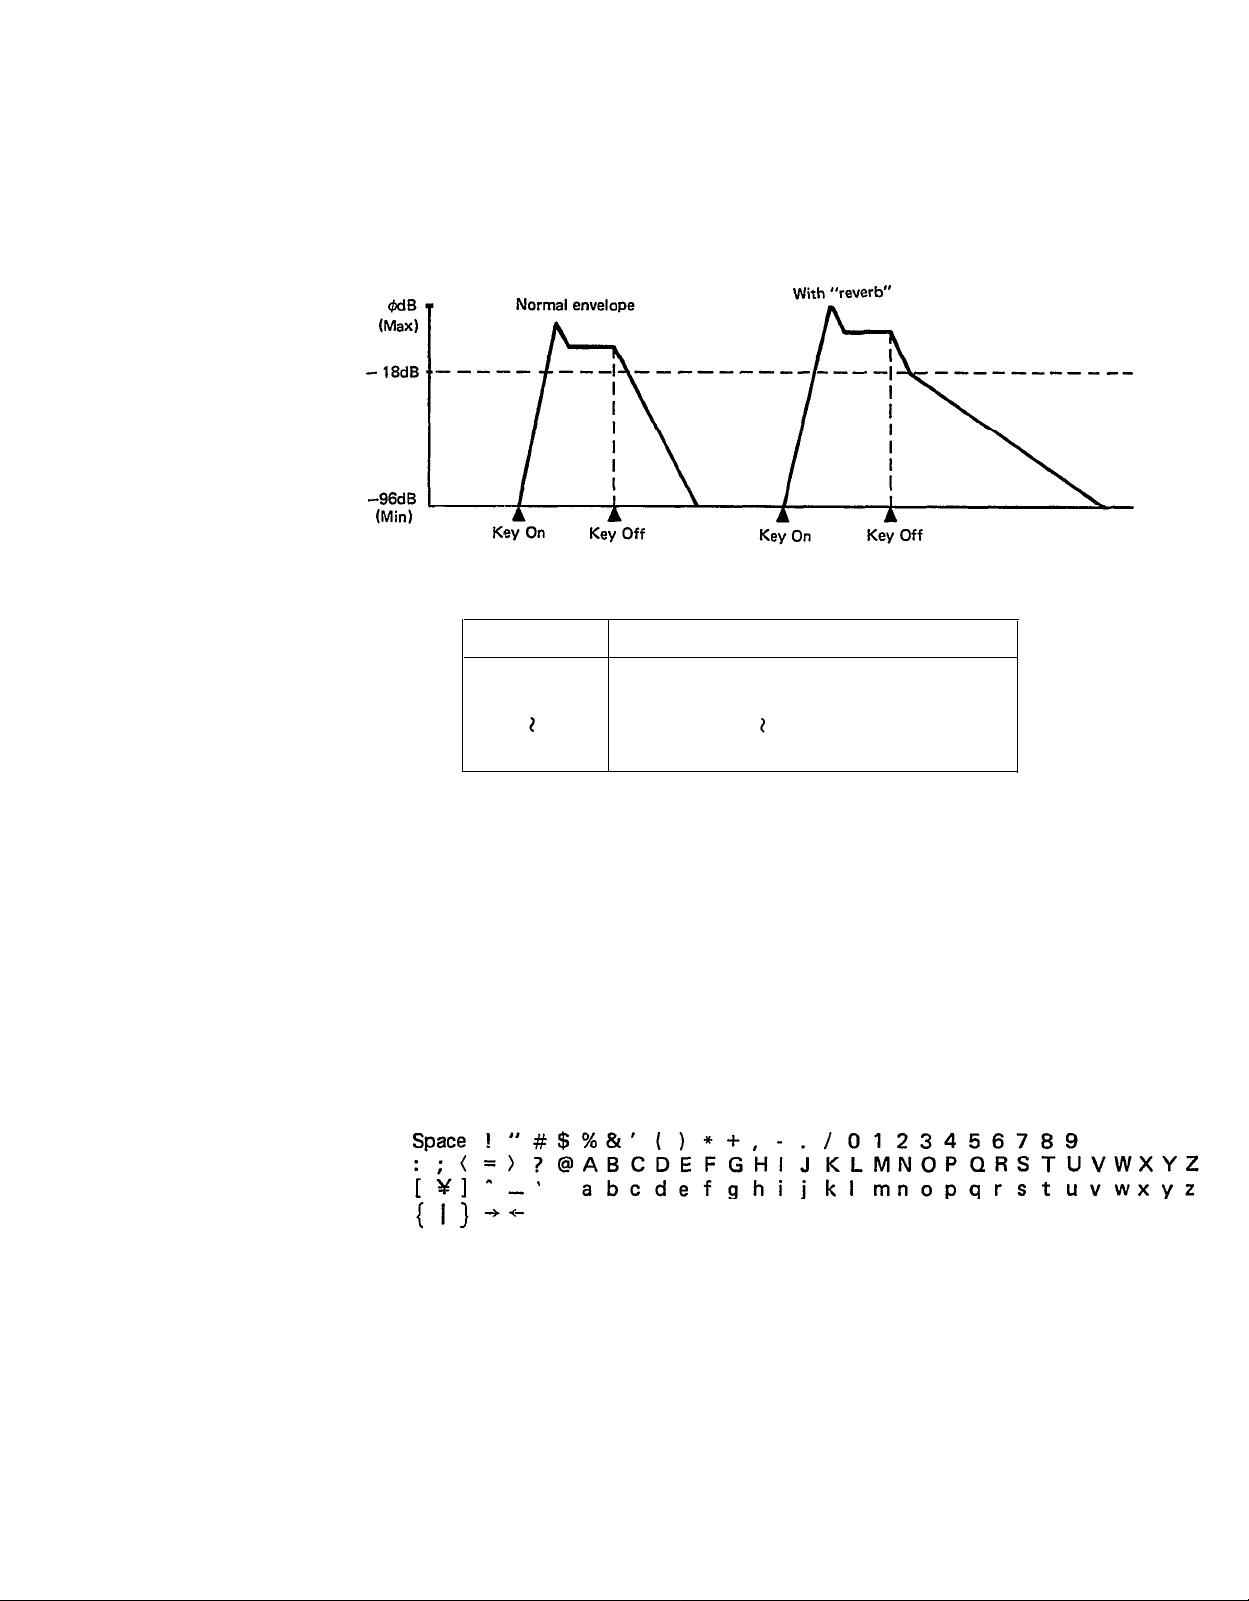
Rev. Rate (off, 1-7)
This is a “pseudo-reverb” effect created by slowing the EG release rates after a
certain point. It depends on the OP1 EG. (OP1 on/off or OP1 output level does
not matter.) When the EG level of OP1 descends to -18dB, this “pseudoreverb” is triggered, and the Release Rates of all operators will be slowed down
to the Reverb Rate, producing a lingering effect characteristic of reverb.
Rev. Rate
off
1
Effect
No effect
EG-Release
Rate
=
1 (long “reverb”)
Name (10 characters)
7
EG-Release Rate =
7 (short “reverb”)
Note that if the OP1 EG Attack Rate is 0, the sound may linger for quite a
while after the note is released. Also, if the EG Release Rate is already less than
the Reverb Rate, there will be no effect. This “pseudo-reverb” must be pro-
grammed with the other voice parameters in mind.
You can name your newly created voice (or rename a preset voice). Use the
CURSOR keys to move the blinking cursor, and use the DATA ENTRY keys to
step through the characters shown below.
–23–
SINGLE: Utility
SINGLE UTILITY
This is where you save and load data to external devices, and perform various other useful functions. These
settings are not part of a Performance Memory. They are set for the entire TX81Z. To enter Utility mode,
press UTILITY while in PLAY SINGLE or EDIT SINGLE mode.
Select parameters using the PARAMETER keys. If the LCD shows “xxxx ?” you can press YES and use the
PARAMETER keys to select the sub-parameters.
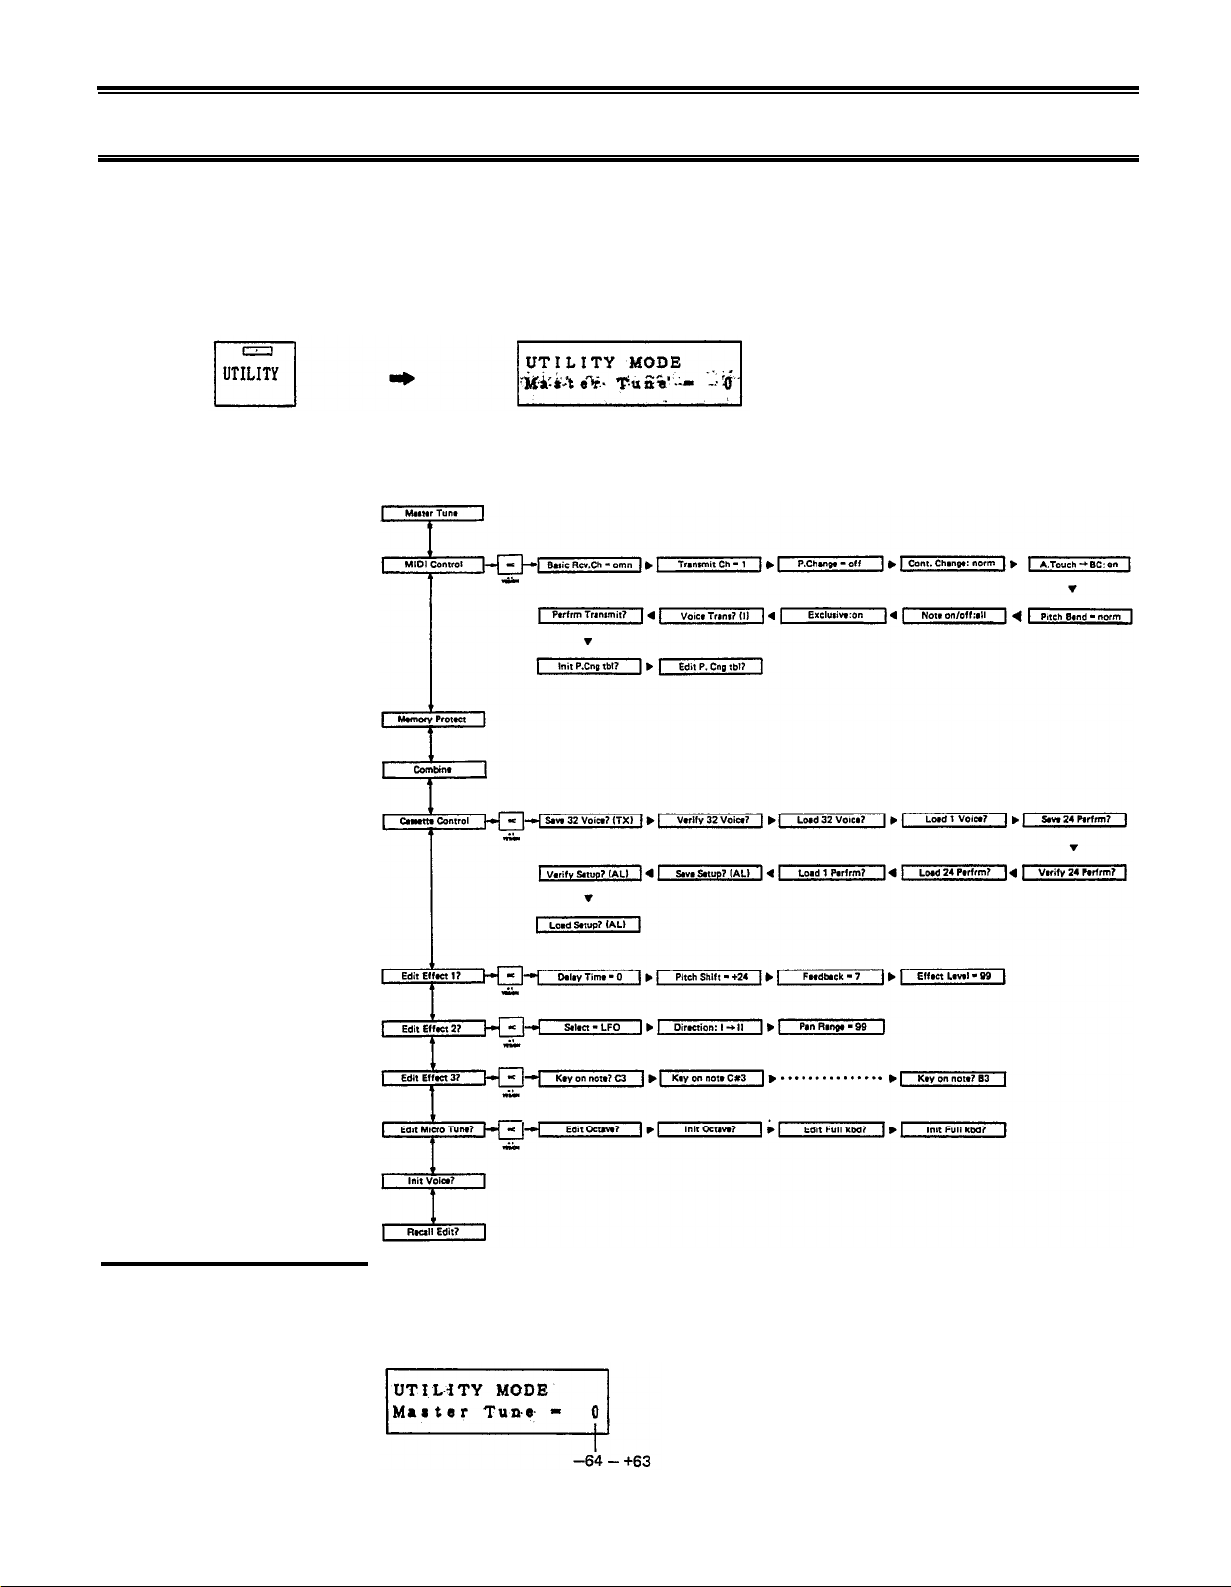
Master Tune
This is the master tune for the entire TX81Z.
Use it to tune the TX81Z to other instruments. The tuning range is one semi-
tone (100 cents) below and above standard pitch (A3=440Hz).
–24–

SINGLE: Utility
Midi Control?
Answer YES and use the PARAMETER keys to select the following parameters.
Receive Channel
(1-16, omni)
Transmit Channel (1-16)
Note on/off
(all, even, odd)
P. Change (off, corn, ind)
This is the MIDI channel on which the TX81Z will receive System Exclusive
data and Program Changes. In SINGLE mode, this is the channel you will play.
When this is set to “omn”, all channels will be received.
This is the MIDI channel on which TX81Z data (bulk voice data, etc.) will be
transmitted. When transmitting data to another TX81Z, this must match the
receive channel of the other device (unless the receiver is set to “omni”).
All:
Even:
Odd:
All note numbers are received (the normal mode).
Even
Odd
"
"
By using two TX81Zs together and setting one to Even and the other to Odd,
you can effectively raise the simultaneous-note capacity to 16 notes.
This determines how the TX81Z will react to Program Change messages.
Off:
Ignore program change messages.
Cont. Change
(off, norm, G1-G16)
A. Touch
BC
(off, on)
Common:
Look up the corresponding Voice Number (I01-D32) or
Performance Number (PF1-24) in the Program Change Table
(p.26).
Individual: Each instrument receives program changes separately and looks
up its Voice Number from the table. If already in Performance
mode and the table entry is a Performance Number, it is
ignored.
Off:
Control Change messages (MIDI messages Bn.xx.yy) will be ignored.
This includes messages such as Modulation Wheel, Breath Controller,
etc. Sustain pedal on/off will always be received.
Norm: Control change messages are received normally by each channel.
G1-16:
You can specify a “Global MlDI Channel” for control change messages.
In PERFORMANCE mode when a control change arrives on this channel, it will affect all instruments regardless of their channel setting. For
example, if a MIDI guitar transmitted Note On messages with a different channel for each string, a Modulation Wheel on the guitar could
control all channels simultaneously.
Normally the TX81Z does not receive Aftertouch messages (Dn.xx), but when
this is set “on”,
incoming Aftertouch messages will be treated as Breath Con-
troller (Bn.02.xx) messages. See Control Change, above.
–25–

SINGLE: Utility
Pitch Bend
(off, norm, G1-G16)
Exclusive (on, off)
Voice Transmit?
Off:
Pitch Bend messages (MIDI messages En.xx.yy) will be ignored.
Norm:Pitch Bend messages are received normally by each channel.
G1-16:
You can specify a “Global MIDI Channel” for pitch bend messages.
In PERFORMANCE mode when a pitch bend message arrives on this
channel, it will affect all instruments regardless of their channel setting.
For example, if a MlDI guitar transmitted Note On messages with a dif-
ferent channel for each string, a MIDI pitch bend arm on the guitar
could control all channels simultaneously.
When this is Off, all System Exclusive messages (bulk data) will be ignored, and
the TX81Z will not transmit bulk data. (The functions voice, Performance and
Setup Transmit will be skipped.)
If you answer YES, the 32 voices in bank I will be transmitted from MIDI
OUT. To transmit the 32 voices from another bank (I, A, B, C, D) press NO to
select the bank, and YES to transmit it.
Note
This data can be received by another TX81Z (or any data storage device)
if its Memory Protect (p.27) is Off, its Exclusive (p.26) is On, and its
Receive Channel (p.25) matches the Transmit Channel (p.25).
A disk-type MIDI data storage device such as the MDF1 is handy for
storing TX81Z data.
Performance Transmit?
Setup Transmit?
lnit P. Ch. Tbl.
If you answer YES, the 24 performance memories will be transmitted from
MIDI OUT. (See the note to Voice Transmit, above.)
Press NO to select AL, SY, EF, MC and then press YES to transmit the selected
data from MlDI OUT. (See the note to Voice Transmit, above.)
All data described below (PC+EF+MC) except System data.
AL
SY
System data. The settings for Combine, Memory Protect, Receive
Channel, Transmit Channel, P. Change, Cont. Change, and Exclusive.
Program Change Table (p.26).
PC
Data for the three effects (p.29).
EF
MCThe two user-programmable scales (p.31).
When you press YES, the Program Change Table (see below) will be initialized
as follows.
Incoming Program Change
PGM 1
PGM
2
will select
I01
I02
PGM
PGM
PGM
32
33
128
–26–
I32
A01
C32
 Loading...