

Page 1

STUDIO MANAGER
STUDIO MANAGER
Owner’s Manual
Special Notices
•Studio Manager and this owner’s manual are exclusively copyright © by Yamaha Corporation.
•Duplication of the software or reproduction of this manual in whole or in part by any means is expressly forbidden without the written consent of the manufacturer.
•Duplication of the commercially available music sequence data and/or digital audio files is strictly prohibited,
except for your personal use.
•Yamaha makes no representations or warranties with regard to the use of the software and documentation and
cannot be held responsible for the results of using of this manual and software.
•This disc is a CD-ROM. Do not attempt to play the disc on an audio CD player. Doing so may result in irreparable
damage to your audio CD player.
•The screen displays as illustrated in this owner’s manual are for instructional purposes and may appear somewhat
different from the screens that appear on your computer.
•Future upgrades of application or system software and any changes to the specifications or functions will be
announced separately.
•All other trademarks are the property of their respective holders and are hereby acknowledged.
❏ Yamaha Pro Audio global site
http://www.yamahaproaudio.com/
❏ Yamaha synth.com
http://www.yamahasynth.com
Table of Contents
Overview of Studio Manager . . . . . . . . . . . . . 2
Starting and Configuring Studio Manager . . 3
Quitting Studio Manager . . . . . . . . . . . . . . . . 5
Synchronizing with your hardware product . 5
Working with Files. . . . . . . . . . . . . . . . . . . . . . 6
*Specifications and descriptions in this owner’s manual are for information purposes only. Yamaha Corp. reserves
the right to change or modify products or specifications at any time without prior notice. Since specifications,
equipment or options may not be the same in every locale, please check with your Yamaha dealer.
Description of menus and buttons
In the event that menu and button names on a Windows system are different from those on a Macintosh,
this manual uses the Windows menu and button names followed by the Macintosh menu and button names
in parentheses.
Mapping MIDI Ports . . . . . . . . . . . . . . . . . . . . 6
Setting Preferences . . . . . . . . . . . . . . . . . . . . . 7
Menu Bar/Pop-up Menu . . . . . . . . . . . . . . . . . 7
Operation within Cubase . . . . . . . . . . . . . . . . 9
Supported editors . . . . . . . . . . . . . . . . . . . . . 10
1
Studio Manager Version 2 Owner’s Manual
Page 2
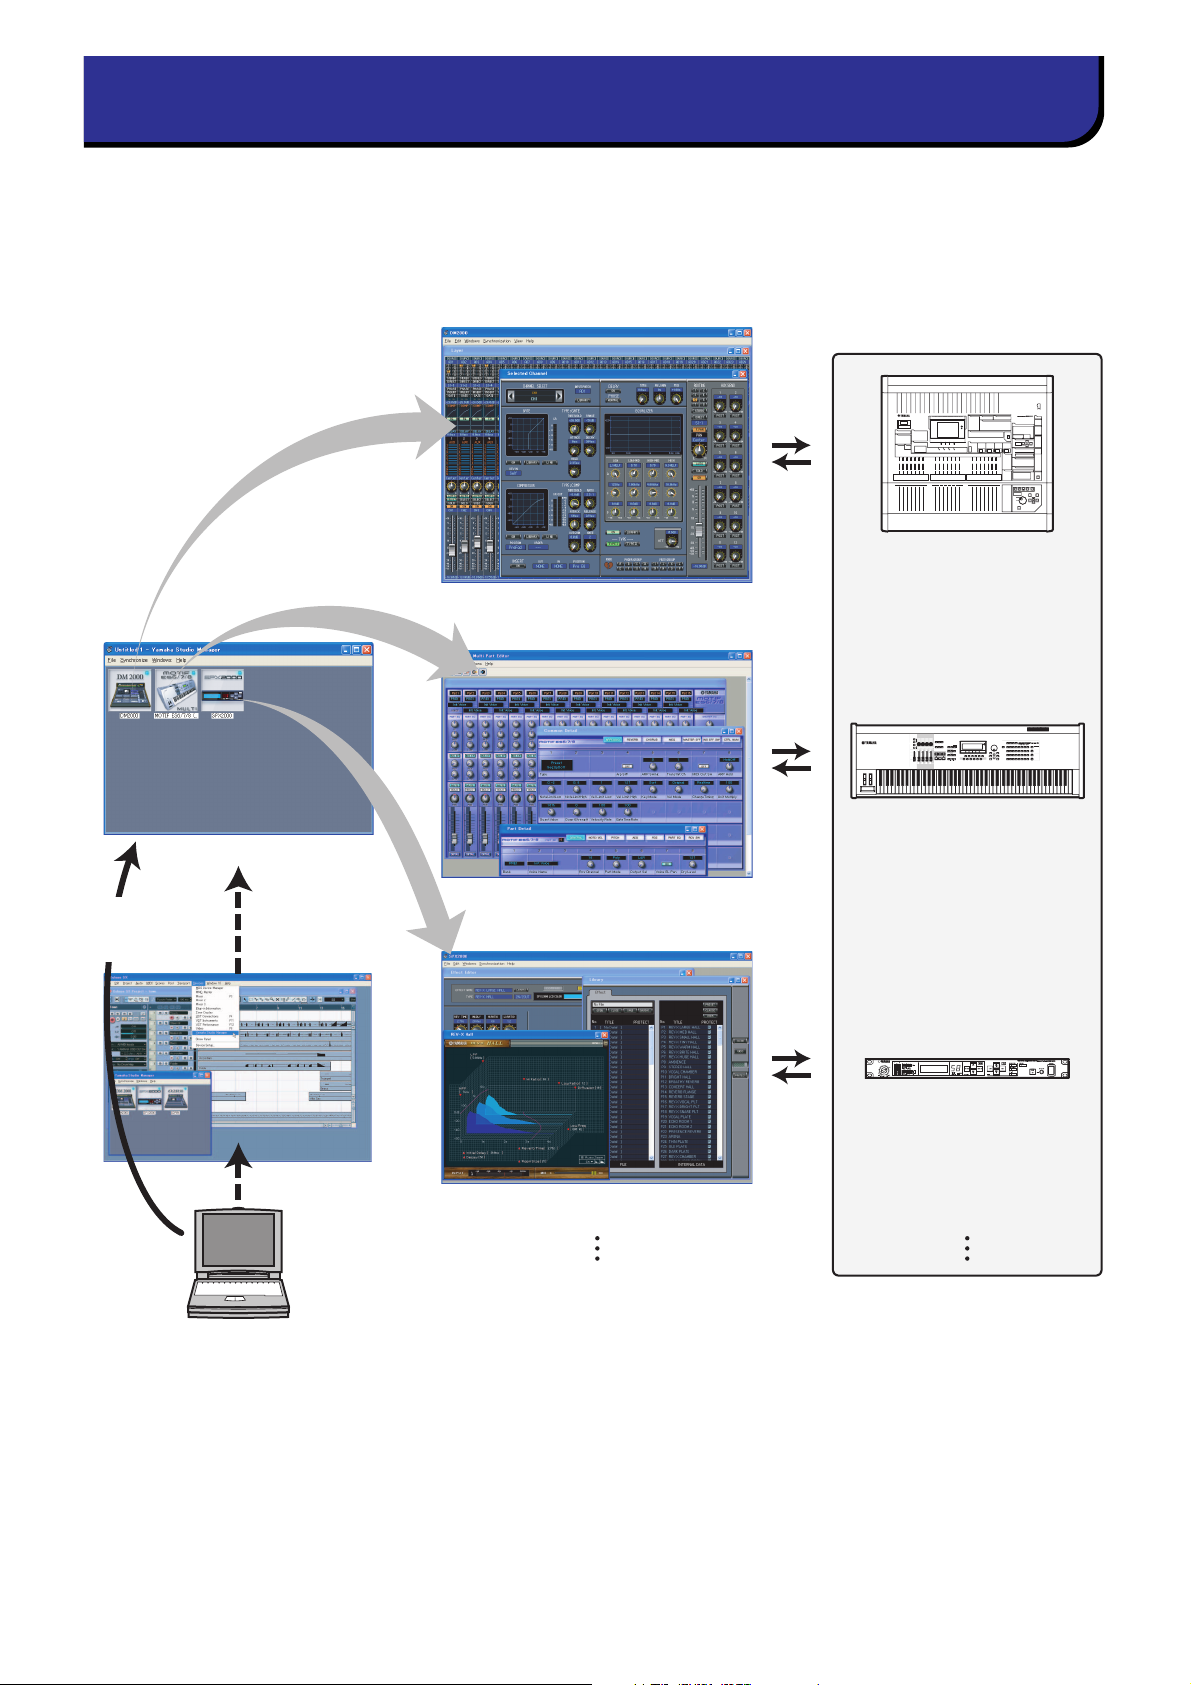
Overview of Studio Manager
Studio Manager is a cross-platform application that enables you to start multiple Editors that control YAMAHA
hardware products remotely, and to save multiple Editor settings.
You can run Studio Manager as a stand-alone application, or as a plug-in within DAW applications that are compatible with Studio Connections, such as Cubase SX 3.0 or later. In either case, the basic functionality is the same. For
the latest information on compatible DAW applications, refer to the following website.
http://www.studioconnections.org/
Hardware products
Open an editor from
Studio Manager
Synchronize
DM2000
DM2000 Editor
Synchro-
Studio Manager
Start up Studio
Manager in
stand-alone form
nize
MOTIF ES6/7/8 Multi Part Editor
Open from a
compatible DAW
application
Synchronize
SPX2000 Editor
MOTIF ES6/7/8
SPX2000
The settings of each editor can be saved and recalled together from Studio Manager or the DAW application. In other
words, you can change the settings of your entire system in a single operation by recalling the settings for multiple
devices from Studio Manager or your DAW application.
When you want to save setting files, you can do this from Studio Manager to recall multiple devices at once, or from
an individual Editor to recall only a specific device. When you save your settings in your DAW application, the Studio
Manager settings will also be saved together with the DAW application file, and can also be recalled in the same way.
To use Studio Manager, you must first perform the following operations:
1. Start and configure Studio Manager (see page 3).
2. Start and configure an Editor.
3. Synchronize the application with the corresponding hardware product (see page 5).
For more information on using the Editors, refer to the Owner’s Manual for the Editors.
2
Studio Manager Version 2 Owner’s Manual
Page 3
Starting and Configuring Studio Manager
1 Start Studio Manager.
As a stand-alone application in Windows 2000/XP: Click the Start button, move the cursor to [Programs
(All Programs)], then [YAMAHA Studio Manager], then click [Studio Manager].
As a stand-alone application in Mac OS X: Select and open the “Applications” folder, the “YAMAHA”
folder, then the “Studio Manager” folder, then double-click “SM2.”
Cubase versions SX 3.0 and later: From Cubase’s [Device] menu, choose [Yamaha Studio Manager] to open
the Studio Manager window. (Studio Manager starts running when Cubase is started.)
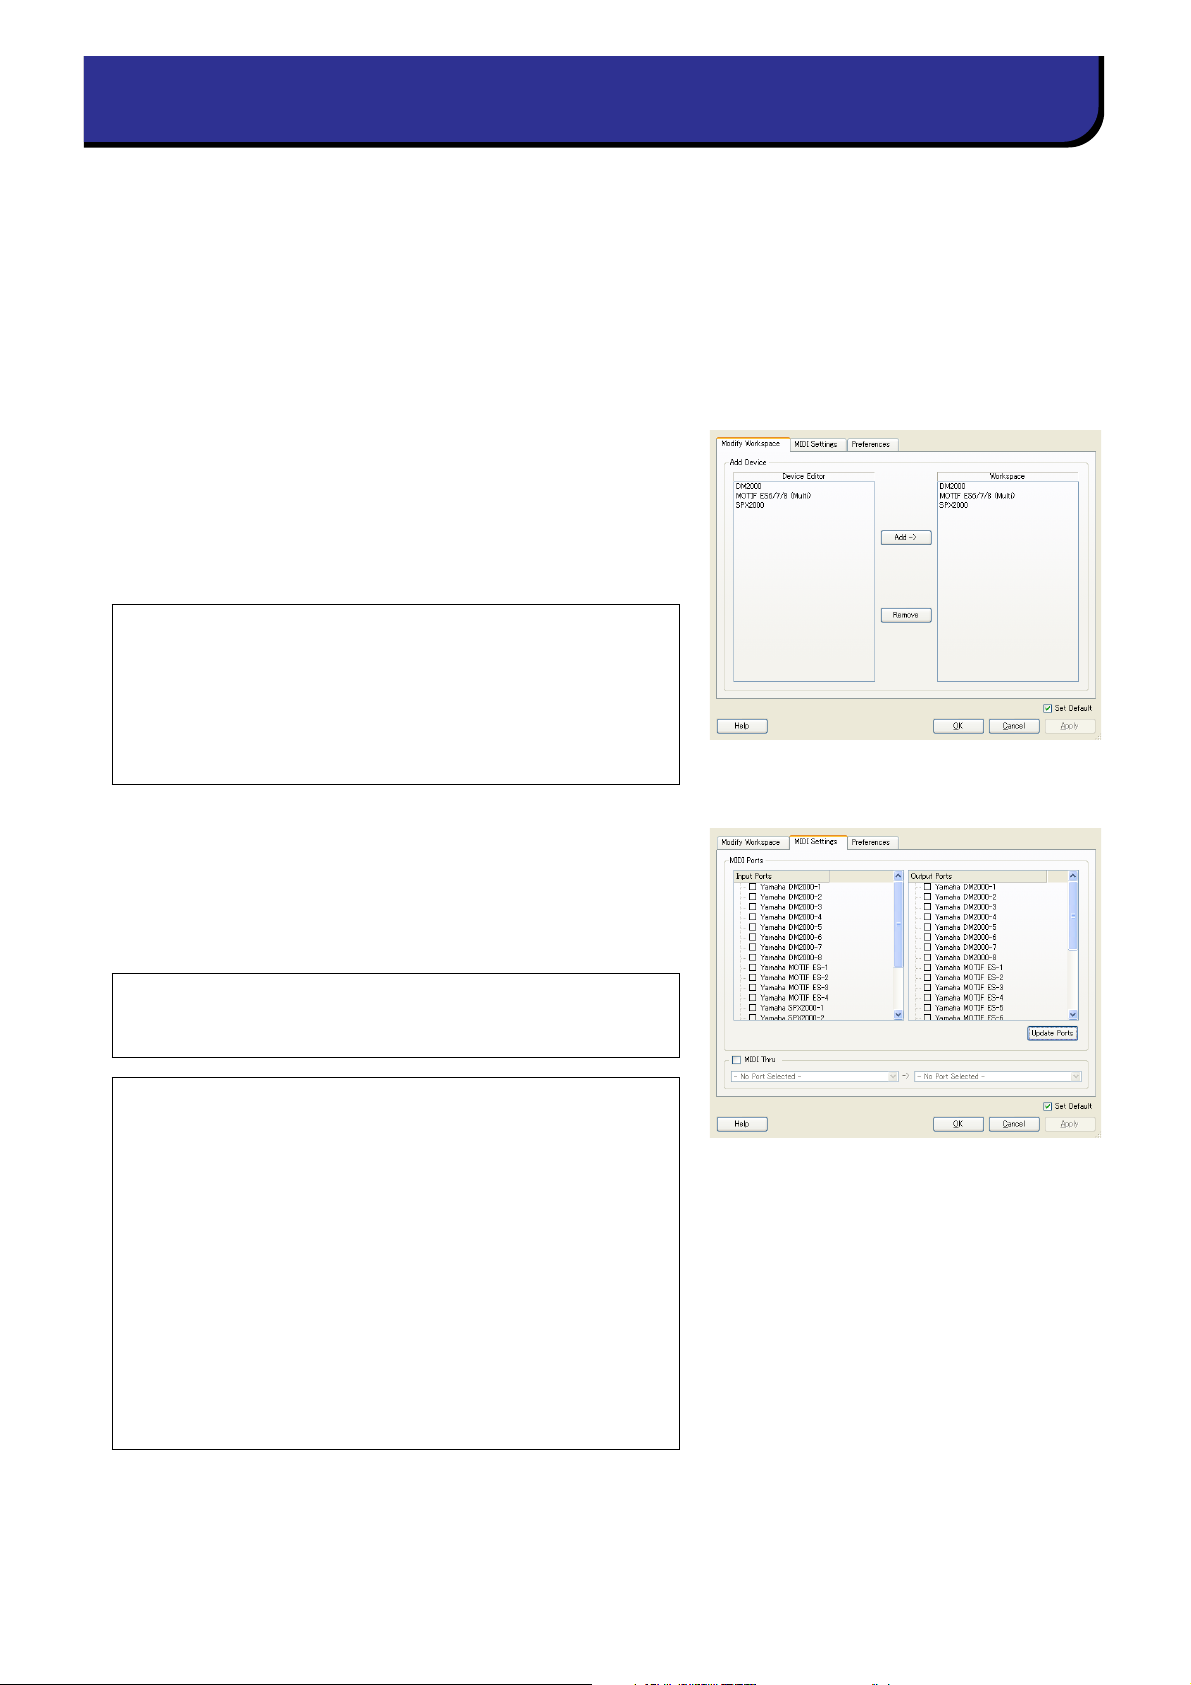
2 Select the devices you want to edit.
In the Setup window, open the Modify Workspace page. The
Device Editor section lists the names of the installed devices.
Highlight the desired device name, then double-click it or click the
[Add->] button.
The selected device name is added in the Workspace section.
NOTE: Use the following button and checkbox, if necessary:
[Remove].............Removes the selected device from the
Workspace section.
[Set Default]........ Mark this checkbox, then click the [Apply] or
[OK] button. The next time you start Studio
Manager, the current Setup window settings
will be automatically selected.
3 Specify the desired MIDI ports.
Select the [MIDI Settings] tab and specify the MIDI In/Out Ports
to which the hardware product are connected. However if you
want to use Studio Manager in Cubase, you’ll need to specify that
MIDI port within Cubase.
NOTE: To activate MIDI ports in Studio Manager, you must
specify the MIDI ports in this MIDI Ports tab and in the Editor for
the console or device.
NOTE: Use the following button, checkboxes, and pull-down
options, if necessary.
[Update Ports] .... If you click this button, Studio Manager will
search for MIDI ports that have been enabled
since you started the application. If no port is
detected, restart Studio Manager.
[MIDI Thru] ........ If you mark this checkbox, then use the pull-
down options to select a port for MIDI In/Out,
a MIDI signal will be input from a port
assigned as MIDI In, and routed to and
output from a port assigned as MIDI Out.
[Set Default] ....... Mark this checkbox, then click the [Apply] or
[OK] button. The next time you start Studio
Manager, the current Setup window settings
will be automatically selected.
3
Studio Manager Version 2 Owner’s Manual
Page 4

4 Click [OK].
The Setup window closes, and the Studio Manager window becomes active, with the icon of the device you
selected in step 2 shown in the workspace.
5 Double-click the icon for the hardware
product you want to edit to open its Editor.
NOTE: Right-clicking the mouse in the window will
display a pop-up menu (see page 8).
NOTE: To change the icon name, select the icon, then
click the name.
NOTE: Use the following box, if necessary.
[MIDI Thru Ch.] .. This field appears if MIDI Thru is
enabled.
If you select “Original,” a MIDI
signal will be output to the output
channel that has the same number
as the input channel.
If you select any channel from “1”
through “16,” MIDI signals of all
channels received at the input port
will be combined and output to the
specified channel.
Studio Manager window
4
Studio Manager Version 2 Owner’s Manual
Page 5

Quitting Studio Manager
Select [Exit] from the [File] menu in the Studio Manager window (select [Quit SM2] from the [SM2] menu). If there
are no unsaved changes, all windows close and Studio Manager quits. If there are unsaved changes, a message asking
whether you want to save the changes appears. You can also quit Studio Manager by clicking the Close button in the
Studio Manager window.
If you’re using Studio Manager in your DAW application, quitting your DAW application will also quit Studio Manager. Simply closing the Studio Manager window does not quit Studio Manager. When you save your DAW application file, the Studio Manager settings are also saved within that file.
Synchronizing with your hardware product
In some cases, such as when Studio Manager starts up for the first time, the parameter settings on the hardware
product and the parameter settings in Studio Manager (in the devices’ Editor) may be different. Therefore, you must
first synchronize the parameter settings on the hardware product with those in Studio Manager (in the corresponding Editors). Follow the steps below to synchronize Studio Manager with the hardware product.
NOTE: You can also synchronize the parameter settings with the corresponding hardware product in
each Editor. For information on using the Editors, refer to the Owner’s Manual for the Editors.
1 Select [Synchronize], then [Recall...] in the Studio Manager window.
The following window opens.
2 Select whether you want to transfer your
settings to Studio Manager (each Editor), or
hardware product.
Choose “Select direction of data transfer” or “According
to editor setting” for each Editor.
• Select direction of data transfer
You can select the data transfer direction in Studio
Manager.
[To Hardware]: Tr ansfers the current settings from
Studio Manager (each Editor) to your hardware product.
[From Hardware]: Tr ansfers the settings from your
hardware product to Studio Manager (Editor).
• According to editor setting
The data transfer direction will be determined by the settings in the Editor.
For more information, refer to the instruction manual for the Editor.
3 Click [OK].
The synchronizing process begins.
Do not operate the hardware product while synchronization is in progress.
5
Studio Manager Version 2 Owner’s Manual
Page 6

Working with Files
You can save the various parameter setting files either as a complete set using Studio Manager or your DAW application, or individually using each Editor. The following table shows how to manage your setting files.
Creating a new file
Opening a previously saved file Choose [Open (Import)] from the [File] menu.
Saving the current file
Saving the current file with a new name Choose [Save As... (Export)] from the [File] menu.
If you save a file in the Studio Manager window, all selected Editor settings are saved in a file with a file extension of
“. Y SM”. If the “Automatically synchronize on file load” preference (see page 7) is turned on, opening a file will recall
the entire set of system settings (Recall function).
If you’re using Studio Manager with your DAW application, the settings of all selected Editors will be saved together
within the file of the DAW application. If desired, you can also save files from Studio Manager, and then open them
from Studio Manager running as a stand-alone application.
If you save a file in an Editor, only that Editor’s settings are saved in a file.
NOTE: When you create a new file, or open a previously saved file, a message appears asking whether you want
to save the currently-open file. Click [Yes] to save the current file and open another. Click [No] to open another
without saving the current one. Click [Cancel] to cancel the operation.
Choose [New] from the [File] menu.
(only if Studio Manager is running as stand-alone)
Choose [Save] from the [File] menu.
(only if Studio Manager is running as stand-alone)
Mapping MIDI Ports
If MIDI ports specified in Editors are not
enabled on the computer (e.g., when you open a
file on another computer), it’s convenient to
change all MIDI port settings together in the Remap MIDI Ports window (shown on the right).
Choose [Re-map MIDI Ports] from the [File]
menu to display the window.
NOTE: This function is not available if you’re
using Studio Manager in your DAW
application.
❏ Workspace
This column lists the MIDI ports specified in
Editors by the corresponding device names
and [port names].
❏ System
This column lists the MIDI ports enabled on the computer. If the ports listed in the Workspace column and the
ports listed in the System column do not match, click the port name in the System column to display a pull-down
menu, then select a matching port from the menu.
6
Studio Manager Version 2 Owner’s Manual
Page 7

Setting Preferences
You can also change the preference settings, if necessary. Choose [Setup...] from
the [File] menu, then click the [Preferences] tab to display the window shown
on the right.
Automatically synchronize on file
load: When you open a file in the Stu-
dio Manager window or open a file of
your DAW application, Studio Manager (Editors) will automatically synchronize with the corresponding
hardware product. In this way, Studio
Manager performs the Recall function
to recall the entire system settings automatically when you open a file.
Set Default: Mark this checkbox,
then click the [Apply] or [OK] button.
The next time you start Studio Manager, the current Setup window settings
will be automatically selected.
Menu Bar/Pop-up Menu
Menu Bar
❏ File Menu
New* (Ctrl+N / +N) Creates a new file.
Open (Ctrl+O/ +O)
Import (Ctrl+I/ +I)
Save* (Ctrl+S / +S) Saves the current file.
Save As
Export (Ctrl+E/ +E)
Setup
Re-map MIDI Ports* Opens the Re-map MIDI Ports window (see page 6).
Opens a previously saved file.
Saves the current file with a different name.
Open the Setup window to configure Studio Manager. Click a tab at the top
of the window to select the Modify Workspace page (see page 3), MIDI Ports
page (see page 3), or Preferences page (see page 7). On a Macintosh computer, choose [Preferences] from the [SM2] menu.
Exit* (Ctrl+Q)
*If you’re using Studio Manager with your DAW application, these menu items will not appear.
Quits Studio Manager. On a Macintosh computer, choose [Quit SM2] from
the [SM2] menu.
❏ Synchronize Menu
Recall
Synchronizes Studio Manager (Editors) with the corresponding hardware
product (see page 5).
7
Studio Manager Version 2 Owner’s Manual
Page 8

❏ Windows Menu
Lists the Editors for which a window is currently open. When you select an Editor, the corresponding Editor window becomes active.
❏ Help Menu
Manual (F1) Displays this manual in Adobe PDF format.
About Yamaha Studio
Manager
Displays the information (such as a version number) of Studio Manager. On a
Macintosh computer, choose [About Yamaha Studio Manager] from the
[SM2] menu.
Pop-up Menu
Right-click the mouse on an icon in the Studio Manager window (on a Macintosh computer, click an icon while
holding down the [control] key) to display the following pop-up menu.
Open/Show Opens/activates the selected Editor.
Close Closes the selected Editor.
Synchronize Synchronizes with the corresponding device.
Specifies whether the Recall function will be performed for the correspond-
Recall Enabled
Configure Recall
Remove Deletes the selected icon from the Studio Manager window.
ing device. If this check box is checked, Studio Manager will perform the
Recall function for the corresponding device and the indicator located in
the upper right corner of the corresponding icon will light up.
If the corresponding device is selected for the Recall function, you can
specify the data items to be synchronized using this sub-menu. The submenu contents vary with the Editor. Some Editors enable you to select only
a single data item, and some enable you to select multiple data items.
Right-click the mouse anywhere except on any icon in the Studio Manager window (on a Macintosh computer, click
anywhere except on any icon while holding down the [control] key) to display the following pop-up menu.
Modify Workspace Opens the Modify Workspace page in the Setup window (see page 3).
Arrange by Name Check this to sort the icons by name.
Left to Right Check this to position icons from left to right.
Top to Bottom Check this to position icons from top to bottom.
8
Studio Manager Version 2 Owner’s Manual
Page 9

Operation within Cubase
If you’re using StudioManager with Cubase SX 3.0 or a later version of Cubase, you can also control the various Editors from within Cubase as follows.
Using Studio Manager from within Cubase enables you to transmit and receive through the same port MIDI performance data and MIDI control signals from the Editor.
If your Editor supports OPT2, you can also use Recall and Audio Integration.
Starting and Configuring Studio Manager
Start Studio Manager, select the devices you want to edit, and specify the desired MIDI ports using the Editor (see
page 3).
Virtual MIDI port display
The MIDI port used by an Editor selected in Studio Manager is shown within Cubase as the MIDI port for that
device name. You can assign this port to a MIDI track.
Audio Integration
You can open the editor directly and edit the hardware device in the same way as you would open the control panel of
a VST instrument.
For details about Audio Integration, visit our web site at:
http://www.studioconnections.org/
Starting an Editor from Cubase
If you’ve assigned the editor to a MIDI port, you can open the editor from Cubase’s “Open Device Panel” button.
9
Studio Manager Version 2 Owner’s Manual
Page 10

Supported editors
As of this date (May 2008), the following editors are StudioManager-compatible.
Editor OPT compatibility
LS9 Editor OPT2 LS9-16/LS9-32
PM5D V2 Editor
DSP5D Editor
PM5D Editor OPT2 PM5D
M7CL Editor OPT2 M7CL
DM2000 Editor OPT2 DM2000
02R96 Editor OPT2 02R96
DM1000 Editor OPT2 DM1000
01V96 Editor OPT2 01V96
SPX 2000 Editor OPT2
01X Editor OPT2 01X
MOTIF-RACK XS Editor OPT2
MOTIF XS Editor OPT2
MOTIF ES6/7/8 Multi Part Editor OPT2
MOTIF ES6/7/8 Voice Editor OPT2
S90 ES Multi Part Editor OPT2
OPT2 PM5D V2.x
OPT2 DSP5D
Audio Integration
✔
✔
✔
✔
✔
✔
Supported hardware
SPX2000
MOTIF-RACK XS
MOTIF XS 6/7/8
MOTIF ES 6/7/8
MOTIF ES 6/7/8
S90 ES
S90 ES Voice Editor OPT2
MO6/MO8 Multi Part Editor OPT2
MO6/MO8 Voice Editor OPT2
MOTIF-RACK ES Multi Part Editor OPT2
MOTIF-RACK ES Voice Editor OPT2
MOTIF-RACK Multi Part Editor OPT2
MOTIF-RACK Voice Editor OPT2
GTRC OPT2
Voice Editor for MOTIF6/7/8 OPT(*) MOTIF 6/7/8
Voice Editor for S90 OPT(*) S90
Voice Editor for S08 OPT(*) S08
VL Visual Editor OPT(*) PLG100-VL/PLG150-VL
DX Simulator OPT(*) PLG100-DX/PLG150-DX
AN Expert Editor OPT(*) PLG150-AN
Plug-in Board Editor for PLG150-DR OPT(*) PLG150-DR
Plug-in Board Editor for PLG150-PC OPT(*) PLG150-PC
✔
✔
✔
✔
✔
✔
✔
S90 ES
MO6/MO8
MO6/MO8
MOTIF-RACK ES
MOTIF-RACK ES
MOTIF-RACK
MOTIF-RACK
Available on any MIDI device
*: Can also be opened from Studio Manager, but there are some limitations (see below) on the functionality.
•Not supported by the Macintosh version.
•When saving all settings together from Studio Manager or a DAW application, only some settings will be saved;
this means that Recall is not supported.
•Cubase’s virtual MIDI port display (see page 9) is not supported.
•The editor cannot be opened directly from Cubase (see page 9)
10
Studio Manager Version 2 Owner’s Manual
Page 11

About Open Plug-in Technology
Open Plug-in Technology (OPT) is a software format that enables you to control MIDI devices from a music DAW
application software. For example, this allows you to start up and operate various parts of your music system, such as
plug-in board editors, and mixing control editors - directly from an OPT-compatible sequencer, without having to
use each separately. OPT also makes it unnecessary to set MIDI drivers for each application, streamlining your music
production system and making all operations more convenient and seamless.
In addition to the original OPT, there is also Open Plug-in Technology Version 2 (OPT2), designed for use with the
Recall software. Studio Manager is a host application that supports OPT 2.
❏ About the OPT Levels and Overview
The host application and its compatibility with OPT is divided into three levels, as shown below.
Level 1: OPT Panels provides basic support for opening and displaying OPT control panels that can
transmit data via the client’s external MIDI ports. Typically this will allow basic hardware editor control panels to operate properly.
Level 2: OPT Processors provides support for real-time MIDI processors and panel automation.
Ty pically this will allow both real-time and offline MIDI effects to operate properly and supply automation to OPT panels.
Level 3: OPT Views provides support for edit views and MIDI processors/panels that require direct
access to client program storage structures. Typically this will allow sophisticated MIDI edit views to
be supported.
OPT-compatible plug-in software is connected directly to an OPT-compatible
host application.
Host Appli-
cation
Editor
OPT
Editor
Editor
❏ About the OPT2 Overview
OPT2 is a software plug-in format that is a further development of OPT Level 1 (Panels), and adds
functionality that allows Studio Connections to be implemented.
Host Appli-
cation
Studio
Manager
OPT2
Editor
Editor
Editor
Plug-in software compatible with OPT2 is indirectly connected
to the DAW application compatible with Studio Connections,
via the Studio Manager.
11
U.R.G., Pro Audio & Digital Musical Instrument Division, Yamaha Corporation
© 2004 Yamaha Corporation
704IP-01E0
Studio Manager Version 2 Owner’s Manual
 Loading...